Deploy Application to Azure Service Fabric
In this lab we will crate an Azure Automation account, configure automation assets in Azure and deploy two load balanced virtual machines in Azure in parallel using Windows PowerShell based runbook.
DevOps MPP Course Source
- This lab is used in course DevOps200.2x: Infrastructure as Code - Module 1.
Pre-requisites:
- An Azure Subscription
Lab Tasks:
- Create an Automation Account
- Update AzureRM modules
- Configure Automation Variables (Portal)
- Create and run an Automation Windows PowerShell workflow-based textual runbook that provisions two load-balanced Azure VM in parallel (Portal)
- Create and run an Automation Windows PowerShell-based textual runbook that deprovisions the lab environment (Portal)
Estimated Lab Time:
- approx. 45 minutes
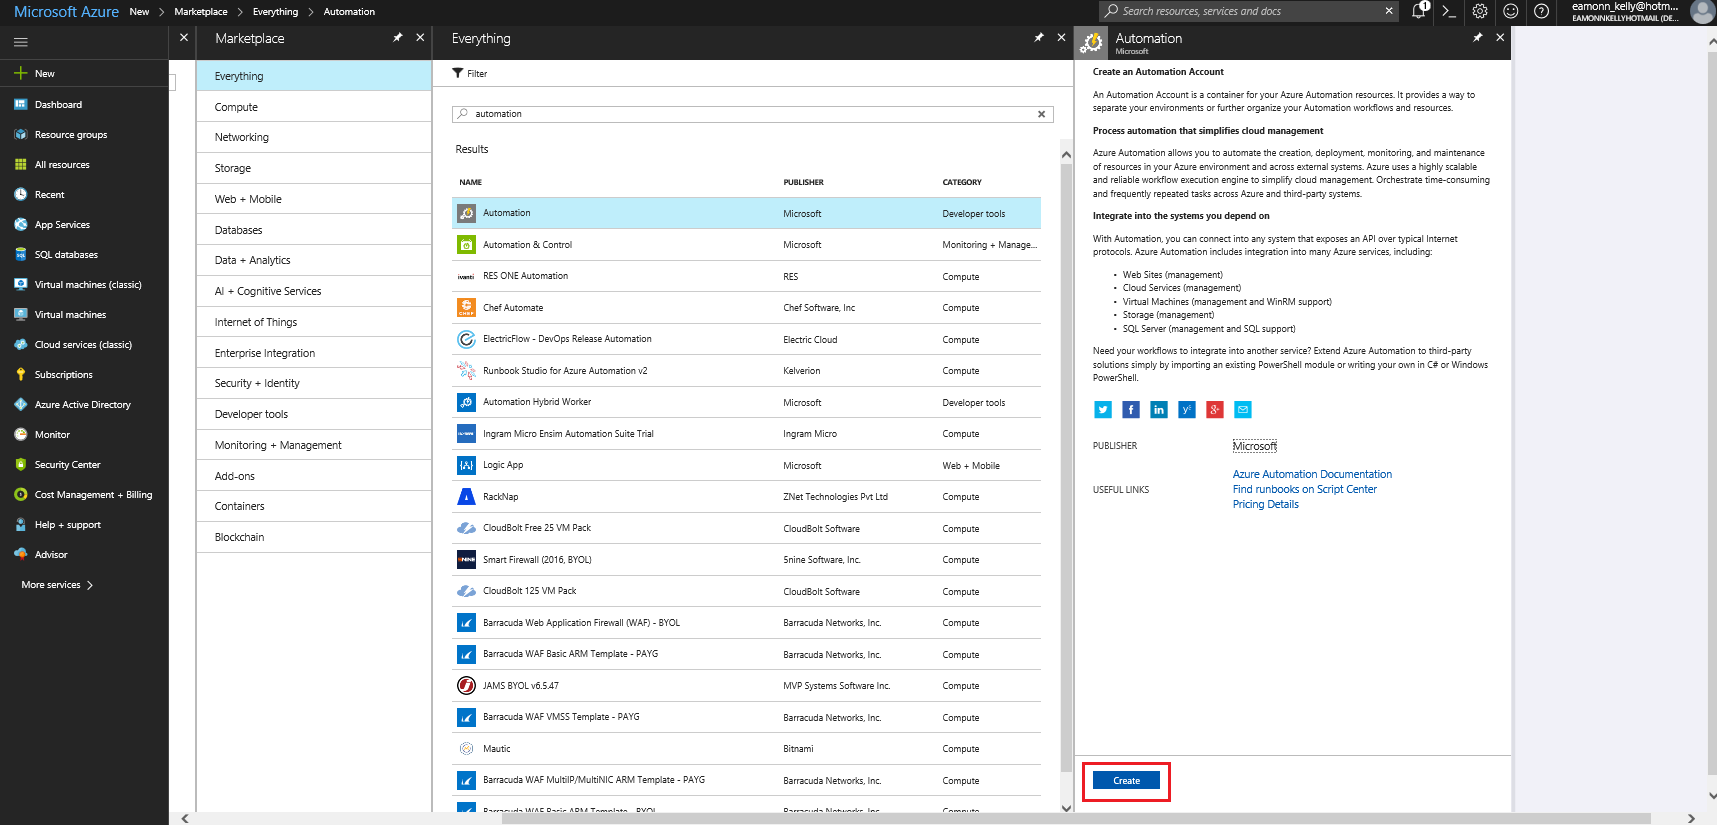
Task 1: Create an Automation Account (Portal)
-
In the Azure Portal go to Automation and click on Create
-
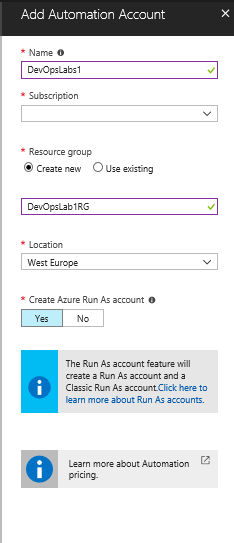
In the Add Automation Account pane, create a new Automation account with the following settings:
- Name: DevOpsLabs1
- Subscription: your Azure subscription
- Resource Group: DevOpsLab1RG
- Location: an Azure region close to the lab location
- Create Azure Run As Account: Yes
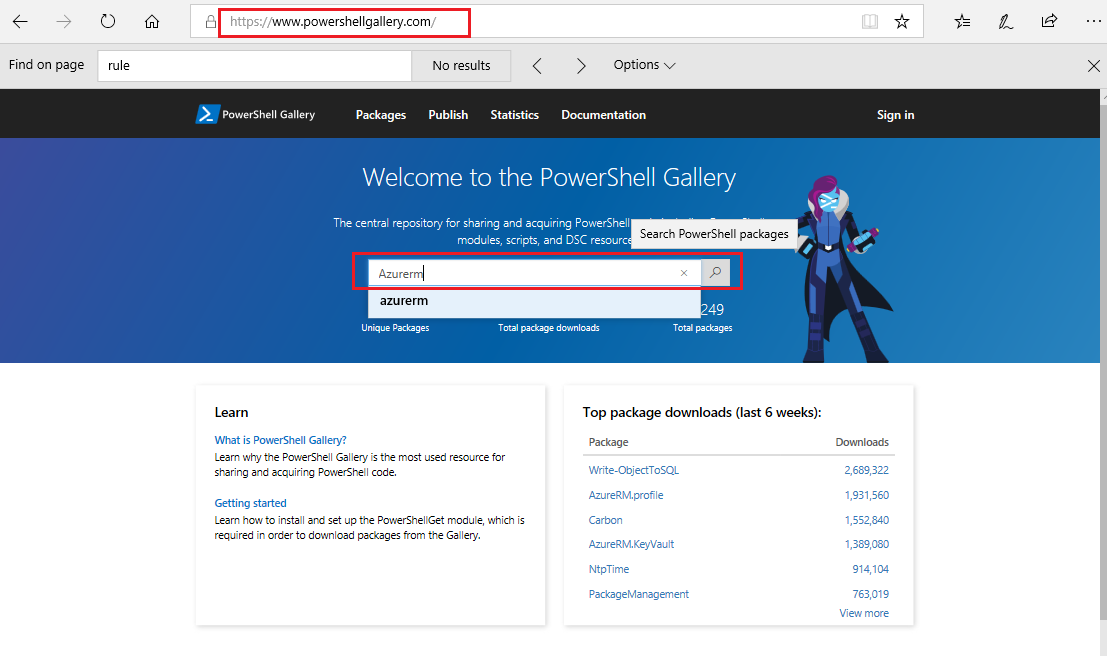
Task 2: Update AzureRM Modules
-
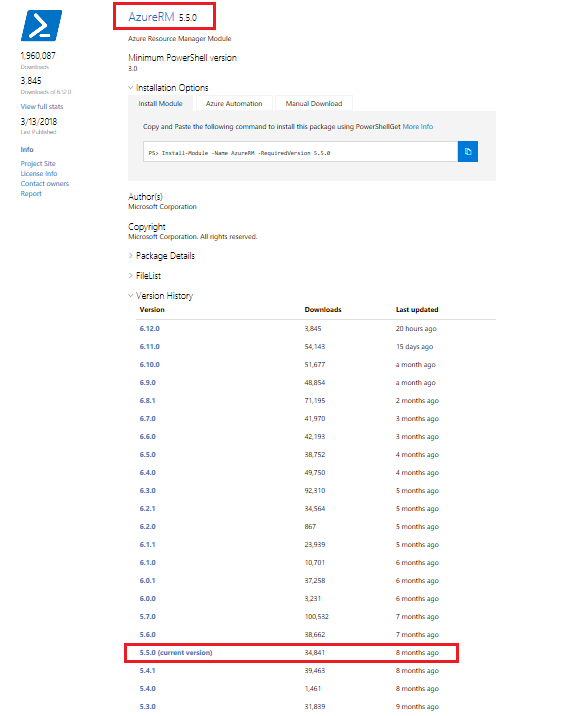
Go to the Powershell Gallery and search for the AzureRM module
-
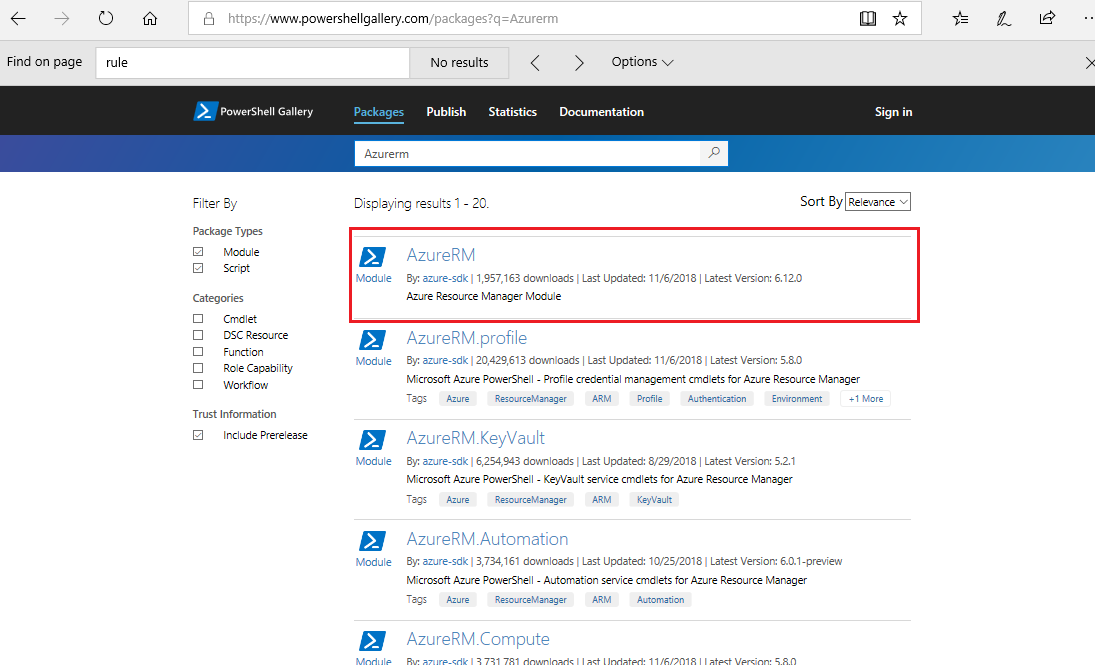
Open the AzureRM page (The current version at time of writing, Nov 2018, is v6.12.0) and locate version 5.5.0
Important: Version 6.12.0 breaks the lab file workflow. The lab has only been tested using version 5.5.0 and as such you must use V5.5.0 of the AzureRM module. Some later version of the module may work, but have not been tested, as such using a later version may cause your workflow to fail. If you workflow does fail you should check the module versions as per the details here.
-
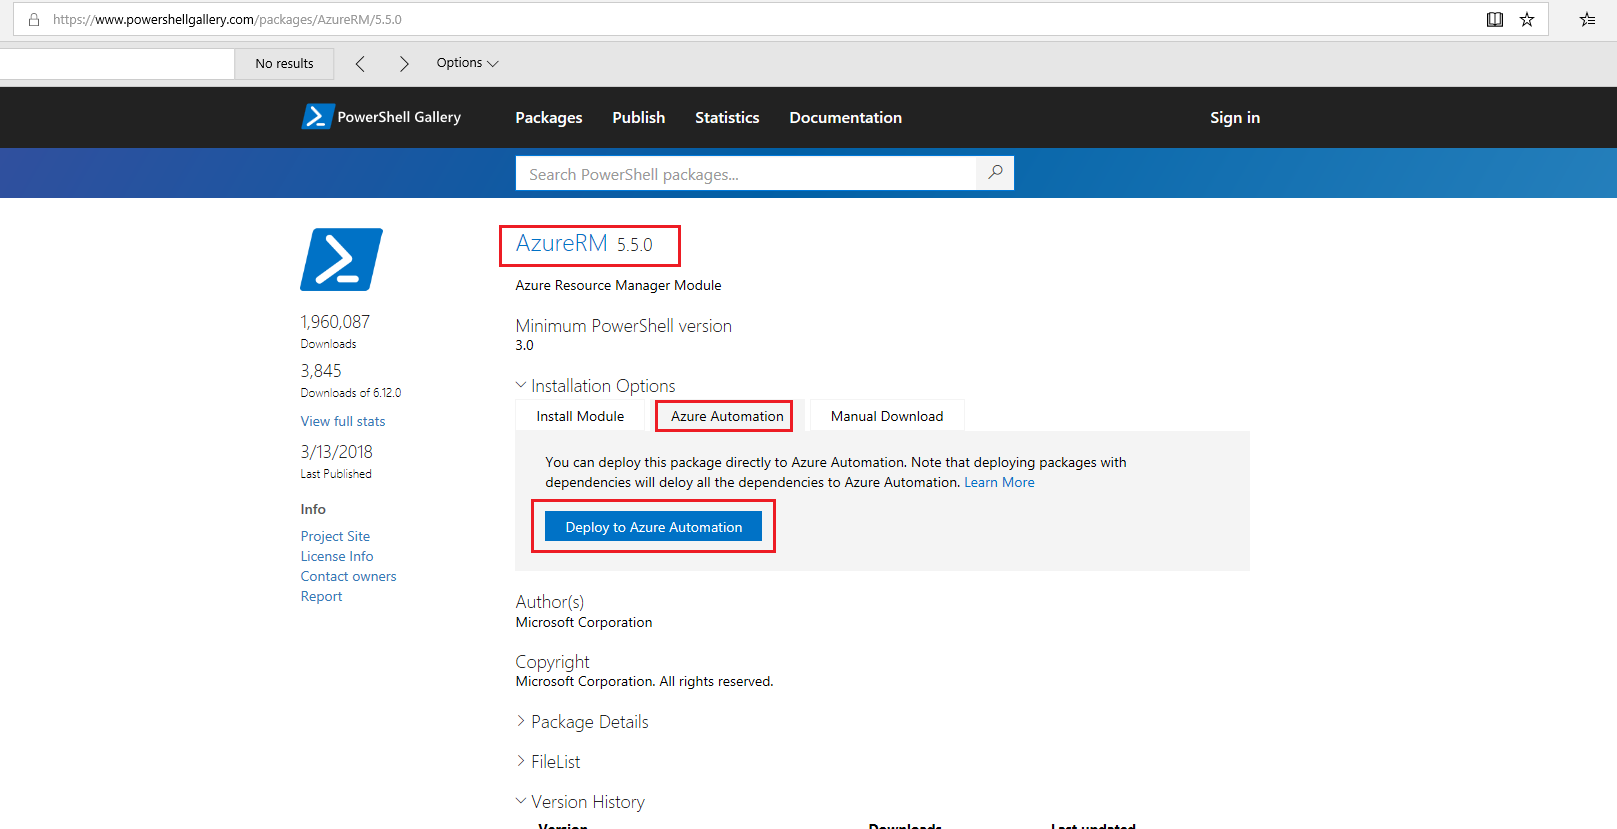
Go to the Azure Automation tab and select Deploy to Azure Automation
-
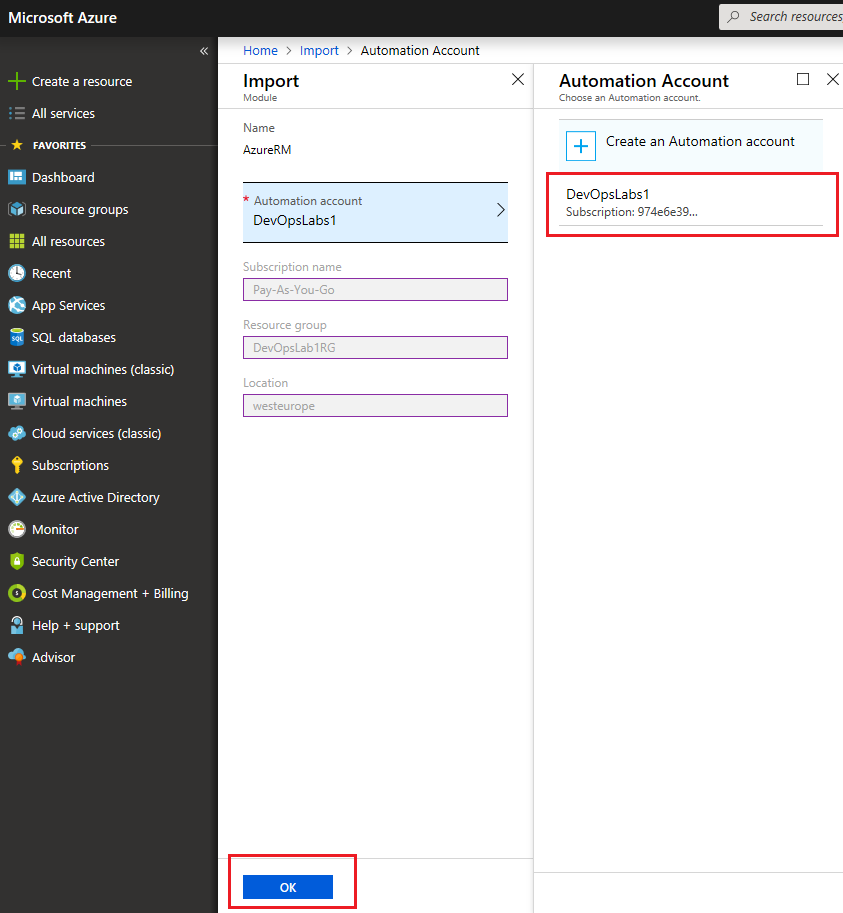
You will be brought into Azure and if prompted enter your Azure Automation account details. Select your Azure Automation account and click OK
-
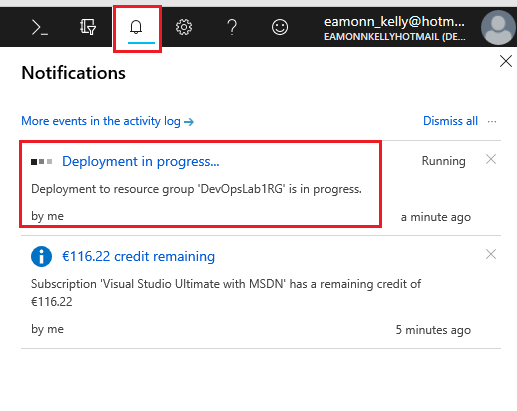
Click on the Notification icon in the Azure dashboard and open the deployment.
-
You will be brought to the deployment and you can view its progress. It will update and deploy all modules associated with Azure RM. It can take up to 30 mins to complete.
-
Once complete, verify the following module details

- AzureRM = 5.5.0
- AzureRM.Network = 5.3.0
- AzureRM.Profile = 4.4.0
Note: It is also possible to update module from within Azure Automation, however we do so via the PowerShell Gallery so we can choose a specific version to use.
Task 3: Configure Automation Variables (Portal)
-
In the Azure portal, go to SAHRED RECOURCES > Variables create Automation variables in the Automation account you created and use the below values.

- Name: VM1Name
- Description: leave blank
- Type: String
- Value: vm1
- Encrypted: No
- Name: VM2Name
- Description: leave blank
- Type: String
- Value: vm2
- Encrypted: No
- Name: ResourceGroupName
- Description: leave blank
- Type: String
- Value: a new Resource group name, different to the name of the resource group you specified earlier in this lab. Use a short name such as rg1 for example, as the name is appended to other resource names, and some resources require names within certain character limits.
- Encrypted: No
- Name: UserName
- Description: leave blank
- Type: String
- Value: Student
- Encrypted: No
- Name: Password
- Description: leave blank
- Type: String
- Value: Pa55w.rd1234
- Encrypted: Yes
-
Name: Location
Note: You can get the Azure DataCenter location names to use by running the command
Azure Location list, either with the Azure CLI 2.0 or PowerShell- Description: leave blank
- Type: String
- Value: eastus (or your nearest Azure DataCenter)
- Encrypted: No
- Name: VM1Name
Task 4: Create and run an Automation Windows PowerShell workflow-based textual runbook that provisions two load-balanced Azure VM in parallel (Portal)
Note: You have two options in Task 3,
a) To copy and paste the code below into a bew runbook, steps 1 to 3 below.
or
b) To import a pre-existing runbook contain this code, steps 4, to 6 below.
NOTE: It is recommended to use option b) and to download the .ps1 file from GitHub, then import the runbook into Azure. This will reduce the chance of you encountering formatting errors from copying and pasting when running the script.
-
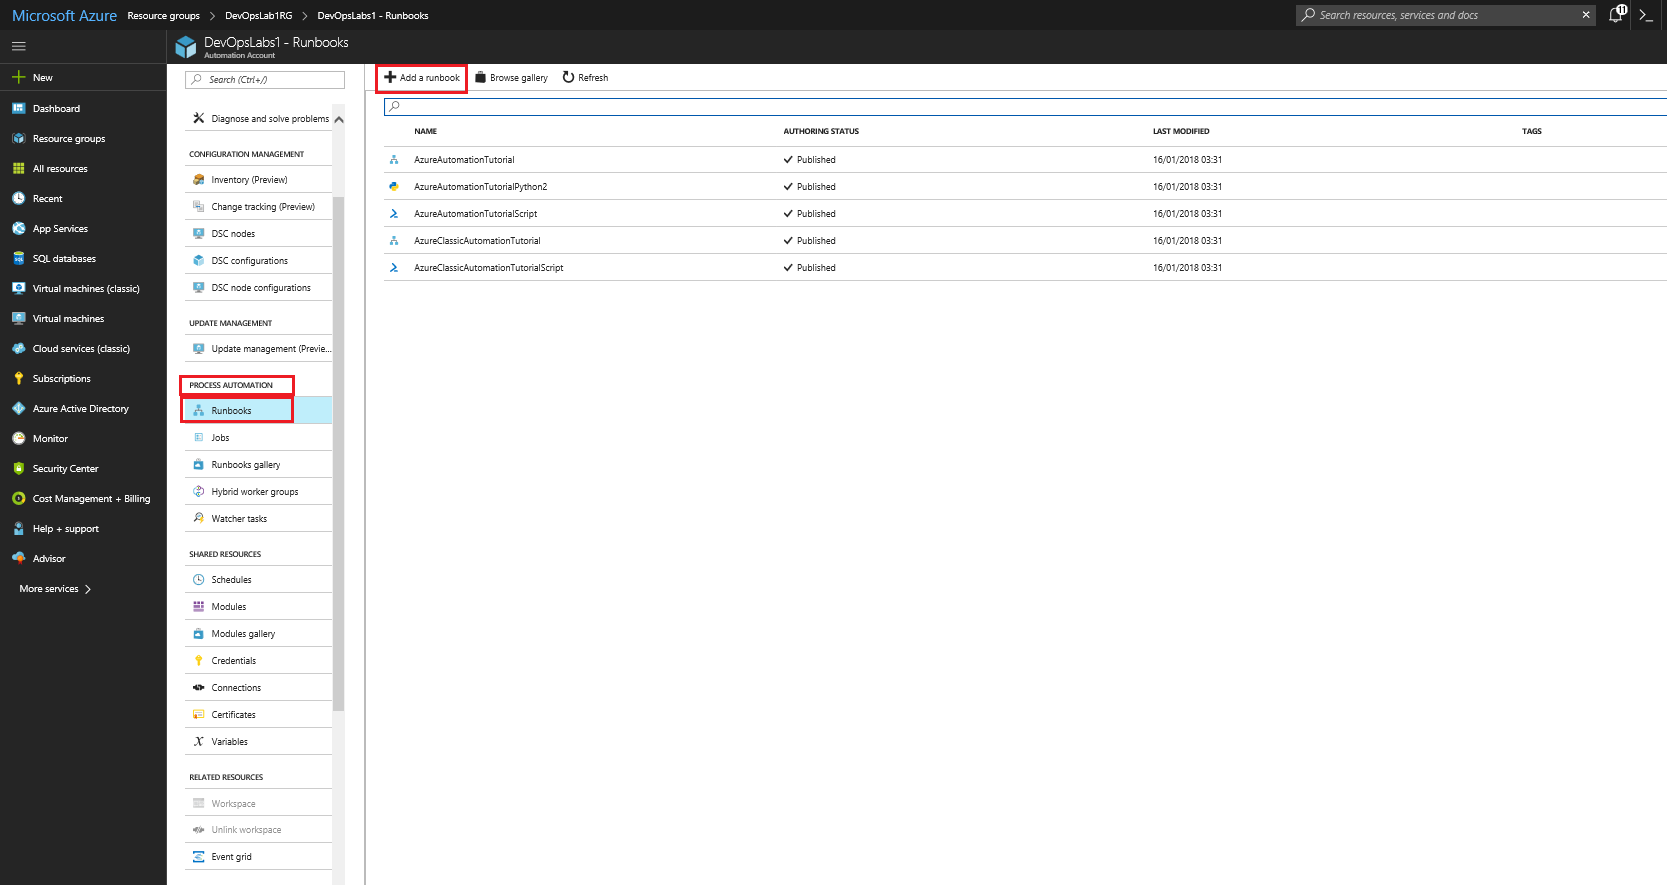
From the Azure portal, in the Automation account you created earlier go to PROCESS AUTOMATION > Runbooks and choose to Add a runbook and then to Create a new runbook
-
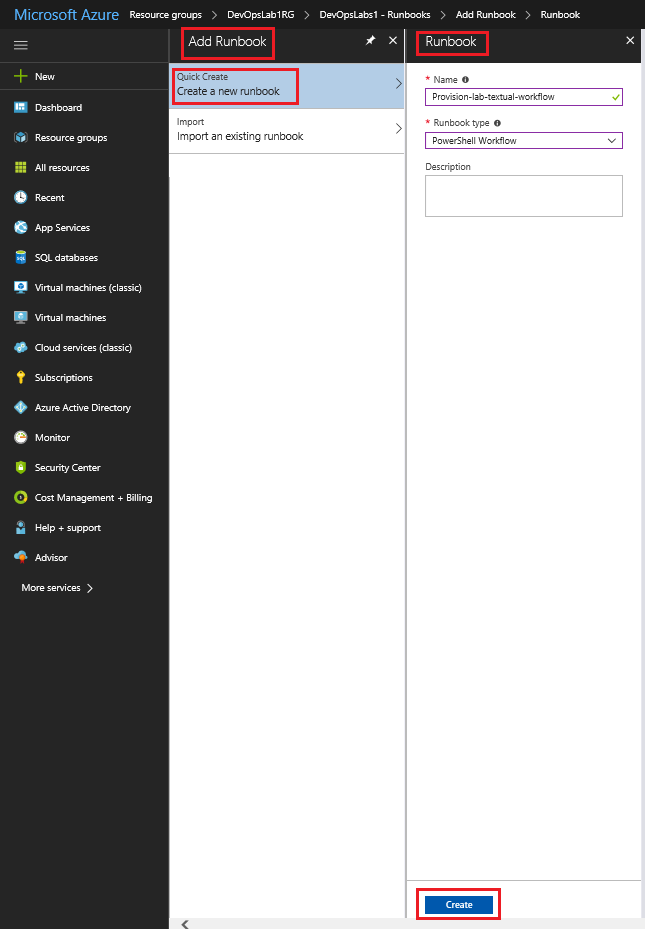
Create and publish an Automation runbook with the following settings:
- Name: Provision-lab-textual-workflow
- Runbook type: PowerShell Workflow
-
Then add the following code
workflow Provision-lab-textual-workflow-v1 { $c = Get-AutomationConnection -Name 'AzureRunAsConnection' Add-AzureRmAccount -ServicePrincipal -Tenant $c.TenantID -ApplicationID $c.ApplicationID -CertificateThumbprint $c.CertificateThumbprint $vm1Name = Get-AutomationVariable -Name 'VM1Name' $vm2Name = Get-AutomationVariable -Name 'VM2Name' $resourceGroupName = Get-AutomationVariable -Name 'ResourceGroupName' $location = Get-AutomationVariable -Name 'Location' $username = Get-AutomationVariable -Name 'UserName' $password = Get-AutomationVariable -Name 'Password' $vmSize = 'Standard_A1' $vnetName = $resourceGroupName + '-vnet1' $vnetPrefix = '10.0.0.0/16' $subnet1Name = 'subnet1' $subnet1Prefix = '10.0.0.0/24' $avSetName = $resourceGroupName + '-avset1' $publisherName = 'MicrosoftWindowsServer' $offer = 'WindowsServer' $sku = '2016-Datacenter' $version = 'latest' $vmosDiskSize = 128 $publicIpvm1Name = $resourceGroupName + $vm1Name + '-pip1' $publicIpvm2Name = $resourceGroupName + $vm2Name + '-pip1' $nic1Name = $resourceGroupName + $vm1Name + '-nic1' $nic2Name = $resourceGroupName + $vm2Name + '-nic1' $vm1osDiskName = $resourceGroupName + $vm1Name + 'osdisk' $vm2osDiskName = $resourceGroupName + $vm2Name + 'osdisk' ##$resourceGroup = New-AzureRmResourceGroup -Name $resourceGroupName -Location $location InlineScript { $resourceGroup = Get-AzureRmResourceGroup -Name $using:resourceGroupName -ErrorAction SilentlyContinue if(!$resourceGroup) { Write-Host "Creating resource group '$resourceGroupName' in location $location"; New-AzureRmResourceGroup -Name $using:resourceGroupName -Location $using:location -Verbose } else{ Write-Host "Using existing resource group '$resourceGroupName'"; } } $securePassword = ConvertTo-SecureString -String $password -AsPlainText -Force $credentials = New-Object System.Management.Automation.PSCredential -ArgumentList $username,$securePassword $avSet = New-AzureRmAvailabilitySet -ResourceGroupName $resourceGroupName -Name $avSetName -Location $location -PlatformUpdateDomainCount 5 -PlatformFaultDomainCount 3 InlineScript { $subnet = New-AzureRmVirtualNetworkSubnetConfig -Name $using:subnet1Name -AddressPrefix $using:subnet1Prefix $vnet = New-AzureRmVirtualNetwork -Name $using:vnetName -ResourceGroupName $using:resourceGroupName -Location $using:location -AddressPrefix $using:vnetPrefix -Subnet $using:subnet Set-AzureRmVirtualNetwork -VirtualNetwork $vnet } Parallel { InlineScript { $vnet = Get-AzureRmVirtualNetwork -Name $using:vnetName -ResourceGroupName $using:resourceGroupName $publicIpvm1 = New-AzureRmPublicIpAddress -Name $using:publicIpvm1Name -ResourceGroupName $using:resourceGroupName -Location $using:location -AllocationMethod Dynamic $nic1 = New-AzureRmNetworkInterface -Name $using:nic1Name -ResourceGroupName $using:resourceGroupName -Location $using:location -SubnetId $vNet.Subnets[0].Id -PublicIpAddressId $publicIpvm1.Id $vm1 = New-AzureRmVMConfig -VMName $using:vm1Name -VMSize $using:vmSize -AvailabilitySetId $using:avSet.Id $randomnumber1 = Get-Random -Minimum 0 -Maximum 99999999 $tempName1 = $using:resourceGroupName + $using:vm1Name + $randomnumber1 $nameAvail1 = Get-AzureRmStorageAccountNameAvailability -Name $tempName1 If ($nameAvail1.NameAvailable -ne $true) { Do { $randomNumber1 = Get-Random -Minimum 0 -Maximum 99999999 $tempName1 = $using:resourceGroupName + $using:vm1Name + $randomnumber1 $nameAvail1 = Get-AzureRmStorageAccountNameAvailability -Name $tempName1 } Until ($nameAvail1.NameAvailable -eq $True) } $storageAccountName1 = $tempName1 $storageAccount1 = New-AzureRmStorageAccount -ResourceGroupName $using:resourceGroupName -Name $storageAccountName1 -SkuName "Standard_LRS" -Kind "Storage" -Location $using:location $vm1 = Set-AzureRmVMOperatingSystem -VM $vm1 -Windows -ComputerName $using:vm1Name -Credential $using:credentials -ProvisionVMAgent EnableAutoUpdate $vm1 = Set-AzureRmVMSourceImage -VM $vm1 -PublisherName $using:publisherName -Offer $using:offer -Skus $using:sku -Version $using:version $blobPath1 = 'vhds/' + $using:vm1osDiskName + '.vhd' $osDiskUri1 = $storageAccount1.PrimaryEndpoints.Blob.ToString() + $blobPath1 $vm1 = Set-AzureRmVMOSDisk -VM $vm1 -Name $using:vm1osDiskName -VhdUri $osDiskUri1 -CreateOption fromImage $vm1 = Add-AzureRmVMNetworkInterface -VM $vm1 -Id $nic1.Id New-AzureRmVM -ResourceGroupName $using:resourceGroupName -Location $using:location -VM $vm1 } InlineScript { $vnet = Get-AzureRmVirtualNetwork -Name $using:vnetName -ResourceGroupName $using:resourceGroupName $publicIpvm2 = New-AzureRmPublicIpAddress -Name $using:publicIpvm2Name -ResourceGroupName $using:resourceGroupName -Location $using:location -AllocationMethod Dynamic $nic2 = New-AzureRmNetworkInterface -Name $using:nic2Name -ResourceGroupName $using:resourceGroupName -Location $using:location -SubnetId $vNet.Subnets[0].Id -PublicIpAddressId $publicIpvm2.Id $vm2 = New-AzureRmVMConfig -VMName $using:vm2Name -VMSize $using:vmSize -AvailabilitySetId $using:avSet.Id $randomnumber2 = Get-Random -Minimum 0 -Maximum 99999999 $tempName2 = $using:resourceGroupName + $using:vm2Name + $randomnumber2 $nameAvail2 = Get-AzureRmStorageAccountNameAvailability -Name $tempName2 If ($nameAvail2.NameAvailable -ne $true) { Do { $randomNumber2 = Get-Random -Minimum 0 -Maximum 99999999 $tempName2 = $using:resourceGroupName + $using:vm2Name + $randomnumber2 $nameAvail2 = Get-AzureRmStorageAccountNameAvailability -Name $tempName2 } Until ($nameAvail2.NameAvailable -eq $True) } $storageAccountName2 = $tempName2 $storageAccount2 = New-AzureRmStorageAccount -ResourceGroupName $using:resourceGroupName -Name $storageAccountName2 -SkuName "Standard_LRS" -Kind "Storage" -Location $using:location $vm2 = Set-AzureRmVMOperatingSystem -VM $vm2 -Windows -ComputerName $using:vm2Name -Credential $using:credentials -ProvisionVMAgent EnableAutoUpdate $vm2 = Set-AzureRmVMSourceImage -VM $vm2 -PublisherName $using:publisherName -Offer $using:offer -Skus $using:sku -Version $using:version $blobPath2 = 'vhds/' + $using:vm2osDiskName + '.vhd' $osDiskUri2 = $storageAccount2.PrimaryEndpoints.Blob.ToString() + $blobPath2 $vm2 = Set-AzureRmVMOSDisk -VM $vm2 -Name $using:vm2osDiskName -VhdUri $osDiskUri2 -CreateOption fromImage $vm2 = Add-AzureRmVMNetworkInterface -VM $vm2 -Id $nic2.Id New-AzureRmVM -ResourceGroupName $using:resourceGroupName -Location $using:location -VM $vm2 } } InlineScript { $publicIplbName = $using:resourceGroupName + 'lb-pip1' $feIplbConfigName = $using:resourceGroupName + '-felbipconfig' $beAddressPoolConfigName = $using:resourceGroupName + '-beipapconfig' $lbName = $using:resourceGroupName + 'lb' $publicIplb = New-AzureRmPublicIpAddress -Name $publicIplbName -ResourceGroupName $using:resourceGroupName -Location $using:location -AllocationMethod Dynamic $feIplbConfig = New-AzureRmLoadBalancerFrontendIpConfig -Name $feIplbConfigName -PublicIpAddress $publicIplb $beIpAaddressPoolConfig = New-AzureRmLoadBalancerBackendAddressPoolConfig -Name $beAddressPoolConfigName $healthProbeConfig = New-AzureRmLoadBalancerProbeConfig -Name HealthProbe -RequestPath '\' -Protocol http -Port 80 -IntervalInSeconds 15 -ProbeCount 2 $lbrule = New-AzureRmLoadBalancerRuleConfig -Name HTTP -FrontendIpConfiguration $feIplbConfig -BackendAddressPool $beIpAaddressPoolConfig -Probe $healthProbe -Protocol Tcp -FrontendPort 80 -BackendPort 80 $lb = New-AzureRmLoadBalancer -ResourceGroupName $using:resourceGroupName -Name $lbName -Location $using:location -FrontendIpConfiguration $feIplbConfig -LoadBalancingRule $lbrule -BackendAddressPool $beIpAaddressPoolConfig -Probe $healthProbeConfig $nic1 = Get-AzureRmNetworkInterface -Name $using:nic1Name -ResourceGroupName $using:resourceGroupName $nic1.IpConfigurations[0].LoadBalancerBackendAddressPools = $beIpAaddressPoolConfig $nic2 = Get-AzureRmNetworkInterface -Name $using:nic2Name -ResourceGroupName $using:resourceGroupName $nic2.IpConfigurations[0].LoadBalancerBackendAddressPools = $beIpAaddressPoolConfig Set-AzureRmNetworkInterface -NetworkInterface $nic1 Set-AzureRmNetworkInterface -NetworkInterface $nic2 } } -
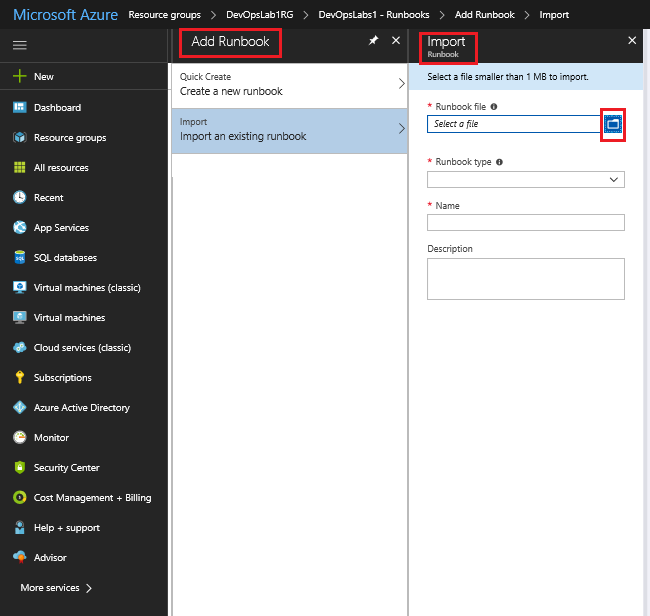
If you prefer to import a pre-existing version of the runbook, go to the location https://github.com/Microsoft/PartsUnlimited/tree/master/Labfiles/Devops200.2x-InfrastructureasCode/Mod01
-
Copy the file Provision-lab-textual-workflow-v1.ps1 to your local enviroment.
-
Then in the Azure Portal go to Runbooks > Add a runbook and import the runbook with the following settings
- Runbook file: < the .ps1 file you just downloaded >
- Runbook type: PowerShell Workflow
-
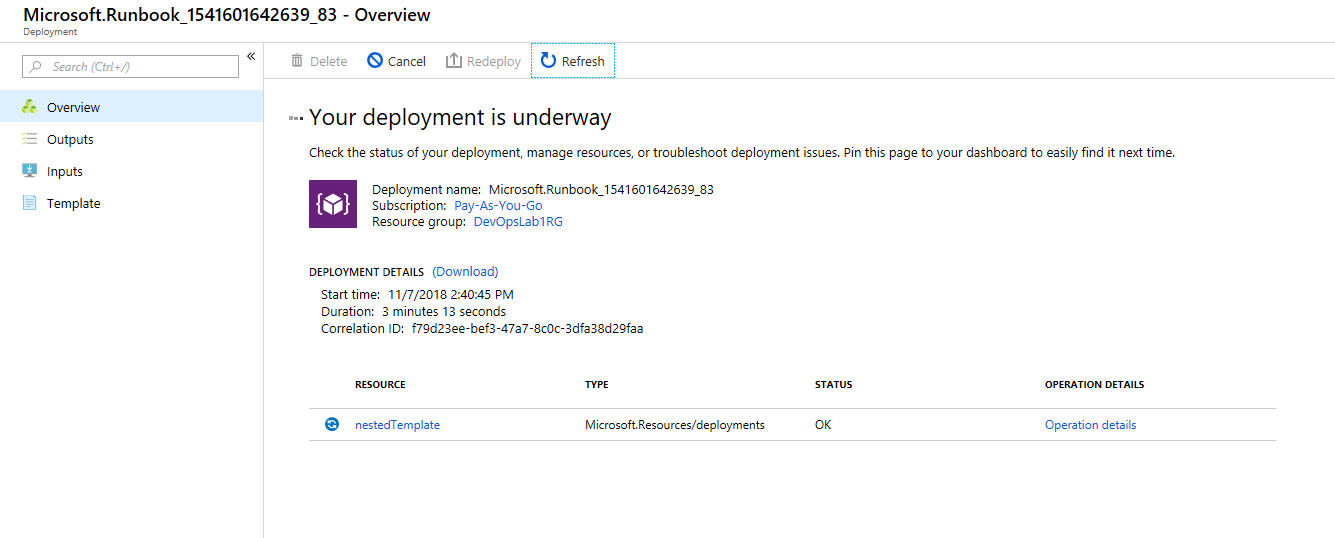
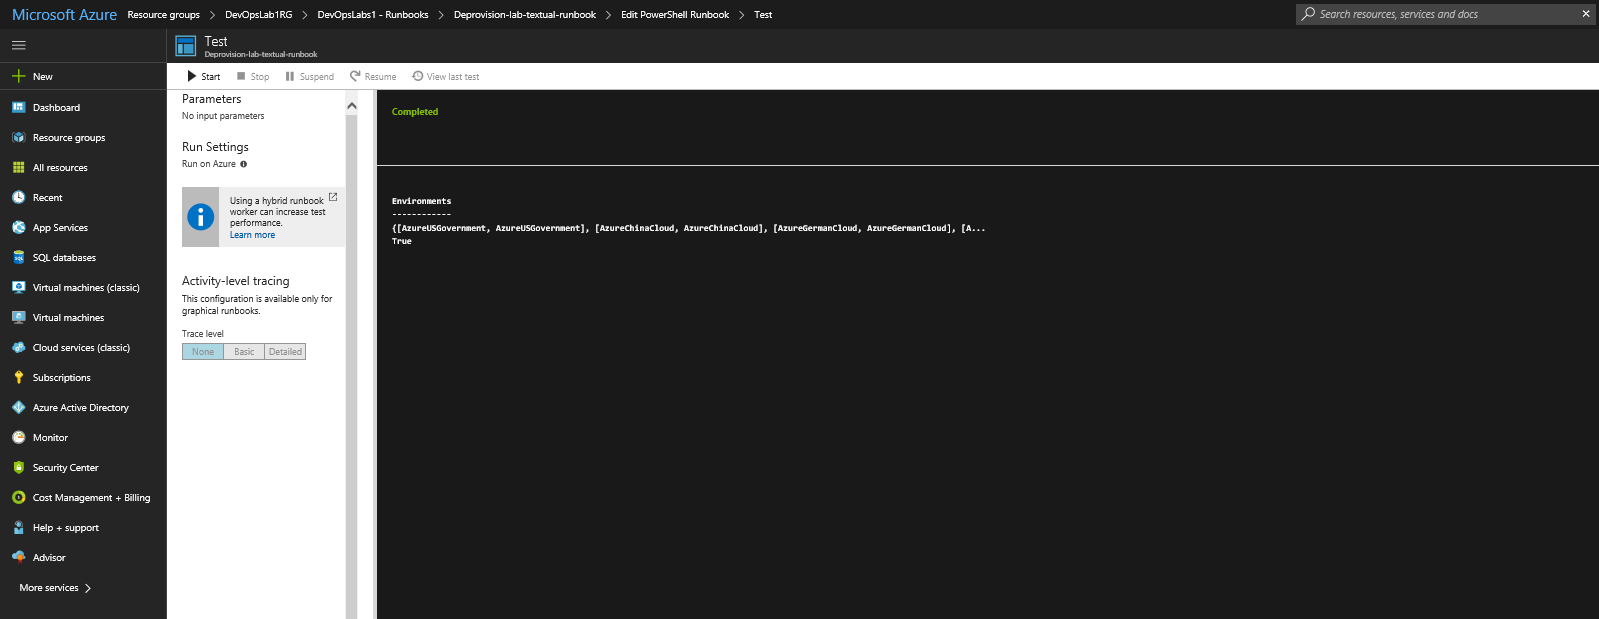
Go to Edit then the Test pane and click Start
Note: You will likely encounter errors when you first test the runbook, this is normal, and you need to work through any errors encounterd one by one using the output in the Test Pane to guide you, i.e. run a test > identify and fix the issue reported, run a test again to verify it is fixed and continue like that in iterations until the script runs successfully.
It can take up to 15 minutes or more to complete.
Typical errors encountered may be
- If you receive an error about missing operators or brackets, and you have copied and pastd the script code, you may want to download the script form GitHub and importing the file into Azure. This may be the quickest way to resolve the formatting errors.
- the dash operator “-” having its associated parameter wrapped to the next line or having a space between the operator and the parameter or cmdlet, or missing altogether.
- The workflow name in the script must match the runbook name.
- Another option is to copy and paste the code from this page into Powershell ISE and use the PowerShell editing features to help run and debug the runbook , or export the runbook as a ps1 file. The option to export will be greyed out until the runbook is published.
- You may also need to delete any pre-existing resource group of the same name you specified earlier
- If you receive errors about a particular resource or parameter value not being avialable in a particular region i.e. vmsize not being avilaable in westus for example, you may have to change the region you specified to a different one. For vm size, you can determine sizes available per location by running the command
az vm list-sizes --location westus -output tablewith Azure CLI.
-
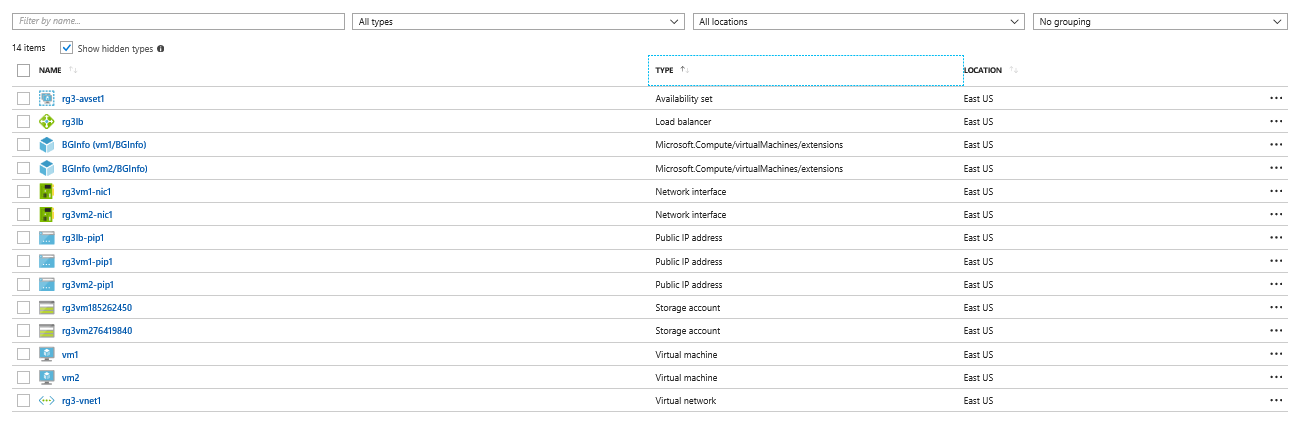
Start the runbook and ensure that it successfully provisions two virtual machines, an external load balancer, and various other resources required by the vms and LB. You should end up with the resources as outlined in the below screnshot.
Task 5: Create and run an Automation Windows PowerShell-based textual runbook that deprovisions the lab environment (Portal)
-
From the Azure portal, in the Automation account you created in the first exercise of this lab, create and publish an Automation runbook with the following settings:
- Name: Deprovision-lab-textual-runbook
- Runbook type: PowerShell
Note: As in Task 3, as an alternative you can also import a pre-existing version of the runbook, i.e. go to the location https://github.com/Microsoft/PartsUnlimited/tree/master/Labfiles/Devops200.2x-InfrastructureasCode/Mod01
and download the file Deprovision-lab-textual-runbook.ps1, then import it.
-
Add the following runbook code:
$c = Get-AutomationConnection -Name 'AzureRunAsConnection' Add-AzureRmAccount -ServicePrincipal -Tenant $c.TenantID -ApplicationID $c.ApplicationID -CertificateThumbprint $c.CertificateThumbprint $resourceGroupName = Get-AutomationVariable -Name 'ResourceGroupName' Remove-AzureRmResourceGroup -Name $resourceGroupName -Force -
Test the runbook in the Test pane and verify it runs successfully. The purpose of the runbook is to remove the resource group containing all our lab resources.
Note: If you delete the resource group and all resources within it using this de-provisioniong script in Task 4, run the provisioning runbook again, as in Task 3, to re-deploy the virtual machines, as you will be using these resources in some of the remaining Infrastructure as Code labs, and they will be required.
Summary
In this lab you have:
- Created an Azure Automation Account
- Defined Azure Automation variables and updated modules
- Created or Imported a workflow-based textual runbook, tested the runbook, and run it to provision two load-balanced Azure VM in parallel (Portal)
- Created and run an Automation Windows PowerShell-based textual runbook that deprovisions the lab environment (Portal)