Azure Automation Runbook Deployments
In this lab we will create an Azure Automation Account, and configure automation assets in Azure. We will then use a Windows PowerShell-based runbook to deploy two load balanced Virtual Machines (VMs) to Azure, in parallel.
DevOps Course Source:
This lab is used in the following courses.
- DevOps200.2x: Infrastructure as Code - Module 1 Azure Automation.
- AZ-400T05: Implementing Application Infrastructure - Module 2 Azure Automation. The lab compliments the AZ-400 series of courses to help you prepare for the AZ-400 Microsoft Azure DevOps Solutions certification exam.
Pre-requisites:
- A Microsoft account
- An Azure Subscription
Lab Tasks:
- Create an Azure Automation Account (Azure Portal)
- Update
AzureRMmodules (PowerShell Gallery) - Configure Automation Variables (Azure Portal)
- Create and run an Automation Windows PowerShell, workflow-based, textual runbook that provisions two load-balanced Azure VMs, in parallel (Azure Portal)
- Create and run an Automation Windows PowerShell-based textual runbook that deprovisions the lab environment (Azure Portal)
Estimated Lab Time:
- Approx. 45 minutes
Task 1: Create an Automation Account (Azure Portal)
-
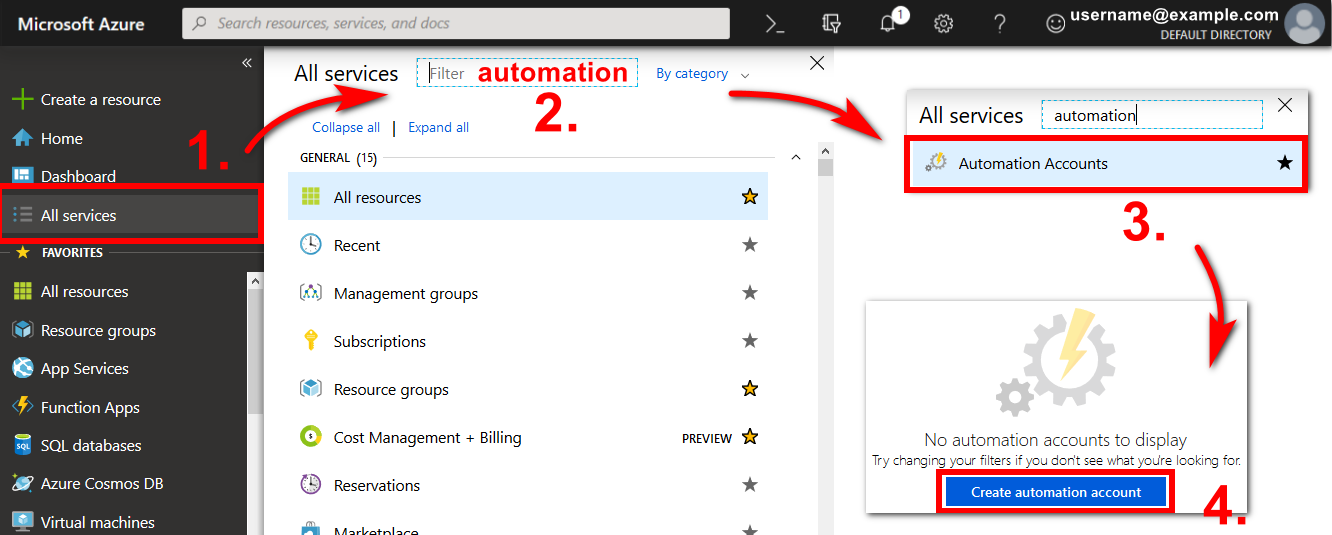
Sign in to Azure Portal. From the menu on the left, choose All services. Type automation into the Filter text entry field, and select Automation Accounts.
-
In the Add Automation Account pane, create a new Automation Account with the following settings:
- Name:
DevOpsLabs1. - Subscription: Choose your Azure subscription.
- Resource Group: Select
DevOpsLab1RGif you already created a Resource Group with this name in a previous lab. If you have not already created a Resource Group, choose Create new, and enterDevOpsLab1RGas the name of the new Resource Group. - Location: Select an Azure region close to your lab location.
- Create Azure Run As Account: Choose
Yes.
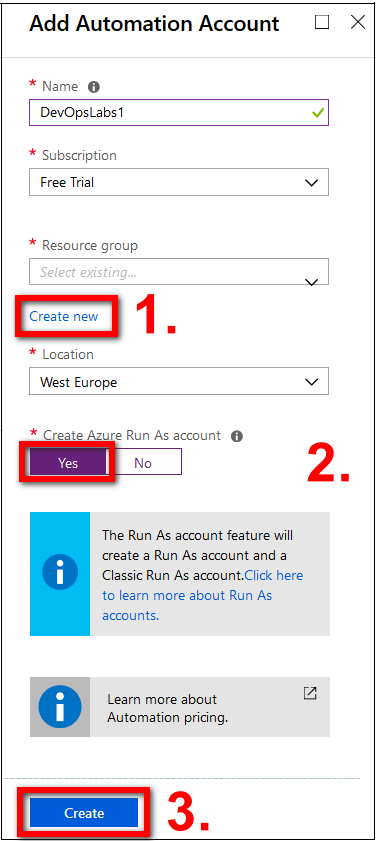
Select the Create button to create your new DevOpsLabs1 Azure Automation Account.
- Name:
Task 2: Update AzureRM Modules (PowerShell Gallery)
-
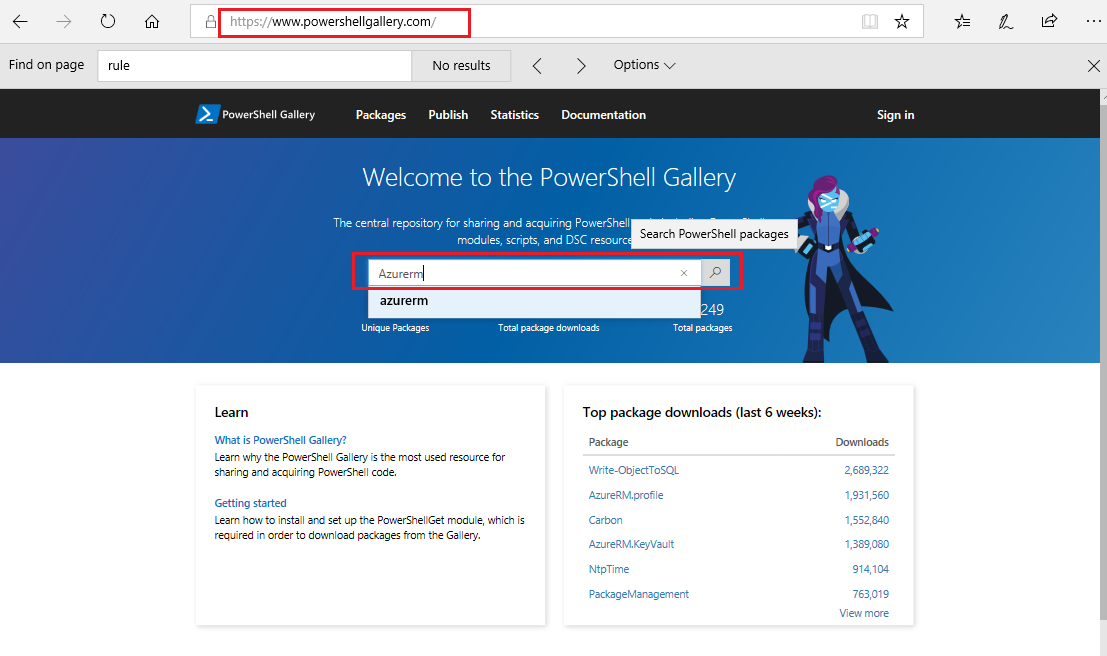
Go to the Powershell Gallery and search for the AzureRM module.
Note: The newer
Azmodule is a replacement for theAzureRMmodule`. The Az module has feature parity with the AzureRM module, but there are some minor inconsistences. For the purposes of this lab, we use the AzureRM module because it supports provisioning two VMs from a Windows PowerShell-based runbook in parallel. At the time of writing (February 2019), Azure Automation does not support using the Az module to perform these operations.For more information about the Az module, see the page Introducing the new Azure PowerShell Az module.
-
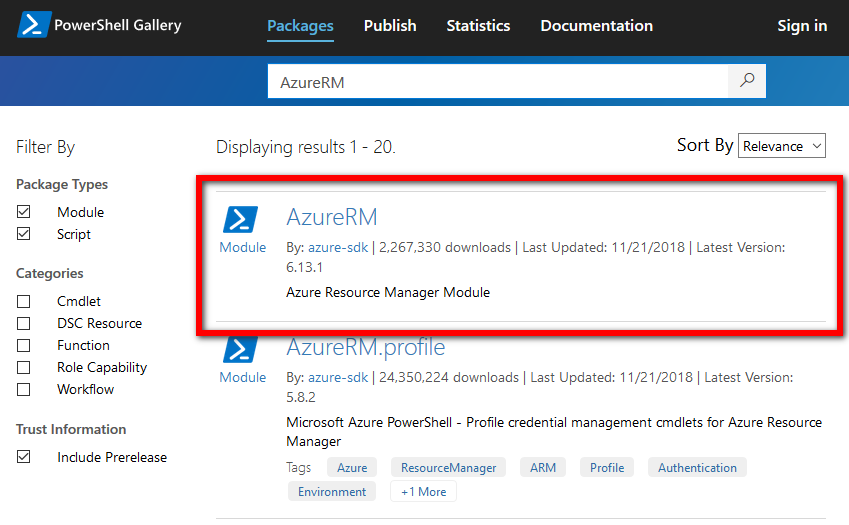
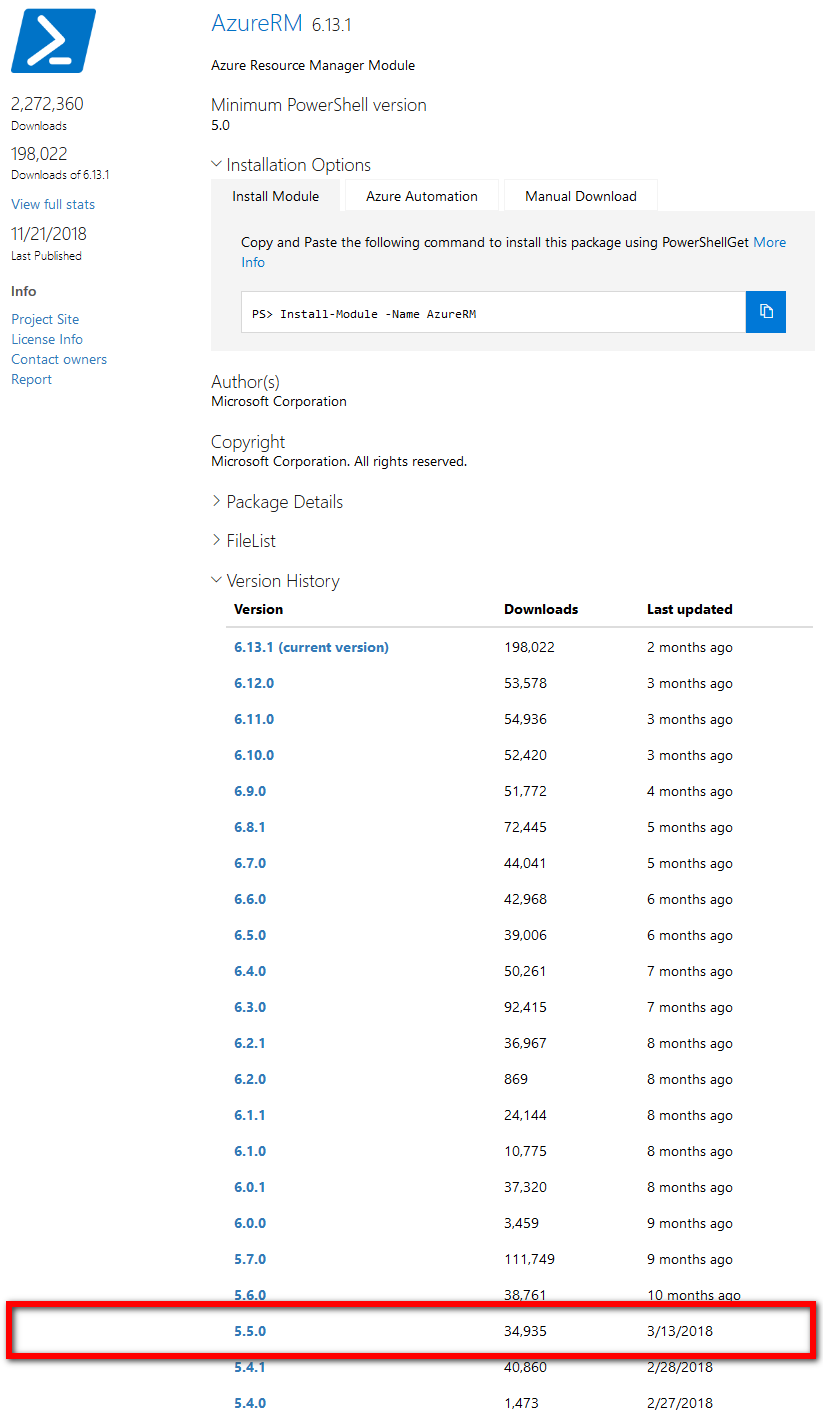
Open the AzureRM page and locate version 5.5.0.
Note: At the time of writing, February 2019, the current version of the AzureRM module a is 6.13.1. AzureRM version 6.13.1 breaks the lab file workflow. This lab was tested successfully with version 5.5.0. You must use version 5.5.0 of the AzureRM module. Later versions of the module may work, but have not been tested fully. Using a later version may cause your workflow to fail. If your workflow fails, you should check that you are using version 5.5.0 of the AzureRM module.
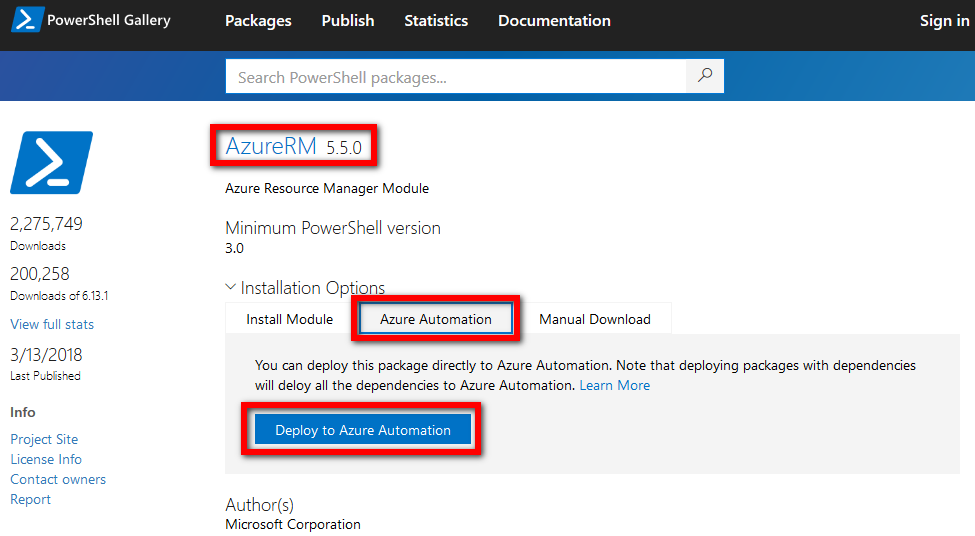
-
Go to the Azure Automation tab and select Deploy to Azure Automation
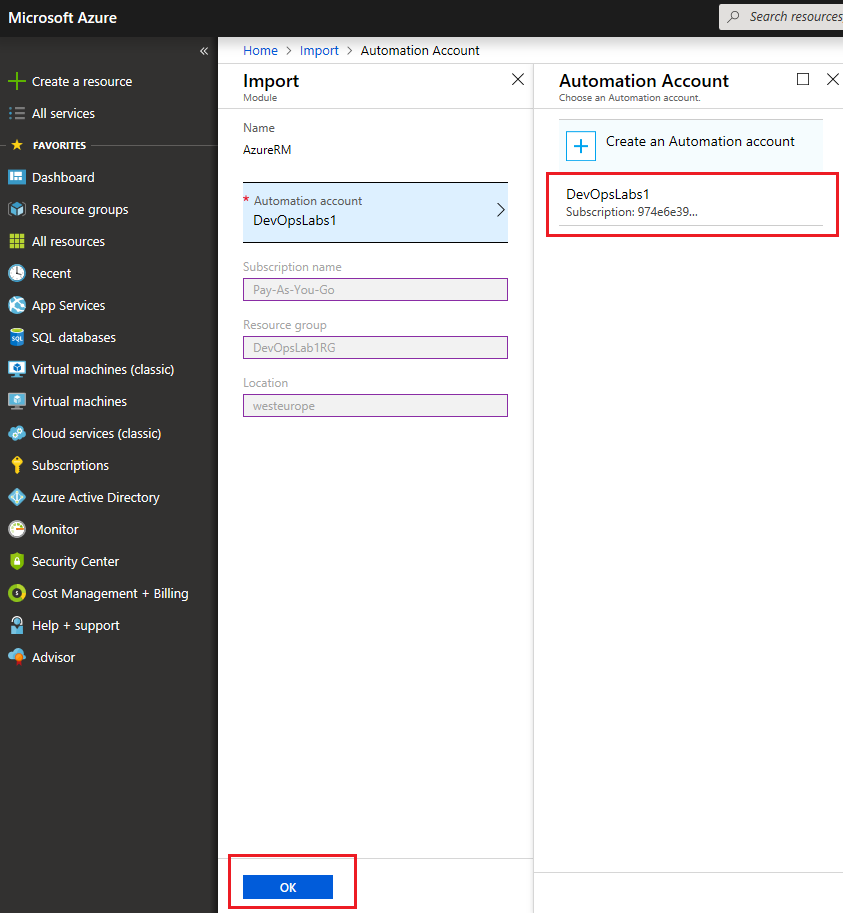
-
You will be brought into Azure. If prompted, enter your Azure Automation Account details. Choose your Azure Automation DevOpsLabs1 account and select OK.
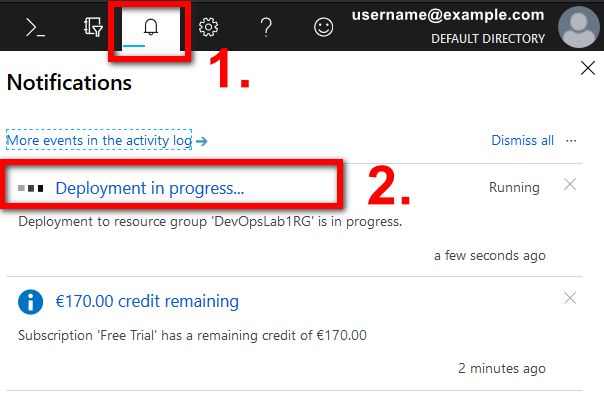
-
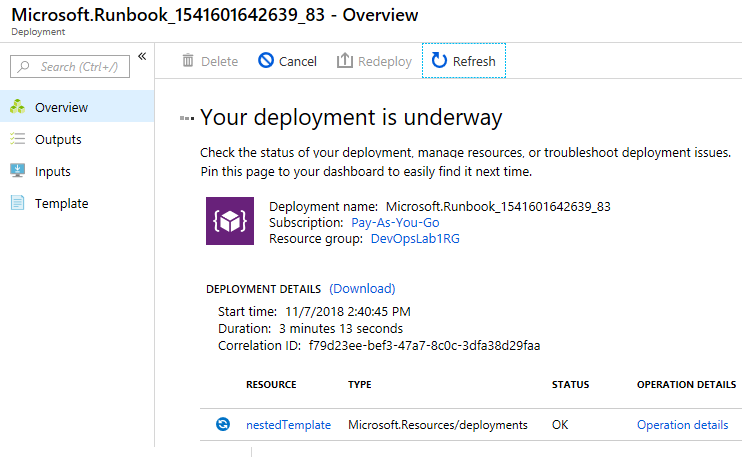
Select the Notifications icon in the Azure dashboard, and choose Deployment in progress.
-
You will be brought to the Azure runbook overview pane. From within the pane, you can view the progress of your update to the AzureRM module. Azure will update and deploy all modules associated with AzureRM. Be advised that the update and deployment can take up to 30 mins to complete.
-
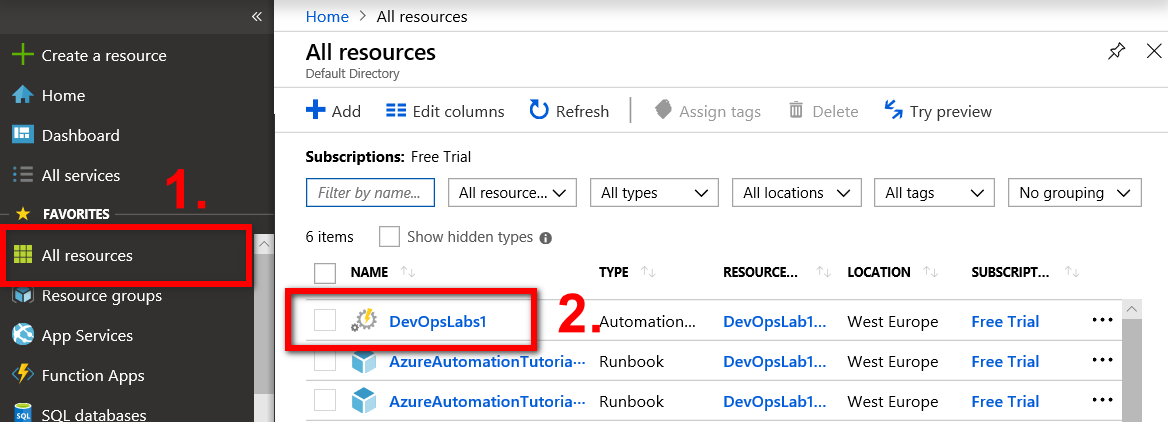
Once the update and deployment are complete, you need to check the details of the AzureRM module and associated modules. From the main menu on the left, choose All resources, and select your Azure Automation DevOpsLabs1 Automation Account.
-
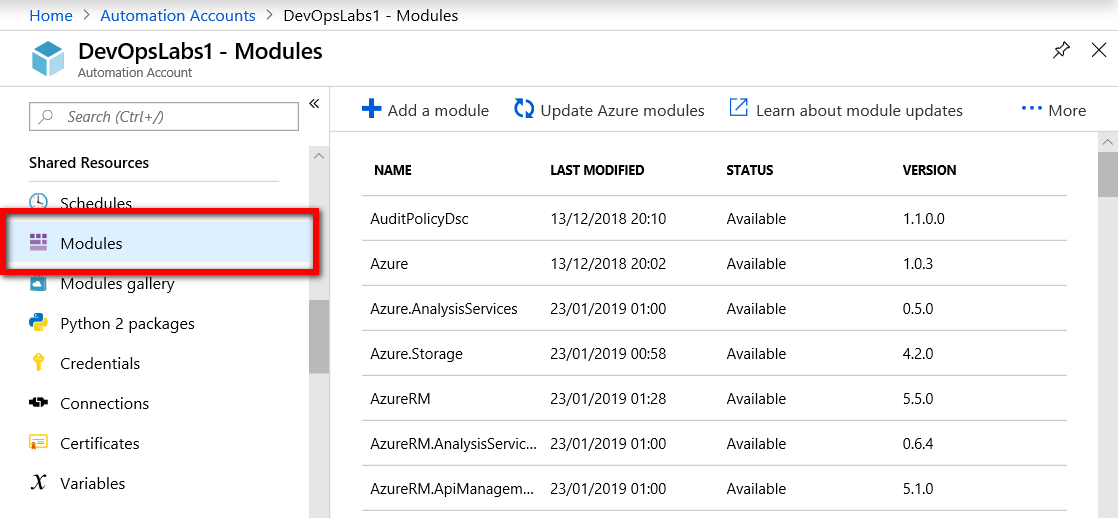
From within the Automation Accounts pane for your DevOpsLabs1 Automation Account, scroll down to the Shared Resources section, and choose Modules.
-
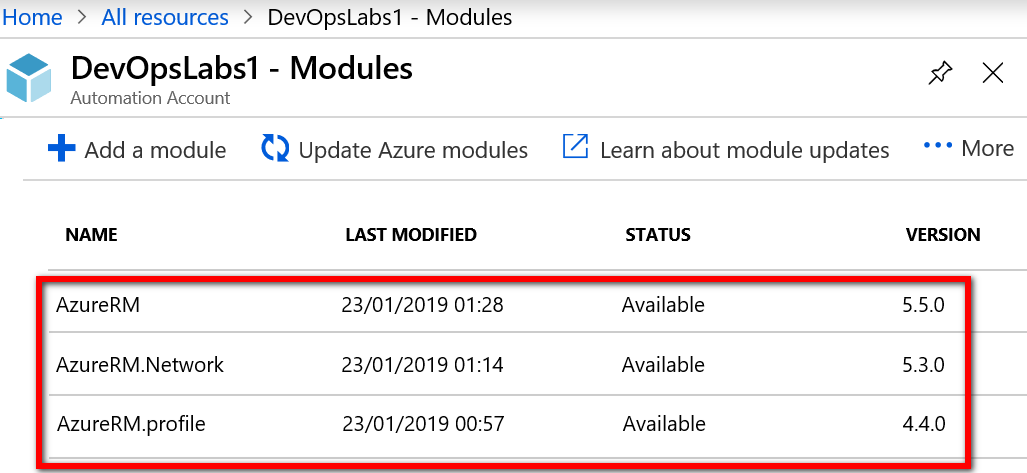
Scroll down through the list of modules and locate modules with the prefix AzureRM. Verify that the module versions match the following versions.
- AzureRM version =
5.5.0 - AzureRM.Network version =
5.3.0 - AzureRM.Profile version =
4.4.0
- AzureRM version =
Note: You can also update the AzureRM module from within Azure Automation. However, we updated using the PowerShell Gallery to allow us to specify the version of AzureRM to use.
Task 3: Configure Automation Variables (Azure Portal)
-
In Azure Portal, choose Variables. Variables are listed under the Shared Resources section in the Automation Accounts pane for your DevOpsLabs1 Automation Account.
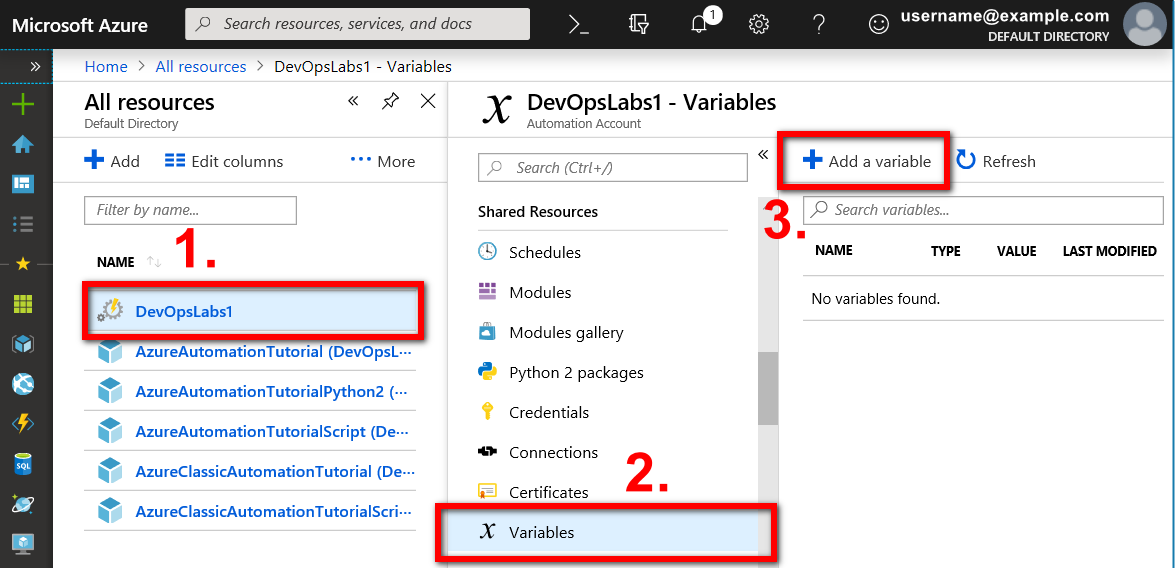
-
Select Add a variable. Create and configure six new variables with the following values.
- Name:
VM1Name- Description: Leave empty
- Type:
String - Value:
vm1 - Encrypted:
No
- Name:
VM2Name- Description: Leave blank
- Type:
String - Value:
vm2 - Encrypted:
No
- Name:
ResourceGroupName- Description: Leave blank
- Type:
String - Value: Choose a name for the new Resource Group that is different from the
DevOpsLab1RGResource Group you created earlier in this lab. Use a short name such asrg1, for example. The name of the new Resource Group will be appended to the name of any resources you assign to the new Resource Group. Some resource types can only use a limited number of characters in the resource name. - Encrypted:
No
- Name:
UserName- Description: Leave blank
- Type:
String - Value:
Student - Encrypted:
No
- Name:
Password- Description: Leave blank
- Type:
String - Value:
Pa55w.rd1234 - Encrypted:
No
- Name:
Location- Description: Leave blank
- Type:
String - Value: The short-name for the location your DevOpsLabs1 Automation Account is using, without spaces. For example, East US becomes
eastus. - Encrypted:
No
- Name:
Note: You can get Azure location names by running one of the following commands either in the Azure CLI 2.0 or in Windows PowerShell (with the Azure PowerShell module installed).
Azure Location list(requires theAzmodule)Get-AzureRmLocation(requires theAzureRMmodule)You can also run the commands in Azure Cloud Shell, for details see the page Quickstart for PowerShell in Azure Cloud Shell.
Alternatively, you can use one of the Region Names listed on the page Azure Locations. Remove any white spaces if you add a Region Name as a value to your Location Variable. For example, East US will become
eastus.For information about using PowerShell with Azure see the page Overview of Azure PowerShell.
Task 4: Create and run an Automation Windows PowerShell workflow-based textual runbook that provisions two load-balanced Azure VM in parallel (Azure Portal)
Choose one of the following two options to complete Task 4:
-
a) Copy the code that is provided below and paste it into a new runbook, by following steps 1 to 3, below.
or
-
b) Import a pre-existing runbook that contains the code provided below, by following steps 4 to 6 below.
Note: Option b) is recommended, as this option reduces the risk of encountering formatting errors that are associated with copying and pasting code.
-
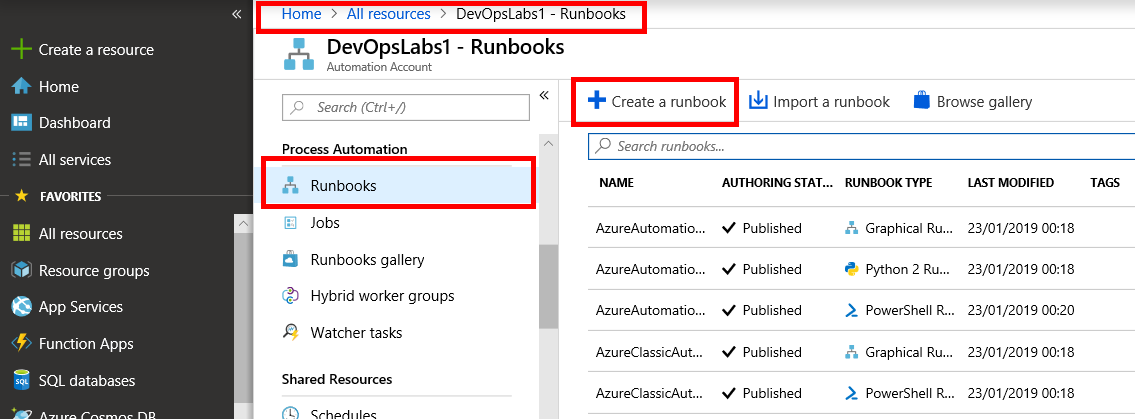
From the Azure Portal, in the Automation Account you created earlier, go to Process Automation > Runbooks. Choose Create a runbook.
-
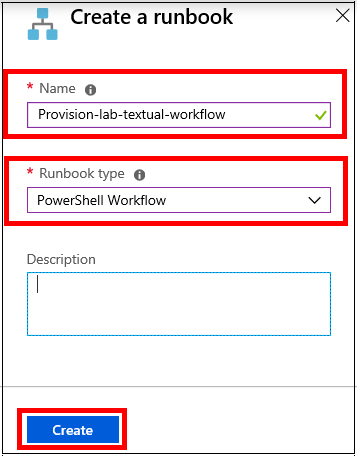
Enter the following values into the fields provides, then select Create.
- Name:
Provision-lab-textual-workflow - Runbook type:
PowerShell Workflow
- Name:
-
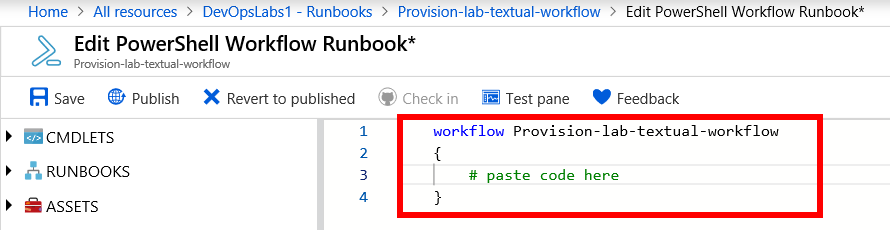
Copy the following code and paste it into the Edit PowerShell Workflow Runbook pane. When you have pasted the code, proceed to Step 7.
workflow Provision-lab-textual-workflow { $c = Get-AutomationConnection -Name 'AzureRunAsConnection' Add-AzureRmAccount -ServicePrincipal -Tenant $c.TenantID -ApplicationID $c.ApplicationID -CertificateThumbprint $c.CertificateThumbprint $vm1Name = Get-AutomationVariable -Name 'VM1Name' $vm2Name = Get-AutomationVariable -Name 'VM2Name' $resourceGroupName = Get-AutomationVariable -Name 'ResourceGroupName' $location = Get-AutomationVariable -Name 'Location' $username = Get-AutomationVariable -Name 'UserName' $password = Get-AutomationVariable -Name 'Password' $vmSize = 'Standard_A1' $vnetName = $resourceGroupName + '-vnet1' $vnetPrefix = '10.0.0.0/16' $subnet1Name = 'subnet1' $subnet1Prefix = '10.0.0.0/24' $avSetName = $resourceGroupName + '-avset1' $publisherName = 'MicrosoftWindowsServer' $offer = 'WindowsServer' $sku = '2016-Datacenter' $version = 'latest' $vmosDiskSize = 128 $publicIpvm1Name = $resourceGroupName + $vm1Name + '-pip1' $publicIpvm2Name = $resourceGroupName + $vm2Name + '-pip1' $nic1Name = $resourceGroupName + $vm1Name + '-nic1' $nic2Name = $resourceGroupName + $vm2Name + '-nic1' $vm1osDiskName = $resourceGroupName + $vm1Name + 'osdisk' $vm2osDiskName = $resourceGroupName + $vm2Name + 'osdisk' ##$resourceGroup = New-AzureRmResourceGroup -Name $resourceGroupName -Location $location InlineScript { $resourceGroup = Get-AzureRmResourceGroup -Name $using:resourceGroupName -ErrorAction SilentlyContinue if(!$resourceGroup) { Write-Host "Creating resource group '$resourceGroupName' in location $location"; New-AzureRmResourceGroup -Name $using:resourceGroupName -Location $using:location -Verbose } else{ Write-Host "Using existing resource group '$resourceGroupName'"; } } $securePassword = ConvertTo-SecureString -String $password -AsPlainText -Force $credentials = New-Object System.Management.Automation.PSCredential -ArgumentList $username,$securePassword $avSet = New-AzureRmAvailabilitySet -ResourceGroupName $resourceGroupName -Name $avSetName -Location $location -PlatformUpdateDomainCount 5 -PlatformFaultDomainCount 3 InlineScript { $subnet = New-AzureRmVirtualNetworkSubnetConfig -Name $using:subnet1Name -AddressPrefix $using:subnet1Prefix $vnet = New-AzureRmVirtualNetwork -Name $using:vnetName -ResourceGroupName $using:resourceGroupName -Location $using:location -AddressPrefix $using:vnetPrefix -Subnet $using:subnet Set-AzureRmVirtualNetwork -VirtualNetwork $vnet } Parallel { InlineScript { $vnet = Get-AzureRmVirtualNetwork -Name $using:vnetName -ResourceGroupName $using:resourceGroupName $publicIpvm1 = New-AzureRmPublicIpAddress -Name $using:publicIpvm1Name -ResourceGroupName $using:resourceGroupName -Location $using:location -AllocationMethod Dynamic $nic1 = New-AzureRmNetworkInterface -Name $using:nic1Name -ResourceGroupName $using:resourceGroupName -Location $using:location -SubnetId $vNet.Subnets[0].Id -PublicIpAddressId $publicIpvm1.Id $vm1 = New-AzureRmVMConfig -VMName $using:vm1Name -VMSize $using:vmSize -AvailabilitySetId $using:avSet.Id $randomnumber1 = Get-Random -Minimum 0 -Maximum 99999999 $tempName1 = $using:resourceGroupName + $using:vm1Name + $randomnumber1 $nameAvail1 = Get-AzureRmStorageAccountNameAvailability -Name $tempName1 If ($nameAvail1.NameAvailable -ne $true) { Do { $randomNumber1 = Get-Random -Minimum 0 -Maximum 99999999 $tempName1 = $using:resourceGroupName + $using:vm1Name + $randomnumber1 $nameAvail1 = Get-AzureRmStorageAccountNameAvailability -Name $tempName1 } Until ($nameAvail1.NameAvailable -eq $True) } $storageAccountName1 = $tempName1 $storageAccount1 = New-AzureRmStorageAccount -ResourceGroupName $using:resourceGroupName -Name $storageAccountName1 -SkuName "Standard_LRS" -Kind "Storage" -Location $using:location $vm1 = Set-AzureRmVMOperatingSystem -VM $vm1 -Windows -ComputerName $using:vm1Name -Credential $using:credentials -ProvisionVMAgent EnableAutoUpdate $vm1 = Set-AzureRmVMSourceImage -VM $vm1 -PublisherName $using:publisherName -Offer $using:offer -Skus $using:sku -Version $using:version $blobPath1 = 'vhds/' + $using:vm1osDiskName + '.vhd' $osDiskUri1 = $storageAccount1.PrimaryEndpoints.Blob.ToString() + $blobPath1 $vm1 = Set-AzureRmVMOSDisk -VM $vm1 -Name $using:vm1osDiskName -VhdUri $osDiskUri1 -CreateOption fromImage $vm1 = Add-AzureRmVMNetworkInterface -VM $vm1 -Id $nic1.Id New-AzureRmVM -ResourceGroupName $using:resourceGroupName -Location $using:location -VM $vm1 } InlineScript { $vnet = Get-AzureRmVirtualNetwork -Name $using:vnetName -ResourceGroupName $using:resourceGroupName $publicIpvm2 = New-AzureRmPublicIpAddress -Name $using:publicIpvm2Name -ResourceGroupName $using:resourceGroupName -Location $using:location -AllocationMethod Dynamic $nic2 = New-AzureRmNetworkInterface -Name $using:nic2Name -ResourceGroupName $using:resourceGroupName -Location $using:location -SubnetId $vNet.Subnets[0].Id -PublicIpAddressId $publicIpvm2.Id $vm2 = New-AzureRmVMConfig -VMName $using:vm2Name -VMSize $using:vmSize -AvailabilitySetId $using:avSet.Id $randomnumber2 = Get-Random -Minimum 0 -Maximum 99999999 $tempName2 = $using:resourceGroupName + $using:vm2Name + $randomnumber2 $nameAvail2 = Get-AzureRmStorageAccountNameAvailability -Name $tempName2 If ($nameAvail2.NameAvailable -ne $true) { Do { $randomNumber2 = Get-Random -Minimum 0 -Maximum 99999999 $tempName2 = $using:resourceGroupName + $using:vm2Name + $randomnumber2 $nameAvail2 = Get-AzureRmStorageAccountNameAvailability -Name $tempName2 } Until ($nameAvail2.NameAvailable -eq $True) } $storageAccountName2 = $tempName2 $storageAccount2 = New-AzureRmStorageAccount -ResourceGroupName $using:resourceGroupName -Name $storageAccountName2 -SkuName "Standard_LRS" -Kind "Storage" -Location $using:location $vm2 = Set-AzureRmVMOperatingSystem -VM $vm2 -Windows -ComputerName $using:vm2Name -Credential $using:credentials -ProvisionVMAgent EnableAutoUpdate $vm2 = Set-AzureRmVMSourceImage -VM $vm2 -PublisherName $using:publisherName -Offer $using:offer -Skus $using:sku -Version $using:version $blobPath2 = 'vhds/' + $using:vm2osDiskName + '.vhd' $osDiskUri2 = $storageAccount2.PrimaryEndpoints.Blob.ToString() + $blobPath2 $vm2 = Set-AzureRmVMOSDisk -VM $vm2 -Name $using:vm2osDiskName -VhdUri $osDiskUri2 -CreateOption fromImage $vm2 = Add-AzureRmVMNetworkInterface -VM $vm2 -Id $nic2.Id New-AzureRmVM -ResourceGroupName $using:resourceGroupName -Location $using:location -VM $vm2 } } InlineScript { $publicIplbName = $using:resourceGroupName + 'lb-pip1' $feIplbConfigName = $using:resourceGroupName + '-felbipconfig' $beAddressPoolConfigName = $using:resourceGroupName + '-beipapconfig' $lbName = $using:resourceGroupName + 'lb' $publicIplb = New-AzureRmPublicIpAddress -Name $publicIplbName -ResourceGroupName $using:resourceGroupName -Location $using:location -AllocationMethod Dynamic $feIplbConfig = New-AzureRmLoadBalancerFrontendIpConfig -Name $feIplbConfigName -PublicIpAddress $publicIplb $beIpAaddressPoolConfig = New-AzureRmLoadBalancerBackendAddressPoolConfig -Name $beAddressPoolConfigName $healthProbeConfig = New-AzureRmLoadBalancerProbeConfig -Name HealthProbe -RequestPath '\' -Protocol http -Port 80 -IntervalInSeconds 15 -ProbeCount 2 $lbrule = New-AzureRmLoadBalancerRuleConfig -Name HTTP -FrontendIpConfiguration $feIplbConfig -BackendAddressPool $beIpAaddressPoolConfig -Probe $healthProbe -Protocol Tcp -FrontendPort 80 -BackendPort 80 $lb = New-AzureRmLoadBalancer -ResourceGroupName $using:resourceGroupName -Name $lbName -Location $using:location -FrontendIpConfiguration $feIplbConfig -LoadBalancingRule $lbrule -BackendAddressPool $beIpAaddressPoolConfig -Probe $healthProbeConfig $nic1 = Get-AzureRmNetworkInterface -Name $using:nic1Name -ResourceGroupName $using:resourceGroupName $nic1.IpConfigurations[0].LoadBalancerBackendAddressPools = $beIpAaddressPoolConfig $nic2 = Get-AzureRmNetworkInterface -Name $using:nic2Name -ResourceGroupName $using:resourceGroupName $nic2.IpConfigurations[0].LoadBalancerBackendAddressPools = $beIpAaddressPoolConfig Set-AzureRmNetworkInterface -NetworkInterface $nic1 Set-AzureRmNetworkInterface -NetworkInterface $nic2 } } -
If you prefer, you can import a pre-existing version of the runbook from the Lab files directory in Microsoft’s Parts Unlimited GitHub repository.
-
Download the RAW file Provision-lab-textual-workflow-v1.ps1 from GitHub and save it to your local environment. You can also copy the contents of the file from GitHub, paste them into a new file and save the file in your local environment with the filename
Provision-lab-textual-workflow-v1.ps1.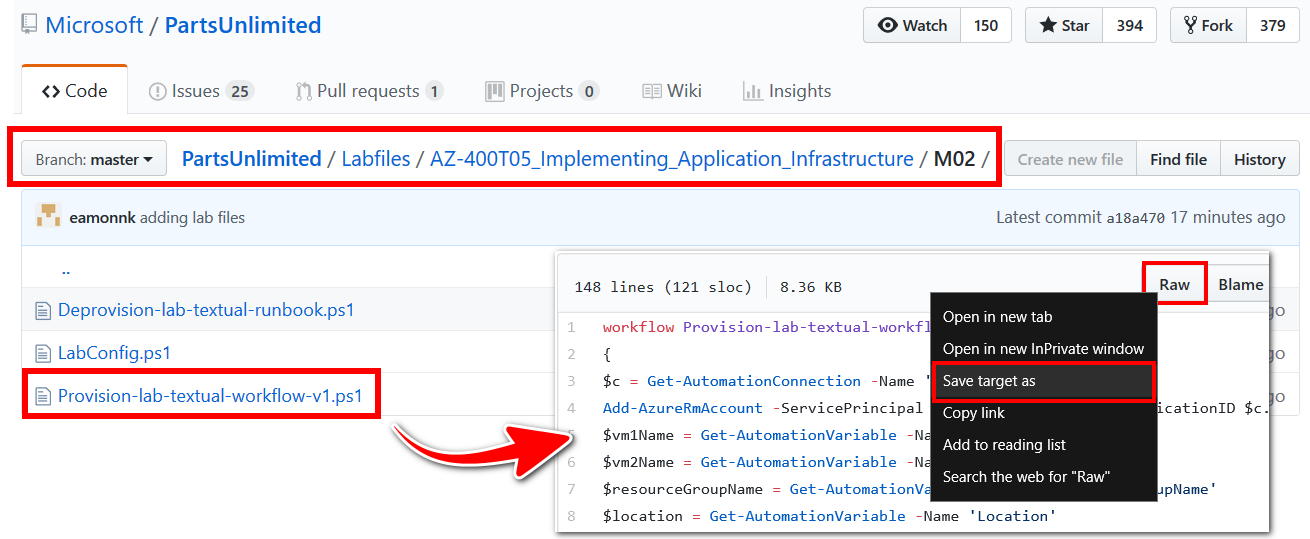
-
From the Azure Portal, in the Automation Account you created earlier, go to Process Automation > Runbooks. Choose Add a runbook, and import the runbook with the following settings. Then, select Create.
- Runbook file: Select the local path to the .ps1 file you downloaded/ saved.
- Runbook type:
PowerShell Workflow

-
With your runbook open in the Edit PowerShell Workflow Runbook pane, select the Test pane button, Then, choose Start. Wait for the test completed message to be displayed.
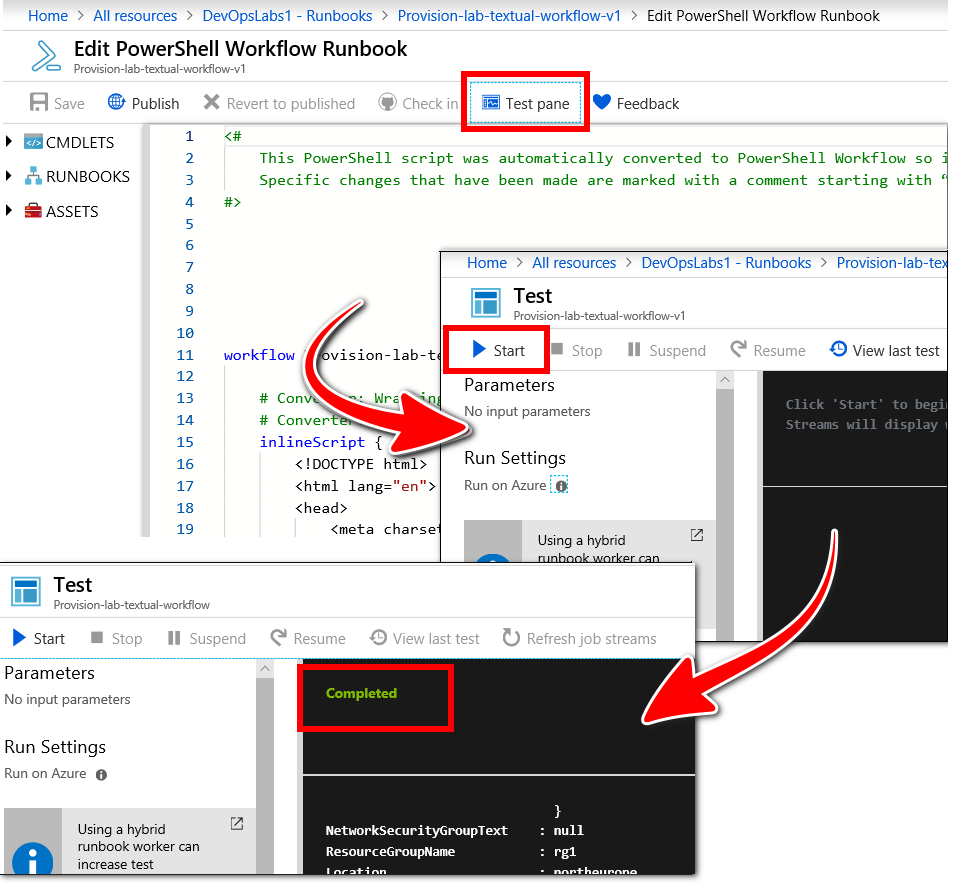
Note: The test and start runbook operations can take more than 15 minutes to complete. It is normal to encounter errors when you test the runbook for the first time. You should resolve the errors, one-by-one, by using the output displayed in the Test pane as a guide.
A useful approach to resolving errors is to run the test runbook operation, identify a reported issue, apply a fix for the reported issue, then re-run a test to verify that you have fixed the issue. You should repeat this pattern until you have fixed all of the issues, and the script runs successfully.
You may encounter the following common errors
- Missing operators or brackets. If you have copied and pasted the script code directly from this lab, you can download the RAW script file from GitHub to your local environment instead. You can also copy the contents of the file on GitHub, paste it into a new file and save the file in your local environment with the filename
Provision-lab-textual-workflow-v1.ps1. You can then import the script file into Azure. This may be the quickest way to resolve formatting errors. - Dash operator (
-). Verify any parameters following a dash that are wrapped to the next line. Check for unnecessary space between the operator and the parameter or cmdlet. A required dash operator may be missing altogether. - Workflow or runbook name errors. The workflow name in the script must match the file name of the runbook.
- Use PowerShell ISE. Another option is to copy and paste the code from this lab into Powershell ISE. You can then use the PowerShell ISE’s editing features to help debug and run the runbook, or export the runbook as a
.ps1file. The option to export may be greyed out until you publish the runbook. - Unique Resource Group name. You may need to delete pre-existing Resource Groups that use the same Resource Group name you specified earlier for use in this lab.
- Resource or parameter value not available in region. Some resources are only available from certain regions. You may need to change the region you specified to a different one. You can determine the VM sizes available for a particular location/ region, such as
westusfor example, by running the commandaz vm list-sizes --location westus -output tablewith Azure CLI or PowerShell (requires Az module).
- Missing operators or brackets. If you have copied and pasted the script code directly from this lab, you can download the RAW script file from GitHub to your local environment instead. You can also copy the contents of the file on GitHub, paste it into a new file and save the file in your local environment with the filename
-
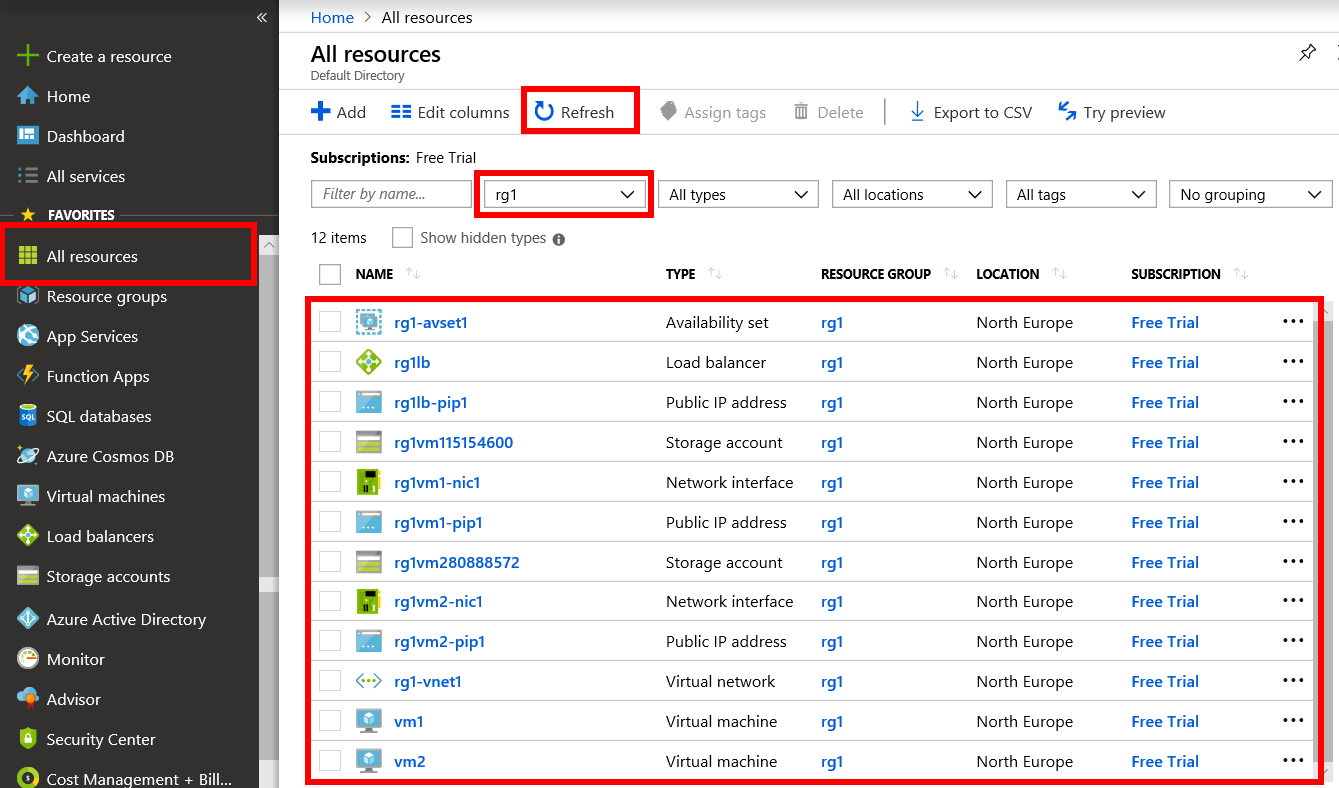
Verify that the runbook provisions two Virtual Machines (VMs), an external Load Balancer (LB), and the other resources required by the VMs and LB. Choose All resources from the left menu. Filter by Resource Group type by selecting the value you assigned to the
ResourceGroupNamevariable in Task 3. Select the Refresh button.The runbook should have provisioned the resources outlined in the following screenshot.
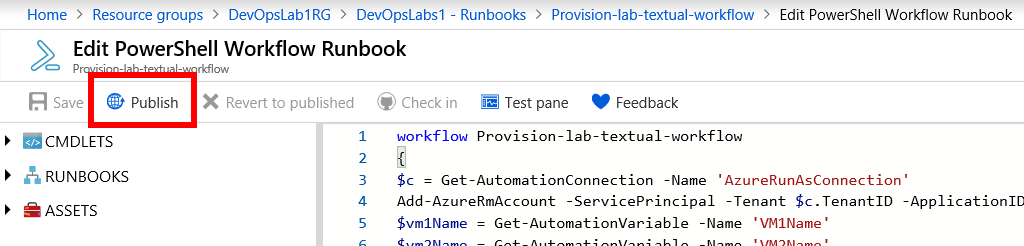
-
Go back to the Edit PowerShell Workflow Runbook pane, and select the publish button to publish the runbook.
Task 5: Create and run an Automation Windows PowerShell-based textual runbook that deprovisions the lab environment (Azure Portal)
Create a new runbook to remove the Resource Group that contains all the resources we created in this lab.
-
From within the Azure Portal, in the Automation Account you created previously, create a new Automation runbook with the following settings:
- Name:
Deprovision-lab-textual-runbook - Runbook type:
PowerShell
- Name:
-
Add the following runbook code:
$c = Get-AutomationConnection -Name 'AzureRunAsConnection' Add-AzureRmAccount -ServicePrincipal -Tenant $c.TenantID -ApplicationID $c.ApplicationID -CertificateThumbprint $c.CertificateThumbprint $resourceGroupName = Get-AutomationVariable -Name 'ResourceGroupName' Remove-AzureRmResourceGroup -Name $resourceGroupName -ForceNote: Similar to Task 4, as an alternative, you can use an existing version of the runbook from GitHub. Download the RAW file Deprovision-lab-textual-runbook.ps1, and then import it. You can also copy the files contents, paste them into a new file, save the file as
Deprovision-lab-textual-runbook.ps1, then import the file. -
Test the runbook in the Test pane, verify that it runs successfully, and publish the runbook.

Note: If you delete the Resource Group and all resources within with this de-provisioning script (Task 5), you can run the provisioning runbook again that you created previously (Task 4). Running the provisioning runbook again will re-deploy the Virtual Machines, Load Balancer, etc. These resources are required by the upcoming Infrastructure as Code labs.
Summary
In this lab you have:
- Created an Azure Automation Account
- Defined Azure Automation variables and updated modules
- Created or imported a workflow-based textual runbook, tested the runbook, and run it to provision two load-balanced Azure VMs in parallel
- Created and run an Automation Windows PowerShell-based textual runbook that deprovisions the lab environment