


AutoGen Studio: Solving a task with multiple agents that generate a pdf
document with images.
TL;DR
To help you rapidly prototype multi-agent solutions for your tasks, we are introducing AutoGen Studio, an interface powered by AutoGen. It allows you to:
- Declaratively define and modify agents and multi-agent workflows through a point and click, drag and drop interface (e.g., you can select the parameters of two agents that will communicate to solve your task).
- Use our UI to create chat sessions with the specified agents and view results (e.g., view chat history, generated files, and time taken).
- Explicitly add skills to your agents and accomplish more tasks.
- Publish your sessions to a local gallery.
AutoGen Studio is open source code here, and can be installed via pip. Give it a try!
pip install autogenstudio
Introduction
The accelerating pace of technology has ushered us into an era where digital assistants (or agents) are becoming integral to our lives. AutoGen has emerged as a leading framework for orchestrating the power of agents. In the spirit of expanding this frontier and democratizing this capability, we are thrilled to introduce a new user-friendly interface: AutoGen Studio.
With AutoGen Studio, users can rapidly create, manage, and interact with agents that can learn, adapt, and collaborate. As we release this interface into the open-source community, our ambition is not only to enhance productivity but to inspire a level of personalized interaction between humans and agents.
Note: AutoGen Studio is meant to help you rapidly prototype multi-agent workflows and demonstrate an example of end user interfaces built with AutoGen. It is not meant to be a production-ready app.
Getting Started with AutoGen Studio
The following guide will help you get AutoGen Studio up and running on your system.
Configuring an LLM Provider
To get started, you need access to a language model. You can get this set up by following the steps in the AutoGen documentation here. Configure your environment with either OPENAI_API_KEY or AZURE_OPENAI_API_KEY.
For example, in your terminal, you would set the API key like this:
export OPENAI_API_KEY=<your_api_key>
You can also specify the model directly in the agent's configuration as shown below.
llm_config = LLMConfig(
    config_list=[{
        "model": "gpt-4",
        "api_key": "<azure_api_key>",
        "base_url": "<azure api base url>",
        "api_type": "azure",
        "api_version": "2024-02-15-preview"
    }],
    temperature=0,
)
Installation
There are two ways to install AutoGen Studio - from PyPi or from source. We recommend installing from PyPi unless you plan to modify the source code.
-
Install from PyPi
We recommend using a virtual environment (e.g., conda) to avoid conflicts with existing Python packages. With Python 3.10 or newer active in your virtual environment, use pip to install AutoGen Studio:
pip install autogenstudio -
Install from Source
Note: This approach requires some familiarity with building interfaces in React.
If you prefer to install from source, ensure you have Python 3.10+ and Node.js (version above 14.15.0) installed. Here's how you get started:
-
Clone the AutoGen Studio repository and install its Python dependencies:
pip install -e . -
Navigate to the
samples/apps/autogen-studio/frontenddirectory, install dependencies, and build the UI:npm install -g gatsby-cli
npm install --global yarn
yarn install
yarn build
For Windows users, to build the frontend, you may need alternative commands provided in the autogen studio readme.
-
Running the Application
Once installed, run the web UI by entering the following in your terminal:
autogenstudio ui --port 8081
This will start the application on the specified port. Open your web browser and go to http://localhost:8081/ to begin using AutoGen Studio.
Now that you have AutoGen Studio installed and running, you are ready to explore its capabilities, including defining and modifying agent workflows, interacting with agents and sessions, and expanding agent skills.
What Can You Do with AutoGen Studio?
The AutoGen Studio UI is organized into 3 high level sections - Build, Playground, and Gallery.
Build
This section focuses on defining the properties of agents and agent workflows. It includes the following concepts:
Skills: Skills are functions (e.g., Python functions) that describe how to solve a task. In general, a good skill has a descriptive name (e.g. generate_images), extensive docstrings and good defaults (e.g., writing out files to disk for persistence and reuse). You can add new skills to AutoGen Studio via the provided UI. At inference time, these skills are made available to the assistant agent as they address your tasks.
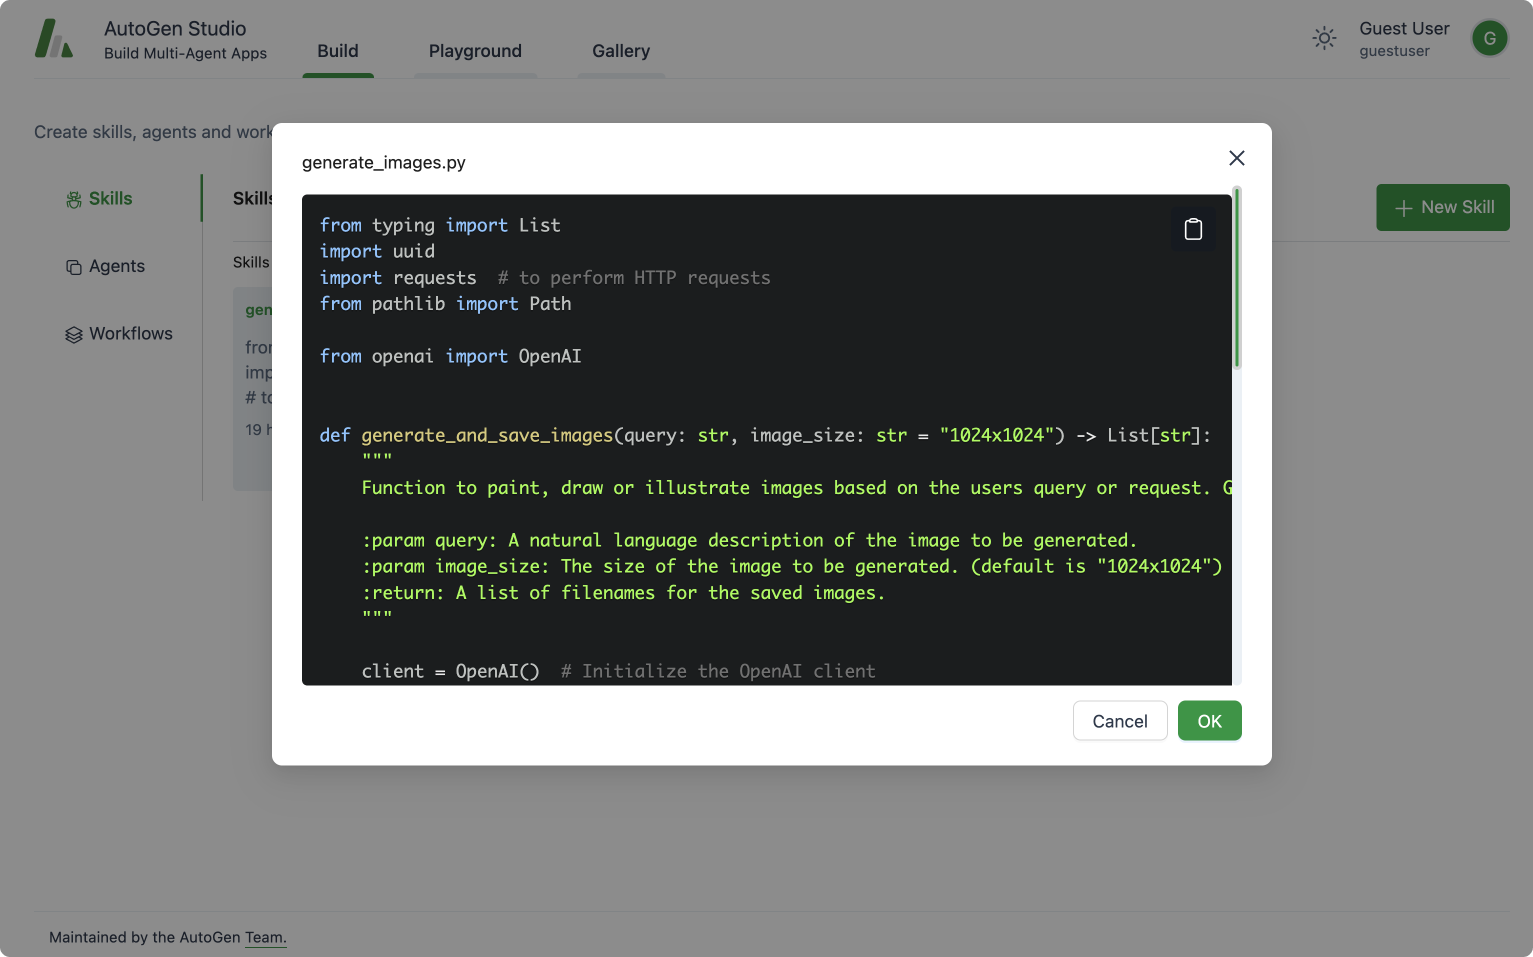
AutoGen Studio Build View: View, add or edit skills that an agent can
leverage in addressing tasks.
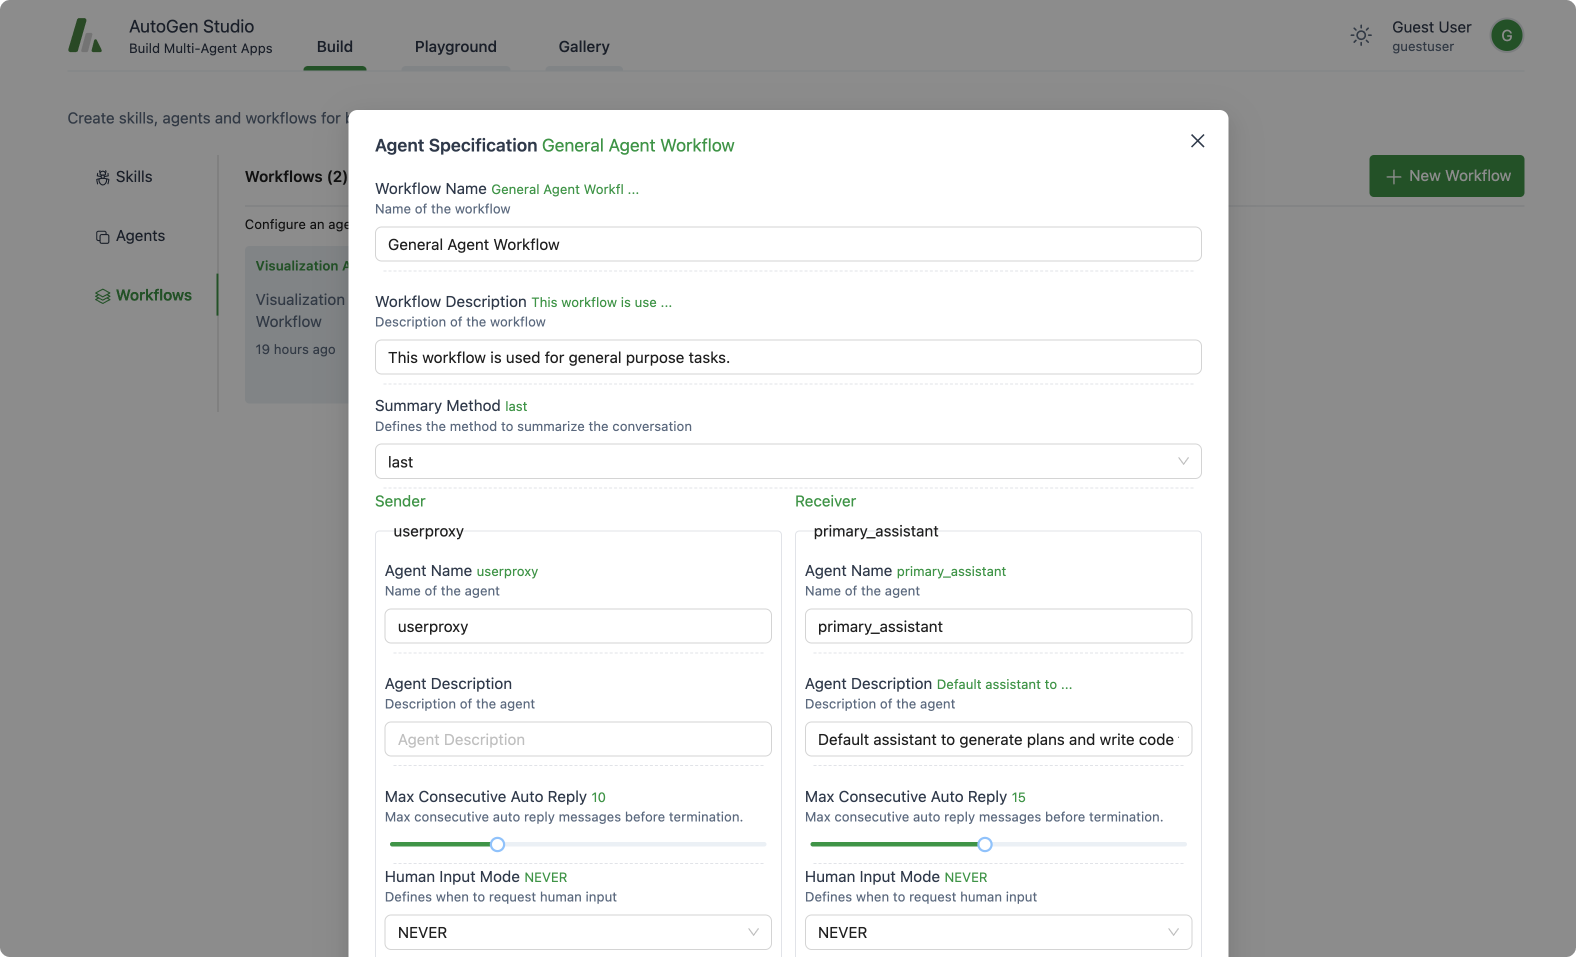
Agents: This provides an interface to declaratively specify properties for an AutoGen agent (mirrors most of the members of a base AutoGen conversable agent class).
Agent Workflows: An agent workflow is a specification of a set of agents that can work together to accomplish a task. The simplest version of this is a setup with two agents – a user proxy agent (that represents a user i.e. it compiles code and prints result) and an assistant that can address task requests (e.g., generating plans, writing code, evaluating responses, proposing error recovery steps, etc.). A more complex flow could be a group chat where even more agents work towards a solution.
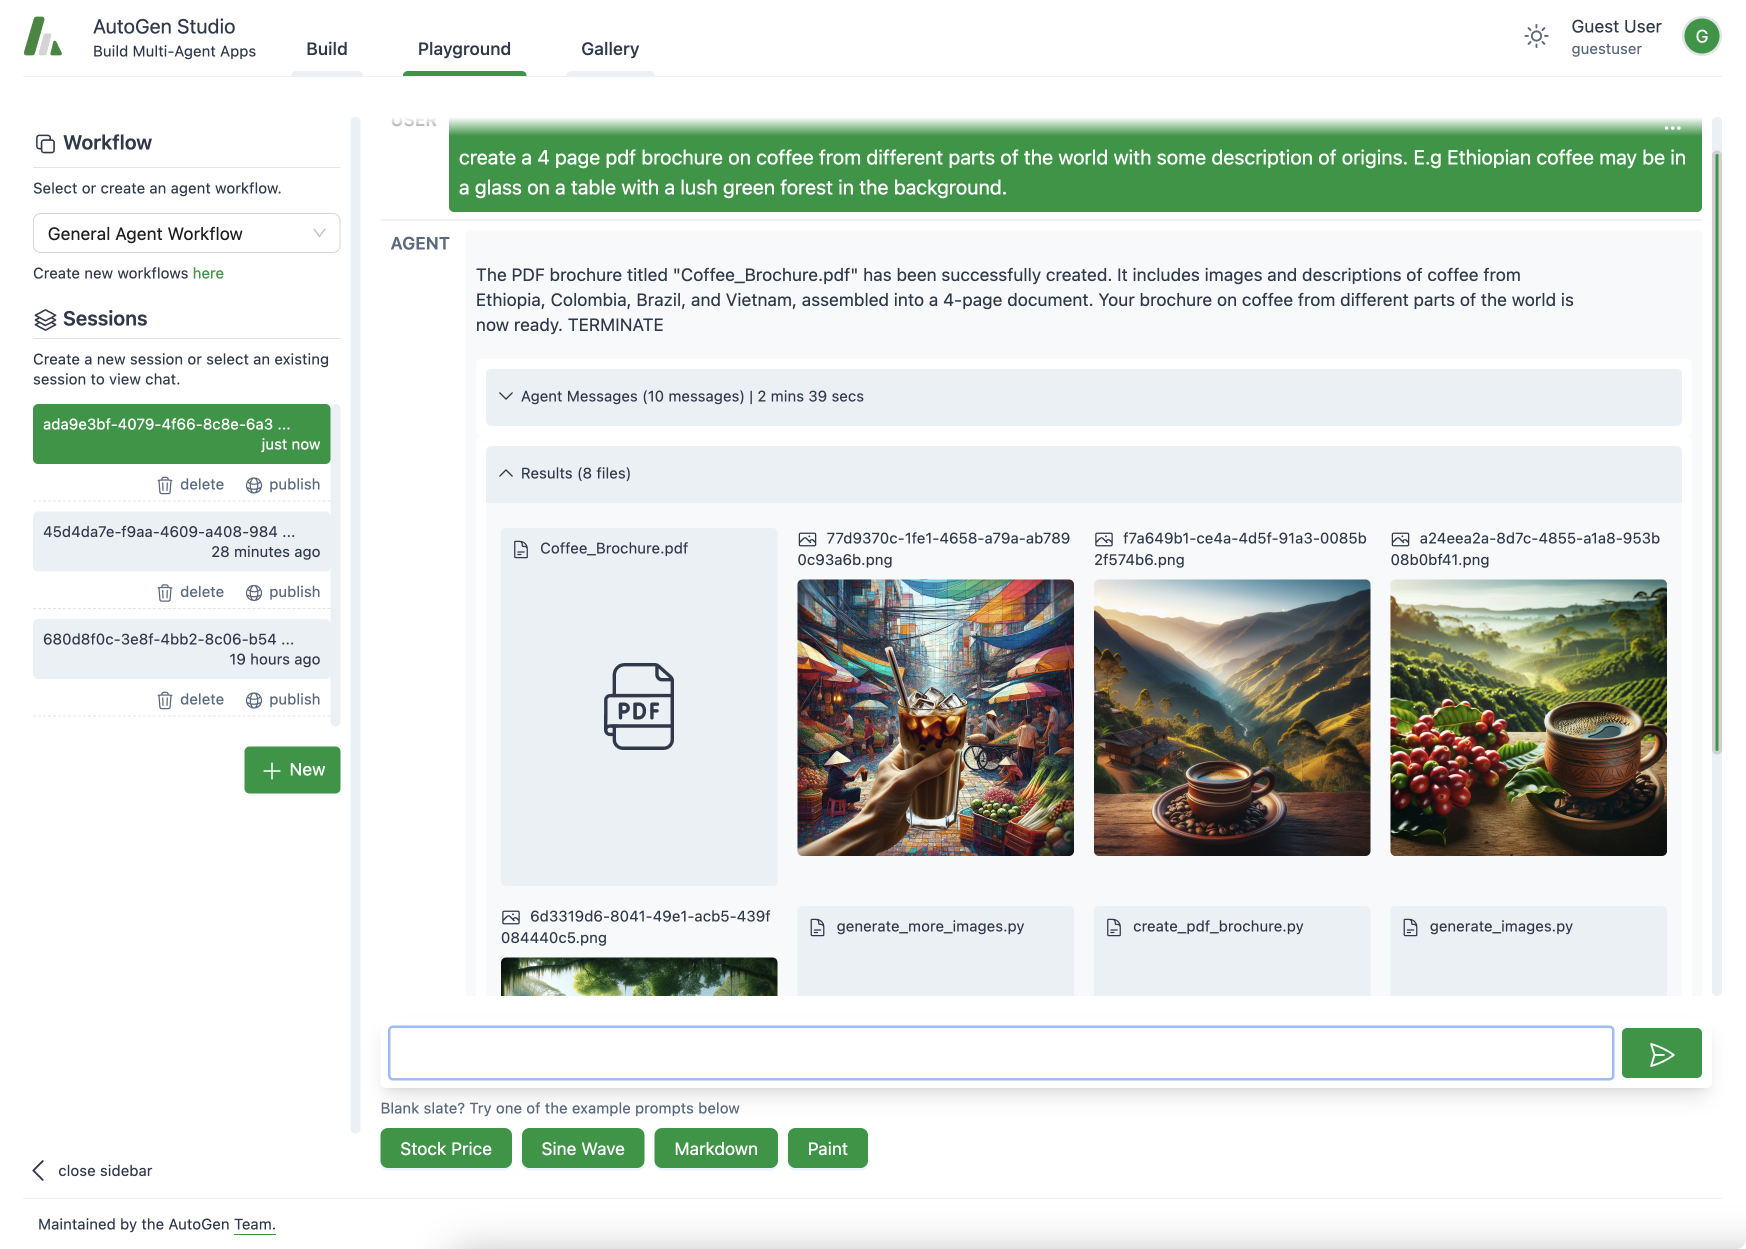
Playground
AutoGen Studio Playground View: Agents collaborate, use available skills
(ability to generate images) to address a user task (generate pdf's).
The playground section is focused on interacting with agent workflows defined in the previous build section. It includes the following concepts:
Session: A session refers to a period of continuous interaction or engagement with an agent workflow, typically characterized by a sequence of activities or operations aimed at achieving specific objectives. It includes the agent workflow configuration, the interactions between the user and the agents. A session can be “published” to a “gallery”.
Chat View: A chat is a sequence of interactions between a user and an agent. It is a part of a session.
Gallery
This section is focused on sharing and reusing artifacts (e.g., workflow configurations, sessions, etc.).
AutoGen Studio comes with 3 example skills: fetch_profile, find_papers, generate_images. Please feel free to review the repo to learn more about how they work.
The AutoGen Studio API
While AutoGen Studio is a web interface, it is powered by an underlying python API that is reusable and modular. Importantly, we have implemented an API where agent workflows can be declaratively specified (in JSON), loaded and run. An example of the current API is shown below. Please consult the AutoGen Studio repo for more details.
import json
from autogenstudio import AutoGenWorkFlowManager, AgentWorkFlowConfig

# load an agent specification in JSON
agent_spec = json.load(open('agent_spec.json'))

# Create an AutoGen Workflow Configuration from the agent specification
agent_work_flow_config = FlowConfig(**agent_spec)

# Create a Workflow from the configuration
agent_work_flow = AutoGenWorkFlowManager(agent_work_flow_config)

# Run the workflow on a task
task_query = "What is the height of the Eiffel Tower?"
agent_work_flow.run(message=task_query)
Road Map and Next Steps
As we continue to develop and refine AutoGen Studio, the road map below outlines an array of enhancements and new features planned for future releases. Here's what users can look forward to:
- Complex Agent Workflows: We're working on integrating support for more sophisticated agent workflows, such as
GroupChat, allowing for richer interaction between multiple agents or dynamic topologies. - Improved User Experience: This includes features like streaming intermediate model output for real-time feedback, better summarization of agent responses, information on costs of each interaction. We will also invest in improving the workflow for composing and reusing agents. We will also explore support for more interactive human in the loop feedback to agents.
- Expansion of Agent Skills: We will work towards improving the workflow for authoring, composing and reusing agent skills.
- Community Features: Facilitation of sharing and collaboration within AutoGen Studio user community is a key goal. We're exploring options for sharing sessions and results more easily among users and contributing to a shared repository of skills, agents, and agent workflows.
Contribution Guide
We welcome contributions to AutoGen Studio. We recommend the following general steps to contribute to the project:
- Review the overall AutoGen project contribution guide.
- Please review the AutoGen Studio roadmap to get a sense of the current priorities for the project. Help is appreciated especially with Studio issues tagged with
help-wanted. - Please initiate a discussion on the roadmap issue or a new issue to discuss your proposed contribution.
- Please review the autogenstudio dev branch here [dev branch].(https://github.com/microsoft/autogen/tree/autogenstudio) and use as a base for your contribution. This way, your contribution will be aligned with the latest changes in the AutoGen Studio project.
- Submit a pull request with your contribution!
- If you are modifying AutoGen Studio in vscode, it has its own devcontainer to simplify dev work. See instructions in
.devcontainer/README.mdon how to use it. - Please use the tag
studiofor any issues, questions, and PRs related to Studio.
FAQ
Q: Where can I adjust the default skills, agent and workflow configurations?
A: You can modify agent configurations directly from the UI or by editing the autogentstudio/utils/dbdefaults.json file which is used to initialize the database.
Q: If I want to reset the entire conversation with an agent, how do I go about it?
A: To reset your conversation history, you can delete the database.sqlite file. If you need to clear user-specific data, remove the relevant autogenstudio/web/files/user/<user_id_md5hash> folder.
Q: Is it possible to view the output and messages generated by the agents during interactions?
A: Yes, you can view the generated messages in the debug console of the web UI, providing insights into the agent interactions. Alternatively, you can inspect the database.sqlite file for a comprehensive record of messages.
Q: Where can I find documentation and support for AutoGen Studio? A: We are constantly working to improve AutoGen Studio. For the latest updates, please refer to the AutoGen Studio Readme. For additional support, please open an issue on GitHub or ask questions on Discord.
Q: Can I use Other Models with AutoGen Studio?
Yes. AutoGen standardizes on the openai model api format, and you can use any api server that offers an openai compliant endpoint. In the AutoGen Studio UI, each agent has an llm_config field where you can input your model endpoint details including model name, api key, base url, model type and api version. For Azure OpenAI models, you can find these details in the Azure portal. Note that for Azure OpenAI, the model name is the deployment id or engine, and the model type is "azure".
For other OSS models, we recommend using a server such as vllm to instantiate an openai compliant endpoint.
Q: The Server Starts But I Can't Access the UI
A: If you are running the server on a remote machine (or a local machine that fails to resolve localhost correstly), you may need to specify the host address. By default, the host address is set to localhost. You can specify the host address using the --host <host> argument. For example, to start the server on port 8081 and local address such that it is accessible from other machines on the network, you can run the following command:
autogenstudio ui --port 8081 --host 0.0.0.0