CameraTraps
Pytorch-Wildlife: A Collaborative Deep Learning Framework for Conservation
Welcome to Version 1.0
The Pytorch-Wildlife library allows users to directly load the MegadetectorV5 model weights for animal detection. We’ve fully refactored our codebase, prioritizing ease of use in model deployment and expansion. In addition to MegadetectorV5, Pytorch-Wildlife also accommodates a range of classification weights, such as those derived from the Amazon Rainforest dataset and the Opossum classification dataset. Explore the codebase and functionalities of Pytorch-Wildlife through our interactive Gradio web app and detailed Jupyter notebooks, designed to showcase the practical applications of our enhancements. You can find more information in our documentation.
Table of Contents
Prerequisites
- Python 3.8
- NVIDIA GPU for CUDA support (Optional, the code and demo also supports cpu calculation).
condaormambafor python environment management and specific version ofopencv.- If you are using CUDA. CudaToolkit 12.1 is required. 4.1 If you are using CUDA and you have PytorchWildlife 1.0.2.14 or lower, CudaToolkit 11.3 is required.
Create environment
If you have conda or mamba installed, you can create a new environment with the following commands (switch conda to mamba for mamba users):
conda create -n pytorch-wildlife python=3.8 -y
conda activate pytorch-wildlife
NOTE: For Windows users, please use the Anaconda Prompt if you are using Anaconda. Otherwise, please use PowerShell for the conda environment and the rest of the set up.
Ubuntu
If you are using a clean install of Ubuntu, additional libraries of OpenCV may need to be installed, please run the following command:
sudo apt-get update
sudo apt-get install -y python3-opencv
MacOS
If you are using MacOS, please run the following command to install ffmpeg for video decoding:
brew install ffmpeg
Windows
Windows installation is a bit more complicated due to operating system differences. Please refer to our Windows installation guide for details.
CUDA for Windows
If you want to use your CUDA-compatible GPU and you are using Windows. Please run the following commands (CUDA 12.1 is required):
pip uninstall torch torchvision torchaudio
pip install torch torchvision torchaudio --index-url https://download.pytorch.org/whl/cu121
Installation
Install through pip:
pip install PytorchWildlife
Using Docker
- Install Docker on your OS. Here are the guidelines for Windows, Ubuntu and Mac.
- Pull the docker image from our DockerHub.
docker pull andreshdz/pytorchwildlife:1.0.2.3 - Run the gradio demo after pulling the image
docker run -p 80:80 andreshdz/pytorchwildlife:1.0.2.3 python demo/gradio_demo.py - If you want to run any code using the docker image, please use
docker run andreshdz/pytorchwildlife:1.0.2.3followed by the command that you want to execute.
Running the Demo
Here is a brief example on how to perform detection and classification on a single image using PyTorch-wildlife:
import torch
from PytorchWildlife.models import detection as pw_detection
from PytorchWildlife.models import classification as pw_classification

img = torch.randn((3, 1280, 1280))

# Detection
detection_model = pw_detection.MegaDetectorV5() # Model weights are automatically downloaded.
detection_result = detection_model.single_image_detection(img)

#Classification
classification_model = pw_classification.AI4GAmazonRainforest() # Model weights are automatically downloaded.
classification_results = classification_model.single_image_classification(img)
If you want to use our Gradio demo for a user-friendly interface. Please run the following code inside the current repo. You can also find Jupyter Notebooks with an image and video tutorial:
git clone https://github.com/microsoft/CameraTraps.git
cd CameraTraps
cd demo
# For the image demo
python image_demo.py
# For the video demo
python video_demo.py
# For the gradio app
python demo_gradio.py
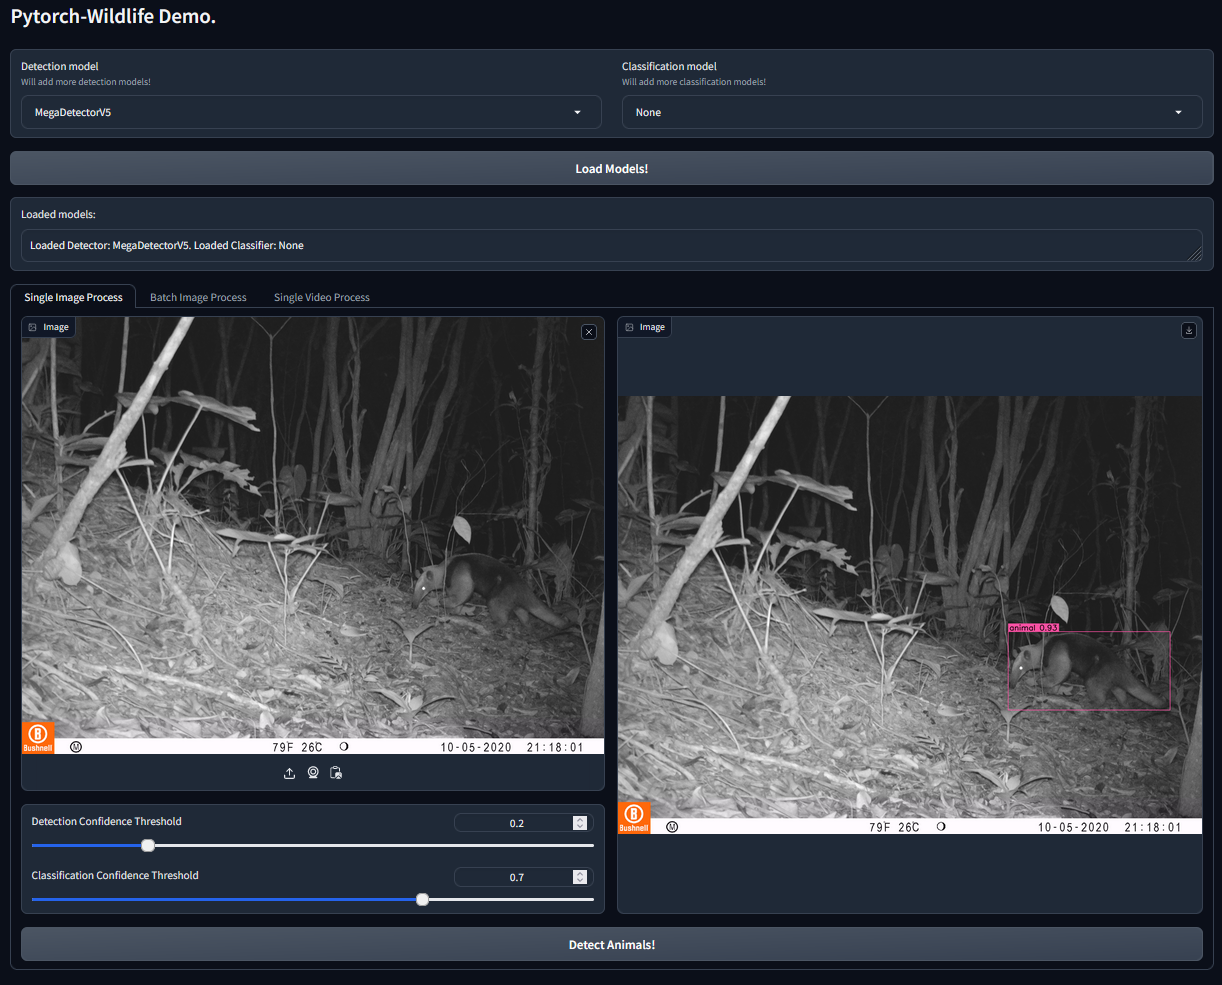
The demo_gradio.py will launch a Gradio interface where you can:
- Perform Single Image Detection: Upload an image and set a confidence threshold to get detections.
- Perform Batch Image Detection: Upload a zip file containing multiple images to get detections in a JSON format.
- Perform Video Detection: Upload a video and get a processed video with detected animals.
As a showcase platform, the gradio demo offers a hands-on experience with all the available features. However, it’s important to note that this interface is primarily for demonstration purposes. While it is fully equipped to run all the features effectively, it may not be optimized for scenarios involving excessive data loads. We advise users to be mindful of this limitation when experimenting with large datasets.
Some browsers may not render processed videos due to unsupported codec. If that happens, please either use a newer version of browser or run the following for a conda version of opencv and choose avc1 in the Video encoder drop down menu in the webapp (this might not work for MacOS):
pip uninstall opencv-python
conda install -c conda-forge opencv
NOTE: Windows may encounter some errors with large file uploads making Batch Image Detection and Video Detection unable to process. It is a Gradio issue. Newer versions of Gradio in the future may fix this problem.
Using Jupyter
Juptyer helps to progressively understand what each code block does. We have provided a set of demo files that can be read using Jupyter. If you have the Anaconda Navigator installed, you should have the option to run Jupyter. To make sure that the PytorchWildlife environment is recognized by Jupyter, please run the following code while your pytorch-wildlife environment is active:
conda install ipykernel
python -m ipykernel install --user --name pytorch-wildlife --display-name "Python (PytorchWildlife)"
Once you execute the commands, you should be able to choose the Python (PytorchWildlife) kernel to start running the code!
License
This project is licensed under the MIT License. Refer to the LICENSE file for more details.
Copyright
Copyright (c) Microsoft Corporation. All rights reserved.