Information Protection and Data Loss Prevention
Last updated: 05/10/2021
With information protection and sensitivity labels, you can intelligently classify and help protect your sensitive content, while making sure that your organization's productivity and ability to collaborate is not hindered.
Combined with data loss prevention you can help prevent the accidental oversharing of the sensitive information in your organization. With this in mind, let’s get started with understanding the capabilities which are available as part of Microsoft Information Protection (MIP), how you discover sensitive information and protect it using the various provided tools provided by MIP and Data Loss Prevention (DLP)
Your Deployment Plan⚓︎
The objective is to create a deployment plan that follows the progression of crawl-walk-run methodology while highlighting the user and administrator experience at each stage. Your focus should be on the end user result and the security controls you achieve with each implemented stage. Solutions or tools covered in this guide for deployment consideration are:
The DAG is not inclusive of all requirements or architectures needed for successful implementation of Microsoft 365’ but rather a focus on security and compliance as it relates to solutions included as part of Microsoft information Protection & Compliance licenses.
See Microsoft 365 productivity illustrations for guidance on implementation of all M365 capabilities with focus on cross technologies.
Crawl Stage - The first stage is about starting to evaluate where your organization is today regarding the information security and compliance with your goal of defining a strategic direction for your organization. Using this strategy to foster adoption of a solution by gathering the requirements of supporting systems, impact on end users, and skillset needed for each role owner. The crawl phase describes steps you should do at the beginning of any deployment, whether your requirements are basic or advanced. It includes steps for product education, defining requirements, and evaluation or testing.
Walk Stage - The second stage builds the foundation for a successful, scalable, and sustainable deployment. In this phase, you plan the details of your implementation and to build the solution. You may also run a pilot or a proof of concept with a selected group of users or locations.
Run Stage - The last stage is about optimizing the solution for Microsoft 365. In this phase you will set up an automated scalable approach for each solution.
Following the above approach will lead to successful adoption and deployment of each solution while protecting your intellectual property, stopping fraud or insider trading, plugging the sensitive data leaks, along with making the workplace safe.
Microsoft Information Protection⚓︎
Implement Microsoft Information Protection (MIP) to help you discover, classify, and protect sensitive information wherever it lives or travels.
Contrary to popular opinion, MIP is not a single product but rather a suite of technologies supported by many aspects of the Microsoft 365 ecosystem. MIP capabilities are included with Microsoft 365 Compliance and give you the tools to know your data, protect your data, and prevent data loss.
The main capabilities associated with MIP are as follows:
- Sensitive information types (SITs)
- Trainable Classifiers
- Data Classification
- Sensitivity Labels
- Azure Information Protection (AIP) unified labeling client
- Azure Information Protection (AIP) unified labeling Scanner
- Azure Purview
- Double Key Encryption (DKE)
- Office 365 Message Encryption (OME)
- Service encryption with Customer Key
- SharePoint Information Rights Management (IRM)
- Rights Management connector
- Microsoft Defender for Cloud Apps (MDCA)
- Microsoft Information Protection (MIP) SDK
- Data Loss Prevention (DLP)
Learn more about MIP basics here.
With MIP and a Sensitivity labels policy you can:
-
Deploy your classification taxonomy to the company end user employees and give them the ability to apply these labels to documents and emails. Labels can also be applied automatically or in a recommended way based on sensitive information stored in the document or email.
-
Leverage the applied sensitivity labels as a condition for data loss prevention use cases.
-
Mark the document or email sensitivity with a header, footer and/or watermark. This will make the data sensitivity visible to anyone who consumes the document, within an app, via the web or as a hard copy.
-
Apply sensitivity labels for SharePoint online, Teams sites and groups, providing another layer of control on the container level access within managed or un-managed devices, if it should be set for Public or Private access and/or external access.
-
With encryption you can control who can consume content (for example: only company employees + approved partners) and what permissions he or she has (for example: Read but Do Not Print or Edit).
Best Practices⚓︎
Defining the right label taxonomy and protection policies is the most critical step in a Microsoft Information Protection deployment. Labels will be the interface for users to understand content sensitivity, how it matches company policies, and will be the primary input for users to flag content that needs to be protected.
A good label taxonomy needs to meet business and/or regulatory needs, be intuitively understandable by users, provide good policy tips and be easy to use. It should not prevent users from doing their jobs, while at the same time help prevent instances of data leakage or misuse and address compliance requirements.
With these requirements in mind, the following best practices have proven to make deployment of information protection policies in many organizations easier, faster, and more successful.
Prior to Deployment Plan⚓︎
-
Discover your sensitive information in your existing repositories. This is the first step we recommend as part of our best practice approach to detect the data you own and be ready to configure it as part of your sensitivity label configurations as well as data loss prevention policies later in this guide.
-
Microsoft 365 cloud: Use Content Explorer in Microsoft 365 compliance center to discover data stored in Microsoft 365 (SharePoint, OneDrive), read more about it here.
-
Non-Microsoft cloud repositories: Use Microsoft Defender for Cloud Apps to connect non-Microsoft applications and discover sensitive information beyond the Microsoft 365 services. Read more about it here.
-
On-premises repositories: Use Azure Information Protection Scanner to discover data stored in your on-premises file shares, read more about it here.
-
Azure resources: Use Azure Purview to identify sensitive information stored in Azure Repositories, read more about it here.
-
-
Consider the methods in which users will interact with MIP labels and how you intend to implement this:
-
Interactively within Microsoft 365 Apps via the Sensitivity Button. Read more about it in the “MIP Client Consideration” section.
-
Natively for macOS, iOS and Android
-
Native labeling vs AIP Client
-
-
Container labeling for SharePoint Sites, Teams and Office 365 Groups
-
Public vs Private access
-
Unmanaged device access
-
Sharing levels
-
-
PowerBI Dashboards and PBIX assets
-
-
Use label names for your labels that intuitively resonate with your users. Using company jargon that is well ingrained in the employee’s culture is a valid approach, though care must be taken to ensure the labels are also meaningful to new employees. For example, using acronyms in label names is not ideal due to the opacity to new employees and the difficulty of visually recognizing them. Using short, meaningful words such as “Confidential” or “Secret” generally works best.
-
Consider label order. Labels are sorted from lowest sensitivity to highest sensitivity, which means higher sensitivity labels represent an “upgrade” in the confidentiality of the information and usually have stronger protection measures. This order can be enforced by preventing users from downgrading sensitivity of a document unless they have the right privileges, and there are multiple scenarios in which it is important that the order of the labels is clear. It is important that the names you use reflect this order, ad you should avoid using terms that have no clear hierarchy. For example, not all users might agree on whether “Confidential” or “Secret” is the most sensitive label, so using something like “Confidential” vs. “Highly confidential” may be preferable.
-
Use sublabels with intent. Labels are generally used to represent the actual sensitivity of the content that is labeled, while sublabels are typically used to represent variations in the protection or the scope of the content. For example, you might have a label taxonomy that includes “General Business”, “Confidential” and “Highly Confidential” as top-level labels. Sublabels such as “Internal” or “External” designate specific types of data in some of those top-level categories that need to be controlled in specific ways. You might also have project/team specific sublabels or sublabels to address special requirements such as excluding the application of content markings for content that should not be modified.
-
Keep it simple with no more than five top level labels and five sublabels. User experience research shows that with five or fewer labels, users can target the desired label directly in a single movement, whereas if there are more elements in the list the user will typically have to read through them each time, making mistakes more likely. The 5x5 approach is proven to keep things simple and help users choose the right labels, but if you can keep labels below those numbers, even better.
-
Define labels that will last a long time. Since labels often become part of a company’s culture and language, it is critical that they are not frequently altered, especially when it comes to the names and meanings of the top-level labels. The approach mentioned in the previous point makes this easy: using top-level labels to represent the sensitivity of the document means they will not change often. Sublabels, on the other hand, can be more dynamic, and while it is preferable to frame them in a way that follows a clear pattern that rarely changes, adding or changing sublabels as additional requirements such as new projects or divisions come up is usually not a problem if you follow a consistent pattern.
-
Do not put sensitive information in a label’s name or description. This might sound obvious, but it is common that IT departments are asked to create a label to protect information for a merger or acquisition or a label for a secret project that is not known to the general population in the company. Putting the name of the company or a word that reveals more about the project than what is public in the name of the label can reveal such data to all users, even if the label is scoped to a small team. While scoped labels are not made available to all users, metadata about the existence of such labels is carried within the policies all users get, so it is important that codenames or other non-disclosing keywords are used in such labels instead.
-
Plan your auto-labeling strategy, MIP provide both Service and Client based auto-labeling for different use cases:
-
Service-side auto labeling policies should be used for data at rest in SharePoint Online and OneDrive for Business and data in transit for Exchange Online when specific SITs need to be detected and labels applied automatically. This can be especially helpful when the data source is not controlled and might be that data is stored or sent without being labeled by the client solution. Also, it’s a great option to label data that is already stored in SharePoint Online and OneDrive for Business.
-
Client-side labeling when users edit documents or compose (also reply or forward) emails: Use a label that is configured for auto-labeling for files and emails (includes Word, Excel, PowerPoint, and Outlook). This method supports recommending a label to a user, as well as automatically applying a label. But in both cases, the user decides whether to accept or reject the label, to help ensure the correct labeling of content. This client-side labeling has minimal delay for documents because the label can be applied even before the document is saved. However, not all client apps support auto-labeling. This capability is supported by the Azure Information Protection unified labeling client, and some versions of Office.
-
-
If your organization operates in multiple languages, work with your localization teams to ensure the names chosen for the labels can be easily localized and are meaningful in all the required languages. Consider words that have a clear meaning in one language might be harder to localize or be ambiguous when translated. Examples of such words are “Public” which can have nuanced meanings in some languages, and “Personal” which can be easily confused in meaning to refer to private information.
-
Consider the impact on usability. Forcing users to select labels too frequently can lead to users doing it reflexively without thinking about the label they should apply. Using a predefined default label is good practice in scenarios where manually labeling everything could be a burden - and where there is some “safe” sensitivity level that applies to most content. One such case is email, where for most users in most organizations labeling emails as “Internal” by default should be a safe option and reduce user effort considerably. Users can label emails as “external”, “public” or “confidential” as needed. At the same time, most users do not create dozens of new documents per day, so asking them to individually label each document without providing a default is an acceptable requirement in most cases. MIP allows you to do this by using a different default label for emails and documents using the advanced option named “OutlookDefaultLabel” that specifies a default label for Outlook independently from what is set for documents.
-
Compartmentalize data sparingly. Compartmentalization of data is essential in many businesses and using scoped sublabels that are shown and give rights to people in specific departments is a good practice, but you should use this capability in moderation. If you have a dozen critical projects that need to contain their data from being accessed by the general population of employees, creating sublabels specifically for them is beneficial. But if you have a thousand projects that demand the same treatment, the administrative burden imposed by such label taxonomy would be large and you will likely end up hitting a practical limit. The best practice is to define a clear rule for which kinds of teams, projects, divisions, or groups get their own sublabels which ensures only a small number of sublabels need to be created (a few dozen) - and stick with it.
-
Consider what threats you are trying to prevent – not what users will be doing with the content. When defining protection policies some organizations start by thinking about what users need to do with their content, and define rights based on that. That often leads to frustration, since IT will rarely know everything every employee needs to do with the content. It can also lead to more protection than is necessary, and since there is a small overhead (for the computers and the humans) involved whenever accessing something is protected via encryption and rights enforcement, that is undesirable. Start instead with what threats you are trying to prevent: you might want to prevent your competitors from accessing your confidential plans, or from users accidentally putting sensitive data where unauthorized people can view it. Based on those requirements, define the minimal controls that must be there to ensure those scenarios do not happen and implement them. With time, as you gain more confidence on understanding what users need to do, you can adjust settings to implement tighter restrictions as needed.
-
Involve different teams in the review of your proposed label taxonomy, including compliance, legal, public relations, end user education, etc. Defining labels is not an IT security task alone, and their early feedback will help you define a label taxonomy that will work for a long time and not need to be revised after deployment when those teams observe the labels you defined do not meet their needs or address their scenarios.
Deployment Test Plan⚓︎
-
For the labeling client experience, consider your deployment methodology for Windows:
-
Native labeling use Monthly Enterprise Channel or Monthly Channel for updates to Office 365 ProPlus. This will ensure you gain access to all MIP features immediately upon release. Semi-Annual Channel is strongly discouraged.
-
AIP client should not be the default consideration and should only be used when needing specific functionality not yet available in the native client, or when you are using Office perpetual installation.
-
For MAC we support the Native labeling in the office client. More details can be found here.
-
For a comparison of update channels for M365, use this link.
-
-
In some instances, a hybrid deployment of Native Labeling and AIP client may be appropriate. A good example is when File Explorer extension functionality is needed whilst wanting to keep the native experience as pristine as possible. In this case, the AIP client can be deployed along with an ADMX template to disable the Office Add-In components.
-
Validate labels before deploying to users. Conduct a practical validation to see how accurate your users are at using these labels. One option is to create an email with fake sensitive information in the form of documents attached and send it to a subset of users asking them to open each document in turn and label it. They do not even need to report the results, since you will be able to see how they labeled each document in the Activity Explorer in the compliance center. You can alternatively do an offline activity, by setting baskets in the office’s entrance, printing copies of a mix of pretend sensitive documents, and putting them in a pile at the entrance with a sign that says, “take one and put it in the corresponding basket”. Users usually do this exercise consciously and it allows you to get a very representative idea of how well your users understand policies and labeling taxonomy. After you have done an exercise, you can validate the accuracy of user’s actions and tune your labels and training materials accordingly.
-
Socialize labels so they become part of the organization’s natural language. While experience indicates the sensitivity label UI is simple enough that users do not need to be trained in its use, it is important to perform an awareness campaign in which the meaning of the different labels and the important of their use is highlighted (i.e., awareness emails, physical posters, etc.). The objective of such a campaign is that users incorporate the organization’s labels as part of their natural language and that can intuitively assign documents to their corresponding label. The MIP CxE team has published several sample documents that can be used in this regard, referenced in the helpful links section above.
-
Schedule multiple workshops with stakeholders during the testing phase to validate the label taxonomy is working effectively and catch any changes needed before wholesale deployment to production has occurred avoiding the need to reclassify large amounts of data in the future. Although we mention above that this validation should be done before deployment to users, it is inevitable that some changes will likely occur, and this should be expected by the project team.
-
Ensure you have a well-documented test plan with clear tasks, testing scenarios and clear outcomes.
-
Establish end user training and education. Measure their understanding of the organization information protection policies. Use “knowledge measure questions” if you can.
Production Deployment⚓︎
-
Leverage the existing formal feedback mechanism from your end user-base to ensure that your label taxonomy remains effective and relevant to the organization. Making sure that established clear timelines for formal review and revision if necessary are followed.
-
Monitor the classification activities. Using the “Activity Explorer” capability in the compliance center allows you to gain insights on how your users utilizing sensitivity labels (among other things). This will enable you to monitor how actively your users are following the organization policies and doing their due diligence when it comes to information labelling.
-
Update the configuration, as necessary. Ensure all business units’ requirements have been clearly addressed and document acceptance before rolling out to a wider end user base.
While if you implement all the recommendations above you are set for a successful deployment of MIP, the process to implement is equally important. We highly recommend a “Crawl-Walk-Run” approach, in which the technology is introduced in stages, focusing on things that cause minimal disruption initially such as manual labels without protection, adding basic protection elements in a later stage (e.g. DLP controls to prevent highly confidential items from being accidentally sent outside, or encryption with very broad rights applied), and finally adding more restrictive permissions and tighter controls once you are confident in the use of the technology.
You can also introduce these changes in waves across your organization, focusing on limited sets of end users first and expanding to broader audiences. This will allow you to deploy quickly without causing disruption, and help you get a baseline of user behavior before introducing tight restrictions. It will also help you identify early potential conflicts or compatibility issues between different tools so you can address them before they have significant impact.
Considerations⚓︎
Let us start with classifying and protecting our unstructured data assets in documents and emails. Using the guidance above we can start with a classification taxonomy that makes sense to the business. This will allow us to take strides in protecting our data in place. Leveraging the work, we have completed in defining our tenant specific Sensitive Information Types (SITs) will allow us to marry these SITs against different classification categories to ensure protection gets baked into these assets at creation time, thus providing an additional layer of defense over and above that already afforded to us through our efforts up until now.
This classification taxonomy can also be applied to data containers in our organization to ensure control over access and management of these areas. For more details on container labels please review the document here.
When you create a sensitivity label, you can automatically assign that label to files and emails when it matches conditions that you specify.
This ability to apply sensitivity labels to content automatically is important because:
-
You don't need to train your users when to use each of your classifications.
-
You don't need to rely on users to classify all content correctly.
-
Users no longer need to know about your policies—they can instead focus on their work.
There are two different methods for automatically applying a sensitivity label to content in Microsoft 365:
-
Client-side labeling when users edit documents or compose (also reply or forward) emails: Use a label that's configured for auto-labeling for files and emails (includes Word, Excel, PowerPoint, and Outlook).
-
Supports recommending a label to users or automatically applying a label.
-
User decides whether to accept or reject the label, to help ensure the correct labeling of content.
-
Minimal delay for documents because the label can be applied even before the document is saved.
-
Not all client apps support auto-labeling. This capability is supported by the Azure Information Protection unified labeling client, and some versions of Office.
For configuration instructions, see How to configure auto-labeling for Office apps on this page.
-
-
Service-side auto labeling policies are a powerful way of applying labels to data at rest and in transit across several M365 workloads, however, it is important to be aware of the limitations imposed by these:
-
Specific to auto-labelling for SharePoint Online and OneDrive for Business:
-
Office files for Word, PowerPoint, and Excel are supported. - These files can be auto-labelled when they are not part of an active session and whether they have been created, uploaded, or changed since you created auto-labelling policies, or they are existing files that have not been changed since auto-labelling policies have been created.
-
Maximum of 25,000 automatically labelled files in your tenant per day.
-
Maximum of 10 auto-labelling policies per tenant, each targeting up to 10 sites (SharePoint Online or OneDrive for Business).
-
Existing values for “modified”, “modified by”, and the “date” are not changed because of auto-labelling policies—for both simulation mode and when labels are applied.
-
When the label applies encryption, the Rights Management issuer and Rights Management owner is the account that last modified the file.
-
-
Specific to auto-labelling for Exchange Online:
-
Unlike manual labelling or auto-labelling with Office apps, Office attachments (Word, Excel, and PowerPoint files) and PDF attachments are also scanned for the conditions you specify in your auto-labelling policy. When there is a match, the email is labelled but not the attachment.
-
For more details on this including what file types are supported please review the information here.
-
If you have Exchange transport rules (ETRs) or data loss prevention (DLP) policies that apply Information Rights Management (IRM) encryption: When content is identified by these rules or policies and an auto-labelling policy, the label is applied. If that label applies encryption, the Information Rights Management settings from the Exchange transport rules or DLP policies are ignored. However, if that label doesn't apply encryption, the Information Rights Management settings from the transport rules or DLP policies are applied in addition to the label.
-
Email that has Information Rights Management encryption with no label will be replaced by a label with any encryption settings when there is a match by using auto-labelling.
-
Incoming email is labelled when there is a match with your auto-labelling conditions. However, if the label is configured for encryption, that encryption is not applied.
-
When the label applies encryption, the Rights Management issuer and Rights Management owner is the person who sends the email.
-
-
With these limitations in mind, Microsoft Defender for Cloud Apps (MDCA) can be used to apply labels for these services and several third-party SaaS applications also. MDCA has its own limitations and considerations which are discussed in this blog post.
To protect and label structured data you should consider a solution like Azure Purview which among other things can allow you to Classify data using built-in and custom classifiers and Microsoft Information Protection sensitivity labels which allows you to label sensitive data consistently across SQL Server, Azure, Microsoft 365, and Power BI. To understand more about Azure Purview, check out this link.
MIP Client Considerations⚓︎
When it comes to windows client you have two options, either a built-in client or a unified label client. Strategically, organizations should use the built-in client as it supports cross platform with a consistent experience. The built-in client does not need an add-in to deploy, or the need to be manage or keep up to date while providing a deeper integration with office products which includes performance improvement.
While there are some feature gaps using the built-in client compared to the unified label client, we are working diligently to close that gap in the interim you can use the unified label client. To determine which features exist in the built-in client and which in the unified label client use the following table comparison.
When it comes to MAC clients you can use the built-in client for office and Edge for viewing PDFs.
Helpful Resources⚓︎
- Using Sensitivity Labels in M365 – How to Protect NDA Data from Leaking
- End User Training for Sensitivity Labels in M365 – How to Accelerate Your Adoption
- Secure external collaboration using sensitivity labels
- Using Azure PIM for the AIP Super User feature management
Data Loss Prevention⚓︎
To comply with business standards and industry regulations, organizations must protect sensitive information and prevent its inadvertent disclosure. Sensitive information can include financial data or personally identifiable information (PII) such as credit card numbers, social security numbers, or health records. With a data loss prevention (DLP) policy in the M365 SCC, you can identify, monitor, and automatically protect sensitive information across multiple Microsoft 365 workloads.
With a DLP policy, you can:
-
Identify sensitive information across many locations, such as Exchange Online, SharePoint Online, OneDrive for Business, Microsoft Teams, Windows 10 Devices, Microsoft Defender for Cloud Apps. For example, you can identify any document containing a credit card number that is stored in any OneDrive for Business site, or you can monitor just the OneDrive sites of specific people.
-
Prevent the accidental sharing of sensitive information. For example, you can identify any document or email containing a health record that is shared with people outside your organization, and then automatically block access to that document or block the email from being sent.
-
Monitor and protect sensitive information in the desktop versions of Excel, PowerPoint, and Word applications. Just like in Exchange Online, SharePoint Online, and OneDrive for Business, these Office desktop programs include the same capabilities to identify sensitive information and apply DLP policies. DLP provides continuous monitoring when people share content in these Office programs.
-
Help users learn how to stay compliant without interrupting their workflow. You can educate your users about DLP policies and help them remain compliant without blocking their work. For example, if a user tries to share a document containing sensitive information, a DLP policy can both send them an email notification and show them a policy tip in the context of the document library that allows them to override the policy if they have a business justification. The same policy tips also appear in Outlook on the web (OWA), Outlook, Excel, PowerPoint, and Word Office clients.
-
View DLP alerts and reports showing content that matches your organization’s DLP policies. To view alerts and metadata related to your DLP policies you can use the DLP Alerts Management Dashboard. You can also view policy match reports to assess how your organization is complying with a DLP policy. If a DLP policy allows users to override a policy tip and report a false positive, you can also view what users have reported.
You create and manage DLP policies on the Data Loss Prevention page in the Microsoft 365 compliance center.
Learn about how DLP policies are structured.
Best Practices⚓︎
Prior to Deployment Plan⚓︎
-
Identify the appropriate stakeholders and personas in your organization to collaborate for the design of DLP policies and workloads to be monitored. Some recommended personas to include compliance/privacy, security, human resources, and legal.
-
Identify the types of information you need to protect and where this information is stored. Consider using the Data Classification page in the M365 SCC to help with this identification. Are there any types of information that will require the creation of custom Sensitive Information Types to detect? Where is the information stored in terms of workloads? Use the DLP Playbook to answer these questions and more. Currently, DLP supports the following workloads for protection:
- Exchange Online
- SharePoint Online
- OneDrive for Business
- Microsoft Teams
- Devices
- Microsoft Defender for Cloud Apps (acting as a proxy for creation of MDCA policy within the tenant
-
Currently only global full or view only permissions are available for alerts at this time and cannot be further carved into areas of responsibility based on such as departments, locations etc. All designs should take this limitation into account before deployment is undertaken. If this capability is an absolute requirement, consider establishing a feed of all DLP alerts and activities into Azure Sentinel and configuring access rights accordingly within the solution..
-
Existing Exchange Online mail flow and DLP rules created in the Exchange Admin Center (EAC) will need to be gradually migrated to the M365 SCC, but will continue to function together with new policies created in the M365 SCC as documented here. Consider creating equivalent rules and disabling old rules in EAC while testing your new ones, then deleting the old rules when no longer needed.
-
Using the presence of Sensitivity labels as a condition in your DLP policy should be closely considered as a standard in your organization. A sensitivity label is more likely to represent security sensitive information than a simple pattern match from a SIT, especially if you are using manual or recommended labeling, as the data is likely to have been deliberately classified by and end user as a match for certain sensitive information. Additionally, labels applied automatically via a trainable classifier are far more likely to be accurately classified than from pattern matching.
Deployment Test Plan⚓︎
-
Always create DLP policies initially in test mode as this gives you an opportunity to determine not only if the policy is alerting correctly via email (nothing will flow through to the DLP reports in audit mode by design) but this will also allow you to determine if the thresholds you have configured for each rule are appropriate. For example, suppose you have configured your rule to trigger when more than 5 credit card numbers have detected. During testing you realize that it would be more appropriate to trigger the rule on 1 credit card number, so you edit the rule to make this change and then enable the policy to allow for the population of alerts in the reports.
-
Use the DLP policy templates initially to see whether they make sense for your organization. These templates are preconfigured with certain Sensitive Information Types to monitor based on the regulatory compliance frameworks you need to monitor broken down by vertical organization type and country. This can drastically reduce the amount of time needed to create and test policies during your deployment test.
-
If your licensing plan allows, consider using alerts based on volume thresholds rather than sending alerts each time a rule is matched. This allows for more targeted alert behavior based on when certain thresholds are exceeded or when the number of activities are above a certain number, which is more likely to be representative of suspicious behavior and leads to fewer alerts being ignored as “noise”.
-
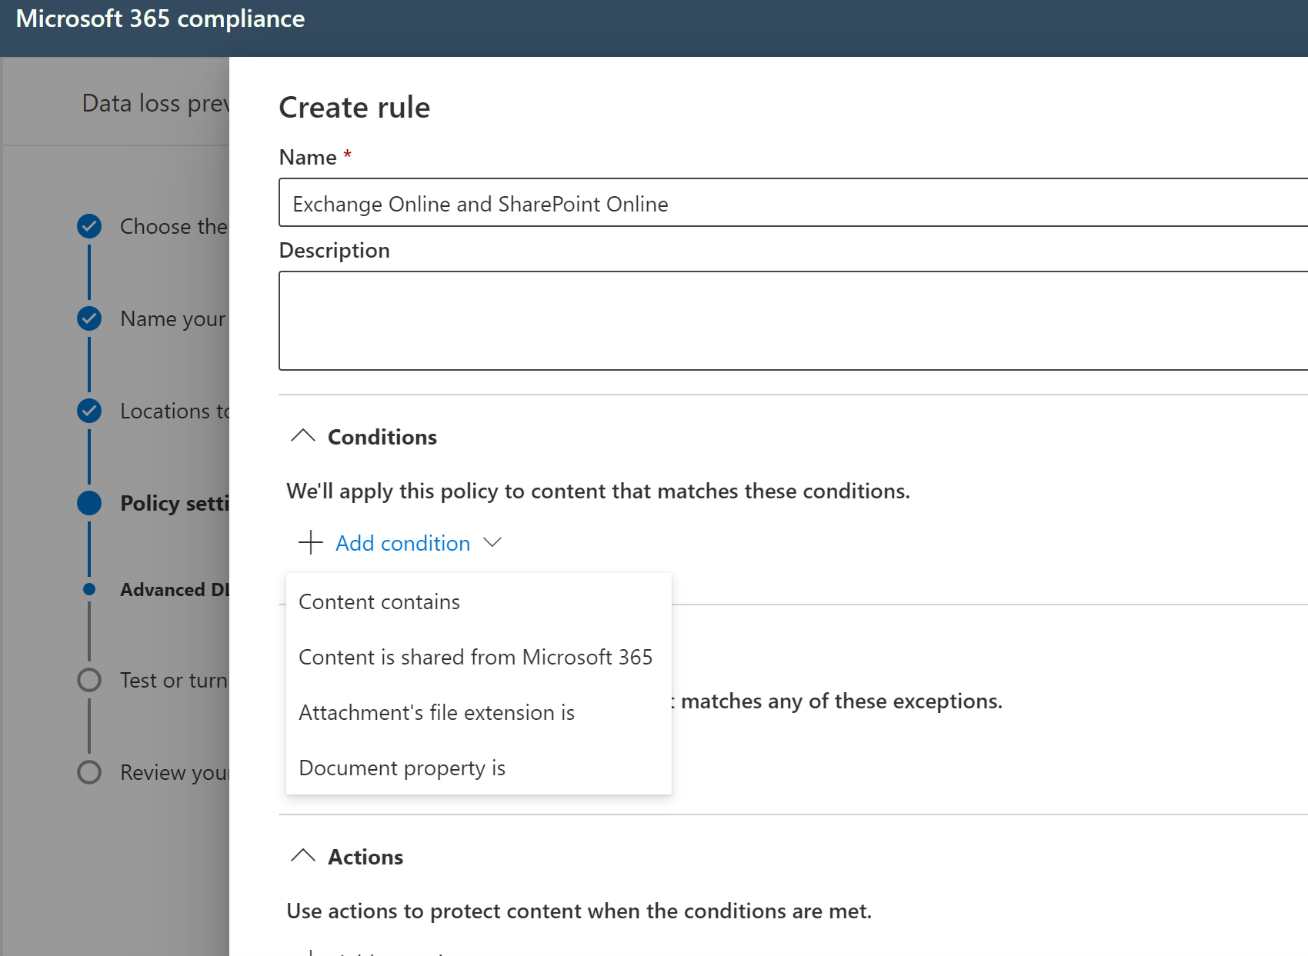
When creating DLP policies, consider separate policies per workload. For example, you might have a policy named “PCI-DSS-ExchangeOnline” and one named “PCI-DSS-SharePointOnline”. The reason for this is that when combining workloads, the DLP rules interface will only show conditions common to each workload chosen, which can lead to many options missing when incompatibilities occur. Consider a case where a policy is choosing Exchange Online and SharePoint Online as workloads. The below figures show the DLP Rules Wizard conditions when the policy chooses Exchange Online in isolation versus in conjunction with SharePoint Online.

-
When adding files to SharePoint Online and OneDrive for Business, there is an expected lag time between when the file is added and indexing occurs, a necessary process that must complete before DLP policies can be enforced. For more on how this works use this link. This leads to an opportunity for data leakage while waiting for this process to occur. Consider configuring SharePoint sensitive by default functionality to ensure this does not become an issue.
-
Ensure that you have fully documented your policies and their expected outcomes for end users as part of your user acceptance and training procedures. Not all aspects of the user experience are identical across all platforms and this should be considered so as not to generate unnecessary help desk calls. A good example of this is policy tips and their behavior across the various OS platforms. You should expect to see Policy Tips in Office Online and Windows, but not macOS for instance.
-
Ensure you have a well-documented and functional test plan, with clear tasks and outcomes.
Production Deployment⚓︎
-
DLP reports should be scheduled and emailed to appropriate stakeholders based on the report types (schedules and recipients can be defined directly from the report itself in the Security and Compliance report viewer at https://protection.office.com). Note currently you cannot schedule the following reports in the new Compliance portal (you can still do this in the older security and compliance center):
-
DLP Policy Matches
-
DLP Incidents
-
-
Consider allowing users to mark items as false positives or provide an exception with justification. This will allow you to track what is being shared out and not slow business process down. These should be reviewed carefully to see if a policy needs to be adjusted or changed.
-
Define exceptions to your DLP rules that are based on sensitivity labels. MIP labels are highly synergistic with traditional DLP. The biggest challenge with DLP is handling incidents such as false positives and exceptions, which generally disrupt user work and often require reactive actions taken by IT to unblock productivity and labels can help with that. For example, you can define a DLP rule that blocks Personally identifiable information (PII) from being shared outside of the organization, but make an exception for low-count PII (e.g., <2 credit card numbers) if the content is labeled as “Non-business” to allow for employees to share their personal information with family members when needed, and also exempt moderate counts of PII (e.g. <10 credit card numbers) if it is in protected form. You can even create a blanket exception for a label such as “Executive Sharing Exception” which bypasses all DLP filters, but that is only available to specific people that are trusted to deal with this information, and that they must explicitly choose for the sensitive content they need to share. Use of such labels can be closely monitored and reported.
-
When you are setting up a policy for Teams as a workload you should consider combining this with SharePoint Online and OneDrive for Business to maintain complete coverage. It is important to understand that “Teams” as a DLP workload only covers private chat and channel messages. Files shared in channels and chat are served from SharePoint and OneDrive, respectively.
-
Ideally Onboarding devices to Endpoint DLP should be done automatically within a Mobile Device Management (MDM) when possible, such as Microsoft Intune or System Center Configuration Manager. If Microsoft Defender for Endpoint is already deployed in the organization, there is nothing further to do for this onboarding to occur. Otherwise, you can onboard devices with a script, Group Policy or VDI onboarding scripts. More details can be found here.
Considerations⚓︎
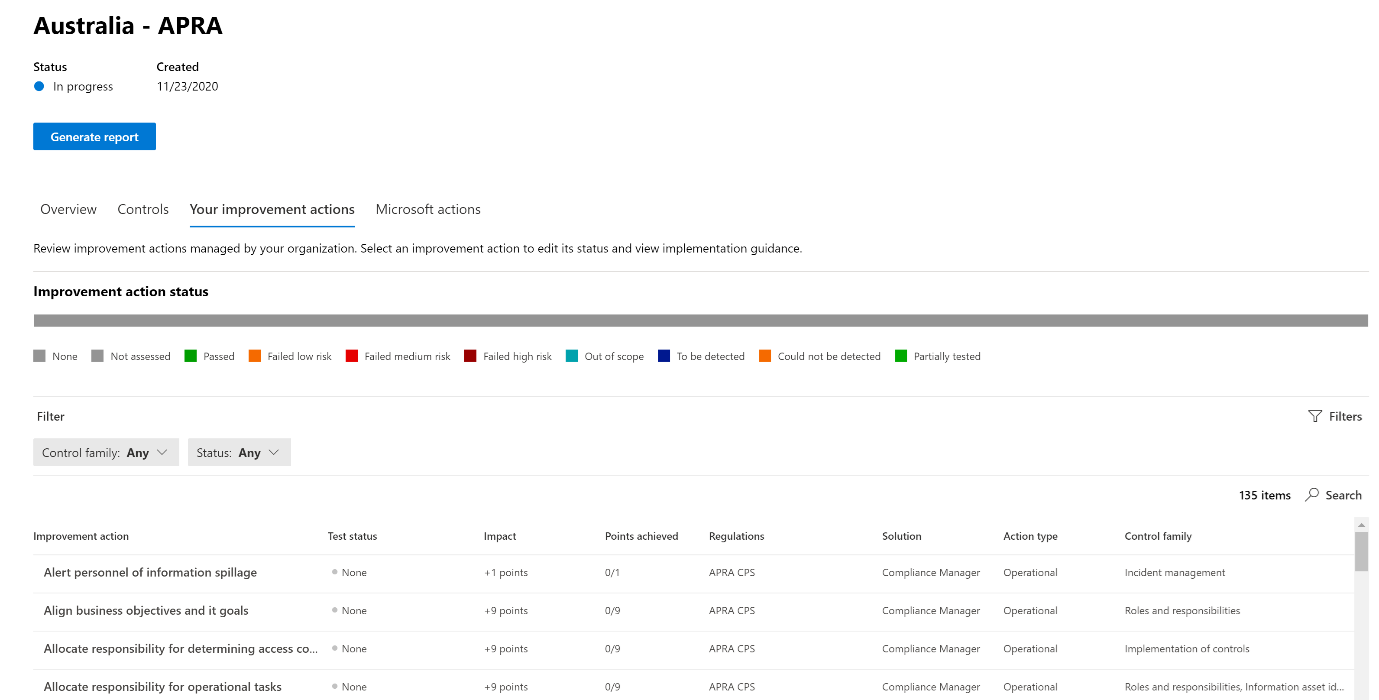
While DLP might be a very important part of your compliance configuration you may want to consider reviewing the assessments that are available in from Compliance Manager, there is a significant chance that some control objectives require you to establish not only data loss prevention strategies, but also procedures to follow if information spillage does occur in the organization. Figure 1 below shows the improvement actions within a given tenant for an example compliance assessment.
It is important to take these into consideration not only when planning your DLP strategy, but also updating these improvement actions upon completion of deployment will feed into an overall audit package to be provided to auditors when necessary for these regulatory compliance reporting periods.
-
Consider using the out of the box (OOTB) SITs policy templates first, then start customizing the OOTB as you need if necessary.
-
Sensitive Information Types (SITs) creation is likely to be a large factor of your initial deployment work. When using Regular Expressions (RegEx) for SIT definition, use websites such as regex101.com or regexr.com to help construct the RegEx’s to be used. Be aware that the RegEx engine used in Microsoft DLP is Boost.Regex 5.1.3 so care should be taken to ensure all expressions conform to this standard. Some aspects of RegEx construction can create performance issues in the service, therefore it is also important to be aware of any potential validation issues.
-
When creating a DLP policy in test mode, be aware that while incident emails will be generated, NO alerts will be created in the DLP reports within the Security and Compliance center. This is an expected outcome to avoid polluting the reports with false alerts.
-
When working with Endpoint DLP, be aware that content is evaluated when created or modified. Existing content at rest on the device is not scanned at this time.
-
When considering applying DLP policies to Teams, it is important to remember that the Teams “workload” as shown in the wizard refers to chat and channel messages only. Files within Teams will be resident in either SharePoint Online or OneDrive for Business, therefore a comprehensive Teams protection strategy should also take these workloads into account when planning your policies.
-
All DLP reports can show data from the most recent four-month period. The most recent data can take up to 24 hours to appear in the reports.
Helpful Resources⚓︎
-
When testing SITs and Endpoint DLP actions, it can be useful to have a library of links to assist in this testing:
-
https://filebin.net – excellent for testing HTTP post/upload actions
-
https://dlptest.com – provides several testing options as well as samples for common restricted items such as credit card numbers, SSN, etc.
-
https://fauxid.com/ - Provides you with data that can be used to generate SSN, credit card numbers etc.
-
-
Migrating from Exchange Transport Rules to Unified DLP - The complete playbook