Data-AI-Kenya-Hack
Setting Up Microsoft Fabric Capacity with an Azure Trial
Microsoft Fabric is a cloud-based platform that offers various services and experiences for different analytical scenarios, such as data engineering, data science, real-time analytics, and business intelligence. Microsoft Fabric is built on a foundation of Software as a Service (SaaS), which means that users do not have to worry about the underlying infrastructure or management of the services. Instead, they can focus on creating and consuming insights from their data.
Microsoft Fabric brings together the best of Microsoft’s existing analytics products, such as Power BI, Azure Data Factory, and Azure Synapse, into a single unified environment. Users can easily access and reuse all the data and assets across these products and enjoy familiar, easy-to-learn shared experiences. Microsoft Fabric also provides centralized administration and governance for all the services, ensuring data security, privacy, and compliance.
For more information about Microsoft Fabric, visit the website Learn more about Fabric or this article What is Microsoft Fabric?.
This guide will walk you through the steps to set up Microsoft Fabric Capacity with an Azure trial. By following these steps, you will be able to create a Fabric Capacity in Azure, which is essential for using Fabric’s data processing features. Additionally, you will need a Microsoft 365 or Office 365 trial account to access Microsoft Fabric. The guide will also provide instructions on how to avoid unexpected charges by pausing or deleting the Fabric Capacity and canceling the Azure and Office 365 trials.
Note: This guide may seem long and involving many steps, but this is because we are setting a Microsoft 365 tenant, and an Azure Subscription before creating the Fabric Capacity. In an ideal scenario your IT team would have already set up the Microsoft 365 tenant and Azure subscription for you and the sign up to Microsoft Fabric would only take less than 5 minutes.
If you already have a Fabric Capacity you can skip the entire sign up process and go straight to creating a new workspace in Microsoft Fabric. If you have a Microsoft 365 or Office 365 account, you can skip the first part of this guide and go directly to signing up for Microsoft Fabric and creating a Fabric Capacity in Azure.
Part 1: Sign Up for an Office 365 Trial
Before using Microsoft Fabric, you need an Office 365 trial account because Fabric requires a Microsoft 365 tenant to work. If you already have a Microsoft 365 or Office 365 account, you can skip this step.
- Open this link: Microsoft 365 Enterprise Plans.
- Choose “Office 365 E1” (or E3/E5) and click “Try for free”.
- Follow the setup prompts:
- Use a personal email (not a work or school email) to register.
- Click Next, then select “Set up account” to create your Microsoft 365 tenant.
Note: This process will require providing a payment method and will enable recurring billing after 30 days (which can be disabled with additional steps). This will be mentioned during the registration process:
- Once the account is created, Microsoft will generate a new username with a .onmicrosoft.com domain.
- Example:
yourname@yourcompany.onmicrosoft.com
- Example:
- After setup, click “Start using Office 365 E1 (No Teams) - Trial” to access the Microsoft 365 Admin Center.
Note: This trial lasts one month, so cancel before it expires to avoid charges.

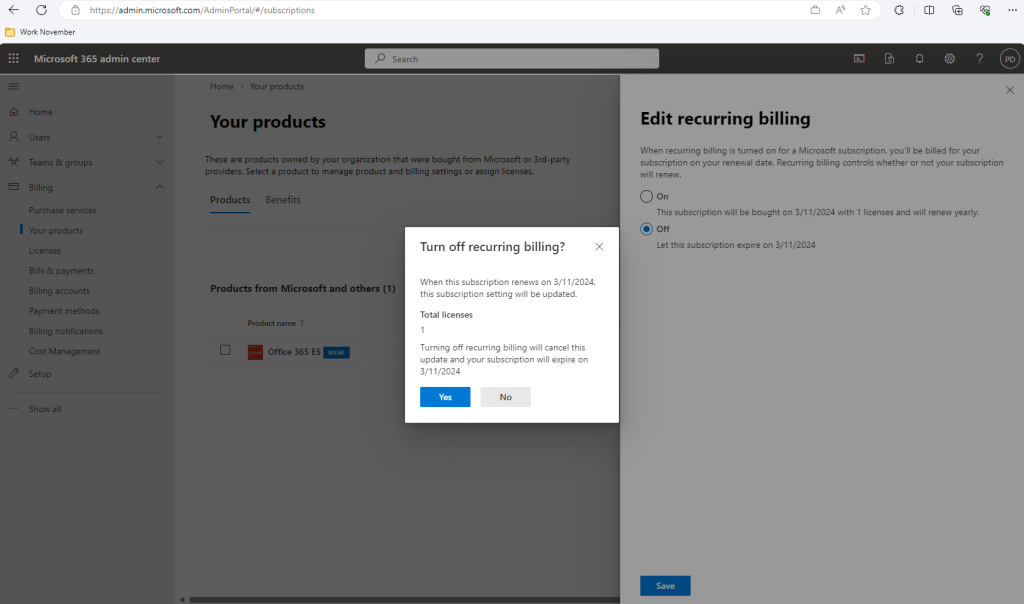
Upon activation, you can disable the recurring billing manually by logging into https://admin.microsoft.com with the newly created organizational account, then navigate to Billing => Your Products and select the 3 dots next to the newly created Office 365 subscription. From there you can turn off recurring billing as shown:
Part 2: Sign up for Microsoft Fabric
Now that you have a Microsoft 365 tenant, you need to sign up for Microsoft Fabric.
- Navigate to http://app.fabric.microsoft.com in a new tab.
- Sign in using the .onmicrosoft.com email address from Part 1.
- Follow the prompts to complete account creation.
- Once the setup is done, the Microsoft Fabric home page will open in a new tab.
Part 3: Sign Up for a Free Azure Account
One of the ways you can purchase Microsoft Fabric Capacities is by buying an Azure SKU. Azure SKUs are billed per second with no commitments. Learn more about Azure SKUs here.
For this guide, we will use a free Azure trial to set up a Fabric Capacity.
- Open http://aka.ms/freeazure in a new tab.
- Click “Try Azure for free” to start the trial.
- Sign in using your .onmicrosoft.com username.
- Follow the setup steps:
- Verify your identity using your phone number.
- Enter credit card details (only for identity verification; no charges unless you upgrade).
- Important: Use a credit card that hasn’t been used for an Azure free trial before.
- Once your Azure account is set up, confirm that your free Azure subscription is active by navigating to portal.azure.com to access the Azure portal.
- On the Home page, click “Subscriptions”.
- You should see your Free Azure Subscription listed.
Part 4: Create a Microsoft Fabric Capacity in Azure
- Sign in to the Azure Portal using your .onmicrosoft.com username.
- In Azure, select the Microsoft Fabric service. You can search for Microsoft Fabric using the search menu.
- Select “Create Fabric Capacity” to start the setup process.
- In the Create Fabric Capacity wizard fill in the following details:
- Under Resource Group, click “Create new”, and enter a name for your resource group. This is a logical container for your resources in Azure.
- Provide a Capacity Name.
- Choose a Region.
- Under Capacity Size, select F2 (cheapest option). Capacities come in different stock keeping units (SKUs) and we measure them by capacity units (CUs). You can view a detailed list of Microsoft Fabric capacities in Capacities and SKUs.
- Select “Review + Create”.
- Select “Create”.
- Once the resource is created, click “Go to resource”.
Note: Cost-Saving Tip: You can pause and resume your capacity anytime to save costs.
Create a new Workspace in Microsoft Fabric
-
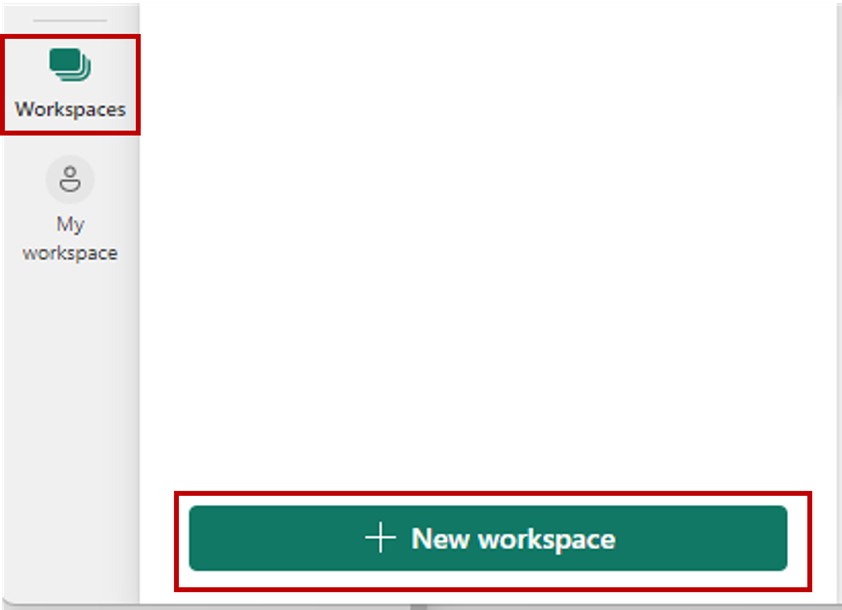
From the Fabric Home Page, select Workspaces > + New Workspace and teh create workspace pane opens.
- Fill out the following details:
- Name - provide a unique name for the workspace (mandatory)
- Description - provide a description for the workspace (optional)
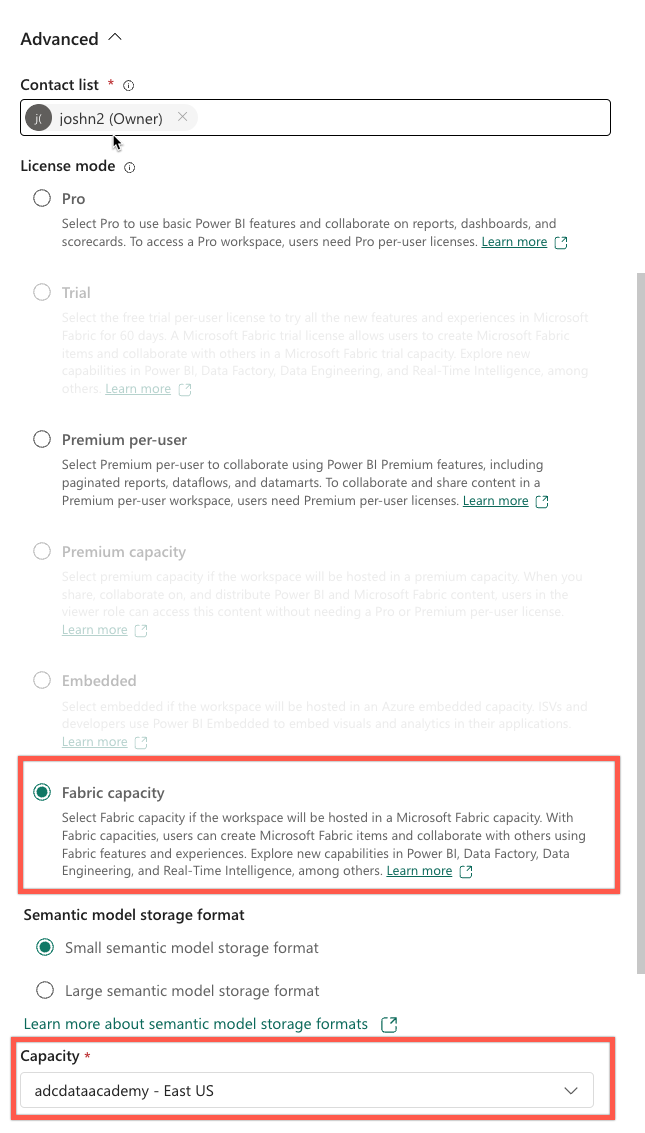
- Expand Advanced to find some of the advanced settings options. Under License Mode select Fabric Capacity.
-
Select the capacity you created in the Azure portal under Capacity
Note: Your capacity need to be running in order to be able to select it. If you have paused your capacity, you will need to resume it before you can select it.
- Finally select Apply to create the workspace.
Cleanup: Avoid Unexpected Charges 💰
NOte: The F2 Fabric Capacity in East US costs ~$262/month, but the Azure free trial provides only $200 in free credits.
1. Pause Fabric Capacity (To Save Credits)
- Go to portal.azure.com.
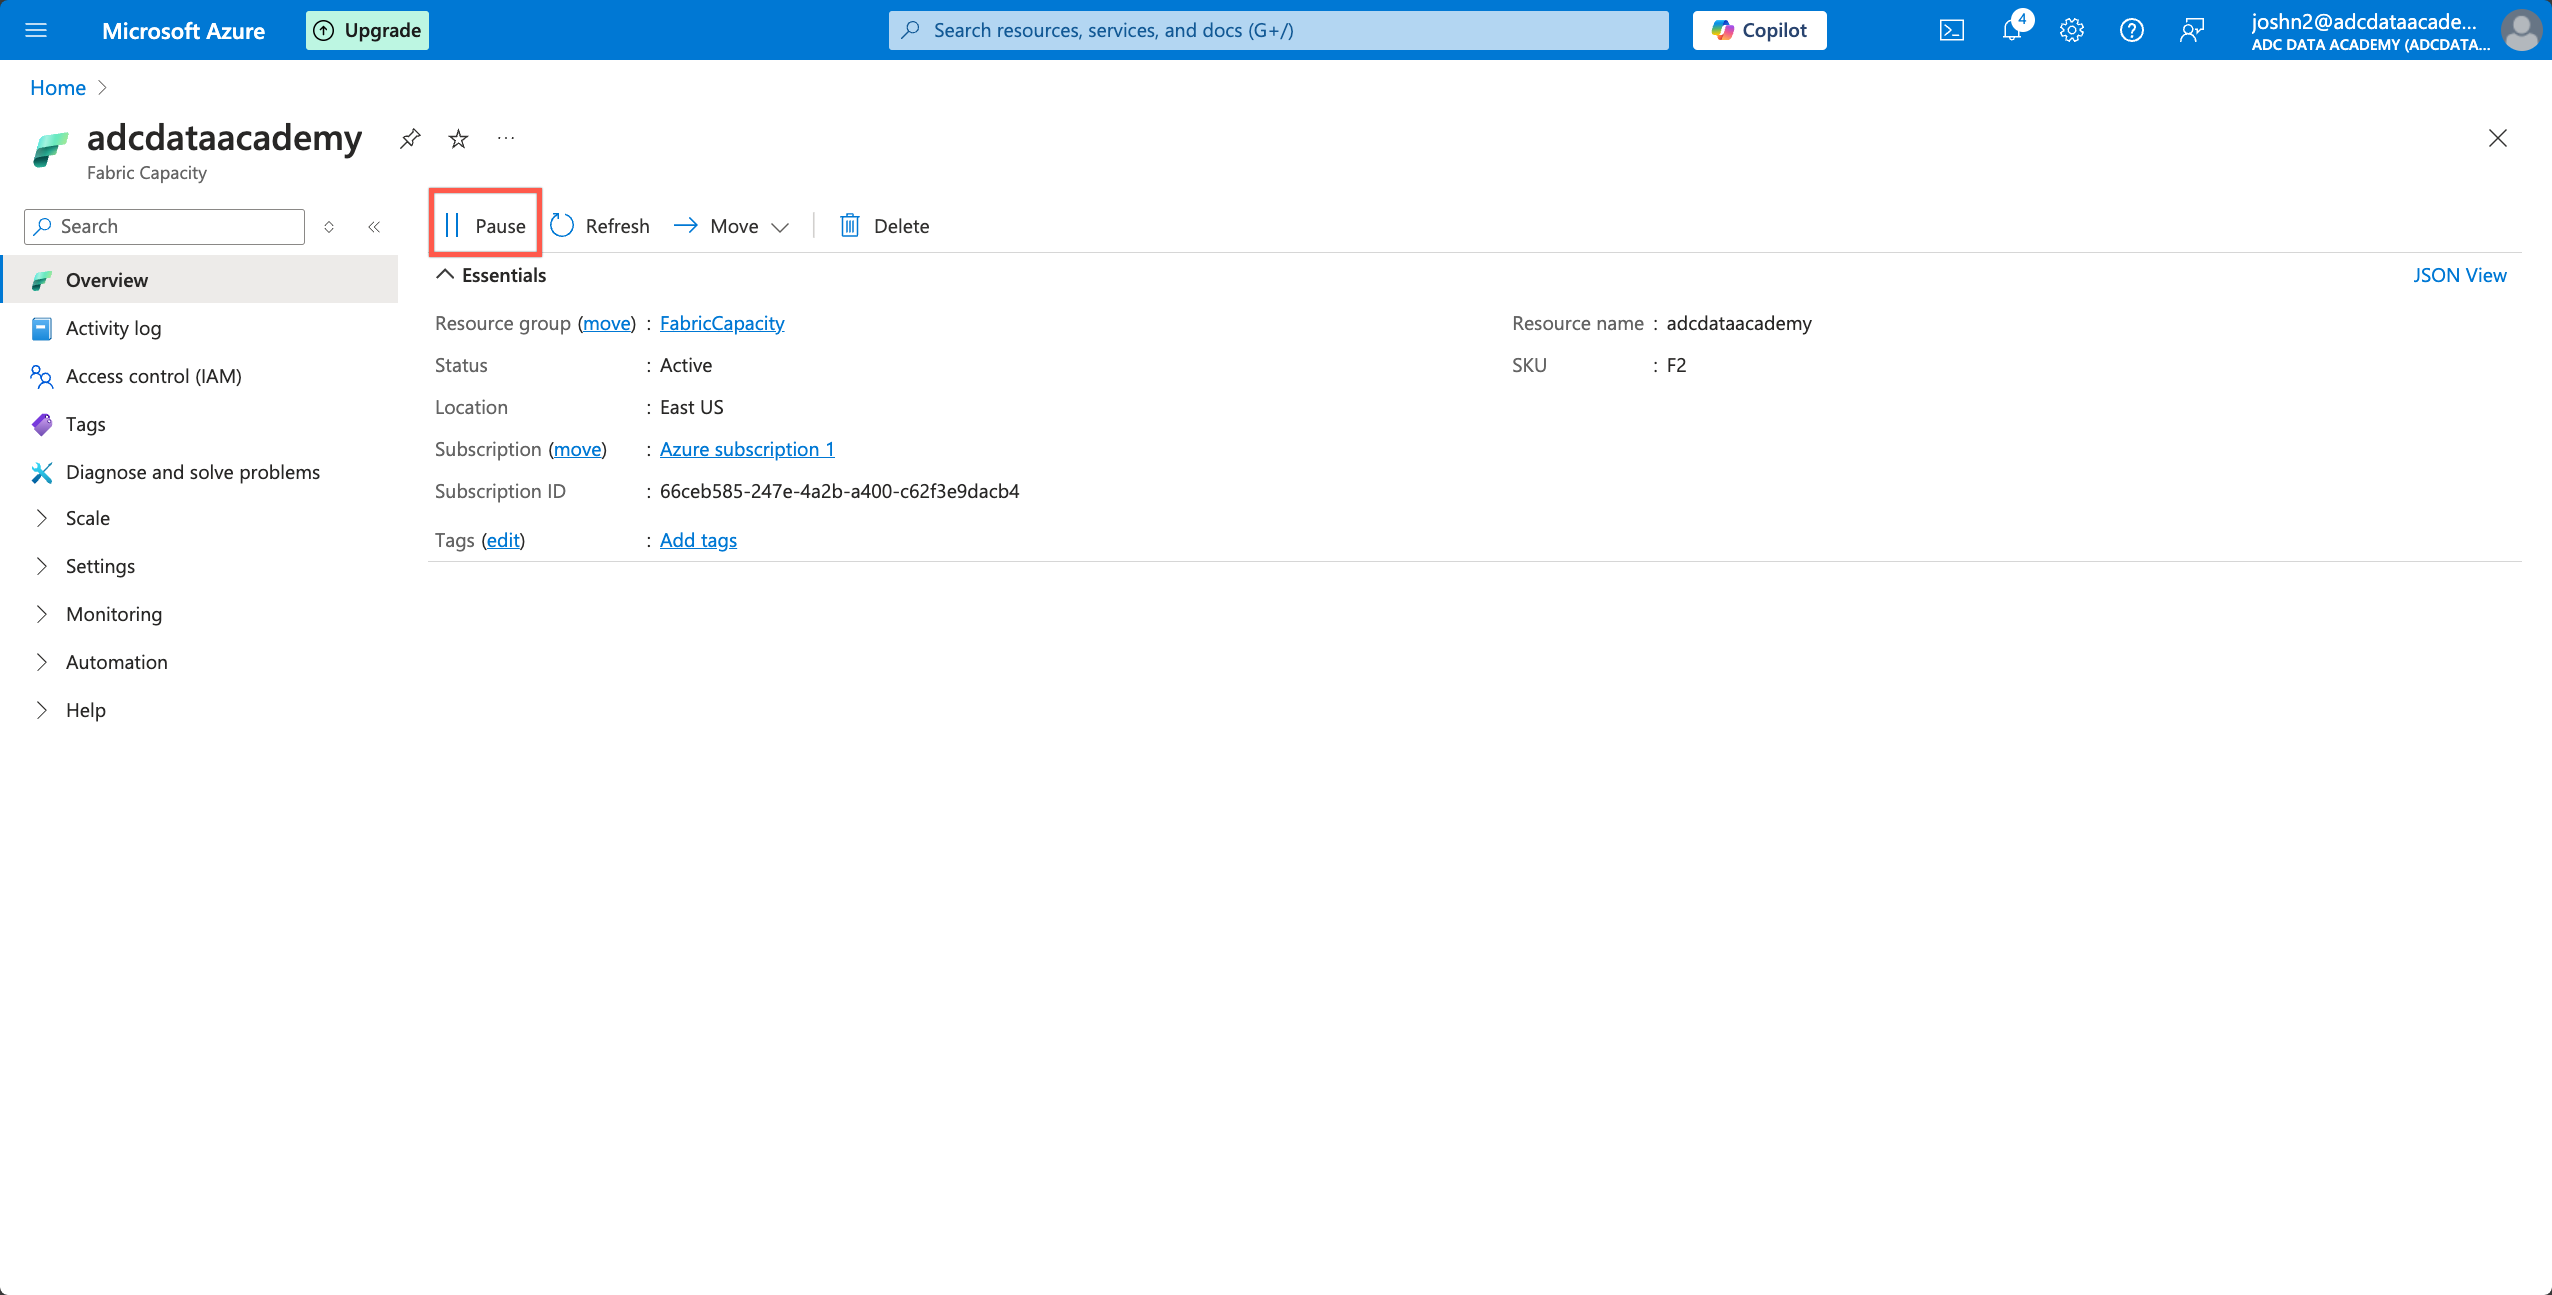
- Open your Fabric Capacity resource.
-
Click “Pause”.
2. Delete Fabric Capacity (To Stop Charges)
- In Azure Portal, go to “Resource Groups”.
- Find the Resource Group containing your Fabric Capacity.
- Click “Delete Resource Group”.
3. Cancel Azure Subscription
Before the one-month trial ends, you should cancel your Azure subscription to avoid unexpected charges.
- In Azure Portal, go to “Subscriptions”.
- Select your Free Trial Subscription.
- Click “Cancel Subscription”.
4. Cancel Office 365 Trial
Before the one-month trial ends, you should cancel your Office 365 trial to avoid unexpected charges.
- Go to admin.microsoft.com.
- Click Billing > Your Products.
- Find Office 365 E1 Trial and click Manage Subscription.
- Click “Cancel Subscription”.