mrtk_developmentreleases/2.0.0releases/2.1.0releases/2.2.0releases/2.3.0releases/2.4.0releases/2.5.0releases/2.5.1releases/2.5.2releases/2.5.3
  • Features and Architecture
  • API Documentation

We've moved!

Starting from MRTK 2.6, we are publishing both conceptual docs and API references on docs.microsoft.com. For conceptual docs, please visit our new landing page. For API references, please visit the MRTK-Unity section of the dot net API explorer. Existing content will remain here but will not be updated further.

  • Features and Architecture
  • Welcome to MRTK
  • Updates and Deployment
  • Building and Deploying MRTK
Search Results for

    Show / Hide Table of Contents
    • Welcome to MRTK
      • Installation Guide
      • Configuration
        • Using the Unity Package Manager
        • MRTK configuration dialog
        • Getting started with MRTK and XR SDK
      • Updates and Deployment
        • Updating from earlier versions
        • Upgrading from HTK
        • Building and Deploying MRTK
      • Packages and Release Notes
        • Release Notes
        • MRTK Packages
      • Performance and Best Practices
        • Performance
        • Hologram Stabilization
        • Using MRTK in large projects
    • Architecture
      • Overview
      • Framework and Runtime
      • Input System
        • Terminology
        • Core System
        • Controllers, Pointers, and Focus
      • Systems, Extension Services and Data Providers
    • Feature Overviews
      • Boundary System
        • Boundary System Overview
        • Configuring the Boundary Visualization
      • Camera System
        • Camera System Overview
        • Camera Settings Providers
          • Windows Mixed Reality Camera Settings
          • Unity AR Camera Settings [Experimental]
          • Creating a camera settings provider
      • Cross Platform Support
        • Configure MRTK for iOS and Android
        • Configure MRTK for Leap Motion Hand Tracking
        • Configure MRTK for Oculus Quest
      • Detecting Platform Capabilities
      • Diagnostics System
        • Diagnostics System Overview
        • Configuring the Diagnostics System
        • Using the Visual Profiler
      • Extension Services
        • Extension Service Creation Wizard
        • Scene Transition Service Overview
        • Hand Physics Service Overview
      • Input System
        • Input Overview
        • Input Actions
        • Input Events
        • Input Providers
          • Input Providers Overview
          • Creating an input data provider
        • Controllers
        • Eyes
          • Overview
          • Getting Started
          • Access Data via Code
          • Validate Tracking Calibration
        • Gaze
        • Gestures
        • Hands
        • How to Add Near Interaction
        • In-Editor Input Simulation
        • Pointers
        • Voice Input
          • Dictation
          • Speech (Command and Control)
      • Multi Scene System
        • Multi Scene System Overview
        • Scene Types
        • Content Scene Loading
        • Monitoring Content Loading
        • Lighting Scene Operations
      • Packaging
        • MRTK Packages
        • MRTK Modularization
      • Profiles
        • Profiles Overview
        • Configuration Guide
      • Rendering
        • MRTK Standard Shader
        • Material Instance Overview
        • Hover Light Overview
        • Proximity Light Overview
        • Clipping Primitive Overview
      • Services
        • What makes a mixed reality feature
        • What are the MixedRealityServiceRegistry and IMixedRealityServiceRegistrar
        • Extension services
      • Spatial Awareness System
        • Spatial Awareness Overview
        • Spatial Observers
          • Configuring Observers for Device
          • Configuring Observers for Editor
          • Controlling Observers via Code
          • Creating a custom Observer
      • Teleport System Overview
      • Tools
        • Dependency Window
        • Extension Service Creation Wizard
        • Holographic Remoting
        • Input Animation Recording
          • Input Animation File Format Specification
        • Migration Window
        • Optimize Window
        • Runtime tools
          • Controller Mapping tool
          • InputFeatureUsage tool
      • UX Building Blocks
        • Toolbox Window
        • Button
        • Bounds Control
        • Object Manipulator
        • Constraint Manager
        • Slate
        • System Keyboard
        • Interactable
        • Solvers
          • Tap to Place
        • Object Collection
        • Scrolling Object Collection
        • Tooltips
        • Slider
        • Hand Menu
        • Near Menu
        • App Bar
        • Fingertip Visualization
        • Progress Indicator
        • Dialog [Experimental]
        • Hand Coach [Experimental]
        • Pulse Shader [Experimental]
        • Dock Control [Experimental]
        • HoloLens Keyboard Helpers [Experimental]
        • Rigged Hand Visualizer [Experimental]
        • Elastic System [Experimental]
        • Bounding Box [Obsolete]
        • Manipulation Handler [Obsolete]
      • Example Scenes
        • Examples Hub
        • Hand Interaction Example
        • Eye Tracking Interaction Example
    • Contributing
      • Contributing Overview
      • Coding Guidelines
      • Writing and Running Tests
      • Writing Documentation
      • Pull Requests
      • Experimental Features
      • Breaking Changes
      • How to use DocFX
    • Planning
      • Roadmap
    • Notice
    • Authors

    Building and deploying MRTK

    To run an app on device as a standalone app (for HoloLens, Android, iOS, etc.), the build and deploy step needs to be executed in the unity project. Building and deploying an app that uses MRTK is just like building and deploying any other Unity app. There are no MRTK-specific instructions. Read below for detailed steps on how to build and deploy a Unity app for HoloLens. Learn more about building for other platforms at Publishing Builds.

    Building and deploying MRTK to HoloLens 1 and HoloLens 2 (UWP)

    Instructions on how to build and deploy for HoloLens 1 and HoloLens 2 (UWP) can be found at building your application to device.

    Tip: When building for WMR, HoloLens 1, or HoloLens 2, it is recommended that the build settings "Target SDK Version" and "Minimum Platform Version" look like they do in the picture below:

    Build window

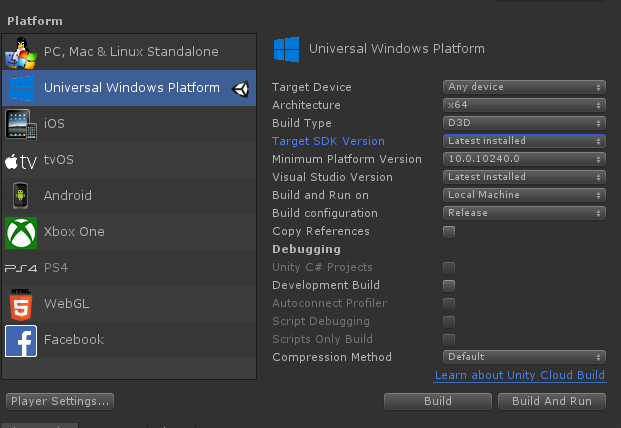
    The other settings can be different (for example, Build Configuration/Architecture/Build Type and others can always be changed inside the Visual Studio solution).

    Make sure that the "Target SDK Version" dropdown includes the option "10.0.18362.0" - if this is missing, the latest Windows SDK needs to be installed.

    Unity 2019.3 and HoloLens

    If a HoloLens app appears as a 2D panel on device, make sure the following settings have been configured in Unity 2019.3.x before deploying your UWP app:

    If using the legacy XR:

    1. Navigate to Edit > Project Settings, Player
    2. Under XR Settings in the UWP tab, make sure Virtual Reality Supported is enabled and the Windows Mixed Reality SDK has been added to SDKs.
    3. Build and deploy in Visual Studio

    If using the XR-Plugin:

    1. Follow the steps found in Getting Started with XRSDK
    2. Make sure the configuration profile is the DefaultXRSDKConfigurationProfile
    3. Navigate to Edit > Project Settings, XR-Plugin Management and make sure Windows Mixed Reality is enabled.
    4. Build and deploy in Visual Studio
    Important

    If using Unity 2019.3.x, select ARM64 and not ARM as the build architecture in Visual Studio. With the default Unity settings in Unity 2019.3.x, a Unity app will not deploy to a HoloLens if ARM is selected due to a Unity bug. This can be tracked on Unity's issue tracker.

    If the ARM architecture is required, navigate to Edit > Project Settings, Player, and under the Other Settings menu disable Graphics Jobs. Disabling Graphics Jobs will allow the app to deploy using the ARM build architecture for Unity 2019.3.x, but ARM64 is recommended.

    Building and deploying MRTK to a Windows Mixed Reality Headset

    The Windows Mixed Reality (WMR) headset can be used for Universal Windows Platform (UWP) and Standalone builds. A Standalone build for a WMR headset requires the following extra steps:

    Note

    Unity's XR SDK also supports native WMR in Standalone builds, but does not require SteamVR or WMR plugin. These steps are required for Unity's legacy XR.

    1. Install Steam
    2. Install SteamVR
    3. Install the WMR Plugin

    How to use WMR plugin

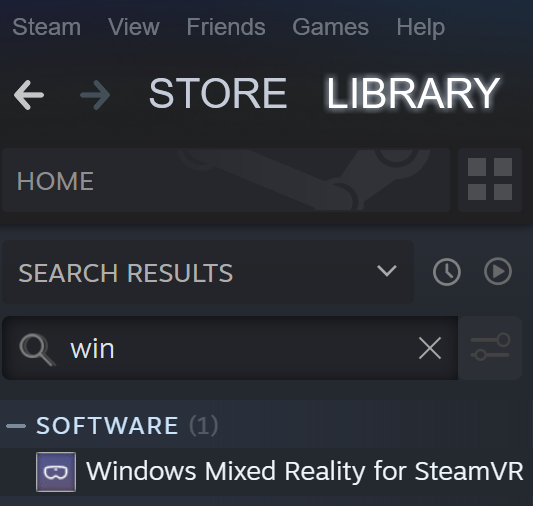
    1. Open Steam and search for the Windows Mixed Reality Plugin

      • Make sure SteamVR is closed before launching the WMR Plugin. Launching the WMR plugin also launches SteamVR.
      • Make sure the WMR headset is plugged in.

      WMR Plugin Search

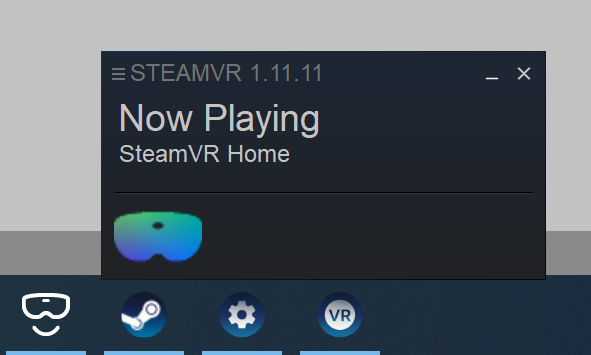
    2. Select Launch for the Windows Mixed Reality for SteamVR Plugin.

      WMR Plugin

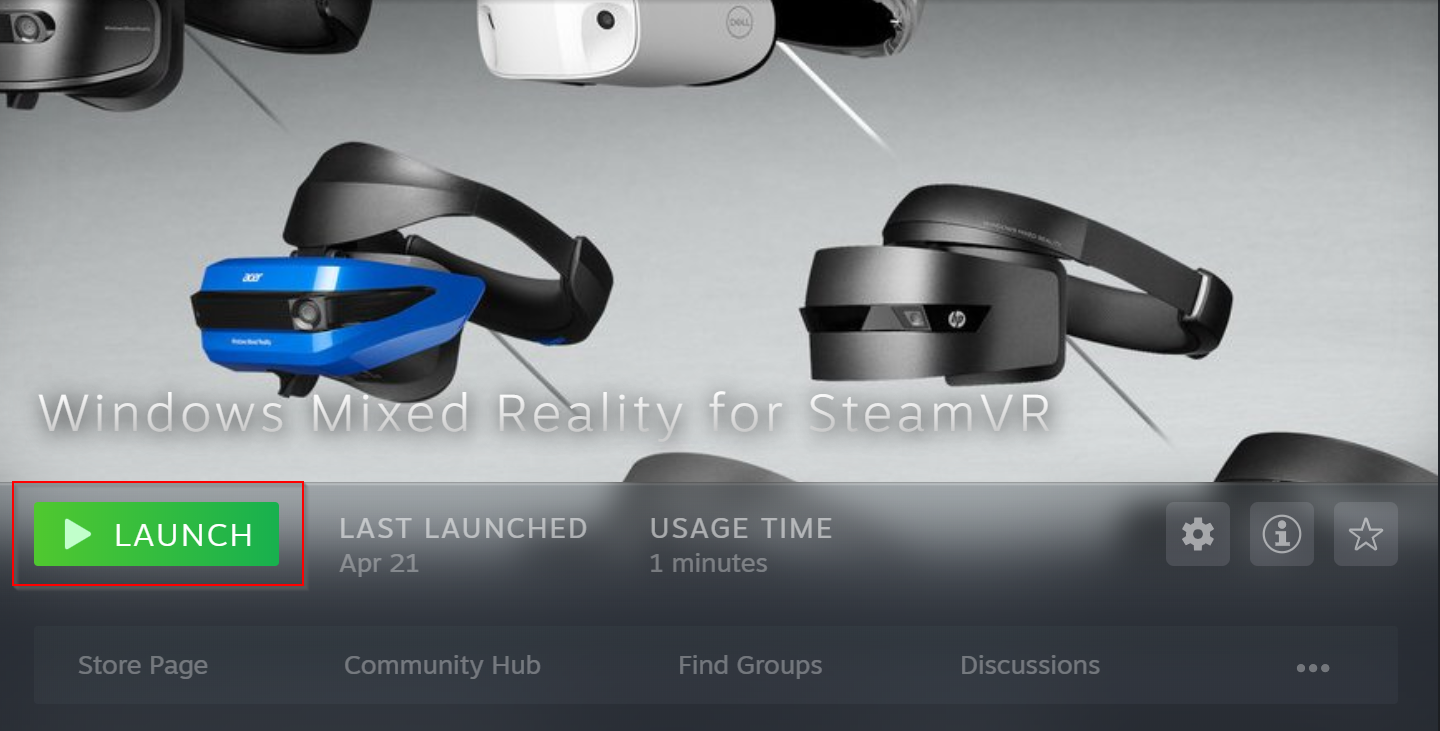
      • SteamVR and the WMR plugin will launch and a new tracking status window for the WMR headset will appear.

      • For more information visit the Windows Mixed Reality Steam Documentation

        WMR Launch Appearance

    3. In Unity, with your MRTK scene open, navigate to File > Build Settings

    4. Build the scene

      • Select Add Open Scene
      • Make sure the Platform is Standalone
      • Select Build
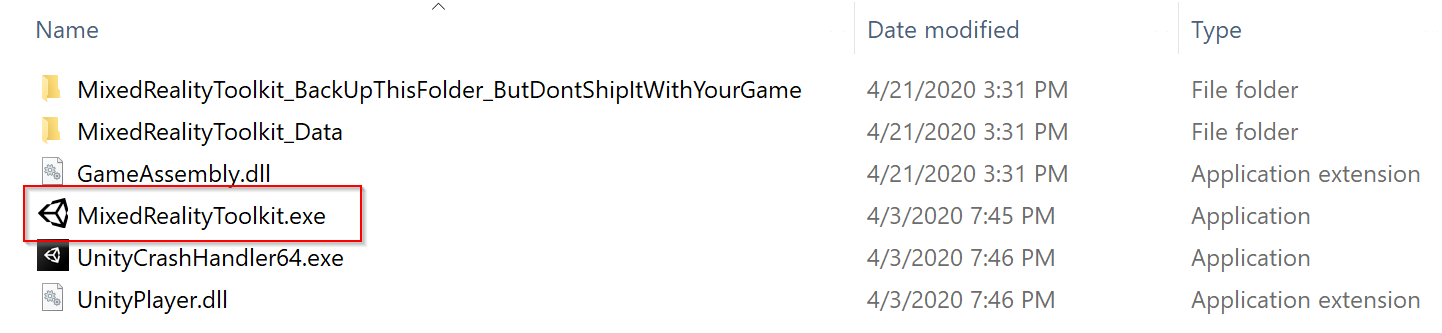
      • Choose the location for the new build in File Explorer

      Build Settings for Standalone

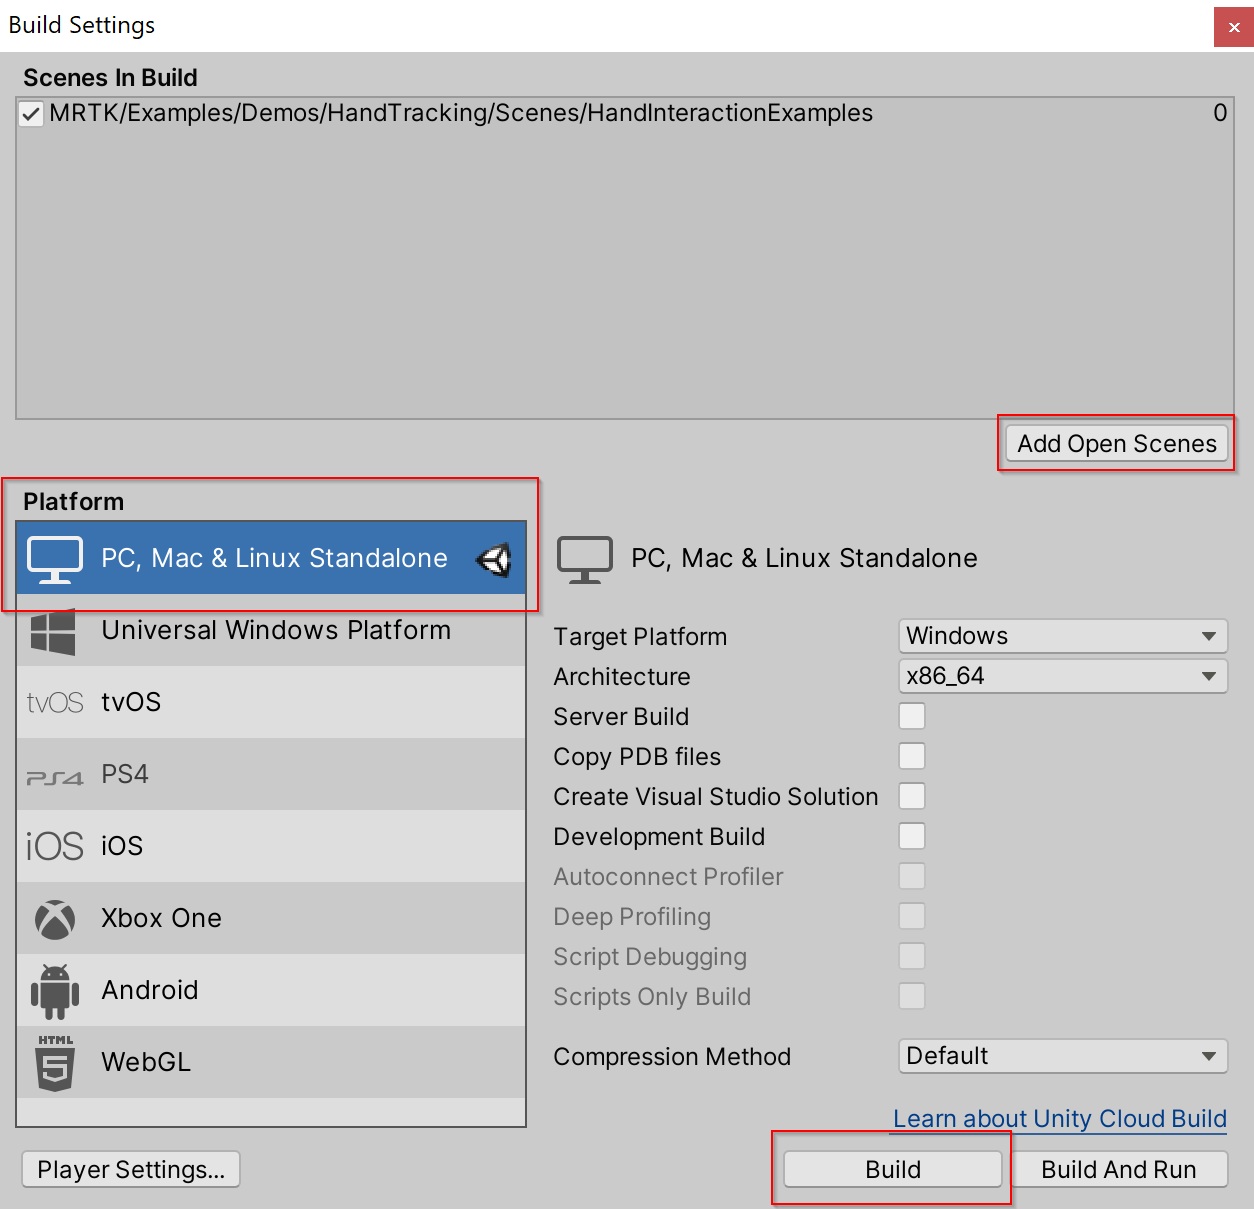
    5. A new Unity executable will be created, to launch your app select the Unity executable in File Explorer.

      File Explorer Unity

    See also

    • Android and iOS Support
    • Leap Motion Support
    • Detecting Platform Capabilities
    • Improve this Doc
    In This Article
    • Building and deploying MRTK to HoloLens 1 and HoloLens 2 (UWP)
      • Unity 2019.3 and HoloLens
    • Building and deploying MRTK to a Windows Mixed Reality Headset
      • How to use WMR plugin
    • See also
    Back to top Generated by DocFX