Optimize Window
The MRTK Optimize Window is a utility to help automate and inform in the process of configuring a mixed reality project for best performance in Unity. This tool generally focuses on rendering configurations that when set to the correct preset can save milliseconds of processing.
The Active Build Target is the build platform currently targeted by the project for compiling.
The Performance Target instructs the optimize tool what kind of device endpoints to target.
- AR Headsets are mobile-class devices such as HoloLens
- VR Standalone are mobile-class devices such as the Oculus Go or Quest
- VR Tethered are PC-powered devices such as the Samsung Odyssey, Oculus Rift or HTC Vive etc.

Setting optimizations
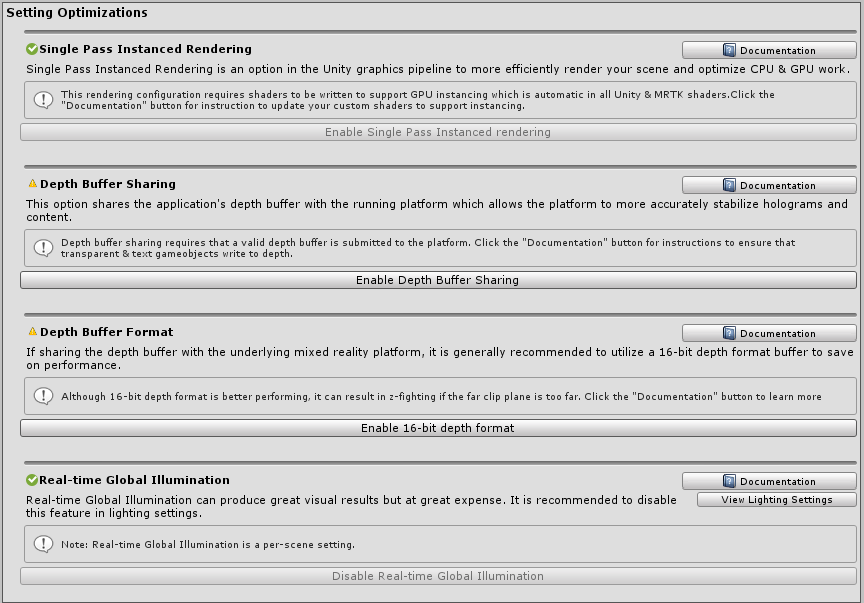
The settings optimization tab covers some of the important rendering configurations for a Unity project. This section can help automate and inform what settings should be changed for the best performing results.
A green check icon means that an optimal value has been configured in the project/scene for this particular setting. A yellow warning icon indicates the current configuration can be improved. Clicking the associated button in a given section will auto-configure that setting in the Unity project/scene to a more optimal value.

Single Pass Instanced Rendering
Single Pass instanced rendering is the most efficient rendering path for mixed reality applications. This configuration ensures the render pipeline is executed only once for both eyes and that draw calls are instanced across both eyes.
Depth buffer sharing
To improve hologram stabilization, developers can share the application's depth buffer which gives the platform information of where and what holograms to stabilize in the rendered scene.
Depth buffer format
Furthermore, for AR Headsets, it is recommended to utilize a 16-bit depth format when enabling depth buffer sharing compared to 24-bit. This means lower precision but saves on performance. If z-fighting occurs because there is less precision in calculating depth for pixels, then it is recommended to move the far clip plane closer to the camera (ex: 50m instead of 1000m).
Note
If using 16-bit depth format, stencil buffer required effects will not work because Unity does not create a stencil buffer in this setting. Selecting 24-bit depth format conversely will generally create an 8-bit stencil buffer, if applicable on the endpoint graphics platform.
If using a Mask component which requires the stencil buffer, consider using RectMask2D instead which does not require the stencil buffer and thus can be used in conjunction with a 16-bit depth format.
Real-time Global Illumination
Real-time Global illumination in Unity can provide fantastic aesthetic results but at a very high cost. Global illumination lighting is very expensive in mixed reality and thus it is recommended to disable this feature in development.
Note
Global illumination settings in Unity are set per-scene and not once across the entire project.
Scene analysis
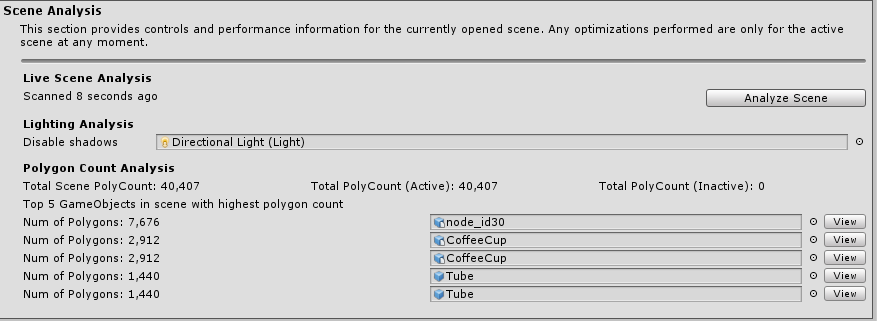
The Scene Analysis tab is designed to inform developers what elements currently in the scene will likely have the biggest impact on performance.

Lighting analysis
This section will examine the number of lights currently in the scene as well as any lights that should disable shadows. Shadow casting is a very expensive operation.
Polygon count analysis
The tool also provides polygon count statistics. It can be very helpful to quickly identify which GameObjects have the highest polygon complexity in a given scene to target for optimizations.
Shader analysis
The Unity Standard shader can produce very high quality visual results for games but is not generally best suited for the performance needs of mixed reality applications, especially since such applications are generally GPU bounded. Thus, it is recommended to developers to utilize the MRTK Standard shader to balance aesthetics & graphical features with performance.
The Shader Analysis tab scans the current project's Asset folder for materials using the Unity Standard shader or if desired, all materials not using Mixed Reality Toolkit provided shaders. Once discovered, developers can convert all materials or convert individually using the appropriate buttons.
