PPCC25-ALM
🚀 Lab 3: Deploy
A key facet of healthy ALM is separating changes in development from those in testing and in production. Pipelines in Power Platform deploys the latest version of your solution across these environments, with the ability to add secure approvals and review changes before they’re deployed. Note: in this lab you’ll only deploy from development to production, but in the real world it’s recommended to add an additional test stage. Other stages may also be added.
📋 Prerequisites
Complete lab 2.1
If you did not complete lab 2.1, import the ContosoRealEstate_1_0_0_2.zip unmanaged solution in your development environment. This solution is available in your lab materials folder.
✅ Lab 3 Tasks
- Types of Pipelines
- Task 1 - Create a Platform Host pipeline
- Deploy using Platform Host pipeline
- Task 2 - Create a Custom Host pipeline
- Create a Custom Host environment
- Configure environment records for the pipeline
- Configure a basic pipeline
- Deploy using a Custom Host pipeline
- Task 3 (Optional) - Extend pipelines (optional, but highly recommended)
- Gated extensions
- Create an Application User
- Create Sharing Security Group
- Create application user in Dataverse
- Create an approval + SPN delegated deployment flow
- Update flow after solution import
- Update pipeline to run as delegated
- Create a security role
- Share MDA with security role
- Run SPN delegated pipeline
- Task 4 - Redeploy a prior version
📚 Types of Pipelines
There are two ways to configure Power Pipelines—
Platform host - Out of the box tenant-wide pipelines ghosted under a “platform host” configuration. These pipelines are configured by makers for personal use. Personal pipelines cannot be extended, nor can they be shared with other makers in the tenant.
Custom host - Pipelines configuration hosted under a custom environment, where Power Pipelines modules are installed by admins. Custom pipelines enable greater control as they are centrally governed by admins and shared with makers for use. Custom host pipelines also provide greater visibility, like audit where a certain solution is deployed and who initiated the request. Custom host pipelines also retain backups of solution artifacts in both Managed and Unmanaged forms. Due to these reasons, custom hosts draw from your Dataverse storage capacity whereas the platform host doesn’t.
🎯 Task 1 - Create a Platform Host Personal Pipeline
- Navigate to your Dev environment. On the Maker Portal (https://make.preview.powerapps.com), make sure the Dev env is selected on the top right environment drop down
- Click on Solutions tab in the left-hand navigation blade
- Once in the Solutions page, open the Contoso Real Estate solution
- On the left-hand navigation panel, click on the rocket icon for Power Pipelines page
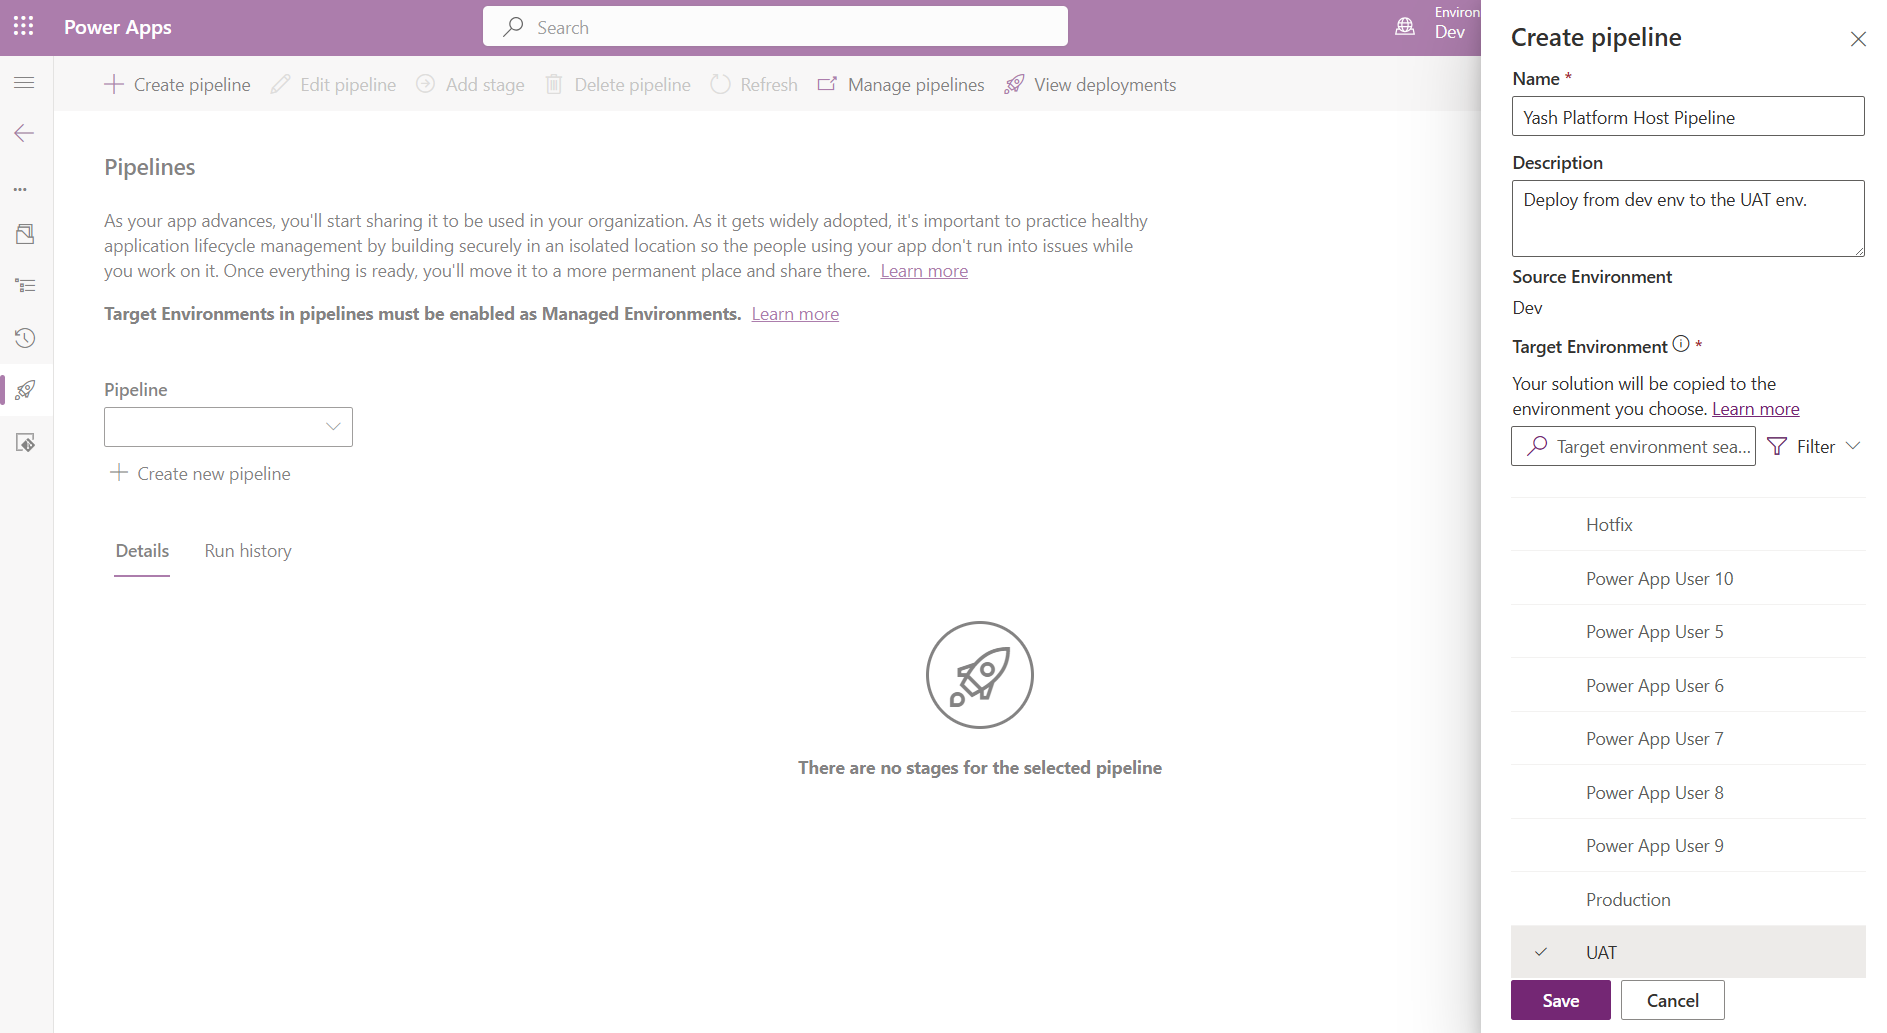
- On the Pipelines page, select + Create pipeline
- In the Create pipeline pop out wizard, provide the following details:
- Name:
Platform Host Pipeline - Description: Include description of which environments this pipeline will deploy to
- Target environment: select your UAT environment
- Click Save
- Name:
-
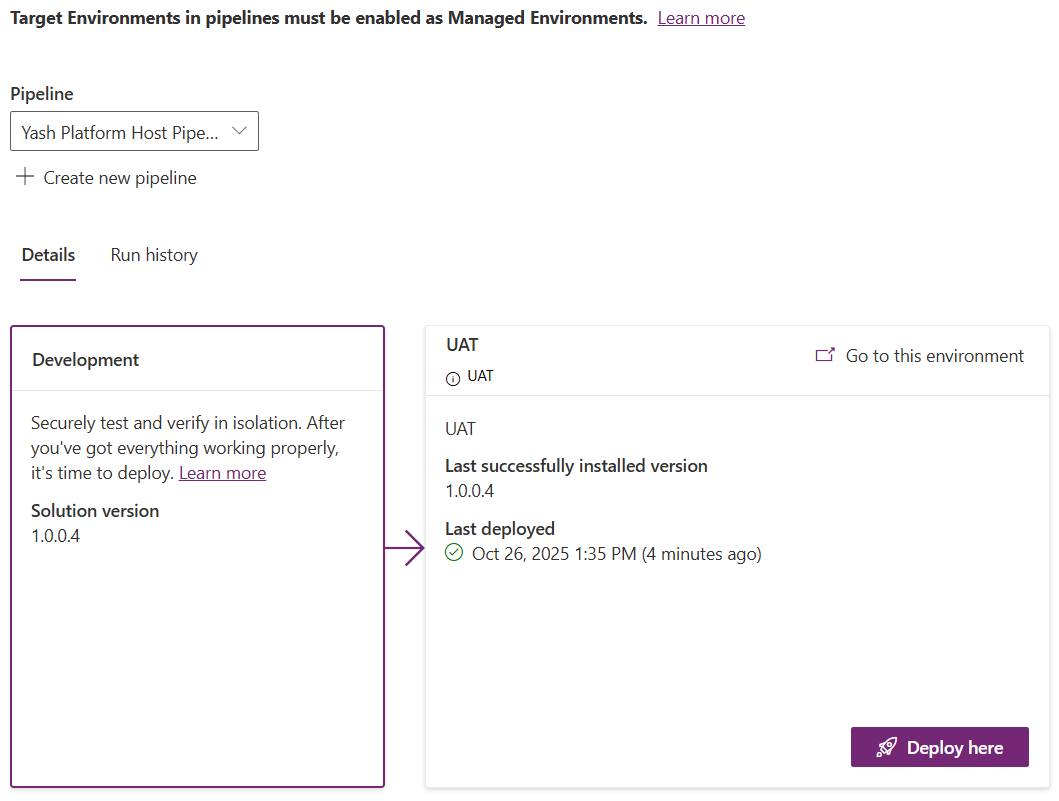
The completed pipeline should now have two stages—Development and UAT.
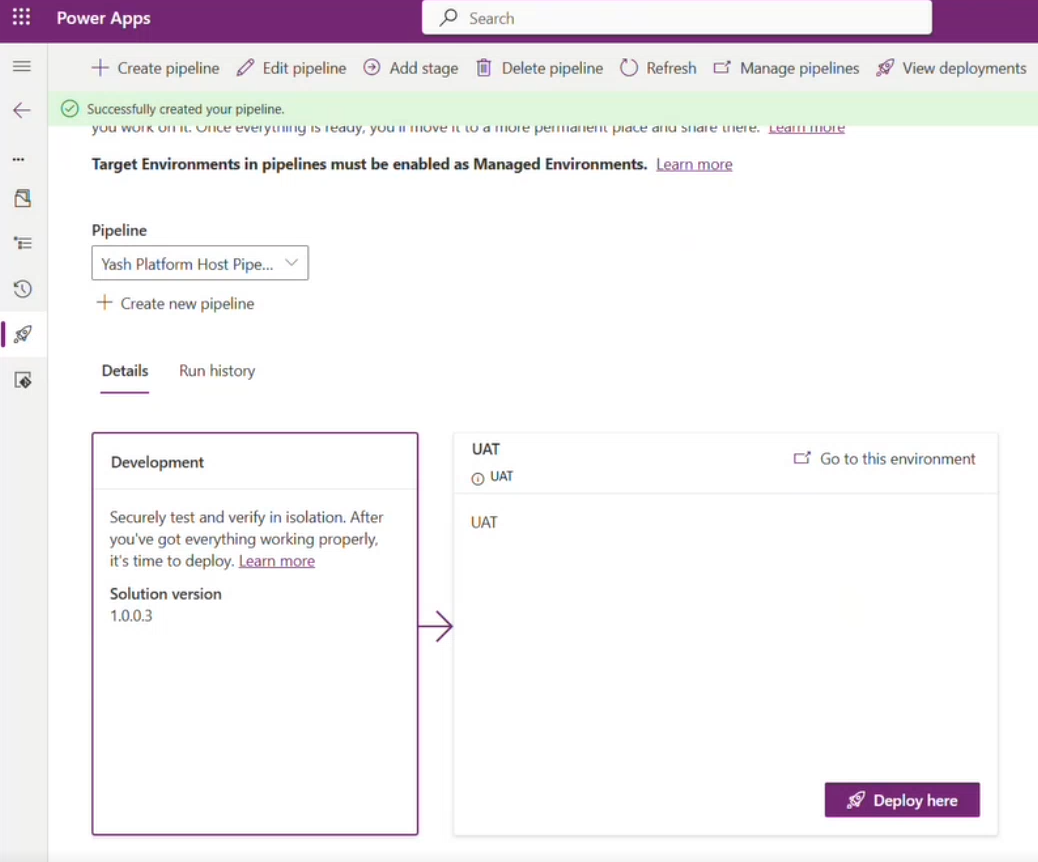
You’re now ready to use this Pipeline to deploy your solutions! In the real world, if your specific deployment process requires an additional environment, click on Add Stage button to add additional stages.
Deploy using a Platform Host pipeline
Now, let’s do a quick deployment to the UAT env to test our pipeline.
- On the UAT stage, click Deploy here to initiate the solution deployment to production.
- You can schedule deployments by selecting Later in the Deployment Schedule section to set a time and date for your scheduled deployment.
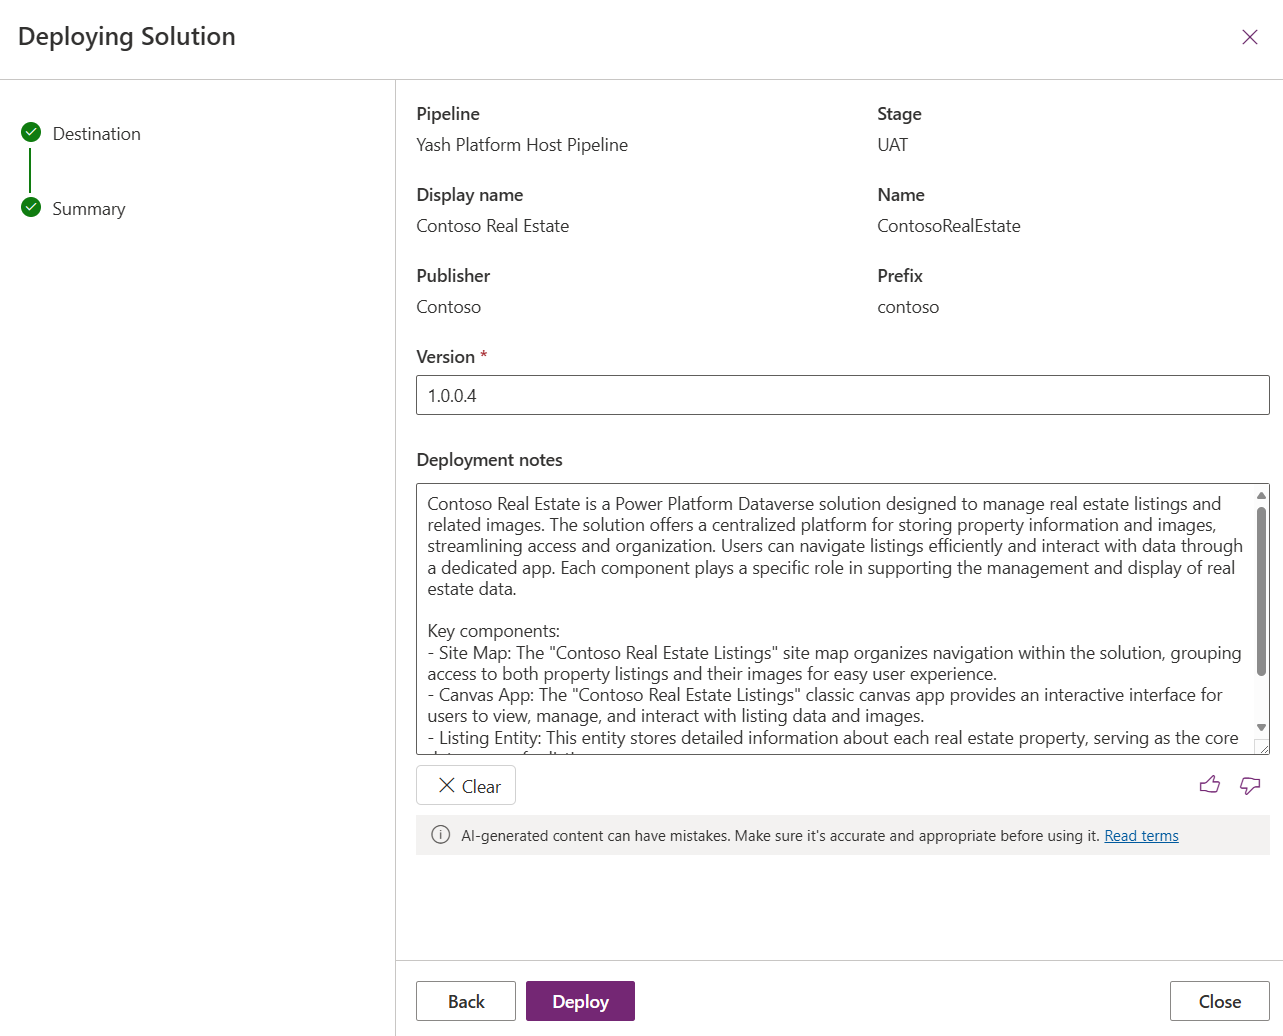
- Click Next
- In the summary section, review the AI-generated note in the Deployment Notes section. It contains a summary of your solution’s capabilities.
- Click Deploy to begin your deployment
Your UAT stage will update with the progress of the deployment:
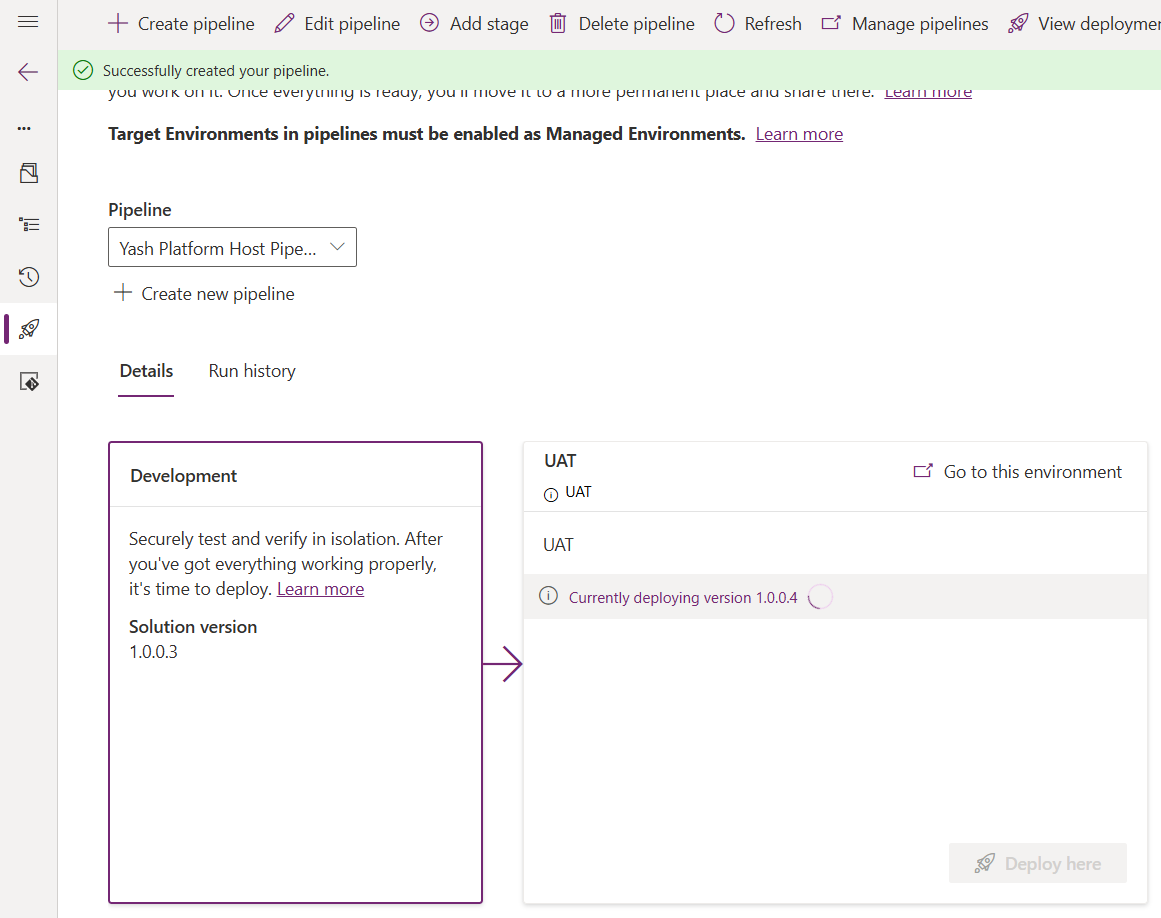
When the deployment completes, you can see the success message on the stage:
Remember: Platform Host pipelines are not shareable, nor can they be extended to support approvals or delegations. Continue to the Custom Host Pipelines section to create extendable and shareable pipelines.
🏗️ Task 2 - Create a Custom Host Pipeline
Create a Custom Host environment
Let’s begin by creating a new Custom Host Environment. This special-purpose environment acts as the storage and management plane for all pipeline configuration, security, and run history. You can install multiple Custom Host environments to separately manage pipelines for different business orgs or geographic locations. One host for the entire tenant is also acceptable as long as all environments are in the same geographic location.
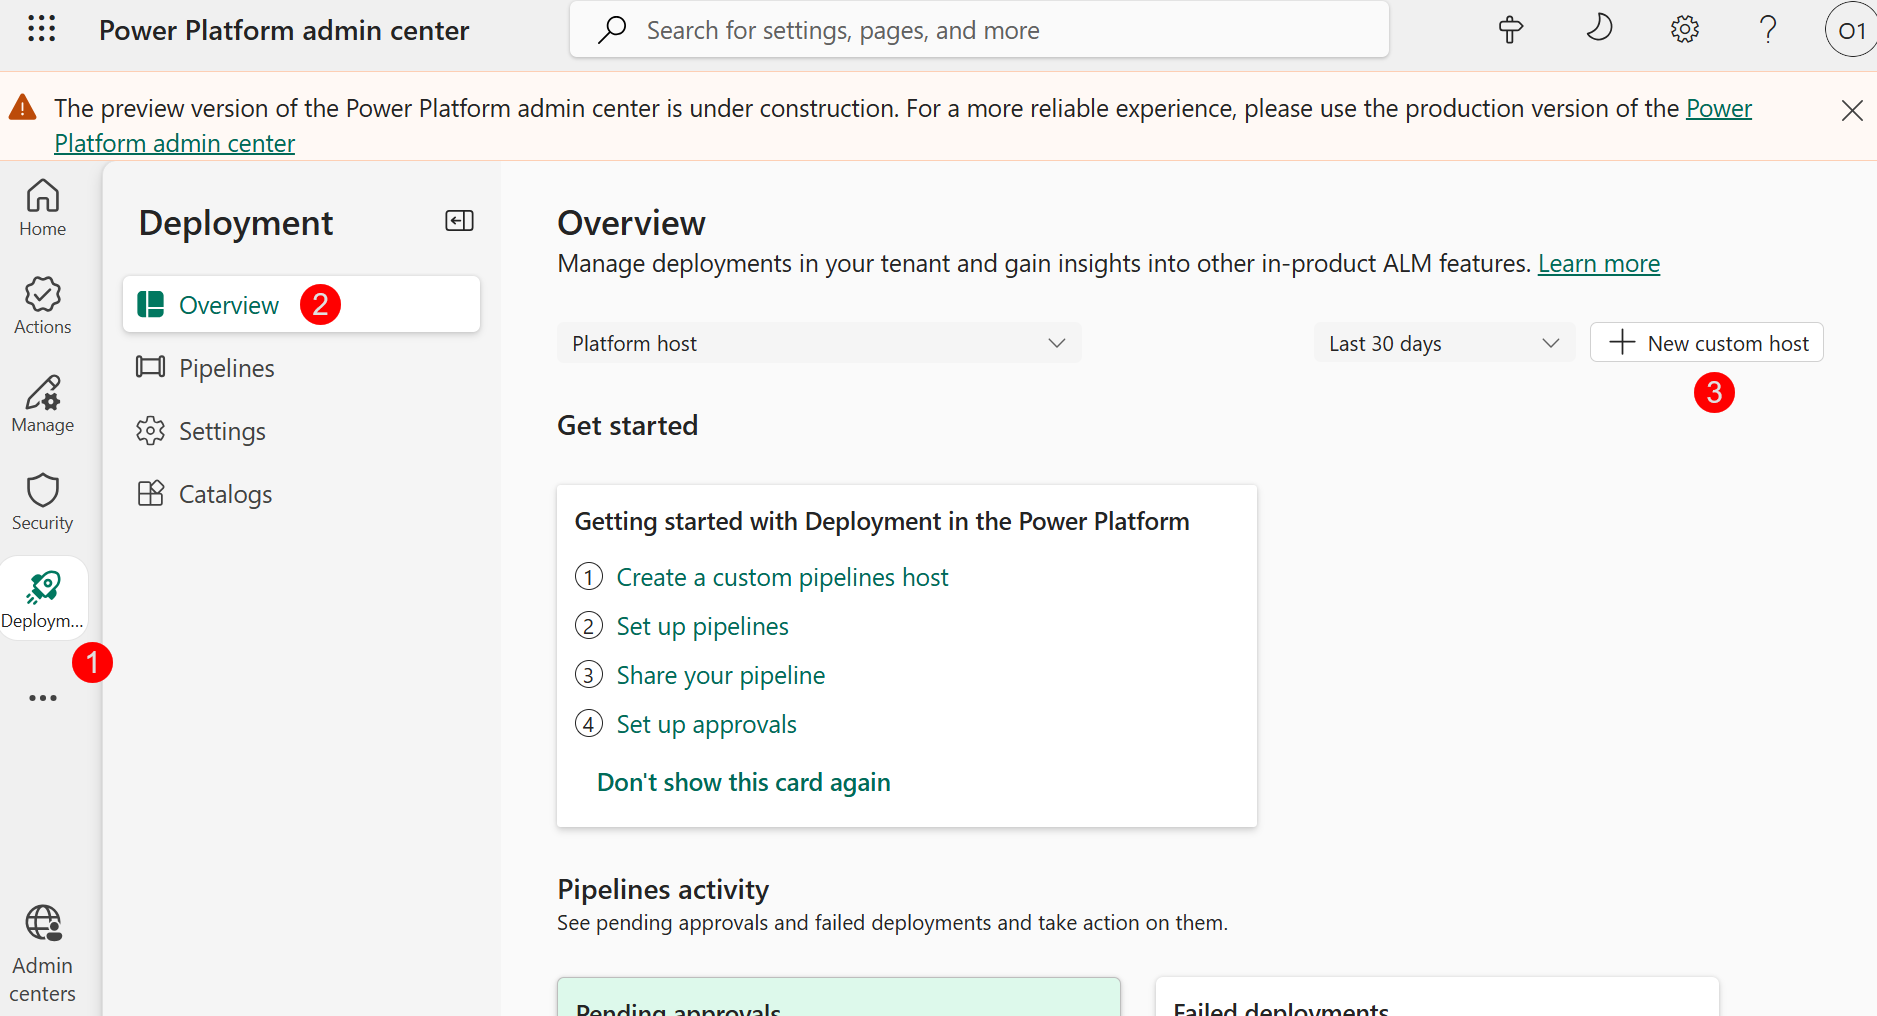
- In the Power Platform Admin Center (https://admin.preview.powerplatform.microsoft.com/) select Deployments from the left-hand navigation panel
- Make sure you are on the Overview tab
- Click + New custom host button to kick off a new environment creation with Power Platform Pipelines modules pre-installed.
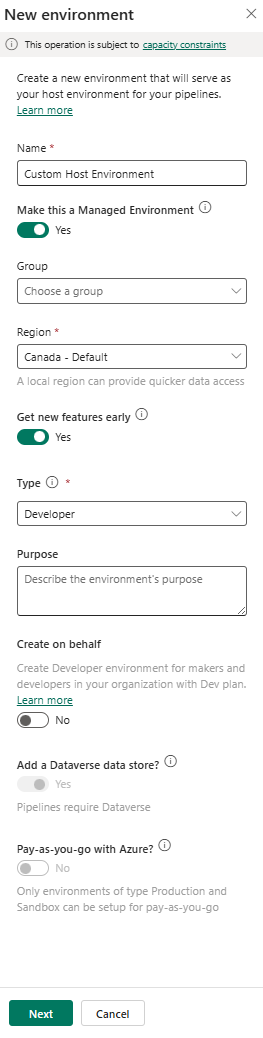
- Configure the New Environment creation:
- Name: “Custom Host Environment”
- Make this a Managed Environment: Yes
- Region: Canada
- Get new features early: Yes
- Type: Developer
- Click Next
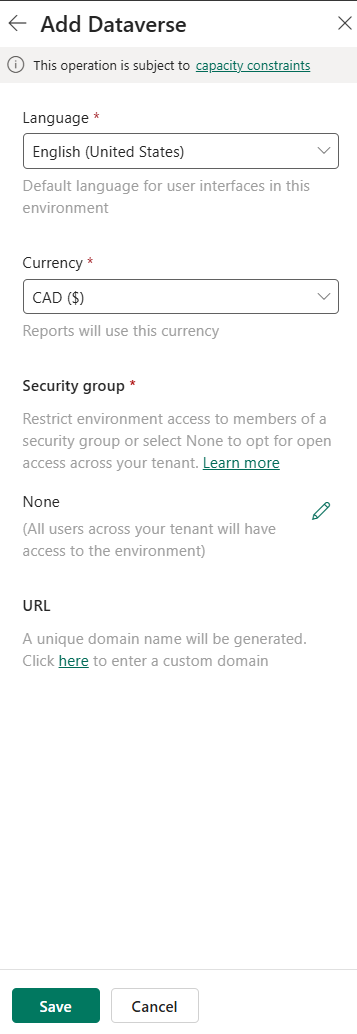
- (Optional) Under Security Group, click + Select, select None
Note: In a real-world setting, using a Security Group is recommended to allow only authorized users access to this environment.
- Click Save
Now that the Custom Host Environment is created, we can begin configuring the custom host pipeline.
We will be using the same Dev and UAT environments for the Custom Host pipeline we build in this lab. Make sure you have the EnvironmentIds for both environments handy.
| Original Environment Name | New Environment Name | EnvironmentId | Purpose |
|---|---|---|---|
| Power App User 1 | Dev | Development | |
| Power App User 2 | Hotfix | Secondary environment for hotfix development and multi-environment testing | |
| Power App User 3 | UAT | Testing your solution | |
| Power App User 4 | Production | Where your solutions are shared with end users |
Configure environment records for the pipeline
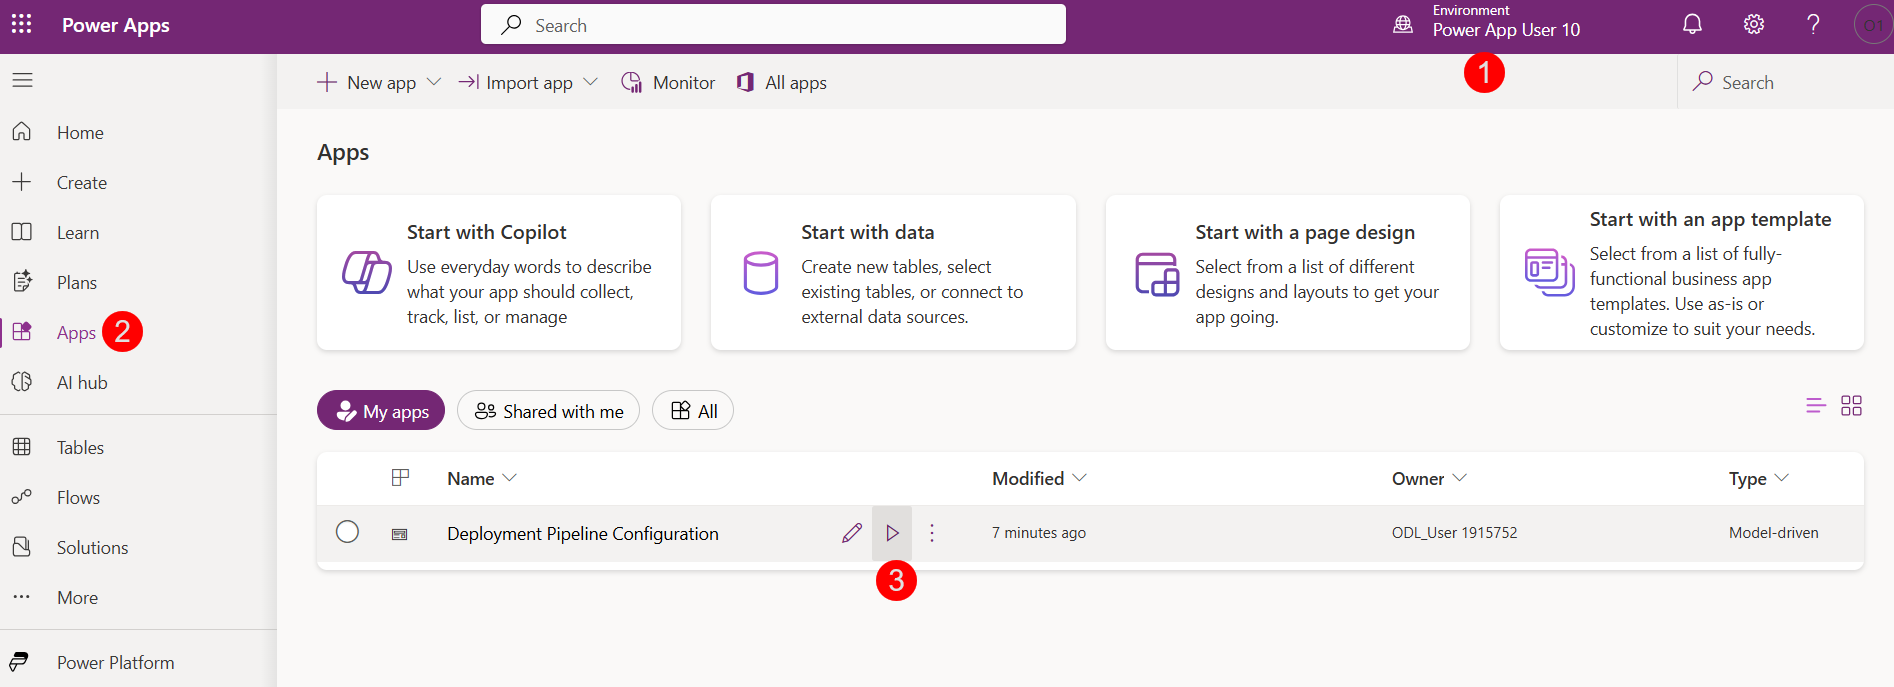
- Navigate back to PowerApps maker portal at https://make.preview.powerapps.com/
- In the top right hand corner in the Environment selection dropdown, select the Custom Host Environment which you just created
- Click on the Apps tab
-
Click on the play icon on the Deployment Pipeline Configuration app to play it
-
In the Pipeline Configuration app, select Environments on the left pane, then + New
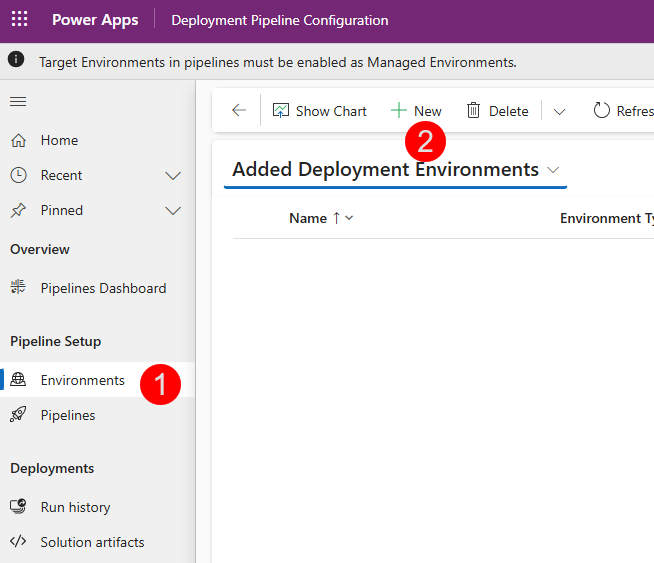
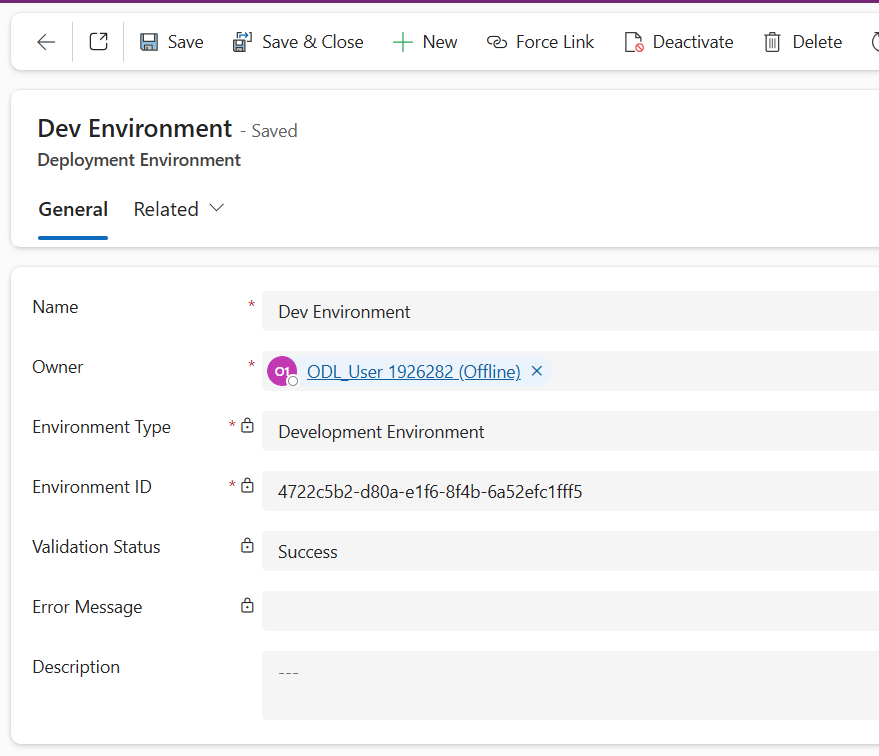
- Let’s create the development (source) environment record. We will use the Dev environment for this. Select New in the ribbon to create a new environment record
- Name: Dev Environment
- Environment Type: Select Development Environment for your source environment
- Environment Id: < Environment ID of the Dev env >
- Click Save
- Wait for one minute, and click refresh in the ribbon to check the Validation Status
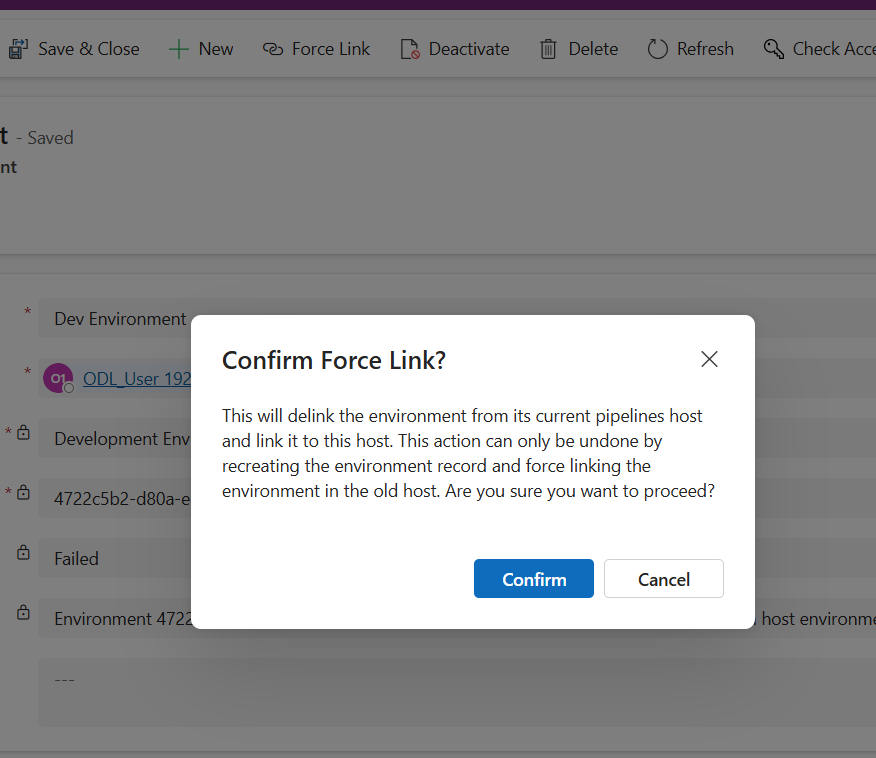
Since we already used this Dev environment in our Platform Host Pipeline, the validation will fail.

- Let’s use the Force Link button in the ribbon to bypass this error. Click Force Link in the ribbon, then click Confirm in the dialog box.
- Wait a minute, then refresh to verify Validation Status equals Success
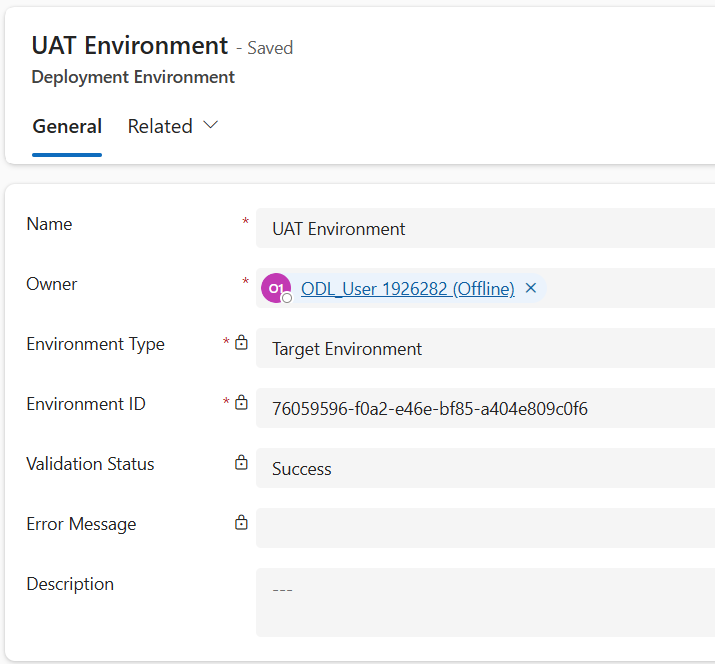
- Let’s create the UAT (target) environment record. Select New in the ribbon to create a new environment record
- Name: UAT Environment
- Environment Type: Target Environment
- Environment Id:
- Click Save
- If Validation fails, repeat the steps to Force Link this environment to the Custom Host Pipeline
- Once complete, verify Validation Status equals Success
-
Repeat again if you want to add more than one target environment
Configure a basic pipeline
-
Select Pipelines in the left navigation pane
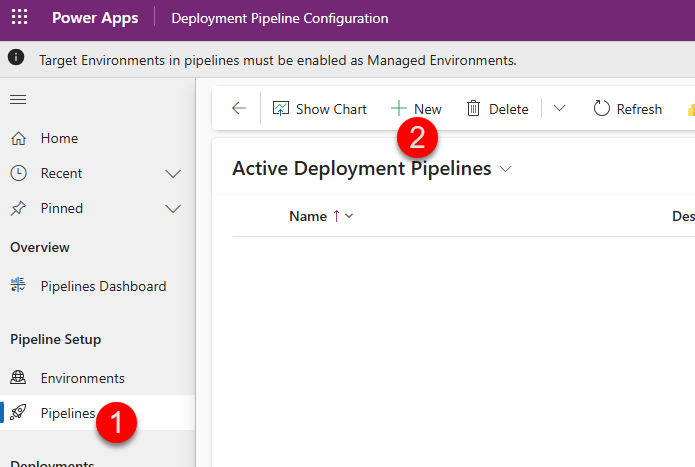
- Select New in the ribbon to create a new deployment pipeline record
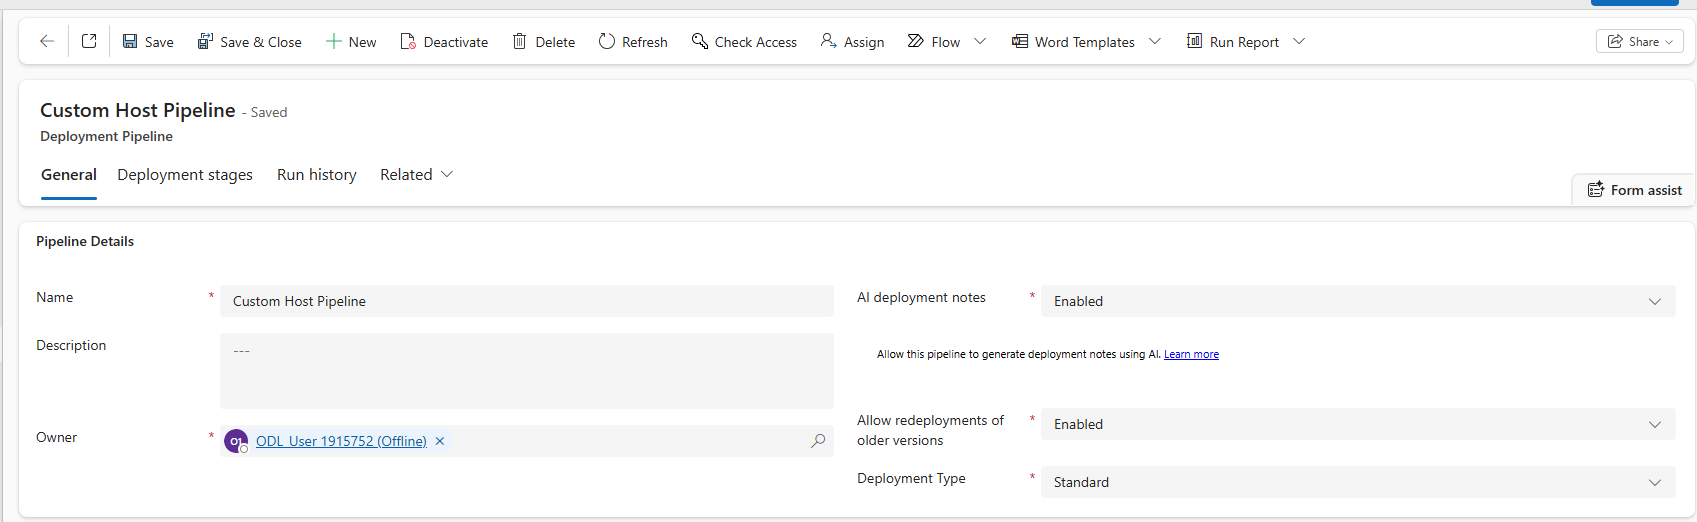
- Name: Custom Host Pipeline
- Description: optional, add a description of the purpose this pipeline serves
- AI deployment notes: Enabled
- Allow redeployments of older versions: Enabled
- Deployment Type: Standard
- Click Save
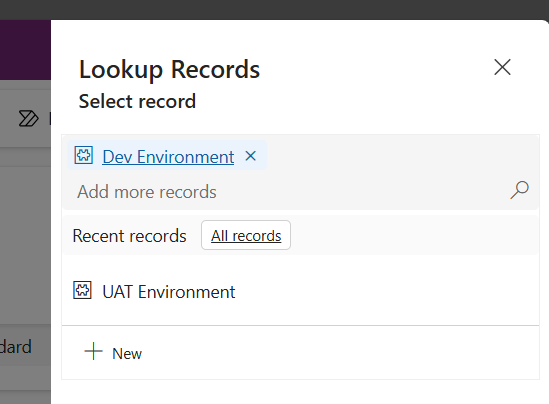
- Scroll down to the Linked Development Environments grid
- Click on the three vertical dots on the top right corner of the grid to open additional grid options
- Select Add Existing Deployment Environment, then select Dev environment you configured earlier in this lab, then click Add
-
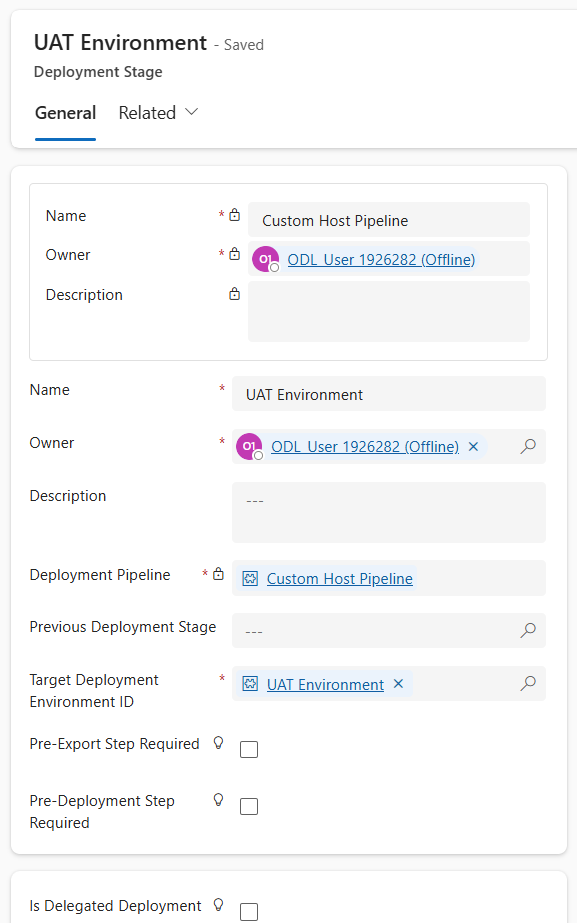
In the Deployment Stages (Deployment pipeline) grid, select New Deployment Stage
- Complete the form:
- Name: UAT Environment
- Description: optional, add a description of the environment you are deploying to
- Previous Deployment Stage: Leave blank as this will be our first deployment stage
- Target Deployment Environment ID: UAT Environment
-
Click Save and Close
-
In the real world, repeat last two steps if you have more than one target environments for your pipeline.
- This pattern can be repeated to add up to 7 deployment stages in your pipeline.
Congratulations! You have created a basic Custom Host Pipeline. Go to your development (source) environment, and open any unmanaged solution. Then, click on the Pipelines tab (rocket icon) to open the Pipelines pane. Here, you will see your newly created pipeline:
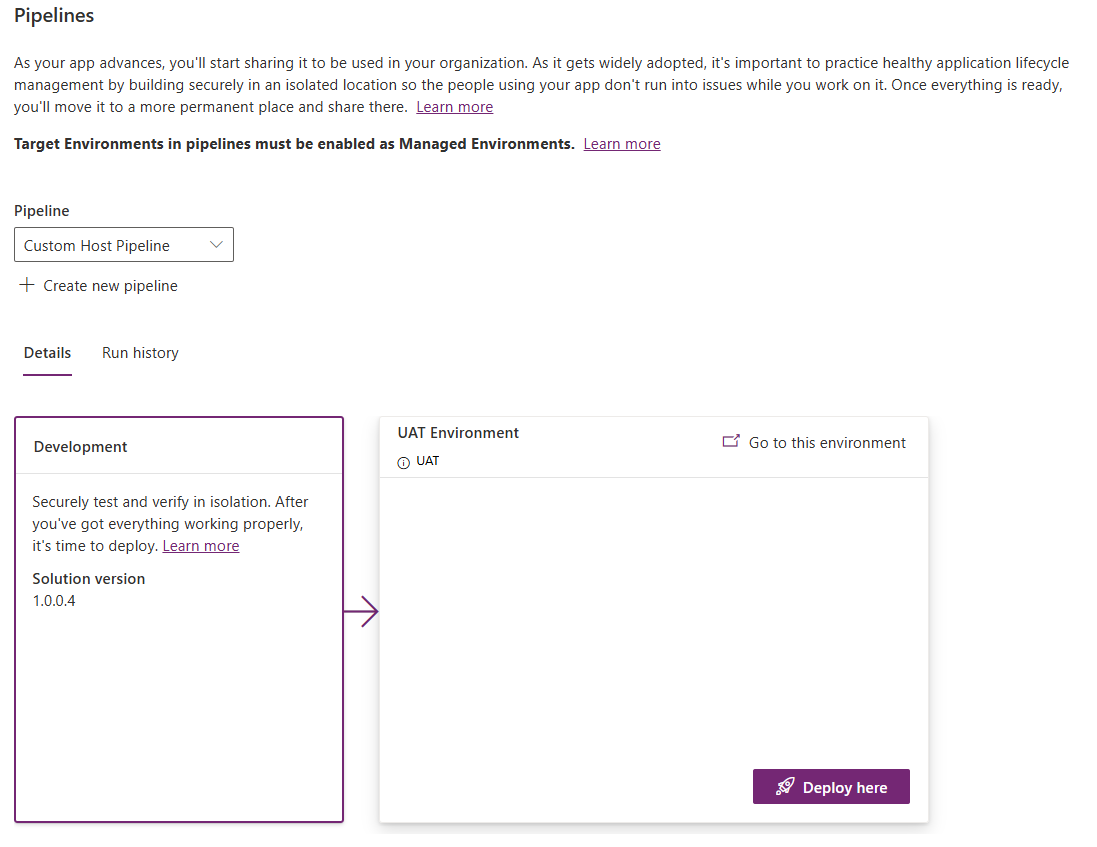
Deploy Using a Custom Host pipeline
-
Click Deploy here button in the UAT Environment stage
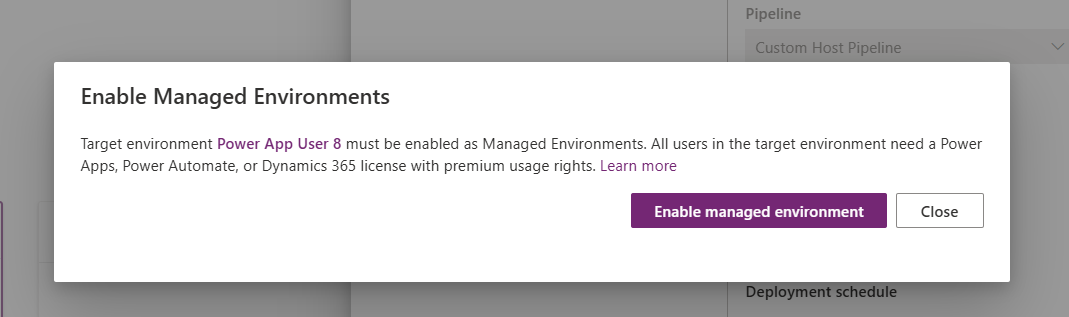
-
You will get a popup which asks you to enable Managed Environments (ME) on the target env. Remember, Pipelines are a ME only feature. Your Target environments must be enabled for ME to perform a deployment. Only Power Platform and D365 Admins will see this prompt, so in the real world, admins should enable ME on every environment they expect to be used in a pipeline. Steps to enable ME can be found in the documentation. Click Enable managed environment
-
Follow the same steps you performed in the Deploy Using a Platform Host pipeline section to complete the deployment.
So far, the two types of pipelines we’ve explored enable basic deployments only. However, some processes call for greater control over the deployment process to ensure production assets are kept safe from unintentional or unapproved changes. For example, while administrators have permission to deploy to production, it’s important makers and developers do not have elevated access. Or, maybe the process mandates an admin or change manager’s approval before a deployment to production can be initiated. Let’s configure our pipeline to support these processes.
🔧 Task 3 (Optional) - Extend Pipelines
Gated extensions

In this section, we will extend deployment pipelines we created in the sections above. Extending pipelines allows organizations to tailor pipelines to their unique needs. For example, you can add approvals, deploy via service principals, and integrate with internal systems of record, Azure DevOps, GitHub, and much more. Custom steps can be initiated at various stages of the pipeline. These steps are defined by Microsoft Dataverse business events. In Power Pipelines terminology, these initiation stages are called “Gated Extensions.” Here are the 3 available gated extensions:
Pre-export step required: Allows running custom validation logic when a deployment request is submitted. Pipelines won’t export the solution from a development environment until this step is marked as completed. This should only be used on the first stage of the pipeline.
Pre-deployment step required: Allows initiation of custom steps after a deployment has been triggered, but before installation begins on the target environment. This gated extension can be used to trigger processes such as approvals before a solution is deployed to the target environment.
Is delegated deployment: Carries out deployments using a service principal or pipeline stage owner’s identity instead of the requesting maker’s identity. This identity ensures makers can request deployments without elevated (or any) access within target environments. Requires approval from an authorized identity.
Each step of a pipeline deployment triggers a real-time event at the beginning and completion of the step for which you can initiate custom logic. Additional triggers are produced when gated extensions are enabled. These correspond to the custom step inserted when an extension is enabled on the pipeline stage.
The tables here indicate triggers and actions required for each extension:
| Gated extension | Start trigger | Complete Step | Unbound action | Connection to use |
|---|---|---|---|---|
| Pre-export step required | OnDeploymentRequested | N/A | UpdatePreExportStepStatus | Any identity with access to update the deployment stage run record |
| Is delegated deployment | OnApprovalStarted | OnDeploymentCompleted | Create a connection as the service principal or pipeline stage owner as configured on the pipeline stage. The pipeline stage owner must be an owner of the service principal in Microsoft Entra ID. | |
| Predeployment step required | OnPreDeploymentStarted | OnPreDeploymentCompleted | UpdatePreDeploymentStepStatus | Any identity with access to update the deployment stage run record |
Now, let’s extend the Custom Host pipeline we created in the previous task to include an Approval step. Once we get the approval, we will perform a Delegated deployment using a SPN user.
Create Enterprise Application
-
Navigate to https://portal.azure.com
IMPORTANT: You’ll need to set up MFA to proceed with the Enterprise Application creation. This is a security requirement for accessing the Azure portal. Follow the on screen instructions to configure MFA. If you are UNABLE to enroll in MFA for any reason, you may switch to a “Stage Owner” delegation pipeline. Please skip to the “Stage Owner Delegated Pipeline” section. You do not need to create the Enterprise Application, security group, nor do you have to add the Enterprise Application user to any environments.
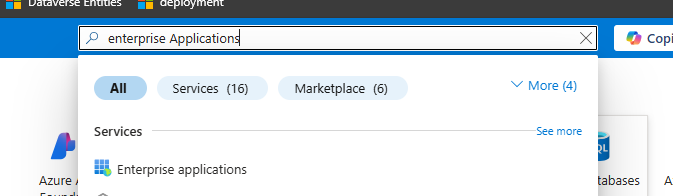
-
Once you have access to the Azure portal, search “Enterprise Applications” in the top search bar
-
In the Enterprise applications page, click + New Application, then select + Create your own application
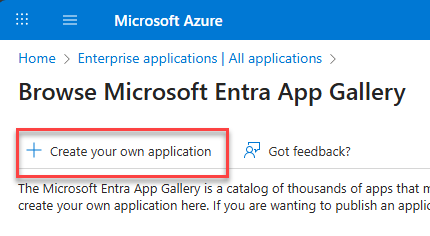
-
In the Create your own application wizard, provide a name for your enterprise application. We will use “Delegated Deployment User.” Click Create
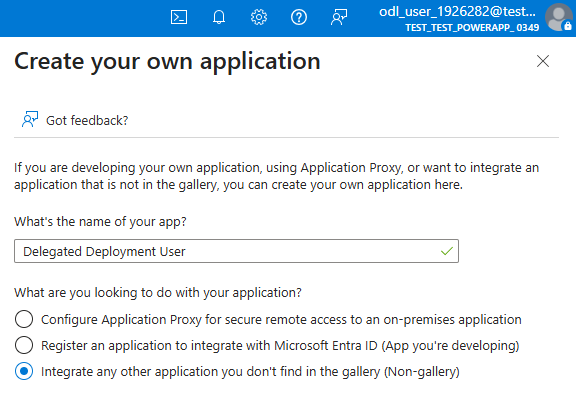
-
Once your Enterprise application is created, in the left hand navigation pane, click Owners under the Manage tab
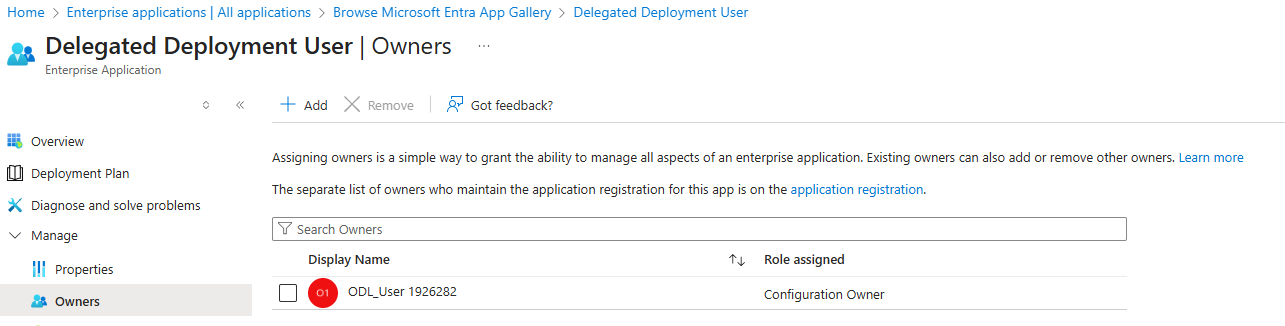
-
Click + Add to add your own user as an owner. You can find your own username by clicking your username on the top right corner. It will most likely begin with “ODL_User…” Click Select
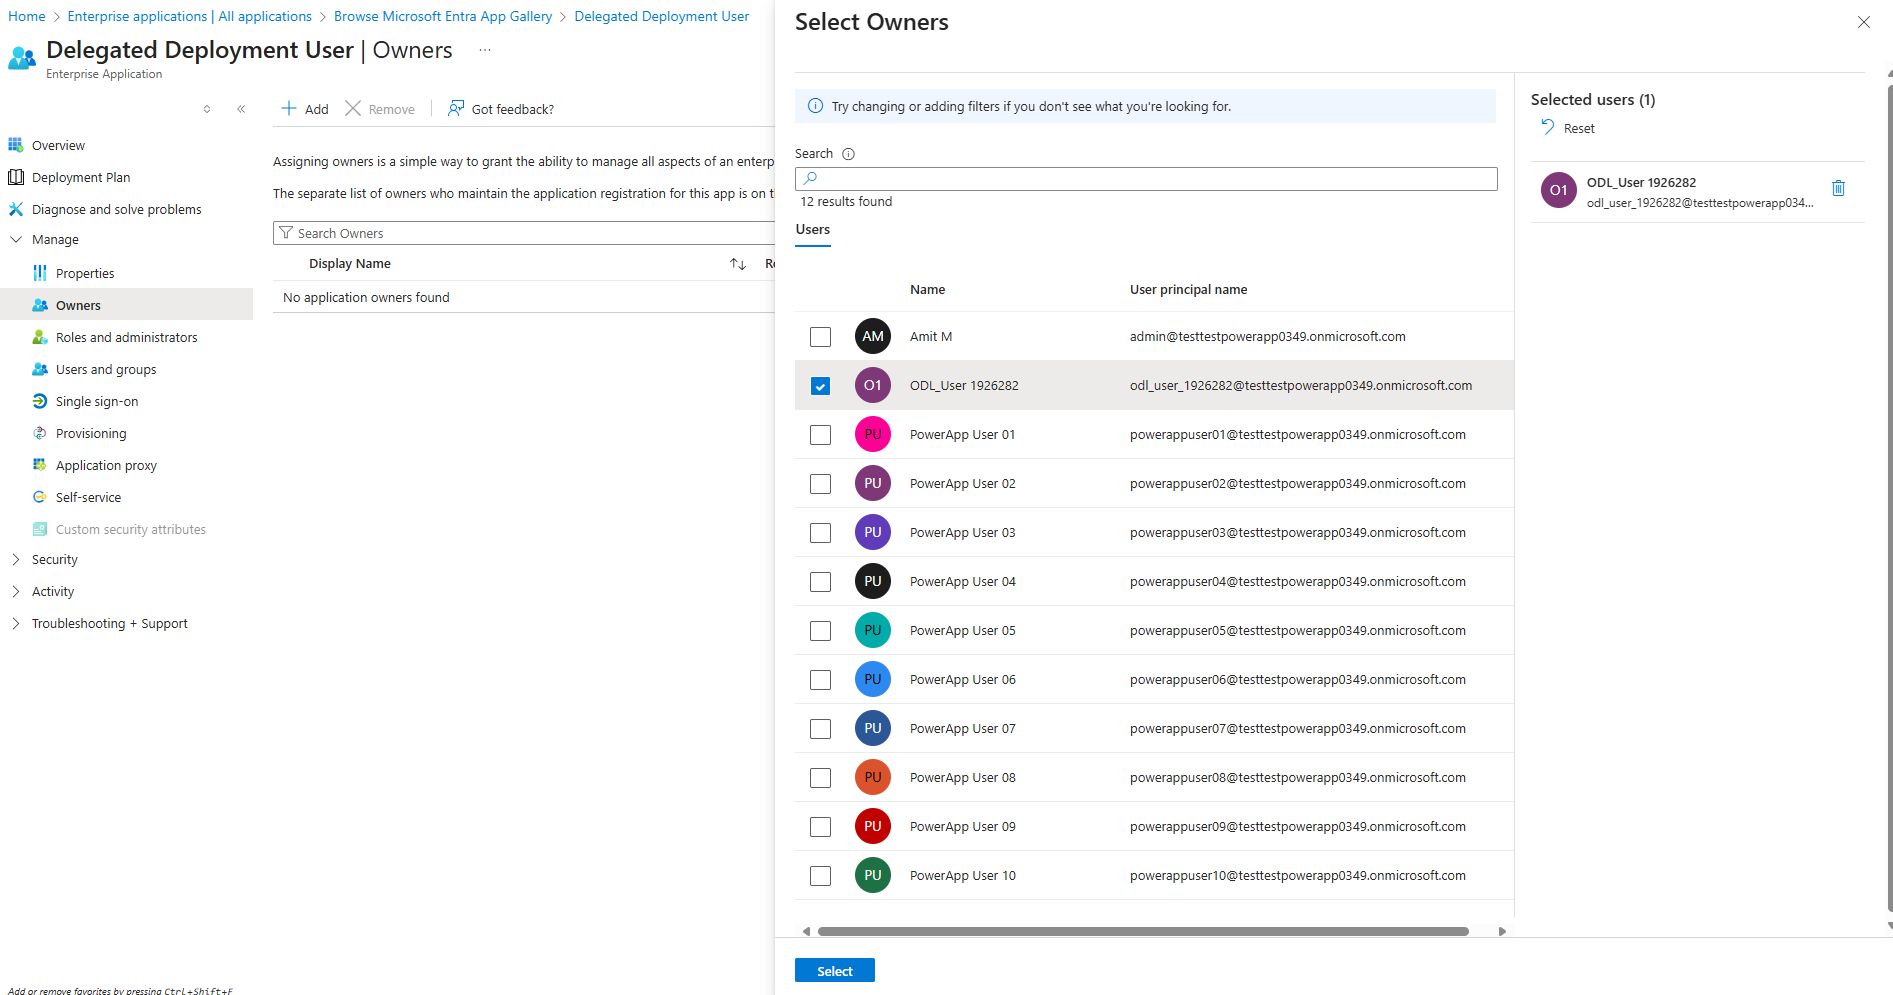
This owner you added to this application user must correspond to the Stage Owner where you initiate the gated extension from. We will need to remember this for later in this lab.
-
Under the Security tab, select Permissions, then click the Application registration link
Next, let’s add a certificate to our new app user. This is how we will authenticate our connection.
-
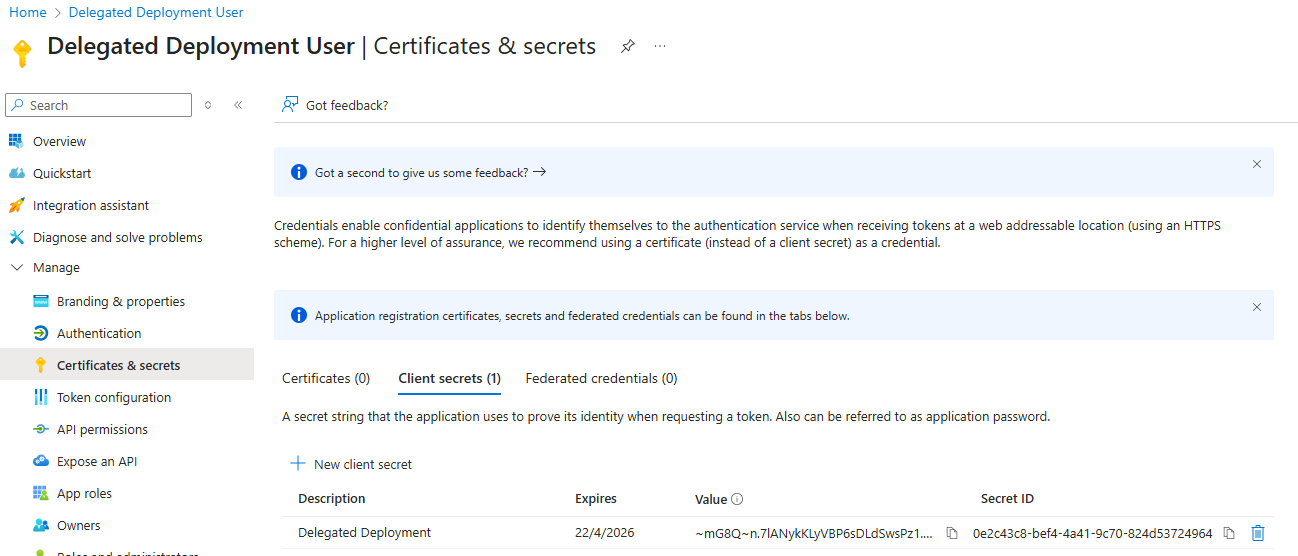
Under the Manage tab, click on Certificates & secrets
- Click + New client secret
- Description: Delegated Deployment
- Expires: Recommended: 180 days (6 months)
- IMPORTANT: note the client secret value before navigating away and store it in an easily accessible place. Tip—use Notepad, sticky notes, or OneNote for easy copy/paste later
-
Value: _______
-
-
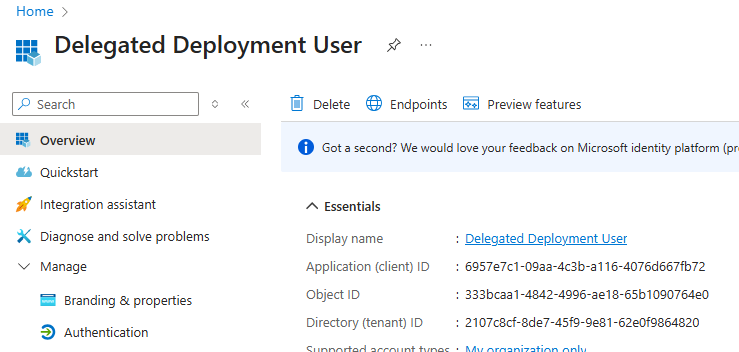
Click on the Overview tab in the navigation blade
- Note down Application (client) ID and Directory (tenant) ID
- Application (client) ID: _______
- Directory (tenant) ID: _______
Create Sharing Security Group
While we are still on the Azure portal, let’s create our security group.
-
Navigate to the new group creation page by using this link: https://portal.azure.com/?l=en.en-ie#view/Microsoft_AAD_IAM/AddGroupBlade
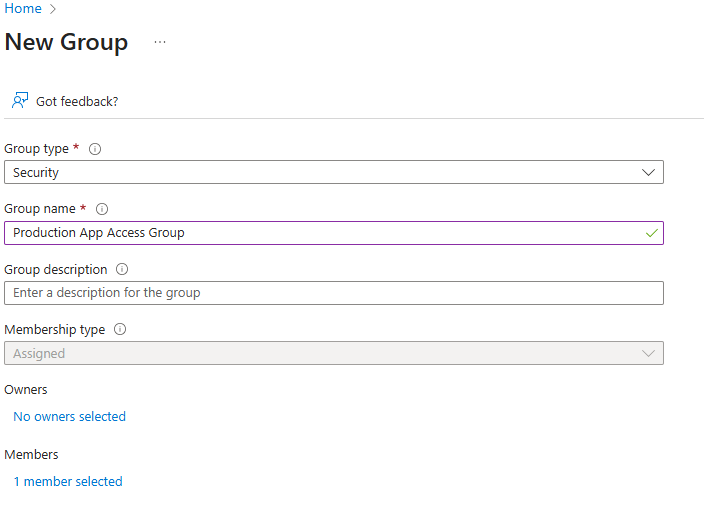
- Use the following group details:
- Group Type: Security
- Group Name: Production App Access Group
-
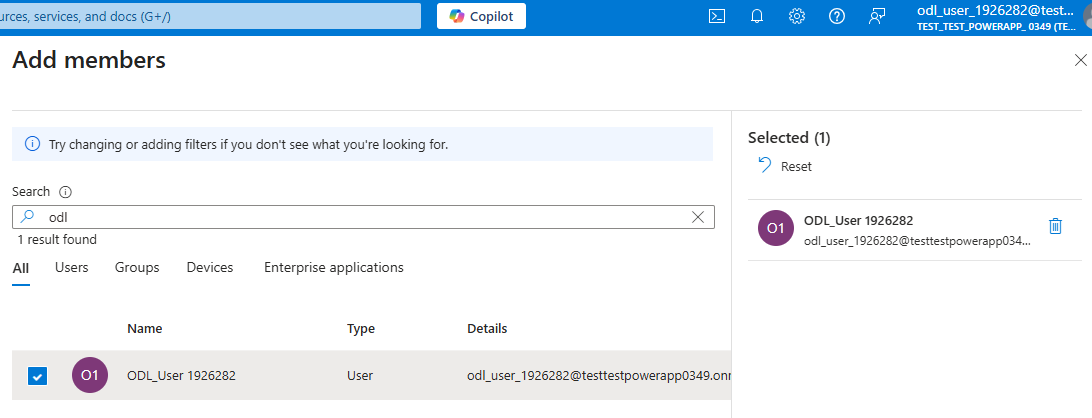
Click No members selected to add members to the group
-
Search for your own lab user, click Select
Your group should look like this before clicking Create:
Create application user in Dataverse
Add Application User to each environment of our pipeline, including the Custom Host Environment
-
-
Navigate to PPAC at admin.powerplatform.microsoft.com
-
In the Environments tab, select your Custom Host environment
-
In the Access section, under S2S apps, click See all
-
Click + New app user
-
App: click + Add an app > select the app registration you created earlier (you may need to search the name of the Enterprise App if it is not listed) > click Add
-
Business unit: select default BU (type “org” and select the first item)
-
Security roles: System Administrator*
*The System Administrator role is required for the SPN user as it is necessary to deploy certain solutions containing components, such as plugins.
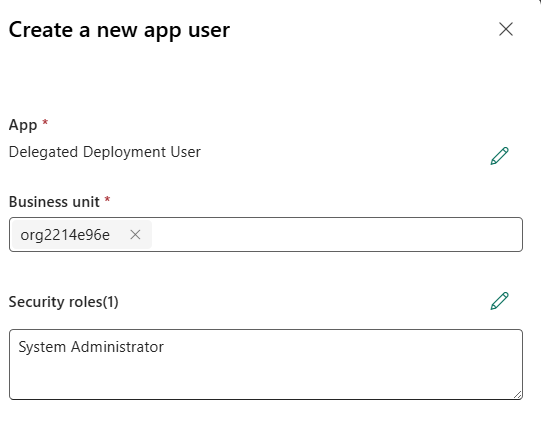
-
Click Create
-
Your application user will be listed with a # prefix in the Name column
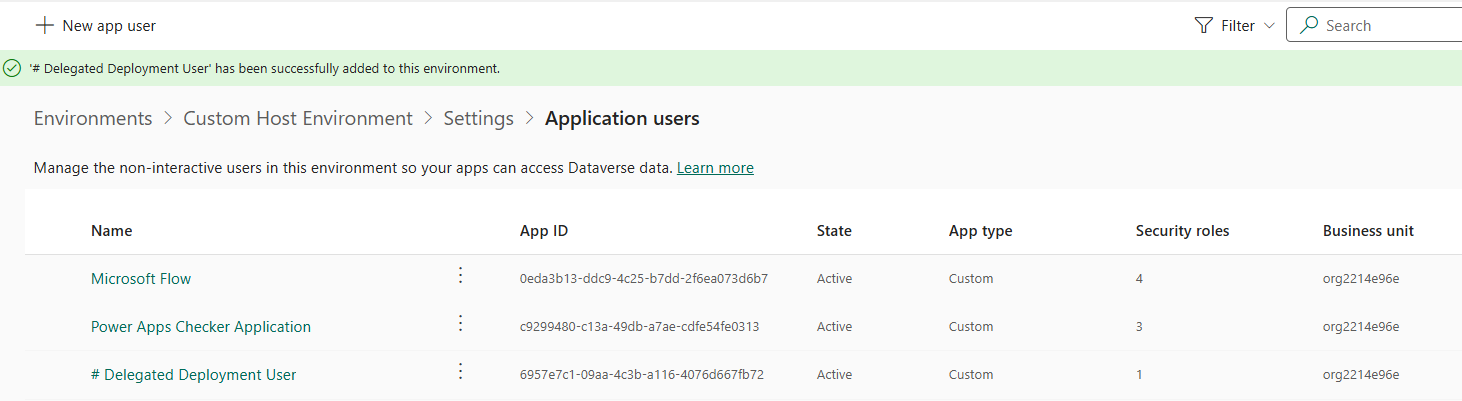
- Repeat this process for your Dev and UAT environments
Create an approval + SPN delegated deployment flow
Pathway 1 - For the purposes of this lab, we have provided a complete version of this flow in your lab materials folder. If you are running low on time but would still like to complete this section of the lab, manually import the “Lab 3 Approval Delegation Flow.zip” solution folder in your Custom Host Environment. After import, jump to Update Flow after solution import section.
Pathway 2 - If you would like to create the flow manually, follow the steps below.
NOTE: In the instructions below, we have provided the written expression for the dynamic values. You may choose to copy/paste the expressions from the instructions below, or use the lightning bolt icon to add the dynamic values to your flow manually.
-
Navigate back to https://make.preview.powerapps.com/ and select your Custom Host Environment from the environment picker dropdown
-
Click Flows from the left-hand navigation blade
-
Click + New flow > choose “Automated cloud flow” and name your flow “SPN Delegated Deployment Approvals”
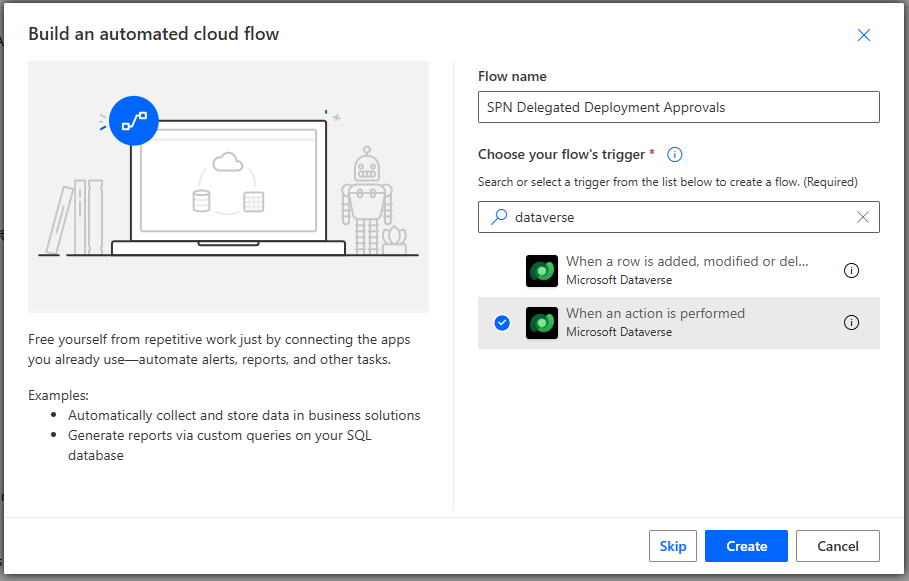
-
Select the trigger “When an action is performed” from the Dataverse connector.
- Configure the trigger with the following parameters:
- Catalog: Microsoft Dataverse Common
- Category: Power Platform Pipelines
- Table Name: (none)
- Action Name: OnApprovalStarted
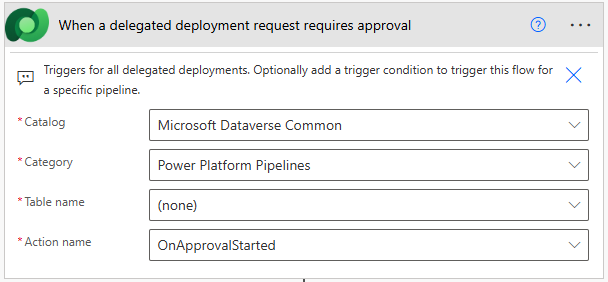
-
Click the three dots and select Settings, set the trigger condition to the below parameter. This trigger condition allows us to have a unique flow process for each pipeline. If you’d like to use the same flow for all your pipelines, skip this step:
@equals(triggerOutputs()?['body/OutputParameters/DeploymentPipelineName'], 'Custom Host Pipeline')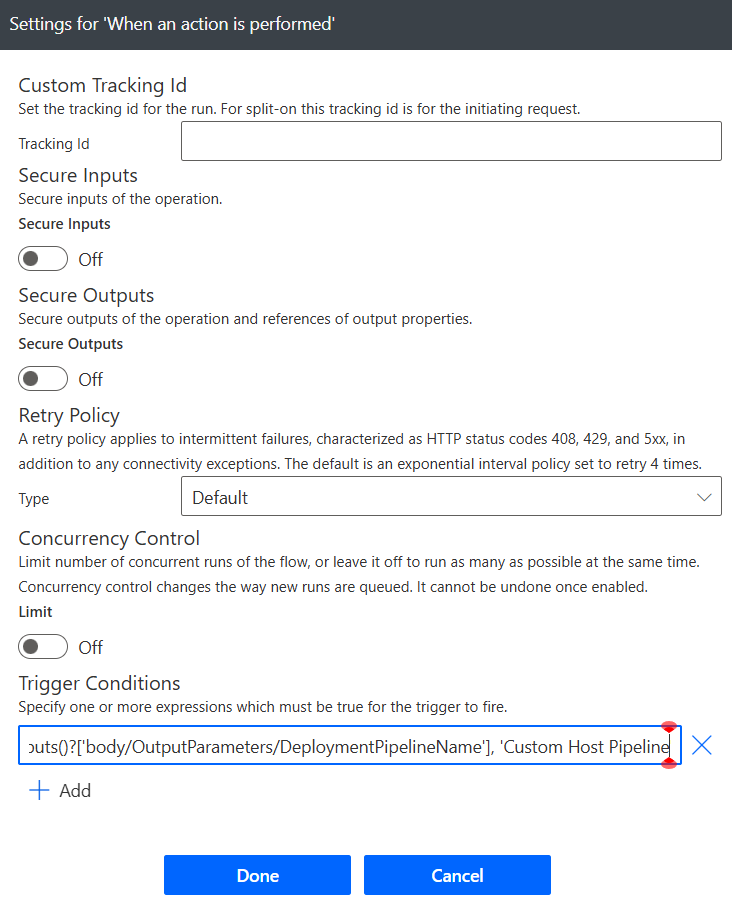
SKIP UPDATING THE CONNECTION IF YOU ARE USING STAGE OWNER DELEGATION
-
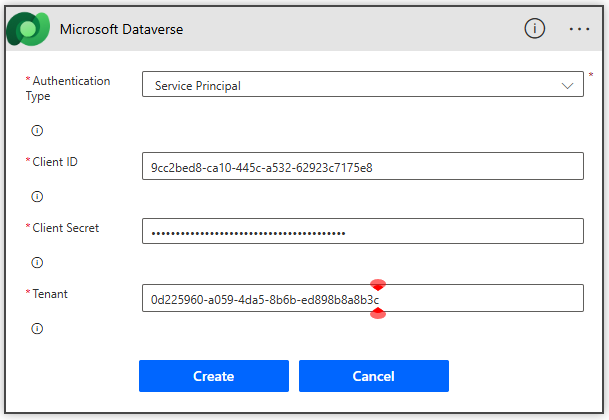
On the trigger “When an action is performed” Dataverse action, click the 3 dots, click + Add new connection [Connection Reference]
- Configure the connection:
- Authentication Type: Service Principal
- Client ID: < Client ID of the App User you created earlier>
- Client Secret: < Client secret of the App User certificate you created earlier>
- Tenant: < TenantID you saved earlier>
-
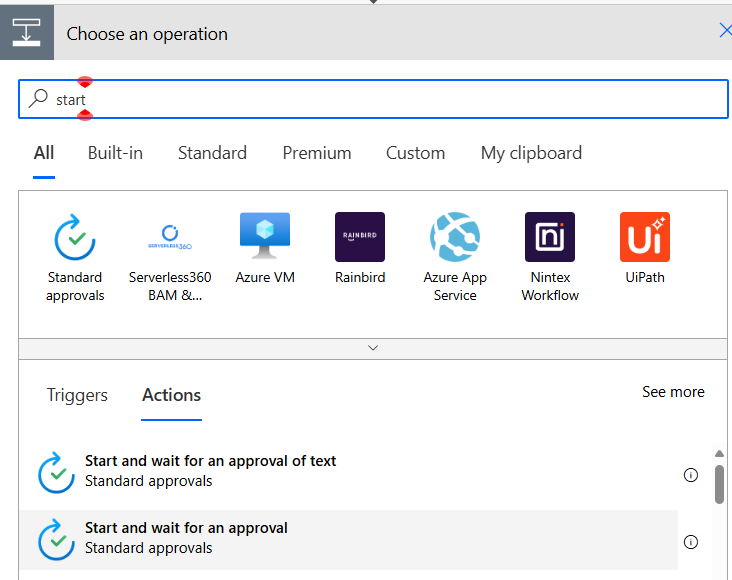
Click +New Step and search for “Start and wait for an approval” in the Standard Approvals connector.
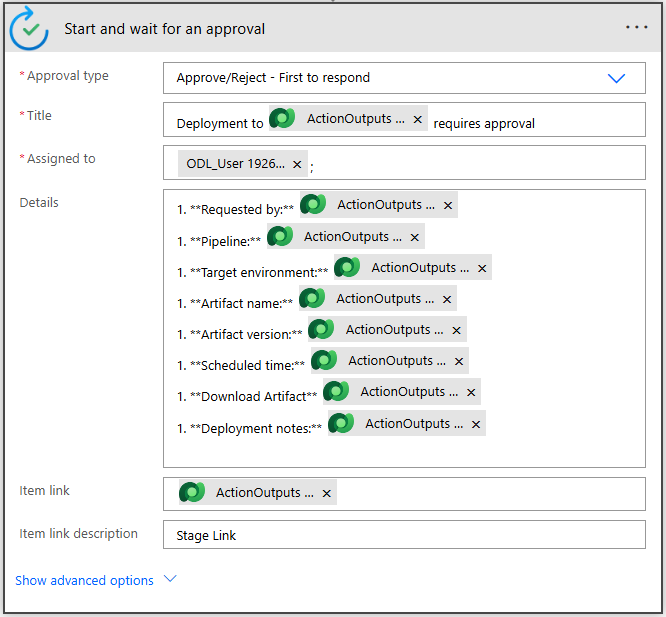
- Configure the approval with the following parameters (you may copy/paste the parameters):
- Approval Type: Approve/Reject – First to respond
- Title: Deployment to @{triggerOutputs()?[‘body/OutputParameters/DeploymentStageName’]} requires approval
- Assigned To: « YOUR EMAIL HERE»
-
Details: Provide the deployment details using the provided markdown format. A sample is provided below:
1. **Requested by:** @{triggerOutputs()?['body/OutputParameters/DeployAsUser']} 1. **Pipeline:** @{triggerOutputs()?['body/OutputParameters/DeploymentPipelineName']} 1. **Target environment:** @{triggerOutputs()?['body/OutputParameters/DeploymentStageName']} 1. **Artifact name:** @{triggerOutputs()?['body/OutputParameters/ArtifactName']} 1. **Artifact version:** @{triggerOutputs()?['body/OutputParameters/SolutionArtifactVersion']} 1. **Scheduled time:** @{triggerOutputs()?['body/OutputParameters/ScheduledTime']} 1. **Download Artifact** @{triggerOutputs()?['body/OutputParameters/UnmanagedArtifactFileDownloadLink']} 1. **Deployment notes:** @{triggerOutputs()?['body/OutputParameters/AIGeneratedSolutionDescription']} - Item Link:
@{triggerOutputs()?['body/OutputParameters/StageRunDetailsLink']} - Item Link Description: Stage Link
-
Click Save
-
Click + New step and add a condition to check and add “responses approver response” dynamic variable to the condition. This is the expression parameter:
if @items('Apply_to_each')?['approverResponse'] is equal to Approve. When you add the Condition parameter, an Apply to each will automatically be added around your condition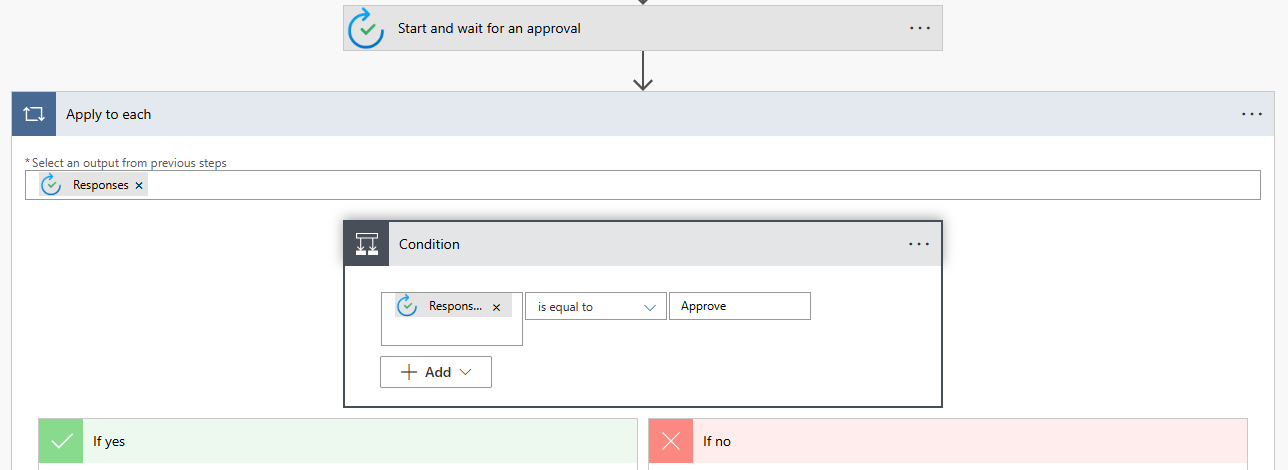
-
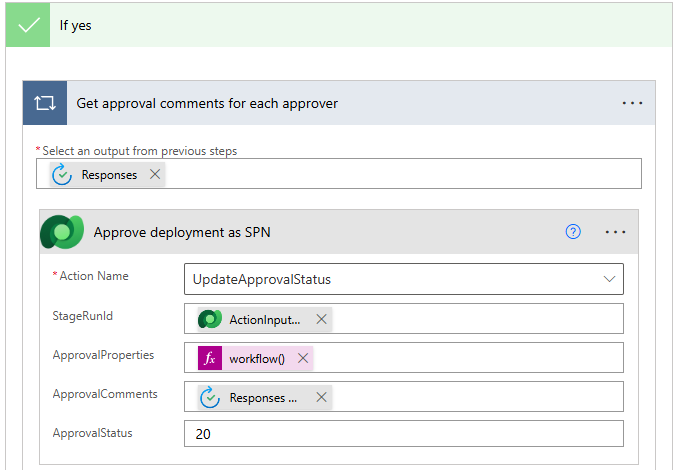
In the If yes path, add the Perform an unbound action step from the Microsoft Dataverse connector.
- Configure the true condition with the following parameters:
- Action Name: UpdateApprovalStatus
- ApprovalComments:
@{items('Apply_to_each')?['comments']} - StageRunId:
@triggerOutputs()?['body/InputParameters/StageRunId'] - ApprovalProperties:
@{workflow()} - ApprovalStatus: 20
-
Tip: Approval Status Step mappings: Pending- 10, Completed – 20, Failed – 30
-
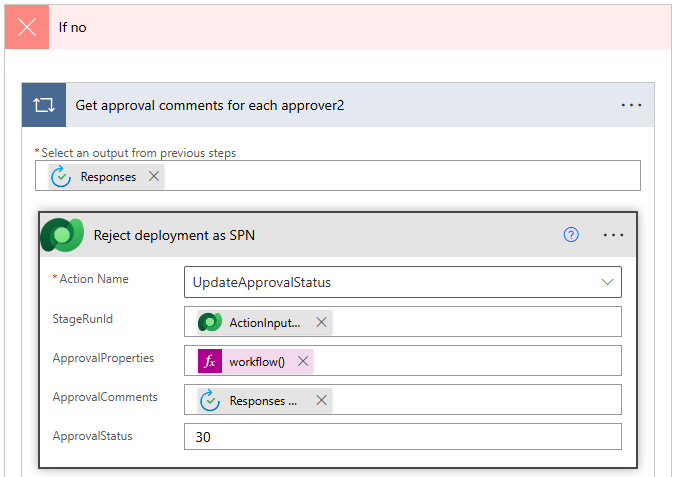
If the If no path, add the Perform an unbound action step from the Microsoft Dataverse connector.
- Configure the false condition with the following parameters:
- Action Name: UpdateApprovalStatus
- ApprovalComments:
@{items('Apply_to_each')?['comments']} - StageRunId:
@triggerOutputs()?['body/InputParameters/StageRunId'] - ApprovalProperties:
@{workflow()} - ApprovalStatus: 30
-
Tip: Approval Status Step mappings: Pending- 10, Completed – 20, Failed – 30
-
Save your flow.
SKIP UPDATING THE CONNECTION IF YOU ARE USING STAGE OWNER DELEGATION
We’re not done yet! Since we will be doing a delegated deployment, we need to make sure to configure the flow to use the SPN credentials to update the UpdateApprovalStatus actions.
-
On the If yes Dataverse action, click the 3 dots, check to see if the connection you created earlier is the one associated to this action. It should say “Microsoft Dataverse.” If not, click + Add new connection [Connection Reference]
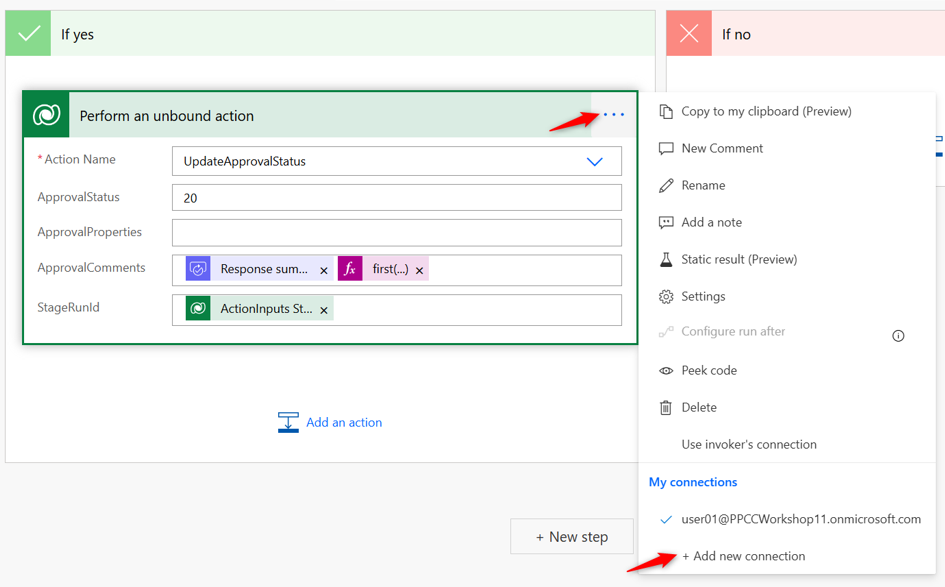
- Configure the connection:
- Authentication Type: Service Principal
- Client ID: < Client ID of the App User you created earlier>
- Client Secret: < Client secret of the App User certificate you created earlier>
-
Tenant: < TenantID you saved earlier>

-
Do the same for the If no Dataverse action
-
Click Save
Update Flow after solution import
This section is only needed if you used the solution import method to create your flow. If you created the flow yourself, skip this section and continue on to the “Update pipeline to run as delegated” section.
-
After importing your solution, check the following items. If you need help with the steps, refer to the manual flow creation steps above.
- Ensure the Trigger Condition of your flow has the correct Pipeline name. The sample pipeline is configured for “Custom Host Pipeline” Update only if you used a different name for your pipeline. Here is a sample trigger condition:
@equals(triggerOutputs()?['body/OutputParameters/DeploymentPipelineName'], 'Custom Host Pipeline')-
In the Start and wait action, update the Assigned to field with your username
-
If you are using SPN delegation only:
-
Update the trigger with the SPN connection. Refer to the previous Task for detailed steps.
-
Update the If yes and If no connections to use the SPN connection.
-
Update pipeline to run as SPN delegated
The flow we just created in the previous section will not trigger until we enable the Is Delegated Deployment gated extension in the pipeline configuration. Now, let’s configure our pipeline to initiate the flow.
-
-
Return to the Pipeline Host environment, and launch the Deployment Pipeline Configuration app
-
Click on the Pipelines tab
-
Open the pipeline you created earlier called Custom Host Pipeline
-
In the Deployment Stages (Deployment pipeline) grid, open the first stage in your pipeline. This will be the stage with a blank value in the Previous Deployment Stage column.
-
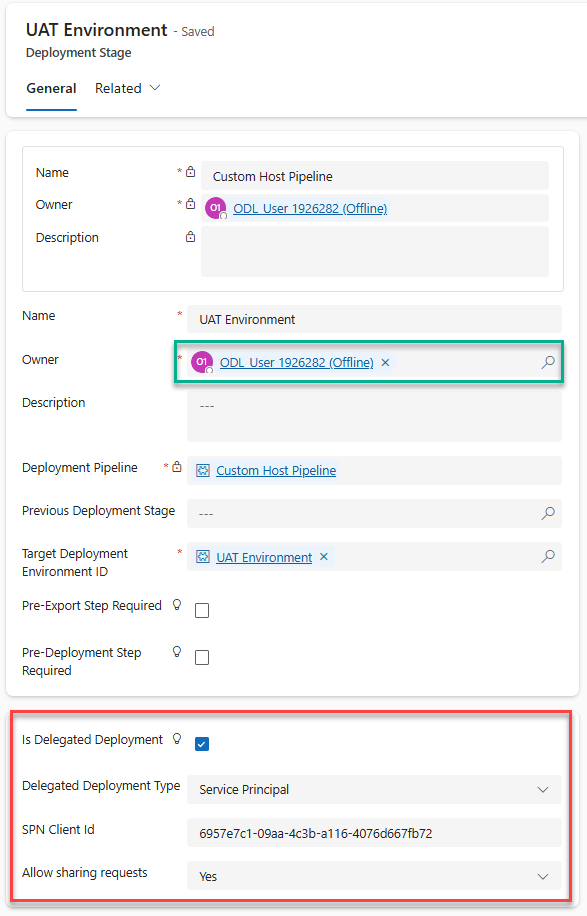
On the deployment stage record form, check the box next to Is Delegated Deployment
-
Select Service Principal for Delegated Deployment Type
-
For SPN Client Id, provide the client ID of the app user you created earlier
-
Allow sharing requests: Yes
Take note of the stage Owner field (highlighted in green on the screenshot below). It is important that the owner you added on the Enterprise Application we created earlier match the owner of this stage.
-
- Click Save & Close
Update pipeline to run as Stage Owner Delegated
As you might know by now, there are two types of delegation offered in Power Pipelines– Stage Owner delegation and Service Principal delegation. In this section, we will focus on Stage Owner delegation. Many organizations leverage Service Accounts (fully interactive, shared, accounts with elevated privileges) as opposed to using SPNs. Such organizations can leverage Stage Owner delegation to allow makers to deploy solutions under the Service Account’s context. This type of delegation does have some drawbacks, which limits their capabilities when compared to SPN delegation. For example, since connections cannot be shared with interactive accounts, when you deploy with Stage Owner delegation only the stage owner themselves can configure connections in the target env. When other users who’ve been given access to the Stage Owner delegated pipeline try to deploy, they will not be able to set the connections in the target environment. Stage Owner pipelines also do not support sharing components in the target environment.
Let’s configure our pipeline to use Stage Owner delegation.
-
Return to the Pipeline Host environment, and launch the Deployment Pipeline Configuration app
-
Click on the Pipelines tab
-
Open the pipeline you created earlier called Custom Host Pipeline
-
In the Deployment Stages (Deployment pipeline) grid, open the first stage in your pipeline. This will be the stage with a blank value in the Previous Deployment Stage column.
-
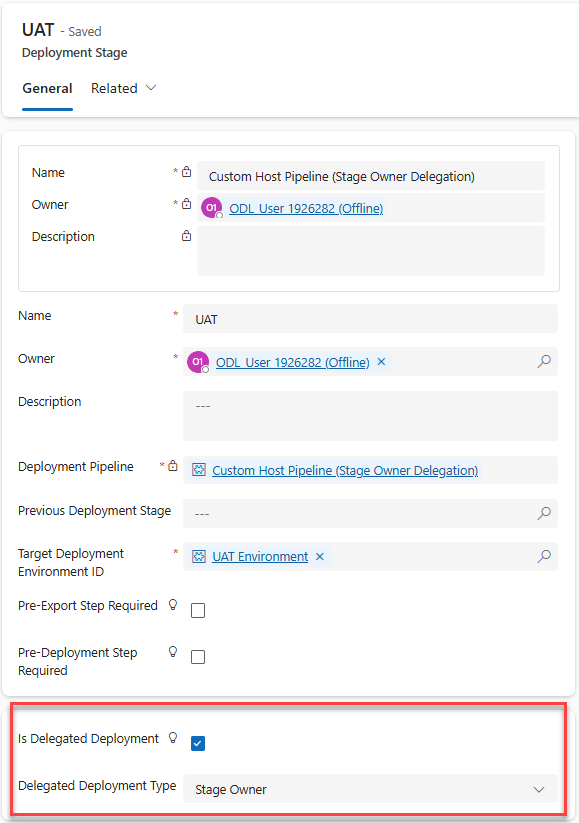
On the deployment stage record form, check the box next to Is Delegated Deployment
-
Select Stage Owner for Delegated Deployment Type
-
-
Click Save & Close
Create a security role
Let’s update our Contoso Real Estate solution with an additional component. We will create a security role to include as a part of the solution in our next deployment. We will also use this security role to grant access to users in the target environment after deployment is complete.
-
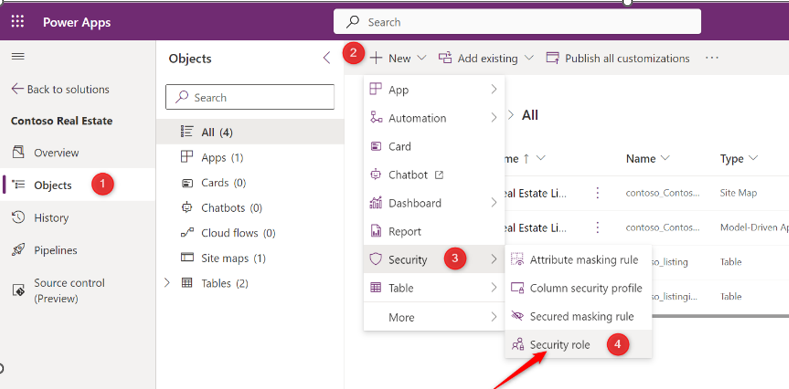
In the developer environment, click on the Solutions tab, then drill into the Contoso Real Estate solution
-
Click Objects > +New > then Security > and finally, Security Role
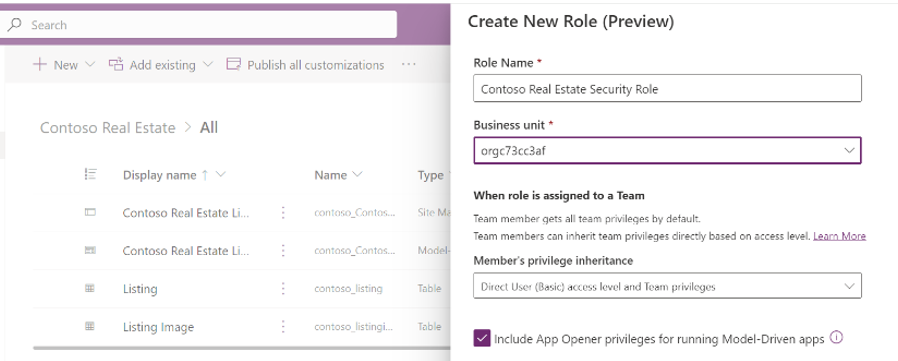
- Configure the Create New Role screen with these details:
- Role Name: Contoso Real Estate Security Role
- Business Unit: <root BU, usually begins with “org” prefix>
- Member’s privilege inheritance: Direct User (Basic) access level and Team privileges
- Check the box for Include App Opener privileges for running Model Driven Apps
- Click Save
-
Search “Listing” on the top right corner to filter Listing tables
-
Select Listing table, then click Permission Settings
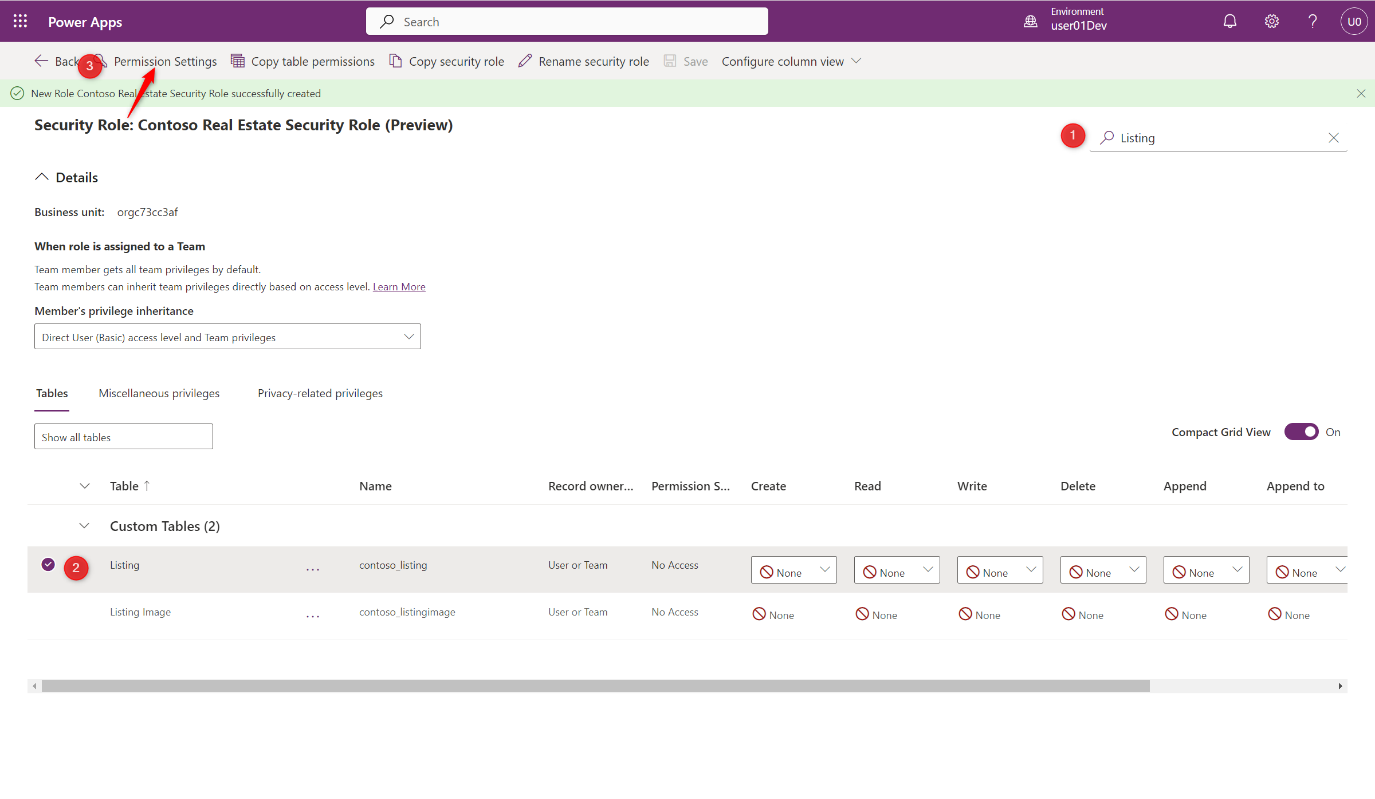
-
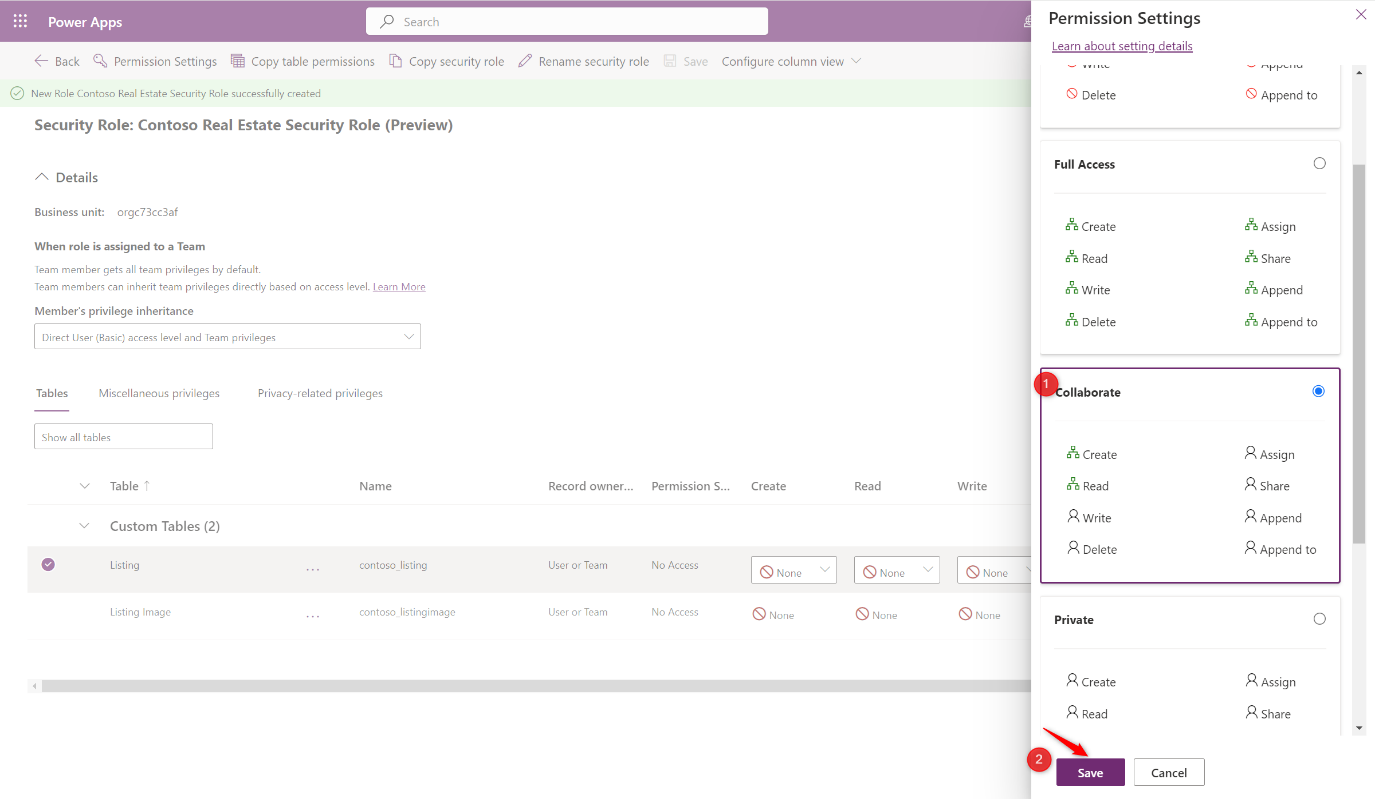
Select Collaborate in the Permission Settings blade and click Save
- Repeat for the Listing Image table as well
Create a Power Automate Cloud Flow
So far, we do not have any connection references in the app. For the purposes of demonstrating connections and connection sharing capabilities of pipelines, let’s add a quick flow to our solution. Skip this step if you are running low on time! It is not required to perform a successful delegated deployment.
-
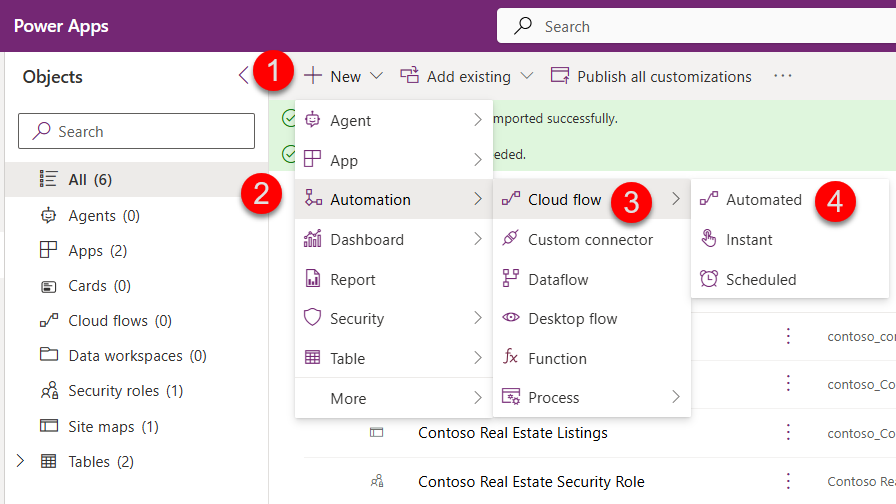
In the Contoso Real Estate solution, click + New > then Automation > Cloud Flow > Automated
-
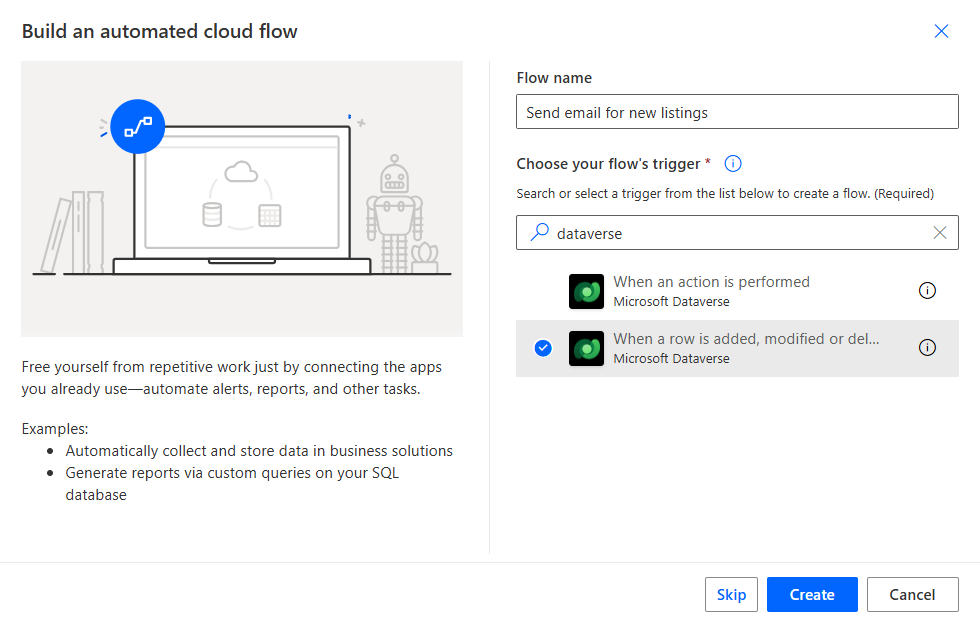
Name your flow “Send email for new listings”
-
Search for Dataverse, and select When a row is added, modified, or deleted trigger
-
Click Create
-
In the maker canvas, on the Trigger action select Oauth Authentication Type and complete the sign in wizard.
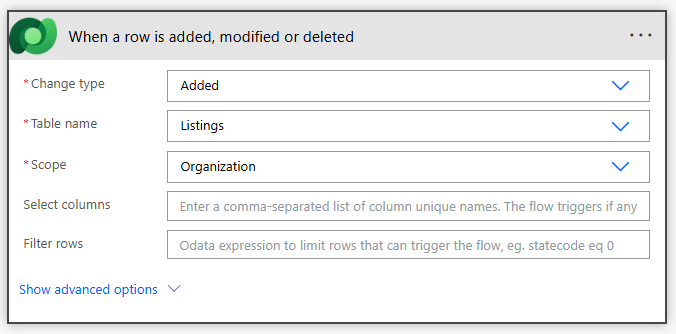
- In the Trigger action, complete the following:
- Change Type: Added
- Table name: Listings
- Scope: Organization
-
Click +New step
-
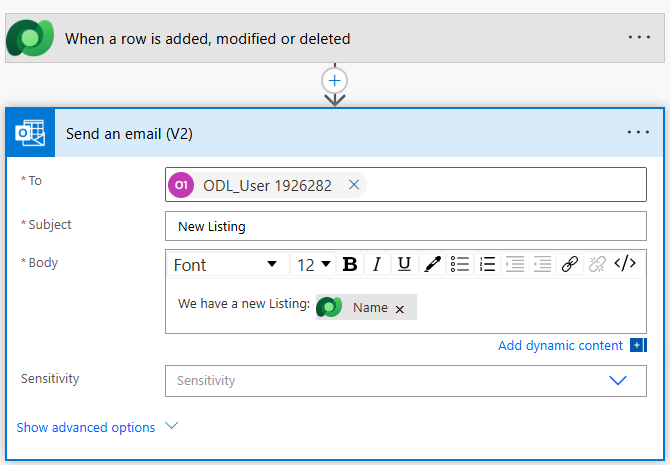
Search for Outlook and select Send an email (V2) action
- Configure the Send an email (V2) action like below:
- To: < your own username>
- Subject: New Listing
- Body: We have a new listing: < Name dynamics value>
-
Click Save
-
In your solution, you will now see 3 new items. In addition to the Cloud Flow, as we used two connections in the flow, one for Dataverse and another for Outlook, we will have 2 connection references added. Connection references are a means to package connection mappings to various actions in a solution.

Share MDA with Security Role
Now, let’s bind the Model Driven app with the new Security Role. This will allow us to set up sharing prior to deployment to the target env.
-
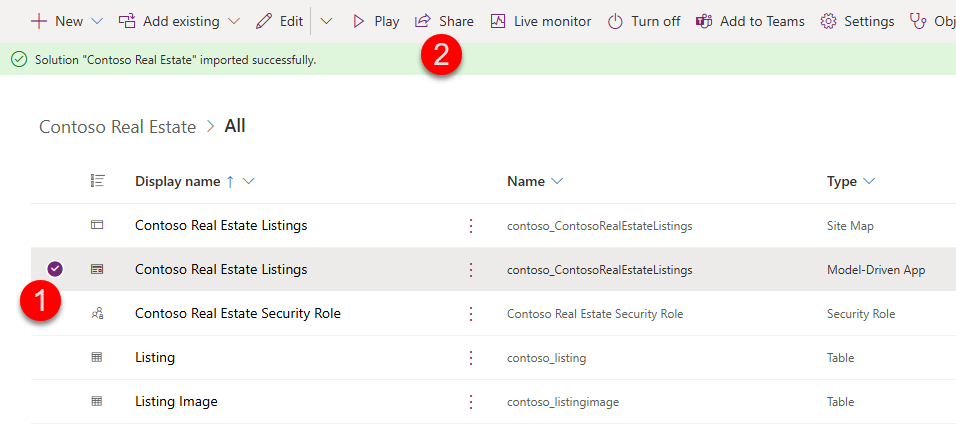
In the Solution explorer, select the Contoso Real Estate Listings Model Driven App
-
Click Share in the ribbon (If the share button is not illuminated, uncheck and click Publish All Customizations first)
-
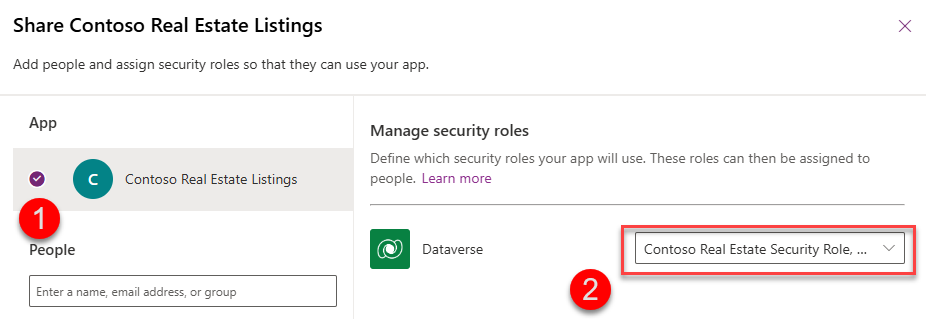
In the Share Contoso Real Estate wizard, select the App
-
In the Dataverse connector dropdown, select Contoso Real Estate Security Role
-
We are not sharing with any users yet, so go ahead and click Share
Run SPN delegated pipeline
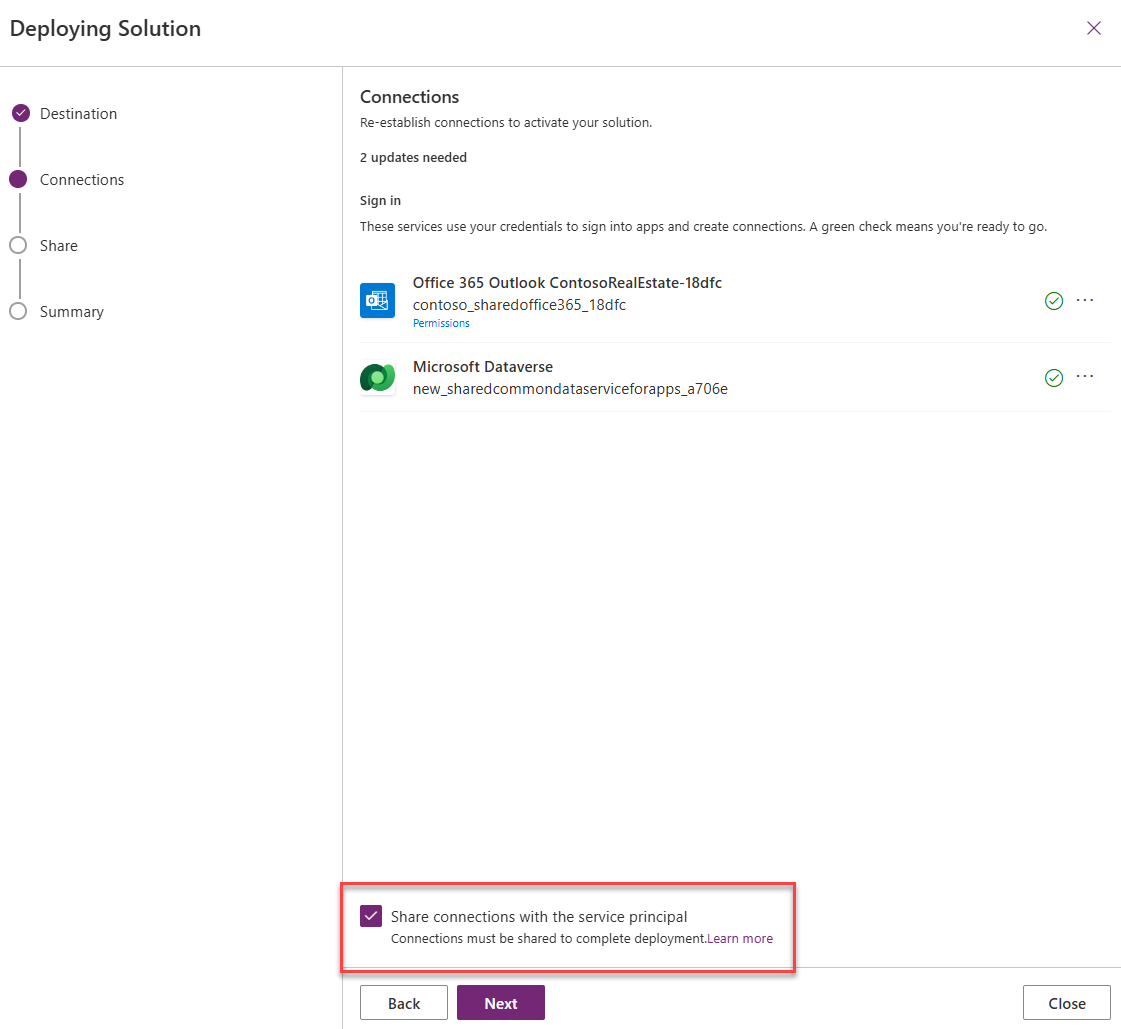
Finally, let’s test the new approvals and SPN delegation steps we just added. Go to your development environment, where you just created the security role, and start a deployment using the Custom Host Pipeline. After the usual validation, you will see an additional step called Share which we didn’t see when deploying before. This step will allow us to share objects within the Target environment directly from your Pipeline deployment. Since we also added a cloud flow with two connections, we will also see a new Connections step when deploying.
In your Dev environment, go to the Solutions page. There, in your Contoso Real Estate solution, click on the pipelines icon, and click Deploy Here on the UAT stage.
After the Select deployment target step, we see the Connections step. Make sure you leave “Share connections with the service principal” checked as this is a requirement to associate new connections with the connection references in the UAT env
After clicking Next, we see the Share step:

-
Search for Production App Access in the enter a group name box
-
Select the Contoso Real Estate Security Role to assign this role to members of the Production App Access team. Click Next
-
On the summary tab, take a close look at the AI-generated Deployment Notes section. This will be provided for all approvers to review as a part of the approval request.
-
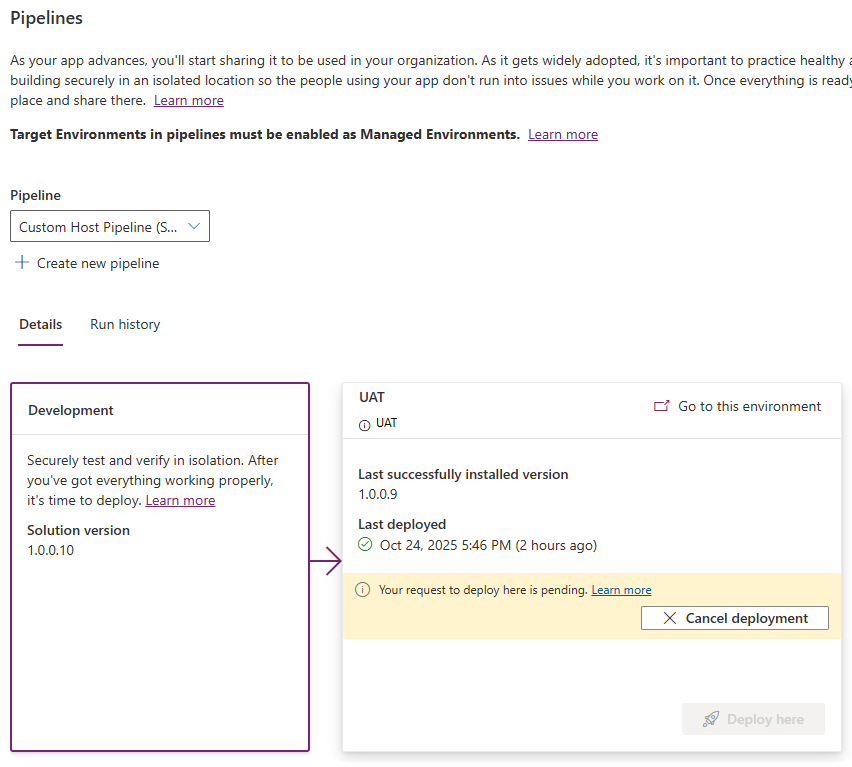
Click Deploy on the next page. The Deployment stage will look like this as the pipeline waits for the approval process to complete:

-
Proceed to the “Approve a pipeline deployment” section
Run a Stage Owner delegated pipeline
SKIP THIS SECTION IF YOU ARE USING SPN DELEGATION.
Now that our pipeline is configured, let’s test it by kicking off a deployment.
-
In your Dev environment, go to the Solutions page. There, in your Contoso Real Estate solution, click on the pipelines icon, and click Deploy Here on the UAT stage.
-
After the Select deployment target step, we see the Connections step. Note: connections will only be set correctly on the connection reference in the UAT environment when the Stage Owner is also initiating the deployment. If this was being done by a user who the pipeline has been shared with, the connections they configure here will be nil in the target environment.
-
Click Next
-
On the summary tab, take a close look at the AI-generated Deployment Notes section. This will be provided for all approvers to review as a part of the approval request.
-
Click Deploy on the next page. The Deployment stage will update to reflect that it is waiting for approvals:
Approve a pipeline deployment
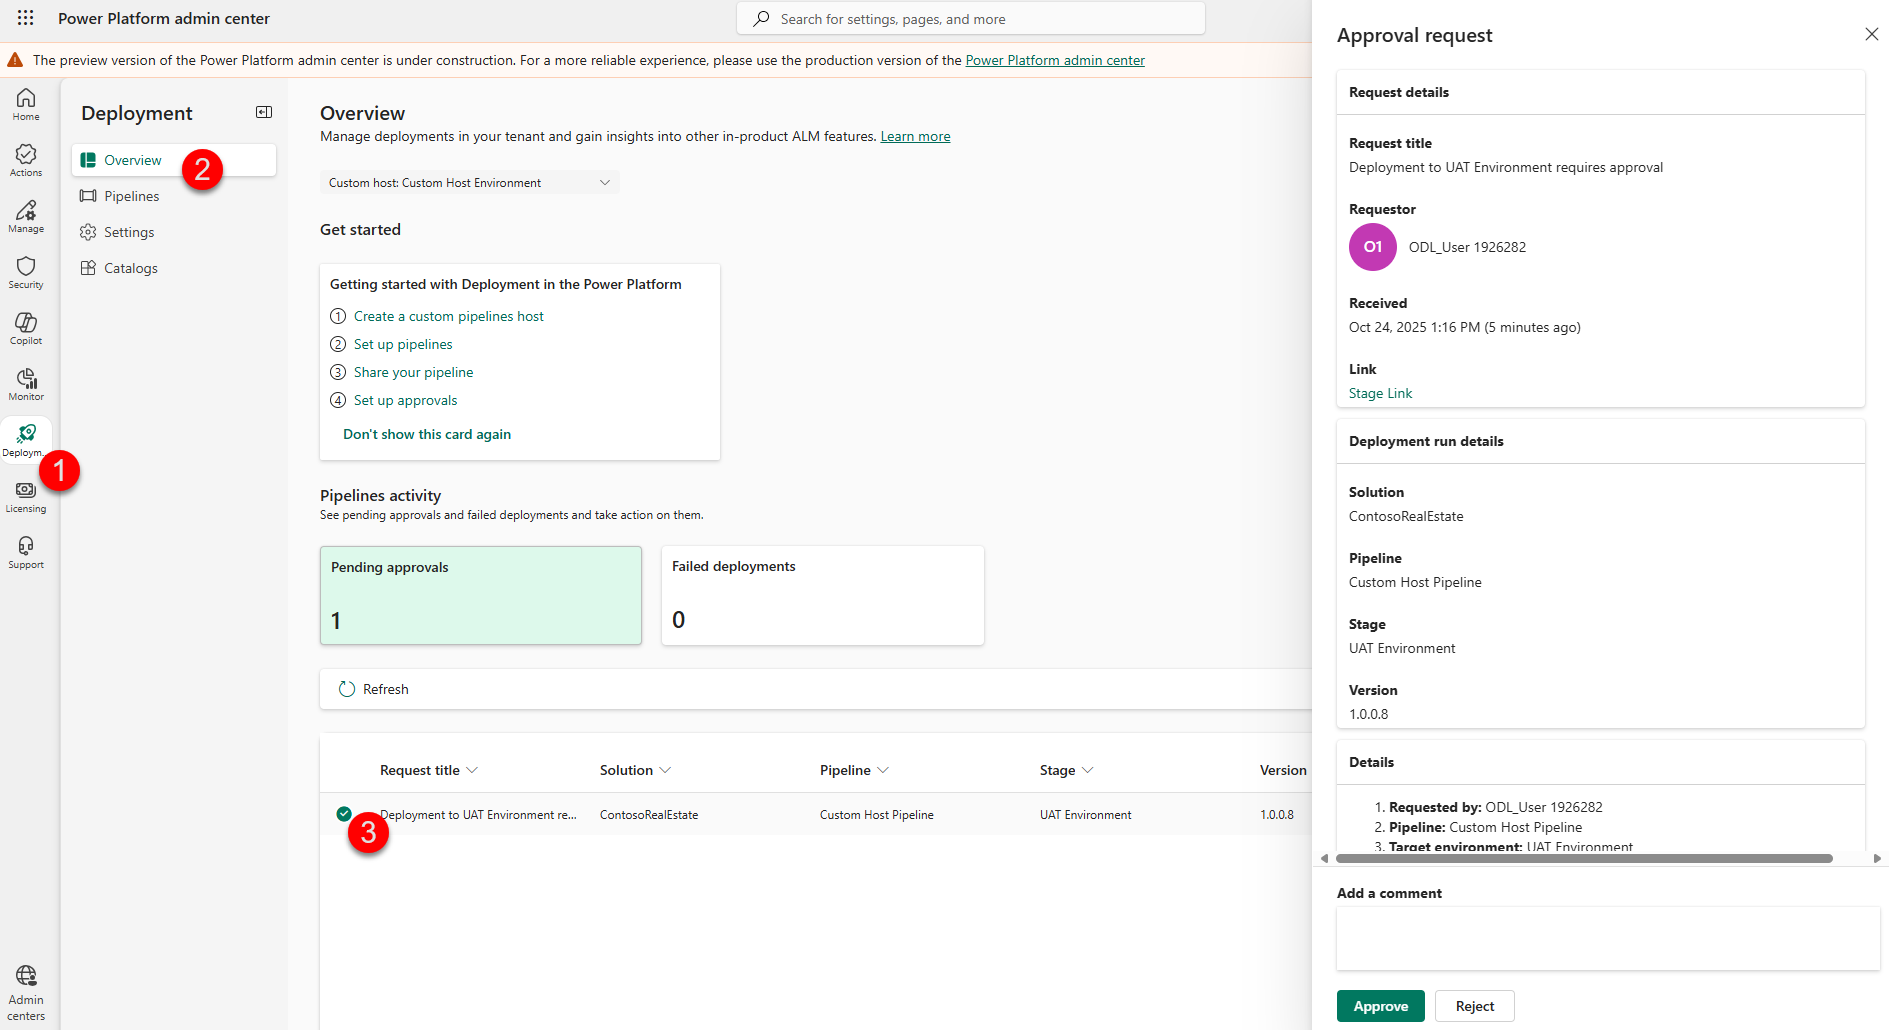
Now, let’s approve our deployment. While there are many ways to action on an Approval request in Power Platform, such as Approvals tab on Power Automate Maker portal, Approvals in Teams, or Approval email in Outlook, we will leverage new Advanced Approvals functionality in Deployments to approve the request. This is a great one-stop-shop like experience for Admins who are responsible for reviewing approvals across multiple pipelines under the same Host or across multiple Hosts.
-
Navigate to the PPAC at https://admin.preview.powerplatform.microsoft.com/deployment/overview
-
On the Overview tab, you will see the Pipelines activity section
-
Here, you should find the approval you just initiated through your deployment pipeline. Click on it to see the deployment details of the Approval request:
-
Provide comments for your request, and click Approve
-
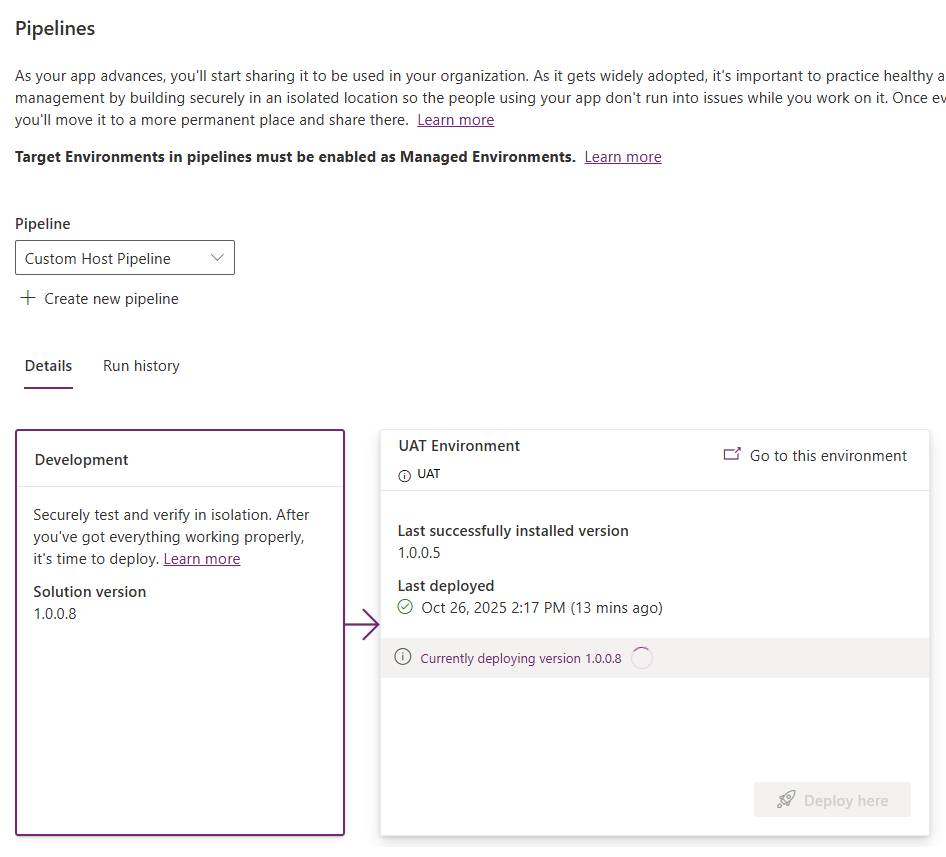
Check back on your pipeline after receiving the approval. Your deployment stage will update with “Currently deploying version #.#.#.#”
-
Once complete, click on the Go to this environment hyperlink on the deployment stage
-
Click on the Solutions blade on the left-hand navigation
-
Click Managed tab
-
Open the Contoso Real Estate solution > On the Model Driven App, select 3 dots > click Share
-
On the Share Pane, scroll down and verify that the Production App Access Group is listed
🔄 Task 4 - Redeploy a prior version
Prerequisite: If you didn’t complete task 4, submit another deployment now. Run History should have at least two deployed versions.
While delegated deployments and approvals reduce the chances of breaking applications in production, mistakes can and do happen.
Let’s pretend the last deployment contained a critical breaking change and it needs to be rolled back. In this task, you’ll re-deploy the last known good version of your solution.
-
Open the maker portal (https://make.preview.powerapps.com/) and make sure you are in your development environment
-
Open Solutions from the left hand navigation blade
-
Open the unmanaged solution (Contoso Real Estate) that you deployed using the pipeline earlier in this lab
-
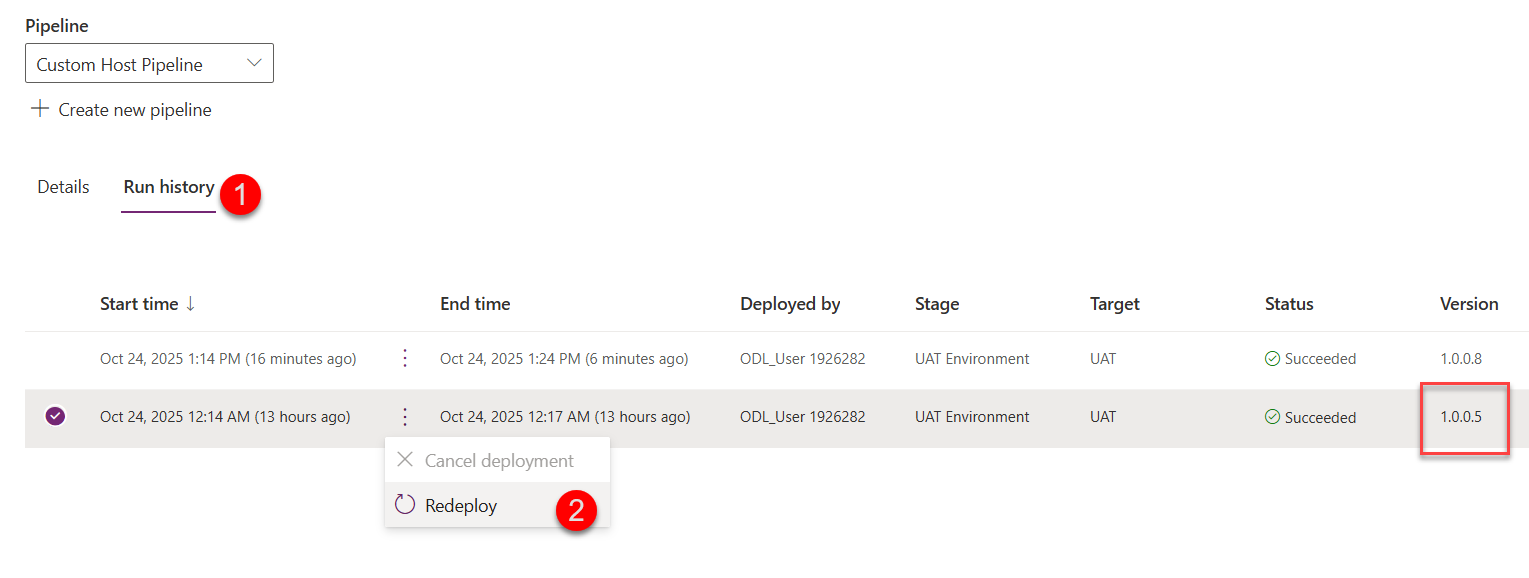
Select Pipelines > click on the Run History tab
-
Select the lower version, then Re-deploy from the menu.
-
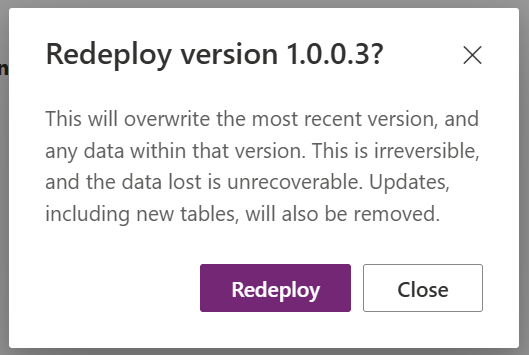
Select Redeploy in the confirmation popup
-
When the deployment panel opens, click Next until you get to the last screen, then Deploy. See prior Task for detailed steps if needed.
-
In a new tab, open Power Automate portal again and Approve the deployment request
-
Deployment is now in-progress. Wait until it finishes. You may need to refresh the pipelines page.
-
Disaster averted! Now the prior version is deployed to production and you have time to fix the (hypothetical) issue and deploy an updated version when ready.
📎 Appendix
Steps to enable Managed Environments
-
Navigate to Power Platform Admin Center (PPAC) at https://admin.powerplatform.microsoft.com/manage/environments
-
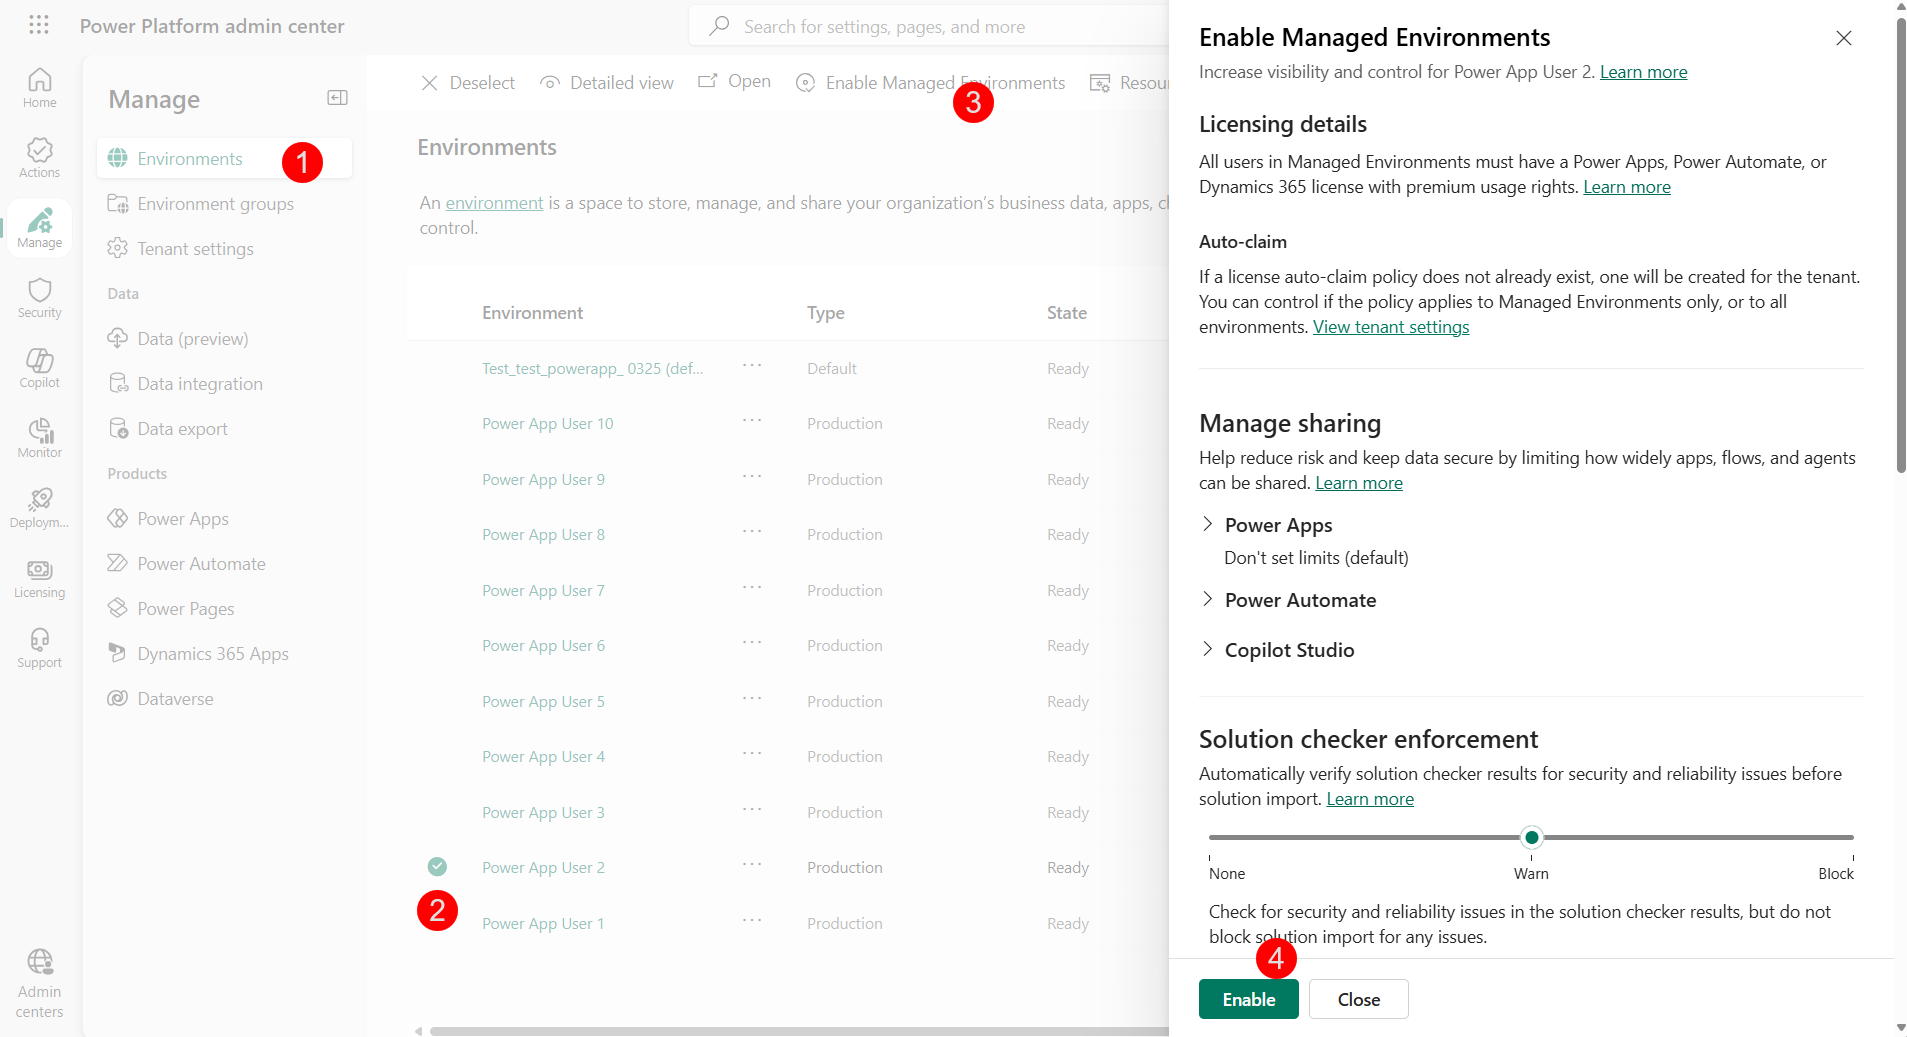
In the Manage tab on the left hand side, click on Environments
-
Select the environment where you want to enable Managed Environments
-
In the ribbon, click Enable Managed Environments
-
Click Enable in the fly out wizard
-
Repeat for any other environments where you need to enable Managed Environments.