Azure Deployments using Resource Manager templates
In this lab we will create an Azure Resource manager template, we will then separate out our some component resources by linking templates to modularize the resources. We will then modify the main deployment template to call the linked template and updated dependencies, and finally deploy the templates to Azure.
DevOps Course Source
This lab is used in the following courses:
- AZ-400T05: Implementing Application infrastructure - Module 1
Pre-requisites:
- An Azure Subscription
Lab Tasks:
- Task 1: Create Resource Manager template
- Task 2: Create a Linked template for storage resources
- Task 3: Upload Linked Template to Azure Blob Storage and generate SAS token
- Task 4: Modify the main template to call Linked template
- Task 5: Modify main template to update dependencies
- Task 6: Deploy resources to Azure using linked templates
Estimated Lab Time:
- approx. 45 minutes
Task 1: Create Resource Manager template
-
In the task we will use Visual Studio Code as our editor, which can be installed from here https://code.visualstudio.com/.
-
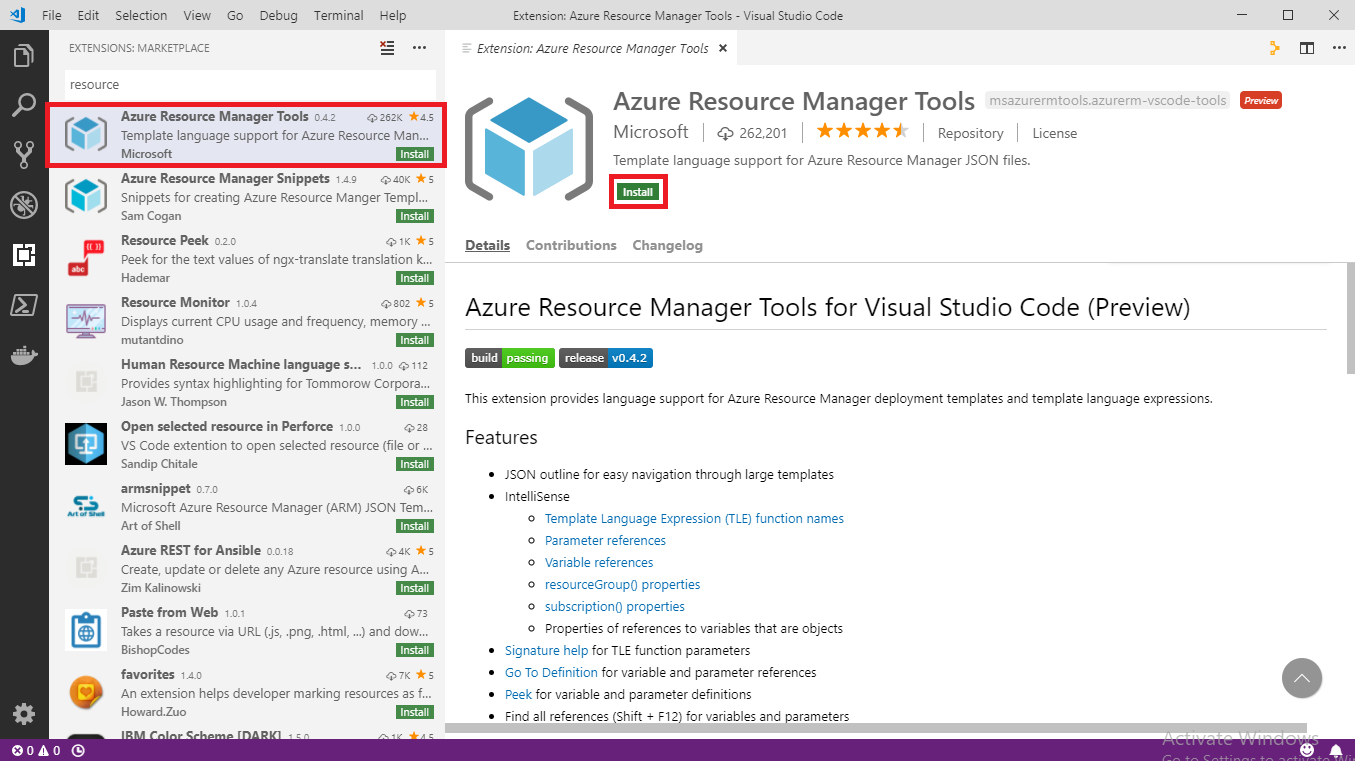
In Visual Studio Code, go to File > Preferences > Extensions and in the search box type Azure Resource Manager tools install the Azure Resource Manager Tools
-
Open Visual Studio Code and go to File > Open File… and in the Open File dialogue enter the URL https://raw.githubusercontent.com/Azure/azure-quickstart-templates/master/101-vm-simple-windows/azuredeploy.json and click Open
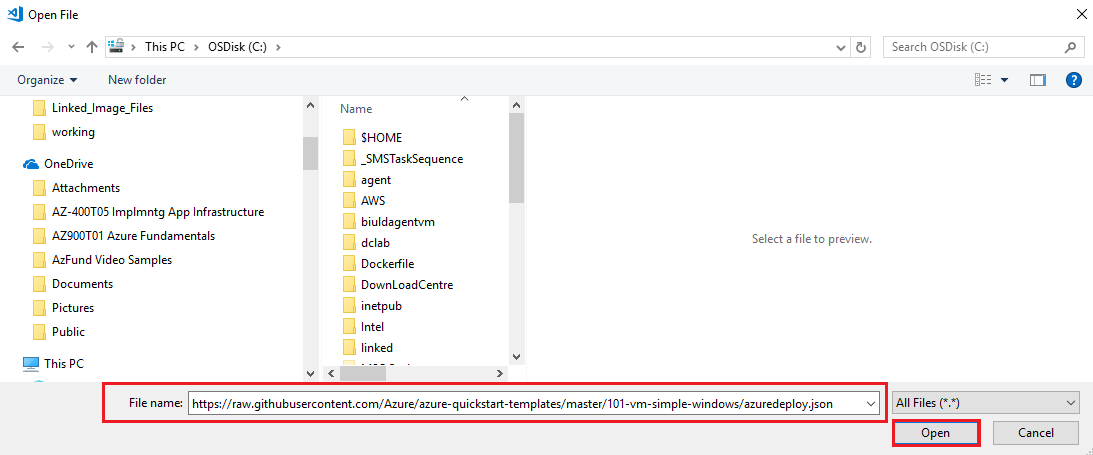
Rather than creating a template from scratch we will use one of the Azure Quickstart Templates. We will use the Deploy a simple Windows template VM. The templates are downloadable the templates from GitHub - 101-vm-simple-windows
-
Create a local folder, you can name it something like C:\Templates, or something like that, this is will be our local working directory.
-
Return to Visual Studio Code with our
azuredeploy.jsontemplate open and go to File > Save as and save the template in our newly created local folder.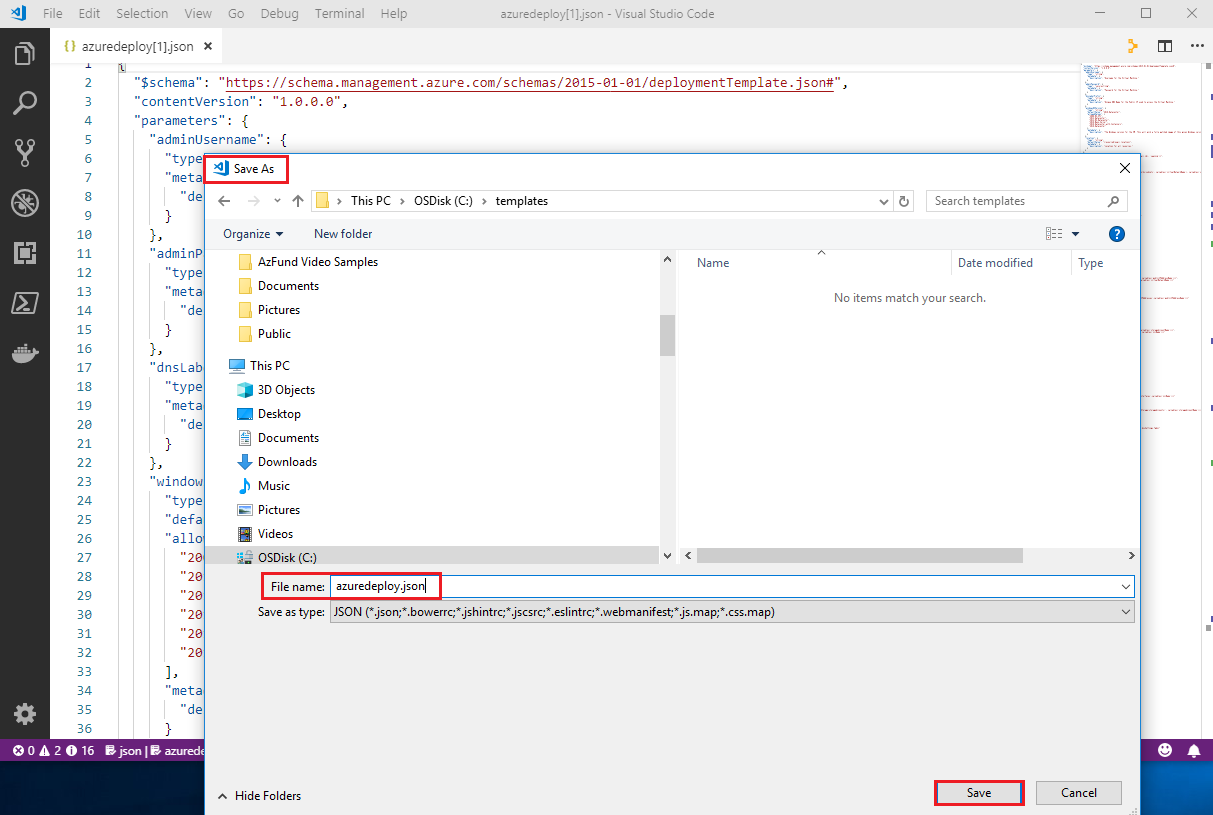
-
Have a look through the resource manager template to get a better understanding of its structure. There are five resources defined by the template:
- Microsoft.Storage/storageAccounts. See the template reference. Microsoft.Storage storageAccounts template reference
- Microsoft.Network/publicIPAddresses. See the template reference. Microsoft.Network publicIPAddresses template reference
- Microsoft.Network/virtualNetworks. See the template reference. Microsoft.Network virtualNetworks template reference
- Microsoft.Network/networkInterfaces. See the template reference. Microsoft.Network networkInterfaces template reference
- Microsoft.Compute/virtualMachines. See the template reference. Microsoft.Compute virtualMachines template reference
-
In Visual Studio Code go to File > Save as… Create a new folder underneath where the downloaded templates are located called Storage so it should be something like
C:\templates\storage, rename the filestorage.jsonor something similar and save it.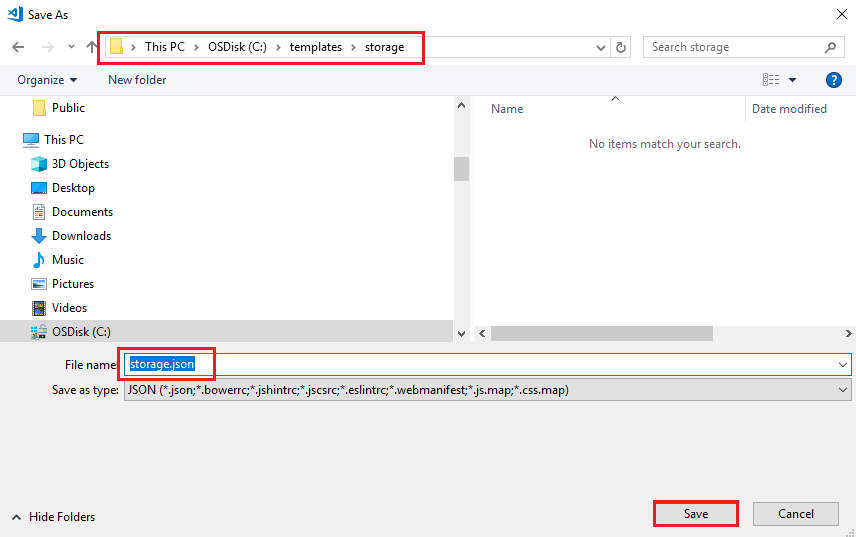
We now have two identical json files
- C:\templates\azuredeploy.json
- C:\templates\storage\storage.json
Task 2: Create a Linked template for storage resources
The linked storage template we are creating, storage.json will create a storage account. The linked storage template needs to pass a value back to the main template, azuredeploy.json, and this value is defined in the outputs element of the linked storage template.
-
Open Visual Studio Code and open the
storage.json. Ensure it is the storage.json that is open and not theazuredeploy.json. -
In the
storage.json, remove all the resource element except thestorageAccountsresource. It should result in a resource section looking like the below."resources": [ { "type": "Microsoft.Storage/storageAccounts", "name": "[variables('storageAccountName')]", "location": "[parameters('location')]", "apiVersion": "2018-07-01", "sku": { "name": "Standard_LRS" }, "kind": "Storage", "properties": {} }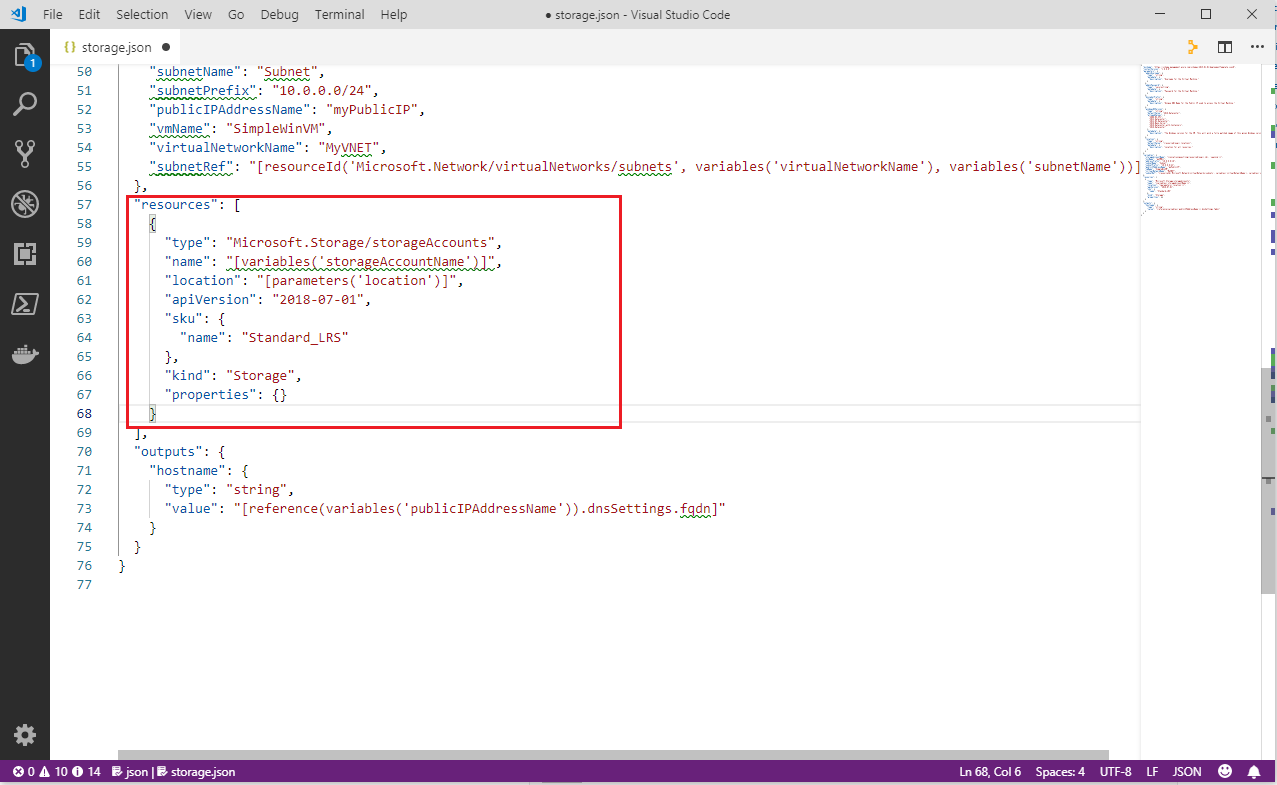
-
Rename the
nameelement of storageAccount fromvariablestoparameters"resources": [ { "type": "Microsoft.Storage/storageAccounts", "name": "[parameters('storageAccountName')]", "location": "[parameters('location')]", "apiVersion": "2018-07-01", "sku": { "name": "Standard_LRS" }, "kind": "Storage", "properties": {} } -
Next, remove the
variablessection and all variable definitions, as highlighted below,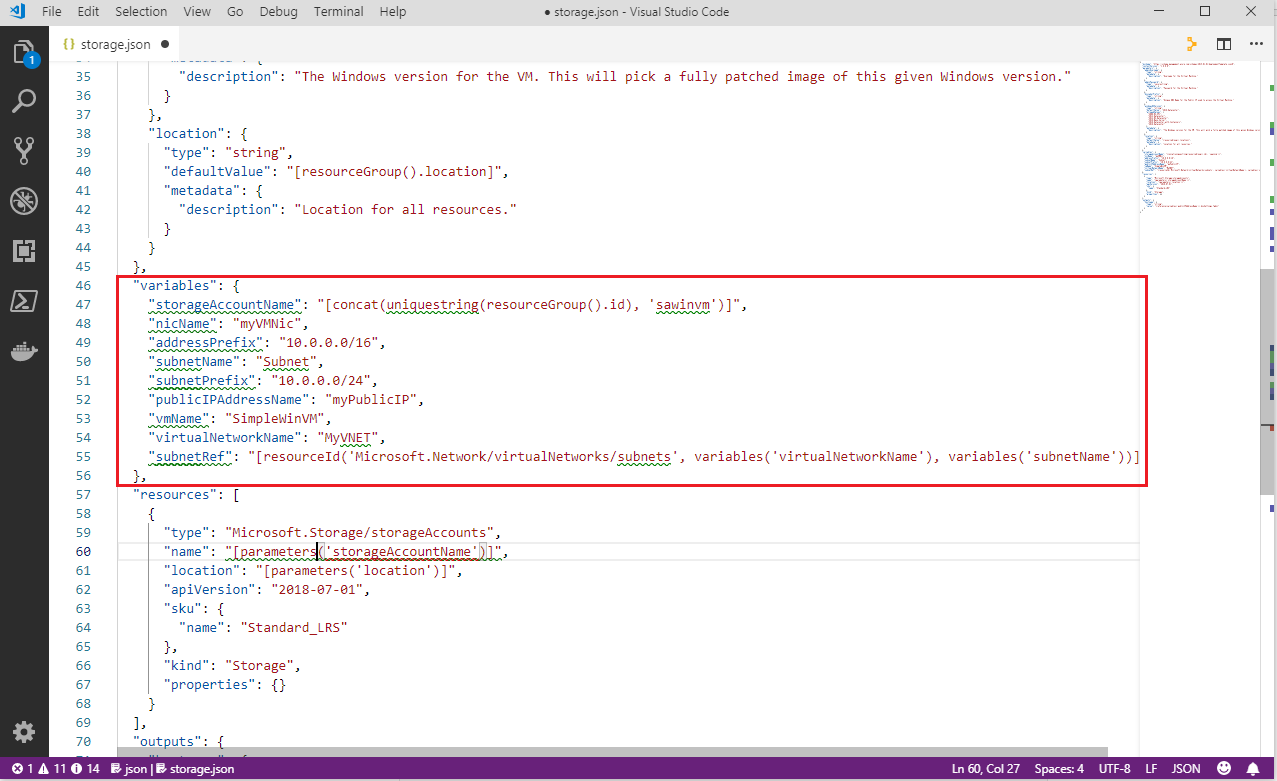
-
Next, remove all
parametervalues except location and add the following paramter code. It should end up looking as in the screenshot below."storageAccountName":{ "type": "string", "metadata": { "description": "Azure Storage account name." } },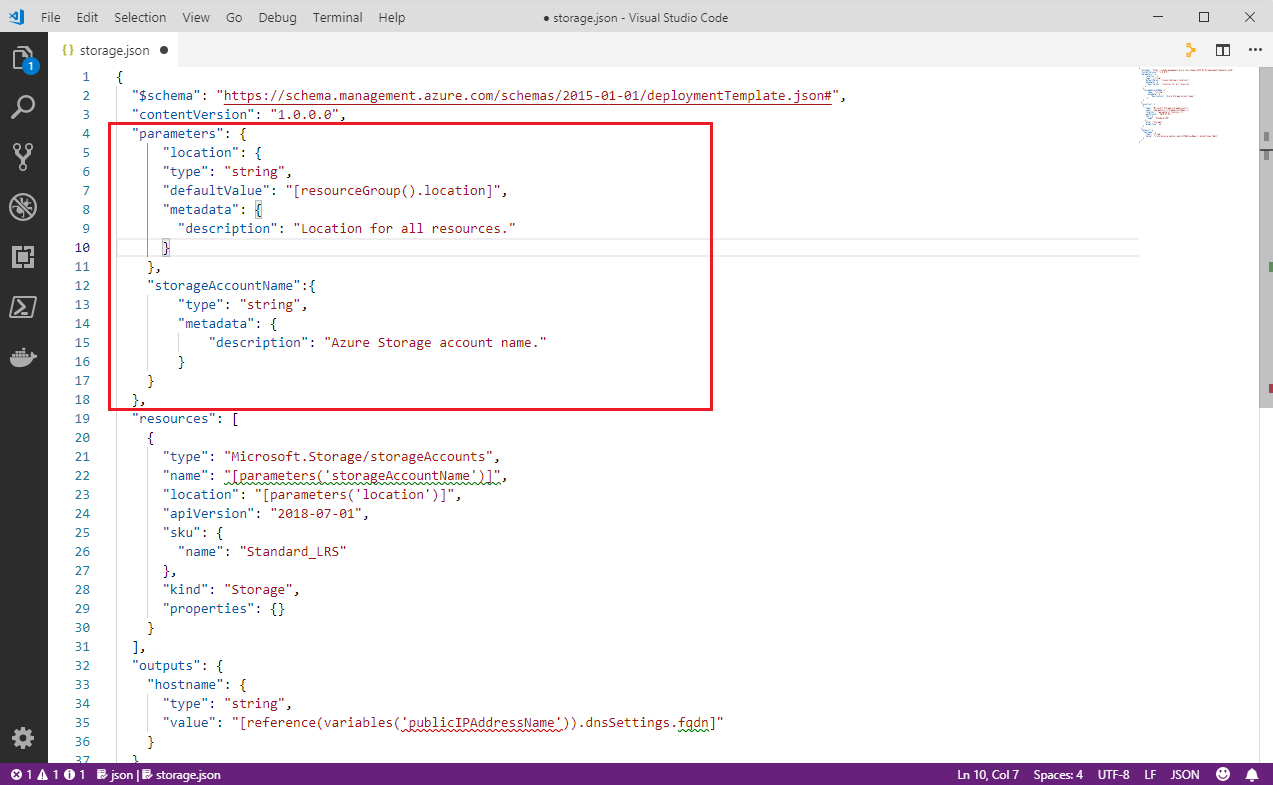
-
Next, update the
outputsection to define astorageURIoutput value. ThestorageUrivalue is required by the virtual machine resource definition in the main template. You pass the value back to the main template as an output value. Modify the output so it looks like the below."outputs": { "storageUri": { "type": "string", "value": "[reference(parameters('storageAccountName')).primaryEndpoints.blob]" } }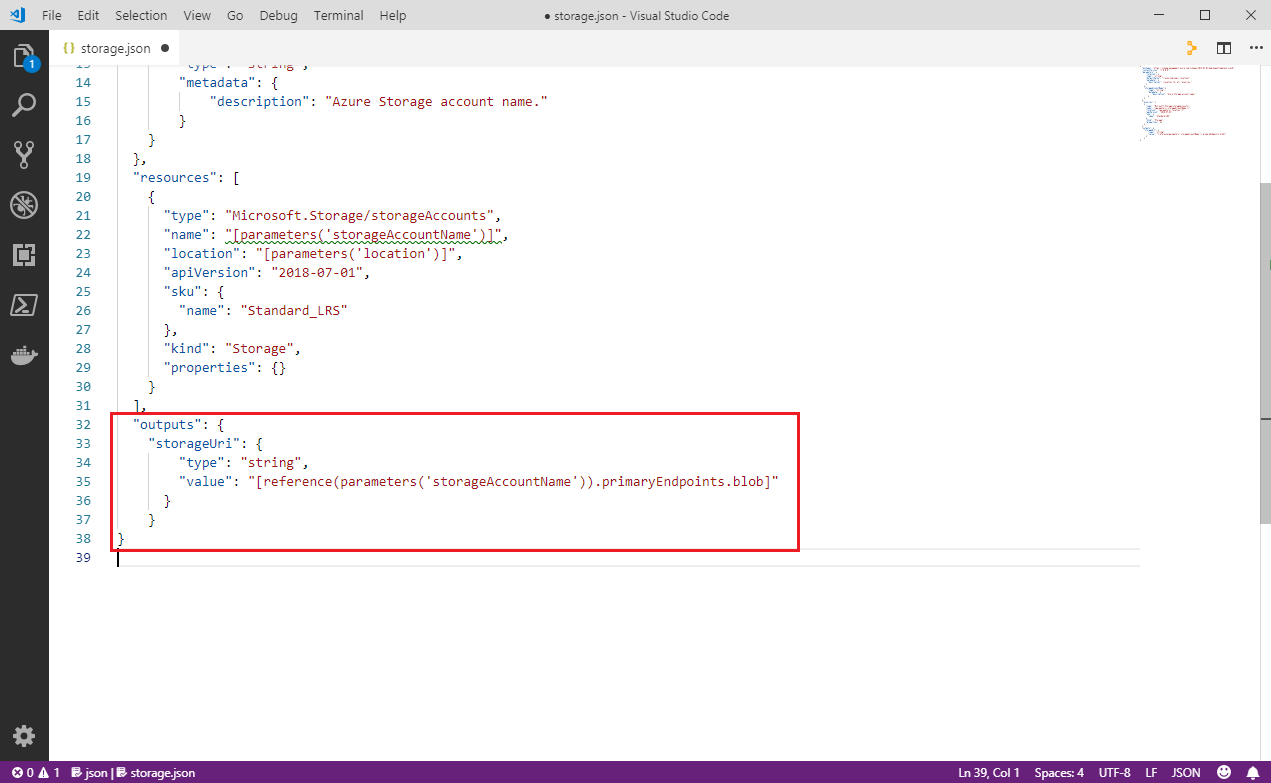
-
Save the
storage.jsontemplate. The linked storage template should now look like the below,{ "$schema": "https://schema.management.azure.com/schemas/2015-01-01/deploymentTemplate.json#", "contentVersion": "1.0.0.0", "parameters": { "storageAccountName":{ "type": "string", "metadata": { "description": "Azure Storage account name." } }, "location": { "type": "string", "defaultValue": "[resourceGroup().location]", "metadata": { "description": "Location for all resources." } } }, "resources": [ { "type": "Microsoft.Storage/storageAccounts", "name": "[parameters('storageAccountName')]", "apiVersion": "2016-01-01", "location": "[parameters('location')]", "sku": { "name": "Standard_LRS" }, "kind": "Storage", "properties": {} } ], "outputs": { "storageUri": { "type": "string", "value": "[reference(parameters('storageAccountName')).primaryEndpoints.blob]" } } }
Task 3: Upload Linked Template to Azure Blob Storage and generate SAS token
When linking to a template, the Azure Resource Manager service must be able to access it. As such You cannot specify a local file or a file that is only available on your local network. You can only provide a URI value that includes either http or https.
In order to achieve this we will upload our linked storage template, storage.json, to blob storage in Azure. Then we will generate a url that we can then use to access it.
We will perform these steps in the Azure CLI, and we would recommend to do so for ease of use. Azure Cloud Shell, has the latest Az powershell module installed ready for use. however you could manually create a blob container via the Azure Portal, upload thw file and generate a URL, or run the powershell commands locally, however ensure you have the latest powershell modules installed locally if running from a local environment.
-
Open the Azure Cloud Shell via http://shell.azure.com
-
Switch the Azure Cloud Shell to a PowerShell command line.
-
The below is a PowerShell script, that will create a blob storage container, upload our template file and generate s URL with a SAS token that we can call in our main template. Have a read through the below to understand what it is doing. When youi are ready copy and paste the below into the Azure Cloud Shell and enter values as prompted. i.e.
Note: Ensure you note the value that are output at the end of the script, as they will be required later in the lab.
$projectNamePrefix = Read-Host -Prompt "Enter a project name:" # This name is used to generate names for Azure resources, such as storage account name. $location = Read-Host -Prompt "Enter a location (i.e. centralus)" # use your nearest datacenter $resourceGroupName = $projectNamePrefix + "rg" $storageAccountName = $projectNamePrefix + "stracc" $containerName = "linktempblobcntr" # The name of the Blob container to be created. $linkedTemplateURL = "https://raw.githubusercontent.com/Microsoft/PartsUnlimited/master/Labfiles/AZ-400T05_Implementing_Application_Infrastructure/M01/storage.json" # A completed linked template used in this lab. $fileName = "storage.json" # A file name used for downloading and uploading the linked template. # Download the lab linked template Invoke-WebRequest -Uri $linkedTemplateURL -OutFile "$home/$fileName" # This generates a copy of the storage.json template in your Azure Cloud Shell session # Create a resource group New-AzResourceGroup -Name $resourceGroupName -Location $location # creates a new resource group into which we create a storage account, then a blob container # Create a storage account $storageAccount = New-AzStorageAccount ` -ResourceGroupName $resourceGroupName ` -Name $storageAccountName ` -Location $location ` -SkuName "Standard_LRS" $context = $storageAccount.Context # Create a container New-AzureStorageContainer -Name $containerName -Context $context # Upload the linked template Set-AzureStorageBlobContent ` -Container $containerName ` -File "$home/$fileName" ` -Blob $fileName ` -Context $context # Generate a SAS token. We set an expiry time of 24 hours, but you could have shorter values for increased security. $templateURI = New-AzureStorageBlobSASToken ` -Context $context ` -Container $containerName ` -Blob $fileName ` -Permission r ` -ExpiryTime (Get-Date).AddHours(24.0) ` -FullUri echo "You need the following values later in the tutorial:" echo "Resource Group Name: $resourceGroupName" echo "Linked template URI with SAS token: $templateURI" echo "finished" -
Note the output values of the below, they should look something like the below.
- $resourcegroupName: lnkedtempprojrg
- $templateURI: https://lnkedtempprojstracc.blob.core.windows.net/linktempblobcntr/storage.json?sv=2018-03-28&sr=b&sig=B4hDLt9rFaWHZXToJlMwMjejAQGT7x0INdDR9bHBQnI%3D&se=2019-02-05T10%3A09%3A48Z&sp=r
For scenarios requiring more security we could configure the main template to generate a SAS token when the template is being run, and give the SAS token expiry a smaller window to make it more secure. You can see the Deploy private Resource Manager template with SAS token and Azure PowerShell page for more details on how to do this.
Task 4: Modify the main template to call Linked template
To account for the changes we made to the templates structure by modularizing all the storage elements, we now need to modify the main template to call the new storage resource definition.
-
In Visual Studio Code open the main template
azuredeploy.json. -
In the
resourcesection remove thestorageresource element{ "type": "Microsoft.Storage/storageAccounts", "name": "[variables('storageAccountName')]", "location": "[parameters('location')]", "apiVersion": "2018-07-01", "sku": { "name": "Standard_LRS" }, "kind": "Storage", "properties": {} },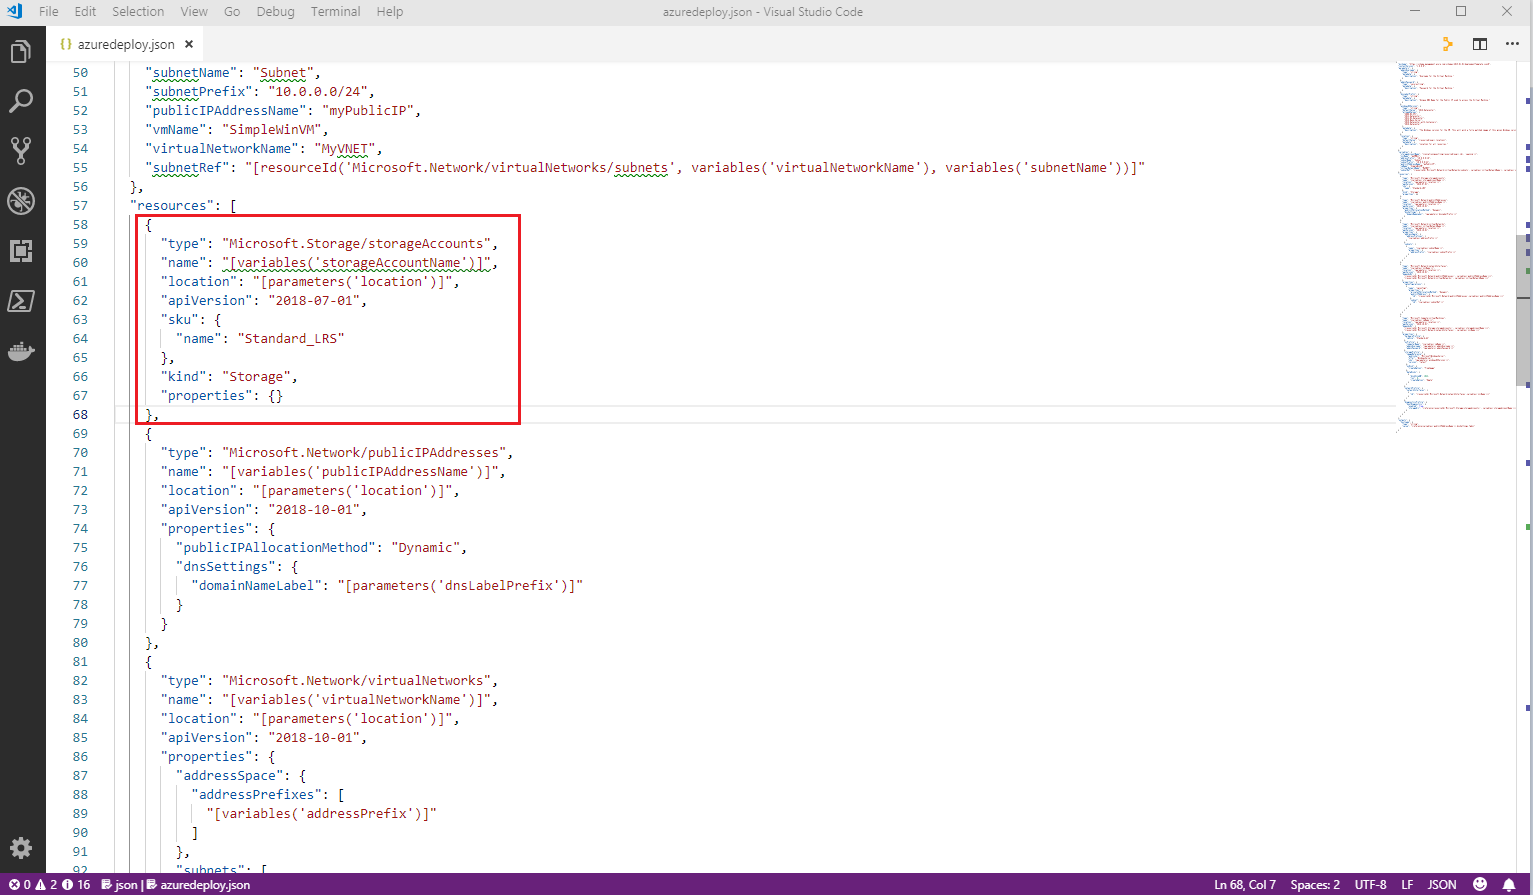
-
Next, add the following code to the
resourcessection where the storage element was that you just deleted.Note: Ensure to paste in the
$templateURIvalue that you obtained when you uploaded the linkedstorage.jsonto blob storage earlier.{ "name": "linkedTemplate", "type": "Microsoft.Resources/deployments", "apiVersion": "2018-05-01", "properties": { "mode": "Incremental", "templateLink": { "uri":"< enter the Template URI value you obtained earlier containing a SAS Token >" }, "parameters": { "storageAccountName":{"value": "[variables('storageAccountName')]"}, "location":{"value": "[parameters('location')]"} } } },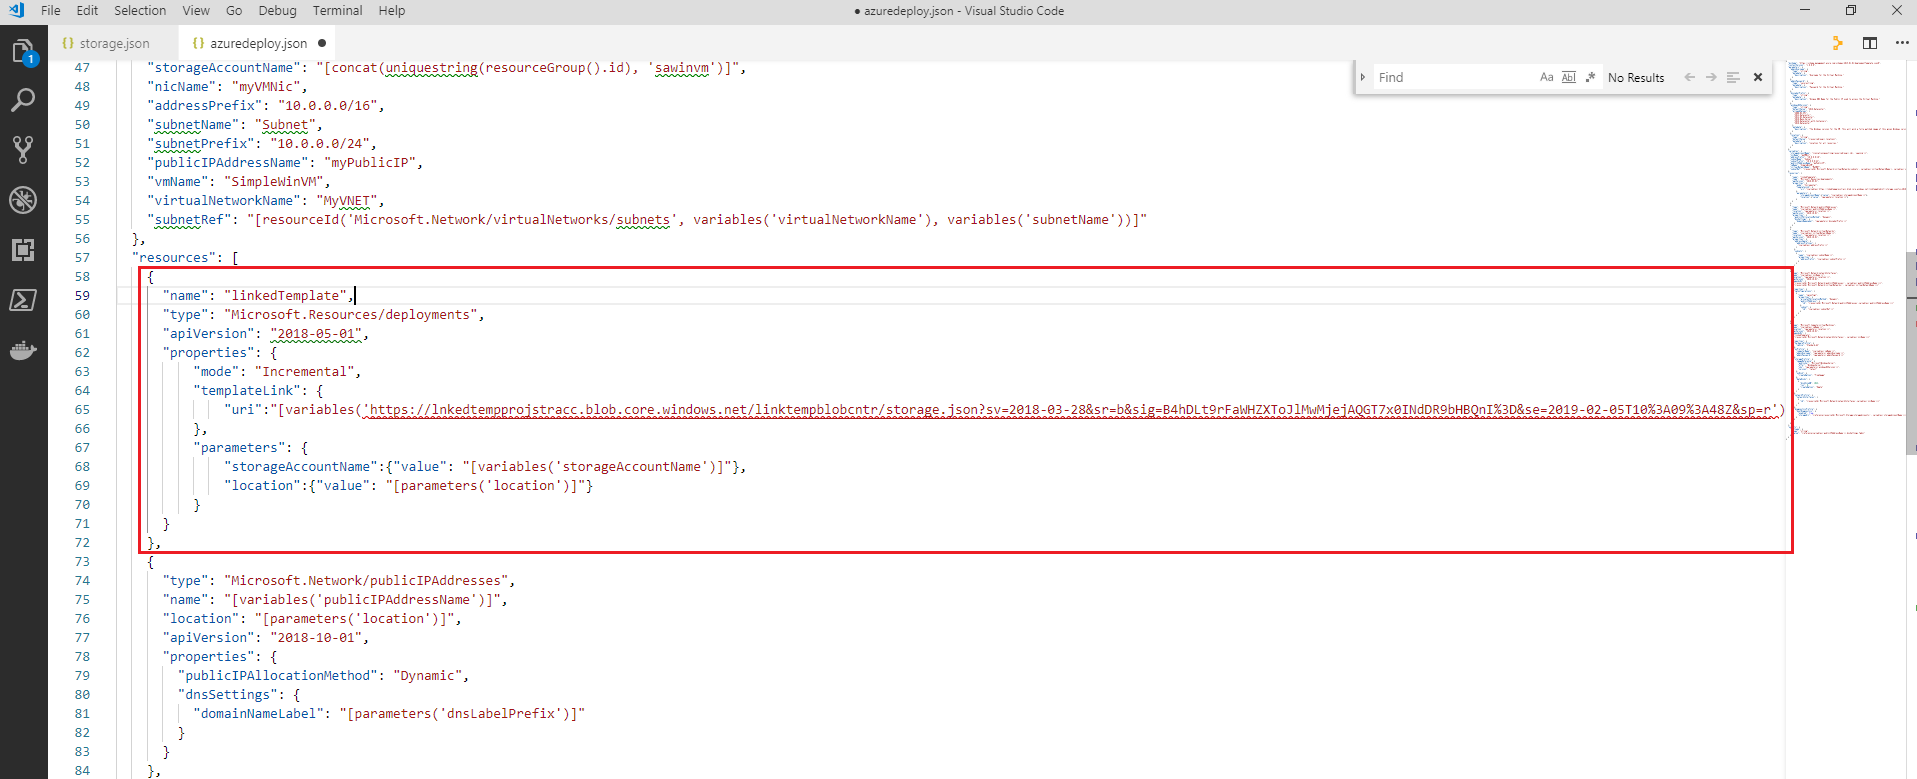
Note the following details from this section above:
- A
Microsoft.Resources/deploymentsresource in the main template is used to link to another template. - The
deploymentsresource has a name calledlinkedTemplate. This name is used for configuring dependency. - You can only use
Incrementaldeployment mode when calling linked templates. templateLink/uricontains the linked template URI. Update the value to the URI you get when you upload the linked template (the one with a SAS token).- Use
parametersto pass values from the main template to the linked template.
- A
-
Save the template.
Task 5: Modify main template to update dependencies
-
Next, because the storage account is defined in the linked storage template now, we must update the following two elements of the
Microsoft.Compute/virtualMachinesresource definition. In the resource section in the virtual machines element, update thedependOnelement to the below:from
       "dependsOn": [
         "[resourceId('Microsoft.Storage/storageAccounts/', variables('storageAccountName'))]",
         "[resourceId('Microsoft.Network/networkInterfaces/', variables('nicName'))]"
to
       "dependsOn": [
         "linkedTemplate",
         "[resourceId('Microsoft.Network/networkInterfaces/', variables('nicName'))]"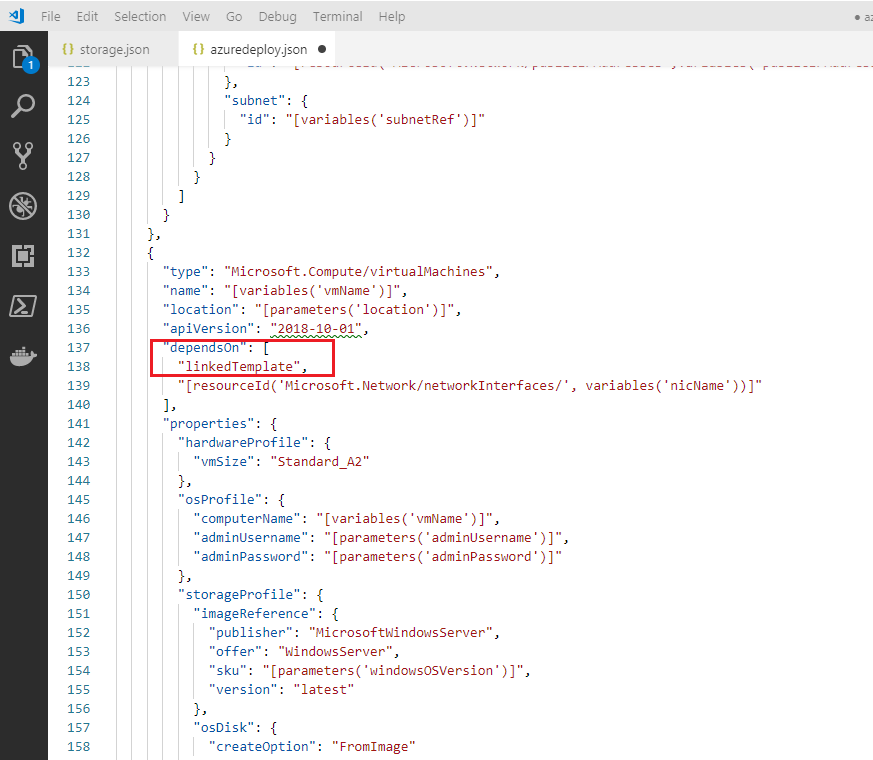
-
Still in the
resourcessection under theMicrosoft.Compute/virtualMachineselement, reconfigure theproperties/diagnosticsProfile/bootDiagnostics/storageUrielement to the output value you defined in the linked storage template as below. This value is required by the main templatefrom
        "diagnosticsProfile": {
          "bootDiagnostics": {
            "enabled": true,
            "storageUri": "[reference(resourceId('Microsoft.Storage/storageAccounts/', variables('storageAccountName'))).primaryEndpoints.blob]"
          }
to
        "diagnosticsProfile": {
          "bootDiagnostics": {
            "enabled": true,
            "storageUri": "[reference('linkedtemplate').outputs.storageUri.value]"
          }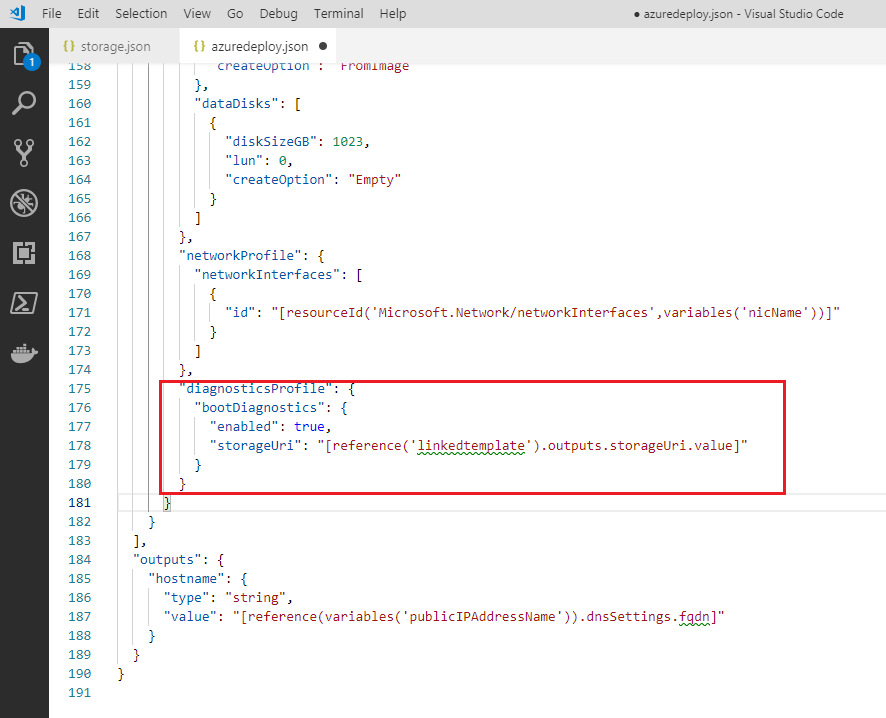
-
Save the updated main deployment template.
Task 6: Deployed resources to Azure using linked templates
You can deploy templates using a variety of methods, including directly from the Azure Portal, or using Azure CLI or Powershell, locally, or via the Azure Cloud Shell. We will will use Azure CLI run from a local command line.
If we wanted to do the deployment using in the Azure Cloud Shell, we would just need to ensure the main deployment template, azuredeploy.json, was accessible from the Azure Cloud Shell. We could do that by uploading the azuredeploy.json to blob storage and obtaining the file URL. Then when running an Azure CLI command we would use a --template-uri parameter rather than a --template-file parameter that we use below.
-
Open a local command prompt
-
Sign in to Azure by running the below command. If the CLI can open your default browser, it will do so and load a sign-in page. Otherwise, you need to open a browser page and follow the instructions on the command line to enter an authorization code after navigating to
https://aka.ms/deviceloginin your browser.az login -
Sign in with your Azure credentials and ensure you are in the same subscription context as the resource group you created earlier. You cna check this using the command
az account listand if you need ot change the account context you can use the command
az account set --subscription < your subscription name or ID> -
Deploy the template by running the command
az group deployment create --name < name for the deployment > --resource-group < resource group you created earlier when running PowerShell script > --template-file < path to the main template file i.e. C:\Templates\azuredeploy.json >If you receive errors when running the above command to deploy the templates you could check the following:
- If you have multiple Azure subscriptions ensure you have set the subscription context to the correct one where the resource group is deployed.
- Ensure the files are accessible via the URLs you have provided
-
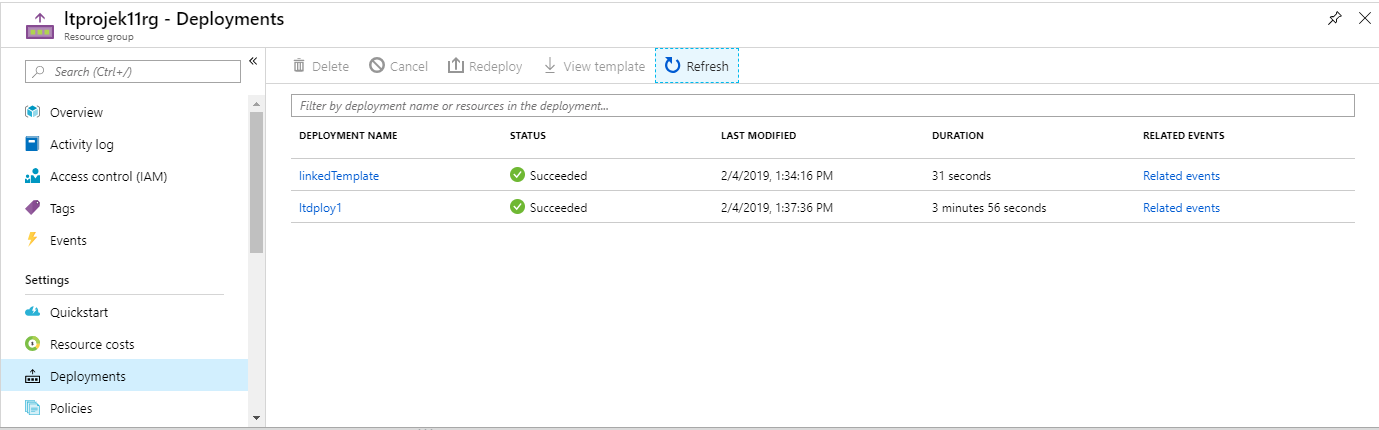
Either via the Azure cli command output or the Azure Portal verify the virtual machine and storage resources were all created successfully

-
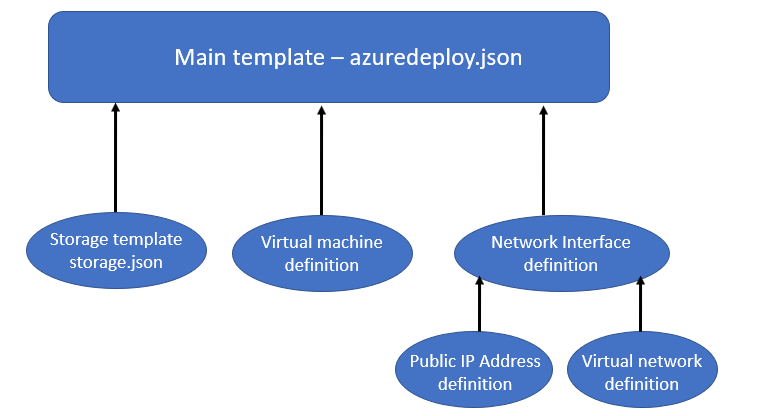
As a next step we could now proceed with modularizing the remaining resource definitions in our deployment template, such as our network and virtual machine resource definitions. A way to approach this would be to modularize based on dependencies. A graphical representing of the dependencies in the template we use here is shown below.
Note: If you do not intend using the deployed resources you should delete them now to avoid incurring costs related ot them. You can do so by deleting the resource groups.
Summary
In this lab you have:
- Created Resource Manager template by re-using a Quickstart template
- Created a Linked template for storage resources by defining just storage definitions
- Uploaded the Linked storage template to Azure Blob Storage and generates SAS token to be called by Main deployment template.
- Modified the main template to call Linked template
- Modified main template to update dependencies
- Deployed resources to Azure using linked templates