Challenge 6 - Dapr MQTT Input Binding
< Previous Challenge - Home - Next Challenge >
Introduction
In this challenge, you’re going to add a Dapr input binding in the TrafficControlService. It’ll receive entry-cam and exit-cam messages over the MQTT protocol.
Description
In this challenge you’ll focus on Dapr input bindings. The following diagram depicts how input bindings work:

For this hands-on challenge, you will add an input binding leveraging the Dapr binding building block.
- Stand up a Mosquitto MQTT message broker in a Docker container.
- Create a Dapr configuration file(s) for specifying the Dapr MQTT input binding components.
- Modify the
Simulationapp to puttrafficcontrol/entrycam&trafficcontrol/exitcammessages on the MQTT queue.- Modify the
MqttTrafficControlServiceclass to do this (look at theHttpTrafficControlServiceas an example). - Modify the
Programclass to use this new service.
- Modify the
- Restart all services & run the
Simulationapplication. - Once you have the solution running locally, modify the
Simulationto use Azure IoT Hub & modify the Dapr configuration to use Azure Event Hub as the MQTT message broker.
Success Criteria
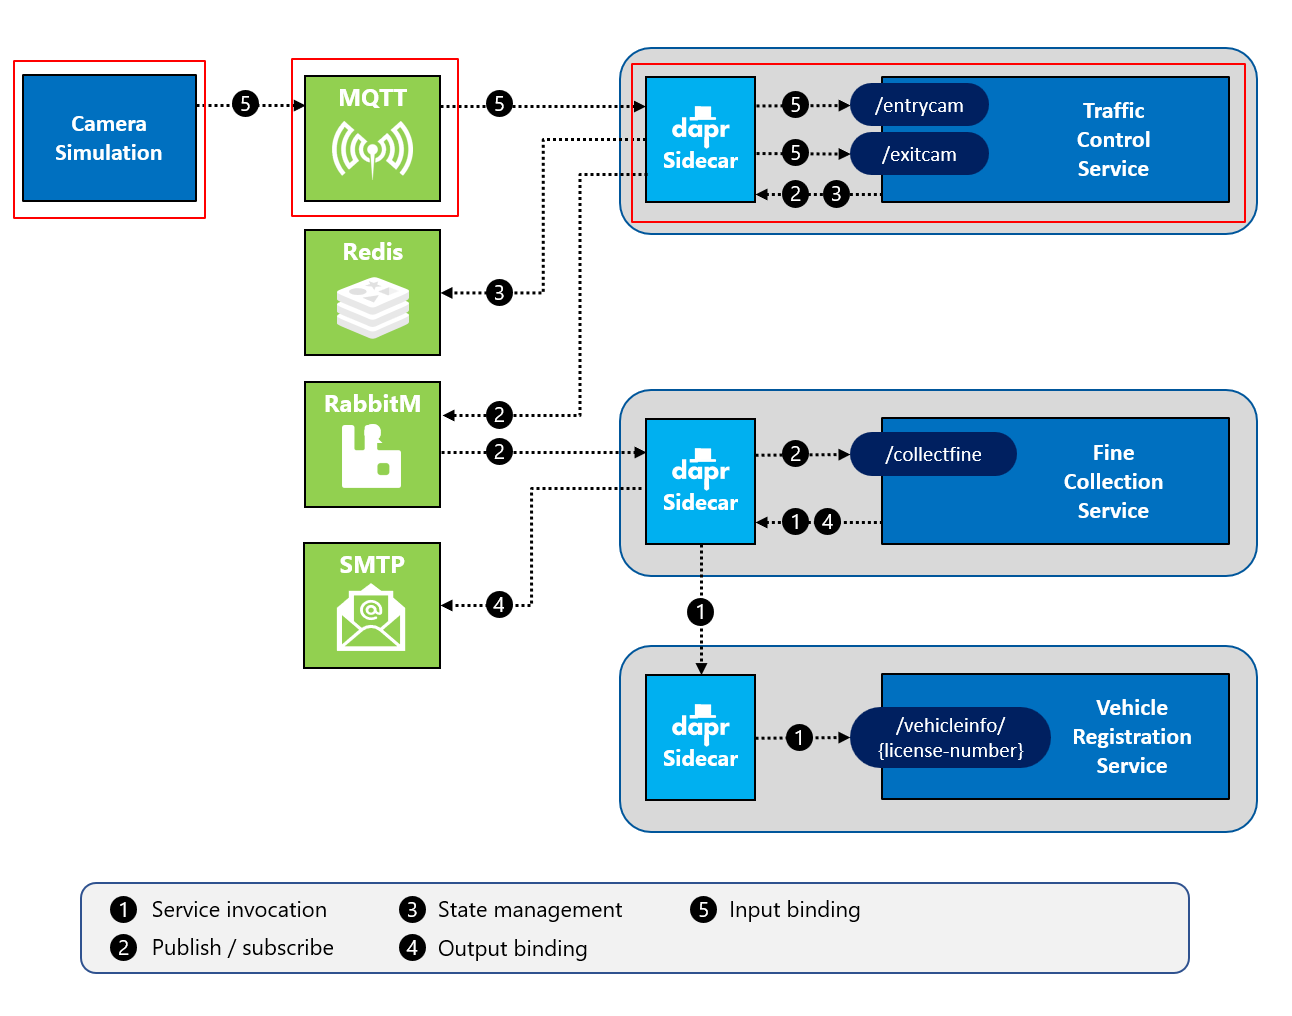
This challenge targets the operation labeled as number 5 in the end-state setup:
Local

Azure

- Validate that the Mosquitto MQTT message broker service is running locally.
- Validate that the
TrafficControlServicereceives messages via its Dapr component. - Validate that the
Simulationapplication publishes entry-cam and exit-cam messages to the MQTT broker. - Validate that messages are being sent through the Azure IoT Hub & Event Hub.
Tips
- Use MQTT broker Mosquitto for local development.
-
In order to connect to Mosquitto, you need to pass in a custom configuration file when starting it. With Docker, you can pass a configuration file when starting a container using a Volume mount. The folder
Resources/Infrastructure/mosquittoalready contains a config file you can use.-
Open a terminal window in VS Code and make sure the current folder is
Resources/Infrastructure/mosquitto. -
Start a Mosquitto MQTT container by entering the following command: When running on Windows PowerShell:
docker run -d -p 1883:1883 -p 9001:9001 -v $pwd/:/mosquitto/config/ --name dtc-mosquitto eclipse-mosquittoWhen running on Mac or Linux:
docker run -d -p 1883:1883 -p 9001:9001 -v $(pwd)/:/mosquitto/config/ --name dtc-mosquitto eclipse-mosquitto
This will pull the docker image
eclipse-mosquittofrom Docker Hub and start it. The name of the container will bedtc-mosquitto. The server will be listening for connections on port1883for MQTT traffic.The
-vflag specifies a Docker volume mount. It mounts the current folder (containing the config file) as the/mosquitto/config/folder in the container. Mosquitto reads its config file from that folder. -
-
To peak into the Mosquitto server, open a new terminal window and execute the following command:
docker logs dtc-mosquitto -
Add the following MQTT configuration flags when connecting to the Mosquitto MQTT queue in the
Simulationapp.var configuration = new MqttConfiguration() { KeepAliveSecs = 60, Port = 1883 }; -
Use Azure IoT Hub & Event Hub for deployments to Azure.
-
Create a IoT Device in Azure IoT Hub to represent your Simulation app.
az iot hub device-identity create --device-id simulation --hub-name <iot-hub-name> -
Get the IoT Hub Connection String for the device you just created.
az iot hub device-identity connection-string show --device-id simulation --hub-name <iot-hub-name>
-
- Note that the
Microsoft.Azure.Devices.Client.Messageclass allows you to add additional properties to facilitate message routing (look in the Azure portal, under the IoT Hub you provisioned, at theMessage Routingblade,Routing queriessection for details on which properties to add).