ai-agents-for-beginners
Configuración del Curso
Introducción
Esta lección cubrirá cómo ejecutar los ejemplos de código de este curso.
Únete a Otros Estudiantes y Obtén Ayuda
Antes de comenzar a clonar tu repositorio, únete al canal de Discord de Agentes de IA para Principiantes para obtener cualquier ayuda con la configuración, preguntas sobre el curso o para conectar con otros estudiantes.
Clona o Haz Fork de este Repositorio
Para comenzar, por favor clona o haz fork del repositorio de GitHub. Esto creará tu propia versión del material del curso para que puedas ejecutar, probar y modificar el código.
Esto se puede hacer haciendo clic en el enlace para hacer fork del repositorio
Ahora deberías tener tu propia versión forked de este curso en el siguiente enlace:
Clonación Superficial (recomendado para taller / Codespaces)
El repositorio completo puede ser grande (~3 GB) cuando descargas todo el historial y todos los archivos. Si solo vas a asistir al taller o solo necesitas algunas carpetas de lecciones, una clonación superficial (o clonación dispersa) evita la mayor parte de esa descarga truncando el historial y/o saltándose blobs.
Clonación superficial rápida — historial mínimo, todos los archivos
Reemplaza <tu-nombre-de-usuario> en los comandos a continuación con la URL de tu fork (o la URL upstream si prefieres).
Para clonar solo el historial del último commit (descarga pequeña):
git clone --depth 1 https://github.com/<your-username>/ai-agents-for-beginners.git
Para clonar una rama específica:
git clone --depth 1 --branch <branch-name> https://github.com/<your-username>/ai-agents-for-beginners.git
Clonación parcial (dispersa) — blobs mínimos + solo carpetas seleccionadas
Esto usa clonación parcial y sparse-checkout (requiere Git 2.25+ y se recomienda Git moderno con soporte de clonación parcial):
git clone --depth 1 --filter=blob:none --sparse https://github.com/<your-username>/ai-agents-for-beginners.git
Entra en la carpeta del repositorio:
cd ai-agents-for-beginners
Luego especifica qué carpetas quieres (el ejemplo abajo muestra dos carpetas):
git sparse-checkout set 00-course-setup 01-intro-to-ai-agents
Después de clonar y verificar los archivos, si solo necesitas los archivos y quieres liberar espacio (sin historial git), por favor elimina los metadatos del repositorio (💀irreversible — perderás toda la funcionalidad de Git: no commits, pulls, pushes ni acceso al historial).
# zsh/bash
rm -rf .git
# PowerShell
Remove-Item -Recurse -Force .git
Usando GitHub Codespaces (recomendado para evitar descargas locales grandes)
-
Crea un nuevo Codespace para este repositorio vía la UI de GitHub.
- En la terminal del Codespace recién creado, ejecuta uno de los comandos de clonación superficial/dispersa arriba para traer solo las carpetas de lecciones que necesitas al espacio de trabajo de Codespaces.
- Opcional: después de clonar dentro de Codespaces, elimina .git para recuperar espacio adicional (ver comandos de eliminación arriba).
- Nota: Si prefieres abrir el repositorio directamente en Codespaces (sin una clonación extra), ten en cuenta que Codespaces construirá el entorno devcontainer y puede que aún provea más de lo que necesitas. Clonar una copia superficial dentro de un Codespace nuevo te da más control sobre el uso de disco.
Consejos
- Siempre reemplaza la URL de clonación con la de tu fork si quieres editar/commitear.
- Si luego necesitas más historial o archivos, puedes obtenerlos o ajustar sparse-checkout para incluir carpetas adicionales.
Ejecutando el Código
Este curso ofrece una serie de Jupyter Notebooks que puedes ejecutar para obtener experiencia práctica construyendo Agentes de IA.
Los ejemplos de código utilizan Microsoft Agent Framework (MAF) con el FoundryChatClient, que se conecta a Microsoft Foundry Agent Service V2 (la API de Respuestas) a través de Microsoft Foundry.
Todos los notebooks de Python están etiquetados como *-python-agent-framework.ipynb.
Requisitos
- Python 3.12+
-
NOTA: Si no tienes Python3.12 instalado, asegúrate de instalarlo. Luego crea tu entorno virtual usando python3.12 para asegurar que se instalen las versiones correctas desde el archivo requirements.txt.
Ejemplo
Crear directorio de entorno virtual Python:
python -m venv venvLuego activa el entorno virtual para:
# zsh/bash
source venv/bin/activate
# Command Prompt for Windows venv\Scripts\activate
-
-
.NET 10+: Para los códigos de ejemplo que usan .NET, asegúrate de instalar .NET 10 SDK o posterior. Luego, verifica la versión del SDK .NET instalado:
dotnet --list-sdks - Azure CLI — Requerido para autenticación. Instala desde aka.ms/installazurecli.
- Suscripción de Azure — Para acceder a Microsoft Foundry y Microsoft Foundry Agent Service.
- Proyecto Microsoft Foundry — Un proyecto con un modelo desplegado (p.ej.,
gpt-4.1-mini). Ver Paso 1 abajo.
Hemos incluido un archivo requirements.txt en la raíz de este repositorio que contiene todos los paquetes Python requeridos para ejecutar los ejemplos de código.
Puedes instalarlos ejecutando el siguiente comando en tu terminal en la raíz del repositorio:
pip install -r requirements.txt
Recomendamos crear un entorno virtual de Python para evitar conflictos y problemas.
Configurar VSCode
Asegúrate de que estás usando la versión correcta de Python en VSCode.
Configura Microsoft Foundry y Microsoft Foundry Agent Service
Paso 1: Crea un Proyecto de Microsoft Foundry
Necesitas un hub y un proyecto de Microsoft Foundry con un modelo desplegado para ejecutar los notebooks.
- Ve a ai.azure.com e inicia sesión con tu cuenta de Azure.
- Crea un hub (o usa uno existente). Ver: Resumen de recursos Hub.
- Dentro del hub, crea un proyecto.
- Despliega un modelo (p.ej.,
gpt-4.1-mini) desde Modelos + Endpoints → Desplegar modelo.
Paso 2: Recupera el Endpoint del Proyecto y el Nombre del Despliegue del Modelo
Desde tu proyecto en el portal de Microsoft Foundry:
- Endpoint del Proyecto — Ve a la página de Resumen y copia la URL del endpoint.
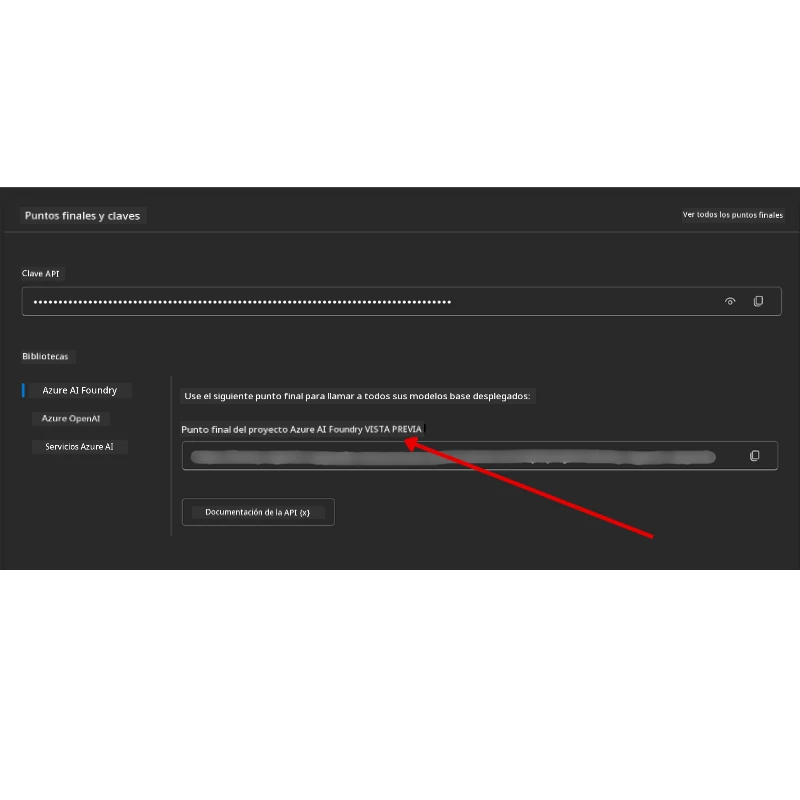
- Nombre del Despliegue del Modelo — Ve a Modelos + Endpoints, selecciona tu modelo desplegado y anota el Nombre del despliegue (p.ej.,
gpt-4.1-mini).
Paso 3: Inicia sesión en Azure con az login
Todos los notebooks usan AzureCliCredential para autenticación — no hay claves API que gestionar. Esto requiere que inicies sesión mediante la CLI de Azure.
-
Instala la CLI de Azure si no la tienes: aka.ms/installazurecli
-
Inicia sesión ejecutando:
az loginO si estás en un entorno remoto/Codespace sin navegador:
az login --use-device-code -
Selecciona tu suscripción si se te solicita — elige la que contiene tu proyecto Foundry.
-
Verifica que estás conectado:
az account show
¿Por qué
az login? Los notebooks se autentican usandoAzureCliCredentialdel paqueteazure-identity. Esto significa que tu sesión de la CLI de Azure provee las credenciales — no hay claves API o secretos en tu archivo.env. Esta es una mejor práctica de seguridad.
Paso 4: Crea tu archivo .env
Copia el archivo de ejemplo:
# zsh/bash
cp .env.example .env
# PowerShell
Copy-Item .env.example .env
Abre .env y completa estos dos valores:
AZURE_AI_PROJECT_ENDPOINT=https://<your-project>.services.ai.azure.com/api/projects/<your-project-id>
AZURE_AI_MODEL_DEPLOYMENT_NAME=gpt-4.1-mini
| Variable | Dónde encontrarla |
|---|---|
AZURE_AI_PROJECT_ENDPOINT |
Portal Foundry → tu proyecto → página de Resumen |
AZURE_AI_MODEL_DEPLOYMENT_NAME |
Portal Foundry → Modelos + Endpoints → nombre del modelo desplegado |
¡Eso es todo para la mayoría de las lecciones! Los notebooks se autenticarán automáticamente a través de tu sesión az login.
Paso 5: Instala las dependencias de Python
pip install -r requirements.txt
Recomendamos ejecutar esto dentro del entorno virtual que creaste anteriormente.
Configuración adicional para la Lección 5 (Agentic RAG)
La Lección 5 usa Azure AI Search para generación aumentada por recuperación. Si planeas ejecutar esa lección, añade estas variables a tu archivo .env:
| Variable | Dónde encontrarla |
|---|---|
AZURE_SEARCH_SERVICE_ENDPOINT |
Portal Azure → tu recurso Azure AI Search → Resumen → URL |
AZURE_SEARCH_API_KEY |
Portal Azure → tu recurso Azure AI Search → Configuración → Claves → clave administrativa primaria |
Configuración adicional para Lecciones que llaman directamente a Azure OpenAI (Lecciones 6 y 8)
Algunos notebooks en las lecciones 6 y 8 llaman directamente a Azure OpenAI (usando la API de Respuestas) en lugar de pasar por un proyecto Microsoft Foundry. Estos ejemplos usaban previamente Modelos de GitHub, que está en desuso (retirándose en julio de 2026) y no soporta la API de Respuestas. Si planeas ejecutar esos ejemplos, añade estas variables a tu archivo .env:
| Variable | Dónde encontrarla |
|---|---|
AZURE_OPENAI_ENDPOINT |
Portal Azure → tu recurso Azure OpenAI → Claves y Endpoint → Endpoint (p.ej. https://<tu-recurso>.openai.azure.com) |
AZURE_OPENAI_DEPLOYMENT |
El nombre de tu modelo desplegado (p.ej. gpt-4.1-mini) que soporta la API de Respuestas |
AZURE_OPENAI_API_KEY |
Opcional — solo si usas autenticación basada en clave en vez de az login / Entra ID |
La API de Respuestas usa el endpoint estable
/openai/v1/, por lo que no se requiereapi-version. Inicia sesión conaz loginpara usar autenticación sin clave Entra ID.
Proveedor Alternativo: MiniMax (Compatible con OpenAI)
MiniMax provee modelos de contexto largo (hasta 204K tokens) a través de una API compatible con OpenAI. Dado que el OpenAIChatClient del Microsoft Agent Framework funciona con cualquier endpoint compatible con OpenAI, puedes usar MiniMax como un reemplazo directo de Azure OpenAI o OpenAI.
Añade estas variables a tu archivo .env:
| Variable | Dónde encontrarla |
|---|---|
MINIMAX_API_KEY |
Plataforma MiniMax → Claves API |
MINIMAX_BASE_URL |
Usa https://api.minimax.io/v1 (valor por defecto) |
MINIMAX_MODEL_ID |
Nombre del modelo a usar (p.ej., MiniMax-M3) |
Modelos de ejemplo: MiniMax-M3 (recomendado), MiniMax-M2.7, MiniMax-M2.7-highspeed (respuestas más rápidas). Los nombres y disponibilidad de modelos pueden cambiar con el tiempo, y el acceso a un modelo dado puede depender de tu cuenta o región — consulta la Plataforma MiniMax para la lista actual. Si MiniMax-M3 no está disponible para tu cuenta, configura MINIMAX_MODEL_ID a un modelo al que tengas acceso (p.ej. MiniMax-M2.7).
Los ejemplos que usan OpenAIChatClient (p.ej., el flujo de reserva de hotel en la Lección 14) detectarán y usarán automáticamente tu configuración de MiniMax cuando MINIMAX_API_KEY esté configurado.
Proveedor Alternativo: Foundry Local (Ejecuta Modelos en el Dispositivo)
Foundry Local es un runtime ligero que descarga, gestiona y sirve modelos de lenguaje totalmente en tu propia máquina a través de una API compatible con OpenAI — sin nube, sin suscripción Azure, y sin claves API. Es una gran opción para desarrollo sin conexión, experimentación sin costos en la nube o para mantener datos en el dispositivo.
Dado que el OpenAIChatClient del Microsoft Agent Framework funciona con cualquier endpoint compatible con OpenAI, Foundry Local es un reemplazo local directo a Azure OpenAI.
1. Instala Foundry Local
# Windows
winget install Microsoft.FoundryLocal

# macOS
brew install foundrylocal
2. Descarga y ejecuta un modelo (esto también inicia el servicio local):
foundry model list          # ver modelos disponibles
foundry model run phi-4-mini
3. Instala el SDK de Python usado para descubrir el endpoint local:
pip install foundry-local-sdk
4. Apunta el Microsoft Agent Framework a tu modelo local:
from foundry_local import FoundryLocalManager
from agent_framework.openai import OpenAIChatClient

# Descarga (si es necesario) y sirve el modelo localmente, luego descubre el endpoint/puerto.
manager = FoundryLocalManager("phi-4-mini")

chat_client = OpenAIChatClient(
    base_url=manager.endpoint,      # por ejemplo, http://localhost:<puerto>/v1
    api_key=manager.api_key,        # siempre "no requerido" para Foundry Local
    model_id=manager.get_model_info("phi-4-mini").id,
)

agent = chat_client.as_agent(
    name="LocalAgent",
    instructions="You are a helpful assistant running fully on-device.",
)
Nota: Foundry Local expone un endpoint de Chat Completions compatible con OpenAI. Úsalo para desarrollo local y escenarios sin conexión. Para el conjunto completo de características de la API de Respuestas (conversaciones con estado, orquestación profunda de herramientas y desarrollo estilo agente), apunta a Azure OpenAI o a un proyecto Microsoft Foundry como se muestra en las lecciones. Consulta la documentación de Foundry Local para el catálogo actual de modelos y soporte de plataforma.
Configuración adicional para la lección 8 (Flujo de trabajo Bing Grounding)
El notebook del flujo de trabajo condicional en la lección 8 usa Bing grounding a través de Microsoft Foundry. Si planeas ejecutar ese ejemplo, agrega esta variable a tu archivo .env:
| Variable | Dónde encontrarla |
|---|---|
BING_CONNECTION_ID |
Portal Microsoft Foundry → tu proyecto → Administración → Recursos conectados → tu conexión Bing → copia el ID de la conexión |
Solución de problemas
Errores de verificación del certificado SSL en macOS
Si estás en macOS y encuentras un error como:
ssl.SSLCertVerificationError: [SSL: CERTIFICATE_VERIFY_FAILED] certificate verify failed: self-signed certificate in certificate chain
Este es un problema conocido con Python en macOS donde los certificados SSL del sistema no se confían automáticamente. Prueba las siguientes soluciones en orden:
Opción 1: Ejecutar el script Install Certificates de Python (recomendado)
# Reemplaza 3.XX con la versión de Python que tienes instalada (por ejemplo, 3.12 o 3.13):
/Applications/Python\ 3.XX/Install\ Certificates.command
Opción 2: Usa connection_verify=False en tu notebook (solo para notebooks de Models en GitHub)
En el notebook de la lección 6 (06-building-trustworthy-agents/code_samples/06-system-message-framework.ipynb), ya se incluye una solución comentada. Descomenta connection_verify=False al crear el cliente:
client = ChatCompletionsClient(
    endpoint=endpoint,
    credential=AzureKeyCredential(token),
    connection_verify=False,  # Deshabilitar la verificación SSL si encuentra errores de certificado
)
⚠️ Advertencia: Deshabilitar la verificación SSL (
connection_verify=False) reduce la seguridad al omitir la validación del certificado. Usa esto solo como una solución temporal en entornos de desarrollo, nunca en producción.
Opción 3: Instalar y usar truststore
pip install truststore
Luego añade lo siguiente al inicio de tu notebook o script antes de hacer cualquier llamada de red:
import truststore
truststore.inject_into_ssl()
¿Atascado en algún lugar?
Si tienes algún problema ejecutando esta configuración, únete a nuestro Discord de la comunidad Azure AI o crea un problema.
Próxima lección
Ahora estás listo para ejecutar el código de este curso. ¡Disfruta aprendiendo más sobre el mundo de los Agentes de IA!
Introducción a los agentes de IA y casos de uso de agentes
Descargo de responsabilidad: Este documento ha sido traducido utilizando el servicio de traducción automática Co-op Translator. Aunque nos esforzamos por la precisión, tenga en cuenta que las traducciones automatizadas pueden contener errores o inexactitudes. El documento original en su idioma nativo debe considerarse la fuente autorizada. Para información crítica, se recomienda una traducción profesional humana. No somos responsables de cualquier malentendido o interpretación errónea que surja del uso de esta traducción.