ai-agents-for-beginners

(위 이미지를 클릭하면 이 수업의 비디오를 볼 수 있습니다)
AI 에이전트의 메타인지
소개
메타인지에 관한 수업에 오신 것을 환영합니다! 이 장은 자신의 사고 과정을 성찰하는 방법에 대해 궁금해하는 초보자들을 위해 설계되었습니다. 이 수업이 끝나면 핵심 개념을 이해하고 AI 에이전트 설계에 메타인지를 적용할 수 있는 실용적인 예제를 활용할 수 있게 될 것입니다.
학습 목표
이 수업을 완료하면 다음을 할 수 있습니다:
- 에이전트 정의에서 추론 루프의 의미를 이해합니다.
- 자기 수정이 가능한 에이전트를 돕기 위한 계획 및 평가 기법을 활용합니다.
- 작업을 수행하기 위해 코드를 조작할 수 있는 자체 에이전트를 만듭니다.
메타인지 소개
메타인지는 자신의 사고에 대해 사고하는 고차원적 인지 과정을 말합니다. AI 에이전트의 경우, 이는 자기 인식과 과거 경험을 기반으로 행동을 평가하고 조정할 수 있음을 의미합니다. 메타인지는 “사고에 대한 사고”로, 에이전트형 AI 시스템 개발에서 중요한 개념입니다. 이는 AI 시스템이 자신의 내부 프로세스를 인식하고 모니터링, 조절 및 적응할 수 있게 합니다. 우리가 상황을 읽거나 문제를 바라볼 때 하는 것과 유사합니다. 이러한 자기 인식은 AI 시스템이 더 나은 결정을 내리고 오류를 식별하며 시간이 지남에 따라 성능을 향상시키는 데 도움을 줄 수 있습니다 — 다시 말해 튜링 테스트와 AI가 지배할 것인지에 대한 논쟁으로 되돌아갑니다.
에이전트형 AI 시스템의 맥락에서 메타인지는 다음과 같은 여러 과제를 해결하는 데 도움이 될 수 있습니다:
- 투명성: AI 시스템이 자신의 추론과 결정을 설명할 수 있도록 보장합니다.
- 추론: AI 시스템이 정보를 종합하고 타당한 결정을 내리는 능력을 향상시킵니다.
- 적응성: AI 시스템이 새로운 환경과 변화하는 조건에 적응할 수 있게 합니다.
- 인식: 환경으로부터의 데이터를 인식하고 해석하는 정확성을 향상시킵니다.
메타인지란 무엇인가?
메타인지, 즉 “사고에 대한 사고”는 자신의 인지 과정을 자기 인식하고 자기 조절하는 고차원적 인지 과정입니다. AI 분야에서 메타인지는 에이전트가 자신의 전략과 행동을 평가하고 조정할 수 있게 하여 문제 해결 및 의사결정 능력을 향상시킵니다. 메타인지를 이해함으로써 더 지능적일 뿐만 아니라 더 적응력 있고 효율적인 AI 에이전트를 설계할 수 있습니다. 진정한 메타인지에서는 AI가 명시적으로 자신의 추론에 대해 추론하는 모습을 보게 됩니다.
예시: “나는 더 저렴한 항공권을 우선시했어… 직항을 놓치고 있을 수 있으니 다시 확인해볼게.”
어떤 경로를 선택했는지 또는 왜 그렇게 선택했는지를 기록합니다.
- 과거의 사용자 선호에 과도하게 의존했기 때문에 실수를 했음을 인지하고, 단순히 최종 추천을 바꾸는 것이 아니라 의사결정 전략 자체를 수정합니다.
- 패턴을 진단합니다. 예: “사용자가 ‘너무 붐빈다’고 언급할 때마다 특정 명소를 제거하는 것뿐만 아니라, 내가 항상 인기순으로 ‘상위 명소’를 선정하는 방식이 잘못되었다는 점도 반영해야 한다.”
AI 에이전트에서의 메타인지의 중요성
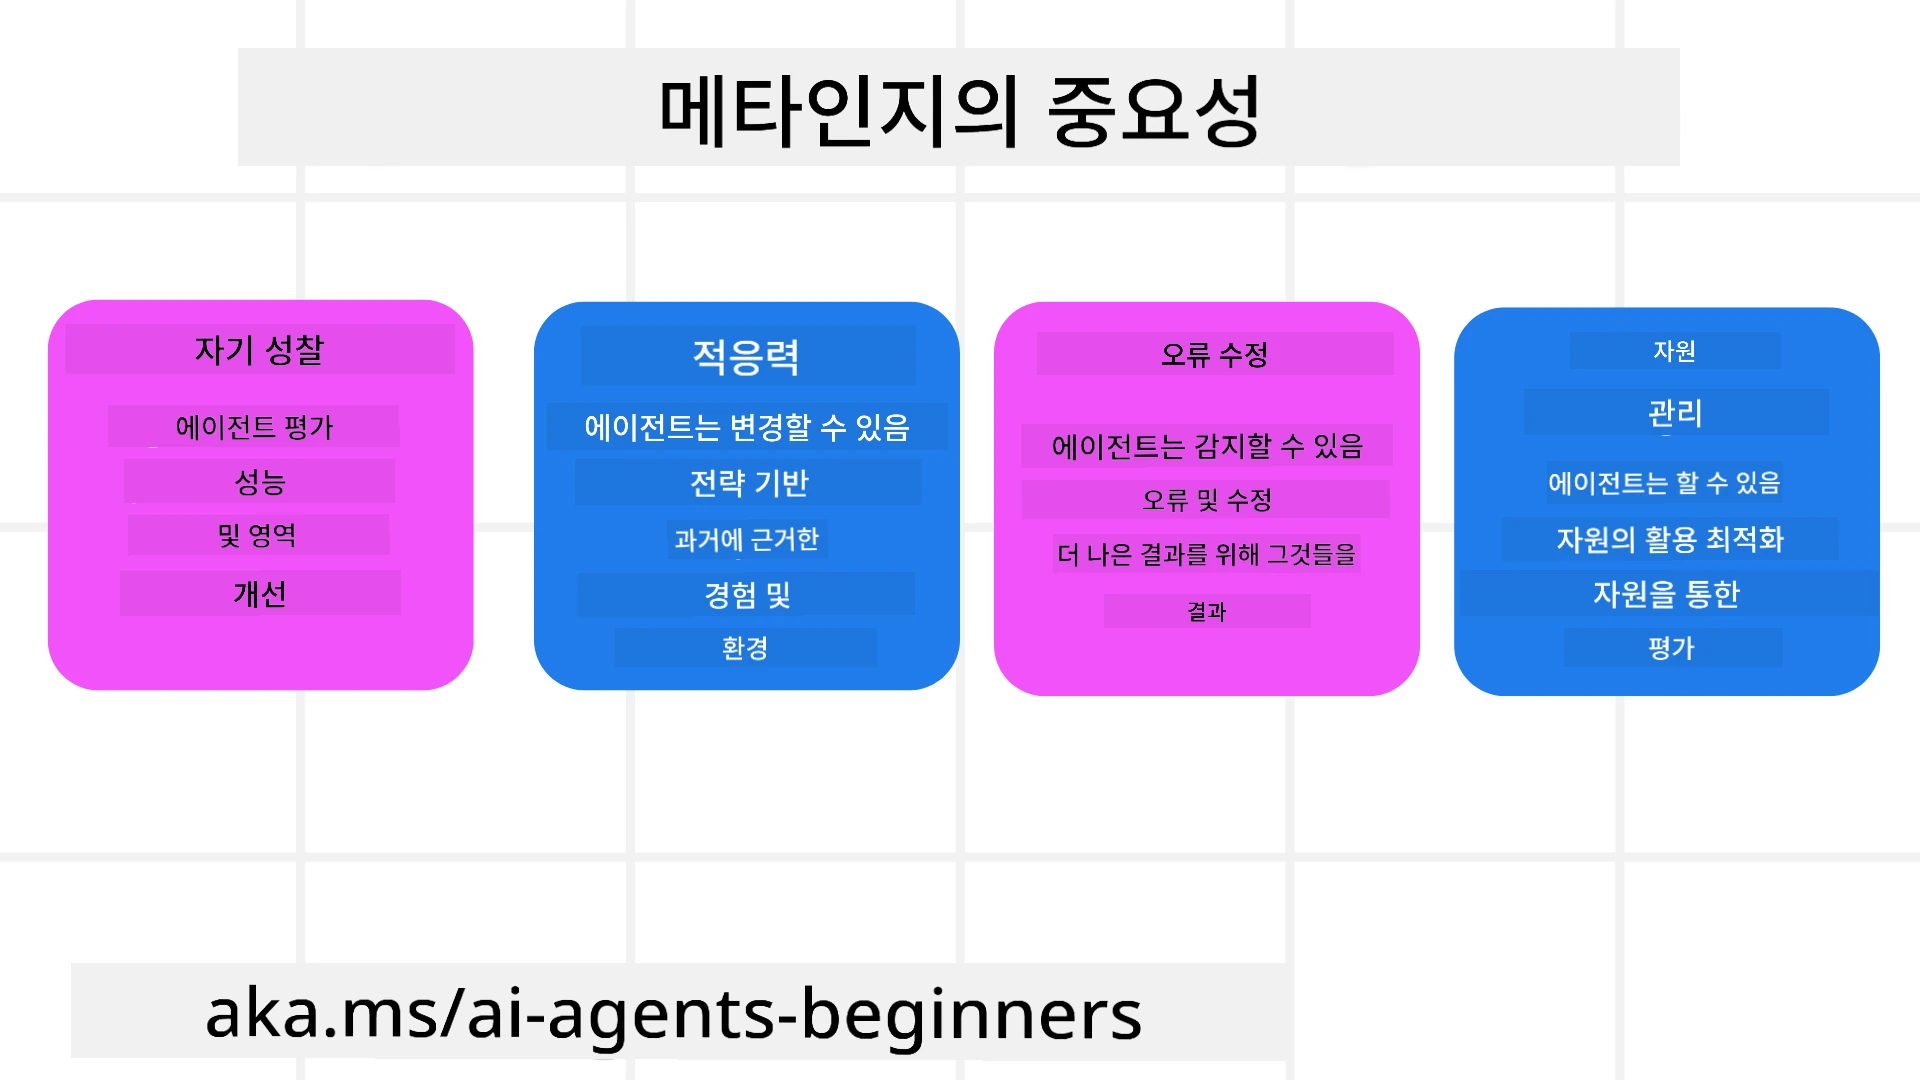
- 자기 성찰: 에이전트가 자신의 성과를 평가하고 개선이 필요한 영역을 식별할 수 있습니다.
- 적응성: 에이전트가 과거 경험과 변화하는 환경에 따라 전략을 수정할 수 있습니다.
- 오류 수정: 에이전트가 자율적으로 오류를 감지하고 수정하여 보다 정확한 결과를 제공합니다.
- 자원 관리: 에이전트가 시간과 계산 자원과 같은 자원의 사용을 계획 및 평가하여 최적화할 수 있습니다.
AI 에이전트의 구성 요소
메타인지 프로세스에 들어가기 전에 AI 에이전트의 기본 구성 요소를 이해하는 것이 중요합니다. AI 에이전트는 일반적으로 다음으로 구성됩니다:
- 페르소나: 에이전트의 성격과 특성으로, 사용자가 에이전트와 상호작용하는 방식을 정의합니다.
- 도구: 에이전트가 수행할 수 있는 기능과 능력입니다.
- 기술: 에이전트가 보유한 지식과 전문성입니다.
이러한 구성 요소는 특정 작업을 수행할 수 있는 “전문성 단위”를 함께 만듭니다.
예시: 여행을 계획할 뿐만 아니라 실시간 데이터와 과거 고객 여정 경험을 기반으로 경로를 조정하는 에이전트 서비스인 여행 에이전트를 고려해보세요.
예시: 여행 에이전트 서비스에서의 메타인지
여행 계획을 돕는 AI 기반의 여행 에이전트를 설계한다고 상상해보세요. 이 에이전트, “여행 에이전트”는 사용자에게 휴가 계획을 도와줍니다. 메타인지를 통합하려면 여행 에이전트는 자기 인식과 과거 경험을 기반으로 자신의 행동을 평가하고 조정해야 합니다. 메타인지가 어떻게 작용할 수 있는지 살펴보면 다음과 같습니다:
현재 작업
현재 작업은 사용자가 파리로 여행을 계획하도록 돕는 것입니다.
작업을 완료하기 위한 단계
- 사용자 선호 수집: 사용자의 여행 날짜, 예산, 관심사(예: 박물관, 음식, 쇼핑) 및 특정 요구사항에 대해 묻습니다.
- 정보 검색: 사용자의 선호에 맞는 항공편, 숙박, 명소 및 레스토랑을 검색합니다.
- 추천 생성: 항공편 상세, 호텔 예약 및 추천 활동을 포함한 개인화된 일정표를 제공합니다.
- 피드백 기반 조정: 추천에 대한 사용자의 피드백을 묻고 필요한 조정을 합니다.
필요한 자원
- 항공 및 호텔 예약 데이터베이스 접근 권한.
- 파리의 명소 및 레스토랑에 관한 정보.
- 이전 상호작용에서의 사용자 피드백 데이터.
경험 및 자기 성찰
여행 에이전트는 메타인지를 사용하여 성과를 평가하고 과거 경험에서 학습합니다. 예를 들어:
- 사용자 피드백 분석: 여행 에이전트는 어떤 추천이 호응을 얻었고 어떤 추천이 그렇지 않았는지 판단하기 위해 사용자 피드백을 검토합니다. 그리고 미래의 제안을 그에 맞게 조정합니다.
- 적응성: 사용자가 이전에 붐비는 장소를 싫어한다고 언급한 경우, 여행 에이전트는 향후 피크 시간대의 인기 관광지는 권장하지 않습니다.
- 오류 수정: 예를 들어 여행 에이전트가 예약 시 만실인 호텔을 제안한 실수를 했다면, 향후 추천 전에 가용성을 더 엄격하게 확인하도록 학습합니다.
실용 개발자 예시
메타인지를 통합할 때 여행 에이전트 코드가 어떻게 보일지에 대한 단순화된 예시는 다음과 같습니다:
class Travel_Agent:
    def __init__(self):
        self.user_preferences = {}
        self.experience_data = []

    def gather_preferences(self, preferences):
        self.user_preferences = preferences

    def retrieve_information(self):
        # 선호도에 따라 항공편, 호텔 및 관광지를 검색합니다
        flights = search_flights(self.user_preferences)
        hotels = search_hotels(self.user_preferences)
        attractions = search_attractions(self.user_preferences)
        return flights, hotels, attractions

    def generate_recommendations(self):
        flights, hotels, attractions = self.retrieve_information()
        itinerary = create_itinerary(flights, hotels, attractions)
        return itinerary

    def adjust_based_on_feedback(self, feedback):
        self.experience_data.append(feedback)
        # 피드백을 분석하고 향후 추천을 조정합니다
        self.user_preferences = adjust_preferences(self.user_preferences, feedback)

# 사용 예시
travel_agent = Travel_Agent()
preferences = {
    "destination": "Paris",
    "dates": "2025-04-01 to 2025-04-10",
    "budget": "moderate",
    "interests": ["museums", "cuisine"]
}
travel_agent.gather_preferences(preferences)
itinerary = travel_agent.generate_recommendations()
print("Suggested Itinerary:", itinerary)
feedback = {"liked": ["Louvre Museum"], "disliked": ["Eiffel Tower (too crowded)"]}
travel_agent.adjust_based_on_feedback(feedback)
메타인지가 중요한 이유
- 자기 성찰: 에이전트가 자신의 성과를 분석하고 개선 영역을 식별할 수 있습니다.
- 적응성: 에이전트가 피드백과 변화하는 조건에 따라 전략을 수정할 수 있습니다.
- 오류 수정: 에이전트가 자율적으로 실수를 감지하고 수정할 수 있습니다.
- 자원 관리: 에이전트가 시간과 계산 자원과 같은 자원의 사용을 최적화할 수 있습니다.
메타인지를 통합함으로써 여행 에이전트는 보다 개인화되고 정확한 여행 추천을 제공하여 전체 사용자 경험을 향상시킬 수 있습니다.
2. 에이전트의 계획 수립
계획 수립은 AI 에이전트 행동의 중요한 구성 요소입니다. 이는 현재 상태, 자원 및 가능한 장애물을 고려하여 목표를 달성하기 위해 필요한 단계를 개괄하는 것을 포함합니다.
계획의 요소
- 현재 작업: 작업을 명확히 정의합니다.
- 작업을 완료하기 위한 단계: 작업을 관리 가능한 단계로 분해합니다.
- 필요한 자원: 필요한 자원을 식별합니다.
- 경험: 계획 수립에 과거 경험을 활용합니다.
예시: 다음은 여행 에이전트가 사용자의 여행 계획을 효과적으로 돕기 위해 수행해야 할 단계입니다:
여행 에이전트를 위한 단계
- 사용자 선호 수집
- 사용자의 여행 날짜, 예산, 관심사 및 특정 요구사항에 대해 물어봅니다.
- 예시: “언제 여행할 계획이신가요?” “예산 범위는 어떻게 되나요?” “휴가 중 어떤 활동을 즐기시나요?”
- 정보 검색
- 사용자 선호에 따라 관련 여행 옵션을 검색합니다.
- 항공편: 사용자의 예산과 선호 여행 날짜 내에서 이용 가능한 항공편을 찾습니다.
- 숙박: 위치, 가격 및 편의시설에 대한 사용자의 선호에 맞는 호텔 또는 렌탈 숙소를 찾습니다.
- 명소 및 레스토랑: 사용자의 관심사에 부합하는 인기 명소, 활동 및 식당을 식별합니다.
- 추천 생성
- 검색된 정보를 개인화된 일정표로 편집합니다.
- 항공편 옵션, 호텔 예약 및 추천 활동과 같이 사용자의 선호에 맞게 추천을 맞춤화하여 제공합니다.
- 일정 사용자에게 제시
- 제안된 일정표를 사용자에게 공유하여 검토를 받습니다.
- 예시: “파리 여행을 위한 제안 일정입니다. 항공편 상세, 호텔 예약, 추천 활동 및 레스토랑 목록이 포함되어 있습니다. 의견 알려주세요!”
- 피드백 수집
- 제안된 일정에 대해 사용자에게 피드백을 요청합니다.
- 예시: “항공편 옵션이 마음에 드시나요?” “호텔이 필요에 맞나요?” “추가하거나 제거하고 싶은 활동이 있나요?”
- 피드백 기반 조정
- 사용자 피드백에 따라 일정표를 수정합니다.
- 사용자의 선호에 더 잘 맞도록 항공편, 숙박 및 활동 추천을 조정합니다.
- 최종 확인
- 업데이트된 일정표를 사용자에게 최종 확인을 위해 제시합니다.
- 예시: “피드백을 반영하여 조정했습니다. 업데이트된 일정입니다. 모두 괜찮으신가요?”
- 예약 및 확인
- 사용자가 일정을 승인하면 항공편, 숙박 및 사전 계획된 활동을 예약합니다.
- 확인 세부 정보를 사용자에게 전송합니다.
- 지속적인 지원 제공
- 여행 전 및 여행 중에 변경이나 추가 요청이 있을 경우 사용자를 도울 수 있도록 계속 대기합니다.
- 예시: “여행 중 추가 도움이 필요하시면 언제든지 연락 주세요!”
예시 상호작용
class Travel_Agent:
    def __init__(self):
        self.user_preferences = {}
        self.experience_data = []

    def gather_preferences(self, preferences):
        self.user_preferences = preferences

    def retrieve_information(self):
        flights = search_flights(self.user_preferences)
        hotels = search_hotels(self.user_preferences)
        attractions = search_attractions(self.user_preferences)
        return flights, hotels, attractions

    def generate_recommendations(self):
        flights, hotels, attractions = self.retrieve_information()
        itinerary = create_itinerary(flights, hotels, attractions)
        return itinerary

    def adjust_based_on_feedback(self, feedback):
        self.experience_data.append(feedback)
        self.user_preferences = adjust_preferences(self.user_preferences, feedback)

# 야유 요청 내의 사용 예
travel_agent = Travel_Agent()
preferences = {
    "destination": "Paris",
    "dates": "2025-04-01 to 2025-04-10",
    "budget": "moderate",
    "interests": ["museums", "cuisine"]
}
travel_agent.gather_preferences(preferences)
itinerary = travel_agent.generate_recommendations()
print("Suggested Itinerary:", itinerary)
feedback = {"liked": ["Louvre Museum"], "disliked": ["Eiffel Tower (too crowded)"]}
travel_agent.adjust_based_on_feedback(feedback)
3. 교정형 RAG 시스템
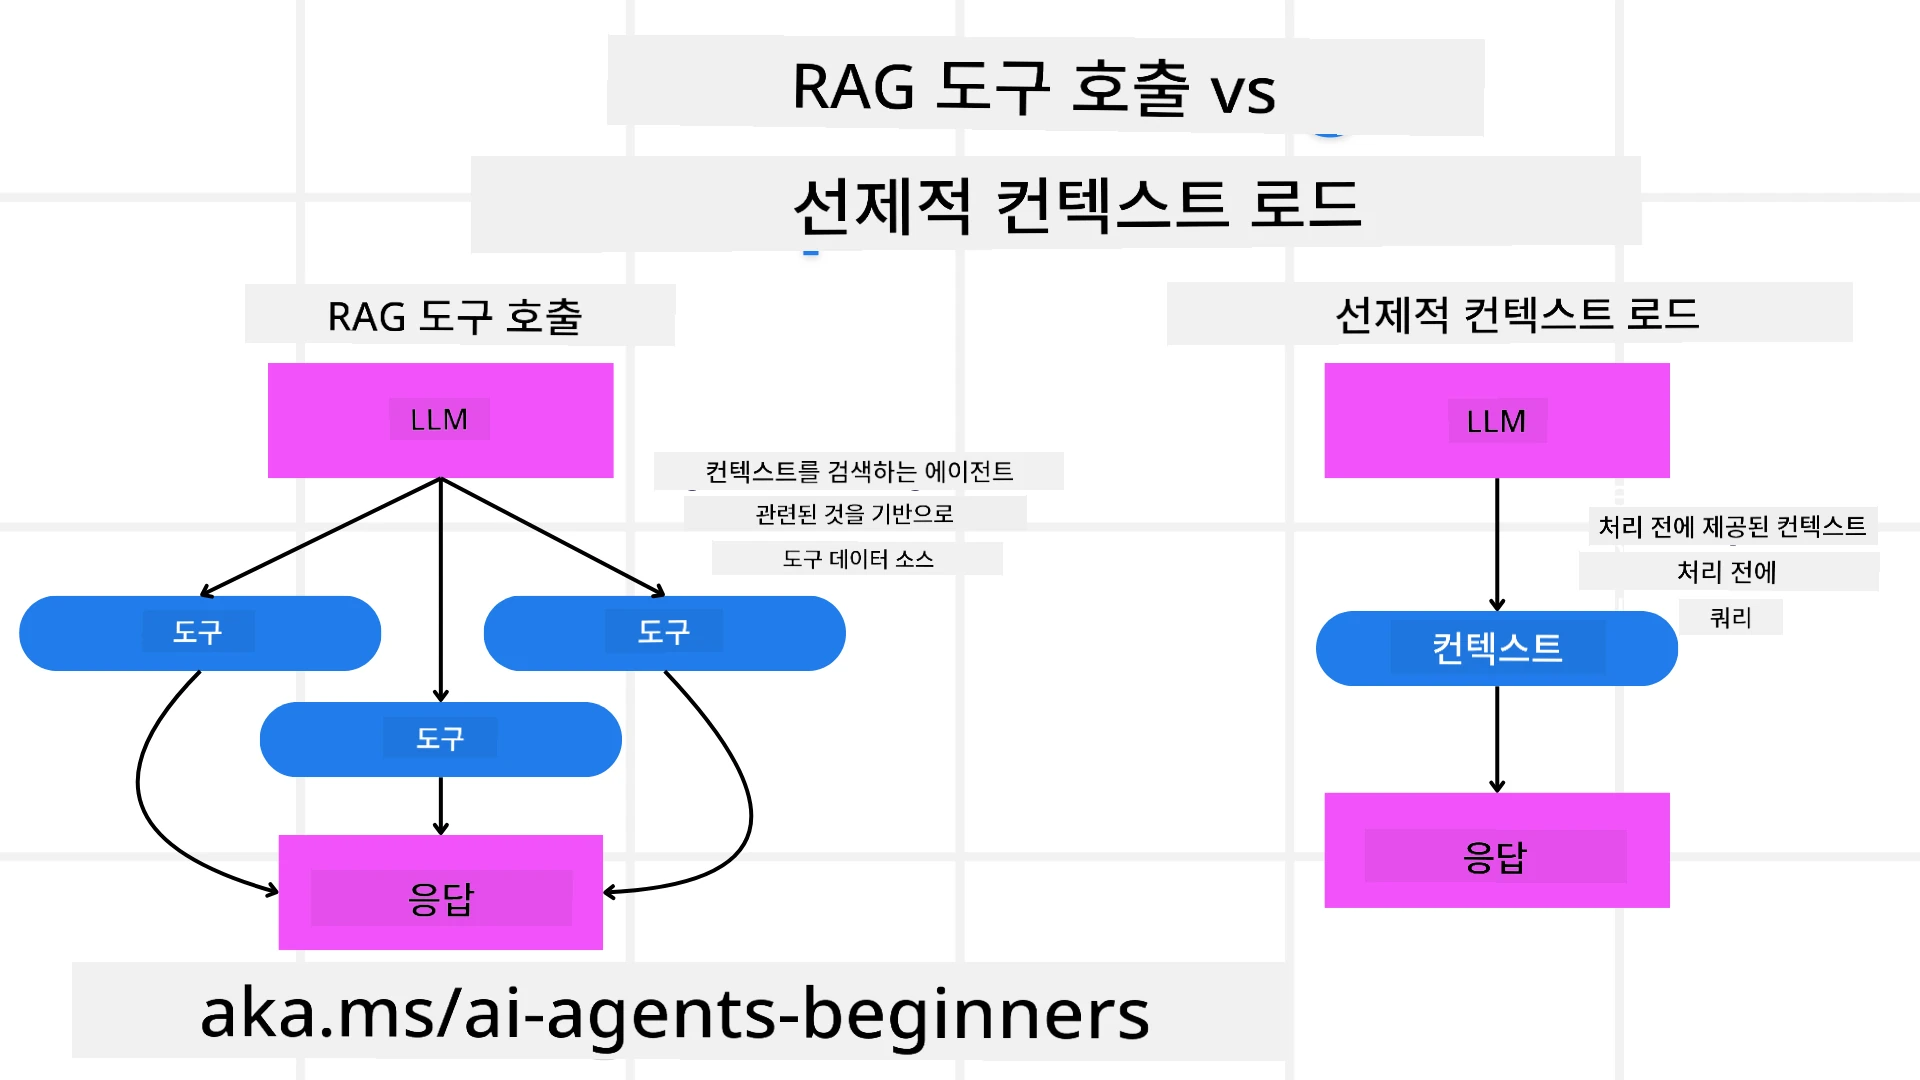
먼저 RAG 도구와 선제적 컨텍스트 로드의 차이를 이해하는 것부터 시작합시다
검색 증강 생성 (RAG)
RAG는 검색 시스템과 생성 모델을 결합합니다. 쿼리가 들어오면 검색 시스템은 외부 소스에서 관련 문서나 데이터를 가져오고, 이 검색된 정보는 생성 모델에 대한 입력을 보강하는 데 사용됩니다. 이는 모델이 보다 정확하고 문맥에 맞는 응답을 생성하는 데 도움이 됩니다.
RAG 시스템에서 에이전트는 지식 기반에서 관련 정보를 검색하고 이를 사용하여 적절한 응답이나 행동을 생성합니다.
교정형 RAG 접근법
교정형 RAG 접근법은 오류를 수정하고 AI 에이전트의 정확도를 향상시키기 위해 RAG 기법을 사용하는 데 중점을 둡니다. 여기에는 다음이 포함됩니다:
- 프롬프트 기법: 에이전트가 관련 정보를 검색하도록 유도하는 특정 프롬프트 사용.
- 도구: 검색된 정보의 관련성을 평가하고 정확한 응답을 생성할 수 있게 하는 알고리즘 및 메커니즘 구현.
- 평가: 에이전트의 성능을 지속적으로 평가하고 정확도와 효율성을 향상시키기 위해 조정.
예시: 검색 에이전트에서의 교정형 RAG
웹에서 정보를 검색하여 사용자 질의에 답하는 검색 에이전트를 고려해보세요. 교정형 RAG 접근법은 다음을 포함할 수 있습니다:
- 프롬프트 기법: 사용자의 입력을 기반으로 검색 쿼리를 작성합니다.
- 도구: 자연어 처리 및 머신러닝 알고리즘을 사용하여 검색 결과를 순위화하고 필터링합니다.
- 평가: 검색된 정보의 부정확성을 식별하고 수정하기 위해 사용자 피드백을 분석합니다.
여행 에이전트에서의 교정형 RAG
교정형 RAG(검색 증강 생성)는 AI가 정보를 검색하고 생성하는 능력을 향상시키는 동시에 부정확성을 교정할 수 있게 합니다. 여행 에이전트가 보다 정확하고 관련성 높은 여행 추천을 제공하기 위해 교정형 RAG 접근법을 사용할 수 있는 방법을 살펴봅시다.
이 접근법은 다음을 포함합니다:
- 프롬프트 기법: 에이전트가 관련 정보를 검색하도록 유도하는 특정 프롬프트 사용.
- 도구: 검색된 정보의 관련성을 평가하고 정확한 응답을 생성할 수 있게 하는 알고리즘 및 메커니즘 구현.
- 평가: 에이전트의 성능을 지속적으로 평가하고 정확도와 효율성을 향상시키기 위해 조정.
여행 에이전트에 교정형 RAG를 구현하는 단계
- 초기 사용자 상호작용
- 여행 에이전트는 목적지, 여행 날짜, 예산 및 관심사와 같은 초기 선호를 수집합니다.
-
예시:
preferences = {
    "destination": "Paris",
    "dates": "2025-04-01 to 2025-04-10",
    "budget": "moderate",
    "interests": ["museums", "cuisine"]
}
- 정보 검색
- 여행 에이전트는 사용자 선호에 따라 항공편, 숙박, 명소 및 레스토랑에 대한 정보를 검색합니다.
-
예시:
flights = search_flights(preferences)
hotels = search_hotels(preferences)
attractions = search_attractions(preferences)
- 초기 추천 생성
- 여행 에이전트는 검색된 정보를 사용하여 개인화된 일정표를 생성합니다.
-
예시:
itinerary = create_itinerary(flights, hotels, attractions)
print("Suggested Itinerary:", itinerary)
- 사용자 피드백 수집
- 여행 에이전트는 초기 추천에 대해 사용자에게 피드백을 요청합니다.
-
예시:
feedback = {
    "liked": ["Louvre Museum"],
    "disliked": ["Eiffel Tower (too crowded)"]
}
- 교정형 RAG 과정
- 프롬프트 기법: 여행 에이전트는 사용자 피드백을 바탕으로 새로운 검색 쿼리를 작성합니다.
-
예시:
if "disliked" in feedback:
    preferences["avoid"] = feedback["disliked"]
-
- 도구: 여행 에이전트는 알고리즘을 사용하여 새로운 검색 결과를 순위화하고 필터링하며, 사용자 피드백을 기반으로 관련성을 강조합니다.
-
예시:
new_attractions = search_attractions(preferences)
new_itinerary = create_itinerary(flights, hotels, new_attractions)
print("Updated Itinerary:", new_itinerary)
-
- 평가: 여행 에이전트는 사용자 피드백을 분석하고 필요한 조정을 수행하여 추천의 관련성과 정확성을 지속적으로 평가합니다.
-
예시:
def adjust_preferences(preferences, feedback):
    if "liked" in feedback:
        preferences["favorites"] = feedback["liked"]
    if "disliked" in feedback:
        preferences["avoid"] = feedback["disliked"]
    return preferences

preferences = adjust_preferences(preferences, feedback)
-
- 프롬프트 기법: 여행 에이전트는 사용자 피드백을 바탕으로 새로운 검색 쿼리를 작성합니다.
실용적 예시
여행 에이전트에 교정형 RAG 접근법을 통합한 단순화된 Python 코드 예시는 다음과 같습니다:
class Travel_Agent:
    def __init__(self):
        self.user_preferences = {}
        self.experience_data = []

    def gather_preferences(self, preferences):
        self.user_preferences = preferences

    def retrieve_information(self):
        flights = search_flights(self.user_preferences)
        hotels = search_hotels(self.user_preferences)
        attractions = search_attractions(self.user_preferences)
        return flights, hotels, attractions

    def generate_recommendations(self):
        flights, hotels, attractions = self.retrieve_information()
        itinerary = create_itinerary(flights, hotels, attractions)
        return itinerary

    def adjust_based_on_feedback(self, feedback):
        self.experience_data.append(feedback)
        self.user_preferences = adjust_preferences(self.user_preferences, feedback)
        new_itinerary = self.generate_recommendations()
        return new_itinerary

# 사용 예
travel_agent = Travel_Agent()
preferences = {
    "destination": "Paris",
    "dates": "2025-04-01 to 2025-04-10",
    "budget": "moderate",
    "interests": ["museums", "cuisine"]
}
travel_agent.gather_preferences(preferences)
itinerary = travel_agent.generate_recommendations()
print("Suggested Itinerary:", itinerary)
feedback = {"liked": ["Louvre Museum"], "disliked": ["Eiffel Tower (too crowded)"]}
new_itinerary = travel_agent.adjust_based_on_feedback(feedback)
print("Updated Itinerary:", new_itinerary)
선제적 컨텍스트 로드
사전 컨텍스트 로드(Pre-emptive Context Load)는 쿼리를 처리하기 전에 관련 컨텍스트나 배경 정보를 모델에 로드하는 것을 포함합니다. 이는 모델이 시작 시점부터 이 정보에 접근할 수 있게 하여, 처리 중에 추가 데이터를 검색할 필요 없이 더 정보에 기반한 응답을 생성하는 데 도움이 될 수 있습니다.
다음은 여행사 애플리케이션을 위한 파이썬에서의 사전 컨텍스트 로드가 어떻게 보일 수 있는지에 대한 단순화된 예입니다:
class TravelAgent:
    def __init__(self):
        # 인기 목적지와 해당 정보를 미리 로드
        self.context = {
            "Paris": {"country": "France", "currency": "Euro", "language": "French", "attractions": ["Eiffel Tower", "Louvre Museum"]},
            "Tokyo": {"country": "Japan", "currency": "Yen", "language": "Japanese", "attractions": ["Tokyo Tower", "Shibuya Crossing"]},
            "New York": {"country": "USA", "currency": "Dollar", "language": "English", "attractions": ["Statue of Liberty", "Times Square"]},
            "Sydney": {"country": "Australia", "currency": "Dollar", "language": "English", "attractions": ["Sydney Opera House", "Bondi Beach"]}
        }

    def get_destination_info(self, destination):
        # 사전 로드된 컨텍스트에서 목적지 정보를 가져오기
        info = self.context.get(destination)
        if info:
            return f"{destination}:\nCountry: {info['country']}\nCurrency: {info['currency']}\nLanguage: {info['language']}\nAttractions: {', '.join(info['attractions'])}"
        else:
            return f"Sorry, we don't have information on {destination}."

# 사용 예시
travel_agent = TravelAgent()
print(travel_agent.get_destination_info("Paris"))
print(travel_agent.get_destination_info("Tokyo"))
설명
-
초기화(
__init__메서드):TravelAgent클래스는 파리, 도쿄, 뉴욕, 시드니와 같은 인기 목적지에 대한 정보를 포함한 사전(딕셔너리)을 미리 로드합니다. 이 딕셔너리에는 각 목적지의 국가, 통화, 언어 및 주요 명소와 같은 세부 정보가 포함되어 있습니다. -
정보 검색(
get_destination_info메서드): 사용자가 특정 목적지에 대해 문의할 때,get_destination_info메서드는 미리 로드된 컨텍스트 딕셔너리에서 관련 정보를 가져옵니다.
컨텍스트를 미리 로드하면 여행사 애플리케이션이 외부 소스에서 실시간으로 이 정보를 검색할 필요 없이 사용자 문의에 빠르게 응답할 수 있습니다. 이는 애플리케이션을 더 효율적이고 반응성이 좋게 만듭니다.
목표로 계획 초기화 후 반복(iterating)
목표로 계획을 초기화(bootstrapping)하는 것은 명확한 목표나 원하는 결과를 처음부터 설정하는 것을 포함합니다. 이 목표를 사전에 정의하면 모델이 반복 과정 전반에 걸쳐 이를 지침으로 사용할 수 있습니다. 이렇게 하면 각 반복이 원하는 결과에 더 가까워지도록 하여 프로세스가 더 효율적이고 집중되도록 합니다.
다음은 여행사에서 계획을 반복하기 전에 목표로 여행 계획을 초기화하는 방법의 예입니다:
시나리오
여행사는 고객을 위해 맞춤형 휴가를 계획하려고 합니다. 목표는 고객의 선호도와 예산을 기반으로 고객 만족도를 극대화하는 여행 일정을 만드는 것입니다.
단계
- 고객의 선호도와 예산을 정의합니다.
- 이러한 선호도를 기반으로 초기 계획을 부트스트랩합니다.
- 반복적으로 계획을 개선하여 고객 만족도를 최적화합니다.
Python 코드
class TravelAgent:
    def __init__(self, destinations):
        self.destinations = destinations

    def bootstrap_plan(self, preferences, budget):
        plan = []
        total_cost = 0

        for destination in self.destinations:
            if total_cost + destination['cost'] <= budget and self.match_preferences(destination, preferences):
                plan.append(destination)
                total_cost += destination['cost']

        return plan

    def match_preferences(self, destination, preferences):
        for key, value in preferences.items():
            if destination.get(key) != value:
                return False
        return True

    def iterate_plan(self, plan, preferences, budget):
        for i in range(len(plan)):
            for destination in self.destinations:
                if destination not in plan and self.match_preferences(destination, preferences) and self.calculate_cost(plan, destination) <= budget:
                    plan[i] = destination
                    break
        return plan

    def calculate_cost(self, plan, new_destination):
        return sum(destination['cost'] for destination in plan) + new_destination['cost']

# 사용 예
destinations = [
    {"name": "Paris", "cost": 1000, "activity": "sightseeing"},
    {"name": "Tokyo", "cost": 1200, "activity": "shopping"},
    {"name": "New York", "cost": 900, "activity": "sightseeing"},
    {"name": "Sydney", "cost": 1100, "activity": "beach"},
]

preferences = {"activity": "sightseeing"}
budget = 2000

travel_agent = TravelAgent(destinations)
initial_plan = travel_agent.bootstrap_plan(preferences, budget)
print("Initial Plan:", initial_plan)

refined_plan = travel_agent.iterate_plan(initial_plan, preferences, budget)
print("Refined Plan:", refined_plan)
코드 설명
-
초기화(
__init__메서드):TravelAgent클래스는 이름, 비용, 활동 유형과 같은 속성을 가진 잠재적 목적지 목록으로 초기화됩니다. -
계획 초기화(
bootstrap_plan메서드): 이 메서드는 고객의 선호도와 예산을 기반으로 초기 여행 계획을 생성합니다. 목적지 목록을 반복하면서 고객의 선호도와 예산에 맞는 경우 계획에 추가합니다. -
선호도 일치(
match_preferences메서드): 이 메서드는 목적지가 고객의 선호도와 일치하는지 확인합니다. -
계획 반복(
iterate_plan메서드): 이 메서드는 고객의 선호도와 예산 제약을 고려하여 계획에 있는 각 목적지를 더 나은 항목으로 교체하려 시도함으로써 초기 계획을 정교화합니다. -
비용 계산(
calculate_cost메서드): 이 메서드는 잠재적 신규 목적지를 포함한 현재 계획의 총비용을 계산합니다.
사용 예
- 초기 계획: 여행사는 관광을 선호하고 예산이 $2000인 고객을 기반으로 초기 계획을 생성합니다.
- 정교화된 계획: 여행사는 계획을 반복하여 고객의 선호도와 예산을 최적화합니다.
명확한 목표(예: 고객 만족도 극대화)로 계획을 부트스트랩하고 반복적으로 계획을 정교화함으로써, 여행사는 고객의 선호도와 예산에 맞는 맞춤형 최적화된 여행 일정을 만들 수 있습니다. 이 접근 방식은 여행 계획이 처음부터 고객의 선호도와 예산에 부합하도록 하고 각 반복에서 개선되도록 보장합니다.
재순위(re-ranking) 및 스코어링을 위한 LLM 활용
대형 언어 모델(LLM)은 검색된 문서나 생성된 응답의 관련성 및 품질을 평가하여 재순위 및 스코어링에 사용할 수 있습니다. 작동 방식은 다음과 같습니다:
검색( Retrieval ): 초기 검색 단계에서 쿼리를 기반으로 후보 문서 또는 응답 집합을 가져옵니다.
재순위( Re-ranking ): LLM이 이러한 후보들을 평가하고 관련성 및 품질에 따라 재순위를 매깁니다. 이 단계는 가장 관련성이 높고 품질이 좋은 정보가 먼저 제시되도록 보장합니다.
스코어링( Scoring ): LLM은 각 후보에 대해 관련성 및 품질을 반영한 점수를 부여합니다. 이는 사용자에게 가장 적합한 응답이나 문서를 선택하는 데 도움이 됩니다.
LLM을 재순위 및 스코어링에 활용하면 시스템이 더 정확하고 맥락적으로 적절한 정보를 제공할 수 있어 전반적인 사용자 경험을 향상시킵니다.
다음은 여행사가 사용자 선호도에 따라 여행 목적지를 재순위 및 스코어링하기 위해 대형 언어 모델(LLM)을 사용하는 방법의 예입니다(파이썬):
시나리오 - 선호도 기반 여행
여행사는 고객의 선호도를 기반으로 최적의 여행 목적지를 추천하려고 합니다. LLM은 목적지들을 재순위 및 스코어링하여 가장 관련성 높은 옵션이 제시되도록 도와줍니다.
단계:
- 사용자 선호도 수집.
- 잠재적 여행 목적지 목록 검색.
- LLM을 사용하여 사용자 선호도에 따라 목적지를 재순위 및 스코어링.
다음은 이전 예제를 Azure OpenAI 서비스를 사용하도록 업데이트하는 방법입니다:
요구사항
- Azure 구독이 필요합니다.
- Azure OpenAI 리소스를 생성하고 API 키를 획득합니다.
예제 Python 코드
import requests
import json

class TravelAgent:
    def __init__(self, destinations):
        self.destinations = destinations

    def get_recommendations(self, preferences, api_key, endpoint):
        # Azure OpenAI용 프롬프트를 생성합니다
        prompt = self.generate_prompt(preferences)

        # 요청을 위한 헤더와 페이로드를 정의합니다
        headers = {
            'Content-Type': 'application/json',
            'Authorization': f'Bearer {api_key}'
        }
        payload = {
            "prompt": prompt,
            "max_tokens": 150,
            "temperature": 0.7
        }

        # 재랭킹되고 점수가 매겨진 목적지를 얻기 위해 Azure OpenAI API를 호출합니다
        response = requests.post(endpoint, headers=headers, json=payload)
        response_data = response.json()

        # 추천 항목을 추출하여 반환합니다
        recommendations = response_data['choices'][0]['text'].strip().split('\n')
        return recommendations

    def generate_prompt(self, preferences):
        prompt = "Here are the travel destinations ranked and scored based on the following user preferences:\n"
        for key, value in preferences.items():
            prompt += f"{key}: {value}\n"
        prompt += "\nDestinations:\n"
        for destination in self.destinations:
            prompt += f"- {destination['name']}: {destination['description']}\n"
        return prompt

# 사용 예시
destinations = [
    {"name": "Paris", "description": "City of lights, known for its art, fashion, and culture."},
    {"name": "Tokyo", "description": "Vibrant city, famous for its modernity and traditional temples."},
    {"name": "New York", "description": "The city that never sleeps, with iconic landmarks and diverse culture."},
    {"name": "Sydney", "description": "Beautiful harbour city, known for its opera house and stunning beaches."},
]

preferences = {"activity": "sightseeing", "culture": "diverse"}
api_key = 'your_azure_openai_api_key'
endpoint = 'https://your-endpoint.com/openai/deployments/your-deployment-name/completions?api-version=2022-12-01'

travel_agent = TravelAgent(destinations)
recommendations = travel_agent.get_recommendations(preferences, api_key, endpoint)
print("Recommended Destinations:")
for rec in recommendations:
    print(rec)
코드 설명 - Preference Booker
-
초기화:
TravelAgent클래스는 이름과 설명과 같은 속성을 가진 잠재적 여행 목적지 목록으로 초기화됩니다. -
권장사항 받기(
get_recommendations메서드): 이 메서드는 사용자 선호도를 기반으로 Azure OpenAI 서비스에 보낼 프롬프트를 생성하고 Azure OpenAI API에 HTTP POST 요청을 하여 재순위 및 스코어링된 목적지를 얻습니다. -
프롬프트 생성(
generate_prompt메서드): 이 메서드는 사용자 선호도와 목적지 목록을 포함하여 Azure OpenAI에 보낼 프롬프트를 구성합니다. 프롬프트는 모델이 제공된 선호도에 따라 목적지를 재순위 및 스코어링하도록 안내합니다. -
API 호출:
requests라이브러리를 사용하여 Azure OpenAI API 엔드포인트에 HTTP POST 요청을 합니다. 응답에는 재순위 및 스코어링된 목적지가 포함됩니다. -
사용 예: 여행사는 관광 및 다양한 문화에 대한 관심과 같은 사용자 선호도를 수집하고 Azure OpenAI 서비스를 사용하여 여행 목적지에 대한 재순위 및 스코어링된 추천을 받습니다.
your_azure_openai_api_key를 실제 Azure OpenAI API 키로, https://your-endpoint.com/...을 Azure OpenAI 배포의 실제 엔드포인트 URL로 교체해야 합니다.
LLM을 재순위 및 스코어링에 활용함으로써 여행사는 고객에게 더 개인화되고 관련성 높은 여행 추천을 제공하여 전반적인 경험을 향상시킬 수 있습니다.
RAG: 프롬프트 기법 vs 도구
Retrieval-Augmented Generation(RAG)은 AI 에이전트 개발에서 프롬프트 기법이자 도구가 될 수 있습니다. 두 가지의 차이를 이해하면 프로젝트에서 RAG를 더 효과적으로 활용할 수 있습니다.
프롬프트 기법으로서의 RAG
무엇인가?
- 프롬프트 기법으로서 RAG는 특정 쿼리나 프롬프트를 구성하여 대규모 말뭉치나 데이터베이스에서 관련 정보를 검색하도록 유도하는 것을 포함합니다. 이 정보는 이후 응답이나 행동을 생성하는 데 사용됩니다.
작동 방식:
- 프롬프트 구성: 작업이나 사용자 입력에 기반하여 잘 구성된 프롬프트나 쿼리를 만듭니다.
- 정보 검색: 프롬프트를 사용하여 기존 지식 베이스나 데이터셋에서 관련 데이터를 검색합니다.
- 응답 생성: 검색된 정보를 생성형 AI 모델과 결합하여 포괄적이고 일관된 응답을 생성합니다.
여행사 예시:
- 사용자 입력: “파리에서 박물관을 방문하고 싶어요.”
- 프롬프트: “파리의 주요 박물관을 찾아라.”
- 검색된 정보: 루브르 박물관, 오르세 미술관 등에 대한 세부 정보.
- 생성된 응답: “파리의 주요 박물관으로는 루브르 박물관, 오르세 미술관, 퐁피두 센터 등이 있습니다.”
도구로서의 RAG
무엇인가?
- 도구로서 RAG는 검색과 생성 프로세스를 자동화하는 통합 시스템으로, 개발자가 각 쿼리에 대해 수동으로 프롬프트를 작성하지 않고도 복잡한 AI 기능을 구현할 수 있게 합니다.
작동 방식:
- 통합: AI 에이전트의 아키텍처 내에 RAG를 내장하여 검색과 생성 작업을 자동으로 처리하도록 합니다.
- 자동화: 이 도구는 사용자 입력을 받는 것부터 최종 응답을 생성하는 것까지 전체 프로세스를 관리하여 각 단계마다 명시적 프롬프트를 요구하지 않습니다.
- 효율성: 검색 및 생성 과정을 간소화하여 에이전트의 성능을 향상시키고 더 빠르고 정확한 응답을 가능하게 합니다.
여행사 예시:
- 사용자 입력: “파리에서 박물관을 방문하고 싶어요.”
- RAG 도구: 자동으로 박물관에 대한 정보를 검색하고 응답을 생성합니다.
- 생성된 응답: “파리의 주요 박물관으로는 루브르 박물관, 오르세 미술관, 퐁피두 센터 등이 있습니다.”
비교
| Aspect | Prompting Technique | Tool |
|---|---|---|
| Manual vs Automatic | Manual formulation of prompts for each query. | Automated process for retrieval and generation. |
| Control | Offers more control over the retrieval process. | Streamlines and automates the retrieval and generation. |
| Flexibility | Allows for customized prompts based on specific needs. | More efficient for large-scale implementations. |
| Complexity | Requires crafting and tweaking of prompts. | Easier to integrate within an AI agent’s architecture. |
실용적인 예
프롬프트 기법 예시:
def search_museums_in_paris():
    prompt = "Find top museums in Paris"
    search_results = search_web(prompt)
    return search_results

museums = search_museums_in_paris()
print("Top Museums in Paris:", museums)
도구 예시:
class Travel_Agent:
    def __init__(self):
        self.rag_tool = RAGTool()

    def get_museums_in_paris(self):
        user_input = "I want to visit museums in Paris."
        response = self.rag_tool.retrieve_and_generate(user_input)
        return response

travel_agent = Travel_Agent()
museums = travel_agent.get_museums_in_paris()
print("Top Museums in Paris:", museums)
관련성 평가(Evaluating Relevancy)
관련성 평가(Evaluating relevancy)는 AI 에이전트 성능의 중요한 측면입니다. 이는 에이전트가 검색하고 생성한 정보가 적절하고 정확하며 사용자에게 유용한지 확인합니다. 다음은 AI 에이전트에서 관련성을 평가하는 방법과 실용적인 예 및 기법입니다.
관련성 평가의 핵심 개념
- 컨텍스트 인식:
- 에이전트는 사용자의 쿼리 컨텍스트를 이해하여 관련성 높은 정보를 검색하고 생성해야 합니다.
- 예시: 사용자가 “파리의 최고의 레스토랑”을 묻는다면, 에이전트는 음식 종류나 예산 같은 사용자의 선호도를 고려해야 합니다.
- 정확성:
- 에이전트가 제공하는 정보는 사실에 근거하고 최신이어야 합니다.
- 예시: 과거 정보나 폐업한 가게 대신 현재 영업 중이고 리뷰가 좋은 레스토랑을 추천해야 합니다.
- 사용자 의도:
- 에이전트는 쿼리 이면의 사용자의 의도를 추론하여 가장 관련성 높은 정보를 제공해야 합니다.
- 예시: 사용자가 “저렴한 호텔”을 묻는다면 에이전트는 합리적 가격의 옵션을 우선적으로 제시해야 합니다.
- 피드백 루프:
- 사용자 피드백을 지속적으로 수집하고 분석하면 에이전트가 관련성 평가 과정을 개선하는 데 도움이 됩니다.
- 예시: 이전 추천에 대한 사용자 평점과 피드백을 반영하여 향후 응답을 개선합니다.
관련성 평가를 위한 실용적인 기법
- 관련성 스코어링:
- 검색된 각 항목에 대해 사용자의 쿼리 및 선호도와 얼마나 잘 일치하는지에 따라 관련성 점수를 부여합니다.
-
예시:
def relevance_score(item, query):
    score = 0
    if item['category'] in query['interests']:
        score += 1
    if item['price'] <= query['budget']:
        score += 1
    if item['location'] == query['destination']:
        score += 1
    return score
- 필터링 및 랭킹:
- 관련성이 낮은 항목을 필터링하고 나머지 항목을 관련성 점수에 따라 순위화합니다.
-
예시:
def filter_and_rank(items, query):
    ranked_items = sorted(items, key=lambda item: relevance_score(item, query), reverse=True)
    return ranked_items[:10]  # 상위 10개 관련 항목 반환
- 자연어 처리(NLP):
- 사용자의 쿼리를 이해하고 관련 정보를 검색하기 위해 NLP 기법을 사용합니다.
-
예시:
def process_query(query):
    # 사용자의 쿼리에서 핵심 정보를 추출하기 위해 NLP를 사용하세요
    processed_query = nlp(query)
    return processed_query
- 사용자 피드백 통합:
- 제공된 추천에 대한 사용자 피드백을 수집하고 이를 향후 관련성 평가에 반영합니다.
-
예시:
def adjust_based_on_feedback(feedback, items):
    for item in items:
        if item['name'] in feedback['liked']:
            item['relevance'] += 1
        if item['name'] in feedback['disliked']:
            item['relevance'] -= 1
    return items
예시: 여행사에서의 관련성 평가
다음은 여행사가 여행 추천의 관련성을 평가하는 방법에 대한 실용적인 예입니다:
class Travel_Agent:
    def __init__(self):
        self.user_preferences = {}
        self.experience_data = []

    def gather_preferences(self, preferences):
        self.user_preferences = preferences

    def retrieve_information(self):
        flights = search_flights(self.user_preferences)
        hotels = search_hotels(self.user_preferences)
        attractions = search_attractions(self.user_preferences)
        return flights, hotels, attractions

    def generate_recommendations(self):
        flights, hotels, attractions = self.retrieve_information()
        ranked_hotels = self.filter_and_rank(hotels, self.user_preferences)
        itinerary = create_itinerary(flights, ranked_hotels, attractions)
        return itinerary

    def filter_and_rank(self, items, query):
        ranked_items = sorted(items, key=lambda item: self.relevance_score(item, query), reverse=True)
        return ranked_items[:10]  # 상위 10개의 관련 항목을 반환합니다

    def relevance_score(self, item, query):
        score = 0
        if item['category'] in query['interests']:
            score += 1
        if item['price'] <= query['budget']:
            score += 1
        if item['location'] == query['destination']:
            score += 1
        return score

    def adjust_based_on_feedback(self, feedback, items):
        for item in items:
            if item['name'] in feedback['liked']:
                item['relevance'] += 1
            if item['name'] in feedback['disliked']:
                item['relevance'] -= 1
        return items

# 사용 예시
travel_agent = Travel_Agent()
preferences = {
    "destination": "Paris",
    "dates": "2025-04-01 to 2025-04-10",
    "budget": "moderate",
    "interests": ["museums", "cuisine"]
}
travel_agent.gather_preferences(preferences)
itinerary = travel_agent.generate_recommendations()
print("Suggested Itinerary:", itinerary)
feedback = {"liked": ["Louvre Museum"], "disliked": ["Eiffel Tower (too crowded)"]}
updated_items = travel_agent.adjust_based_on_feedback(feedback, itinerary['hotels'])
print("Updated Itinerary with Feedback:", updated_items)
의도를 고려한 검색(Search with Intent)
의도를 고려한 검색은 사용자의 쿼리 뒤에 있는 근본적인 목적이나 목표를 이해하고 해석하여 가장 관련성 높고 유용한 정보를 검색하고 생성하는 것을 포함합니다. 이 접근 방식은 단순히 키워드를 일치시키는 것을 넘어 사용자의 실제 요구와 컨텍스트를 파악하는 데 중점을 둡니다.
의도를 고려한 검색의 핵심 개념
- 사용자 의도 이해:
- 사용자 의도는 주로 세 가지 유형으로 분류할 수 있습니다: 정보형(informational), 탐색형(navigational), 거래형(transactional).
- 정보형 의도: 사용자가 어떤 주제에 대한 정보를 찾고 있음(예: “파리의 최고 박물관은 무엇인가요?”).
- 탐색형 의도: 사용자가 특정 웹사이트나 페이지로 이동하고자 함(예: “루브르 박물관 공식 홈페이지”).
- 거래형 의도: 사용자가 항공편 예약이나 구매와 같은 거래를 수행하려고 함(예: “파리행 항공편 예약”).
- 사용자 의도는 주로 세 가지 유형으로 분류할 수 있습니다: 정보형(informational), 탐색형(navigational), 거래형(transactional).
- 컨텍스트 인식:
- 사용자의 이전 상호작용, 선호도 및 현재 쿼리의 세부사항을 고려하면 의도를 정확히 파악하는 데 도움이 됩니다.
- 자연어 처리(NLP):
- NLP 기법은 사용자가 제공한 자연어 쿼리를 이해하고 해석하는 데 사용됩니다. 여기에는 엔티티 인식, 감정 분석 및 쿼리 구문 분석과 같은 작업이 포함됩니다.
- 개인화:
- 사용자의 이력, 선호도 및 피드백을 기반으로 검색 결과를 개인화하면 검색된 정보의 관련성을 높일 수 있습니다.
실용 예: 여행사에서의 의도를 고려한 검색
Travel Agent를 예로 들어 의도를 고려한 검색을 어떻게 구현할 수 있는지 살펴보겠습니다.
-
사용자 선호도 수집
class Travel_Agent: def __init__(self): self.user_preferences = {} def gather_preferences(self, preferences): self.user_preferences = preferences -
사용자 의도 이해
def identify_intent(query): if "book" in query or "purchase" in query: return "transactional" elif "website" in query or "official" in query: return "navigational" else: return "informational" - 컨텍스트 인식
def analyze_context(query, user_history): # 현재 쿼리를 사용자 기록과 결합하여 문맥을 파악합니다 context = { "current_query": query, "user_history": user_history } return context -
검색 및 결과 개인화
def search_with_intent(query, preferences, user_history): intent = identify_intent(query) context = analyze_context(query, user_history) if intent == "informational": search_results = search_information(query, preferences) elif intent == "navigational": search_results = search_navigation(query) elif intent == "transactional": search_results = search_transaction(query, preferences) personalized_results = personalize_results(search_results, user_history) return personalized_results def search_information(query, preferences): # 정보성 의도에 대한 예시 검색 로직 results = search_web(f"best {preferences['interests']} in {preferences['destination']}") return results def search_navigation(query): # 탐색 의도에 대한 예시 검색 로직 results = search_web(query) return results def search_transaction(query, preferences): # 거래성 의도에 대한 예시 검색 로직 results = search_web(f"book {query} to {preferences['destination']}") return results def personalize_results(results, user_history): # 개인화 예시 로직 personalized = [result for result in results if result not in user_history] return personalized[:10] # 상위 10개의 개인화된 결과 반환 -
사용 예시
travel_agent = Travel_Agent()
preferences = {
    "destination": "Paris",
    "interests": ["museums", "cuisine"]
}
travel_agent.gather_preferences(preferences)
user_history = ["Louvre Museum website", "Book flight to Paris"]
query = "best museums in Paris"
results = search_with_intent(query, preferences, user_history)
print("Search Results:", results)
4. 도구로서의 코드 생성
코드 생성 에이전트는 AI 모델을 사용하여 코드를 작성하고 실행하여 복잡한 문제를 해결하고 작업을 자동화합니다.
코드 생성 에이전트
코드 생성 에이전트는 생성형 AI 모델을 사용하여 코드를 작성하고 실행합니다. 이러한 에이전트는 다양한 프로그래밍 언어로 코드를 생성하고 실행함으로써 복잡한 문제를 해결하고 작업을 자동화하며 유용한 인사이트를 제공합니다.
실용적 응용
- 자동화된 코드 생성: 데이터 분석, 웹 스크래핑 또는 머신러닝과 같은 특정 작업을 위한 코드 조각을 생성합니다.
- RAG로서의 SQL: 데이터베이스에서 데이터를 검색하고 조작하기 위해 SQL 쿼리를 사용합니다.
- 문제 해결: 알고리즘 최적화 또는 데이터 분석과 같은 특정 문제를 해결하기 위해 코드를 생성하고 실행합니다.
예: 데이터 분석을 위한 코드 생성 에이전트
코드 생성 에이전트를 설계한다고 가정해 보겠습니다. 작동 방식은 다음과 같습니다:
- 작업: 추세와 패턴을 식별하기 위해 데이터셋을 분석합니다.
- 단계:
- 데이터셋을 데이터 분석 도구에 로드합니다.
- 데이터를 필터링하고 집계하기 위한 SQL 쿼리를 생성합니다.
- 쿼리를 실행하고 결과를 가져옵니다.
- 결과를 사용해 시각화와 인사이트를 생성합니다.
- 필요 자원: 데이터셋 접근, 데이터 분석 도구, SQL 기능.
- 경험: 과거 분석 결과를 사용하여 향후 분석의 정확성과 관련성을 향상시킵니다.
예: 여행 에이전트를 위한 코드 생성 에이전트
이 예에서는 코드 생성 에이전트인 Travel Agent를 설계하여 코드를 생성하고 실행함으로써 사용자의 여행 계획을 지원합니다. 이 에이전트는 여행 옵션 가져오기, 결과 필터링, 일정 작성 등 작업을 처리할 수 있습니다.
코드 생성 에이전트 개요
- 사용자 선호 수집: 목적지, 여행 날짜, 예산 및 관심사와 같은 사용자 입력을 수집합니다.
- 데이터를 가져오기 위한 코드 생성: 항공편, 호텔 및 명소에 대한 데이터를 검색하기 위한 코드 스니펫을 생성합니다.
- 생성된 코드 실행: 생성된 코드를 실행하여 실시간 정보를 가져옵니다.
- 일정 생성: 가져온 데이터를 개인화된 여행 계획으로 정리합니다.
- 피드백 기반 조정: 사용자 피드백을 받고 필요에 따라 결과를 개선하기 위해 코드를 재생성합니다.
단계별 구현
-
사용자 선호 수집
class Travel_Agent: def __init__(self): self.user_preferences = {} def gather_preferences(self, preferences): self.user_preferences = preferences -
데이터를 가져오기 위한 코드 생성
def generate_code_to_fetch_data(preferences): # 예: 사용자 선호에 따라 항공편을 검색하는 코드를 생성 code = f""" def search_flights(): import requests response = requests.get('https://api.example.com/flights', params={preferences}) return response.json() """ return code def generate_code_to_fetch_hotels(preferences): # 예: 호텔을 검색하는 코드를 생성 code = f""" def search_hotels(): import requests response = requests.get('https://api.example.com/hotels', params={preferences}) return response.json() """ return code -
생성된 코드 실행
def execute_code(code): # exec를 사용하여 생성된 코드를 실행합니다 exec(code) result = locals() return result travel_agent = Travel_Agent() preferences = { "destination": "Paris", "dates": "2025-04-01 to 2025-04-10", "budget": "moderate", "interests": ["museums", "cuisine"] } travel_agent.gather_preferences(preferences) flight_code = generate_code_to_fetch_data(preferences) hotel_code = generate_code_to_fetch_hotels(preferences) flights = execute_code(flight_code) hotels = execute_code(hotel_code) print("Flight Options:", flights) print("Hotel Options:", hotels) -
일정 생성
def generate_itinerary(flights, hotels, attractions): itinerary = { "flights": flights, "hotels": hotels, "attractions": attractions } return itinerary attractions = search_attractions(preferences) itinerary = generate_itinerary(flights, hotels, attractions) print("Suggested Itinerary:", itinerary) -
피드백 기반 조정
def adjust_based_on_feedback(feedback, preferences):
    # 사용자 피드백에 따라 환경설정을 조정
    if "liked" in feedback:
        preferences["favorites"] = feedback["liked"]
    if "disliked" in feedback:
        preferences["avoid"] = feedback["disliked"]
    return preferences

feedback = {"liked": ["Louvre Museum"], "disliked": ["Eiffel Tower (too crowded)"]}
updated_preferences = adjust_based_on_feedback(feedback, preferences)

# 업데이트된 환경설정으로 코드를 재생성하고 실행
updated_flight_code = generate_code_to_fetch_data(updated_preferences)
updated_hotel_code = generate_code_to_fetch_hotels(updated_preferences)

updated_flights = execute_code(updated_flight_code)
updated_hotels = execute_code(updated_hotel_code)

updated_itinerary = generate_itinerary(updated_flights, updated_hotels, attractions)
print("Updated Itinerary:", updated_itinerary)
환경 인식 및 추론 활용
테이블의 스키마를 기반으로 하는 것은 환경 인식과 추론을 활용하여 쿼리 생성 과정을 향상시킬 수 있습니다.
다음은 이를 수행하는 방법의 예입니다:
- 스키마 이해: 시스템은 테이블의 스키마를 이해하고 이 정보를 사용하여 쿼리 생성의 기반으로 삼습니다.
- 피드백 기반 조정: 시스템은 피드백을 기반으로 사용자 선호를 조정하고 스키마의 어떤 필드를 업데이트해야 하는지 추론합니다.
- 쿼리 생성 및 실행: 시스템은 새 선호도에 따라 업데이트된 항공편 및 호텔 데이터를 가져오기 위해 쿼리를 생성하고 실행합니다.
다음은 이러한 개념을 통합한 업데이트된 Python 코드 예제입니다:
def adjust_based_on_feedback(feedback, preferences, schema):
    # 사용자 피드백에 따라 선호도 조정
    if "liked" in feedback:
        preferences["favorites"] = feedback["liked"]
    if "disliked" in feedback:
        preferences["avoid"] = feedback["disliked"]
    # 스키마를 기반으로 다른 관련 선호도를 조정하기 위한 추론
    for field in schema:
        if field in preferences:
            preferences[field] = adjust_based_on_environment(feedback, field, schema)
    return preferences

def adjust_based_on_environment(feedback, field, schema):
    # 스키마와 피드백을 기반으로 선호도를 조정하는 맞춤 로직
    if field in feedback["liked"]:
        return schema[field]["positive_adjustment"]
    elif field in feedback["disliked"]:
        return schema[field]["negative_adjustment"]
    return schema[field]["default"]

def generate_code_to_fetch_data(preferences):
    # 업데이트된 선호도에 따라 항공편 데이터를 가져오는 코드 생성
    return f"fetch_flights(preferences={preferences})"

def generate_code_to_fetch_hotels(preferences):
    # 업데이트된 선호도에 따라 호텔 데이터를 가져오는 코드 생성
    return f"fetch_hotels(preferences={preferences})"

def execute_code(code):
    # 코드 실행을 시뮬레이션하고 모의 데이터를 반환
    return {"data": f"Executed: {code}"}

def generate_itinerary(flights, hotels, attractions):
    # 항공편, 호텔 및 명소를 기반으로 일정 생성
    return {"flights": flights, "hotels": hotels, "attractions": attractions}

# 예시 스키마
schema = {
    "favorites": {"positive_adjustment": "increase", "negative_adjustment": "decrease", "default": "neutral"},
    "avoid": {"positive_adjustment": "decrease", "negative_adjustment": "increase", "default": "neutral"}
}

# 사용 예시
preferences = {"favorites": "sightseeing", "avoid": "crowded places"}
feedback = {"liked": ["Louvre Museum"], "disliked": ["Eiffel Tower (too crowded)"]}
updated_preferences = adjust_based_on_feedback(feedback, preferences, schema)

# 업데이트된 선호도에 따라 코드를 재생성하고 실행
updated_flight_code = generate_code_to_fetch_data(updated_preferences)
updated_hotel_code = generate_code_to_fetch_hotels(updated_preferences)

updated_flights = execute_code(updated_flight_code)
updated_hotels = execute_code(updated_hotel_code)

updated_itinerary = generate_itinerary(updated_flights, updated_hotels, feedback["liked"])
print("Updated Itinerary:", updated_itinerary)
설명 - 피드백 기반 예약
- 스키마 인식:
schema딕셔너리는 피드백에 따라 선호를 어떻게 조정해야 하는지 정의합니다. 여기에는favorites와avoid와 같은 필드와 해당 조정이 포함되어 있습니다. - 선호 조정(
adjust_based_on_feedback메서드): 이 메서드는 사용자 피드백과 스키마에 따라 선호도를 조정합니다. - 환경 기반 조정(
adjust_based_on_environment메서드): 이 메서드는 스키마와 피드백에 따라 조정을 맞춤화합니다. - 쿼리 생성 및 실행: 시스템은 조정된 선호도에 따라 업데이트된 항공편 및 호텔 데이터를 가져오기 위한 코드를 생성하고 이러한 쿼리의 실행을 시뮬레이션합니다.
- 일정 생성: 시스템은 새로운 항공편, 호텔 및 명소 데이터를 기반으로 업데이트된 일정을 생성합니다.
시스템을 환경 인식형으로 만들고 스키마 기반으로 추론하도록 하면 보다 정확하고 관련성 높은 쿼리를 생성하여 더 나은 여행 추천과 개인화된 사용자 경험을 제공할 수 있습니다.
RAG(검색 증강 생성) 기법으로서의 SQL 사용
SQL(Structured Query Language)은 데이터베이스와 상호작용하기 위한 강력한 도구입니다. 검색 증강 생성(RAG) 접근의 일부로 사용될 때, SQL은 데이터베이스에서 관련 데이터를 검색하여 AI 에이전트의 응답이나 행동을 정보 제공하고 생성하는 데 활용될 수 있습니다. Travel Agent 맥락에서 SQL을 RAG 기법으로 사용할 수 있는 방법을 살펴보겠습니다.
핵심 개념
- 데이터베이스 상호작용:
- SQL은 데이터베이스에 쿼리를 실행하고 관련 정보를 검색하며 데이터를 조작하는 데 사용됩니다.
- 예: 여행 데이터베이스에서 항공편 세부사항, 호텔 정보 및 명소를 가져오기.
- RAG와의 통합:
- SQL 쿼리는 사용자 입력과 선호도에 기반하여 생성됩니다.
- 검색된 데이터는 개인화된 추천이나 행동을 생성하는 데 사용됩니다.
- 동적 쿼리 생성:
- AI 에이전트는 상황과 사용자 요구에 따라 동적 SQL 쿼리를 생성합니다.
- 예: 예산, 날짜 및 관심사를 기준으로 결과를 필터링하도록 SQL 쿼리를 맞춤화하기.
적용 사례
- 자동화된 코드 생성: 특정 작업을 위한 코드 스니펫을 생성합니다.
- RAG로서의 SQL: 데이터를 조작하기 위해 SQL 쿼리를 사용합니다.
- 문제 해결: 문제를 해결하기 위해 코드를 생성하고 실행합니다.
예시: 데이터 분석 에이전트:
- 작업: 추세를 찾기 위해 데이터셋을 분석합니다.
- 단계:
- 데이터셋을 로드합니다.
- 데이터를 필터링하기 위한 SQL 쿼리를 생성합니다.
- 쿼리를 실행하고 결과를 가져옵니다.
- 시각화와 인사이트를 생성합니다.
- 자원: 데이터셋 접근, SQL 기능.
- 경험: 과거 결과를 사용하여 향후 분석을 개선합니다.
실용 예: Travel Agent에서 SQL 사용
-
사용자 선호 수집
class Travel_Agent: def __init__(self): self.user_preferences = {} def gather_preferences(self, preferences): self.user_preferences = preferences -
SQL 쿼리 생성
def generate_sql_query(table, preferences): query = f"SELECT * FROM {table} WHERE " conditions = [] for key, value in preferences.items(): conditions.append(f"{key}='{value}'") query += " AND ".join(conditions) return query -
SQL 쿼리 실행
import sqlite3 def execute_sql_query(query, database="travel.db"): connection = sqlite3.connect(database) cursor = connection.cursor() cursor.execute(query) results = cursor.fetchall() connection.close() return results -
추천 생성
def generate_recommendations(preferences):
    flight_query = generate_sql_query("flights", preferences)
    hotel_query = generate_sql_query("hotels", preferences)
    attraction_query = generate_sql_query("attractions", preferences)

    flights = execute_sql_query(flight_query)
    hotels = execute_sql_query(hotel_query)
    attractions = execute_sql_query(attraction_query)

    itinerary = {
        "flights": flights,
        "hotels": hotels,
        "attractions": attractions
    }
    return itinerary

travel_agent = Travel_Agent()
preferences = {
    "destination": "Paris",
    "dates": "2025-04-01 to 2025-04-10",
    "budget": "moderate",
    "interests": ["museums", "cuisine"]
}
travel_agent.gather_preferences(preferences)
itinerary = generate_recommendations(preferences)
print("Suggested Itinerary:", itinerary)
예시 SQL 쿼리
-
항공편 쿼리
SELECT * FROM flights WHERE destination='Paris' AND dates='2025-04-01 to 2025-04-10' AND budget='moderate'; -
호텔 쿼리
SELECT * FROM hotels WHERE destination='Paris' AND budget='moderate'; -
명소 쿼리
SELECT * FROM attractions WHERE destination='Paris' AND interests='museums, cuisine';
SQL을 검색 증강 생성(RAG) 기법의 일부로 활용함으로써, Travel Agent와 같은 AI 에이전트는 관련 데이터를 동적으로 검색하고 활용하여 정확하고 개인화된 추천을 제공할 수 있습니다.
메타인지의 예
메타인지 구현을 시연하기 위해, 문제를 해결하는 동안 자신의 의사결정 과정을 반성합니다 에이전트를 만들어 보겠습니다. 이 예에서는 에이전트가 호텔 선택을 최적화하려고 시도한 다음 자신의 추론을 평가하고 오류나 최적이 아닌 선택을 했을 때 전략을 조정하는 시스템을 구축합니다.
이것을 가격과 품질의 조합에 따라 호텔을 선택하는 기본 예제로 시뮬레이션하되, 에이전트가 자신의 결정을 ‘반성’하고 그에 따라 조정하는 방식을 사용합니다.
이것이 메타인지를 어떻게 보여주는가:
- 초기 결정: 에이전트는 품질 영향을 이해하지 못한 채 가장 저렴한 호텔을 선택합니다.
- 반성 및 평가: 초기 선택 후 에이전트는 사용자 피드백을 사용해 호텔이 “나쁜” 선택인지 확인합니다. 호텔의 품질이 너무 낮다고 판단되면 자신의 추론을 반성합니다.
- 전략 조정: 에이전트는 반성을 바탕으로 전략을 조정하여 “cheapest”에서 “highest_quality”로 전환함으로써 향후 의사결정 과정을 개선합니다.
다음은 예시입니다:
class HotelRecommendationAgent:
    def __init__(self):
        self.previous_choices = []  # 이전에 선택한 호텔들을 저장합니다
        self.corrected_choices = []  # 수정된 선택들을 저장합니다
        self.recommendation_strategies = ['cheapest', 'highest_quality']  # 사용 가능한 전략들

    def recommend_hotel(self, hotels, strategy):
        """
        Recommend a hotel based on the chosen strategy.
        The strategy can either be 'cheapest' or 'highest_quality'.
        """
        if strategy == 'cheapest':
            recommended = min(hotels, key=lambda x: x['price'])
        elif strategy == 'highest_quality':
            recommended = max(hotels, key=lambda x: x['quality'])
        else:
            recommended = None
        self.previous_choices.append((strategy, recommended))
        return recommended

    def reflect_on_choice(self):
        """
        Reflect on the last choice made and decide if the agent should adjust its strategy.
        The agent considers if the previous choice led to a poor outcome.
        """
        if not self.previous_choices:
            return "No choices made yet."

        last_choice_strategy, last_choice = self.previous_choices[-1]
        # 마지막 선택이 좋았는지 알려주는 사용자 피드백이 있다고 가정해봅시다
        user_feedback = self.get_user_feedback(last_choice)

        if user_feedback == "bad":
            # 이전 선택이 만족스럽지 않으면 전략을 조정합니다
            new_strategy = 'highest_quality' if last_choice_strategy == 'cheapest' else 'cheapest'
            self.corrected_choices.append((new_strategy, last_choice))
            return f"Reflecting on choice. Adjusting strategy to {new_strategy}."
        else:
            return "The choice was good. No need to adjust."

    def get_user_feedback(self, hotel):
        """
        Simulate user feedback based on hotel attributes.
        For simplicity, assume if the hotel is too cheap, the feedback is "bad".
        If the hotel has quality less than 7, feedback is "bad".
        """
        if hotel['price'] < 100 or hotel['quality'] < 7:
            return "bad"
        return "good"

# 호텔 목록(가격 및 품질)을 시뮬레이션합니다
hotels = [
    {'name': 'Budget Inn', 'price': 80, 'quality': 6},
    {'name': 'Comfort Suites', 'price': 120, 'quality': 8},
    {'name': 'Luxury Stay', 'price': 200, 'quality': 9}
]

# 에이전트를 생성합니다
agent = HotelRecommendationAgent()

# 1단계: 에이전트가 "가장 저렴한" 전략을 사용하여 호텔을 추천합니다
recommended_hotel = agent.recommend_hotel(hotels, 'cheapest')
print(f"Recommended hotel (cheapest): {recommended_hotel['name']}")

# 2단계: 에이전트가 선택을 되돌아보고 필요하면 전략을 조정합니다
reflection_result = agent.reflect_on_choice()
print(reflection_result)

# 3단계: 에이전트가 조정된 전략을 사용하여 다시 추천합니다
adjusted_recommendation = agent.recommend_hotel(hotels, 'highest_quality')
print(f"Adjusted hotel recommendation (highest_quality): {adjusted_recommendation['name']}")
에이전트의 메타인지 능력
여기서 핵심은 에이전트의 능력입니다:
- 이전 선택과 의사결정 과정을 평가합니다.
- 그 반성을 바탕으로 전략을 조정합니다. 즉, 메타인지가 작동하고 있는 사례입니다.
이는 시스템이 내부 피드백에 기반해 추론 과정을 조정할 수 있는 단순한 형태의 메타인지입니다.
결론
메타인지는 AI 에이전트의 기능을 크게 향상시킬 수 있는 강력한 도구입니다. 메타인지적 과정을 통합함으로써 보다 지능적이고 적응력 있으며 효율적인 에이전트를 설계할 수 있습니다. 추가 자료를 활용하여 AI 에이전트의 흥미로운 메타인지 분야를 더 탐구해 보세요.
메타인지 설계 패턴에 대해 궁금한 점이 더 있으신가요?
다른 학습자들과 만나고, 오피스 아워에 참석하며 AI 에이전트 관련 질문에 답을 얻으려면 Microsoft Foundry Discord에 참여하세요.
이전 강의
다음 강의
면책 고지: 이 문서는 AI 번역 서비스 Co-op Translator(https://github.com/Azure/co-op-translator)를 사용하여 번역되었습니다. 정확성을 위해 최선을 다하고 있으나 자동 번역에는 오류나 부정확성이 포함될 수 있음을 유의해 주십시오. 원문(원래 언어로 된 문서)이 권위 있는 출처로 간주되어야 합니다. 중요한 정보의 경우에는 전문 번역가에 의한 번역을 권장합니다. 이 번역의 사용으로 인해 발생하는 오해나 잘못된 해석에 대해서는 당사가 책임을 지지 않습니다.