ai-agents-for-beginners
Setup for Di Course
Intro
Dis lesson go show how to run di code samples for dis course.
Join Other Learners and Get Help
Before you start to clone your repo, join the AI Agents For Beginners Discord channel make you fit get help with setup, ask questions about di course, or connect with oda learners.
Clone or Fork this Repo
To start, please clone or fork di GitHub Repository. That one go create your own copy of di course material so you fit run, test, and tweak di code!
This fit do by clicking di link to fork di repo
You suppose don get your own forked version of dis course for di link below:
Shallow Clone (we recommend am for workshop / Codespaces)
Di full repository fit big (~3 GB) when you download full history and all files. If you just dey attend workshop or you only need small number of lesson folders, shallow clone (or sparse clone) go avoid most of dat download by truncating history and/or skipping blobs.
Quick shallow clone — minimal history, all files
Replace <your-username> in the commands below with your fork URL (or the upstream URL if you prefer).
To clone only di latest commit history (small download):
git clone --depth 1 https://github.com/<your-username>/ai-agents-for-beginners.git
To clone a specific branch:
git clone --depth 1 --branch <branch-name> https://github.com/<your-username>/ai-agents-for-beginners.git
Partial (sparse) clone — minimal blobs + only selected folders
Dis one dey use partial clone and sparse-checkout (requires Git 2.25+ and we recommend recent Git wey support partial clone):
git clone --depth 1 --filter=blob:none --sparse https://github.com/<your-username>/ai-agents-for-beginners.git
Traverse into di repo folder:
cd ai-agents-for-beginners
Then specify which folders you want (example below dey show two folders):
git sparse-checkout set 00-course-setup 01-intro-to-ai-agents
After you clone and verify di files, if you only need di files and wan free space (no git history), delete di repository metadata (💀irreversible — you go lose all Git functionality: no commits, pulls, pushes, or history access).
# zsh/bash
rm -rf .git
# PowerShell
Remove-Item -Recurse -Force .git
Using GitHub Codespaces (we recommend am to avoid big local downloads)
-
Create new Codespace for dis repo via the GitHub UI.
- For di terminal of di newly created Codespace, run one of di shallow/sparse clone commands above to bring only di lesson folders wey you need into di Codespace workspace.
- Optional: after cloning inside Codespaces, remove .git to reclaim extra space (see removal commands above).
- Note: If you prefer to open the repo directly in Codespaces (without an extra clone), be aware Codespaces will construct di devcontainer environment and e fit still provision more than you need. Cloning a shallow copy inside a fresh Codespace give you more control over disk usage.
Tips
- Always change di clone URL to your fork if you want to edit/commit.
- If later you need more history or files, you fit fetch dem or adjust sparse-checkout to include additional folders.
How to Run Di Code
Dis course get plenty Jupyter Notebooks wey you fit run to get hands-on experience building AI Agents.
Di code samples dey use Microsoft Agent Framework (MAF) with the AzureAIProjectAgentProvider, wey connects to Azure AI Agent Service V2 (the Responses API) through Microsoft Foundry.
All Python notebooks dem label *-python-agent-framework.ipynb.
Requirements
- Python 3.12+
-
NOTE: If you no get Python 3.12 installed, make sure say you install am. Then create your venv using python3.12 to make sure di correct versions go install from di requirements.txt file.
Example
Create Python venv directory:
python -m venv venvThen activate di venv for:
# zsh/bash
source venv/bin/activate
# Command Prompt for Windows venv\Scripts\activate
-
-
.NET 10+: For di sample codes wey dey use .NET, make sure you install .NET 10 SDK or later. Then, check your installed .NET SDK version:
dotnet --list-sdks - Azure CLI — You need am for authentication. Install from aka.ms/installazurecli.
- Azure Subscription — To access Microsoft Foundry and Azure AI Agent Service.
- Microsoft Foundry Project — Project wey get deployed model (e.g.,
gpt-4o). See Step 1 below.
We don include requirements.txt file for di root of this repository wey get all di required Python packages to run di code samples.
You fit install dem by running di command below for your terminal at di root of di repository:
pip install -r requirements.txt
We recommend say you create Python virtual environment to avoid any conflicts and issues.
Setup VSCode
Make sure say you dey use di correct Python version for VSCode.
Set Up Microsoft Foundry and Azure AI Agent Service
Step 1: Create Microsoft Foundry Project
You need Azure AI Foundry hub and project wey get deployed model to run di notebooks.
- Go to ai.azure.com and sign in with your Azure account.
- Create a hub (or use an existing one). See: Hub resources overview.
- Inside di hub, create a project.
- Deploy a model (e.g.,
gpt-4o) from Models + Endpoints → Deploy model.
Step 2: Retrieve Your Project Endpoint and Model Deployment Name
From your project for di Microsoft Foundry portal:
- Project Endpoint — Go to di Overview page and copy di endpoint URL.
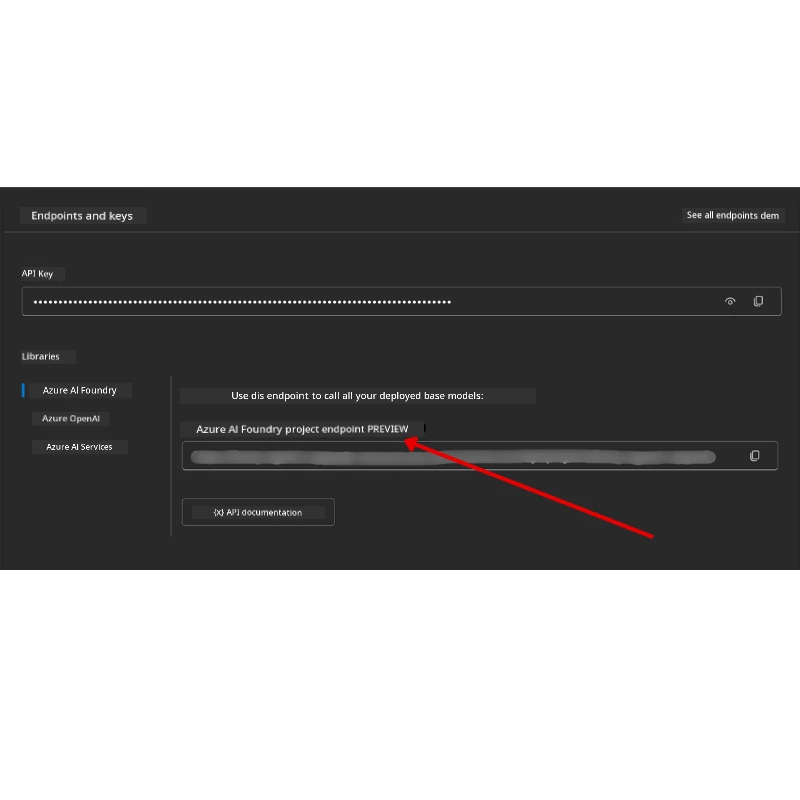
- Model Deployment Name — Go to Models + Endpoints, select your deployed model, and note di Deployment name (e.g.,
gpt-4o).
Step 3: Sign in to Azure with az login
All notebooks use AzureCliCredential for authentication — no API keys to manage. E mean say you must sign in via di Azure CLI.
-
Install the Azure CLI if you never do am: aka.ms/installazurecli
-
Sign in by running:
az loginOr if you dey in a remote/Codespace environment without a browser:
az login --use-device-code -
Select your subscription if prompted — choose di one wey contain your Foundry project.
-
Verify say you don sign in:
az account show
Why
az login? Di notebooks dey authenticate usingAzureCliCredentialfrom diazure-identitypackage. E mean say your Azure CLI session dey provide di credentials — no API keys or secrets for your.envfile. This na a security best practice.
Step 4: Create Your .env File
Copy di example file:
# zsh/bash
cp .env.example .env
# PowerShell
Copy-Item .env.example .env
Open .env and fill in these two values:
AZURE_AI_PROJECT_ENDPOINT=https://<your-project>.services.ai.azure.com/api/projects/<your-project-id>
AZURE_AI_MODEL_DEPLOYMENT_NAME=gpt-4o
| Variable | Where to find am |
|---|---|
AZURE_AI_PROJECT_ENDPOINT |
Foundry portal → your project → Overview page |
AZURE_AI_MODEL_DEPLOYMENT_NAME |
Foundry portal → Models + Endpoints → your deployed model’s name |
Na im for most lessons! Di notebooks go authenticate automatically through your az login session.
Step 5: Install Python Dependencies
pip install -r requirements.txt
We recommend say you run dis inside di virtual environment wey you create earlier.
Additional Setup for Lesson 5 (Agentic RAG)
Lesson 5 dey use Azure AI Search for retrieval-augmented generation. If you plan to run dat lesson, add these variables to your .env file:
| Variable | Where to find am |
|---|---|
AZURE_SEARCH_SERVICE_ENDPOINT |
Azure portal → your Azure AI Search resource → Overview → URL |
AZURE_SEARCH_API_KEY |
Azure portal → your Azure AI Search resource → Settings → Keys → primary admin key |
Additional Setup for Lesson 6 and Lesson 8 (GitHub Models)
Some notebooks for lessons 6 and 8 dey use GitHub Models instead of Azure AI Foundry. If you plan to run those samples, add these variables to your .env file:
| Variable | Where to find am |
|---|---|
GITHUB_TOKEN |
GitHub → Settings → Developer settings → Personal access tokens |
GITHUB_ENDPOINT |
Use https://models.inference.ai.azure.com (default value) |
GITHUB_MODEL_ID |
Model name to use (e.g. gpt-4o-mini) |
Additional Setup for Lesson 8 (Bing Grounding Workflow)
Di conditional workflow notebook for lesson 8 dey use Bing grounding via Azure AI Foundry. If you plan to run dat sample, add dis variable to your .env file:
| Variable | Where to find am |
|---|---|
BING_CONNECTION_ID |
Azure AI Foundry portal → your project → Management → Connected resources → your Bing connection → copy di connection ID |
Troubleshooting
SSL Certificate Verification Errors on macOS
If you dey on macOS and you encounter an error like:
ssl.SSLCertVerificationError: [SSL: CERTIFICATE_VERIFY_FAILED] certificate verify failed: self-signed certificate in certificate chain
Dis na known issue with Python on macOS where di system SSL certificates no dey automatically trusted. Try di following solutions for order:
Option 1: Run Python’s Install Certificates script (recommended)
# Change 3.XX to the Python version wey you don install (for example, 3.12 or 3.13):
/Applications/Python\ 3.XX/Install\ Certificates.command
Option 2: Use connection_verify=False in your notebook (for GitHub Models notebooks only)
For di Lesson 6 notebook (06-building-trustworthy-agents/code_samples/06-system-message-framework.ipynb), commented-out workaround don already dey included. Uncomment connection_verify=False when you dey create di client:
client = ChatCompletionsClient(
    endpoint=endpoint,
    credential=AzureKeyCredential(token),
    connection_verify=False,  # Turn off SSL verification if you get certificate wahala
)
⚠️ Warning: Disabling SSL verification (
connection_verify=False) reduce security because e skip certificate validation. Use dis only as temporary workaround for development environments, never for production.
Option 3: Install and use truststore
pip install truststore
Then add di following at di top of your notebook or script before you make any network calls:
import truststore
truststore.inject_into_ssl()
You Stuck Somewhere?
If you get any issues running dis setup, join our Azure AI Community Discord or open an issue.
Next Lesson
You don ready now to run di code for dis course. Happy to learn more about di world of AI Agents!
Intro to AI Agents and How Dem Dey Use Am
Make you note: Dem don use AI translation service Co-op Translator (https://github.com/Azure/co-op-translator) translate this document. Even though we dey try make am correct, make you sabi say automatic translations fit get mistakes or wrong translations. The original document for e original language suppose be the main authoritative source. If na critical information, e better make professional human translator handle am. We no go take responsibility for any misunderstanding or wrong interpretation wey fit come from this translation.