ai-agents-for-beginners
課程設定
介紹
本課將涵蓋如何執行本課程的程式範例。
加入其他學習者並取得協助
在開始複製你的 repo 之前,請加入 AI Agents For Beginners Discord channel 以取得任何設定協助、提出課程相關問題,或與其他學習者連繫。
複製或 Fork 此儲存庫
首先,請複製或 Fork GitHub 儲存庫。這會建立你自己的課程教材版本,讓你可以執行、測試並微調程式碼!
This can be done by clicking the link to 分叉此儲存庫
You should now have your own forked version of this course in the following link:
淺層複製(建議用於工作坊 / Codespaces)
完整的儲存庫在下載完整的歷史紀錄與所有檔案時可能很大(約 3 GB)。如果你只參加工作坊或只需要幾個課程資料夾,淺層複製(或稀疏複製)可透過截短歷史紀錄和/或跳過 blobs 來避免大部分下載。
快速淺層複製 — 最小歷史,所有檔案
Replace <your-username> in the below commands with your fork URL (or the upstream URL if you prefer).
To clone only the latest commit history (small download):
git clone --depth 1 https://github.com/<your-username>/ai-agents-for-beginners.git
To clone a specific branch:
git clone --depth 1 --branch <branch-name> https://github.com/<your-username>/ai-agents-for-beginners.git
部分(稀疏)複製 — 最小 blobs + 只選定的資料夾
This uses partial clone and sparse-checkout (requires Git 2.25+ and recommended modern Git with partial clone support):
git clone --depth 1 --filter=blob:none --sparse https://github.com/<your-username>/ai-agents-for-beginners.git
Traverse into the repo folder:
cd ai-agents-for-beginners
Then specify which folders you want (example below shows two folders):
git sparse-checkout set 00-course-setup 01-intro-to-ai-agents
After cloning and verifying the files, if you only need files and want to free space (no git history), please delete the repository metadata (💀irreversible — you will lose all Git functionality: no commits, pulls, pushes, or history access).
# zsh/bash
rm -rf .git
# PowerShell
Remove-Item -Recurse -Force .git
使用 GitHub Codespaces(建議以避免本機大檔案下載)
-
透過 GitHub UI 為此儲存庫建立新的 Codespace。
- 在新建立的 Codespace 的終端機中,執行上方其中一個 shallow/sparse clone 命令,將你需要的課程資料夾帶入 Codespace 工作區。
- 選擇性:在 Codespaces 內複製後,移除 .git 以回收額外空間(參見上方移除命令)。
- 注意:如果你偏好直接在 Codespaces 中開啟儲存庫(不額外複製),請注意 Codespaces 會建構 devcontainer 環境,可能仍會佔用超出你需求的資源。於新的 Codespace 內複製淺層副本可讓你更掌控磁碟用量。
小提示
- 若要編輯/提交,請務必將複製 URL 替換為你的 fork。
- 若日後需要更多歷史或檔案,你可以抓取它們或調整 sparse-checkout 以包含附加的資料夾。
執行程式碼
本課程提供一系列可執行的 Jupyter 筆記本,讓你獲得構建 AI Agents 的實作經驗。
The code samples use Microsoft Agent Framework (MAF) with the AzureAIProjectAgentProvider, which connects to Azure AI Agent Service V2 (the Responses API) through Microsoft Foundry.
All Python notebooks are labelled *-python-agent-framework.ipynb.
需求
- Python 3.12+
-
注意:如果你還沒安裝 Python 3.12,請確保安裝。然後使用 python3.12 建立你的 venv,以確保從 requirements.txt 安裝正確的版本。
範例
Create Python venv directory:
python -m venv venvThen activate venv environment for:
# zsh/bash
source venv/bin/activate
# Command Prompt for Windows venv\Scripts\activate
-
-
.NET 10+: For the sample codes using .NET, ensure you install .NET 10 SDK or later. Then, check your installed .NET SDK version:
dotnet --list-sdks - Azure CLI — 需要用於驗證。從 aka.ms/installazurecli 安裝。
- Azure Subscription — 用以存取 Microsoft Foundry 與 Azure AI Agent Service。
- Microsoft Foundry Project — A project with a deployed model (e.g.,
gpt-4o). See Step 1 below.
We have included a requirements.txt file in the root of this repository that contains all the required Python packages to run the code samples.
You can install them by running the following command in your terminal at the root of the repository:
pip install -r requirements.txt
We recommend creating a Python virtual environment to avoid any conflicts and issues.
設定 VSCode
請確認在 VSCode 中使用正確版本的 Python。
設定 Microsoft Foundry 與 Azure AI Agent Service
步驟 1:建立 Microsoft Foundry 專案
You need an Azure AI Foundry hub and project with a deployed model to run the notebooks.
- 前往 ai.azure.com 並以你的 Azure 帳戶登入。
- 建立一個 hub(或使用現有的)。參見:Hub resources overview。
- 在 hub 中建立一個 project。
- 從 Models + Endpoints → Deploy model 部署一個模型(例如
gpt-4o)。
步驟 2:取得你的專案端點與模型部署名稱
From your project in the Microsoft Foundry portal:
- Project Endpoint — 前往 Overview 頁面並複製端點 URL。
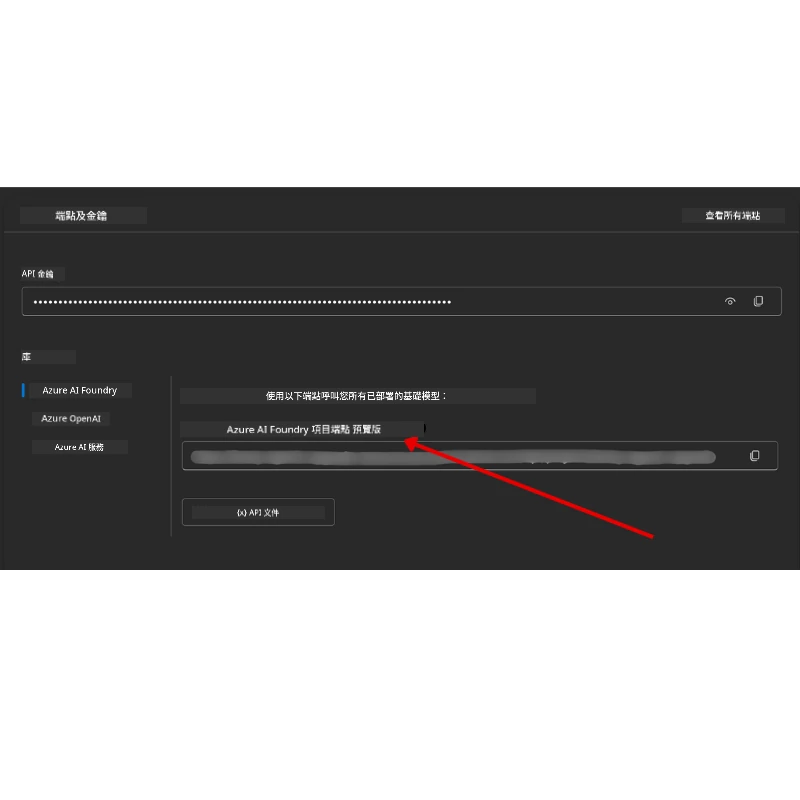
- Model Deployment Name — 前往 Models + Endpoints,選擇你已部署的模型,並記下 Deployment name(例如
gpt-4o)。
步驟 3:使用 az login 登入 Azure
All notebooks use AzureCliCredential for authentication — no API keys to manage. This requires you to be signed in via the Azure CLI.
-
安裝 Azure CLI(如果尚未安裝):aka.ms/installazurecli
-
登入,執行:
az login或者如果你在沒有瀏覽器的遠端/Codespace 環境:
az login --use-device-code -
選擇你的訂閱(若有提示)— 選擇包含你的 Foundry 專案的那一個。
-
驗證 你已登入:
az account show
為什麼要
az login? 筆記本使用azure-identity套件中的AzureCliCredential來驗證。這表示你的 Azure CLI 會話會提供認證 — 無需在.env檔案中放置 API 金鑰或祕密。這是一項 安全性最佳實務。
步驟 4:建立你的 .env 檔案
複製範例檔案:
# zsh/bash
cp .env.example .env
# PowerShell
Copy-Item .env.example .env
Open .env and fill in these two values:
AZURE_AI_PROJECT_ENDPOINT=https://<your-project>.services.ai.azure.com/api/projects/<your-project-id>
AZURE_AI_MODEL_DEPLOYMENT_NAME=gpt-4o
| 變數 | 在哪裡找到 |
|---|---|
AZURE_AI_PROJECT_ENDPOINT |
Foundry 入口網站 → 你的專案 → Overview 頁面 |
AZURE_AI_MODEL_DEPLOYMENT_NAME |
Foundry 入口網站 → Models + Endpoints → 你已部署模型的名稱 |
That’s it for most lessons! The notebooks will authenticate automatically through your az login session.
步驟 5:安裝 Python 相依套件
pip install -r requirements.txt
We recommend running this inside the virtual environment you created earlier.
第 5 課(Agentic RAG)所需的額外設定
第 5 課使用 Azure AI Search 進行檢索增強生成。如果你打算執行該課程,請將以下變數新增到你的 .env 檔案:
| 變數 | 在哪裡找到 |
|---|---|
AZURE_SEARCH_SERVICE_ENDPOINT |
Azure 入口網站 → 你的 Azure AI Search 資源 → Overview → URL |
AZURE_SEARCH_API_KEY |
Azure 入口網站 → 你的 Azure AI Search 資源 → Settings → Keys → 主要管理金鑰 |
第 6 課與第 8 課(GitHub Models)的額外設定
第 6 與第 8 課的某些筆記本使用 GitHub Models(而不是 Azure AI Foundry)。若你要執行那些範例,請將以下變數新增到你的 .env 檔案:
| 變數 | 在哪裡找到 |
|---|---|
GITHUB_TOKEN |
GitHub → Settings → Developer settings → Personal access tokens |
GITHUB_ENDPOINT |
使用 https://models.inference.ai.azure.com(預設值) |
GITHUB_MODEL_ID |
要使用的模型名稱(例如 gpt-4o-mini) |
第 8 課(Bing Grounding 工作流程)的額外設定
The conditional workflow notebook in lesson 8 uses Bing grounding via Azure AI Foundry. If you plan to run that sample, add this variable to your .env file:
| 變數 | 在哪裡找到 |
|---|---|
BING_CONNECTION_ID |
Azure AI Foundry 入口網站 → 你的專案 → Management → Connected resources → 你的 Bing 連線 → 複製連線 ID |
疑難排解
macOS 上的 SSL 憑證驗證錯誤
If you are on macOS and encounter an error like:
ssl.SSLCertVerificationError: [SSL: CERTIFICATE_VERIFY_FAILED] certificate verify failed: self-signed certificate in certificate chain
This is a known issue with Python on macOS where the system SSL certificates are not automatically trusted. Try the following solutions in order:
選項 1:執行 Python 的 Install Certificates 腳本(建議)
# 將 3.XX 替換為你已安裝的 Python 版本(例如 3.12 或 3.13):
/Applications/Python\ 3.XX/Install\ Certificates.command
選項 2:在你的筆記本中使用 connection_verify=False(僅針對 GitHub Models 筆記本)
In the Lesson 6 notebook (06-building-trustworthy-agents/code_samples/06-system-message-framework.ipynb), a commented-out workaround is already included. Uncomment connection_verify=False when creating the client:
client = ChatCompletionsClient(
    endpoint=endpoint,
    credential=AzureKeyCredential(token),
    connection_verify=False,  # 如果遇到憑證錯誤,請停用 SSL 驗證
)
⚠️ 警告: 停用 SSL 驗證(
connection_verify=False)會透過跳過憑證驗證而降低安全性。僅在開發環境中作為暫時解法使用,切勿在生產環境中使用。
選項 3:安裝並使用 truststore
pip install truststore
Then add the following at the top of your notebook or script before making any network calls:
import truststore
truststore.inject_into_ssl()
卡住了嗎?
If you have any issues running this setup, hop into our Azure AI 社群 Discord or 建立 issue。
下一課
你現在已準備好執行本課程的程式碼。祝你在 AI Agents 的世界中學習愉快!
免責聲明: 本文件已使用 AI 翻譯服務 Co-op Translator 進行翻譯。雖然我們力求準確,但自動翻譯可能包含錯誤或不精確之處。原始語言版本應被視為權威來源。對於重要資訊,建議採用專業人工翻譯。我們對因使用本翻譯而導致的任何誤解或曲解概不負責。