20.2 LSTM代码实现
20.2 LSTM代码实现⚓︎
上一节,我们学习了LSTM的基本原理,本小节我们用代码实现LSTM网络,并用含有4个时序的LSTM进行二进制减法的训练和测试。
20.2.1 LSTM单元的代码实现⚓︎
下面是单个LSTM Cell实现的代码。
初始化⚓︎
初始化时需要告知LSTM Cell 输入向量的维度和隐层状态向量的维度,分别为input\_size和hidden\_size。
def __init__(self, input_size, hidden_size, bias=True):
            self.input_size = input_size
            self.hidden_size = hidden_size
            self.bias = bias
前向计算⚓︎
def forward(self, x, h_p, c_p, W, U, b=None):
    self.get_params(W, U, b)
    self.x = x

    # caclulate each gate
    # use g instead of \tilde{c}
    self.f = self.get_gate(x, h_p, self.wf, self.uf, self.bf, Sigmoid())
    self.i = self.get_gate(x, h_p, self.wi, self.ui, self.bi, Sigmoid())
    self.g = self.get_gate(x, h_p, self.wg, self.ug, self.bg, Tanh())
    self.o = self.get_gate(x, h_p, self.wo, self.uo, self.bo, Sigmoid())
    # calculate the states
    self.c = np.multiply(self.f, c_p) + np.multiply(self.i, self.g)
    self.h = np.multiply(self.o, Tanh().forward(self.c))
其中,get\_params将传入参数拆分,每个门使用一个独立参数。get\_gate实现每个门的前向计算公式。
def get_params(self, W, U, b=None):
            self.wf, self.wi, self.wg, self.wo = self.split_params(W, self.hidden_size)
            self.uf, self.ui, self.ug, self.uo = self.split_params(U, self.input_size)
            self.bf, self.bi, self.bg, self.bo = self.split_params((b if self.bias else np.zeros((4, self.hidden_size))) , 1)
def get_gate(self, x, h, W, U, b, activator):
    if self.bias:
        z = np.dot(h, W) + np.dot(x, U) + b
    else:
        z = np.dot(h, W) + np.dot(x, U)
    a = activator.forward(z)
    return a
反向传播⚓︎
反向传播过程分为沿时间传播和沿层次传播两部分。dh将误差传递给前一个时刻,dx将误差传向下一层。
def backward(self, h_p, c_p, in_grad):
        tanh = lambda x : Tanh().forward(x)

        self.dzo = in_grad * tanh(self.c) * self.o * (1 - self.o)
        self.dc = in_grad * self.o * (1 - tanh(self.c) * tanh(self.c))
        self.dzg = self.dc * self.i * (1- self.g * self.g)
        self.dzi = self.dc * self.g * self.i * (1 - self.i)
        self.dzf = self.dc * c_p * self.f * (1 - self.f)

        self.dwo = np.dot(h_p.T, self.dzo)
        self.dwg = np.dot(h_p.T, self.dzg)
        self.dwi = np.dot(h_p.T, self.dzi)
        self.dwf = np.dot(h_p.T, self.dzf)

        self.duo = np.dot(self.x.T, self.dzo)
        self.dug = np.dot(self.x.T, self.dzg)
        self.dui = np.dot(self.x.T, self.dzi)
        self.duf = np.dot(self.x.T, self.dzf)

        if self.bias:
            self.dbo = np.sum(self.dzo,axis=0, keepdims=True)
            self.dbg = np.sum(self.dzg,axis=0, keepdims=True)
            self.dbi = np.sum(self.dzi,axis=0, keepdims=True)
            self.dbf = np.sum(self.dzf,axis=0, keepdims=True)

        # pass to previous time step
        self.dh = np.dot(self.dzf, self.wf.T) + np.dot(self.dzi, self.wi.T) + np.dot(self.dzg, self.wg.T) + np.dot(self.dzo, self.wo.T)
        # pass to previous layer
        self.dx = np.dot(self.dzf, self.uf.T) + np.dot(self.dzi, self.ui.T) + np.dot(self.dzg, self.ug.T) + np.dot(self.dzo, self.uo.T)
最后,我们将所有拆分的参数merge到一起,便于更新梯度。
def merge_params(self):
        self.dW = np.concatenate((self.dwf, self.dwi, self.dwg, self.dwo), axis=0)
        self.dU = np.concatenate((self.duf, self.dui, self.dug, self.duo), axis=0)
        if self.bias:
            self.db = np.concatenate((self.dbf, self.dbi, self.dbg, self.dbo), axis=0)
以上,完成了LSTM Cell的代码实现。
通常,LSTM的输出会接一个线性层,得到最终预测输出,即公式(7)和(8)的内容。
下面是线性单元的实现代码:
class LinearCell_1_2(object):
    def __init__(self, input_size, output_size, activator=None, bias=True):
        self.input_size = input_size
        self.output_size = output_size
        self.bias = bias
        self.activator = activator

    def forward(self, x, V, b=None):
        self.x = x
        self.batch_size = self.x.shape[0]
        self.V = V
        self.b = b if self.bias else np.zeros((self.output_size))
        self.z = np.dot(x, V) + self.b
        if self.activator:
            self.a = self.activator.forward(self.z)

    def backward(self, in_grad):
        self.dz = in_grad
        self.dV = np.dot(self.x.T, self.dz)
        if self.bias:
            # in the sake of backward in batch
            self.db = np.sum(self.dz, axis=0, keepdims=True)
        self.dx = np.dot(self.dz, self.V.T)
20.2.2 用LSTM训练网络⚓︎
我们以前面讲过的4位二进制减法为例,验证LSTM网络的正确性。
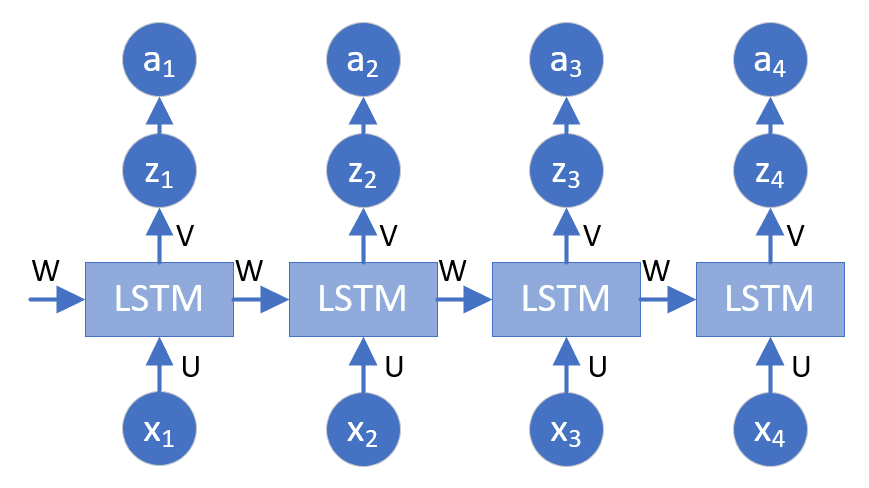
该实例需要4个时间步(time steps),我们搭建一个含有4个LSTM单元的单层网络,连接一个线性层,提供最终预测输出。网络结构如图20-5所示.

图20-5 训练网络结构示意图
网络初始化,前向计算,反向传播的代码如下:
class net(object):
    def __init__(self, dr, input_size, hidden_size, output_size, bias=True):
        self.dr = dr
        self.loss_fun = LossFunction_1_1(NetType.BinaryClassifier)
        self.loss_trace = TrainingHistory_3_0()
        self.times = 4
        self.input_size = input_size
        self.hidden_size = hidden_size
        self.output_size = output_size
        self.bias = bias
        self.lstmcell = []
        self.linearcell = []
        #self.a = []
        for i in range(self.times):
            self.lstmcell.append(LSTMCell_1_2(input_size, hidden_size, bias=bias))
            self.linearcell.append(LinearCell_1_2(hidden_size, output_size, Logistic(), bias=bias))
            #self.a.append((1, self.output_size))

    def forward(self, X):
        hp = np.zeros((1, self.hidden_size))
        cp = np.zeros((1, self.hidden_size))
        for i in range(self.times):
            self.lstmcell[i].forward(X[:,i], hp, cp, self.W, self.U, self.bh)
            hp = self.lstmcell[i].h
            cp = self.lstmcell[i].c
            self.linearcell[i].forward(hp, self.V, self.b)
            #self.a[i] = Logistic().forward(self.linearcell[i].z)
在反向传播的过程中,不同时间步,误差的来源不同。最后的时间步,传入误差只来自输出层的误差dx。其他时间步的误差来自于两个方向dh和dx(时间和层次)。第一个时间步,传入的状态h0,c0皆为0。
    def backward(self, Y):
        hp = []
        cp = []
        # The last time step:
        tl = self.times-1
        dz = self.linearcell[tl].a - Y[:,tl:tl+1]
        self.linearcell[tl].backward(dz)
        hp = self.lstmcell[tl-1].h
        cp = self.lstmcell[tl-1].c
        self.lstmcell[tl].backward(hp, cp, self.linearcell[tl].dx)
        # Middle time steps:
        dh = []
        for i in range(tl-1, 0, -1):
            dz = self.linearcell[i].a - Y[:,i:i+1]
            self.linearcell[i].backward(dz)
            hp = self.lstmcell[i-1].h
            cp = self.lstmcell[i-1].c
            dh = self.linearcell[i].dx + self.lstmcell[i+1].dh
            self.lstmcell[i].backward(hp, cp, dh)
        # The first time step:
        dz = self.linearcell[0].a - Y[:,0:1]
        self.linearcell[0].backward(dz)
        dh = self.linearcell[0].dx + self.lstmcell[1].dh
        self.lstmcell[0].backward(np.zeros((self.batch_size, self.hidden_size)), np.zeros((self.batch_size, self.hidden_size)), dh)
下面就可以开始训练了,训练部分主要分为:初始化参数,训练网络,更新参数,计算误差几个部分。主要代码如下:
def train(self, batch_size, checkpoint=0.1):
    self.batch_size = batch_size
    max_epoch = 100
    eta = 0.1
    # Try different initialize method
    #self.U = np.random.random((4 * self.input_size, self.hidden_size))
    #self.W = np.random.random((4 * self.hidden_size, self.hidden_size))
    self.U = self.init_params_uniform((4 * self.input_size, self.hidden_size))
    self.W = self.init_params_uniform((4 * self.hidden_size, self.hidden_size))
    self.V = np.random.random((self.hidden_size, self.output_size))
    self.bh = np.zeros((4, self.hidden_size))
    self.b = np.zeros((self.output_size))

    max_iteration = math.ceil(self.dr.num_train/batch_size)
    checkpoint_iteration = (int)(math.ceil(max_iteration * checkpoint))

    for epoch in range(max_epoch):
        self.dr.Shuffle()
        for iteration in range(max_iteration):
            # get data
            batch_x, batch_y = self.dr.GetBatchTrainSamples(batch_size, iteration)
            # forward
            self.forward(batch_x)
            self.backward(batch_y)
            # update
            for i in range(self.times):
                self.lstmcell[i].merge_params()
                self.U = self.U - self.lstmcell[i].dU * eta /self.batch_size
                self.W = self.W - self.lstmcell[i].dW * eta /self.batch_size
                self.V = self.V - self.linearcell[i].dV * eta /self.batch_size
                if self.bias:
                    self.bh = self.bh - self.lstmcell[i].db * eta /self.batch_size
                    self.b = self.b - self.linearcell[i].db * eta /self.batch_size
            # check loss
            total_iteration = epoch * max_iteration + iteration
            if (total_iteration+1) % checkpoint_iteration == 0:
                X,Y = self.dr.GetValidationSet()
                loss,acc,_ = self.check_loss(X,Y)
                self.loss_trace.Add(epoch, total_iteration, None, None, loss, acc, None)
                print(epoch, total_iteration)
                print(str.format("loss={0:6f}, acc={1:6f}", loss, acc))
            #end if
        #enf for
        if (acc == 1.0):
            break
    #end for
    self.loss_trace.ShowLossHistory("Loss and Accuracy", XCoordinate.Iteration)
20.2.3 最终结果⚓︎
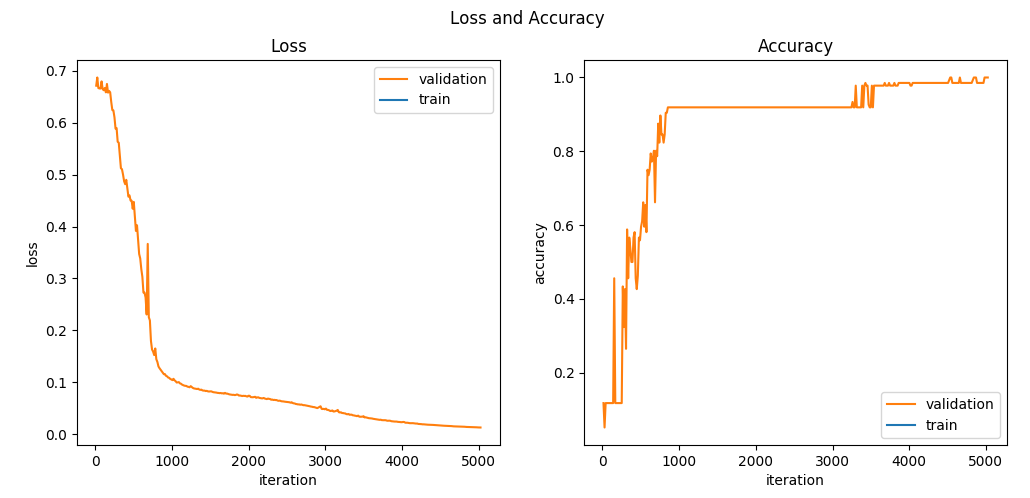
图20-6展示了训练过程,以及loss和accuracy的曲线变化。

图20-6 loss和accuracy的曲线变化图
该模型在验证集上可得100%的正确率。随机测试样例预测值与真实值完全一致。网络正确性得到验证。
  x1: [1, 1, 0, 1]
- x2: [1, 0, 0, 1]
------------------
true: [0, 1, 0, 0]
pred: [0, 1, 0, 0]
13 - 9 = 4
====================
  x1: [1, 0, 0, 0]
- x2: [0, 1, 0, 1]
------------------
true: [0, 0, 1, 1]
pred: [0, 0, 1, 1]
8 - 5 = 3
====================
  x1: [1, 1, 0, 0]
- x2: [1, 0, 0, 1]
------------------
true: [0, 0, 1, 1]
pred: [0, 0, 1, 1]
12 - 9 = 3
代码位置⚓︎
ch20, Level1
思考和练习⚓︎
- 本例中都使用了bias参数,如果去掉bias(即bh,b皆为0)效果如何。
- 用不同的方式初始化权重W,U,比较不同的结果。
- 使用不同batch_size,比较不同结果。