
Azure Red Hat OpenShift Workshop
Azure Red Hat OpenShift is a fully managed Red Hat OpenShift service in Azure that is jointly engineered and supported by Microsoft and Red Hat. In this lab, you’ll go through a set of tasks that will help you understand some of the concepts of deploying and securing container based applications on top of Azure Red Hat OpenShift.
You can use this guide as an OpenShift tutorial and as study material to help you get started to learn OpenShift.
Some of the things you’ll be going through:
- Creating a project on the Azure Red Hat OpenShift Web Console
- Deploying a MongoDB container that uses Azure Disks for persistent storage
- Deploying a Node JS API and frontend app from Git Hub using Source-To-Image (S2I)
- Exposing the web application frontend using Routes
- Creating a network policy to control communication between the different tiers in the application
You’ll be doing the majority of the labs using the OpenShift CLI, but you can also accomplish them using the Azure Red Hat OpenShift web console.
Prerequisites
Azure subscription and Azure Red Hat OpenShift environment
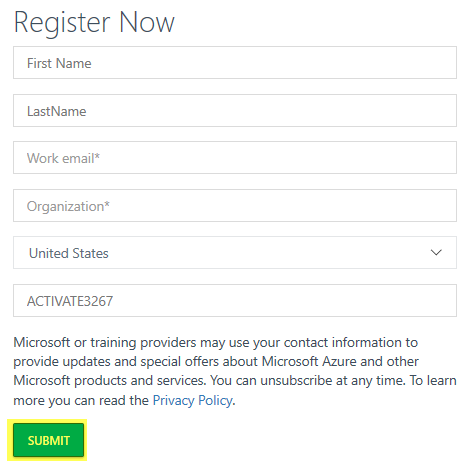
If you have been provided with a Microsoft Hands-on Labs environment for this workshop through a registration link and an activation code, please continue to registration and activate the lab.
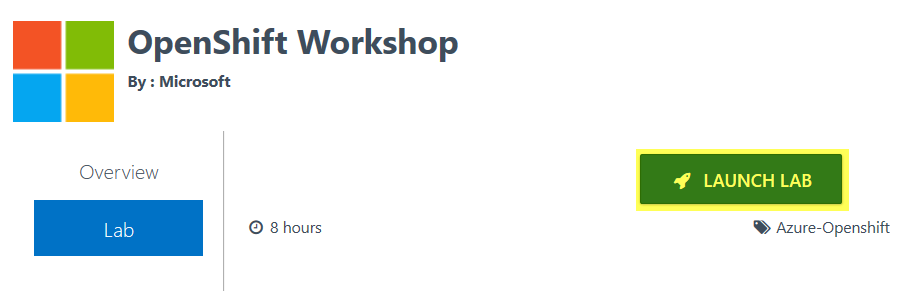
After you complete the registration, click Launch Lab
The Azure subscription and associated lab credentials will be provisioned. This will take a few moments. This process will also provision an Azure Red Hat OpenShift cluster.
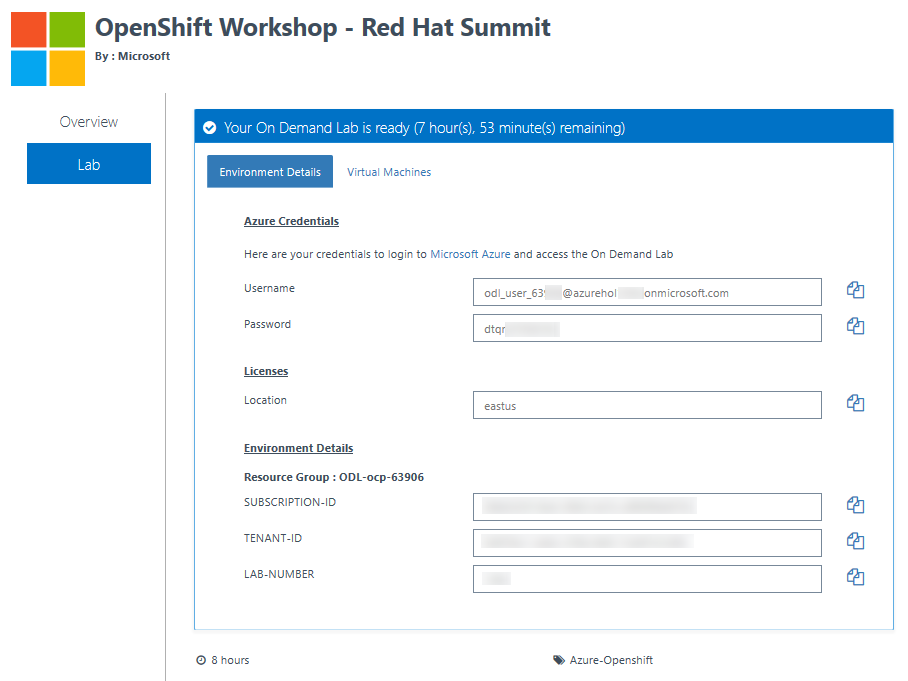
Once the environment is provisioned, a screen with all the appropriate lab credentials will be presented. Additionally, you’ll have your Azure Red Hat OpenShift cluster endpoint. The credentials will also be emailed to the email address entered at registration.
You can now skip the Create cluster section and jump to create project.
Tools
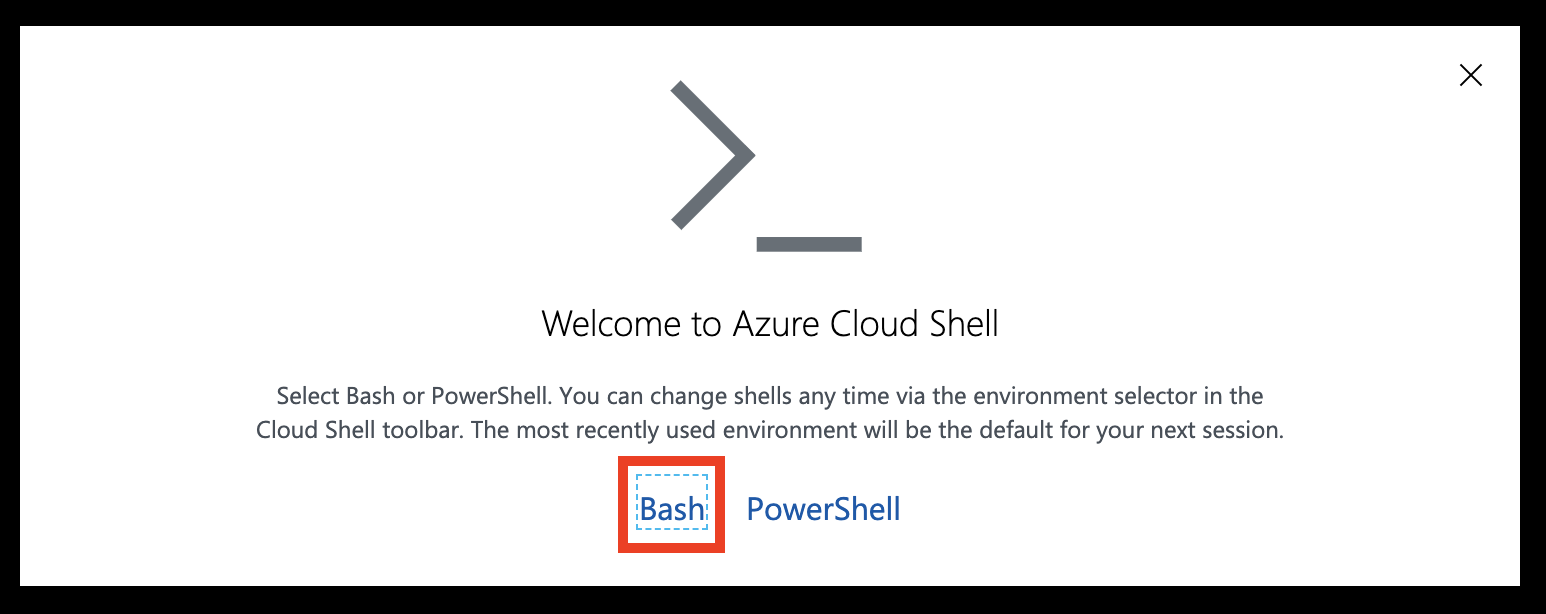
Azure Cloud Shell
You can use the Azure Cloud Shell accessible at https://shell.azure.com once you login with an Azure subscription.
Head over to https://shell.azure.com and sign in with your Azure Subscription details.
Select Bash as your shell.
Select Show advanced settings
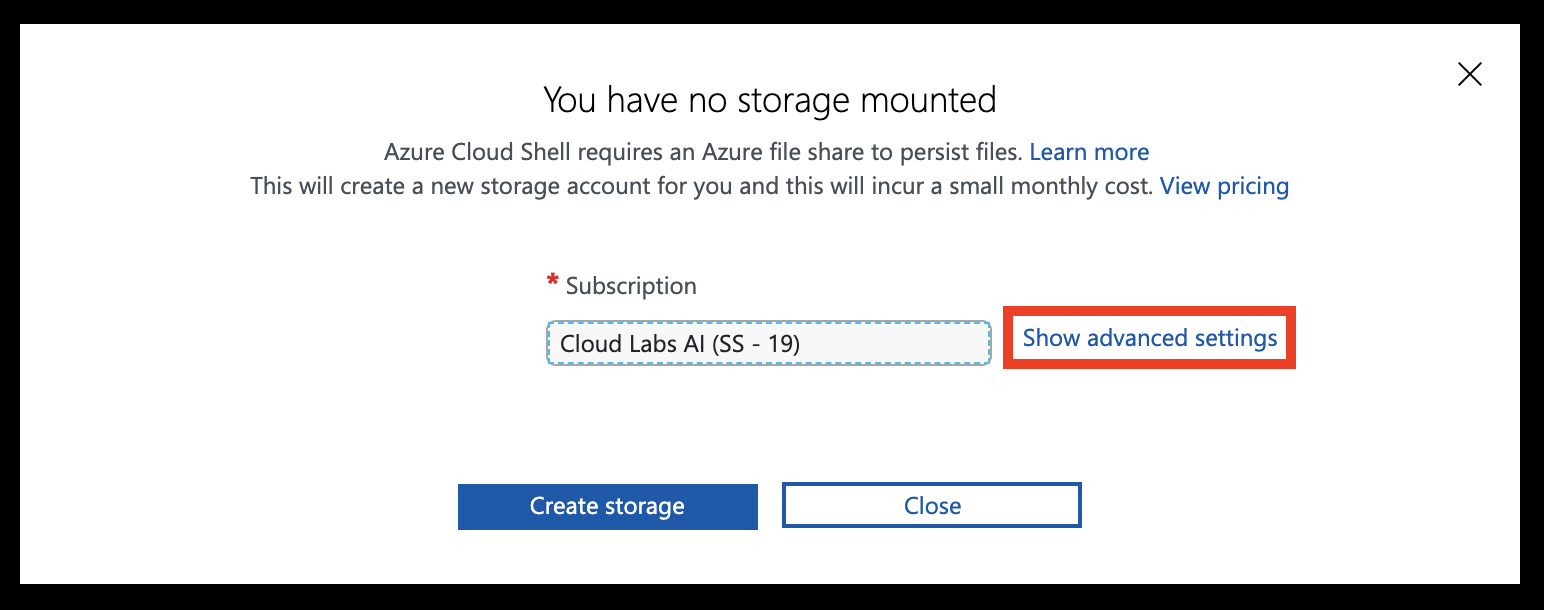
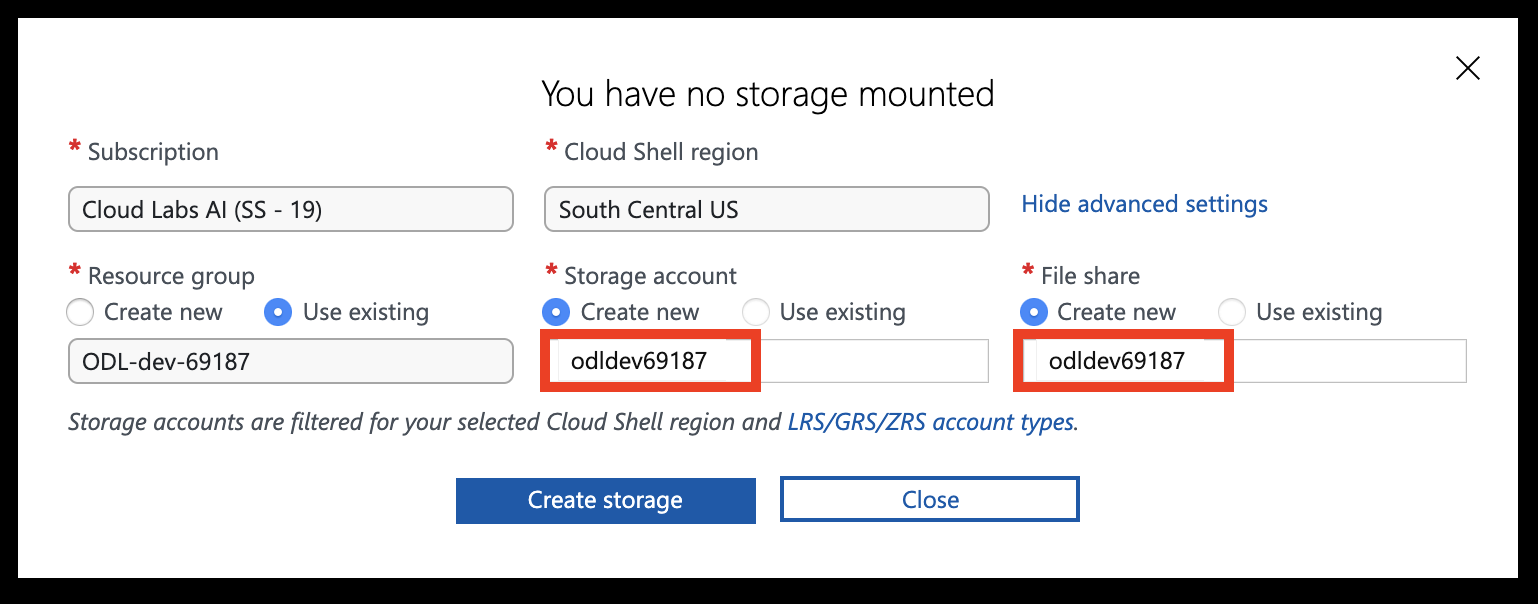
Set the Storage account and File share names to your resource group name (all lowercase, without any special characters). Leave other settings unchanged, then hit Create storage
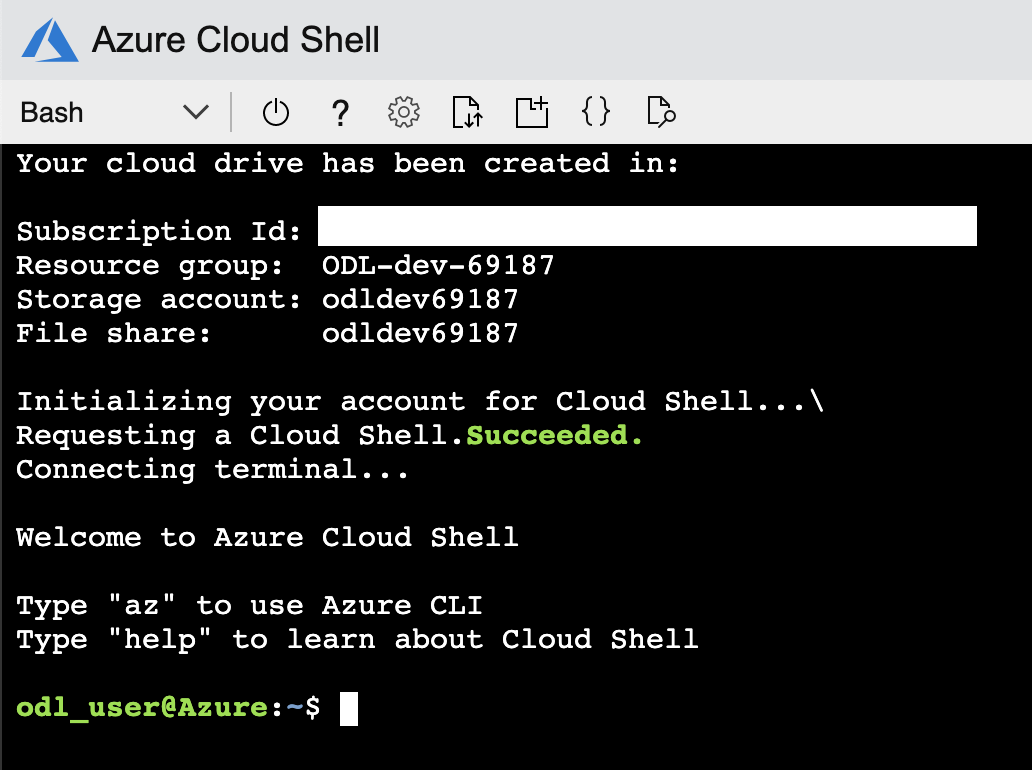
You should now have access to the Azure Cloud Shell
OpenShift CLI (oc)
You’ll need to download the latest OpenShift CLI (oc) client tools for OpenShift 4. You can follow the steps below on the Azure Cloud Shell.
Note You’ll need to change the link below to the latest link you get from the page.
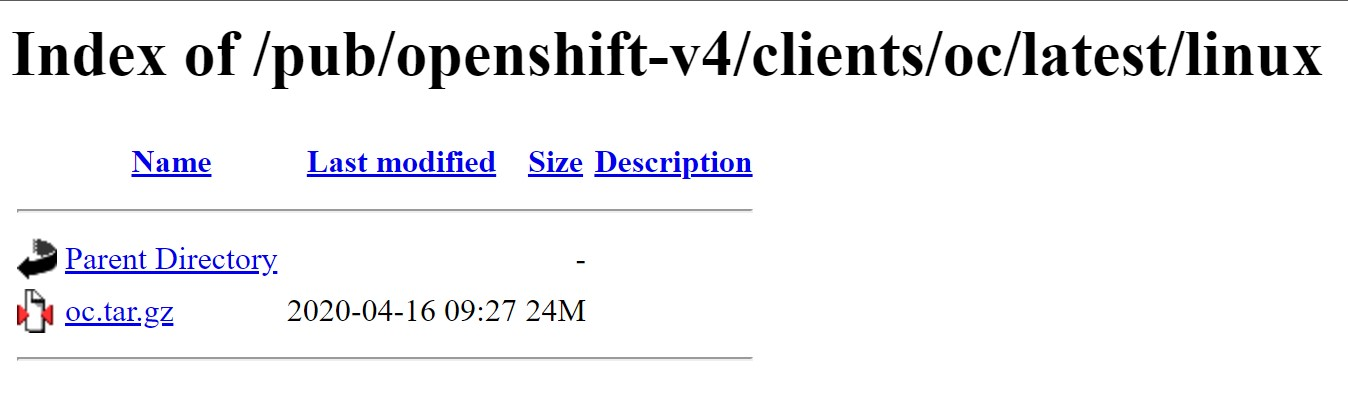
Please run following commands on Azure Cloud Shell to download and setup the OpenShift client.
cd ~
curl https://mirror.openshift.com/pub/openshift-v4/clients/ocp/latest/openshift-client-linux.tar.gz > openshift-client-linux.tar.gz

mkdir openshift

tar -zxvf openshift-client-linux.tar.gz -C openshift

echo 'export PATH=$PATH:~/openshift' >> ~/.bashrc && source ~/.bashrc
The OpenShift CLI (oc) is now installed.
In case you want to work from your own operating system, here are the links to the different versions of CLI:
- https://mirror.openshift.com/pub/openshift-v4/clients/ocp/latest/openshift-client-windows.zip
- https://mirror.openshift.com/pub/openshift-v4/clients/ocp/latest/openshift-client-linux.tar.gz
- https://mirror.openshift.com/pub/openshift-v4/clients/ocp/latest/openshift-client-mac.tar.gz
GitHub Account
You’ll need a personal GitHub account. You can sign up for free here.
Create cluster
We will now create our own cluster.
If you choose to install and use the CLI locally, this tutorial requires that you are running the Azure CLI version 2.6.0 or later. Run az --version to find the version. If you need to install or upgrade, see Install Azure CLI.
Azure Red Hat OpenShift requires a minimum of 40 cores to create and run an OpenShift cluster. The default Azure resource quota for a new Azure subscription does not meet this requirement. To request an increase in your resource limit, see Standard quota: Increase limits by VM series.
Verify your permissions
To create an Azure Red Hat OpenShift cluster, verify the following permissions on your Azure subscription, Azure Active Directory user, or service principal:
| Permissions | Resource Group which contains the VNet | User executing az aro create |
Service Principal passed as –client-id |
|---|---|---|---|
| User Access Administrator | X | X | |
| Contributor | X | X | X |
Register the resource providers
Next, you need to register the following resource providers in your subscription.
-
Register the
Microsoft.RedHatOpenShiftresource provider:az provider register -n Microsoft.RedHatOpenShift --wait -
Register the
Microsoft.Computeresource provider:az provider register -n Microsoft.Compute --wait -
Register the
Microsoft.Storageresource provider:az provider register -n Microsoft.Storage --wait
Create a virtual network containing two empty subnets
Next, you will create a virtual network containing two empty subnets.
-
Set the following variables.
LOCATION=eastus # the location of your cluster RESOURCEGROUP=aro-rg # the name of the resource group where you want to create your cluster CLUSTER=cluster # the name of your cluster -
Create a resource group
An Azure resource group is a logical group in which Azure resources are deployed and managed. When you create a resource group, you are asked to specify a location. This location is where resource group metadata is stored, it is also where your resources run in Azure if you don’t specify another region during resource creation. Create a resource group using the [az group create][az-group-create] command.
az group create --name $RESOURCEGROUP --location $LOCATIONThe following example output shows the resource group created successfully:
{ "id": "/subscriptions/<guid>/resourceGroups/aro-rg", "location": "eastus", "managedBy": null, "name": "aro-rg", "properties": { "provisioningState": "Succeeded" }, "tags": null } -
Create a virtual network.
Azure Red Hat OpenShift clusters running OpenShift 4 require a virtual network with two empty subnets, for the master and worker nodes.
Create a new virtual network in the same resource group you created earlier.
 az network vnet create \
 --resource-group $RESOURCEGROUP \
 --name aro-vnet \
 --address-prefixes 10.0.0.0/22
The following example output shows the virtual network created successfully:
{ "newVNet": { "addressSpace": { "addressPrefixes": [ "10.0.0.0/22" ] }, "id": "/subscriptions/<guid>/resourceGroups/aro-rg/providers/Microsoft.Network/virtualNetworks/aro-vnet", "location": "eastus", "name": "aro-vnet", "provisioningState": "Succeeded", "resourceGroup": "aro-rg", "type": "Microsoft.Network/virtualNetworks" } } -
Add an empty subnet for the master nodes.
az network vnet subnet create \ --resource-group $RESOURCEGROUP \ --vnet-name aro-vnet \ --name master-subnet \ --address-prefixes 10.0.0.0/23 -
Add an empty subnet for the worker nodes.
az network vnet subnet create \ --resource-group $RESOURCEGROUP \ --vnet-name aro-vnet \ --name worker-subnet \ --address-prefixes 10.0.2.0/23 -
Disable subnet private endpoint policies on the master subnet. This is required to be able to connect and manage the cluster.
 az network vnet subnet update \
 --name master-subnet \
 --resource-group $RESOURCEGROUP \
 --vnet-name aro-vnet \
 --disable-private-link-service-network-policies true
Get a Red Hat pull secret
A Red Hat pull secret enables your cluster to access Red Hat container registries along with additional content. This step is required to be able to pull Red Hat images.
Obtain your pull secret by navigating to https://cloud.redhat.com/openshift/install/azure/aro-provisioned and clicking Download pull secret. You will need to log in to your Red Hat account or create a new Red Hat account with your business email and accept the terms and conditions.
Note You can upload that file to Azure Cloud Shell by dragging and dropping the file into the window.

Create the cluster
Run the following command to create a cluster. When running the az aro create command, you can reference your pull secret using the –pull-secret @pull-secret.txt parameter. Execute az aro create from the directory where you stored your pull-secret.txt file. Otherwise, replace @pull-secret.txt with @<path-to-my-pull-secret-file>.
az aro create \
--resource-group $RESOURCEGROUP \
--name $CLUSTER \
--vnet aro-vnet \
--master-subnet master-subnet \
--worker-subnet worker-subnet \
--pull-secret @pull-secret.txt
# --domain foo.example.com # [OPTIONAL] custom domain
Note It normally takes about 35 minutes to create a cluster. If you’re running this from the Azure Cloud Shell and it timeouts, you can reconnect again and review the progress using
az aro list --query "[].{resource:resourceGroup, name:name, provisioningState:provisioningState}" -o table.
Important If you choose to specify a custom domain, for example foo.example.com, the OpenShift console will be available at a URL such as
https://console-openshift-console.apps.foo.example.com, instead of the built-in domainhttps://console-openshift-console.apps.<random>.<location>.aroapp.io.By default, OpenShift uses self-signed certificates for all of the routes created on
*.apps.<random>.<location>.aroapp.io. If you choose to use custom DNS after connecting to the cluster, you will need to follow the OpenShift documentation to configure a custom CA for your ingress controller and a custom CA for your API server.
Get kubeadmin credentials
Run the following command to find the password for the kubeadmin user.
az aro list-credentials \
  --name $CLUSTER \
  --resource-group $RESOURCEGROUP
The following example output shows the password will be in kubeadminPassword.
{
  "kubeadminPassword": "<generated password>",
  "kubeadminUsername": "kubeadmin"
}
Save these secrets, you are going to use them to connect to the web console.
Get web console address
Each Azure Red Hat OpenShift cluster has a public hostname that hosts the OpenShift Web Console.
You can use command az aro list to list the clusters in your current Azure subscription.
az aro list -o table
The cluster web console’s URL will be listed. You will need this for the next section.
Connect to the cluster
This section assumes you have been given cluster credentials by your lab administrator, or that you have created a cluster in the previous section. You should have;
- Web Console URL
- A username (eg:
kubeadmin,student01) - A password
Login to the web console
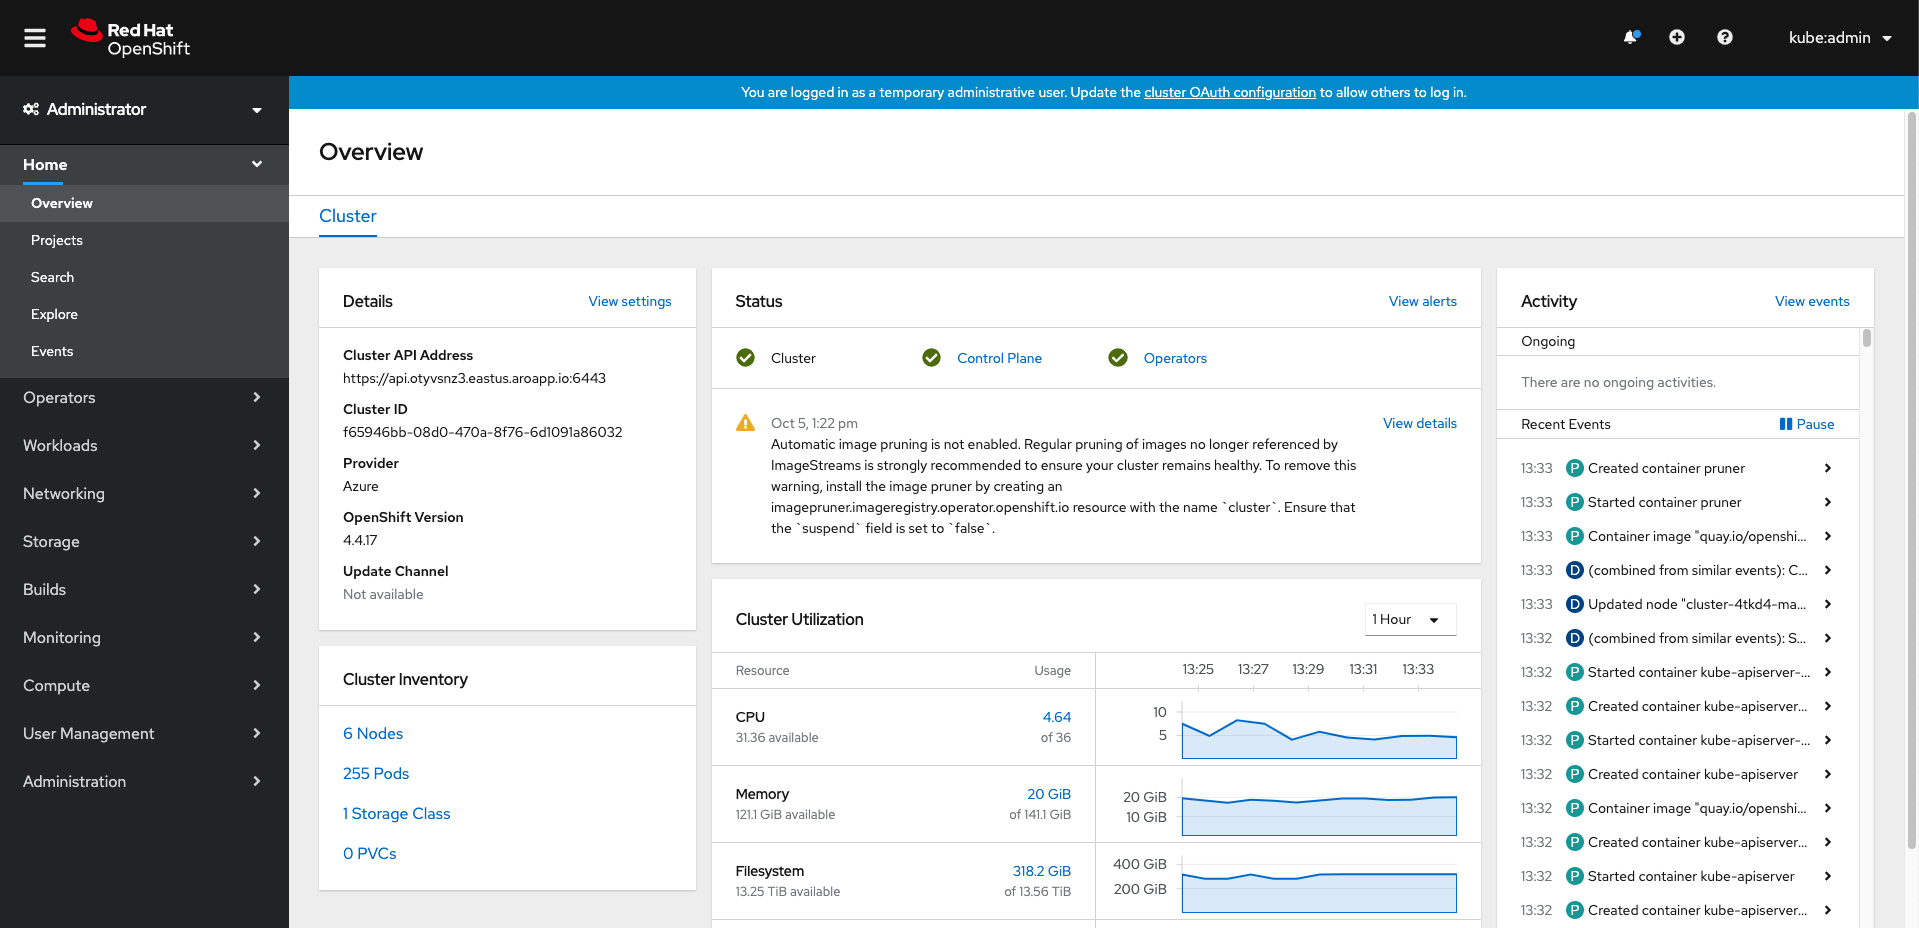
Open the Web Console URL in your web browser, and login with the credentials you have. After logging in, you should be able to see the Azure Red Hat OpenShift Web Console.
Choose an option to use the oc command
This workshop will make extensive use of the oc OpenShift Client to run commands. You can run this command line client in several different ways.
- Option 1) Use the “web terminal” built into the OpenShift Web Console. This is the easiest if you have already had a OpenShift cluster installed for you for this workshop.
- Option 2) Use the Azure Cloud Shell. This is the most natural option if you created the cluster yourself.
Option 1 - Use the OpenShift web terminal to use oc
To launch the web terminal, click the command line terminal icon (  ) on the upper right of the console. A web terminal instance is displayed in the Command line terminal pane. This instance is automatically logged in with your credentials.
Option 2 - Use the Azure Cloud Shell to use oc
Note Make sure you complete the prerequisites to install the OpenShift CLI on the Azure Cloud Shell.
Once you’re logged into the Web Console, click on the username on the top right, then click Copy login command.

On the following page click on Display Token and copy the oc login line.

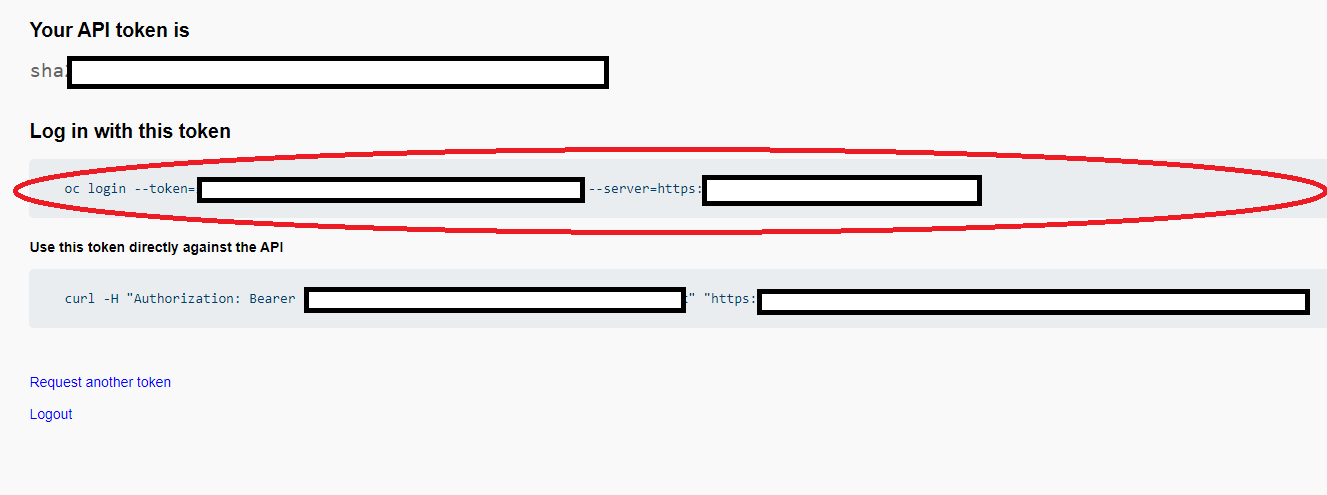
Open the Azure Cloud Shell and paste the login command. You should be able to connect to the cluster.

Lab 1 - Go Microservices
Now that you have your environment provisioned and the prerequisites fulfilled, it is time to start working on the labs.
Application Overview
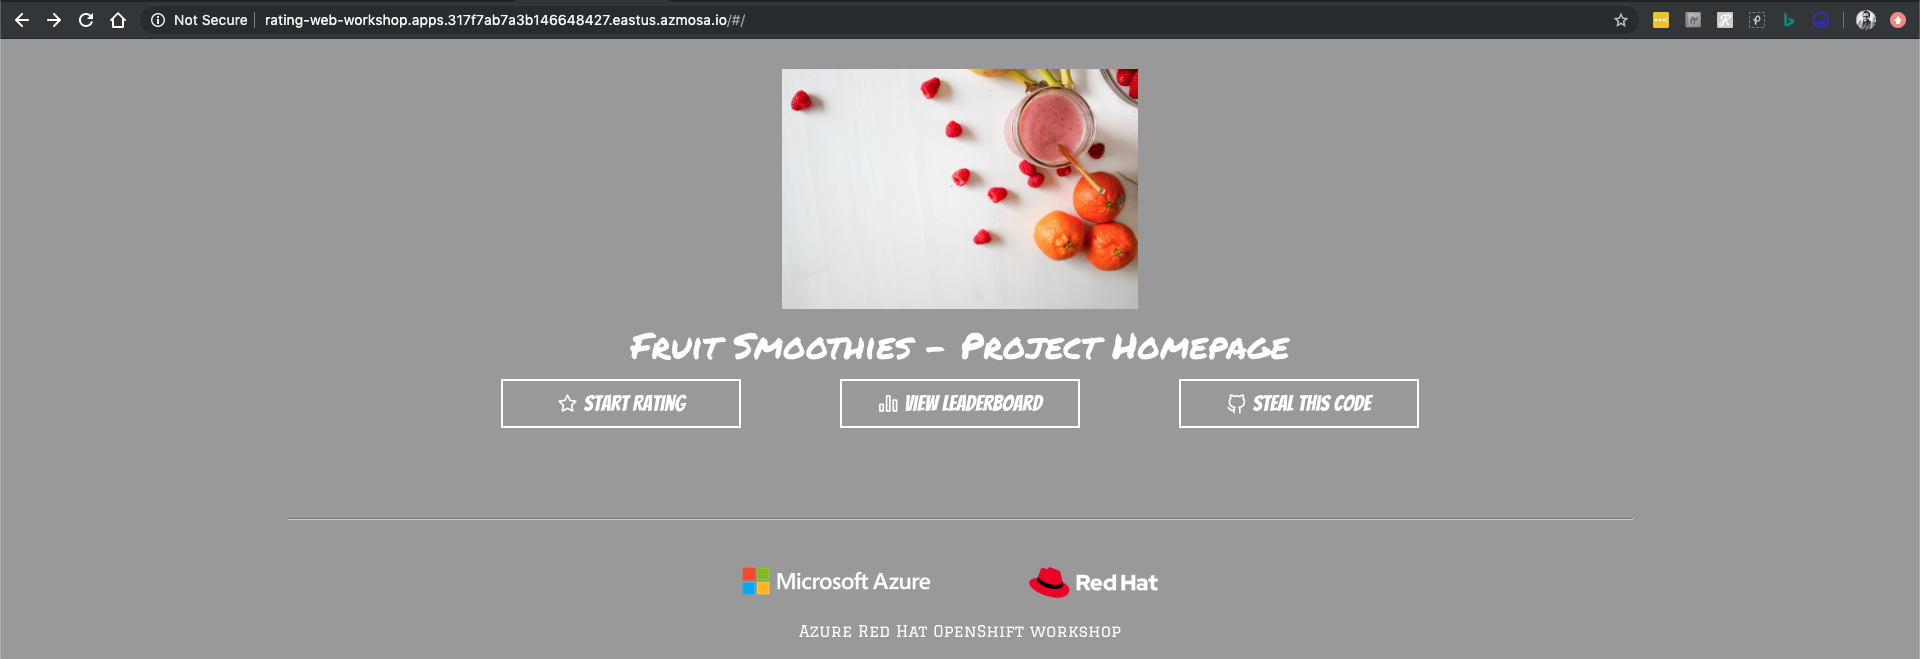
You will be deploying a ratings application on Azure Red Hat OpenShift.
The application consists of 3 components:
| Component | Link |
|---|---|
A public facing API rating-api |
GitHub repo |
A public facing web frontend rating-web |
GitHub repo |
| A MongoDB with pre-loaded data | Data |
Once you’re done, you’ll have an experience similar to the below.

Create Project
Create a project
A project allows a community of users to organize and manage their content in isolation from other communities. A project has a 1-to-1 mapping with a standard Kubernetes namespace.
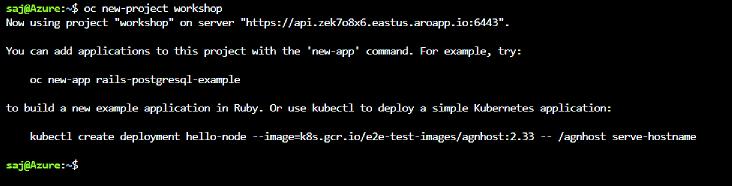
oc new-project workshop
Resources
Deploy MongoDB
Create mongoDB from Docker hub
Azure Red Hat OpenShift allows you to deploy a container image from Docker hub easily and we will deploy a MongoDB database service this way. The mandatory environment variables (user, password, database name etc.) can be passed in the oc new-app command line
Deploy the MongoDB database:
oc new-app bitnami/mongodb \
  -e MONGODB_USERNAME=ratingsuser \
  -e MONGODB_PASSWORD=ratingspassword \
  -e MONGODB_DATABASE=ratingsdb \
  -e MONGODB_ROOT_USER=root \
  -e MONGODB_ROOT_PASSWORD=ratingspassword
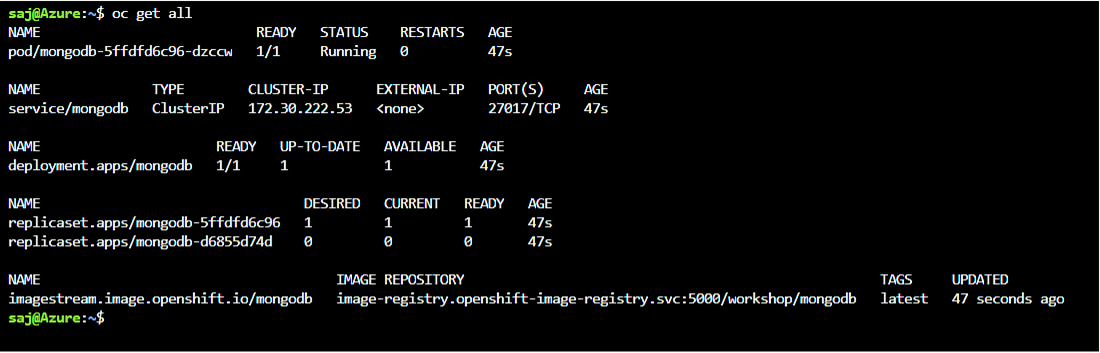
If you now head back to the web console, and switch to the workshop project, you should see a new deployment for mongoDB.
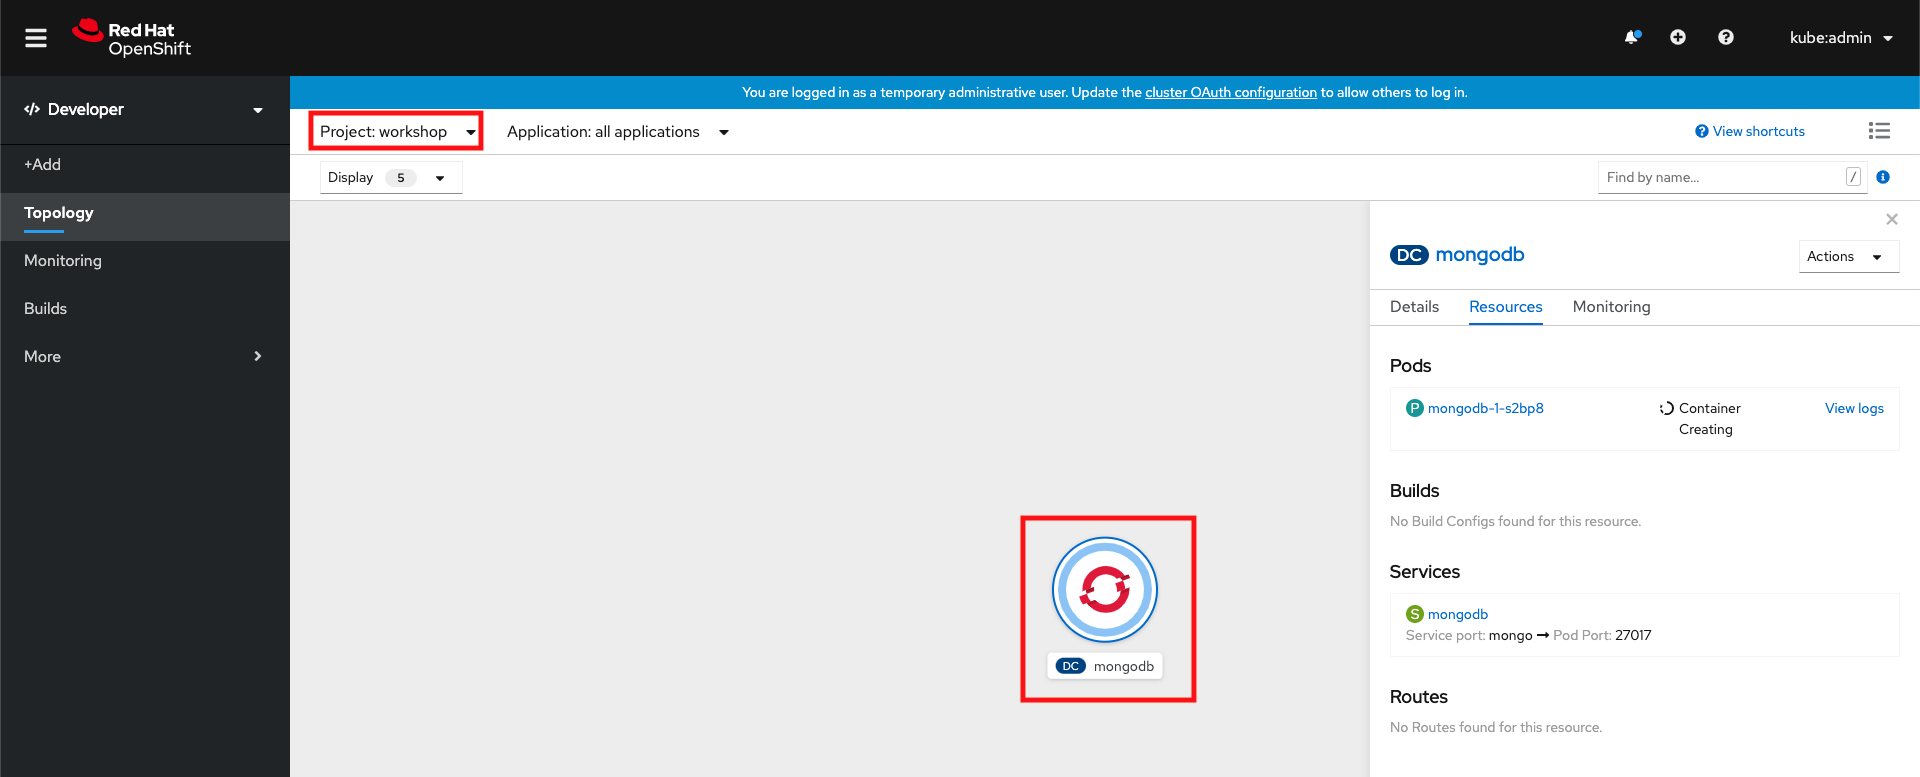
Verify if the mongoDB pod was created successfully
Run the oc get all command to view the status of the new application and verify if the deployment of the mongoDB template was successful.
oc get all
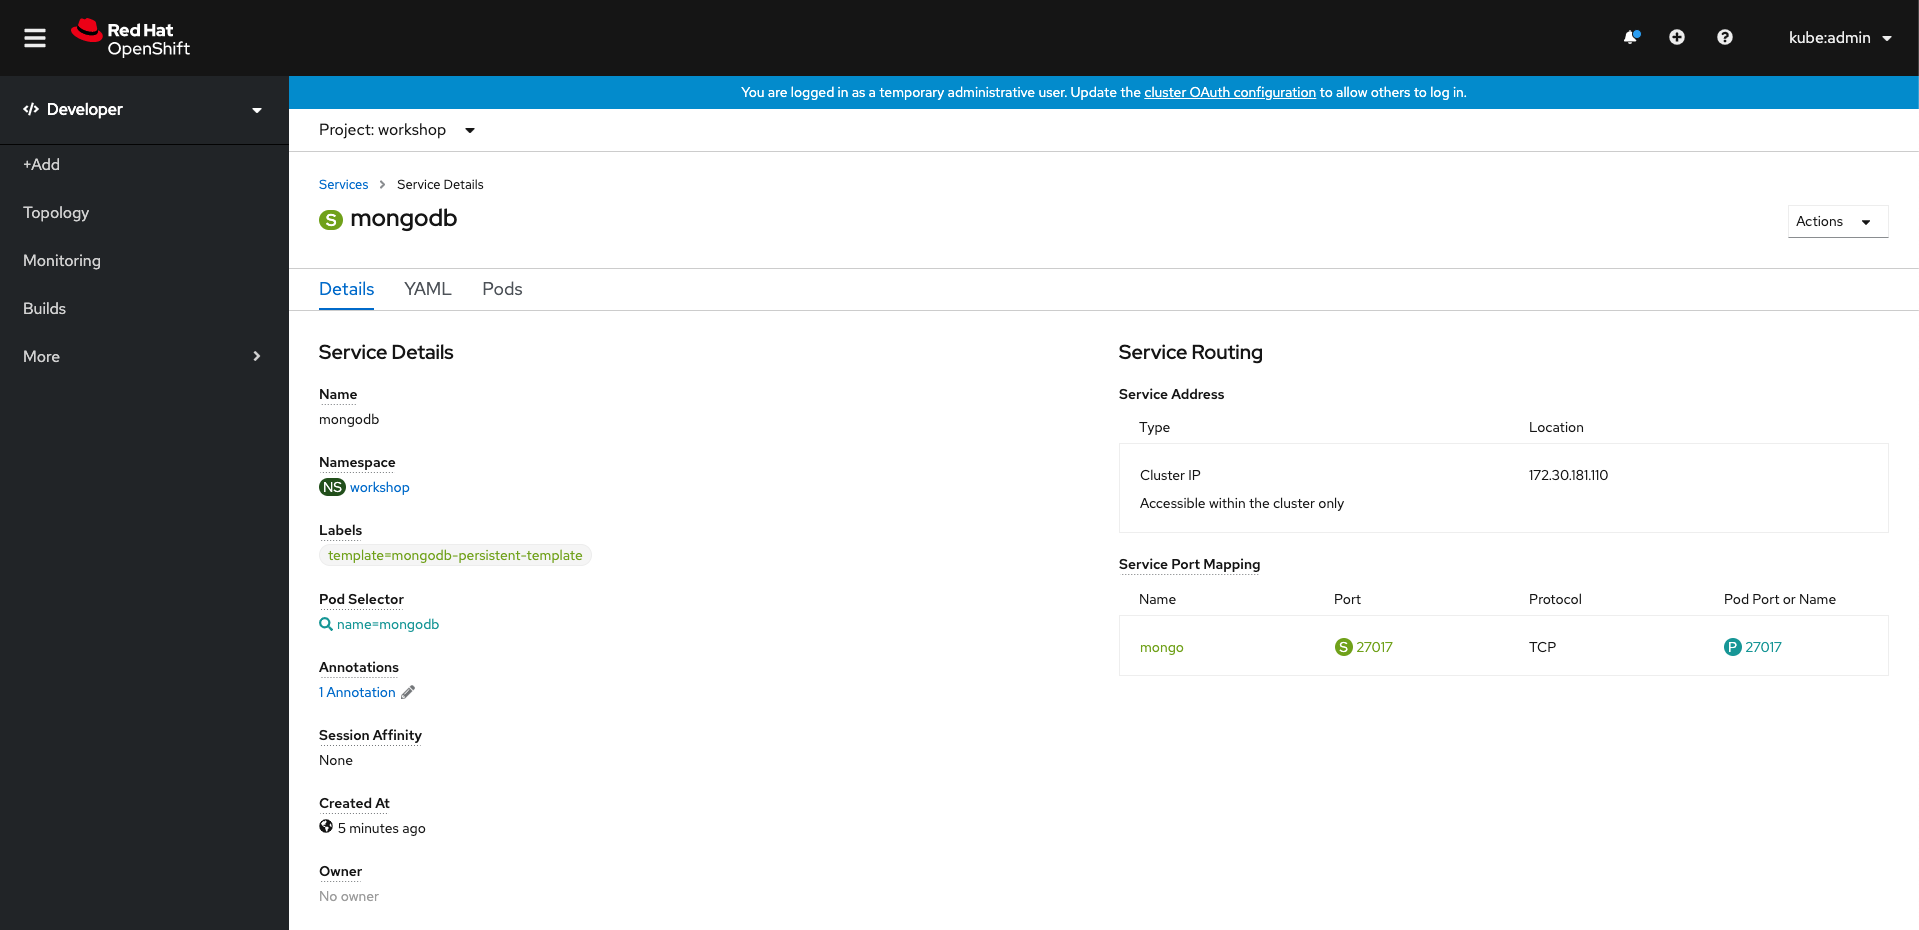
Retrieve mongoDB service hostname
Find the mongoDB service.
oc get svc mongodb

The service will be accessible at the following DNS name: mongodb.workshop.svc.cluster.local which is formed of [service name].[project name].svc.cluster.local. This resolves only within the cluster.
You can also retrieve this from the web console. You’ll need this hostname to configure the rating-api.
Deploy Ratings API
The rating-api is a NodeJS application that connects to mongoDB to retrieve and rate items. Below are some of the details that you’ll need to deploy this.
rating-apion GitHub: https://github.com/MicrosoftDocs/mslearn-aks-workshop-ratings-api- The container exposes port 8080
- MongoDB connection is configured using an environment variable called
MONGODB_URI
Fork the application to your own GitHub repository
To be able to setup CI/CD webhooks, you’ll need to fork the application into your personal GitHub repository.
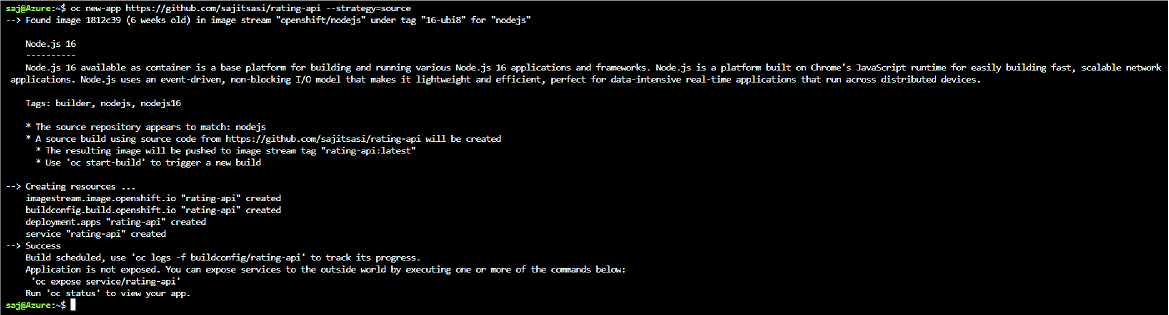
Use the OpenShift CLI to deploy the rating-api
Note You’re going to be using source-to-image (S2I) as a build strategy.
oc new-app https://github.com/<your GitHub username>/mslearn-aks-workshop-ratings-api --strategy=source --name=rating-api
Configure the required environment variables
Create the MONGODB_URI environment variable. This URI should look like mongodb://[username]:[password]@[endpoint]:27017/ratingsdb. You’ll need to replace the [usernaame] and [password] with the ones you used when creating the database. You’ll also need to replace the [endpoint] with the hostname acquired in the previous step
Hit Save when done.
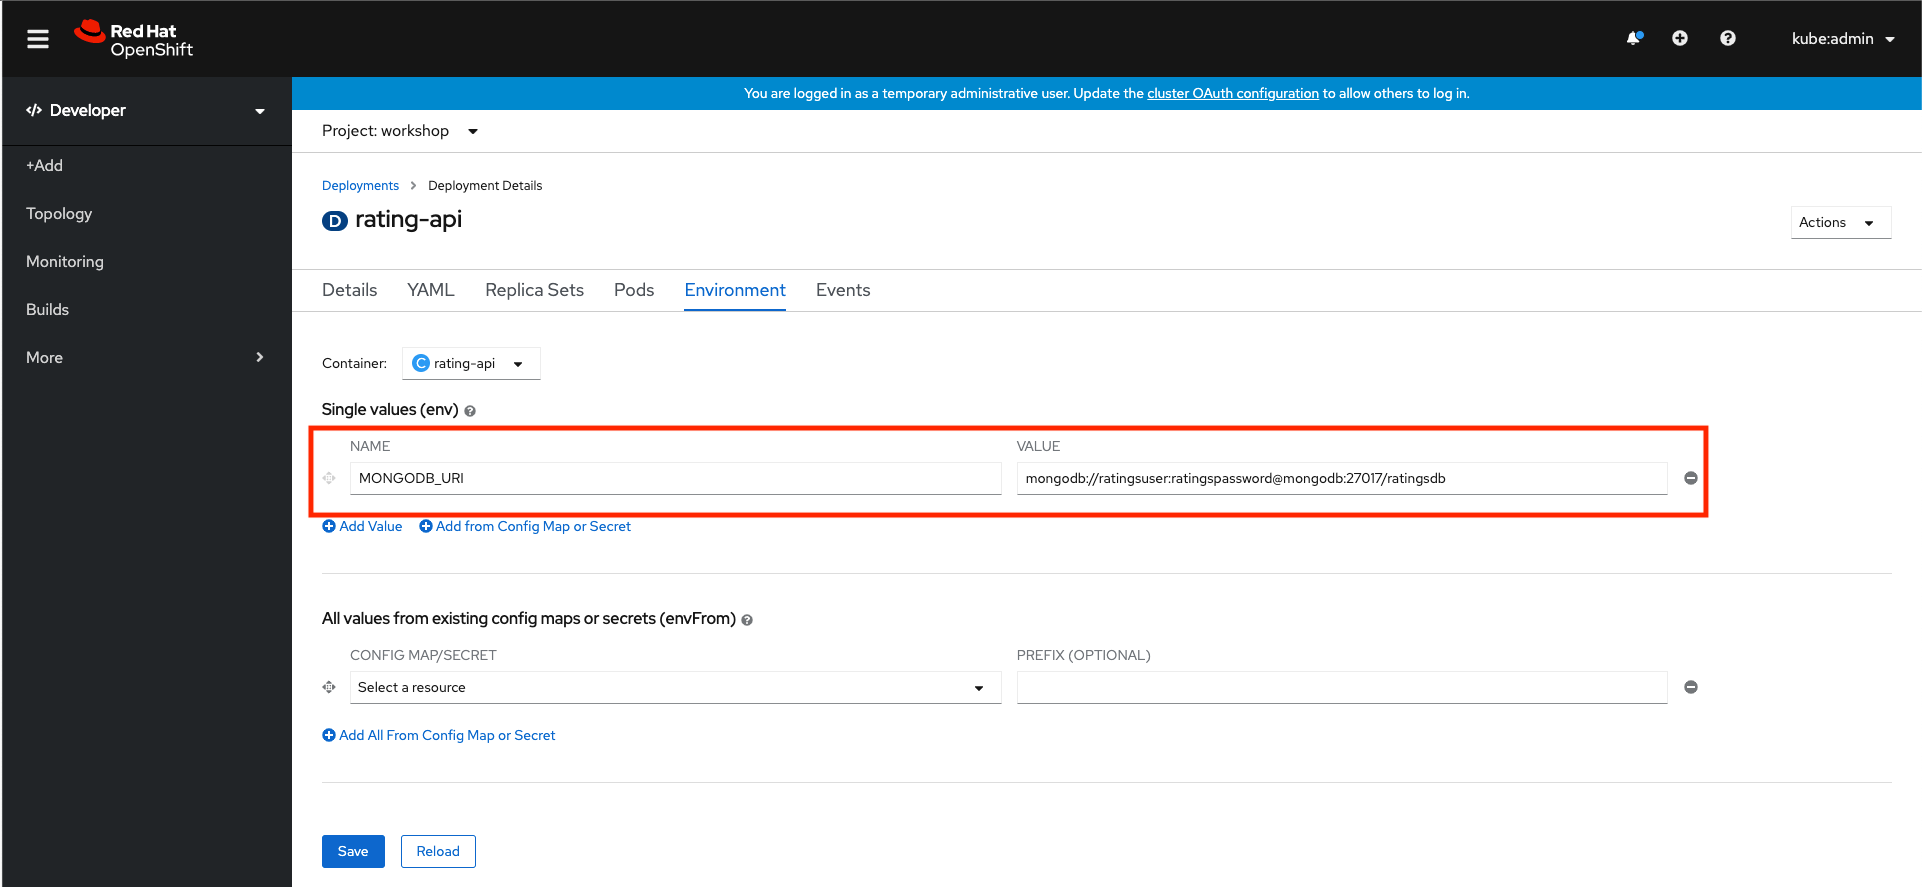
It can also be done with CLI
oc set env deploy/rating-api MONGODB_URI=mongodb://ratingsuser:ratingspassword@mongodb.workshop.svc.cluster.local:27017/ratingsdb
Verify that the service is running
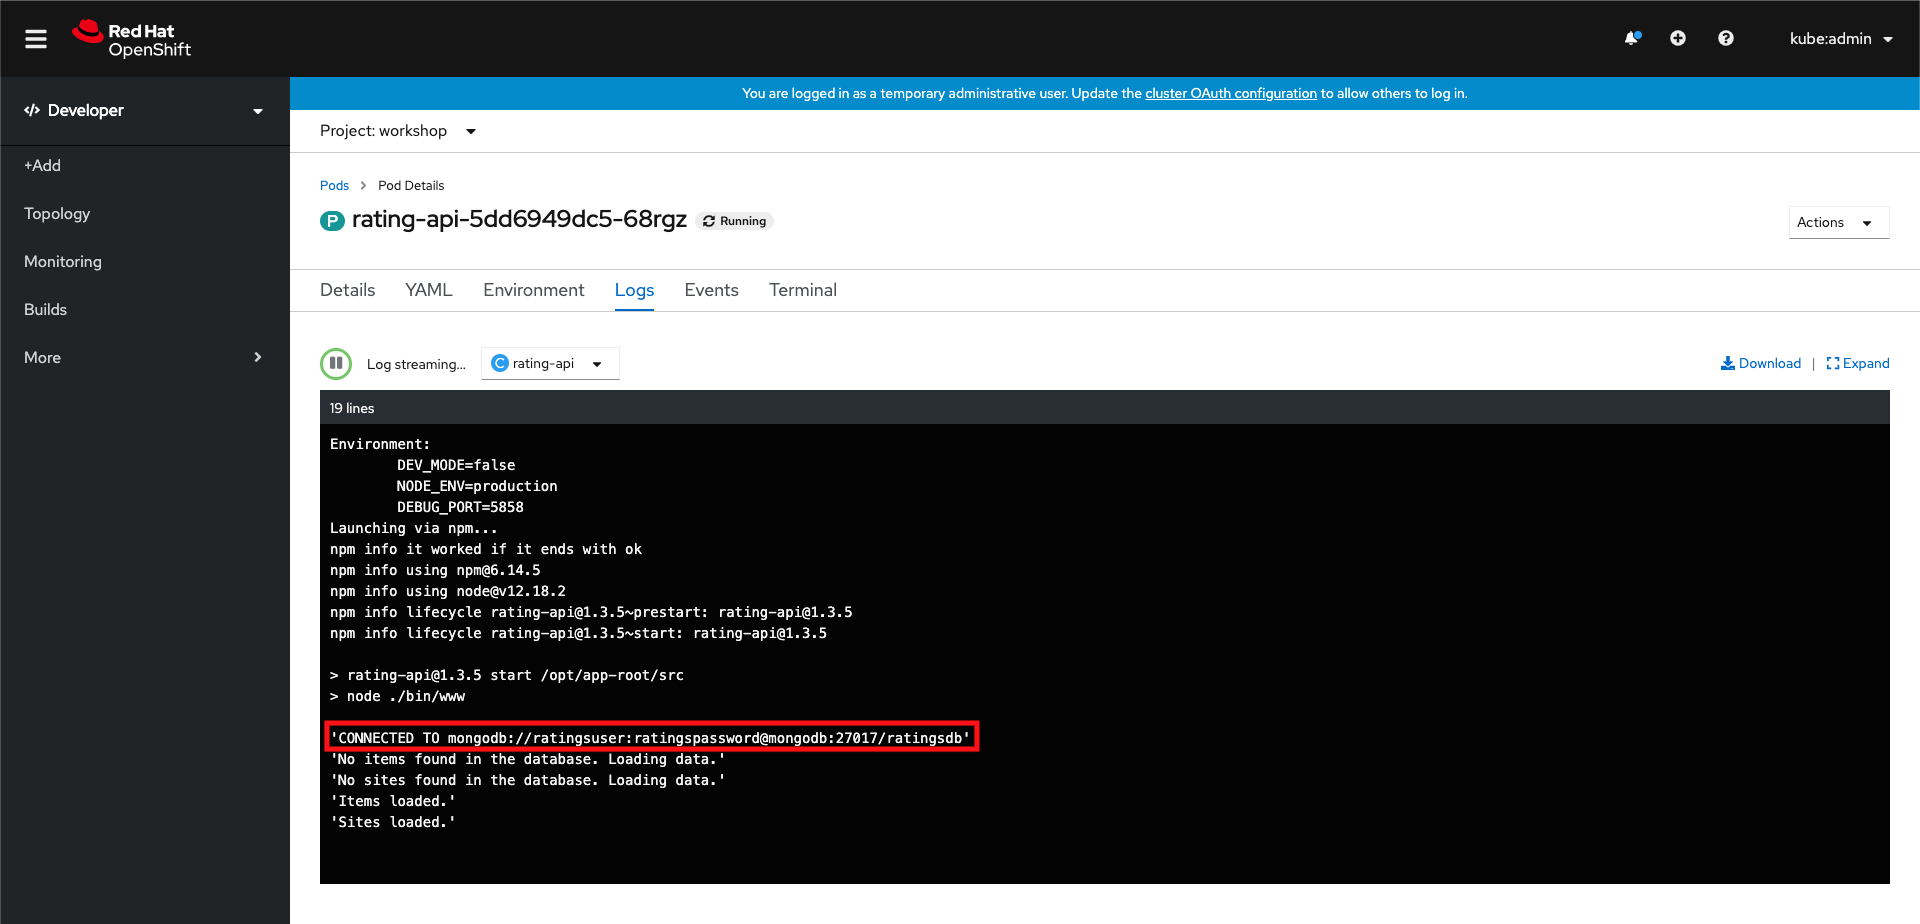
If you navigate to the logs of the rating-api deployment, you should see a log message confirming the code can successfully connect to the mongoDB.
For that, in the deployment’s details screen, click on Pods tab, then on one of the pods
Retrieve rating-api service hostname
Find the rating-api service.
oc get svc rating-api
The service will be accessible at the following DNS name over port 8080: rating-api.workshop.svc.cluster.local:8080 which is formed of [service name].[project name].svc.cluster.local. This resolves only within the cluster.
Setup GitHub webhook
To trigger S2I builds when you push code into your GitHib repo, you’ll need to setup the GitHub webhook.
Retrieve the GitHub webhook trigger secret. You’ll need use this secret in the GitHub webhook URL.
oc get bc/rating-api -o=jsonpath='{.spec.triggers..github.secret}'
You’ll get back something similar to the below. Make note the secret key in the red box as you’ll need it in a few steps.

Retrieve the GitHub webhook trigger URL from the build configuration.
oc describe bc/rating-api
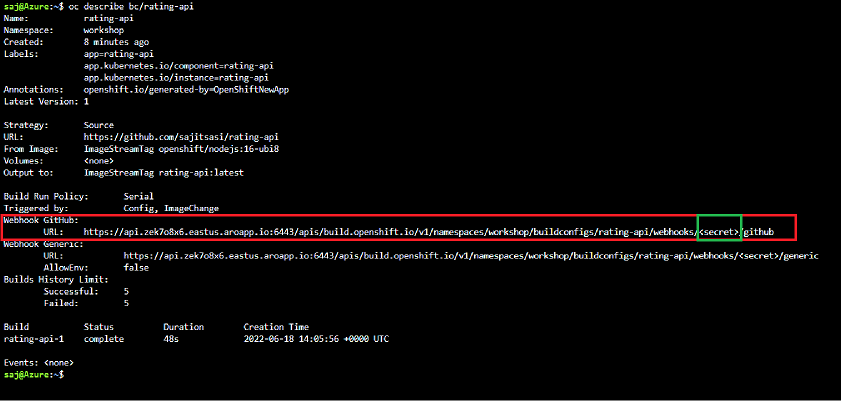
Replace the <secret> placeholder with the secret you retrieved in the previous step to have a URL similar to https://api.otyvsnz3.eastus.aroapp.io:6443/apis/build.openshift.io/v1/namespaces/workshop/buildconfigs/rating-api/webhooks/SECRETSTRING/github. You’ll use this URL to setup the webhook on your GitHub repository.
In your GitHub repository, select Add Webhook from Settings → Webhooks.
Paste the URL output (similar to above) into the Payload URL field.
Change the Content Type from GitHub’s default application/x-www-form-urlencoded to application/json.
Click Add webhook.
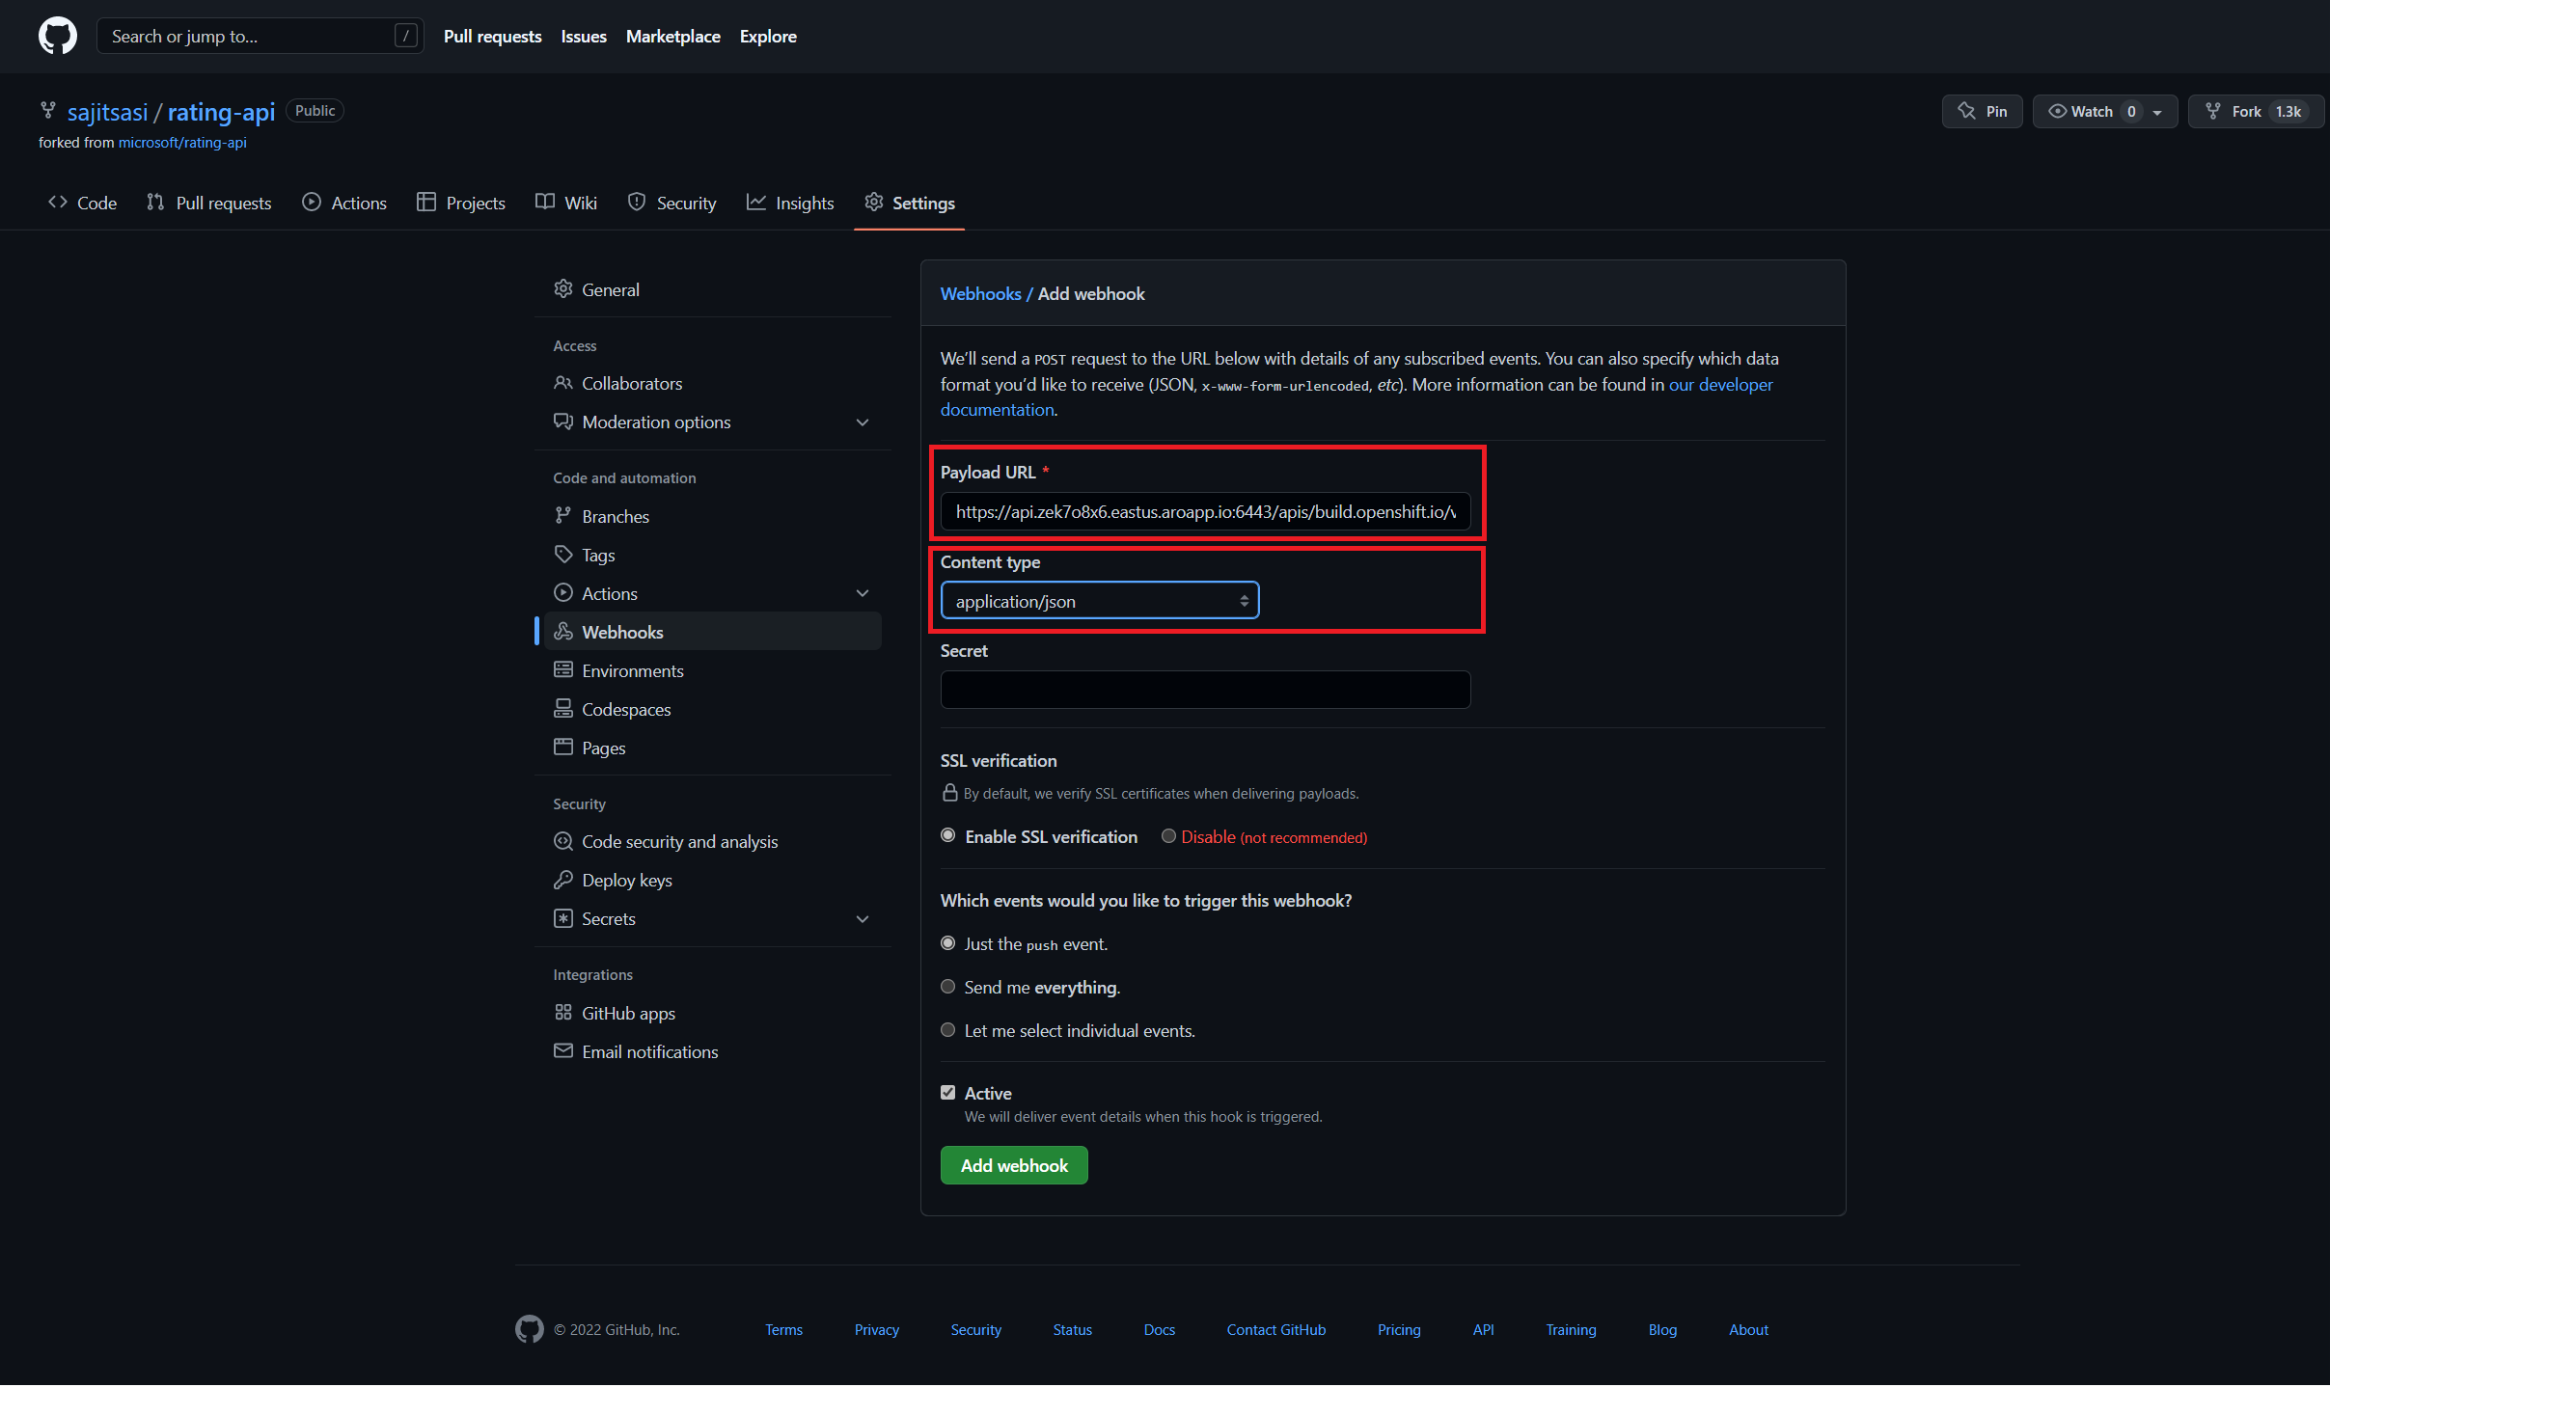
You should see a message from GitHub stating that your webhook was successfully configured.
Now, whenever you push a change to your GitHub repository, a new build will automatically start, and upon a successful build a new deployment will start.
Resources
Deploy Ratings frontend
The rating-web is a NodeJS application that connects to the rating-api. Below are some of the details that you’ll need to deploy this.
rating-webon GitHub: https://github.com/MicrosoftDocs/mslearn-aks-workshop-ratings-web- The rating-web frontend Dockerfile needs modification to the image to run on ARO 4.x versions
- The container exposes port 8080
- The web app connects to the API over the internal cluster DNS, using a proxy through an environment variable named
API
Fork the application to your own GitHub repository
To be able to setup CI/CD webhooks, you’ll need to fork the application into your personal GitHub repository.
Modify Dockerfile in your repository
Note The Dockerfile needs to be modified to use the correct node.js image to build correctly.
Note The
gitcommands shown below have been run in a local shell pre-authenticated against the GitHub repository
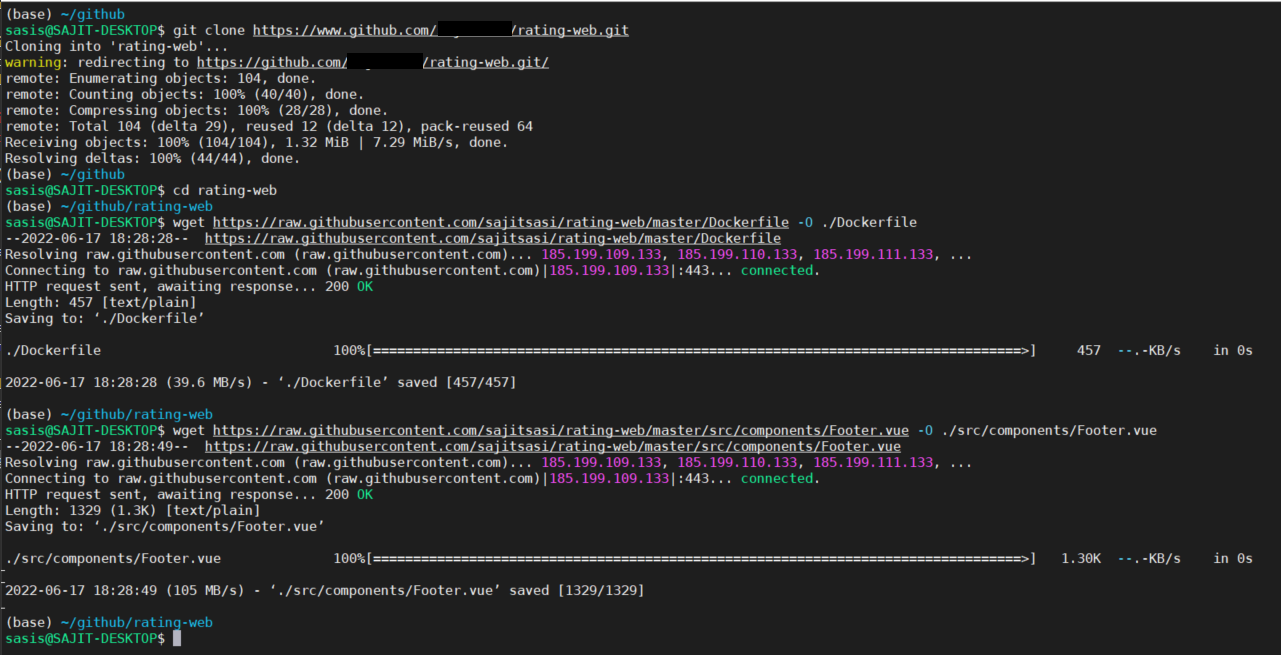
- Clone the Git repository locally and change to repo directory
git clone https://github.com/<your GitHub username>/mslearn-aks-workshop-ratings-web.git
cd mslearn-aks-workshop-ratings-web
- Download updated Dockerfile and Footer.vue files
wget https://raw.githubusercontent.com/sajitsasi/rating-web/master/Dockerfile -O ./Dockerfile
wget https://raw.githubusercontent.com/sajitsasi/rating-web/master/src/components/Footer.vue -O ./src/components/Footer.vue
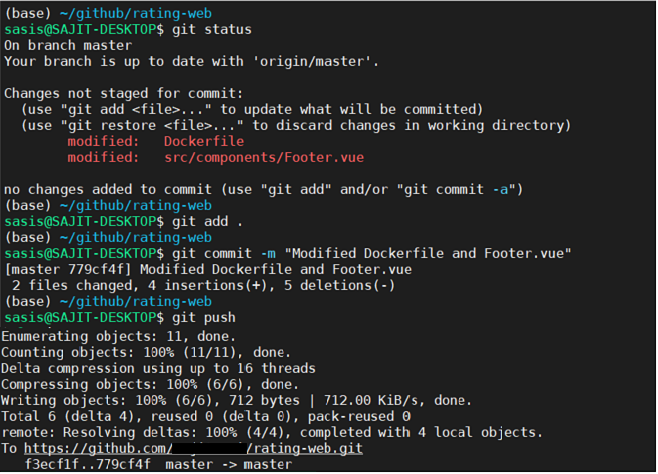
- Verify, stage, commit and push changes to your local repository
git status
git add .
git commit -m "Modified Dockerfile and Footer.vue"
git push
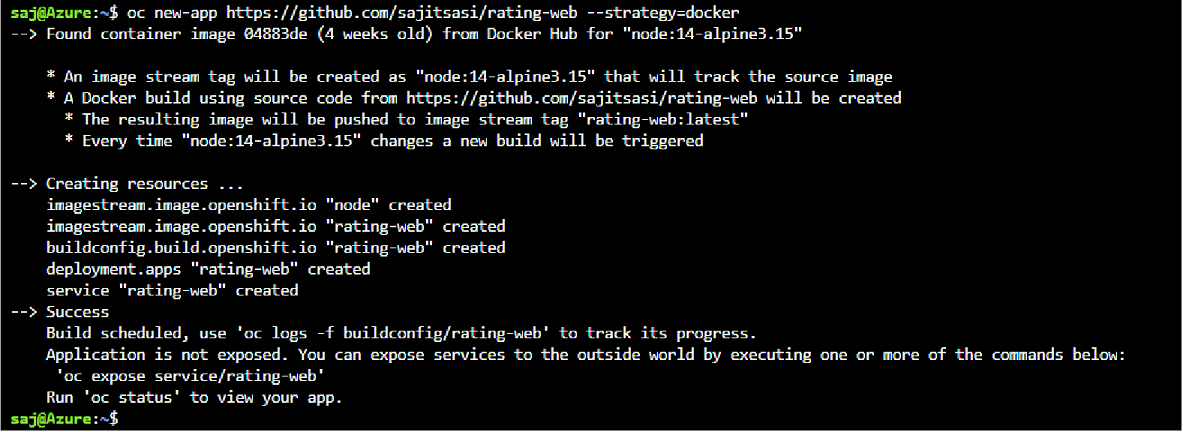
Use the OpenShift CLI to deploy the rating-web
Note You’re going to be using source-to-image (S2I) as a build strategy.
oc new-app https://github.com/<your GitHub username>/mslearn-aks-workshop-ratings-web --strategy=docker --name=rating-web
The build will take between 5-10 minutes
Configure the required environment variables
Create the API environment variable for rating-web Deployment Config. The value of this variable is going to be the hostname/port of the rating-api service.
Instead of setting the environment variable through the Azure Red Hat OpenShift Web Console, you can set it through the OpenShift CLI.
oc set env deploy rating-web API=http://rating-api:8080
Expose the rating-web service using a Route
Expose the service.
oc expose svc/rating-web
Find out the created route hostname
oc get route rating-web
You should get a response similar to the below.

Notice the fully qualified domain name (FQDN) is comprised of the application name and project name by default. The remainder of the FQDN, the subdomain, is your Azure Red Hat OpenShift cluster specific apps subdomain.
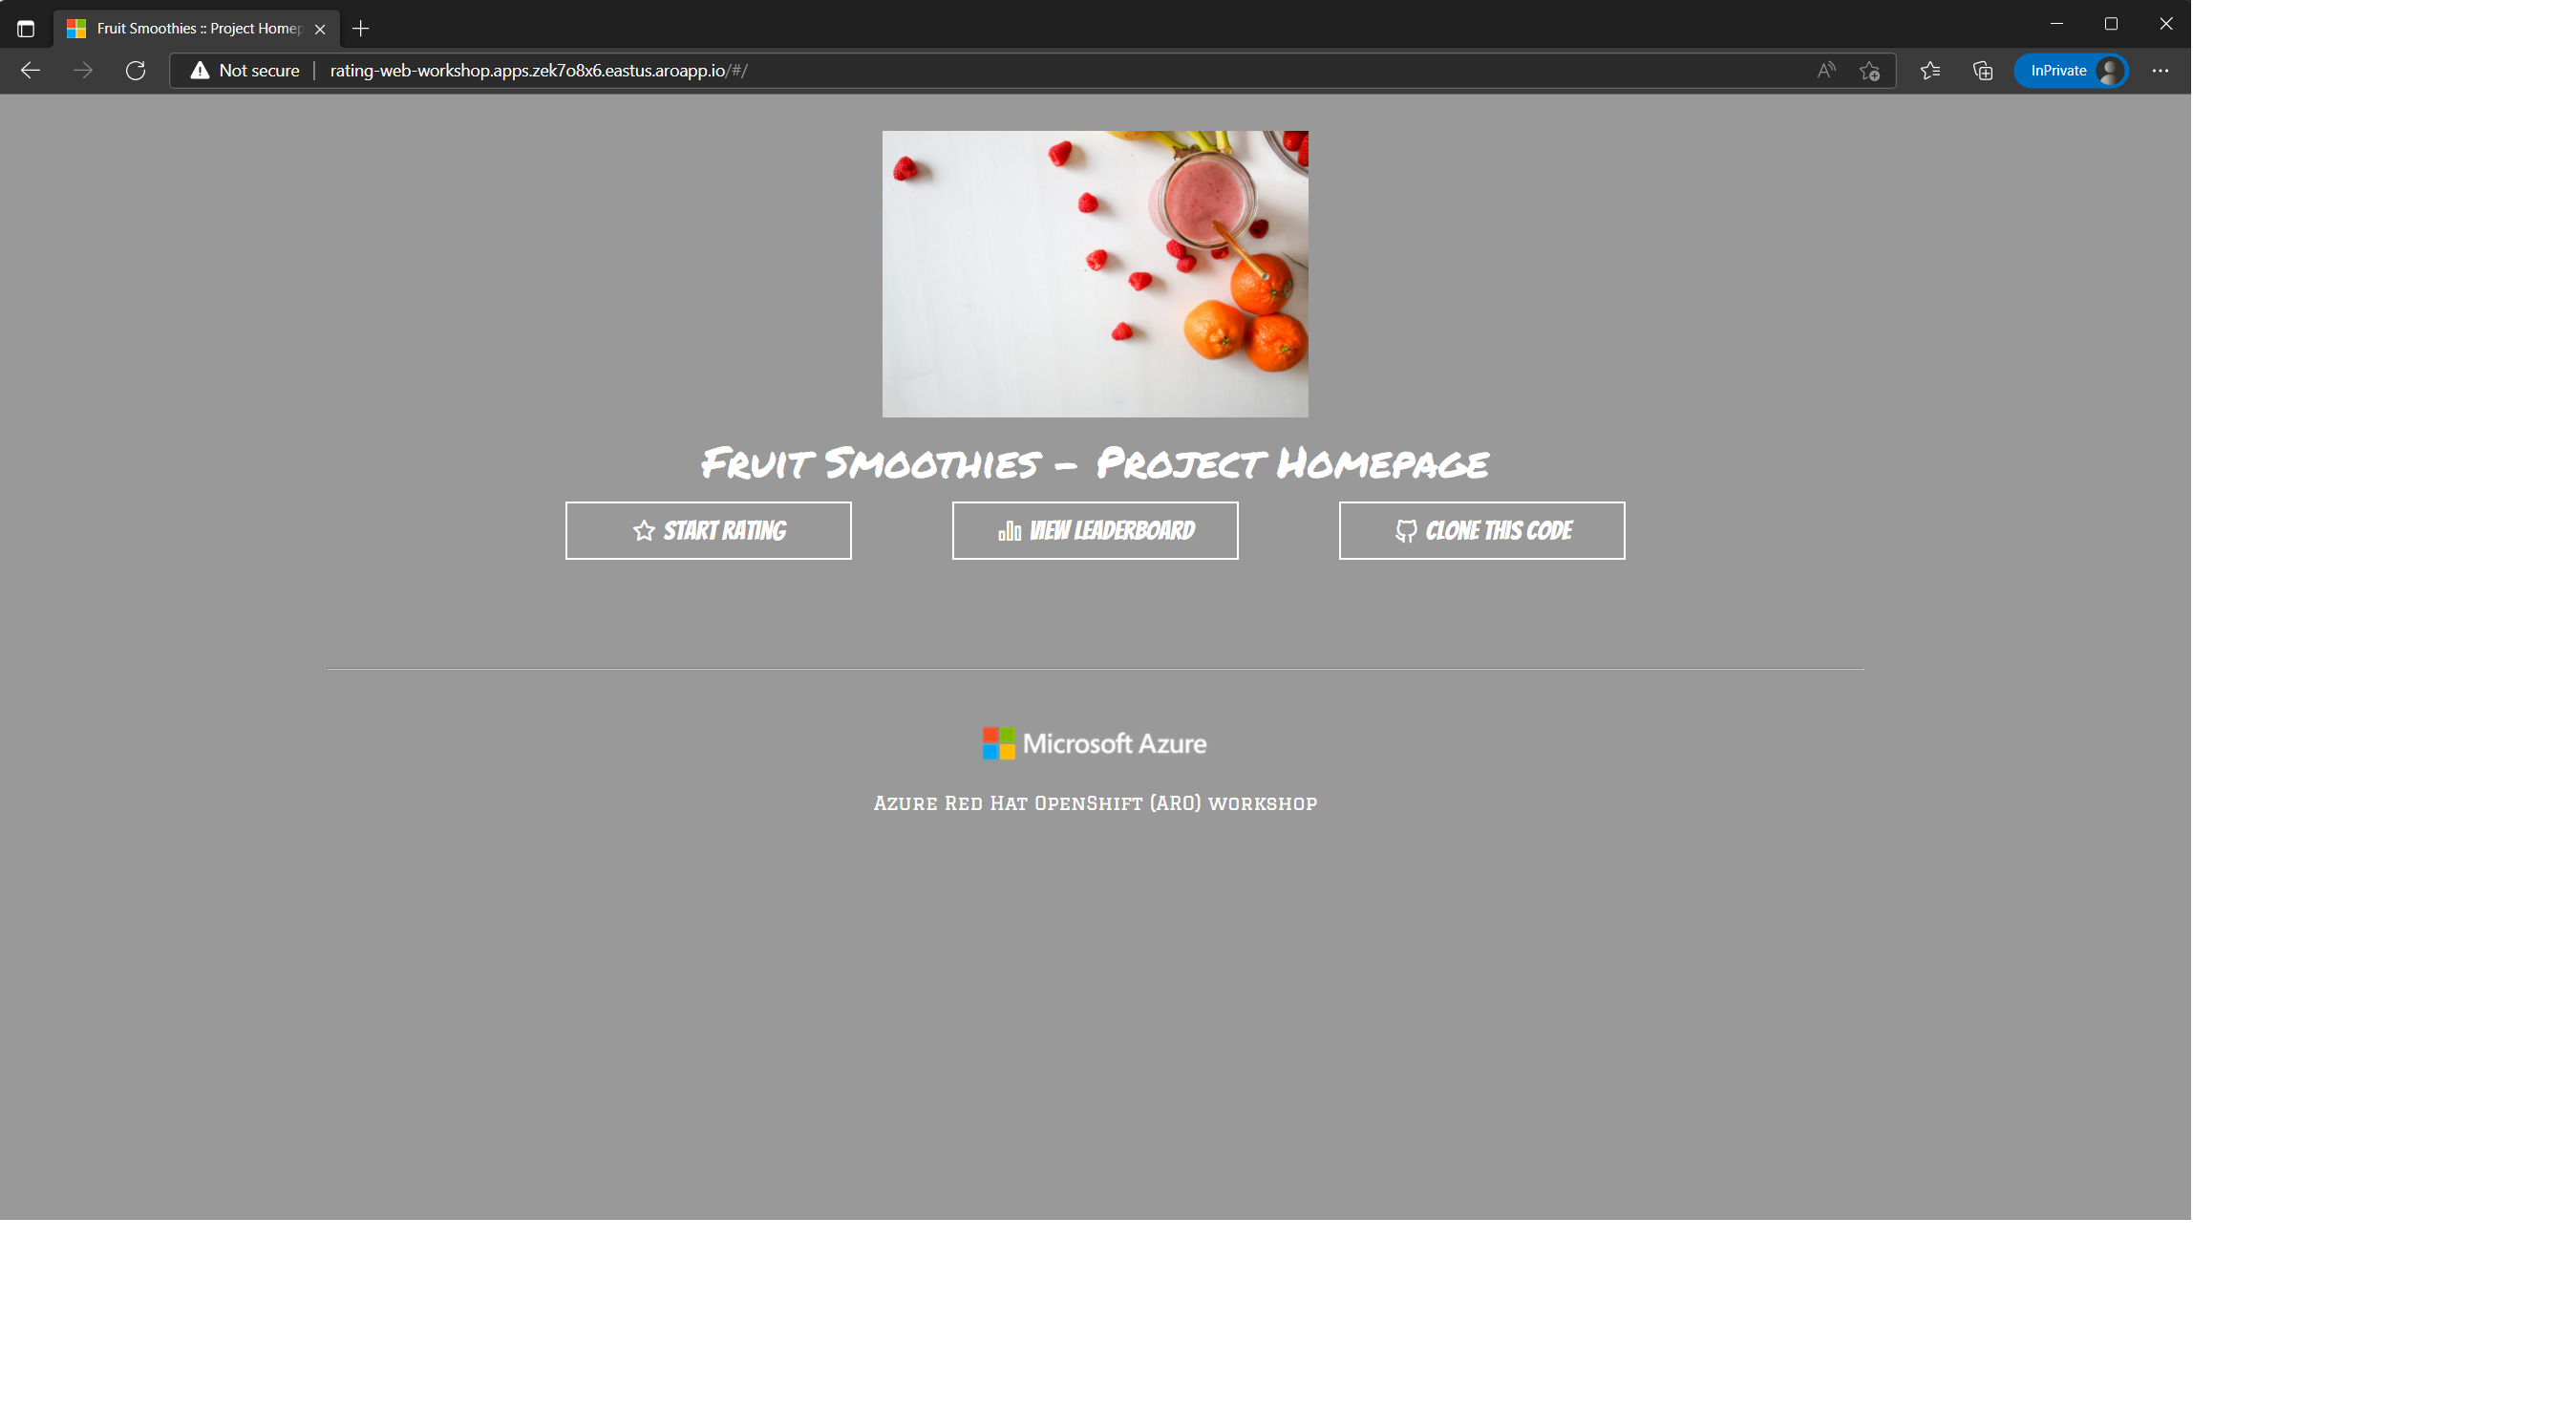
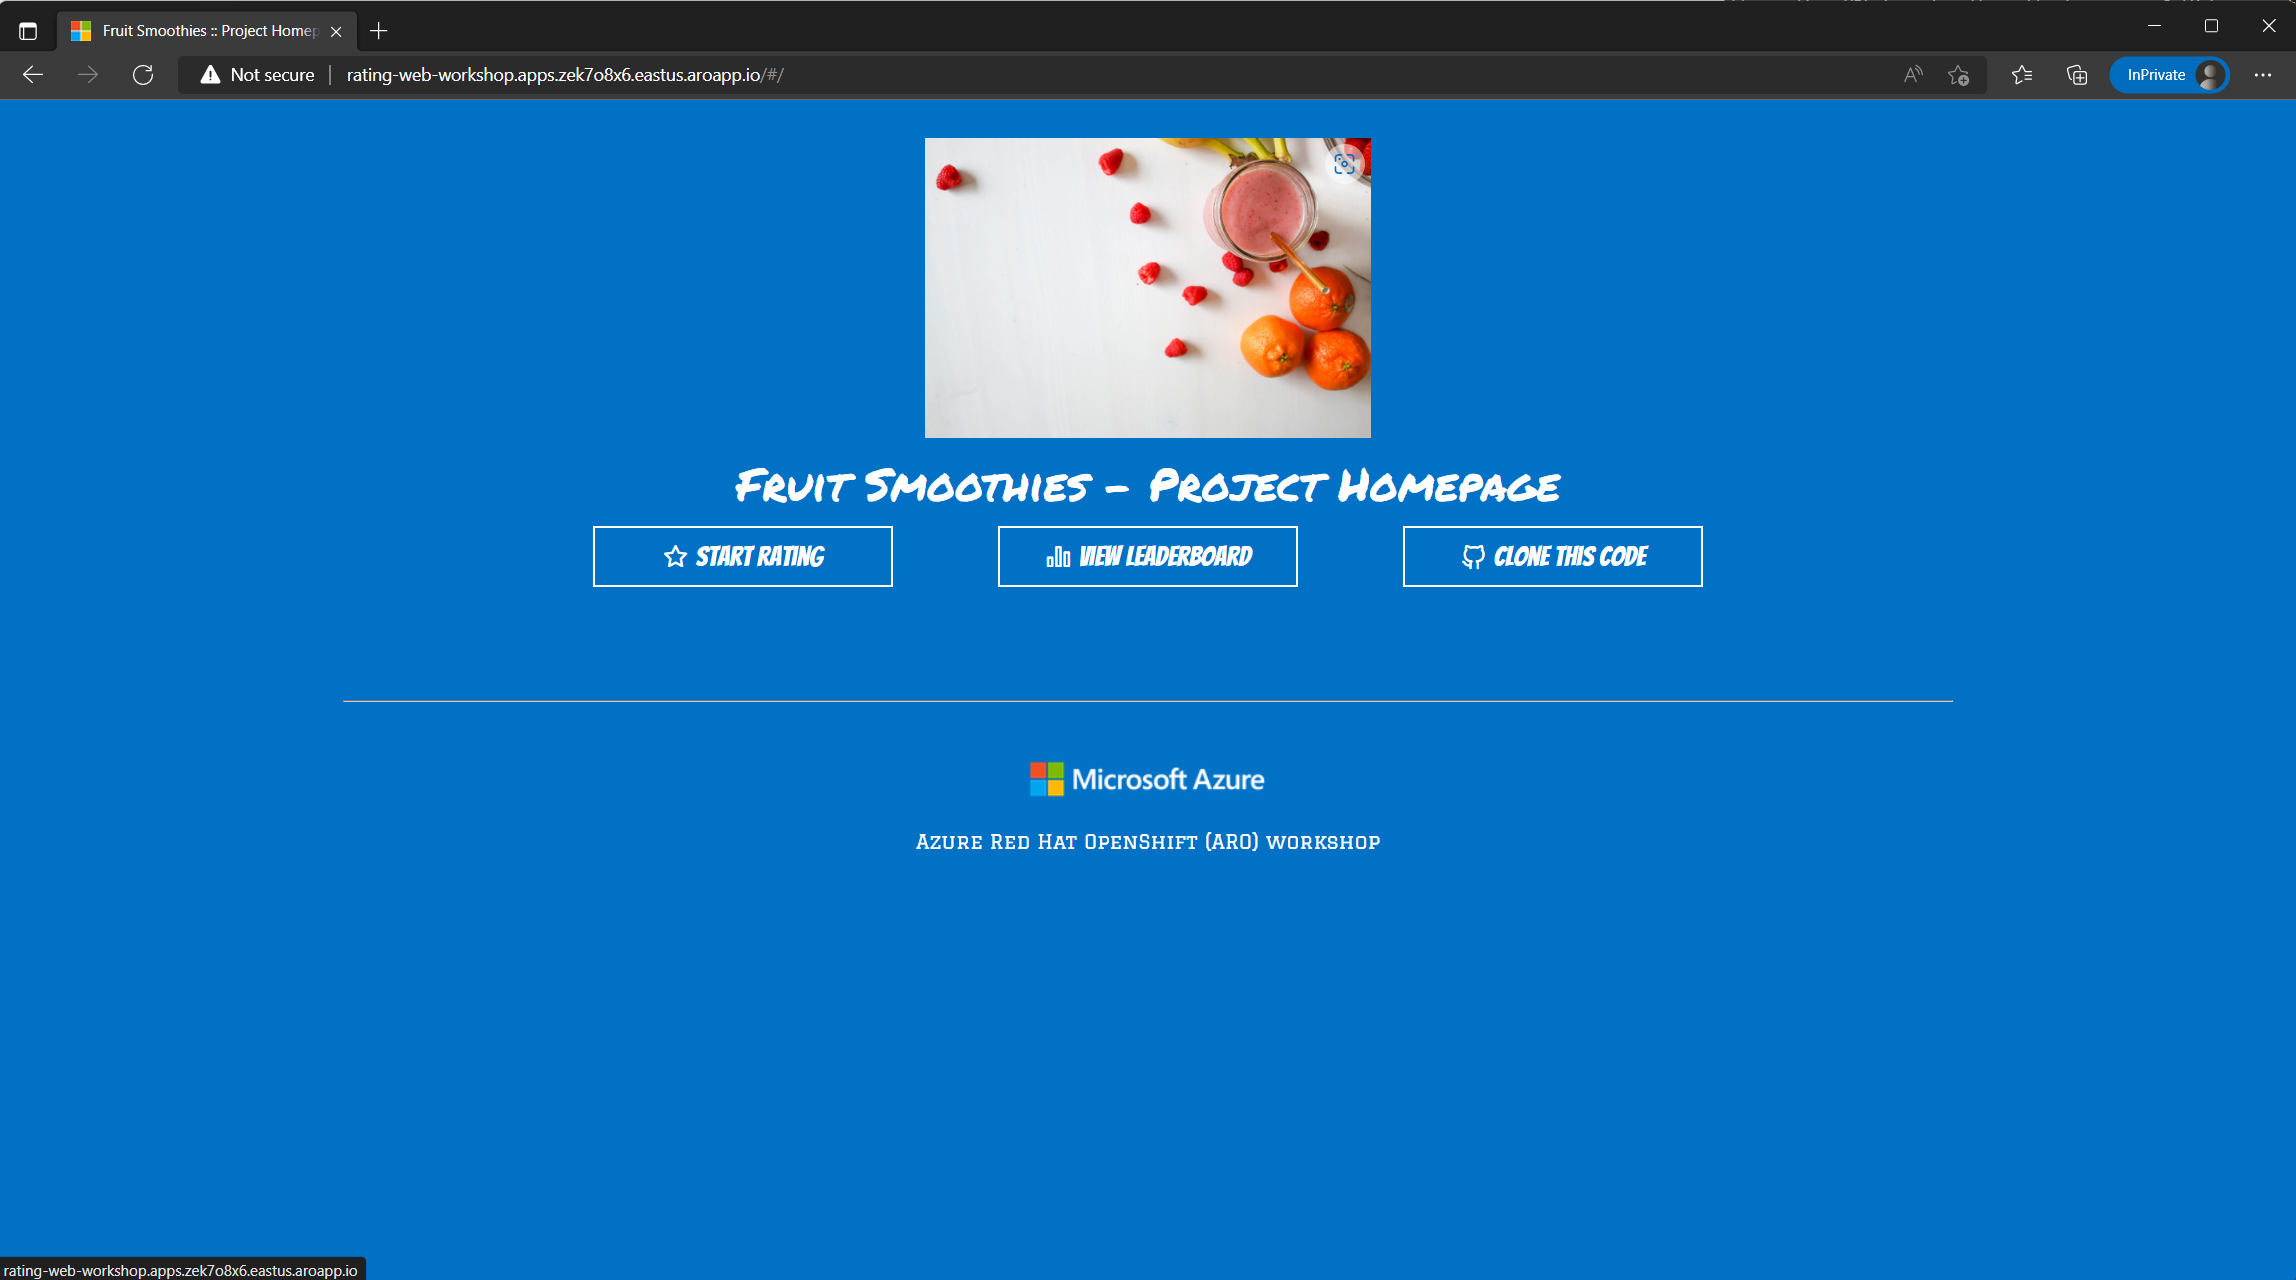
Try the service
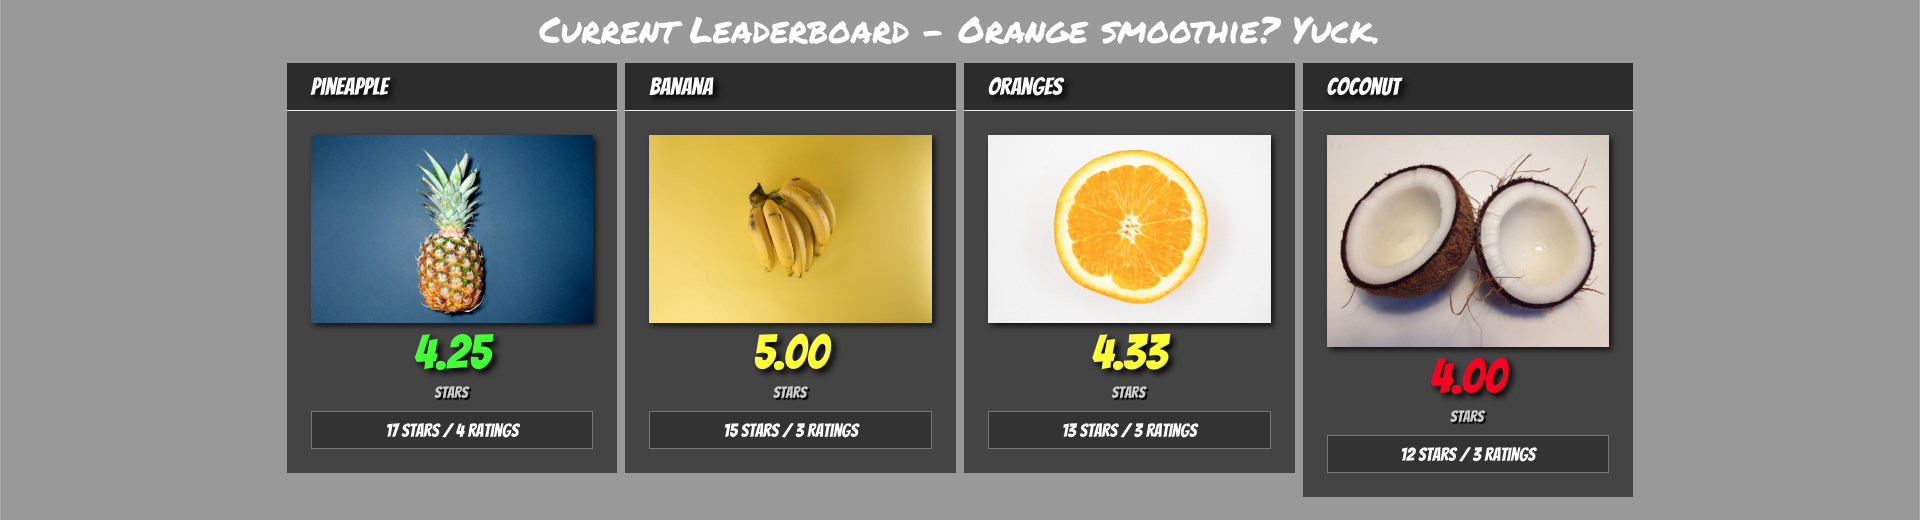
Open the hostname in your browser, you should see the rating app page. Play around, submit a few votes and check the leaderboard.
Setup GitHub webhook
To trigger S2I builds when you push code into your GitHib repo, you’ll need to setup the GitHub webhook.
Retrieve the GitHub webhook trigger secret. You’ll need use this secret in the GitHub webhook URL.
oc get bc/rating-web -o=jsonpath='{.spec.triggers..github.secret}'
You’ll get back something similar to the below. Make note the secret key in the red box as you’ll need it in a few steps.

Retrieve the GitHub webhook trigger URL from the build configuration.
oc describe bc/rating-web
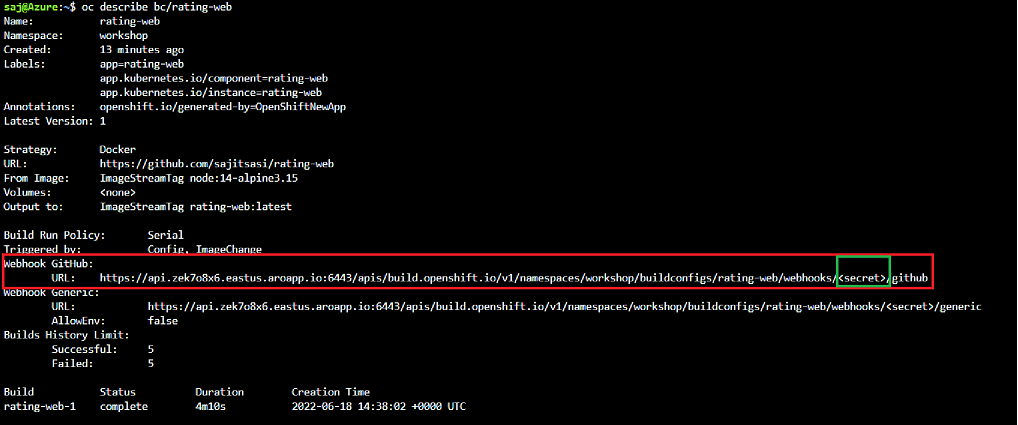
Replace the <secret> placeholder with the secret you retrieved in the previous step to have a URL similar to https://api.otyvsnz3.eastus.aroapp.io:6443/apis/build.openshift.io/v1/namespaces/workshop/buildconfigs/rating-web/webhooks/SECRETSTRING/github. You’ll use this URL to setup the webhook on your GitHub repository.
In your GitHub repository, select Add Webhook from Settings → Webhooks.
Paste the URL output (similar to above) into the Payload URL field.
Change the Content Type from GitHub’s default application/x-www-form-urlencoded to application/json.
Click Add webhook.

You should see a message from GitHub stating that your webhook was successfully configured.
Now, whenever you push a change to your GitHub repository, a new build will automatically start, and upon a successful build a new deployment will start.
Make a change to the website app and see the rolling update
Go to the https://github.com/<your GitHub username>/rating-web/blob/master/src/App.vue file in your repository on GitHub.
Edit the file, and change the background-color: #999; line to be background-color: #0071c5.
Commit the changes to the file into the master branch.

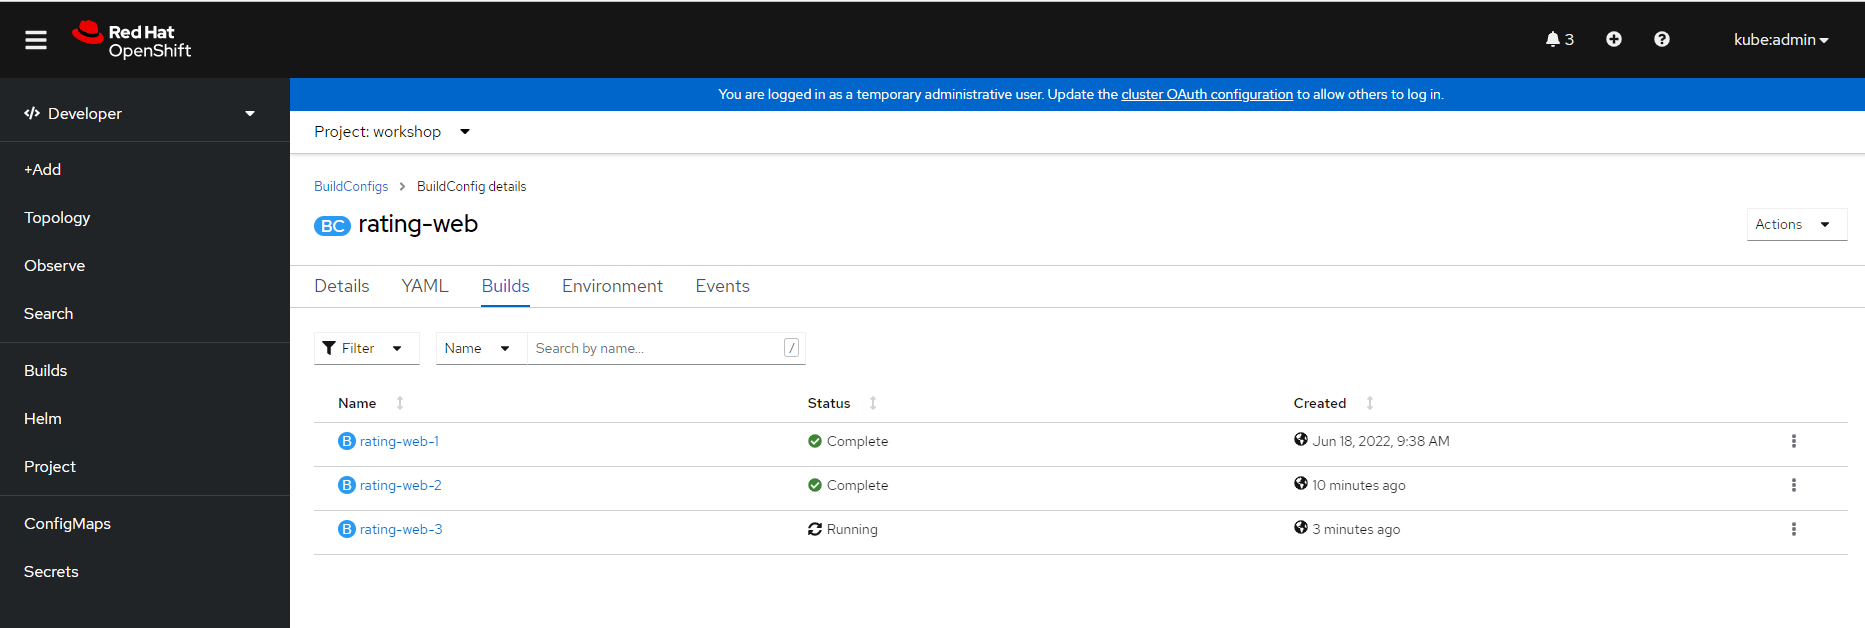
Immediately, go to the Builds tab in the OpenShift Web Console. You’ll see a new build queued up which was triggered by the push. Once this is done, it will trigger a new deployment and you should see the new website color updated.
Resources
Create Network Policy
Now that you have the application working, it is time to apply some security hardening. You’ll use network policies to restrict communication to the rating-api.
Switch to the Cluster Console
Switch to the Administrator console.
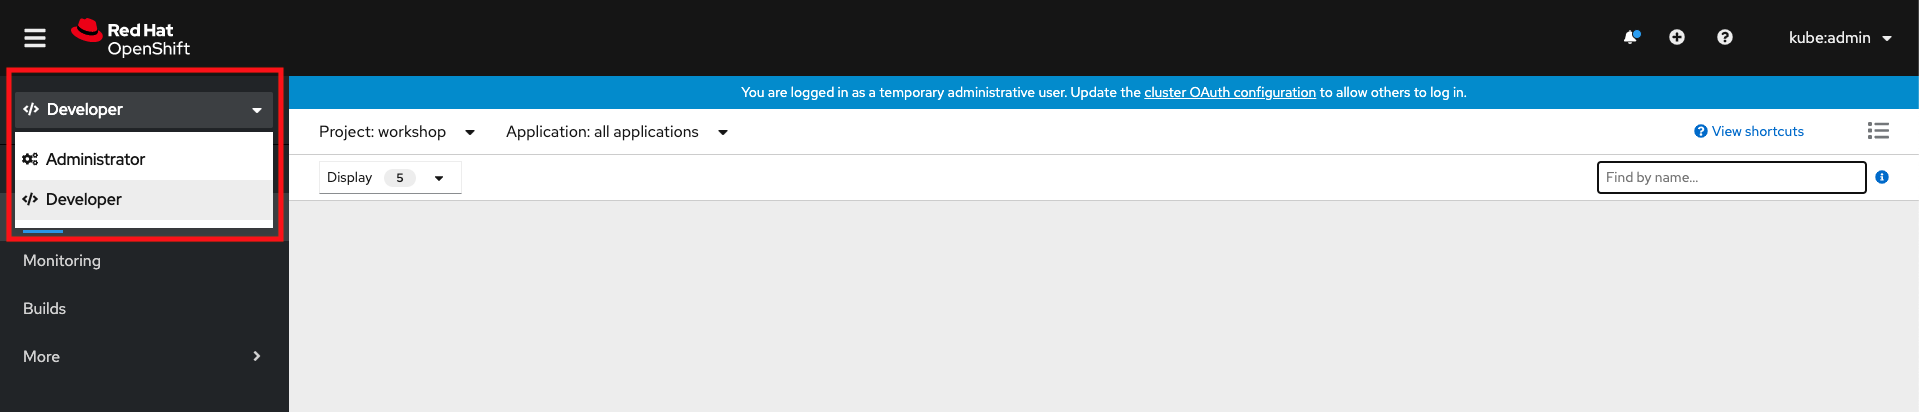
Make sure you’re in the workshop project, expand Networking and click Create Network Policy.
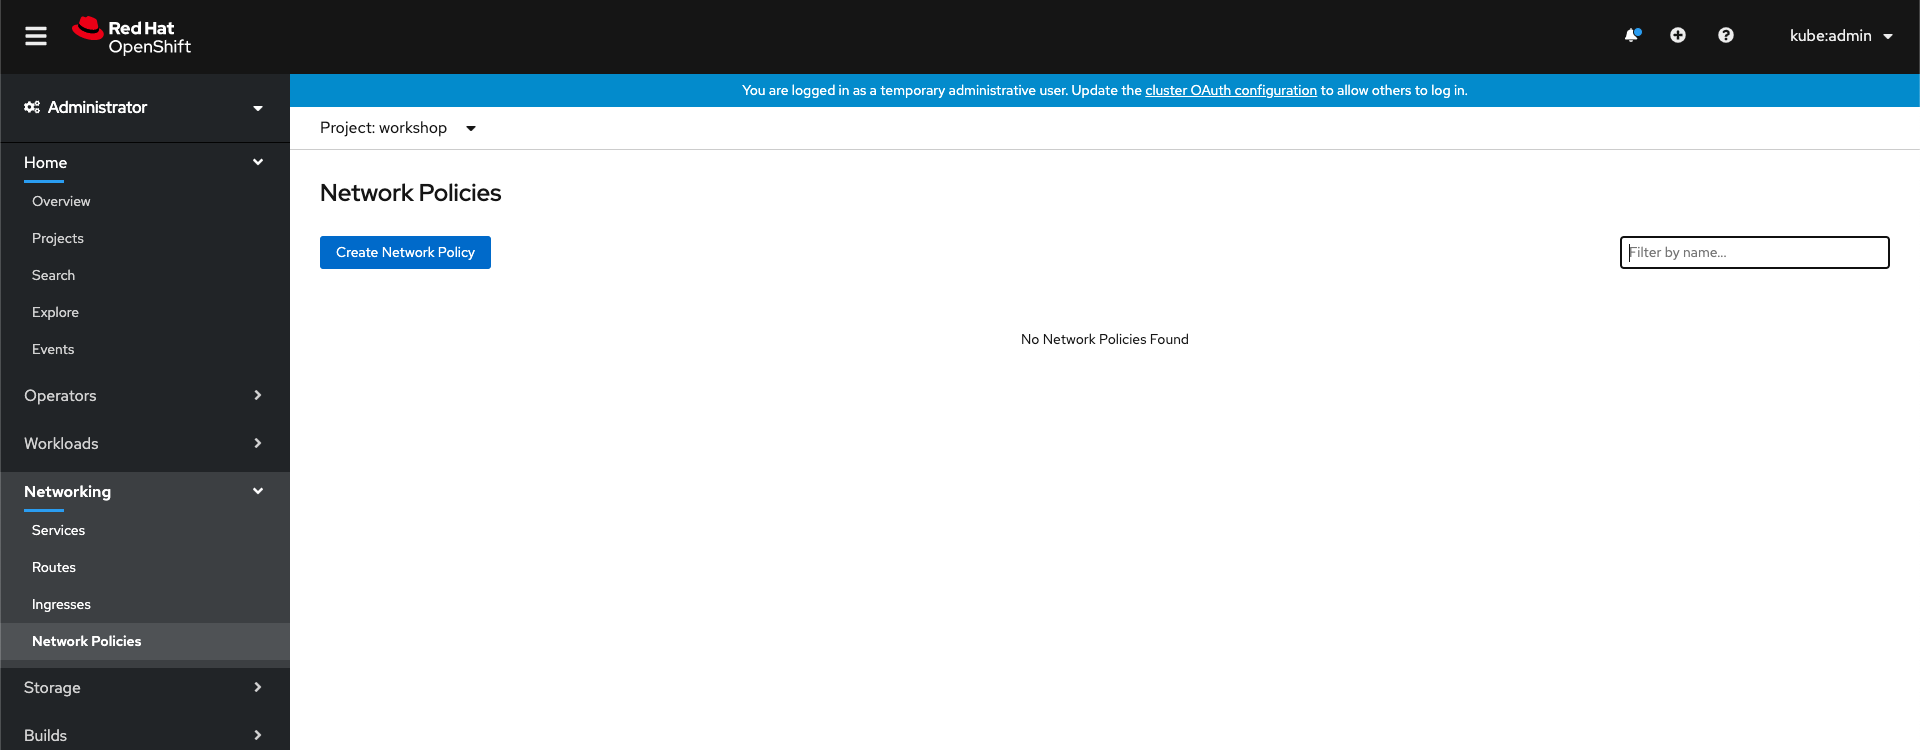
Create network policy
You will create a policy that applies to any pod matching the app=rating-api label. The policy will allow ingress only from pods matching the app=rating-web label.
Use the YAML below in the editor, and make sure you’re targeting the workshop project.
apiVersion: networking.k8s.io/v1
kind: NetworkPolicy
metadata:
  name: api-allow-from-web
  namespace: workshop
spec:
  podSelector:
    matchLabels:
      app: rating-api
  ingress:
    - from:
        - podSelector:
            matchLabels:
              app: rating-web
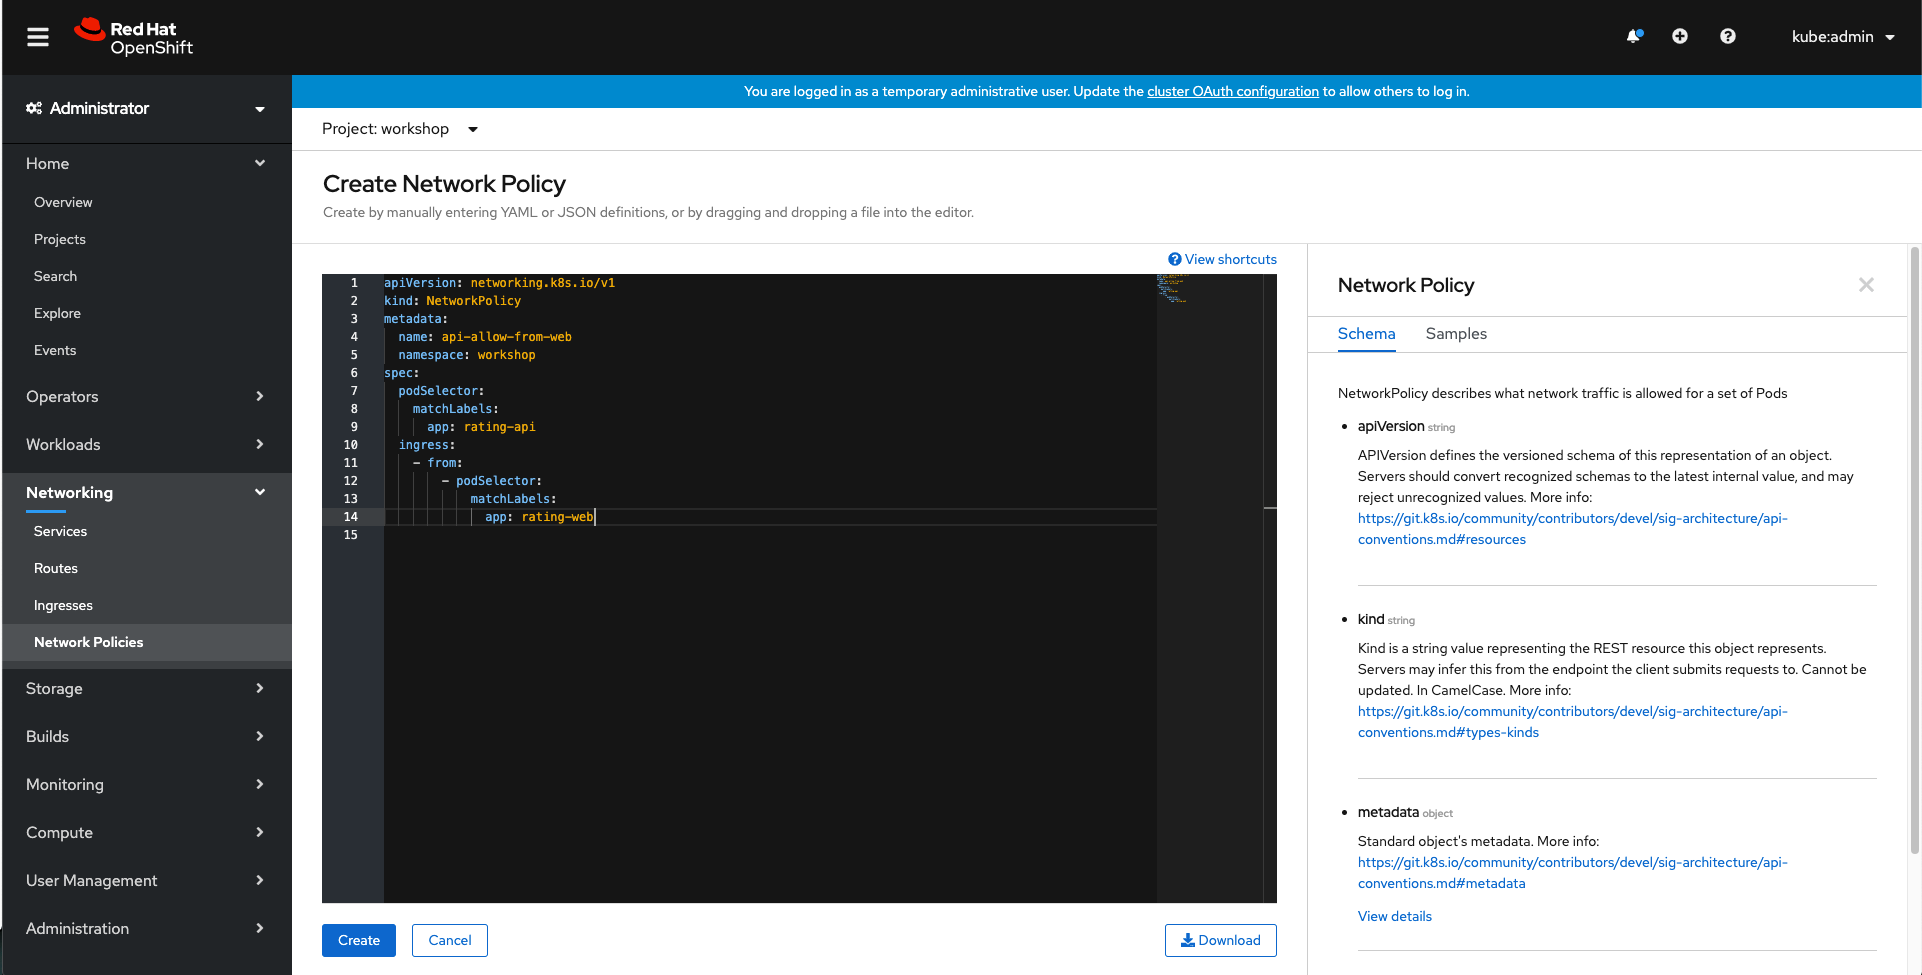
Click Create.
Resources
Lab 2 - ARO Internals
Application Overview
Resources
- The source code for this app is available here: https://github.com/openshift-cs/ostoy
- OSToy front-end container image: https://quay.io/repository/ostoylab/ostoy-frontend?tab=tags
- OSToy microservice container image: https://quay.io/repository/ostoylab/ostoy-microservice?tab=tags
- Deployment Definition YAMLs:
Note In order to simplify the deployment of the app (which you will do next) we have included all the objects needed in the above YAMLs as “all-in-one” YAMLs. In reality though, an enterprise would most likely want to have a different yaml file for each Kubernetes object.
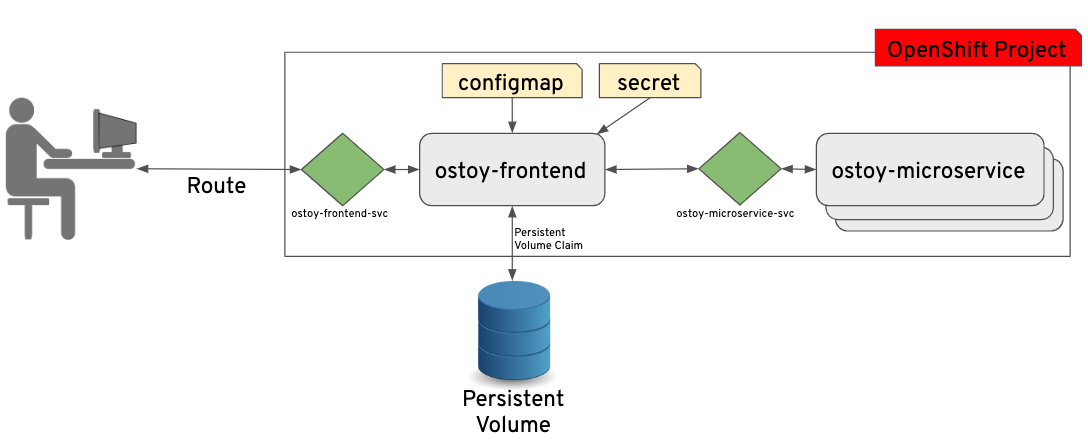
About OSToy
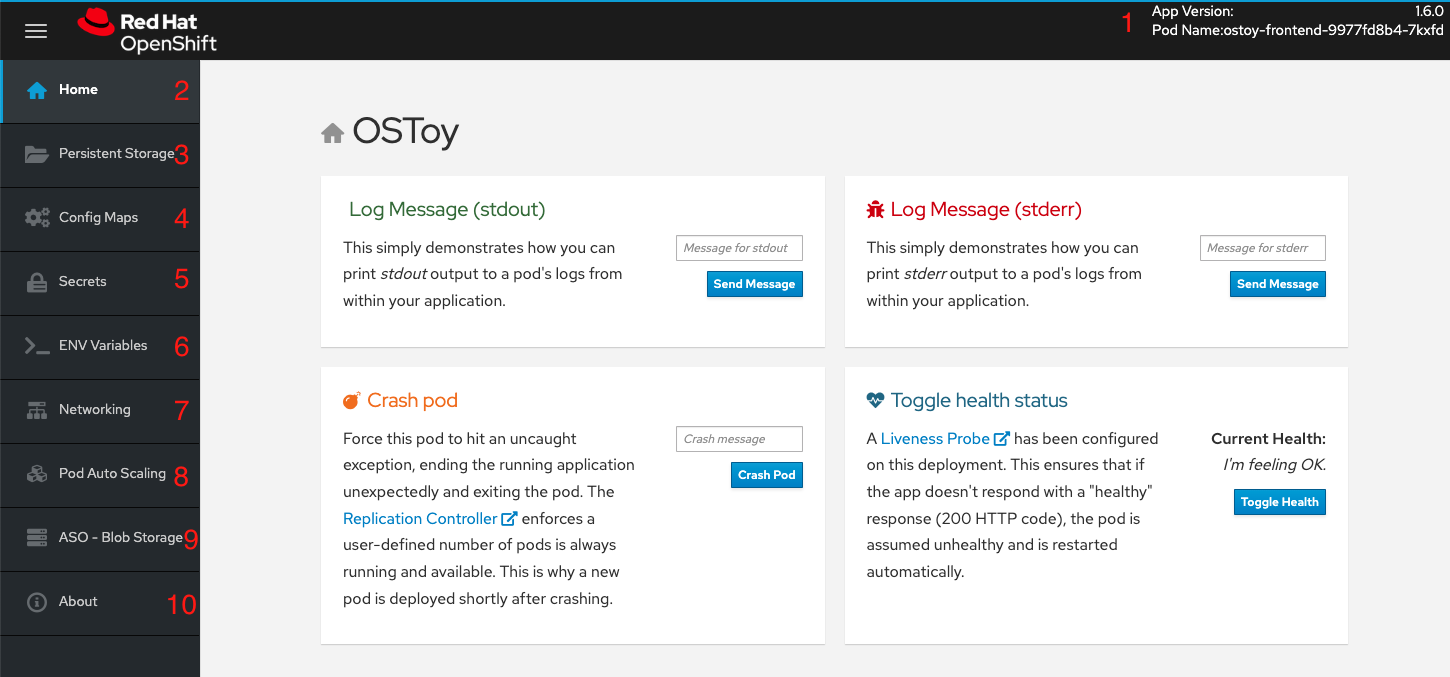
OSToy is a simple Node.js application that we will deploy to Azure Red Hat OpenShift. It is used to help us explore the functionality of Kubernetes. This application has a user interface which you can:
- write messages to the log (stdout / stderr)
- intentionally crash the application to view self-healing
- toggle a liveness probe and monitor OpenShift behavior
- read config maps, secrets, and env variables
- if connected to shared storage, read and write files
- check network connectivity, intra-cluster DNS, and intra-communication with an included microservice
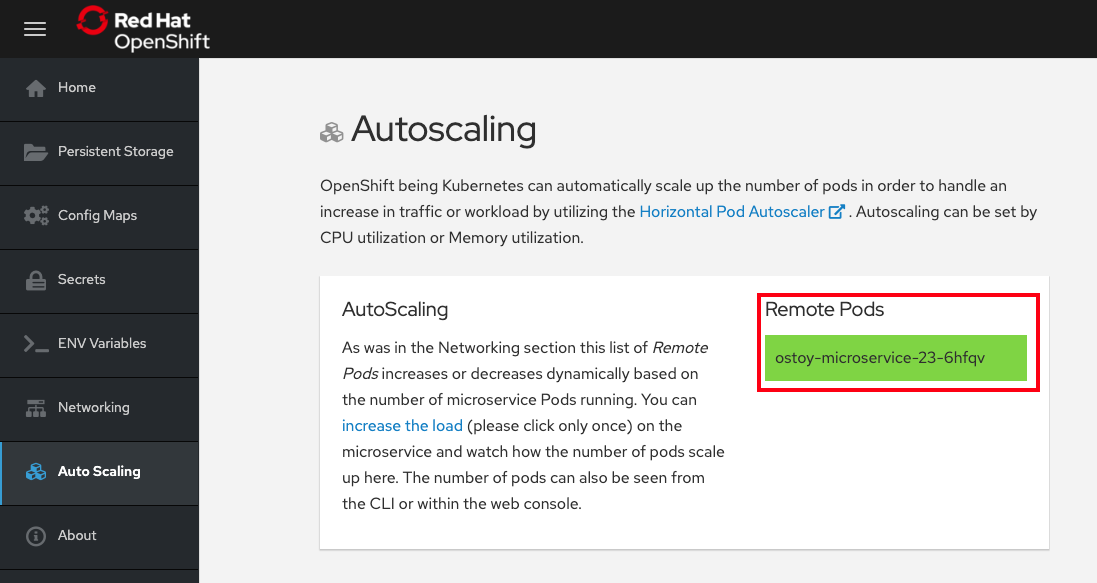
- increase the load to view automatic scaling of the pods to handle the load (via the Horizontal Pod Autoscaler)
- connect to an Azure Blob Storage container to read and write objects (if Blob Storage already present)
OSToy Application Diagram
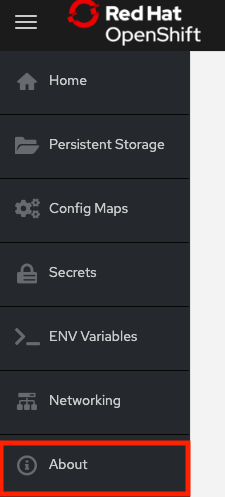
Familiarization with the Application UI
- Shows the pod name that served your browser the page.
- Home: The main page of the application where you can perform some of the functions listed which we will explore.
- Persistent Storage: Allows us to write data to the persistent volume bound to this application.
- Config Maps: Shows the contents of configmaps available to the application and the key:value pairs.
- Secrets: Shows the contents of secrets available to the application and the key:value pairs.
- ENV Variables: Shows the environment variables available to the application.
- Auto Scaling: Explore the Horizontal Pod Autoscaler to see how increased loads are handled.
- Networking: Tools to illustrate networking within the application.
- ASO - Blob Storage: Integrate with Azure Blob Storage to read and write objects to a container.
- About: Shows some more information about the application.
Learn more about the application
To learn more, click on the “About” menu item on the left once we deploy the app.
Application Deployment
Retrieve login command
If not logged in via the CLI, click on the dropdown arrow next to your name in the top-right and select Copy Login Command.
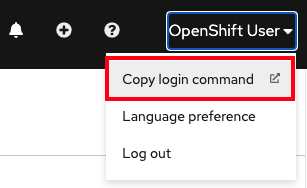
A new tab will open click “Display Token”
Copy the command under where it says “Log in with this token”. Then go to your terminal and paste that command and press enter. You will see a similar confirmation message if you successfully logged in.
$ oc login --token=sha256~qWBXdQ_X_4wWZor0XZO00ZZXXXXXXXXXXXX --server=https://api.abcs1234.westus.aroapp.io:6443
Logged into "https://api.abcd1234.westus.aroapp.io:6443" as "kube:admin" using the token provided.

You have access to 67 projects, the list has been suppressed. You can list all projects with 'oc projects'

Using project "default".
Create new project
Create a new project called “OSToy” in your cluster.
Use the following command:
oc new-project ostoy
You should receive the following response:
$ oc new-project ostoy
Now using project "ostoy" on server "https://api.abcd1234.westus2.aroapp.io:6443".
[...]
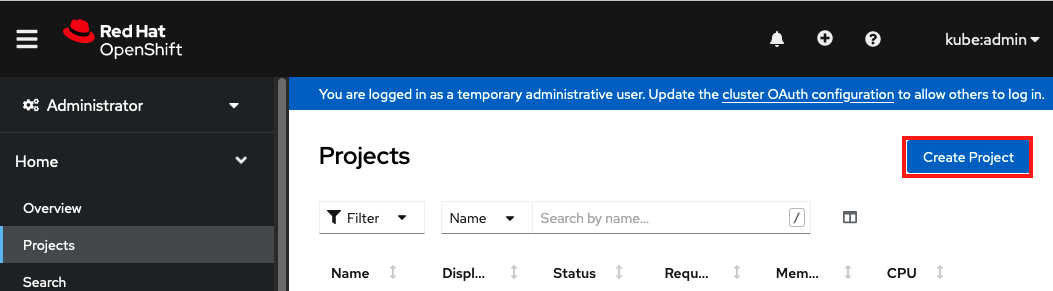
Equivalently you can also create this new project using the web console by selecting Home > Projects on the left menu, then clicking on the “Create Project” button on the right.
View the YAML deployment manifest
View the Kubernetes deployment manifest. If you wish you can download them from the following locations to your Azure Cloud Shell, to your local machine, or just use the direct link in the next steps.
Feel free to open them up and take a look at what we will be deploying. For simplicity of this lab we have placed all the Kubernetes objects we are deploying in one “all-in-one” YAML file. Though in reality there are benefits (ease of maintenance and less risk) to separating these out into individual files.
Deploy backend microservice
The microservice serves internal web requests and returns a JSON object containing the current hostname and a randomly generated color string.
In your terminal deploy the microservice using the following command:
oc apply -f https://raw.githubusercontent.com/microsoft/aroworkshop/master/yaml/ostoy-microservice-deployment.yaml
You should see the following response:
$ oc apply -f https://raw.githubusercontent.com/microsoft/aroworkshop/master/yaml/ostoy-microservice-deployment.yaml
deployment.apps/ostoy-microservice created
service/ostoy-microservice-svc created
Deploy the front-end service
This deployment contains the node.js frontend for our application along with a few other Kubernetes objects.
If you open the ostoy-frontend-deployment.yaml you will see we are defining:
- Persistent Volume Claim
- Deployment Object
- Service
- Route
- Configmaps
- Secrets
Deploy the frontend along with creating all objects mentioned above by entering:
oc apply -f https://raw.githubusercontent.com/microsoft/aroworkshop/master/yaml/ostoy-frontend-deployment.yaml
You should see all objects created successfully
$ oc apply -f https://raw.githubusercontent.com/microsoft/aroworkshop/master/yaml/ostoy-frontend-deployment.yaml
persistentvolumeclaim/ostoy-pvc created
deployment.apps/ostoy-frontend created
service/ostoy-frontend-svc created
route.route.openshift.io/ostoy-route created
configmap/ostoy-configmap-env created
secret/ostoy-secret-env created
configmap/ostoy-configmap-files created
secret/ostoy-secret created
Get route
Get the route so that we can access the application via:
oc get route
You should see the following response:
NAME           HOST/PORT                                                      PATH      SERVICES              PORT      TERMINATION   WILDCARD
ostoy-route   ostoy-route-ostoy.apps.abcd1234.westus2.aroapp.io             ostoy-frontend-svc   <all>                   None
Copy ostoy-route-ostoy.apps.abcd1234.westus2.aroapp.io above and paste it into your browser and press enter. You should see the homepage of our application. Ensure that it is http:// and not https://

Logging and Metrics
Assuming you can access the application via the Route provided and are still logged into the CLI (please go back to part 2 if you need to do any of those) we’ll start to use this application. As stated earlier, this application will allow you to “push the buttons” of OpenShift and see how it works. We will do this to test the logs.
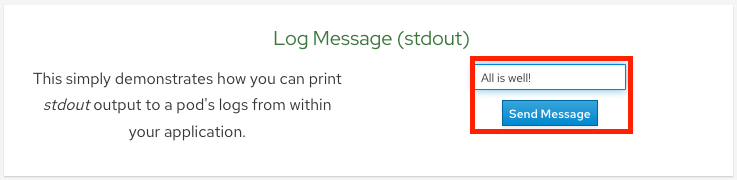
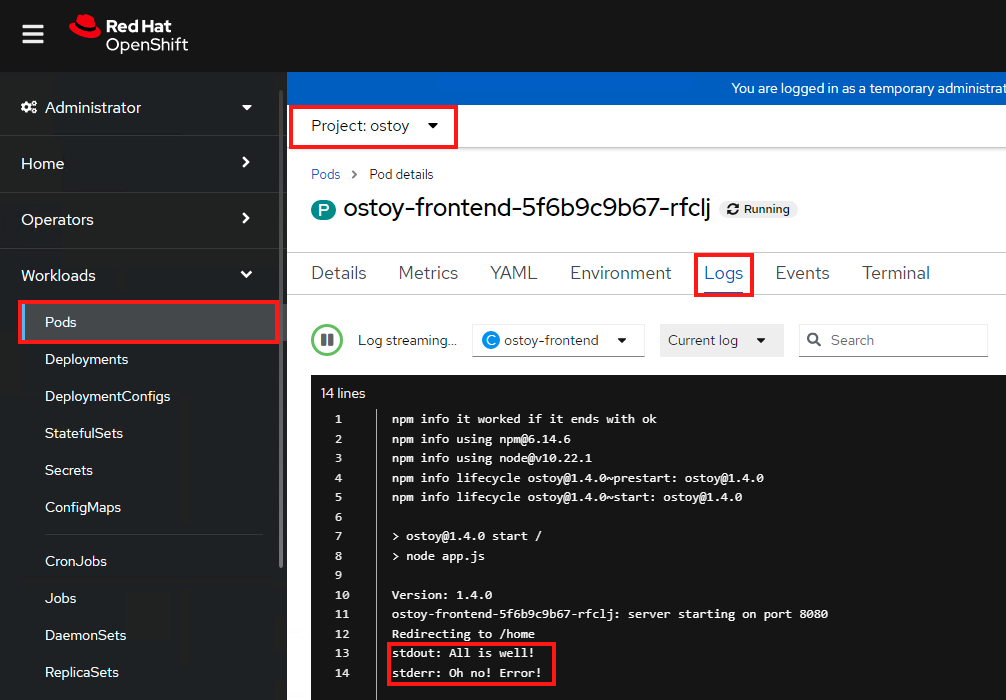
Click on the Home menu item and then click in the message box for “Log Message (stdout)” and write any message you want to output to the stdout stream. You can try “All is well!”. Then click “Send Message”.
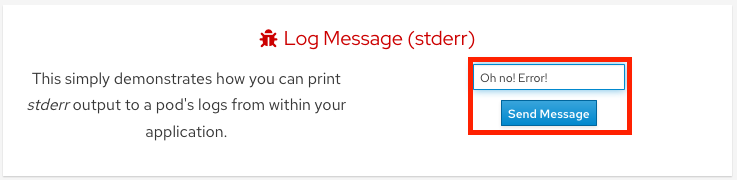
Click in the message box for “Log Message (stderr)” and write any message you want to output to the stderr stream. You can try “Oh no! Error!”. Then click “Send Message”.
View logs directly from the pod
Go to the CLI and enter the following command to retrieve the name of your frontend pod which we will use to view the pod logs:
$ oc get pods -o name
pod/ostoy-frontend-679cb85695-5cn7x
pod/ostoy-microservice-86b4c6f559-p594d
So the pod name in this case is ostoy-frontend-679cb85695-5cn7x. Then run oc logs ostoy-frontend-679cb85695-5cn7x and you should see your messages:
$ oc logs ostoy-frontend-679cb85695-5cn7x
[...]
ostoy-frontend-679cb85695-5cn7x: server starting on port 8080
Redirecting to /home
stdout: All is well!
stderr: Oh no! Error!
You should see both the stdout and stderr messages.
Try to see them from within the OpenShift Web Console as well. Make sure you are in the “ostoy” project. In the left menu click Workloads > Pods > <frontend-pod-name>. Then click the “Logs” sub-tab.
View metrics and logs by integrating with Azure Arc
You can use Azure services for metrics and logging by enabling your ARO cluster with Azure Arc. The instructions for setting this up can be found at the following locations. Perform them in the following order. These are prerequisites for this part of the lab.
- Connect an existing cluster to Azure Arc
- Azure Monitor Container Insights for Azure Arc-enabled Kubernetes clusters
Note: These also have some small prerequisites. Make sure to read those too. Also, when it asks for the “Cluster Name” for the CLI commands, it will most likely be the name of the Arc enabled cluster name and NOT the name of your ARO cluster.
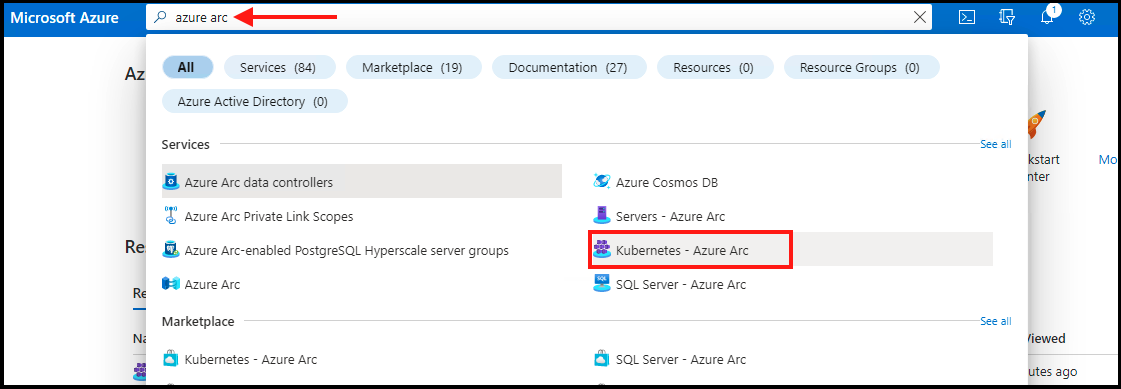
Once you have completed the above steps, if you are not already in Container Insights, then type “Azure Arc” in the search bar from the Home screen and select “Kubernetes - Azure Arc”.
Select the Arc connected cluster you just created, then select “Insights”.
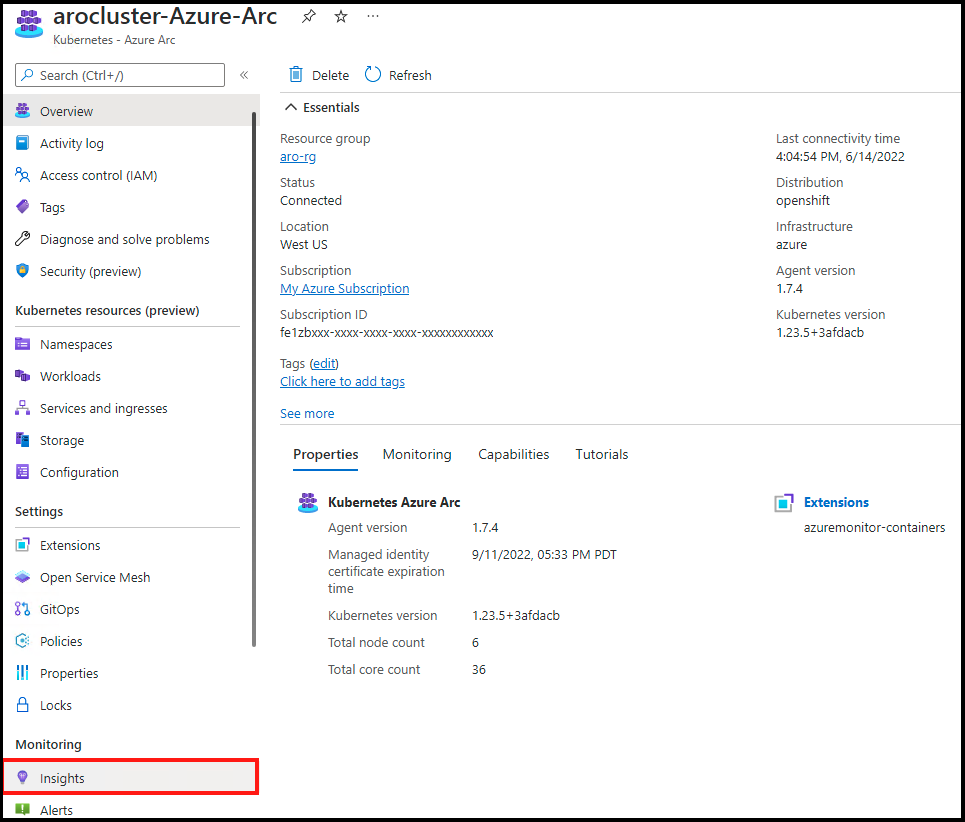
You will see a page with all sorts of metrics for the cluster.

Note: Please feel free to come back to this section after the “Pod Autoscaling” section and see how you can use Container Insights to view metrics. You may need to add a filter by “namespace” to see the pods from our application.
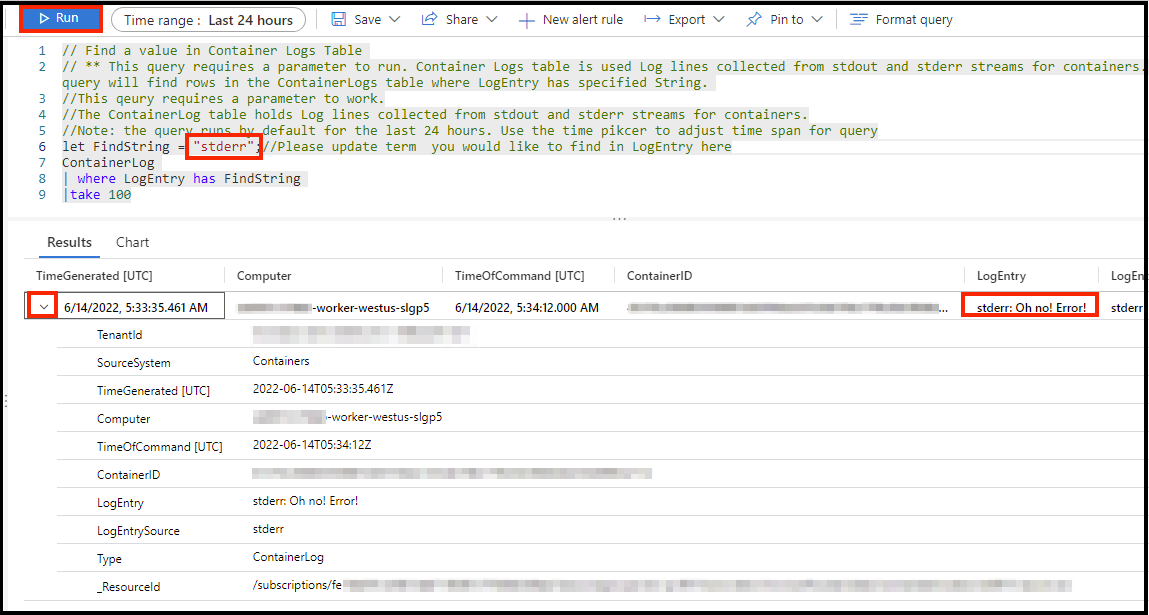
To see the log messages we outputted to stdout and stderr, click on “Logs” in the left menu, then the “Container Logs” query. Finally, click “Load to editor” for the pre-created query called “Find a value in Container Logs Table”.
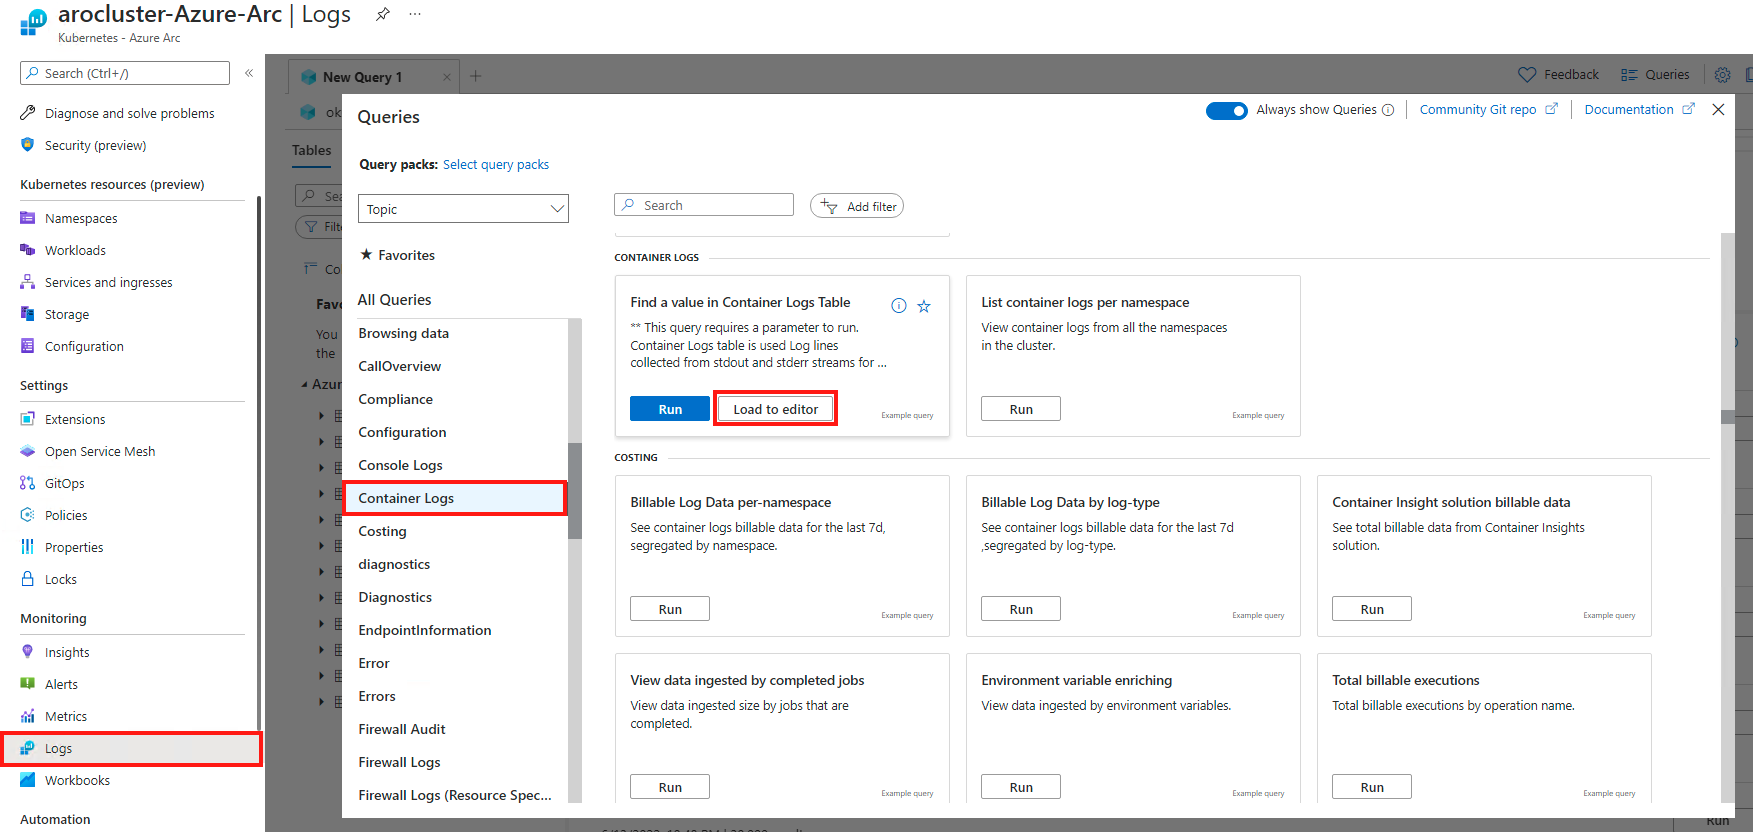
This will populate a query that requires a parameter to search for. Let’s look for our error entry. Type “stderr” in the location for FindString, then click run. You should see one line returned that contains the message you inputted earlier. You can also click the twist for more information.
Feel free to spend a few minutes exploring logs with the pre-created queries or try your own to see how robust the service is.
Exploring Health Checks
In this section we will intentionally crash our pods and also make a pod non-responsive to the liveness probes and see how Kubernetes behaves. We will first intentionally crash our pod and see that Kubernetes will self-heal by immediately spinning it back up. Then we will trigger the health check by stopping the response on the /health endpoint in our app. After three consecutive failures, Kubernetes should kill the pod and then recreate it.
It would be best to prepare by splitting your screen between the OpenShift Web Console and the OSToy application so that you can see the results of our actions immediately.
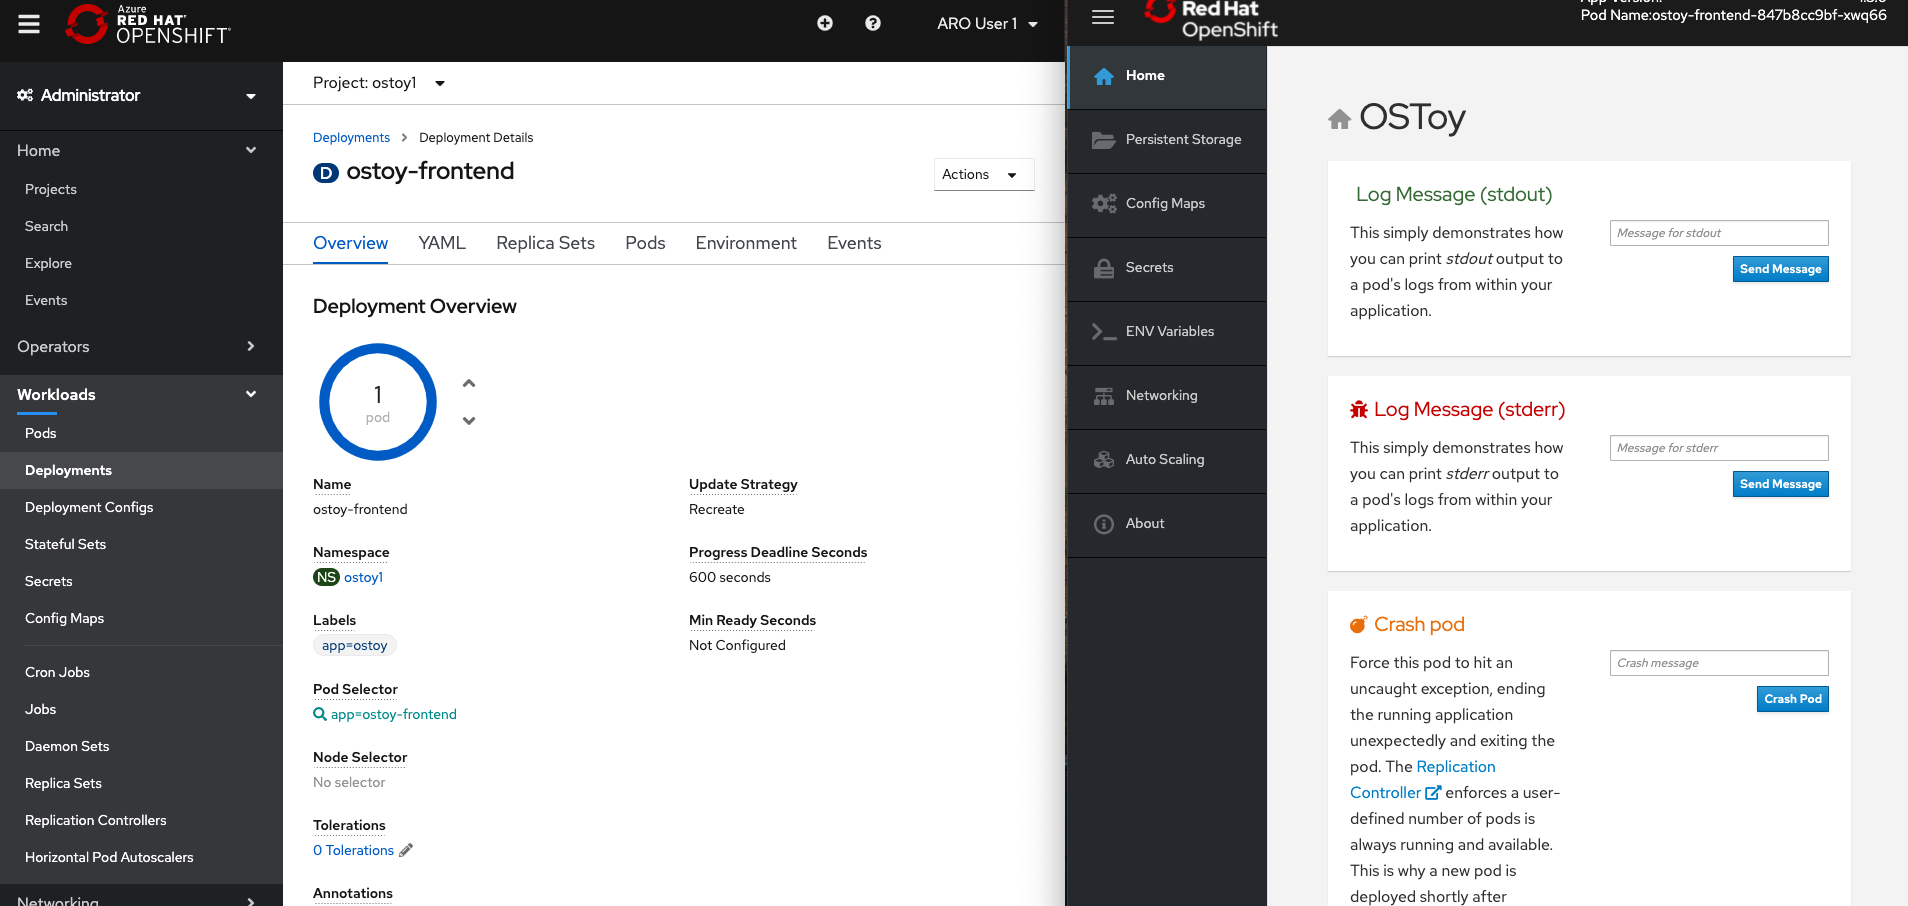
But if your screen is too small or that just won’t work, then open the OSToy application in another tab so you can quickly switch to the OpenShift Web Console once you click the button. To get to this deployment in the OpenShift Web Console go to the left menu and click:
Workloads > Deployments > “ostoy-frontend”
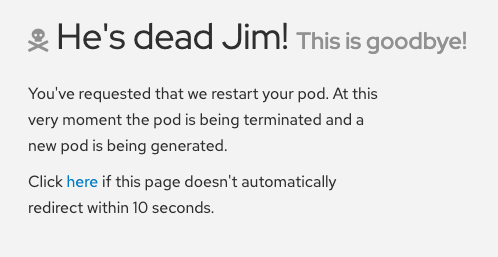
Go to the browser tab that has your OSToy app, click on Home in the left menu, and enter a message in the “Crash Pod” tile (e.g., “This is goodbye!”) and press the “Crash Pod” button. This will cause the pod to crash and Kubernetes should restart the pod. After you press the button you will see:
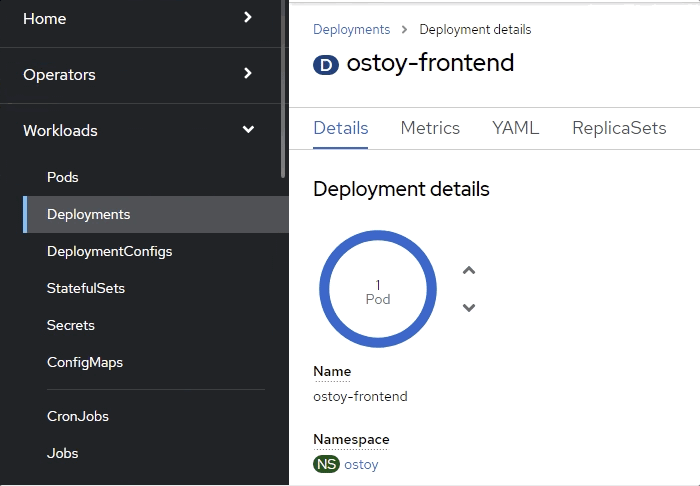
Quickly switch to the tab with the deployment showing in the web console. You will see that the pod turns yellowish, meaning it is down but should quickly come back up and show blue. It does happen quickly so you might miss it.
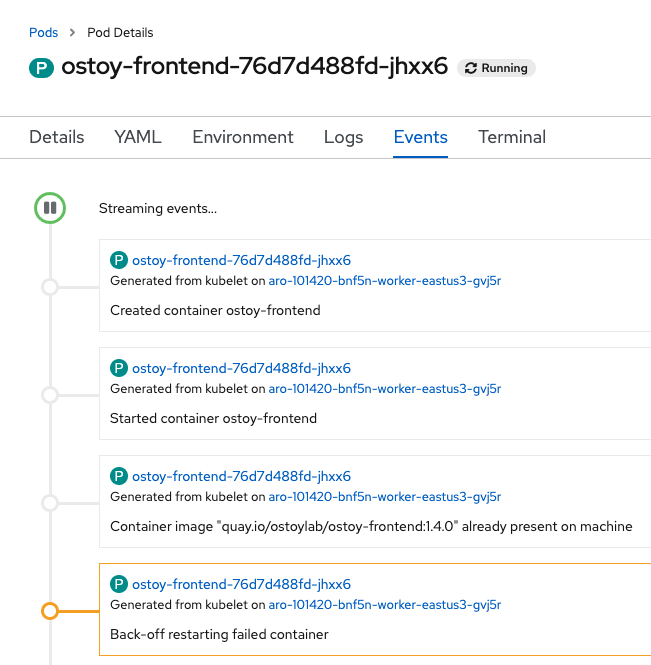
You can also check in the pod events and further verify that the container has crashed and been restarted.
Click on Pods > [Pod Name] > Events

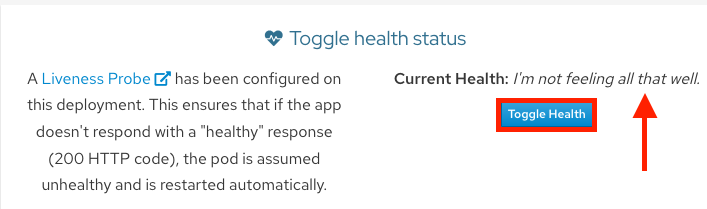
Keep the page from the pod events still open from the previous step. Then in the OSToy app click on the “Toggle Health” button, in the “Toggle health status” tile. You will see the “Current Health” switch to “I’m not feeling all that well”.
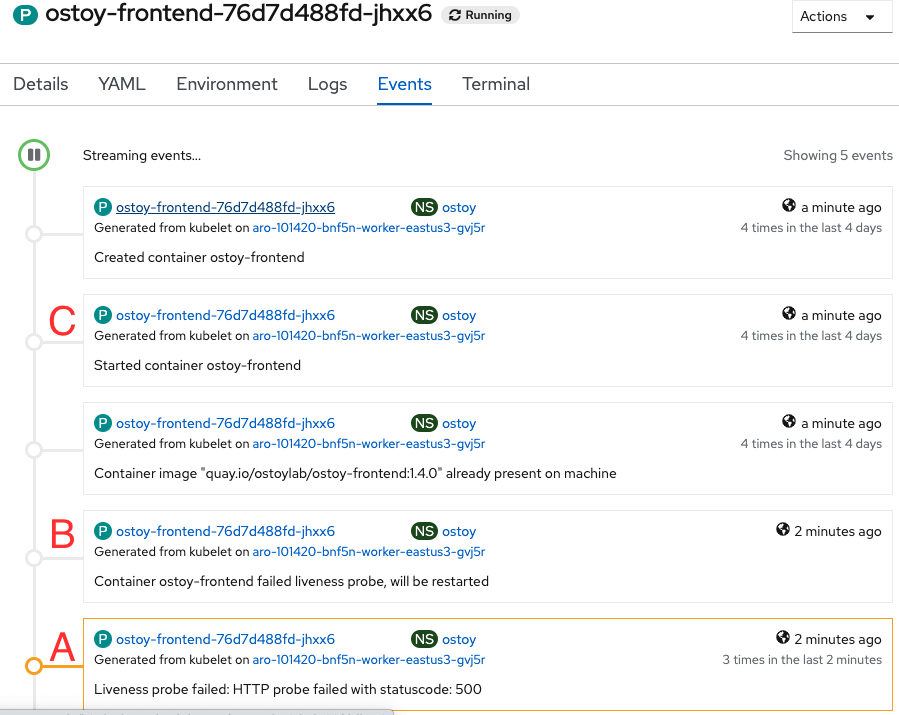
This will cause the app to stop responding with a “200 HTTP code”. After 3 such consecutive failures (“A”), Kubernetes will kill the pod (“B”) and restart it (“C”). Quickly switch back to the pod events tab and you will see that the liveness probe failed and the pod as being restarted.
Persistent Storage
In this section we will execute a simple example of using persistent storage by creating a file that will be stored on a persistent volume in our cluster and then confirm that it will “persist” across pod failures and recreation.
Inside the OpenShift web console click on Storage > Persistent Volume Claims in the left menu. You will then see a list of all persistent volume claims that our application has made. In this case there is just one called “ostoy-pvc”. If you click on it you will also see other pertinent information such as whether it is bound or not, size, access mode and creation time.
In this case the mode is RWO (Read-Write-Once) which means that the volume can only be mounted to one node, but the pod(s) can both read and write to that volume. The default in ARO is for Persistent Volumes to be backed by Azure Disk, but it is possible to use Azure Files so that you can use the RWX (Read-Write-Many) access mode. See here for more info on access modes.
In the OSToy app click on Persistent Storage in the left menu. In the “Filename” area enter a filename for the file you will create (e.g., “test-pv.txt”). Use the “.txt” extension so you can easily open it in the browser.
Underneath that, in the “File contents” box, enter text to be stored in the file. (e.g., “Azure Red Hat OpenShift is the greatest thing since sliced bread!”). Then click “Create file”.

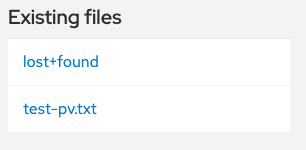
You will then see the file you created appear above under “Existing files”. Click on the file and you will see the filename and the contents you entered.

We now want to kill the pod and ensure that the new pod that spins up will be able to see the file we created. Exactly like we did in the previous section. Click on Home in the left menu.
Click on the “Crash pod” button. (You can enter a message if you’d like).
Click on Persistent Storage in the left menu.
You will see the file you created is still there and you can open it to view its contents to confirm.
Now let’s confirm that it’s actually there by using the CLI and checking if it is available to the container. If you remember we mounted the directory /var/demo_files to our PVC. So get the name of your frontend pod:
oc get pods
then get an SSH session into the container
oc rsh <pod name>
then cd /var/demo_files
if you enter ls you can see all the files you created. Next, let’s open the file we created and see the contents
cat test-pv.txt
You should see the text you entered in the UI.
$ oc get pods
NAME                                  READY     STATUS    RESTARTS   AGE
ostoy-frontend-5fc8d486dc-wsw24       1/1       Running   0          18m
ostoy-microservice-6cf764974f-hx4qm   1/1       Running   0          18m

$ oc rsh ostoy-frontend-5fc8d486dc-wsw24

/ $ cd /var/demo_files/

/var/demo_files $ ls
lost+found   test-pv.txt

/var/demo_files $ cat test-pv.txt
Azure Red Hat OpenShift is the greatest thing since sliced bread!
Then exit the SSH session by typing exit. You will then be in your CLI.
Configuration
In this section we’ll take a look at how OSToy can be configured using ConfigMaps, Secrets, and Environment Variables. This section won’t go into details explaining each (the links above are for that), but will show you how they are exposed to the application.
Configuration using ConfigMaps
ConfigMaps allow you to decouple configuration artifacts from container image content to keep containerized applications portable.
Click on Config Maps in the left menu.
This will display the contents of the configmap available to the OSToy application. We defined this in the ostoy-frontend-deployment.yaml here:
kind: ConfigMap
apiVersion: v1
metadata:
  name: ostoy-configmap-files
data:
  config.json:  '{ "default": "123" }'
Configuration using Secrets
Kubernetes Secret objects allow you to store and manage sensitive information, such as passwords, OAuth tokens, and ssh keys. Putting this information in a secret is safer and more flexible than putting it, verbatim, into a pod definition or a container image.
Click on Secrets in the left menu.
This will display the contents of the secrets available to the OSToy application. We defined this in the ostoy-frontend-deployment.yaml here:
apiVersion: v1
kind: Secret
metadata:
  name: ostoy-secret
data:
  secret.txt: VVNFUk5BTUU9bXlfdXNlcgpQQVNTV09SRD1AT3RCbCVYQXAhIzYzMlk1RndDQE1UUWsKU01UUD1sb2NhbGhvc3QKU01UUF9QT1JUPTI1
type: Opaque
Configuration using Environment Variables
Using environment variables is an easy way to change application behavior without requiring code changes. It allows different deployments of the same application to potentially behave differently based on the environment variables, and OpenShift makes it simple to set, view, and update environment variables for Pods/Deployments.
Click on ENV Variables in the left menu.
This will display the environment variables available to the OSToy application. We added four as defined in the deployment spec of ostoy-frontend-deployment.yaml here:
  env:
  - name: ENV_TOY_CONFIGMAP
    valueFrom:
      configMapKeyRef:
        name: ostoy-configmap-env
        key: ENV_TOY_CONFIGMAP
  - name: ENV_TOY_SECRET
    valueFrom:
      secretKeyRef:
        name: ostoy-secret-env
        key: ENV_TOY_SECRET
  - name: MICROSERVICE_NAME
    value: OSTOY_MICROSERVICE_SVC
  - name: NAMESPACE
  valueFrom:
    fieldRef:
      fieldPath: metadata.namespace
The third one, MICROSERVICE_NAME is used for the intra-cluster communications between pods for this application. The application looks for this environment variable to know how to access the microservice in order to get the colors.
Networking and Scaling
In this section we’ll see how OSToy uses intra-cluster networking to separate functions by using microservices and visualize the scaling of pods.
Let’s review how this application is set up…
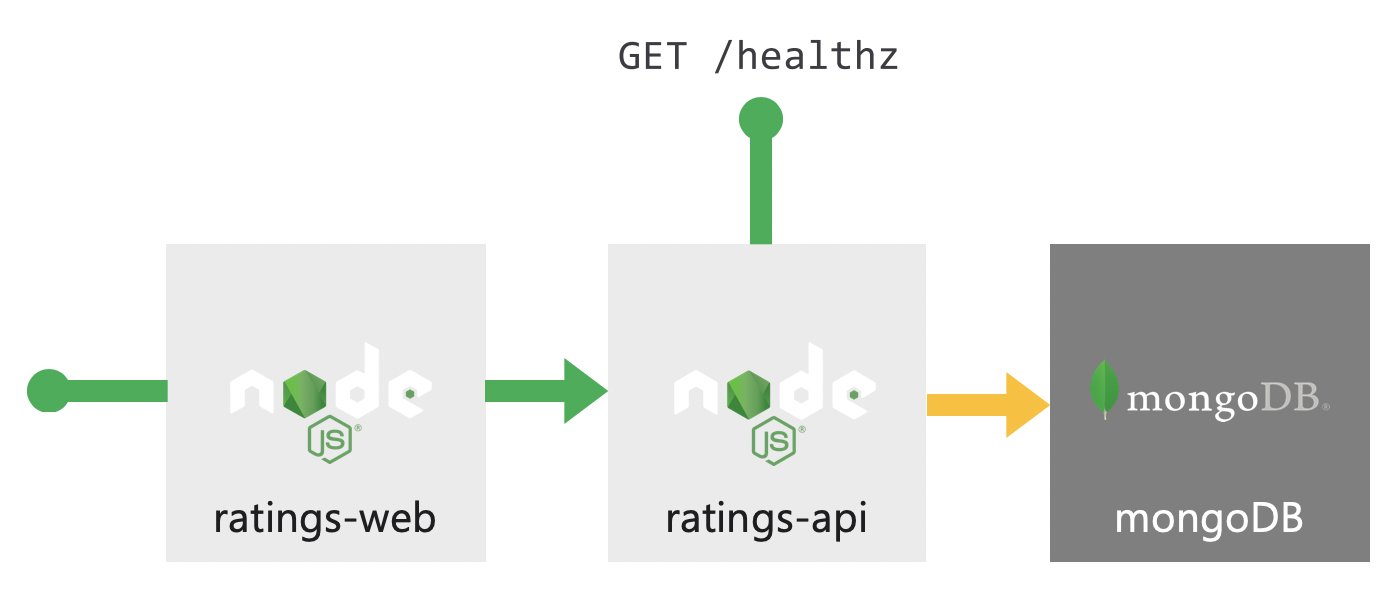
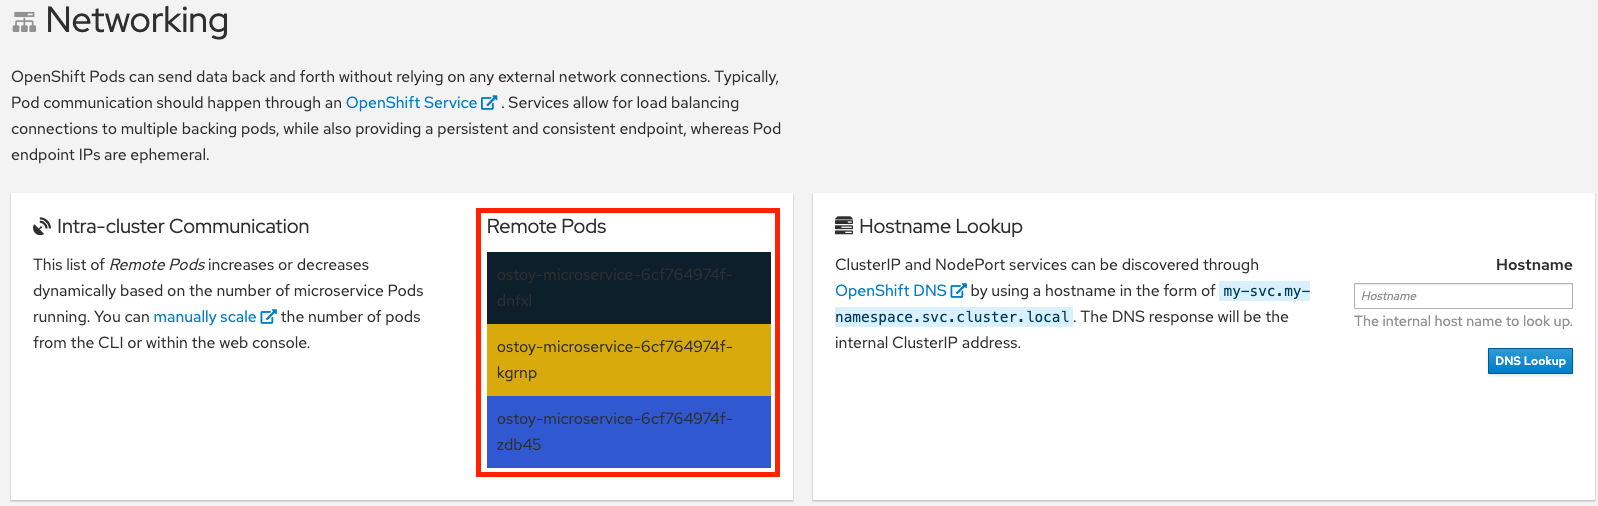
As can be seen in the image above we have defined at least 2 separate pods, each with its own service. One is the frontend web application (with a service and a publicly accessible route) and the other is the backend microservice with a service object created so that the frontend pod can communicate with the microservice (across the pods if more than one). Therefore this microservice is not accessible from outside this cluster (or from other namespaces/projects, if configured, due to OpenShifts’ network policy, ovs-networkpolicy). The sole purpose of this microservice is to serve internal web requests and return a JSON object containing the current hostname and a randomly generated color string. This color string is used to display a box with that color displayed in the tile titled “Intra-cluster Communication”.
Networking
Click on Networking in the left menu. Review the networking configuration.
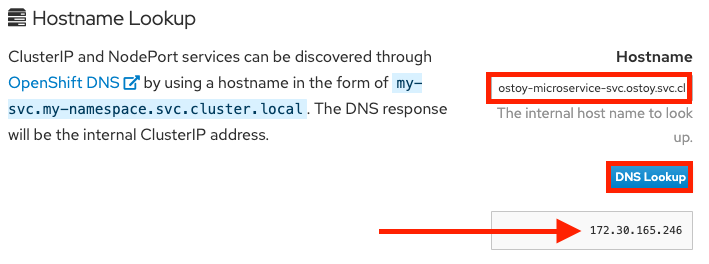
The right tile titled “Hostname Lookup” illustrates how the service name created for a pod can be used to translate into an internal ClusterIP address. Enter the name of the microservice following the format of <my-svc>.<my-namespace>.svc.cluster.local which we created in our ostoy-microservice.yaml as seen here:
apiVersion: v1
kind: Service
metadata:
  name: ostoy-microservice-svc
  labels:
    app: ostoy-microservice
spec:
  type: ClusterIP
  ports:
    - port: 8080
      targetPort: 8080
      protocol: TCP
  selector:
    app: ostoy-microservice
In this case we will enter: ostoy-microservice-svc.ostoy.svc.cluster.local
We will see an IP address returned. In our example it is 172.30.165.246. This is the intra-cluster IP address; only accessible from within the cluster.
Scaling
OpenShift allows one to scale up/down the number of pods for each part of an application as needed. This can be accomplished via changing our replicaset/deployment definition (declarative), by the command line (imperative), or via the web console (imperative). In our deployment definition (part of our ostoy-frontend-deployment.yaml) we stated that we only want one pod for our microservice to start with. This means that the Kubernetes Replication Controller will always strive to keep one pod alive. We can also define pod autoscaling using the Horizontal Pod Autoscaler (HPA) based on load to expand past what we defined. We will do this in a later section of this lab.
If we look at the tile on the left we should see one box randomly changing colors. This box displays the randomly generated color sent to the frontend by our microservice along with the pod name that sent it. Since we see only one box that means there is only one microservice pod. We will now scale up our microservice pods and will see the number of boxes change.
To confirm that we only have one pod running for our microservice, run the following command, or use the web console.
$ oc get pods
NAME                                   READY     STATUS    RESTARTS   AGE
ostoy-frontend-679cb85695-5cn7x       1/1       Running   0          1h
ostoy-microservice-86b4c6f559-p594d   1/1       Running   0          1h
Let’s change our microservice definition yaml to reflect that we want 3 pods instead of the one we see. Download the ostoy-microservice-deployment.yaml and save it on your local machine.
Open the file using your favorite editor. Ex: vi ostoy-microservice-deployment.yaml.
Find the line that states replicas: 1 and change that to replicas: 3. Then save and quit.
It will look like this
spec:
    selector:
      matchLabels:
        app: ostoy-microservice
    replicas: 3
Assuming you are still logged in via the CLI, execute the following command:
oc apply -f ostoy-microservice-deployment.yaml
Confirm that there are now 3 pods via the CLI (oc get pods) or the web console (Workloads > Deployments > ostoy-microservice).
See this visually by visiting the OSToy app and seeing how many boxes you now see. It should be three.
Now we will scale the pods down using the command line. Execute the following command from the CLI:
oc scale deployment ostoy-microservice --replicas=2
Confirm that there are indeed 2 pods, via the CLI (oc get pods) or the web console.
See this visually by visiting the OSToy App and seeing how many boxes you now see. It should be two.
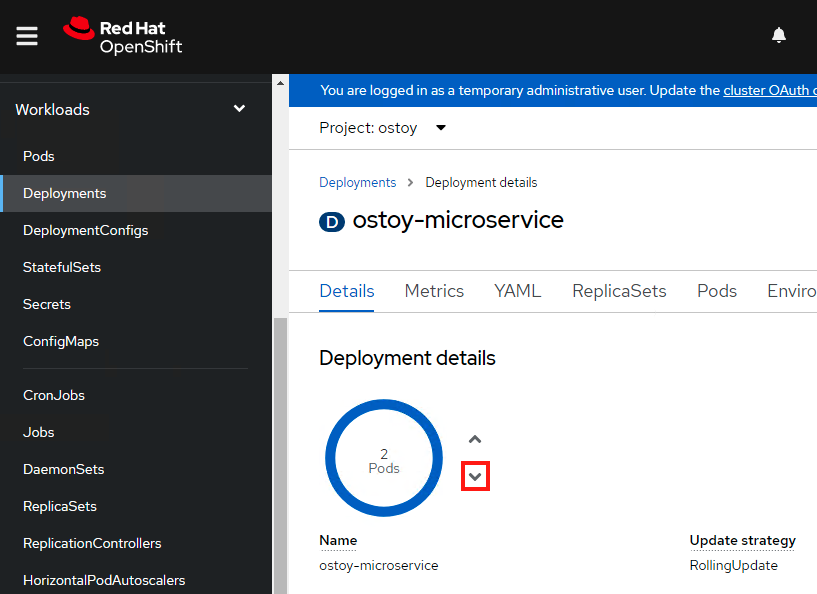
Lastly, let’s use the web console to scale back down to one pod. Make sure you are in the project you created for this app (i.e., “ostoy”), in the left menu click Workloads > Deployments > ostoy-microservice. On the left you will see a blue circle with the number 2 in the middle. Click on the down arrow to the right of that to scale the number of pods down to 1.
See this visually by visiting the OSToy app and seeing how many boxes you now see. It should be one. You can also confirm this via the CLI or the web console.
Pod Autoscaling
In this section we will explore how the Horizontal Pod Autoscaler (HPA) can be used and works within Kubernetes/OpenShift.
As defined in the documentation:
[…] you can use a horizontal pod autoscaler (HPA) to specify how OpenShift Container Platform should automatically increase or decrease the scale of a replication controller or deployment configuration, based on metrics collected from the pods that belong to that replication controller or deployment configuration.
In more simple words, “if there is a lot of work, make more pods”.
We will create a HPA and then use OSToy to generate CPU intensive workloads. We will then observe how the HPA will scale up the number of pods in order to handle the increased workloads.
1. Create the Horizontal Pod Autoscaler
Run the following command to create the HPA. This will create an HPA that maintains between 1 and 10 replicas of the pods controlled by the ostoy-microservice deployment created. Roughly speaking, the HPA will increase and decrease the number of replicas (via the deployment) to maintain an average CPU utilization across all pods of 80% (since each pod requests 50 millicores, this means average CPU usage of 40 millicores).
oc autoscale deployment/ostoy-microservice --cpu-percent=80 --min=1 --max=10
2. View the current number of pods
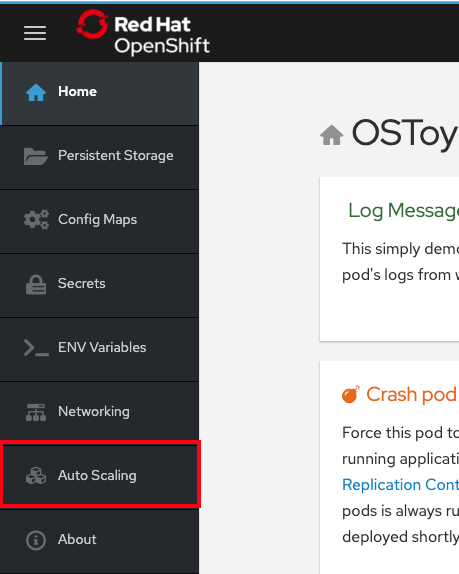
In the OSToy app in the left menu, click on “Autoscaling” to access this portion of the workshop.
As was in the networking section you will see the total number of pods available for the microservice by counting the number of colored boxes. In this case we have only one. This can be verified through the web console or from the CLI.
You can use the following command to see the running microservice pods only:
oc get pods --field-selector=status.phase=Running | grep microservice
3. Increase the load
Since we now only have one pod, let’s increase the workload that the pod needs to perform. Click the button in the card that says “increase the load”. Please click only ONCE!
This will generate some CPU intensive calculations. (If you are curious about what it is doing you can click here).
Note: The page may become slightly unresponsive. This is normal; so be patient while the new pods spin up.
4. See the pods scale up
After about a minute the new pods will show up on the page (represented by the colored rectangles). Confirm that the pods did indeed scale up through the OpenShift Web Console or the CLI (you can use the command above).
Note: The page may still lag a bit which is normal.
You can see in this case it scaled up 2 more microservice pods (for a total of 3).
$ oc get pods --field-selector=status.phase=Running
NAME                                READY   STATUS    RESTARTS       AGE
ostoy-frontend-64c8668694-7pq6k     1/1     Running   3 (105m ago)   23h
ostoy-microservice-cf8bfb4c-bkwx8   1/1     Running   0              104s
ostoy-microservice-cf8bfb4c-j24f9   1/1     Running   0              23h
ostoy-microservice-cf8bfb4c-xls2t   1/1     Running   0              104s
5. Review resources in included observability
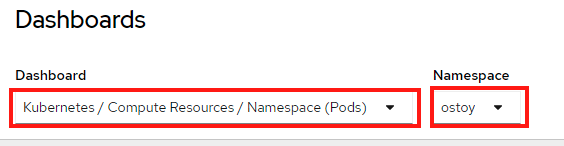
In the OpenShift web console left menu, click on Observe > Dashboards
In the dashboard, select Kubernetes / Compute Resources / Namespace (Pods) and our namespace ostoy.
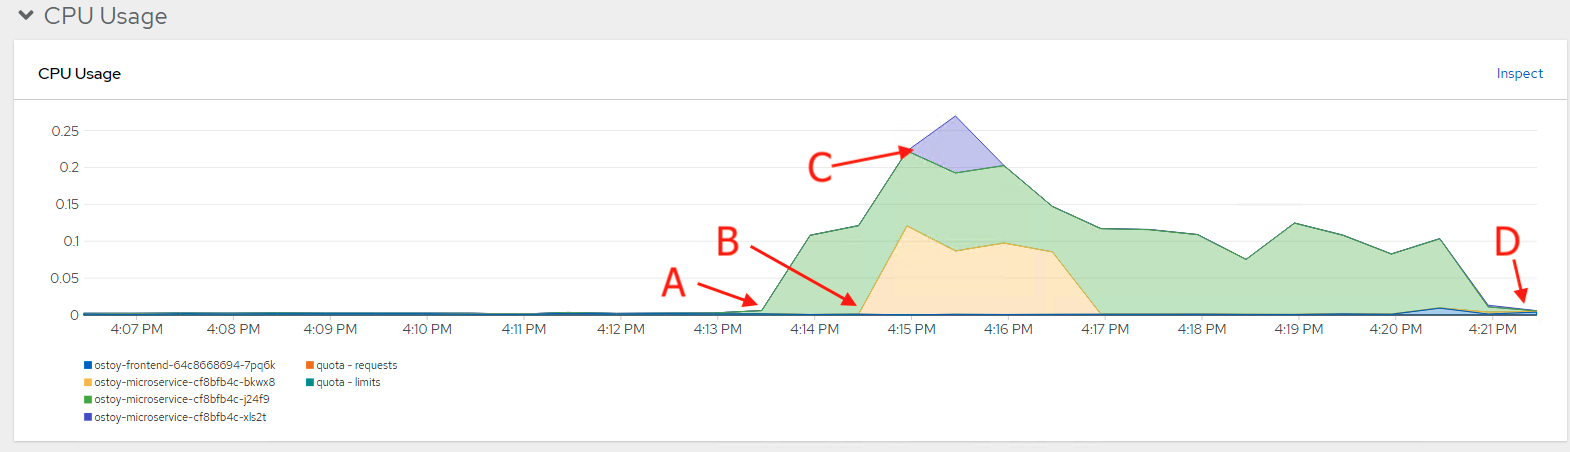
Wait a few minutes and colorful graphs will appear showing resource usage across CPU and memory. The top graph will show recent CPU consumption per pod and the lower graph will indicate memory usage. Looking at this graph you can see how things developed. As soon as the load started to increase (A), two new pods started to spin up (B, C). The thickness of each graph is its CPU consumption indicating which pods handled more load. We also see that the load decreased (D), after which, the pods were spun back down.
At this point feel free to go back to the logging section to view this data through Container Insights for Azure Arc-enabled Kubernetes clusters.
Managing Worker Nodes
There may be times when you need to change aspects of your worker nodes. Things like scaling, changing the type, adding labels or taints to name a few. Most of these things are done through the use of machine sets. A machine is a unit that describes the host for a node and a machine set is a group of machines. Think of a machine set as a “template” for the kinds of machines that make up the worker nodes of your cluster. Similar to how a replicaset is to pods. A machine set allows users to manage many machines as a single entity though it is contained to a specific availability zone. If you’d like to learn more see Overview of machine management
Scaling worker nodes
View the machine sets that are in the cluster
Let’s see which machine sets we have in our cluster. If you are following this lab, you should only have three so far (one for each availability zone).
From the terminal run:
oc get machinesets -n openshift-machine-api
You will see a response like:
$ oc get machinesets -n openshift-machine-api
NAME                           DESIRED   CURRENT   READY   AVAILABLE   AGE
ok0620-rq5tl-worker-westus21   1         1         1       1           72m
ok0620-rq5tl-worker-westus22   1         1         1       1           72m
ok0620-rq5tl-worker-westus23   1         1         1       1           72m
This is telling us that there is a machine set defined for each availability zone in westus2 and that each has one machine.
View the machines that are in the cluster
Let’s see which machines (nodes) we have in our cluster.
From the terminal run:
oc get machine -n openshift-machine-api
You will see a response like:
$ oc get machine -n openshift-machine-api
NAME                                 PHASE     TYPE              REGION    ZONE   AGE
ok0620-rq5tl-master-0                Running   Standard_D8s_v3   westus2   1      73m
ok0620-rq5tl-master-1                Running   Standard_D8s_v3   westus2   2      73m
ok0620-rq5tl-master-2                Running   Standard_D8s_v3   westus2   3      73m
ok0620-rq5tl-worker-westus21-n6lcs   Running   Standard_D4s_v3   westus2   1      73m
ok0620-rq5tl-worker-westus22-ggcmv   Running   Standard_D4s_v3   westus2   2      73m
ok0620-rq5tl-worker-westus23-hzggb   Running   Standard_D4s_v3   westus2   3      73m
As you can see we have 3 master nodes, 3 worker nodes, the types of nodes, and which region/zone they are in.
Scale the number of nodes up via the CLI
Now that we know that we have 3 worker nodes, let’s scale the cluster up to have 4 worker nodes. We can accomplish this through the CLI or through the OpenShift Web Console. We’ll explore both.
From the terminal run the following to imperatively scale up a machine set to 2 worker nodes for a total of 4. Remember that each machine set is tied to an availability zone so with 3 machine sets with 1 machine each, in order to get to a TOTAL of 4 nodes we need to select one of the machine sets to scale up to 2 machines.
oc scale --replicas=2 machineset <machineset> -n openshift-machine-api
For example:
$ oc scale --replicas=2 machineset ok0620-rq5tl-worker-westus23 -n openshift-machine-api
machineset.machine.openshift.io/ok0620-rq5tl-worker-westus23 scaled
View the machine set
oc get machinesets -n openshift-machine-api
You will now see that the desired number of machines in the machine set we scaled is “2”.
$ oc get machinesets -n openshift-machine-api
NAME                           DESIRED   CURRENT   READY   AVAILABLE   AGE
ok0620-rq5tl-worker-westus21   1         1         1       1           73m
ok0620-rq5tl-worker-westus22   1         1         1       1           73m
ok0620-rq5tl-worker-westus23   2         2         1       1           73m
If we check the machines in the clusters
oc get machine -n openshift-machine-api
You will see that one is in the “Provisioned” phase (and in the zone of the machineset we scaled) and will shortly be in “running” phase.
$ oc get machine -n openshift-machine-api
NAME                                 PHASE         TYPE              REGION    ZONE   AGE
ok0620-rq5tl-master-0                Running       Standard_D8s_v3   westus2   1      74m
ok0620-rq5tl-master-1                Running       Standard_D8s_v3   westus2   2      74m
ok0620-rq5tl-master-2                Running       Standard_D8s_v3   westus2   3      74m
ok0620-rq5tl-worker-westus21-n6lcs   Running       Standard_D4s_v3   westus2   1      74m
ok0620-rq5tl-worker-westus22-ggcmv   Running       Standard_D4s_v3   westus2   2      74m
ok0620-rq5tl-worker-westus23-5fhm5   Provisioned   Standard_D4s_v3   westus2   3      54s
ok0620-rq5tl-worker-westus23-hzggb   Running       Standard_D4s_v3   westus2   3      74m
Scale the number of nodes down via the Web Console
Now let’s scale the cluster back down to a total of 3 worker nodes, but this time, from the web console. (If you need the URL or credentials in order to access it please go back to the relevant portion of Lab 1)
Access your OpenShift web console from the relevant URL. If you need to find the URL you can run:
az aro show \
   --name <CLUSTER-NAME> \
   --resource-group <RESOURCEGROUP> \
   --query "consoleProfile.url" -o tsv
Expand “Compute” in the left menu and then click on “MachineSets”
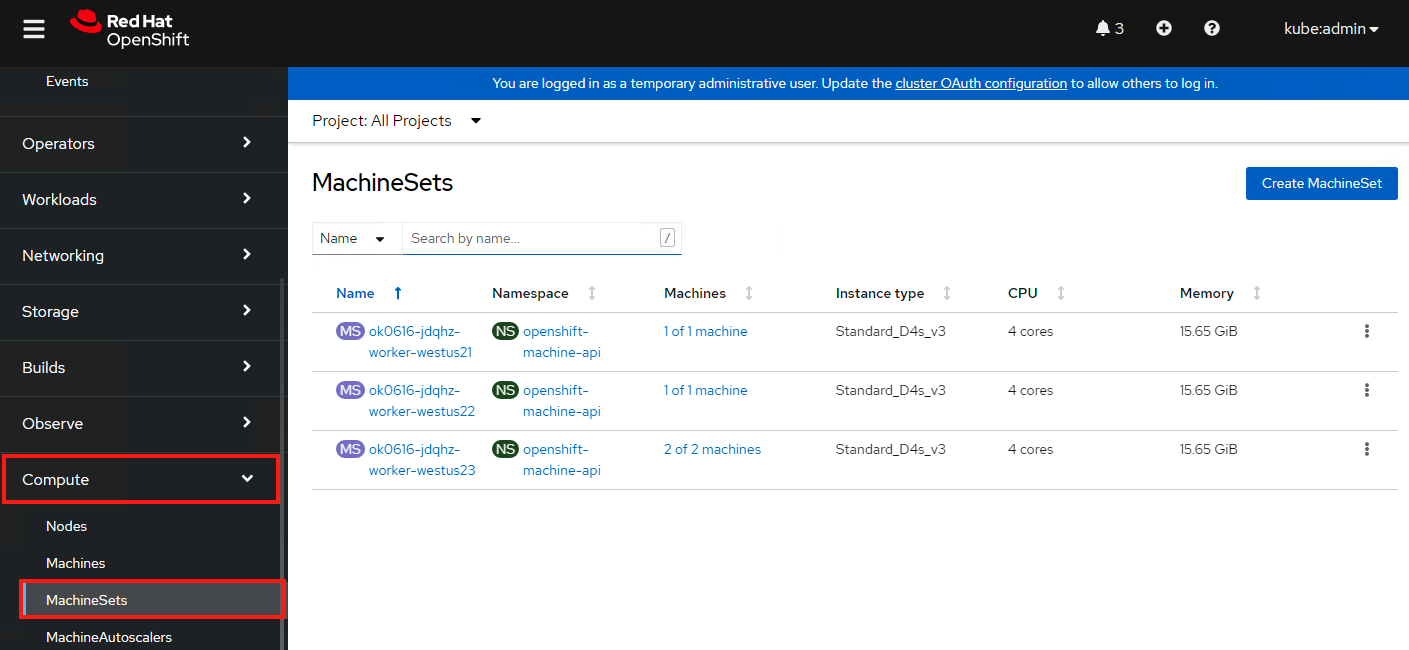
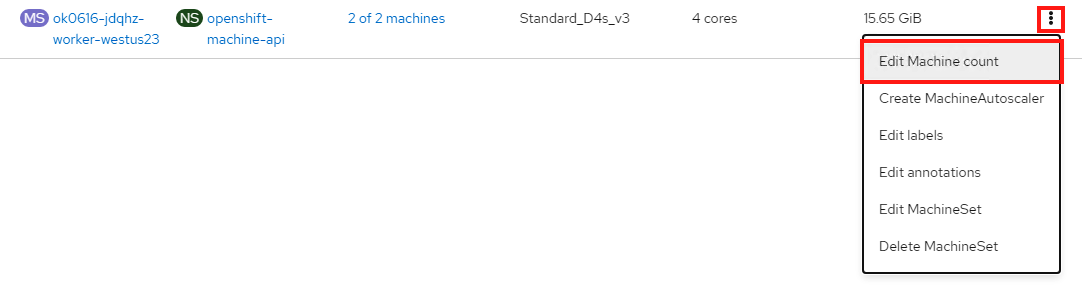
In the main pane you will see the same information about the machine sets from the command line. Now click on the “three dots” at the end of the line for the machine set that you scaled up to “2”. Select “Edit machine count” and decrease it to “1”. Click save.
This will now decrease that machine set to only have one machine in it.
Cluster Autoscaling
The cluster autoscaler adjusts the size of an OpenShift Container Platform cluster to meet its current deployment needs. The cluster autoscaler increases the size of the cluster when there are pods that fail to schedule on any of the current worker nodes due to insufficient resources or when another node is necessary to meet deployment needs. The cluster autoscaler does not increase the cluster resources beyond the limits that you specify. To learn more visit the documentation for cluster autoscaling.
A ClusterAutoscaler must have at least 1 machine autoscaler in order for the cluster autoscaler to scale the machines. The cluster autoscaler uses the annotations on machine sets that the machine autoscaler sets to determine the resources that it can scale. If you define a cluster autoscaler without also defining machine autoscalers, the cluster autoscaler will never scale your cluster.
Create a Machine Autoscaler
This can be accomplished via the Web Console or through the CLI with a YAML file for the custom resource definition. We’ll use the latter.
Download the sample MachineAutoscaler resource definition and open it in your favorite editor.
For metadata.name give this machine autoscaler a name. Technically, this can be anything you want. But to make it easier to identify which machine set this machine autoscaler affects, specify or include the name of the machine set to scale. The machine set name takes the following form: <clusterid>-<machineset>-<region-az>.
For spec.ScaleTargetRef.name enter the name of the exact MachineSet you want this to apply to. Below is an example of a completed file.
apiVersion: "autoscaling.openshift.io/v1beta1"
kind: "MachineAutoscaler"
metadata:
  name: "ok0620-rq5tl-worker-westus21-autoscaler"
  namespace: "openshift-machine-api"
spec:
  minReplicas: 1
  maxReplicas: 7
  scaleTargetRef:
    apiVersion: machine.openshift.io/v1beta1
    kind: MachineSet
    name: ok0620-rq5tl-worker-westus21
Save your file.
Then create the resource in the cluster. Assuming you kept the same filename:
$ oc create -f machine-autoscaler.yaml
machineautoscaler.autoscaling.openshift.io/ok0620-rq5tl-worker-westus21-mautoscaler created
You can also confirm this by checking the web console under “MachineAutoscalers” or by running:
$ oc get machineautoscaler -n openshift-machine-api
NAME                           REF KIND     REF NAME                      MIN   MAX   AGE
ok0620-rq5tl-worker-westus21   MachineSet   ok0620-rq5tl-worker-westus2   1     7     40s
Create the Cluster Autoscaler
This is the sample ClusterAutoscaler resource definition for this lab.
See the documentation for a detailed explanation of each parameter. You shouldn’t need to edit this file.
Create the resource in the cluster:
$ oc create -f https://raw.githubusercontent.com/microsoft/aroworkshop/master/yaml/cluster-autoscaler.yaml
clusterautoscaler.autoscaling.openshift.io/default created
Test the Cluster Autoscaler
Now we will test this out. Create a new project where we will define a job with a load that this cluster cannot handle. This should force the cluster to autoscale to handle the load.
Create a new project called “autoscale-ex”:
oc new-project autoscale-ex
Create the job
oc create -f https://raw.githubusercontent.com/openshift/training/master/assets/job-work-queue.yaml
After a few seconds, run the following to see what pods have been created.
oc get pods
$ oc get pods
NAME                     READY   STATUS              RESTARTS   AGE
work-queue-28n9m-29qgj   1/1     Running             0          53s
work-queue-28n9m-2c9rm   0/1     Pending             0          53s
work-queue-28n9m-57vnc   0/1     Pending             0          53s
work-queue-28n9m-5gz7t   0/1     Pending             0          53s
work-queue-28n9m-5h4jv   0/1     Pending             0          53s
work-queue-28n9m-6jz7v   0/1     Pending             0          53s
work-queue-28n9m-6ptgh   0/1     Pending             0          53s
work-queue-28n9m-78rr9   1/1     Running             0          53s
work-queue-28n9m-898wn   0/1     ContainerCreating   0          53s
work-queue-28n9m-8wpbt   0/1     Pending             0          53s
work-queue-28n9m-9nm78   1/1     Running             0          53s
work-queue-28n9m-9ntxc   1/1     Running             0          53s
[...]
We see a lot of pods in a pending state. This should trigger the cluster autoscaler to create more machines using the MachineAutoscaler we created. If we check on the MachineSets:
$ oc get machinesets -n openshift-machine-api
NAME                           DESIRED   CURRENT   READY   AVAILABLE   AGE
ok0620-rq5tl-worker-westus21   5         5         1       1           7h17m
ok0620-rq5tl-worker-westus22   1         1         1       1           7h17m
ok0620-rq5tl-worker-westus23   1         1         1       1           7h17m
We see that the cluster autoscaler has already scaled the machine set up to 5 in our example. Though it is still waiting for those machines to be ready.
If we check on the machines we should see that 4 are in a “Provisioned” state (there was 1 already existing from before for a total of 5 in this machine set).
$ oc get machines -n openshift-machine-api
NAME                                 PHASE         TYPE              REGION    ZONE   AGE
ok0620-rq5tl-master-0                Running       Standard_D8s_v3   westus2   1      7h18m
ok0620-rq5tl-master-1                Running       Standard_D8s_v3   westus2   2      7h18m
ok0620-rq5tl-master-2                Running       Standard_D8s_v3   westus2   3      7h18m
ok0620-rq5tl-worker-westus21-7hqgz   Provisioned   Standard_D4s_v3   westus2   1      72s
ok0620-rq5tl-worker-westus21-7j22r   Provisioned   Standard_D4s_v3   westus2   1      73s
ok0620-rq5tl-worker-westus21-7n7nf   Provisioned   Standard_D4s_v3   westus2   1      72s
ok0620-rq5tl-worker-westus21-8m94b   Provisioned   Standard_D4s_v3   westus2   1      73s
ok0620-rq5tl-worker-westus21-qnlfl   Running       Standard_D4s_v3   westus2   1      13m
ok0620-rq5tl-worker-westus22-9dtk5   Running       Standard_D4s_v3   westus2   2      22m
ok0620-rq5tl-worker-westus23-hzggb   Running       Standard_D4s_v3   westus2   3      7h15m
After a few minutes we should see all 5 are provisioned.
$ oc get machinesets -n openshift-machine-api
NAME                           DESIRED   CURRENT   READY   AVAILABLE   AGE
ok0620-rq5tl-worker-westus21   5         5         5       5           7h23m
ok0620-rq5tl-worker-westus22   1         1         1       1           7h23m
ok0620-rq5tl-worker-westus23   1         1         1       1           7h23m
If we now wait a few more minutes for the pods to complete, we should see the cluster autoscaler begin scale down the machine set and thus delete machines.
$ oc get machinesets -n openshift-machine-api
NAME                           DESIRED   CURRENT   READY   AVAILABLE   AGE
ok0620-rq5tl-worker-westus21   4         4         4       4           7h27m
ok0620-rq5tl-worker-westus22   1         1         1       1           7h27m
ok0620-rq5tl-worker-westus23   1         1         1       1           7h27m


$ oc get machines -n openshift-machine-api
NAME                                 PHASE      TYPE              REGION    ZONE   AGE
ok0620-rq5tl-master-0                Running    Standard_D8s_v3   westus2   1      7h28m
ok0620-rq5tl-master-1                Running    Standard_D8s_v3   westus2   2      7h28m
ok0620-rq5tl-master-2                Running    Standard_D8s_v3   westus2   3      7h28m
ok0620-rq5tl-worker-westus21-7hqgz   Running    Standard_D4s_v3   westus2   1      10m
ok0620-rq5tl-worker-westus21-7j22r   Running    Standard_D4s_v3   westus2   1      10m
ok0620-rq5tl-worker-westus21-8m94b   Deleting   Standard_D4s_v3   westus2   1      10m
ok0620-rq5tl-worker-westus21-qnlfl   Running    Standard_D4s_v3   westus2   1      22m
ok0620-rq5tl-worker-westus22-9dtk5   Running    Standard_D4s_v3   westus2   2      32m
ok0620-rq5tl-worker-westus23-hzggb   Running    Standard_D4s_v3   westus2   3      7h24m
Adding node labels
To add a node label it is recommended to set the label in the machine set. While you can directly add a label the node, this is not recommended since nodes could be overwritten and then the label would disappear. Once the machine set is modified to contain the desired label any new machines created from that set would have the newly added labels. This means that existing machines (nodes) will not get the label. Therefore, to make sure all nodes have the label, you should scale the machine set down to zero and then scale the machine set back up.
Using the web console
Select “MachineSets” from the left menu. You will see the list of machinesets.

We’ll select the first one “ok0620-rq5tl-worker-westus21”
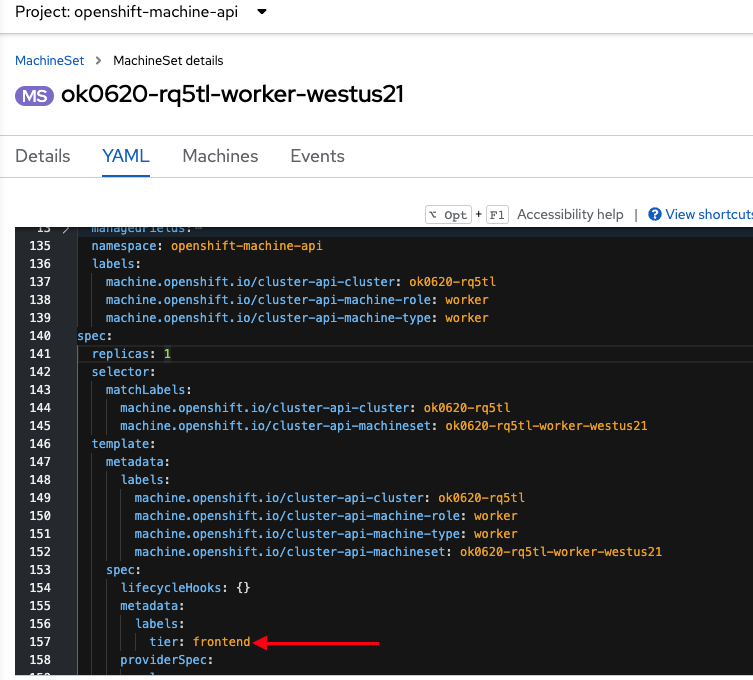
Click on the second tab “YAML”
Click into the YAML and under spec.template.spec.metadata add “labels:” then under that add a key:value pair for the label you want. In our example we can add a label “tier: frontend”. Click Save.
The already existing machine won’t get this label but any new machines will. So to ensure that all machines get the label, we will scale down this machine set to zero, then once completed we will scale it back up as we did earlier.
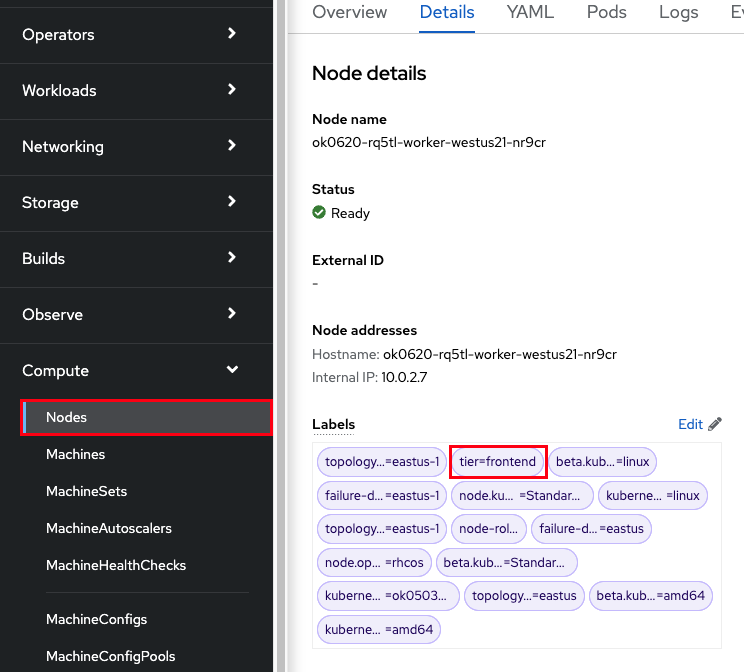
Click on the node that was just created.
You can see that the label is now there.
Azure Service Operator - Blob Store
Integrating with Azure services
So far, our OSToy application has functioned independently without relying on any external services. While this may be nice for a workshop environment, it’s not exactly representative of real-world applications. Many applications require external services like databases, object stores, or messaging services.
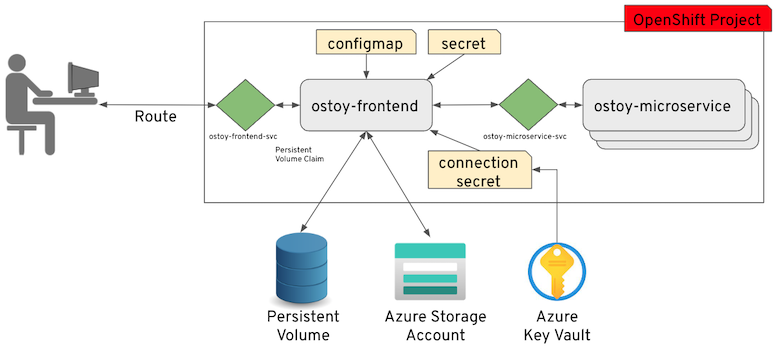
In this section, we will learn how to integrate our OSToy application with other Azure services, specifically Azure Blob Storage and Key Vault. By the end of this section, our application will be able to securely create and read objects from Blob Storage.
To achieve this, we will use the Azure Service Operator (ASO) to create the necessary services for our application directly from Kubernetes. We will also utilize Key Vault to securely store the connection secret required for accessing the Blob Storage container. We will create a Kubernetes secret to retrieve this secret from Key Vault, enabling our application to access the Blob Storage container using the secret.
To demonstrate this integration, we will use OSToy to create a basic text file and save it in Blob Storage. Finally, we will confirm that the file was successfully added and can be read from Blob Storage.
Azure Service Operator (ASO)
The Azure Service Operator (ASO) allows you to create and use Azure services directly from Kubernetes. You can deploy your applications, including any required Azure services directly within the Kubernetes framework using a familiar structure to declaratively define and create Azure services like Storage Blob or CosmosDB databases.
Key Vault
Azure Key Vault is a cloud-based service provided by Microsoft Azure that allows you to securely store and manage cryptographic keys, secrets, and certificates used by your applications and services.
Why should you use Key Vault to store secrets?
Using a secret store like Azure Key Vault allows you to take advantage of a number of benefits.
- Scalability - Using a secret store service is already designed to scale to handle a large number of secrets over placing them directly in the cluster.
- Centralization - You are able to keep all your organizations secrets in one location.
- Security - Features like access control, monitoring, encryption and audit are already baked in.
- Rotation - Decoupling the secret from your cluster makes it much easier to rotate secrets since you only have to update it in Key Vault and the Kubernetes secret in the cluster will reference that external secret store. This also allows for separation of duties as someone else can manage these resources.
Section overview
To provide a clearer understanding of the process, the procedure we will be following consists of three primary parts.
- Install the Azure Service Operator - This allows you to create/delete Azure services (in our case, Blob Storage) through the use of a Kubernetes Custom Resource. Install the controller which will also create the required namespace and the service account and then create the required resources.
- Setup Key Vault - Perform required prerequisites (ex: install CSI drivers), create a Key Vault instance, add the connection string.
- Application access - Configuring the application to access the stored connection string in Key Vault and thus enable the application to access the Blob Storage location.
Below is an updated application diagram of what this will look like after completing this section.
Access the cluster
- Login to the cluster using the
ocCLI if you are not already logged in.
Setup
Define helper variables
-
Set helper environment variables to facilitate execution of the commands in this section. Replace
<REGION>with the Azure region you are deploying into (ex:eastusorwestus2).export AZURE_SUBSCRIPTION_ID=$(az account show --query "id" --output tsv) export AZ_TENANT_ID=$(az account show -o tsv --query tenantId) export MY_UUID=$(uuidgen | cut -d - -f 2 | tr '[:upper:]' '[:lower:]') export PROJECT_NAME=ostoy-${MY_UUID} export KEYVAULT_NAME=secret-store-${MY_UUID} export REGION=<REGION>
Create a service principal
If you don’t already have a Service Principal to use then we need to create one. It is recommended to create one with Contributor level permissions for this workshop so that the Azure Service
Operator can create resources and that access can be granted to Key Vault.
-
Create a service principal for use in the lab and store the client secret in an environment variable.
export SERVICE_PRINCIPAL_CLIENT_SECRET="$(az ad sp create-for-rbac -n aro-lab-sp-${MY_UUID} --role contributor --scopes /subscriptions/$AZURE_SUBSCRIPTION_ID --query 'password' -o tsv)" -
Get the service principal Client Id.
export SERVICE_PRINCIPAL_CLIENT_ID="$(az ad sp list --display-name aro-lab-sp-${MY_UUID} --query '[0].appId' -o tsv)" -
Install Helm if you don’t already have it. You can also check the Official Helm site for other install options.
curl https://raw.githubusercontent.com/helm/helm/main/scripts/get-helm-3 | bash
Install the Azure Service Operator
- Set up ASO
-
We first need to install Cert Manager. Run the following.
oc apply -f https://github.com/jetstack/cert-manager/releases/download/v1.8.2/cert-manager.yaml -
Confirm that the cert-manager pods have started successfully before continuing.
oc get pods -n cert-managerYou will see a response like:
NAME READY STATUS RESTARTS AGE cert-manager-677874db78-t6wgn 1/1 Running 0 1m cert-manager-cainjector-6c5bf7b759-l722b 1/1 Running 0 1m cert-manager-webhook-5685fdbc4b-rlbhz 1/1 Running 0 1m -
We then need to add the latest Helm chart for the ASO.
helm repo add aso2 https://raw.githubusercontent.com/Azure/azure-service-operator/main/v2/charts -
Update the Helm repository.
helm repo update -
Install the ASO.
helm upgrade --install --devel aso2 aso2/azure-service-operator \ --create-namespace \ --namespace=azureserviceoperator-system \ --set azureSubscriptionID=$AZURE_SUBSCRIPTION_ID \ --set azureTenantID=$AZ_TENANT_ID \ --set azureClientID=$SERVICE_PRINCIPAL_CLIENT_ID \ --set azureClientSecret=$SERVICE_PRINCIPAL_CLIENT_SECRET -
Ensure that the pods are running successfully. This could take about 2 minutes.
oc get pods -n azureserviceoperator-systemYou will see a response like:
NAME                                                      READY   STATUS    RESTARTS   AGE
azureserviceoperator-controller-manager-5b4bfc59df-lfpqf   2/2     Running   0          24s
-
Create Storage Accounts and containers using the ASO
Now we need to create a Storage Account for our Blob Storage, to use with OSToy. We could create this using the CLI or the Azure Portal, but wouldn’t it be nice if we could do so using standard Kubernetes objects? We could have defined the all these resources in once place (like in the deployment manifest), but for the purpose of gaining experience we will create each resource separately below.
-
Create a new OpenShift project for our OSToy app (even if you already have one from earlier).
oc new-project $PROJECT_NAME -
Create a resource group.
cat << EOF | oc apply -f - apiVersion: resources.azure.com/v1api20200601 kind: ResourceGroup metadata: name: ${PROJECT_NAME}-rg namespace: $PROJECT_NAME spec: location: $REGION EOF -
Confirm that the Resource Group was actually created. You will see the name returned. It may take a minute or two to appear.
az group list --query '[].name' --output tsv | grep ${MY_UUID} -
Create a Storage Account.
cat << EOF | oc apply -f - apiVersion: storage.azure.com/v1api20210401 kind: StorageAccount metadata: name: ostoystorage${MY_UUID} namespace: $PROJECT_NAME spec: location: $REGION kind: BlobStorage sku: name: Standard_LRS owner: name: ${PROJECT_NAME}-rg accessTier: Hot EOF -
Confirm that it was created. It may take a minute or two to appear.
az storage account list --query '[].name' --output tsv | grep ${MY_UUID} -
Create a Blob service.
cat << EOF | oc apply -f - apiVersion: storage.azure.com/v1api20210401 kind: StorageAccountsBlobService metadata: name: ostoystorage${MY_UUID}service namespace: $PROJECT_NAME spec: owner: name: ostoystorage${MY_UUID} EOF -
Create a container.
cat << EOF | oc apply -f - apiVersion: storage.azure.com/v1api20210401 kind: StorageAccountsBlobServicesContainer metadata: name: ${PROJECT_NAME}-container namespace: $PROJECT_NAME spec: owner: name: ostoystorage${MY_UUID}service EOF -
Confirm that the container was created. It make take a minute or two to appear.
az storage container list --auth-mode login --account-name ostoystorage${MY_UUID} --query '[].name' -o tsv -
Obtain the connection string of the Storage Account for use in the next section. The connection string contains all the information required to connect to the storage account. This should be guarded and securely stored. The
--nameparameter is the name of the Storage Account we created using the ASO.export CONNECTION_STRING=$(az storage account show-connection-string --name ostoystorage${MY_UUID} --resource-group ${PROJECT_NAME}-rg -o tsv)
The storage account is now set up for use with our application.
Install Kubernetes Secret Store CSI
In this part we will create a Key Vault location to store the connection string to our Storage account. Our application will use this to connect to the Blob Storage container we created, enabling it to display the contents, create new files, as well as display the contents of the files. We will mount this as a secret in a secure volume mount within our application. Our application will then read that to access the Blob storage.
-
To simplify the process for the workshop, a script is provided that will do the prerequisite work in order to use Key Vault stored secrets. If you are curious, please feel free to read the script, otherwise just run it. This should take about 1-2 minutes to complete.
curl https://raw.githubusercontent.com/microsoft/aroworkshop/master/resources/setup-csi.sh | bashOr, if you’d rather not live on the edge, feel free to download it first.
Note: Instead, you could connect your cluster to Azure ARC and use the KeyVault extension
-
Create an Azure Key Vault in the resource group we created using the ASO above.
az keyvault create -n $KEYVAULT_NAME --resource-group ${PROJECT_NAME}-rg --location $REGION -
Store the connection string as a secret in Key Vault.
az keyvault secret set --vault-name $KEYVAULT_NAME --name connectionsecret --value $CONNECTION_STRING -
Set an Access Policy for the Service Principal. This allows the Service Principal to get secrets from the Key Vault instance.
az keyvault set-policy -n $KEYVAULT_NAME --secret-permissions get --spn $SERVICE_PRINCIPAL_CLIENT_ID -
Create a secret for Kubernetes to use to access the Key Vault. When this command is executed, the Service Principal’s credentials are stored in the
secrets-store-credsSecret object, where it can be used by the Secret Store CSI driver to authenticate with Azure Key Vault and retrieve secrets when needed.oc create secret generic secrets-store-creds \ -n $PROJECT_NAME \ --from-literal clientid=$SERVICE_PRINCIPAL_CLIENT_ID \ --from-literal clientsecret=$SERVICE_PRINCIPAL_CLIENT_SECRET -
Create a label for the secret. By default, the secret store provider has filtered watch enabled on secrets. You can allow it to find the secret in the default configuration by adding this label to the secret.
oc -n $PROJECT_NAME label secret secrets-store-creds secrets-store.csi.k8s.io/used=true -
Create the Secret Provider Class to give access to this secret. To learn more about the fields in this class see Secret Provider Class object.
 cat <<EOF | oc apply -f -
 apiVersion: secrets-store.csi.x-k8s.io/v1
 kind: SecretProviderClass
 metadata:
   name: azure-kvname
   namespace: $PROJECT_NAME
 spec:
   provider: azure
   parameters:
     usePodIdentity: "false"
     useVMManagedIdentity: "false"
     userAssignedIdentityID: ""
     keyvaultName: "${KEYVAULT_NAME}"
     objects: |
       array:
         - |
           objectName: connectionsecret
           objectType: secret
           objectVersion: ""
     tenantId: "${AZ_TENANT_ID}"
 EOF
Create a custom Security Context Constraint (SCC)
SCCs are outside the scope of this workshop. Though, in short, OpenShift SCCs are a mechanism for controlling the actions and resources that a pod or container can access in an OpenShift cluster. SCCs can be used to enforce security policies at the pod or container level, which helps to improve the overall security of an OpenShift cluster. For more details please see Managing security context constraints.
-
Create a new SCC that will allow our OSToy app to use the Secrets Store Provider CSI driver. The SCC that is used by default,
restricted, does not allow it. So in this custom SCC we are explicitly allowing access to CSI. If you are curious feel free to view the file first, the last line in specific.oc apply -f https://raw.githubusercontent.com/microsoft/aroworkshop/master/yaml/ostoyscc.yaml -
Create a Service Account for the application.
oc create sa ostoy-sa -n $PROJECT_NAME -
Grant permissions to the Service Account using the custom SCC we just created.
oc adm policy add-scc-to-user ostoyscc system:serviceaccount:${PROJECT_NAME}:ostoy-sa
Deploy the OSToy application
-
Deploy the application. First deploy the microservice.
oc apply -n $PROJECT_NAME -f https://raw.githubusercontent.com/microsoft/aroworkshop/master/yaml/ostoy-microservice-deployment.yaml -
Run the following to deploy the frontend. This will automatically remove the comment symbols for the new lines that we need in order to use the secret.
curl https://raw.githubusercontent.com/microsoft/aroworkshop/master/yaml/ostoy-frontend-deployment.yaml | sed 's/#//g' | oc apply -n $PROJECT_NAME -f -
See the storage contents through OSToy
After about a minute we can use our app to see the contents of our Blob storage container.
-
Get the route for the newly deployed application.
oc get route ostoy-route -n $PROJECT_NAME -o jsonpath='{.spec.host}{"\n"}' - Open a new browser tab and enter the route from above. Ensure that it is using
http://and nothttps://. - A new menu item will appear. Click on “ASO - Blob Storage” in the left menu in OSToy.
-
You will see a page that lists the contents of the bucket, which at this point should be empty.
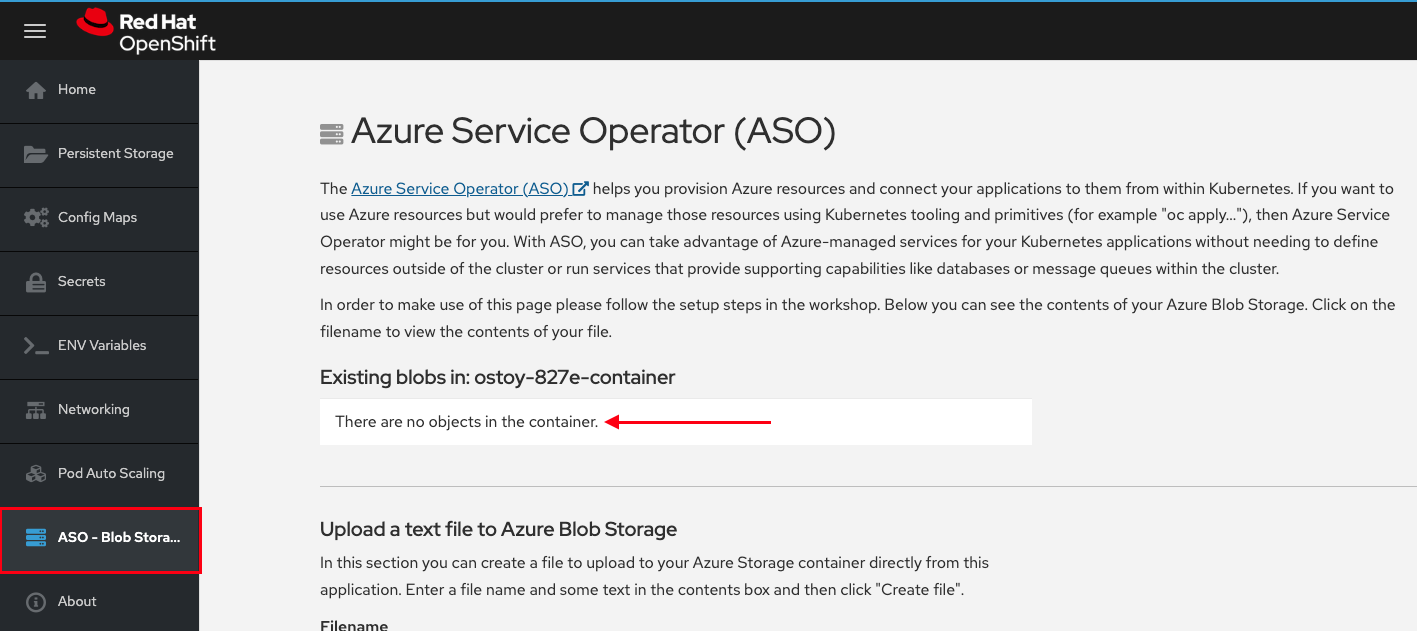
- Move on to the next step to add some files.
Create files in your Azure Blob Storage Container
For this step we will use OStoy to create a file and upload it to the Blob Storage Container. While Blob Storage can accept any kind of file, for this workshop we’ll use text files so that the contents can easily be rendered in the browser.
- Click on “ASO - Blob Storage” in the left menu in OSToy.
- Scroll down to the section underneath the “Existing files” section, titled “Upload a text file to Blob Storage”.
- Enter a file name for your file.
- Enter some content for your file.
-
Click “Create file”.
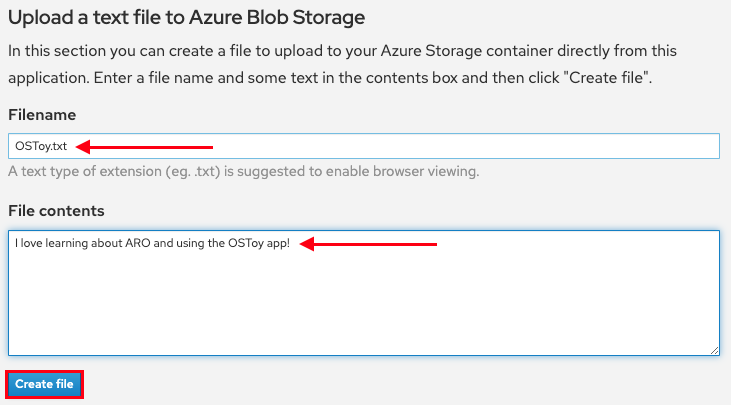
- Scroll up to the top section for existing files and you should see your file that you just created there.
-
Click on the file name to view the file.
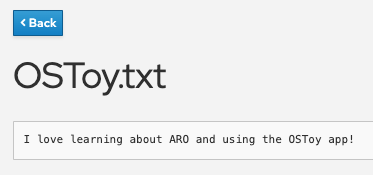
-
Now to confirm that this is not just some smoke and mirrors, let’s confirm directly via the CLI. Run the following to list the contents of our bucket.
az storage blob list --account-name ostoystorage${MY_UUID} --connection-string $CONNECTION_STRING -c ${PROJECT_NAME}-container --query "[].name" -o tsvWe should see our file(s) returned.
Concepts
Source-To-Image (S2I)
Source-to-Image (S2I) is a toolkit and workflow for building reproducible container images from source code. S2I produces ready-to-run images by injecting source code into a container image and letting the container prepare that source code for execution. By creating self-assembling builder images, you can version and control your build environments exactly like you use container images to version your runtime environments.
How it works
For a dynamic language like Ruby, the build-time and run-time environments are typically the same. Starting with a builder image that describes this environment - with Ruby, Bundler, Rake, Apache, GCC, and other packages needed to set up and run a Ruby application installed - source-to-image performs the following steps:
-
Start a container from the builder image with the application source injected into a known directory
-
The container process transforms that source code into the appropriate runnable setup - in this case, by installing dependencies with Bundler and moving the source code into a directory where Apache has been preconfigured to look for the Ruby config.ru file.
-
Commit the new container and set the image entrypoint to be a script (provided by the builder image) that will start Apache to host the Ruby application.
For compiled languages like C, C++, Go, or Java, the dependencies necessary for compilation might dramatically outweigh the size of the actual runtime artifacts. To keep runtime images slim, S2I enables a multiple-step build processes, where a binary artifact such as an executable or Java WAR file is created in the first builder image, extracted, and injected into a second runtime image that simply places the executable in the correct location for execution.
For example, to create a reproducible build pipeline for Tomcat (the popular Java webserver) and Maven:
-
Create a builder image containing OpenJDK and Tomcat that expects to have a WAR file injected
-
Create a second image that layers on top of the first image Maven and any other standard dependencies, and expects to have a Maven project injected
-
Invoke source-to-image using the Java application source and the Maven image to create the desired application WAR
-
Invoke source-to-image a second time using the WAR file from the previous step and the initial Tomcat image to create the runtime image
By placing our build logic inside of images, and by combining the images into multiple steps, we can keep our runtime environment close to our build environment (same JDK, same Tomcat JARs) without requiring build tools to be deployed to production.
Goals and benefits
Reproducibility
Allow build environments to be tightly versioned by encapsulating them within a container image and defining a simple interface (injected source code) for callers. Reproducible builds are a key requirement to enabling security updates and continuous integration in containerized infrastructure, and builder images help ensure repeatability as well as the ability to swap runtimes.
Flexibility
Any existing build system that can run on Linux can be run inside of a container, and each individual builder can also be part of a larger pipeline. In addition, the scripts that process the application source code can be injected into the builder image, allowing authors to adapt existing images to enable source handling.
Speed
Instead of building multiple layers in a single Dockerfile, S2I encourages authors to represent an application in a single image layer. This saves time during creation and deployment, and allows for better control over the output of the final image.
Security
Dockerfiles are run without many of the normal operational controls of containers, usually running as root and having access to the container network. S2I can be used to control what permissions and privileges are available to the builder image since the build is launched in a single container. In concert with platforms like OpenShift, source-to-image can enable admins to tightly control what privileges developers have at build time.
Routes
An OpenShift Route exposes a service at a host name, like www.example.com, so that external clients can reach it by name. When a Route object is created on OpenShift, it gets picked up by the built-in HAProxy load balancer in order to expose the requested service and make it externally available with the given configuration. You might be familiar with the Kubernetes Ingress object and might already be asking “what’s the difference?”. Red Hat created the concept of Route in order to fill this need and then contributed the design principles behind this to the community; which heavily influenced the Ingress design. Though a Route does have some additional features as can be seen in the chart below.
NOTE: DNS resolution for a host name is handled separately from routing; your administrator may have configured a cloud domain that will always correctly resolve to the router, or if using an unrelated host name you may need to modify its DNS records independently to resolve to the router.
Also of note is that an individual route can override some defaults by providing specific configuraitons in its annotations. See here for more details: https://docs.openshift.com/aro/4/networking/routes/route-configuration.html
ImageStreams
An ImageStream stores a mapping of tags to images, metadata overrides that are applied when images are tagged in a stream, and an optional reference to a Docker image repository on a registry.
What are the benefits
Using an ImageStream makes it easy to change a tag for a container image. Otherwise to change a tag you need to download the whole image, change it locally, then push it all back. Also promoting applications by having to do that to change the tag and then update the deployment object entails many steps. With ImageStreams you upload a container image once and then you manage it’s virtual tags internally in OpenShift. In one project you may use the dev tag and only change reference to it internally, in prod you may use a prod tag and also manage it internally. You don’t really have to deal with the registry!
You can also use ImageStreams in conjunction with DeploymentConfigs to set a trigger that will start a deployment as soon as a new image appears or a tag changes its reference.
See here for more details: https://blog.openshift.com/image-streams-faq/
OpenShift Docs: https://docs.openshift.com/aro/4/openshift_images/managing_images/managing-images-overview.html
ImageStream and Builds: https://cloudowski.com/articles/why-managing-container-images-on-openshift-is-better-than-on-kubernetes/
Builds
A build is the process of transforming input parameters into a resulting object. Most often, the process is used to transform input parameters or source code into a runnable image. A BuildConfig object is the definition of the entire build process.
OpenShift Container Platform leverages Kubernetes by creating Docker-formatted containers from build images and pushing them to a container image registry.
Build objects share common characteristics: inputs for a build, the need to complete a build process, logging the build process, publishing resources from successful builds, and publishing the final status of the build. Builds take advantage of resource restrictions, specifying limitations on resources such as CPU usage, memory usage, and build or pod execution time.
See here for more details: https://docs.openshift.com/aro/4/openshift_images/image-streams-manage.html
Contributors
The following people have contributed to this workshop, thanks!


