We use cookies on this site to enhance your user experience
By clicking the Accept button, you agree to us doing so. More info on our cookie policy
We use cookies on this site to enhance your user experience
By clicking the Accept button, you agree to us doing so. More info on our cookie policy
Power BI Desktop Configuration
Power BI Desktop must be configured to support the new .pbip format for seamless Fabric integration.
Steps:

Figure: Enable Power BI Project (.pbip) Format
⚠️ Important Notes:
- TMDL and PBIR options: Visible but should remain unchecked
- Restart required: Restart Power BI Desktop after enabling
- Compatibility: .pbip format ensures deployment pipeline compatibility
Configure parameters in Power Query Editor to support multiple environments.
⚠️ Pro TIP:
- Create a Power BI Template with these parameters to save time on new reports.
Step 1: Open Power Query Editor
Step 2: Create Environment Parameter
Name: Environment
Description: Current deployment environment (DEV, UAT, or PROD)
Required: ✅ Checked
Type: Text
Suggested Values: List of values
  - DEV
  - UAT
  - PROD
Current Value: DEV
Step 3: Create Server Parameter
Name: SrvName
Description: Database server name based on environment
Required: ✅ Checked
Type: Text
Suggested Values: Any value
Current Value: dev-server-id.database.fabric.microsoft.com
Step 4: Create Database Parameter
Name: DbName
Description: Database name based on environment
Required: ✅ Checked
Type: Text
Suggested Values: Any value
Current Value: adventureworks-dev-workspace-id
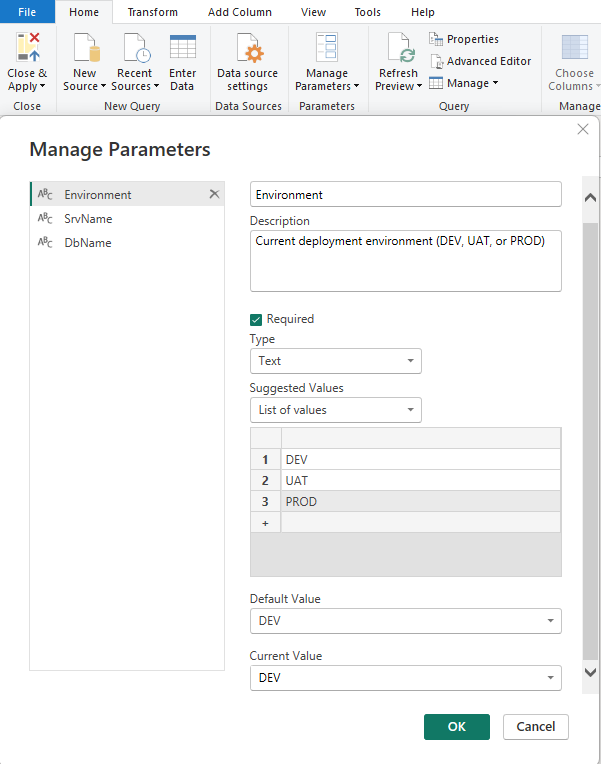
Figure: Environment Parameter Configuration
Step 5: Apply Parameters to Data Source
SrvName parameterDbName parameter
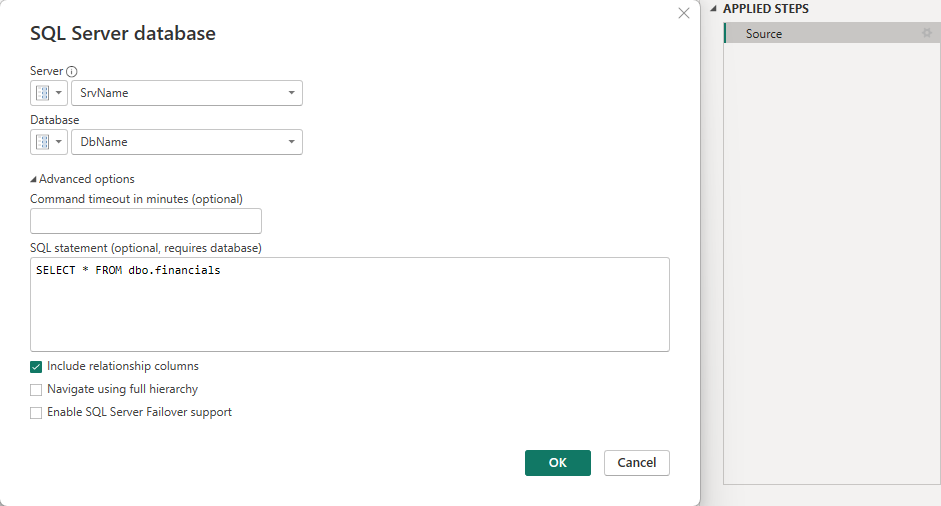
Figure: Apply Parameters to Data Source
Naming Convention:
[ProjectName]_[ReportType]_[Version].pbip
Example: SalesAnalytics_Dashboard_v1.0.pbip
Folder Structure After Save:
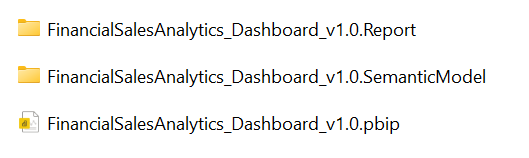
Figure: Power BI Project Folder Structure