Configuration: Configure access to LLMs and other services
# Overview
> Set up your LLM connection and authorization with environment variables for seamless integration.
You will need to configure the LLM connection and authorization secrets. You can use remote (like OpenAI, Azure, etc.) and local models (like Ollama, Jan, LMStudio, etc.) with GenAIScript. ## Model selection [Section titled “Model selection”](#model-selection) The model used by the script is configured through the `model` field in the `script` function. The model name is formatted as `provider:model-name`, where `provider` is the LLM provider and the `model-name` is provider specific. ```js script({ model: "openai:gpt-4o", }); ``` ### Large, small, vision models [Section titled “Large, small, vision models”](#large-small-vision-models) You can also use the `small`, `large`, `vision` [model aliases](/genaiscript/reference/scripts/model-aliases) to use the default configured small, large and vision-enabled models. Large models are typically in the OpenAI gpt-4 reasoning range and can be used for more complex tasks. Small models are in the OpenAI gpt-4o-mini range, and are useful for quick and simple tasks. ```js script({ model: "small" }); ``` ```js script({ model: "large" }); ``` The model aliases can also be overridden from the [cli run command](/genaiscript/reference/cli/run), or environment variables or configuration file. [Learn more about model aliases](/genaiscript/reference/scripts/model-aliases). ```sh genaiscript run ... --model large_model_id --small-model small_model_id ``` or by adding the `GENAISCRIPT_MODEL_LARGE` and `GENAISCRIPT_MODEL_SMALL` environment variables. .env ```txt GENAISCRIPT_MODEL_LARGE="azure_serverless:..." GENAISCRIPT_MODEL_SMALL="azure_serverless:..." GENAISCRIPT_MODEL_VISION="azure_serverless:..." ``` You can also configure the default aliases for a given LLM provider by using the `provider` argument. The default are documented in this page and printed to the console output. ```js script({ provider: "openai" }); ``` ```sh genaiscript run ... --provider openai ``` ### Model aliases [Section titled “Model aliases”](#model-aliases) In fact, you can define any alias for your model (only alphanumeric characters are allowed) through environment variables of the name `GENAISCRIPT_MODEL_ALIAS` where `ALIAS` is the alias you want to use. .env ```txt GENAISCRIPT_MODEL_TINY=... ``` Model aliases are always lowercased when used in the script. ```js script({ model: "tiny" }); ``` ## `.env` file and `.env.genaiscript` file [Section titled “.env file and .env.genaiscript file”](#env-file-and-envgenaiscript-file) GenAIScript uses a `.env` file (and `.env.genaiscript`) to load secrets and configuration information into the process environment variables. GenAIScript multiple `.env` files to load configuration information. 1. Create or update a `.gitignore` file in the root of your project and make it sure it includes `.env`. This ensures that you do not accidentally commit your secrets to your source control. .gitignore ```txt ... .env .env.genaiscript ``` 2. Create a `.env` file in the root of your project. * .gitignore * **.env** 3. Update the `.env` file with the configuration information (see below). Do Not Commit Secrets The `.env` file should never be commited to your source control! If the `.gitignore` file is properly configured, the `.env`, `.env.genaiscript` file will appear grayed out in Visual Studio Code. .gitignore ```txt ... .env ``` ### Custom .env file location [Section titled “Custom .env file location”](#custom-env-file-location) You can specify a custom `.env` file location through the CLI or an environment variable. * GenAIScript script loads the following `.env` files in order by default: * `~/.env.genaiscript` * `./.env.genaiscript` * `./.env` * by adding the `--env <...files>` argument to the CLI. Each `.env` file is imported in order and may override previous values. ```sh npx genaiscript ... --env .env .env.debug ``` * by setting the `GENAISCRIPT_ENV_FILE` environment variable. ```sh GENAISCRIPT_ENV_FILE=".env.local" npx genaiscript ... ``` * by specifying the `.env` file location in a [configuration file](/genaiscript/reference/configuration-files). \~/genaiscript.config.yaml ```json { "$schema": "https://microsoft.github.io/genaiscript/schemas/config.json", "envFile": [".env.local", ".env.another"] } ``` ### No .env file [Section titled “No .env file”](#no-env-file) If you do not want to use a `.env` file, make sure to populate the environment variables of the genaiscript process with the configuration values. Here are some common examples: * Using bash syntax ```sh OPENAI_API_KEY="value" npx --yes genaiscript run ... ``` * GitHub Action configuration .github/workflows/genaiscript.yml ```yaml run: npx --yes genaiscript run ... env: OPENAI_API_KEY: ${{ secrets.OPENAI_API_KEY }} ``` ## `configure` command [Section titled “configure command”](#configure-command) The [configure](/genaiscript/reference/cli/configure) command is an interactive command to configure and validate the LLM connections. ```sh npx genaiscript configure ``` ## Dev Containers on Windows [Section titled “Dev Containers on Windows”](#dev-containers-on-windows) You can use [Dev Containers](https://code.visualstudio.com/docs/devcontainers/tutorial) to easily create a containerized development environment. * Install [WSL2](https://learn.microsoft.com/en-us/windows/wsl/install) * Install [Docker Desktop](https://docs.docker.com/get-started/get-docker/). Make sure the Docker service is running. * Open Visual Studio Code * Install the [dev container extension](vscode:extension/ms-vscode-remote.remote-containers) in VSCode * Open the command palette (`Ctrl`+`Shift`+`P`) and type \**New Dev Container…* * Select the `Node.JS & TypeScript` image. ## Echo [Section titled “Echo”](#echo) The `echo` provider is a dry run LLM provider that returns the messages without calling any LLM. It is most useful for debugging when you want to see the result LLM request without sending it. ```js script({ model: "echo", }); ``` Echo replies with the chat messages as markdown and JSON, which can be helpful for debugging. ## None [Section titled “None”](#none) The `none` provider prevents the execution of LLM. It is typically used on a top-level script that exclusively uses inline prompts. ```js script({ model: "none", }); ``` ## Custom Provider (OpenAI compatible) [Section titled “Custom Provider (OpenAI compatible)”](#custom-provider-openai-compatible) You can use a custom provider that is compatible with the [OpenAI text generation API](https://platform.openai.com/docs/guides/text-generation). This is useful for running LLMs on a local server or a different cloud provider. For example, to define a `ollizard` provider, you need to set the `OLLIARD_API_BASE` environment variable to the custom provider URL, and `OLLIZARD_API_KEY` if needed. .env ```txt OLLIZARD_API_BASE=http://localhost:1234/v1 #OLLIZARD_API_KEY=... ``` Other environment suffixes are: `_API_VERSION`, `_API_TYPE`, `_API_CREDENTIALS` (for Azure), `_API_PROVIDER` to specify what built provider it maps to. Then you can use this provider like any other provider. ```js script({ model: "ollizard:llama3.2:1b", }); ``` ## Model specific environment variables [Section titled “Model specific environment variables”](#model-specific-environment-variables) You can provide different environment variables for each named model by using the `PROVIDER_MODEL_API_...` prefix or `PROVIDER_API_...` prefix. The model name is capitalized and all non-alphanumeric characters are converted to `_`. This allows to have various sources of LLM computations for different models. For example, to enable the `ollama:phi3` model running locally, while keeping the default `openai` model connection information. .env ```txt OLLAMA_PHI3_API_BASE=http://localhost:11434/v1 ``` ## Running behind a proxy [Section titled “Running behind a proxy”](#running-behind-a-proxy) You can set the `HTTP_PROXY` and/or `HTTPS_PROXY` environment variables to run GenAIScript behind a proxy. .env ```txt HTTP_PROXY=http://proxy.example.com:8080 ``` ## Checking your configuration [Section titled “Checking your configuration”](#checking-your-configuration) You can check your configuration by running the `genaiscript info env` [command](/genaiscript/reference/cli). It will display the current configuration information parsed by GenAIScript. ```sh genaiscript info env ```
# Alibaba Cloud
The `alibaba` provider access the [Alibaba Cloud](https://www.alibabacloud.com/) models. ```js script({ model: "alibaba:qwen-max", }); ``` 1. Sign up for a [Alibaba Cloud account](https://www.alibabacloud.com/help/en/model-studio/developer-reference/get-api-key) and obtain an API key from their [console](https://bailian.console.alibabacloud.com/). 2. Add your Alibaba API key to the `.env` file: .env ```txt ALIBABA_API_KEY=sk_... ``` 3. Find the model that best suits your needs by visiting the [Alibaba models](https://www.alibabacloud.com/help/en/model-studio/developer-reference/use-qwen-by-calling-api). 4. Update your script to use the `model` you choose. ```js script({ ... model: "alibaba:qwen-max", }) ``` ### Aliases The following model aliases are attempted by default in GenAIScript. | Alias | Model identifier | | ---------- | ----------------- | | large | qwen-max | | small | qwen-turbo | | long | qwen-plus | | embeddings | text-embedding-v3 | ### Limitations * Uses [OpenAI compatibility layer](https://www.alibabacloud.com/help/en/model-studio/developer-reference/compatibility-of-openai-with-dashscope) * listModels * Ignore prediction of output tokens * Tools implemented as fallback tools automatically.
# Anthropic
The `anthropic` provider access [Anthropic](https://www.anthropic.com/) models. Anthropic is an AI research company that offers powerful language models, including the Claude series. ```js script({ model: "anthropic:claude-2.1" }); ``` To use Anthropic models with GenAIScript, follow these steps: 1. Sign up for an Anthropic account and obtain an API key from their [console](https://console.anthropic.com/). 2. Add your Anthropic API key to the `.env` file: .env ```txt ANTHROPIC_API_KEY=sk-ant-api... ``` 3. Find the model that best suits your needs by visiting the [Anthropic model documentation](https://docs.anthropic.com/en/docs/about-claude/models#model-names). 4. Update your script to use the `model` you choose. ```js script({ ... model: "anthropic:claude-3-5-sonnet-20240620", }) ``` ### Aliases The following model aliases are attempted by default in GenAIScript. | Alias | Model identifier | | ---------------- | ------------------------ | | large | claude-sonnet-4-0 | | small | claude-3-5-haiku-latest | | vision | claude-sonnet-4-0 | | vision\_small | claude-3-5-sonnet-latest | | reasoning | claude-sonnet-4-0:high | | reasoning\_small | claude-sonnet-4-0:low | ### Limitations * logprobs (and top logprobs) ignored * Ignore prediction of output tokens * topLogprobs
# Anthropic Bedrock
The `anthropic_bedrock` provider accesses Anthropic models on Amazon Bedrock. You can find the model names in the [Anthropic model documentation](https://docs.anthropic.com/en/docs/about-claude/models#model-names). ```js script({ model: "anthropic_bedrock:anthropic.claude-3-sonnet-20240229-v1:0", }); ``` ## Configuration [Section titled “Configuration”](#configuration) GenAIScript supports multiple ways to configure AWS credentials for Bedrock access: ### Required Environment Variables [Section titled “Required Environment Variables”](#required-environment-variables) * `AWS_REGION` - The AWS region where Bedrock is enabled (e.g., `us-east-1`, `us-west-2`) ### Authentication Options [Section titled “Authentication Options”](#authentication-options) Choose one of the following authentication methods: * Access Keys ```bash export AWS_ACCESS_KEY_ID="AKIA..." export AWS_SECRET_ACCESS_KEY="..." export AWS_SESSION_TOKEN="..." # Optional, for temporary credentials ``` * AWS Profile ```bash export AWS_PROFILE="my-profile" ``` * Bedrock API Key ```bash export AWS_BEARER_TOKEN_BEDROCK="your-bedrock-api-key" ``` ### Optional Environment Variables [Section titled “Optional Environment Variables”](#optional-environment-variables) * `ANTHROPIC_SMALL_FAST_MODEL_AWS_REGION` - Override AWS region for small/fast models * `DISABLE_PROMPT_CACHING` - Set to `1` to disable Anthropic prompt caching * `ANTHROPIC_MODEL` - Override the default Anthropic model ID for Bedrock ### Setup Steps [Section titled “Setup Steps”](#setup-steps) 1. **Enable Bedrock Access** Request access to Claude models in the [Amazon Bedrock console](https://console.aws.amazon.com/bedrock/) under “Model Access”. 2. **Configure Credentials** Set up your AWS credentials using one of the methods above. GenAIScript follows the standard [AWS credential provider chain](https://docs.aws.amazon.com/sdk-for-javascript/v3/developer-guide/setting-credentials-node.html). 3. **Set Region** Configure the AWS region where you have Bedrock access: ```bash export AWS_REGION="us-east-1" ``` 4. **Test Configuration** ```bash genaiscript configure anthropic_bedrock ``` ### Aliases The following model aliases are attempted by default in GenAIScript. | Alias | Model identifier | | ---------------- | ---------------------------------------------- | | reasoning | anthropic.claude-3-7-sonnet-20250219-v1:0:high | | reasoning\_small | anthropic.claude-3-7-sonnet-20250219-v1:0:low | | large | anthropic.claude-3-7-sonnet-20250219-v1:0:0 | | small | anthropic.claude-3-5-haiku-20241022-v1:0 | | vision | anthropic.claude-3-7-sonnet-20250219-v1:0:0 | | vision\_small | anthropic.claude-3-5-haiku-20241022-v1:0 | ### Limitations * logprobs (and top logprobs) ignored * Ignore prediction of output tokens * topLogprobs
# Azure AI Foundry
Azure AI Foundry provides access to serverless and deployed models, both for OpenAI and other providers. There are multiple ways to access those servers that are supported in GenAIScript: * without any deployment, using the [Azure AI Model Inference](#azure_ai_inference) provider, * with deployment for OpenAI models, using the [Azure AI OpenAI Serverless](#azure_serverless) provider, * with deployments for non-OpenAI models, use the [Azure AI Serverless Models](#azure_serverless_models) provider. You can deploy “serverless” models through [Azure AI Foundry](https://ai.azure.com/) and pay as you go per token. You can browse the [Azure AI Foundry model catalog](https://ai.azure.com/explore/models) and use the [serverless API](https://learn.microsoft.com/en-us/azure/ai-studio/how-to/deploy-models-serverless-availability) filter to see the available models. There are two types of serverless deployments that require different configurations: OpenAI models and all other models. The OpenAI models, like `gpt-4o`, are deployed to `.openai.azure.com` endpoints, while the Azure AI models, like `Meta-Llama-3.1-405B-Instruct` are deployed to `.models.ai.azure.com` endpoints. They are configured slightly differently. ### Azure AI Inference[]() [Section titled “Azure AI Inference ”](#azure-ai-inference) The [Azure AI Model Inference API](https://learn.microsoft.com/en-us/azure/ai-foundry/model-inference/reference/reference-model-inference-api?tabs=javascript) provides a single endpoint to access a number of LLMs. This is a great way to experiment as you do not need to create deployments to access models. It supports both Entra ID and key-based authentication. ```js script({ model: "azure_ai_inference:gpt-4o" }); ``` [Play](https://youtube.com/watch?v=kh670Bxe_1E) #### Managed Identity (Entra ID) [Section titled “Managed Identity (Entra ID)”](#managed-identity-entra-id) 1. **Follow [these steps](https://learn.microsoft.com/en-us/azure/ai-foundry/model-inference/how-to/configure-entra-id?tabs=rest\&pivots=ai-foundry-portal) carefully** to configure the required Roles for your user. 2. Open and open your project 3. Configure the **Endpoint Target URL** as the `AZURE_AI_INFERENCE_API_ENDPOINT`. .env ```txt AZURE_AI_INFERENCE_API_ENDPOINT=https://.services.ai.azure.com/models ``` 4. Find the model name in the model catalog with the **Deployment options = Serverless API** filter and use it in your script, `model: "azure_id_inference:model-id"`. ```js script({ model: "azure_ai_inference:model-id" }); ``` #### API Key [Section titled “API Key”](#api-key) 1. Open , open your project and go the **Overview** page. 2. Configure the **Endpoint Target URL** as the `AZURE_AI_INFERENCE_API_ENDPOINT` variable and the key in `AZURE_AI_INFERENCE_API_KEY` in the `.env` file\***\*.\*\*** .env ```txt AZURE_AI_INFERENCE_API_ENDPOINT=https://.services.ai.azure.com/models AZURE_AI_INFERENCE_API_KEY=... ``` 3. Find the model name in the model catalog with the **Deployment options = Serverless API** filter and use it in your script, `model: "azure_id_inference:model-id"`. ```js script({ model: "azure_ai_inference:model-id" }); ``` #### API Version [Section titled “API Version”](#api-version) The default API version for Azure AI Inference is 2025-03-01-preview. You can change it by setting the `AZURE_AI_INFERENCE_API_VERSION` environment variable (see [Azure AI Documentation](https://learn.microsoft.com/en-us/azure/ai-services/openai/api-version-deprecation)) .env ```txt AZURE_AI_INFERENCE_API_VERSION=2025-01-01-preview ``` ### Aliases The following model aliases are attempted by default in GenAIScript. | Alias | Model identifier | | ---------------- | ---------------------- | | large | gpt-4o | | small | gpt-4o-mini | | vision | gpt-4o | | vision\_small | gpt-4o-mini | | reasoning | o1 | | reasoning\_small | o1-mini | | embeddings | text-embedding-3-small | ### Limitations * listModels * logprobs (and top logprobs) ignored * Ignore prediction of output tokens * topLogprobs ### Azure AI OpenAI Serverless[]() [Section titled “Azure AI OpenAI Serverless ”](#azure-ai-openai-serverless) The `azure_serverless` provider supports OpenAI models deployed through the Azure AI Foundry serverless deployments. It supports both Entra ID and key-based authentication. ```js script({ model: "azure_serverless:deployment-id" }); ``` #### Managed Identity (Entra ID) [Section titled “Managed Identity (Entra ID)”](#managed-identity-entra-id-1) 1. Open , open your project and go the **Deployments** page. 2. Deploy a **base model** from the catalog. You can use the `Deployment Options` -> `Serverless API` option to deploy a model as a serverless API. 3. Deploy an OpenAI base model. This will also create a new Azure OpenAI resource in your subscription (which may be invisible to you, more later). 4. Update the `.env` file with the deployment endpoint in the `AZURE_SERVERLESS_OPENAI_API_ENDPOINT` variable. .env ```txt AZURE_SERVERLESS_OPENAI_API_ENDPOINT=https://....openai.azure.com ``` 5. Go back to the **Overview** tab in your Azure AI Foundry project and click on **Open in Management center**. 6. Click on the **Azure OpenAI Service** resource, then click on the **Resource** external link which will take you back to the (underlying) Azure OpenAI service in Azure Portal. 7. Navigate to **Access Control (IAM)**, then **View My Access**. Make sure your user or service principal has the **Cognitive Services OpenAI User/Contributor** role. If you get a `401` error, click on **Add**, **Add role assignment** and add the **Cognitive Services OpenAI User** role to your user. At this point, you are ready to login with the Azure CLI and use the managed identity. 1. Install the [Azure CLI](https://learn.microsoft.com/en-us/javascript/api/overview/azure/identity-readme?view=azure-node-latest#authenticate-via-the-azure-cli). 2. Open a terminal and login ```sh az login ``` #### API Key [Section titled “API Key”](#api-key-1) 1. Open your [Azure OpenAI resource](https://portal.azure.com) and navigate to **Resource Management**, then **Keys and Endpoint**. 2. Update the `.env` file with the endpoint and the secret key (**Key 1** or **Key 2**) and the endpoint. .env ```txt AZURE_SERVERLESS_OPENAI_API_ENDPOINT=https://....openai.azure.com AZURE_SERVERLESS_OPENAI_API_KEY=... ``` ### Aliases The following model aliases are attempted by default in GenAIScript. | Alias | Model identifier | | ---------------- | ---------------------- | | large | gpt-4o | | small | gpt-4o-mini | | vision | gpt-4o | | vision\_small | gpt-4o-mini | | reasoning | o1 | | reasoning\_small | o1-mini | | embeddings | text-embedding-3-small | ### Limitations * listModels * Ignore prediction of output tokens ### Azure AI Serverless Models[]() [Section titled “Azure AI Serverless Models ”](#azure-ai-serverless-models) The `azure_serverless_models` provider supports non-OpenAI models, such as DeepSeek R1/v3, deployed through the Azure AI Foundary serverless deployments. ```js script({ model: "azure_serverless_models:deployment-id" }); ``` #### Managed Identity (Entra ID) [Section titled “Managed Identity (Entra ID)”](#managed-identity-entra-id-2) 1. Open your **Azure AI Project** resource in the [Azure Portal](https://portal.azure.com) 2. Navigate to **Access Control (IAM)**, then **View My Access**. Make sure your user or service principal has the **Azure AI Developer** role. If you get a `401` error, click on **Add**, **Add role assignment** and add the **Azure AI Developer** role to your user. 3. Configure the **Endpoint Target URL** as the `AZURE_SERVERLESS_MODELS_API_ENDPOINT`. .env ```txt AZURE_SERVERLESS_MODELS_API_ENDPOINT=https://...models.ai.azure.com ``` 4. Navigate to **deployments** and make sure that you have your LLM deployed and copy the Deployment Info name, you will need it in the script. 5. Update the `model` field in the `script` function to match the model deployment name in your Azure resource. ```js script({ model: "azure_serverless:deployment-info-name", ... }) ``` #### API Key [Section titled “API Key”](#api-key-2) 1. Open and open the **Deployments** page. 2. Deploy a **base model** from the catalog. You can use the `Deployment Options` -> `Serverless API` option to deploy a model as a serverless API. 3. Configure the **Endpoint Target URL** as the `AZURE_SERVERLESS_MODELS_API_ENDPOINT` variable and the key in `AZURE_SERVERLESS_MODELS_API_KEY` in the `.env` file\***\*.\*\*** .env ```txt AZURE_SERVERLESS_MODELS_API_ENDPOINT=https://...models.ai.azure.com AZURE_SERVERLESS_MODELS_API_KEY=... ``` 4. Find the deployment name and use it in your script, `model: "azure_serverless_models:deployment-id"`. #### Support for multiple inference deployments [Section titled “Support for multiple inference deployments”](#support-for-multiple-inference-deployments) You can update the `AZURE_SERVERLESS_MODELS_API_KEY` with a list of `deploymentid=key` pairs to support multiple deployments (each deployment has a different key). .env ```txt AZURE_SERVERLESS_MODELS_API_KEY=" model1=key1 model2=key2 model3=key3 " ``` ### Limitations * listModels * Ignore prediction of output tokens
# Azure AI Search
This is not a LLM provider, but a content search provider. However since it is configured similarly to the other Azure services, it is included here. It allows you to do [vector search](/genaiscript/reference/scripts/vector-search) of your documents using [Azure AI Search](https://learn.microsoft.com/en-us/azure/search/search-what-is-azure-search). ```js const index = await retrieval.index("animals", { type: "azure_ai_search", }); await index.insertOrUpdate(env.files); const docs = await index.search("cat dog"); ``` ### Managed Identity (Entra ID) [Section titled “Managed Identity (Entra ID)”](#managed-identity-entra-id) The service is configured through the `AZURE_AI_SEARCH_ENDPOINT` environment variable and the [configuration of the managed identity](https://learn.microsoft.com/en-us/azure/search/search-security-rbac?tabs=roles-portal-admin%2Croles-portal%2Croles-portal-query%2Ctest-portal%2Ccustom-role-portal). ```txt AZURE_AI_SEARCH_ENDPOINT=https://{{service-name}}.search.windows.net/ ``` 1. Open your **Azure AI Search** resource in the [Azure Portal](https://portal.azure.com), click on **Overview** and click on **Properties**. 2. Click on **API Access control** and enable **Role-based access control** or **Both**. 3. Open the **Access Control (IAM)** tab and make sure your user or service principal has the **Search Service Contributor** role. ### API Key [Section titled “API Key”](#api-key) The service is configured through the `AZURE_AI_SEARCH_ENDPOINT` and `AZURE_AI_SEARCH_API_KEY` environment variables. ```txt AZURE_AI_SEARCH_ENDPOINT=https://{{service-name}}.search.windows.net/ AZURE_AI_SEARCH_API_KEY=... ```
# Azure OpenAI
The [Azure OpenAI](https://learn.microsoft.com/en-us/azure/ai-services/openai/reference#chat-completions) provider, `azure` uses the `AZURE_OPENAI_...` environment variables. You can use a managed identity (recommended) or an API key to authenticate with the Azure OpenAI service. You can also use a service principal as documented in [automation](/genaiscript/getting-started/automating-scripts). ```js script({ model: "azure:deployment-id" }); ``` ### Managed Identity (Entra ID) [Section titled “Managed Identity (Entra ID)”](#managed-identity-entra-id) 1. Open your Azure OpenAI resource in the [Azure Portal](https://portal.azure.com) 2. Navigate to **Access Control (IAM)**, then **View My Access**. Make sure your user or service principal has the **Cognitive Services OpenAI User/Contributor** role. If you get a `401` error, click on **Add**, **Add role assignment** and add the **Cognitive Services OpenAI User** role to your user. 3. Navigate to **Resource Management**, then **Keys and Endpoint**. 4. Update the `.env` file with the endpoint. .env ```txt AZURE_OPENAI_API_ENDPOINT=https://....openai.azure.com ``` 5. Navigate to **deployments** and make sure that you have your LLM deployed and copy the `deployment-id`, you will need it in the script. 6. Open a terminal and **login** with [Azure CLI](https://learn.microsoft.com/en-us/javascript/api/overview/azure/identity-readme?view=azure-node-latest#authenticate-via-the-azure-cli). ```sh az login ``` 7. Update the `model` field in the `script` function to match the model deployment name in your Azure resource. ```js script({ model: "azure:deployment-id", ... }) ``` Set the `NODE_ENV` environment variable to `development` to enable the `DefaultAzureCredential` to work with the Azure CLI. Otherwise, it will use a chained token credential with `env`, `workload`, `managed identity`, `azure cli`, `azure dev cli`, `azure powershell`, `devicecode` credentials. ### Listing models [Section titled “Listing models”](#listing-models) There are two ways to list the models in your Azure OpenAI resource: use the Azure Management APIs or by calling into a custom `/models` endpoint. ### Using the management APIs (this is the common way) [Section titled “Using the management APIs (this is the common way)”](#using-the-management-apis-this-is-the-common-way) In order to allow GenAIScript to list deployments in your Azure OpenAI service, you need to provide the Subscription ID **and you need to use Microsoft Entra!**. 1. Open the Azure OpenAI resource in the [Azure Portal](https://portal.azure.com), open the **Overview** tab and copy the **Subscription ID**. 2. Update the `.env` file with the subscription id. .env ```txt AZURE_OPENAI_SUBSCRIPTION_ID="..." ``` 3. Test your configuration by running ```sh npx genaiscript models azure ``` #### Using the `/models` endpoint [Section titled “Using the /models endpoint”](#using-the-models-endpoint) This approach assumes you have set a OpenAI comptaible `/models` enpoint in your subscription that returns the list of deployments in a format compatible with the OpenAI API. You can set the `AZURE_OPENAI_API_MODELS_TYPE` environment variable to point to `openai`. .env ```txt AZURE_OPENAI_API_MODELS_TYPE="openai" ``` ### Custom credentials [Section titled “Custom credentials”](#custom-credentials) In some situations, the default credentials chain lookup may not work. In that case, you can specify an additional environment variable `AZURE_OPENAI_API_CREDENTIALS` with the type of credential that should be used. .env ```txt AZURE_OPENAI_API_CREDENTIALS=cli ``` The types are mapped directly to their [@azure/identity](https://www.npmjs.com/package/@azure/identity) credential types: * `cli` - `AzureCliCredential` * `env` - `EnvironmentCredential` * `powershell` - `AzurePowerShellCredential` * `devcli` - `AzureDeveloperCliCredential` * `workloadidentity` - `WorkloadIdentityCredential` * `managedidentity` - `ManagedIdentityCredential` Set `NODE_ENV` to `development` to use the `DefaultAzureCredential` with the GenAIScript. ### Custom token scopes [Section titled “Custom token scopes”](#custom-token-scopes) The default token scope for Azure OpenAI access is `https://cognitiveservices.azure.com/.default`. You can override this value using the `AZURE_OPENAI_TOKEN_SCOPES` environment variable. .env ```txt AZURE_OPENAI_TOKEN_SCOPES=... ``` ### API Version [Section titled “API Version”](#api-version) GenAIScript maintains a [default API version](https://learn.microsoft.com/en-us/azure/ai-services/openai/api-version-deprecation) to access Azure OpenAI. * current version: 2025-04-01-preview You can override this value using the `AZURE_OPENAI_API_VERSION` environment variable. .env ```txt AZURE_OPENAI_API_VERSION=2025-01-01-preview ``` You can also override the API version on a per-deployment basis by settings the `AZURE_OPENAI_API_VERSION_` environment variable (where deployment-id is capitalized). .env ```txt AZURE_OPENAI_API_VERSION_GPT-4O=2025-01-01-preview ``` ### API Key [Section titled “API Key”](#api-key) 1. Open your [Azure OpenAI resource](https://portal.azure.com) and navigate to **Resource Management**, then **Keys and Endpoint**. 2. Update the `.env` file with the secret key (**Key 1** or **Key 2**) and the endpoint. .env ```txt AZURE_OPENAI_API_KEY=... AZURE_OPENAI_API_ENDPOINT=https://....openai.azure.com ``` 3. The rest of the steps are the same: Find the deployment name and use it in your script, `model: "azure:deployment-id"`. ### Aliases The following model aliases are attempted by default in GenAIScript. | Alias | Model identifier | | ----- | ---------------- | ### Limitations * Ignore prediction of output tokens
# DeepSeek
`deepseek` is the [DeepSeek (https://www.deepseek.com/)](https://www.deepseek.com/) chat model provider. It uses the `DEEPSEEK_API_...` environment variables. 1. Create a new secret key from the [DeepSeek API Keys portal](https://platform.deepseek.com/usage). 2. Update the `.env` file with the secret key. .env ```txt DEEPSEEK_API_KEY=sk_... ``` 3. Set the `model` field in `script` to `deepseek:deepseek:deepseek-chat` which is currently the only supported model. ```js script({ model: "deepseek:deepseek-chat", ... }) ``` ### Aliases The following model aliases are attempted by default in GenAIScript. | Alias | Model identifier | | ------ | ---------------- | | large | deepseek-chat | | small | deepseek-chat | | vision | deepseek-chat | ### Limitations * listModels
# Docker Model Runner
The `docker` provider connects to the [Docker Model Runner](https://docs.docker.com/model-runner/) local server. It assumes GenAIScript is running in a container uses the `http://model-runner.docker.internal/engines/v1/` endpoint by default. 1. Install [Docker](https://docs.docker.com/) To use Docker Model RRunner models, use the `docker:modelid` syntax. If you change the default server URL, you can set the `DOCKER_MODEL_RUNNER_API_BASE` environment variable. .env ```txt DOCKER_MODEL_RUNNER_API_BASE=... ``` ### Limitations * listModels * Ignore prediction of output tokens * top\_p ignored
# GitHub Models
The [GitHub Models](https://github.com/marketplace/models) provider, `github`, allows running models through the GitHub Marketplace. This provider is useful for prototyping and subject to [rate limits](https://docs.github.com/en/github-models/prototyping-with-ai-models#rate-limits) depending on your subscription. ```js script({ model: "github:openai/gpt-4o" }); ``` ### Codespace configuration [Section titled “Codespace configuration”](#codespace-configuration) If you are running from a [GitHub Codespace](https://github.com/features/codespaces), the token is already configured for you… It just works. ### GitHub Actions configuration [Section titled “GitHub Actions configuration”](#github-actions-configuration) As of [April 2025](https://github.blog/changelog/2025-04-14-github-actions-token-integration-now-generally-available-in-github-models/), you can use the GitHub Actions token (`GITHUB_TOKEN`) to call AI models directly inside your workflows. 1. Ensure that the `models` permission is enabled in your workflow configuration. genai.yml ```yaml permissions: models: read ``` 2. Pass the `GITHUB_TOKEN` when running `genaiscript` genai.yml ```yaml run: npx -y genaiscript run ... env: GITHUB_TOKEN: ${{ secrets.GITHUB_TOKEN }} ``` Read more in the [GitHub Documentation](https://docs.github.com/en/github-models/integrating-ai-models-into-your-development-workflow#using-ai-models-with-github-actions) ### Configuring with your own token [Section titled “Configuring with your own token”](#configuring-with-your-own-token) If you are not using GitHub Actions or Codespaces, you can use your own token to access the models. 1. Create a [GitHub personal access token](https://github.com/settings/tokens/new). The token should not have any scopes or permissions. 2. Update the `.env` file with the token. .env ```txt GITHUB_TOKEN=... ``` To configure a specific model, 1. Open the [GitHub Marketplace](https://github.com/marketplace/models) and find the model you want to use. 2. Copy the model name from the Javascript/Python samples ```js const modelName = "microsoft/Phi-3-mini-4k-instruct"; ``` to configure your script. ```js script({ model: "github:microsoft/Phi-3-mini-4k-instruct", }); ``` If you are already using `GITHUB_TOKEN` variable in your script and need a different one for GitHub Models, you can use the `GITHUB_MODELS_TOKEN` variable instead. ### GitHub CLI authentication [Section titled “GitHub CLI authentication”](#github-cli-authentication) If you don’t have environment variables configured, GenAIScript will attempt to use the GitHub CLI (`gh`) to retrieve your authentication token. 1. Install the GitHub CLI from and ensure it’s available in your PATH. 2. Authenticate with GitHub using the CLI: ```bash gh auth login ``` This approach is convenient for local development but requires that you have the GitHub CLI installed and authenticated. ### Organization Inference Point [Section titled “Organization Inference Point”](#organization-inference-point) By default, GitHub Models uses the current actor to run inference. You can specify an organization in the `GITHUB_MODELS_ORG` environment to run inference on behalf of that organization instead. .env ```txt GITHUB_MODELS_ORG=my-org ``` The actor must be a member of the organization and have enabled models in the organization (see [documentation](https://docs.github.com/en/rest/models/embeddings#run-an-embedding-request-attributed-to-an-organization)). ### `o1-preview` and `o1-mini` models [Section titled “o1-preview and o1-mini models”](#o1-preview-and-o1-mini-models) Currently these models do not support streaming and system prompts. GenAIScript handles this internally. ```js script({ model: "github:openai/o1-mini", }); ``` ### Aliases The following model aliases are attempted by default in GenAIScript. | Alias | Model identifier | | ---------------- | ----------------------------- | | large | openai/gpt-4.1 | | small | openai/gpt-4.1-mini | | tiny | openai/gpt-4.1-nano | | vision | openai/gpt-4.1 | | reasoning | openai/o3 | | reasoning\_small | openai/o3-mini | | embeddings | openai/text-embedding-3-small | ### Limitations * Smaller context windows, and rate limiting in free tier. See https\://docs.github.com/en/github-models/use-github-models/prototyping-with-ai-models. * listModels * logprobs (and top logprobs) ignored * Ignore prediction of output tokens * topLogprobs
# GitHub Copilot Chat
If you have access to **GitHub Copilot Chat in Visual Studio Code**, GenAIScript will be able to leverage those [language models](https://code.visualstudio.com/api/extension-guides/language-model) as well. This mode is useful to run your scripts without having a separate LLM provider or local LLMs. However, those models are not available from the command line and have additional limitations and rate limiting defined by the GitHub Copilot platform. There is no configuration needed as long as you have GitHub Copilot installed and configured in Visual Studio Code. You can force using this model by using `github_copilot_chat:*` as a model name or set the **GenAIScript > Language Chat Models Provider** setting to true. This will default GenAIScript to use this provider for model aliases. [Play](https://youtube.com/watch?v=LRrVMiZgWJg) 1. Install [GitHub Copilot Chat](https://marketplace.visualstudio.com/items?itemName=GitHub.copilot-chat) (emphasis on **Chat**) 2. run your script 3. Confirm that you are allowing GenAIScript to use the GitHub Copilot Chat models. 4. select the best chat model that matches the one you have in your script 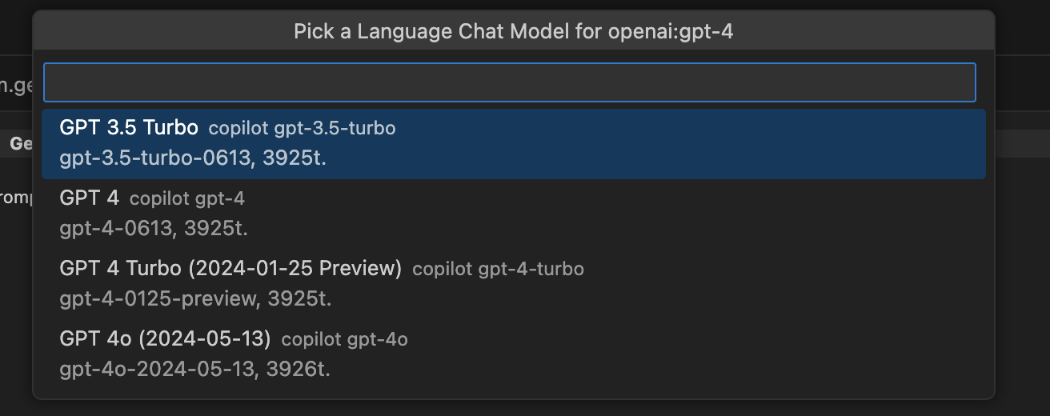 (This step is skipped if you already have mappings in your settings) The mapping of GenAIScript model names to Visual Studio Models is stored in the settings.
# Google AI
## Google AI[]() [Section titled “Google AI ”](#google-ai) The `google` provider allows you to use Google AI models. It gives you access 1. Open [Google AI Studio](https://aistudio.google.com/app/apikey) and create a new API key. 2. Update the `.env` file with the API key. .env ```txt GEMINI_API_KEY=... ``` 3. Find the model identifier in the [Gemini documentation](https://ai.google.dev/gemini-api/docs/models/gemini) and use it in your script or cli with the `google` provider. ```py ... const model = genAI.getGenerativeModel({ model: "gemini-1.5-pro-latest", }); ... ``` then use the model identifier in your script. ```js script({ model: "google:gemini-1.5-pro-latest" }); ``` ### Aliases The following model aliases are attempted by default in GenAIScript. | Alias | Model identifier | | ---------------- | ---------------------------------- | | large | gemini-1.5-flash-latest | | small | gemini-1.5-flash-latest | | vision | gemini-1.5-flash-latest | | long | gemini-1.5-flash-latest | | reasoning | gemini-2.0-flash-thinking-exp-1219 | | reasoning\_small | gemini-2.0-flash-thinking-exp-1219 | | embeddings | text-embedding-004 | ### Limitations * Uses [OpenAI compatibility layer](https://ai.google.dev/gemini-api/docs/openai) * listModels * logprobs (and top logprobs) ignored * Ignore prediction of output tokens * Seed ignored * Tools implemented as fallback tools automatically. * topLogprobs
# Hugging Face
The `huggingface` provider allows you to use [Hugging Face Models](https://huggingface.co/models?other=text-generation-inference) using [Text Generation Inference](https://huggingface.co/docs/text-generation-inference/index). ```js script({ model: "huggingface:microsoft/Phi-3-mini-4k-instruct", }); ``` To use Hugging Face models with GenAIScript, follow these steps: 1. Sign up for a [Hugging Face account](https://huggingface.co/) and obtain an API key from their [console](https://huggingface.co/settings/tokens). If you are creating a **Fined Grained** token, enable the **Make calls to the serverless inference API** option. 2. Add your Hugging Face API key to the `.env` file as `HUGGINGFACE_API_KEY`, `HF_TOKEN` or `HUGGINGFACE_TOKEN` variables. .env ```txt HUGGINGFACE_API_KEY=hf_... ``` 3. Find the model that best suits your needs by visiting the [HuggingFace models](https://huggingface.co/models?other=text-generation-inference). 4. Update your script to use the `model` you choose. ```js script({ ... model: "huggingface:microsoft/Phi-3-mini-4k-instruct", }) ``` ### Logging [Section titled “Logging”](#logging) You can enable the `genaiscript:huggingface` and `genaiscript:huggingface:msg` [logging namespaces](/genaiscript/reference/scripts/logging) for more information about the requests and responses: ### Aliases The following model aliases are attempted by default in GenAIScript. | Alias | Model identifier | | ---------- | ---------------------------------------- | | large | meta-llama/Llama-3.3-70B-Instruct | | small | microsoft/phi-4 | | vision | meta-llama/Llama-3.2-11B-Vision-Instruct | | embeddings | nomic-ai/nomic-embed-text-v1.5 | ### Limitations * Uses [OpenAI compatibility layer](https://huggingface.github.io/text-generation-inference/) * listModels * Ignore prediction of output tokens
# Jan
The `jan` provider connects to the [Jan](https://jan.ai/) local server. 1. [Jan](https://jan.ai/) 2. Open Jan and download the models you plan to use. You will find the model identifier in the model description page. 3. Click on the **Local API Server** icon (lower left), then **Start Server**. Keep the desktop application running! To use Jan models, use the `jan:modelid` syntax. If you change the default server URL, you can set the `JAN_API_BASE` environment variable. .env ```txt JAN_API_BASE=http://localhost:1234/v1 ``` ### Limitations * Ignore prediction of output tokens * top\_p ignored
# LiteLLM
The [LiteLLM](https://docs.litellm.ai/) proxy gateway provides a OpenAI compatible API for running models locally. Configure the `LITELLM_...` keys to set the key and optionally the base url. Use the `litellm` provider. .env ```txt LITELLM_API_KEY="..." #LITELLM_API_BASE="..." ```
# LLaMA.cpp
[LLaMA.cpp](https://github.com/ggerganov/llama.cpp/tree/master/examples/server) also allow running models locally or interfacing with other LLM vendors. 1. Update the `.env` file with the local server information. .env ```txt OPENAI_API_BASE=http://localhost:... ```
# Llamafile
is a single file desktop application that allows you to run an LLM locally. The provider is `llamafile` and the model name is ignored.
# LM Studio
The `lmstudio` provider connects to the [LMStudio](https://lmstudio.ai/) headless server. and allows to run local LLMs. 1. Install [LMStudio](https://lmstudio.ai/download) (v0.3.5+) 2. Open LMStudio 3. Open the [Model Catalog](https://lmstudio.ai/models), select your model and load it at least once so it is downloaded locally. 4. Open the settings (Gearwheel icon) and enable **Enable Local LLM Service**. 5. GenAIScript assumes the local server is at `http://localhost:1234/v1` by default. Add a `LMSTUDIO_API_BASE` environment variable to change the server URL. .env ```txt LMSTUDIO_API_BASE=http://localhost:2345/v1 ``` Find the model **API identifier** in the dialog of loaded models then use that identifier in your script: ```js script({ model: "lmstudio:llama-3.2-1b-instruct", }); ``` * GenAIScript uses the [LMStudio CLI](https://lmstudio.ai/docs/cli) to pull models on demand. * Specifying the quantization is currently not supported. ### Aliases The following model aliases are attempted by default in GenAIScript. | Alias | Model identifier | | ---------- | ------------------------------------ | | embeddings | text-embedding-nomic-embed-text-v1.5 | ### Limitations * Ignore prediction of output tokens ### LM Studio and Hugging Face Models [Section titled “LM Studio and Hugging Face Models”](#lm-studio-and-hugging-face-models) Follow [this guide](https://huggingface.co/blog/yagilb/lms-hf) to load Hugging Face models into LMStudio. ## Jan [Section titled “Jan”](#jan) The `jan` provider connects to the [Jan](https://jan.ai/) local server. 1. [Jan](https://jan.ai/) 2. Open Jan and download the models you plan to use. You will find the model identifier in the model description page. 3. Click on the **Local API Server** icon (lower left), then **Start Server**. Keep the desktop application running! To use Jan models, use the `jan:modelid` syntax. If you change the default server URL, you can set the `JAN_API_BASE` environment variable. .env ```txt JAN_API_BASE=http://localhost:1234/v1 ``` ### Limitations * Ignore prediction of output tokens * top\_p ignored
# LocalAI
[LocalAI](https://localai.io/) act as a drop-in replacement REST API that’s compatible with OpenAI API specifications for local inferencing. It uses free Open Source models and it runs on CPUs. LocalAI acts as an OpenAI replacement, you can see the [model name mapping](https://localai.io/basics/container/#all-in-one-images) used in the container, like `gpt-4` is mapped to `phi-2`. 1. Install Docker. See the [LocalAI documentation](https://localai.io/basics/getting_started/#prerequisites) for more information. 2. Update the `.env` file and set the api type to `localai`. .env ```txt OPENAI_API_TYPE=localai ``` To start LocalAI in docker, run the following command: ```sh docker run -p 8080:8080 --name local-ai -ti localai/localai:latest-aio-cpu docker start local-ai docker stats echo "LocalAI is running at http://127.0.0.1:8080" ```
# Mistral AI
The `mistral` provider allows you to use [Mistral AI Models](https://mistral.ai/technology/#models) using the [Mistral API](https://docs.mistral.ai/). ```js script({ model: "mistral:mistral-large-latest" }); ``` 1. Sign up for a [Mistral AI account](https://mistral.ai/) and obtain an API key from their [console](https://console.mistral.ai/). 2. Add your Mistral AI API key to the `.env` file: .env ```txt MISTRAL_API_KEY=... ``` 3. Update your script to use the `model` you choose. ```js script({ ... model: "mistral:mistral-large-latest", }) ``` ### Aliases The following model aliases are attempted by default in GenAIScript. | Alias | Model identifier | | ------ | -------------------- | | large | mistral-large-latest | | small | mistral-small-latest | | vision | pixtral-large-latest | ### Limitations * Ignore prediction of output tokens
# Ollama
[Ollama](https://ollama.ai/) is a desktop application that lets you download and run models locally. Running tools locally may require additional GPU resources depending on the model you are using. Use the `ollama` provider to access Ollama models. 1. Start the Ollama application or ```sh ollama serve ``` 2. Update your script to use the `ollama:phi3.5` model (or any [other model](https://ollama.com/library) or from [Hugging Face](https://huggingface.co/docs/hub/en/ollama)). ```js script({ ..., model: "ollama:phi3.5", }) ``` GenAIScript will automatically pull the model, which may take some time depending on the model size. The model is cached locally by Ollama. 3. If Ollama runs on a server or a different computer or on a different port, you have to configure the `OLLAMA_HOST` environment variable to connect to a remote Ollama server. .env ```txt OLLAMA_HOST=https://:/ # server url OLLAMA_HOST=0.0.0.0:12345 # different port ``` You can specify the model size by adding the size to the model name, like `ollama:llama3.2:3b`. ```js script({ ..., model: "ollama:llama3.2:3b", }) ``` ### Ollama with Hugging Face models [Section titled “Ollama with Hugging Face models”](#ollama-with-hugging-face-models) You can also use [GGUF models](https://huggingface.co/models?library=gguf) from [Hugging Face](https://huggingface.co/docs/hub/en/ollama). ```js script({ ..., model: "ollama:hf.co/bartowski/Llama-3.2-1B-Instruct-GGUF", }) ``` ### Ollama with Docker [Section titled “Ollama with Docker”](#ollama-with-docker) You can conviniately run Ollama in a Docker container. * if you are using a [devcontainer](https://code.visualstudio.com/devcontainers) or a [GitHub Codespace](https://github.com/features/codespaces), make sure to add the `docker-in-docker` option to your `devcontainer.json` file. ```json { "features": { "docker-in-docker": "latest" } } ``` * start the [Ollama container](https://ollama.com/blog/ollama-is-now-available-as-an-official-docker-image) ```sh docker run -d -v ollama:/root/.ollama -p 11434:11434 --name ollama ollama/ollama ``` * stop and remove the Ollama containers ```sh docker stop ollama && docker rm ollama ``` ### Aliases The following model aliases are attempted by default in GenAIScript. | Alias | Model identifier | | ---------- | ---------------- | | embeddings | nomic-embed-text | ### Limitations * Uses [OpenAI compatibility layer](https://github.com/ollama/ollama/blob/main/docs/openai.md) * logit\_bias ignored * Ignore prediction of output tokens
# OpenAI
`openai` is the OpenAI chat model provider. It uses the `OPENAI_API_...` environment variables. 1. [Upgrade your account](https://platform.openai.com/settings/organization/billing/overview) to get access to the models. You will get 404s if you do not have a paying account. 2. Create a new secret key from the [OpenAI API Keys portal](https://platform.openai.com/api-keys). 3. Update the `.env` file with the secret key. .env ```txt OPENAI_API_KEY=sk_... ``` 4. Find the model you want to use from the [OpenAI API Reference](https://platform.openai.com/docs/models/gpt-4o) or the [OpenAI Chat Playground](https://platform.openai.com/playground/chat). 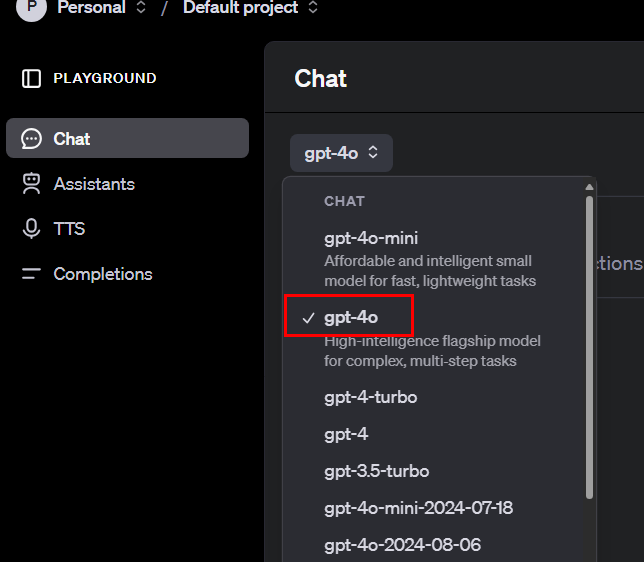 5. Set the `model` field in `script` to the model you want to use. ```js script({ model: "openai:gpt-4o", ... }) ``` ## Logging [Section titled “Logging”](#logging) You can enable the `genaiscript:openai` and `genaiscript:openai:msg` [logging namespaces](/genaiscript/reference/scripts/logging) for more information about the requests and responses: ### Aliases The following model aliases are attempted by default in GenAIScript. | Alias | Model identifier | | ---------------- | ---------------------- | | large | gpt-4.1 | | small | gpt-4.1-mini | | tiny | gpt-4.1-nano | | vision | gpt-4.1 | | vision\_small | gpt-4.1-mini | | embeddings | text-embedding-3-small | | reasoning | o1 | | reasoning\_small | o3-mini | | transcription | whisper-1 | | speech | tts-1 | | image | gpt-image-1 | | intent | gpt-4.1-mini |
# OpenRouter
You can configure the OpenAI provider to use the [OpenRouter](https://openrouter.ai/docs/quick-start) service instead by setting the `OPENAI_API_BASE` to `https://openrouter.ai/api/v1`. You will also need an [api key](https://openrouter.ai/settings/keys). .env ```txt OPENAI_API_BASE=https://openrouter.ai/api/v1 OPENAI_API_KEY=... ``` Then use the OpenRouter model name in your script: ```js script({ model: "openai:openai/gpt-4o-mini" }); ``` By default, GenAIScript will set the site URL and name to `GenAIScript` but you can override these settings with your own values: .env ```txt OPENROUTER_SITE_URL=... # populates HTTP-Referer header OPENROUTER_SITE_NAME=... # populate X-Title header ```
# SGLang
[SGLang](https://docs.sglang.ai/) is a fast serving framework for large language models and vision language models. The provider is `sglang` and the model name is ignored.
# vLLM
## vLLM [Section titled “vLLM”](#vllm) [vLLM](https://docs.vllm.ai/) is a fast and easy-to-use library for LLM inference and serving. The provider is `vllm` and the model name is ignored.
# Whisper ASR WebServices
This `whisperasr` provider allows to configure a [transcription](/genaiscript/reference/scripts/transcription) task to use the [Whisper ASR WebService project](https://ahmetoner.com/whisper-asr-webservice/). ```js const transcript = await transcribe("video.mp4", { model: "whisperasr:default", }); ``` This whisper service can run locally or in a docker container (see [documentation](https://ahmetoner.com/whisper-asr-webservice/)). CPU ```sh docker run -d -p 9000:9000 -e ASR_MODEL=base -e ASR_ENGINE=openai_whisper onerahmet/openai-whisper-asr-webservice:latest ``` You can also override the `transcription` model alias to change the default model used by `transcribe`. ## GitHub Actions [Section titled “GitHub Actions”](#github-actions) When running GenAIScript with whisper-asr in [GitHub Actions](/genaiscript/getting-started/automating-scripts), you need to set up the whisper-asr container as a service since the whisper-asr provider requires its own containerized service to function. ### Service Container Configuration [Section titled “Service Container Configuration”](#service-container-configuration) Configure the whisper-asr service container in your workflow: .github/workflows/transcription.yml ```yaml name: Transcription with Whisper ASR on: [push, pull_request] jobs: transcribe: runs-on: ubuntu-latest services: whisper-asr: image: onerahmet/openai-whisper-asr-webservice:latest ports: - 9000:9000 env: ASR_MODEL: base ASR_ENGINE: openai_whisper options: >- --health-cmd "curl -f http://localhost:9000/health || exit 1" --health-interval 30s --health-timeout 10s --health-retries 5 steps: - uses: actions/checkout@v4 - uses: actions/setup-node@v4 with: node-version: "22" - name: Run transcription script run: npx --yes genaiscript run transcript-script audio.wav env: WHISPERASR_API_BASE: http://whisper-asr:9000 # Add your LLM provider secrets here OPENAI_API_KEY: ${{ secrets.OPENAI_API_KEY }} ``` ### Environment Variables [Section titled “Environment Variables”](#environment-variables) Set the `WHISPERASR_API_BASE` environment variable to point to your whisper-asr service: ```yaml env: WHISPERASR_API_BASE: http://whisper-asr:9000 ```
# Windows AI
The `windows` provider support [AI for Windows Apps](https://learn.microsoft.com/en-us/windows/ai/) which provides state-of-the-art local models, with NPU hardware support. 1. Install the [AI Toolkit for Visual Studio Code](https://marketplace.visualstudio.com/items?itemName=ms-windows-ai-studio.windows-ai-studio) extension. 2. Open the **Model Catalog** and add a model from the **ONNX Models** runtime section. 3. Right click on the model in the Explorer view and select **Copy model name** 4. Set the model name in your script to the model name you copied. ```js script({ model: "windows:Phi-4-mini-gpu-int4-rtn-block-32", }); ``` See [Azure AI Toolkit getting started guide](https://learn.microsoft.com/en-us/windows/ai/toolkit/toolkit-getting-started).