Guides: Guides on various LLM programming topics
# Bicep Best Practices
> Learn how to apply best practices to Azure Bicep files for more efficient and maintainable infrastructure as code.
[Azure Bicep](https://learn.microsoft.com/en-us/azure/azure-resource-manager/bicep/overview?tabs=bicep) is a Domain Specific Language (DSL) for deploying Azure resources declaratively. It is a language that is designed to be a more readable and maintainable way to define Azure resources. Bicep comes with a [linter](https://learn.microsoft.com/en-us/azure/azure-resource-manager/bicep/linter) that detects various faults, but also comes with online best practices which are not completely covered by the linter. ## Web App Basic Linux [Section titled “Web App Basic Linux”](#web-app-basic-linux) The following is a Bicep file that deploys a web app with a Linux app service plan. It is the **microsoft.web/webapp-basic-linux/main.bicep** sample template in the [bicep playground](https://azure.github.io/bicep/). web-app-basic-linux.bicep ```bicep @description('Base name of the resource such as web app name and app service plan ') @minLength(2) param webAppName string = 'AzureLinuxApp' @description('The SKU of App Service Plan ') param sku string = 'S1' @description('The Runtime stack of current web app') param linuxFxVersion string = 'php|7.4' @description('Location for all resources.') param location string = resourceGroup().location var webAppPortalName = '${webAppName}-webapp' #disable-next-line genaiscript var appServicePlanName = 'AppServicePlan-${webAppName}' resource appServicePlan 'Microsoft.Web/serverfarms@2022-03-01' = { name: appServicePlanName location: location sku: { name: sku } kind: 'linux' properties: { reserved: true } } resource webAppPortal 'Microsoft.Web/sites@2022-03-01' = { name: webAppPortalName location: location kind: 'app' properties: { serverFarmId: appServicePlan.id siteConfig: { linuxFxVersion: linuxFxVersion ftpsState: 'FtpsOnly' } httpsOnly: true } identity: { type: 'SystemAssigned' } } ``` ## Script [Section titled “Script”](#script) The file is `linter` clean, but some improvements could be made with best practices. The following script will apply best practices to the Bicep file. bicep-best-practices.genai.mjs ```js script({ title: "Bicep Best Practices", temperature: 0, system: ["system", "system.annotations"], accept: ".bicep", }); def("FILE", env.files, { endsWith: ".bicep" }); $`You are an expert at Azure Bicep. Review the bicep in FILE and generate errors to enhance the script base on best practices (https://learn.microsoft.com/en-us/azure/azure-resource-manager/bicep/best-practices). - Generate the top 3 most important annotations. - Limit range to a single line. - Do NOT generate notes. - If a line starts with "#disable-next-line genaiscript", ignore the next line. `; ``` * line numbers are added to the file content to help the LLM precisely locate the issues. ```js def("FILE", env.files, { endsWith: ".bicep", lineNumbers: true, }); ``` * the script uses a builtin support for [annotations](/genaiscript/reference/scripts/annotations) to generate parsable warnings and errors. Annotations are automatically integrated as problems in VSCode or as build errors in the CI/CD pipeline. ```js $`... and generate annotations ...`; ``` * added support to ignore false positives using the `#disable-next-line genaiscript` comment ```js $`- If a line starts with "#disable-next-line genaiscript", ignore the next line.`; ``` * GPT-4 already knows about the best practices for Bicep, no need to repeat them! ## Results [Section titled “Results”](#results) The LLM generates 3 annotations for the Bicep file. The annotations are surfaced as squiggly lines in VSCode. 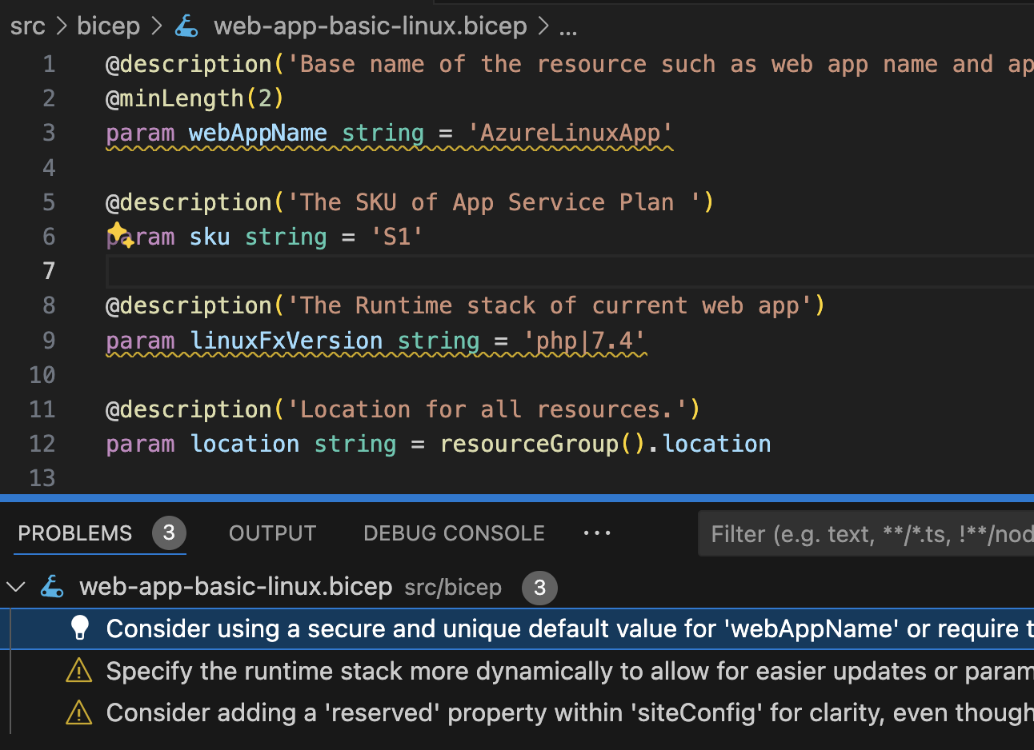
# Blocks Localization
> Learn how to localize MakeCode programming blocks while preserving block properties and variable names for international audiences.
This is another instance of using the LLM to produce translation of natural strings with an embedded DSL, similarly to the [Documentation Translation](/genaiscript/case-studies/documentation-translations) guide. [MakeCode](https://makecode.com) uses a [microformat](https://makecode.com/defining-blocks) to define the shape of coding blocks. When translating the format strings, it is critical to converse the properties of the blocks, such as the number of arguments, their types, and the order of the arguments. ## Don’t break the blocks! [Section titled “Don’t break the blocks!”](#dont-break-the-blocks) The [localization strings](https://github.com/microsoft/pxt-jacdac/blob/45d3489c0b96ed0f74c9bbea53fb0714ae9f7fcc/buzzer/_locales/jacdac-buzzer-strings.json#L1) for the buzzer library are: jacdac-buzzer-strings.json ````json { "jacdac.BuzzerCmd.PlayNote": "Play a note at the given frequency and volume.", "jacdac.BuzzerCmd.PlayTone": "Play a PWM tone with given period and duty for given duration.\nThe duty is scaled down with `volume` register.\nTo play tone at frequency `F` Hz and volume `V` (in `0..1`) you will want\nto send `P = 1000000 / F` and `D = P * V / 2`.\n* ```\nconst [period, duty, duration] = jdunpack<[number, number, number]>(buf, \"u16 u16 u16\")\n```", "jacdac.BuzzerReg.Volume": "Read-write ratio u0.8 (uint8_t). The volume (duty cycle) of the buzzer.\n* ```\nconst [volume] = jdunpack<[number]>(buf, \"u0.8\")\n```", "modules.BuzzerClient.playTone|block": "play %music tone|at %note|for %duration", "{id:category}Jacdac": "Jacdac", "{id:category}Modules": "Modules", "{id:group}Music": "Music" } ```` For example, the string for the [Jacdac buzzer play tone block](https://github.com/microsoft/pxt-jacdac/blob/45d3489c0b96ed0f74c9bbea53fb0714ae9f7fcc/buzzer/_locales/jacdac-buzzer-strings.json#L5-L6) contains reference to variables (`%music`) that should be maintained in the translated string. ```json { ... "modules.BuzzerClient.playTone|block": "play %music tone|at %note|for %duration", ... } ``` and Bing Translate gives us the following translation Bing Translator ```txt %Musikton|bei %Note|für %Dauer abspielen ``` As one can see, bing translated the `%variable` name which will break the block definition. The [GenAIScript translation](https://github.com/microsoft/pxt-jacdac/blob/45d3489c0b96ed0f74c9bbea53fb0714ae9f7fcc/buzzer/_locales/de/jacdac-buzzer-strings.json#L5) is correct. GenAIScript ```txt spiele %music Ton|bei %note|für %duration ``` If you look closely in the script source, you will find guidance in the prompt to properly handle the variables. block-translator.genai.mjs ```js $`... - Every variable name is prefixed with a '%' or a '$', like %foo or $bar. - Do NOT translate variable names. ... `; ``` ## Custom data format [Section titled “Custom data format”](#custom-data-format) Another challenge with translations is that the localized string often contain escaped characters that break formats like JSON or YAML. Therefore, we use a custom simple `key=value` format to encode the strings, to avoid encoding issues. We use the `defFileMerge` feature to convert the parse key-value file, and merge them with the existing translations. block-translator.genai.mjs ```js // register a callback to custom merge files defFileMerge((filename, label, before, generated) => { if (!filename.endsWith("-strings.json")) return undefined; // load existing translatins const olds = JSON.parse(before || "{}"); // parse out key-value lines into a JavaScript record object const news = generated .split(/\n/g) .map((line) => /^([^=]+)=(.+)$/.exec(line)) .filter((m) => !!m) .reduce((o, m) => { const [, key, value] = m; // assign o[key] = value; return o; }, {}); // merge new translations with olds ones Object.assign(olds, news); // return stringified json return JSON.stringify(olds, null, 2); }); ``` ## Parameterization for Automation [Section titled “Parameterization for Automation”](#parameterization-for-automation) The language code `langCode` is pulled from [variables](/genaiscript/reference/scripts/variables) `env.vars` or defaulted to `de`. ```js const langCode = env.vars.lang || "de"; ``` This technique allows to reconfigure these variables from the command line using the `--vars lang=fr` argument. ## Script [Section titled “Script”](#script) The full script is show below. block-translator.genai.mjs ```js script({ title: "MakeCode Blocks Localization", description: "Translate block strings that define blocks in MakeCode", group: "MakeCode", temperature: 0, }) // language parameterization const langCode = (env.vars.lang || "de") + "" // given a language code, refer to the full name to help the LLM const langName = { fr: "French", "es-ES": "Spanish", de: "German", sr: "Serbian", vi: "Vietnamese", it: "Italian", }[langCode] if (!langName) cancel("unknown language") // assume we've been pointed at the .json file const file = env.files[0] if (!file) cancel("no strings file found") const { filename, content } = file const dir = path.dirname(filename) // read the stings, which are stored as a JSON record const strings = JSON.parse(content) // find the existing translation and remove existing translations const trfn = path.join(dir, langCode, path.basename(filename)) const translated = await workspace.readJSON(trfn) if (translated) for (const k of Object.keys(strings)) if (translated[k]) delete strings[k] // shortcut: all translation is done if (Object.keys(strings).length === 0) cancel(`no strings to translate`) // use simple .env format key=value format const contentToTranslate = Object.entries(strings) .map(([k, v]) => `${k}=${v.replace(/(\.|\n).*/s, ".").trim()}`) .join("\n") // the prompt engineering piece $` ## Role You are an expert at Computer Science education. You are an expert TypeScript coder. You are an expert at Microsoft MakeCode. You are an expert ${langName} translator. ## Task Translate the content of ORIGINAL to ${langName} (lang-iso '${langCode}'). The ORIGINAL files are formatted with one key and localized value pair per line as follows. \`\`\` key1=en value1 key2=en value2 ... \`\`\` Write the translation to file ${trfn} formatted with one key and localized value pair per line as follows (DO NOT use JSON). \`\`\` file="${trfn}" key1=${langCode} value1 key2=${langCode} value2 ... \`\`\` ## Recommendations - DO NOT translate the keys - DO translate the values to ${langName} (lang-iso '${langCode}') - DO NOT use foul language. ### Block Strings The value for keys ending with "|block" are MakeCode block strings (https://makecode.com/defining-blocks) and should be translated following these rules: - Every variable name is prefixed with a '%' or a '$', like %foo or $bar. - Do NOT translate variable names. - Some variable names have a value, like '%foo=toggleOnOff'. The value should be NOT translated. - All variables in the original string should be in the translated string. - Make sure to translate '\\%' to '\\%' and '\\$' to '\\$' if they are not variables. - Event string starts with 'on', like 'on pressed'. Interpret 'on' as 'when' when, like 'when pressed', when translating. - The translations of "...|block" string should be short. ` // add to prompt context def( "ORIGINAL", { filename, content: contentToTranslate, }, { language: "txt" } ) // merge the translations with the old one and marshal yaml to json defFileMerge((filename, label, before, generated) => { if (!filename.endsWith("-strings.json")) return undefined // existing translatins const olds = JSON.parse(before || "{}") // parse out kv const news = generated .split(/\n/g) .map((line) => /^([^=]+)=(.+)$/.exec(line)) .filter((m) => !!m) .reduce((o, m) => { const [, key, value] = m // assign o[key] = value return o }, {}) // merge new translations with olds ones Object.assign(olds, news) // return stringified json return JSON.stringify(olds, null, 2) }) ``` The result from this script can be inspected in this [pull request](https://github.com/microsoft/pxt-jacdac/pull/108).
# Documentation Translations
> Explore the challenges and solutions for localizing MakeCode documentation with custom macros while maintaining rich rendering in multiple languages.
[Microsoft MakeCode](https://makecode.com) is a web-based platform for creating engaging computer science learning experiences. It provides a block-based programming environment that allows students to create games, animations, and interactive stories. The MakeCode documentation and tutorials uses [markdown with many additional macros and micro syntaxes](https://makecode.com/writing-docs) to create rich-rendered tutorials and documentations, like the [Rock Paper Scissors tutorial](https://makecode.microbit.org/projects/rock-paper-scissors). ## Localization challenge [Section titled “Localization challenge”](#localization-challenge) One major challenge in localizing the MakeCode resource is that tools like Bing Translator or Google Translate had the tendency to destroy the custom macro annotation; thus breaking the rich rendering of the documentation. Let’s illustrate this with the Step 6 of the Rock Paper Scissors tutorial: ````markdown ## {Step 6} Click on the `||variables:Variables||` category in the Toolbox. Drag a `||variables:hand||` block out and drop it into the `||logic:0 = 0||` comparison block replacing the first **0**. Click on the second 0 in the comparison block and change to **1**. ```blocks let hand = 0; input.onGesture(Gesture.Shake, function() { hand = randint(1, 3) if (hand == 1) { } else { } }) ``` ```` In this content, it is critical to keep the `||variables:hand||` and `||logic:0 = 0||` annotations as they are. And also the `blocks` macro should be left untouched. > Unfortunately, traditional translation system do not have a way to “teach” the syntax or emphasize the importance of these annotations. For example, when translated to French in Bing Translate, a number of errors are introduced: ` `` ` becomes `'`, extra whitespaces, `logic` becomes `logique`, and so forth. ```markdown ## {Étape 6} Cliquez sur le bouton ''||variables :Variables||'' dans la boîte à outils. Faites glisser un ''||variables :main||'' et déposez-le dans le fichier ''||logique :0 = 0||'' en remplacement du premier **0**. Cliquez sur le deuxième 0 dans le bloc de comparaison et passez à **1**. '''blocs let main = 0 ; input.onGesture(Gesture.Shake, function() { main = randint(1, 3) if (main == 1) { } else { } }) ''' ``` ## Teaching the LLM how to translate [Section titled “Teaching the LLM how to translate”](#teaching-the-llm-how-to-translate) GenAIScript allowed to develop and automate a script that create high-quality LLM-based translations for the MakeCode documentation. A (simplified) version of the script is shown below and annotated with comments. ```js script({ title: "Translate MakeCode documentation", group: "Translation", temperature: 0, }); // allow CLI argument injection const langName = env.vars.lang || "French"; // context const file = env.files[0]; def("ORIGINAL", file, { language: "markdown" }); // task $`You are an expert at Computer Science education. You are an expert at writing MakeCode documentation and tutorials. You are an expert ${langName} translator.`; // task $`Translate the documentation in ORIGINAL to ${langName}. - Do not translate header starting with ~ - Do NOT translate code in \`blocks\` or in \`typescript\` or in \`spy\` or in \`python\`. However, you can should comments. - Do not translate @variable@ or @unplugged - Translate \`## {}\` as \`## {}\` - When you encounter a snippet like "\`\`||:||\`\`", DO NOT translate and DO translate text. \`\`||:||\`\` --> \`\`||:||\`\` ... `; ``` Using this script, the translation of `Step 6` to French is as follows, and you’ll notice that all the errors have been solved. ````markdown ## {Étape 6} Cliquez sur la catégorie `||variables:Variables||` dans la boîte à outils. Faites glisser un bloc `||variables:main||` et déposez-le dans le bloc de comparaison `||logic:0 = 0||`, en remplaçant le premier **0**. Cliquez sur le deuxième 0 dans le bloc de comparaison et changez-le en **1**. ```blocks let main = 0; input.onGesture(Gesture.Shake, function() { main = randint(1, 3) if (main == 1) { } else { } }) ``` ```` ## Automation [Section titled “Automation”](#automation) Note that we use `env.vargs.lang` [variable](/genaiscript/reference/scripts/variables) which allows to modify this value through the command line. ```js const langName = env.vars.lang || "French"; ``` Using the genaiscript CLI, we can run the script for each desired language in a GitHub Action. ```sh npx genaiscript run translate ... --vars lang=German ``` ### Validation and upload [Section titled “Validation and upload”](#validation-and-upload) The CLI can be automated using your favorite bash/script runtime. For example, using [zx](https://google.github.io/zx/), we automate for a number of locales: * translate documentation, * save translation to files, * run the MakeCode compiler to validate the translations * upload/update translation to the translation database ai-translation.mjs ```js const langs = ["French", "German", ...] for(const lang of langs) { // run script and create translations await $`genaiscript run translate ... --vars lang=${lang} ... --apply-edits` // run MakeCode compiler to validate translations await $`makecode check-docs ...` // upload the database await $`translation upload ...` } ```
# Image Alt Text
> Learn how to automatically generate descriptive alt text for images using OpenAI Vision model to enhance accessibility and SEO.
It is a best practice to provide an `alt` attribute for images. This attribute is used to describe the image to users who are unable to see it. It is also used by search engines to understand the content of the image. ```html  ``` However, this task can be tedious and developers are often tempted to skip it, or provide a generic `alt` text like “image”. ```html ``` ## The script [Section titled “The script”](#the-script) To solve this issue, we created a script that uses the OpenAI Vision model to analyze the documentation images and generate a description alt text. To start, we assume that the script is run on a single image file and we use [defImage](/genaiscript/reference/scripts/images) to add it to the prompt context. image-alt-text.genai.mjs ```js const file = env.files[0]; defImages(file); ``` Then we give a task to the LLM to generate a good alt text. image-alt-text.genai.mjs ```js ... $`You are an expert in assistive technology. You will analyze each image and generate a description alt text for the image.` ``` finally, we use [defFileOutput](/genaiscript/reference/scripts/file-output) to define a file output route. image-alt-text.genai.mjs ```js ... defFileOutput(file.filename + ".txt", `Alt text for image ${file.filename}`) ``` ## Usage in Astro [Section titled “Usage in Astro”](#usage-in-astro) The GenAIScript documentation uses Astro, which allows to author pages in [MDX](https://docs.astro.build/en/guides/markdown-content/). The code below shows how the generated alt text, stored in a separate text file, is injected in the final HTML. ```mdx import { Image } from "astro:assets"; import src from "../../../assets/debugger.png"; import alt from "../../../assets/debugger.png.txt?raw"; ``` The `debugger.png` image shows the screenshot of a debugging session and the generated alt text file contents. 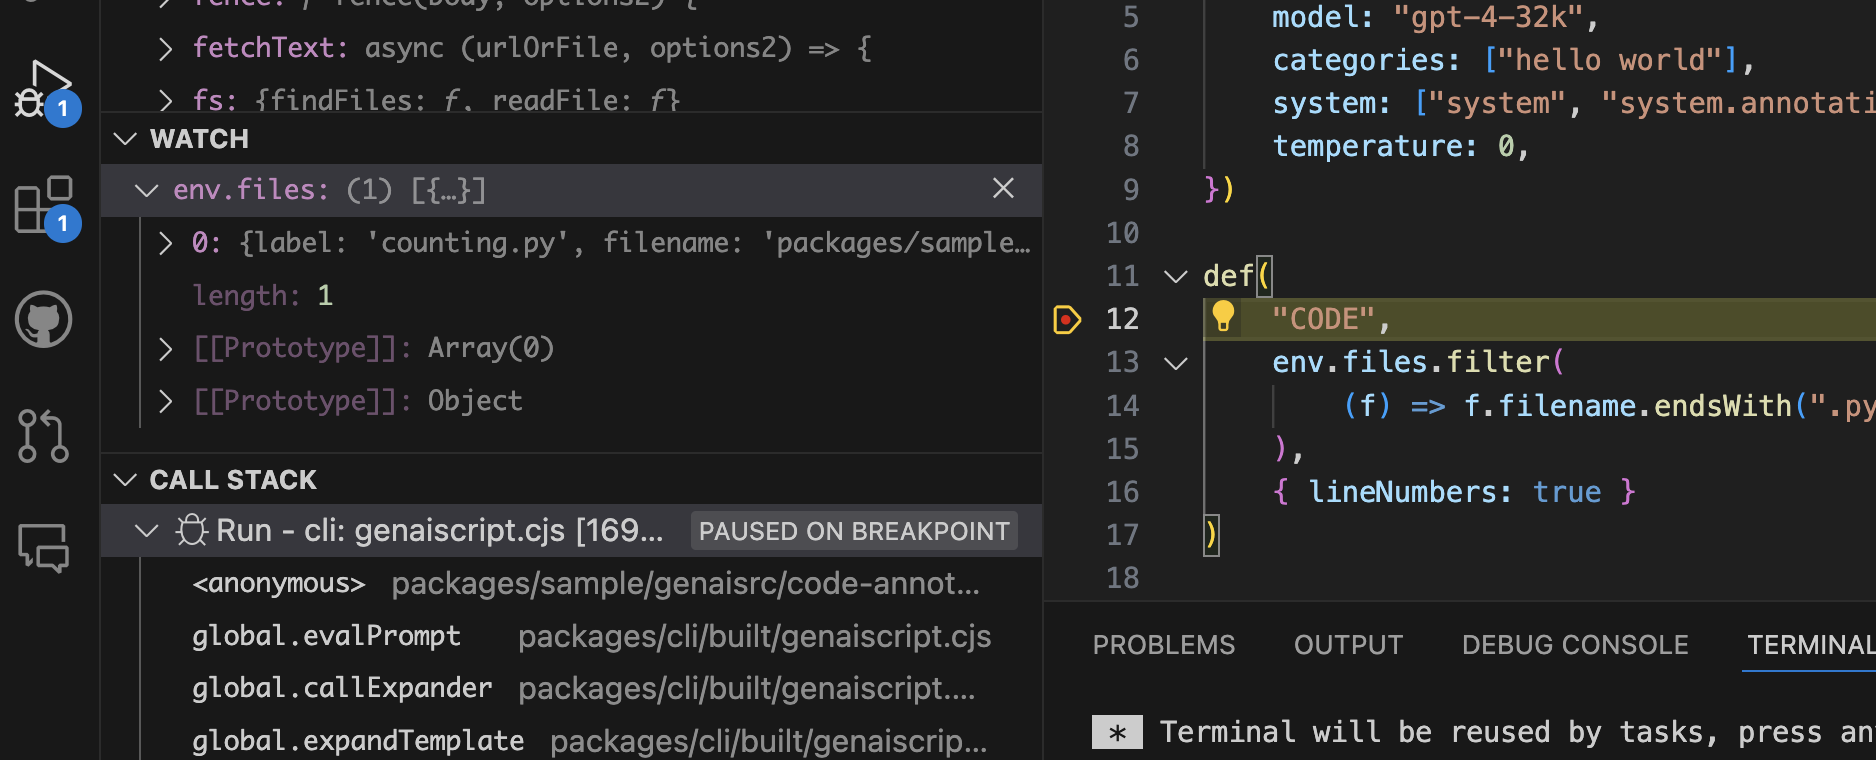 debugger.png.txt ```txt A screenshot of a debugging session in a code editor with a breakpoint set on a line of code. The editor is displaying several panels including the watch variables, call stack, and a terminal output. The code is partially visible with a function definition and JSON configuration data. ``` ## Automation [Section titled “Automation”](#automation) Using the [run](/genaiscript/reference/cli/run) command, we can apply the script to each image in the docs. ```sh for file in assets/**.png; do npx --yes genaiscript run image-alt-text "$file" ``` To avoid regenerating the alt text, we also detect if a file exists in the script and cancel accordingly. image-alt-text.genai.mjs ```sh for file in assets/**.png; do if [ ! -f "$file" ]; then npx --yes genaiscript run image-alt-text "$file" fi done ``` ## Full source [Section titled “Full source”](#full-source) The full source looks like this: image-alt-text.genai.mjs ```js script({ title: "Image Alt Text generator", description: "Generate alt text for images", model: "vision", group: "docs", maxTokens: 4000, temperature: 0, }) // input const file = env.files[0] // context defImages(file) // task $`You are an expert in assistive technology. You will analyze each image and generate a description alt text for the image and save it to a file. - Do not include Alt text in the description.` // output defFileOutput(file.filename + ".txt", `Alt text for image ${file.filename}`) ```
# Release Notes
> Generate comprehensive release notes combining commit history and code diffs
There are plenty of automated `release notes` generator that inspect the list of commits since the last release and generate a list of changes. The release notes are typically exclusively based on the commit messages. In the GenAIScript project, we create a release notes generator **that uses both commit history and the diff of the changes**. You can see one of the first prototype generated release notes for [v1.41.6](https://github.com/microsoft/genaiscript/releases/tag/1.41.6). ```markdown We are excited to announce the release of GenAIScript 1.41.6! 🎉 In this release, we've made some significant improvements to enhance your experience. Here are the key changes: Improved Release Script: We've fine-tuned our release script to ensure smoother and more efficient releases in the future. 🛠️ ... ``` ## Commit history and diff [Section titled “Commit history and diff”](#commit-history-and-diff) We start our script by calling `git` a few times to retrieve the previous release tag, the list of commits, and the diff since the tag. (This magic was mostly found using a GitHub Copilot Chat session). git-release-notes.genai.mjs ```js const { stdout: tag } = await host.exec( `git describe --tags --abbrev=0 HEAD^`, ); const { stdout: commits } = await host.exec( `git log HEAD...${tag}`, ); const { stdout: diff } = await host.exec( `git diff ${tag}..HEAD`, ); ``` We use the `def` function with `maxTokens` to inline this information without exceeding the content window of the model (32k input). git-release-notes.genai.mjs ```js def("COMMITS", commits, { maxTokens: 4000 }); def("DIFF", diff, { maxTokens: 20000 }); ``` ## Role and task [Section titled “Role and task”](#role-and-task) The rest of the script follows a typical pattern with a role and a task. ```js $` You are an expert software developer and release manager. ## Task Generate a clear, exciting, relevant, useful release notes for the upcoming release. - The commits in the release are in COMMITS. - The diff of the changes are in DIFF. `; ``` ## The script [Section titled “The script”](#the-script) The full script as it is running in GenAIScript is as follows: git-release-notes.genai.mjs ```js script({ system: ["system"], temperature: 0.5, model: "github:openai/gpt-4o", }); const product = env.vars.product || "GenAIScript"; // find previous tag const { version } = await workspace.readJSON("package.json"); const tag = await git.lastTag(); const excludedPaths = [ "package.json", "**/package.json", "yarn.lock", "**/yarn.lock", "**/genaiscript.d.ts", "**/jsconfig.json", "docs/**", ".github/*", ".vscode/*", "slides/**", "THIRD_PARTY_LICENSES.md", ]; const commits = ( await git.log({ excludedGrep: "(skip ci|THIRD_PARTY_NOTICES|THIRD_PARTY_LICENSES|genai)", base: tag, head: "HEAD", excludedPaths, }) ) .map(({ message }) => message) .join("\n"); console.debug(commits.slice(0, 50) + "..."); const diff = await git.diff({ base: tag, head: "HEAD", excludedPaths, }); console.debug(diff.slice(0, 1000) + "..."); const commitsName = def("COMMITS", commits, { ignoreEmpty: true, maxTokens: 3000, }); const diffName = def("DIFF", diff, { maxTokens: 12000 }); $` You are an expert software developer and release manager. ## Task Generate a clear, exciting, relevant, useful release notes for the upcoming release ${version} of ${product} on GitHub. - The commits in the release are in ${commitsName}. - The diff of the changes are in ${diffName}. ## Guidelines - only include the most important changes. All changes must be in the commits. - tell a story about the changes - use emojis - ignore commits with '[skip ci]' in the message - do NOT give a commit overview - do NOT add a top level title - do NOT mention ignore commits or instructions - be concise - do not wrap text in markdown section `; ``` ## Release-it integration [Section titled “Release-it integration”](#release-it-integration) GenAIScript uses [release-it](https://github.com/release-it/release-it) to automate the release process. We configured release-it to run the script using the [cli](/genaiscript/reference/cli) by adding a `github.releaseNotes` field in the `release-it` configuration. package.json ```json "release-it": { "github": { "releaseNotes": "node packages/cli/dist/src/index.js run git-release-notes --cache --cache-name releases --no-run-trace --no-output-trace" } } ```
# SEO Front Matter
> Learn how to automate the creation of SEO-optimized front matter for your markdown documents with GenAIScript.
Generating and maintaining good SEO front matter fields can be a tedious task. GenAIScript can help you automate this process. The script below will generate SEO information and update the existing file. The script uses a custom merge strategy to merge the new front matter with the existing front matter. slides.genai.mjs ```js script({ model: "large", accept: ".md,.mdx", parameters: { force: false, }, }) // force refreshing all files const { force, dbg } = env.vars // filter out files that don't have a front matter.description const file = env.files[0] const fm = MD.frontmatter(file.content) if (!force && fm?.description) cancel("file already has description") if (file.content?.includes("autogenerated")) cancel("file is autogenerated") // insert markdown files in context const res = await runPrompt( (ctx) => { ctx.def("FILE", file) // prompt to generate front matter for markdown files ctx.$`##Role You are a search engine optimization expert at creating front matter for markdown document. ## Task Generate the front matter content as the new file content. ## Guidance - Update description as needed. - Update keywords as needed, only 5 keywords or less. - optimize for search engine optimization. - If no front matter is present, generate it. ## Things to avoid - Do NOT repeat project name (GenAIScript) in 'title' field - DO NOT modify the existing 'title' or 'sidebar' fields. - Do NOT use 'Guide' in title. ` }, { responseType: "json_schema", responseSchema: { title: "", description: "", keywords: [""], }, } ) const frontmatter = res.json const { title, description, keywords, tags } = frontmatter file.content = MD.updateFrontmatter(file.content, { title, description, keywords, tags, }) await workspace.writeFiles(file) ``` ## Batching over all files [Section titled “Batching over all files”](#batching-over-all-files) Once the script has been tuned on a few files, you can automate using the [CLI](/genaiscript/reference/cli). The CLI has a **—apply-edits** flag to apply the changes to the file. ```sh for file in src/**/*.md; do genaiscript run frontmatter "$file" --apply-edits ``` You can run this command in your CI/CD pipeline to keep your SEO front matter up to date.
# TLA+ AI Linter
> Explore how the TLA+ AI Linter leverages GenAI scripts and LLMs to enhance TLA+ specifications with automated linting and consistent comment verification.
[TLA+](https://lamport.azurewebsites.net/tla/tla.html) is a high-level language for modeling programs and systems—especially concurrent and distributed ones. It’s based on the idea that the best way to describe things precisely is with simple mathematics. TLA+ does not come with a traditional linter or formatter. The TLA+ AI Linter is a GenAI script that uses LLMs to lint TLA+ files. ## TLA+ specifications [Section titled “TLA+ specifications”](#tla-specifications) The following is a TLA+ spec that models a seminal solution to the [termination detection problem in distributed systems](https://www.cs.utexas.edu/users/EWD/ewd09xx/EWD998.PDF). EWD998PCal.tla ```txt ------------------------------- MODULE EWD998PCal ------------------------------- (***************************************************************************) (* TLA+ specification of an algorithm for distributed termination *) (* detection on a ring, due to Shmuel Safra, published as EWD 998: *) (* Shmuel Safra's version of termination detection. *) (* https://www.cs.utexas.edu/users/EWD/ewd09xx/EWD998.PDF *) (***************************************************************************) EXTENDS Integers, Bags, BagsExt CONSTANT N ASSUME NAssumption == N \in Nat \ {0} \* At least one node. Node == 0 .. N-1 Initiator == 0 \* Any node can be the initiator; 0 has just been conveniently choosen to simplify the definition of token initiation. (******** --algorithm ewd998 { variables (* Although we know the relationship between the counter and network, modeling network as a set of messages would be too cumbersome. We have two alternatives for modeling the network: as a bag of messages or as a sequence of messages. Although modeling it as a sequence may seem more intuitive, we do not require its ordering properties for our purposes. Therefore, we have decided to use a bag to represent the network. It's worth noting that Distributed Plucal refers to this concept as a "channel". *) network = [n \in Node |-> IF n = Initiator THEN SetToBag({[type|-> "tok", q |-> 0, color |-> "black"]}) ELSE EmptyBag]; define { (* The passMsg operator is not implementable -at least not without using extra synchronization- because it atomically reads a message from the nic's in-buffer and writes to its out-buffer! *) passMsg(net, from, oldMsg, to, newMsg) == [ net EXCEPT ![from] = BagRemove(@, oldMsg), ![to] = BagAdd(@, newMsg) ] sendMsg(net, to, msg) == [ net EXCEPT ![to] = BagAdd(@, msg) ] dropMsg(net, to, msg) == [ net EXCEPT ![to] = BagRemove(@, msg) ] pendingMsgs(net, rcv) == DOMAIN net[rcv] } fair process (node \in Node) variables active \in BOOLEAN, color = "black", counter = 0; { l: while (TRUE) { either { \* send some payload message to some other node. when active; with (to \in Node \ {self}) { network := sendMsg(network, to, [type|-> "pl"]); }; counter := counter + 1 } or { \* receive a payload message. Reactivates the node. with (msg \in pendingMsgs(network, self)) { when msg.type = "pl"; counter := counter - 1; active := TRUE; color := "black"; network := dropMsg(network, self, msg) } } or { \* terminate the current node. active := FALSE } or { \* pass the token to the next node. when self # Initiator; with (tok \in pendingMsgs(network, self)) { when tok.type = "tok" /\ ~active; network := passMsg(network, self, tok, self-1, [type|-> "tok", q |-> tok.q + counter, color |-> (IF color = "black" THEN "black" ELSE tok.color)]); color := "white"; } } or { \* Initiate token. when self = Initiator; with (tok \in pendingMsgs(network, self)) { when tok.type = "tok" /\ (color = "black" \/ tok.q + counter # 0 \/ tok.color = "black"); network := passMsg(network, self, tok, N-1, [type|-> "tok", q |-> 0, color |-> "white"]); color := "white"; } } } } } ********) \* BEGIN TRANSLATION (chksum(pcal) = "4d658e04" /\ chksum(tla) = "530581e3") VARIABLE network (* define statement *) passMsg(net, from, oldMsg, to, newMsg) == [ net EXCEPT ![from] = BagRemove(@, oldMsg), ![to] = BagAdd(@, newMsg) ] sendMsg(net, to, msg) == [ net EXCEPT ![to] = BagAdd(@, msg) ] dropMsg(net, to, msg) == [ net EXCEPT ![to] = BagRemove(@, msg) ] pendingMsgs(net, rcv) == DOMAIN net[rcv] VARIABLES active, color, counter vars == << network, active, color, counter >> ProcSet == (Node) Init == (* Global variables *) /\ network = [n \in Node |-> IF n = Initiator THEN SetToBag({[type|-> "tok", q |-> 0, color |-> "black"]}) ELSE EmptyBag] (* Process node *) /\ active \in [Node -> BOOLEAN] /\ color = [self \in Node |-> "black"] /\ counter = [self \in Node |-> 0] node(self) == \/ /\ active[self] /\ \E to \in Node \ {self}: network' = sendMsg(network, to, [type|-> "pl"]) /\ counter' = [counter EXCEPT ![self] = counter[self] + 1] /\ UNCHANGED <> \/ /\ \E msg \in pendingMsgs(network, self): /\ msg.type = "pl" /\ counter' = [counter EXCEPT ![self] = counter[self] - 1] /\ active' = [active EXCEPT ![self] = TRUE] /\ color' = [color EXCEPT ![self] = "black"] /\ network' = dropMsg(network, self, msg) \/ /\ active' = [active EXCEPT ![self] = FALSE] /\ UNCHANGED <> \/ /\ self # Initiator /\ \E tok \in pendingMsgs(network, self): /\ tok.type = "tok" /\ ~active[self] /\ network' = passMsg(network, self, tok, self-1, [type|-> "tok", q |-> tok.q + counter[self], color |-> (IF color[self] = "black" THEN "black" ELSE tok.color)]) /\ color' = [color EXCEPT ![self] = "white"] /\ UNCHANGED <> \/ /\ self = Initiator /\ \E tok \in pendingMsgs(network, self): /\ tok.type = "tok" /\ (color[self] = "black" \/ tok.q + counter[self] # 0 \/ tok.color = "black") /\ network' = passMsg(network, self, tok, N-1, [type|-> "tok", q |-> 0, color |-> "white"]) /\ color' = [color EXCEPT ![self] = "white"] /\ UNCHANGED <> Next == (\E self \in Node: node(self)) Spec == /\ Init /\ [][Next]_vars /\ \A self \in Node : WF_vars(node(self)) \* END TRANSLATION ----------------------------------------------------------------------------- token == LET tpos == CHOOSE i \in Node : \E m \in DOMAIN network[i]: m.type = "tok" tok == CHOOSE m \in DOMAIN network[tpos] : m.type = "tok" IN [pos |-> tpos, q |-> tok.q, color |-> tok.color] pending == [n \in Node |-> IF [type|->"pl"] \in DOMAIN network[n] THEN network[n][[type|->"pl"]] ELSE 0] EWD998 == INSTANCE EWD998 EWD998Spec == EWD998!Init /\ [][EWD998!Next]_EWD998!vars \* Not checking liveness because we cannot easily define fairness for what ewd998 calls system actions. THEOREM Spec => EWD998Spec ----------------------------------------------------------------------------- Alias == [ network |-> network, active |-> active, color |-> color, counter |-> counter, token |-> token, pending |-> pending ] StateConstraint == \A i \in DOMAIN counter : counter[i] < 3 ============================================================================= ``` ## Script [Section titled “Script”](#script) The following GenAI script will lint the TLA+ spec above. More specifically, it will check if the prose comments in the spec are consistent with the TLA+ definitions. tlAI-Linter.genai.mjs ```js // metadata (including model parameters) // learn more at https://aka.ms/genaiscript script({ title: "tlAI-Linter", description: "Check if the prose comments and their TLA+ declarations and definitions are syntactically and semantically consistent" }) // use def to emit LLM variables def("TLA+", env.files.filter(f => f.filename.endsWith(".tla")), {lineNumbers: true}) // use $ to output formatted text to the prompt $`You are an expert at TLA+/TLAPLUS. Your task is to check if the prose comments and their TLA+ declarations and definitions are syntactically and semantically consistent!!! Explain any consistencies and inconsistencies you may find. Report inconsistent and consistent pairs in a single ANNOTATION section. ## TLA+ Syntax Hints - A formula [A]_v is called a temporal formula, and is shorthand for the formula A \/ v' = v. In other words, the formula is true if A is true or if the value of v remains unchanged. Usually v is a tuple of the spec's variables. - The symbol \`#\` is alternative syntax used for inequality in TLA+; the other symbol is \`/=\". ## TLA+ Semantics Hints - Do NOT add any invariants or properties to the behavior specification Spec or any of its subformulas. This would change THEOREM Spec => Inv into THEOREM Spec /\ Inv => Inv, which is vacuously true. - TLA+ specs are always stuttering insensitive, i.e., the next-state relation is always [A]_v. In other words, one cannot write a stuttering sensitive specification. ## TLA+ Convention Hints - The type correctness invariant is typically called TypeOK. - Users can employ TLA labels as a means to conceptually associate a comment with a sub-formula like a specific disjunct or conjunct of a TLA formula. Even though these labels have no other function, they facilitate referencing particular parts of the formula from a comment. ## Formal and informal math Hints - Take into account that humans may write informal math that is syntactically different from the formal math, yet semantically equivalent. For example, humans may write \`N > 3T\` instead of \`N > 3 * T\`. ` ``` * line numbers are added to the file content to help the LLM precisely locate the issues. ```js def( "TLA+", env.files.filter((f) => f.filename.endsWith(".tla")), { lineNumbers: true }, ); ``` * the script uses a builtin support for [annotations](/genaiscript/reference/scripts/annotations) to generate parseable warnings and errors. Annotations are automatically integrated as problems in VSCode or as build errors in the CI/CD pipeline. ```js $`Report inconsistent and consistent pairs in a single ANNOTATION section.`; ``` * GPT-4 already knows a lot about logic and basic math. However, the script also lists common TLA+ idioms that are relevant to lint a spec. ## Github Action [Section titled “Github Action”](#github-action) PR.yml ```yaml name: tlAI-linter on: pull_request: branches: - main - dev jobs: linting: name: tlAI-linter runs-on: ubuntu-latest env: OPENAI_API_KEY: ${{ secrets.OPENAI_API_KEY }} OPENAI_API_BASE: ${{ secrets.OPENAI_API_BASE }} OPENAI_API_TYPE: ${{ secrets.OPENAI_API_TYPE }} defaults: run: shell: bash steps: - name: Clone repo uses: actions/checkout@v4 with: ## All history for git diff below to succeed. fetch-depth: 0 - name: Setup NodeJS ## https://github.com/actions/setup-node - uses: pnpm/action-setup@v4 uses: actions/setup-node@v4 with: node-version: "22" - name: Run GenAIscript on the TLA+ specs that are added in this pull request. ## Identify git diff: $(git diff --name-only HEAD^ | grep '.tla') ## Install genaiscript runtime: https://microsoft.github.io/genaiscript/reference/cli/ ## Output LLM response in SARIF format: https://microsoft.github.io/genaiscript/reference/scripts/annotations/ run: npx --yes genaiscript run .github/scripts/tlAI-Linter.genai.js $(git diff --name-only HEAD^ | grep '.tla') -oa results.sarif - name: Upload SARIF file ## https://sarifweb.azurewebsites.net ## https://docs.github.com/en/code-security/code-scanning/integrating-with-code-scanning/uploading-a-sarif-file-to-github if: success() || failure() uses: github/codeql-action/upload-sarif@v3 with: sarif_file: results.sarif ``` * after cloning the repository and installing dependencies such as node.js, the GenAI script is run to lint the TLA+ specs that were added or modified in the PR. * the script’s output, i.e., the annotations generated by the LLM, are formatted as a [SARIF](https://sarifweb.azurewebsites.net) report and [upload](https://docs.github.com/en/code-security/code-scanning/integrating-with-code-scanning/uploading-a-sarif-file-to-github) to the PR. ## Results [Section titled “Results”](#results) The linter generated annotations for each prose comment in the spec, and one comment is found to be inconsistent with the TLA+ definitions. A corresponding warning is added to the PR. 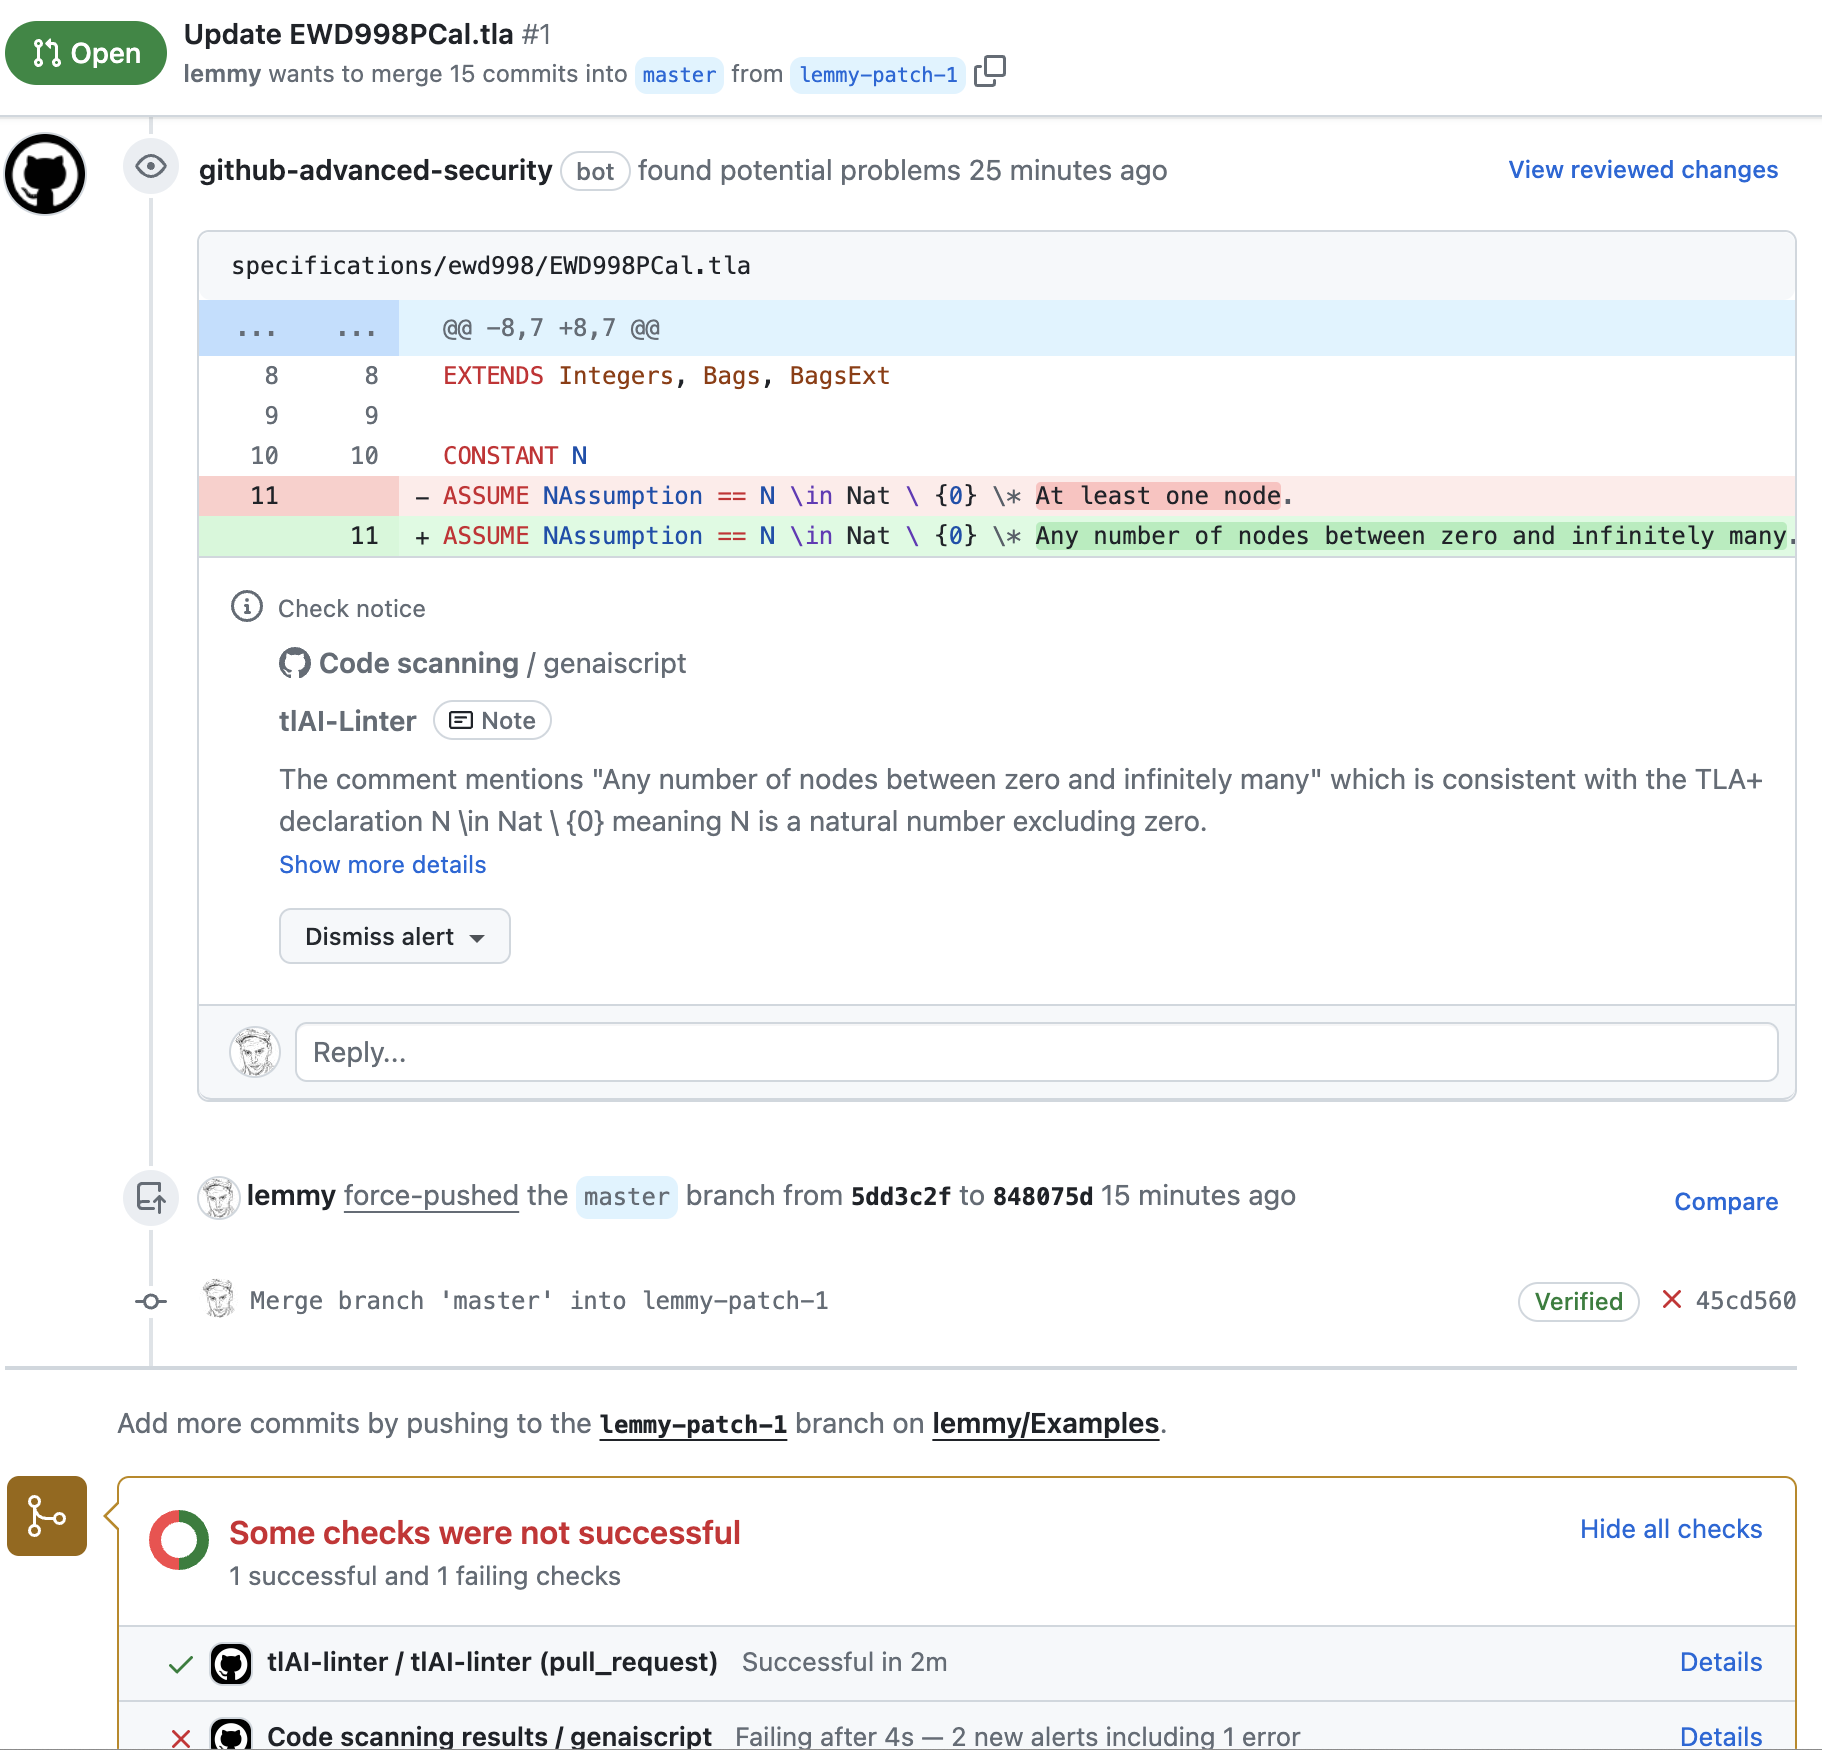
# Agentic tools
> Using agentic tools in your script
[Agentic](https://agentic.so) ([GitHub](https://github.com/transitive-bullshit/agentic)) is no longer supported.
# Ask My Image
> Learn how to apply GenAIScript to images for data extraction and analysis using AI models.
The quick-start guide illustrates how to write a GenAIScript that takes input from an image file. 1. Place your image in a directory visible in VS Code Explorer 2. Use the `> GenAIScript: Create new script...` command in the command palette to create a new script. 3. Update the model in the script header to refer to a model that understands images: ```js script({ title: "Apply a script to an image", model: "openai:gpt-4o", }) ``` 4. Use [defImages](/genaiscript/reference/scripts/images/) to ingest the image file into the model context: ```js defImages(env.files, { detail: "low" }) ``` 5. Replace the text `"TELL THE LLM WHAT TO DO..."` with what you want it to do with your image file. ```js $`You are a helpful assistant. Your goal is to look at the image of a chart provided and extract the data it is presented in a tabular format.` ``` 6. Right click on the image file in VS Code Explorer. Select **Run GenAIScript**. Select the script you just wrote. 7. The Output will be displayed in a new document tab.
# Ask My PDF
> Quick-start guide to using GenAIScript for summarizing and critiquing PDF documents with AI assistance.
The quick-start guide illustrates how to write a GenAIScript that takes input from a pdf file. 1. Place your PDF document in a directory visible in VS Code Explorer 2. Use the `> GenAIScript: Create new script...` command in the command palette to create a new script. 3. Define and name the pdf file as an input: ```js const src = def("PDFSOURCE", env.files, { endsWith: ".pdf" }) ``` 4. Replace the text `"TELL THE LLM WHAT TO DO..."` with what you want it to do with your pdf file. Use the name in the def to refer to the file. ```js $`You are a helpful assistant. Summarize the content of ${src} and critique the document. ` ``` 5. Right click on the pdf document in VS Code Explorer. Select **Run GenAIScript**. Select the script you just wrote. 6. Output will be displayed in a new document tab. ### Example: Lorem Ipsum [Section titled “Example: Lorem Ipsum”](#example-lorem-ipsum) In this example, we will extract text from a pdf that describes the history of Lorem Ipsem. ask-my-pdf.genai.mjs ```js const src = def("PDFSOURCE", env.files, { endsWith: ".pdf" }) $`You are a helpful assistant. Summarize the content of ${src} and critique the document. - Only one paragraph. Keep it short. ` ```
# Automated Git Commit Messages
> Streamline your Git workflow with an automation script for generating commit messages
In the world of software development, making consistent and informative commit messages is crucial but often overlooked. This task can become tedious, especially when you are in the flow of coding. To help with this, we’ve crafted a [script tailored to automate generating Git commit messages](https://github.com/microsoft/genaiscript/blob/main/samples/sample/genaisrc/samples/gcm.genai.mts), ensuring they are meaningful and save you time. The script acts as a regular node.js automation script and uses [runPrompt](/genaiscript/reference/scripts/inline-prompts) to issue calls to the LLM and ask the user to confirm the generated text. ## Explaining the Script [Section titled “Explaining the Script”](#explaining-the-script) First, we check if there are any staged changes in the Git repository: ```ts let { stdout } = await host.exec("git", ["diff", "--cached"]) ``` If no changes are staged, we ask the user if they want to stage all changes. If the user confirms, we stage all changes. Otherwise, we bail out. ```ts const stage = await host.confirm("No staged changes. Stage all changes?", { default: true, }) if (stage) { await host.exec("git", ["add", "."]) stdout = (await host.exec("git", ["diff", "--cached"])).stdout } if (!stdout) cancel("no staged changes") ``` We generate an initial commit message using the staged changes: ```ts message = ( await runPrompt( (_) => { _.def("GIT_DIFF", stdout, { maxTokens: 20000 }) _.$`GIT_DIFF is a diff of all staged changes, coming from the command: \`\`\` git diff --cached \`\`\` Please generate a concise, one-line commit message for these changes. - do NOT add quotes` }, { cache: false, temperature: 0.8 } ) ).text ``` The prompt configuration above indicates that the message should be concise, related to the “git diff —cached” output, and should not include quotes. User chooses how to proceed with the generated message: ```ts choice = await host.select( message, [{ name: "commit", value: "commit", description: "accept message and commit" }, ...], ) ``` Options are given to edit or regenerate the message. If the user chooses to edit the message, we ask them to input a new message: ```ts if (choice === "edit") { message = await host.input("Edit commit message", { required: true }) choice = "commit" } ``` If the user chooses to commit the message, we commit the changes: ```ts if (choice === "commit" && message) { console.log((await host.exec("git", ["commit", "-m", message])).stdout) } ``` ## Running the Script [Section titled “Running the Script”](#running-the-script) You can run this script using the [CLI](/genaiscript/reference/cli). ```bash genaiscript run gcm ``` You can wrap this command in a `gcm.sh` file or in your package `script` section in `package.json`: ```json { "devDependencies": { "genaiscript": "*" }, "scripts": { "gcm": "genaiscript run gcm" } } ``` Then you can run the script using: ```bash npm run gcm ``` ## Using git hooks [Section titled “Using git hooks”](#using-git-hooks) You can also attach to the [commit-msg](https://git-scm.com/docs/githooks#_commit_msg) git hook to run the message generation on demand. Using the [huksy](https://typicode.github.io/husky/) framework, we can register the execution of genaiscript in the `.husky/commit-msg` file. The `commit-msg` hook receives a file location where the message is stored. We pass this parameter to the script so that it gets populated in the `env.files` variable. .husky/commit-msg ```bash genaiscript run commit-msg "$1" ``` In the script, we check if the content of the file already has a user message, otherwise generate a new message. commit-msg.genai.mts ```js const msg = env.files[0] // file created by git to hold the message const msgContent = msg.content // check if the user added any message ?.split(/\n/g) .filter((l) => l && !/^#/.test(l)) // filter out comments .join("\n") if (msgContent) cancel("commit message already exists") ... await host.writeText(msg.filename, message) ``` ## Acknowledgements [Section titled “Acknowledgements”](#acknowledgements) This script was inspired from Karpathy’s [commit message generator](https://gist.github.com/karpathy/1dd0294ef9567971c1e4348a90d69285).
# Business card scanner
> Using OpenAI Vision to scan business cards.
This guide shows how to use vision and image variables to scan business card information in a structured format. ## Vision model [Section titled “Vision model”](#vision-model) You will need access to a deployment of the OpenAI vision model. In this example, it is identifier by `gpt-4o`. Also set the `maxTokens` to 4000 to ensure the model can process the entire business card. ```js script({ ... model: "openai:gpt-4o", maxTokens: 4000, }) ``` ## `defImage` [Section titled “defImage”](#defimage) The [defImage](/genaiscript/reference/scripts/images) function can be used to input multiple files to the script. The non-image files will automatically be ignored, so you can typically pass [env.files](/genaiscript/reference/scripts/context) directly to `defImages`. ```js defImages(env.files) ``` ## Producing CSV [Section titled “Producing CSV”](#producing-csv) All together the script looks like the following: scan-business-card.genai.mjs ```js script({ description: "Given an image of business card, extract the details to a csv file", group: "vision", model: "vision", maxTokens: 4000, }) defImages(env.files) const outputName = path.join(path.dirname(env.files[0].filename), "card.csv") $`You are a helpful assistant. You are given an image of a business card. Extract the following information in ${outputName}: Name, Address, Phone, Email, Company, Title, Website, Category of Business If you can't infer the category, mark it as "Unknown"` ``` ## Using a schema [Section titled “Using a schema”](#using-a-schema) We can add data format validation by adding a schema for the business data rows. ```js const schema = defSchema("EXPENSE", { type: "array", items: { type: "object", properties: { Date: { type: "string" }, Location: { type: "string" }, Total: { type: "number" }, Tax: { type: "number" }, Item: { type: "string" }, ExpenseCategory: { type: "string" }, Quantity: { type: "number" }, }, required: ["Date", "Location", "Total", "Tax", "Item", "Quantity"], }, }) ``` And the script above is adapter to use the schema instead of the CSV description. scan-business-card.genai.mjs ```js script({ description: "Given an image of a receipt, extract a csv of the receipt data", group: "vision", model: "vision", maxTokens: 4000, }) defImages(env.files) const schema = defSchema("EXPENSE", { type: "array", items: { type: "object", properties: { Date: { type: "string" }, Location: { type: "string" }, Total: { type: "number" }, Tax: { type: "number" }, Item: { type: "string" }, ExpenseCategory: { type: "string" }, Quantity: { type: "number" }, }, required: ["Date", "Location", "Total", "Tax", "Item", "Quantity"], }, }) const outputName = path.join(path.dirname(env.files[0].filename), "items.csv") $`You are a helpful assistant that is an expert in filing expense reports. You have information from a receipt in RECEIPT and you need to put the data in ${outputName} using the ${schema} schema.` ```
# Containerized Tools
> Learn how to create and use containerized tools with executable dependencies in a secure environment using GCC as an example.
This guide shows how to create a [tool](/genaiscript/reference/scripts/tools) that call an executable in a [container](/genaiscript/reference/scripts/container). This is a flexible and secure way to run tools that may have dependencies or security concerns. This is typically done by creating a container with a particular image (`gcc` here) ```js // start a fresh container const container = await host.container({ image: "gcc", }) ``` then reusing the container in the tool invocations. You can return the result of `container.exec` from the tool and it will be handled by the runtime. ```js defTool(..., async (args) => { ... // use container in tool const res = await container.exec("gcc", ["main.c"]) return res }) ``` ## Example: GCC as a Tool [Section titled “Example: GCC as a Tool”](#example-gcc-as-a-tool) This sample uses the official [GCC](https://hub.docker.com/_/gcc) docker image to compile a C program as tool. The LLM engine will invoke the tool to validate the syntax of the generated code. ```js script({ model: "large", }) let container = undefined let sourceIndex = 0 defTool( "gcc", "GNU Compiler Collection (GCC), C/C++ compiler", { source: "", }, async (args) => { const { source } = args if (!container) // lazy allocation of container container = await host.container({ image: "gcc", }) const fn = `tmp/${sourceIndex++}/main.c` await container.writeText(fn, source) const res = await container.exec("gcc", [fn]) return res } ) $`Generate a valid C program that prints "Hello, World!"` ```
# DeepSeek R1 and V3
> DeepSeek is a powerful tool for searching and filtering data in a deep structure. There are multiple LLM providers that can run DeepSeek.
As DeepSeek mentions, [DeepSeek-R1](https://github.com/deepseek-ai/DeepSeek-R1) and [DeepSeek-V3](https://github.com/deepseek-ai/DeepSeek-V3) are advanced large language models (LLM), that have gained significant attention for its performance and cost-effectiveness. DeepSeek’s innovations highlight the potential for achieving high-level AI performance with fewer resources, challenging existing industry norms and prompting discussions about the future direction of AI development. These pages documents the various options to run DeepSeek LLMs. ## DeepSeek.com [Section titled “DeepSeek.com”](#deepseekcom) [DeepSeek.com](https://deepseek.com) is a LLM provider that develops the DeepSeek models. * [`deepseek` provider](/genaiscript/configuration/deepseek) ## Azure AI Foundry [Section titled “Azure AI Foundry”](#azure-ai-foundry) [Azure AI Foundry](https://ai.azure.com) provides token-based billing for DeepSeek R1 and DeepSeek V3 models. See [Announcement](https://techcommunity.microsoft.com/blog/machinelearningblog/announcing-deepseek-v3-on-azure-ai-foundry-and-github/4390438). ```js script({ model: "azure_ai_inference:deepseek-v3", }) ``` * [`azure_ai_inference` provider](/genaiscript/configuration/azure-ai-foundry) ## GitHub Marketplace Models [Section titled “GitHub Marketplace Models”](#github-marketplace-models) [GitHub Marketplace Models](https://github.com/marketplace/models) provides a free experience to experiement with DeepSeek R1 and DeepSeek V3 models. ```js script({ model: "github:deepSeek-v3", }) ``` * [`github` provider](/genaiscript/configuration/github) ## And others! [Section titled “And others!”](#and-others) This is by no means complete and there are many other providers that can run DeepSeek models. * [Ollama](https://ollama.com/library/deepseek-v3) (if you’re machine can handle it) * [LM Studio](https://lmstudio.ai/models) * …
# Detection of Outdated Descriptions
> Automate the detection of outdated descriptions in markdown documentation to maintain accuracy and consistency.
Developer documentation typically includes a description in each file. This descriptions can become outdated, leading to confusion and incorrect information. To prevent this, you can automate the detection of outdated descriptions in your documentation using GenAIScript. ## Markdown and frontmatter [Section titled “Markdown and frontmatter”](#markdown-and-frontmatter) Many documentation systems use the markdown format to write documentation and a ‘frontmatter’ header to store metadata. Here’s an example of a markdown file with frontmatter: ```markdown --- title: "My Document" description: "This is a sample document." --- # My Document Lorem ipsum dolor sit amet, consectetur adipiscing elit. ``` The goal is to create a script that detects when the `description` field in the frontmatter is outdated. ## The script [Section titled “The script”](#the-script) GenAIScript is meant to run on files and provides a special variable `env.files` that contains the list of files to be analyzed. You can use this variable to include the files in the context using the [def](/genaiscript/reference/scripts/context) function. We limit each file to 2000 tokens to avoid exploding the content on large files. detect-outdated-descriptions.genai.mjs ```js // Define the file to be analyzed def("DOCS", env.files, { endsWith: ".md", maxTokens: 2000 }) ``` The next step is to give a task to the script. In this case to check that the content and `description` field in the frontmatter match. ```js // Analyze the content to detect outdated descriptions $`Check if the 'description' field in the front matter in DOCS is outdated.` ``` Finally, we leverage the built-in diagnostics generation feature to create an error for each outdated description. ```js // enable diagnostics generation $`Generate an error for each outdated description.` ``` ## Running in Visual Studio Code [Section titled “Running in Visual Studio Code”](#running-in-visual-studio-code) Once you save this script in your workspace, you will be able to execute it on a file or a folder through the context menu by selecting **Run GenAIScript…**. 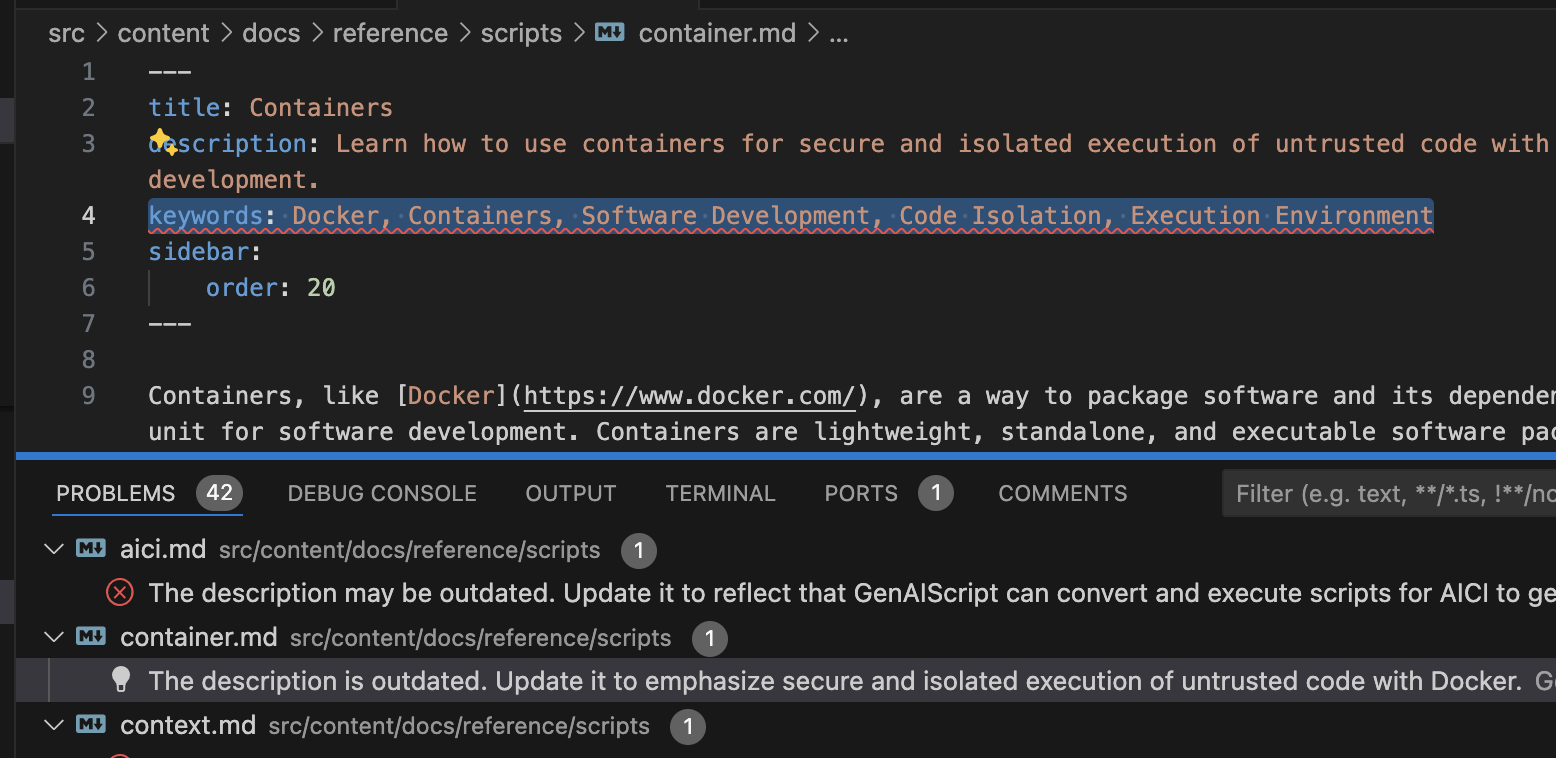 ## Automation [Section titled “Automation”](#automation) You can automatically run this tool on your documentation files to identify outdated descriptions using the [cli](/genaiscript/reference/cli). ```sh genaiscript run detect-outdated-descriptions **/*.md ``` This script can be integrated into your CI/CD pipeline to automate the detection process.
# Evals with multiple Models
> Evaluating multiple models in a single script
GenAIScript allows you to [evaluate](/genaiscript/reference/scripts/tests) multiple models in a single script against multiple tests. This is useful when you want to compare the performance of different models on the same input. GenAIScript leverages [PromptFoo](https://www.promptfoo.dev/docs/getting-started/) to evaluate the outputs of the models. In this example, we will evaluate the performance of three models on a summarizing script. summarizer.genai.js ```js const file = def("FILE", env.files) $`Summarize ${file} in one sentence.` ``` ## Defining tests [Section titled “Defining tests”](#defining-tests) First, you need to add one or more tests as the `tests` field in the `script` function. ```js script({ tests: { files: "markdown.md", keywords: "markdown" }, }) ... ``` In this case, we add a simple `keyword` assertion but you can find many other options in the [tests](/genaiscript/reference/scripts/tests) reference. ## Defining test models [Section titled “Defining test models”](#defining-test-models) Next add the list of model identifier or [model aliases](/genaiscript/reference/scripts/model-aliases) you want to test against. ```js script({ ..., testModels: [ "azure_ai_inference:gpt-4o", "azure_ai_inference:gpt-4o-mini", "azure_ai_inference:deepseek-r1", ], }) ... ``` ## Running tests [Section titled “Running tests”](#running-tests) Tests can be run using the `genaiscript` CLI or in Visual Studio Code (see [testing scripts](/genaiscript/getting-started/testing-scripts)). ```sh genaiscript test summarizer ``` Next, open the PromptFoo dashboard to see the results of the tests. ```sh genaiscript test view ```
# Generated Knowledge
> Explore the technique of generated knowledge in AI prompting to enhance accuracy in answering questions.
[Generated Knowledge](https://learnprompting.org/docs/intermediate/generated_knowledge) is a prompting technique where one first asks the LLM a question to generate facts, then uses the generated answer to answer a question correctly. * *knownledge generation*, the LLM is asked to generate a set of facts about the question. * *knownledge integration*, the LLM is asked a question augmented by the knowledge generated This technique can be acheived by using [runPrompt](/genaiscript/reference/scripts/inline-prompts) to execute an LLM request and use it in the final prompt. ## Example [Section titled “Example”](#example) This example demanstrates this technique to generate a blog post. ```js script({ title: "blog using generated knowledge", model: "small", group: "mcp", description: "Using Generated Knowledge technique. More at https://learnprompting.org/docs/intermediate/generated_knowledge", tests: { files: "src/rag/markdown.md", keywords: ["markdown"], }, }) // first prompt LLM to generate facts const { text } = await runPrompt((_) => { _.def("FILE", env.files) _.$`Generate 5 facts about the content of FILE.` }) // then use the facts to generate a blog def("FACTS", text) $`Use the above facts to write a one paragraph blog post` ```
# Images in Azure Blob Storage
> Leverage Azure SDK to handle image files in Blob Storage within prompts
It is possible to use the Azure Node.JS SDK to download images from Azure Blog Storage and use them in the prompt. The `defImages` function support the node.js \[Buffer] type. ## Configuration [Section titled “Configuration”](#configuration) Install the [@azure/storage-blob](https://www.npmjs.com/package/@azure/storage-blob) and [@azure/identity](https://www.npmjs.com/package/@azure/identity) packages. ```sh npm install -D @azure/storage-blob @azure/identity ``` Make sure to login with the Azure CLI and set the subscription. ```sh az login ``` ## Reading blobs [Section titled “Reading blobs”](#reading-blobs) Open a connection to the Azure Blob Storage and get a client to the container. We deconstruct the `account` and `container` from the `env.vars` object so that they can be set through the [cli](/genaiscript/reference/cli). ```ts import { BlobServiceClient } from "@azure/storage-blob" import { DefaultAzureCredential } from "@azure/identity" const { account = "myblobs", container = "myimages" } = env.vars const blobServiceClient = new BlobServiceClient( `https://${account}.blob.core.windows.net`, new DefaultAzureCredential() ) const containerClient = blobServiceClient.getContainerClient(container) ``` If you do not have a specific blob in mind, you can iterate through the blobs, and download them into a buffer (`buf`). ```ts import { buffer } from "node:stream/consumers" for await (const blob of containerClient.listBlobsFlat()) { const blockBlobClient = containerClient.getBlockBlobClient(blob.name) const downloadBlockBlobResponse = await blockBlobClient.download(0) const body = await downloadBlockBlobResponse.readableStreamBody const image = await buffer(body) ... ``` ## Using images in the prompt [Section titled “Using images in the prompt”](#using-images-in-the-prompt) The `image` buffer can be passed in `defImages` to be used in the prompt. ```ts defImages(image, { detail: "low" }) ``` However since images can be “heavy”, you will most likely have to use [inline prompts](/genaiscript/reference/scripts/inline-prompts) to split into smaller queries. (Note the use of `_.`) ```ts for await (const blob of containerClient.listBlobsFlat()) { ... const res = await runPrompt(_ => { _.defImages(image, { detail: "low" }) _.$`Describe the image.` }) // res contains the LLM response for the inner prompt ... ``` ## Summarizing results [Section titled “Summarizing results”](#summarizing-results) To summarize all images, we store each image summary using the `def` function and add prompting to summarize the descriptions. ```ts ... def("IMAGES_SUMMARY", { filename: blob.name, content: res.text }) } $`Summarize IMAGES_SUMMARY.` ``` ## Full source [Section titled “Full source”](#full-source) azure-blobs.genai.mts ```js import { BlobServiceClient } from "@azure/storage-blob"; import { DefaultAzureCredential } from "@azure/identity"; import { buffer } from "node:stream/consumers"; script({ parameters: { account: { description: "Azure Storage Account Name", default: "genaiscript", type: "string", }, container: { description: "Azure Storage Container Name", default: "images", type: "string", }, }, }); const { account, container } = env.vars; const url = `https://${account}.blob.core.windows.net`; console.log(`analyzing images in ${account}/${container} at ${url}`); const blobServiceClient = new BlobServiceClient(url, new DefaultAzureCredential()); const containerClient = blobServiceClient.getContainerClient(container); for await (const blob of containerClient.listBlobsFlat()) { console.log(`blob: ` + blob.name); const blockBlobClient = containerClient.getBlockBlobClient(blob.name); const downloadBlockBlobResponse = await blockBlobClient.download(0); const body = await downloadBlockBlobResponse.readableStreamBody; const image = await buffer(body); const res = await runPrompt((_) => { _.defImages(image, { detail: "low" }); _.$`Describe the images.`; }); def("IMAGES_SUMMARY", { filename: blob.name, content: res.text }); } $`Summarize IMAGES_SUMMARY.`; ```
# Issue Reviewer
> Learn how to automate reviewing issues with a script.
This guide shows how to automate reviewing issues with a GenAIScript that provides feedback and code analysis in GitHub Actions. ## Resolving the issue [Section titled “Resolving the issue”](#resolving-the-issue) The script starts by getting the current issue information from the GitHub API. issue-reviewer.genai.mjs ```js const { title, body } = await github.getIssue() ``` The `github.getIssue` assumes that GenAIScript is running in a GitHub Action, it will have access to the github token (`GITHUB_TOKEN`) and the `GITHUB_ISSUE` issue id. The `GITHUB_ISSUE` needs to be configured in the GitHub Action from the `github.event.issue` object. github-action.yml ```yaml jobs: review: - run: ... env: GITHUB_ISSUE: ${{ github.event.issue.number }} ``` ## The task [Section titled “The task”](#the-task) The prompt sets the task and how to perform the review in a system message. issue-reviewer.genai.mts ```js $`## Tasks You are an expert developer and have been asked to review an issue. Review the TITLE and BODY and report your feedback that will be added as a comment to the issue. `.role("system") ``` ## The context [Section titled “The context”](#the-context) Then it adds the issue title and body to the prompt. issue-reviewer.genai.mts ```js def("TITLE", title) def("BODY", body) ``` ## Automation in Github Actions [Section titled “Automation in Github Actions”](#automation-in-github-actions) Add this step to your Github Actions workflow to automate the issue review process. The `--pull-request-comment` flag stands for [—pull-request-comment](/genaiscript/reference/cli/run#pull-requests) and takes care of up-serting a comment in the pull request/issue conversation. ```yaml permissions: content: read # permission to read the repository issues: write # permission to write a comment ... - run: npx --yes genaiscript run issue-reviewer --pull-request-comment --out-trace $GITHUB_STEP_SUMMARY env: GITHUB_ISSUE: ${{ github.event.issue.number }} GITHUB_TOKEN: ${{ secrets.GITHUB_TOKEN }} ... # LLM secrets ``` ## Full source [Section titled “Full source”](#full-source) issue-reviewer.genai.mjs ```js script({ title: "Issue Reviewer", description: "Review issues and provide feedback", responseType: "markdown", systemSafety: true, parameters: { issue: { type: "integer", description: "The issue number to answer.", required: false, }, }, }); const { title, body } = await github.getIssue(env.vars.issue); def("TITLE", title); def("BODY", body); $`## Role You are an expert developer at TypeScript and GenAIScript (https://github.com/microsoft/genaiscript) and have been asked to review an issue. ## Task Review the and <BODY> and report your feedback that will be added as a comment to the issue. - Check that has enough details to help the developer. Ask clarifying questions if needed. - do not suggest code changes or guidance. Only provide feedback on the issue itself. `; ```
# Llama Guard your files
> Automate the process of checking your files for harmful content using Llama-guard3.
[Llama-guard3](https://ollama.com/library/llama-guard3) is a LLM model that specializes in detecting harmful content in text. The script we’re discussing aims at batch applying llama-guard to your files. By automating this process, you can save time and focus on addressing only the files that need attention. guard.genai.mjs ```js // iterate over files and check if they are safe using llama-guard3:8b (https://ollama.com/library/llama-guard3) for (const file of env.files) { const { text } = await prompt`${file}`.options({ model: "ollama:llama-guard3:8b", label: file.filename, cache: "llama-guard3:8b", system: [], }); const safe = /safe/.test(text) && !/unsafe/.test(text); if (!safe) console.error(text); } ``` ## Line-by-Line Explanation of the Script 📜 [Section titled “Line-by-Line Explanation of the Script 📜”](#line-by-line-explanation-of-the-script) Let’s dive into the GenAI script and understand its components: ```js // Iterate over each file provided by the environment for (const file of env.files) { ``` Here, we loop through each file available in the `env.files` array, which contains the files you want to check. ```js // Use a GenAI model to analyze each file for safety const { text } = await prompt`${file}`.options({ model: "ollama:llama-guard3:8b", label: file.filename, cache: "llama-guard3:8b", system: [], }) ``` This block uses the GenAI model [ollama:llama-guard3:8b](https://ollama.com/library/llama-guard3) to analyze the contents of each file. The `prompt` function sends the file to the model, and various options are set to specify the model, label the file, and manage cache. ```js // Determine if the file is considered safe const safe = /safe/.test(text) && !/unsafe/.test(text) ``` The script checks if the model’s analysis considers the file safe by searching the response text for the word “safe” and ensuring “unsafe” isn’t present. ```js // Log and store filenames of unsafe files if (!safe) { console.error(text) } ``` If a file is found to be unsafe, its details are logged to the console. ## Running the Script with GenAIScript CLI 🚀 [Section titled “Running the Script with GenAIScript CLI 🚀”](#running-the-script-with-genaiscript-cli) To run this script, you’ll need to use the GenAIScript CLI. If you haven’t installed it yet, follow the [installation guide](https://microsoft.github.io/genaiscript/getting-started/installation). Once installed, execute the script using the following command: ```shell genaiscript run guard **/*.ts ``` This command will check all the files matching ”\**/*.ts” and let you know which ones are unsafe. Happy coding and stay safe! 🛡️
# LLM Agents
> Learn how to use the inline prompts to create a LLM agent.
An **[agent](/genaiscript/reference/scripts/agents)** is a special kind of [tool](/genaiscript/reference/scripts/tools) that uses an [inline prompt](/genaiscript/reference/scripts/inline-prompts) and [tools](/genaiscript/reference/scripts/tools) to solve a task. ## Usage [Section titled “Usage”](#usage) We want to build a script that can investigate the most recent run failures in a GitHub repository using GitHub Actions. To do so, we probably will need to the following agents: * query the GitHub API, `agent_github` * compute some git diff to determine which changes broken the build, `agent_git` * read or search files `agent_fs` github-investigator.genai.mts ```js script({ tools: ["agent_fs", "agent_git", "agent_github", ...], ... }) ``` Each of these agent is capable of calling an LLM with a specific set of tools to accomplish a task. The full script source code is available below: github-investigator.genai.mts ```js script({ tools: ["agent_fs", "agent_git", "agent_github", "agent_interpreter", "agent_docs"], model: "reasoning", parameters: { jobUrl: { type: "string" }, // URL of the job workflow: { type: "string" }, // Workflow name failure_run_id: { type: "number" }, // ID of the failed run branch: { type: "string" }, // Branch name }, }); const { workflow = "build.yml", failure_run_id, branch = await git.branch(), jobUrl } = env.vars; if (jobUrl) { $`1. Extract the run id and job id from the ${jobUrl}`; $`2. Find the last successful run before the failed run for the same workflow and branch`; } else if (failure_run_id) { $`1. Find the failed run ${failure_run_id} of ${workflow} for branch ${branch} 2. Find the last successful run before the failed run for the same workflow and branch`; } else { $`0. Find the worflow ${workflow} in the repository 1. Find the latest failed run of ${workflow} for branch ${branch} 2. Find the last successful run before the failed run`; } $`3. Compare the run job logs between the failed run and the last successful run 4. git diff the failed run commit (head_sha) and the last successful run commit - show a diff of the source code that created the problem if possible 5. Analyze all the above information and identify the root cause of the failure - generate a patch to fix the problem if possible 6. Generate a detailled report of the failure and the root cause - include a list of all HTML urls to the relevant runs, commits, pull requests or issues - include diff of code changes - include the patch if generated - include a summary of the root cause `; defOutputProcessor(async ({ messages }) => { await runPrompt((_) => { _.$`- Generate a pseudo code summary of the plan implemented in MESSAGES. MESSAGES is a LLM conversation with tools. - Judge the quality of the plan and suggest 2 improvements. - Generate a python program that optimizes the plan in code. Assume "llm" is a LLM call.`; _.def( "MESSAGES", messages.map((msg) => _.$`- ${msg.role}: ${msg.content || JSON.stringify(msg)}`).join("\n"), ); }); return undefined; }); ``` ## Multiple instances of the same agent [Section titled “Multiple instances of the same agent”](#multiple-instances-of-the-same-agent) Some agents, like `agent_git`, can be instantiated with different parameters, like working on different repositories. multi-agents.genai.mts ```js script({ system: [ "system.agent_git", { id: "system.agent_git", parameters: { repo: "microsoft/jacdac", variant: "jacdac" }, }, ], }); $`Generate a table with the last commits of the jacdac and current git repository?`; ``` In such case, make sure to provide a `variant` argument that will be used to generate a unique agent name. ## To split or not to split [Section titled “To split or not to split”](#to-split-or-not-to-split) You could try to load all the tools in the same LLM call and run the task as a single LLM conversation. Results may vary. github-investigator.genai.mts ```js script({ tools: ["fs", "git", "github", ...], ... }) ```
# LLM as a tool
> Create tools and inline prompts using LLM models for executing various tasks
It is possible [tools](/genaiscript/reference/scripts/tools) and [inline prompts](/genaiscript/reference/scripts/inline-prompts) to create a tool that uses an LLM model to execute a prompt. ```js defTool( "llm-small", "Invokes smaller LLM", { prompt: { type: "string", description: "the prompt to be executed by the LLM", }, }, async ({ prompt }) => await runPrompt(prompt, { model: "small", label: "llm-small", }) ) ``` The `"small"` model is an alias that can be configured in the `script` metadata, cli arguments or environment variables. ```js script({ smallModel: "openai:gpt-4o-mini", }) ``` The inlined prompts can declare their own tools or use system prompts declaring them. ```js defTool( "agent_file_system", `An agent that uses gpt-4o to execute an LLM requests with tools that can search and read the file system. `, { prompt: { type: "string", description: "the prompt to be executed by the LLM", }, }, async ({ prompt }) => await env.generator.runPrompt( (_) => { _.$`You are an AI assistant that can help with file system tasks. Answer the user question in the most concise way possible. Use wildcards and regex if needed. If the question is ambiguous, ask for clarification. Use tools to search and read the file system. QUESTION:` _.writeText(prompt) }, { model: "openai:gpt-4o", label: `llm-4o agent_fs ${prompt}`, tools: "fs", } ) ) ```
# PDF Vision
Extracting markdown from PDFs is a tricky task… the PDF file format was never really meant to be read back. There are many techniques applied in the field to get the best results: * one can read the text using [Mozilla’s pdfjs](https://mozilla.github.io/pdf.js/) (GenAIScript uses that), which may give some results but the text might be garbled or not in the correct order. And tables are a challenge. And this won’t work for PDFs that are images only. * another technique would be to apply OCR algorithm on segments of the image to “read” the rendered text. In this guide, we will build a GenAIScript that uses a LLM with vision support to extract text and images from a PDF, converting each page into markdown. Let’s assume that the user is running our script on a PDF file, so it is the first element of `env.files`. We use the PDF parser to extract both the pages and images from the PDF file. The `renderAsImage` option is set to `true`, which means each page is also converted into an image. ```ts const { pages, images } = await parsers.PDF(env.files[0], { renderAsImage: true, }) ``` We begin a loop that iterates over each page in the PDF. ```ts for (let i = 0; i < pages.length; ++i) { const page = pages[i] const image = images[i] ``` For each iteration, we extract the current page and its corresponding image. We use the `runPrompt` function to process both text and image data. ```ts // mix of text and vision const res = await runPrompt( (ctx) => { if (i > 0) ctx.def("PREVIOUS_PAGE", pages[i - 1]) ctx.def("PAGE", page) if (i + 1 < pages.length) ctx.def("NEXT_PAGE", pages[i + 1]) ctx.defImages(image, { autoCrop: true, greyscale: true }) ``` The context `ctx` is set up with definitions for the current page, and optionally the previous and next pages. Images are defined with auto-cropping and greyscale adjustments. ```ts ctx.$`You are an expert in reading and extracting markdown from a PDF image stored in the attached images. Your task is to convert the attached image to markdown. - We used pdfjs-dist to extract the text of the current page in PAGE, the previous page in PREVIOUS_PAGE and the next page in NEXT_PAGE. - Generate markdown. Do NOT emit explanations. - Generate CSV tables for tables. - For images, generate a short alt-text description. ` ``` This prompt instructs GenAI to convert the page image into markdown. It highlights the use of `pdfjs-dist` for text extraction and instructs how to handle text, tables, and images. ```ts }, { model: "small", label: `page ${i + 1}`, cache: "pdf-ocr", system: [ "system", "system.assistant", "system.safety_jailbreak", "system.safety_harmful_content", ], } ) ``` We configure the model with specific settings, such as labeling each page, caching settings, and system configurations for safety. ```ts ocrs.push(parsers.unfence(res.text, "markdown") || res.error?.message) } ``` Each result is processed, converted back to markdown, and added to the `ocrs` array. ```ts console.log(ocrs.join("\n\n")) ``` Finally, we print out all the collected OCR results in markdown format. ## Running the Script [Section titled “Running the Script”](#running-the-script) To run this script using the GenAIScript CLI, navigate to your terminal and execute: ```bash genaiscript run pdfocr <mypdf.pdf> ``` For more details on installing and setting up the GenAIScript CLI, refer to the [official documentation](https://microsoft.github.io/genaiscript/getting-started/installation). This script provides a straightforward way to convert PDFs into markdown, making it easier to work with their contents programmatically. Happy coding! 🚀 ## Full source [Section titled “Full source”](#full-source) The full script source code is available below: pdfocr.genai.mts ```js script({ files: "src/pdf/jacdac.pdf", }); for (const file of env.files.filter((f) => f.filename.endsWith(".pdf"))) { // extract text and render pages as images const { pages, images } = await parsers.PDF(file, { renderAsImage: true, }); console.log(`pages: ${pages.length}`); const ocrs: string[] = []; for (let i = 0; i < pages.length; ++i) { const page = pages[i]; const image = images[i]; // todo: orientation // mix of text and vision const res = await runPrompt( (ctx) => { if (i > 0) ctx.def("PREVIOUS_PAGE", pages[i - 1]); ctx.def("PAGE", page); if (i + 1 < pages.length) ctx.def("NEXT_PAGE", pages[i + 1]); ctx.defImages(image, { autoCrop: true, greyscale: true }); ctx.$`You are an expert in reading and extracting markdown from a PDF image stored in the attached images. Your task is to convert the attached image to markdown. - We used pdfjs-dist to extract the text of the current page in PAGE, the previous page in PREVIOUS_PAGE and the next page in NEXT_PAGE. - Generate markdown. Do NOT emit explanations. - Generate CSV tables for tables. - For images, generate a short alt-text description. `; }, { model: "small", label: `page ${i + 1}`, cache: "pdf-ocr", system: [ "system", "system.assistant", "system.safety_jailbreak", "system.safety_harmful_content", ], }, ); ocrs.push(parsers.unfence(res.text, "markdown") || res.error?.message); } await workspace.writeText(file.filename + ".md", ocrs.join("\n\n")); } ```
# Phi-3 Mini with Ollama
> Learn how to integrate Phi-3 Mini, a powerful 3.8B parameter model by Microsoft, with Ollama for local execution of state-of-the-art AI models.
[Phi-3 Mini](https://azure.microsoft.com/en-us/blog/introducing-phi-3-redefining-whats-possible-with-slms/) is a 3.8B parameters, lightweight, state-of-the-art open model by Microsoft. In this guide, we use [Ollama](https://ollama.com/), a desktop application that let you download and run model locally. 1. Start the Ollama application or run the command to launch the server from a terminal. ```sh ollama serve ``` 2. (optional) Pull your model from the Ollama server (see [list of models](https://ollama.com/library)). GenAIScript will automatically attempt to pull it if missing. ```sh ollama pull phi3 ``` 3. Update your script to use the `ollama:phi3` model. summarize-phi3.genai.mjs ```js script({ model: "ollama:phi3", title: "summarize with phi3", system: ["system"], }) const file = def("FILE", env.files) $`Summarize ${file} in a single paragraph.` ``` 4. Apply this script to the files you want to summarize!
# Present My Code
> Step-by-step instructions on presenting code effectively using GenAIScript and creating engaging slides.
1. Save the script below in your project as `genaisrc/slides.genai.js`. slides.genai.mjs ```js script({ title: "Generate Slides", description: "Generate a slide-deck in markdown. Install extension 'vscode-reveal'.", group: "samples", temperature: 0.1, tests: { files: ["src/greeter.ts"], keywords: "greeter", }, }) const output = env.files[0].filename + ".slides.md" def( "SOURCE", env.files.filter((f) => !f.filename.endsWith(".slides.md")) ) $`Generate a slide deck in markdown format for the content in SOURCE in file ${output} using markdown. - Each slide SHOULD have a title, unless it is only showing a code snippet. - USE heading level 3 for slide titles. - Do NOT add "Slide:" or "Title:" in the slide. - Keep slides titles VERY short. - USE --- to separate slides. - Keep the content on each slide short. Maximum 3 bullet points. - Use mermaid syntax if you need to generate state diagrams, class inheritance diagrams, relationships. - If the source is code, describe the code and show the code in a separate slide. - Keep code snippet short. Maximum 10 lines. Maximum 42 columns. Use multiple slides if needed. Ellipse sections with ... if necessary. - The first slide have a title and a summary of the slide deck. - IGNORE Contributing, Copyright and Trademarks sections. ` ``` 2. Right click on the code file or folder, select **Run GenAIScript…** and select **Generate Slides**. 3. Apply the refactoring to save the generated slides file. 4. To visualize the slides, install the [vscode-reveal extension](https://marketplace.visualstudio.com/items?itemName=evilz.vscode-reveal). Open the slides file and click **slides** in the status bar.
# Programming Language Personas
> Learn how to use expert programming language personas in GenAIScript
GenAIScript includes expert programming language personas that provide specialized knowledge and best practices for different programming languages. These personas are automatically activated when your scripts reference specific language keywords or file extensions. ## Available Language Personas [Section titled “Available Language Personas”](#available-language-personas) ### Go (Golang) - `system.go` [Section titled “Go (Golang) - system.go”](#go-golang---systemgo) The Go persona provides expertise in: * Proper error handling with explicit error checking * Clear and concise variable and function naming following Go conventions * Appropriate use of goroutines and channels for concurrency * Proper package organization and imports * Following the Go standard library patterns and conventions * Writing idiomatic Go code that is simple, readable, and efficient **Auto-activation triggers:** * File extensions: `*.go` * Keywords: `golang`, `go `(with space) ### Rust - `system.rust` [Section titled “Rust - system.rust”](#rust---systemrust) The Rust persona provides expertise in: * Proper ownership and borrowing principles to ensure memory safety * Idiomatic use of Result and Option types for error handling * Effective use of traits and generics for code reusability * Following Rust naming conventions and code style * Leveraging the type system for safety and performance * Writing code that is zero-cost abstraction and performant * Proper use of Cargo and the Rust ecosystem **Auto-activation triggers:** * File extensions: `*.rs` * Keywords: `rust`, `cargo` ### Java - `system.java` [Section titled “Java - system.java”](#java---systemjava) The Java persona provides expertise in: * Proper object-oriented design principles and patterns * Effective use of Java’s type system and generics * Following Java naming conventions and code style * Appropriate exception handling and resource management * Understanding of the Java Memory Model and garbage collection * Leveraging the Java standard library and ecosystem effectively * Writing clean, maintainable, and well-documented code * Proper use of build tools like Maven or Gradle **Auto-activation triggers:** * File extensions: `*.java` * Keywords: `java `(with space), `maven`, `gradle` ### C/C++ - `system.cpp` [Section titled “C/C++ - system.cpp”](#cc---systemcpp) The C/C++ persona provides expertise in: * Proper memory management and avoiding memory leaks * Understanding of pointers, references, and RAII principles * Effective use of the C++ Standard Library and modern C++ features * Following C/C++ naming conventions and code style * Writing efficient and performance-optimized code * Proper header organization and include guards * Understanding of compilation, linking, and build systems * Safe coding practices to avoid common vulnerabilities * Appropriate use of C++ features like templates, lambdas, and smart pointers **Auto-activation triggers:** * File extensions: `*.cpp`, `*.cxx`, `*.cc`, `*.c++`, `*.h`, `*.hpp` * Keywords: `c++`, `cpp`, `cmake` ### TypeScript - `system.typescript` [Section titled “TypeScript - system.typescript”](#typescript---systemtypescript) The TypeScript persona provides expertise in: * Modern TypeScript features and syntax * Type safety and advanced type system usage * Integration with JavaScript ecosystems * Best practices for scalable TypeScript applications * Proper configuration and tooling setup * ESM modules and async/await patterns **Auto-activation triggers:** * File extensions: `*.ts`, `*.tsx` * Keywords: `typescript`, `ts `(with space) ### Python - `system.python` [Section titled “Python - system.python”](#python---systempython) The Python persona provides expertise in: * PEP 8 compliant code style and conventions * Pythonic programming patterns and idioms * Proper use of Python’s standard library * Type hints and modern Python features * Package management and virtual environments * Performance optimization and best practices * Clean, readable, and maintainable code structure **Auto-activation triggers:** * File extensions: `*.py`, `*.pyi` * Keywords: `python`, `pip`, `conda`, `virtualenv` ## Automatic Activation [Section titled “Automatic Activation”](#automatic-activation) GenAIScript automatically detects when to include language personas based on: 1. **File extensions** in your script’s file processing 2. **Keywords** in your script content 3. **Build tool references** (cargo, maven, gradle, cmake) For example, this script will automatically include the Go persona: ```js script({ title: "Go Code Review", files: "*.go" }) $`Review this Go code and suggest improvements.` ``` ## Manual Activation [Section titled “Manual Activation”](#manual-activation) You can also explicitly activate language personas using the `system` parameter: ```js script({ title: "Multi-language Review", system: ["system.go", "system.rust", "system.java"] }) $`Compare implementations across Go, Rust, and Java.` ``` ## Example Usage [Section titled “Example Usage”](#example-usage) ### Go Code Analysis [Section titled “Go Code Analysis”](#go-code-analysis) go-review\.genai.mts ```js script({ title: "Go Code Review", description: "Review Go code for best practices", files: "*.go" }) $`Analyze the Go code and provide suggestions for: - Error handling patterns - Goroutine and channel usage - Code organization and naming conventions - Performance optimizations` ``` ### Rust Safety Check [Section titled “Rust Safety Check”](#rust-safety-check) rust-safety.genai.mts ```js script({ title: "Rust Safety Analysis", files: "*.rs" }) $`Review this Rust code focusing on: - Ownership and borrowing correctness - Memory safety guarantees - Proper use of Result and Option types - Performance implications` ``` ### Java Architecture Review [Section titled “Java Architecture Review”](#java-architecture-review) java-architecture.genai.mts ```js script({ title: "Java Architecture Review", files: "**/*.java" }) $`Analyze the Java codebase for: - Object-oriented design principles - Design pattern usage - Exception handling strategies - Performance and memory considerations` ``` ### C++ Modernization [Section titled “C++ Modernization”](#c-modernization) cpp-modernize.genai.mts ```js script({ title: "C++ Modernization", files: ["*.cpp", "*.h", "*.hpp"] }) $`Review this C++ code and suggest modernizations: - Use of modern C++ features (C++11/14/17/20) - Memory safety with smart pointers - Performance optimizations - Best practices for headers and includes` ``` ### TypeScript Type Safety [Section titled “TypeScript Type Safety”](#typescript-type-safety) typescript-types.genai.mts ```js script({ title: "TypeScript Type Safety Review", files: "*.ts" }) $`Review this TypeScript code focusing on: - Type safety and proper type annotations - Advanced TypeScript features usage - Integration with JavaScript libraries - Performance and compilation optimizations` ``` ### Python Code Quality [Section titled “Python Code Quality”](#python-code-quality) python-quality.genai.mts ```js script({ title: "Python Code Quality Review", files: "*.py" }) $`Analyze this Python code for: - PEP 8 compliance and style - Pythonic patterns and idioms - Type hints and modern Python features - Performance and best practices` ``` ## Combining with Other Systems [Section titled “Combining with Other Systems”](#combining-with-other-systems) Language personas work well with other system prompts: ```js script({ title: "Comprehensive Code Review", system: ["system.go", "system.git_info", "system.diff"], files: "*.go" }) $`Review the Git changes to Go files and provide detailed feedback.` ``` The language personas enhance GenAIScript’s ability to provide expert-level guidance tailored to each programming language’s unique characteristics and best practices.
# Prompt As Code
> Tutorial on using GenAIScript runtime and syntax to assemble prompts
This page is a tutorial on creating prompt with GenAIScript. It is designed to be opened in Visual Studio Code as a Notebook. ## About GenAIScript Markdown Notebooks [Section titled “About GenAIScript Markdown Notebooks”](#about-genaiscript-markdown-notebooks) The [GenAIScript Markdown Notebook](/genaiscript/reference/scripts/notebook) will parse the markdown document into a Notebook view and use Visual Studio Code’s support to provide a rich editing experience. It should work with any markdown file as long as the code fence use ”\`\`\`”. * Each **JavaScript** code block is an self-contained GenAIScript that can be executed individually. The results are attached to each code block and saved in the markdown file. * This is a stateless kernel, so the variables are not shared between code blocks. * Other languages are not supported in this notebook and simply ignored. ## Prompt as code [Section titled “Prompt as code”](#prompt-as-code) GenAIScript lets you write prompts as a JavaScript program. GenAIScript runs your program; generate chat messages; then handles the remaining interaction with the LLM API. ### `$` Let’s start with a simple hello world program. ```js $`Say "hello!" in emojis` ``` <!-- genaiscript output start --> <!-- genaiscript output end --> The `$` function formats the strings and write them to the user message. This user message is added to the chat messages and sent to the LLM API. Under the snippet, you can review both the **user** message (that our program generated) and the **assistant** (LLM) response. You can run the code block by clicking the **Execute Cell** button on the top left corner of the code block. It will be default try to use the `openai:gpt-3.5-turbo` LLM. If you need to use a different model, update the `model` field in the front matter at the start of the document. There are many options documented in [configuration](/genaiscript/getting-started/configuration). Once the execution is done, you will also an additional **trace** entry that allows you to dive in the internal details of the GenAIScript execution. This is very helpful to diagnose issues with your prompts. The trace can be quite large so it is not serialized in the markdown file. You can use the JavaScript `for` loop and sequence multiple `$` calls to append text to the user message. You can also inner expression to generate dynamic content. ```js // let's give 3 tasks to the LLM // to get 3 different outputs for (let i = 1; i <= 3; i++) $`- Say "hello!" in ${i} emojis.` $`Respond with a markdown list` ``` <!-- genaiscript output start --> <!-- genaiscript output end --> To recap, the GenAIScript runs and generates a user messages; that gets sent to the LLM. You can review the user message (and others) in the trace. ## `def` and `env.files` [Section titled “def and env.files”](#def-and-envfiles) The [`def` function](https://microsoft.github.io/genaiscript/reference/scripts/context/#definition-def) lets you declare and assign **LLM variables**. The concept of variable is most useful to import context data, in particular files, and refer to them in the rest of the prompt. ```js def("FILE", env.files) $`Summarize FILE in one short sentence. Respond as plain text.` ``` <!-- genaiscript output start --> <!-- genaiscript output end --> In GenAIScript, the [`env.files`](https://microsoft.github.io/genaiscript/reference/scripts/context/#environment-env) variable contains the [list of files in context](/genaiscript/reference/scripts/files), which can be determined by a user selection in the UI, CLI arguments, or pre-configured like in this script. You can change the files in `env.files` by editing the `files` field in the front matter at the start of the document. ### Filtering [Section titled “Filtering”](#filtering) When using GenAIScript from the user interface, it is common to apply a script to an entire folder. This means that you’ll get a bunch of files in `env.files` including some unneeded ones. The `def` function provides various options to filter the files, like the `endsWith` option. `def` also provides `maxTokens` which will trim the content size to a number of tokens. LLM context is finite! ```js script({ files: "src/samples/**" }) // glob all files under src/samples def("FILE", env.files, { endsWith: ".md", maxTokens: 1000 }) // only consider markdown files $`Summarize FILE in one short sentence. Respond as plain text.` ``` <!-- genaiscript output start --> <!-- genaiscript output end -->
# Search and Fetch
> Learn how to leverage web search and fetching pages in GenAIScript
Suppose we want to plan a weekend trip using a GenAIScript that will help us plan by using web search to learn about things to do and the expected weather. 1. Use the `> GenAIScript: Create new script...` command in the command palette to create a new script. 2. Start the script by defining the model and title: ```js script({ title: "plan-weekend", description: "Given details about my goals, help plan my weekend", model: "openai:gpt-4o", }) ``` 3. Use the [`webSearch`](/genaiscript/reference/scripts/web-search/) function to search for information about the destination. If you don’t have one, then you can search for the web pages manually and use the URLs directly in the call to the `host.fetchText` function. ```js const parkinfo = await retrieval.webSearch("mt rainier things to do") ``` 4. `webSearch` returns a list of URLs. Use [`fetchText`](/genaiscript/reference/scripts/fetch/) to fetch the contents of the 1st URL. ```js const parktext = await host.fetchText(parkinfo.webPages[0]) ``` 5. `host.fetchText` returns a lot of formatting HTML tags, etc. Use [`runPrompt`](/genaiscript/reference/scripts/inline-prompts/) to call the LLM to clean out the tags and just keep the text. ```js const cleanInfo = await runPrompt(_ => { // use def, $ and other helpers _.def("INFO", parktext.text) _.$`You are an expert in web content. Extract out of the file INFO, which is HTML with lots of CSS and HTML tags, the important information that a human would want to know.` }) ``` 6. Repeat to get the latest weather info about your destination. ```js const weather = await retrieval.webSearch("mt rainier weather") ``` 7. Replace the text `"TELL THE LLM WHAT TO DO..."` with what kind of vacation you want to plan. ```js $`You are a helpful assistant that is an expert in planning weekend trips. I've included information about my destination in PARKINFO and WEATHER. Help me plan a weekend trip starting tomorrow.` ``` 8. Press the “Run” button on the upper right corner of the editor to run the script. (You can run this script in this way because it takes no other input in `env.files`)) 9. The output will be displayed in a new document tab. Here’s an example of the output you might get: ```plaintext Based on the information provided in PARKINFO and the various weather forecasts, here's a concise plan for your weekend trip to Mount Rainier National Park starting tomorrow: Day 1: Arrival and Exploration Morning: Arrive at the park via the Nisqually entrance, which is open year-round. Afternoon: Visit Paradise, one of the most popular areas in the park. Check the weather before heading out, as the forecast suggests a heavy fall of snow and extremely cold temperatures. Dress warmly and carry snow chains if driving. Evening: Have dinner at the Paradise Inn, if open, and stay overnight in the park or nearby accommodation. ``` Here’s the complete GenAIScript: ```js script({ title: "plan-weekend", description: "Given details about my goals, help plan my weekend", model: "openai:gpt-4o", }) const parkinfo = await retrieval.webSearch("mt rainier things to do") const parktext = await fetchText(parkinfo.webPages[0]) const cleanInfo = await runPrompt(_ => { // use def, $ and other helpers _.def("INFO", parktext.text) _.$`You are an expert in web content. Extract out of the file INFO, which is HTML with lots of CSS and HTML tags, the important information that a human would want to know.` }) if (cleanInfo) def("PARKINFO", cleanInfo.text) const weather = await retrieval.webSearch("mt rainier weather") def("WEATHER", weather.webPages) $`You are a helpful assistant that is an expert in planning weekend trips. I've included information about my destination in PARKINFO and ${weather}. Help me plan a weekend trip starting tomorrow.` ```
# Search And Transform
> Learn how to search and transform data in your data sources.
This script is an evolution of the “search and replace” feature from text editor, where the “replace” step has been replaced by a LLM transformation. It can be useful to batch apply text transformations that are not easily done with regular expressions. For example, when GenAIScript added the ability to use a string command string in the `exec` command, we needed to convert all script using ```js host.exec("cmd", ["arg0", "arg1", "arg2"]) ``` to ```js host.exec(`cmd arg0 arg1 arg2`)` ``` While it’s possible to match this function call with a regular expression ```regex host\.exec\s*\([^,]+,\s*\[[^\]]+\]\s*\) ``` it’s not easy to formulate the replacement string… unless you can describe it in natural language: ```txt Convert the call to a single string command shell in TypeScript ``` Here are some example of the transformations where the LLM correctly handled variables. * concatenate the arguments of a function call into a single string ```diff const { stdout } = await host.exec("git", ["diff"]) const { stdout } = await host.exec(`git diff`) ``` * concatenate the arguments and use the `${}` syntax to interpolate variables ```diff const { stdout: commits } = await host.exec("git", [ "log", "--author", author, "--until", until, "--format=oneline", ]) const { stdout: commits } = await host.exec(`git log --author ${author} --until ${until} --format=oneline`) ``` ## Search [Section titled “Search”](#search) The search step is done with the [workspace.grep](/genaiscript/reference/scripts/files) that allows to efficiently search for a pattern in files (this is the same search engine that powers the Visual Studio Code search). ```js const { pattern, globs } = env.vars const patternRx = new RegExp(pattern, "g") const { files } = await workspace.grep(patternRx, { globs }) ``` ## Compute Transforms [Section titled “Compute Transforms”](#compute-transforms) The second step is to apply the regular expression to the file content and pre-compute the LLM transformation of each match using an [inline prompt](/genaiscript/reference/scripts/inline-prompts). ```js const { transform } = env.vars ... const patches = {} // map of match -> transformed for (const file of files) { const { content } = await workspace.readText(file.filename) for (const match of content.matchAll(patternRx)) { const res = await runPrompt( (ctx) => { ctx.$` ## Task Your task is to transform the MATCH with the following TRANSFORM. Return the transformed text. - do NOT add enclosing quotes. ## Context ` ctx.def("MATCHED", match[0]) ctx.def("TRANSFORM", transform) }, { label: match[0], system: [], cache: "search-and-transform" } ) ... ``` Since the LLM sometimes decides to wrap the answer in quotes, we need to remove them. ```js ... const transformed = res.fences?.[0].content ?? res.text patches[match[0]] = transformed ``` ## Transform [Section titled “Transform”](#transform) Finally, with the transforms pre-computed, we apply a final regex replace to patch the old file content with the transformed strings. ```js const newContent = content.replace( patternRx, (match) => patches[match] ?? match ) await workspace.writeText(file.filename, newContent) } ``` ## Parameters [Section titled “Parameters”](#parameters) The script takes three parameters: a file glob, a pattern to search for, and a LLM transformation to apply. We declare these parameters in the `script` metadata and extract them from the `env.vars` object. ```js script({ ..., parameters: { glob: { type: "string", description: "The glob pattern to filter files", default: "*", }, pattern: { type: "string", description: "The text pattern (regular expression) to search for", }, transform: { type: "string", description: "The LLM transformation to apply to the match", }, }, }) const { pattern, glob, transform } = env.vars ``` ## Full source [Section titled “Full source”](#full-source) st.genai.mts ```ts script({ title: "Search and transform", description: "Search for a pattern in files and apply a LLM transformation the match", parameters: { glob: { type: "string", description: "The glob pattern to filter files", }, pattern: { type: "string", description: "The text pattern (regular expression) to search for", }, transform: { type: "string", description: "The LLM transformation to apply to the match", }, }, }); let { pattern, glob, transform } = env.vars; if (!glob) glob = (await host.input("Enter the glob pattern to filter files (default: *)")) || "*"; if (!pattern) pattern = await host.input("Enter the pattern to search for (regular expression)"); if (!pattern) cancel("pattern is missing"); const patternRx = new RegExp(pattern, "g"); if (!transform) transform = await host.input("Enter the LLM transformation to apply to the match"); if (!transform) cancel("transform is missing"); const { files } = await workspace.grep(patternRx, { glob }); // cached computed transformations const patches = {}; for (const file of files) { console.log(file.filename); const { content } = await workspace.readText(file.filename); // skip binary files if (!content) continue; // compute transforms for (const match of content.matchAll(patternRx)) { console.log(` ${match[0]}`); if (patches[match[0]]) continue; const res = await runPrompt( (_) => { _.$` ## Task Your task is to transform the MATCH with the following TRANSFORM. Return the transformed text. - do NOT add enclosing quotes. ## Context `; _.def("MATCHED", match[0]); _.def("TRANSFORM", transform, { detectPromptInjection: "available", }); }, { label: match[0], system: ["system.assistant", "system.safety_jailbreak", "system.safety_harmful_content"], cache: "search-and-transform", }, ); const transformed = res.fences?.[0].content ?? res.text; if (transformed) patches[match[0]] = transformed; console.log(` ${match[0]} -> ${transformed ?? "?"}`); } // apply transforms const newContent = content.replace(patternRx, (match) => patches[match] ?? match); // save results if file content is modified if (content !== newContent) await workspace.writeText(file.filename, newContent); } ``` To run this script, you can use the `--vars` option to pass the pattern and the transform. ```sh genaiscript st --vars 'pattern=host\.exec\s*\([^,]+,\s*\[[^\]]+\]\s*\)' 'transform=Convert the call to a single string command shell in TypeScript' ```
# Sharing scripts
> Learn how to share GenAIScript scripts across projects using Git repositories, submodules, and GitHub Gists.
GenAIScript scripts are files and can be shared like any other code file. As long as the script file are under the project folder, GenAIScript will look for `**/*.genai.js` files and `**/*.genai.mjs`. Here are some ideas to share files. ## Git repository + submodules [Section titled “Git repository + submodules”](#git-repository--submodules) If you store your scripts in a git repository, you can use git submodules to share them across multiple projects. * repository containing your script (e.g. `https://.../shared-scripts`) - referencing `shared-scritps` as a git submodule ```sh git submodule add https://.../shared-scripts git submodule update --init --recursive ``` ## GitHub Gists [Section titled “GitHub Gists”](#github-gists) [Gists](https://gist.github.com/) is a lightweight way to share a couple files.
# Summarize Many Documents
> Learn how to run a GenAIScript over many documents
Suppose I have a directory with multiple `.pdf` (or other) files and I want to run a GenAIScript over all of them. In this example, I’m generating a catchy tweet for each document and I want to save the tweet in another file. ## Development [Section titled “Development”](#development) 1. Use the `> GenAIScript: Create new script...` command in the command palette to create a new script. 2. This is an easy script. Assuming the script will take the file as an argument, you can refer to that argument in `env.files` and tell the LLM what to do with it: gen-tweet.genai.mjs ```js script({ title: "gen-tweet" }) def("FILE", env.files) $`Given the paper in FILE, write a 140 character summary of the paper that makes the paper sound exciting and encourages readers to look at it.` ``` 3. Right click on the document in VS Code Explorer (it can be a `.pdf`, a `.docx`, or a `.md` file because `def` knows how to read and parse all these file types). Select **Run GenAIScript**. Select the script `gen-tweet` you just wrote. 4. Assuming we give the GenAIScript a paper describing GenAIScript, the Output will be displayed in a new document tab. ```plaintext Discover GenAIScript: a revolutionary scripting language integrating AI to automate complex tasks, making coding accessible to all! #AI #CodingFuture ``` Because we didn’t tell the LLM to write the output to a file, it will by default go to standard out. ## Automation [Section titled “Automation”](#automation) 1. We can run the script from the [command line](/genaiscript/reference/cli/): ```sh npx genaiscript run gen-tweet example1.pdf ``` 2. The output will be displayed in the terminal. 3. Now that we have the script working for a single file, we can use the command line to apply it to a list of files. Let’s assume you start with a file `ex1.pdf` you want the output in a new file `ex1.tweet.md`. How you do this depends on the shell script you prefer. * bash ```bash for file in *.pdf; do newfile="${file%.pdf}.tweet.md"; # foo.pdf -> foo.tweet.md if [ ! -f "$newfile" ]; then # skip if already exists npx genaiscript run gen-tweet $file > $newfile fi done ``` * PowerShell ```powershell Get-ChildItem -Filter *.pdf | ForEach-Object { $newName = $_.BaseName + ".tweet.md" if (-not (Test-Path $newName)) { npx genaiscript run gen-tweet $_.FullName | Set-Content "$newName" } } ``` * Python (on Windows) ```python import subprocess, sys, os for input_file in sys.argv[1:]: output_file = os.path.splitext(input_file)[0] + '.tweet.md' if not os.path.exists(output_file): with open(output_file, 'w') as outfile: result = subprocess.check_output( ["npx", "genaiscript", "run", "gen-tweet", input_file], universal_newlines=True) outfile.write(result) ``` * JavaScript (node.js) ```js #!/usr/bin/env zx import "zx/globals" const files = await glob("*.pdf") for (const file of files) { const out = file.replace(/\.pdf$/i, ".tweet.md") // foo.pdf -> foo.tweet.md if (!(await fs.exists(out))) // don't regenerate if it already exists await $`genaiscript run gen-tweet ${file} > ${out}` } ``` This script requires [zx](https://github.com/google/zx).
# Tool Agent
> Learn how to define a built-in agent using functions for decision-making and reasoning in arithmetic operations.
Using [tools (formerly functions)](/genaiscript/reference/scripts/tools), you can define a built-in agent that can take decisions and reasoning based on the tools provided to it. Let’s illustrate this concept using the [llamaindex sum div sample](https://ts.llamaindex.ai/examples/agent): an agent that can sum or divide two numbers and needs to answer basic arithmetic questions. ## Using tools [Section titled “Using tools”](#using-tools) By declaring tools (and providing a descriptive description), you provide the opportunity for the LLM to requests a tool call during the output generation. In the snippet below, we declare a tool that can sum two numbers. It will be called by the LLM when a sum operation is required. ```js defTool( "sum", "Sum two numbers", { type: "object", properties: { a: { type: "number", description: "The first number", }, b: { type: "number", description: "The second number", }, }, required: ["a", "b"], }, ({ a, b }) => `${a + b}` ) ``` You can also simplify the parameter definition by provider an example object and the schema will be inferred.\_createMdxContent ```js defTool("sum", "Sum two numbers", { a: 1, b: 2 }, ({ a, b }) => `${a + b}`) ``` ## Parameters [Section titled “Parameters”](#parameters) The arithmetic question can be declared as a [script parameter](/genaiscript/reference/scripts/variables) to be used in the agent script. ```js script({ ..., parameters: { "question": { type: "string", default: "How much is 5 + 5? then divide by 2?" } } }) ``` The parameter value are populated in the `env.vars` object. ```js ... $`Answer the following arithmetic question: ${env.vars.question} ` ``` Putting it all together, we define another tool to divide two numbers and inline an arithmetic question. ```js script({ title: "math-agent", model: "small", description: "A port of https://ts.llamaindex.ai/examples/agent", parameters: { question: { type: "string", default: "How much is 11 + 4? then divide by 3?", }, }, tests: { description: "Testing the default prompt", keywords: "5", }, }) defTool( "sum", "Use this function to sum two numbers", { type: "object", properties: { a: { type: "number", description: "The first number", }, b: { type: "number", description: "The second number", }, }, required: ["a", "b"], }, ({ a, b }) => `${a + b}` ) defTool( "divide", "Use this function to divide two numbers", { type: "object", properties: { a: { type: "number", description: "The first number", }, b: { type: "number", description: "The second number", }, }, required: ["a", "b"], }, ({ a, b }) => `${a / b}` ) $`Answer the following arithmetic question: ${env.vars.question} ` ``` ## Using `system.math` [Section titled “Using system.math”](#using-systemmath) The system prompt [system.math](/genaiscript/reference/scripts/system#systemmath) wraps the `parsers.math` expression parser and evaluator and exposes it as a tool. This simplifies the agent script as we do not have to define tools anymore. math-agent.genai.mjs ```js script({ title: "math-agent-system", model: "small", description: "A port of https://ts.llamaindex.ai/examples/agent", system: ["system", "system.math", "system.tools"], parameters: { "question": { type: "string", default: "How much is (11 + 4 / 9.11)? then divide by 3.13?" } }, tests: { description: "Testing the default prompt", keywords: "5" } }) $`Respond this math question: ${env.vars.question} - do not generate python code - print the final result in text format ` ```
# Transformer.js
> Implement summarization with Transformers.js and leverage local hardware acceleration
Caution We have temporarily removed support for the `transformers` to reduce the installation footprint. HuggingFace [Transformers.js](https://huggingface.co/docs/transformers.js/index) is a JavaScript library that lets you run pretrained models locally on your machine. The library uses [onnxruntime](https://onnxruntime.ai/) to leverage the CPU/GPU capabilities of your hardware. In this guide, we will show how to create [summaries](https://huggingface.co/tasks/summarization) using the [Transformers.js](https://huggingface.co/docs/transformers.js/api/pipelines#module_pipelines.SummarizationPipeline) library. ## Import the pipeline [Section titled “Import the pipeline”](#import-the-pipeline) The snippet below imports the Transformers.js library and loads the summarizer pipeline and model. You can specify a model name or let the library pick the latest and greatest. ```js import { pipeline } from "@genaiscript/runtime" const summarizer = await pipeline("summarization") ``` Allocating and loading the model can take some time, so it’s best to do this at the beginning of your script and only once. ## Invoke the pipeline [Section titled “Invoke the pipeline”](#invoke-the-pipeline) The summarizer pipeline has a single argument, the content to summarize. It returns an array of summaries which we need to unpack to access the final summary text. This is what we do below and `summary_index` contains the summary text. ```js const [summary] = await summarizer(content) // @ts-ignore const { summary_text } = summary ```
# Using Secrets
> Utilize secrets to augment documents with TypeScript and REST APIs
This guide shows how to use TypeScript, a 3rd party search service, and [secrets](/genaiscript/reference/scripts/secrets) to create a script that augments documents with information from the web. The goal is to create a script that will augment an existing document with information gathered from the web. ## Tavily Search [Section titled “Tavily Search”](#tavily-search) [Tavily](https://tavily.com/) is a search service optimized for LLMs that provides a [REST API](https://docs.tavily.com/docs/tavily-api/rest_api). The REST API can be invoked using JavaScript [fetch](https://developer.mozilla.org/en-US/docs/Web/API/Fetch_API/Using_Fetch) and requires an API key. The script uses the `TAVILY_API_KEY` which will have to be declare in the script using this function. ```ts const res = await fetch(..., { headers: { 'api_key': env.secrets.TAVILY_API_KEY } }) ``` We define a function `tavilySearch` in [TypeScript](/genaiscript/reference/scripts/typescript) that wraps the `fetch` call and we add type annotations to provide a nice editing experience. ```ts export async function tavilySearch(query: string): Promise<{ answer: string query: string results: { title: string url: string content: string score: number }[] }> { ... } ``` The full source looks like this: tavily.mts ```ts /** * Uses the Tavily API to search for a query. * @param query question * @param apiKey API key https://docs.tavily.com/docs/tavily-api/rest_api * @returns */ export async function tavilySearch(query: string): Promise<{ answer: string; query: string; results: { title: string; url: string; content: string; score: number; }[]; }> { const apiKey = env.secrets.TAVILY_API_KEY; if (!apiKey) throw new Error("secret TAVILY_API_KEY is not available"); const res = await fetch("https://api.tavily.com/search", { method: "POST", headers: { "Content-Type": "application/json", }, body: JSON.stringify({ api_key: apiKey, query, include_answer: true, max_results: 5, }), }); const data: any = await res.json(); return data; } ``` ## Question -> Search -> Augment [Section titled “Question -> Search -> Augment”](#question---search---augment) The script is split into 3 phases: * run a prompt to generate a question based on the document content * use Tavily to generate an answer to the question * run a prompt to augment the document with the answer The secret `TAVILY_API_KEY` needed by Tavily is declared in the `script` function call. Also make sure to add it to your `.env` file. ```js script({ secrets: ["TAVILY_API_KEY"], }) ``` The `tavilySearch` function is imported using a dynamic [import](/genaiscript/reference/scripts/imports). ```ts const { tavilySearch } = await import("./tavily.mts") const { answer } = await tavilySearch(question.text) ``` The full source looks like this: document-augmentor.genai.mts ```ts script({ secrets: ["TAVILY_API_KEY"], files: "src/rag/markdown.md", }); const { tavilySearch } = await import("./tavily.mts"); const file = env.files[0]; // Question const { text: question } = await runPrompt((_) => { const filen = _.def("FILE", file); _.$`Generate a question that summarizes the content of ${filen}`; }); // Search const { answer } = await tavilySearch(question); // Augment const filen = def("FILE", file); const answern = def("ANSWER", answer); $`You are an expert at writing document. Integrate the information of ${answern} into ${filen} to make it more informative.`; ```
# Video Alt Text
> Learn how to generate alt text for videos
GenAIScript supports [speech transcription](/genaiscript/reference/scripts/transcription) and [video frame extraction](/genaiscript/reference/scripts/videos) which can be combined to analyze videos. ## Video Alt Text [Section titled “Video Alt Text”](#video-alt-text) The HTML video attribute does not have an `alt` attribute.. but you can still attach a accessible description using the `aria-label` attribute. We will build a script that generates the description using the transcript and video frames. ## Transcript [Section titled “Transcript”](#transcript) We use the `transcribe` function to generate the transcript. It will use the `transcription` model alias to compute a transcription. For OpenAI, it defaults to `openai:whisper-1`. Transcriptions are useful to reduce hallucations of LLMs when analyzing images and also provides good timestemp candidates to screenshot the video stream. ```js const file = env.files[0] const transcript = await transcribe(file) // OpenAI whisper ``` ## Video Frames [Section titled “Video Frames”](#video-frames) The next step is to use the transcript to screenshot the video stream. GenAIScript uses [ffmpeg](https://ffmpeg.org/) to render the frames so make sure you have it installed and configured. ```js const frames = await ffmpeg.extractFrames(file, { transcript, }) ``` ## Context [Section titled “Context”](#context) Both the transcript and the frames are added to the prompt context. Since some videos may be silent, we ignore empty transcripts. We also use low detail for the frames to improve performance. ```js def("TRANSCRIPT", transcript?.srt, { ignoreEmpty: true }) // ignore silent videos defImages(frames, { detail: "low" }) // low detail for better performance ``` ## Prompting it together [Section titled “Prompting it together”](#prompting-it-together) Finally, we give the task to the LLM to generate the alt text. ```js $`You are an expert in assistive technology. You will analyze the video and generate a description alt text for the video. ` ``` Using this script, you can automatically generate high quality alt text for videos. ```sh genaiscript run video-alt-text path_to_video.mp4 ``` ## Full source [Section titled “Full source”](#full-source) video-alt-text.genai.mjs ```js script({ description: "Generate a description alt text for a video", accept: ".mp4,.webm", system: [ "system.output_plaintext", "system.safety_jailbreak", "system.safety_harmful_content", "system.safety_validate_harmful_content", ], files: "src/audio/helloworld.mp4", model: "vision", }); const file = env.files[0]; const transcript = await transcribe(file, { cache: "alt-text" }); // OpenAI whisper const frames = await ffmpeg.extractFrames(file, { transcript, }); // ffmpeg to extract frames def("TRANSCRIPT", transcript?.srt, { ignoreEmpty: true }); // ignore silent videos defImages(frames, { detail: "low" }); // low detail for better performance $`You are an expert in assistive technology. You will analyze the video and generate a description alt text for the video. - The video is included as a set of <FRAMES> images and the <TRANSCRIPT>. - Do not include alt text in the description. - Keep it short but descriptive. - Do not generate the [ character.`; ```
# Zod Schema
> Learn how to define and convert TypeScript-first Zod schemas to JSON schema
[zod](https://zod.dev/) is a TypeScript-first schema validation with static type inference. ```ts import { z } from "@genaiscript/runtime" // city array schema const CitySchema = z.array( z.object({ name: z.string(), population: z.number(), url: z.string(), }) ) ``` The zod schemas can be used in `defSchema` to constrain the output of the tool. ```ts // JSON schema to constrain the output of the tool. const schema = defSchema("CITY_SCHEMA", CitySchema) ... ```
``` However, this task can be tedious and developers are often tempted to skip it, or provide a generic `alt` text like “image”. ```html ``` ## The script [Section titled “The script”](#the-script) To solve this issue, we created a script that uses the OpenAI Vision model to analyze the documentation images and generate a description alt text. To start, we assume that the script is run on a single image file and we use [defImage](/genaiscript/reference/scripts/images) to add it to the prompt context. image-alt-text.genai.mjs ```js const file = env.files[0]; defImages(file); ``` Then we give a task to the LLM to generate a good alt text. image-alt-text.genai.mjs ```js ... $`You are an expert in assistive technology. You will analyze each image and generate a description alt text for the image.` ``` finally, we use [defFileOutput](/genaiscript/reference/scripts/file-output) to define a file output route. image-alt-text.genai.mjs ```js ... defFileOutput(file.filename + ".txt", `Alt text for image ${file.filename}`) ``` ## Usage in Astro [Section titled “Usage in Astro”](#usage-in-astro) The GenAIScript documentation uses Astro, which allows to author pages in [MDX](https://docs.astro.build/en/guides/markdown-content/). The code below shows how the generated alt text, stored in a separate text file, is injected in the final HTML. ```mdx import { Image } from "astro:assets"; import src from "../../../assets/debugger.png"; import alt from "../../../assets/debugger.png.txt?raw"; ``` The `debugger.png` image shows the screenshot of a debugging session and the generated alt text file contents.  debugger.png.txt ```txt A screenshot of a debugging session in a code editor with a breakpoint set on a line of code. The editor is displaying several panels including the watch variables, call stack, and a terminal output. The code is partially visible with a function definition and JSON configuration data. ``` ## Automation [Section titled “Automation”](#automation) Using the [run](/genaiscript/reference/cli/run) command, we can apply the script to each image in the docs. ```sh for file in assets/**.png; do npx --yes genaiscript run image-alt-text "$file" ``` To avoid regenerating the alt text, we also detect if a file exists in the script and cancel accordingly. image-alt-text.genai.mjs ```sh for file in assets/**.png; do if [ ! -f "$file" ]; then npx --yes genaiscript run image-alt-text "$file" fi done ``` ## Full source [Section titled “Full source”](#full-source) The full source looks like this: image-alt-text.genai.mjs ```js script({ title: "Image Alt Text generator", description: "Generate alt text for images", model: "vision", group: "docs", maxTokens: 4000, temperature: 0, }) // input const file = env.files[0] // context defImages(file) // task $`You are an expert in assistive technology. You will analyze each image and generate a description alt text for the image and save it to a file. - Do not include Alt text in the description.` // output defFileOutput(file.filename + ".txt", `Alt text for image ${file.filename}`) ```
# Release Notes
> Generate comprehensive release notes combining commit history and code diffs
There are plenty of automated `release notes` generator that inspect the list of commits since the last release and generate a list of changes. The release notes are typically exclusively based on the commit messages. In the GenAIScript project, we create a release notes generator **that uses both commit history and the diff of the changes**. You can see one of the first prototype generated release notes for [v1.41.6](https://github.com/microsoft/genaiscript/releases/tag/1.41.6). ```markdown We are excited to announce the release of GenAIScript 1.41.6! 🎉 In this release, we've made some significant improvements to enhance your experience. Here are the key changes: Improved Release Script: We've fine-tuned our release script to ensure smoother and more efficient releases in the future. 🛠️ ... ``` ## Commit history and diff [Section titled “Commit history and diff”](#commit-history-and-diff) We start our script by calling `git` a few times to retrieve the previous release tag, the list of commits, and the diff since the tag. (This magic was mostly found using a GitHub Copilot Chat session). git-release-notes.genai.mjs ```js const { stdout: tag } = await host.exec( `git describe --tags --abbrev=0 HEAD^`, ); const { stdout: commits } = await host.exec( `git log HEAD...${tag}`, ); const { stdout: diff } = await host.exec( `git diff ${tag}..HEAD`, ); ``` We use the `def` function with `maxTokens` to inline this information without exceeding the content window of the model (32k input). git-release-notes.genai.mjs ```js def("COMMITS", commits, { maxTokens: 4000 }); def("DIFF", diff, { maxTokens: 20000 }); ``` ## Role and task [Section titled “Role and task”](#role-and-task) The rest of the script follows a typical pattern with a role and a task. ```js $` You are an expert software developer and release manager. ## Task Generate a clear, exciting, relevant, useful release notes for the upcoming release. - The commits in the release are in COMMITS. - The diff of the changes are in DIFF. `; ``` ## The script [Section titled “The script”](#the-script) The full script as it is running in GenAIScript is as follows: git-release-notes.genai.mjs ```js script({ system: ["system"], temperature: 0.5, model: "github:openai/gpt-4o", }); const product = env.vars.product || "GenAIScript"; // find previous tag const { version } = await workspace.readJSON("package.json"); const tag = await git.lastTag(); const excludedPaths = [ "package.json", "**/package.json", "yarn.lock", "**/yarn.lock", "**/genaiscript.d.ts", "**/jsconfig.json", "docs/**", ".github/*", ".vscode/*", "slides/**", "THIRD_PARTY_LICENSES.md", ]; const commits = ( await git.log({ excludedGrep: "(skip ci|THIRD_PARTY_NOTICES|THIRD_PARTY_LICENSES|genai)", base: tag, head: "HEAD", excludedPaths, }) ) .map(({ message }) => message) .join("\n"); console.debug(commits.slice(0, 50) + "..."); const diff = await git.diff({ base: tag, head: "HEAD", excludedPaths, }); console.debug(diff.slice(0, 1000) + "..."); const commitsName = def("COMMITS", commits, { ignoreEmpty: true, maxTokens: 3000, }); const diffName = def("DIFF", diff, { maxTokens: 12000 }); $` You are an expert software developer and release manager. ## Task Generate a clear, exciting, relevant, useful release notes for the upcoming release ${version} of ${product} on GitHub. - The commits in the release are in ${commitsName}. - The diff of the changes are in ${diffName}. ## Guidelines - only include the most important changes. All changes must be in the commits. - tell a story about the changes - use emojis - ignore commits with '[skip ci]' in the message - do NOT give a commit overview - do NOT add a top level title - do NOT mention ignore commits or instructions - be concise - do not wrap text in markdown section `; ``` ## Release-it integration [Section titled “Release-it integration”](#release-it-integration) GenAIScript uses [release-it](https://github.com/release-it/release-it) to automate the release process. We configured release-it to run the script using the [cli](/genaiscript/reference/cli) by adding a `github.releaseNotes` field in the `release-it` configuration. package.json ```json "release-it": { "github": { "releaseNotes": "node packages/cli/dist/src/index.js run git-release-notes --cache --cache-name releases --no-run-trace --no-output-trace" } } ```
# SEO Front Matter
> Learn how to automate the creation of SEO-optimized front matter for your markdown documents with GenAIScript.
Generating and maintaining good SEO front matter fields can be a tedious task. GenAIScript can help you automate this process. The script below will generate SEO information and update the existing file. The script uses a custom merge strategy to merge the new front matter with the existing front matter. slides.genai.mjs ```js script({ model: "large", accept: ".md,.mdx", parameters: { force: false, }, }) // force refreshing all files const { force, dbg } = env.vars // filter out files that don't have a front matter.description const file = env.files[0] const fm = MD.frontmatter(file.content) if (!force && fm?.description) cancel("file already has description") if (file.content?.includes("autogenerated")) cancel("file is autogenerated") // insert markdown files in context const res = await runPrompt( (ctx) => { ctx.def("FILE", file) // prompt to generate front matter for markdown files ctx.$`##Role You are a search engine optimization expert at creating front matter for markdown document. ## Task Generate the front matter content as the new file content. ## Guidance - Update description as needed. - Update keywords as needed, only 5 keywords or less. - optimize for search engine optimization. - If no front matter is present, generate it. ## Things to avoid - Do NOT repeat project name (GenAIScript) in 'title' field - DO NOT modify the existing 'title' or 'sidebar' fields. - Do NOT use 'Guide' in title. ` }, { responseType: "json_schema", responseSchema: { title: "", description: "", keywords: [""], }, } ) const frontmatter = res.json const { title, description, keywords, tags } = frontmatter file.content = MD.updateFrontmatter(file.content, { title, description, keywords, tags, }) await workspace.writeFiles(file) ``` ## Batching over all files [Section titled “Batching over all files”](#batching-over-all-files) Once the script has been tuned on a few files, you can automate using the [CLI](/genaiscript/reference/cli). The CLI has a **—apply-edits** flag to apply the changes to the file. ```sh for file in src/**/*.md; do genaiscript run frontmatter "$file" --apply-edits ``` You can run this command in your CI/CD pipeline to keep your SEO front matter up to date.
# TLA+ AI Linter
> Explore how the TLA+ AI Linter leverages GenAI scripts and LLMs to enhance TLA+ specifications with automated linting and consistent comment verification.
[TLA+](https://lamport.azurewebsites.net/tla/tla.html) is a high-level language for modeling programs and systems—especially concurrent and distributed ones. It’s based on the idea that the best way to describe things precisely is with simple mathematics. TLA+ does not come with a traditional linter or formatter. The TLA+ AI Linter is a GenAI script that uses LLMs to lint TLA+ files. ## TLA+ specifications [Section titled “TLA+ specifications”](#tla-specifications) The following is a TLA+ spec that models a seminal solution to the [termination detection problem in distributed systems](https://www.cs.utexas.edu/users/EWD/ewd09xx/EWD998.PDF). EWD998PCal.tla ```txt ------------------------------- MODULE EWD998PCal ------------------------------- (***************************************************************************) (* TLA+ specification of an algorithm for distributed termination *) (* detection on a ring, due to Shmuel Safra, published as EWD 998: *) (* Shmuel Safra's version of termination detection. *) (* https://www.cs.utexas.edu/users/EWD/ewd09xx/EWD998.PDF *) (***************************************************************************) EXTENDS Integers, Bags, BagsExt CONSTANT N ASSUME NAssumption == N \in Nat \ {0} \* At least one node. Node == 0 .. N-1 Initiator == 0 \* Any node can be the initiator; 0 has just been conveniently choosen to simplify the definition of token initiation. (******** --algorithm ewd998 { variables (* Although we know the relationship between the counter and network, modeling network as a set of messages would be too cumbersome. We have two alternatives for modeling the network: as a bag of messages or as a sequence of messages. Although modeling it as a sequence may seem more intuitive, we do not require its ordering properties for our purposes. Therefore, we have decided to use a bag to represent the network. It's worth noting that Distributed Plucal refers to this concept as a "channel". *) network = [n \in Node |-> IF n = Initiator THEN SetToBag({[type|-> "tok", q |-> 0, color |-> "black"]}) ELSE EmptyBag]; define { (* The passMsg operator is not implementable -at least not without using extra synchronization- because it atomically reads a message from the nic's in-buffer and writes to its out-buffer! *) passMsg(net, from, oldMsg, to, newMsg) == [ net EXCEPT ![from] = BagRemove(@, oldMsg), ![to] = BagAdd(@, newMsg) ] sendMsg(net, to, msg) == [ net EXCEPT ![to] = BagAdd(@, msg) ] dropMsg(net, to, msg) == [ net EXCEPT ![to] = BagRemove(@, msg) ] pendingMsgs(net, rcv) == DOMAIN net[rcv] } fair process (node \in Node) variables active \in BOOLEAN, color = "black", counter = 0; { l: while (TRUE) { either { \* send some payload message to some other node. when active; with (to \in Node \ {self}) { network := sendMsg(network, to, [type|-> "pl"]); }; counter := counter + 1 } or { \* receive a payload message. Reactivates the node. with (msg \in pendingMsgs(network, self)) { when msg.type = "pl"; counter := counter - 1; active := TRUE; color := "black"; network := dropMsg(network, self, msg) } } or { \* terminate the current node. active := FALSE } or { \* pass the token to the next node. when self # Initiator; with (tok \in pendingMsgs(network, self)) { when tok.type = "tok" /\ ~active; network := passMsg(network, self, tok, self-1, [type|-> "tok", q |-> tok.q + counter, color |-> (IF color = "black" THEN "black" ELSE tok.color)]); color := "white"; } } or { \* Initiate token. when self = Initiator; with (tok \in pendingMsgs(network, self)) { when tok.type = "tok" /\ (color = "black" \/ tok.q + counter # 0 \/ tok.color = "black"); network := passMsg(network, self, tok, N-1, [type|-> "tok", q |-> 0, color |-> "white"]); color := "white"; } } } } } ********) \* BEGIN TRANSLATION (chksum(pcal) = "4d658e04" /\ chksum(tla) = "530581e3") VARIABLE network (* define statement *) passMsg(net, from, oldMsg, to, newMsg) == [ net EXCEPT ![from] = BagRemove(@, oldMsg), ![to] = BagAdd(@, newMsg) ] sendMsg(net, to, msg) == [ net EXCEPT ![to] = BagAdd(@, msg) ] dropMsg(net, to, msg) == [ net EXCEPT ![to] = BagRemove(@, msg) ] pendingMsgs(net, rcv) == DOMAIN net[rcv] VARIABLES active, color, counter vars == << network, active, color, counter >> ProcSet == (Node) Init == (* Global variables *) /\ network = [n \in Node |-> IF n = Initiator THEN SetToBag({[type|-> "tok", q |-> 0, color |-> "black"]}) ELSE EmptyBag] (* Process node *) /\ active \in [Node -> BOOLEAN] /\ color = [self \in Node |-> "black"] /\ counter = [self \in Node |-> 0] node(self) == \/ /\ active[self] /\ \E to \in Node \ {self}: network' = sendMsg(network, to, [type|-> "pl"]) /\ counter' = [counter EXCEPT ![self] = counter[self] + 1] /\ UNCHANGED <> \/ /\ \E msg \in pendingMsgs(network, self): /\ msg.type = "pl" /\ counter' = [counter EXCEPT ![self] = counter[self] - 1] /\ active' = [active EXCEPT ![self] = TRUE] /\ color' = [color EXCEPT ![self] = "black"] /\ network' = dropMsg(network, self, msg) \/ /\ active' = [active EXCEPT ![self] = FALSE] /\ UNCHANGED <> \/ /\ self # Initiator /\ \E tok \in pendingMsgs(network, self): /\ tok.type = "tok" /\ ~active[self] /\ network' = passMsg(network, self, tok, self-1, [type|-> "tok", q |-> tok.q + counter[self], color |-> (IF color[self] = "black" THEN "black" ELSE tok.color)]) /\ color' = [color EXCEPT ![self] = "white"] /\ UNCHANGED <> \/ /\ self = Initiator /\ \E tok \in pendingMsgs(network, self): /\ tok.type = "tok" /\ (color[self] = "black" \/ tok.q + counter[self] # 0 \/ tok.color = "black") /\ network' = passMsg(network, self, tok, N-1, [type|-> "tok", q |-> 0, color |-> "white"]) /\ color' = [color EXCEPT ![self] = "white"] /\ UNCHANGED <> Next == (\E self \in Node: node(self)) Spec == /\ Init /\ [][Next]_vars /\ \A self \in Node : WF_vars(node(self)) \* END TRANSLATION ----------------------------------------------------------------------------- token == LET tpos == CHOOSE i \in Node : \E m \in DOMAIN network[i]: m.type = "tok" tok == CHOOSE m \in DOMAIN network[tpos] : m.type = "tok" IN [pos |-> tpos, q |-> tok.q, color |-> tok.color] pending == [n \in Node |-> IF [type|->"pl"] \in DOMAIN network[n] THEN network[n][[type|->"pl"]] ELSE 0] EWD998 == INSTANCE EWD998 EWD998Spec == EWD998!Init /\ [][EWD998!Next]_EWD998!vars \* Not checking liveness because we cannot easily define fairness for what ewd998 calls system actions. THEOREM Spec => EWD998Spec ----------------------------------------------------------------------------- Alias == [ network |-> network, active |-> active, color |-> color, counter |-> counter, token |-> token, pending |-> pending ] StateConstraint == \A i \in DOMAIN counter : counter[i] < 3 ============================================================================= ``` ## Script [Section titled “Script”](#script) The following GenAI script will lint the TLA+ spec above. More specifically, it will check if the prose comments in the spec are consistent with the TLA+ definitions. tlAI-Linter.genai.mjs ```js // metadata (including model parameters) // learn more at https://aka.ms/genaiscript script({ title: "tlAI-Linter", description: "Check if the prose comments and their TLA+ declarations and definitions are syntactically and semantically consistent" }) // use def to emit LLM variables def("TLA+", env.files.filter(f => f.filename.endsWith(".tla")), {lineNumbers: true}) // use $ to output formatted text to the prompt $`You are an expert at TLA+/TLAPLUS. Your task is to check if the prose comments and their TLA+ declarations and definitions are syntactically and semantically consistent!!! Explain any consistencies and inconsistencies you may find. Report inconsistent and consistent pairs in a single ANNOTATION section. ## TLA+ Syntax Hints - A formula [A]_v is called a temporal formula, and is shorthand for the formula A \/ v' = v. In other words, the formula is true if A is true or if the value of v remains unchanged. Usually v is a tuple of the spec's variables. - The symbol \`#\` is alternative syntax used for inequality in TLA+; the other symbol is \`/=\". ## TLA+ Semantics Hints - Do NOT add any invariants or properties to the behavior specification Spec or any of its subformulas. This would change THEOREM Spec => Inv into THEOREM Spec /\ Inv => Inv, which is vacuously true. - TLA+ specs are always stuttering insensitive, i.e., the next-state relation is always [A]_v. In other words, one cannot write a stuttering sensitive specification. ## TLA+ Convention Hints - The type correctness invariant is typically called TypeOK. - Users can employ TLA labels as a means to conceptually associate a comment with a sub-formula like a specific disjunct or conjunct of a TLA formula. Even though these labels have no other function, they facilitate referencing particular parts of the formula from a comment. ## Formal and informal math Hints - Take into account that humans may write informal math that is syntactically different from the formal math, yet semantically equivalent. For example, humans may write \`N > 3T\` instead of \`N > 3 * T\`. ` ``` * line numbers are added to the file content to help the LLM precisely locate the issues. ```js def( "TLA+", env.files.filter((f) => f.filename.endsWith(".tla")), { lineNumbers: true }, ); ``` * the script uses a builtin support for [annotations](/genaiscript/reference/scripts/annotations) to generate parseable warnings and errors. Annotations are automatically integrated as problems in VSCode or as build errors in the CI/CD pipeline. ```js $`Report inconsistent and consistent pairs in a single ANNOTATION section.`; ``` * GPT-4 already knows a lot about logic and basic math. However, the script also lists common TLA+ idioms that are relevant to lint a spec. ## Github Action [Section titled “Github Action”](#github-action) PR.yml ```yaml name: tlAI-linter on: pull_request: branches: - main - dev jobs: linting: name: tlAI-linter runs-on: ubuntu-latest env: OPENAI_API_KEY: ${{ secrets.OPENAI_API_KEY }} OPENAI_API_BASE: ${{ secrets.OPENAI_API_BASE }} OPENAI_API_TYPE: ${{ secrets.OPENAI_API_TYPE }} defaults: run: shell: bash steps: - name: Clone repo uses: actions/checkout@v4 with: ## All history for git diff below to succeed. fetch-depth: 0 - name: Setup NodeJS ## https://github.com/actions/setup-node - uses: pnpm/action-setup@v4 uses: actions/setup-node@v4 with: node-version: "22" - name: Run GenAIscript on the TLA+ specs that are added in this pull request. ## Identify git diff: $(git diff --name-only HEAD^ | grep '.tla') ## Install genaiscript runtime: https://microsoft.github.io/genaiscript/reference/cli/ ## Output LLM response in SARIF format: https://microsoft.github.io/genaiscript/reference/scripts/annotations/ run: npx --yes genaiscript run .github/scripts/tlAI-Linter.genai.js $(git diff --name-only HEAD^ | grep '.tla') -oa results.sarif - name: Upload SARIF file ## https://sarifweb.azurewebsites.net ## https://docs.github.com/en/code-security/code-scanning/integrating-with-code-scanning/uploading-a-sarif-file-to-github if: success() || failure() uses: github/codeql-action/upload-sarif@v3 with: sarif_file: results.sarif ``` * after cloning the repository and installing dependencies such as node.js, the GenAI script is run to lint the TLA+ specs that were added or modified in the PR. * the script’s output, i.e., the annotations generated by the LLM, are formatted as a [SARIF](https://sarifweb.azurewebsites.net) report and [upload](https://docs.github.com/en/code-security/code-scanning/integrating-with-code-scanning/uploading-a-sarif-file-to-github) to the PR. ## Results [Section titled “Results”](#results) The linter generated annotations for each prose comment in the spec, and one comment is found to be inconsistent with the TLA+ definitions. A corresponding warning is added to the PR. 
# Agentic tools
> Using agentic tools in your script
[Agentic](https://agentic.so) ([GitHub](https://github.com/transitive-bullshit/agentic)) is no longer supported.
# Ask My Image
> Learn how to apply GenAIScript to images for data extraction and analysis using AI models.
The quick-start guide illustrates how to write a GenAIScript that takes input from an image file. 1. Place your image in a directory visible in VS Code Explorer 2. Use the `> GenAIScript: Create new script...` command in the command palette to create a new script. 3. Update the model in the script header to refer to a model that understands images: ```js script({ title: "Apply a script to an image", model: "openai:gpt-4o", }) ``` 4. Use [defImages](/genaiscript/reference/scripts/images/) to ingest the image file into the model context: ```js defImages(env.files, { detail: "low" }) ``` 5. Replace the text `"TELL THE LLM WHAT TO DO..."` with what you want it to do with your image file. ```js $`You are a helpful assistant. Your goal is to look at the image of a chart provided and extract the data it is presented in a tabular format.` ``` 6. Right click on the image file in VS Code Explorer. Select **Run GenAIScript**. Select the script you just wrote. 7. The Output will be displayed in a new document tab.
# Ask My PDF
> Quick-start guide to using GenAIScript for summarizing and critiquing PDF documents with AI assistance.
The quick-start guide illustrates how to write a GenAIScript that takes input from a pdf file. 1. Place your PDF document in a directory visible in VS Code Explorer 2. Use the `> GenAIScript: Create new script...` command in the command palette to create a new script. 3. Define and name the pdf file as an input: ```js const src = def("PDFSOURCE", env.files, { endsWith: ".pdf" }) ``` 4. Replace the text `"TELL THE LLM WHAT TO DO..."` with what you want it to do with your pdf file. Use the name in the def to refer to the file. ```js $`You are a helpful assistant. Summarize the content of ${src} and critique the document. ` ``` 5. Right click on the pdf document in VS Code Explorer. Select **Run GenAIScript**. Select the script you just wrote. 6. Output will be displayed in a new document tab. ### Example: Lorem Ipsum [Section titled “Example: Lorem Ipsum”](#example-lorem-ipsum) In this example, we will extract text from a pdf that describes the history of Lorem Ipsem. ask-my-pdf.genai.mjs ```js const src = def("PDFSOURCE", env.files, { endsWith: ".pdf" }) $`You are a helpful assistant. Summarize the content of ${src} and critique the document. - Only one paragraph. Keep it short. ` ```
# Automated Git Commit Messages
> Streamline your Git workflow with an automation script for generating commit messages
In the world of software development, making consistent and informative commit messages is crucial but often overlooked. This task can become tedious, especially when you are in the flow of coding. To help with this, we’ve crafted a [script tailored to automate generating Git commit messages](https://github.com/microsoft/genaiscript/blob/main/samples/sample/genaisrc/samples/gcm.genai.mts), ensuring they are meaningful and save you time. The script acts as a regular node.js automation script and uses [runPrompt](/genaiscript/reference/scripts/inline-prompts) to issue calls to the LLM and ask the user to confirm the generated text. ## Explaining the Script [Section titled “Explaining the Script”](#explaining-the-script) First, we check if there are any staged changes in the Git repository: ```ts let { stdout } = await host.exec("git", ["diff", "--cached"]) ``` If no changes are staged, we ask the user if they want to stage all changes. If the user confirms, we stage all changes. Otherwise, we bail out. ```ts const stage = await host.confirm("No staged changes. Stage all changes?", { default: true, }) if (stage) { await host.exec("git", ["add", "."]) stdout = (await host.exec("git", ["diff", "--cached"])).stdout } if (!stdout) cancel("no staged changes") ``` We generate an initial commit message using the staged changes: ```ts message = ( await runPrompt( (_) => { _.def("GIT_DIFF", stdout, { maxTokens: 20000 }) _.$`GIT_DIFF is a diff of all staged changes, coming from the command: \`\`\` git diff --cached \`\`\` Please generate a concise, one-line commit message for these changes. - do NOT add quotes` }, { cache: false, temperature: 0.8 } ) ).text ``` The prompt configuration above indicates that the message should be concise, related to the “git diff —cached” output, and should not include quotes. User chooses how to proceed with the generated message: ```ts choice = await host.select( message, [{ name: "commit", value: "commit", description: "accept message and commit" }, ...], ) ``` Options are given to edit or regenerate the message. If the user chooses to edit the message, we ask them to input a new message: ```ts if (choice === "edit") { message = await host.input("Edit commit message", { required: true }) choice = "commit" } ``` If the user chooses to commit the message, we commit the changes: ```ts if (choice === "commit" && message) { console.log((await host.exec("git", ["commit", "-m", message])).stdout) } ``` ## Running the Script [Section titled “Running the Script”](#running-the-script) You can run this script using the [CLI](/genaiscript/reference/cli). ```bash genaiscript run gcm ``` You can wrap this command in a `gcm.sh` file or in your package `script` section in `package.json`: ```json { "devDependencies": { "genaiscript": "*" }, "scripts": { "gcm": "genaiscript run gcm" } } ``` Then you can run the script using: ```bash npm run gcm ``` ## Using git hooks [Section titled “Using git hooks”](#using-git-hooks) You can also attach to the [commit-msg](https://git-scm.com/docs/githooks#_commit_msg) git hook to run the message generation on demand. Using the [huksy](https://typicode.github.io/husky/) framework, we can register the execution of genaiscript in the `.husky/commit-msg` file. The `commit-msg` hook receives a file location where the message is stored. We pass this parameter to the script so that it gets populated in the `env.files` variable. .husky/commit-msg ```bash genaiscript run commit-msg "$1" ``` In the script, we check if the content of the file already has a user message, otherwise generate a new message. commit-msg.genai.mts ```js const msg = env.files[0] // file created by git to hold the message const msgContent = msg.content // check if the user added any message ?.split(/\n/g) .filter((l) => l && !/^#/.test(l)) // filter out comments .join("\n") if (msgContent) cancel("commit message already exists") ... await host.writeText(msg.filename, message) ``` ## Acknowledgements [Section titled “Acknowledgements”](#acknowledgements) This script was inspired from Karpathy’s [commit message generator](https://gist.github.com/karpathy/1dd0294ef9567971c1e4348a90d69285).
# Business card scanner
> Using OpenAI Vision to scan business cards.
This guide shows how to use vision and image variables to scan business card information in a structured format. ## Vision model [Section titled “Vision model”](#vision-model) You will need access to a deployment of the OpenAI vision model. In this example, it is identifier by `gpt-4o`. Also set the `maxTokens` to 4000 to ensure the model can process the entire business card. ```js script({ ... model: "openai:gpt-4o", maxTokens: 4000, }) ``` ## `defImage` [Section titled “defImage”](#defimage) The [defImage](/genaiscript/reference/scripts/images) function can be used to input multiple files to the script. The non-image files will automatically be ignored, so you can typically pass [env.files](/genaiscript/reference/scripts/context) directly to `defImages`. ```js defImages(env.files) ``` ## Producing CSV [Section titled “Producing CSV”](#producing-csv) All together the script looks like the following: scan-business-card.genai.mjs ```js script({ description: "Given an image of business card, extract the details to a csv file", group: "vision", model: "vision", maxTokens: 4000, }) defImages(env.files) const outputName = path.join(path.dirname(env.files[0].filename), "card.csv") $`You are a helpful assistant. You are given an image of a business card. Extract the following information in ${outputName}: Name, Address, Phone, Email, Company, Title, Website, Category of Business If you can't infer the category, mark it as "Unknown"` ``` ## Using a schema [Section titled “Using a schema”](#using-a-schema) We can add data format validation by adding a schema for the business data rows. ```js const schema = defSchema("EXPENSE", { type: "array", items: { type: "object", properties: { Date: { type: "string" }, Location: { type: "string" }, Total: { type: "number" }, Tax: { type: "number" }, Item: { type: "string" }, ExpenseCategory: { type: "string" }, Quantity: { type: "number" }, }, required: ["Date", "Location", "Total", "Tax", "Item", "Quantity"], }, }) ``` And the script above is adapter to use the schema instead of the CSV description. scan-business-card.genai.mjs ```js script({ description: "Given an image of a receipt, extract a csv of the receipt data", group: "vision", model: "vision", maxTokens: 4000, }) defImages(env.files) const schema = defSchema("EXPENSE", { type: "array", items: { type: "object", properties: { Date: { type: "string" }, Location: { type: "string" }, Total: { type: "number" }, Tax: { type: "number" }, Item: { type: "string" }, ExpenseCategory: { type: "string" }, Quantity: { type: "number" }, }, required: ["Date", "Location", "Total", "Tax", "Item", "Quantity"], }, }) const outputName = path.join(path.dirname(env.files[0].filename), "items.csv") $`You are a helpful assistant that is an expert in filing expense reports. You have information from a receipt in RECEIPT and you need to put the data in ${outputName} using the ${schema} schema.` ```
# Containerized Tools
> Learn how to create and use containerized tools with executable dependencies in a secure environment using GCC as an example.
This guide shows how to create a [tool](/genaiscript/reference/scripts/tools) that call an executable in a [container](/genaiscript/reference/scripts/container). This is a flexible and secure way to run tools that may have dependencies or security concerns. This is typically done by creating a container with a particular image (`gcc` here) ```js // start a fresh container const container = await host.container({ image: "gcc", }) ``` then reusing the container in the tool invocations. You can return the result of `container.exec` from the tool and it will be handled by the runtime. ```js defTool(..., async (args) => { ... // use container in tool const res = await container.exec("gcc", ["main.c"]) return res }) ``` ## Example: GCC as a Tool [Section titled “Example: GCC as a Tool”](#example-gcc-as-a-tool) This sample uses the official [GCC](https://hub.docker.com/_/gcc) docker image to compile a C program as tool. The LLM engine will invoke the tool to validate the syntax of the generated code. ```js script({ model: "large", }) let container = undefined let sourceIndex = 0 defTool( "gcc", "GNU Compiler Collection (GCC), C/C++ compiler", { source: "", }, async (args) => { const { source } = args if (!container) // lazy allocation of container container = await host.container({ image: "gcc", }) const fn = `tmp/${sourceIndex++}/main.c` await container.writeText(fn, source) const res = await container.exec("gcc", [fn]) return res } ) $`Generate a valid C program that prints "Hello, World!"` ```
# DeepSeek R1 and V3
> DeepSeek is a powerful tool for searching and filtering data in a deep structure. There are multiple LLM providers that can run DeepSeek.
As DeepSeek mentions, [DeepSeek-R1](https://github.com/deepseek-ai/DeepSeek-R1) and [DeepSeek-V3](https://github.com/deepseek-ai/DeepSeek-V3) are advanced large language models (LLM), that have gained significant attention for its performance and cost-effectiveness. DeepSeek’s innovations highlight the potential for achieving high-level AI performance with fewer resources, challenging existing industry norms and prompting discussions about the future direction of AI development. These pages documents the various options to run DeepSeek LLMs. ## DeepSeek.com [Section titled “DeepSeek.com”](#deepseekcom) [DeepSeek.com](https://deepseek.com) is a LLM provider that develops the DeepSeek models. * [`deepseek` provider](/genaiscript/configuration/deepseek) ## Azure AI Foundry [Section titled “Azure AI Foundry”](#azure-ai-foundry) [Azure AI Foundry](https://ai.azure.com) provides token-based billing for DeepSeek R1 and DeepSeek V3 models. See [Announcement](https://techcommunity.microsoft.com/blog/machinelearningblog/announcing-deepseek-v3-on-azure-ai-foundry-and-github/4390438). ```js script({ model: "azure_ai_inference:deepseek-v3", }) ``` * [`azure_ai_inference` provider](/genaiscript/configuration/azure-ai-foundry) ## GitHub Marketplace Models [Section titled “GitHub Marketplace Models”](#github-marketplace-models) [GitHub Marketplace Models](https://github.com/marketplace/models) provides a free experience to experiement with DeepSeek R1 and DeepSeek V3 models. ```js script({ model: "github:deepSeek-v3", }) ``` * [`github` provider](/genaiscript/configuration/github) ## And others! [Section titled “And others!”](#and-others) This is by no means complete and there are many other providers that can run DeepSeek models. * [Ollama](https://ollama.com/library/deepseek-v3) (if you’re machine can handle it) * [LM Studio](https://lmstudio.ai/models) * …
# Detection of Outdated Descriptions
> Automate the detection of outdated descriptions in markdown documentation to maintain accuracy and consistency.
Developer documentation typically includes a description in each file. This descriptions can become outdated, leading to confusion and incorrect information. To prevent this, you can automate the detection of outdated descriptions in your documentation using GenAIScript. ## Markdown and frontmatter [Section titled “Markdown and frontmatter”](#markdown-and-frontmatter) Many documentation systems use the markdown format to write documentation and a ‘frontmatter’ header to store metadata. Here’s an example of a markdown file with frontmatter: ```markdown --- title: "My Document" description: "This is a sample document." --- # My Document Lorem ipsum dolor sit amet, consectetur adipiscing elit. ``` The goal is to create a script that detects when the `description` field in the frontmatter is outdated. ## The script [Section titled “The script”](#the-script) GenAIScript is meant to run on files and provides a special variable `env.files` that contains the list of files to be analyzed. You can use this variable to include the files in the context using the [def](/genaiscript/reference/scripts/context) function. We limit each file to 2000 tokens to avoid exploding the content on large files. detect-outdated-descriptions.genai.mjs ```js // Define the file to be analyzed def("DOCS", env.files, { endsWith: ".md", maxTokens: 2000 }) ``` The next step is to give a task to the script. In this case to check that the content and `description` field in the frontmatter match. ```js // Analyze the content to detect outdated descriptions $`Check if the 'description' field in the front matter in DOCS is outdated.` ``` Finally, we leverage the built-in diagnostics generation feature to create an error for each outdated description. ```js // enable diagnostics generation $`Generate an error for each outdated description.` ``` ## Running in Visual Studio Code [Section titled “Running in Visual Studio Code”](#running-in-visual-studio-code) Once you save this script in your workspace, you will be able to execute it on a file or a folder through the context menu by selecting **Run GenAIScript…**.  ## Automation [Section titled “Automation”](#automation) You can automatically run this tool on your documentation files to identify outdated descriptions using the [cli](/genaiscript/reference/cli). ```sh genaiscript run detect-outdated-descriptions **/*.md ``` This script can be integrated into your CI/CD pipeline to automate the detection process.
# Evals with multiple Models
> Evaluating multiple models in a single script
GenAIScript allows you to [evaluate](/genaiscript/reference/scripts/tests) multiple models in a single script against multiple tests. This is useful when you want to compare the performance of different models on the same input. GenAIScript leverages [PromptFoo](https://www.promptfoo.dev/docs/getting-started/) to evaluate the outputs of the models. In this example, we will evaluate the performance of three models on a summarizing script. summarizer.genai.js ```js const file = def("FILE", env.files) $`Summarize ${file} in one sentence.` ``` ## Defining tests [Section titled “Defining tests”](#defining-tests) First, you need to add one or more tests as the `tests` field in the `script` function. ```js script({ tests: { files: "markdown.md", keywords: "markdown" }, }) ... ``` In this case, we add a simple `keyword` assertion but you can find many other options in the [tests](/genaiscript/reference/scripts/tests) reference. ## Defining test models [Section titled “Defining test models”](#defining-test-models) Next add the list of model identifier or [model aliases](/genaiscript/reference/scripts/model-aliases) you want to test against. ```js script({ ..., testModels: [ "azure_ai_inference:gpt-4o", "azure_ai_inference:gpt-4o-mini", "azure_ai_inference:deepseek-r1", ], }) ... ``` ## Running tests [Section titled “Running tests”](#running-tests) Tests can be run using the `genaiscript` CLI or in Visual Studio Code (see [testing scripts](/genaiscript/getting-started/testing-scripts)). ```sh genaiscript test summarizer ``` Next, open the PromptFoo dashboard to see the results of the tests. ```sh genaiscript test view ```
# Generated Knowledge
> Explore the technique of generated knowledge in AI prompting to enhance accuracy in answering questions.
[Generated Knowledge](https://learnprompting.org/docs/intermediate/generated_knowledge) is a prompting technique where one first asks the LLM a question to generate facts, then uses the generated answer to answer a question correctly. * *knownledge generation*, the LLM is asked to generate a set of facts about the question. * *knownledge integration*, the LLM is asked a question augmented by the knowledge generated This technique can be acheived by using [runPrompt](/genaiscript/reference/scripts/inline-prompts) to execute an LLM request and use it in the final prompt. ## Example [Section titled “Example”](#example) This example demanstrates this technique to generate a blog post. ```js script({ title: "blog using generated knowledge", model: "small", group: "mcp", description: "Using Generated Knowledge technique. More at https://learnprompting.org/docs/intermediate/generated_knowledge", tests: { files: "src/rag/markdown.md", keywords: ["markdown"], }, }) // first prompt LLM to generate facts const { text } = await runPrompt((_) => { _.def("FILE", env.files) _.$`Generate 5 facts about the content of FILE.` }) // then use the facts to generate a blog def("FACTS", text) $`Use the above facts to write a one paragraph blog post` ```
# Images in Azure Blob Storage
> Leverage Azure SDK to handle image files in Blob Storage within prompts
It is possible to use the Azure Node.JS SDK to download images from Azure Blog Storage and use them in the prompt. The `defImages` function support the node.js \[Buffer] type. ## Configuration [Section titled “Configuration”](#configuration) Install the [@azure/storage-blob](https://www.npmjs.com/package/@azure/storage-blob) and [@azure/identity](https://www.npmjs.com/package/@azure/identity) packages. ```sh npm install -D @azure/storage-blob @azure/identity ``` Make sure to login with the Azure CLI and set the subscription. ```sh az login ``` ## Reading blobs [Section titled “Reading blobs”](#reading-blobs) Open a connection to the Azure Blob Storage and get a client to the container. We deconstruct the `account` and `container` from the `env.vars` object so that they can be set through the [cli](/genaiscript/reference/cli). ```ts import { BlobServiceClient } from "@azure/storage-blob" import { DefaultAzureCredential } from "@azure/identity" const { account = "myblobs", container = "myimages" } = env.vars const blobServiceClient = new BlobServiceClient( `https://${account}.blob.core.windows.net`, new DefaultAzureCredential() ) const containerClient = blobServiceClient.getContainerClient(container) ``` If you do not have a specific blob in mind, you can iterate through the blobs, and download them into a buffer (`buf`). ```ts import { buffer } from "node:stream/consumers" for await (const blob of containerClient.listBlobsFlat()) { const blockBlobClient = containerClient.getBlockBlobClient(blob.name) const downloadBlockBlobResponse = await blockBlobClient.download(0) const body = await downloadBlockBlobResponse.readableStreamBody const image = await buffer(body) ... ``` ## Using images in the prompt [Section titled “Using images in the prompt”](#using-images-in-the-prompt) The `image` buffer can be passed in `defImages` to be used in the prompt. ```ts defImages(image, { detail: "low" }) ``` However since images can be “heavy”, you will most likely have to use [inline prompts](/genaiscript/reference/scripts/inline-prompts) to split into smaller queries. (Note the use of `_.`) ```ts for await (const blob of containerClient.listBlobsFlat()) { ... const res = await runPrompt(_ => { _.defImages(image, { detail: "low" }) _.$`Describe the image.` }) // res contains the LLM response for the inner prompt ... ``` ## Summarizing results [Section titled “Summarizing results”](#summarizing-results) To summarize all images, we store each image summary using the `def` function and add prompting to summarize the descriptions. ```ts ... def("IMAGES_SUMMARY", { filename: blob.name, content: res.text }) } $`Summarize IMAGES_SUMMARY.` ``` ## Full source [Section titled “Full source”](#full-source) azure-blobs.genai.mts ```js import { BlobServiceClient } from "@azure/storage-blob"; import { DefaultAzureCredential } from "@azure/identity"; import { buffer } from "node:stream/consumers"; script({ parameters: { account: { description: "Azure Storage Account Name", default: "genaiscript", type: "string", }, container: { description: "Azure Storage Container Name", default: "images", type: "string", }, }, }); const { account, container } = env.vars; const url = `https://${account}.blob.core.windows.net`; console.log(`analyzing images in ${account}/${container} at ${url}`); const blobServiceClient = new BlobServiceClient(url, new DefaultAzureCredential()); const containerClient = blobServiceClient.getContainerClient(container); for await (const blob of containerClient.listBlobsFlat()) { console.log(`blob: ` + blob.name); const blockBlobClient = containerClient.getBlockBlobClient(blob.name); const downloadBlockBlobResponse = await blockBlobClient.download(0); const body = await downloadBlockBlobResponse.readableStreamBody; const image = await buffer(body); const res = await runPrompt((_) => { _.defImages(image, { detail: "low" }); _.$`Describe the images.`; }); def("IMAGES_SUMMARY", { filename: blob.name, content: res.text }); } $`Summarize IMAGES_SUMMARY.`; ```
# Issue Reviewer
> Learn how to automate reviewing issues with a script.
This guide shows how to automate reviewing issues with a GenAIScript that provides feedback and code analysis in GitHub Actions. ## Resolving the issue [Section titled “Resolving the issue”](#resolving-the-issue) The script starts by getting the current issue information from the GitHub API. issue-reviewer.genai.mjs ```js const { title, body } = await github.getIssue() ``` The `github.getIssue` assumes that GenAIScript is running in a GitHub Action, it will have access to the github token (`GITHUB_TOKEN`) and the `GITHUB_ISSUE` issue id. The `GITHUB_ISSUE` needs to be configured in the GitHub Action from the `github.event.issue` object. github-action.yml ```yaml jobs: review: - run: ... env: GITHUB_ISSUE: ${{ github.event.issue.number }} ``` ## The task [Section titled “The task”](#the-task) The prompt sets the task and how to perform the review in a system message. issue-reviewer.genai.mts ```js $`## Tasks You are an expert developer and have been asked to review an issue. Review the TITLE and BODY and report your feedback that will be added as a comment to the issue. `.role("system") ``` ## The context [Section titled “The context”](#the-context) Then it adds the issue title and body to the prompt. issue-reviewer.genai.mts ```js def("TITLE", title) def("BODY", body) ``` ## Automation in Github Actions [Section titled “Automation in Github Actions”](#automation-in-github-actions) Add this step to your Github Actions workflow to automate the issue review process. The `--pull-request-comment` flag stands for [—pull-request-comment](/genaiscript/reference/cli/run#pull-requests) and takes care of up-serting a comment in the pull request/issue conversation. ```yaml permissions: content: read # permission to read the repository issues: write # permission to write a comment ... - run: npx --yes genaiscript run issue-reviewer --pull-request-comment --out-trace $GITHUB_STEP_SUMMARY env: GITHUB_ISSUE: ${{ github.event.issue.number }} GITHUB_TOKEN: ${{ secrets.GITHUB_TOKEN }} ... # LLM secrets ``` ## Full source [Section titled “Full source”](#full-source) issue-reviewer.genai.mjs ```js script({ title: "Issue Reviewer", description: "Review issues and provide feedback", responseType: "markdown", systemSafety: true, parameters: { issue: { type: "integer", description: "The issue number to answer.", required: false, }, }, }); const { title, body } = await github.getIssue(env.vars.issue); def("TITLE", title); def("BODY", body); $`## Role You are an expert developer at TypeScript and GenAIScript (https://github.com/microsoft/genaiscript) and have been asked to review an issue. ## Task Review the and <BODY> and report your feedback that will be added as a comment to the issue. - Check that has enough details to help the developer. Ask clarifying questions if needed. - do not suggest code changes or guidance. Only provide feedback on the issue itself. `; ```
# Llama Guard your files
> Automate the process of checking your files for harmful content using Llama-guard3.
[Llama-guard3](https://ollama.com/library/llama-guard3) is a LLM model that specializes in detecting harmful content in text. The script we’re discussing aims at batch applying llama-guard to your files. By automating this process, you can save time and focus on addressing only the files that need attention. guard.genai.mjs ```js // iterate over files and check if they are safe using llama-guard3:8b (https://ollama.com/library/llama-guard3) for (const file of env.files) { const { text } = await prompt`${file}`.options({ model: "ollama:llama-guard3:8b", label: file.filename, cache: "llama-guard3:8b", system: [], }); const safe = /safe/.test(text) && !/unsafe/.test(text); if (!safe) console.error(text); } ``` ## Line-by-Line Explanation of the Script 📜 [Section titled “Line-by-Line Explanation of the Script 📜”](#line-by-line-explanation-of-the-script) Let’s dive into the GenAI script and understand its components: ```js // Iterate over each file provided by the environment for (const file of env.files) { ``` Here, we loop through each file available in the `env.files` array, which contains the files you want to check. ```js // Use a GenAI model to analyze each file for safety const { text } = await prompt`${file}`.options({ model: "ollama:llama-guard3:8b", label: file.filename, cache: "llama-guard3:8b", system: [], }) ``` This block uses the GenAI model [ollama:llama-guard3:8b](https://ollama.com/library/llama-guard3) to analyze the contents of each file. The `prompt` function sends the file to the model, and various options are set to specify the model, label the file, and manage cache. ```js // Determine if the file is considered safe const safe = /safe/.test(text) && !/unsafe/.test(text) ``` The script checks if the model’s analysis considers the file safe by searching the response text for the word “safe” and ensuring “unsafe” isn’t present. ```js // Log and store filenames of unsafe files if (!safe) { console.error(text) } ``` If a file is found to be unsafe, its details are logged to the console. ## Running the Script with GenAIScript CLI 🚀 [Section titled “Running the Script with GenAIScript CLI 🚀”](#running-the-script-with-genaiscript-cli) To run this script, you’ll need to use the GenAIScript CLI. If you haven’t installed it yet, follow the [installation guide](https://microsoft.github.io/genaiscript/getting-started/installation). Once installed, execute the script using the following command: ```shell genaiscript run guard **/*.ts ``` This command will check all the files matching ”\**/*.ts” and let you know which ones are unsafe. Happy coding and stay safe! 🛡️
# LLM Agents
> Learn how to use the inline prompts to create a LLM agent.
An **[agent](/genaiscript/reference/scripts/agents)** is a special kind of [tool](/genaiscript/reference/scripts/tools) that uses an [inline prompt](/genaiscript/reference/scripts/inline-prompts) and [tools](/genaiscript/reference/scripts/tools) to solve a task. ## Usage [Section titled “Usage”](#usage) We want to build a script that can investigate the most recent run failures in a GitHub repository using GitHub Actions. To do so, we probably will need to the following agents: * query the GitHub API, `agent_github` * compute some git diff to determine which changes broken the build, `agent_git` * read or search files `agent_fs` github-investigator.genai.mts ```js script({ tools: ["agent_fs", "agent_git", "agent_github", ...], ... }) ``` Each of these agent is capable of calling an LLM with a specific set of tools to accomplish a task. The full script source code is available below: github-investigator.genai.mts ```js script({ tools: ["agent_fs", "agent_git", "agent_github", "agent_interpreter", "agent_docs"], model: "reasoning", parameters: { jobUrl: { type: "string" }, // URL of the job workflow: { type: "string" }, // Workflow name failure_run_id: { type: "number" }, // ID of the failed run branch: { type: "string" }, // Branch name }, }); const { workflow = "build.yml", failure_run_id, branch = await git.branch(), jobUrl } = env.vars; if (jobUrl) { $`1. Extract the run id and job id from the ${jobUrl}`; $`2. Find the last successful run before the failed run for the same workflow and branch`; } else if (failure_run_id) { $`1. Find the failed run ${failure_run_id} of ${workflow} for branch ${branch} 2. Find the last successful run before the failed run for the same workflow and branch`; } else { $`0. Find the worflow ${workflow} in the repository 1. Find the latest failed run of ${workflow} for branch ${branch} 2. Find the last successful run before the failed run`; } $`3. Compare the run job logs between the failed run and the last successful run 4. git diff the failed run commit (head_sha) and the last successful run commit - show a diff of the source code that created the problem if possible 5. Analyze all the above information and identify the root cause of the failure - generate a patch to fix the problem if possible 6. Generate a detailled report of the failure and the root cause - include a list of all HTML urls to the relevant runs, commits, pull requests or issues - include diff of code changes - include the patch if generated - include a summary of the root cause `; defOutputProcessor(async ({ messages }) => { await runPrompt((_) => { _.$`- Generate a pseudo code summary of the plan implemented in MESSAGES. MESSAGES is a LLM conversation with tools. - Judge the quality of the plan and suggest 2 improvements. - Generate a python program that optimizes the plan in code. Assume "llm" is a LLM call.`; _.def( "MESSAGES", messages.map((msg) => _.$`- ${msg.role}: ${msg.content || JSON.stringify(msg)}`).join("\n"), ); }); return undefined; }); ``` ## Multiple instances of the same agent [Section titled “Multiple instances of the same agent”](#multiple-instances-of-the-same-agent) Some agents, like `agent_git`, can be instantiated with different parameters, like working on different repositories. multi-agents.genai.mts ```js script({ system: [ "system.agent_git", { id: "system.agent_git", parameters: { repo: "microsoft/jacdac", variant: "jacdac" }, }, ], }); $`Generate a table with the last commits of the jacdac and current git repository?`; ``` In such case, make sure to provide a `variant` argument that will be used to generate a unique agent name. ## To split or not to split [Section titled “To split or not to split”](#to-split-or-not-to-split) You could try to load all the tools in the same LLM call and run the task as a single LLM conversation. Results may vary. github-investigator.genai.mts ```js script({ tools: ["fs", "git", "github", ...], ... }) ```
# LLM as a tool
> Create tools and inline prompts using LLM models for executing various tasks
It is possible [tools](/genaiscript/reference/scripts/tools) and [inline prompts](/genaiscript/reference/scripts/inline-prompts) to create a tool that uses an LLM model to execute a prompt. ```js defTool( "llm-small", "Invokes smaller LLM", { prompt: { type: "string", description: "the prompt to be executed by the LLM", }, }, async ({ prompt }) => await runPrompt(prompt, { model: "small", label: "llm-small", }) ) ``` The `"small"` model is an alias that can be configured in the `script` metadata, cli arguments or environment variables. ```js script({ smallModel: "openai:gpt-4o-mini", }) ``` The inlined prompts can declare their own tools or use system prompts declaring them. ```js defTool( "agent_file_system", `An agent that uses gpt-4o to execute an LLM requests with tools that can search and read the file system. `, { prompt: { type: "string", description: "the prompt to be executed by the LLM", }, }, async ({ prompt }) => await env.generator.runPrompt( (_) => { _.$`You are an AI assistant that can help with file system tasks. Answer the user question in the most concise way possible. Use wildcards and regex if needed. If the question is ambiguous, ask for clarification. Use tools to search and read the file system. QUESTION:` _.writeText(prompt) }, { model: "openai:gpt-4o", label: `llm-4o agent_fs ${prompt}`, tools: "fs", } ) ) ```
# PDF Vision
Extracting markdown from PDFs is a tricky task… the PDF file format was never really meant to be read back. There are many techniques applied in the field to get the best results: * one can read the text using [Mozilla’s pdfjs](https://mozilla.github.io/pdf.js/) (GenAIScript uses that), which may give some results but the text might be garbled or not in the correct order. And tables are a challenge. And this won’t work for PDFs that are images only. * another technique would be to apply OCR algorithm on segments of the image to “read” the rendered text. In this guide, we will build a GenAIScript that uses a LLM with vision support to extract text and images from a PDF, converting each page into markdown. Let’s assume that the user is running our script on a PDF file, so it is the first element of `env.files`. We use the PDF parser to extract both the pages and images from the PDF file. The `renderAsImage` option is set to `true`, which means each page is also converted into an image. ```ts const { pages, images } = await parsers.PDF(env.files[0], { renderAsImage: true, }) ``` We begin a loop that iterates over each page in the PDF. ```ts for (let i = 0; i < pages.length; ++i) { const page = pages[i] const image = images[i] ``` For each iteration, we extract the current page and its corresponding image. We use the `runPrompt` function to process both text and image data. ```ts // mix of text and vision const res = await runPrompt( (ctx) => { if (i > 0) ctx.def("PREVIOUS_PAGE", pages[i - 1]) ctx.def("PAGE", page) if (i + 1 < pages.length) ctx.def("NEXT_PAGE", pages[i + 1]) ctx.defImages(image, { autoCrop: true, greyscale: true }) ``` The context `ctx` is set up with definitions for the current page, and optionally the previous and next pages. Images are defined with auto-cropping and greyscale adjustments. ```ts ctx.$`You are an expert in reading and extracting markdown from a PDF image stored in the attached images. Your task is to convert the attached image to markdown. - We used pdfjs-dist to extract the text of the current page in PAGE, the previous page in PREVIOUS_PAGE and the next page in NEXT_PAGE. - Generate markdown. Do NOT emit explanations. - Generate CSV tables for tables. - For images, generate a short alt-text description. ` ``` This prompt instructs GenAI to convert the page image into markdown. It highlights the use of `pdfjs-dist` for text extraction and instructs how to handle text, tables, and images. ```ts }, { model: "small", label: `page ${i + 1}`, cache: "pdf-ocr", system: [ "system", "system.assistant", "system.safety_jailbreak", "system.safety_harmful_content", ], } ) ``` We configure the model with specific settings, such as labeling each page, caching settings, and system configurations for safety. ```ts ocrs.push(parsers.unfence(res.text, "markdown") || res.error?.message) } ``` Each result is processed, converted back to markdown, and added to the `ocrs` array. ```ts console.log(ocrs.join("\n\n")) ``` Finally, we print out all the collected OCR results in markdown format. ## Running the Script [Section titled “Running the Script”](#running-the-script) To run this script using the GenAIScript CLI, navigate to your terminal and execute: ```bash genaiscript run pdfocr <mypdf.pdf> ``` For more details on installing and setting up the GenAIScript CLI, refer to the [official documentation](https://microsoft.github.io/genaiscript/getting-started/installation). This script provides a straightforward way to convert PDFs into markdown, making it easier to work with their contents programmatically. Happy coding! 🚀 ## Full source [Section titled “Full source”](#full-source) The full script source code is available below: pdfocr.genai.mts ```js script({ files: "src/pdf/jacdac.pdf", }); for (const file of env.files.filter((f) => f.filename.endsWith(".pdf"))) { // extract text and render pages as images const { pages, images } = await parsers.PDF(file, { renderAsImage: true, }); console.log(`pages: ${pages.length}`); const ocrs: string[] = []; for (let i = 0; i < pages.length; ++i) { const page = pages[i]; const image = images[i]; // todo: orientation // mix of text and vision const res = await runPrompt( (ctx) => { if (i > 0) ctx.def("PREVIOUS_PAGE", pages[i - 1]); ctx.def("PAGE", page); if (i + 1 < pages.length) ctx.def("NEXT_PAGE", pages[i + 1]); ctx.defImages(image, { autoCrop: true, greyscale: true }); ctx.$`You are an expert in reading and extracting markdown from a PDF image stored in the attached images. Your task is to convert the attached image to markdown. - We used pdfjs-dist to extract the text of the current page in PAGE, the previous page in PREVIOUS_PAGE and the next page in NEXT_PAGE. - Generate markdown. Do NOT emit explanations. - Generate CSV tables for tables. - For images, generate a short alt-text description. `; }, { model: "small", label: `page ${i + 1}`, cache: "pdf-ocr", system: [ "system", "system.assistant", "system.safety_jailbreak", "system.safety_harmful_content", ], }, ); ocrs.push(parsers.unfence(res.text, "markdown") || res.error?.message); } await workspace.writeText(file.filename + ".md", ocrs.join("\n\n")); } ```
# Phi-3 Mini with Ollama
> Learn how to integrate Phi-3 Mini, a powerful 3.8B parameter model by Microsoft, with Ollama for local execution of state-of-the-art AI models.
[Phi-3 Mini](https://azure.microsoft.com/en-us/blog/introducing-phi-3-redefining-whats-possible-with-slms/) is a 3.8B parameters, lightweight, state-of-the-art open model by Microsoft. In this guide, we use [Ollama](https://ollama.com/), a desktop application that let you download and run model locally. 1. Start the Ollama application or run the command to launch the server from a terminal. ```sh ollama serve ``` 2. (optional) Pull your model from the Ollama server (see [list of models](https://ollama.com/library)). GenAIScript will automatically attempt to pull it if missing. ```sh ollama pull phi3 ``` 3. Update your script to use the `ollama:phi3` model. summarize-phi3.genai.mjs ```js script({ model: "ollama:phi3", title: "summarize with phi3", system: ["system"], }) const file = def("FILE", env.files) $`Summarize ${file} in a single paragraph.` ``` 4. Apply this script to the files you want to summarize!
# Present My Code
> Step-by-step instructions on presenting code effectively using GenAIScript and creating engaging slides.
1. Save the script below in your project as `genaisrc/slides.genai.js`. slides.genai.mjs ```js script({ title: "Generate Slides", description: "Generate a slide-deck in markdown. Install extension 'vscode-reveal'.", group: "samples", temperature: 0.1, tests: { files: ["src/greeter.ts"], keywords: "greeter", }, }) const output = env.files[0].filename + ".slides.md" def( "SOURCE", env.files.filter((f) => !f.filename.endsWith(".slides.md")) ) $`Generate a slide deck in markdown format for the content in SOURCE in file ${output} using markdown. - Each slide SHOULD have a title, unless it is only showing a code snippet. - USE heading level 3 for slide titles. - Do NOT add "Slide:" or "Title:" in the slide. - Keep slides titles VERY short. - USE --- to separate slides. - Keep the content on each slide short. Maximum 3 bullet points. - Use mermaid syntax if you need to generate state diagrams, class inheritance diagrams, relationships. - If the source is code, describe the code and show the code in a separate slide. - Keep code snippet short. Maximum 10 lines. Maximum 42 columns. Use multiple slides if needed. Ellipse sections with ... if necessary. - The first slide have a title and a summary of the slide deck. - IGNORE Contributing, Copyright and Trademarks sections. ` ``` 2. Right click on the code file or folder, select **Run GenAIScript…** and select **Generate Slides**. 3. Apply the refactoring to save the generated slides file. 4. To visualize the slides, install the [vscode-reveal extension](https://marketplace.visualstudio.com/items?itemName=evilz.vscode-reveal). Open the slides file and click **slides** in the status bar.
# Programming Language Personas
> Learn how to use expert programming language personas in GenAIScript
GenAIScript includes expert programming language personas that provide specialized knowledge and best practices for different programming languages. These personas are automatically activated when your scripts reference specific language keywords or file extensions. ## Available Language Personas [Section titled “Available Language Personas”](#available-language-personas) ### Go (Golang) - `system.go` [Section titled “Go (Golang) - system.go”](#go-golang---systemgo) The Go persona provides expertise in: * Proper error handling with explicit error checking * Clear and concise variable and function naming following Go conventions * Appropriate use of goroutines and channels for concurrency * Proper package organization and imports * Following the Go standard library patterns and conventions * Writing idiomatic Go code that is simple, readable, and efficient **Auto-activation triggers:** * File extensions: `*.go` * Keywords: `golang`, `go `(with space) ### Rust - `system.rust` [Section titled “Rust - system.rust”](#rust---systemrust) The Rust persona provides expertise in: * Proper ownership and borrowing principles to ensure memory safety * Idiomatic use of Result and Option types for error handling * Effective use of traits and generics for code reusability * Following Rust naming conventions and code style * Leveraging the type system for safety and performance * Writing code that is zero-cost abstraction and performant * Proper use of Cargo and the Rust ecosystem **Auto-activation triggers:** * File extensions: `*.rs` * Keywords: `rust`, `cargo` ### Java - `system.java` [Section titled “Java - system.java”](#java---systemjava) The Java persona provides expertise in: * Proper object-oriented design principles and patterns * Effective use of Java’s type system and generics * Following Java naming conventions and code style * Appropriate exception handling and resource management * Understanding of the Java Memory Model and garbage collection * Leveraging the Java standard library and ecosystem effectively * Writing clean, maintainable, and well-documented code * Proper use of build tools like Maven or Gradle **Auto-activation triggers:** * File extensions: `*.java` * Keywords: `java `(with space), `maven`, `gradle` ### C/C++ - `system.cpp` [Section titled “C/C++ - system.cpp”](#cc---systemcpp) The C/C++ persona provides expertise in: * Proper memory management and avoiding memory leaks * Understanding of pointers, references, and RAII principles * Effective use of the C++ Standard Library and modern C++ features * Following C/C++ naming conventions and code style * Writing efficient and performance-optimized code * Proper header organization and include guards * Understanding of compilation, linking, and build systems * Safe coding practices to avoid common vulnerabilities * Appropriate use of C++ features like templates, lambdas, and smart pointers **Auto-activation triggers:** * File extensions: `*.cpp`, `*.cxx`, `*.cc`, `*.c++`, `*.h`, `*.hpp` * Keywords: `c++`, `cpp`, `cmake` ### TypeScript - `system.typescript` [Section titled “TypeScript - system.typescript”](#typescript---systemtypescript) The TypeScript persona provides expertise in: * Modern TypeScript features and syntax * Type safety and advanced type system usage * Integration with JavaScript ecosystems * Best practices for scalable TypeScript applications * Proper configuration and tooling setup * ESM modules and async/await patterns **Auto-activation triggers:** * File extensions: `*.ts`, `*.tsx` * Keywords: `typescript`, `ts `(with space) ### Python - `system.python` [Section titled “Python - system.python”](#python---systempython) The Python persona provides expertise in: * PEP 8 compliant code style and conventions * Pythonic programming patterns and idioms * Proper use of Python’s standard library * Type hints and modern Python features * Package management and virtual environments * Performance optimization and best practices * Clean, readable, and maintainable code structure **Auto-activation triggers:** * File extensions: `*.py`, `*.pyi` * Keywords: `python`, `pip`, `conda`, `virtualenv` ## Automatic Activation [Section titled “Automatic Activation”](#automatic-activation) GenAIScript automatically detects when to include language personas based on: 1. **File extensions** in your script’s file processing 2. **Keywords** in your script content 3. **Build tool references** (cargo, maven, gradle, cmake) For example, this script will automatically include the Go persona: ```js script({ title: "Go Code Review", files: "*.go" }) $`Review this Go code and suggest improvements.` ``` ## Manual Activation [Section titled “Manual Activation”](#manual-activation) You can also explicitly activate language personas using the `system` parameter: ```js script({ title: "Multi-language Review", system: ["system.go", "system.rust", "system.java"] }) $`Compare implementations across Go, Rust, and Java.` ``` ## Example Usage [Section titled “Example Usage”](#example-usage) ### Go Code Analysis [Section titled “Go Code Analysis”](#go-code-analysis) go-review\.genai.mts ```js script({ title: "Go Code Review", description: "Review Go code for best practices", files: "*.go" }) $`Analyze the Go code and provide suggestions for: - Error handling patterns - Goroutine and channel usage - Code organization and naming conventions - Performance optimizations` ``` ### Rust Safety Check [Section titled “Rust Safety Check”](#rust-safety-check) rust-safety.genai.mts ```js script({ title: "Rust Safety Analysis", files: "*.rs" }) $`Review this Rust code focusing on: - Ownership and borrowing correctness - Memory safety guarantees - Proper use of Result and Option types - Performance implications` ``` ### Java Architecture Review [Section titled “Java Architecture Review”](#java-architecture-review) java-architecture.genai.mts ```js script({ title: "Java Architecture Review", files: "**/*.java" }) $`Analyze the Java codebase for: - Object-oriented design principles - Design pattern usage - Exception handling strategies - Performance and memory considerations` ``` ### C++ Modernization [Section titled “C++ Modernization”](#c-modernization) cpp-modernize.genai.mts ```js script({ title: "C++ Modernization", files: ["*.cpp", "*.h", "*.hpp"] }) $`Review this C++ code and suggest modernizations: - Use of modern C++ features (C++11/14/17/20) - Memory safety with smart pointers - Performance optimizations - Best practices for headers and includes` ``` ### TypeScript Type Safety [Section titled “TypeScript Type Safety”](#typescript-type-safety) typescript-types.genai.mts ```js script({ title: "TypeScript Type Safety Review", files: "*.ts" }) $`Review this TypeScript code focusing on: - Type safety and proper type annotations - Advanced TypeScript features usage - Integration with JavaScript libraries - Performance and compilation optimizations` ``` ### Python Code Quality [Section titled “Python Code Quality”](#python-code-quality) python-quality.genai.mts ```js script({ title: "Python Code Quality Review", files: "*.py" }) $`Analyze this Python code for: - PEP 8 compliance and style - Pythonic patterns and idioms - Type hints and modern Python features - Performance and best practices` ``` ## Combining with Other Systems [Section titled “Combining with Other Systems”](#combining-with-other-systems) Language personas work well with other system prompts: ```js script({ title: "Comprehensive Code Review", system: ["system.go", "system.git_info", "system.diff"], files: "*.go" }) $`Review the Git changes to Go files and provide detailed feedback.` ``` The language personas enhance GenAIScript’s ability to provide expert-level guidance tailored to each programming language’s unique characteristics and best practices.
# Prompt As Code
> Tutorial on using GenAIScript runtime and syntax to assemble prompts
This page is a tutorial on creating prompt with GenAIScript. It is designed to be opened in Visual Studio Code as a Notebook. ## About GenAIScript Markdown Notebooks [Section titled “About GenAIScript Markdown Notebooks”](#about-genaiscript-markdown-notebooks) The [GenAIScript Markdown Notebook](/genaiscript/reference/scripts/notebook) will parse the markdown document into a Notebook view and use Visual Studio Code’s support to provide a rich editing experience. It should work with any markdown file as long as the code fence use ”\`\`\`”. * Each **JavaScript** code block is an self-contained GenAIScript that can be executed individually. The results are attached to each code block and saved in the markdown file. * This is a stateless kernel, so the variables are not shared between code blocks. * Other languages are not supported in this notebook and simply ignored. ## Prompt as code [Section titled “Prompt as code”](#prompt-as-code) GenAIScript lets you write prompts as a JavaScript program. GenAIScript runs your program; generate chat messages; then handles the remaining interaction with the LLM API. ### `$` Let’s start with a simple hello world program. ```js $`Say "hello!" in emojis` ``` <!-- genaiscript output start --> <!-- genaiscript output end --> The `$` function formats the strings and write them to the user message. This user message is added to the chat messages and sent to the LLM API. Under the snippet, you can review both the **user** message (that our program generated) and the **assistant** (LLM) response. You can run the code block by clicking the **Execute Cell** button on the top left corner of the code block. It will be default try to use the `openai:gpt-3.5-turbo` LLM. If you need to use a different model, update the `model` field in the front matter at the start of the document. There are many options documented in [configuration](/genaiscript/getting-started/configuration). Once the execution is done, you will also an additional **trace** entry that allows you to dive in the internal details of the GenAIScript execution. This is very helpful to diagnose issues with your prompts. The trace can be quite large so it is not serialized in the markdown file. You can use the JavaScript `for` loop and sequence multiple `$` calls to append text to the user message. You can also inner expression to generate dynamic content. ```js // let's give 3 tasks to the LLM // to get 3 different outputs for (let i = 1; i <= 3; i++) $`- Say "hello!" in ${i} emojis.` $`Respond with a markdown list` ``` <!-- genaiscript output start --> <!-- genaiscript output end --> To recap, the GenAIScript runs and generates a user messages; that gets sent to the LLM. You can review the user message (and others) in the trace. ## `def` and `env.files` [Section titled “def and env.files”](#def-and-envfiles) The [`def` function](https://microsoft.github.io/genaiscript/reference/scripts/context/#definition-def) lets you declare and assign **LLM variables**. The concept of variable is most useful to import context data, in particular files, and refer to them in the rest of the prompt. ```js def("FILE", env.files) $`Summarize FILE in one short sentence. Respond as plain text.` ``` <!-- genaiscript output start --> <!-- genaiscript output end --> In GenAIScript, the [`env.files`](https://microsoft.github.io/genaiscript/reference/scripts/context/#environment-env) variable contains the [list of files in context](/genaiscript/reference/scripts/files), which can be determined by a user selection in the UI, CLI arguments, or pre-configured like in this script. You can change the files in `env.files` by editing the `files` field in the front matter at the start of the document. ### Filtering [Section titled “Filtering”](#filtering) When using GenAIScript from the user interface, it is common to apply a script to an entire folder. This means that you’ll get a bunch of files in `env.files` including some unneeded ones. The `def` function provides various options to filter the files, like the `endsWith` option. `def` also provides `maxTokens` which will trim the content size to a number of tokens. LLM context is finite! ```js script({ files: "src/samples/**" }) // glob all files under src/samples def("FILE", env.files, { endsWith: ".md", maxTokens: 1000 }) // only consider markdown files $`Summarize FILE in one short sentence. Respond as plain text.` ``` <!-- genaiscript output start --> <!-- genaiscript output end -->
# Search and Fetch
> Learn how to leverage web search and fetching pages in GenAIScript
Suppose we want to plan a weekend trip using a GenAIScript that will help us plan by using web search to learn about things to do and the expected weather. 1. Use the `> GenAIScript: Create new script...` command in the command palette to create a new script. 2. Start the script by defining the model and title: ```js script({ title: "plan-weekend", description: "Given details about my goals, help plan my weekend", model: "openai:gpt-4o", }) ``` 3. Use the [`webSearch`](/genaiscript/reference/scripts/web-search/) function to search for information about the destination. If you don’t have one, then you can search for the web pages manually and use the URLs directly in the call to the `host.fetchText` function. ```js const parkinfo = await retrieval.webSearch("mt rainier things to do") ``` 4. `webSearch` returns a list of URLs. Use [`fetchText`](/genaiscript/reference/scripts/fetch/) to fetch the contents of the 1st URL. ```js const parktext = await host.fetchText(parkinfo.webPages[0]) ``` 5. `host.fetchText` returns a lot of formatting HTML tags, etc. Use [`runPrompt`](/genaiscript/reference/scripts/inline-prompts/) to call the LLM to clean out the tags and just keep the text. ```js const cleanInfo = await runPrompt(_ => { // use def, $ and other helpers _.def("INFO", parktext.text) _.$`You are an expert in web content. Extract out of the file INFO, which is HTML with lots of CSS and HTML tags, the important information that a human would want to know.` }) ``` 6. Repeat to get the latest weather info about your destination. ```js const weather = await retrieval.webSearch("mt rainier weather") ``` 7. Replace the text `"TELL THE LLM WHAT TO DO..."` with what kind of vacation you want to plan. ```js $`You are a helpful assistant that is an expert in planning weekend trips. I've included information about my destination in PARKINFO and WEATHER. Help me plan a weekend trip starting tomorrow.` ``` 8. Press the “Run” button on the upper right corner of the editor to run the script. (You can run this script in this way because it takes no other input in `env.files`)) 9. The output will be displayed in a new document tab. Here’s an example of the output you might get: ```plaintext Based on the information provided in PARKINFO and the various weather forecasts, here's a concise plan for your weekend trip to Mount Rainier National Park starting tomorrow: Day 1: Arrival and Exploration Morning: Arrive at the park via the Nisqually entrance, which is open year-round. Afternoon: Visit Paradise, one of the most popular areas in the park. Check the weather before heading out, as the forecast suggests a heavy fall of snow and extremely cold temperatures. Dress warmly and carry snow chains if driving. Evening: Have dinner at the Paradise Inn, if open, and stay overnight in the park or nearby accommodation. ``` Here’s the complete GenAIScript: ```js script({ title: "plan-weekend", description: "Given details about my goals, help plan my weekend", model: "openai:gpt-4o", }) const parkinfo = await retrieval.webSearch("mt rainier things to do") const parktext = await fetchText(parkinfo.webPages[0]) const cleanInfo = await runPrompt(_ => { // use def, $ and other helpers _.def("INFO", parktext.text) _.$`You are an expert in web content. Extract out of the file INFO, which is HTML with lots of CSS and HTML tags, the important information that a human would want to know.` }) if (cleanInfo) def("PARKINFO", cleanInfo.text) const weather = await retrieval.webSearch("mt rainier weather") def("WEATHER", weather.webPages) $`You are a helpful assistant that is an expert in planning weekend trips. I've included information about my destination in PARKINFO and ${weather}. Help me plan a weekend trip starting tomorrow.` ```
# Search And Transform
> Learn how to search and transform data in your data sources.
This script is an evolution of the “search and replace” feature from text editor, where the “replace” step has been replaced by a LLM transformation. It can be useful to batch apply text transformations that are not easily done with regular expressions. For example, when GenAIScript added the ability to use a string command string in the `exec` command, we needed to convert all script using ```js host.exec("cmd", ["arg0", "arg1", "arg2"]) ``` to ```js host.exec(`cmd arg0 arg1 arg2`)` ``` While it’s possible to match this function call with a regular expression ```regex host\.exec\s*\([^,]+,\s*\[[^\]]+\]\s*\) ``` it’s not easy to formulate the replacement string… unless you can describe it in natural language: ```txt Convert the call to a single string command shell in TypeScript ``` Here are some example of the transformations where the LLM correctly handled variables. * concatenate the arguments of a function call into a single string ```diff const { stdout } = await host.exec("git", ["diff"]) const { stdout } = await host.exec(`git diff`) ``` * concatenate the arguments and use the `${}` syntax to interpolate variables ```diff const { stdout: commits } = await host.exec("git", [ "log", "--author", author, "--until", until, "--format=oneline", ]) const { stdout: commits } = await host.exec(`git log --author ${author} --until ${until} --format=oneline`) ``` ## Search [Section titled “Search”](#search) The search step is done with the [workspace.grep](/genaiscript/reference/scripts/files) that allows to efficiently search for a pattern in files (this is the same search engine that powers the Visual Studio Code search). ```js const { pattern, globs } = env.vars const patternRx = new RegExp(pattern, "g") const { files } = await workspace.grep(patternRx, { globs }) ``` ## Compute Transforms [Section titled “Compute Transforms”](#compute-transforms) The second step is to apply the regular expression to the file content and pre-compute the LLM transformation of each match using an [inline prompt](/genaiscript/reference/scripts/inline-prompts). ```js const { transform } = env.vars ... const patches = {} // map of match -> transformed for (const file of files) { const { content } = await workspace.readText(file.filename) for (const match of content.matchAll(patternRx)) { const res = await runPrompt( (ctx) => { ctx.$` ## Task Your task is to transform the MATCH with the following TRANSFORM. Return the transformed text. - do NOT add enclosing quotes. ## Context ` ctx.def("MATCHED", match[0]) ctx.def("TRANSFORM", transform) }, { label: match[0], system: [], cache: "search-and-transform" } ) ... ``` Since the LLM sometimes decides to wrap the answer in quotes, we need to remove them. ```js ... const transformed = res.fences?.[0].content ?? res.text patches[match[0]] = transformed ``` ## Transform [Section titled “Transform”](#transform) Finally, with the transforms pre-computed, we apply a final regex replace to patch the old file content with the transformed strings. ```js const newContent = content.replace( patternRx, (match) => patches[match] ?? match ) await workspace.writeText(file.filename, newContent) } ``` ## Parameters [Section titled “Parameters”](#parameters) The script takes three parameters: a file glob, a pattern to search for, and a LLM transformation to apply. We declare these parameters in the `script` metadata and extract them from the `env.vars` object. ```js script({ ..., parameters: { glob: { type: "string", description: "The glob pattern to filter files", default: "*", }, pattern: { type: "string", description: "The text pattern (regular expression) to search for", }, transform: { type: "string", description: "The LLM transformation to apply to the match", }, }, }) const { pattern, glob, transform } = env.vars ``` ## Full source [Section titled “Full source”](#full-source) st.genai.mts ```ts script({ title: "Search and transform", description: "Search for a pattern in files and apply a LLM transformation the match", parameters: { glob: { type: "string", description: "The glob pattern to filter files", }, pattern: { type: "string", description: "The text pattern (regular expression) to search for", }, transform: { type: "string", description: "The LLM transformation to apply to the match", }, }, }); let { pattern, glob, transform } = env.vars; if (!glob) glob = (await host.input("Enter the glob pattern to filter files (default: *)")) || "*"; if (!pattern) pattern = await host.input("Enter the pattern to search for (regular expression)"); if (!pattern) cancel("pattern is missing"); const patternRx = new RegExp(pattern, "g"); if (!transform) transform = await host.input("Enter the LLM transformation to apply to the match"); if (!transform) cancel("transform is missing"); const { files } = await workspace.grep(patternRx, { glob }); // cached computed transformations const patches = {}; for (const file of files) { console.log(file.filename); const { content } = await workspace.readText(file.filename); // skip binary files if (!content) continue; // compute transforms for (const match of content.matchAll(patternRx)) { console.log(` ${match[0]}`); if (patches[match[0]]) continue; const res = await runPrompt( (_) => { _.$` ## Task Your task is to transform the MATCH with the following TRANSFORM. Return the transformed text. - do NOT add enclosing quotes. ## Context `; _.def("MATCHED", match[0]); _.def("TRANSFORM", transform, { detectPromptInjection: "available", }); }, { label: match[0], system: ["system.assistant", "system.safety_jailbreak", "system.safety_harmful_content"], cache: "search-and-transform", }, ); const transformed = res.fences?.[0].content ?? res.text; if (transformed) patches[match[0]] = transformed; console.log(` ${match[0]} -> ${transformed ?? "?"}`); } // apply transforms const newContent = content.replace(patternRx, (match) => patches[match] ?? match); // save results if file content is modified if (content !== newContent) await workspace.writeText(file.filename, newContent); } ``` To run this script, you can use the `--vars` option to pass the pattern and the transform. ```sh genaiscript st --vars 'pattern=host\.exec\s*\([^,]+,\s*\[[^\]]+\]\s*\)' 'transform=Convert the call to a single string command shell in TypeScript' ```
# Sharing scripts
> Learn how to share GenAIScript scripts across projects using Git repositories, submodules, and GitHub Gists.
GenAIScript scripts are files and can be shared like any other code file. As long as the script file are under the project folder, GenAIScript will look for `**/*.genai.js` files and `**/*.genai.mjs`. Here are some ideas to share files. ## Git repository + submodules [Section titled “Git repository + submodules”](#git-repository--submodules) If you store your scripts in a git repository, you can use git submodules to share them across multiple projects. * repository containing your script (e.g. `https://.../shared-scripts`) - referencing `shared-scritps` as a git submodule ```sh git submodule add https://.../shared-scripts git submodule update --init --recursive ``` ## GitHub Gists [Section titled “GitHub Gists”](#github-gists) [Gists](https://gist.github.com/) is a lightweight way to share a couple files.
# Summarize Many Documents
> Learn how to run a GenAIScript over many documents
Suppose I have a directory with multiple `.pdf` (or other) files and I want to run a GenAIScript over all of them. In this example, I’m generating a catchy tweet for each document and I want to save the tweet in another file. ## Development [Section titled “Development”](#development) 1. Use the `> GenAIScript: Create new script...` command in the command palette to create a new script. 2. This is an easy script. Assuming the script will take the file as an argument, you can refer to that argument in `env.files` and tell the LLM what to do with it: gen-tweet.genai.mjs ```js script({ title: "gen-tweet" }) def("FILE", env.files) $`Given the paper in FILE, write a 140 character summary of the paper that makes the paper sound exciting and encourages readers to look at it.` ``` 3. Right click on the document in VS Code Explorer (it can be a `.pdf`, a `.docx`, or a `.md` file because `def` knows how to read and parse all these file types). Select **Run GenAIScript**. Select the script `gen-tweet` you just wrote. 4. Assuming we give the GenAIScript a paper describing GenAIScript, the Output will be displayed in a new document tab. ```plaintext Discover GenAIScript: a revolutionary scripting language integrating AI to automate complex tasks, making coding accessible to all! #AI #CodingFuture ``` Because we didn’t tell the LLM to write the output to a file, it will by default go to standard out. ## Automation [Section titled “Automation”](#automation) 1. We can run the script from the [command line](/genaiscript/reference/cli/): ```sh npx genaiscript run gen-tweet example1.pdf ``` 2. The output will be displayed in the terminal. 3. Now that we have the script working for a single file, we can use the command line to apply it to a list of files. Let’s assume you start with a file `ex1.pdf` you want the output in a new file `ex1.tweet.md`. How you do this depends on the shell script you prefer. * bash ```bash for file in *.pdf; do newfile="${file%.pdf}.tweet.md"; # foo.pdf -> foo.tweet.md if [ ! -f "$newfile" ]; then # skip if already exists npx genaiscript run gen-tweet $file > $newfile fi done ``` * PowerShell ```powershell Get-ChildItem -Filter *.pdf | ForEach-Object { $newName = $_.BaseName + ".tweet.md" if (-not (Test-Path $newName)) { npx genaiscript run gen-tweet $_.FullName | Set-Content "$newName" } } ``` * Python (on Windows) ```python import subprocess, sys, os for input_file in sys.argv[1:]: output_file = os.path.splitext(input_file)[0] + '.tweet.md' if not os.path.exists(output_file): with open(output_file, 'w') as outfile: result = subprocess.check_output( ["npx", "genaiscript", "run", "gen-tweet", input_file], universal_newlines=True) outfile.write(result) ``` * JavaScript (node.js) ```js #!/usr/bin/env zx import "zx/globals" const files = await glob("*.pdf") for (const file of files) { const out = file.replace(/\.pdf$/i, ".tweet.md") // foo.pdf -> foo.tweet.md if (!(await fs.exists(out))) // don't regenerate if it already exists await $`genaiscript run gen-tweet ${file} > ${out}` } ``` This script requires [zx](https://github.com/google/zx).
# Tool Agent
> Learn how to define a built-in agent using functions for decision-making and reasoning in arithmetic operations.
Using [tools (formerly functions)](/genaiscript/reference/scripts/tools), you can define a built-in agent that can take decisions and reasoning based on the tools provided to it. Let’s illustrate this concept using the [llamaindex sum div sample](https://ts.llamaindex.ai/examples/agent): an agent that can sum or divide two numbers and needs to answer basic arithmetic questions. ## Using tools [Section titled “Using tools”](#using-tools) By declaring tools (and providing a descriptive description), you provide the opportunity for the LLM to requests a tool call during the output generation. In the snippet below, we declare a tool that can sum two numbers. It will be called by the LLM when a sum operation is required. ```js defTool( "sum", "Sum two numbers", { type: "object", properties: { a: { type: "number", description: "The first number", }, b: { type: "number", description: "The second number", }, }, required: ["a", "b"], }, ({ a, b }) => `${a + b}` ) ``` You can also simplify the parameter definition by provider an example object and the schema will be inferred.\_createMdxContent ```js defTool("sum", "Sum two numbers", { a: 1, b: 2 }, ({ a, b }) => `${a + b}`) ``` ## Parameters [Section titled “Parameters”](#parameters) The arithmetic question can be declared as a [script parameter](/genaiscript/reference/scripts/variables) to be used in the agent script. ```js script({ ..., parameters: { "question": { type: "string", default: "How much is 5 + 5? then divide by 2?" } } }) ``` The parameter value are populated in the `env.vars` object. ```js ... $`Answer the following arithmetic question: ${env.vars.question} ` ``` Putting it all together, we define another tool to divide two numbers and inline an arithmetic question. ```js script({ title: "math-agent", model: "small", description: "A port of https://ts.llamaindex.ai/examples/agent", parameters: { question: { type: "string", default: "How much is 11 + 4? then divide by 3?", }, }, tests: { description: "Testing the default prompt", keywords: "5", }, }) defTool( "sum", "Use this function to sum two numbers", { type: "object", properties: { a: { type: "number", description: "The first number", }, b: { type: "number", description: "The second number", }, }, required: ["a", "b"], }, ({ a, b }) => `${a + b}` ) defTool( "divide", "Use this function to divide two numbers", { type: "object", properties: { a: { type: "number", description: "The first number", }, b: { type: "number", description: "The second number", }, }, required: ["a", "b"], }, ({ a, b }) => `${a / b}` ) $`Answer the following arithmetic question: ${env.vars.question} ` ``` ## Using `system.math` [Section titled “Using system.math”](#using-systemmath) The system prompt [system.math](/genaiscript/reference/scripts/system#systemmath) wraps the `parsers.math` expression parser and evaluator and exposes it as a tool. This simplifies the agent script as we do not have to define tools anymore. math-agent.genai.mjs ```js script({ title: "math-agent-system", model: "small", description: "A port of https://ts.llamaindex.ai/examples/agent", system: ["system", "system.math", "system.tools"], parameters: { "question": { type: "string", default: "How much is (11 + 4 / 9.11)? then divide by 3.13?" } }, tests: { description: "Testing the default prompt", keywords: "5" } }) $`Respond this math question: ${env.vars.question} - do not generate python code - print the final result in text format ` ```
# Transformer.js
> Implement summarization with Transformers.js and leverage local hardware acceleration
Caution We have temporarily removed support for the `transformers` to reduce the installation footprint. HuggingFace [Transformers.js](https://huggingface.co/docs/transformers.js/index) is a JavaScript library that lets you run pretrained models locally on your machine. The library uses [onnxruntime](https://onnxruntime.ai/) to leverage the CPU/GPU capabilities of your hardware. In this guide, we will show how to create [summaries](https://huggingface.co/tasks/summarization) using the [Transformers.js](https://huggingface.co/docs/transformers.js/api/pipelines#module_pipelines.SummarizationPipeline) library. ## Import the pipeline [Section titled “Import the pipeline”](#import-the-pipeline) The snippet below imports the Transformers.js library and loads the summarizer pipeline and model. You can specify a model name or let the library pick the latest and greatest. ```js import { pipeline } from "@genaiscript/runtime" const summarizer = await pipeline("summarization") ``` Allocating and loading the model can take some time, so it’s best to do this at the beginning of your script and only once. ## Invoke the pipeline [Section titled “Invoke the pipeline”](#invoke-the-pipeline) The summarizer pipeline has a single argument, the content to summarize. It returns an array of summaries which we need to unpack to access the final summary text. This is what we do below and `summary_index` contains the summary text. ```js const [summary] = await summarizer(content) // @ts-ignore const { summary_text } = summary ```
# Using Secrets
> Utilize secrets to augment documents with TypeScript and REST APIs
This guide shows how to use TypeScript, a 3rd party search service, and [secrets](/genaiscript/reference/scripts/secrets) to create a script that augments documents with information from the web. The goal is to create a script that will augment an existing document with information gathered from the web. ## Tavily Search [Section titled “Tavily Search”](#tavily-search) [Tavily](https://tavily.com/) is a search service optimized for LLMs that provides a [REST API](https://docs.tavily.com/docs/tavily-api/rest_api). The REST API can be invoked using JavaScript [fetch](https://developer.mozilla.org/en-US/docs/Web/API/Fetch_API/Using_Fetch) and requires an API key. The script uses the `TAVILY_API_KEY` which will have to be declare in the script using this function. ```ts const res = await fetch(..., { headers: { 'api_key': env.secrets.TAVILY_API_KEY } }) ``` We define a function `tavilySearch` in [TypeScript](/genaiscript/reference/scripts/typescript) that wraps the `fetch` call and we add type annotations to provide a nice editing experience. ```ts export async function tavilySearch(query: string): Promise<{ answer: string query: string results: { title: string url: string content: string score: number }[] }> { ... } ``` The full source looks like this: tavily.mts ```ts /** * Uses the Tavily API to search for a query. * @param query question * @param apiKey API key https://docs.tavily.com/docs/tavily-api/rest_api * @returns */ export async function tavilySearch(query: string): Promise<{ answer: string; query: string; results: { title: string; url: string; content: string; score: number; }[]; }> { const apiKey = env.secrets.TAVILY_API_KEY; if (!apiKey) throw new Error("secret TAVILY_API_KEY is not available"); const res = await fetch("https://api.tavily.com/search", { method: "POST", headers: { "Content-Type": "application/json", }, body: JSON.stringify({ api_key: apiKey, query, include_answer: true, max_results: 5, }), }); const data: any = await res.json(); return data; } ``` ## Question -> Search -> Augment [Section titled “Question -> Search -> Augment”](#question---search---augment) The script is split into 3 phases: * run a prompt to generate a question based on the document content * use Tavily to generate an answer to the question * run a prompt to augment the document with the answer The secret `TAVILY_API_KEY` needed by Tavily is declared in the `script` function call. Also make sure to add it to your `.env` file. ```js script({ secrets: ["TAVILY_API_KEY"], }) ``` The `tavilySearch` function is imported using a dynamic [import](/genaiscript/reference/scripts/imports). ```ts const { tavilySearch } = await import("./tavily.mts") const { answer } = await tavilySearch(question.text) ``` The full source looks like this: document-augmentor.genai.mts ```ts script({ secrets: ["TAVILY_API_KEY"], files: "src/rag/markdown.md", }); const { tavilySearch } = await import("./tavily.mts"); const file = env.files[0]; // Question const { text: question } = await runPrompt((_) => { const filen = _.def("FILE", file); _.$`Generate a question that summarizes the content of ${filen}`; }); // Search const { answer } = await tavilySearch(question); // Augment const filen = def("FILE", file); const answern = def("ANSWER", answer); $`You are an expert at writing document. Integrate the information of ${answern} into ${filen} to make it more informative.`; ```
# Video Alt Text
> Learn how to generate alt text for videos
GenAIScript supports [speech transcription](/genaiscript/reference/scripts/transcription) and [video frame extraction](/genaiscript/reference/scripts/videos) which can be combined to analyze videos. ## Video Alt Text [Section titled “Video Alt Text”](#video-alt-text) The HTML video attribute does not have an `alt` attribute.. but you can still attach a accessible description using the `aria-label` attribute. We will build a script that generates the description using the transcript and video frames. ## Transcript [Section titled “Transcript”](#transcript) We use the `transcribe` function to generate the transcript. It will use the `transcription` model alias to compute a transcription. For OpenAI, it defaults to `openai:whisper-1`. Transcriptions are useful to reduce hallucations of LLMs when analyzing images and also provides good timestemp candidates to screenshot the video stream. ```js const file = env.files[0] const transcript = await transcribe(file) // OpenAI whisper ``` ## Video Frames [Section titled “Video Frames”](#video-frames) The next step is to use the transcript to screenshot the video stream. GenAIScript uses [ffmpeg](https://ffmpeg.org/) to render the frames so make sure you have it installed and configured. ```js const frames = await ffmpeg.extractFrames(file, { transcript, }) ``` ## Context [Section titled “Context”](#context) Both the transcript and the frames are added to the prompt context. Since some videos may be silent, we ignore empty transcripts. We also use low detail for the frames to improve performance. ```js def("TRANSCRIPT", transcript?.srt, { ignoreEmpty: true }) // ignore silent videos defImages(frames, { detail: "low" }) // low detail for better performance ``` ## Prompting it together [Section titled “Prompting it together”](#prompting-it-together) Finally, we give the task to the LLM to generate the alt text. ```js $`You are an expert in assistive technology. You will analyze the video and generate a description alt text for the video. ` ``` Using this script, you can automatically generate high quality alt text for videos. ```sh genaiscript run video-alt-text path_to_video.mp4 ``` ## Full source [Section titled “Full source”](#full-source) video-alt-text.genai.mjs ```js script({ description: "Generate a description alt text for a video", accept: ".mp4,.webm", system: [ "system.output_plaintext", "system.safety_jailbreak", "system.safety_harmful_content", "system.safety_validate_harmful_content", ], files: "src/audio/helloworld.mp4", model: "vision", }); const file = env.files[0]; const transcript = await transcribe(file, { cache: "alt-text" }); // OpenAI whisper const frames = await ffmpeg.extractFrames(file, { transcript, }); // ffmpeg to extract frames def("TRANSCRIPT", transcript?.srt, { ignoreEmpty: true }); // ignore silent videos defImages(frames, { detail: "low" }); // low detail for better performance $`You are an expert in assistive technology. You will analyze the video and generate a description alt text for the video. - The video is included as a set of <FRAMES> images and the <TRANSCRIPT>. - Do not include alt text in the description. - Keep it short but descriptive. - Do not generate the [ character.`; ```
# Zod Schema
> Learn how to define and convert TypeScript-first Zod schemas to JSON schema
[zod](https://zod.dev/) is a TypeScript-first schema validation with static type inference. ```ts import { z } from "@genaiscript/runtime" // city array schema const CitySchema = z.array( z.object({ name: z.string(), population: z.number(), url: z.string(), }) ) ``` The zod schemas can be used in `defSchema` to constrain the output of the tool. ```ts // JSON schema to constrain the output of the tool. const schema = defSchema("CITY_SCHEMA", CitySchema) ... ```