Exercise 4: Deployments
In this Exercise, you will create a Deployment and rollout an application update. Deployments provide a consistent mechanism to upgrade an application to a new version, while keeping the downtime to a minimum. Note that internally, Deployments use ReplicaSets for managing pods. However, you never work directly with ReplicaSets since Deployments abstract out that interaction.
Task 1 - Create A New Deployment
Create a Deployment manifest where the pod template contains an
nginxcontainer with a tag 1.0. The 1.0 represents the version of this container and hence of the application running inside it.$ngDepYaml = @" apiVersion: apps/v1 kind: Deployment metadata: name: ng-dep spec: replicas: 2 selector: matchLabels: target: dev template: metadata: name: ng-pod labels: target: dev spec: nodeSelector: kubernetes.io/os: linux containers: - name: nginx image: ghcr.io/microsoft/k8s-on-azure-workshop/k8slab-nginx:1.0 ports: - containerPort: 80 protocol: TCP "@ # Create the Deployment $ngDepYaml | kubectl apply -f -cat << EOF | kubectl apply -f - apiVersion: apps/v1 kind: Deployment metadata: name: ng-dep spec: replicas: 2 selector: matchLabels: target: dev template: metadata: name: ng-pod labels: target: dev spec: nodeSelector: kubernetes.io/os: linux containers: - name: nginx image: ghcr.io/microsoft/k8s-on-azure-workshop/k8slab-nginx:1.0 ports: - containerPort: 80 protocol: TCP EOFCreate a Service to access the pods of the deployment:
$ngSvcYaml = @"
apiVersion: v1
kind: Service
metadata:
  name: ng-svc
spec:
  ports:
    - port: 80
  selector:
    target: dev
  type: LoadBalancer
"@

# Create the Service
$ngSvcYaml | kubectl apply -f -
cat << EOF | kubectl apply -f - apiVersion: v1 kind: Service metadata: name: ng-svc spec: ports: - port: 80 selector: target: dev type: LoadBalancer EOFRun the following command to see the Pods, ReplicaSets, Deployments and Services that were created.
kubectl get all --show-labelskubectl get all --show-labels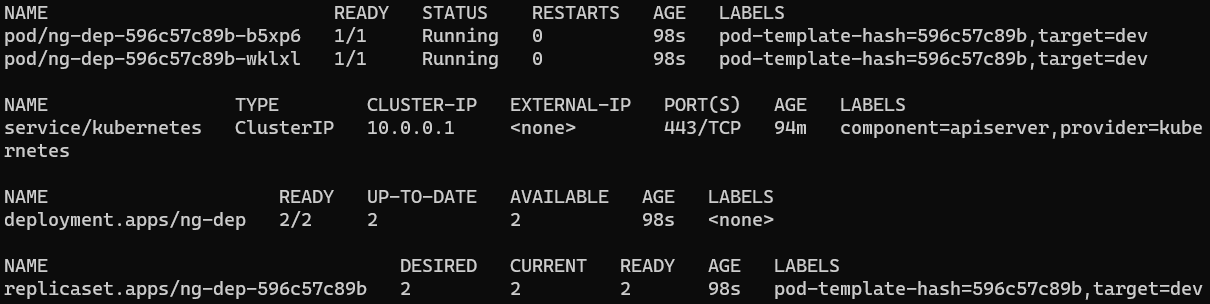
Tip
You can also chain resource types together with a comma to create a customised list of resources to view, e.g.
kubectl get pods,replicasets,deployments,services --show-labelsorkubectl get po,rs,deploy,svc --show-labels
Task 2 - Access Version 1.0 Of Application
Wait about 3-4 minutes to allow Azure to create a Public IP address for the service. Check to see if an address has been assigned by getting the list of services.
kubectl get svckubectl get svc
Tip
If the
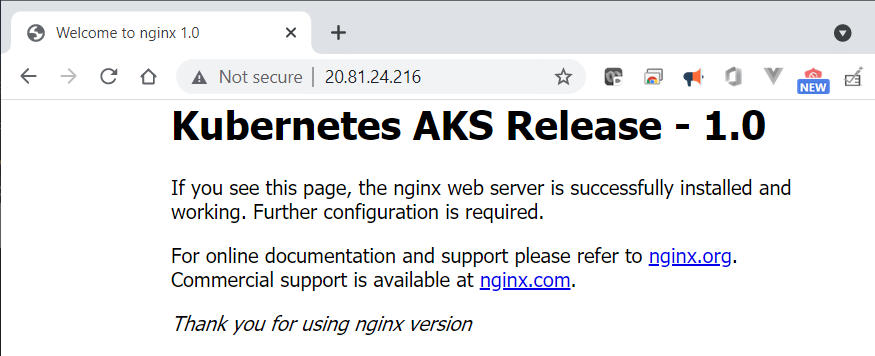
EXTERNAL-IPshows as<pending>, it means the underlying Azure load balancer resource is still being provisioned. Give it a couple more minutes and try again.When you see an EXTERNAL-IP assigned, open a browser with that address, e.g.: http://20.81.24.216
Task 3 - Update The Deployment To Version 2.0
You are now going to update the Deployment to use version 2.0 of the container instead of 1.0. This can be done in one of two ways. One approach is to use imperative syntax, which is faster and is often used during the development/testing stage of an application. The alternate method is to update the YAML file and then to reapply it to the cluster - this is known as the declarative approach.
We will demonstrate the imperative method over the next few steps.
To start rolling out the new update, change the container image tag from 1.0 to 2.0 by running this command:
kubectl set image deployment ng-dep nginx=ghcr.io/microsoft/k8s-on-azure-workshop/k8slab-nginx:2.0kubectl set image deployment ng-dep nginx=ghcr.io/microsoft/k8s-on-azure-workshop/k8slab-nginx:2.0In the command above, ng-dep is the name of Deployment and nginx is the name of the container within the pod template. The change will force the Deployment to create a new ReplicaSet with an image tagged 2.0.
List all the pods and notice that old pods are terminating and that new pods have been created.
kubectl get podskubectl get podsRun
kubectl get podsa few more times to watch new pods get created and old pods deleted. Notice the values in the AGE column change each time you run the command.Run the follwing command to review the Deployment definition with the updated value of container image:
kubectl describe deployment ng-depkubectl describe deployment ng-dep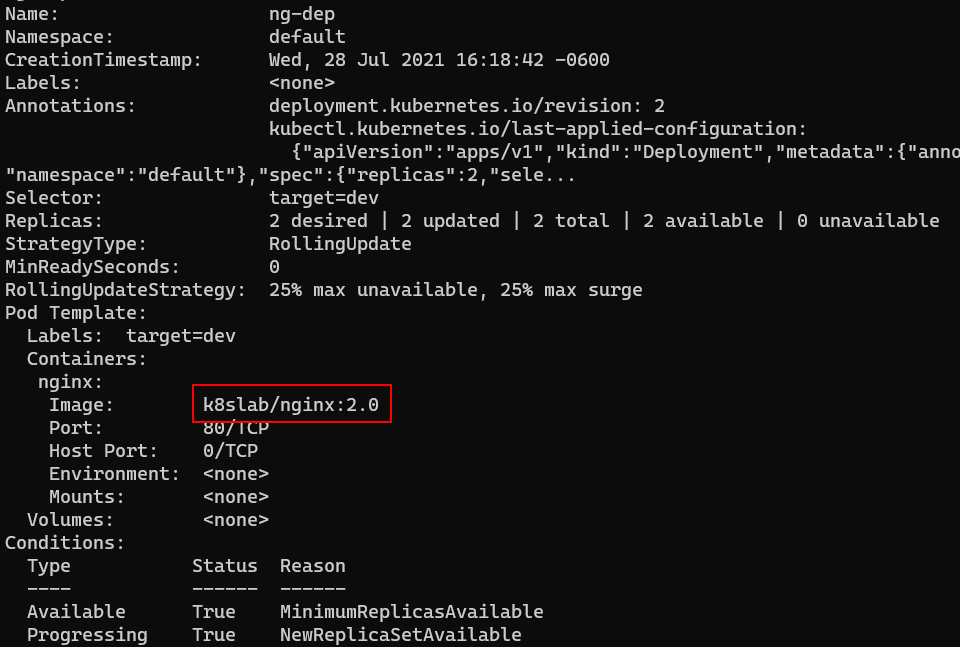
Note
Notice the Image: section (under Containers:) shows the value of container image as 2.0.
Run the command to view the Pods, ReplicaSets and Deployments again.
kubectl get allkubectl get all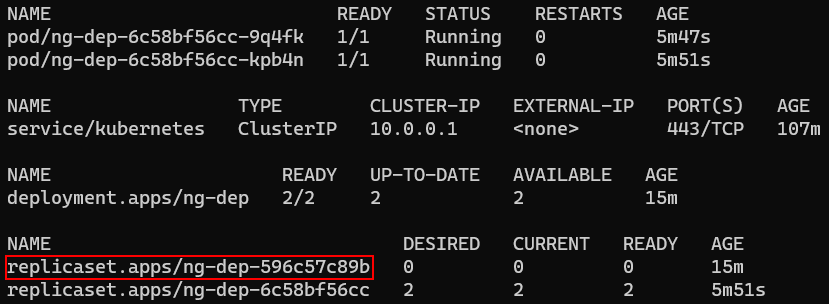
Note
Notice that the old replica set still exists, even though it has 0 DESIRED pods.
Run the
describecommand on the old ReplicaSet.kubectl describe rs <oldReplicaSetName>kubectl describe rs <oldReplicaSetName>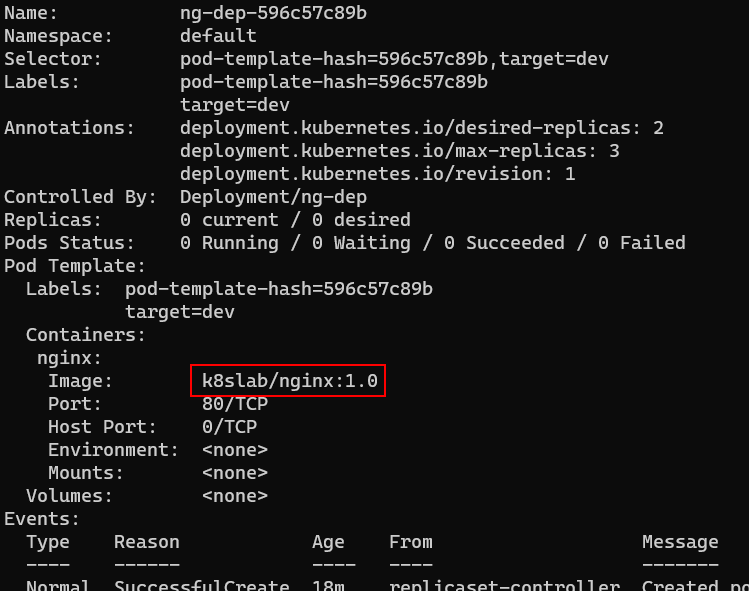
Note
Notice that the old definition still has the previous version number. This is maintained so you can roll back the change to that version if you wish.
Access the 2.0 version of application by refreshing the browser at the same address as above.

Task 4 - Rollback The Deployment
The purpose of maintaining the previous ReplicaSet is to be able to rollback changes to any previous version.
Review the deployment history.
kubectl rollout history deploy/ng-depkubectl rollout history deploy/ng-depRollback the Deployment to the previous version.
kubectl rollout undo deploy/ng-depkubectl rollout undo deploy/ng-depWait a few seconds and refresh the browser again.
Note
Notice the site is back to the previous version.
Knowledge Check
Can you update the Deployment using the declarative approach, where you update the YAML file and update the deployment?
Task 5 - Delete The Deployment And Service
Delete the Deployment and Service.
kubectl delete deployment ng-dep
kubectl delete service ng-svc
kubectl delete deployment ng-dep kubectl delete service ng-svcNote
It may take a few minutes to delete the service because has to delete the Public IP resource in Azure.