Application Lifecycle Management (ALM) in Copilot Studio
Application Lifecycle Management (ALM) in Copilot Studio
Master the complete lifecycle of your Microsoft Copilot Studio agents - from structuring solutions and managing configurations to deploying across environments with pipelines and source control.
Application Lifecycle Management (ALM) in Copilot Studio
Master the complete lifecycle of your Microsoft Copilot Studio agents - from structuring solutions and managing configurations to deploying across environments with pipelines and source control.
Lab Details
| Level | Persona | Duration | Purpose |
|---|---|---|---|
| 300 | Maker/Admin | 45 minutes | After completing this lab, participants will be able to structure solutions with custom publishers, configure environment variables and connection references, deploy solutions across environments using Power Platform pipelines, and manage source control integration with Azure DevOps Git. |
Table of Contents
- Why This Matters
- Introduction
- Core Concepts Overview
- Documentation and Additional Training Links
- Prerequisites
- Summary of Targets
- Use Cases Covered
- Instructions by Use Case
Why This Matters
Makers and Admins - You’ve built amazing agents in your development environment, but how do you move them safely to production? How do you track changes, collaborate with your team, and ensure consistent deployments?
Think of ALM as preparing your kitchen before cooking a complex meal:
- Without ALM: Ingredients scattered across counters, no recipe plan, manual exports, forgotten configurations, and “it worked in dev” syndrome
- With ALM: Everything organized, versioned, and automated - from structured solutions to governed deployment pipelines
Common challenges solved by this lab:
- “I built something great in dev, but can’t easily move it to production”
- “Someone changed my agent and now it’s broken - who did it and how do I fix it?”
- “My agent works perfectly in dev but breaks in production”
- “I forgot to configure the authentication settings after deployment”
- “I can’t track what changed between versions”
In 45 minutes, you’ll set up a complete ALM foundation - from solution structure through automated deployment pipelines and source control.
Introduction
Application Lifecycle Management (ALM) ensures that your solutions evolve safely and efficiently as they move from development to production. This lab walks you through the full ALM journey: structuring your solution with a custom publisher, configuring environment variables and connection references for portability, connecting to source control for versioning and collaboration, and deploying across environments using Power Platform pipelines.
Real-world example: Your customer service agent is ready for production. With a proper ALM setup, the deployment process becomes:
- Structure your work in a solution with a custom publisher
- Configure environment variables and connection references for portability
- Track all changes in Git source control
- Deploy through governed pipelines from DEV to ALM Prod
- Validate environment-specific settings post-deployment
Without ALM, each of these steps is manual, error-prone, and difficult to repeat. With ALM, it becomes an automated, auditable, and confident workflow.
Core Concepts Overview
| Concept | Why it matters |
|---|---|
| Solution | A standard way in Microsoft Power Platform to package and ship components - including agents, topics, knowledge sources, tools, flows, and other solution-aware component types - across environments. |
| Publisher | A metadata element that identifies the creator of solution components. Using a custom publisher improves traceability and supports cleaner prefixes in naming conventions. |
| Environment | A workspace in Power Platform where agents, flows, and data reside. ALM best practices typically involve multiple environments (e.g., dev, test, prod) to manage lifecycle stages. |
| Environment variable | A reusable setting (like a URL, API key, or ID) that can vary between environments without modifying individual components. For secrets, use the secret data type to retrieve values securely from Azure Key Vault. |
| Connection reference | An abstraction that links connectors (e.g., SharePoint, Dataverse, ServiceNow) to credentials and environment-specific settings, allowing reuse and cleaner ALM processes. |
| Managed solution | A read-only version of a solution used for deployment to downstream environments. Managed solutions support clean, controlled, and incremental updates and prevent direct modifications in the target environment. |
| Unmanaged solution | An editable solution used in development. Changes can be versioned and exported for deployment. Should not be used in test or production. |
| Power Platform pipelines | Democratized ALM automation that brings CI/CD capabilities into the service in a manner that’s approachable for all makers, admins, and developers. |
| Pipeline stages | Sequential deployment environments (Development → Test → Production) that solutions must pass through in order, preventing bypass of QA processes. |
| Source control | The practice of tracking and managing changes to your assets over time. Git integration with Azure DevOps enables auditing, collaboration, and versioning. |
Documentation and Additional Training Links
- ALM overview - Microsoft Power Platform
- Publish and deploy your agent
- Environment variables in solutions
- Connection references in a solution
- Overview of pipelines in Power Platform
- Export and import agents using solutions
- Overview of Git integration in Power Platform
Prerequisites
- Access to Microsoft Copilot Studio
- A Microsoft Power Platform environment with at least an Environment Maker security role
- Access to multiple Power Platform environments (DEV, ALM Prod) - provided in the lab setup
Summary of Targets
In this lab, you’ll configure a complete ALM foundation for working with Microsoft Copilot Studio. By the end of the lab, you will:
- Create and configure a structured solution with a custom publisher
- Set up environment variables and connection references for portability across environments
- Create and configure Power Platform pipelines for automated deployment
- Deploy solutions from DEV to ALM Prod and understand post-deployment configuration
Use Cases Covered
| Step | Use Case | Value added | Effort |
|---|---|---|---|
| 1 | Create a Solution and Custom Publisher | Structure your success - Group, manage, and deploy all your agent components with clarity and control | 15 min |
| 2 | Create Environment Variables and Connection References | Adapt with flexibility - Future-proof your agents for seamless multi-environment deployments | 15 min |
| 3 | Create Power Platform Pipelines for Deployment | Automate with confidence - Set up governed, repeatable deployment workflows | 15 min |
Instructions by Use Case
Use Case #1: Create a Solution and Custom Publisher
Use a structured container to group all agent components for better lifecycle management.
| Use case | Value added | Estimated effort |
|---|---|---|
| Create a Solution and Custom Publisher | Structure your success - Group, manage, and deploy all your agent components with clarity and control | 15 minutes |
Summary of tasks
In this section, you’ll learn how to access the Solutions area of Copilot Studio, create a new solution with a custom publisher, and set it as your preferred solution.
Scenario: Properly set up your development environment so that you can later easily package and deploy your agents to other environments.
Objective
Set up your development environment by creating a solution and custom publisher in Microsoft Copilot Studio.
Step-by-step instructions
Open the Solutions Area
-
Go to copilotstudio.microsoft.com.
-
Confirm you are in the correct environment (top-right corner). The environment should be named DEV - User (Your user ID).
Create a Solution
-
In the left navigation (under the … menu), select Solutions.

-
Select New solution.
-
Enter a display name using the following naming convention:
UserID-(Solution Name).
[!TIP]
- Use your UserID followed by a hyphen and a descriptive solution name in parentheses.
- For example, if your UserID is
user01and you are building agents for a training workshop, name your solutionuser01-(Training Workshop Agents).- Avoid names like
DEV,TEST,PROD,POC,MVPor anything tied to a project lifecycle phase.- Use a descriptive, project-based name inside the parentheses.
[!IMPORTANT] Custom connectors must be in their own solution. If your agent depends on a custom connector, that connector must be packaged in a separate solution and deployed to the target environment before the agent solution. The agent solution will fail to deploy if the custom connector it depends on is not already present in the target environment. Always plan your solution structure and deployment order with these dependencies in mind.
Create a Publisher
- If you see a publish with your User name you can select that one, otherwise select + New publisher to create one.
[!TIP]
- Use the username provided to you for logging into the lab as the publisher name.
- While the Display name may contain spaces, the Name can’t contain special characters and spaces.
- Define a short prefix for use in technical names.
[!IMPORTANT] Avoid using the default publisher or the default solution. Custom publishers ensure cleaner component names and better ALM hygiene.
Set and Create
-
Check Set as your preferred solution (so any new component goes into it by default).
-
Select Create.
Congratulations! You’ve completed Use Case #1!
Test your understanding
Key takeaways:
- Solutions first - Solutions help manage your agent and related components across environments.
- Lifecycle readiness - Structuring up front simplifies governance, updates, and deployment.
- Naming matters - Use clean, environment-agnostic names.
- Custom connectors need their own solution - If your agent relies on a custom connector, that connector must be packaged in a separate solution and deployed to the target environment before you deploy the agent solution. The agent solution has a dependency on the custom connector, and the deployment will fail if the connector is not already present in the target environment. Plan your solution structure and deployment order accordingly.
Lessons learned & troubleshooting tips:
- Avoid names like
DevorTestin your solution name - they’re misleading when the solution moves to other environments. - If save fails, ensure the publisher name is unique and valid.
- Keep solution names business-focused, not technical-phase focused.
Use Case #2: Create Environment Variables and Connection References
Use reusable variables and connection abstractions for seamless multi-environment deployments.
| Use case | Value added | Estimated effort |
|---|---|---|
| Create Environment Variables and Connection References | Adapt with flexibility - Future-proof your agents for seamless multi-environment deployments | 15 minutes |
Summary of tasks
In this section, you’ll learn how to create environment variables and connection references in your solution to ensure portability across environments.
Scenario: Configure your environment by anticipating future elements that will need to be updated as your solution moves from development to production.
Objective
Create environment variables and connection references that enable your solution to adapt to different environments without modifying individual components.
Step-by-step instructions
-
Open the solution you created in Use Case #1. If you didn’t navigate away after the create it should leave you in the solution.
-
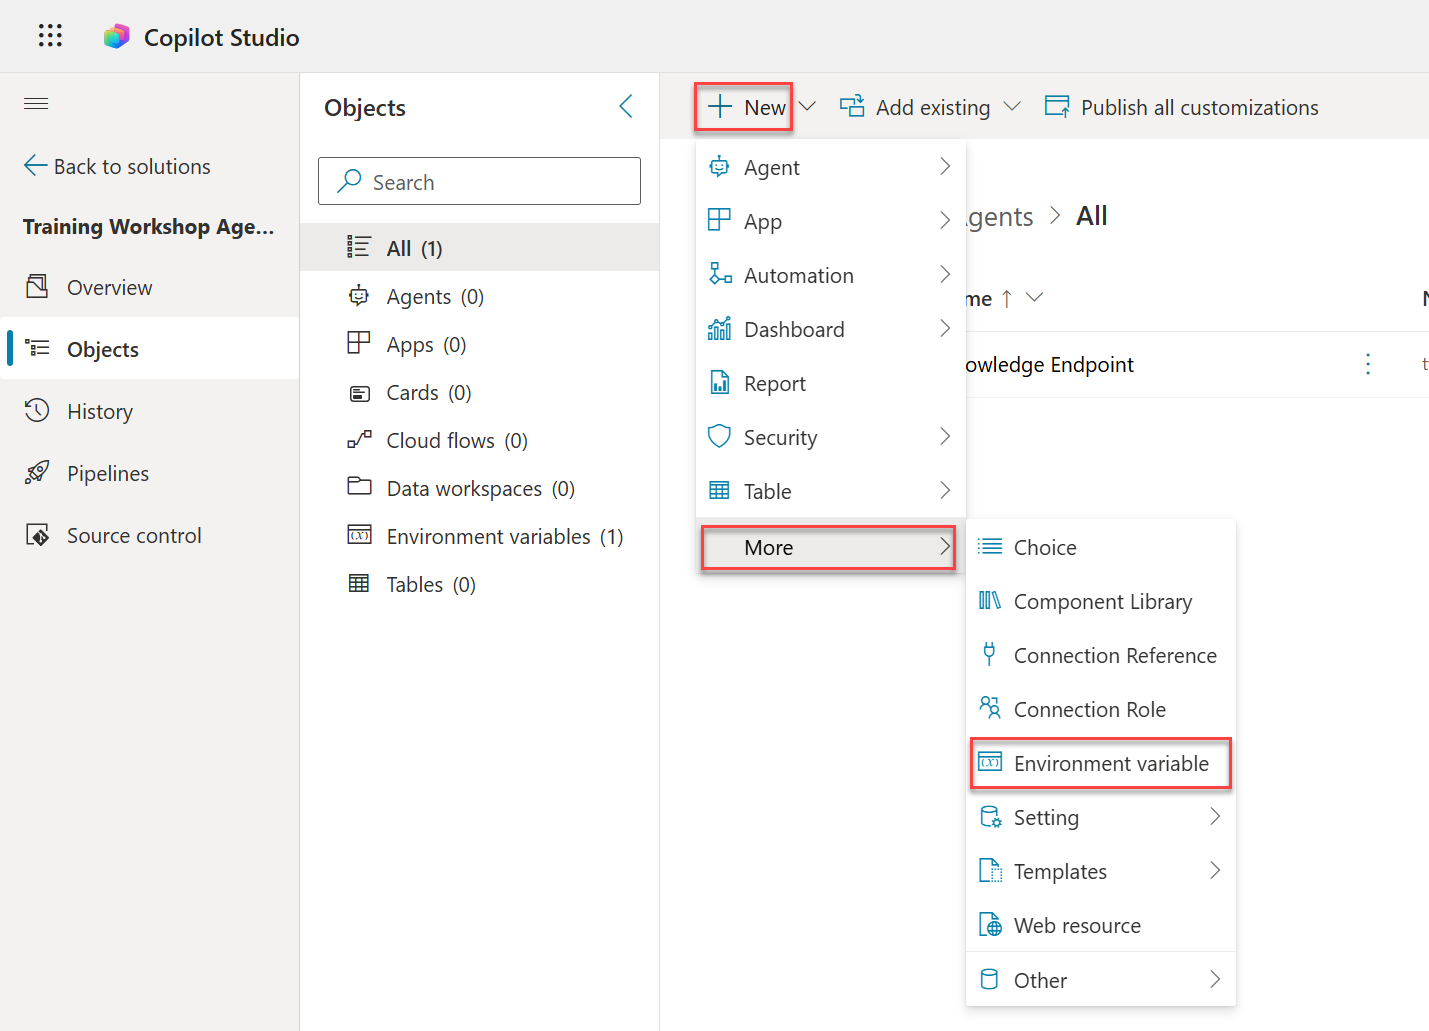
Select + New, then select More and choose Environment variable.
-
In Name, enter:
Custom Knowledge Endpoint, then add your User Name to make it unique. We are only doing this because you will be deploying to a shared environment. -
In Data Type, select Text.
-
Leave Default Value blank, but under Current Value, select + New Value, and enter the Custom Knowledge endpoint URL found in the Lab Resources.
[!IMPORTANT] For configuration, use the provided values in the Lab Resources (specific per training).
[!TIP] Notice how, under Advanced, you can set whether the current value can follow through with your solution deployment, or if it should be reset each time the solution is deployed to a new environment.
- Select Save.
[!TIP] Environment variables can also be of type Secret to retrieve secure values like API keys from Azure Key Vault at runtime.
-
In the solution, select New, then select More and choose Connection reference.
-
Enter
ServiceNowplus your User Name to make it unique , as the name.
[!TIP] In other locales, the connector name may be localized.
-
Select the connector ServiceNow.
-
In the connection dropdown, choose New connection if none exists.
-
Log in through Power Apps in a new tab if needed, then return to Copilot Studio.
[!IMPORTANT]
- For ServiceNow configuration values, use the provided values in the Lab Resources (specific per training).
- For ServiceNow’s
Instanceconfiguration, be sure to scroll down in the connection screen.
- Above the Connection dropdown, select Refresh and choose the newly created connection.
[!TIP] If the Create button is grayed out, it’s because you pasted the display name. Type an extra character in the display name field and remove it to enable the button.
Congratulations! You’ve completed Use Case #2!
Test your understanding
- Do you understand the value of using environment variables instead of hardcoding values like URLs, API keys, or record IDs?
- Do you see the importance of using descriptive, well-scoped names for environment variables (e.g.,
Base API URL,Support Team Email)? - Have you identified which variables should change across environments (e.g., dev, test, prod)?
Challenge: Apply this to your own use case
- List the environment variables your agent needs (e.g., external API base URLs, system emails, etc.).
- Define clear naming conventions to help your team manage them consistently.
- Try creating a Secret-type environment variable that securely references a value in Azure Key Vault.
Use Case #3: Create Power Platform Pipelines for Deployment
Set up automated deployment pipelines that democratize ALM while maintaining proper governance and security through platform controls.
| Use case | Value added | Estimated effort |
|---|---|---|
| Create Power Platform Pipelines for Deployment | Automate with confidence - Set up governed, repeatable deployment workflows | 15 minutes |
Summary of tasks
In this section, you’ll learn how to verify your ALM Prod environment, create Power Platform pipelines, configure deployment stages, and deploy your solution from DEV to ALM Prod.
Scenario: You have a solution ready in DEV and need to establish an automated process to deploy it to the ALM Prod environment with minimal effort and maximum consistency.
Objective
Create a deployment pipeline that automates solution deployment across environments with proper validation and governance controls.
Step-by-step instructions
Verify Your ALM Prod Environment
-
Confirm that your ALM Prod environment has already been provisioned for you. You can verify this by checking the environment switcher (top-right corner) in copilotstudio.microsoft.com — you should see the ALM Prod environment in the list.
[!IMPORTANT] If you do not see the ALM Prod environment, contact your lab instructor for assistance.
Create an agent to deploy
-
Go to the Copilot Studio home page at copilotstudio.microsoft.com
-
Enter the following to describe the agent you wish to create, but do NOT choose to create it yet:
Create a Microsoft Surface Guide agent that knows everything about the Surface devices and can help guide users to pick the one that would be best for how they work. It should use the information from https://www.microsoft.com/en-us/surface as an official knowledge source -
Before saving, select the gear icon (Settings) on the agent and update the Schema name to include your UserID. For example, if your username is
user.xibbqhpx, set the schema name to includexibbqhpx.[!IMPORTANT] You must update the schema name to include your UserID. If you do not set a unique schema name, your pipeline deployment to the ALM Prod environment will fail later. A unique schema name is required to build a pipeline to a shared ALM Prod environment.
-
After the agent is created, do a quick test of the agent by asking something like What are the different Surface devices?.
-
In the left navigation select “…” and then Solutions
-
Select the solution you created previously in this lab to open it and see the list of components.
- You should see Microsoft Surface Guide or something similar in the Agents category of components.
- Your solution is now ready to deploy to the ALM Prod environment.
Access Power Platform Pipelines
-
In the left navigation, select Pipelines.
-
Select + Create pipeline.
Configure Pipeline Basics
-
Enter a Name for your pipeline, e.g.,
<your user name> Pipeline. -
Set a Description to explain the pipeline’s purpose (e.g.,
Automated deployment of agents from DEV to ALM Prod).
Set Up Deployment Stage
-
Select the ALM Prod environment as the Target environment.
-
Save the pipeline configuration.
Test Your Pipeline
-
In the ALM Prod card, select Deploy here. Then follow the wizard steps by selecting Next.
-
If prompted to sign in to service now please do that using the Lab Resources account information provided. Then select Next.
-
Select Deploy to start the actual deployment process.
[!TIP]
- The wizard makes sure that each environment variable has a value set in the target environment, and that all connection references are valid. If any of these checks fail, you will be prompted to fix them before proceeding.
- If the deployment fails because of missing dependencies, go back to your solution explorer, select the … next to each agent > Advanced > Add required objects and try re-deploying the solution.
-
Wait for your deployment to complete.
[!NOTE] The deployment process can take several minutes to complete. This is normal — the platform is exporting your solution as managed, transferring it to the target environment, and importing all components. Be patient and wait for it to finish.
-
In Copilot Studio, switch to the ALM Prod environment.
-
See what the agents look like in the ALM Prod environment. When entering a topic, see how customizations are locked because the solution is managed.
[!IMPORTANT] Critical reminder about non-solution-aware settings:
These Copilot Studio settings require manual post-deployment configuration because they are tied to environment-specific resources, security boundaries, or external service registrations rather than to the agent’s design-time logic:
- Azure Application Insights settings - Instrumentation keys and connection strings point to environment-specific monitoring resources. DEV and PROD should send telemetry to separate Application Insights instances to keep diagnostics isolated.
- Manual authentication settings - App registrations, client IDs, and redirect URIs are registered per environment in Microsoft Entra ID. Bundling them in a solution would risk pointing a production agent at a development identity provider.
- Direct Line / Web channel security settings - Channel secrets and tokens are generated per environment to secure communication between the agent and its clients. These credentials cannot be transferred across environments.
- Deployed channels - Each channel deployment (Teams, web, Dynamics 365, etc.) creates a unique registration with the external platform. The target URLs, app IDs, and platform configurations are different in every environment.
- Sharing (with other makers, or with end-users) - Permissions reference specific users and security groups in each environment’s Microsoft Entra ID tenant. The people who need maker access in DEV are typically different from the end-users in PROD.
Always include these in your post-deployment checklist!
Congratulations! You’ve completed Use Case #3!
Test your understanding
Key takeaways:
- Democratized ALM - Pipelines make sophisticated deployment processes accessible to all makers without requiring deep ALM knowledge.
- Automatic governance - Solutions are automatically exported as managed for target environments, preventing unauthorized changes.
- Sequential validation - Solutions must pass through pipeline stages in order, ensuring proper testing and approval workflows.
- Built-in safeguards - Pipeline artifacts can’t be tampered with, ensuring the same tested solution moves through all stages.
Lessons learned & troubleshooting tips:
- Target environments must be Managed Environments for governance enforcement.
- Pipelines are only visible from development environments, not target environments.
Summary of learnings
True learning comes from doing, questioning, and reflecting - so let’s put your skills to the test.
To maximize the impact of ALM in Copilot Studio:
- Solutions first - Keep all your components within a solution to simplify lifecycle management and ensure clean deployment.
- Name wisely - Adopt a consistent naming convention and always use a custom publisher to avoid default clutter.
- Plan for portability - Use environment variables and connection references to ensure your agent configurations adapt across dev, test, and production.
- Leverage source control - Use Git integration to track, audit, and collaborate - setting the stage for CI/CD without complex tooling.
- Automate where it counts - Use pipelines for streamlined, repeatable deployments with built-in governance.
- Document post-deployment steps - Track settings that aren’t part of the solution so nothing is missed.
[!NOTE] Managed Environment governance in your lab: Your ALM Prod environment uses Managed Environment governance to enforce that solutions are managed and unmanaged customizations are blocked. This ensures deployment integrity and prevents unauthorized changes outside of the pipeline process.
Conclusions and recommendations
ALM golden rules:
- Work in the context of solutions.
- Create separate solutions only if you need to deploy components independently.
- Use a custom publisher and prefix to maintain clarity and traceability.
- Use environment variables for settings and secrets that change across environments.
- Export and deploy solutions as managed, unless you’re setting up a dev environment.
- Avoid customizing outside of dev.
- Consider automating ALM for source control and CI/CD pipelines.
By following these principles, you’ll establish a robust, scalable foundation for managing Copilot agents and Power Platform assets across their full lifecycle - from development through deployment and beyond.