Connecting Snowflake to Copilot Studio: Step-by-Step Guide
By following this comprehensive guide, you've successfully connected Snowflake to Copilot Studio, enabling your agents to query live data through natural language.
Connecting Snowflake to Copilot Studio: Step-by-Step Guide
Overview
By linking Snowflake as a knowledge source for Copilot Studio, you enable real-time querying of your data via natural-language agents — without duplicating data or building custom ETL. Copilot can treat your Snowflake tables as first-class data sources, letting agents answer questions, run analytics, or power workflows based on live data.
Connection Methods
There are multiple ways through which you can connect your agent to Snowflake:
- As a Tool - Gives you the flexibility to either delegate the calling of the agent to the orchestrator or to make explicit calls from your topics
- As a Knowledge Source - Seamlessly grounds your agent knowledge into Snowflake specific selected tables
The choice depends largely on your agent’s objectives and design.
Focus of This Blog
This blog post provides a comprehensive setup guide, with a primary focus on using Snowflake as a knowledge source. It covers:
- Configuring Snowflake
- Registering an app in Azure
- Enabling the Copilot Studio connector
The established connection setup can also be utilized to use Snowflake as a tool.
Note: If you intend to utilize Snowflake Cortex agents, this topic is not addressed in the current article. Should there be sufficient interest, we will consider publishing a subsequent article detailing the steps required to configure Copilot Studio to Cortex agent connectivity.
Prerequisites
You will need the following access privileges to configure Snowflake and Copilot Studio properly:
- ✅ Snowflake Account with admin privileges
- ✅ Power Platform Admin Center access for connector enablement
- ✅ App Registration in Azure for OAuth client and resource roles
- ✅ Microsoft Copilot Studio environment (e.g., Sandbox, Production)
Configuration Steps
Initial Check: Power Platform Admin Center (PPAC)
First, check PPAC to confirm your organization data policies do not block the Snowflake connector in your environment.
When you create a new Copilot Studio agent or access an existing agent, navigate to: Knowledge tab → Advanced → Select ‘Snowflake’ as a knowledge source
For the first time, this will prompt you to enter the connection details.

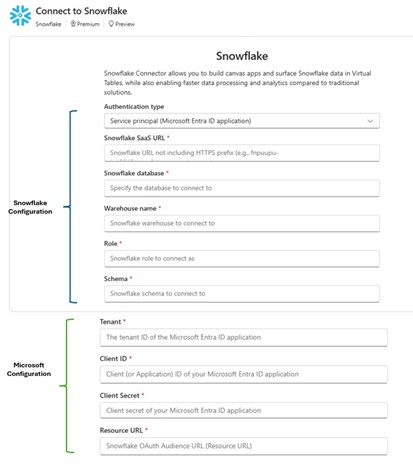
Authentication Method: This guide uses “Service Principal (Microsoft Entra ID application)”
Step 1: Configure Microsoft Azure Resources
You must have access to the Azure admin portal to complete the following three main steps:
- Register a new Snowflake OAuth Resource in Azure (Application ID URI, App scope)
- Register a new Snowflake OAuth Client in Azure (Client ID, Secret, permissions, redirect URI)
- Collect Azure metadata: token endpoint, jwks URI
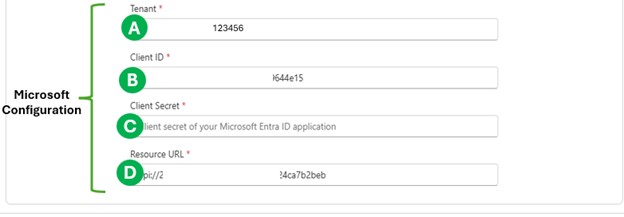
Once complete, you should have:
-
Tenant ID
<TENANT_ID>(A) - OAuth Client ID (B)
- Client Secret (C)
- OAuth Resource URL (D)
1.1 Register “Snowflake OAuth Resource” in Azure/Entra ID
- Go to Azure Portal → App registrations → New registration
-
Name it something like ‘Snowflake OAuth Resource’
- Use “Single-tenant” (or as appropriate)
- After clicking “Register”, go to Expose an API
-
Click “Add” next to Application ID URI
- An Application ID URI will be created for you (e.g.,
api://<GUID>) - Click Save and copy this URI
- This becomes the “Resource URL”
<SNOWFLAKE_APPLICATION_ID_URI>(D)
- An Application ID URI will be created for you (e.g.,
-
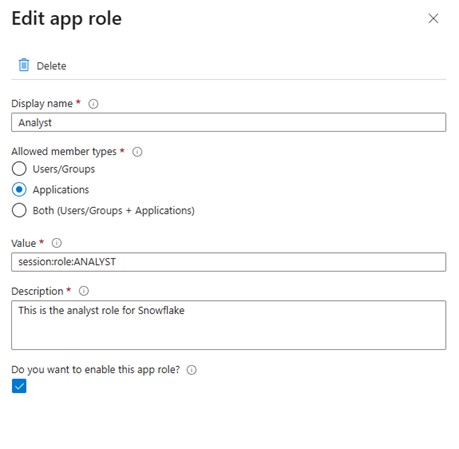
Access the “App Roles” section from the left navigation bar
- Define an application role that aligns with the Snowflake “ANALYST” role intended for later creation in Snowflake as we will see in the next section or select an existing Snowflake role if one is already available.
- When a user signs in, their access token includes their assigned role
- Snowflake checks this role to determine data access (e.g., scope
session:role:ANALYST) - Use the information from the screenshot below to fill in the role details or select the details that match your specific role.
App Role Configuration:
- Go to “Overview” → Endpoints tab
- Copy the “OAuth 2.0 Token endpoint (v2)” value and save it
1.2 Register “Snowflake OAuth Client” in Azure/Entra ID
-
Go to Azure App registrations → New registration
- Name: e.g., ‘Snowflake OAuth Client’
-
Copy the Client ID
- This is Client ID
<OAUTH_CLIENT_ID>(B)
- This is Client ID
-
Under Certificates & secrets → Create a Client secret
- Save this as Client secret
<OAUTH_CLIENT_SECRET>(C)
- Save this as Client secret
-
Under API permissions → Add permission → “APIs my organization uses”
- Type/select the “Snowflake OAuth Resource” you created
- Choose permissions
- For service-principal (app-only) flow, set as Application permissions
- Then grant admin consent
-
Navigate to the Overview page of App registration
- Copy the “Directory (tenant) ID”
- This is the Tenant ID
<TENANT_ID>(A)
⚠️ Almost There! We’re nearly finished with the hardest part — just one more step to complete the Microsoft Azure configuration.
1.3 Gather Necessary Metadata from Azure
We need to collect the “Sub” or “Subject ID” generated by the OAuth client in Azure. This <AZURE_Sub> will serve as the username for the new Snowflake user authentication.
To obtain the “Sub” ID, Execute the following in PowerShell, replacing placeholders <Place_Holder with your actual values
1
2
3
4
5
6
7
8
9
10
11
12
13
14
15
16
17
18
19

# ---- Inputs ----
$TenantId = "<TENANT_ID>"
$ClientId = "<OAUTH_CLIENT_ID>"
$ClientSecret = "<OAUTH_CLIENT_SECRET>"  # Ensure NO leading/trailing space
$Scope = "api://$ClientId/.default"  # Use /.default for client_credentials

# ---- Request ----
$TokenUrl = "https://login.microsoftonline.com/$TenantId/oauth2/v2.0/token"
$Body = @{
    client_id     = $ClientId
    client_secret = $ClientSecret
    grant_type    = "client_credentials"
    scope         = $Scope
}

$TokenResponse = Invoke-RestMethod -Method Post -Uri $TokenUrl -Body $Body -ContentType "application/x-www-form-urlencoded"

# ---- Result ----
$TokenResponse | Format-List
If successful, a long token should appear in your command shell window.
eyJ0eXAiOiJKV3QiLCJhbGciOiJSUzI1NiIsIng1dCI6…
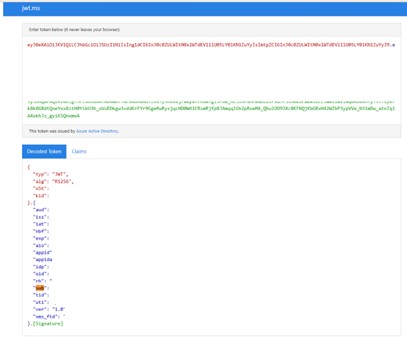
Decode the Token:
- Copy the token
- Visit https://jwt.ms
- Paste it and click “Decode Token”
- Find and copy the value of “Sub”
- Save it as
<AZURE_Sub>
Azure Configuration Summary
Here’s a template for the IDs you should have captured:
| Key Name | Description | Where Used in Snowflake | Actual Value |
|---|---|---|---|
<TENANT_ID> |
Azure Tenant ID | Referenced across various configuration parameters in Snowflake | |
<AZURE_Sub> |
Sub ID extracted from JWT token | Login name for the new Snowflake Copilot user | |
<SNOWFLAKE_APPLICATION_ID_URI> |
Azure resource ID | Provided as one of the entries in the Snowflake External OAuth Audience List |
Step 2: Configure Snowflake
Login to your Snowflake with your admin account or with a user that has admin privileges.
Retrieve Snowflake Configuration Parameters

-
Snowflake SaaS URL
- Select “Account Admin” icon from the left control pane
- Click on your username at the bottom left corner
- Choose “Connect a tool to Snowflake”
- Select “Account/Server URL”
- Copy the Account/Server URL
-
Database Name
- Navigate to left pane → “Catalog” → “Databases”
- Copy the name of your desired database
-
Warehouse Name
- Go to left pane → “Compute” → “Warehouses”
- Copy the appropriate warehouse name
-
Schema Name
- Use left pane → Catalog → Select your database
- Identify and copy the required schema name where tables reside
-
Role
- You must assign an existing role or create a new role
- The role must have necessary access rights to warehouse, database, and schema
- In this guide, we’ll create a new role named “ANALYST”
Snowflake — User / Role / Security Integration Configuration
Create Snowflake User for Copilot/OAuth
Go to “Projects” → “Workspaces” and create a new SQL window.
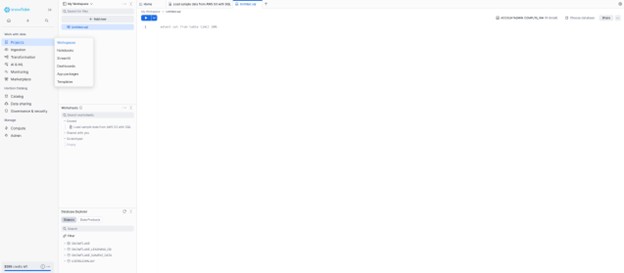
Copy and paste the SQL below after replacing <AZURE_Sub> with your actual Sub ID:
1
2
3
4

CREATE USER COPILOT_OAUTH_USER
    LOGIN_NAME = '<AZURE_Sub>'  -- Sub ID from JWT token
    DISPLAY_NAME = 'Snowflake OAuth User'
    COMMENT = 'Copilot OAuth user';
This ensures there is a matching Snowflake identity for the external-OAuth subject.
Create Analyst Role
Execute the following SQL in Snowflake:
1
2
3
4
5
6
7
8
9

CREATE ROLE ANALYST;

GRANT ROLE ANALYST TO USER COPILOT_OAUTH_USER;

ALTER USER COPILOT_OAUTH_USER SET DEFAULT_ROLE = ANALYST;

GRANT USAGE ON WAREHOUSE COMPUTE_WH TO ROLE ANALYST;

GRANT IMPORTED PRIVILEGES ON DATABASE SNOWFLAKE_SAMPLE_DATA TO ROLE ANALYST;
You can grant the analyst role access to any warehouse, database, or table you choose.
Create Security Integration
Set up security integration with Copilot Studio by activating external OAuth integration.
Replace all placeholders <Place_Holder> with actual values and execute:
1
2
3
4
5
6
7
8
9
10
11
12
13
14
15
16
17
18
19

CREATE OR REPLACE SECURITY INTEGRATION COPILOT_EXTERNAL_OAUTH_AZURE
    TYPE = EXTERNAL_OAUTH
    ENABLED = TRUE

    -- IdP / Azure AD specifics
    EXTERNAL_OAUTH_TYPE = AZURE
    EXTERNAL_OAUTH_ISSUER = 'https://sts.windows.net/<TENANT_ID>/'
    EXTERNAL_OAUTH_JWS_KEYS_URL = 'https://login.microsoftonline.com/<TENANT_ID>/discovery/v2.0/keys'

    -- Audience (the "api://" application ID URI that tokens are issued for)
    EXTERNAL_OAUTH_AUDIENCE_LIST = ('api://<SNOWFLAKE_APPLICATION_ID_URI>')

    -- How Snowflake finds the user in the token
    EXTERNAL_OAUTH_TOKEN_USER_MAPPING_CLAIM = 'sub'
    EXTERNAL_OAUTH_SNOWFLAKE_USER_MAPPING_ATTRIBUTE = 'LOGIN_NAME'

    -- Role behavior: allow any role requested in the token
    -- (you can tighten this later if needed)
    EXTERNAL_OAUTH_ANY_ROLE_MODE = 'ENABLE';
Step 3: Add Snowflake as a Knowledge Source in Copilot Studio
Once Snowflake + Azure side is configured and tested, you can integrate with Copilot Studio.
Configuration Steps:
- Open Copilot Studio, sign in, and go to create or edit your agent
-
Under the agent’s settings, choose “Add knowledge source / connection”
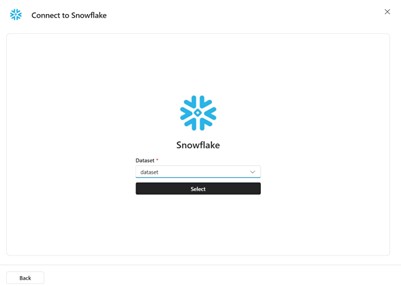
- Select Snowflake
-
When prompted, supply all the connection details you previously prepared:
- Tenant ID (A)
- Client ID (B)
- Client Secret (C)
- Resource URL (D)
- Snowflake SaaS URL
- Database name
- Warehouse name
- Schema name
- Role
- Save the connection
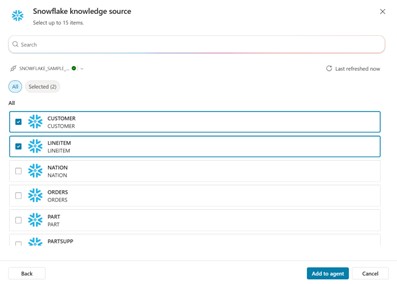
- Copilot Studio will use this connection to query Snowflake tables in real-time
- You can choose the dataset and table names to add as knowledge sources
User Permission
When Snowflake is initially utilized as a Knowledge source, users will be prompted to grant permission for connection creation.
Using the Connection
At this point, you can add tools or knowledge-based prompts to your agent so it can read from Snowflake — for example:
- Answering natural-language queries
- Generating reports
- Combining data with other sources
Troubleshooting & Common Pitfalls
1. Warehouse Status
While it’s not strictly required, if your Snowflake data warehouse instance is suspended when you attempt to create the connection for the first time, it might not automatically restart.
Solution: Make sure your configured warehouse instance is running before creating the initial connection.
2. User Login Name Mismatch
Make sure that the Snowflake user you map (via login_name) matches exactly the Sub claim from the JWT.
Example: Your Snowflake user must have LOGIN_NAME = <sub value>
3. Role Privileges
The Snowflake role assigned to the user should have proper privileges:
- Warehouse access
- Database access
- Schema access
- SELECT or other necessary rights
- Default role/warehouse/database/schema should be set
Without these, even a valid connection may fail.
4. Verification Queries
A variety of helpful Snowflake queries are available under the “SQL Commands” tab when you select “Connect a tool to Snowflake”. These queries can verify:
- Created/existing users
- Roles
- Security integration links
Example queries accessible from: Home → Connect a tool to Snowflake → SQL Commands
Conclusion
By following this comprehensive guide, you’ve successfully connected Snowflake to Copilot Studio, enabling your agents to query live data through natural language. This integration allows you to:
- ✅ Access real-time data without ETL pipelines
- ✅ Ground agent knowledge in Snowflake tables
- ✅ Enable natural-language queries on your data
- ✅ Generate reports and analytics through conversational AI
The connection can be used both as a knowledge source (for seamless grounding) and as a tool (for explicit orchestration).