From DEV to PROD: Auto-Install and Pinning for Copilot Studio Agents
Master the three deployment paths for Copilot Studio agents in Teams. Learn how to customize manifests for DEV/TEST environments and leverage Setup Policies for automated production rollouts with auto-install and pinning.
The Identity Crisis
You’ve built a Copilot Studio agent and promoted it across environments via solution export/import: DEV, TEST, PROD. You deploy each one to Teams. Your developers and testers open Microsoft Teams and see three identical blue icons, all named “Support Agent.”
Which one is production? Which one is the DEV instance they’re supposed to be testing?
Nobody knows.
This isn’t a discoverability problem, it’s an ALM (Application Lifecycle Management) problem. Copilot Studio’s 1-click deploy to Teams generates the same name, same icon, same description, and same manifest regardless of which environment the agent lives in.
The solution? Environment-based deployment strategies that differentiate your agents and give you precise control over distribution, auto-installation, and pinning in the Teams sidebar.
If you haven’t optimized your agent for Teams yet, start with Deploying Copilot Studio Agents in Teams (Because Test Chat Was Too Easy) for production patterns covering reinstalls, inactivity, error handling, and diagnostic cards.
Why Standard Deployment Falls Short
Copilot Studio’s 1-click deploy to Teams works great for single-environment scenarios. Click “Add to Teams,” publish, and you’re done. But it doesn’t account for:
- Environment differentiation - DEV, TEST, and PROD agents look identical
- Teams app distribution - Sharing in Copilot Studio controls who can chat with the agent, but it doesn’t control the Teams app itself: who sees it, where it’s pinned, or whether it auto-installs
- Professional rollouts - No auto-install or pinning capabilities
The root cause? The Teams app manifest generated by Copilot Studio is environment-agnostic. It doesn’t know about DEV, TEST, or PROD.
Understanding the Three Deployment Paths
There are three distinct deployment paths for Copilot Studio agents in Teams, depending on who performs the action (maker vs admin) and the level of governance required.
Deployment Path Comparison
| Aspect | Option 1: Direct Install | Option 2: Maker Submission | Option 3: Admin-Led |
|---|---|---|---|
| Best For | Development, testing | Controlled rollout, QA | Production, maximum control |
| Governance | Low | Medium | High |
| Speed | Fastest | Moderate | Slower |
| Approval | None | Admin required | Admin controlled |
| Initiator | User or maker | Maker | Admin |
| Auto-Install | No | Yes (after admin approval) | Yes |
| Pinning | No | Yes (after admin approval) | Yes |
| Manifest Control | Full (sideloading) | Limited | Full |
Let’s examine each path in detail.
Option 1: Direct Install (User-Level)
Best for: Development, testing, limited distribution Governance Level: Low • Speed: Fastest • Approval: None
Both methods below are sideloading, which requires custom app policies to be enabled in your tenant.
If sideloading is disabled, users won’t see the “Upload a custom app” option, and the “See agent in Teams” flow may also be blocked depending on your org’s app permission policies.
Method A: From Copilot Studio (“See agent in Teams”)
- Click “See agent in Teams” in Copilot Studio
- Opens the sideloading experience directly in Teams
- Agent uses default name and icon from Copilot Studio settings
- No manifest customization in this method
Method B: Manual Upload
- Download manifest .zip from Copilot Studio
- Customize manifest (name, icons, colors)
- Upload via Teams → Apps → “Upload a custom app”
- Recommended for DEV with custom branding
In both cases, to share the agent with others you’ll need to send them a link to the app. There’s no org-wide distribution with this path.
Option 2: Maker Submission (Approval Workflow)
Best for: Controlled rollout, QA validation, TEST environment Governance Level: Medium • Speed: Moderate • Approval: Admin required
A maker publishes the agent from Copilot Studio using “Submit to your org”.
How It Works:
- In Copilot Studio → Channels → Microsoft Teams
- Click “Submit to your org”
- Creates a request for Teams admin (no immediate deployment)
- Admin reviews and approves the app before it becomes available
- Once approved, appears in org app catalog
Characteristics:
- Formal approval workflow
- App properties (name, icons, colors) configured in Copilot Studio
- Maker-initiated, admin-approved
- No direct editing of .zip manifest in this flow
- Once approved, admin can configure auto-install and pinning via Setup Policies (same as Option 3)
This is the standard governed path for maker-led deployments. It provides a balance between maker autonomy and administrative oversight. And unlike Option 1, once the app is in the org catalog the admin has access to the same auto-install and pinning capabilities as Option 3.
Documentation: Show agent in Teams app store
Option 3: Admin-Led Deployment (Manual Upload)
Best for: Production rollouts, maximum control, auto-install + pinning Governance Level: High • Speed: Slower • Approval: Admin controlled
This is the hero deployment path for production environments. A Teams admin uploads and deploys the app directly via the Teams Admin Center, unlocking powerful distribution features.
How It Works:
- Maker downloads the Teams app manifest (.zip) from Copilot Studio
- Optional: Modify the manifest before upload (name, icons, colors, version)
- Admin uploads to Teams Admin Center → Manage apps
Admin Capabilities:
- Deploy org-wide or to specific security groups
- Pin the app using setup policies (appears in sidebar automatically)
- Auto-install for target user groups (no manual action required)
- Full control over availability and deployment timing
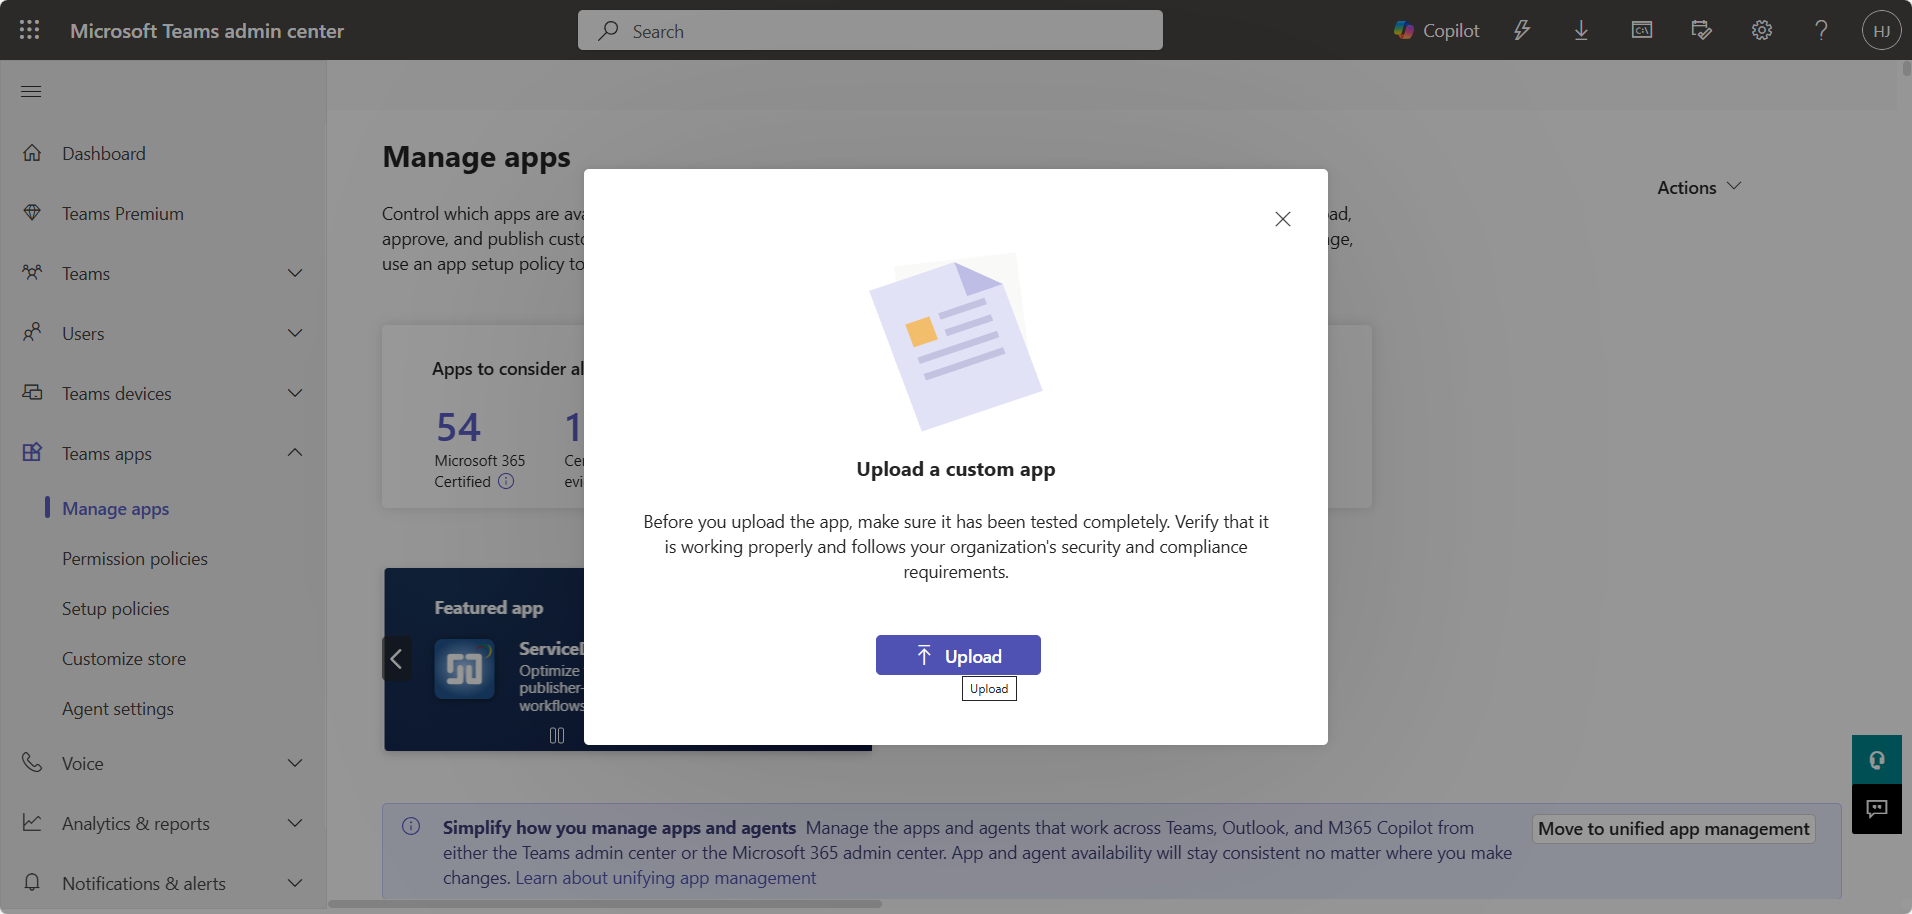 Teams Admin Center - Upload custom app dialog
This is the most controlled and scalable option for production rollouts. The ability to auto-install and pin apps transforms the user experience—instead of asking users to search for and install your agent, it simply appears in their Teams sidebar, ready to use.
Documentation:
Manifest Customization for DEV and TEST
For DEV and TEST environments, you’ll customize the Teams app manifest to differentiate from production. This prevents confusion and makes it immediately obvious which environment users are working with.
Step 1: Download the Manifest
- In Copilot Studio, go to Settings → Channels
- Select Microsoft Teams
- If not added, click “Add channel” and publish
- Go to Settings → Channels → Microsoft Teams → Availability options
- Click “Download manifest” (downloads a .zip file)
The manifest .zip file is your deployment package. For DEV/TEST, you’ll customize it before upload. For PROD with auto-install/pinning, use Option 3 (admin-led deployment).
Step 2: Extract and Review
Extract the .zip file. You’ll find three files:
1
2
3
4

manifest.zip/
├── manifest.json      # App configuration
├── color.png          # Full-color icon (192x192 px)
└── outline.png        # Outline icon (32x32 px)
Step 3: Customize for Your Environment
The manifest.json file contains all the metadata Teams uses to display your agent. Here’s what to customize:
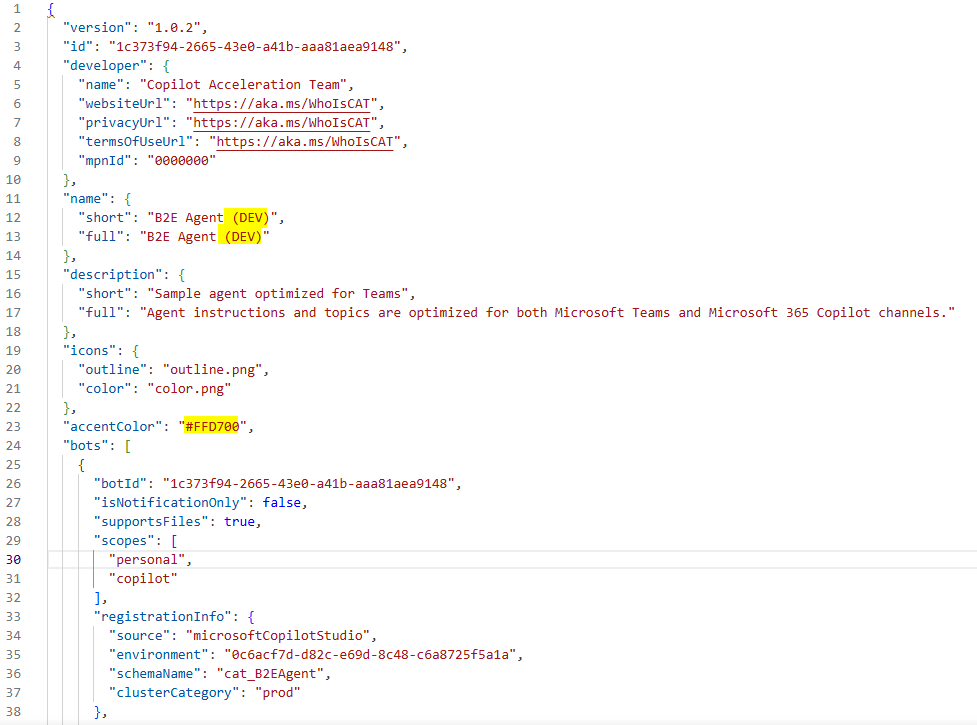 manifest.json showing “(DEV)” suffix and custom accent color
1
2
3
4
5
6
7
8
9
10
11
12

{
  "name": {
    "short": "B2E Agent (DEV)",
    "full": "B2E Agent - Development Environment"
  },
  "description": {
    "short": "Sample agent optimized for Teams",
    "full": "Agent instructions and topics are optimized for both Microsoft Teams and Microsoft 365 Copilot channels."
  },
  "accentColor": "#FFD700",
  "version": "1.0.2"
}
Key changes:
- Add
(DEV)suffix to short name - Custom accent color (yellow/gold for DEV)
- Incremented version number
For the full list of manifest properties you can customize (developer info, icons, permissions, etc.), see the Microsoft 365 app manifest schema reference.
Step 4: Repackage
- Select all three files (manifest.json, color.png, outline.png)
- Compress to a new .zip file
- Important: Files must be at the root level, not in a subfolder
Files must be at root level of the .zip, not nested in a subfolder. Teams will reject improperly structured packages.
Verify structure:
1
2
3
4

manifest_dev.zip/
├── manifest.json
├── color.png
└── outline.png
Sharing Configuration in Copilot Studio
Before deploying, ensure your agent is shared with the right users in Copilot Studio.
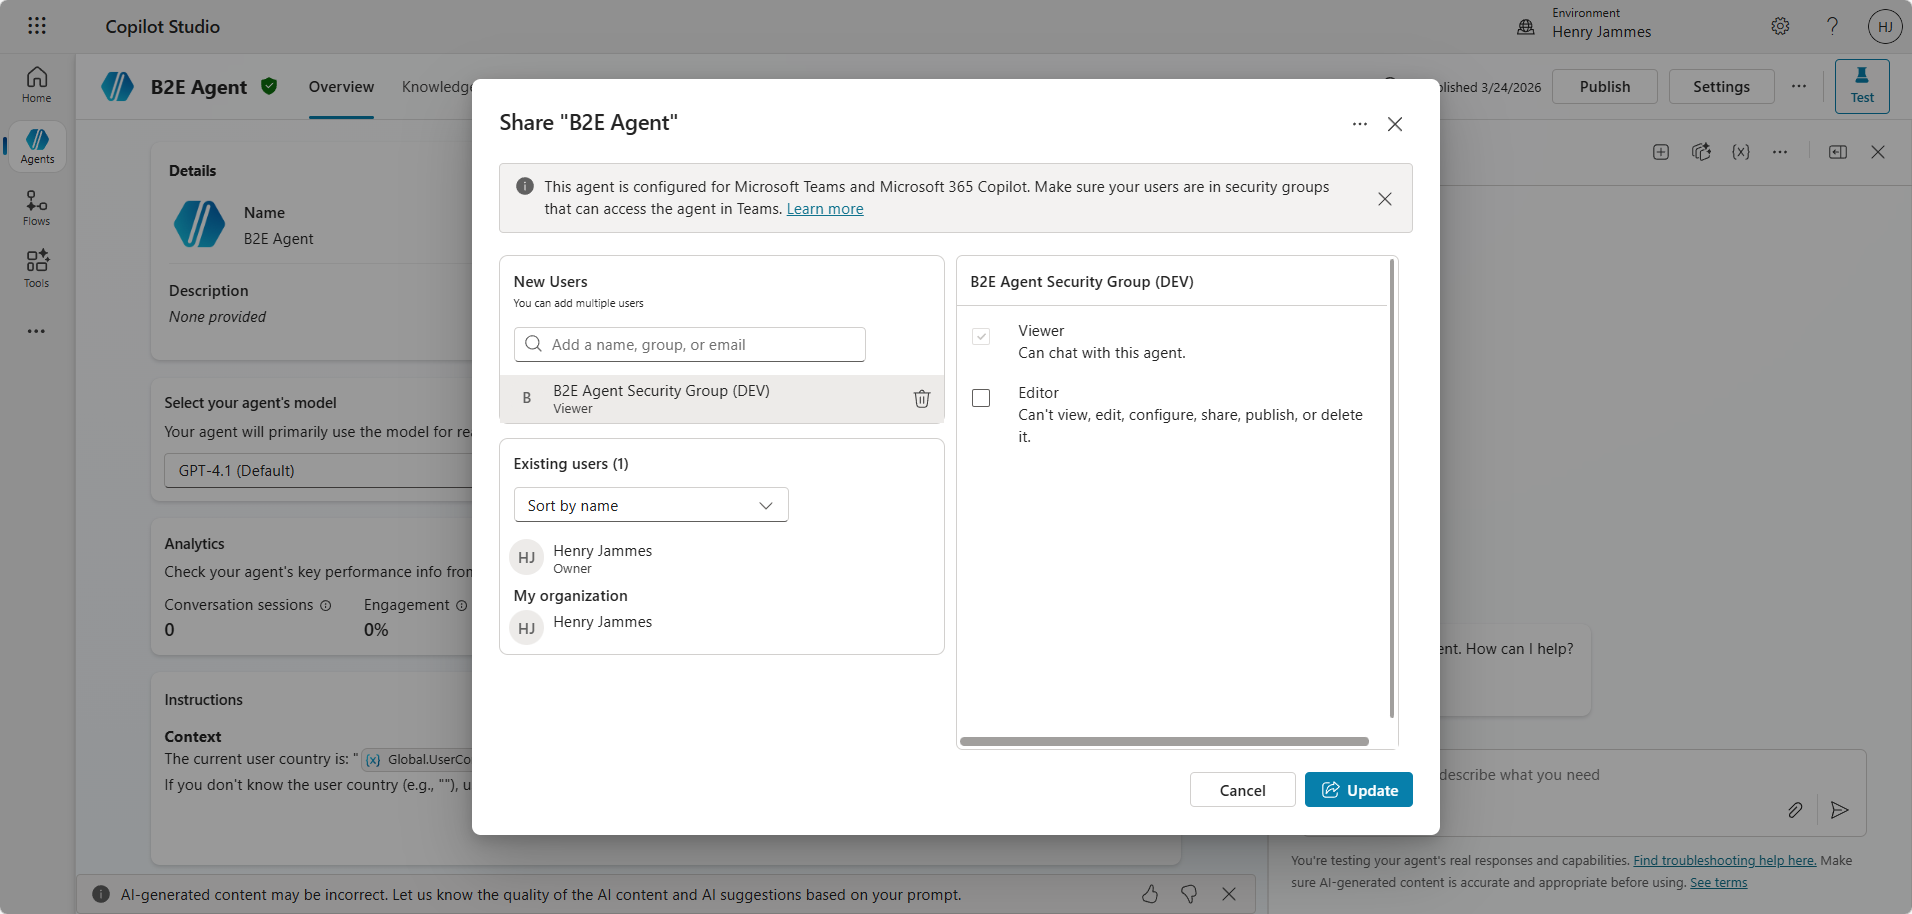 Copilot Studio - Sharing agent with security group
Recommended: Use Security Groups
Create Entra ID security groups for each environment:
-
B2E Agent Security Group (DEV)- Makers, developers -
B2E Agent Security Group (TEST)- QA team, stakeholders -
B2E Agent Security Group (PROD)- All end users
Configure in Copilot Studio
- Settings → Security → Share
- Select Specific people or groups
- Add the appropriate security group
- Set permission level (“Viewer” for end users)
When publishing to the organizational app catalog, sharing must be set to “Everyone in my organization” for admins to see and approve the app. Admins can still limit exposure through Teams Admin Center and M365 Admin Center policies.
The Production Magic: Auto-Install and Pinning
Here’s where Option 3 (Admin-Led Deployment) truly shines. Setup Policies in the Teams Admin Center enable auto-install and pinning, transforming your agent from “something users need to find” to “something that’s already there.”
With auto-install and pinning, you configure the policy once and the agent appears automatically for target users. No installation instructions, no support tickets.
Step 1: Configure Availability
Admin goes to Teams Admin Center:
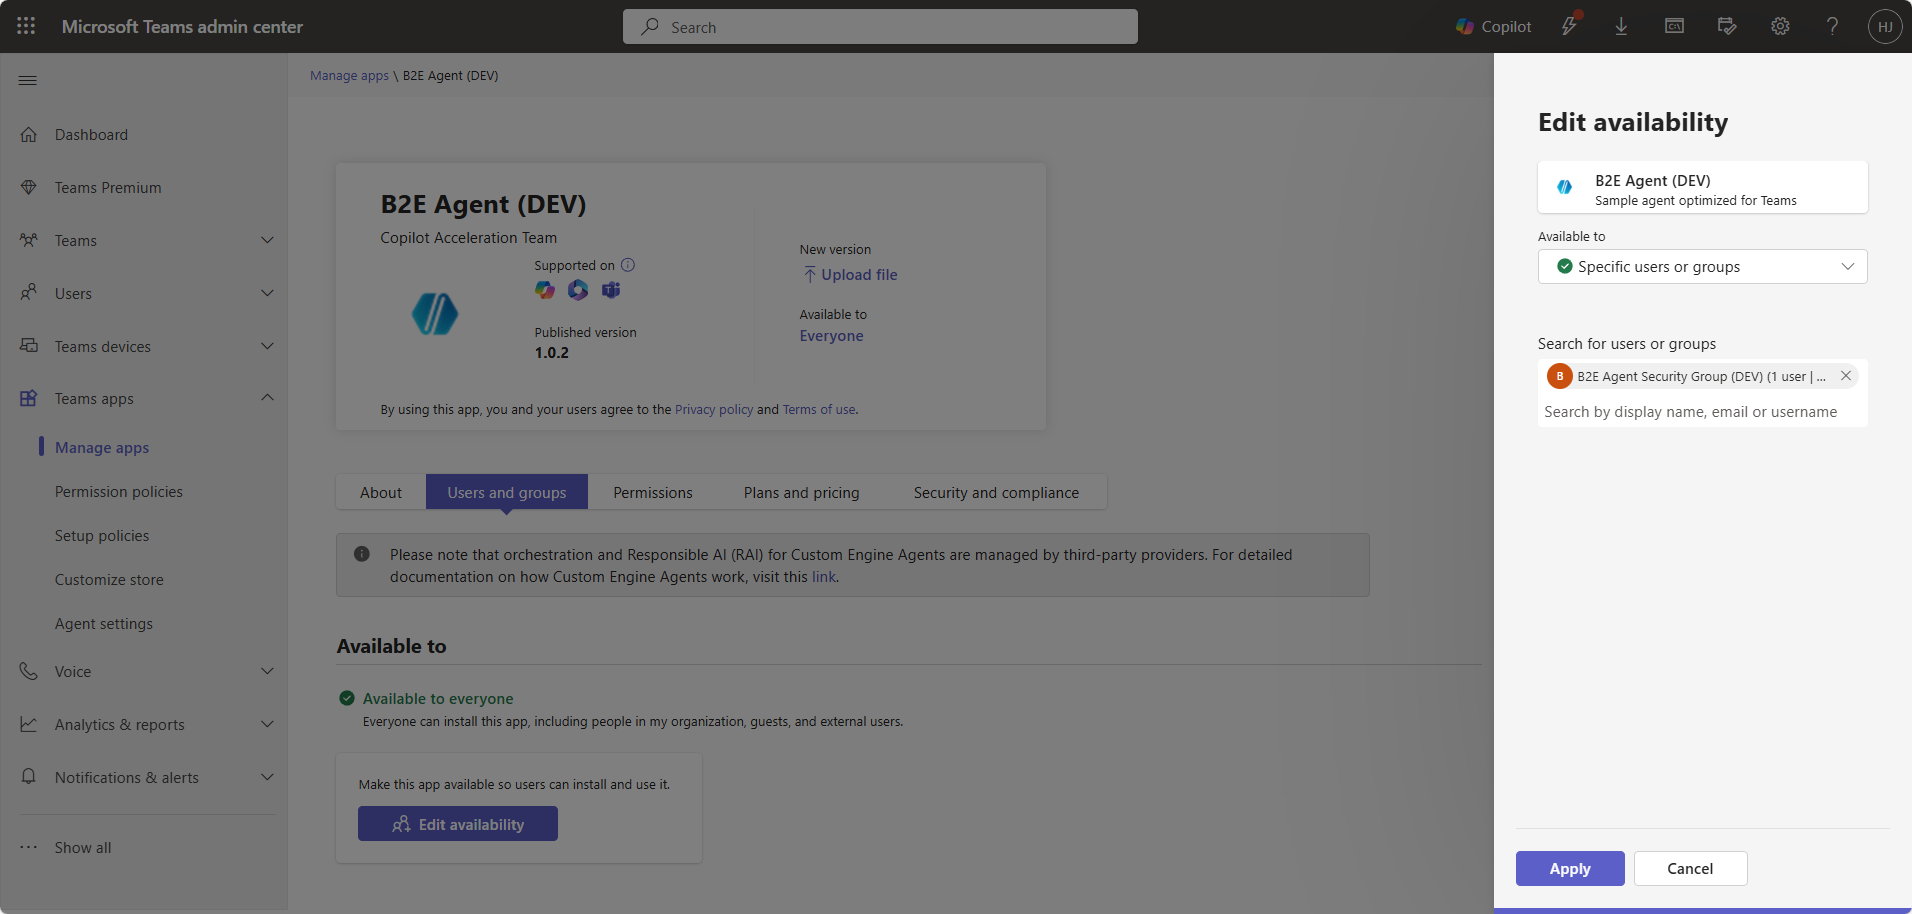 Teams Admin Center - Edit availability to target security groups
Availability Configuration:
- Teams Admin Center → Teams apps → Manage apps
- Find and click the uploaded app
- Click “Users and groups” tab or “Edit availability”
- Select “Specific users or groups”
- Add target security group (e.g., “B2E Agent Security Group (PROD)”)
- Apply
This controls who can see and install the app.
Step 2: Create Setup Policy for Auto-Install and Pinning
This is the key step that enables automated deployment.
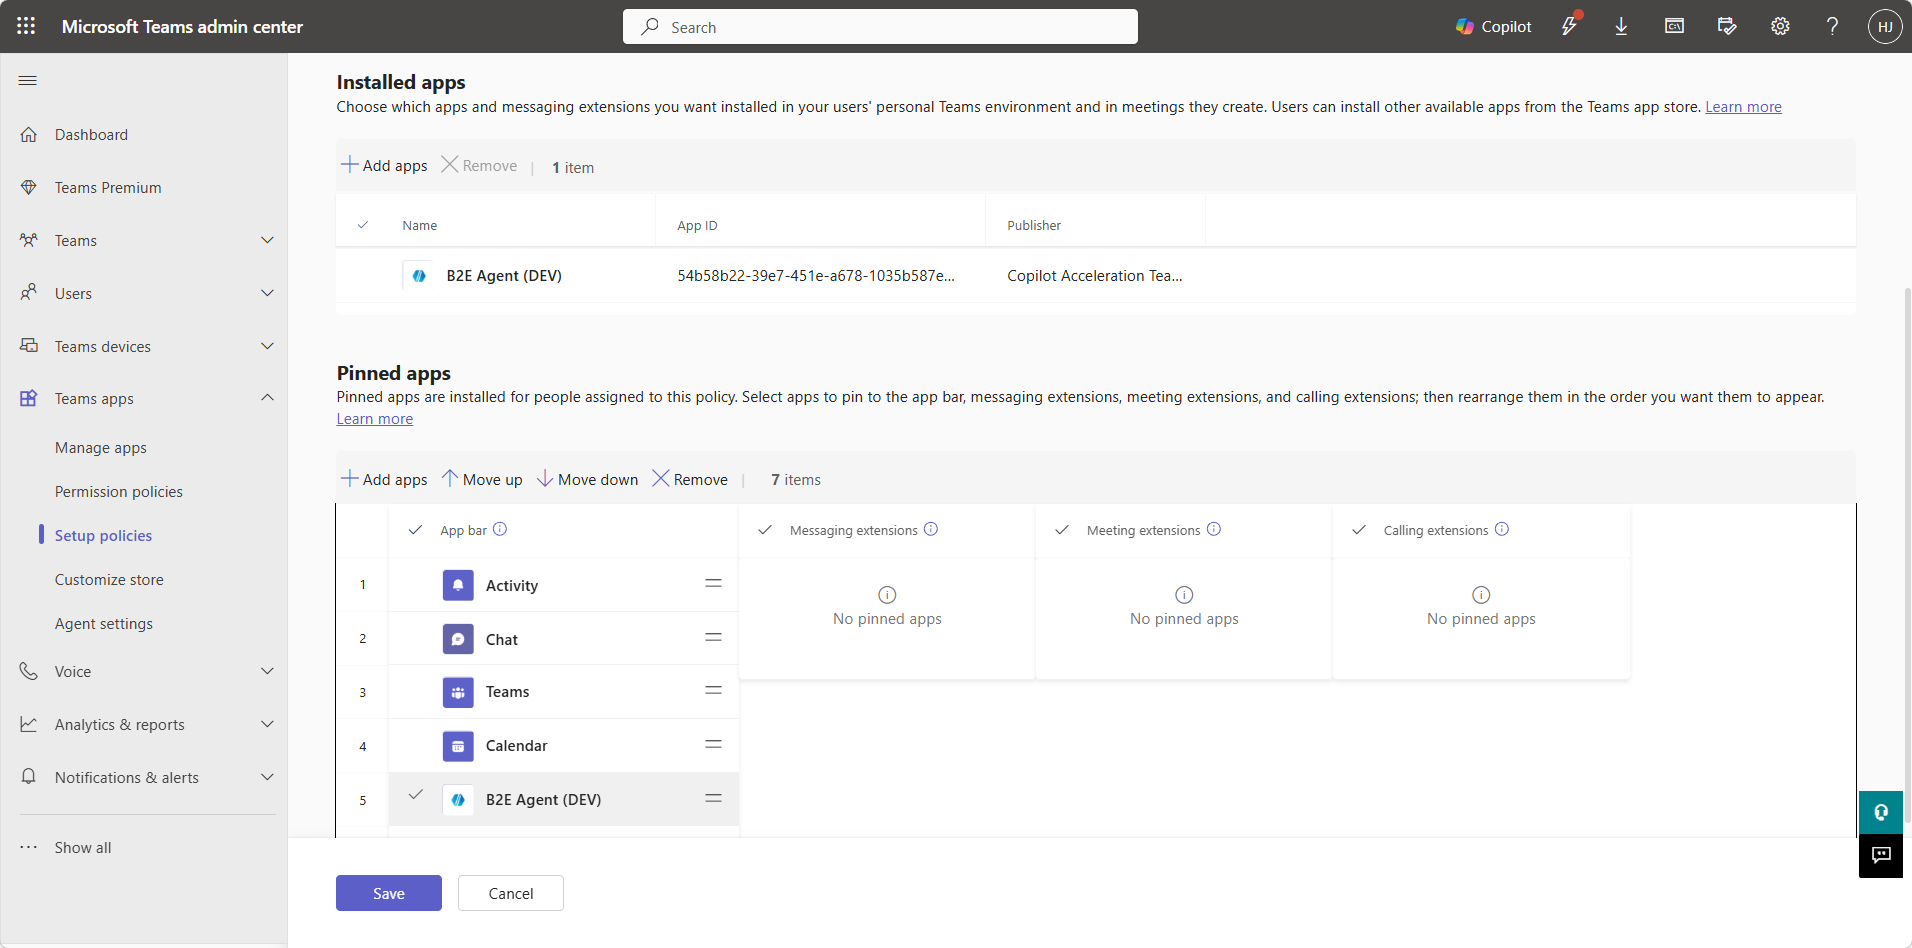 Setup policy showing auto-install (Installed apps) and pinning (Pinned apps) configuration
Setup Policy Creation:
- Go to Teams apps → Setup policies
- Click “Add” to create new policy
- Policy name: “B2E Agent Auto-Install”
-
Installed apps section:
- Click “Add apps”
- Search for “B2E Agent”
- Select it → Click Add
- This enables auto-installation (no user action required)
-
Pinned apps section:
- Click “Add apps”
- Search for “B2E Agent”
- Select it and set position (e.g., position 5)
- Click Add
- This pins the app in the sidebar
- Save the policy
The “Installed apps” section auto-installs the agent. The “Pinned apps” section puts it in the sidebar at your specified position.
Step 3: Assign Policy to Target User Groups
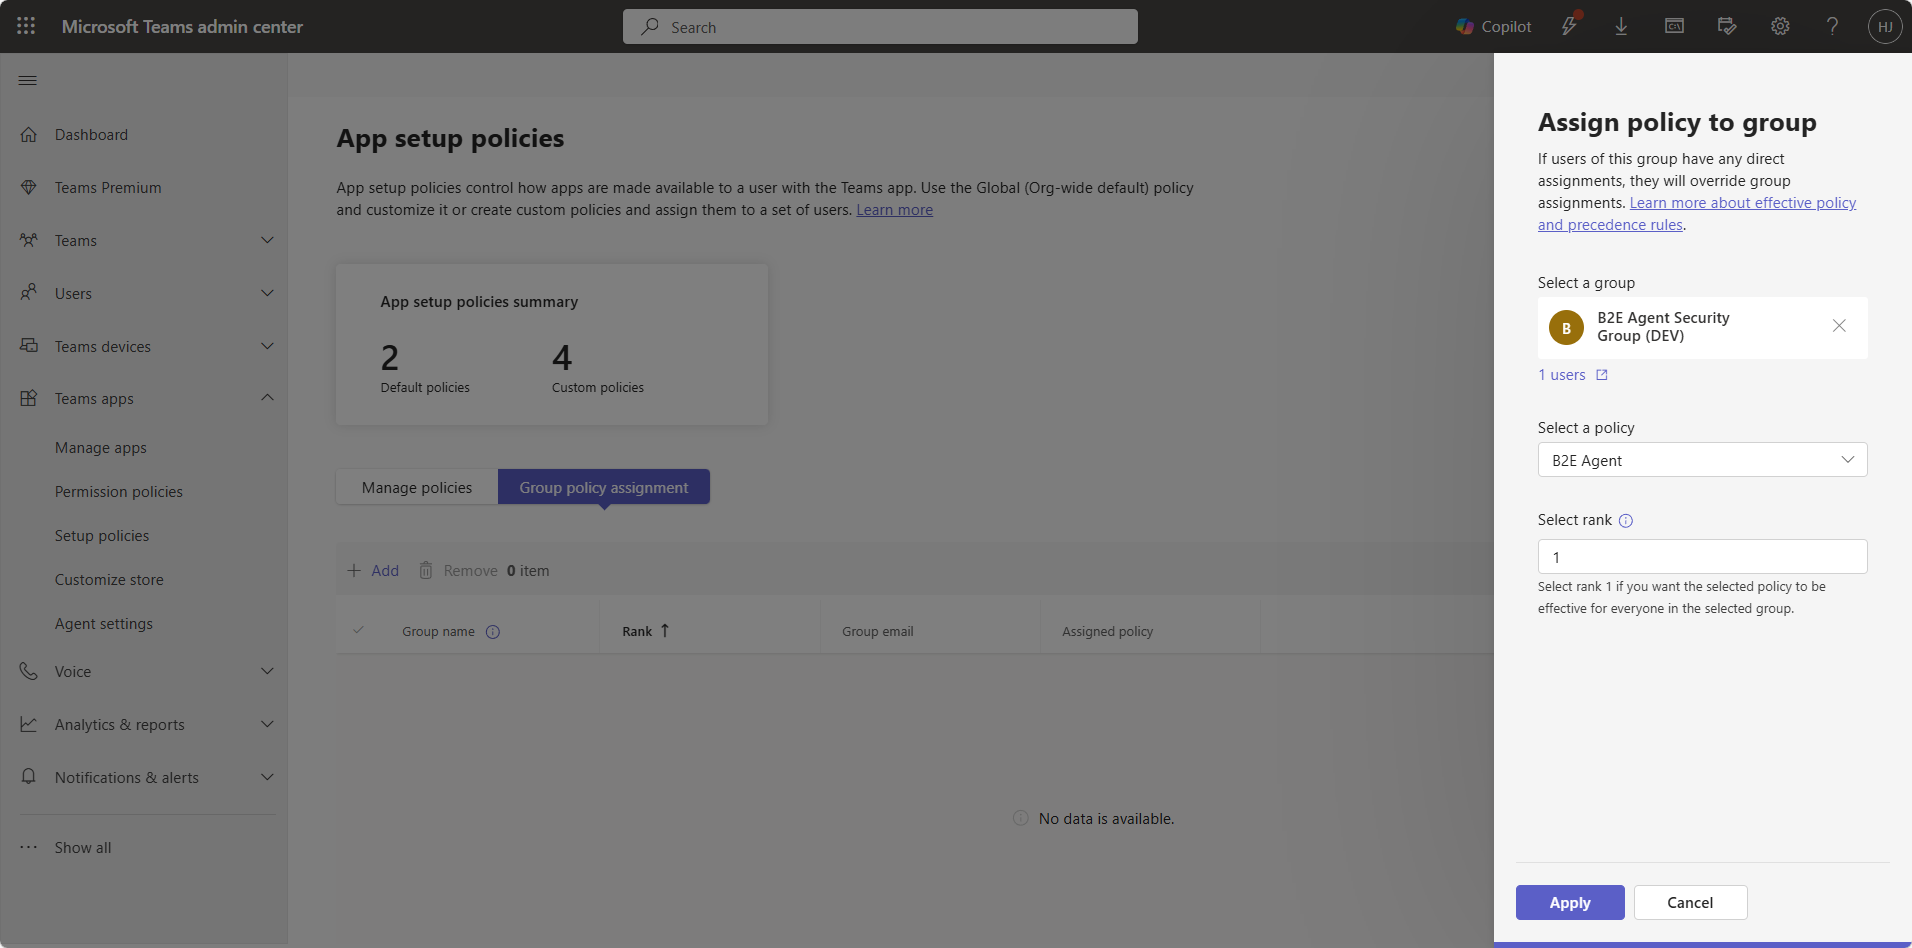 Assigning setup policy to B2E Agent Security Group (DEV)
Policy Assignment:
- Still in Setup policies, select your policy
- Click “Group policy assignment” (recommended over individual assignment)
- Select target security group (e.g., “B2E Agent Security Group (PROD)”)
- Set ranking (if multiple policies exist)
- Apply
Propagation: May take up to 24 hours for full rollout. Users can sign out and back in to Teams to speed up installation.
The User Experience
From the user’s perspective:
- User belongs to “B2E Agent Security Group (PROD)”
- Policy propagates (or they sign out/in)
- Teams client refreshes
- Agent appears pinned in the sidebar at the configured position
- Zero user action required
This is professional, enterprise-grade deployment. No training required, no support tickets, no confusion.
Deploying to Microsoft 365 Copilot
Agents can be made available in Microsoft 365 Copilot alongside Teams.
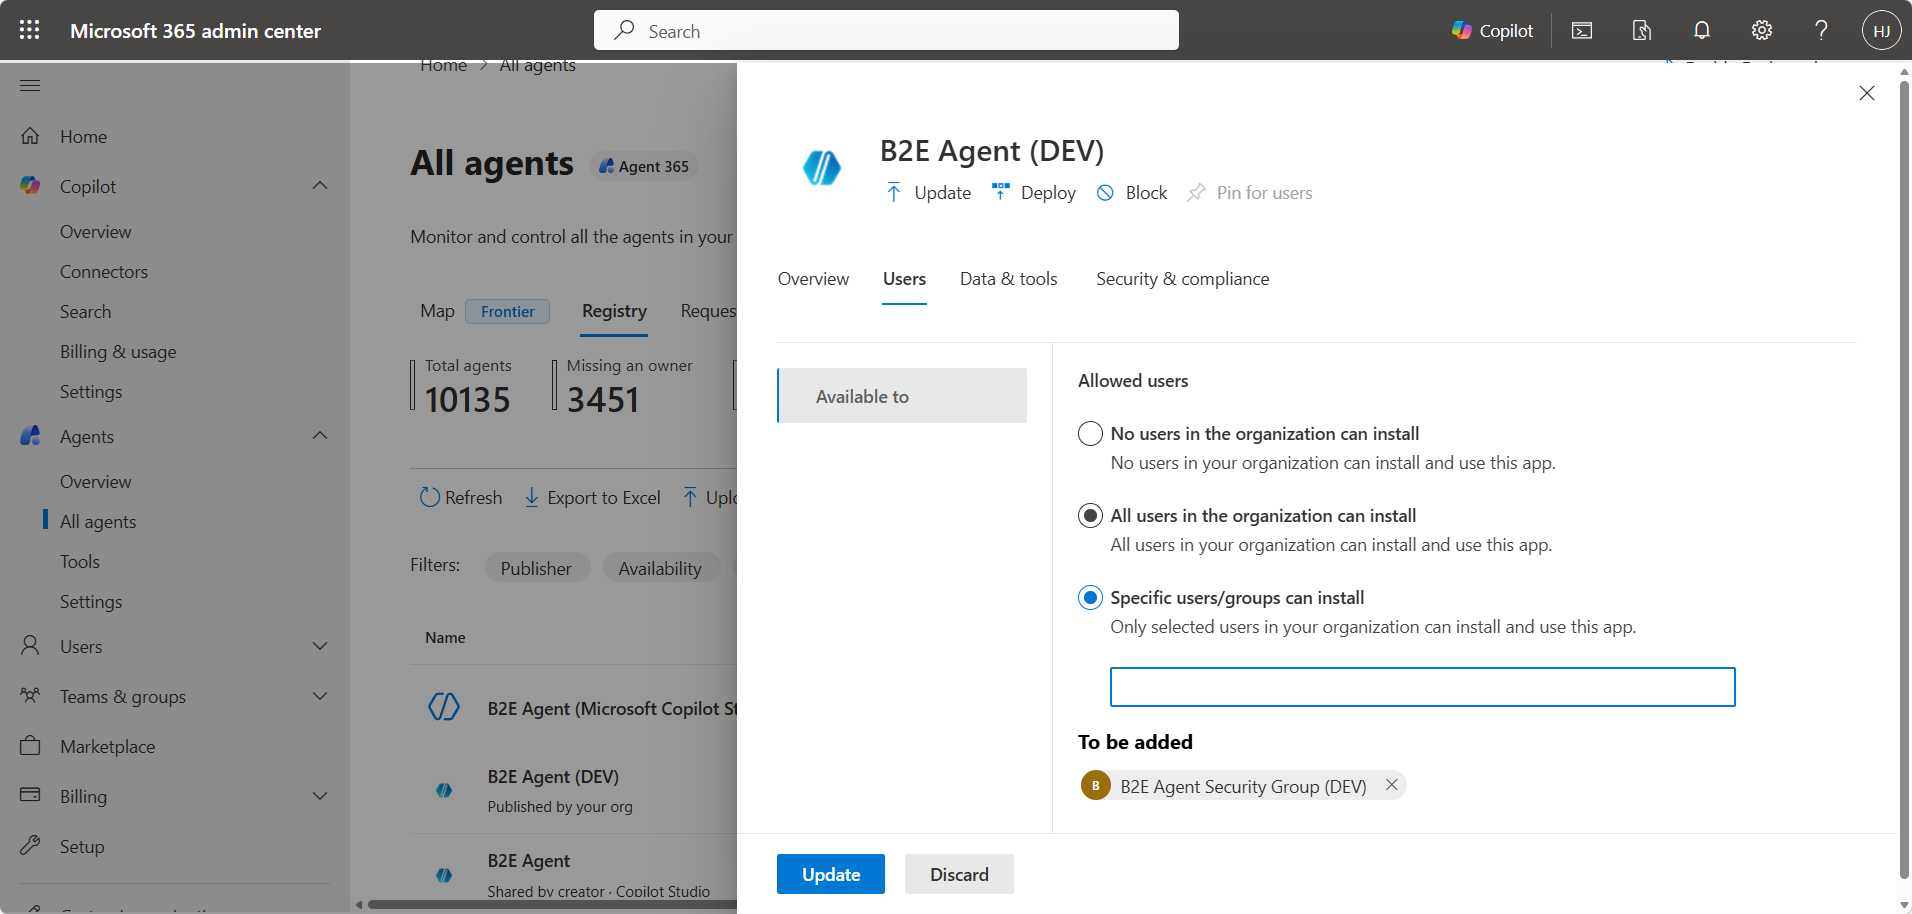 M365 Admin Center - Agent availability with specific users/groups option
M365 Copilot Deployment:
-
Access M365 Admin Center
- Work with a Microsoft 365 admin
- Navigate to Settings → Integrated apps → Agents
-
Configure Agent Availability
- Find your agent in the agent registry
- Click to open agent details
- Go to “Available to” tab
- Select Specific users/groups (recommended)
- Add target security group
- Update
-
Deploy and Pin (Optional)
- Deploy option: Auto-deploy to target users
- Pin for users option: Agent appears in M365 Copilot’s agent picker
The M365 Admin Center offers similar distribution controls to Teams, ensuring consistent governance across both channels.
Teams and Microsoft 365 Copilot are inherently different channels with different runtime behaviors. Don’t assume that because your agent evaluates well in one channel, it will behave the same in the other. Test and validate in both channels independently.
Documentation: Agent Registry in M365 Admin Center
Updating Agents: Runtime vs. Manifest Changes
Understanding update types is crucial for efficient operations.
Runtime Updates (No Manifest Changes)
What: Changes to agent behavior (orchestration, instructions, knowledge, actions, topics)
Process:
- Make changes in Copilot Studio
- Click Publish
- Changes push automatically to all deployed channels
- No redeployment needed
Timeline: Updates appear within minutes
This is the beauty of Copilot Studio’s architecture. Behavioral changes deploy instantly across all environments without touching manifests or admin centers.
Manifest Updates (Name, Icon, Description, Version)
What: Changes to how the app appears in Teams
Process:
- Update
manifest.jsonand increment version number - Update icons if needed
- Repackage as .zip
- Upload to Teams Admin Center as new version
- Teams recognizes higher version number as an upgrade
Version number must be higher for Teams to recognize it as an upgrade. Use semantic versioning: 1.0.0 → 1.0.1 (patch), 1.1.0 (minor), 2.0.0 (major).
Production Deployment Checklist
Use this checklist for every production deployment:
Expand Full Production Checklist
Pre-Deployment:
- Agent published in Copilot Studio (PROD environment)
- Agent tested in DEV and TEST environments
- Agent shared with target security group in Copilot Studio
- Manifest downloaded from Copilot Studio
- Manifest reviewed (name, description, icons, version)
Teams Admin Center:
- Manifest uploaded to Teams Admin Center
- App status set to “Allowed”
- App availability configured for target security group
- Setup policy created with descriptive name
- Auto-install enabled in policy (Installed apps section)
- Pinning configured in policy (Pinned apps section, set position)
- Policy assigned to target security group
Validation:
- Verified with test user (signed out/in, app appears pinned)
- Confirmed agent responds correctly in Teams
- Confirmed agent responds correctly in Microsoft 365 Copilot (if applicable — Teams and M365 Copilot behave differently)
- Verified no conflicting setup policies — policies are not cumulative, the highest-ranked group assignment wins
Communication:
- End users notified of new agent availability
- Support team trained on agent capabilities
- Documentation updated with agent details
Final Thoughts
Copilot Studio makes building conversational agents accessible, but production deployment requires strategy. The three deployment paths—Direct Install, Maker Submission, and Admin-Led—each serve distinct governance needs:
- Option 1 gives makers speed and flexibility for development
- Option 2 adds approval workflows for controlled releases
- Option 3 unlocks professional, enterprise-grade distribution with auto-install and pinning
The real differentiator is Setup Policies in Option 3. When you can auto-install and pin agents directly in user sidebars, you transform adoption from “find and install this tool” to “here’s a tool that’s already installed for you.”
Pair this with manifest customization for DEV/TEST environments, and you have a complete ALM strategy: clear environment differentiation during development, governed release processes, and zero-friction production deployment.
What deployment challenges have you faced with Copilot Studio agents? Drop a comment below—I’d love to hear how you’re handling environment strategies and distribution in your organization.
Before you ship to production, Remi Dyon’s best practices for deploying agents in Teams is worth a read for UX-level guidance on conversation design that complements the ALM strategy here. Once the agent is live and users start hitting issues, having a clear story around How to Get Your Conversation ID When Chatting with Agents saves a lot of back-and-forth in support tickets. And if you want a systematic way to validate agent behavior across environments before you promote to PROD, Copilot Studio Kit: Beyond Test Automation covers the test and governance tooling that ties an ALM pipeline together.
Related Resources
Deployment Documentation:
- Install agent in Teams and M365 Copilot
- Upload custom apps
- Show agent in Teams app store
- Teams custom app policies
- Manage app setup policies
Manifest Documentation:
Admin Documentation: