Adding Custom Headers to MCP Connectors in Copilot Studio
Custom Headers in MCP Connectors
The Model Context Protocol (MCP) allows Copilot Studio agents to connect to external servers that provide tools (and prompts as of recently). While MCP connectors in Copilot Studio are built on top of the custom connector framework, adding custom headers requires editing the OpenAPI specification directly - there’s no UI for this yet.
Why Custom Headers?
Custom headers serve different purposes than tool inputs:
-
Tool inputs define the parameters that the AI orchestrator uses to invoke specific MCP tools (like passing a
queryparameter to a search tool) - Custom headers provide server-level context that applies to ALL tool invocations from a given user or session
Common use cases for custom headers in MCP servers include:
- Custom Authentication: Passing API keys, tokens, or credentials that aren’t supported by standard OAuth flows
- User Context: Providing user roles, departments, or permission levels to filter available tools or data
- Feature Flags: Enabling/disabling server capabilities based on user tier or subscription level
The Challenge: No UI Support Yet
As of October 2025, there’s no UI in Power Apps or Copilot Studio to add custom headers to MCP connectors. You must define them directly in your connector’s OpenAPI specification YAML.
This means you need to:
- Edit the OpenAPI YAML specification manually
- Add the custom header parameters in the right location
- Refresh the connector for each agent
Let’s walk through exactly how to do this. But first, an example!
Use Case: A D&D Adventurer’s Guild MCP Server
To understand why custom headers matter, let’s look at a real (or quasi-real?) example: an MCP server that simulates a D&D-style Adventurer’s Guild.
Our server provides tools for managing quests, hiring adventuring parties, and checking your gold balance. Additionally, quest availability is filtered by player level, but player level isn’t something the AI should decide—it’s determined by the user’s guild rank.
Here’s the list_quests tool from our MCP server:
1
2
3
4
5
6
7
8
9
10
11
12
13
14
15
16
17

server.tool(
  "list_quests",
  "List available quests, including ideal classes and needs.",
  {},
  async () => {
    const ctx = getCurrentContext();  // Retrieves player level from request context
    const q = visibleQuests(ctx.level);  // Filters quests based on level
    return {
      content: [
        {
          type: "text",
          text: JSON.stringify({ level: ctx.level, quests: q }, null, 2)
        }
      ]
    };
  }
);
The server stores different quests with varying difficulty levels, so only level-appropriate quests are returned with each tool call:
1
2
3
4
5
6
7
8
9
10
11
12
13
14
15
16
17
18
19
20
21
22
23
24
25
26
27
28

const QUESTS = [
  {
    id: "q1",
    title: "Rat Problem",
    danger: "Easy",
    reward: 10
  },
  {
    id: "q4",
    title: "Crypt of Ashes",
    danger: "Deadly",
    reward: 120
  },
  {
    id: "q5",
    title: "Dragon's Parley",
    danger: "Legendary",
    reward: 300
  }
];

// What each guild rank can see
const QUEST_VIS_BY_LEVEL: Record<Level, Danger[]> = {
  Novice: ["Easy","Medium"],
  Adept: ["Easy","Medium","Hard"],
  Veteran: ["Easy","Medium","Hard","Deadly"],
  Mythic: ["Easy","Medium","Hard","Deadly","Legendary"]
};
Why This Needs a Custom Header
Player level affects what the server returns, and by implication, what the AI orchestrator sees:
- A Novice player calling
list_questsgets back only “Rat Problem” and similar easy quests - A Mythic player gets the full quest catalog, including “Dragon’s Parley”
This is server-level context, not a tool input. Here’s why:
| player level as tool input | player level as custom connector |
|---|---|
| AI could pass any level value | User’s level is verified and consistent |
| Different for each tool call | Same for all tools in the session |
| Each tool needs the parameter | Set once at the connection level |
Now let’s see how to configure this custom header in your MCP connector.
Adding a Custom Header to Your MCP Connector
Microsoft provides detailed documentation on adding MCP servers to Copilot Studio agents. This guide extends that process to include custom headers via OpenAPI specification modifications.
 MCP Configuration Wizard
Step 1: Locate Your Custom Connector
If you’ve already added an MCP connector using the method specified in Microsoft’s documentation, a new custom connector has been created in your Power Platform environment representing the MCP server.
To access and edit this custom connector:
- Navigate to the Power Apps custom connectors page:
https://make.powerapps.com/environments/{your-environment-id}/customconnectors - Locate your MCP connector in the list
- Click the pencil icon (Edit) to open the connector editor
Step 2: Edit the OpenAPI Specification in Swagger Editor
Once you’re in the custom connector editor, you can directly edit the connector’s YAML:
- Toggle the Swagger editor switch (located in the top right of the interface)
- Locate the
parameterssection under the/mcpPOST endpoint (or add one if it doesn’t exist) - Add your custom header definition directly in the editor
- Click Update connector to save your changes
For our D&D Adventurer’s Guild example, we need to add the user-level header. Here’s what the complete YAML should look like with the custom header added:
1
2
3
4
5
6
7
8
9
10
11
12
13
14
15
16
17
18
19
20
21
22
23
24
25

swagger: '2.0'
info:
  title: guildhall mcp server
  description: guildhall mcp server this is a longer desc
  version: 1.0.0
host: kmvg53tj-3000.eun1.devtunnels.ms
basePath: /
schemes:
  - https
paths:
  /mcp:
    post:
      responses:
        '200':
          description: Immediate Response
      x-ms-agentic-protocol: mcp-streamable-1.0
      operationId: InvokeServer
      parameters:                           # ← Add new header configuration here
        - name: user-level
          in: header
          type: string
          required: false
          description: the user's rank
securityDefinitions: {}
security: []
Known Issue (October 2025): Custom headers using the
X-prefix pattern (e.g.,X-User-Level,X-Tenant-ID) are currently not working with MCP connectors. Use header names without theX-prefix (likeuser-level) until this is resolved. Microsoft teams are actively working on fixing this issue.
Step 3: Refresh the Connector in Your Agent
After updating the custom connector definition, you need to refresh the connector definition in Copilot Studio for the changes to take effect:
- Navigate to your agent in Copilot Studio
- Go to the Tools tab
- Locate your MCP connector in the tools list
- Click the three dots (…) menu next to the connector
- Select Delete to remove the connector from your agent
- Click Add a tool to add it back
- Search for and select your updated MCP connector
Simply updating the custom connector definition in Power Apps is not enough. You must remove and re-add the connector in each agent that uses it for the new custom header configuration to be recognized.
Step 4: Configure Custom Header Values
After re-adding the connector, your custom headers become available as inputs. You can configure them by:
- Click on the newly added MCP connector in your Tools list
- Navigate to the Inputs section
- Click + Add input
- You’ll see your custom header (e.g.,
user-level) in the available inputs list - Select it to add it as a connector input
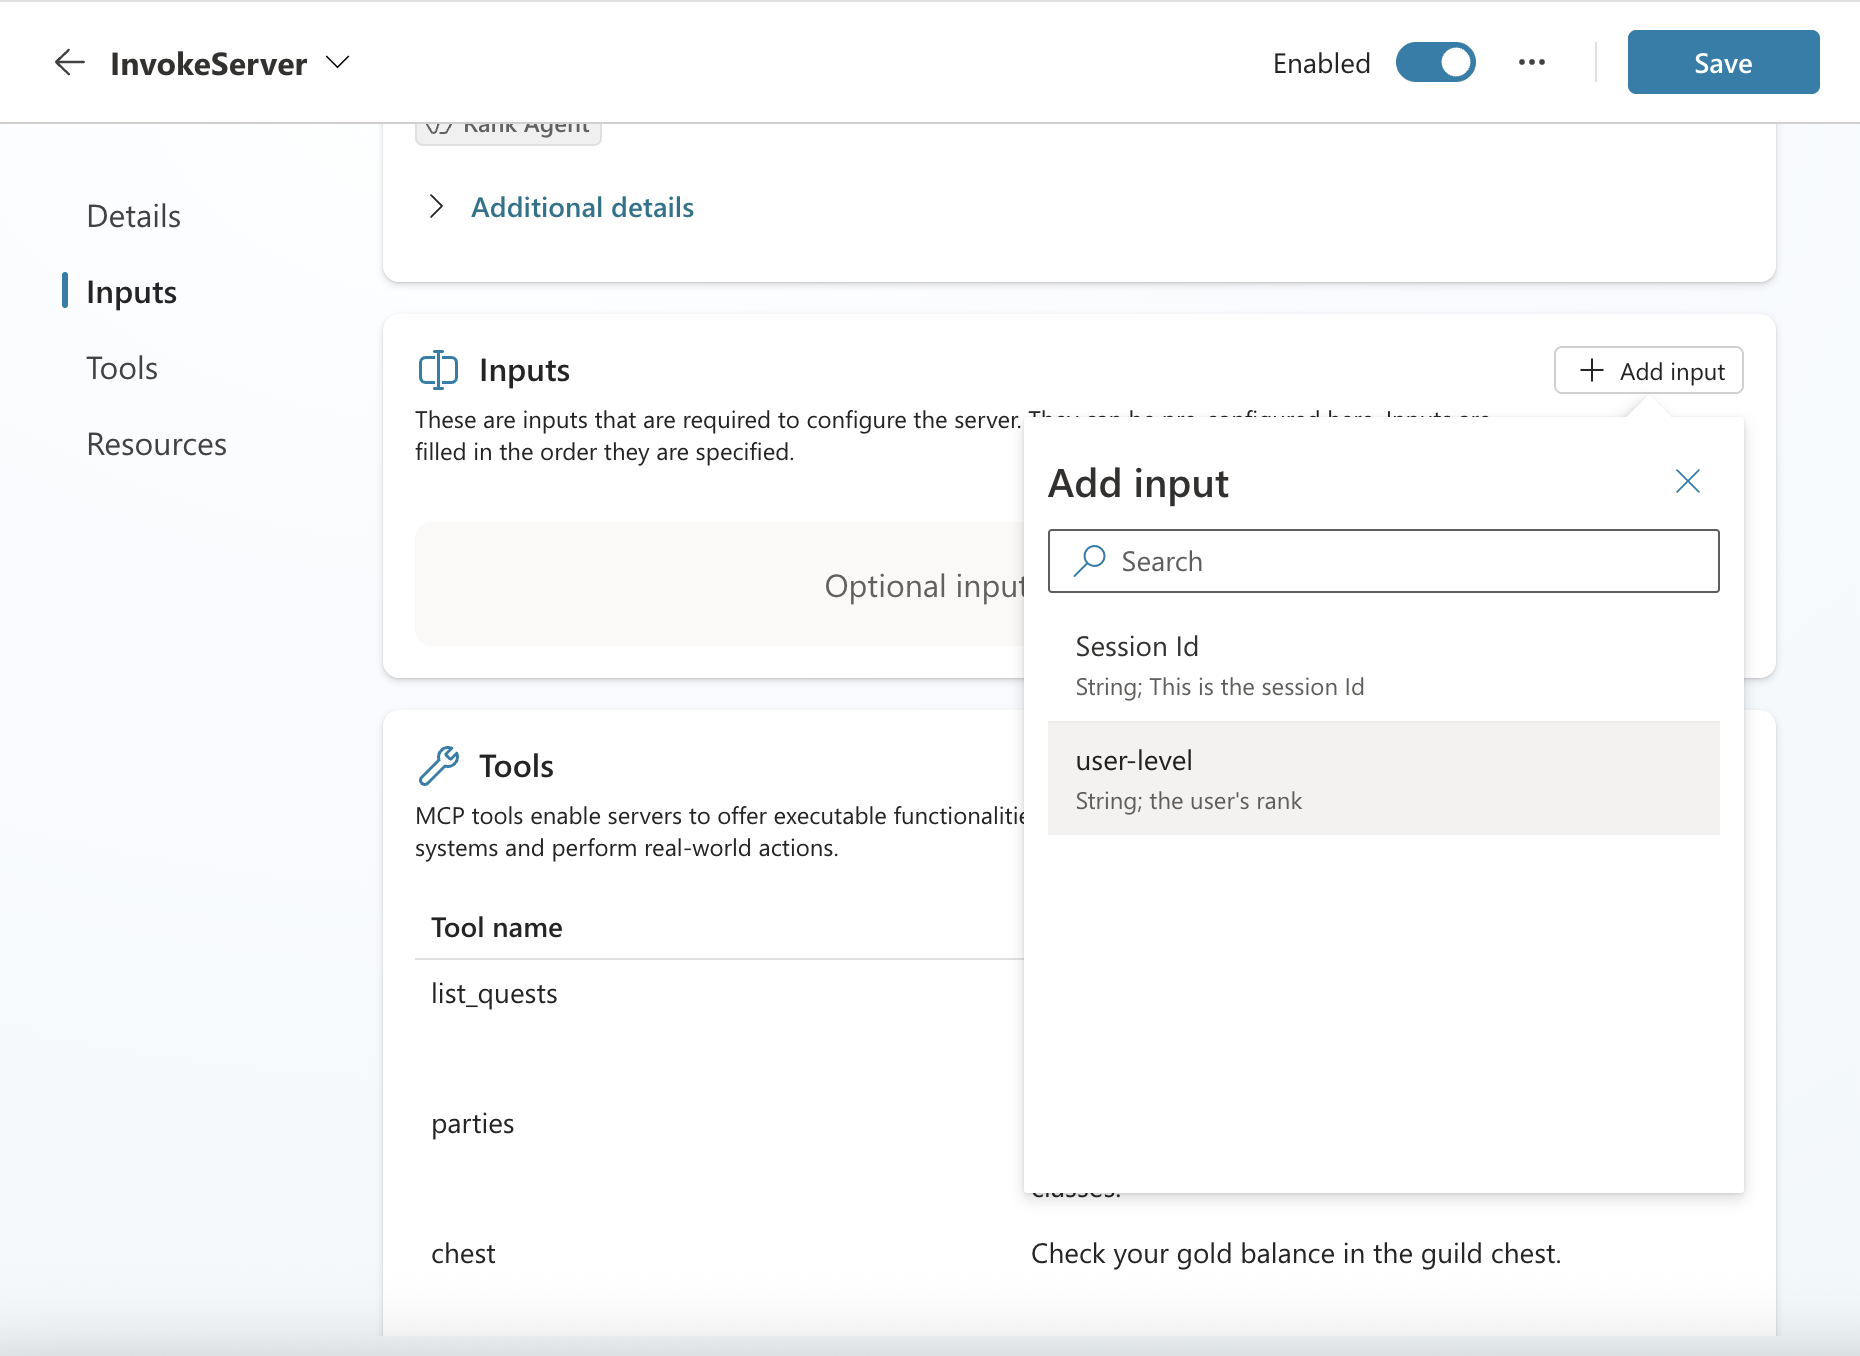 Add an input to the MCP connector
Input values can either be hardcoded or set dynamically using system variables and PowerFX.
Update: Full Hands-On Lab Available!
Want to build this yourself? Check out the complete Adventurer’s Guild Lab that walks through implementing custom headers and OAuth 2.0 authentication for MCP servers:
The lab includes:
- Complete working MCP server sample (TypeScript)
- Step-by-step guide for custom headers and bearer token authentication
- Microsoft Entra ID app registration configuration
- OpenAPI specification examples
- End-to-end Copilot Studio integration
Have you implemented custom headers in your MCP connectors? What use cases are you solving? May your MCP code compile and your quests succeed! Share your adventures in the comments below!