WT21 Electronic Checklists
Introduction
The WT21 supports an electronic checklist feature that allows checklists to be viewed and completed within the avionics. Using this feature, the user can view checklists on the MFDs. The user can also check off individual items in checklists and the system will track which items and checklists have been completed.
By default, the electronic checklists feature is disabled in the WT21. In order to enable the feature in an airplane installation, there are two things that must be done:
- Create an XML file that configures the checklists that are supported by the installation. For more information, see the next section.
- Point the WT21 to the checklists XML file using the
<Checklist>panel.xmltag.
The size of the Checklist display is 40 characters per line with 10 lines per page. These limits need to be taken into account when creating checklist items and the preamble.
Creating a Checklist XML File
Checklists are configured using an XML file. The XML file defines the checklists included in the installation, how they are organized, and the contents of each checklist.
The checklist XML file must be placed within the coui://html_ui/ directory or one of its subdirectories. If the file is placed in another directory, the WT21 will not be able to access it.
It is best practice to place the checklist XML file in an aircraft-specific directory, for example:
coui://html_ui/Airplanes/My_Airplane/checklist.xml
This greatly reduces the risk of file conflicts within the sim's virtual file system.
The Root <Checklist> Tag
Like all XML files, the checklist XML file must contain a single root tag. This tag must be named <Checklist>. All other tags in the file are placed within the root <Checklist> tag.
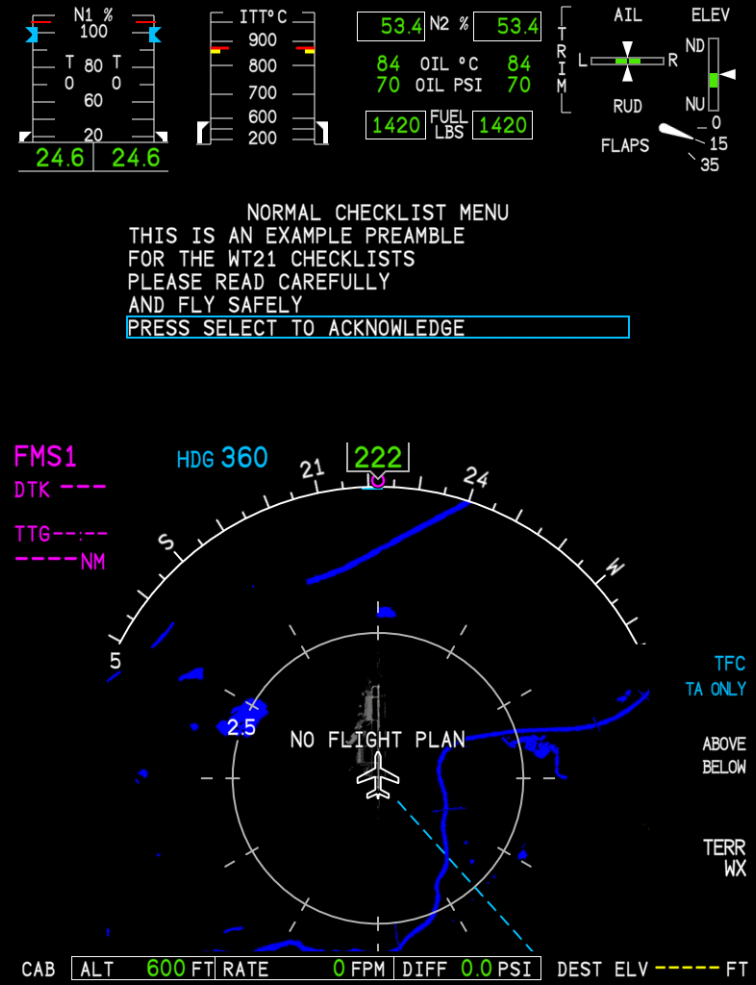
Preamble
The preamble is a notice displayed to the user when opening a checklist menu for the first time. The default preamble is based on the CJ4, but it can be customized by adding a <Preamble> tag directly under the root <Checklist> tag in the XML file:
<Checklist>
  <Preamble>
    THIS IS AN EXAMPLE PREAMBLE
    FOR THE WT21 CHECKLISTS
    PLEASE READ CAREFULLY
    AND FLY SAFELY
  </Preamble>
</Checklist>
Each line within the <Preamble> tag corresponds to a line of text displayed to the user. The leading and trailing whitespace is trimmed from each line and no automatic line wrapping occurs. For advanced formatting, check out the Text Formatting section.
The preamble is limited to 8 lines of text with a maximum of 40 characters per line.
Groups
Checklists are organized into groups. Each group contains one or more checklists. In the checklist page each group has its own associated tab and the user can browse checklists in different groups by selecting different tabs.
Groups are defined in the XML file with <Group> tags placed directly under the root <Checklist> tag:
<Checklist>
  <Group name="NORMAL CHECKLIST">
  </Group>

  <Group name="ABNORMAL CHECKLIST">
  </Group>

  <Group name="EMERGENCY CHECKLIST">
  </Group>

  <Group name="USER CHECKLIST">
  </Group>
</Checklist>
The order of the <Group> tags determines the order they appear in on the Checklist page. Up to 6 groups can be defined in the WT21. In case more than 6 groups are defined, only the first 6 will be displayed.
The name of each group will be displayed at the top of the Checklist page when a list from that group is selected.
The WT21 differentiates between two types of checklist groups: normal checklists and other checklists.
Normal checklists
- The name of the checklist group must match
NORMAL CHECKLIST. - The last item of each checklist in this group (except for the last one) will be
NEXT NORMAL CHKLISTwhich, when selected, will display the next normal checklist. - In the checklist menu, completed normal checklists will be marked accordingly.
Other checklists
- The last item of each checklist in this group will be
RETURN TO CKLST MENUwhich, when selected, will return the user to the checklist menu. - When the checklist is completed and the user returns to the checklist menu, the checklist will be reset making it available for completion again.
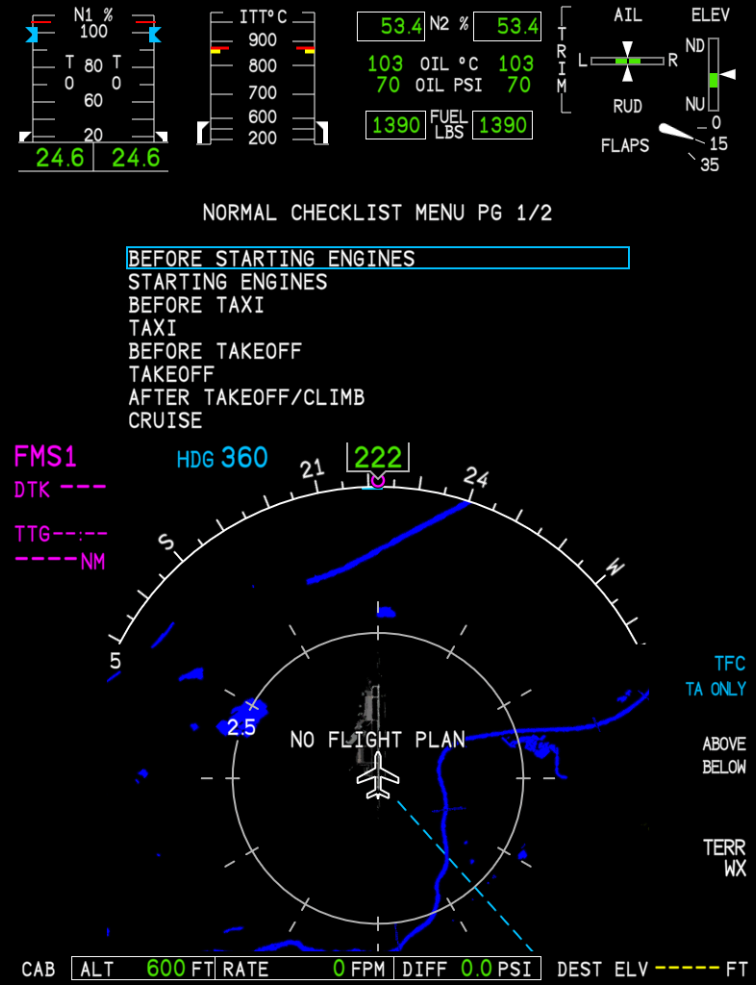
Lists
Lists represent individual checklists. Each list belongs to a checklist group and contains one or more checklist items. The user can select and display one list at a time in the Checklist page.
Lists are defined in the XML file with <List> tags placed directly under the <Group> tags of their parent groups:
<Checklist>
  <Group name="NORMAL CHECKLIST">
    <List name="BEFORE STARTING ENGINES">
    </List>

    <List name="STARTING ENGINES">
    </List>
  </Group>
</Checklist>
The order of the <List> tags within a <Group> tag determines the order of the corresponding lists in the group. The name of each list will be displayed at the top of the Checklist page when the list is selected, and also appears in the checklist pane when the user is browsing through checklists.
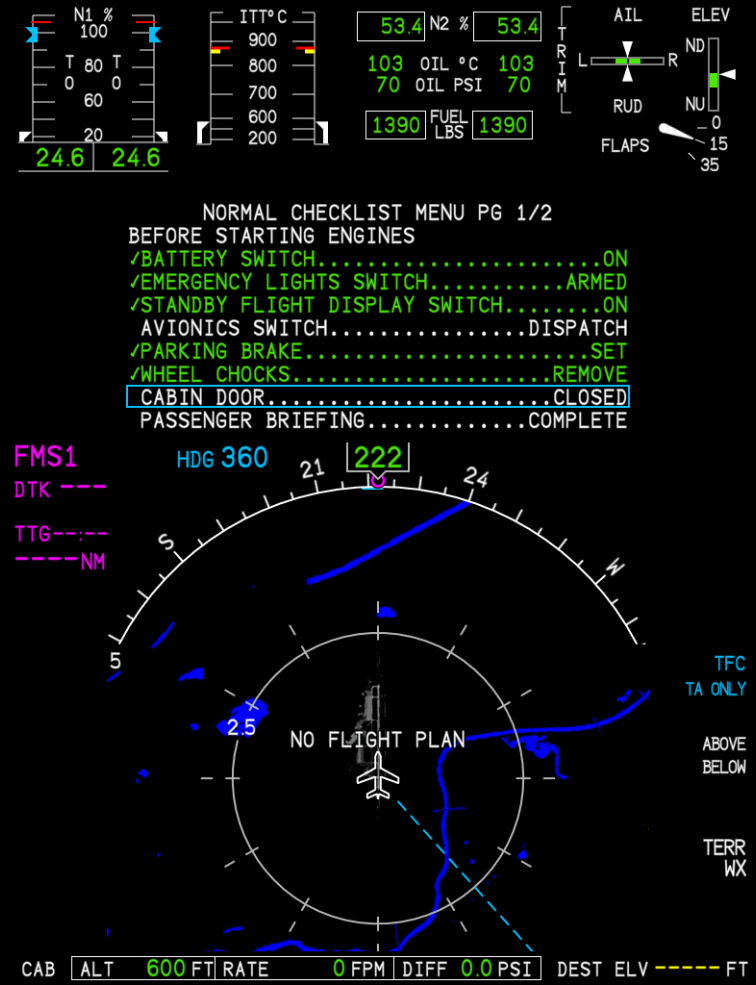
Items
Checklist items represent the "content" of checklists. Only one checklist item type is supported by the WT21: actionable items. Actionable items are items that can be selected and completed by the user. As the user scrolls through the list, the selected item is highlighted with a cyan border and the completion state of the item can be toggled using the CCP. When an item is completed, its text is displayed in green and a checkmark is displayed to the left of the item.
In order to be displayed in the avionics, the list must contain at least one item.
Items are defined in the XML file using <Item> tags placed directly under the <List> tags of their parent lists. The order of the <Item> tags within their parent tag determines the order of the corresponding items in the list.
Defining Items
To define an actionable item, use an <Item> tag with a type attribute of actionable:
<Item type="actionable">
  <LabelText>BATTERY SWITCH</LabelText>
  <ActionText>ON</ActionText>
</Item>
The <LabelText> child tag is required and defines the text that describes the item's topic. The <ActionText> child tag is required and defines the text that describes the action to be taken for the item. The action text is rendered to the right of the label text, and the label and action texts are connected with a string of dots.
Text Formatting
All standard text formatting conventions for XML files must be respected when creating the checklist XML file. In particular, this means that certain characters must always be escaped when they appear in the text content for a tag:
<(less than): escaped with<&(ampersand): escaped with&
Text parsed from the various text tags in the XML file preserves all whitespace characters (including newline characters) except leading and trailing whitespace, which are entirely removed. Enclosing the text in quotes (either single or double) causes the text within the quotes to be parsed as a JSON-formatted string (after any XML-escaped characters are resolved).
To preserve leading and/or trailing whitespace in a text tag, use a JSON-formatted string:
<Text>
  "  The spaces before and after this sentence will be preserved.  "
</Text>
To insert a forced line break, use a JSON-formatted string with an escaped newline character (\n):
<Text>
  "This text will have a line break...\nafter the ellipsis."
</Text>