🏬 Events Management Server Sample
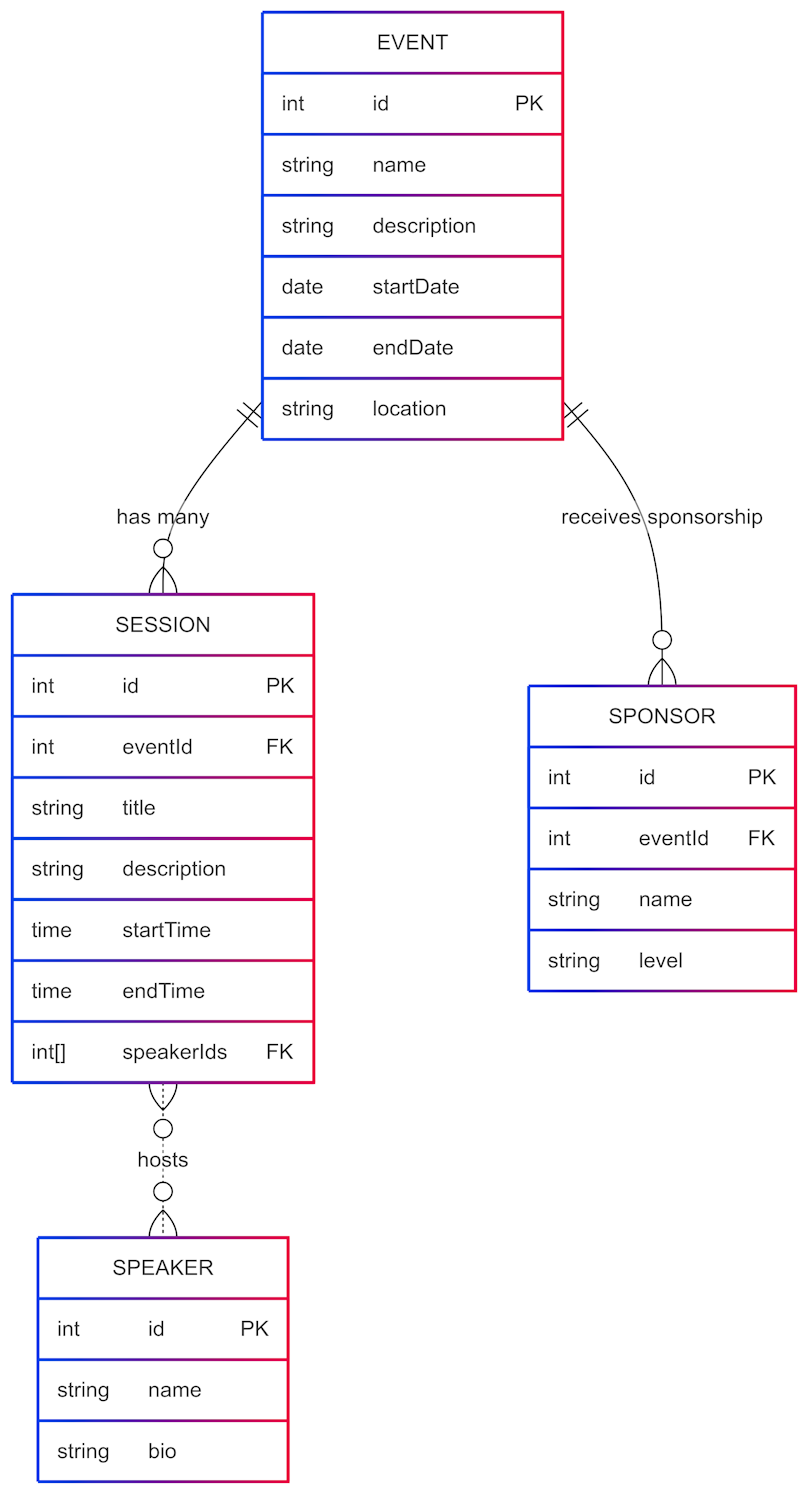
Welcome to the Events Management Server Sample. In this sample, you will learn how to run the MCP Server locally, and then add it to GitHub Copilot and Microsoft Copilot Studio. This sample provides the infrastructure for an event management system. It uses Cosmos DB to store the information about events, speakers, sessions and sponsors. The following diagram shows the database structure:
The server provides the same capabilities exposed in two ways:
- As MCP server using the HTTP Streaming transport protocol, so that you can enable your AI applications and agents to interact with it
- As a REST API, so that you can use it in your applications
The MCP server
The MCP server uses the HTTP Streaming transport protocol to expose the following capabilities:
getAllEvents| Get the list of all the available eventsgetSessions| Get the list of all the sessions, optionally for a specific eventgetSpeakers| Get the list of all the speakers, optionally for a specific eventgetSponsors| Get the list of all the sponsors, optionally for a specific event
The REST API
The REST API exposes the same capabilities as the MCP server, but using a RESTful approach. The following endpoints are available:
GET /events| Get the list of all the available eventsGET /events/{eventId}/sessions| Get the list of all the sessions for a specific eventGET /events/{eventId}/speakers| Get the list of all the speakers for a specific eventGET /events/{eventId}/sponsors| Get the list of all the sponsors for a specific eventGET /sessions| Get the list of all the sessionsGET /speakers| Get the list of all the speakersGET /sponsors| Get the list of all the sponsors
In the http folder you can find a HTTP file you can use to test the REST API. You can open it in Visual Studio Code and run the requests directly from there. You will need the REST Client extension to run the requests.
⚙️ Prerequisites
Visual Studio Code (link)
Node v22 (ideally installed via nvm for Windows)
GitHub account
The Cosmos DB emulator installed:
Power Platform Environment provisioned with the following toggle on:
IMPORTANT
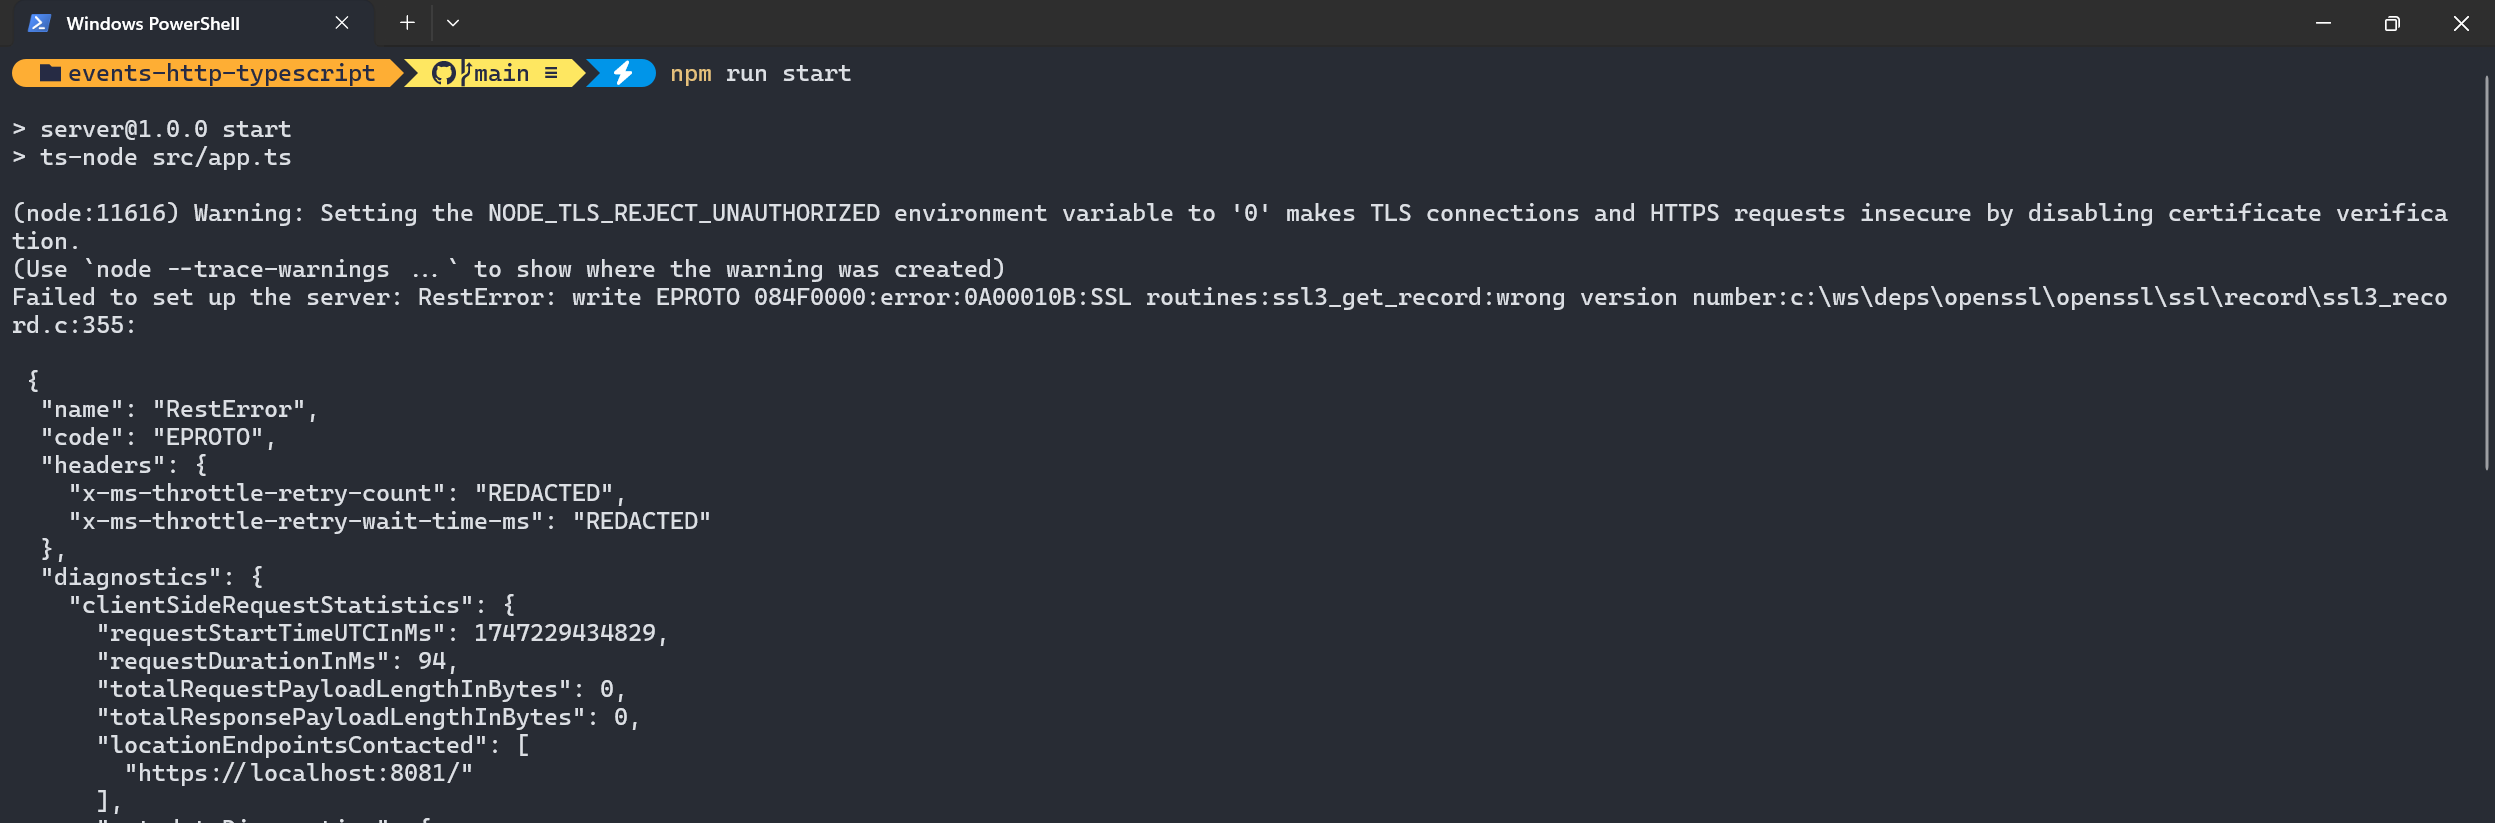
If you opt-in to use the preview of the new version of the Cosmos DB emulator, you must execute the following commands:
- Pull the Docker image:
docker pull mcr.microsoft.com/cosmosdb/linux/azure-cosmos-emulator:vnext-preview- Run the Docker image by explicitly enabling the HTTPS protocol using the
--protocolparameter. By default, in fact, the emulator exposes only HTTP, but the Cosmos DB SDK requires HTTPS:
docker run --detach --publish 8081:8081 --publish 1234:1234 mcr.microsoft.com/cosmosdb/linux/azure-cosmos-emulator:vnext-preview --protocol httpsIf you don't do this, you will get SSL errors like the one in the screenshot below when you run the server:
💿 Populating the database
The database can be populated using two CSV files, one for the events and one for the sessions. The sample contains two sample CSV files in the data folder. To ingest the data into the database, you can follow these steps:
Create a
.envfile in thesamples/events-http-typescriptfolder and add the following variables:textCOSMOS_DB_CONNECTION_STRING="<your-cosmos-db-connection-string>" COSMOS_DB_DATABASE_ID="eventsdb"If you are using the emulator, you can use the following connection string:
textCOSMOS_DB_CONNECTION_STRING="AccountEndpoint=https://localhost:8081/;AccountKey=C2y6yDjf5/R+ob0N8A7Cgv30VRDJIWEHLM+4QDU5DE2nQ9nDuVTqobD4b8mGGyPMbIZnqyMsEcaGQy67XIw/Jw==" COSMOS_DB_DATABASE_ID="eventsdb"Open the terminal on the
samples/events-http-typescriptfolder.Run the command
npm installto install the dependencies.Run the command
npm run startto start the server for the first time. This will create the database and the container.Quit the server by pressing
ctrl+cin the terminal.Run the following command to import the events:
bashnpm run start:importEvents -- <path-to-your-csv-file>For example, if you want to import the
events.csvfile included in the repository, you can run the following command:bashnpm run start:importEvents -- ./data/events.csvNow run the following command to import the sessions:
bashnpm run start:importSessions -- <path-to-your-csv-file>For example, if you want to import the
sessions.csvfile included in the repository, you can run the following command:bashnpm run start:importSessions -- ./data/sessions.csv
If you want to create your own CSV files, you can use the following format.
Events CSV file
The file should contain the following columns:
- Event Id: the unique identifier of the event, it must be a GUID
- Event name: the name of the event
- Description: the description of the event
- Start date: the start date of the event, in the format
yyyy-MM-dd - End date: the end date of the event, in the format
yyyy-MM-dd - Location: the location of the event
- Sponsors: the sponsors of the event, separated by commas
Sessions CSV file
The file should contain the following columns:
- Event ID: the unique identifier of the event, it must be a GUID
- Session title: the title of the session
- Session description: the description of the session
- Session speakers: the speakers of the session, separated by commas
- Session start time: the start time of the session, in the format
yyyy-MM-ddTHH:mm:ss - Session end time: the end time of the session, in the format
yyyy-MM-ddTHH:mm:ss
🚀 Minimal path to awesome
Open Visual Studio Code on the subfolder
samples/events-http-typescriptOpen the terminal and navigate to the same folder
Run
npm run start
Select
PORTSat the top of the Visual Studio Code Terminal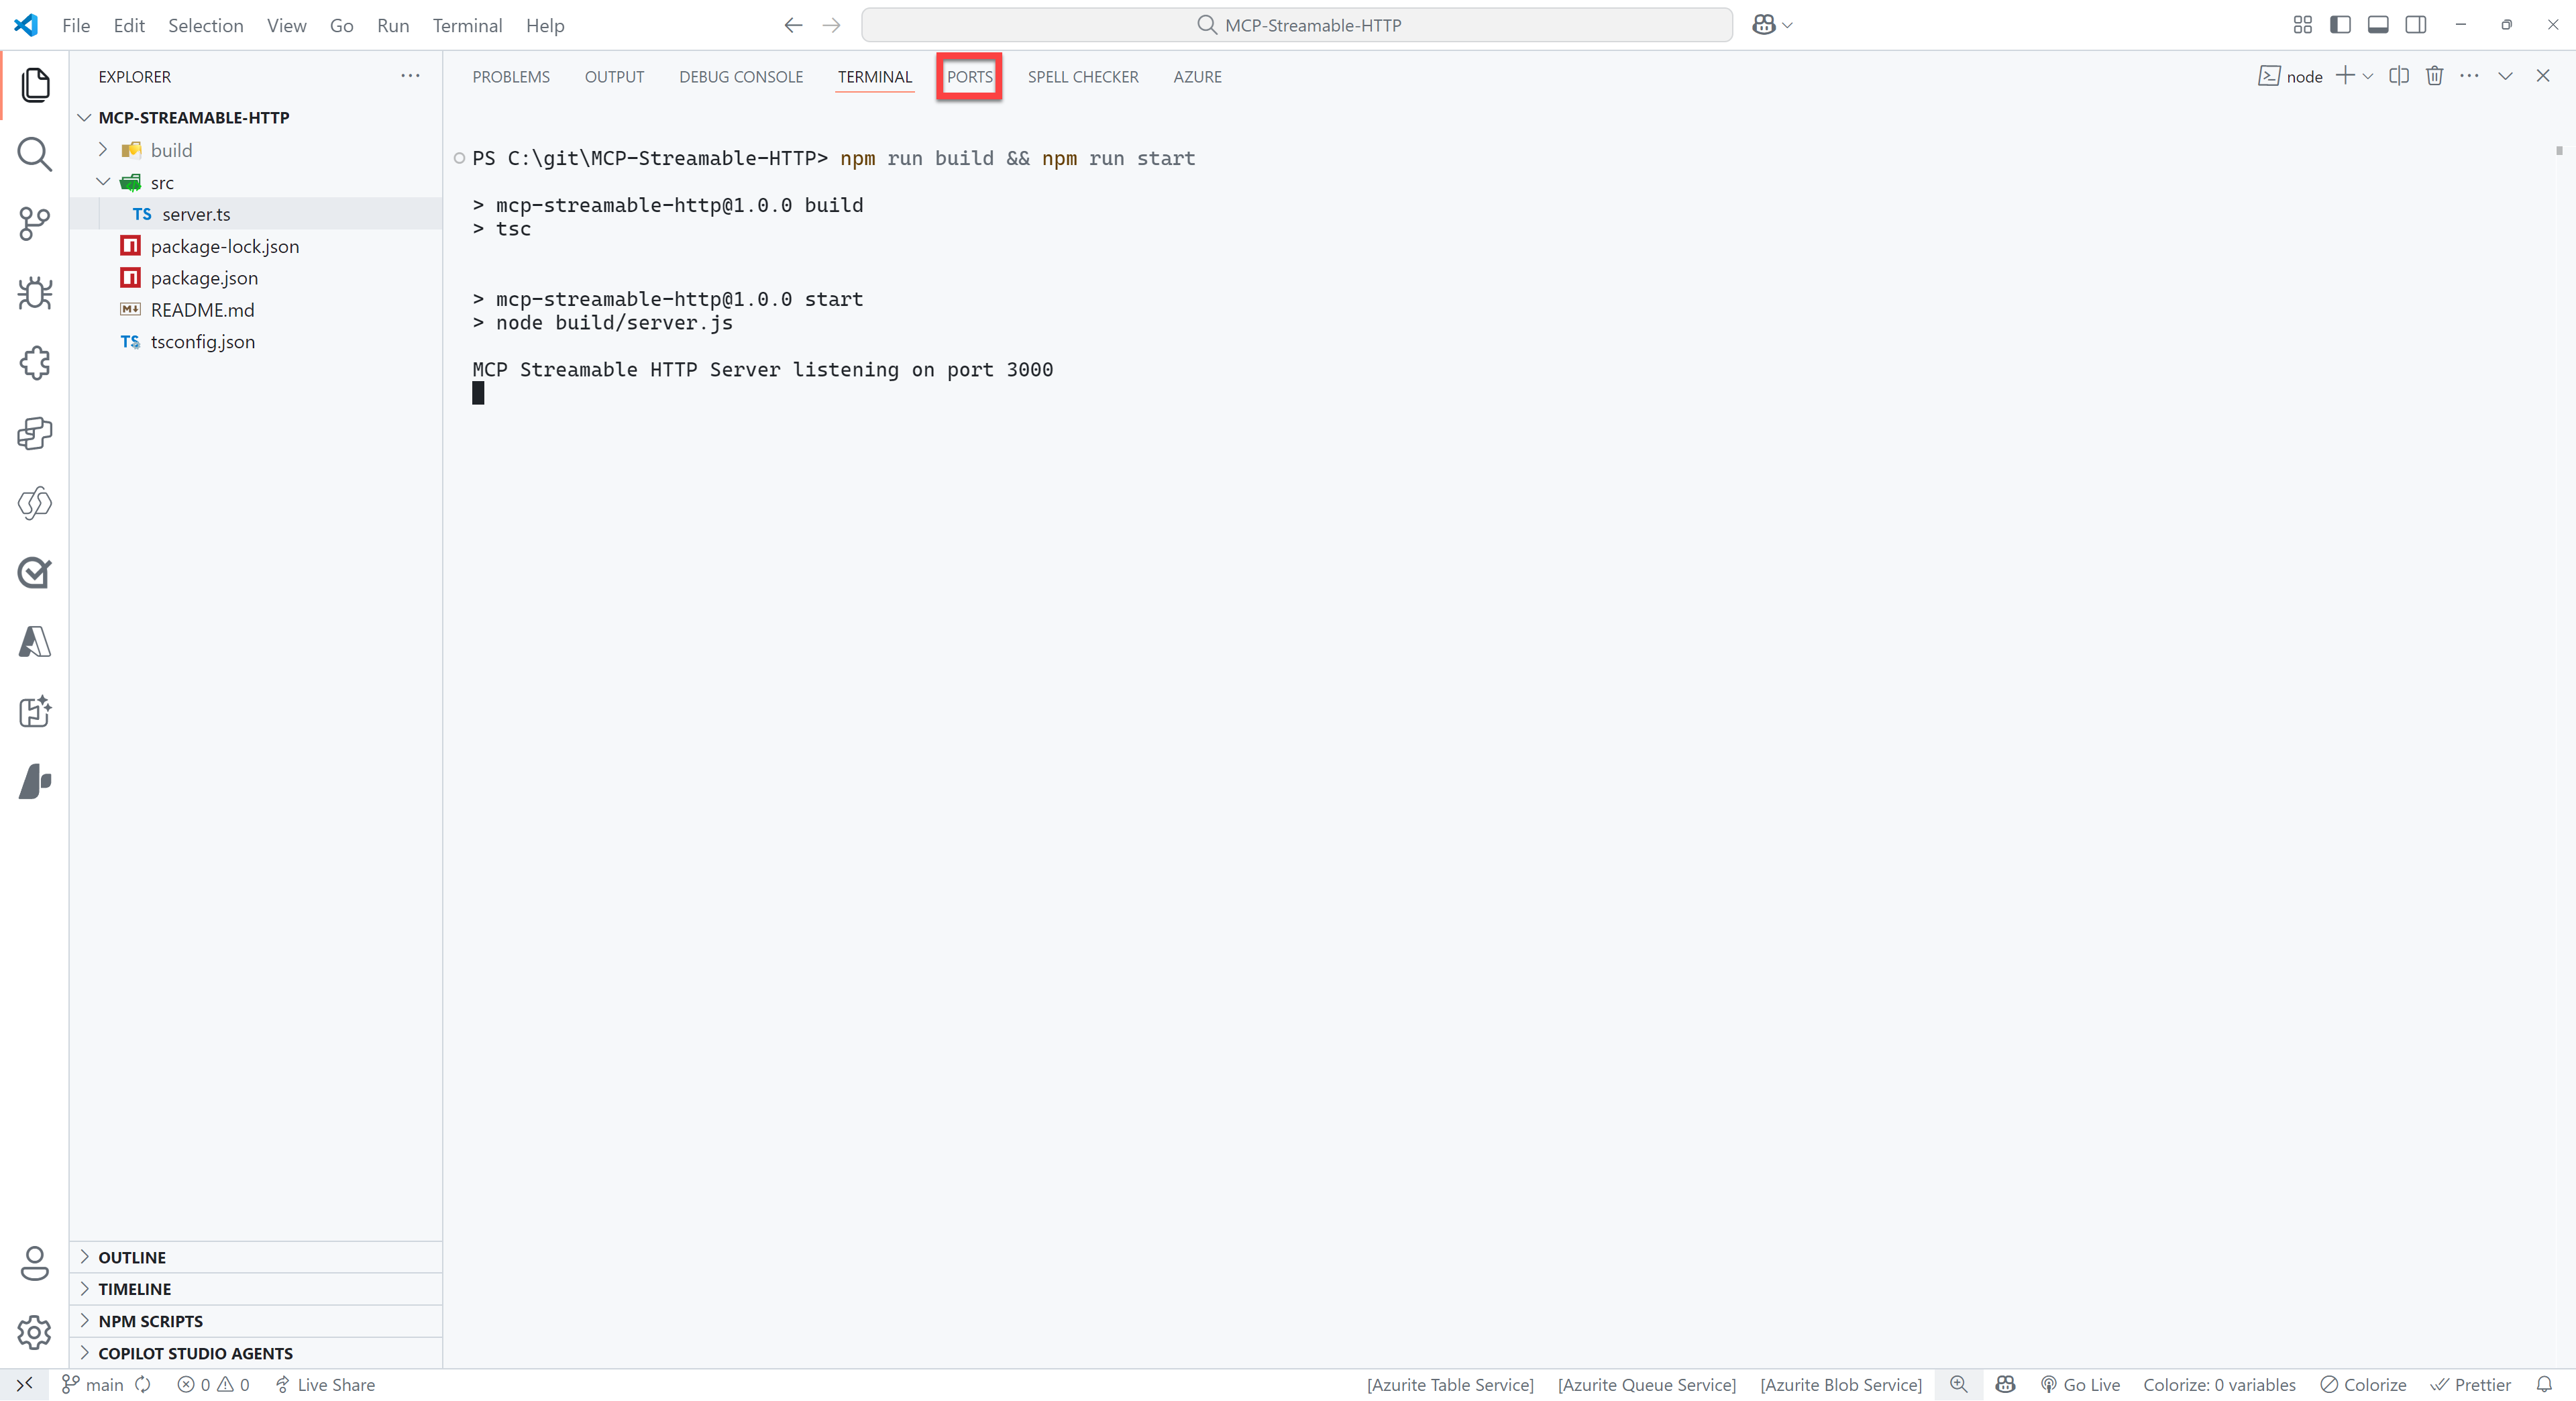
Select the green
Forward a Portbutton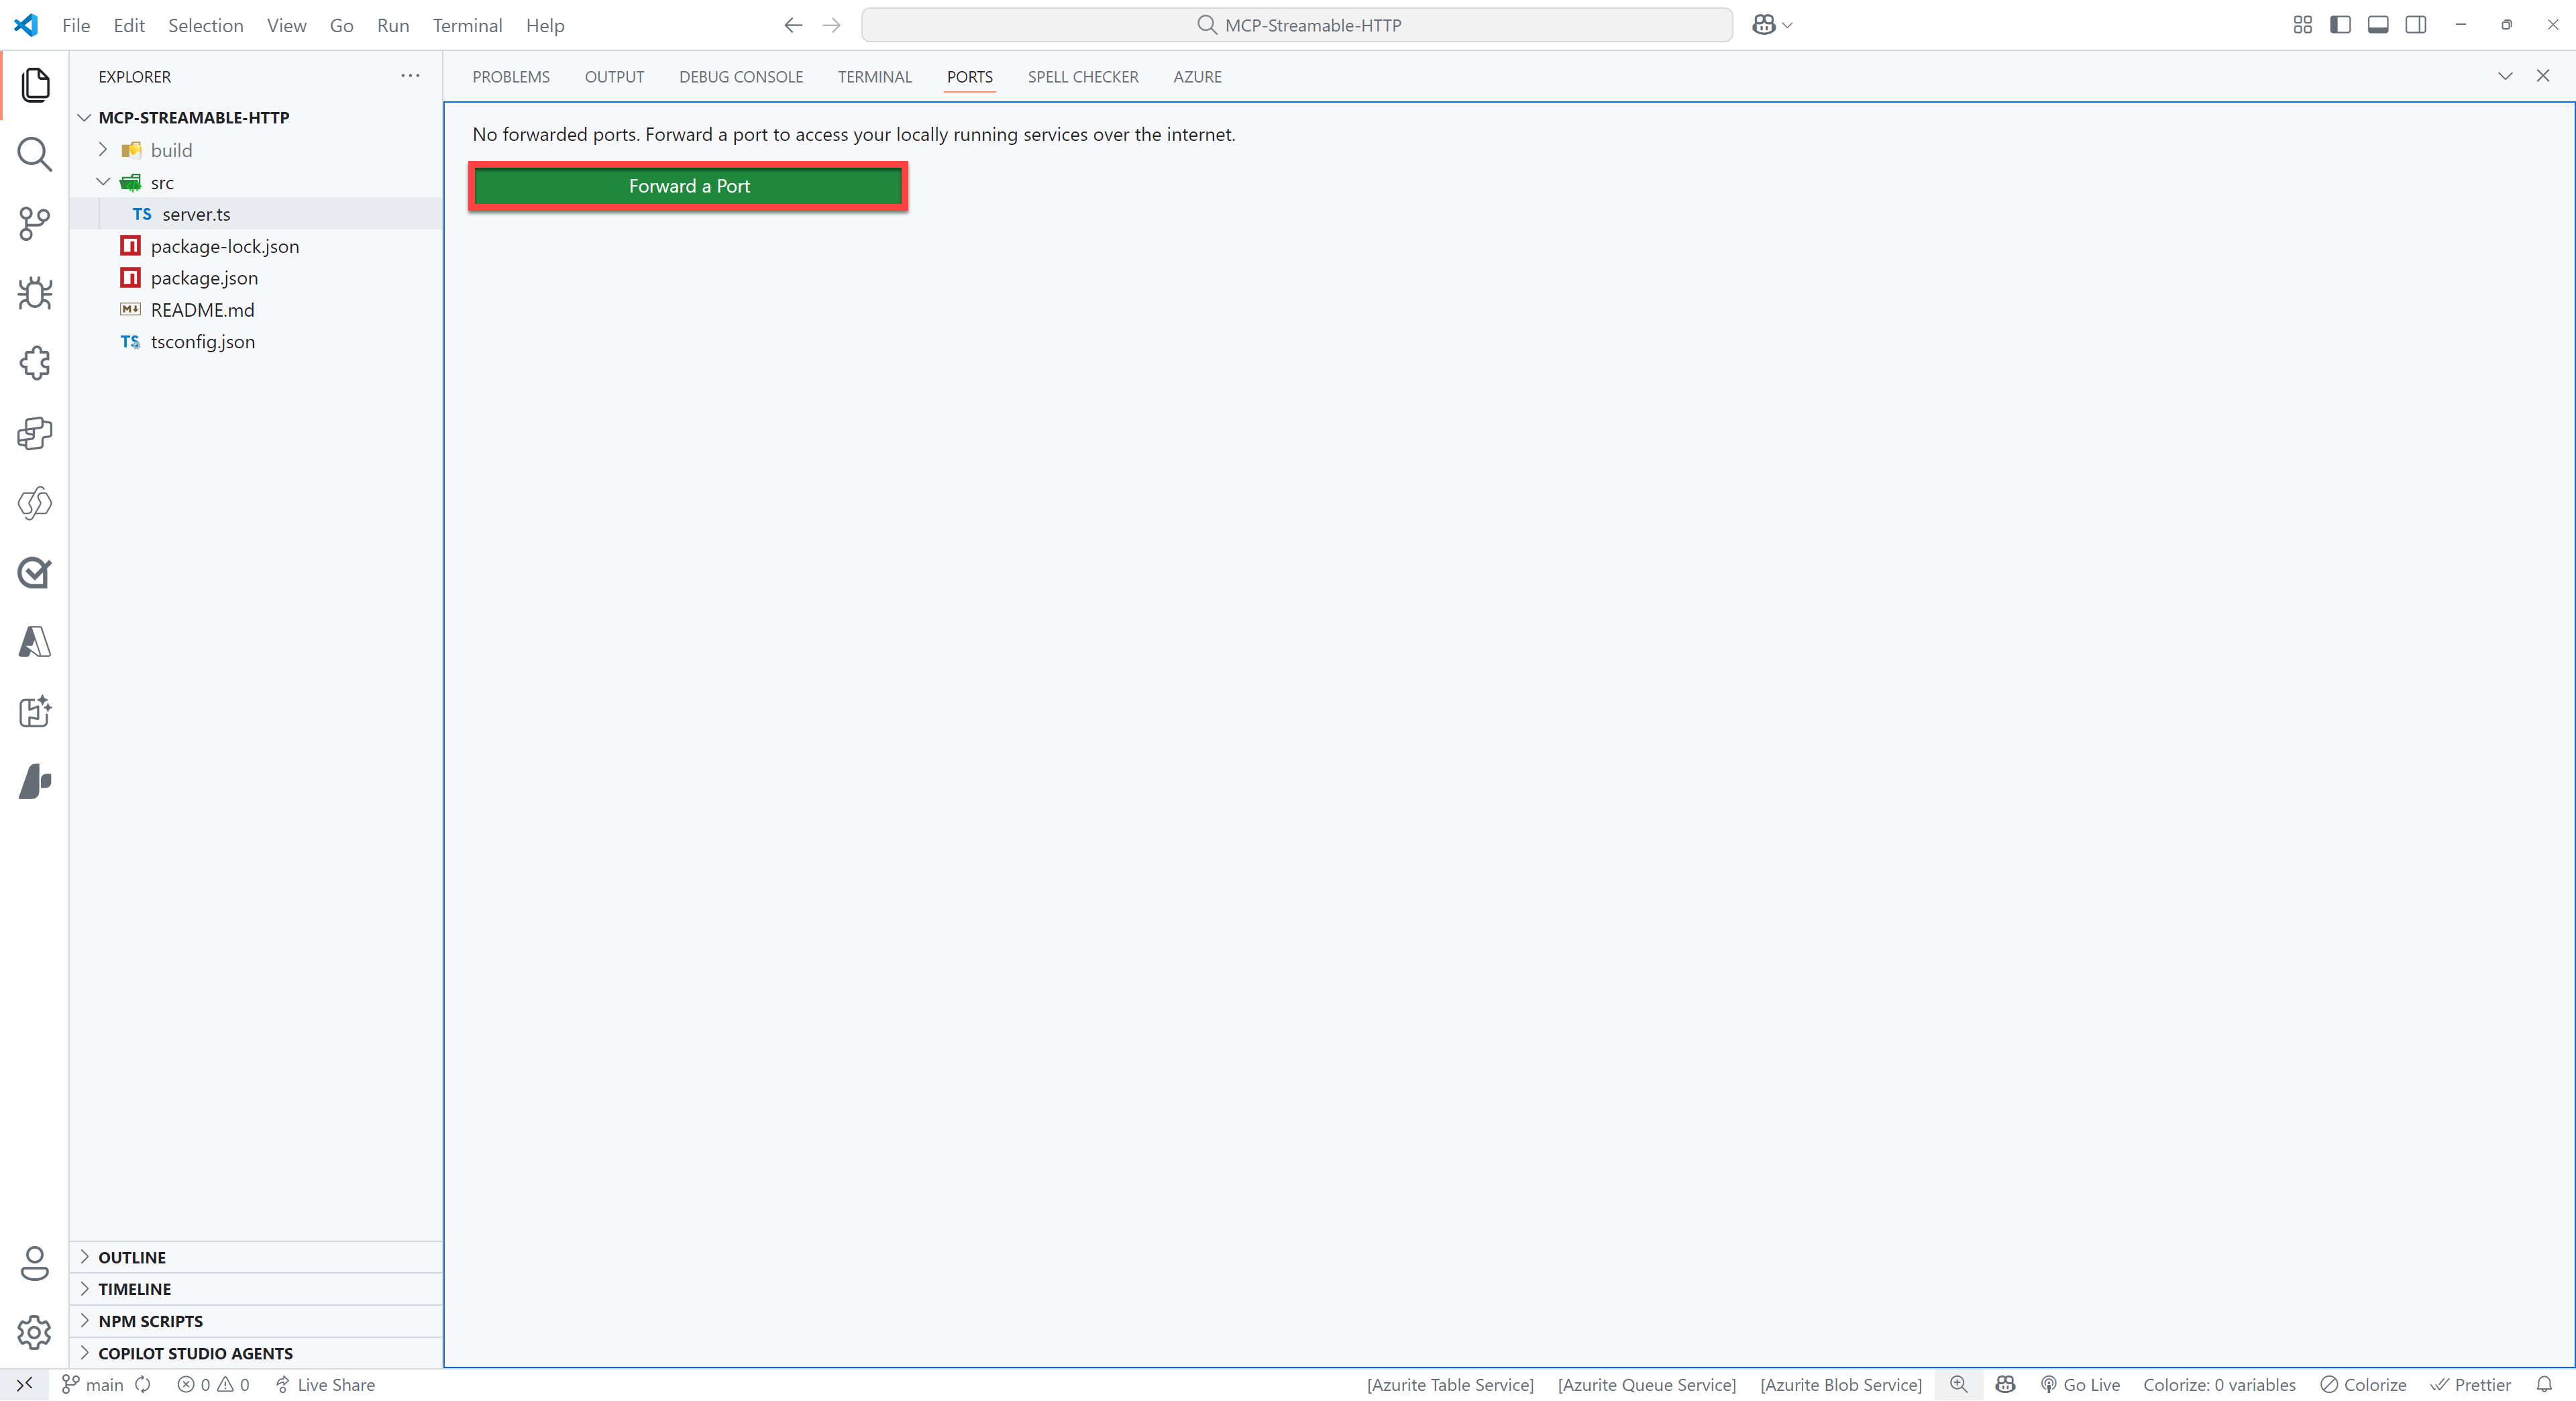
Enter
3000as the port number (this should be the same as the port number you see when you ran the command in step 5). You might be prompted to sign in to GitHub, if so please do this, since this is required to use the port forwarding feature.Right click on the row you just added and select
Port visibility>Publicto make the server publicly availableCtrl + click on the
Forwarded address, which should be something like:https://something-3000.something.devtunnels.msSelect
Copyon the following pop-up to copy the URL
Open to the browser of your choice and paste the URL in the address bar, type
/mcpbehind it and hit enter
If all went well, you will see the following error message:
{"jsonrpc":"2.0","error":{"code":-32000,"message":"Method not allowed."},"id":null}Don't worry - this error message is nothing to be worried about!
If you want to test the REST API, you can open the http/requests.http file in Visual Studio Code and run the requests directly from there. You will need the REST Client extension to run the requests.
👨💻 Use the Events Management MCP Server in Visual Studio Code / GitHub Copilot
To use the Events Vacations MCP Server, you need to use the URL of your server with the /mcp part at the end and add it as an MCP Server in Visual Studio Code.
Press either
ctrl+shift+P(Windows/Linux) orcmd+shift+P(Mac) and typeMCPSelect
MCP: Add Server...Select
HTTP (HTTP or Server-Sent Events)Paste the URL of your server in the input box (make sure
/mcpin the end is included)Press
EnterEnter a name for the server, for instance
EventsMCPSelect
User Settingsto save the MCP Server settings in your user settingsOpen
GitHub CopilotSwitch from
AsktoAgentMake sure the
EventsMCPserver actions are enabledNow you can try some of the following questions:
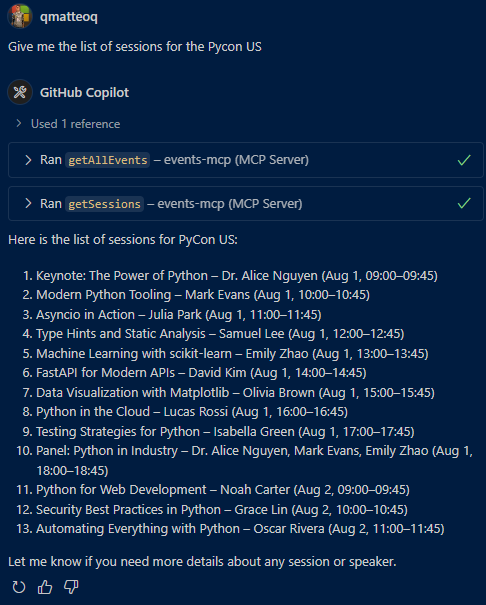
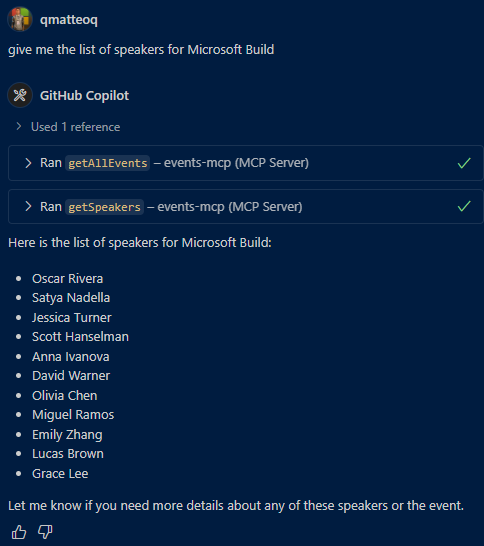
textGive me the list of the events Give me the list of sessions for Microsoft Build Give me the list of speakers for Azure Global Bootcamp Give me the list of sponsors for Pycon US
This should give you responses like the following ones. You will notice the ability of the agent to automatically call multiple tools to achieve the desired result (for example, one call to get all the events, and then a second call to get the sessions for the event you asked for using the eventId).
Now you have added the EventsMCP server to Visual Studio Code!
👨💻 Use the Events Management MCP Server in Microsoft Copilot Studio
Go to https://make.preview.powerapps.com/customconnectors (make sure you’re in the correct environment) and click + New custom connector.
Select
Import from GitHubSelect
Customas Connector TypeSelect
devas the BranchSelect
MCP-Streamable-HTTPas the ConnectorSelect
Continue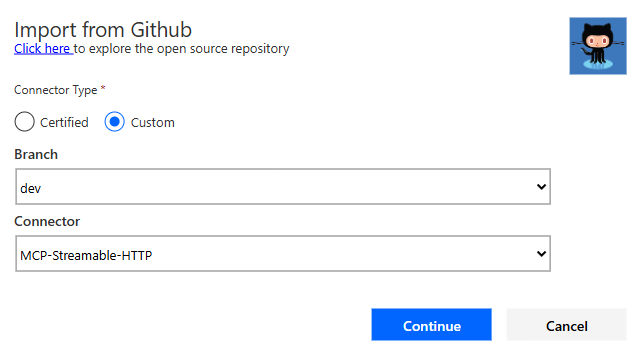
Change the Connector Name to something appropriate, like for instance
Events MCPChange the Description to something appropriate
Paste your root URL (for instance
something-3000.something.devtunnels.ms) in the Host fieldSelect Create connector
You may see a warning and an error upon creation – it should be resolved soon - but you can ignore it for now.
Close the connector
Create your agent
Select Tools > Add a tool > Model Context Protocol > And then select the MCP server you’ve just created