Lab 03 - Advanced Custom Connector features
In this lab, you will go through the following tasks:
- Learn about the technical background of connectors
- Make responses and schemas dynamics
- Implementing triggers to Custom Connectors
You will extend the connector you started building in the previous lab.
😎 Swagger - The "magic" behind connectors
So far we did all our extension and configurations for our Custom Connector directly in the UI, but there are some more hidden features for which there is no UI (yet). For these let's take a look what's behind the scene of connectors. In the end a Custom Connector is basically a huge YAML file. It's important to know that in the end the file is your connector, so sometimes you will have to check here if things go wrong or you want to use a feature not implemented in the UI.
Access & Use the Swagger Editor
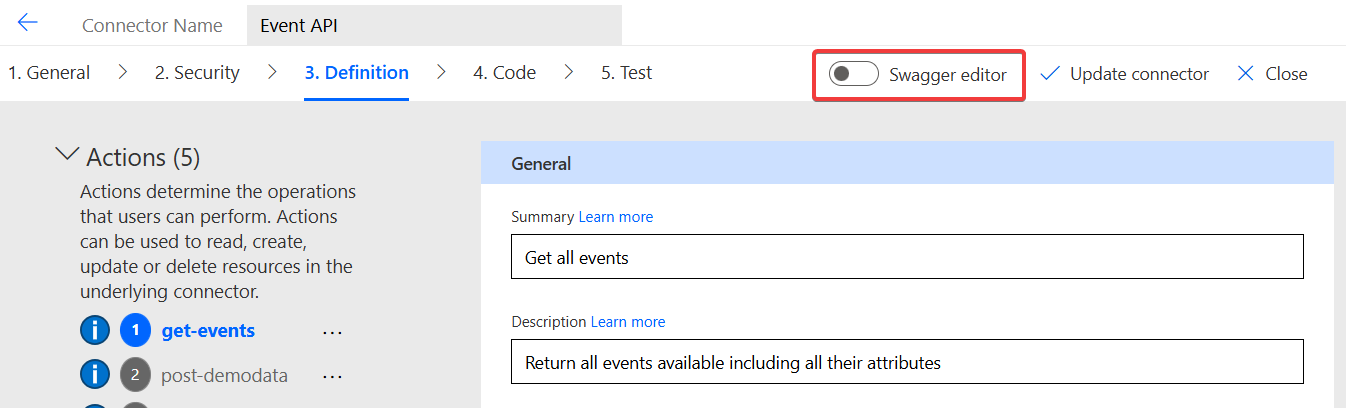
When editing a Custom Connector you can always view and edit the source file by switching the standard UI editor to the Swagger Editor. You do this by activating the toggle for it on the top navigation.
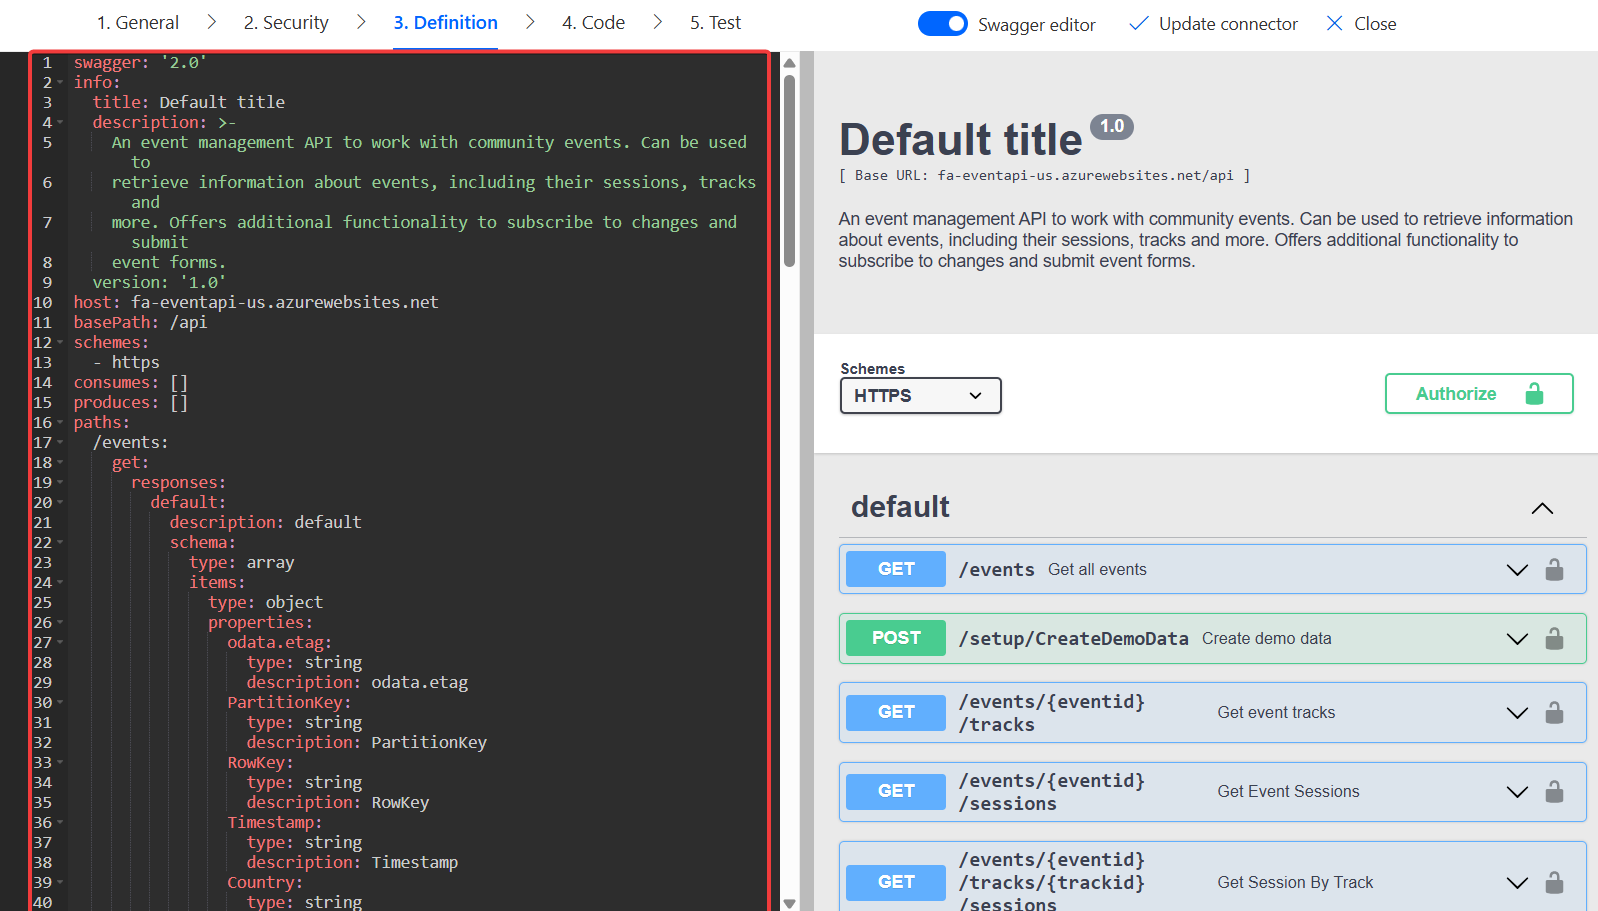
When you do so a new editor loads. You can always switch between the two modes and use whatever editor works best for your next step. Both editors edit the same file and will therefore show changes directly.
In the Swagger Editor, the left screen is the actual editor, while the right side shows additional information and can be used to quickly navigating the file.
Be aware that the sorting order of the actions is different than in the UI editor. In the Swagger editor actions are sorted by their Url Path not the Operation-Id. But you have all the attributes you see in the UI editor and more! Use the Swagger editor to make changes to one action. Recommendation: Change Summary & Description of one + check if you have added Summaries and Description for all actions.
Afterwards change back to the UI editor by using the Swagger Editor again and you will see that the attributes you changed are also changed here. Be aware, in order to update your connector you still need to use Update Connector in the top navigation.
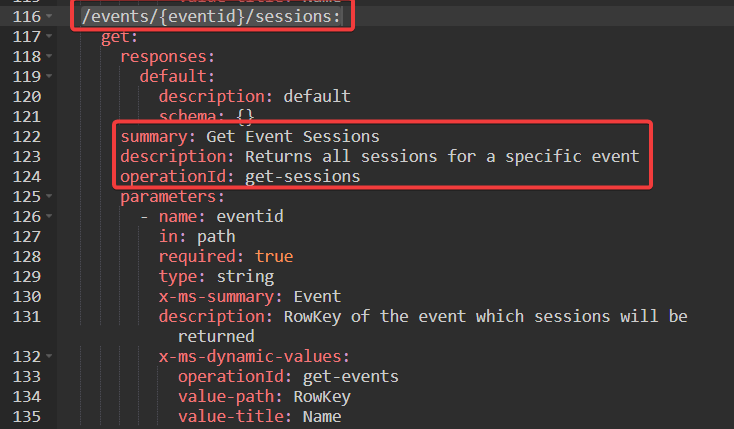
Small exercise: Look for an action with dynamic parameters and check how the dynamic parameters are represented in the YAML file. In the next steps we will configure a similar feature directly here in the Swagger Editor.
Swagger Editor as Debugger
Some errors are also only shown when you are opening the Swagger Editor. This is an important debug step: When you Update your Connector but even after a few minutes the changes are not showing up in Power Automate UI check the Swagger Editor. Sometimes there can be error which are not shown in the normal UI but which prohibit the publication of the connector.
🔍 The wonderful Open-Source-Connector World
One more "hidden" feature of Standard Connectors in Power Platform is that they are almost all open source. This is a great source for inspiration and to look for tips. Microsoft has all the connector definitions in one GitHub Repository
You can ignore most of the folders there, the interesting ones are:
- certified-connectors
- custom-connectors
- independent-publisher-connectors
Go to certified-connectors and look for a standard connector you have used before. If you open its folder you will a apiDefinition.swagger.json file. This is same content we saw before in our Custom Connector as YAML, here it is only formatted as a JSON file. But you can check out how actions are structured and what attributes these connectors are using.
A great source for inspiration or debugging when something is not working as expected!
💫 Making Action Schemas dynamic
One of the features you often see in Standard Connector is another dynamic feature: The dynamic Schema. It is used when you selected on parameter in an action, and based on that selection the "schema" aka the fields shown in that action are changed. Probably the most used actions utilizing this feature are in the Dataverse Connector. Every Create / Update action works like this, first you select the Table and based on this the action will show you all available fields of that table, including all customizations only available in the current environment.
In this step we want to add such a feature to our connector as well. The Event API has an endpoint where you can submit Form, and each form can have very different fields. We want to add a Submit Form action were the user first select the Form and then directly sees which fields are available.
Preparations
For this work we need to add two actions. Add them the same as we did in the Labs before so make sure to:
- Add as action using Import from sample
- Fill Operation Id, Summary, Description
- Make parameters dynamic
- Update Connector
- Test action and use result to define Default Response
The two actions are these:
Event API - Get Forms: GET request to this url:
https://fa-eventapi-us.azurewebsites.net/api/events/{eventid}/formsReturns all available forms for a specific event
Event API - Get Form Schema: GET request to this url:
https://fa-eventapi-us.azurewebsites.net/api/events/{eventid}/forms/{formid}Returns the schema for a specific form. The Schema describes what fields are in the form and what data type they are.
NOTE
The function needs to return the schema as a OpenAPI Schema object
We will use the first action to get a list of forms including their ids so that we can used that in the second action to get the schema of that form which is needed so that the Custom Connector knows which fields are available.
Add these actions as described above! So two times to this:
- Add as action using Import from sample
- Fill Operation Id, Summary, Description
- Make parameters dynamic
- Update Connector
- Test action and use result to define Default Response
Check Result of Operation for a refresher how to add an action like this.
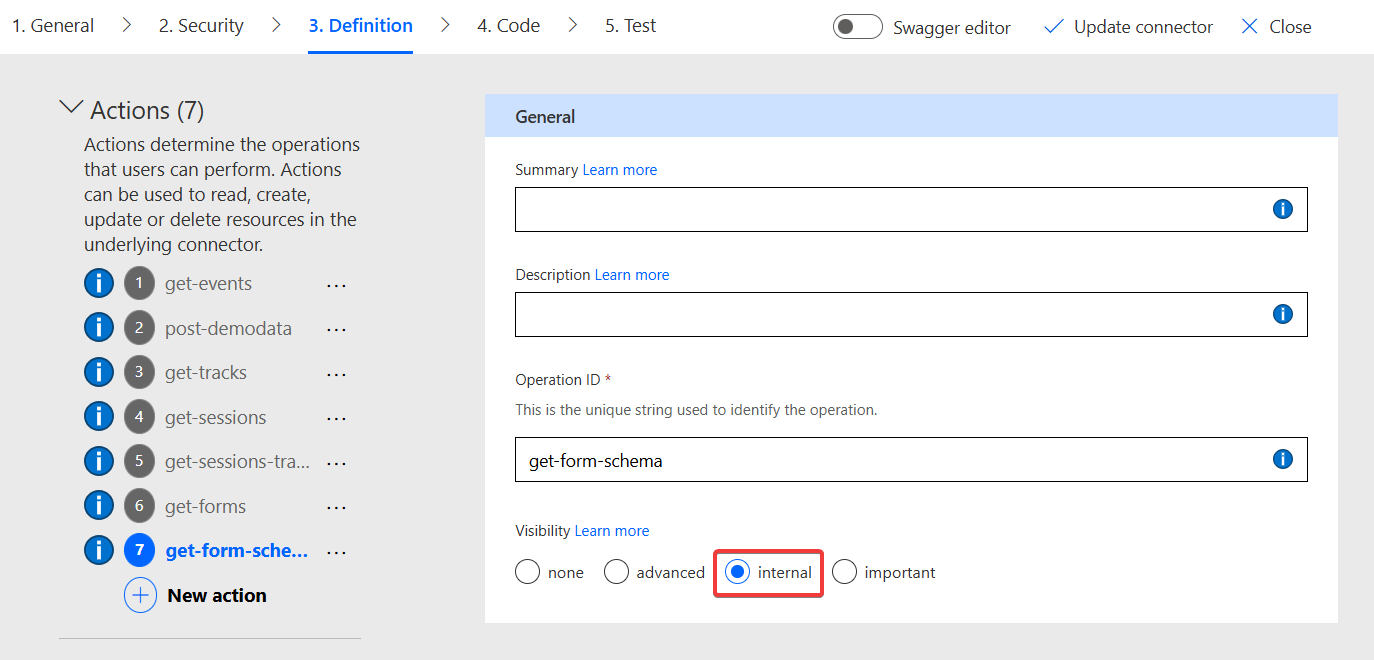
For the Event API - Get Form Schema we want to do one special thing. This function will only be needed for the next action, no user will or want ever use it standalone. In order to not confuse them by showing too many options we can hide these kind of action from the UI in Power Automate and other consumers. For this we need to go to the Definition of the action and set the Visibility to Internal. This way we can still use the action normally for other action, but it will not be shown to the user.
Perfect! When you have added these two function let's combine them for the Submit Form action in the next step.
Add Submit Form action
The Submit Form of the Event API sends a payload in the Body of the request for a specific form of a specific event. The body is a JSON object and what fields should be in there is defined by the schema of the form. So we want to the action to do this:
- Get Event and Form as dynamic parameters
- Use these two parameters to call the GET/Form-Schema action and get the schema
- Use the schema to show the users which fields are available
- Send the entered fields as body to the Submit Form endpoint.
With our preparation we are almost there!
Let's start by adding the action like we did before. The endpoint is the following:
Event API - Submit Form: POST request with body to this url:
https://fa-eventapi-us.azurewebsites.net/api/events/{eventid}/forms/{formid}Submit a form with the entered data.
Use the Import From Sample and make sure to select POST add a - for now - empty JSON {} as Body. 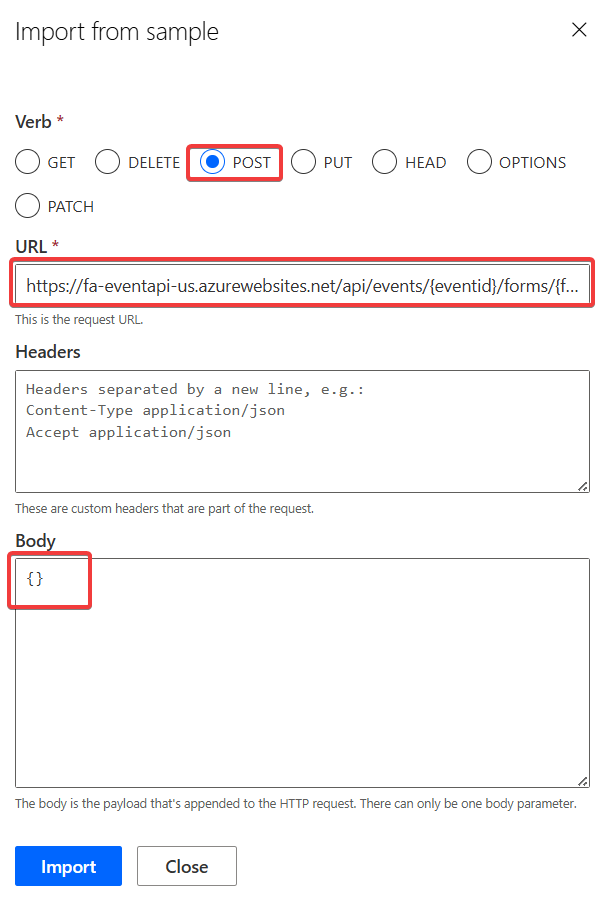
For the eventid and formid use the UI to make the parameters dynamics as we did with the previous actions.
When you go to the body parameter and click on Edit you see that we do not have the option here in the UI to make it dynamic. This is a feature which we can only edit directly in the Swagger Editor. So go back to the action definitions and toggle the Swagger Editor and search for the submit-form action there.
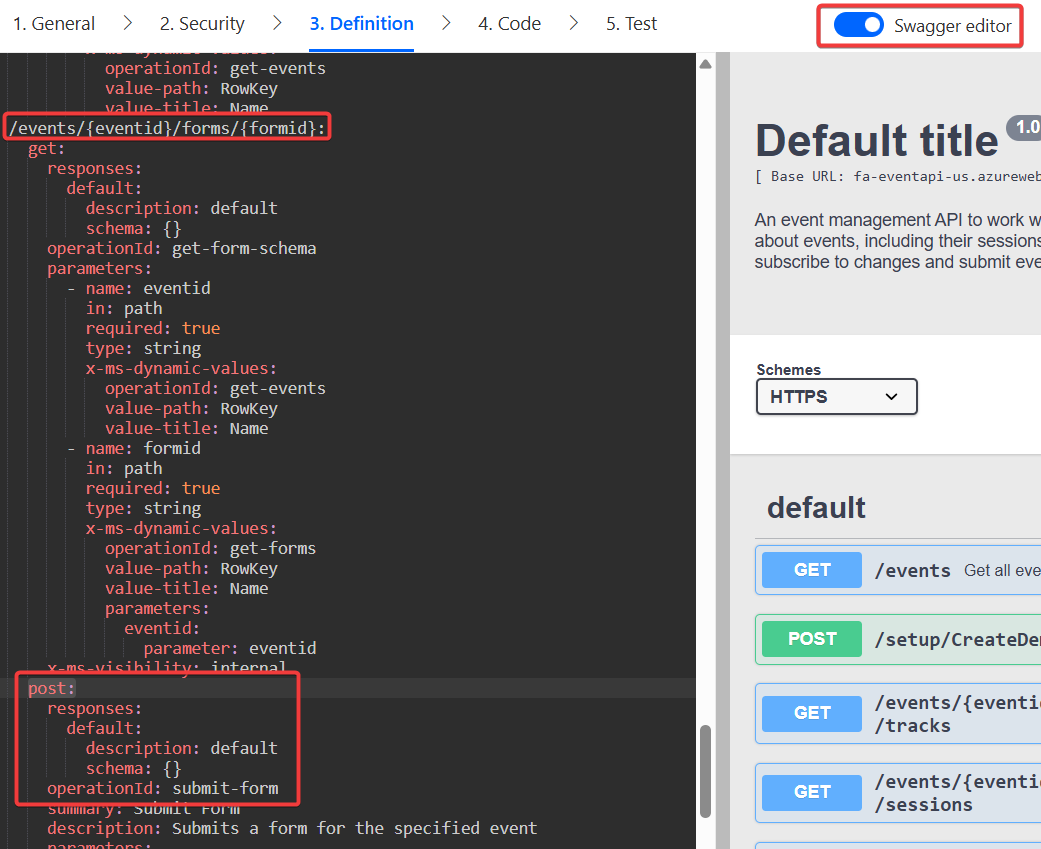
You will see that the body parameter is defined, but has currently no details added to it. We will overwrite this parameter manually in the Swagger Editor.
Before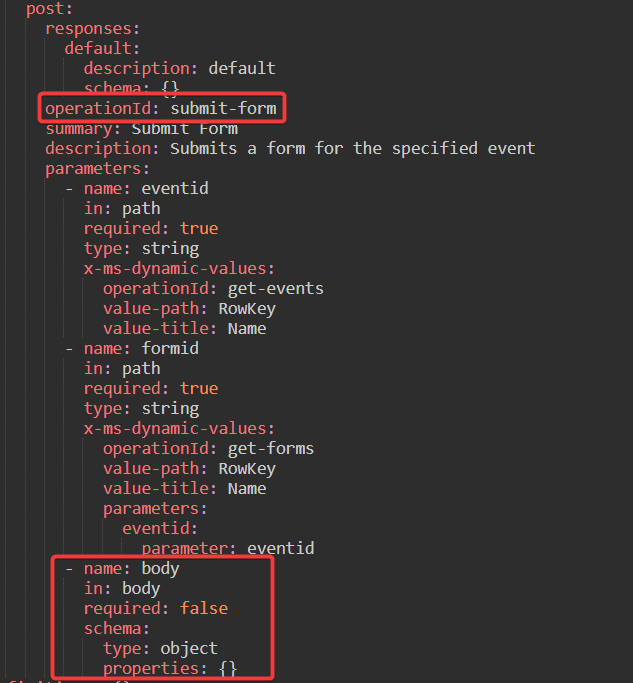
After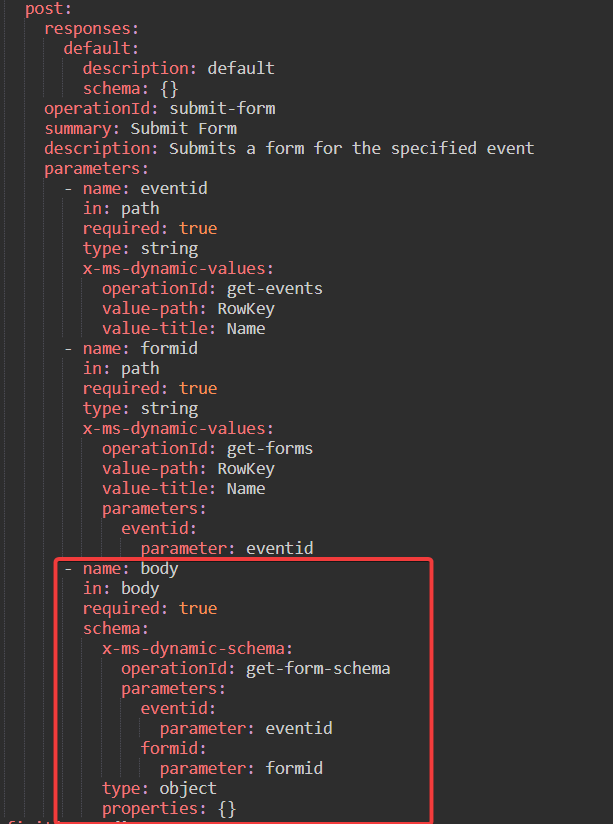
After you made these changes, Update Connector and go back to Power Automate and create a new Flow Submit Form and add the action Submit Form.
At the beginning before you have filled the parameter you will only see the two parameter we had defined in our action. 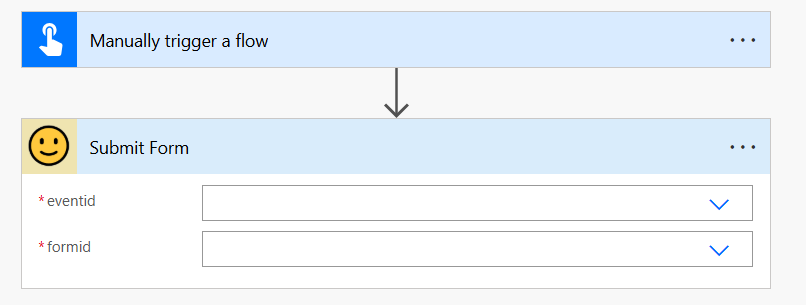
After you fill the two parameter - and wait a few seconds for the connector to make the call to grab the schema, depending on what schema you picked the action will show it's fields. 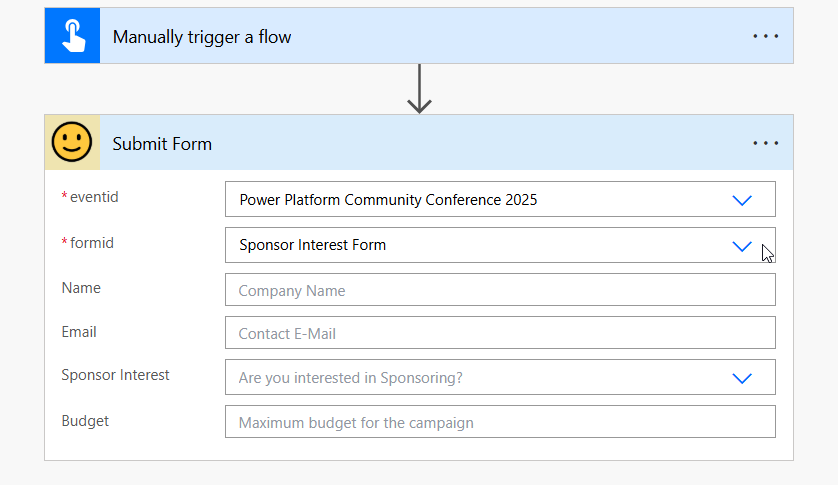
Congrats! You modified your first action via the Swagger Editor and enabled it to have a dynamic schema in one of it's action!
🪝 Custom Triggers via Webhook
Next up we want to make our connector also reactive, so far we only implemented actions - and actions always have to be triggered by something in the Power Platform. If you want to be able to react to external events you need to implement a Trigger in your custom connector.
The Event API offers a webhook for when someones submits a form for an event, we want to create a trigger in our Custom Connector to be able to start logic in Power Platform when this happens.
Create a custom Trigger
Go back to your Connector, to Definition and this time we don't click on create new action but on New Trigger.
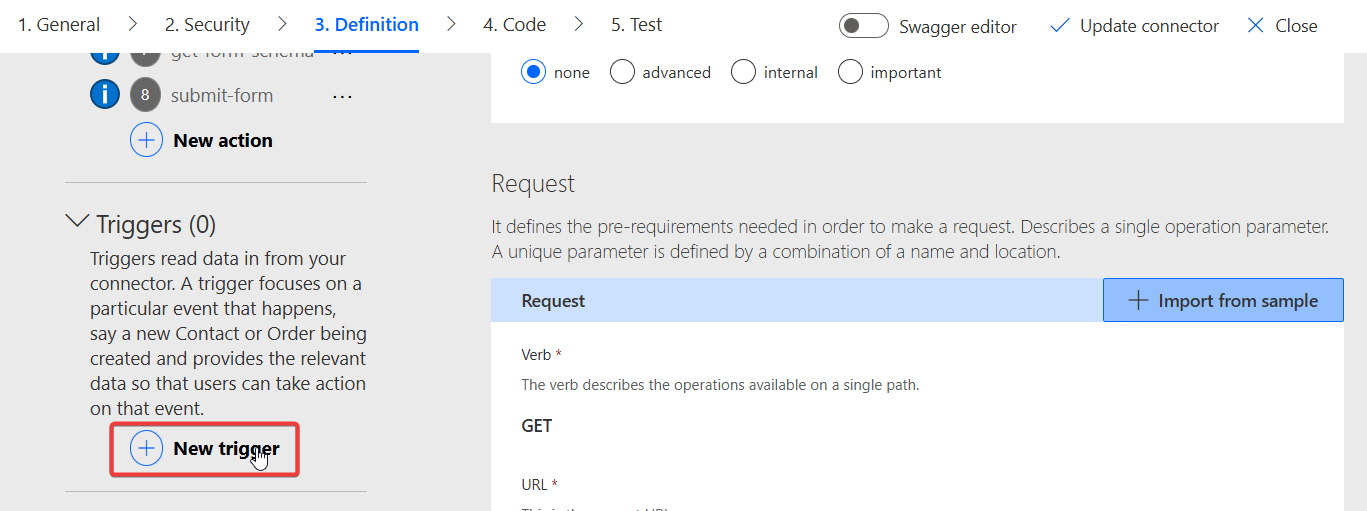
The attributes of a trigger are very similar to an action, make sure to fill Operation Id, Summary and Description. Additionally you must select what type of trigger you want to create. What type should be used is depending on the API you are connecting to, the Event API supports Webhook.
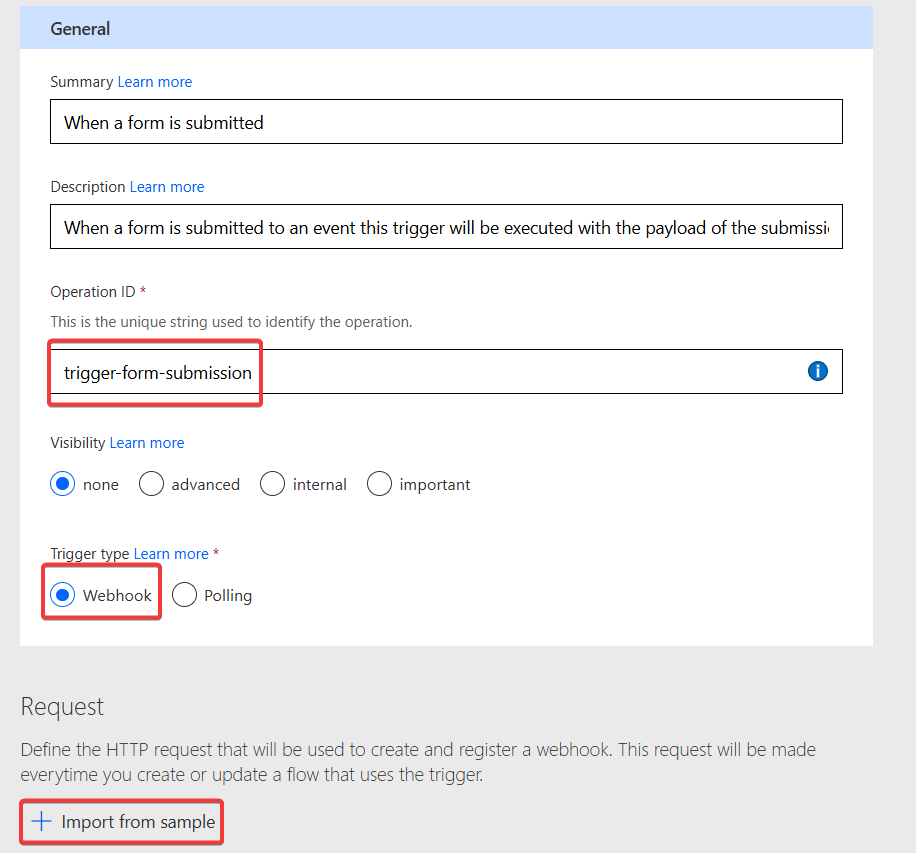
Afterwards we need to define the API endpoint of the API where webhooks can be registered. For this click on Import from sample and similar as you did with the actions add the url for the webhook registration here. For the Event API use this endpoint:
Event API - Register Webhook: POST request to this url:
https://fa-eventapi-us.azurewebsites.net/api/events/{eventid}/webhooksRegisters a webhook for the specified event. You need to send a body with these parameters:
- Topic (what to subscribe to)
- CallbackUrl
Fill the data like this in the Import Wizard: 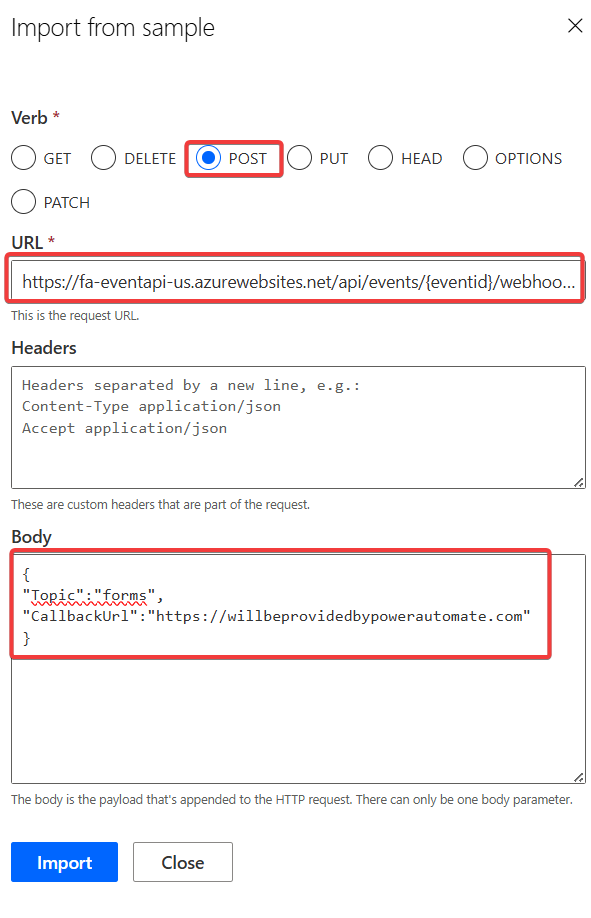
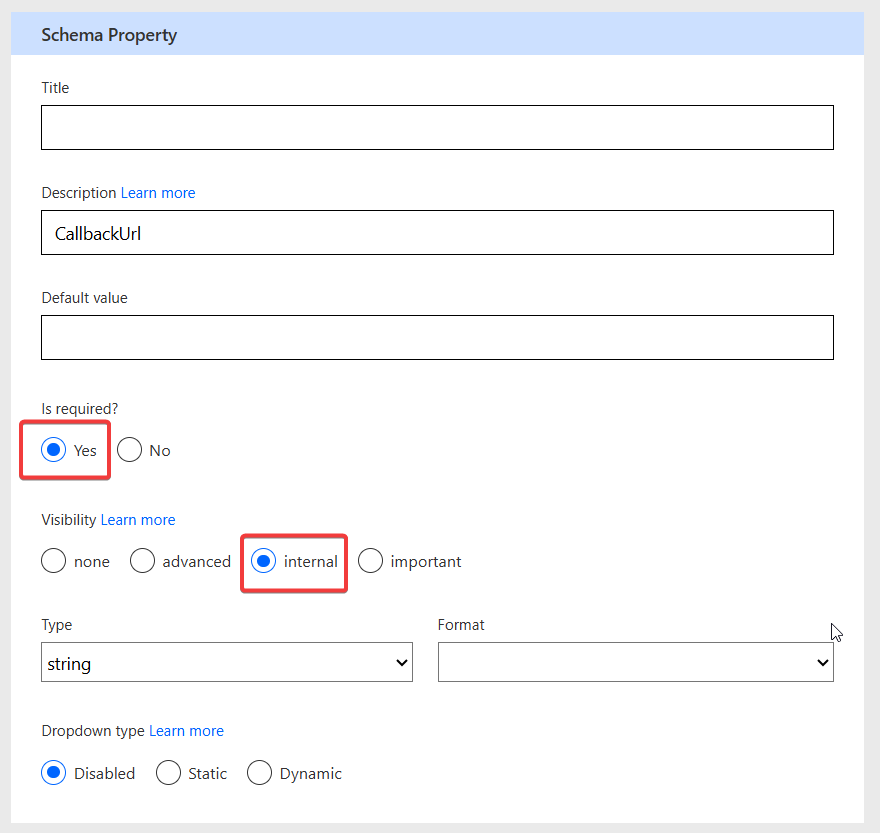
After clicking on Import you will see the parameters being added to the trigger. Click on Edit of the body parameter and check the parameters in there.
- Make sure both are set to Required
- Make sure the visibility of CallbackUrl is set to internal. This is required by the Custom Connector, because this parameter will be filled automatically and can not be changed by the user.
Also Edit the eventid parameter and make it dynamic like we did with the other actions.
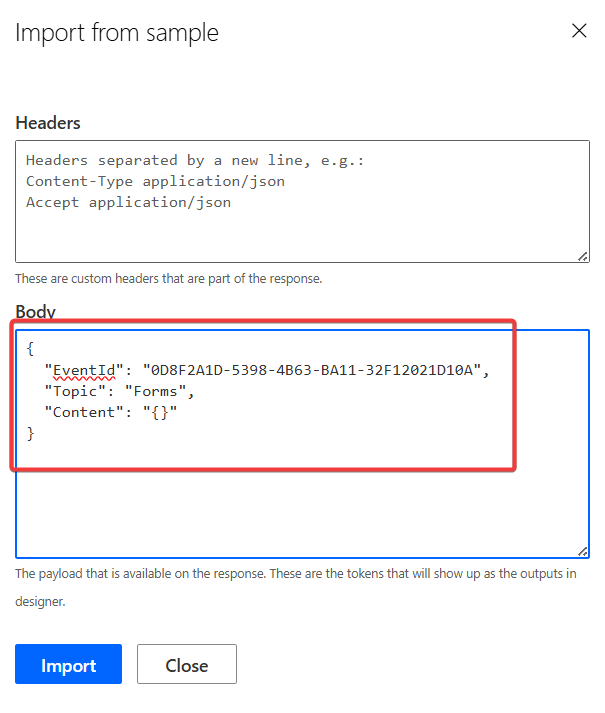
Scroll down to Webhook Response and add a name for it. Then click on Import from Sample and add the following payload as Body
{
  "EventId": "0D8F2A1D-5398-4B63-BA11-32F12021D10A",
  "Topic": "Forms",
  "Content": "abc"
}
Afterwards scroll a down a bit more to Trigger Configuration and select CallbackUrl as the Callback URL parameter. This tells the Custom Connector which parameter it should use to automatically add a callback url. This url will be used by the Event API to send a notification when the trigger should be executed. 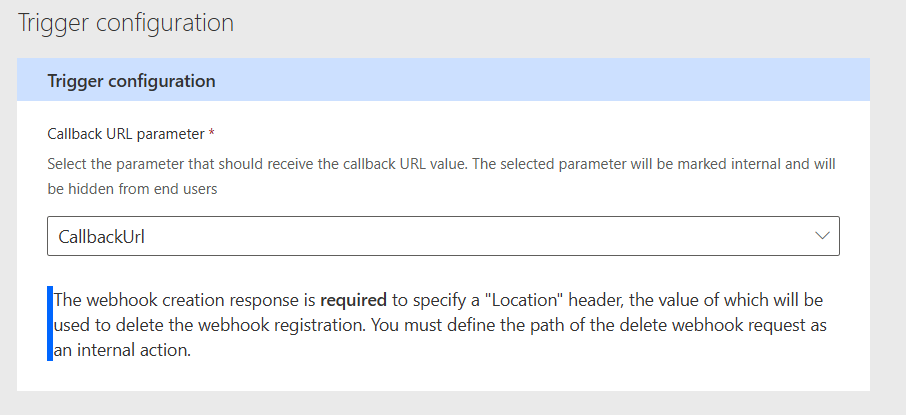
Very good! Update Connector and let's test it!
Testing the custom trigger
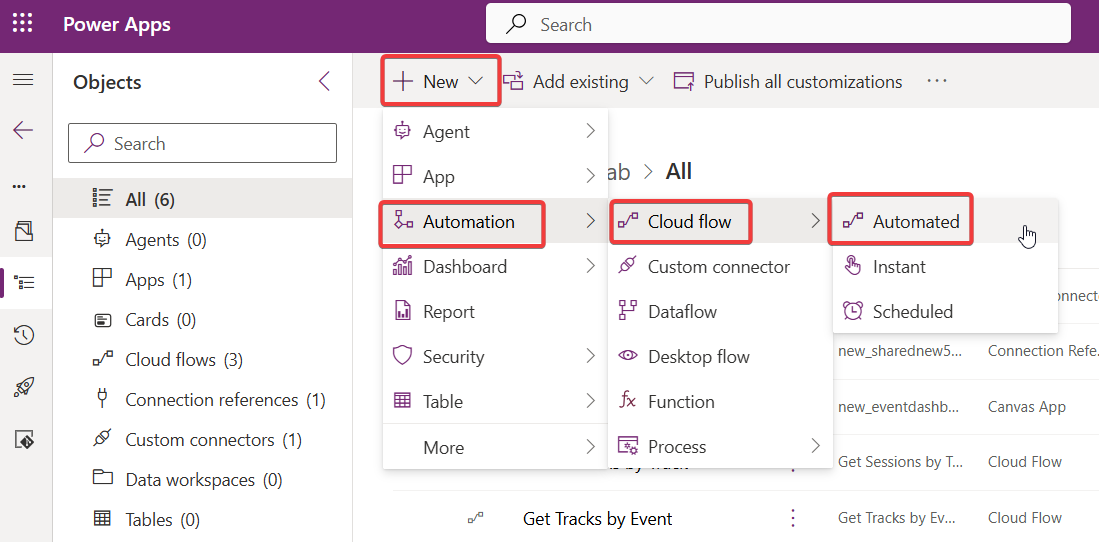
We will test the trigger using Power Automate, so navigate back there and create a new flow, this time not a Manual one, but instead an Automated one. In the Dialog select Skip, we will give it a name and select the trigger in the next step.
In the Flow Editor first give the flow a name and afterwards go to Custom in the trigger action and select Event API. You should see your trigger here, select it. You will see all triggers of our Custom Connector and there the When a form is submitted we just created. 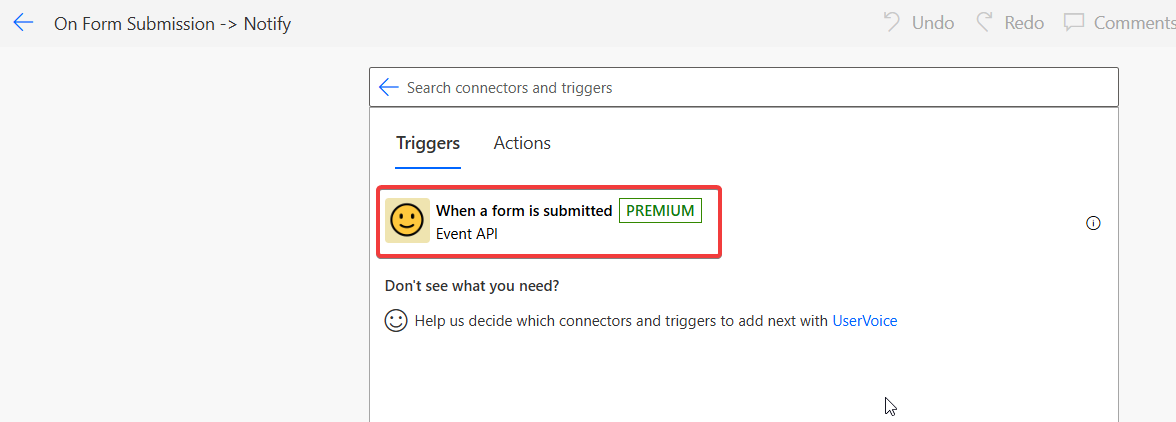
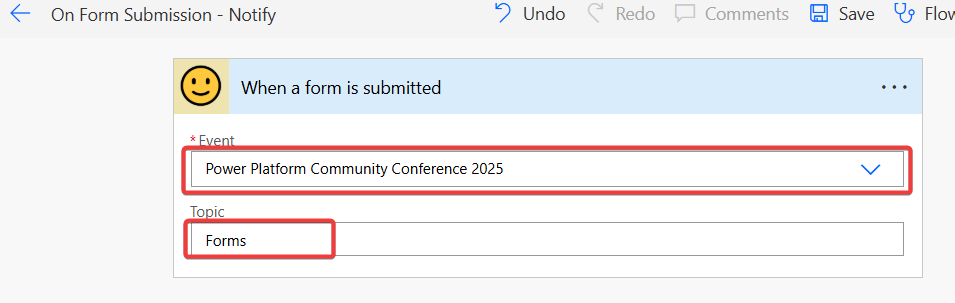
Select the event you want to subscribe for and enter Forms as topic, so that the Event API knows what you are subscribing to.
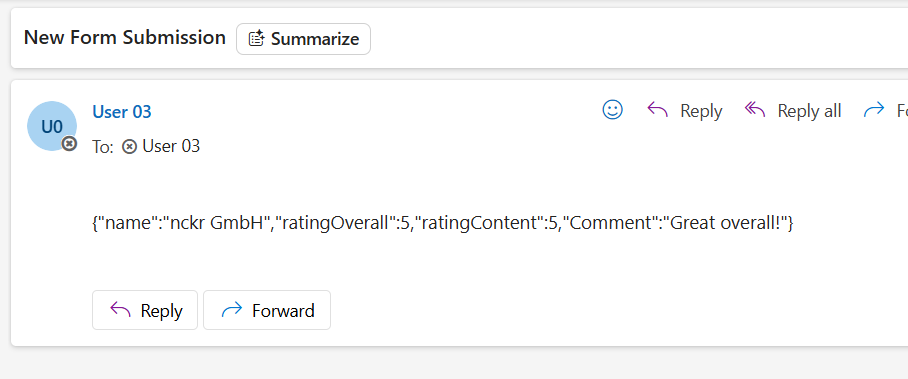
Afterwards create any kind of notification to be notified about new submissions, you can for example use the Outlook 365 connector to send your user a mail.
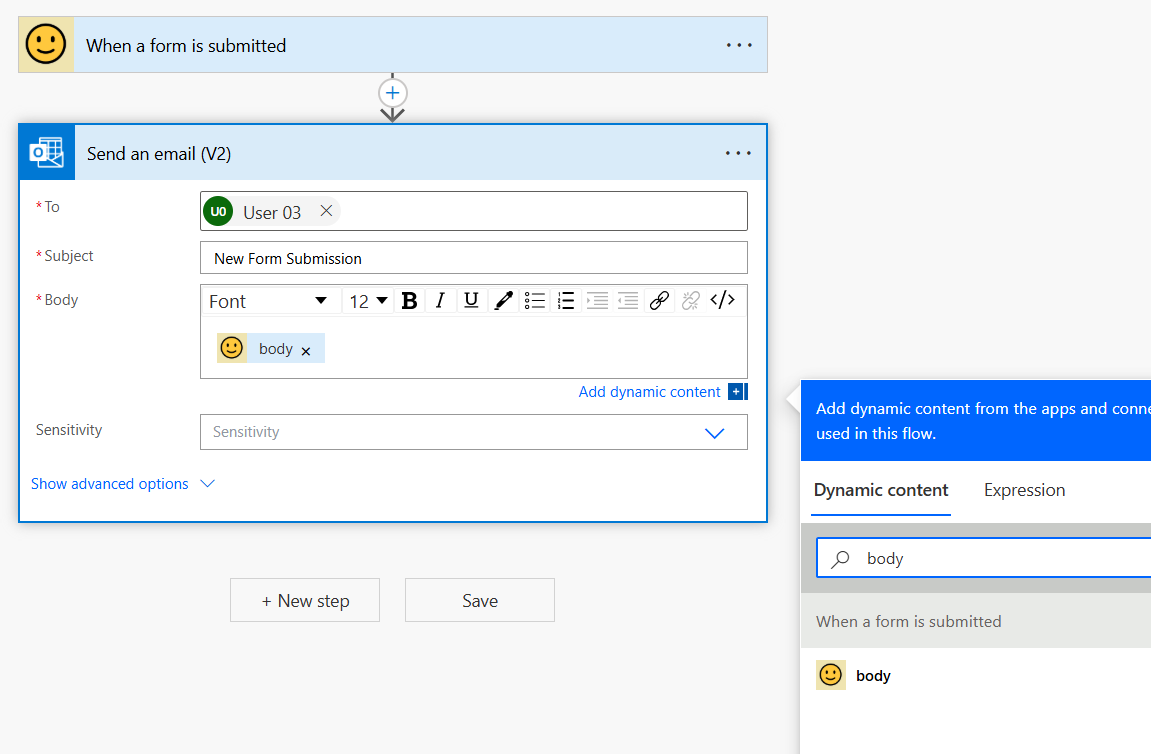
And here we are, submit a form for example by triggering the Submit Form flow we built earlier and tada! Here is our notification 🙂
Congratulation! You have build a complete flow including dynamic action, custom trigger and hopefully got descriptions! How good the descriptions are will be tested in the next lab where we will use the Custom Connector for an Event agent.
🔥 Bonus-Challenge #1: Form Submitter Power Apps
In order to make testing our Trigger easier it would be great to have a Canvas App where user can easily submit forms. Your challenge is to build such an app!