How to get Codex to produce the code you want!
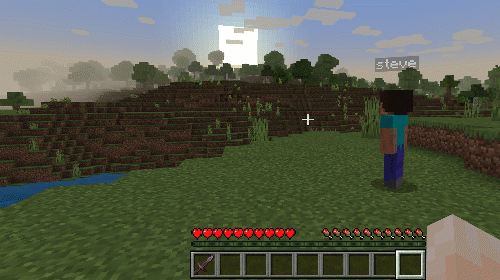
Have you seen AI models that can generate code for you? Well, if you haven’t, you’re going to see them a lot more soon thanks to models like OpenAI’s Codex models. Codex is a family of AI models from Open AI that translates between natural language and code in more than a dozen programming languages. The power of these AI models is that you can quickly develop and iterate on your ideas and build products that help people do more. Here is an example how you can have a conversation with a Minecraft character and have it follow your instructions by generating Minecraft API commands behind the scenes.
This article will show you how to get models like Codex to generate code you want using a technique called Prompt Engineering. Prompt engineering is the practice of using prompts to get the output you want. A prompt is a sequence of text like a sentence or a block of code. The practice of using prompts to elicit output originates with people. Just as you can prompt people with things like a topic for writing an essay, amazingly you can use prompts to elicit an AI model to generate target output based on a task that you have in mind.
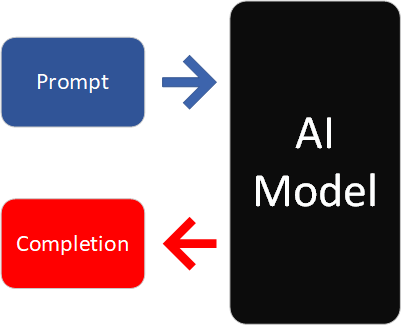
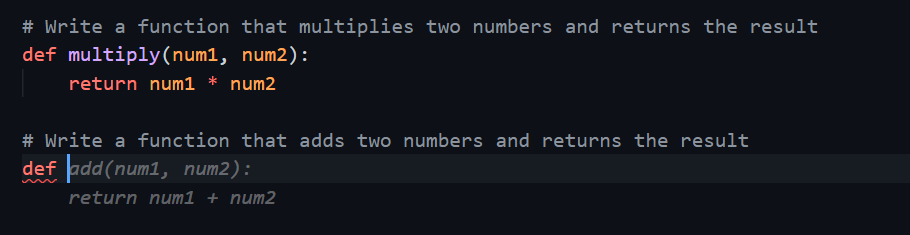
Like a person writing an essay, an AI model takes a prompt and continues writing based on the text in the prompt. The new text that the model outputs is called the completion. An example task might be to write a Python program to add two numbers. If you write out the task as a Python comment like so:
# Write a function that adds two numbers and returns the result.
And give it that comment as a prompt to Codex, it will generate the code as the completion for you like this:
def add(a, b):
    return a + b
The easiest way to get started with OpenAI is to use the OpenAI Playground. This picture shows the Playground after Codex has generated the completion for the prompt in the comment.

The best way to learn how to use OpenAI models is to try them out. Check out the Getting Access section below to learn how you can get started. OpenAI has a number of examples for how to use their models including code examples. For Codex, the best practices documentation is a great resource for understanding how use to it.
Codex also powers GitHub Copilot, an AI pair programmer available in Visual Studio and Visual Studio Code. Copilot draws context from code and comments you’ve written, and then suggests new lines or whole functions. I wrote this article in VS Code, and as I wrote the above Python example, Copilot automatically used Codex to suggest the code. Below is a screenshot of Copilot in action. The grey text including the Python function is Copilot’s suggested completion. Note that it even suggests the close quote for the Markdown code section.

So how can you apply the power of models like Codex in your applications? An example like the one above is simple and easy for Codex to generate. For custom applications, you may need to craft the prompt to better describe your problem. This includes giving Codex examples to help tell it what you are looking for. The rest of this article shows you examples and techniques in prompt engineering to help you get the code you want.
Tell It: Guide the Model with a High Level Task Description
You saw above how you can tell Codex what you want and it will generate it. Codex is amazingly capable at generating code. The quality of its completions depends a lot on what you tell it to do.
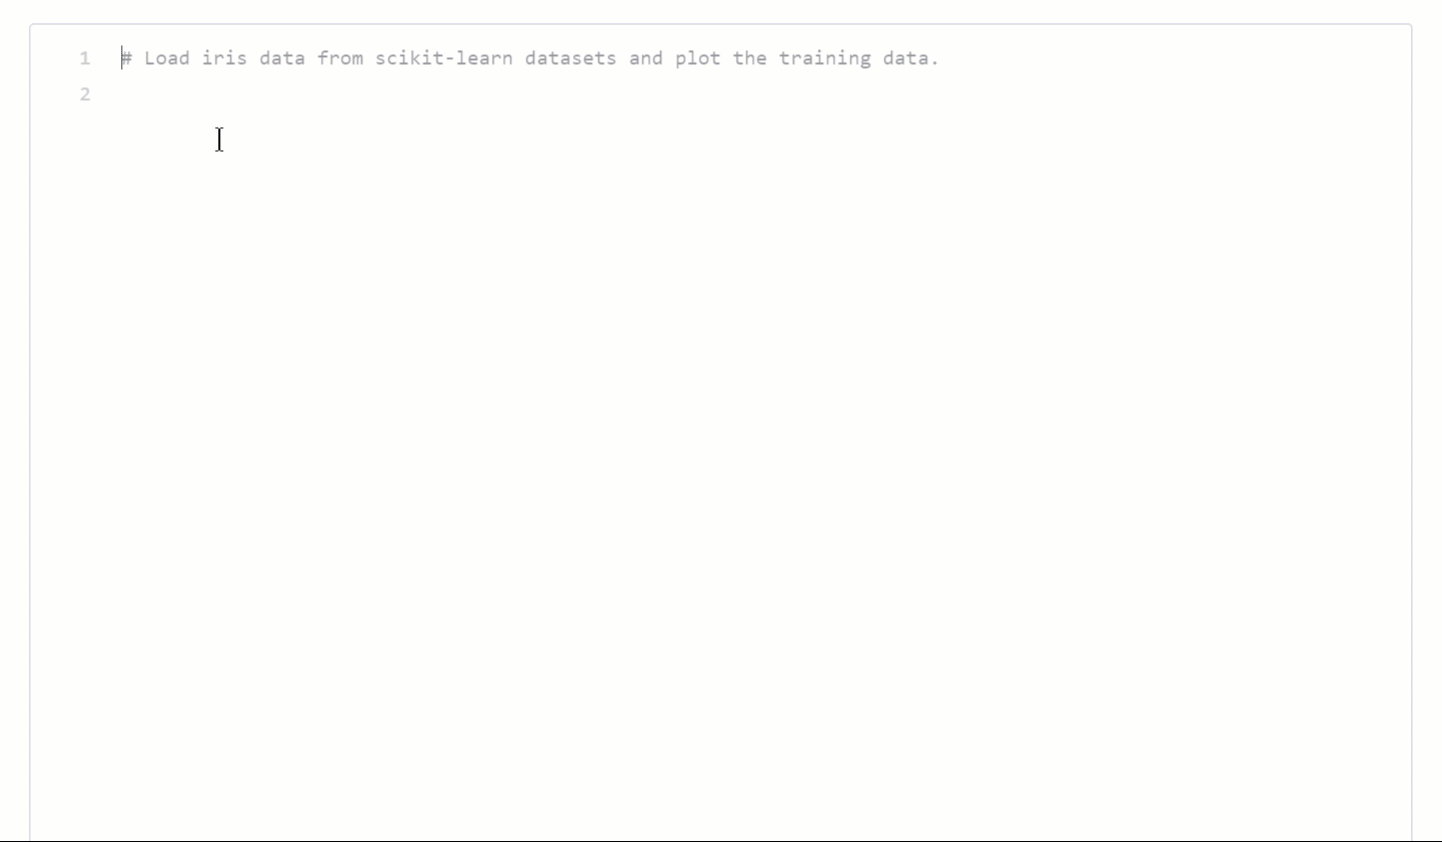
For starters, it is usually a good idea to start your prompt with a high-level description of what you are asking Codex to do. As an example, let’s say you want Codex to generate some Python code to plot data from a standard dataset. We could describe our task like this:
# Load iris data from scikit-learn datasets and plot the training data.
Codex is likely to respond with something like the following. Note that it generates code that assumes the scikit-learn datasets package is imported as datasets.

To fix this, you can tell Codex a bit more detail about what you want it to do. You can tell it that you want Python output and give it additional instructions as well, such as loading libraries first before using them.
# Generate a Python program following user's instructions.
# Be helpful and import any needed libraries first.
Now the output is more reasonable! It loads the expected libraries first before using them. Adding import into the prompt also helps Codex know that you want to import libraries first.
This pattern combines a high level task description with a more specific user instruction. Together these are passed to the model as the prompt, which returns a completion.
Show It: Guide the Model with Examples
Prompts are the input sequences given to an AI model, which generates the output word by word. For a given model, the exact sequence of text that you provide to the model in the prompt influences all of the subsequent output.
Suppose that you prefer a slightly different style of Python code from what Codex generates. For example, to add two numbers, you like to name your arguments differently like this:

The general principle in working with models like Codex is that you tell it what you want it to do. A highly effective way of telling Codex what you want is to show it examples. Then it will work hard to match its output to the way you like. If you give Codex a longer prompt including the above example, then its completion names the arguments exactly as with the example you gave.
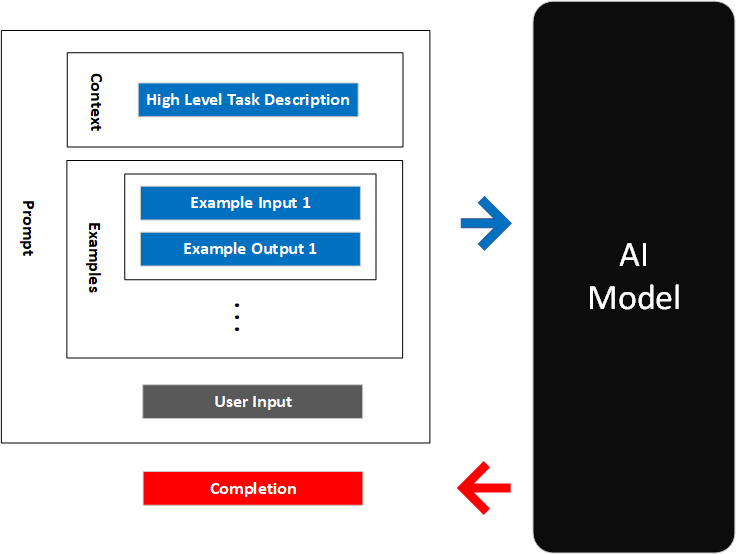
Zero-shot, one-shot, and few-shot learning
As you work with large AI models, you may hear terms like zero-shot learning. Zero-shot learning is a prompt that has no examples - for example just a task description. One-shot has one example, and few-shot has more than one example.
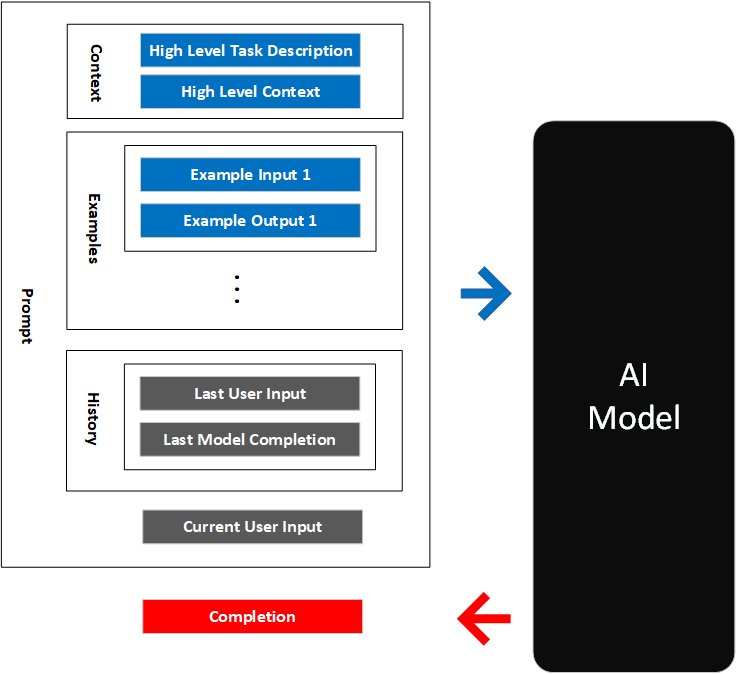
Below is a diagram capturing the general pattern for few-shot learning:
Describe It: Guide the Model with High Level Contextual Information
Codex is trained on a large amount of open source code. As you saw in the example with scikit-learn for Python, it knows about many libraries and packages in a variety of languages.
What if you want to use a library that Codex doesn’t know about? You know by now that the way to get Codex to do something is … to tell it or show it! Specfiically, you can describe the API library to Codex before you use it.
The Minecraft Codex sample uses Minecraft’s Simulated Player API to control a character in the game. The Simulated Player API is a TypeScript library that lets you issue commands to move, chat, look at inventory, mine, and craft items. It’s a newer API that Codex doesn’t know about yet. Let’s see how Codex does generating code for it for the following prompt:
/* Minecraft bot commands using the Simulated Player API. When the comment is
conversational, the bot will respond as a helpful Minecraft bot. Otherwise,
 it will do as asked.*/

// Move forward a bit
Codex tries to make an educated guess using ‘bot’ and ‘Simulated Player’ as cues:

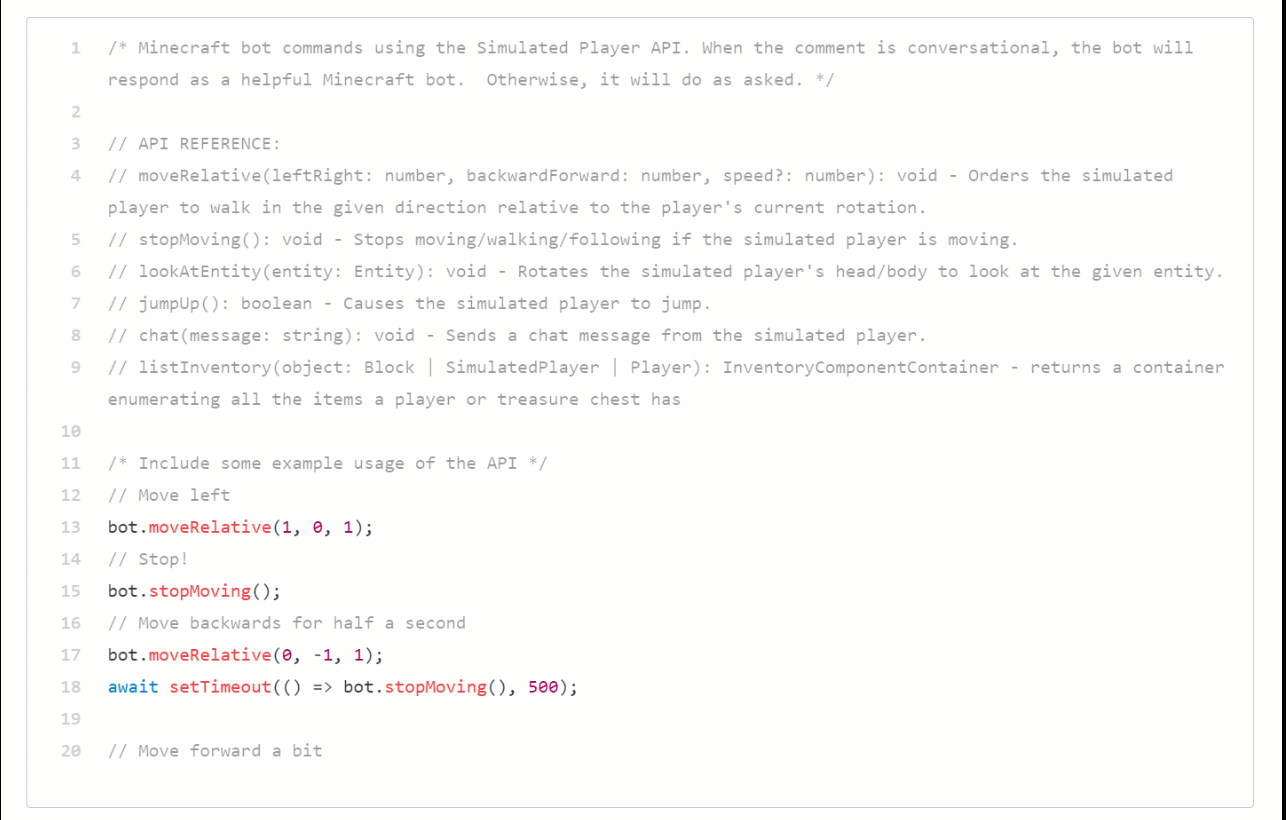
But it’s not correct Simulated Player code. We can show Codex what the Simulated Player API looks like using function signatures for the library. Below is a subset of the API definiition.
// API REFERENCE:
// moveRelative(leftRight: number, backwardForward: number, speed?: number): void - Orders the simulated player to walk in the given direction relative to the player's current rotation.
// stopMoving(): void - Stops moving/walking/following if the simulated player is moving.
// lookAtEntity(entity: Entity): void - Rotates the simulated player's head/body to look at the given entity.
// jumpUp(): boolean - Causes the simulated player to jump.
// chat(message: string): void - Sends a chat message from the simulated player.
// listInventory(object: Block | SimulatedPlayer | Player): InventoryComponentContainer - returns a container enumerating all the items a player or treasure chest has
With the above API definition and some examples, you can get Codex to generate code that follows the API. Here are some examples using the API to control a Minecraft character.
/* Include some example usage of the API */
// Move left
bot.moveRelative(1, 0, 1);
// Stop!
bot.stopMoving();
// Move backwards for half a second
bot.moveRelative(0, -1, 1);
await setTimeout(() => bot.stopMoving(), 500);
Notice how the first example makes explicit what values to use for the moveRelative function signature. Once you have done that, we can ask Codex an instruction to move the character forward a bit. It will then generate the correct code.
This pattern adds high level context in the form of the API definition, as well as examples to help Codex understand what you want it to do. It also allows you to use the API to generate code that is more correct.
Remind It: Guide the Model with Conversational History
For real application use cases with natural language input, it is important to be able to carry the context of a conversation. Consider the following instructions:
User: I want to order a 12oz coffee
User: Oh and can you put it in a 20oz cup?
The AI model would need to know that “it” refers to the 12oz coffee. This is easy for humans, but Codex is a fixed model: it doesn’t change based on the user’s input. Codex doesn’t remember from API call to API call what the last prompt was or what it returned as the completion. How do we get Codex to know that “it” refers to the 12oz coffee? That’s right - we tell it what the user said before. What you can do is add the last input+completion pair as an additional example in the prompt. That gives Codex enough context to give better completions.
Let’s see this in action in another sample application: Codex Babylon. Codex Babylon is a Typescript application that uses BabylonJS to render a 3D scene. BabylonJS is a popular framework for 3D rendering. Codex Babylon provides a web interface to enter natural language commands to place and manipulate objects in a 3D scene. The commands are sent to Codex to generate code that places the objects in the scene. The code is then executed by the app in the browser.
In the animation below, you see the natural language input to make and manipulate cubes, the BabylonJS code that Codex generates, and then the output being rendered right in the browser. You can see that it correctly interprets the user’s instruction to “make them spin”.

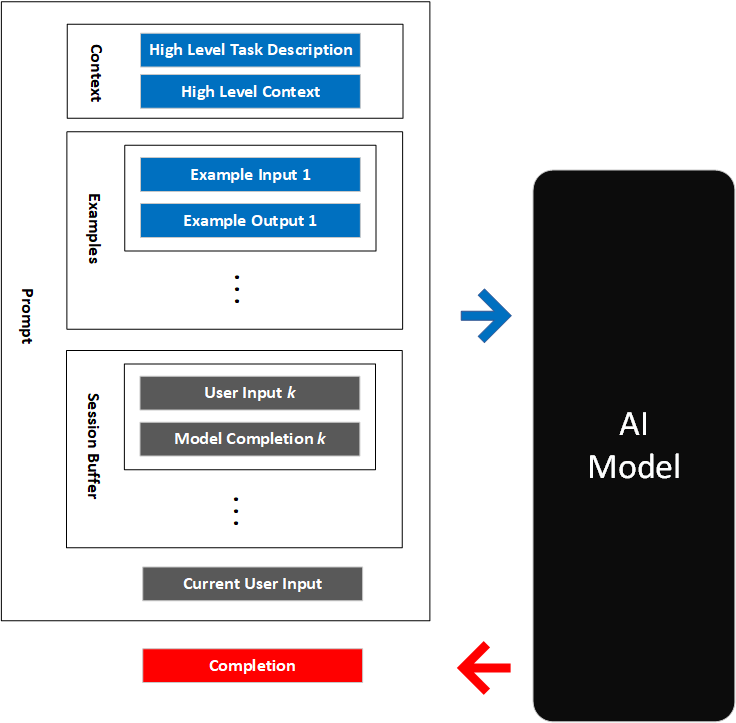
As you might expect, it is not practical to keep adding to the input / output history indefinitely. The context has a limited size. So we keep a rolling window of the user input history in the prompt. This allows Codex to be able to deference things like ‘it’. We call this the session buffer. The Codex Babylon sample includes an implementation of a session buffer.
Putting it all together
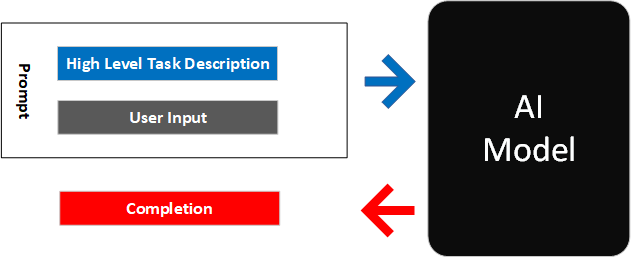
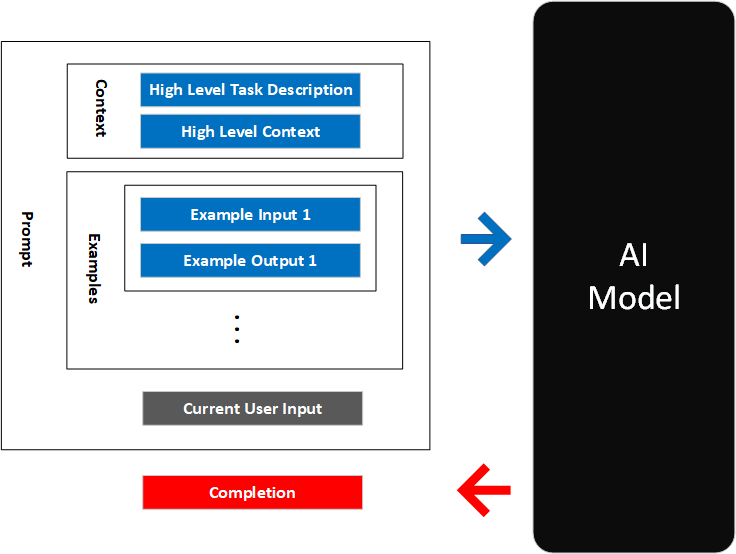
Now we are ready to put all of this together. For a given application, you can provide Codex with a prompt consisting of the following:
- High level task description: Tell the model to use a helpful tone when outputting natural language
- High level context: Describe background information like API hints and database schema to help the model understand the task
- Examples: Show the model examples of what you want
- User input: Remind the model what the user has said before
The boxes in the diagram below are to help you think about what goes into a prompt. The OpenAI models are very flexible and there are no rules that the prompt must follow a specific structure. You can intermix any of the parts (which may get you different results) and you can add or remove parts as you see fit. We hope to cover variations of these patterns in the future. Experiment and see what works for you!
Beyond the Basics
I hope you have enjoyed this introduction to prompt engineering. Prompt engineering is a great way to get started and learn if Codex is a good fit for your application. You can use these same techniques with the other OpenAI models like GPT-3, as well as other foundation models or large language models. As you work to put your application toward production usage, there are a few things you may want to think about.
Hyperparameters
You can tune the behavior of OpenAI models with various hyperparameters such as number of tokens, temperature, and others. The hyperparameters are the parameters that define the behavior of the model. The hyperparameter temperature influences how the model completion may change each time, even with the same input. Setting the temperature to 0 should give you the same output each time, at least within the same session. The stop sequence is useful with Codex to stop it from generating variations of similar code. You can do that by setting the stop sequence to the comment sequence for the programming language you are working with. For example # for Python and // for JavaScript. Other hyperparameters are described in the OpenAI documentation.
Fine Tuning
Fine tuning is the process of using a dataset of curated prompt-completion pairs to customize a model’s behavior for your use case. Fine tuning can increase the accuracy of the completions for your prompts. We won’t cover fine tuning in detail here as it is not available yet for Codex. Here are links to general documentation for fine tuning on OpenAI and Azure.
User Experience
User preception can make or break the experience of what you build. Here are a few areas to keep in mind as you welcome users to your application.
- Performance: Prompt engineering as we have discussed here can increase your prompt size, which in turn increases the latency of the completion responses from Codex. For production applications, you may need to decrease your prompt size to improve the perceived latency of your application. One way to do this is to fine tune your model. In addition to improving accuracy of the model completions, fine tuning has the added benefit that it may improve performance by making it possible to have good results with shorter context in the prompt.
- Interaction Design: How you guide users in their interaction with Codex can have a significant impact on their success with using the model. This is especially true because the output of the model is not always reliable. For example, Copilot makes it easy for users to reject Codex’s suggestions because a user has to actively accept Codex’s output. Because VS Code is an IDE, it’s easy for users to edit Codex’s output if it needs fixing.
- Responsible Use: Large models such as OpenAI are trained on internet data, and can reflect the biases in the training data. To use Codex or other OpenAI models in production, you need to do things like content filtering. Both OpenAI and Azure OpenAI Service offer capabilities to do this. The OpenAI content filter is described here.
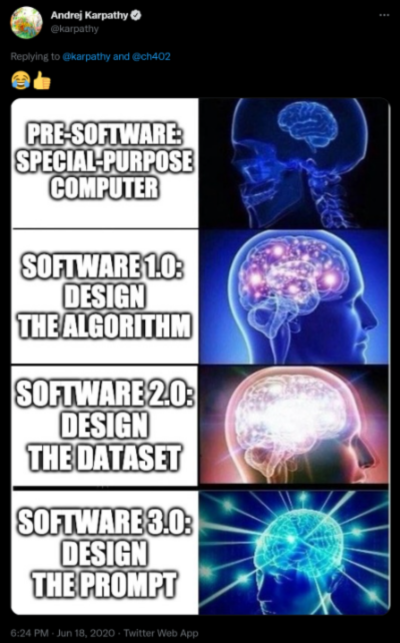
Prompt Engineering as “Software 3.0”
Writing prompts is a new skill in how to build software. Andrej Karpathy, the head of AI at Tesla, shared this picture that designing prompts is “Software 3.0” in a Twitter exchange with Chris Olah.
With what you learned in this article, you can take your first steps to become a Software 3.0 wizard :D!
Getting Access to Codex, Copilot, and OpenAI
Signing up for OpenAI is easy. Codex is currently in limited preview: registered Microsot Build 2022 attendees can sign up to use Codex and other OpenAI models for free. See the details here. They can also sign up to use Copilot from the same page.
Microsoft also offers OpenAI models in the Azure OpenAI Service with Azure’s enterprise capabilities of security, compliance, and global reach. Azure OpenAI Service follows Microsoft’s principles for responsible AI use and offers tools to help you offer these models responsibliy to customers. You can learn more about Azure OpenAI Service and sign up here.
Next Steps
There is no substitute for playing with the models yourself to learn how to use this exciting new technology. You can also look at these samples to learn about building Codex based applications in more detail, including prompt engineering.
We can’t wait to see what you build with Codex to help people achieve new things or to do things more quickly! If you have any questions or comments, feel free to reach out.
Contributions
Keiji Kanazawa (GitHub, Twitter) wrote this article. Ryan Volum helped me and many others understand prompt engineering and implemented many of these techniques in the sample applications. Dom Divakaruni, Seth Juarez, Brian Krabach, Jon Malsan, Jennifer Marsman, Adam Zukor and others reviewed this blog post and provided valuable feedback.