Section 4 - Create the Entra App Registrations
SPARK utilizes Entra registered applications to perform actions within Graph, SharePoint, and Exchange. Two registered applications are required for this toolkit.
Requirements
An Entra administrator will be required for this step. At minimum the installer must have:
- Access to the Microsoft Entra admin center
- The installer must have the Application Administrator or Higher Entra ID RBAC role
- PowerShell 7.2+ installed on the machine performing the installation
- The appreg-spark-sendmail app will require the certificate you generated in the pre-requisites.
PowerShell Script
- Review the script and install the required modules if needed
- Comment out the appropriate
Connect-MgGraphline for your environment - Run the script
- Validate that the
appreg-spark-sendemailapplication registration is created - Complete steps 3-4 to consent the permissions and add the certificate
- Validate that the
appreg-spark-spoactionsapplication registration is created - Complete steps 7-9 to consent the permissions and configure authentication and api uri
This script will only create the application registrations and apply the api permissions. You will need to complete the rest of the configuration afterwards.
1
2
3
4
5
6
7
8
9
10
11
12
13
14
15
16
17
18
19
20
21
22
23
24
25
26
27
28
29
30
31
32
33
34
35
36
37
38
39
40
41
42
43
44
45
46
47
48
49
50
51
52
53
54
55
56
57
58
59
60
61
62
63
64
65
66
67
68
69
70
71
72
73
74
75
76
77
78
79
80
81
82
83
84
85
86
87
88
89
90
91
92
93
94
95
96
97
98
99
100
101
102
103
104
105
106
107
108
109
110
111
112
113
114
115
116
117
118
119
########################################## Required Modules ##########################################
#Install-Module Microsoft.Graph.Applications

########################################## Connect to Graph ##########################################

# Connect to MgGraph
Import-Module Microsoft.Graph.Applications

# Commercia/GCC
#Connect-MgGraph -Scopes "Application.ReadWrite.All"

# GCC High
#Connect-MgGraph -Environment UsGov -Scopes "Application.ReadWrite.All"

# DoD
#Connect-MgGraph -Environment UsGovDoD -Scopes "Application.ReadWrite.All"

########################################## App Registrations ##########################################

# The application registrations
$appRegistrations = @(
    @{
        name = "appreg-spark-sendmail"
        permissions = @(
            # Microsoft Graph
            @{
                ResourceAppId = "00000003-0000-0000-c000-000000000000"
                ResourceAccess = @(
                    # Mail.Send
                    @{
                        Id = "b633e1c5-b582-4048-a93e-9f11b44c7e96"
                        Type = "Role"
                    }
                )
            }
        )
    },
    @{
        name = "appreg-spark-spoactions"
        permissions = @(
            # Microsoft Graph
            @{
                ResourceAppId = "00000003-0000-0000-c000-000000000000"
                ResourceAccess = @(
                    # Directory.Read.All
                    @{
                        Id = "7ab1d382-f21e-4acd-a863-ba3e13f7da61"
                        Type = "Role"
                    },
                    # Group.Read.All
                    @{
                        Id = "5b567255-7703-4780-807c-7be8301ae99b"
                        Type = "Role"
                    },
                    # Sites.FullControl.All
                    @{
                        Id = "a82116e5-55eb-4c41-a434-62fe8a61c773"
                        Type = "Role"
                    },
                    # User.Read.All
                    @{
                        Id = "df021288-bdef-4463-88db-98f22de89214"
                        Type = "Role"
                    }
                )
            },
            # Office 365 Exchange Online
            @{
                ResourceAppId = "00000002-0000-0ff1-ce00-000000000000"
                ResourceAccess = @(
                    # Exchange.ManageAs.App
                    @{
                        Id = "dc50a0fb-09a3-484d-be87-e023b12c6440"
                        Type = "Role"
                    }
                )
            },
            # Office 365 SharePoint Online
            @{
                ResourceAppId = "00000003-0000-0ff1-ce00-000000000000"
                ResourceAccess = @(
                    # Sites.FullControl.All
                    @{
                        Id = "678536fe-1083-478a-9c59-b99265e6b0d3"
                        Type = "Role"
                    }
                )
            }
        )
    }
)

########################################## Create Application Registrations ##########################################
# Parse the application registrations to create
$appRegistrations | ForEach-Object {
    $appReg = Get-MgApplication -Filter "DisplayName eq '$($_.name)'"
    if($appReg -eq $null) {
        # Create the group
        $appReg = New-MgApplication -DisplayName $_.name

        # Log
        Write-Host "Application Registration created: $($_.name)"
    } else {
        # Log
        Write-Host "Application Registration already exists: $($_.name)"
    }

    # Add the api permission
    Update-MgApplication -ApplicationId $appReg.Id -RequiredResourceAccess $_.permissions

    # Log
    Write-Host "Permission added to the application registration"

    # Log
    Write-Host "Admin consent is required"
}

########################################## Disconnect ##########################################
Disconnect-MgGraph
Manual Steps:
Video Walkthrough
Step 1 - Create the Notifications App Registration
In this step, you will create the appreg-spark-sendmail Application Registration in Entra. This application will be used to send notifications via email to the SPO site owners and admins.
- Sign into Microsoft Entra Admin Center
Use the correct URL for your environment:
Worldwide (Commercial) & GCC
https://entra.microsoft.comGCC-High and DoD
https://entra.microsoft.us
- Select Manage, then App registrations from the left navigation
- Click on + New registration from the top navigation
- Set the Name to
appreg-spark-sendmail - Click on Register to create the application

Step 2. Configure the API permissions using the Manifest
- Select API permissions from the left navigation
- Select Manifest from the left navigation
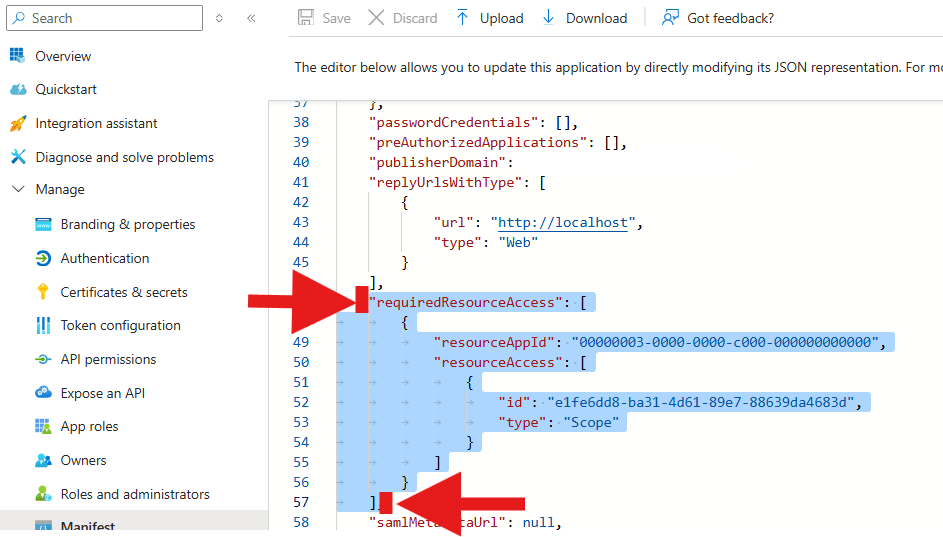
- Find the “requiredResourceAccess[“ property.
-
Highlight everything from
“requiredResourceAccess: [“
to
]
as shown in the figure below and DELETE the highlighted area.
- In the same section, copy and paste in the json code below:
1
2
3
4
5
6
7
8
9
10
11
"requiredResourceAccess": [
 {
     "resourceAppId": "00000003-0000-0000-c000-000000000000",
     "resourceAccess": [
         {
             "id": "b633e1c5-b582-4048-a93e-9f11b44c7e96",
             "type": "Role"
         }
     ]
 }
]
Then click Save.
Validate the permissions are the same as the table below.
| Module Name | Permission | Justification |
|---|---|---|
| Microsoft Graph | Mail.Send | Required for sending email notifications to the distribution lists. |
Step 3 - Grant Admin Consent to the API permissions.
- Select API permissions from the left navigation
- Click on Grant API consent for Contoso
- Click on Yes to approve the permissions requested

Step 4 - Import the Certificate
For this step, you will need the Exchange Send Mail certificate you generated in the pre-requisites step.
- Select Certificates & secrets from the left navigation
- Select the Certificates tab
- Click on Upload certificate

- Select the certificate (.cer) file issued for this toolkit
- Click on Add to upload the certificate
Step 5 - Create the SPO Actions App Registration
This application will be used to authenticate managed identities to access SharePoint Online sites and perform actions such as attestation capture, notifications, and reporting.
- Select App registrations from the left navigation
- Click on + New registration from the top navigation
- Set the Name to
appreg-spark-spoactions
Do not change the application name above. This specific name is referenced by the custom SPFx package used by the SPARK Management Portals.
- Click on Register to create the application
Step 6. Configure the API permissions using the Manifest
- Select API permissions from the left navigation
- Select Manifest from the left navigation
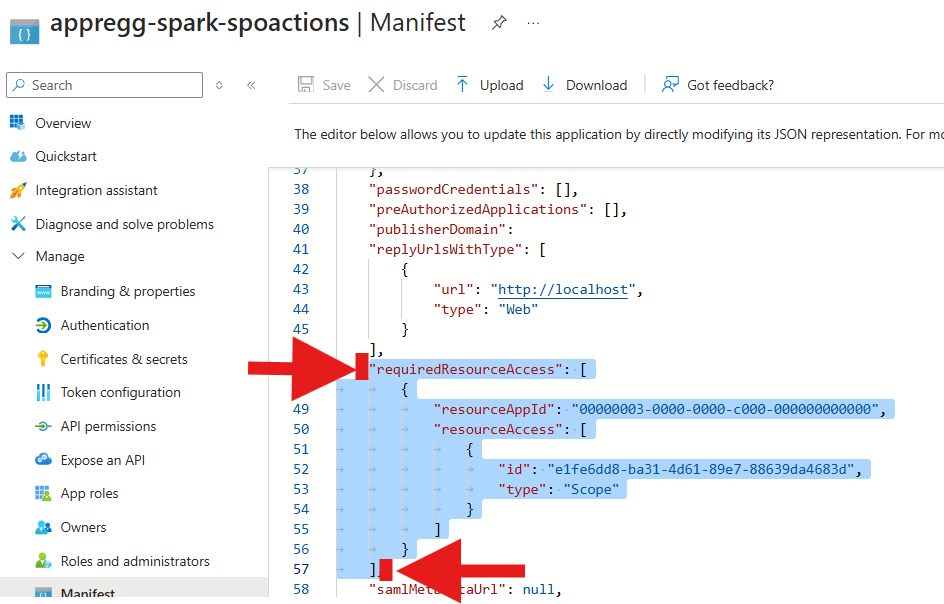
- Find the “requiredResourceAccess[“ property.
- Highlight everything from
“requiredResourceAccess: [“
to
]
as shown in the figure below and DELETE the highlighted area.
- In the same section, copy and paste in the json code below:
1
2
3
4
5
6
7
8
9
10
11
12
13
14
15
16
17
18
19
20
21
22
23
24
25
26
27
28
29
30
31
32
33
34
35
36
37
38
39
40
41
"requiredResourceAccess": [
    {
        "resourceAppId": "00000003-0000-0000-c000-000000000000",
        "resourceAccess": [
            {
                "id": "7ab1d382-f21e-4acd-a863-ba3e13f7da61",
                "type": "Role"
            },
            {
                "id": "5b567255-7703-4780-807c-7be8301ae99b",
                "type": "Role"
            },
            {
                "id": "a82116e5-55eb-4c41-a434-62fe8a61c773",
                "type": "Role"
            },
            {
                "id": "df021288-bdef-4463-88db-98f22de89214",
                "type": "Role"
            }
        ]
    },
    {
        "resourceAppId": "00000003-0000-0ff1-ce00-000000000000",
        "resourceAccess": [
            {
                "id": "678536fe-1083-478a-9c59-b99265e6b0d3",
                "type": "Role"
            }
        ]
    },
    {
        "resourceAppId": "00000002-0000-0ff1-ce00-000000000000",
        "resourceAccess": [
            {
                "id": "dc50a0fb-09a3-484d-be87-e023b12c6440",
                "type": "Role"
            }
        ]
    }
]
You may need to adjust the indentation of the new array to ensure the JSON is valid.
- Click Save
Step 7 - Grant Admin Consent to the API permissions.
- Select API permissions from the left navigation
- Click on Grant API consent for Contoso
- Click on Yes to approve the permissions requested
Validate the API Permissions
| Module Name | Type | Permission | Justification |
|---|---|---|---|
| Microsoft Graph | Application | Directory.Read.All | Required to read user information from Entra. |
| Microsoft Graph | Application | Group.Read.All | Required to read M365 group information from Entra. |
| Microsoft Graph | Application | Sites.FullControl.All | Required to make changes to SharePoint sites in the tenant. |
| Microsoft Graph | Application | User.Read.All | Required to extract user information from Entra. |
| Office 365 Exchange Online | Application | Exchange.ManageAs.App | Manages the distribution lists associated with this application. |
| Office 365 SharePoint Online | Application | Sites.FullControl.All | Required to make changes to SharePoint sites in the tenant. |
Step 8: Configure the SPO Actions App Registration
- Select the Authentication from the left navigation
- Select the + Add a platform under Platform configurations
- Select Web under Web applications

- Under Set Redirect URIs https://localhost as the Redirect URIs
- Select ID tokens under Implicit grant and hybrid flows
- Click on Configure to add the platform

Step 9. Configure the API URI
This is the API url the SPFx solution will use to authenticate with the application registration.
- Click Expose an API from thApplication ID URI left navigation
- Next to Application ID URI Select Add
- Append /appreg-spark-spoactions to the end of the api
This makes the URI unique and easy to find when troubleshooting
- Click on Save to set the Application ID URI

If the app registration name was customized, then you must apply the same value.
- Select + Add a scope under Scopes defined by the API
- Set the following properties, then click on Add scope to add the scope
| Name | Value |
|---|---|
| Scope name | user_impersonation |
| Who can consent? | Admins and users |
| Admin consent display name | Access SPARK SPO Actions as a user |
| Admin consent description | Allow the application to access SharePoint Online on behalf of an admin. |
| User consent display name | Access SPARK SPO Actions as a user |
| User consent description | Allow the application to access SharePoint Online on behalf of the user. |
| State | Enabled |

DOCUMENTATION STEP
Document the following values in the SPARK Deployment Workbook
Deployment Tab > Azure General
- appreg-spark-spoactions appID The App Registration Client ID
- appreg-spark-spoactions objID The App Registration Object (principal) ID
- v_exo_sendEmailApp - appreg-spark-sendmail Enterprise app Client ID
- v_exo_app_id - appreg-spark-sendmail app registration Client ID
- Exchange SendMail Certificate Thumbprint The thumbprint of the exchange certificate
- Certificate Password The password for the exchange certificate
Continue to creating the Creating the PnP App Registration