vscode-react-native
React Native Tools


This VS Code extension provides a development environment for React Native projects.
Using this extension, you can debug your code and quickly run react-native commands from the command palette.

Table of Contents
- Getting started
- React Native commands in the Command Palette
- Debugging React Native applications
- Customization
- Developing inside a Docker Container
- Contributing
- Known Issues
Getting started
Before going any further make sure that you:
- have a working React Native environment.
- are using VS Code and have installed this extension from the Marketplace.
- have your React Native project root folder open in VS Code.
Please notice that the extension uses .vscode/.react directory at the project root to store intermediate files required for debugging. Although these files usually get removed after debug session ends, you may want to add this directory to your project’s .gitignore file.
React Native commands in the Command Palette
In the Command Palette, type React Native and choose a command.
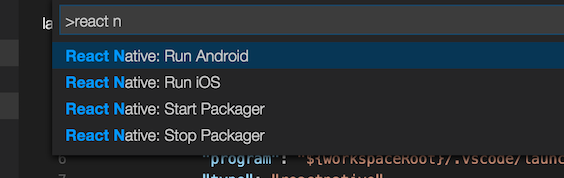
The Run Android command triggers react-native run-android and starts your app for Android.
The Run iOS command similarly triggers react-native run-ios and starts your app in the iOS simulator (e.g. iPhone 6).
The Packager commands allow you to start/stop the Metro Bundler (formerly React Packager).
The full list of commands is:
| Name | Description |
|---|---|
| Run Android on Emulator | Run an Android application on Emulator. Launch order: check target platform support, load run arguments, start Packager, run app in all connected emulators |
| Run Android on Device | Run an Android application on Device. Launch order: check target platform support, load run arguments, start Packager, run app in all connected devices |
| Run iOS on Simulator | Run an iOS application on Simulator. Launch order: load run arguments, check target platform support, start Packager, run app in only one connected emulator |
| Run iOS on Device | Run an iOS application on Device. Launch order: load run arguments, check target platform support, start Packager, run app in only one connected device |
| Run Expo | Run Exponent application. Launch order: login to exponent, load run arguments, start Packager, run app |
| Start Packager | Start Packager in context project workspace folder |
| Stop Packager | Stop Packager |
| Restart Packager | Restart Packager |
| Publish To Expo | Publish to Exponent Host. Launch order: login to exponent, execute Run Expo command, then publish app to host |
| Show Dev Menu | Show development menu for running aplication on iOS or Android device or emulator |
| ReloadApp | Reload an application |
| Run Element Inspector | Load development tools for inspect application UI elements |
Debugging React Native applications
To start debugging create a new debug configuration for your ReactNative app in your .vscode/launch.json. Adding a new configuration can be done by opening your launch.json file and clicking on Add Configuration... button and choosing a relevant debug configuration. All available debug configurations for ReactNative can be accessed by typing in ReactNative and picking one from the list populated by Intellisense as shown in the image below.
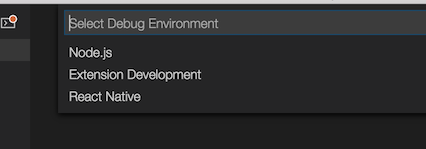
In case if you haven’t created the .vscode/launch.json file yet, you can add a whole default debug configuration set. To do that click the debug icon ![]() in the View bar, and then click the configuration (gear) icon
in the View bar, and then click the configuration (gear) icon ![]() , then choose the React Native debug environment.
, then choose the React Native debug environment.
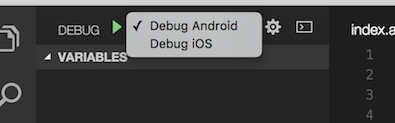
VS Code will generate a launch.json in your project with some default configuration settings as shown below. You can safely close this file, choose the appropriate configuration in the Configuration dropdown, and then press F5 (or click Green Arrow ![]() button) to start debugging your app in VS Code.
button) to start debugging your app in VS Code.
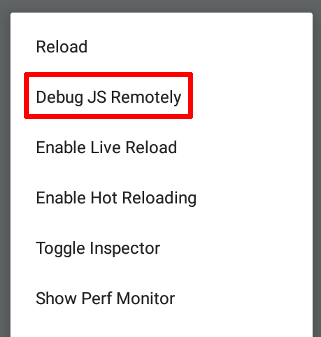
Once app is loaded and running, open the developer menu inside your application and enable remote debugging by clicking on Debug JS Remotely button.
The extension allows you to debug multiple devices and configurations, please read the following sections for more information for your particular use case.
Hermes (Android)
Hermes is the new JavaScript engine optimized for running React Native apps on Android. It improves app performance and decreases app size.
Click here to learn more about Hermes.
Debugging apps with Hermes enabled is currently experimental. Please, see this issue for current known issues on Hermes support.
To debug while using Hermes engine, please choose one of the following debug configurations:
- React Native (Hermes): Debug Android - Experimental
{
    "name": "Debug Android (Hermes) - Experimental",
    "cwd": "${workspaceFolder}",
    "type": "reactnativedirect",
    "request": "launch",
    "platform": "android"
}
- React Native (Hermes): Attach to Hermes application - Experimental
{
    "name": "Attach to Hermes application - Experimental",
    "cwd": "${workspaceFolder}",
    "type": "reactnativedirect",
    "request": "attach"
}
iOS devices
Debugging on an iOS device requires following manual steps:
- Install ios-deploy
npm install -g ios-deploy. - Install a valid iOS development certificate.
- In your project’s
launch.jsonfile settargettodevice. If you need to specify the exact device to run, you can settargettodevice=<iOS_device_name>, or you can also userunArgumentsproperty to specify a particular device to run on in case multiple devices are connected (e.g."runArguments": [ "--device", "My iPhone" ]) - Choose the Debug iOS option from the “Configuration” dropdown and press F5.
- Shake the device to open the development menu and select “Debug JS Remotely”.
Custom scheme for iOS apps
If you want to use a custom scheme for your application you can either pass it as part of the runArguments parameter arguments, or set the scheme configuration parameter as shown below:
"runArguments": ["--scheme", "customScheme", ...]
// or
"runArguments": ["--scheme=customScheme", ...]
// or
"scheme" : "customScheme"
Please be aware, specifying the scheme value as a part of the runArguments parameter arguments will override the scheme configuration parameter value, if it set.
Expo applications
To debug a project created using Expo or the create-react-native-app task, you can use embedded support for Expo.
Prepare your environment by following the Expo CLI Quickstart instruction.
For correct work with Expo this extension requires Android SDK.
So also pay attention to the React Native CLI Quickstart tab, where you can find the Android SDK installation guide:
- Install the Expo app on the target device or emulator
- Ensure that the
Android SDKis installed on your computer (You may install it using theReact Native CLI Quickstartguide) - Ensure that the
expo-cliis installed globally (npm install -g expo-cli)
You can verify that everything is working correctly and that the environment is ready for use with the npx react-native doctor command.
To start debugging in Expo follow these steps:
- Open your project in VS Code with this extension installed.
- Create a debug configuration (as described in Debugging React Native applications), select
Debug in Exponentin the debug drop-down menu, and start debugging - Wait while some dependencies are configured - the extension will install
Expo Development Library(@expo/xdl)when this feature is used for the first time. - If you have not used Exponent on this system before, you will be prompted for an Exponent username and password.
Exponent account allows you to use Expo cloud services. More info about how it works is available here.
If you have not created an Exponent account, then specifying a new username and password will create one.
Note that there is no e-mail associated with the account, and no way to recover a forgotten password.
If you don’t want to create an Exponent account, you can specify
expoHostTypeparameter in your debug configuration to make Expo work locally (via LAN or on localhost). - Once the packager starts, the extension will open a separate tab with QR code to scan from the Exponent app. Once you do so, the Exponent app will connect to the packager and begin running your app.
-
Once the app is loaded and running, open the developer menu and enable remote debugging by clicking on
Debug JS Remotelybutton.From here you can run and debug the app as normal.
Configuring Expo
The extension supports running through Exponent not just the applications created with Expo but even pure React Native applications (in that case you need to add expo package to node_modules in order to make it work with Expo: npm install expo --save-dev. In either cases it uses app.json configuration file in the root of the project.
If you are running Debug in Exponent configuration or any of pallette commands like Run in Exponent, Publish to Exponent then this file will be created automatically if absent or updated with the following basic configuration section:
{
  "expo": {
    "slug": "MyApp", // Project slug
    "name": "MyApp", // Project name
    "sdkVersion": "31.0.0", // Expo SDK version
    "entryPoint": ".vscode\\exponentIndex.js" // Entrypoint for the project
  },
  "name": "MyApp" // Project name
}
Full list of configuration parameters for expo section in app.json may be found on official Expo documentation page.
For running pure React Native app, the extension, creates and uses .vscode/exponentIndex.js which points to the app entrypoint (index.js or index.android.js or index.ios.js) file.
If you want to change your app entrypoint (for example, from index.js to index.android.js), delete .vscode/exponentIndex.js and then restart your debugging session.
NOTE: The extension caches the version of the exponent SDK used by your project. This is helpful since we don’t want to install the SDK each time you run exponent. If you want the extension to update the SDK version based on your React Native version, just restart VS Code and if it is supported it should work. If it does not please open an issue.
Windows applications
You can debug UWP and WPF React Native for Windows applications by changing the platform in your launch.json configuration:
-
For
UWPusewindows:{ "name": "Debug UWP", "cwd": "${workspaceFolder}", "type": "reactnative", "request": "launch", "platform": "windows" } -
For
WPFusewpf:{ "name": "Debug WPF", "cwd": "${workspaceFolder}", "type": "reactnative", "request": "launch", "platform": "wpf" }
TypeScript and Haul
If you use Haul as your React Native bundler instead of the default Metro, you must add sourceMapPathOverrides to the launch.json file.
For example:
{
  // Other configurations
  "sourceMapPathOverrides": {
      "webpack:///./~/*":   "${workspaceRoot}/node_modules/*",
      "webpack:///./*":   "${workspaceRoot}/*",
      "webpack:///*":     "*"
  }
}
Learn more about source map overrides here
Debugger configuration properties
The following is a list of all the configuration properties the debugger accepts in launch.json:
| Name | Description | Type | Defaults |
|---|---|---|---|
cwd |
The path to the project root folder | string |
${workspaceFolder} |
sourceMaps |
Whether to use JavaScript source maps to map the generated bundled code back to its original sources | boolean |
true |
sourceMapPathOverrides |
A set of mappings for rewriting the locations of source files from what the source map says, to their locations on disk. See Debugging with TypeScript and Haul for details | object |
n/a |
trace |
Logging level in debugger process. May be useful for diagnostics. If set to “Trace” all debugger process logs will be available in Debug Console output window |
string |
log |
address |
TCP/IP address of packager to attach to for debugging | string |
localhost |
port |
Port of packager to attach to for debugging | string |
8081 |
remoteRoot |
The source root of the remote host | string |
null |
localRoot |
The local source root that corresponds to the ‘remoteRoot’ | string |
${workspaceFolder} |
skipFiles |
An array of file or folder names, or glob patterns, to skip when debugging | array |
[] |
debuggerWorkerUrlPath |
Path to the app debugger worker to override. For example, if debugger tries to attach to http://localhost:8081/debugger-ui/debuggerWorker.js and you get 404 error from packager output then you may want to change debuggerWorkerUrlPath to another value suitable for your packager ("debugger-ui" will be replaced with the value you provide) | string |
debugger-ui/ |
platform |
The platform to target. Possible values: android, ios, exponent, windows, wpf |
string |
n/a |
target |
Target to run on. Possible values: simulator, device, device=<iOS device name>, <Android emulator/device id>, <iOS simulator name> |
string |
simulator |
logCatArguments |
Arguments to be used for LogCat (The LogCat output will appear on an Output Channel). It can be an array such as: [":S", "ReactNative:V", "ReactNativeJS:V"] |
array |
["*:S", "ReactNative:V", "ReactNativeJS:V"] |
runArguments |
Run arguments to be passed to react-native run-<platform> command (override all other configuration params) |
array |
n/a |
launchActivity |
The Android activity to be launched for debugging, e.g. it specifies --main-activity parameter in react-native run arguments |
string |
MainActivity |
expoHostType |
The connection type to be used on Expo debugging to communicate with a device or an emulator. Possible values: <ul><li>tunnel - allows to deploy and debug an application by means of Expo cloud services</li><li>lan - allows to deploy and install an application via your LAN</li><li>local - allows to debug an application on an emulator or an Android device without network connection</li></ul> |
string |
tunnel |
env |
Environment variables passed to the debugger and react-native run-<platform> command |
object |
{} |
envFile |
Absolute path to a file containing environment variable definitions | string |
${workspaceFolder}/.env |
variant |
A variant to be passed to react-native run-android, e.g. use devDebug to specify --variant=devDebug |
string |
n/a |
scheme |
A scheme name to be passed to react-native run-ios, e.g. devDebug to specify --scheme=devDebug |
string |
n/a |
productName |
iOS bundle display name e.g. AwesomeProject value means that the extension will search for AwesomeProject.app bundle |
string |
n/a |
Customization
The extension can be further customized for other React Native scenarios. These are the most common:
Logging
To expose internal logs to the output, set the following properties:
{
  "react-native-tools": {
    "logLevel": "Trace"
  }
}
logLevel can be None (no logs), Error, Warning, Info, Debug, Trace (all logs). Default is Info.
Build APK and generate bundle
You can add VSCode tasks to build an .apk file and generate iOS/Android bundles.
The following is an example of a tasks.json for react-native init projects.
Place it in the .vscode folder in your project to use it:
{
    "version": "2.0.0",
    "presentation": {
        "reveal": "always",
        "panel": "new"
    },
    "tasks": [
        {
            "taskName": "Build APK Debug",
            "group": "build",
            "type": "shell",
            "windows": {
                "command": "cd android; if($?) {./gradlew assembleDebug}"
            },
            "linux": {
                "command": "cd android && ./gradlew assembleDebug"
            }
        },
        {
            "taskName": "Build APK Release",
            "group": "build",
            "type": "shell",
            "windows": {
                "command": "cd android; if($?) {./gradlew assembleRelease}"
            },
            "linux": {
                "command": "cd android && ./gradlew assembleRelease"
            }
        },
        {
            "taskName": "Generate Android Bundle",
            "group": "build",
            "type": "shell",
            "command": "react-native bundle --platform android --dev false --entry-file index.js --bundle-output android/main.jsbundle"
        },
        {
            "taskName": "Generate iOS Bundle",
            "group": "build",
            "type": "shell",
            "command": "react-native bundle --platform ios --dev false --entry-file index.js --bundle-output ios/main.jsbundle"
        }
    ]
}
To learn more about tasks in VSCode read the official documentation.
Visit generating Signed APK to learn more about this subject.
Specifying custom arguments for react-native run-* command
Using custom run arguments for react-native run-<platform>:
NOTE: This overrides all other configuration parameters.
{
  "react-native.android.runArguments.simulator": ["--appFolder", "/Users/test/AwesomeProject/android/app", "--deviceId", "emulator-5555"],
  "react-native.ios.runArguments.device": ["--project-path", "ios", "--device", "Max's iPhone"],
}
NOTE: You can get the list of installed simulator devices by:
iOS devices (macOS only):
xcrun simctl list --json devices
Android devices:
adb devices
NOTE: If you want to run the application on an iOS device, make sure you have ios-deploy installed globally.
npm install -g ios-deploy
Setting up the react-native packager
To use a custom port for the react-native packager:
{
  "react-native": {
    "packager" : {
      "port": portNumber
    }
  }
}
If you change this port, then for iOS device and simulator scenarios you will have to modify the native code files. Instructions here.
If you use Android, you need to change the debug server by:
- CTRL+M(CMD+M) in the emulator
- Go to Dev Settings
- Debug server host for device => enter ‘localhost:<yourPortNumber>’.
- Reload application (press
Rtwice)
NOTE: Some aspects of React Native hard-code the port to the default as specified in this issue.
Custom environment variables
Extension supports passing custom environment variables to the React Native Packager process context. To add custom variables you can create .env file in the root folder of your project and add needed environment variables in the following format:
Variable1_name=Variable1_value
Variable2_name=Variable2_value
Variables that are declared in this .env file can override the original environment variables from process.env of the Packager process.
It is possible to transfer environment variables (via env and envFile arguments in launch.json) from the launch or attach debug scenarios to the Packager. If these variables are defined, then they will be used, otherwise the .env file is used.
Change project root
To specify a subfolder in which the react-native project is located, set react-native-tools.projectRoot. You can use either an absolute or relative path here:
{
  "react-native-tools": {
    "projectRoot": "./your/react-native/project"
  }
}
Developing inside a Docker Container
The extension supports VS Code Remote Development features on Linux. Please follow the VS Code official documentation to setup your environment to use a remote development approach.
You can use official React Native Docker image provided by the react-native-community.
Here are the steps to run React Native debugging inside a Docker Container on a real Android device:
- Open Command Palette and run the following command
Remote-Containers: Add Development Container Configuration Files...Then select
Existing Dockerfileto create.devcontainer/devcontainer.jsonconfiguration file. - Сreate Dockerfile extending reactnativecommunity/react-native-android image. For example you can use the following Dockerfile:
FROM reactnativecommunity/react-native-android:latest RUN npm install -g expo-cli react-native-cli - Configure your
devcontainer.jsonfile as needed. Below is a sample configuration:{ "name": "React Native Android Container", // Sets the run context to one level up instead of the .devcontainer folder. "context": "..", // Update the 'dockerFile' property if you aren't using the standard 'Dockerfile' filename. "dockerFile": "Dockerfile", // The optional 'runArgs' property can be used to specify additional runtime arguments. "runArgs": [ "--privileged", // give all capabilities to a container, in other words, the container can then do almost everything that the host can do "--net", "host", // forwarding all host machine ports "-v", "/dev/bus/usb:/dev/bus/usb" // mount connected USB devices to a container ], "settings": { // This will ignore your local shell user setting for Linux since shells like zsh are typically // not in base container images. You can also update this to an specific shell to ensure VS Code // uses the right one for terminals and tasks. For example, /bin/bash (or /bin/ash for Alpine). "terminal.integrated.shell.linux": null }, // Add the IDs of extensions you want installed when the container is created in the array below. "extensions": ["msjsdiag.vscode-react-native"] } - Open Command Palette and run the following command
Remote-Containers: Open Folder in Containerto reopen your project in a container - Connect your device via USB and start debugging the same way as on local machine.
Currently the above scenario doesn’t work on macOS and Windows. Docker Container implementation on these OS uses Virtual Machine tools which may have problems with USB forwarding for mobile devices.
Contributing
Please see our contributing guide for more information.
Known Issues
Here is the list of common known issues you may experience while using the extension:
| Issue | Description |
|---|---|
| Debugger doesn’t stop at breakpoints | Breakpoints require sourcemaps to be correctly configured. If you are using TypeScript, then make sure to follow the Getting started section for how to ensure sourcemaps are correctly set up. Also, similar issues may occur on React Native version 0.58.* in some special cases (see #928, #907), bumping dependencies versions of react and react-native package to the more recent ones should resolve these. |
| ‘adb: command not found’ | If you receive an error adb: command not found, you need to update your system Path to include the location of your ADB executable.The ADB executable file is located in a subdirectory along with your other Android SDK files. |
| Targeting iPhone 6 doesn’t work | There was a known issue with React Native (#5850) but it was fixed. Please upgrade your version of React Native. |
| Can’t communicate with socket pipe | (Linux only) If you have two workspaces open that only differ in casing, the extension will fail to communicate effectively. |
“Add configuration” button doesn’t work when trying to add debug configuration to launch.json |
You may need to have to add in some json to launch.json manually. Please, see (#985) |
Known-Issues provides a complete list of active and resolved issues.
Telemetry reporting
VS Code React Native extension collects usage data and sends it to Microsoft to help improve our products and services. Read our privacy statement to learn more.
If you don’t wish to send usage data to Microsoft, edit VSCodeTelemetrySettings.json file at ~/.vscode-react-native and add optIn:false.
Code of conduct
This project has adopted the Microsoft Open Source Code of Conduct. For more information see the Code of Conduct FAQ or contact opencode@microsoft.com with any additional questions or comments.