Create a Regression Model with Azure Machine Learning designer
Module Source
Create a Regression Model with Azure Machine Learning designer
Goals
In this workshop, we will learn how to train regression models - machine Learning models that can predict numerical values. In this workshop, we will focus on predicting car prices, but you can optionally try to use the same approach to predict number of likes in instagram.
| Project Goal | Learn how to predict car prices / instagram likes based on data |
|---|---|
| What will you learn | What is machine learning and regression models. How to use No Code tools in Azure ML to train and deploy a regression model |
| What you’ll need | Azure Subscription |
| Duration | 1 hour |
| Just want to try the app or see the solution? | |
| Slides | Powerpoint, SpeakerDeck |
| Author | Dmitry Soshnikov |
Video walk-through
coming soon
What students will learn
In this project, you will learn about regression - a family of Machine Learning algorithms used to make numerical predictions based on data. We will learn how to use Low-Code/No-Code tools in Azure Machine Learning to train and deploy a regression model.
Prerequisites
For this workshop, you need to have an Azure Account. You may have one from your university, otherwise get Azure for Students, GitHub Student Developer Pack or an Azure Free Trial.
Learn more about creating an Azure Account at Microsoft Learn
Running the Workshop
The workshop closely follows Create a Regression Model with Azure Machine Learning designer Microsoft Learn module. You may want to open the module in a separate tab/window and follow along with the instructions below.
Milestone 1: Create Machine Learning Workspace and Compute Resources
To work with Azure Machine Learning, you need a Workspace. Follow the instructions on Learn to create the workspace interactively using Azure Portal.
If you are a developer and prefer doing things via code, you can also create a workspace through command-line or through Python SDK
After you have create the workspace, open it in Azure Machine Learning Studio
Then, you need to create compute resources. Follow the instructions on Learn to create two types of compute resources:
- Compute instance is a virtual machine that you can use to run Jupyter notebooks, a tool that many data scientists use. We will use it in order to test our model towards the end of the module.
- Compute cluster is a scalable compute that automatically allocated to train your Azure Machine Learning models. It will be the main compute that we will use for training.
Note: With newer release of Azure Machine Learning studio, you can avoid creating compute cluster altogether, and use compute instance to run your experiment. Using clusters to run experiments makes sense when you need fast compute that you want to schedule automatically. In our case, you can save time by not using compute cluster.
Milestone 2: Create the Experiment, Explore and Clean Data
To train our model, we will be using Azure ML Designer to create an experiment pipeline. Follow the instructions on Learn to start the new experiment and explore the dataset.
You should be able to view the dataset:
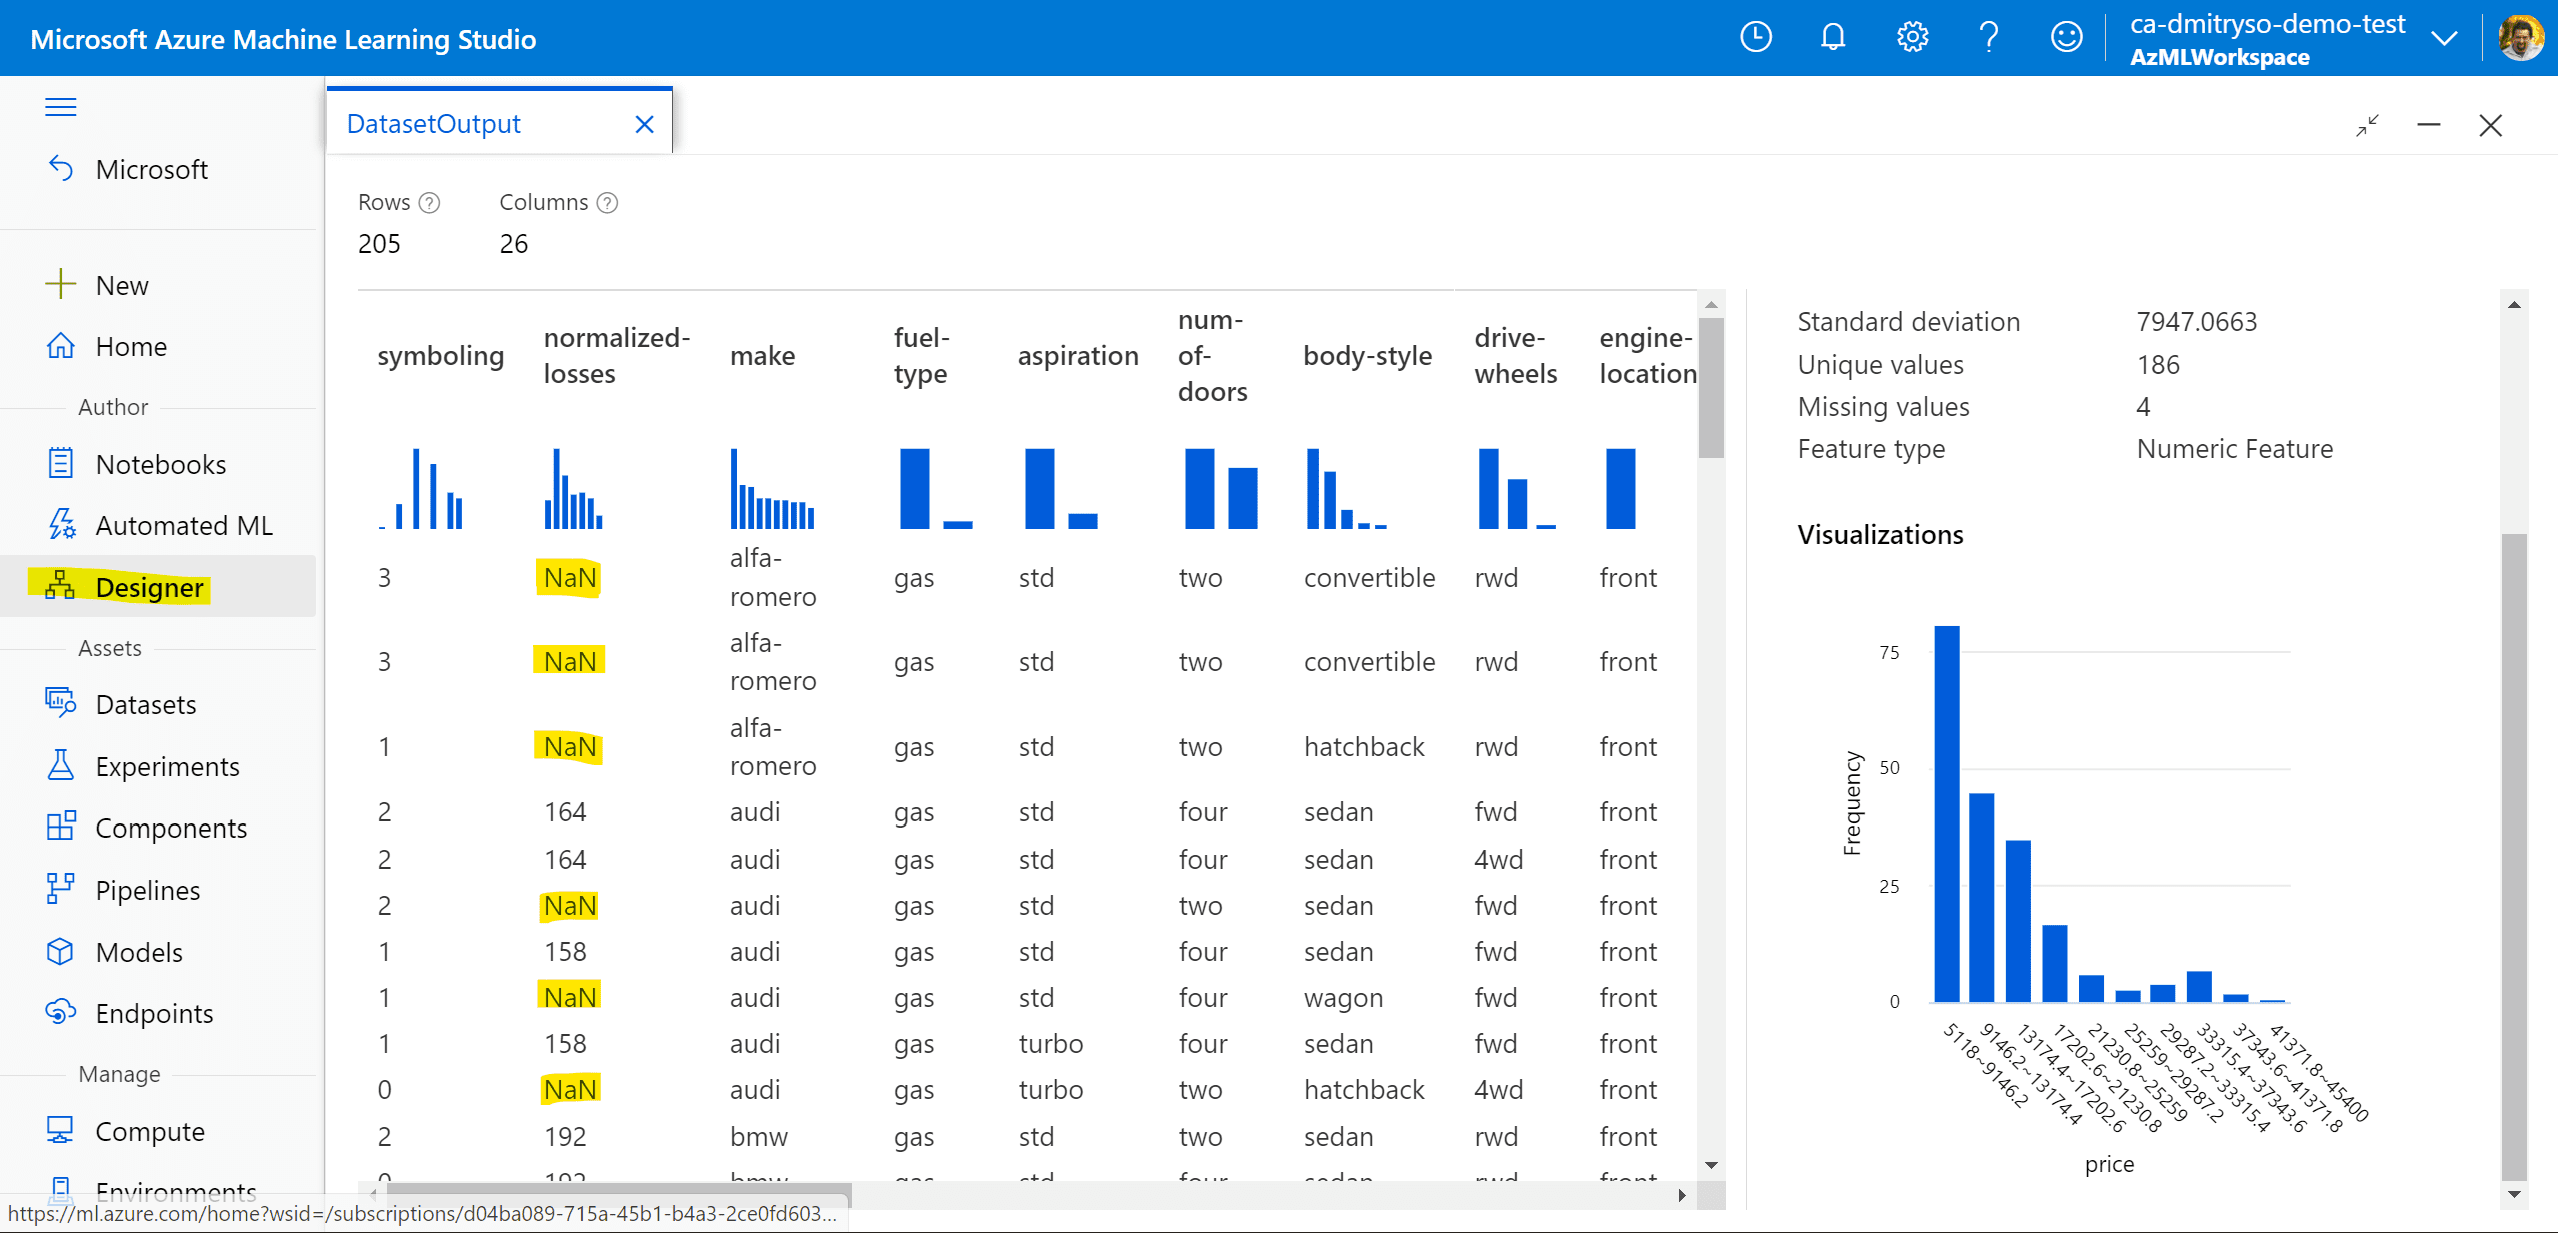
Notice the missing NaN values. We need to get rid of those before training the model. There are also some missing values in other columns. Cleaning the data involves two steps:
- Remove the
normalized-lossescolumn altogether using Select Columns in Dataset box, because it contains too many missing values bore,strokeandhorsepowercolumns also contain some missing values, so we will use Clean missing data to remove only rows with missing values.
If you do not see By name option when adding field names in the options, make sure you have configured the experiement to use one of the compute options you have created on the previous step.
Finally, because all numeric data are on different scale, we need to Normalize Data block to scale all numeric values into 0-1 interval. This should be done for the following columns: symboling, wheel-base, length, width, height, curb-weight, engine-size, bore, stroke, compression-ratio, horsepower, peak-rpm, city-mpg, highway-mpg.
You can run the experiment and see the data at the end of the pipeline to make sure everything works correctly.
Milestone 3: Train the model and evaluate results
Once you have the data, you can train machine learning model to predict prices. Follow the instructions on Learn to split the data into train and test dataset, and train the model on the training data.
You can then use Score model block to apply the model to the test dataset. Finally, follow next learn unit to add Evaluate model block to calculate some statistics.
Your final experiment should look like this:

As a result, we should get coefficient of determination around 93%. This coefficient shows how much predicted prices are related to the real ones in the test dataset, i.e. how accurately are we able to predict. In absolute values, mean absolute error shows the average difference between expected and predicted price, which is around $2k in our case. It is not too bad, given the average price is $13k, so we are making around 15% prediction error.
Milestone 4: Build and Deploy Inference Pipeline
Once we have trained the model, we need to be able to apply it to our own data to make predictions. This can be done using Inference pipeline, which we will build next. Follow next learn unit to build the pipeline.
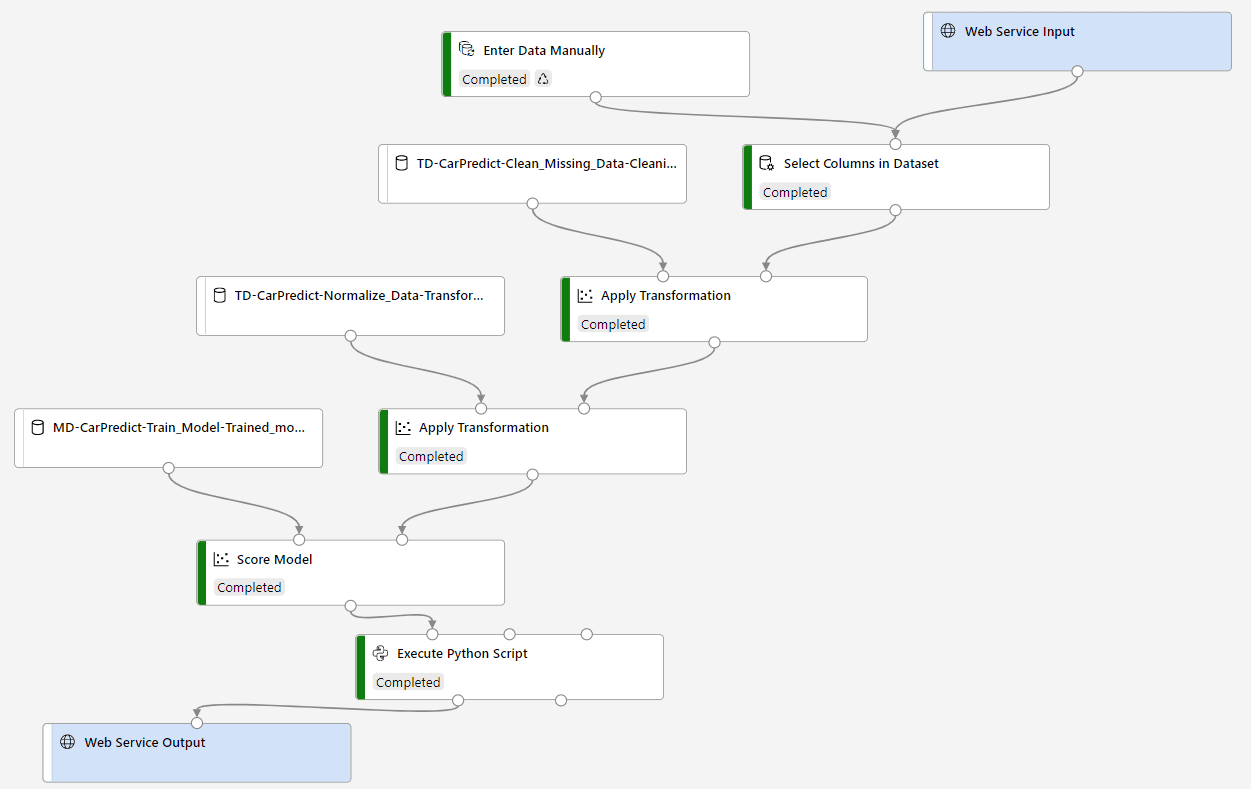
Pipeline is constructed as a separate experiment, which includes two special blocks: web service input and web service output. They represent input and output data of the model, and there can be any transformations in between. In our case, we need to perform the same transformation steps (including normalization) on input data, and then call the model.
We also use Python code block in order to simplify output data from the model. This is not strictly necessary, but it shows how we can embed custom code into the pipeline to perform any data processing we need.
You can now Run the pipeline to make sure it does predictions correctly. It will give you predicted price for the sample data that we have provided in the beginning of the pipeline.
Once we have run the pipeline, we can deploy it, so that the model can be called through the internet as a web service. Follow next learn unit to deploy the service into Azure Container Instance.
Azure ML offers two ways to deploy the model:
- Azure Container Instance (ACI) means that there will be one container on a virtual machine that serves your model. It is not scalable, so we can recommend it for testing, but not for production environments.
- Azure Kubernetes Service (AKS) deploys the model onto Kubernetes cluster (which you can create in the Compute section of the portal), which makes the model scale under load.
In our workshop, we will deploy to ACI.
Milestone 5: Test the Model
Once the model has been deployed, we can call it as REST service through the internet from anywhere, eg. from mobile application, web application, etc. In our case, we will use a piece of Python code to test our web service. Follow this learn unit.
To run Python code, we will use Notebooks feature of Azure Machine Learning. It allows you to create and run Jupyter Notebooks - documents that include text and executable Python code. In the instructions, Python code for calling the service is provided, you need to create the notebook and copy-paste the code there. You also need to provide correct service endpoint URL and key.
Once you run the code, it will call the REST service, and you should see the predicted price as a result. In the similar manner, you can call the same service from any other programming language, making the price prediction functionality available in the wide range of applications.
Milestone 6 [Optional]: Try to train different model
To understand the process even better, it is always a good idea to repeat the same exercise on different data, in different problem domain. For example, you can try to predict the number of likes of an instagram photo. You can use Instagram Likes Dataset.
- instagram.csv contains the result of processing of Instagram posts of a famous blogger. Each photograph was processed using Computer Vision Cognitive Service to extract main category, tags, background/foreground color and some other properties.
| likes | main_category | no_faces | avg_age | date | adult_score | color_fg | color_bg | tags | objects |
|---|---|---|---|---|---|---|---|---|---|
| 321112 | people | 0 | 0 | 2017-06-24 | 0.005 | Pink | Pink | woman person dress clothing | person |
| 245154 | building | 0 | 0 | 2017-06-25 | 0.003 | White | Grey | sky outdoor | plant |
| 279328 | others | 1 | 53.0 | 2017-07-03 | 0.004 | White | Black | text | person |
| 299499 | people | 0 | 0 | 2017-07-05 | 0.069 | Black | Pink | person food outdoor |
- instagram-onehot.csv is the same dataset, but most frequently used tags are represented by one-hot encoding, i.e. they have 0/1 in the corresponding column depending on whether corresponding tag is associated with the image or not.
Before you start building an experiment, you need to upload the dataset to Azure ML portal. Go to Datasets -> Create Dataset -> From Web Files. In the following dialog, provide one of the following URLs to the dataset file:
- instagram.csv -
https://raw.githubusercontent.com/shwars/NeuroWorkshopData/master/Data/instagram/instagram.csv - instagram_onehot.csv -
https://raw.githubusercontent.com/shwars/NeuroWorkshopData/master/Data/instagram/instagram_onehot.csv

After you create the dataset, go to Designer and construct the experiment similar to the one for car prices prediction:
- Start with the uploaded dataset
- Use Select columns from Dataset to ignore some of the columns. You may want to ignore textual columns such as tags or objects.
- Since the data includes a lot of categorical features that are likely to have non-linear effect on the result, use decision trees family of models, for example, Decision Forest Regression.
Train the model and see if you can get reasonably accurate predictions.
You can also explore some other datasets from Kaggle, for example:
- A dataset of Possums physical characteristics. You can try predicting the age of a possum based on head length, skull width, total length, etc.
- A dataset of medical insurance costs, where you can try to predict insurance costs based on different parameters.
- Predicting real estate prices
Milestone 7: Clean Up
Once you have done the experiments, it is important to get rid of the resources that you are not using in order not to spend credits from your Azure subscription. Make sure you do the following:
- Delete the ACI instance of your predictive service.
- Stop the Compute Instance. If you are planning to use Azure ML often, it makes sense to set up the schedule to automatically shut down the compute instance each day at the end of the day, so that you do not leave it running and unused for long periods of time.
- If you are not planning any experiments with Azure ML in the nearest future - delete Azure ML workspace altogether. Even when no compute is running, existing cloud resources still incur some storage costs.
Next steps
Now that you know how to use Azure ML Designer, you can explore other components of Azure ML:
- Automated Machine Learning is another Low Code / No Code approach that automatically tries to find the best model by trying out different options and hyperparameters
- Learn how to Create Classification Models in Azure ML designer
- Learn how you can Explain machine learning models to understand which features play more important role in the result.
Practice
You have learnt how to train a model and make it usable through REST API. You can build a project that will expose your trained regression model to the users by building a mobile or web application. Team up with some peers with programming experience to create an end-to-end predictive application:
- Select a problem domain that interests you. Get an inspiration from datasets available on Kaggle or elsewhere
- Train and deploy the model the way you have done in this workshop
- Build a mobile or web application that consumes the API. You can further learn how to consume REST API from Xamarin.
Followup
- How to Learn Data Science without Coding - blog post describing another No Code/Low Code approach to training machine learning models - Automated ML
Feedback
Be sure to give feedback about this workshop!