Eval Gate for Azure DevOps
New
An Azure DevOps pipeline that uses the Copilot Studio Evaluation API as a PR quality gate. When a developer pushes changes to their feature branch and opens a PR, the pipeline automatically:
- Packs the solution from the PR branch
- Imports it into a shared CI Dev environment
- Runs evaluations against the draft agent
- Blocks or allows the merge based on a configurable pass rate threshold
- Publishes results to the ADO Tests tab
How It Works
flowchart LR
    A[Edit agent in\nCopilot Studio] --> B[Commit & push\nto feature branch]
    B --> C[Open PR]
    C --> D[Pipeline imports\nto CI Dev]
    D --> E[Run evals\non draft]
    E --> F{Pass rate\n>= threshold?}
    F -->|Yes| G[Merge allowed]
    F -->|No| H[Merge blocked]
Pipeline in Action
When a PR is pushed, the pipeline imports the solution, resolves the bot and test set, and runs the evaluation — all visible in the ADO build logs:
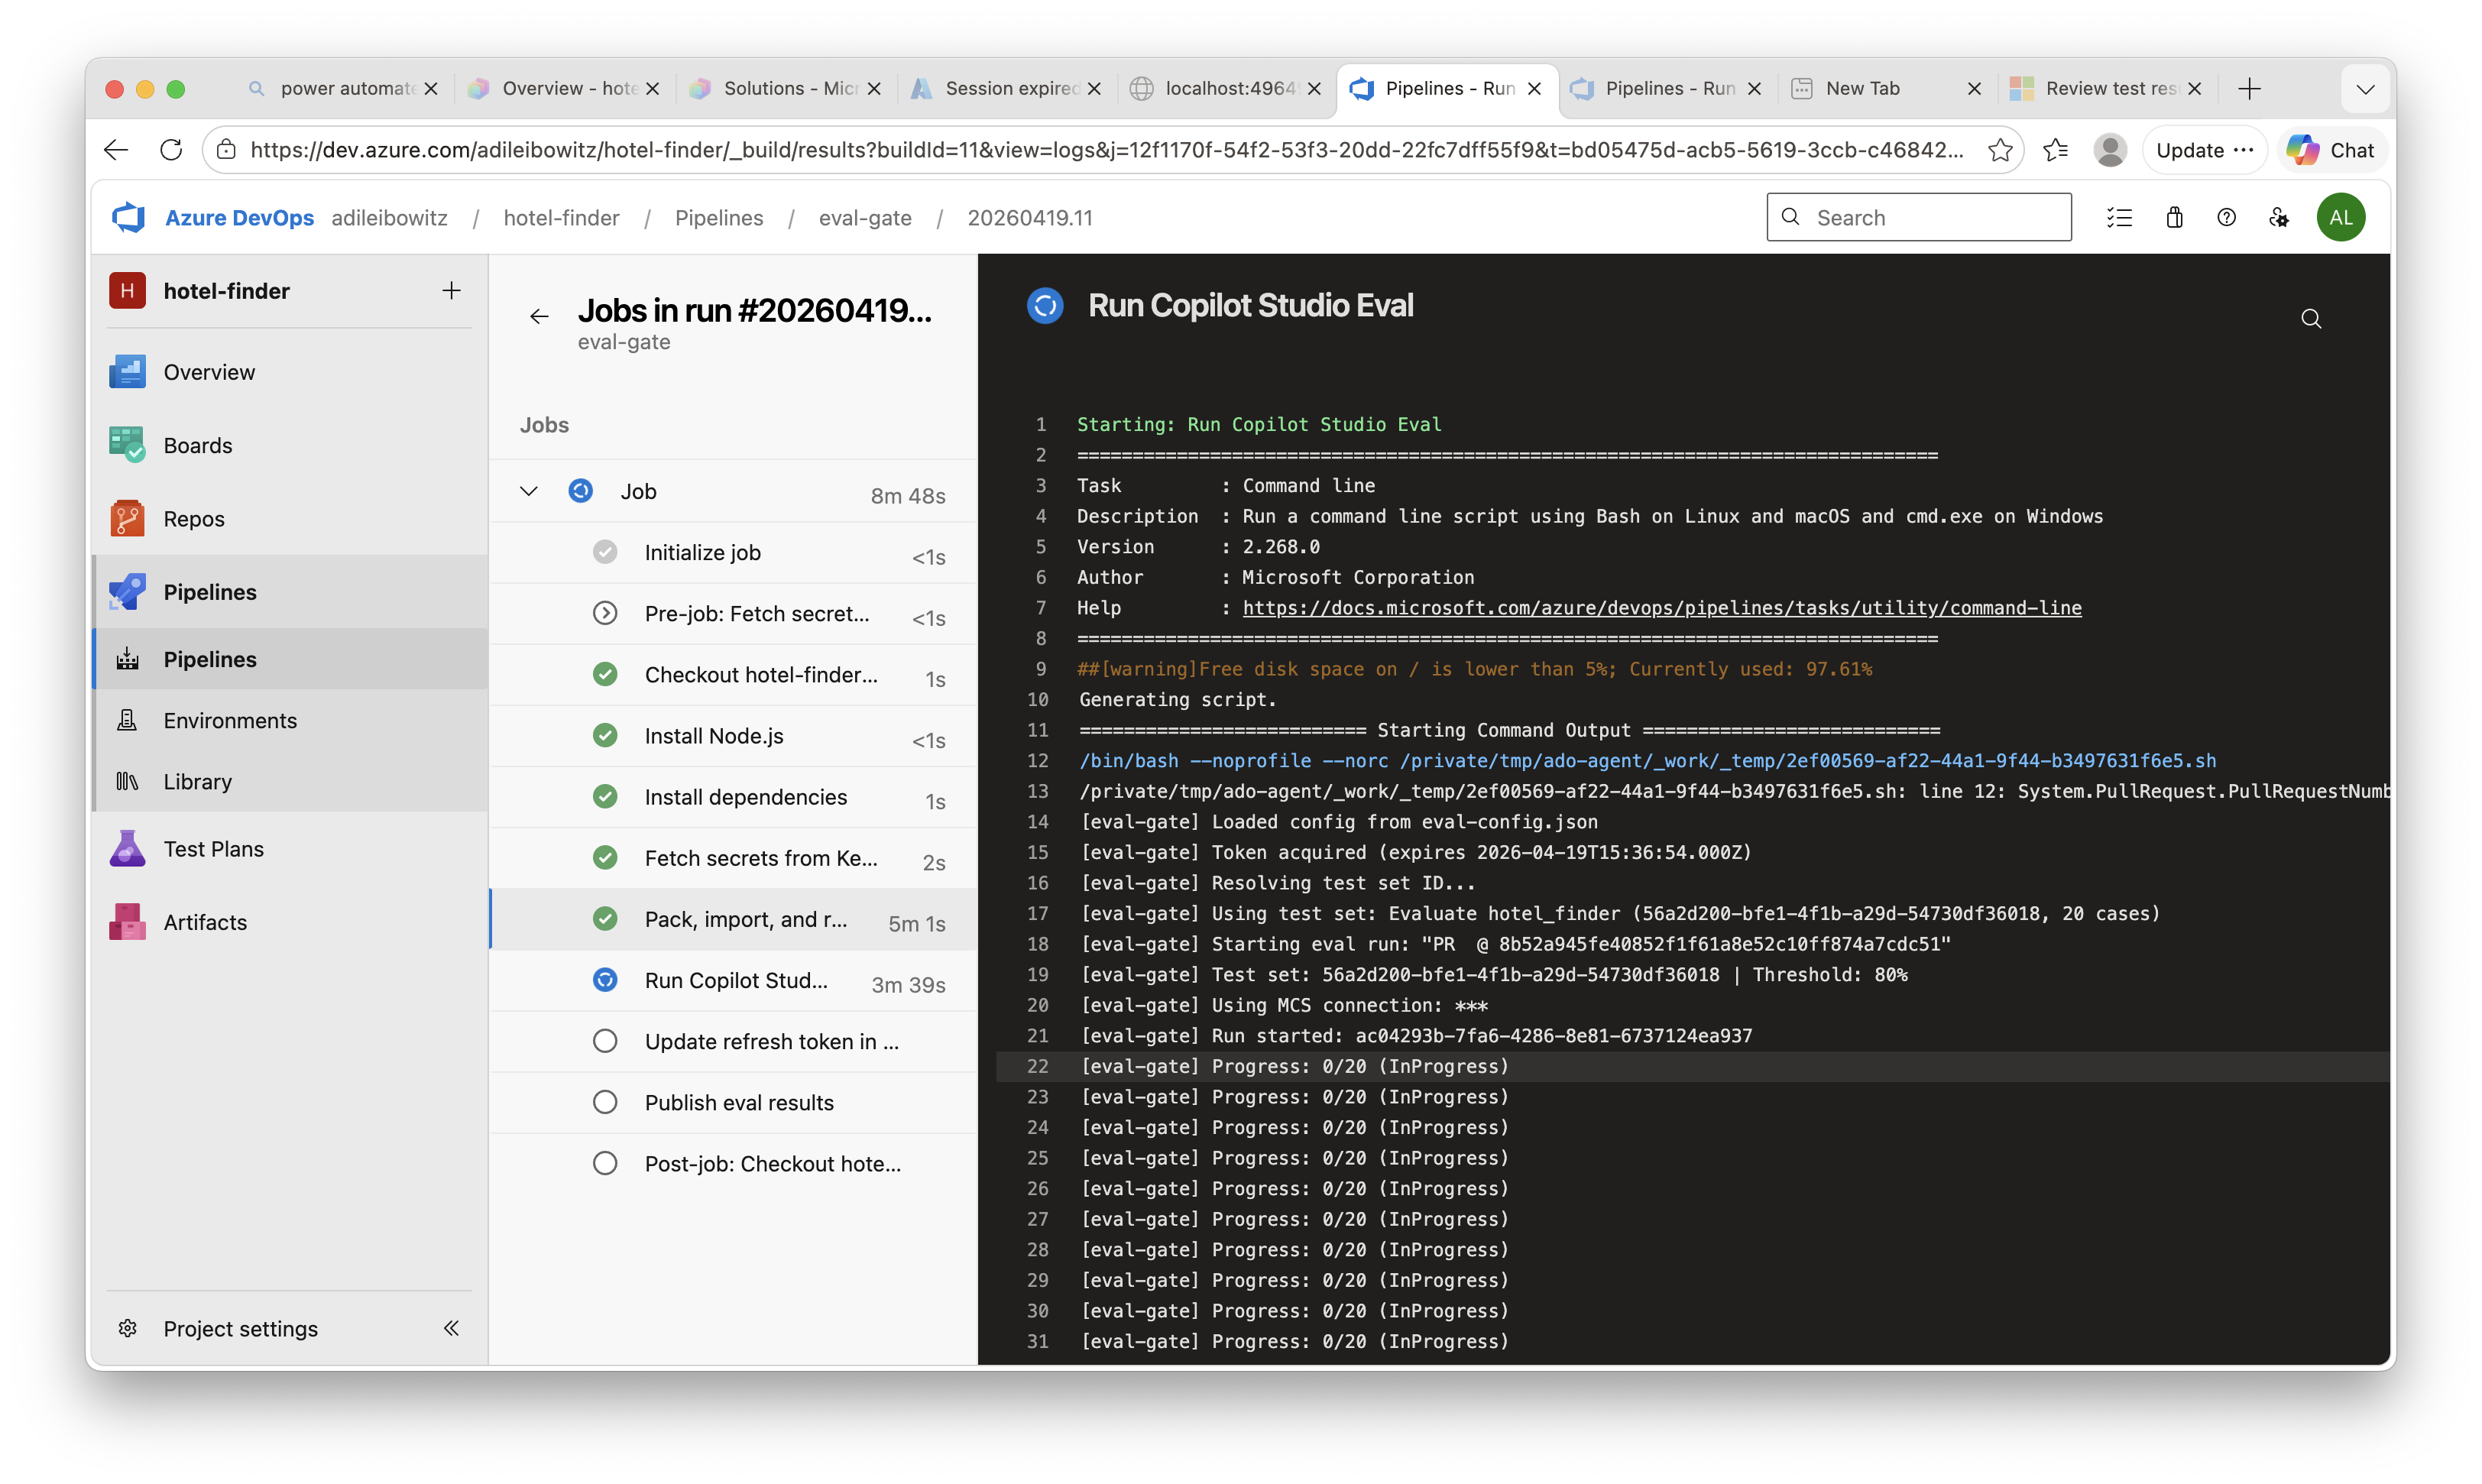
Table of Contents
- How It Works
- Components
- Prerequisites
- Setup
- Part 1: Power Platform — Git integration, CI Dev environment, test set, MCS connection
- Part 2: Authentication — App registration, refresh token
- Part 3: Azure Resources — Key Vault, secrets, ARM service principal
- Part 4: Azure DevOps — Config, service connection, pipeline, branch policy
- Running It
- Local Usage
- Known Limitations
Components
| File | Description |
|---|---|
eval-config.json |
Environment IDs, bot schema name, pass threshold |
scripts/eval-gate.mjs |
Node.js script: MSAL auth + PPAPI client + JUnit output. Single dependency: @azure/msal-node |
pipelines/eval-gate.yml |
ADO pipeline with self-hosted (pac CLI) and hosted (Build Tools) options |
Prerequisites
- Power Platform: Dev environment as Managed Environment, connected to ADO Git via Dataverse git integration
- Copilot Studio: Agent with a test set in the Evaluate tab
- Azure: Subscription with Key Vault access
- Azure DevOps: Project with Git repo, Power Platform Build Tools extension
- Tooling: pac CLI (requires .NET 10), Node.js 18+, Azure CLI
Setup
Part 1: Power Platform
1.1 Connect Dev Environment to Git
- Power Platform Admin Center: enable your Dev environment as Managed Environment
- Copilot Studio → Solutions → Connect to Git
- Choose Environment binding → select your ADO org, project, repo
- Select your feature branch (each developer connects to their own)
- Set Git folder to
src→ Connect
You must use
srcas the Git folder — the pipeline is configured to pack from this path. If you use a different folder, update the--folderargument inpipelines/eval-gate.yml.
To commit changes: open a solution → Source control (left pane) → review changes → Commit & push.
1.2 Create CI Dev Environment
A dedicated environment where the pipeline imports and tests solutions. No git binding needed.
# Install pac CLI (requires .NET 10 — earlier versions produce a DotnetToolSettings.xml error)
dotnet tool install --global Microsoft.PowerApps.CLI.Tool

# Create the environment
pac admin create --name "CI - MyAgent" --type Developer --region unitedstates

# Create a Service Principal for pipeline access
pac admin create-service-principal --environment <ci-dev-env-url>
Save the Application ID, Client Secret, and Environment URL from the output — you’ll need all three. The
create-service-principalcommand automatically assigns the System Administrator role to the SPN in the target environment.
1.3 Create a Test Set
- Open your agent in Copilot Studio → Evaluate tab → New evaluation
- Add 10-20 representative test cases covering key scenarios
- Commit the solution to git — test sets are part of the solution and travel with it on import
The script auto-discovers the test set after import — it uses the first available test set. If your agent has multiple test sets, set
testSetNameineval-config.jsonto target a specific one by display name.
1.4 Create MCS Connection (Optional — for Authenticated Eval)
If your agent uses authenticated actions or knowledge sources (e.g., SharePoint connectors), the eval API needs an mcsConnectionId to authenticate during the run. See Manage user profiles and connections.
- Open Power Automate in the CI Dev environment
- Go to Connections → create a Microsoft Copilot Studio connection
- Click on the connection → copy the ID from the URL:
.../connections/shared_microsoftcopilotstudio/{mcsConnectionId}/details
This connection requires interactive OAuth and cannot be created programmatically. It’s a one-time manual step per CI environment. Without it, the pipeline still works but authenticated actions and knowledge sources will return empty or error results during eval.
Part 2: Authentication
2.1 Create Eval API App Registration
The evaluation API requires delegated (user-context) permissions:
- Azure Portal → App Registrations → New registration
- Name it (e.g., “Copilot Studio Eval API”)
- Under API permissions → Add a permission → APIs my organization uses:
- Search Power Platform API → delegated:
CopilotStudio.MakerOperations.Read,CopilotStudio.MakerOperations.ReadWrite - Search Dynamics CRM → delegated:
user_impersonation(for bot ID resolution)
- Search Power Platform API → delegated:
- Click Grant admin consent for the tenant
- Under Authentication → Add a platform → Mobile and desktop applications → redirect URI:
http://localhost - Authentication → Advanced settings → Allow public client flows: Yes
- Copy the Application (client) ID
2.2 Seed the Refresh Token
cd scripts && npm install

# Start device code flow — follow the browser prompt
node eval-gate.mjs auth --config ../eval-config.json
The token is printed to stdout. Store it in Key Vault (see part 3):
az keyvault secret set \
  --vault-name <kv-name> \
  --name copilot-studio-eval-refresh-token \
  --value "<paste-token>"
Or pipe directly:
node eval-gate.mjs auth --config ../eval-config.json \
  | az keyvault secret set \
      --vault-name <kv-name> \
      --name copilot-studio-eval-refresh-token \
      --value @-
The pipeline attempts to rotate the refresh token on each run. If MSAL issues a new token, it is written back to Key Vault automatically. MSAL does not always issue a new token on every call, so the existing token may remain. Re-run the
authcommand before the 90-day expiry to be safe.
Part 3: Azure Resources
3.1 Create Key Vault
az group create --name rg-copilot-cicd --location eastus

az keyvault create \
  --name <kv-name> \
  --resource-group rg-copilot-cicd \
  --location eastus \
  --enable-rbac-authorization true

# Grant yourself Secrets Officer to seed secrets
az role assignment create \
  --role "Key Vault Secrets Officer" \
  --assignee <your-user-object-id> \
  --scope <key-vault-resource-id>
3.2 Store Secrets in Key Vault
The pipeline reads three secrets from Key Vault:
| Secret Name | Value | Source |
|---|---|---|
copilot-studio-eval-refresh-token |
MSAL refresh token | From node eval-gate.mjs auth (step 2.2) |
copilot-studio-ci-dev-client-secret |
CI Dev SPN client secret | From pac admin create-service-principal (step 1.2) |
copilot-studio-eval-mcs-connection-id |
MCS connector connection ID | From Power Automate URL (step 1.4, optional) |
az keyvault secret set --vault-name <kv-name> \
  --name copilot-studio-eval-refresh-token --value "<token>"

az keyvault secret set --vault-name <kv-name> \
  --name copilot-studio-ci-dev-client-secret --value "<secret>"

# Required even if not using authenticated eval — use a placeholder value if skipping step 1.4
az keyvault secret set --vault-name <kv-name> \
  --name copilot-studio-eval-mcs-connection-id --value "${<id-from-step-1.4>:-none}"
All three secrets must exist in Key Vault. The pipeline’s
AzureKeyVault@2task fails if any named secret is missing. If you’re not using authenticated eval (step 1.4), create thecopilot-studio-eval-mcs-connection-idsecret with the valuenone.
3.3 Create ARM Service Connection SPN
Create a Service Principal for the pipeline to access Key Vault:
az ad sp create-for-rbac \
  --name "copilot-cicd-pipeline" \
  --role "Key Vault Secrets Officer" \
  --scopes /subscriptions/<sub-id>/resourceGroups/<rg>/providers/Microsoft.KeyVault/vaults/<kv-name>
Save the Application ID and Password for step 4.2.
Part 4: Azure DevOps
4.1 Configure eval-config.json
Edit eval-config.json in your repo root and fill in the values from previous steps:
{
  "environmentId": "<ci-dev-environment-guid>",
  "environmentUrl": "https://<ci-dev-org>.crm.dynamics.com/",
  "botSchemaName": "<bot-schema-name>",
  "tenantId": "<entra-tenant-guid>",
  "clientId": "<eval-app-registration-client-id>",
  "passThreshold": 0.8
}
Commit this file to your repo — the pipeline reads it at runtime.
| Field | Description | Where to find it |
|---|---|---|
environmentId |
CI Dev environment GUID | Power Platform Admin Center → Environments |
environmentUrl |
CI Dev Dataverse URL (trailing slash) | Same page, or pac env who |
botSchemaName |
Bot schema name from the solution | src/bots/<name>/bot.yml → @schemaname |
tenantId |
Entra tenant GUID | Azure Portal → Entra ID → Overview |
clientId |
Eval API app registration client ID | From step 2.1 |
passThreshold |
Pass rate required (0.0-1.0) | Choose your quality bar |
agentIdandtestSetIdare resolved dynamically at runtime — you don’t set them.
4.2 Create ADO Service Connection
In ADO: Project Settings → Service connections → New → Azure Resource Manager → Service principal (manual)
| Field | Value |
|---|---|
| Name | AzureRM-KeyVault |
| Subscription ID | Your Azure subscription ID |
| Service Principal ID | App ID from step 3.3 |
| Service Principal Key | Password from step 3.3 |
| Tenant ID | Your Entra tenant ID |
Enable for all pipelines.
4.3 Update Pipeline Variables
Edit pipelines/eval-gate.yml and set:
variables:
  AZURE_SERVICE_CONNECTION: '<your-arm-service-connection-name>'
  KEY_VAULT_NAME: '<your-key-vault-name>'
  CI_DEV_ENV_URL: '<your-ci-dev-environment-url>'
  CI_DEV_APP_ID: '<your-ci-dev-spn-app-id>'
  CI_DEV_TENANT_ID: '<your-tenant-id>'
Commit and push eval-config.json and pipelines/eval-gate.yml to your repo before proceeding.
4.4 Create the Pipeline
- ADO → Pipelines → New pipeline → Azure Repos Git → select your repo
- Point to
pipelines/eval-gate.yml - Save (don’t run yet)
- Pipeline Settings → set max concurrent runs to 1 (sequential execution)
4.5 Approve Service Connections (First Run Only)
The first time the pipeline runs, ADO will prompt you to Permit access to the AzureRM-KeyVault service connection. Click Permit — this is a one-time approval.
4.6 Configure Branch Policy (Merge Gate)
- ADO Repos → Branches →
main→ Branch policies - Build validation → Add → select the eval-gate pipeline
- Set to Required → Trigger: Automatic
Running It
Once setup is complete, the eval gate runs automatically:
- Make a change to your agent in Copilot Studio (edit a topic, update instructions, etc.)
- Commit & push from the Solutions → Source control page to your feature branch
- Open a PR targeting
mainin Azure DevOps - The pipeline triggers automatically on push — it packs the solution, imports it into the CI Dev environment, and runs evaluations against the draft agent
- Check the results in the PR:
- The Summary tab shows the pipeline pass/fail status
- The Tests tab shows individual test case results with metric breakdowns
- The eval results JSON is available as a pipeline artifact
- If the pass rate meets the threshold, the merge button is enabled. Otherwise, the PR is blocked until the agent quality improves.
Subsequent pushes to the same PR branch re-trigger the pipeline — each push gets a fresh eval run.
PR gate passed — eval meets the threshold, merge is allowed:

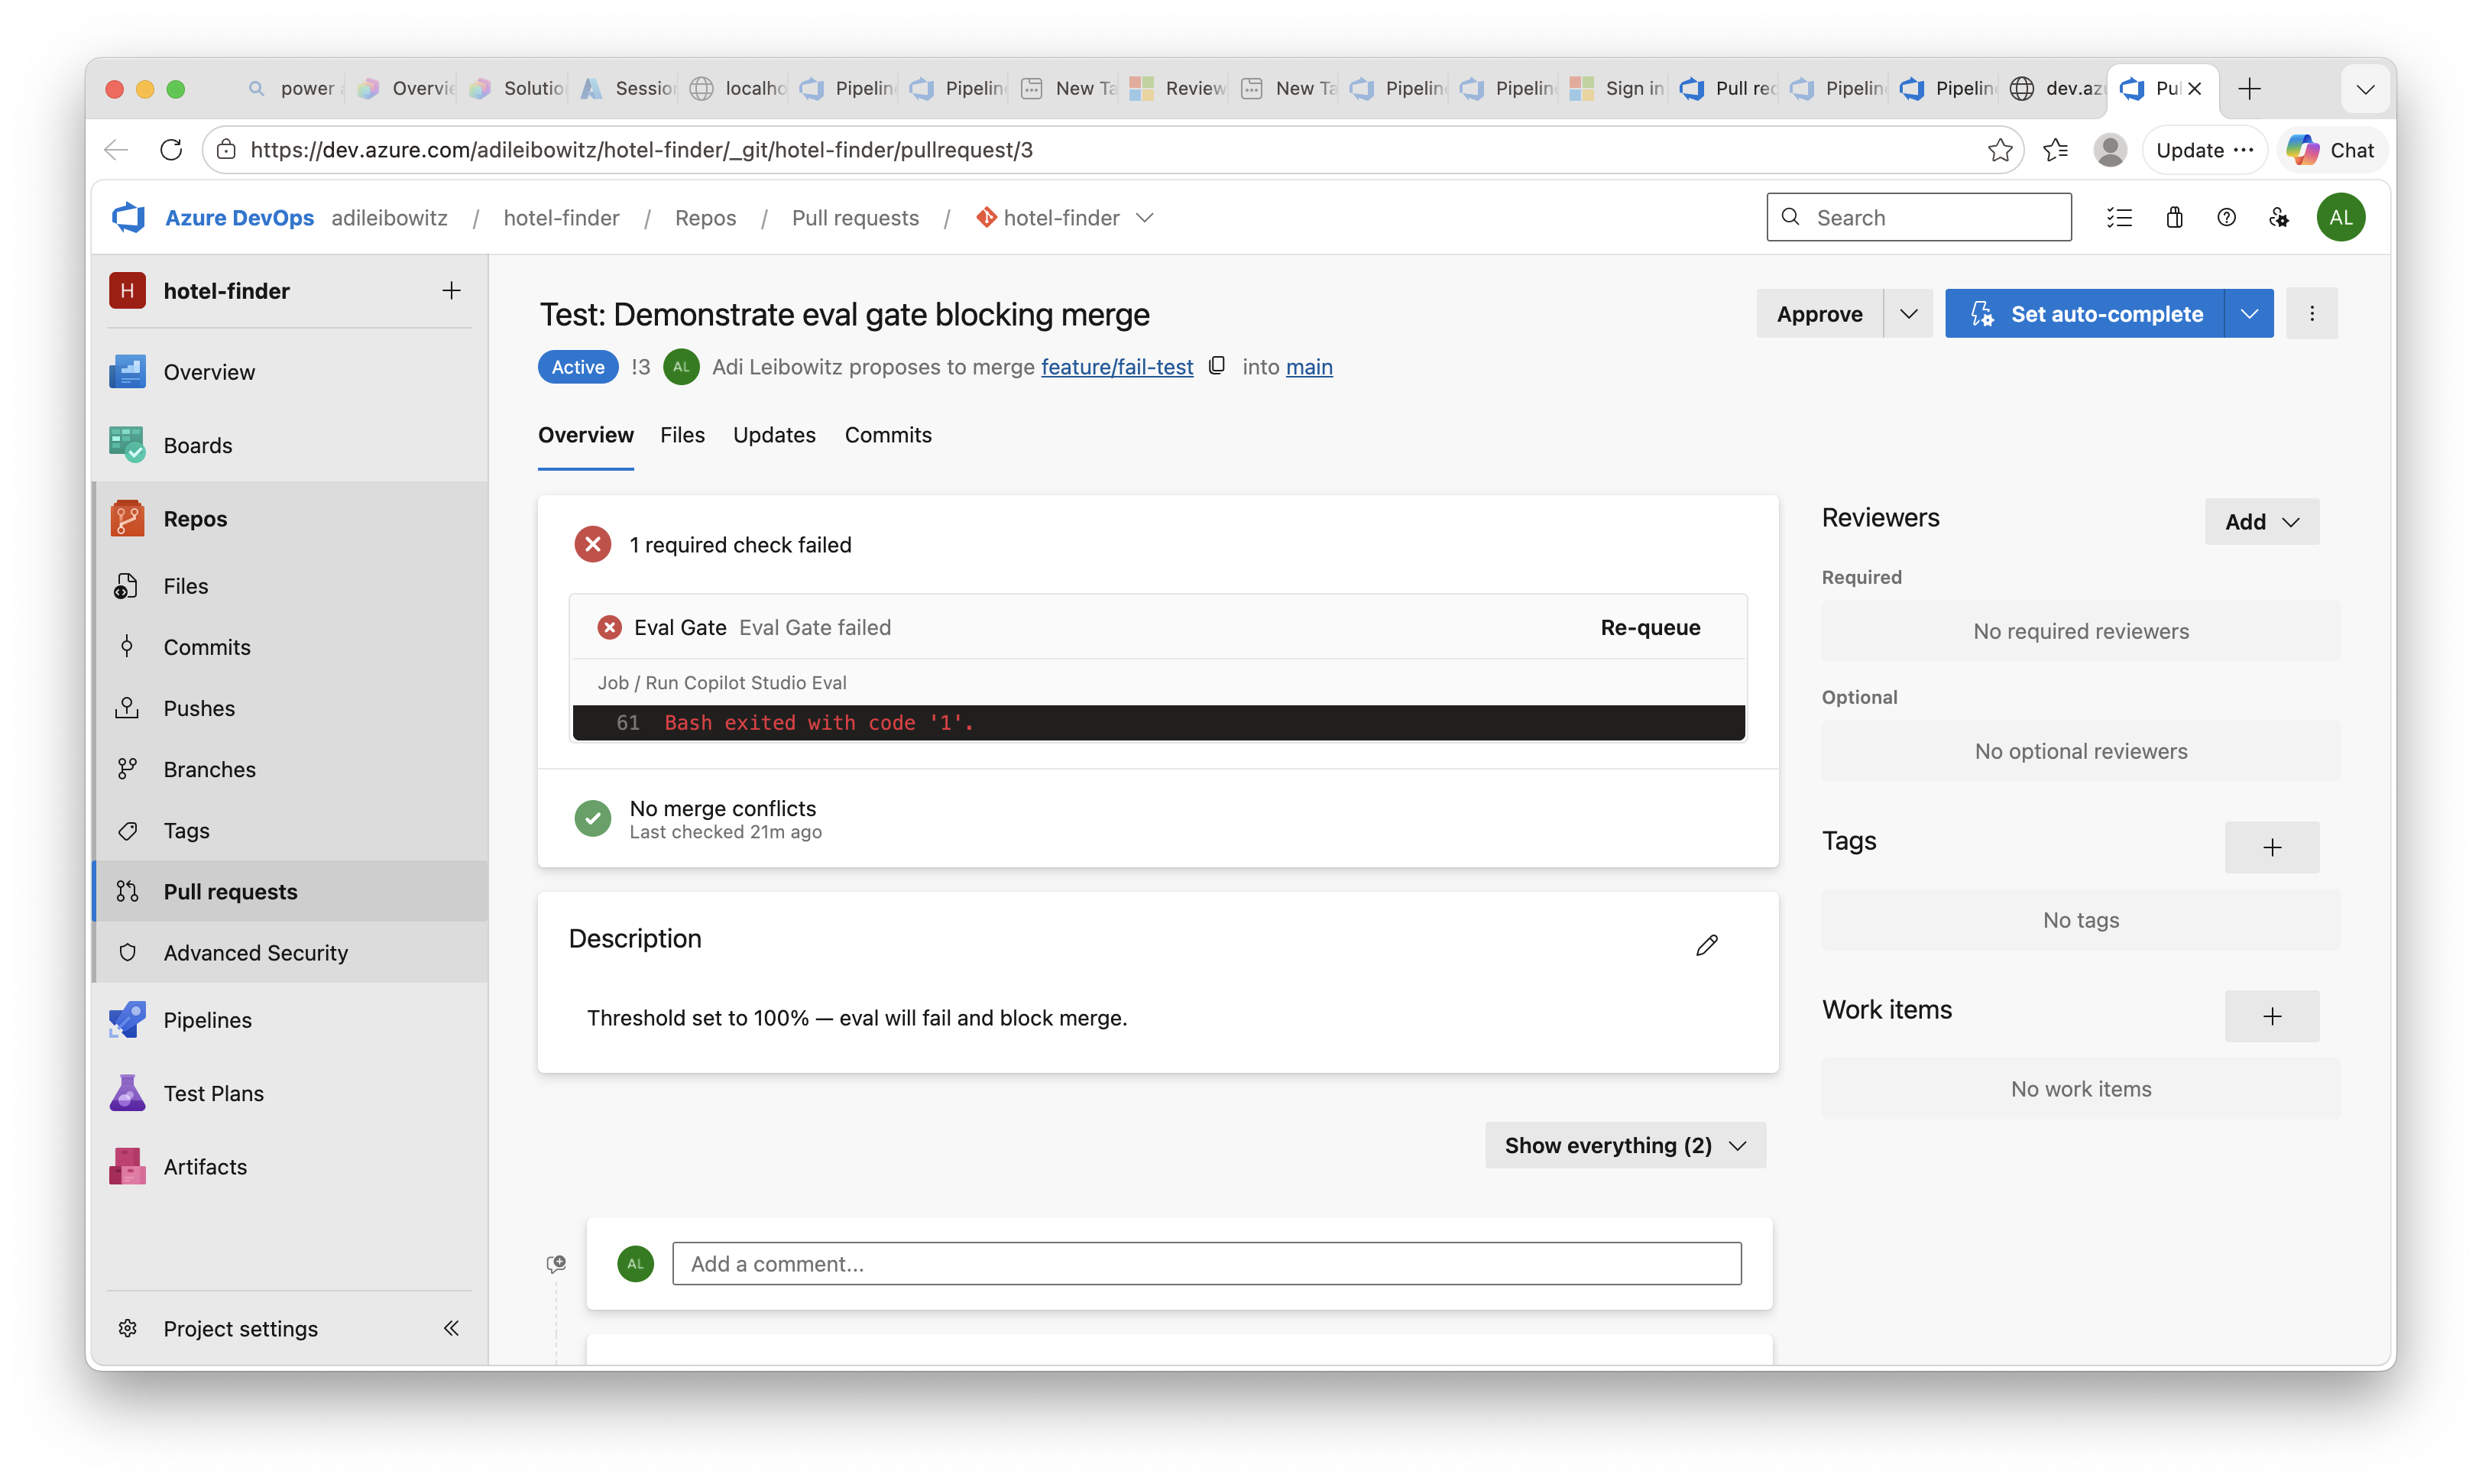
PR gate failed — eval below threshold, merge is blocked:
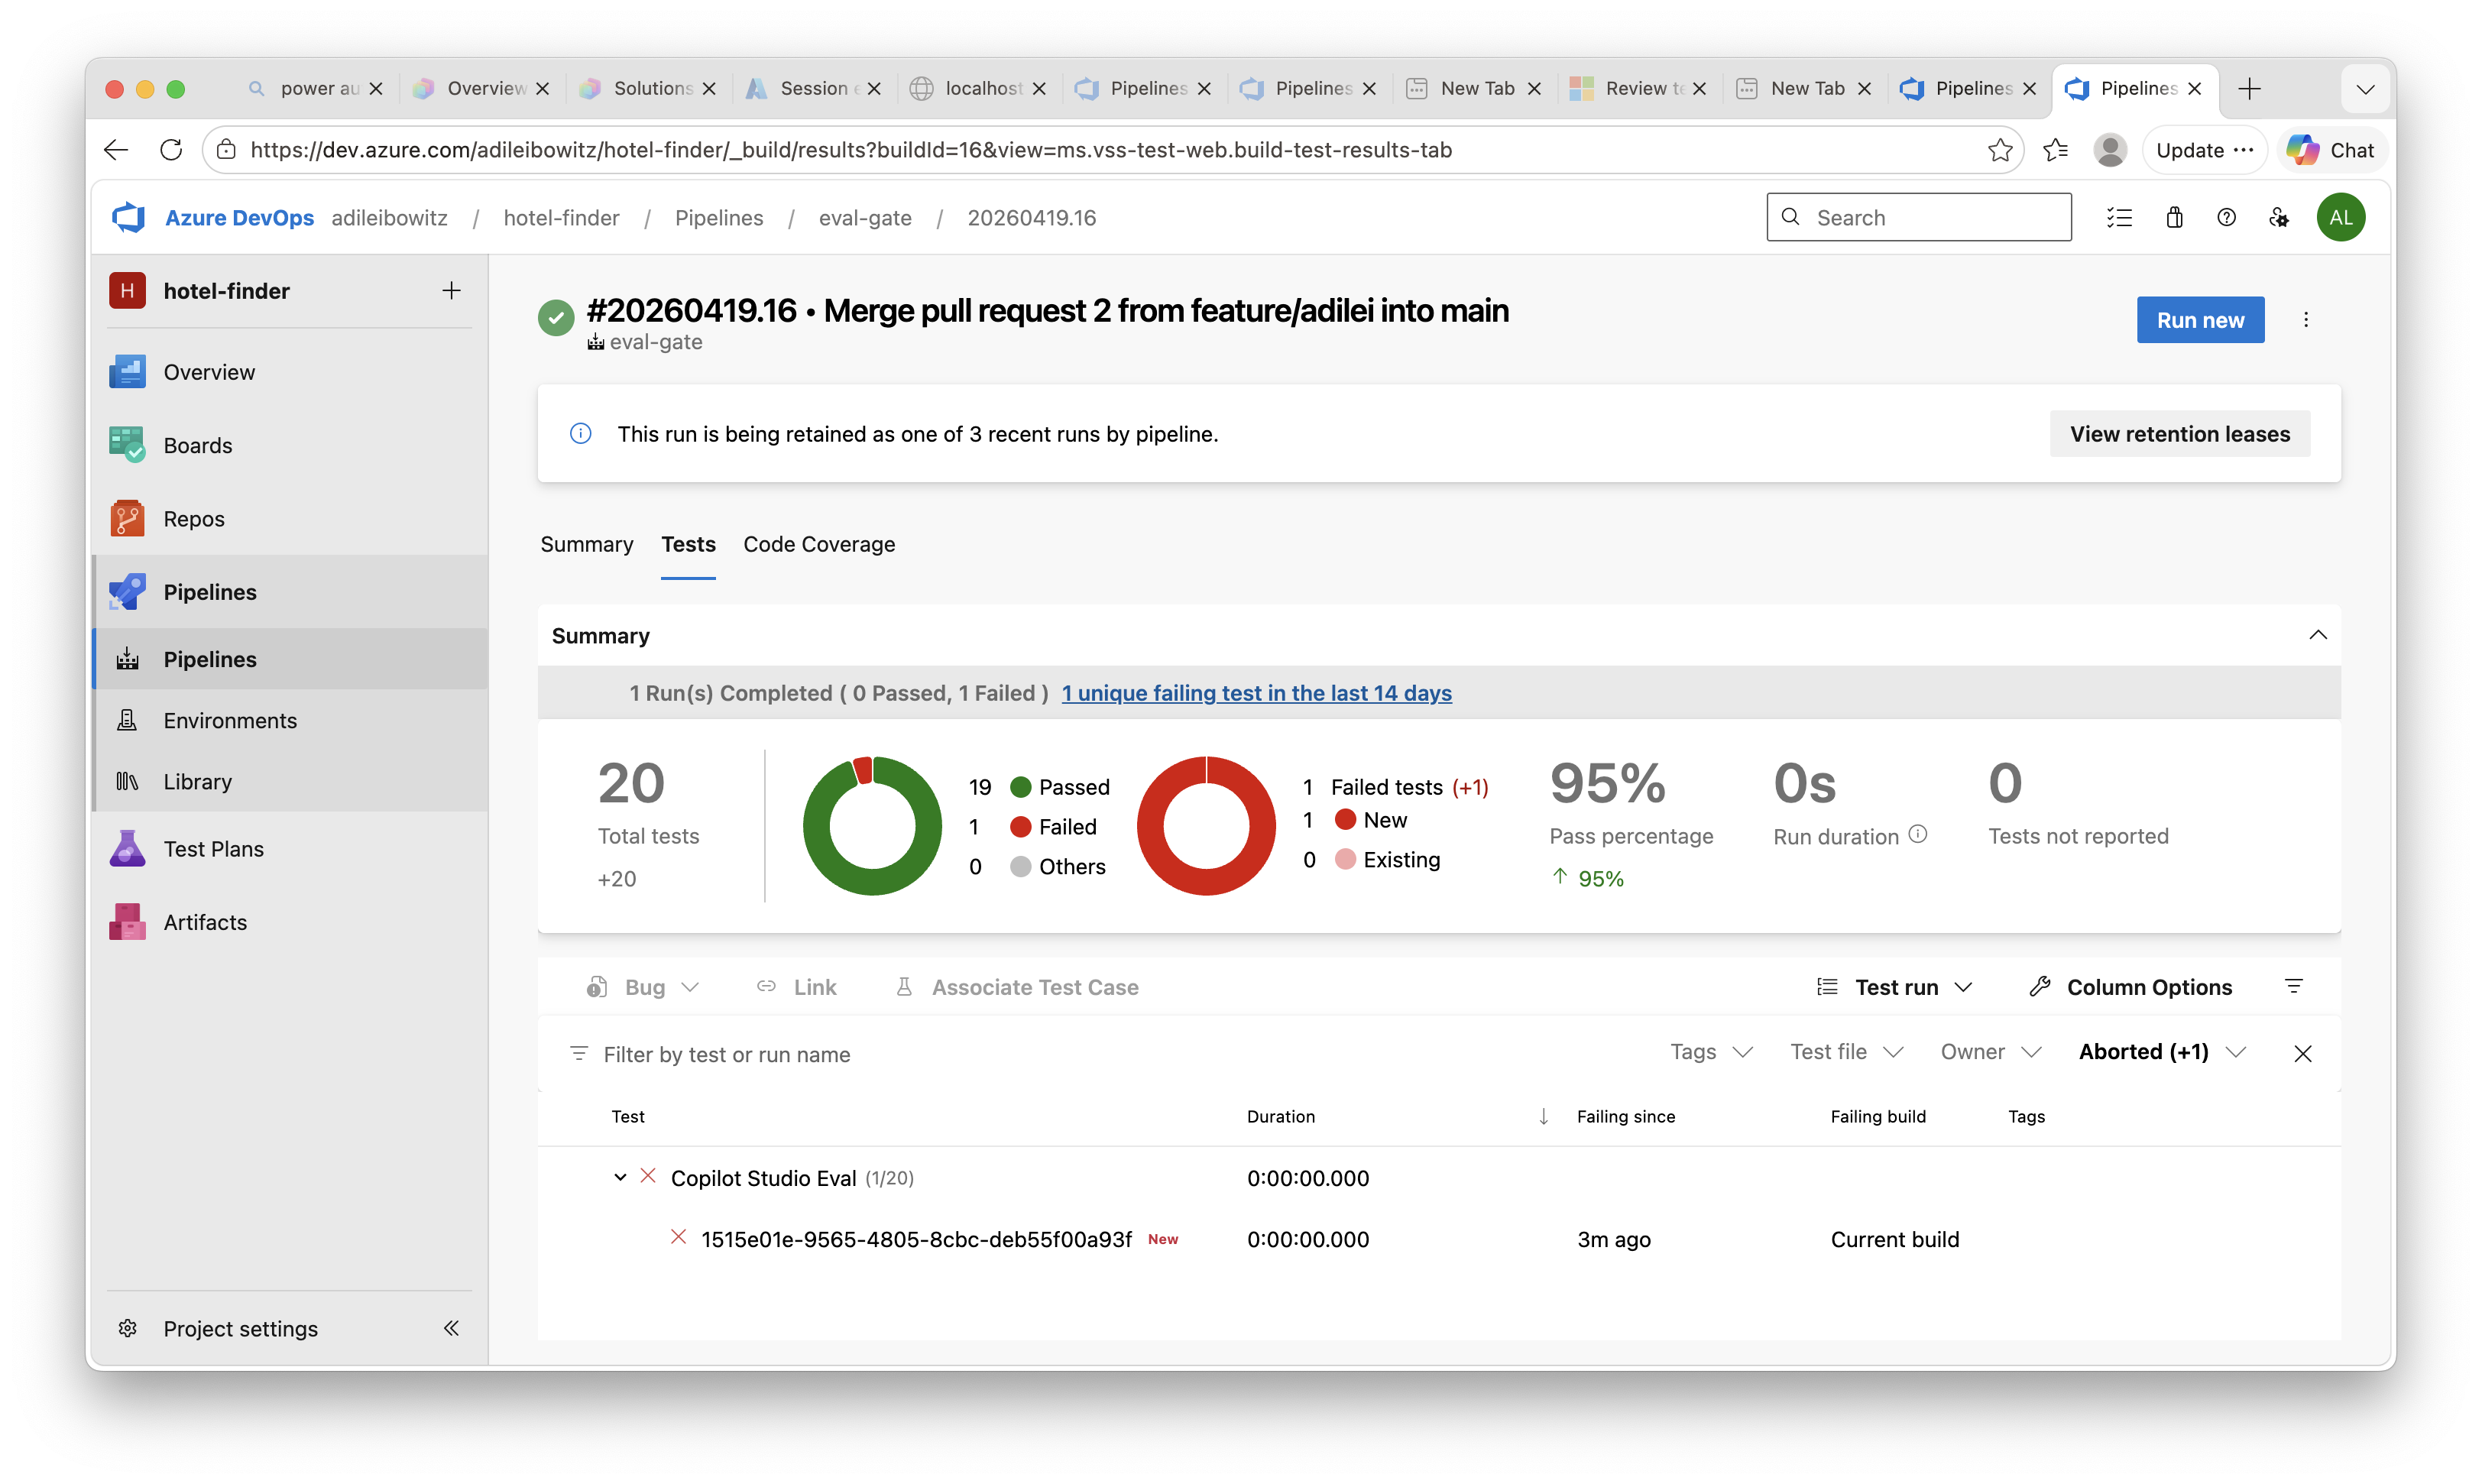
Tests tab — individual test case results with pass/fail breakdown:
Local Usage
Run evals locally against your own Dev environment:
export EVAL_REFRESH_TOKEN="<your-token>"

# Verify bot ID resolution
node scripts/eval-gate.mjs resolve-bot --config eval-config.json

# List test sets
node scripts/eval-gate.mjs list-testsets --config eval-config.json

# Run eval
node scripts/eval-gate.mjs run \
  --config eval-config.json \
  --run-name "local test" \
  --output results.json \
  --junit-output results.junit.xml

# Override for a different environment
node scripts/eval-gate.mjs run \
  --config eval-config.json \
  --environment-id "<my-dev-env-id>" \
  --agent-id "<my-agent-id>" \
  --threshold 0.9 \
  --run-name "local test"
Known Limitations
- Delegated auth only: The eval API requires user-context tokens. The pipeline uses a pre-cached refresh token (90-day expiry). There is no app-only authentication path.
- MCS connection is manual: The Microsoft Copilot Studio connector connection requires interactive OAuth and cannot be created programmatically. See step 1.4 for setup. Without it, authenticated actions and knowledge sources won’t work during eval.
- Single CI environment: Pipeline runs are serialized (max 1 concurrent). Multiple PRs queue and run one at a time.
- Self-hosted agent: The
pacCLI approach requires a self-hosted agent. The pipeline’sDOTNET_ROOTpath is configured for macOS with Homebrew — adjust it for Linux agents. For Microsoft-hosted agents (Windows/Linux), use the commented-out Power Platform Build Tools section in the pipeline YAML. - Errors count as failures: Evaluation errors (e.g., model timeouts, missing MCS connection) count against the pass threshold. If a run produces unexpectedly low scores, check
eval-results.jsonfor test cases withErrorstatus. - Test case names: The eval API returns test case IDs (GUIDs), not display names. Results in the Tests tab show GUIDs.