Boosting classifier accuracy by grouping categories
by Chris Lovett, Byron Changuion, Ofer Dekel, and Lisa Ong
The pretrained models in the Embedded Learning Library (ELL) gallery are trained to identify 1,000 different image categories (see the category names here). This tutorial uses that image classification model to help solve a simpler classification problem: distinguishing among dogs, cats, and other (anything that isn’t a dog or a cat). This classification model has an error rate of 64% on the 1,000-class problem, but it has a low error rate of just 5.7% on the 3-class problem.
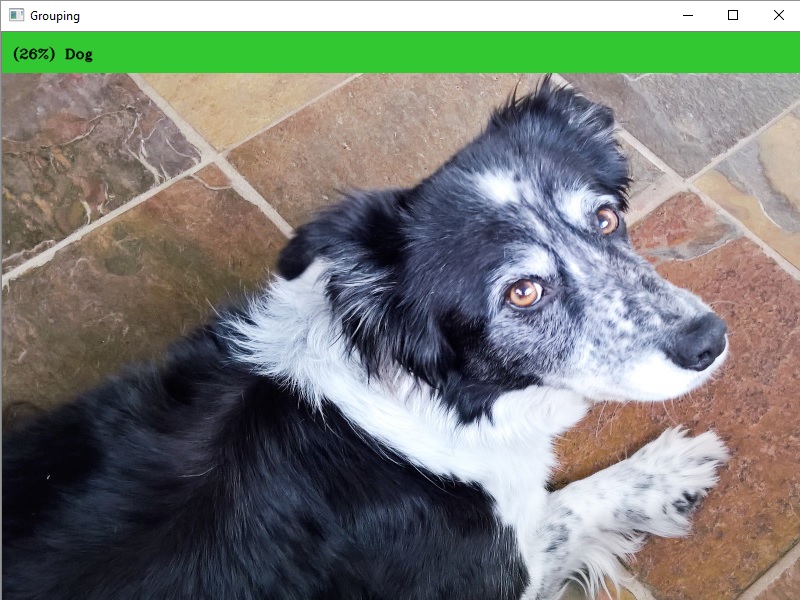
The tutorial includes instructions for a Python script that reads images from the camera and prints Woof! for dog recognition and Meow! for cat recognition while showing the class Dog or Cat as the window header text. In addition, the Next steps section describes how to include sound clips and also how to use callbacks with the model.
Before you begin
Complete the following steps before starting the tutorial.
- Install ELL on your computer (Windows, Ubuntu Linux, macOS).
- Follow the instructions for setting up your Raspberry Pi.
- Optional: Complete the tutorial Getting started with image classification on Raspberry Pi to learn how to produce a Python wrapper for an ELL model.
What you will need
- Laptop or desktop computer
- Raspberry Pi 3
- Raspberry Pi camera or USB webcam
- Optional: active cooling attachment (refer to the tutorial on cooling your Pi)
Deploy a pretrained model on the Raspberry Pi device
You’ll start by repeating the steps of Getting Started with Image Classification on Raspberry Pi, but replace the model suggested in that tutorial with this faster and less accurate model. Use this general process:
- Download the model to your computer.
- Use the
wraptool to compile it for the Raspberry Pi device. - Copy the resulting CMake project to the Pi device.
- Build the project on the Pi device.
Now, a Python module named model is on your Pi device.
Copy the following files to your Pi device.
Write a script
Next, you’ll write a Python script that invokes the model on your Raspberry Pi device, groups the categories as described above, and takes action when a dog or cat is recognized. If you just want the code, copy the complete script from here. Otherwise, create an empty text file named pets.py and copy in the code snippets below.
Import the required modules.
import cv2
import tutorial_helpers as helpers
Import the Python module for the compiled ELL model.
import model
Define a helper function that reads images from the camera.
def get_image_from_camera(camera):
    if camera:
        ret, frame = camera.read()
        if not ret:
            raise Exception("your capture device is not returning images")
        return frame
    return None
Next, define helper functions that check whether a category is contained in a category list. The predicted category is the numeric index of the prediction, so the helper function verifies that the prediction index is contained in the set. (The index is based on which line that category is within the categories.txt file.)
def prediction_index_in_set(prediction_index, set):
    for x in set:
        if prediction_index == int(x):
            return True
    return False
Define helper functions that print woof or meow appropriately.
def take_action(group):
    if group == "Dog":
        print("Woof!!")
    elif group == "Cat":
        print("Meow!!")
Define the main entry point and start the camera.
def main():
    camera = cv2.VideoCapture(0)
The argument 0 in the function call above selects the default camera. If you have more than one camera connected to your Pi device, choose which camera to use by changing this argument. Read the list of dog breed categories from dogs.txt, and the list of cat breed categories from cats.txt.
    with open("dogs.txt", "r") as dogs_file,\
         open("cats.txt", "r") as cats_file:
        dogs = dogs_file.read().splitlines()
        cats = cats_file.read().splitlines()
Create a model wrapper to interact with the model
model_wrapper = model.ModelWrapper()
Get the model input shape, which we will use to prepare the input data.
input_shape = model_wrapper.GetInputShape()
Models may need specific preprocessing for particular datasets, get the preprocessing metadata for the model for use later.
preprocessing_metadata = helpers.get_image_preprocessing_metadata(model_wrapper)
Declare a loop so that the camera can get an image and prepare it to be used as input to the model. The preparation of the image involves cropping and resizing the image while maintaining the aspect ratio, reordering the image channels (if needed), and returning the image data as a flat NumPy array of floats.
    while (cv2.waitKey(1) & 0xFF) == 0xFF:
        image = get_image_from_camera(camera)

        input_data = helpers.prepare_image_for_model(
            image, input_shape.columns, input_shape.rows,
            preprocessing_metadata=preprocessing_metadata)
Wrap the input_data NumPy array in a FloatVector
input_data = model.FloatVector(input_data)
Send the processed image to the model to get a vector of predictions.
predictions = model_wrapper.Predict(input_data)
Use the helper function to get the top prediction. The threshold parameter selects predictions with a 5% or higher confidence.
top_n = helpers.get_top_n(predictions, 1, threshold=0.05)
Check whether the prediction is part of a group.
        group = ""
        label = ""
        if top_n:
            top = top_n[0][0]
            if prediction_index_in_set(top, dogs):
                group = "Dog"
            elif prediction_index_in_set(top, cats):
                group = "Cat"
If the prediction is in one of the defined category groups, take the appropriate action.
        header_text = ""
        if group:
            top = top_n[0]
            take_action(group)
            header_text = "({:.0%}) {}".format(top[1], group)
Finally, display the image and header text.
        helpers.draw_header(image, header_text)

        cv2.imshow("Grouping", image)

if __name__ == "__main__":
    main()
Classify live video on the Raspberry Pi device
By following the Raspberry Pi Setup Instructions, you should now have an Anaconda environment named py34. Activate this environment and run the script.
source activate py34
python pets.py
Point the camera at different objects and see how the model classifies them. Look at dogs.txt and cats.txt to see which categories the model is trained to recognize and try to show those objects to the model. For quick experimentation, point the camera to your computer screen, have your computer display images of different animals, and see when it barks or meows. If you copied the full pets.py script from here, you will also see the average time it takes for the model to process a single frame.
Next steps
Playing sounds
A fun next step would be to introduce the playing of sounds to indicate the detection of either a dog or cat. To do this, download a dog’s bark here and a
cat’s meow here. These can be used with the play_sound function that’s available in the tutorial_helpers module, to play sounds on your computer or on your Raspberry Pi. Find more details on playing sounds at Notes on Playing Audio.
Here’s an example of the classifier running with the audio barks and meows.
Using callbacks
The predict function on the ELL model provides a direct way to send input to the model and get predictions as parameters to the function.
Instead of using the predict function, you can implement input and output callbacks that the ELL model calls when necessary.
The pets_callback.py script from here demonstrates how to provide callbacks for the input image and the output predictions.
First, define a class called CatsDogsPredictor that extends the model.ModelWrapper class.
class CatsDogsPredictor(model.ModelWrapper):
    """Class that implements input and output callbacks for the ELL model
    by deriving from the Model base class.
    """
CatsDogsPredictor.__init__ performs initialization for implementing the callbacks later.
    def __init__(self, camera, cats, dogs):
        """Initializes this object with the camera source and model-related
        information"""
        super(CatsDogsPredictor, self).__init__(self)

        self.camera = camera
        self.dogs = dogs
        self.cats = cats

        self.input_shape = self.GetInputShape()

        self.preprocessing_metadata = helpers.get_image_preprocessing_metadata(self)

        self.image = None
CatsDogsPredictor.input_callback gets an image from the camera, processes it, and returns it to the ELL model. The ELL model will call this when it is ready to get input.
    def input_callback(self):
        """The input callback that returns an image to the model"""
        self.image = get_image_from_camera(self.camera)

        return model.FloatVector(helpers.prepare_image_for_model(
            self.image, self.input_shape.columns, self.input_shape.rows, preprocess_tag=self.preprocess_tag))
CatsDogsPredictor.output_callback receives predictions from the ELL model and determines which group the top prediction belongs to. This prints Woof! and Meow! appropriately while showing the class Dog or Cat as the window header text. Alternatively, you can choose to play a sound by following the instructions in Playing sounds).
    def output_callback(self, predictions):
        """The output callback that the model calls when predictions are ready"""

        header_text = ""
        group, probability = self.get_group(predictions)

        if group:
            if group == "Dog":
                print("Woof!")
            elif group == "Cat":
                print("Meow!")
            header_text = "({:.0%}) {}".format(probability, group)

        helpers.draw_header(self.image, header_text)
        cv2.imshow("Grouping (with callbacks)", self.image)
As a final step, the main entry point creates a CatsDogsPredictor object and calls its predict method in a loop. Each call to predict runs one iteration of the ELL model and invokes the callbacks.
def main():
    """Entry point for the script when called directly"""
    camera = cv2.VideoCapture(0)

    with open("dogs.txt", "r") as dogs_file,\
         open("cats.txt", "r") as cats_file:
        dogs = dogs_file.read().splitlines()
        cats = cats_file.read().splitlines()

    predictor = CatsDogsPredictor(camera, cats, dogs)

    while (cv2.waitKey(1) & 0xFF) == 0xFF:
        predictor.Predict()
Troubleshooting
Find tips in the Troubleshooting section of the Raspberry Pi Setup Instructions.