Getting started with object detection using region of interest networks
by Kern Handa
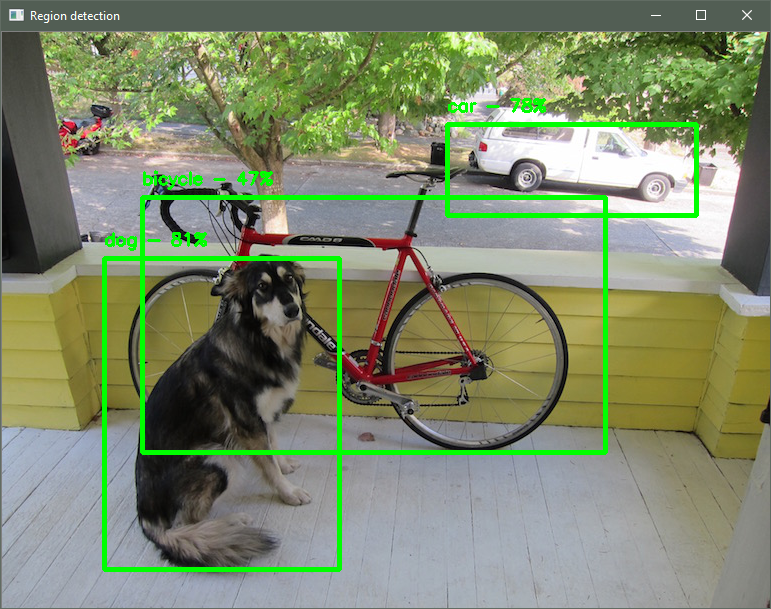
Unlike standard image classification, which only detects the presence of an object, object detection (using regions of interest) models can detect multiple instances of different types of objects in the same image and provide coordinates in the image where these objects are located. The pretrained model used here has been trained to detect 20 different objects and return their positions.
This tutorial shows you how to use a trained Darknet model to detect objects, classify them, and provide a bounding box for the object. The model used in this tutorial can classify 20 different types of objects, such as cats, dogs, cars, and so on. You’ll learn how to write a script that can be used to detect objects in images read from the camera and draw the corresponding bounding boxes and labels.
Before you begin
- Install ELL on your computer (Windows, Ubuntu Linux, macOS).
- Follow the instructions for setting up your Raspberry Pi.
- Complete the basic tutorial, Getting started with image classification on Raspberry Pi, to learn how to produce a Python wrapper for an ELL model.
What you will need
- Laptop or desktop computer
- Raspberry Pi 3 device
- Raspberry Pi camera or USB webcam
- Optional: Active cooling attachment (see our tutorial on cooling your Pi)
Deploy a pretrained model on the Raspberry Pi device
The process for deploying a pretrained model on Raspberry Pi device is similar to instructions you might have followed in the Darknet model section of the importing models tutorial. Start by downloading the model description, weights, and labels.
curl --location -o model.cfg https://raw.githubusercontent.com/pjreddie/darknet/master/cfg/yolov2-tiny-voc.cfg
curl --location -o model.weights https://pjreddie.com/media/files/yolov2-tiny-voc.weights
curl --location -o categories.txt https://raw.githubusercontent.com/pjreddie/darknet/master/data/voc.names
Next, import the Darknet model into ELL by running darknet_import.py,
replacing <ELL-root> with the path to the ELL root directory (the directory
where you cloned the ELL repository).
python <ELL-root>/tools/importers/darknet/darknet_import.py model.cfg model.weights
Output similar to the following will be displayed.
Convolution :  416x416x3  ->  416x416x16 | input padding 1  output padding 0
MaxPooling :  416x416x16  ->  208x208x16 | input padding 0  output padding 1
Convolution :  208x208x16  ->  208x208x32 | input padding 1  output padding 0
MaxPooling :  208x208x32  ->  104x104x32 | input padding 0  output padding 1
Convolution :  104x104x32  ->  104x104x64 | input padding 1  output padding 0
MaxPooling :  104x104x64  ->  52x52x64 | input padding 0  output padding 1
Convolution :  52x52x64  ->  52x52x128 | input padding 1  output padding 0
MaxPooling :  52x52x128  ->  26x26x128 | input padding 0  output padding 1
Convolution :  26x26x128  ->  26x26x256 | input padding 1  output padding 0
MaxPooling :  26x26x256  ->  13x13x256 | input padding 0  output padding 1
Convolution :  13x13x256  ->  13x13x512 | input padding 1  output padding 0
MaxPooling :  13x13x512  ->  13x13x512 | input padding 0  output padding 1
Convolution :  13x13x512  ->  13x13x1024 | input padding 1  output padding 1
Convolution :  13x13x1024  ->  13x13x1024 | input padding 1  output padding 0
Convolution :  13x13x1024  ->  13x13x125 | input padding 0  output padding 0
RegionDetection :  13x13x125  ->  13x13x125 | input padding 0  output padding 0
Saving model file: 'model.ell'
Compile the imported ELL model by running wrap.py for the Raspberry Pi device
target.
python <ELL-root>/tools/wrap/wrap.py --model_file model.ell --language python --target pi3
Copy the resulting CMake project to the Raspberry Pi device, and build it
there, as shown in Getting started with image classification on the Raspberry Pi.
After completing these steps, you should have a Python module on your Pi named
model.
Also copy a few helper functions to the directory.
[Linux/macOS] cp <ELL-root>/docs/tutorials/shared/tutorial_helpers.py .
[Windows] copy <ELL-root>\docs\tutorials\shared\tutorial_helpers.py .
We are ready to move to the Raspberry Pi. If your Pi is accessible over the
network, you can copy the directory using the Unix scp tool or the Windows
WinSCP tool.
Write code to invoke the model on the Raspberry Pi device
Here you’ll write a Python script that invokes the model on a Raspberry Pi device, finds the regions describing the objects of interest in the image, discards overlapping regions, and draws the final set of regions on the image.
If you just want the code, copy the complete script from
here.
Otherwise, create an empty text file named tutorial.py and copy in the code
snippets below.
First, import the required modules.
import cv2
import numpy as np
import tutorial_helpers as helpers
Also, import the Python module for the compiled ELL model.
import model
Object detection models use anchor boxes. In the case of Darknet models, the
values for the anchor boxes can be found in the file that ends in .cfg, which
describes the network layout. Look for the anchors key under the region
heading, like this:
[region]
anchors = 1.08,1.19,  3.42,4.41,  6.63,11.38,  9.42,5.11,  16.62,10.52
Copy these values into the script as a global constant, so that it can be used when running the model.
ANCHOR_BOXES = [1.08,1.19, 3.42,4.41, 6.63,11.38, 9.42,5.11, 16.62,10.52]
Next, set two other constants. The first is a confidence threshold for the object detection. This is the minimum confidence needed for a region to be considered “valid” and drawn onto the final image. The second constant is overlap threshold, which is minimum amount of overlap between two overlapping bounding boxes before they are considered the same and consolidated into one box. Both values are tuneable and should be adjusted according to the scenarios in which they are being used.
CONFIDENCE_THRESHOLD = 0.4
OVERLAP_THRESHOLD = 0.05
As in previous tutorials, define a helper function that reads images from the camera.
def get_image_from_camera(camera):
    if camera:
        ret, frame = camera.read()
        if not ret:
            raise Exception("your capture device is not returning images")
        return frame
    return None
Define the main entry point and use the camera as the image source.
def main():
    camera = cv2.VideoCapture(0)
The argument 0 in the function call above selects the default camera.
If you have more than one camera connected to your Pi device, choose which
camera to use by changing this argument. Read the list of categories from
categories.txt.
    with open("categories.txt", "r") as categories_file:
        categories = categories_file.read().splitlines()
Create a model wrapper to interact with the model
model_wrapper = model.ModelWrapper()
Get the model input shape, which you will use to prepare the input data.
input_shape = model_wrapper.GetInputShape()
Get the model output shape, which you will use to do post-processing after running the model.
output_shape = model_wrapper.GetOutputShape()
Models may need specific preprocessing for particular datasets, get the preprocessing metadata for the model for use later.
preprocessing_metadata = helpers.get_image_preprocessing_metadata(model_wrapper)
Next, set up a loop that keeps going until OpenCV indicates it is done, which is when the user hits any key. At the start of each iteration, read an image from the camera. To exit the loop and close the application, press the Escape key.
    while (cv2.waitKey(1) & 0xFF) != 27:
        original = get_image_from_camera(camera)
The preparation of the image involves resizing the image, reordering the image
channels, and returning the image data as a flat numpy array of floats so
that it can be provided as input to the model.
        image, offset, scale = helpers.prepare_image_for_model(
            original, input_shape.columns, input_shape.rows, reorder_to_rgb=True,
            ravel=False, preprocessing_metadata=preprocessing_metadata)
Wrap the input_data numpy array in a FloatVector
input_data = model.FloatVector(input_data)
Send the processed image to the model to get a vector of predictions.
predictions = model_wrapper.Predict(input_data)
Next, reshape the predictions so that it is no longer a flat array. The predictions now are in a grid, where the channel dimension for each row and column index contains dimensions describing a bounding box, the confidence that there’s actually an object within the bounding box, and the probability of the category describing the object.
        predictions = np.reshape(
            predictions,
            (13, 13, 125))
The reshaped predictions can now be used to get a list of detected regions by
calling helpers.get_regions. To get the correct values for the detected
regions, the helper function applies sigmoid activation to the X and Y
offset coordinates and exponentiates the width and height values returned from
model_wrapper.Predict. It also applies softmax activation to the category
probabilities to identify the most likely classification of the detected
object.
        regions = helpers.get_regions(
            predictions, categories, CONFIDENCE_THRESHOLD, ANCHOR_BOXES)
Object detection models can sometimes lead to a number of regions being
detected for the same object, which can cause rapidly changing bounding boxes
to be rendered for the same object, especially those with probabilities close
to the CONFIDENCE_THRESHOLD. One way of dealing with this is by using the
non-maximum suppression
algorithm. Briefly, for each object detected, start with the bounding box
you’re most confident about and compare that to every other bounding box for
that object. If they overlap sufficiently (in this case, this is controlled by
OVERLAP_THRESHOLD), you discard the lower confidence bounding box. This
leaves you with reasonably unique regions for all the objects in the image.
To use this algorithm, call helpers.non_max_suppression.
        regions = helpers.non_max_suppression(
            regions, OVERLAP_THRESHOLD, categories)
Finally, display the detected regions onto the original image.
        scale = (scale[0] * image.shape[1], scale[1] * image.shape[0])
        helpers.draw_regions_on_image(original, regions, offset, scale)

        cv2.imshow("Object detection", original)

if __name__ == "__main__":
    main()
Detect and classify objects in live video on the Raspberry Pi device
If you set up your device using the Raspberry Pi Setup Instructions, you should have an Anaconda environment named py34. Activate this environment and run the script.
source activate py34
python tutorial.py
Point your camera at different objects and see how the model detects and
classifies them. Look at categories.txt to see which categories the model is
trained to recognize and try to show those objects to the model. For quick
experimentation, point the camera to your computer screen, have your computer
display images of different objects, and see the regions that are detected.
Next steps
An improvement that you could make is to randomly generate a color for each object type, and then use that color to the draw the region where that type of object is detected.
You may also have noticed that drawn box around object moves slightly and changes width or height. This is because of minor differences in lighting and shadow that affect the output of the object detection network. One way to address this issue is to add a post-processing step, where a filter like a Kalman filter is applied to the detected regions.
Troubleshooting
For help with Raspberry Pi device set up, see Raspberry Pi Setup Instructions.