Streamline employee and guest onboarding
Secure and governed access to all applications and resources
Introduction
In this guide, we describe how to configure Microsoft Entra Suite products for a scenario in which the fictional organization, Contoso, wants to hire new remote employees and provide them with secure and seamless access to necessary apps and resources. They want to invite and collaborate with external users (such as partners, vendors, or customers) and provide them with access to relevant apps and resources.
Contoso uses Microsoft Entra Verified ID to issue and verify digital proofs of identity and status for new remote employees (based on human resources data) and external users (based on email invitations). Digital wallets store identity proof and status to allow access to apps and resources. As an additional security measure, Contoso may verify identity with FaceCheck facial recognition based on the picture that the credential stores.
They use Microsoft Entra ID Governance to create and grant access packages for employees and external users based on verifiable credentials.
For employees, they base access packages on job function and department or Lifecycle workflows. Access packages include cloud and on-premises apps and resources to which employees need access.
For external collaborators, they base access packages on based on invitation to define external user roles and permissions. The access packages include only apps and resources to which external users need access.
Employees and external users can request access packages through a self-service portal and provide their digital proofs as identity verification. With single sign-on and multifactor authentication, employees and external users use Microsoft Entra accounts to access apps and resources that their access packages include. Contoso verifies credentials and grants access packages without requiring manual approvals or provisioning.
Contoso uses Microsoft Entra Identity Protection and Conditional Access (CA) to monitor and protect accounts from risky sign-ins and user behavior. They enforce appropriate access controls based on location, device, and risk level
Configure prerequisites
To successfully deploy and test the solution, configure the prerequisites that we describe in this section.
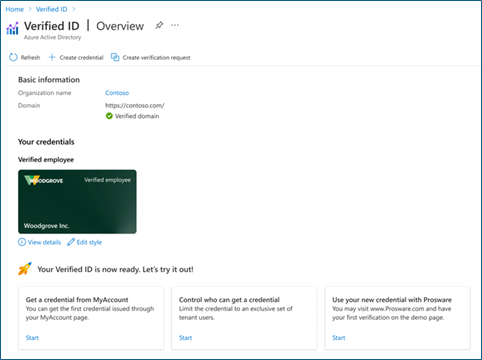
Configure Microsoft Entra Verified ID
For this scenario, complete these prerequisite steps to configure Microsoft Entra Verified ID with Quick setup (Preview):
- Register a custom domain (required for Quick setup) by following the steps in the Add your custom domain article.
2.Sign in to the Microsoft Entra admin center with at least a Global Administrator role.
- Select Verified ID.
- Select Setup.
- Select Get started
-
If you have multiple domains registered for your Microsoft Entra tenant, select the one that you would like to use for Verified ID.
-
After the setup process is complete, you see a default workplace credential available to edit and offer to employees of your tenant on their My Account page.
-
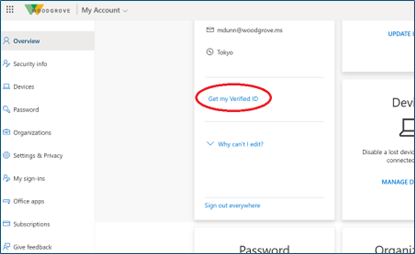
Sign in to the test user�s My Account with their Microsoft Entra credentials. Select Get my Verified ID to issue a verified workplace credential
Configure Microsoft Entra ID Protection
-
Administrators who interact with ID Protection must have one or more of the following role assignments depending on the tasks they're performing. To follow the Zero Trust principle of least privilege, consider using Privileged Identity Management (PIM) to just-in-time activate privileged role assignments.
-
Read ID Protection and Conditional Access policies and configurations
-
[Manage ID Protection]
-
Create or modify Conditional Access policies
-
-
A test user who isn't an administrator to verify policies work as expected before deploying to real users. If you need to create a user, see Quickstart: Add new users to Microsoft Entra ID
-
A group that the user is a member of. If you need to create a group, see Create a group and add members in Microsoft Entra ID.
Add trusted external organization (B2B)
Follow these prerequisite steps to add a trusted external organization (B2B) for the scenario.
-
Sign in to the Microsoft Entra admin center with at least a Security Administrator role.
-
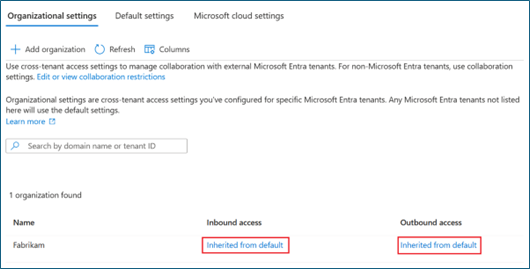
Go to Identity > External Identities > Cross-tenant access settings. Select Organizational settings
-
Select Add organization.
-
Enter the organization's full domain name (or tenant ID).
-
Select the organization in the search results. Select Add.
-
Confirm the new organization (that inherits its access settings from default settings) in Organizational settings.
Create catalog
Follow these prerequisite steps to create an Entitlement management catalog for the scenario.
-
Sign in to the Microsoft Entra admin center with at least an Identity Governance Administrator role.
-
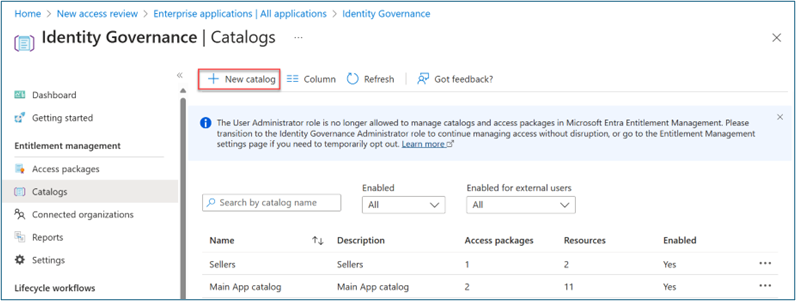
Go to Identity governance > Entitlement management > Catalogs.
-
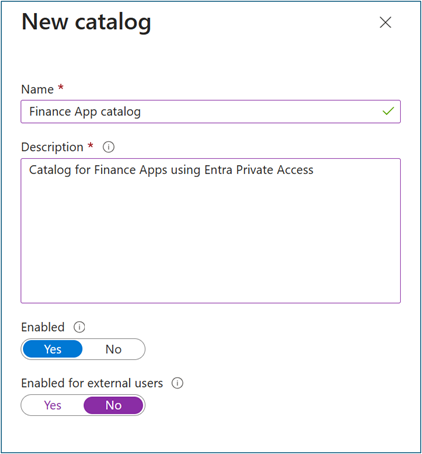
Select +New catalog.
-
Enter a unique name for the catalog and provide a description. Requestors see this information in an access package's details.
-
To create access packages in this catalog for internal users, select Enabled for external users > No.
-
On Catalog, open the catalog to which you want to add resources. Select Resources > +Add resources.
-
Select Type, then Groups and Teams, Applications, or SharePoint sites.
-
Select one or more resources of the type that you want to add to the catalog. Select Add.
Create access packages
To successfully deploy and test the solution, configure the access packages that we describe in this section.
Access package for remote users (internal)
Follow these steps to create an access package in entitlement management with Verified ID for remote (internal) users.
-
Sign in to the Microsoft Entra admin center with at least an Identity Governance Administrator role.
-
Go to Identity governance > Entitlement management > Access package.
-
Select New access package.
-
For Basics, give the access package a name (such as Finance Apps for Remote Users). Specify the catalog that you previously created.
-
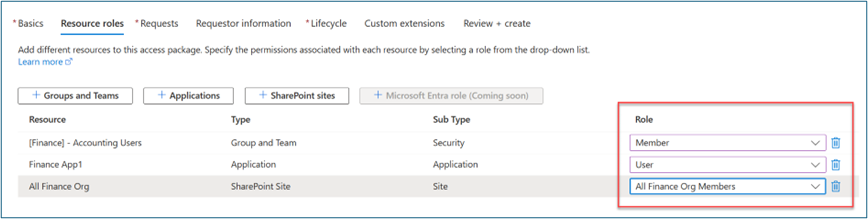
For Resource roles, select a resource type (for example: Groups and Teams, Applications, SharePoint sites). Select one or more resources.
-
In Role, select the role to which you want users assigned for each resource.
-
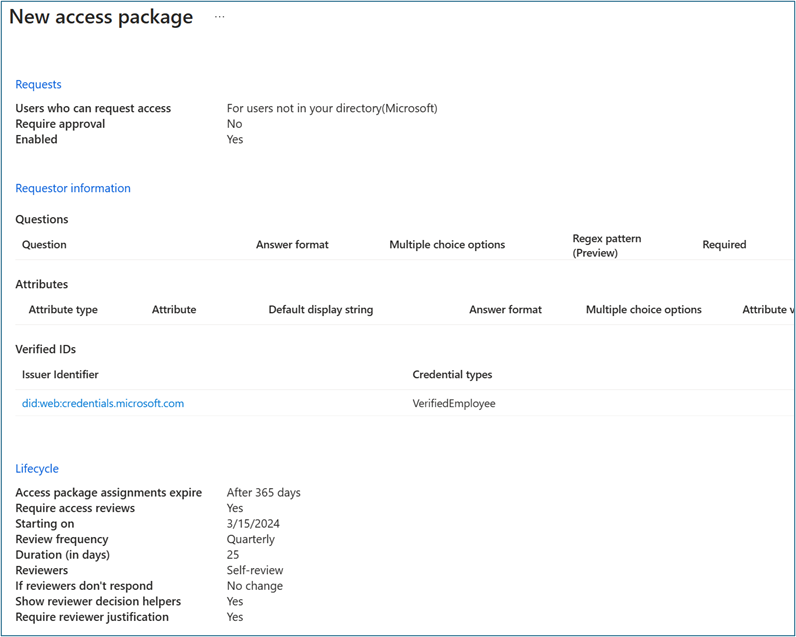
For Requests, select For users in your directory.
-
In Select users and groups, select For Users in your directory. Select + Add users and groups. Select an existing group entitled to request the access package.
-
Scroll to Required Verified Ids.
-
Select + Add issuer. Select an issuer from the Microsoft Entra Verified ID network. Ensure that you select an issuer from an existing verified identity in the guest wallet.
-
Optional: In Approval, specify whether approval is required when users request the access package.
-
Optional: In Requestor information, select Questions. Enter a question that you want to ask the requestor. This question is known as the display string. To add localization options, select Add localization.
-
For Lifecycle, specify when a user's assignment to the access package expires. Specify whether users can extend their assignments. For Expiration, set Access package assignments expiration to On date, Number of days, Number of hours, or Never.
-
In Access Reviews, select Yes.
-
In Starting on, select the current date. Set Review Frequency to Quarterly. Set Duration (in Days) to 25.
Access package for guests (B2B)
Follow these steps to create an access package in entitlement management with Verified ID for guests (B2B).
-
Sign in to the Microsoft Entra admin center with at least an Identity Governance Administrator role.
-
Go to Identity governance > Entitlement management > Access package.
-
Select New access package.
-
For Basics, give the access package a name (such as Finance Apps for Remote Users). Specify the catalog that you previously created.
-
For Resource roles, select a resource type (for example: Groups and Teams, Applications, SharePoint sites). Select one or more resources.
-
In Role, select the role to which you want users assigned for each resource.

-
For Requests, select For users not in your directory.
-
Select Specific connected organizations. To select from a list of connected organizations that you previously added, select Add directory.
-
Enter the name or domain name to search for a previously connected organization.
-
Scroll to Required Verified Ids.
-
Select + Add issuer. Select an issuer from the Microsoft Entra Verified ID network. Ensure that you select an issuer from an existing verified identity in the guest wallet.
-
Optional: In Approval, specify whether approval is required when users request the access package.
-
Optional: In Requestor information, select Questions. Enter a question that you want to ask the requestor. This question is known as the display string. To add localization options, select Add localization.
-
For Lifecycle, specify when a user's assignment to the access package expires. Specify whether users can extend their assignments. For Expiration, set Access package assignments expiration to On date, Number of days, Number of hours, or Never.
-
In Access Reviews, select Yes.
-
In Starting on, select the current date. Set Review Frequency to Quarterly. Set Duration (in Days) to 25.
-
Select Specific reviewers. Select Self Review.
Create lifecycle workflows
In this section, we describe how to create joiner and leaver workflows and run workflows on demand.
Create joiner workflow
To create a joiner workflow, follow these steps.
- Sign in to the Microsoft Entra admin center with at least a Lifecycle Workflows Administrator role.
- Go to Identity governance > Lifecycle workflows > Create a workflow.
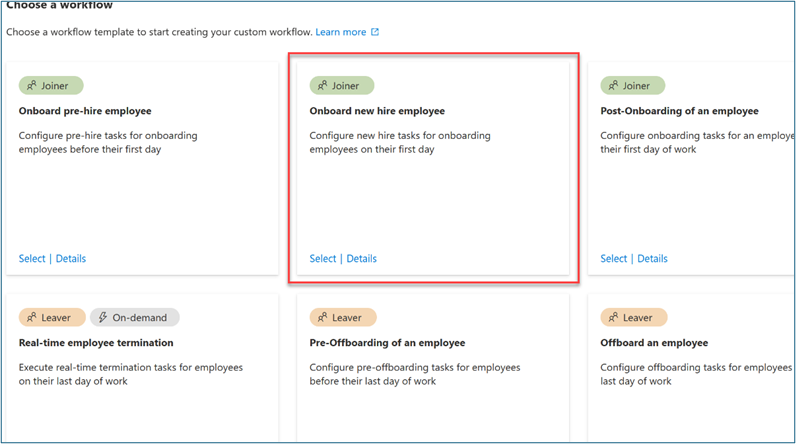
- For Choose a workflow, select Onboard new hire employee.
- For Basics, enter Onboard New hire employee – Finance for the workflow display name and description. Select Next.
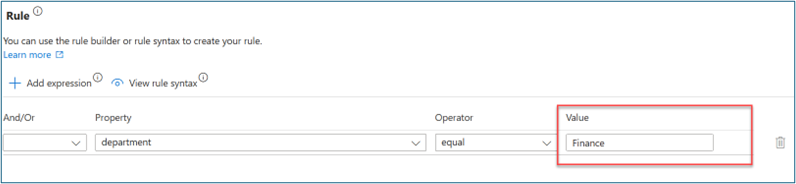
- For Configure scope > Rule, enter values for Property, Operator, and Value. Change the expression of the scope to only users where Property > department has a Value of Finance. Ensure that your test user populates Property with the Finance string so that it’s in the workflow scope
-
On Review tasks, select Add task to add a task to the template. For this scenario, we add Request user access package assignment.
-
For Basics, select Request user access package assignment. Assign a name to this task (such as Assign Finance Access Package). Select a policy.
-
In Configure, select the access package that you previously created.
-
Optional: Add other joiner tasks as follows. For some of these tasks, ensure that important attributes such as Manager and Email are properly mapped to users as described in . Automate employee onboarding tasks before their first day of work using Lifecycle Workflows APIs.
- Enable User Account
- Add user to groups or teams Send Welcome Email
- Generate TAP and Send Email
-
Select Enable Schedule.
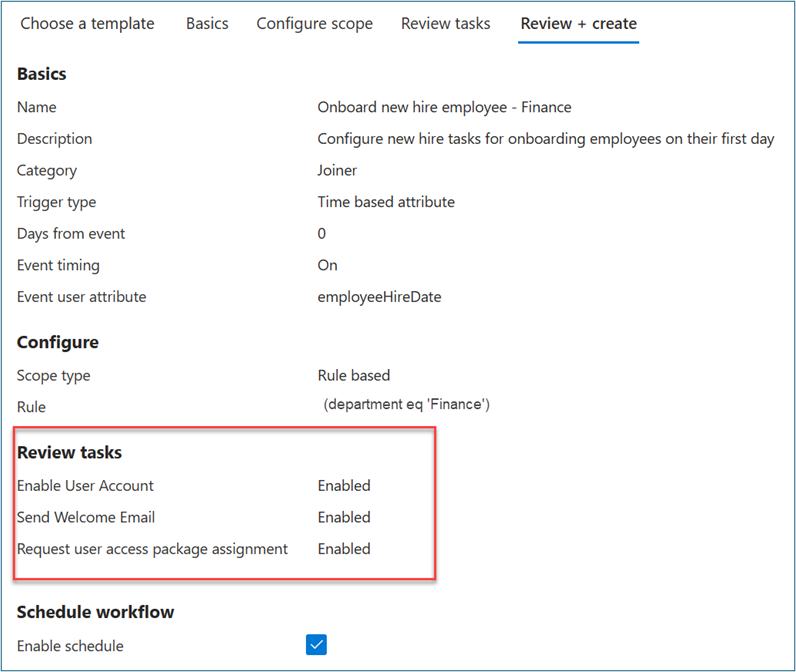
- Select Review + create.
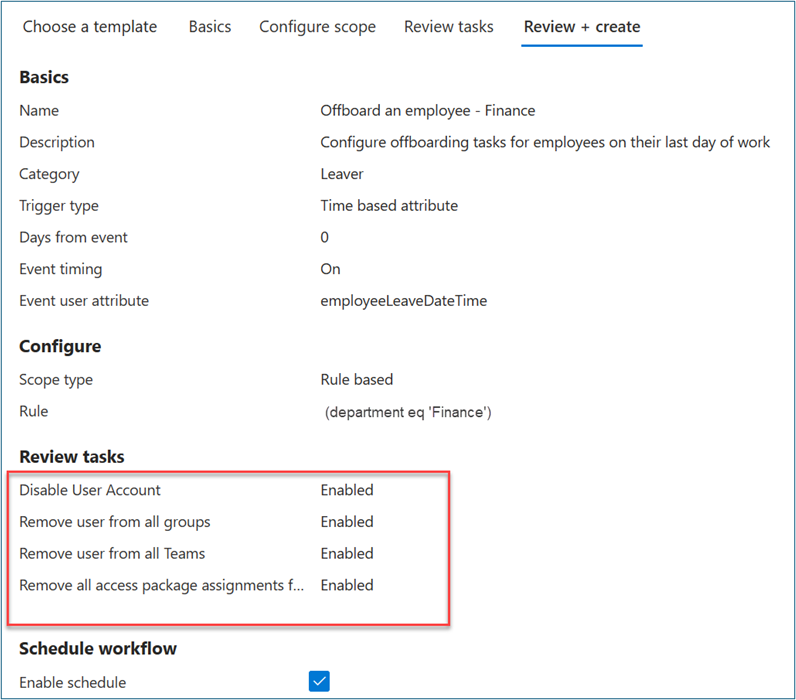
Create leaver workflow (Optional)
To create a leaver workflow, follow these steps.
- Sign in to the Microsoft Entra admin center with at least a Lifecycle Workflows Administrator role.
- Go to Identity governance > Lifecycle workflows > Create a workflow.
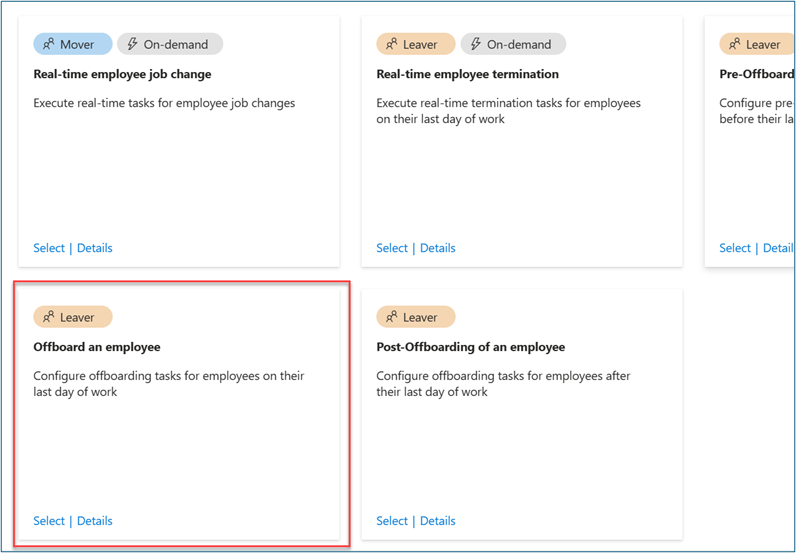
- On Choose a workflow, select Offboard an employee.
- On Basics, enter Offboard an employee – Finance as display name and description for the workflow. Select Next.
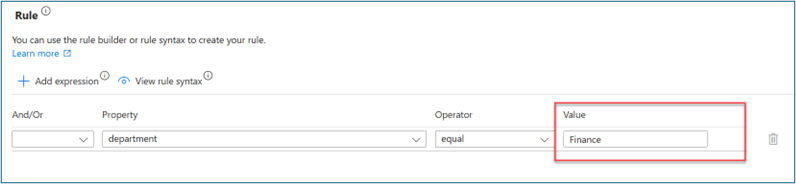
- On Configure scope > Rule, enter values for Property, Operator, and Value. Change the expression of the scope to only users where Property > department has a Value of Finance. Ensure that your test user populates Property with the Finance string so that it’s in the workflow scope.
- On Review tasks, select Add task to add a task to the template. For this scenario we add Request user access package assignment.
- Optional: Add other leaver tasks such as:
- Disable User Account
- Remove user from all groups
- Remove user from all Teams
- Toggle on Enable schedule.
Note: Lifecycle workflows run automatically based on defined triggers that combine time-based attributes and an offset value. For example, if the attribute is employeeHireDate and offsetInDays is -1, then the workflow should trigger one day before the employee hire date. The value can range between -180 and 180 days. The values employeeHireDate and employeeLeaveDateTime must be set within Microsoft Entra ID for users. How to synchronize attributes for Lifecycle workflows provides more information on attributes and processes.
Run joiner workflow on demand
To test this scenario without waiting for the automated schedule, run on-demand lifecycle workflows.
- Initiate the previously created joiner workflow.
- Sign in to the Microsoft Entra admin center with at least a Lifecycle Workflows Administrator role.
- Go to Identity governance > Lifecycle workflows > Workflows.
- On Workflow, select Onboard New hire employee – Finance that you previously created.
- Select Run on-demand.
- On Select users, select Add users.
- On Add users, select the users for which you want to run the on-demand workflow.
- Select Add.
- Confirm your choices. Select Run workflow.
- Select Workflow history to verify task status.

- After all tasks complete, verify that the user has access to the applications that you selected in the access package. This completes the joiner scenario for the user to access necessary apps on day one.
Review Existing Entra ID Protection Reports
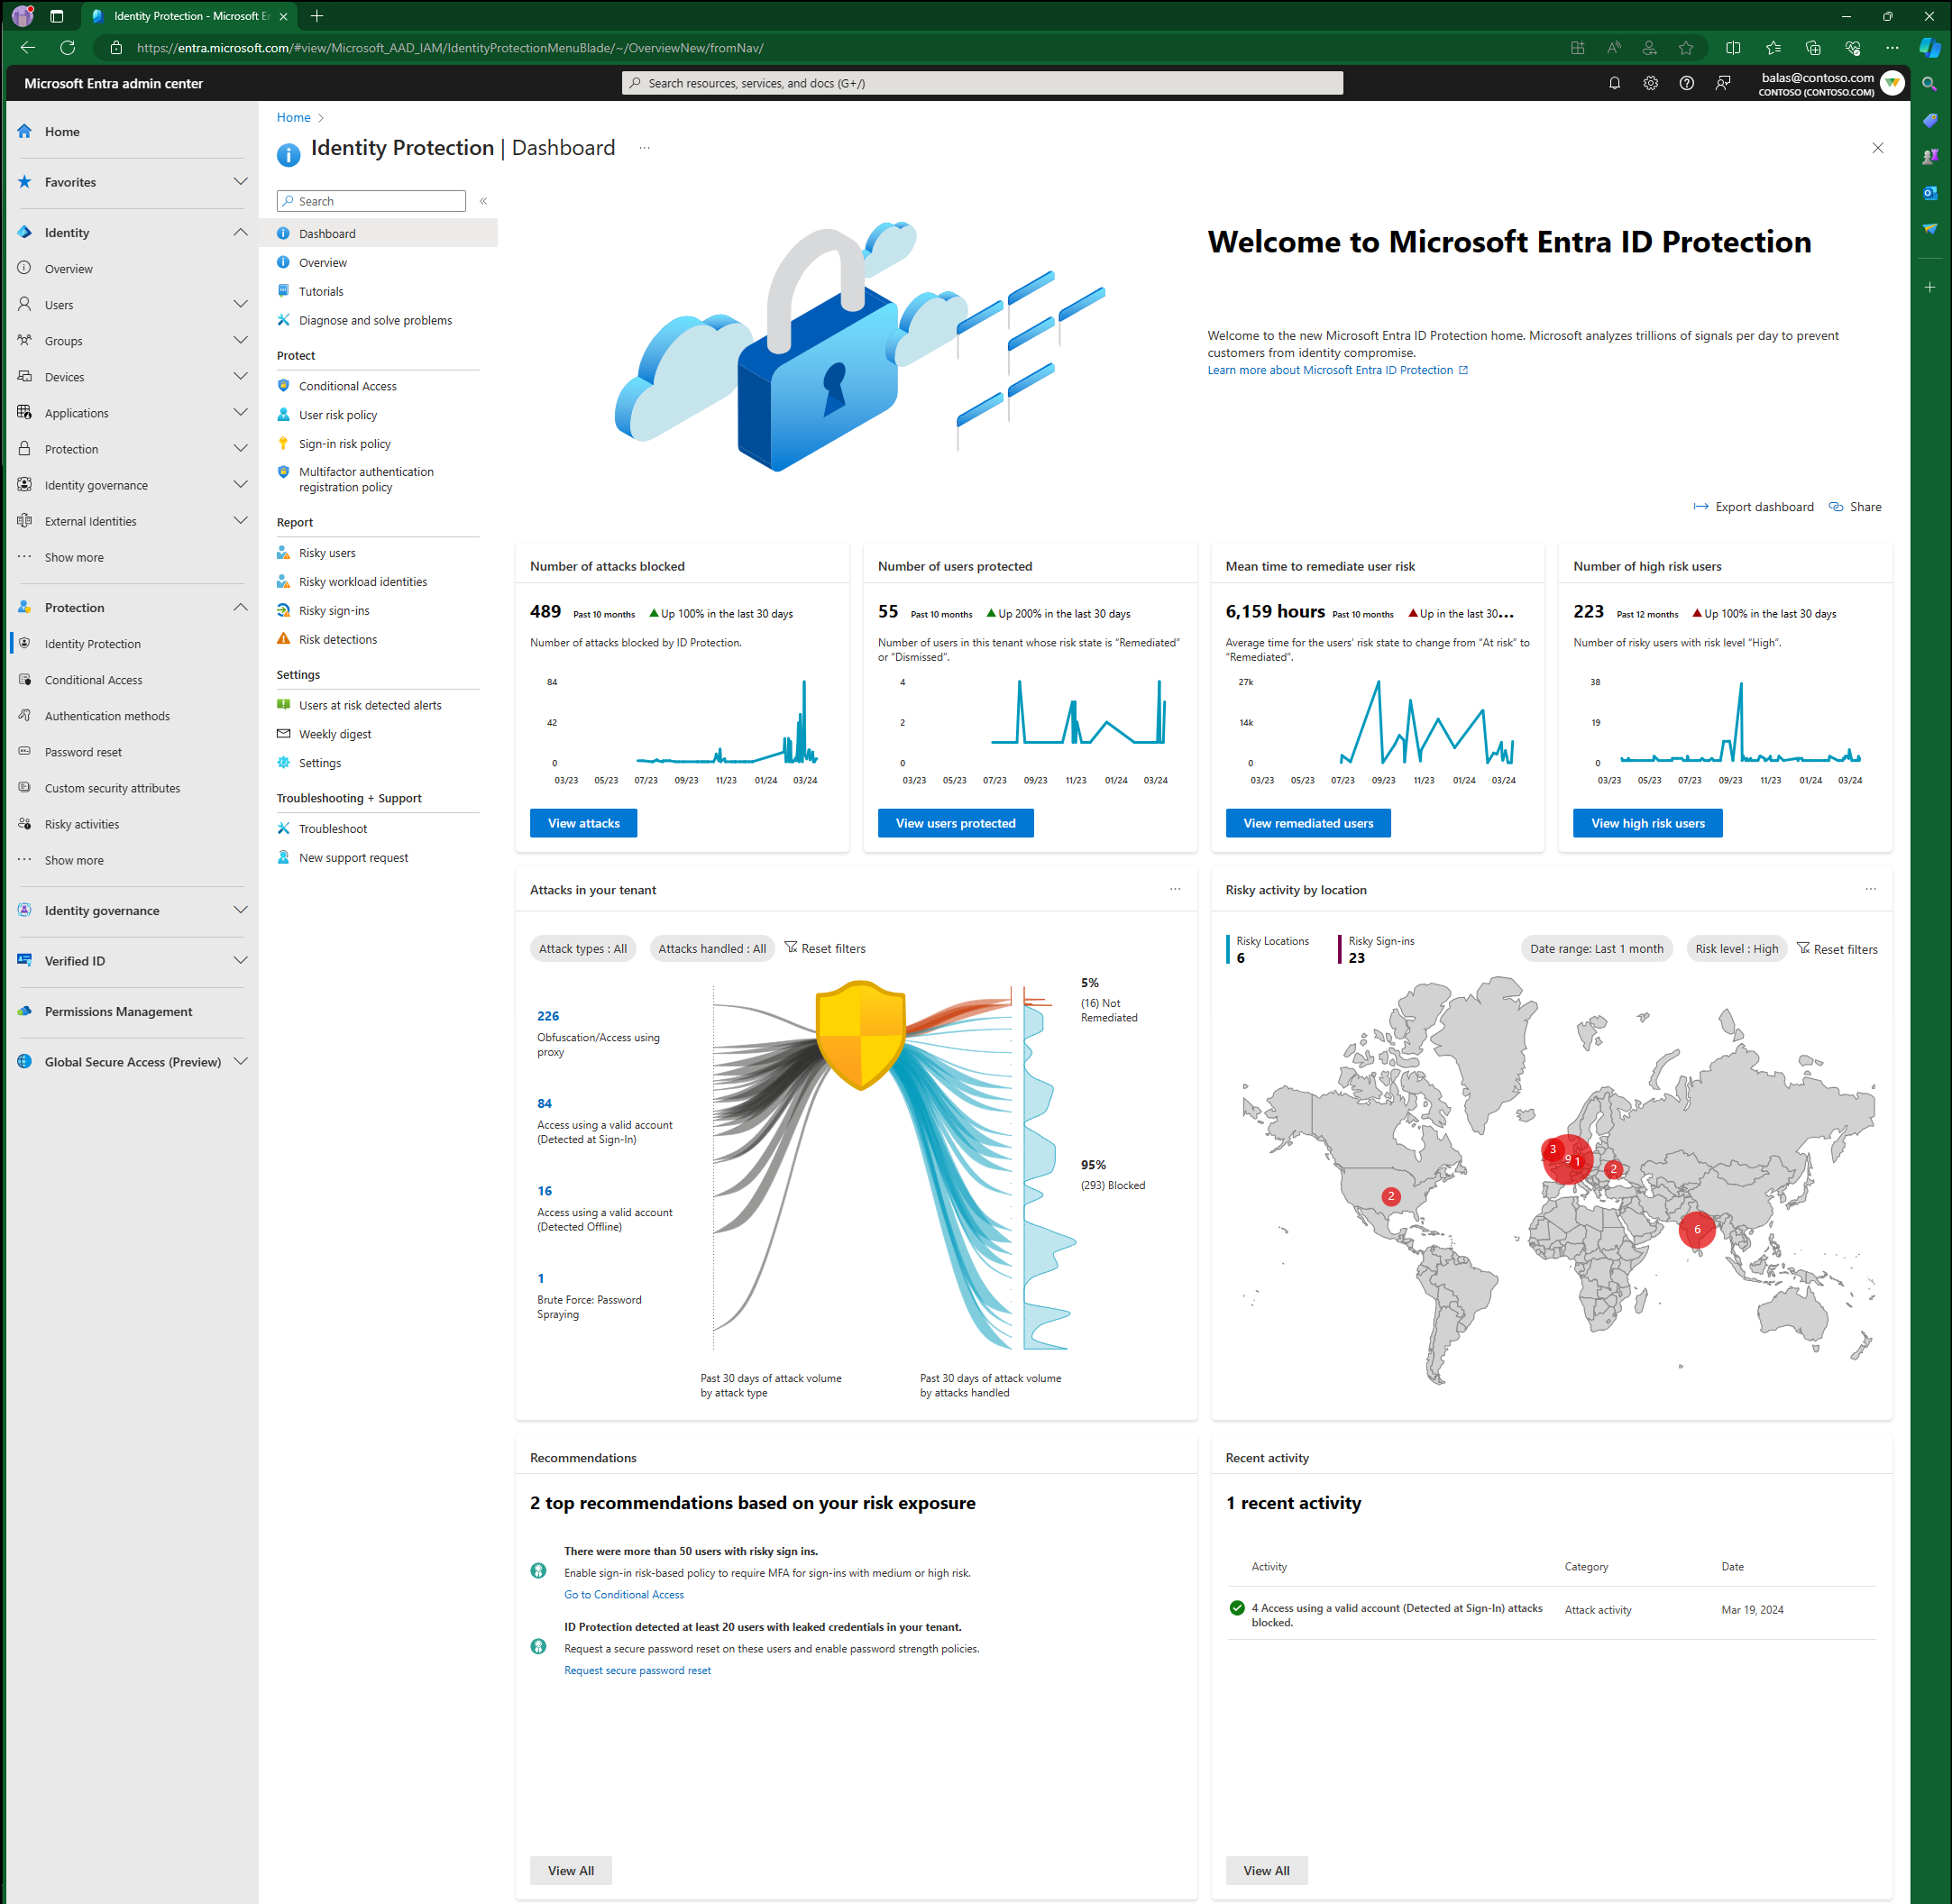
It's important to review the ID Protection reports before deploying risk-based Conditional Access policies. This review gives an opportunity to investigate any existing suspicious behavior. You might choose to dismiss the risk or confirm these users as safe if you determine they aren't at risk
- Investigate risk detections
- Remediate risks and unblock users
- Make bulk changes using Microsoft Graph PowerShell
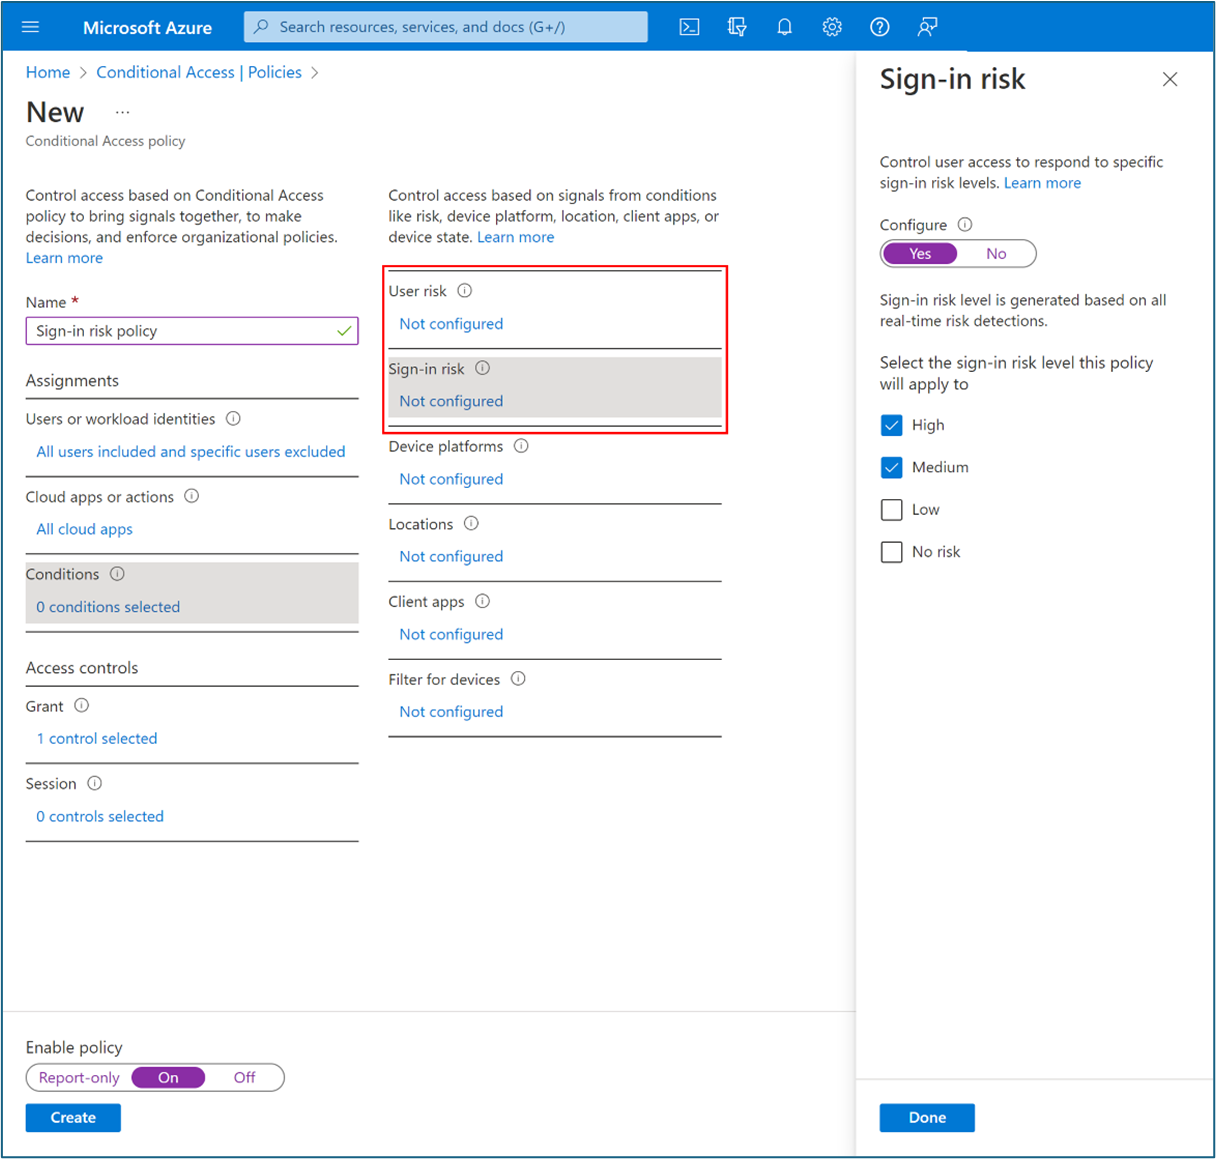
Create sign-in risk-based CA policy
-
Sign in to the Microsoft Entra admin center with at least a Conditional Access (CA) Administrator role.
-
Go to Protection > Conditional Access.
-
Select New policy.
-
Enter a policy name such as Protect applications for remote high-risk sign-in users.
-
For Assignments, select Users.
-
For Include, select a remote user group or select all users.
-
For Exclude, select Users and groups. Select your organization's emergency access or break-glass accounts.
-
Select Done.
-
For Cloud apps or actions> Include, select the application(s) to target this policy.
-
For Conditions > Sign-in risk, set Configure to Yes. For Select the sign-in risk level this policy will apply to, select High and Medium.
-
Select Done.
-
For Access controls > Grant.
-
Select Grant access > Require multifactor authentication.
-
For Session, select Sign-in frequency. Select Every time.
-
Confirm settings. Select Enable policy
- For more information visit the following article about Configuring and enabling risk policies
-
Optional: ID Protection sends risk signals to Conditional Access, to make decisions and enforce organization policies. These policies might require users perform multifactor authentication or secure password change. Consider the following:
- Policy exclusions
- Emergency access or break-glass accounts to prevent lockout due to policy misconfiguration. In the unlikely scenario all administrators are locked out, your emergency-access administrative account can be used to log in and take steps to recover access.
- Service accounts and Service principals, such as the Microsoft Entra Connect Sync Account. Service accounts are non-interactive accounts that aren't tied to any particular user. They're normally used by back-end services allowing programmatic access to applications, but are also used to sign in to systems for administrative purposes. Calls made by service principals won't be blocked by Conditional Access policies scoped to users. Use Conditional Access for workload identities to define policies targeting service principals.
- If your organization has these accounts in use in scripts or code, consider replacing them with managed identities.
- Multifactor Authentication
- For users to self-remediate risk though, they must register for Microsoft Entra multifactor authentication before they become risky.
- Known network locations
- It's important to configure named locations in Conditional Access and add your VPN ranges to Defender for Cloud Apps. Sign-ins from named locations that are marked as trusted or known, improve the accuracy of ID Protection risk calculations. These sign-ins lower a user's risk when they authenticate from a location marked as trusted or known. This practice reduces false positives for some detections in your environment.
- Policy exclusions
Request access package
After you configure an access package with a Verified ID requirement, end-users who are within the scope of the policy can request access in their My Access portal. While reviewing requests for approval, approvers can see the claims of the verified credentials that requestors present.
-
As a remote user or guest, sign in to *myaccess.microsoft.com.
-
Search for the access package that you previously created (such as Finance Apps for Remote Users). You can browse the listed packages or use the search bar. Select Request.
-
The system displays an information banner with a message such as, To request access to this access package you need to present your Verifiable Credentials. Select Request Access. Scan the QR Code with your phone to launch Microsoft Authenticator. Share your credentials.
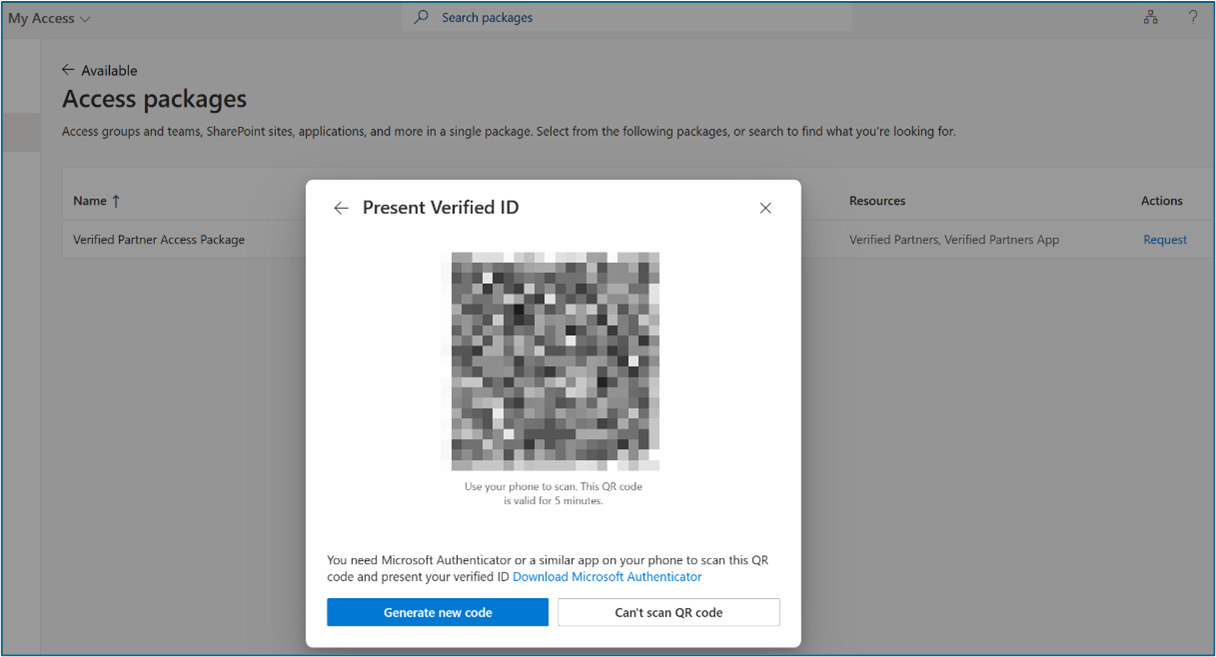
-
After you share your credentials, continue with the approval workflow.
-
Optional: Simulate user risk by following these instructions: Simulating risk detections in Microsoft Entra ID Protection. You may need to try multiple times to raise the user risk to medium or high.
-
Try accessing the application that you previously created for the scenario to confirm blocked access. You may need to wait up to one hour for block enforcement.
-
Validate that access is blocked by the Conditional Access (CA) policy that you created earlier using sign-in logs. Open non-interactive sign in logs from the ZTNA Network Access Client Private application. View logs from the Private Access application name that you previously created as the Resource name.
-
Enable email notifications so you can respond when a user is flagged as a risk. These notifications allow you to start investigating immediately. You can also set up weekly digest emails giving you an overview of risk for that week.
-
The Impact analysis of risk-based access policies workbook helps administrators understand user impact before creating risk-based Conditional Access policies. The ID Protection workbook can help monitor and look for patterns in your tenant. Monitor this workbook for trends and also Conditional Access Report Only mode results to see if there are any changes that need to be made, for example, additions to named locations. You can also use the ID Protection APIs to export risk information to other tools, so your security team can monitor and alert on risk events.