Creating a signaler
The WebRTC standard specifies how a peer-to-peer connection can be established using the Session Description Protocol (SDP), but does not enforce a particular signaling solution to discover and select a remote peer, and to send to and receive from it the SDP messages necessary to establish that connection.
MixedReality-WebRTC offers a built-in solution in the form of the NodeDssSignaler component, but also allows any other custom implementation to be used. For this tutorial, we will use the NodeDssSignaler component for simplicity.
Caution
NodeDssSignaler is very simple and useful for getting started quickly and debugging, but it is worth noting that this is not a production-quality solution and should not be used in production. In particular, this component offers no security whatsoever, all communications happening in clear text over HTTP, and no authentication, as all it requires to connect with a remote peer is to know its identifier. Do not be fooled by the fact that WebRTC supports encryption, as it would be very easy for an attacker to bypass it by compromising the signaler. Remember that any security solution is no better that its weakest link, and NodeDssSignaler is that link. It must be replaced with a secure solution when moving to production.
The NodeDssSignaler component uses a Node.js server with a simple polling model where both peers are constantly checking if a message is available. The server implementation is called node-dss and is freely available on GitHub.
Install and run node-dss
The node-dss repository has instructions on how to install and run the server, which essentially boil down to installing Node.js, downloading the code, and running:
set DEBUG=dss*
npm install
npm start
This opens a console window which will output all requests received from all peers. Leave that console window open and the node-dss server running for the following, and go back to the Unity editor.
Creating a NodeDssSignaler
The NodeDssSignaler component can be added to the existing GameObject, or to a new one. There is no fundamental difference, and this is mostly a matter of taste. For this tutorial we will create a separate game object to separate it from the peer connection in the Hierarchy window.
Create a new GameObject with a NodeDssSignaler component:
- In the Hierarchy window, select Create > Create empty to add a new
GameObjectto the scene. - In the Inspector window, select Add Component > MixedReality-WebRTC > NodeDssSignaler to add a
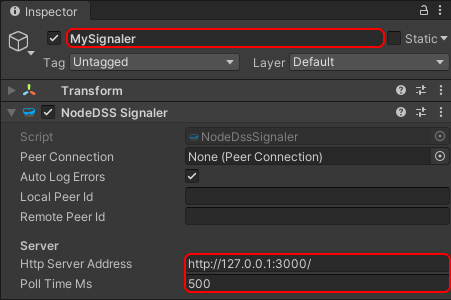
NodeDssSignalercomponent to that new object. - Optionally rename the game object to something easy to remember like "MySignaler" to easily find it in the Hierarchy window.

By default the NodeDssSignaler component is configured to connect to a node-dss server running locally on the developper machine at http://127.0.0.1:3000/ and poll the server every 500 milliseconds to query for available messages. If using another machine, the HTTP address must be changed.
Connecting the signaler
Now that a signaling solution is available, the last step is to assign the Signaler.PeerConnection property of the peer connection component created earlier:
- In the Hierarchy window, make sure the game object with the peer connection component is selected, then in the Inspector window find the
Peer Connectionproperty and click on the circle to its right to bring the asset selection window - Select the Scene tab of that window
- Select the game object with the
PeerConnectioncomponent on it. - The name of the
GameObjectcontaining the component now appears next to thePeer Connectionproperty, followed by "(PeerConnection)" to indicate the actual value is the component of that game object.
The signaler object should now appear in the Inspector window of the peer connection game object.

At that point the peer connection is fully configured and ready to be used. However audio and video tracks are not added automatically, so there is little use for that peer connection. Next we will look at connecting a local webcam and microphone to provide some video and audio track to send through to the peer connection.
Next : Adding local video