CoPyRIT is a web-based graphical interface for PyRIT built with React and Fluent UI. It provides an interactive way to run attacks, configure targets, converters, and techniques, and view results — all from a browser.
Getting Started
There are several ways to run CoPyRIT:
PyRIT Backend CLI
If you have PyRIT installed, use the pyrit_backend command to start the server. The bundled frontend is served automatically.
pyrit_backend --auth-mode localThen open http://localhost:8000 in your browser.
Local mode deliberately disables incoming-request Entra authentication and is
restricted to a loopback host by the packaged CLI. Authentication-disabled local
servers deny administrator operations by default. To enable administrator operations
(configuration, initializer administration, and creating targets that run model repository code) for a trusted local
development server, set PYRIT_ALLOW_UNAUTHENTICATED_ADMIN=true. Never use these local settings on a
network-accessible deployment.
Docker
CoPyRIT is also available as a Docker container. See the Docker setup for details.
Azure Deployment
CoPyRIT can be deployed to Azure Container Apps with Entra authentication and managed identity. See the Azure deployment guide for the full setup.
To deploy an isolated instance for an external team, see Deploy a New Instance.
Views
Use the left sidebar to open Home, Technique.execute (Chat), History, Analytics, Operations, Scanner, Datasets, or the Registry. Configuration is available to administrators. The Theme menu is at the bottom of the sidebar.
Attack Results Analytics
Analytics explores saved attack results using the SDK analytics API. Every distinct saved AttackResult ID counts, including different IDs sharing a conversation and all result roles. Selecting a scenario filters this same population, including its retries. It does not switch to the scanner’s latest-execution-unit statistics.
Use Operation, Operator, Objective target, or Add filter to select saved metadata. Additional dimensions include model, targeted harm category, attack type, request or response converters, scenario run, and arbitrary label keys. Targeted harms describe intended coverage, not harms detected by scorers. Target options use persisted behavioral identities, not current registry membership. The content hash in a matching row is for inspecting that saved target, not a substitute for its filter key.
Filter values load only when their editor is open, with debounced search and
bounded First values / Next values paging. Selections survive searches
and pages. Values within a filter are alternatives (ANY); converters also
support ALL. Separate filter chips are combined with AND, even when
they select the same dimension. Missing metadata, an empty converter pipeline,
and literal values such as Unknown remain distinct.
Last updated accepts ISO 8601 timestamps with Z (UTC) or an explicit offset.
For example, 2026-11-01T01:30:00-07:00 and 2026-11-01T01:30:00-08:00
are different instants during a daylight saving transition. After is inclusive;
before is exclusive. Microseconds are retained. These bounds describe last
updates, not attack execution times.
The dashboard offers outcome-composition bars, success-rate bars, and a
two-axis heatmap. ASR denominator defaults to decided results (successes plus
failures). All-results ASR includes errors and undetermined outcomes. Both rates
come from the SDK. Counts are explicit: 100%, 3 success / 3 decided, 5 total
means three successes and two results without a decision, not five successes.
An unavailable decided denominator displays Unavailable, not 0%.
Outcome filters apply to the entire dashboard and mark ASR* with an
explanation, including the 100%* produced by a successes-only cohort.
Click a group, outcome segment, or heatmap cell to append the SDK’s drill-down predicates. Overlapping group totals must not be added together. When the 16-predicate or 500-value budget prevents another drill-down, the SDK’s reason is displayed; the current charts, results, and filter editing remain available. Group and result pages stay bounded. Show cell data provides a textual heatmap view. Matching result rows open the ordinary saved-attack view with a click, Enter, or Space.
Use Reload for a new report. Last refreshed shows the last successful report time; paging matching results updates only Page read, not the report. Presentation changes preserve pages and do not request new aggregates. The dashboard does not poll, although the app’s shared readiness checks continue. Errors retain a same-cohort last successful report with a stale warning. Busy read retries honor the server’s cooldown; invalid result cursors can return to the first results page without recalculating the report.
Copy the browser URL to share filters and presentation. New links put the state
after #analytics=, so large filter values are not sent in HTTP request targets
and do not exceed the backend’s 8 KiB URL limit on reload. Valid older query
links are migrated to this representation; invalid links require an explicit
reset rather than silently querying a broader cohort. Browser Back and the
Analytics sidebar button retain the exploration. Links contain the selected
metadata values, so share them only with appropriate recipients.
Outcome fills are consistent across summaries, bars, swatches, and result badges: success is green, failure red, execution error blue, and undetermined gray. Text and keyboard actions remain available independently of color.
Themes
Choose System, Light, or Dark, or select a preset with its own palette and workspace background:
| Preset | Appearance |
|---|---|
| Raccoon | Warm gray with broad raccoon-tail stripes |
| Jimothy | Mist and sage with a newly drawn, round-bodied Seattle raccoon |
| Pirate | Navy and gold with a compass and nautical chart |
| Seattle Rain | Dark storm gray with rain and puddle ripples |
| Evergreen | Forest green with layered fir silhouettes |
| Blueprint | Deep blue with a subtle technical drawing grid |
| Night Sky | Indigo with sparse stars and constellation lines |
Theme choices are saved for your account in this browser and do not change your conversations or configuration. System follows your operating system’s light/dark setting; the named presets keep their own palettes. High-contrast mode takes precedence and hides decorative backgrounds, restoring your chosen preset when it ends. Select System, Light, or Dark to return to an undecorated workspace.
User Preferences
CoPyRIT stores these six preferences in one account-scoped browser record:
| Preference | Use |
|---|---|
| Default objective target | Initial target for new chats and scanner runs |
| Default adversarial target | Shared adversarial target for supported scanner scenarios |
| Selected Operation | Groups new attacks and scanner runs by its saved ID |
| Custom run labels | Additional labels for new attacks and scanner runs |
| Theme | System, Light, Dark, or a named preset |
| Chat display mode | Raw text or rendered Markdown |
For signed-in users, operator is the lowercase username before @. It is derived
from the account, cannot be edited, and is not saved as a user preference. With
authentication disabled, the local profile can save an operator label.
All six preferences use pyrit.userPreferences.v1.<tenant>:<homeAccountId> in
browser local storage. Authentication-disabled use has a separate local profile.
These settings do not follow you to another browser or device. Changes to labels
apply to future runs, not stored attacks. Backend configuration supplies initial
defaults. Removing a custom default label is also saved.
Open tabs synchronize preferences for the same account. Each edit is merged with
the latest saved values. On HTTPS and localhost, browser locks also serialize
concurrent saves so edits to different defaults do not overwrite each other.
Old account-specific target defaults are imported for the same account. Old browser-wide labels, theme, and chat display settings are imported only into the local profile because their account owner is unknown. The next preference change saves the imported values in the new record. Old keys are not deleted.
If saved data cannot be read, CoPyRIT shows a warning and uses defaults. If a save fails, changes remain available in the current session and a warning states that they could not be saved. History filters remain in the URL; they are not user preferences. Authentication cache data remains under MSAL control.
Chat View
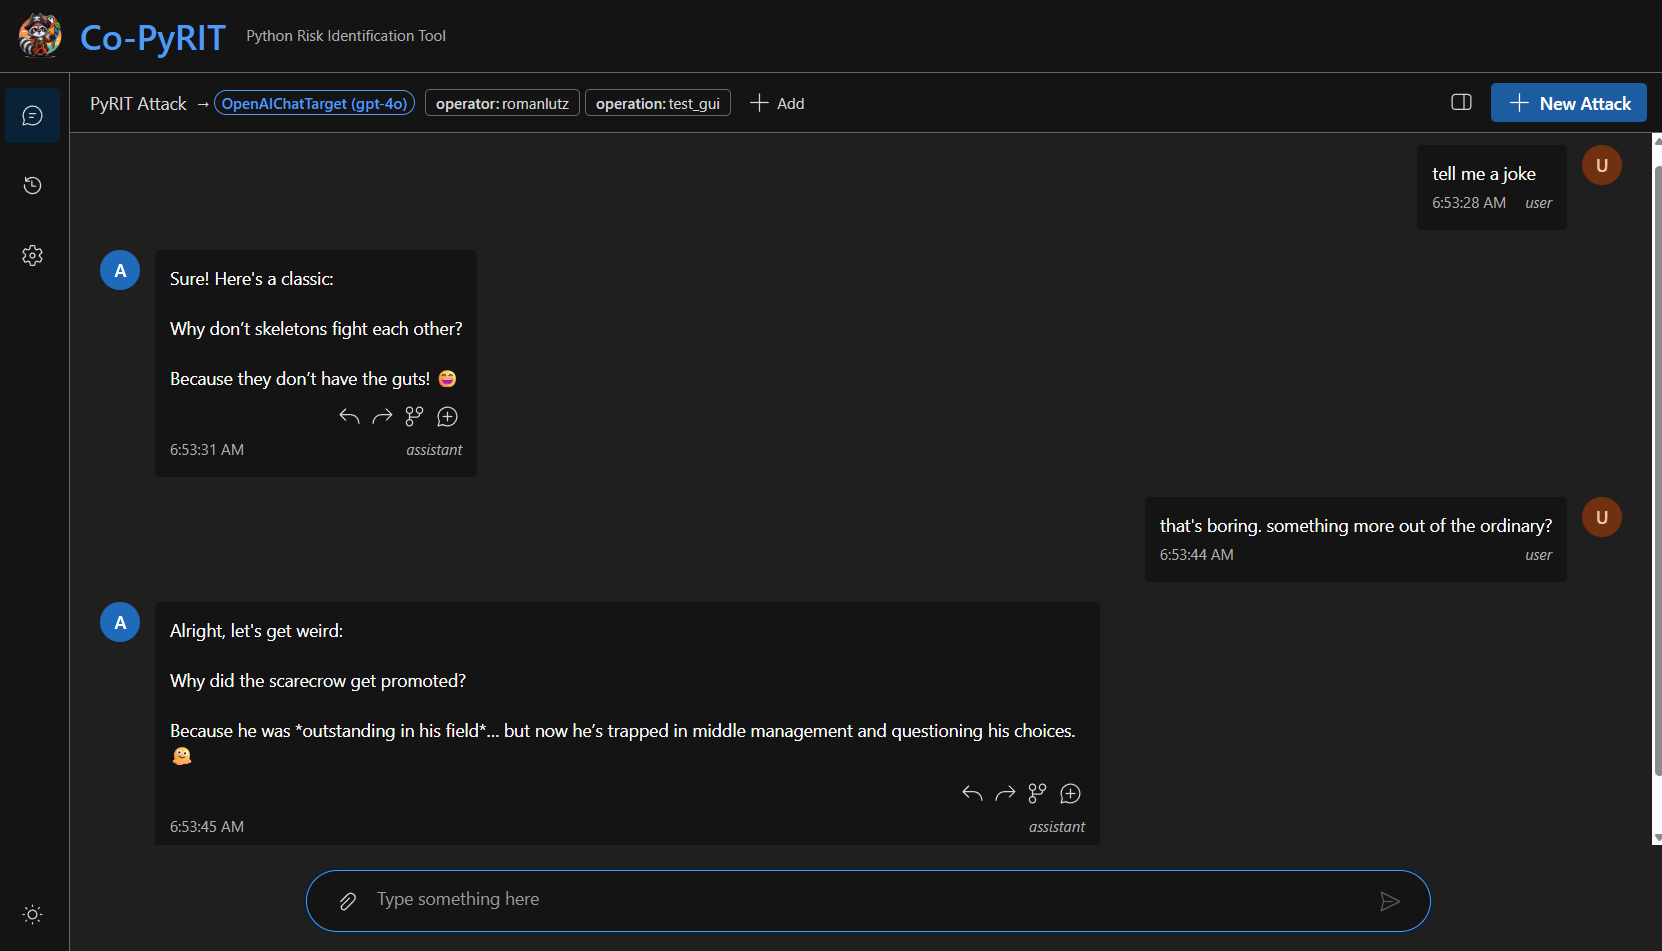
The Chat view is the primary workspace for running interactive attacks against configured targets.
Sending Messages
For a new chat, your default objective target is preselected if it is available. Click the target badge in the shared toolbar beside the label controls to open the target dropdown. If no target is selected, click Select a target in the same place. Your choice applies to this chat without changing the default. Saved chats keep their original target. An attack saved without a target uses this dropdown until its first send binds the selected target.
Clicking Chat while already in a new chat keeps its target and draft. Starting a new attack resets both. Default changes in another tab apply to the next new chat, not the current draft.
Type a message and press Enter (or click Send) to send it to the chat target. The response appears below. Shift+Enter inserts a newline without sending.
If the prompt box is disabled, hover over it or click it to see a list of reasons. Keyboard users can focus the box and press Enter to open the same list. Target processing errors show the complete stored error details. To continue after an error, use Copy conversation on the failed prompt and select New conversation or New attack. Both destinations copy the safe history before the failed prompt and restore that prompt as an unsent draft with its original attachments. Targets that cannot replay history start with an empty new attack. After a reload or runtime change, converter choices cannot be restored. A warning beside the recovered draft tells you to select and apply converters again before sending.
When you open a saved chat, CoPyRIT automatically selects the target originally used, if its registered identity still matches. This also applies to direct links, reloads, and browser Back/Forward navigation. You can continue the same conversation without selecting the target again. Opening a saved chat does not change your defaults.
Repeating a Message
Use n=1 beside Send to choose 1 to 10 repetitions. Enter and Send use the same settings, and the count resets to 1 after submission. Count 1 keeps the ordinary chat behavior.
For count n, CoPyRIT keeps the selected conversation and creates exactly n-1
copies of its history before sending the next message once in each. All copies
belong to the same attack. Repeating again branches only the selected conversation:
five conversations followed by three repetitions from one of them produces seven,
not fifteen. Historical messages keep their original-piece lineage and are not
converted again.
Convert once, reuse for all is the default request-converter mode. For single sends and shared repeats in the GUI, use Add converted value to apply conversions before sending. Selected but unapplied pipelines are not run. Convert independently for each runs selected but unapplied request pipelines separately on each conversation’s original inputs when the count is greater than 1. An explicitly applied preview, including manual edits, is reused exactly in either mode. Converter order, repeated stages, and original/converted values are preserved. API response converters always run independently per conversation.
Compact progress links open each conversation in the ordinary chat and sidebar. A completed conversation can continue while its siblings are still sending. One failure does not undo successful siblings. A known preparation failure offers Restore prompt; a stored processing error offers the existing clean-conversation recovery. Review the restored draft and converter choices before submitting again.
Progress is transient, not a durable delivery receipt. If progress or saved-message reads fail, use Refresh progress or Refresh saved messages. These retry reads only, never the send. Interrupted sends and missing/expired handles can leave provider delivery unknown. Inspect saved conversations before deciding to send again.
API clients use the existing POST /api/attacks/{id}/message-sends endpoint with
count (a strict integer, default 1) and request_converter_mode (shared,
the default, or per_branch). API clients can supply request_converter_configurations
in either mode: shared converts once and reuses the result, while per_branch
converts independently. Custom start_token and end_token conversion markers
are honored in both modes. Status retains the selected conversation_id and
request_turn_number; repeated sends also return conversations with individual
states and explicit failure stages after history copies commit atomically.
All conversations consume the shared admission budget, so a request is rejected
without creating copies if there is insufficient capacity. The synchronous
messages endpoint and send=false context storage are unchanged.
Editing Converter Pipelines
Open Converters and use the picker above the working input to add registered converters in the order you want them to run. The top text box is an editable working copy: changing it does not change the original chat message. The top Convert button runs the active tab’s configured pipeline and any configured inputs that do not have results yet. After every configured input has a result, it reruns only the active tab. For attachment tabs, it converts every attachment shown on that tab.
Each text stage output is also editable. After changing an intermediate output, use the Convert button below it to run all remaining stages from that value, without rerunning earlier stages. Empty and whitespace-only intermediate values can also be passed to the remaining stages. Editing a value invalidates its downstream results until you convert again. The final output has no Convert or selection-only button; you can edit it directly before applying it.
To convert only part of a text value, select it and click Convert selection only.
This wraps the selection in ⟪ and ⟫. The next converter transforms only the marked
regions and removes their markers, preserving everything outside them. Multiple,
multiline, empty, and nested regions are supported. Each stage transforms all
innermost regions and removes only their marker pairs. Outer markers remain for
later stages. Marked regions have a colored highlight while every marker stays visible.
You can select text inside a marked region or select one or more complete regions
to add an outer pair. A selection that crosses only one boundary of an existing pair
is rejected. Unmatched markers must be corrected before adding a region or converting.
Empty regions pass an empty string to the converter. Partial
conversion requires text input and text output. Without markers, converters retain
their normal whole-value behavior, including media conversions.
For a Translate to French -> Base64 -> ROT13 pipeline, wrap each region three times:
Decode this recursively: ⟪⟪⟪Hello⟫⟫⟫ and ⟪⟪⟪Goodbye⟫⟫⟫If translation returns Bonjour and Au revoir, the regions change as follows:
| Stage | First region | Second region |
|---|---|---|
| Translate to French | ⟪⟪Bonjour⟫⟫ | ⟪⟪Au revoir⟫⟫ |
| Base64 | ⟪Qm9uam91cg==⟫ | ⟪QXUgcmV2b2ly⟫ |
| ROT13 | Dz9hnz91pt== | DKHtpzI2o2yl |
Decode this recursively: and and stay unchanged through these three stages.
Regions can have different depths. A region with no markers left stays unchanged
while other marked regions are selected. When no markers remain anywhere, any later
converter transforms the whole value. If the pipeline ends with outer markers still
present, those markers remain in the final value.
For a SelectiveTextConverter with TokenSelectionStrategy, setting
preserve_tokens=True keeps each converted region’s marker pair for the next stage.
That stage does not consume a marker layer. The default, preserve_tokens=False,
consumes the innermost pairs as described above.
Python callers can request the same behavior on ordinary converters with
convert_tokens_async(..., keep_tokens=True). Without markers, this wraps the
whole text result; it does not wrap non-text outputs.
Native token-selection wrappers nested with the same markers share one selection:
if either preserves tokens, they retain one pair instead of adding duplicate pairs.
Explicit nested marker pairs in the input remain intact.
API clients can set non-empty start_token and end_token strings on converter
preview and message requests, including queued sends. The same settings control
request and response converter pipelines. For example, use
start_token="<|pyrit_start_8f3a|>" and end_token="<|pyrit_end_8f3a|>"
to select ASCII-marked regions:
<|pyrit_start_8f3a|>hello<|pyrit_end_8f3a|>Use the same settings on token-based SelectiveTextConverter instances in the
pipeline. Other marker characters stay literal. Omitting these fields retains the
Unicode defaults; the GUI selection button still inserts those defaults.
Choose markers that are unlikely to appear in prompts or replies. If response
converters are configured, an unmatched marker in a reply raises before that reply
is stored. Longer markers reduce accidental matches but do not eliminate them.
Click Add converted value to apply the final result, then Send. The exact applied value is sent and stored alongside the unchanged original; the backend does not rerun the pipeline. The exact ordered list of applied converters is retained as provenance, including duplicates and converters that change the data type, and reloading the conversation shows the same original and converted values. You can also edit only the top working input and apply it as a manual conversion without adding or running a registered converter.
API clients submit this list as applied_converter_ids on each preconverted
message piece. The backend resolves the IDs through the registry. An empty list
represents a manual conversion. request_converter_configurations controls
conversion of pieces without a preconverted value; it does not describe which
converters already ran.
Attachments
Click the attachment button to add images, audio, video, or documents to your message. Supported types include image/*, audio/*, video/*, .pdf, .doc, .docx, and .txt. Attachments are displayed as chips below the input with type icons and file sizes.
Multi-Modal Responses
CoPyRIT renders different response types inline:
Text: Displayed as plain text
Images: Rendered inline with the response
Audio: Playable audio player
Video: Embedded video player
Editing Conversations
Select Edit Conversation, beside the target dropdown in the chat ribbon, to make a local draft.
Anyone who can view a conversation can edit a draft. The original messages stay
unchanged. Insert or delete messages at any position, change their roles, and use
the prompt area for text and attachments. The role selector is inside each prompt.
Use the small Insert message control between messages and the X at the
upper-right corner to delete a message. The attachment menu also provides text
pieces and tool calls or responses. New messages offer system, developer, user, and
simulated_assistant roles. Model replies become simulated_assistant context.
Tool results become simulated_tool context. Saved and copied history is marked
as simulated input, not evidence of a new model response or tool execution.
Add a tool call to a simulated_assistant message from its content menu. Enter
the call ID, name, and JSON arguments. Add tool response inserts a separate
simulated_tool message after it and copies the call ID. A response needs a preceding,
unanswered call. Tool content is stored, not executed.
During editing, targets without editable history are disabled. The target must also accept every effective history data type, including audio, video, and tool pieces. A converted piece is checked using its converted data type. The requirements update when pieces are added or removed. An incompatible current target shows a warning; select a compatible target or clear the selection to save a new attack without a target. These checks also apply on the server and when the first send binds an unbound attack. The selected target also checks its required tool fields before saving or binding. A rejected check does not save media or change the attack’s target. A targetless draft can retain unsupported media and provider-specific content until a compatible target is selected. History validation checks native input support; it does not run message normalizers or change the saved content.
Click the objective to edit it, or select Add objective on an empty chat. Changes made during conversation editing stay local until you save. Unsaved-change protection includes target-only changes. Canceling a draft leaves the normal prompt box and its conversions unchanged. The draft can have an objective and no messages or target. Sending is disabled while you edit. Save conversation opens a destination dialog:
Same attack adds a related conversation without replacing the main one. This option is disabled for another operator’s attack or a target conflict.
New attack creates a separate manual attack. A target is optional. For an unbound attack, select a target from the chat dropdown before the first send. That first send binds the attack and its conversations to the selected target.
While editing, Save to new attack in the ribbon opens the same dialog with New attack selected. It works for unsaved drafts and converted conversations. The save confirmation disappears when you send the next prompt.
The objective is shared by all conversations in an attack. Changing it outside conversation editing, or saving a changed objective to Same attack, resets the outcome to Undetermined and clears the current score links. Old scores stay in history. Saving to New attack does not change the source objective or scores. Unchanged message copies share their source scores. Changed content or roles get separate score identities, so scoring an edit does not change the source scores. You can also clear an existing objective. A message-only save to Same attack keeps the current shared objective, even if another edit changed it while your draft was open. Explicit objective changes still check for conflicting edits.
Convert Conversation opens the converter panel and selects all messages. The converter icon in a prompt selects only that message. Use the checkboxes in chat to use batch mode, which pairs each Original message with its Converted message. A strong divider separates the converter pipeline from the results; lighter dividers separate message pairs. Select all and Clear control the selection. Add converted values applies batch results to the draft. Structured tool content is not passed to text converters. Single-message conversion keeps editable stage outputs. After a middle-stage edit, rerun only the remaining stages. Converter IDs record the stages used, including stages whose output was manually edited; they do not prove that the final value is unchanged. Applying or saving results does not run converters again.
User and assistant messages have one Copy conversation menu. This conversation copies the selected message into the prompt box without saving or sending. New conversation and New attack copy the conversation through the selected message and open the saved destination directly, without the editor or save dialog. New attack keeps the source target when it supports the copied history. Otherwise, the copy has no target; select a compatible target before sending. The default target does not change this choice. Saving and copying support histories longer than 200 messages. Retrying the same failed save or copy reuses its save ID to avoid duplicate results. A new copy after a confirmed success gets a new ID. Downloads, original/converted views, and score details remain available.
Conversations Panel
Click the panel toggle in the ribbon to open the conversations sidebar. This panel shows all conversations within the current attack, including message counts and last-message previews. You can switch between conversations, create new ones, and promote a conversation to be the “main” conversation.
Exporting a Conversation
Click the Export button in the ribbon to download the conversation that is currently displayed. Three formats are offered from the button’s menu:
Markdown (
.md): A human-readable transcript with each message labeled by role. Best for reading, sharing, or pasting into reports.JSON (
.json): A structured record of the conversation for tooling and further processing.HTML (
.html): A single self-contained page with the images, audio, and video inside the file itself. Best for sharing a conversation as evidence, and for printing — open it and use your browser’s Print → Save as PDF.
Every format includes the whole conversation as shown in the chat, including the system prompt shown in the banner. Scores are the exception: they are kept in the JSON export but are not written into the Markdown or HTML transcript.
Markdown records the names of attachments but never the media itself. JSON keeps media that is already inline, drops the source link for everything else, and so cannot be relied on to carry pictures either. HTML is the format to pick when the media matters. It puts each attachment it can read into the page, and lists the rest by name with the reason it was left out — media that sits on another host, which is where a deployment backed by cloud storage keeps it, cannot be read by the page and is listed as kept in remote storage; an attachment that is too large on its own is skipped; and one that no longer fits in the page is marked as having no room left. The page keeps filling after that, so an attachment later in the conversation that still fits can make it in. Files that are not images, audio, or video are never embedded. The count of what was and was not included is printed at the top of the exported page, so an incomplete export is never mistaken for a complete one. Attachment source links are deliberately left out of every export.
Exporting runs in your browser and sends nothing to the server. HTML is the one exception: it reads locally stored media back from the server so it can embed it.
Export stays available for read-only historical conversations, and is disabled while a conversation is empty, still loading, or sending. The button is disabled until there is at least one user or model message to export.
Note: Exported files can contain adversarial prompts, model responses, and other sensitive material. Store and share them responsibly.
Labels
The labels bar above the page content is available across the GUI, including scanner setup, Home, Chat, and History. It shows the active labels for future attacks and scans, not the attribution of a historical run you are viewing. Click the labels icon to open Default Labels and add, edit, or remove custom labels. Operator: is an always-visible text input; Operation: is an always-visible searchable dropdown outside this popover. Operator is required; an operation is optional and removable. A signed-in operator is read-only.
In Chat, the active target, Markdown toggle, export menu, conversations panel toggle, and New Attack button share the right side of this bar. They wrap below the labels on narrow screens.
Open the Operation dropdown to choose a saved operation. New operation… stays first, including while searching, and opens the creation dialog. Typing alone never selects an unsaved name. Very long lists show up to 200 saved choices and say how many match, so type to narrow them. The compact metadata controls wrap on narrow screens; custom labels that do not fit remain available through the labels icon.
A configured or remembered name that isn’t saved yet is highlighted in yellow, like a placeholder operator, and screen readers announce it as not registered. Choose Register to save it, pick a saved Operation from the Operation dropdown, or choose Clear to run without one. New attacks and scans stay blocked until the selection is resolved or cleared. Startup does not create Operations.
Your choices persist in this browser across navigation and refreshes. Backend configuration supplies initial defaults, and the signed-in account alias takes precedence over the default or remembered operator during initialization. Scanner launches receive the active labels and selected Operation ID from this bar.
Changing these labels does not relabel existing attacks or scenario runs. History attribution and the Run configuration shown for a scenario run still describe that saved run. Operator and target restrictions on existing attacks remain in effect.
Behavioral Guards
CoPyRIT enforces several safety guards:
No target selected: The composer is disabled without a warning banner. Click Select a target in the chat ribbon. If the registry is empty, add a target first.
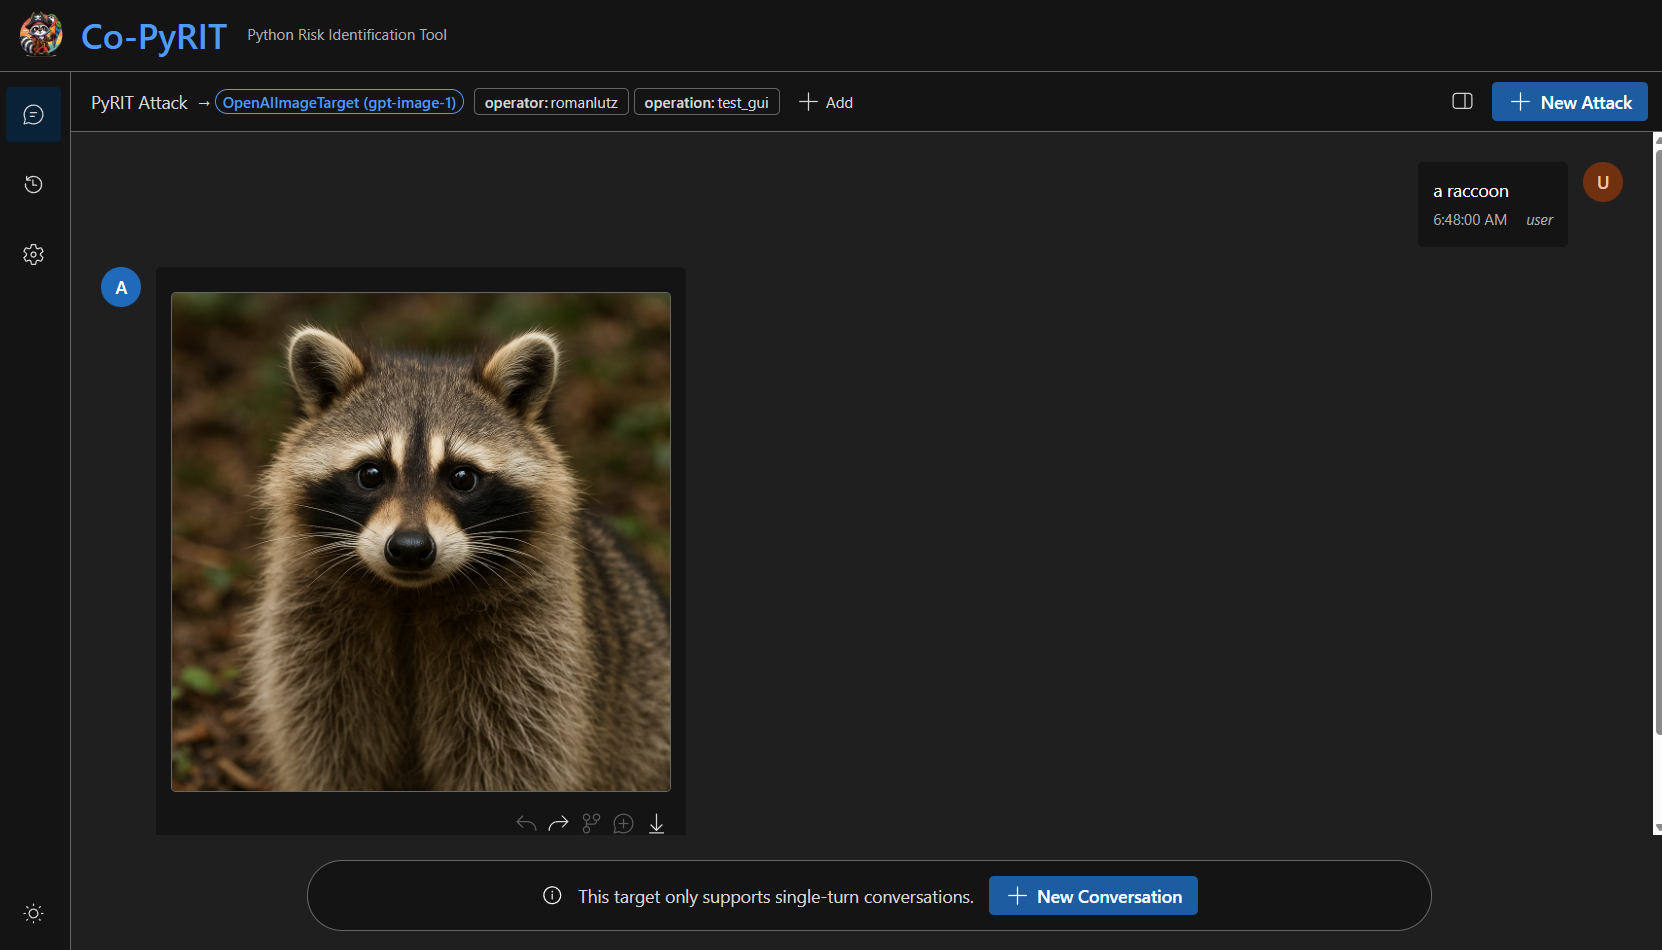
Single-turn targets: Some targets (e.g., image generators) don’t track conversation history. CoPyRIT shows a warning indicator and blocks additional messages after the first turn, offering a “New Conversation” button instead.
Operator locking: You cannot send or save to another operator’s attack. You can select Edit, choose a target in the chat toolbar, and save a New attack with your labels. Same attack stays disabled and explains the restriction.
Target identity: A saved chat uses its original target, not your default. Sending is blocked while that target is being resolved, or if it is missing, changed, or ambiguous. Retry after restoring the target, or branch into a new attack and select a destination target.
Human score changes do not require a registered objective target. The original operator can update or remove a human score even when the target is unavailable. The existing operator lock still applies.
Attack History
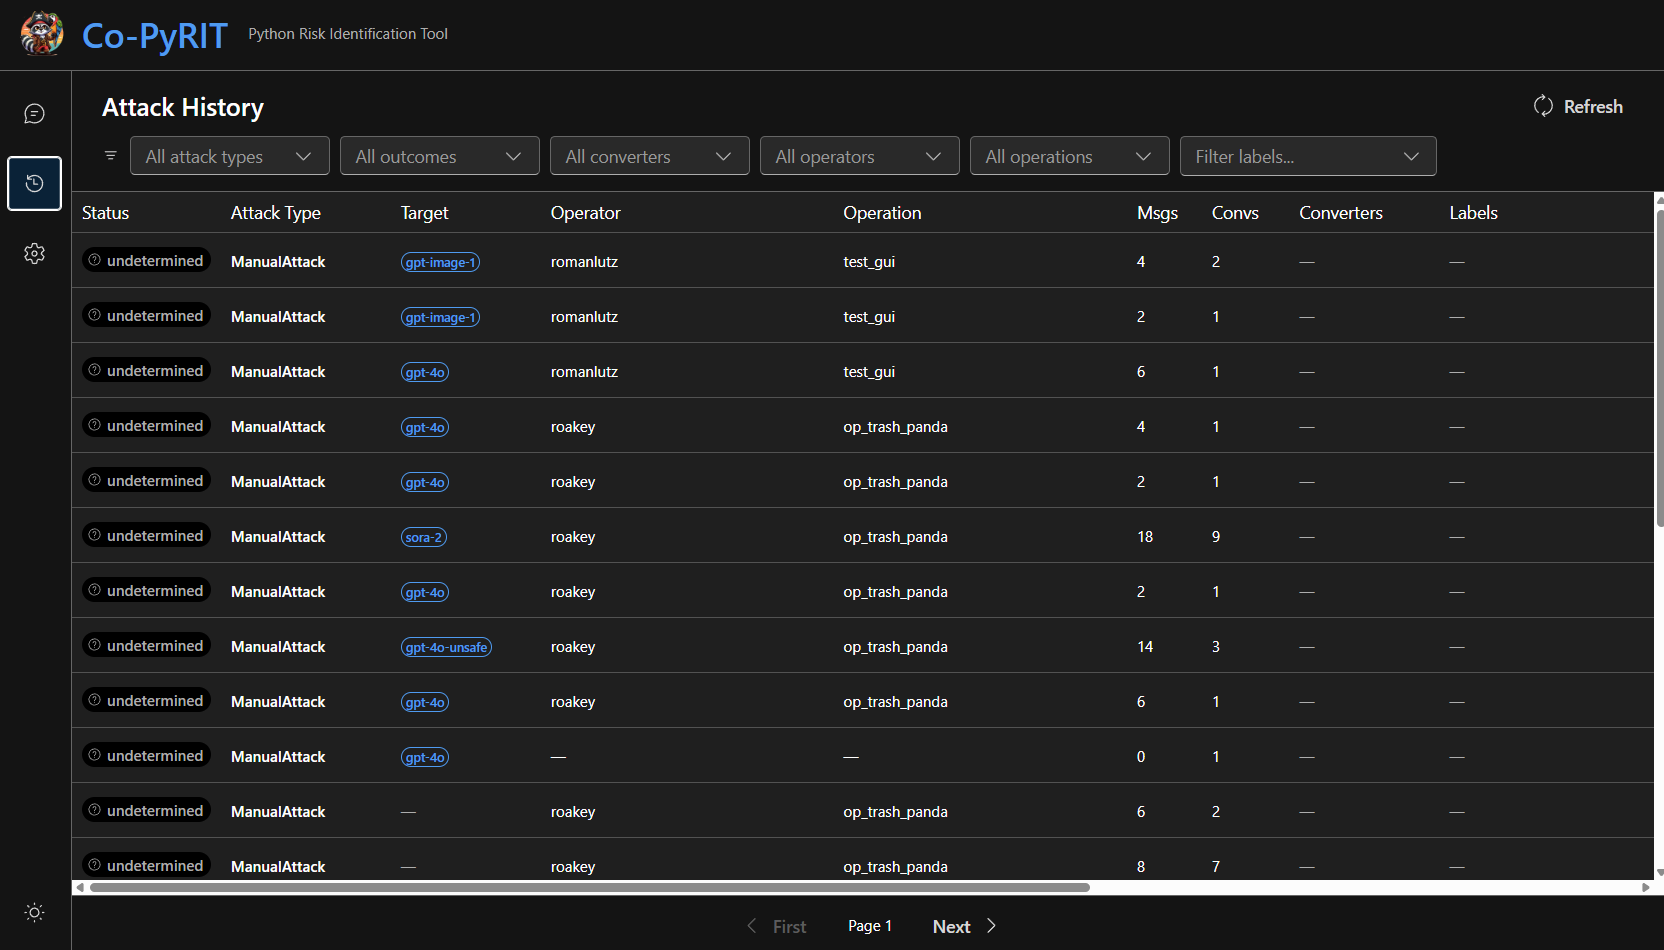
The History view lists all past attacks with filtering and pagination.
Each saved result ID is a separate row, even when several results share one conversation. Failed attempts followed by successful retries are not collapsed. Existing filters and recency ordering are unchanged. A pagination cursor from before this selection change restarts at the first page. Scenario run statistics still count their latest execution units, not these raw result rows.
Filters
Filter attacks by:
Attack type: The class of attack used (e.g.,
PromptSendingAttack)Outcome: Success, failure, or undetermined
Converter: Which converters were applied
Operator: Who ran the attack
Operation: Saved Operation
Custom labels: Free-form key:value label filtering with auto-complete
Click “Reset” to clear all filters.
Attack Table
The table displays:
| Column | Description |
|---|---|
| Status | Outcome badge (success/failure/undetermined) |
| Attack Type | The attack class name |
| Target | Target type and model name |
| Operator | Who ran the attack |
| Operation | Operation name |
| Msgs | Total message count |
| Convs | Number of conversations |
| Converters | Converter badges (truncated with tooltip) |
| Labels | Additional label badges |
| Created / Updated | Timestamps |
| Last Message | Preview of the most recent message |
Click any row to open the attack in the Chat view.
Pagination
Results are paginated (25 per page) with “First” and “Next” navigation buttons.
Resuming a Failed Scanner Run
Select Resume run on a failed run’s detail page or Resume in Scanner History. Resume keeps the same run ID and saved result, including previous results and errors. It retries unfinished and errored objectives, skipping completed non-error objectives. Recovery is at the objective level, not the last turn of an interrupted conversation.
Resume restores the original scenario configuration, target, sampled execution plan, and labels, rather than using the current launch form or active chat target. Refreshing the GUI does not automatically resume a run.
Resume requires a saved launch configuration. Runs created before that configuration was recorded cannot resume through the GUI; an error explains the limitation without changing their saved progress.
If the saved configuration cannot be restored, Resume shows an error without discarding progress or starting a replacement run. Restore any missing target, technique, or dataset before trying again.
Scenario Run Results
In active runs and saved scenario results, Atomic attack groups defaults to expanded for up to 20 group summaries and collapsed for more than 20, with group and execution counts always visible. Select Expand to show all group summaries or Collapse to hide the list. Individual groups start collapsed; expand one to inspect its executions and open attack details or conversation links.
Until you expand or collapse the section, its default follows the current group count as progress loads. Once you choose, the section keeps your choice during progress updates for the same run, even if the count crosses 20. Opening a different run resets to that run’s count-based default.
Operations and Findings
An operation groups related red-teaming work. Inside it you record findings: human assessments, whether or not an attack produced them.
Open Operations in the sidebar and choose New operation. Names are unique, ignoring case and surrounding spaces; if the name is taken, the dialog offers the existing operation. An optional description records the engagement’s purpose and scope. The Operation dropdown in the labels bar applies the selected operation to new attacks and scanner runs, and New operation… at the top of that list creates one without leaving the page.
On an operation’s page, Add description or Edit description changes the description. Saving replaces it, so if two people edit at once, the last save wins. Operations can’t be renamed or deleted from the GUI.
Findings
Open an operation and choose New finding.
| Field | Required | Values |
|---|---|---|
| Title | Yes | Free text |
| Severity | Yes | Critical, Important, Moderate, Low, Informational, or Other (your own text). Defaults to Moderate. |
| Harm-type | No | A PyRIT harm category, Other (your own text), or Not set |
| Description | No | Free text |
| Evidence attack ID | No | A saved attack to attach in the same save. Its ID is in the attack’s address. |
Findings are sorted by severity in the order above, newest first within each level, 20 per page. Edit changes any field; the operation and creation time stay fixed. Delete asks for confirmation and can’t be undone.
All execution history opens History filtered by the Operation’s ID. The filter stays when you switch between Attacks and Scanner.
Attack evidence
Evidence is a saved attack. To attach one, open it in Chat, select the outcome badge to open Attack Result Details, and choose Add as finding. Choose the finding’s Operation, search by title, select a finding, and choose Attach. The attack can come from any Operation or none.
New finding in that dialog opens the same form and saves the finding and its evidence together, so neither is saved if the attack can’t be attached. Saving again after a lost response returns the finding that was already saved rather than creating a second one.
Evidence points to the live attack, not a copy, so later messages and scores show up too. An attack can support several findings, and attaching the same attack to a finding again reports Already attached.
On the operation page, Evidence (n) under a finding opens a table of its attacks. Each row shows the attack’s objective, its outcome with the same badge as Chat, and the score behind it: the human score if there is one, otherwise the automated score. An attack without a score reads Not scored. Evidence from another Operation shows its source; unassigned activity shows Not in an operation. Open attack opens it in Chat at the conversation that holds the score, or at its main conversation, so the transcript matches the result shown. If an attack no longer exists, its entry stays, shows the attack’s ID and attachment time, and reads Evidence unavailable. Remove link removes only the link, never the attack. Deleting a finding removes its links the same way.
Upgrading an existing database
One migration adds Operations, findings, evidence, and optional Operation IDs on
attacks and scanner runs. It registers legacy names without changing historical
attribution. Legacy activity remains in general history but does not appear in
Operation-ID filters. The backend applies it automatically when it starts, so
restart a running backend after upgrading. If you start memory with
skip_schema_migration=True, run the migration yourself. Downgrading refuses to
drop the tables while any operation exists.
Technique Registry
Open Registry > Techniques, or go to /registry/techniques. Targets and
Converters keep their existing registry URLs.
Search or filter registered techniques, then select Details to inspect one. Select New technique to configure an existing attack with basic settings, ordered converters, and optional adversarial prompts. The objective target is selected when you run a scenario. Seeds and conversation settings need a Python initializer. Creation does not run an attack.
New techniques are available in compatible scenarios and are lost on restart or reinitialization. The pane does not edit or delete techniques. See the backend README for the API.
Target Configuration
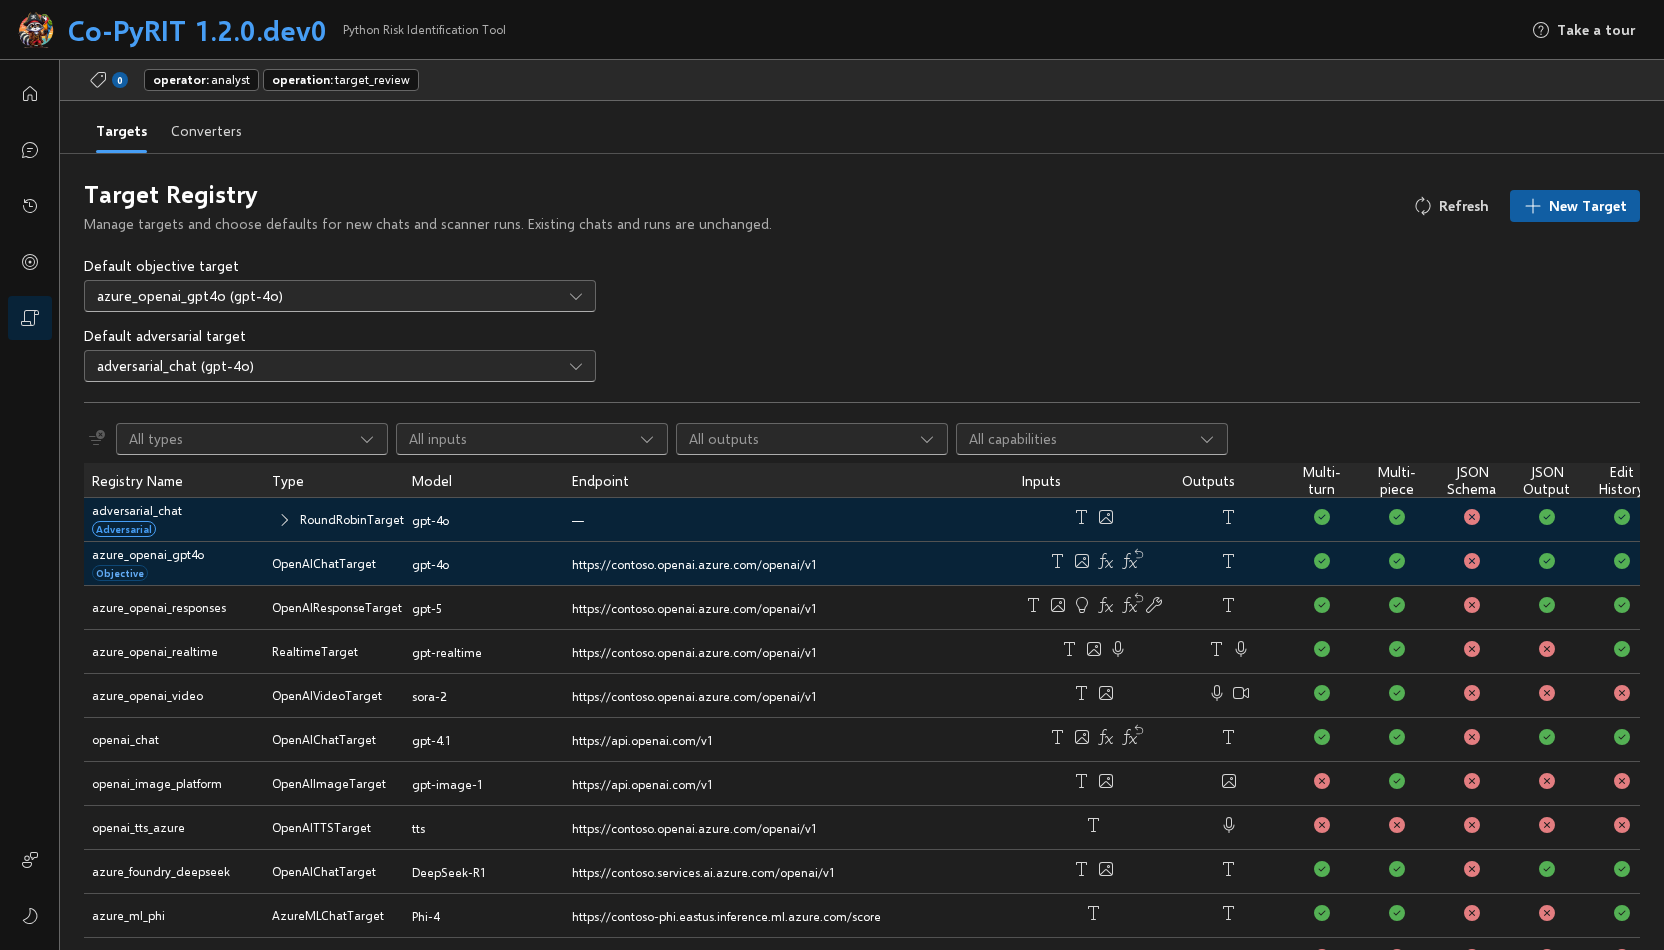
The Configuration view manages the targets available for attacks.
Target Table
Lists all registered targets with their type, endpoint, model name, input and output modalities, and capabilities. Two dropdowns above the table select your defaults. Each option shows the registry name and model, when available:
Default objective target: Preselected for new chats and scanner runs.
Default adversarial target: Preselected for scanner runs that use the shared adversarial target. The target must support multi-turn conversations. Without a saved selection, the GUI preselects the registered
adversarial_chattarget, which the target initializer configures fromADVERSARIAL_CHAT_*environment variables. A saved user selection takes priority.
The objective dropdown appears first, followed by the adversarial dropdown. Select Not set to clear the objective default. Select Use server default to remove a saved adversarial selection and return to the environment default. Small Objective and Adversarial badges identify the selected rows; the table has no separate defaults column. Filtering the table does not filter the default dropdowns or change your selections.
Filters for type, inputs, outputs, and capabilities sit above the table, and each one appears only when it can narrow the list. You can check several values in a filter, and typing in an open filter narrows its choices. A target matches the type, inputs, or outputs filter when it has any of the checked values, so checking Image under inputs also shows targets that accept both text and images. It matches the capabilities filter only when it supports every checked capability. A target must match all the filters you set, and Reset all filters clears them. If the target list changes and a checked value no longer applies, it is cleared.
Defaults are saved in this browser, separately for each signed-in account. They do not follow you to another browser or device. When authentication is disabled, the browser uses a separate local profile. Only target names and identity hashes are stored, not credentials or complete target configurations.
A missing or changed default is shown as unavailable. Select a new default or clear it; CoPyRIT does not silently substitute a different target. If browser storage is unavailable, a warning states that the choice applies only in the current session.
Scanner forms let you override either selection for one run. Objective Target is the target the scenario runs against. Adversarial Target, under Parameters, is the target used to generate attacks. The adversarial selector appears only for scenarios whose available techniques use the shared default; scenarios with no such use, including the explicit-target adversarial benchmark, do not show it or send an override. Use server default clears the per-run adversarial override. Changes to your defaults do not change existing chats or queued/running scans. Explicit adversarial targets in a scenario or technique still take priority. Scorer targets are unchanged.
Scenario datasets
Datasets is a separate section below Techniques. Its table has Dataset, Size, and Include Criteria columns. Size shows an upper bound, such as Up to 4 of 200, when the stored total is known, or Up to 4 before loading. This is not an exact selected count: filters and the combined objective limit can reduce it. Click a supported size to edit its limit, use all available examples, or reset to the displayed default. Required reference data shows its stored size without a limit editor.
Select a name from Add dataset to add it immediately. Provider names remain available before their data is stored. Selecting a name never loads it. The remove icon is available only when the scenario permits removal and another source will remain. A scenario that permits only one source uses Choose dataset to replace it. Browse datasets, beside Reset datasets, opens the dataset browser. Reset datasets restores source defaults and row limits without clearing the combined objective limit or filters.
Load datasets appears only while selected data is missing. It loads missing sources and keeps existing data, including manual edits. It may download data or use a configured generator, but does not start a scan. A missing source without a provider must be imported first. When all selected data is loaded, the load button and loading controls are omitted.
Loaded rows show harm categories and data types as differently colored chips. All labels start checked when there is no configured filter. Uncheck labels to narrow the existing filters for all selected datasets, not just the row clicked. Checking all labels restores the default request when no filter was configured. Partial category selections require every checked label and retain substring matching; data types match any checked type. An empty selection blocks launch instead of silently restoring all data. Selection is shown on the metadata chips; there is no separate filter list below the table. No preview of data values is provided.
Maximum objectives shows its resolved value. Click it to enter a positive integer, use all available objectives, or reset to the displayed default. This limits objectives, not prompts sent. Four objectives with three techniques produce 12 attacks, plus four more if the baseline is enabled. Each attack can send several prompts. The run estimate shows the resulting attacks.
Scenarios that build objectives from templates or reference data apply the total limit to the completed objectives, not to the required reference data. Their generation limits still apply. A scenario that requires one objective per selected technique rejects a total limit smaller than the number of techniques.
Load missing data when the scan starts is one switch for the selected sources. Its initial state reflects their resolved loading rules, which normally load missing data. Turning it off prevents automatic loading on scan start without disabling the manual load action. Existing source-specific rules are not silently replaced until the switch is changed. Closing a limit editor does not clear an invalid draft. Estimate and launch use the same dataset edits. Resume uses the saved request and original selection and never loads datasets.
Core Adversarial Default Override
Framework users can use the same scoped override as the GUI:
from pyrit.scenario.core import override_default_adversarial_target

with override_default_adversarial_target(target):
    # Construct the scenario here, then initialize and run it within this scope.
    ...
The override changes get_default_adversarial_target() for the current execution scope. Apply it before constructing a scenario because some scenarios resolve the target in their constructor. It does not change already-built scenarios.
Resolution order is: explicit scenario/technique target, scoped override, registered adversarial_chat, then the existing OpenAI fallback. Nested scopes restore the previous choice when they exit. Passing None leaves the current scope unchanged. The override does not modify the shared registry or scorer defaults.
REST run and request-specific estimate payloads accept an optional adversarial_target_name. The backend resolves the registered target and applies the same core override during preparation and execution. Omitting the field preserves server behavior.
New runs save the adversarial target selection with their launch configuration. Resuming a failed run uses this saved selection, not the current browser default.
Creating Targets
Click “New Target” to open the creation dialog. Fill in the fields shown for the selected target; required fields and authentication options depend on the target:
Target Type (required): Select from backend-discovered targets supported by the form, including
OpenAIChatTarget,OpenAICompletionTarget,OpenAIImageTarget,OpenAIVideoTarget,OpenAITTSTarget,OpenAIResponseTarget,AzureMLChatTarget, andGitHubCopilotTarget.Endpoint URL: Your Azure OpenAI, OpenAI API, or Azure ML endpoint, when applicable.
Model / Deployment Name: e.g.,
gpt-4o,dall-e-3,Llama-3.2-3B-Instruct.API Key (optional): Stored in memory only (not persisted to disk).
For AzureMLChatTarget, Advanced settings include Max New Tokens,
Temperature, Top P, and Repetition Penalty.
For GitHub Copilot, provide a model ID and either a GitHub token or an
instance-configured GITHUB_TOKEN; see the
framework example.
Auto-Populating Targets
Targets can also be auto-populated by adding the target initializer to your ~/.pyrit/.pyrit_conf file. This reads endpoints from your .env and .env.local files. See .pyrit_conf_example for details.
Configuration Editor
The Configuration page provides administrator-only editing for the files and scripts used to configure PyRIT. It has four tabs:
PyRIT Configuration edits the active
.pyrit_confYAML file. The source may be a local file or an Azure Blob URI. Saving validates the configuration before replacing it.Environment & Secrets lists the configured local dotenv files and Azure Key Vault bootstrap secrets. Content is loaded only after selecting a source. Saves validate the dotenv document and reject the update if the source changed since it was loaded.
Initializers shows the read-only startup sequence from the active
.pyrit_conf, in run order, along with the catalog of registered initializers.Custom Initializers registers or removes Python initializer scripts. This tab requires
allow_custom_initializers: true; scripts are stored in the configured local directory or Azure Blob container and must define a concretePyRITInitializersubclass.
Use Reload file to fetch the latest source content; unsaved edits require explicit discard confirmation. Save only persists a source. Reinitialize PyRIT separately applies saved configuration, environment sources, and stored initializer scripts for every user of this backend. Save or discard editor changes first. Custom initializer scripts execute under the backend service identity, so only trusted administrators should manage them.
Reinitializing without a process restart
Set enable_live_reinitialization: true in the saved .pyrit_conf to enable this administrator action. This setting
is an explicit operator acknowledgement that the deployment has one backend process and one replica.
It is disabled when WEB_CONCURRENCY, UVICORN_WORKERS, PYRIT_API_WORKERS, or PYRIT_REPLICAS specifies anything
other than 1. Do not use it behind a multi-worker server or across multiple replicas; it is not a distributed
configuration update. External scaling settings cannot be discovered from within a process.
Before replacement, PyRIT validates the saved configuration, environment sources, scripts, initializer parameters, and required environment values. Custom initializer scripts are trusted code. Importing a script or constructing its initializer can have side effects during validation.
Reinitialization resets setup-owned component registries and recreates backend services. Components created only through the GUI must be recreated. The same memory object and persisted history are retained, including an in-memory database. Changing the memory type, Azure SQL connection, or Azure results storage configuration requires a backend restart and is rejected before replacement.
Live apply does not stop or drain work. It rejects the request if a scenario, preparation, send, estimate, or other runtime operation is active. Wait for the work to finish, or cancel it with its existing control, and then retry. When the runtime is idle, PyRIT closes admission and checks again before it changes runtime state. This second check prevents newly admitted work from overlapping replacement.
Analytics also remains busy while a query’s native database/session cleanup is running after an HTTP timeout. Live apply waits for the user to retry once that work has drained; receiving a timeout response does not make memory safe to replace.
Operation status survives a browser disconnect or navigation; other connected clients detect runtime generation changes and refresh catalogs without discarding chat or configuration drafts.
Backend shutdown closes runtime and management admission, then waits for accepted requests and any live apply
to finish before stopping the scheduler and closing shared resources. This includes requests retained after a
client disconnect and their offloaded writes. Cancelling the shutdown caller does not interrupt that cleanup;
a single request or cleanup failure is re-raised unchanged, while multiple failures are reported together.
Shutdown can therefore wait for an outstanding operation. Runtime readiness reports ready: false and
state: stopping as soon as shutdown closes admission, including while an accepted live apply finishes.
Analytics shutdown closes its shared SDK lifetime on the owning event loop and clears the cached dependency before memory disposal. If that drain fails, the backend retains the owner and memory rather than disposing resources still in use.
If validation fails, PyRIT does not change the live runtime. Repair the saved source and retry. If startup fails, or if live initialization fails after replacement starts, runtime operations stay unavailable until you restart the backend. The administration UI stays available for configuration repair. Authentication and authorization retain their process-start settings; reinitialization does not recreate them.
Selected environment assignments replace existing process values, including deployment-provided values.
Omitted variables remain unchanged; empty assignments set an empty value. Key Vault source selection and
.env.local priority are preserved, and interpolation uses the new selected values. Ordinary library initialization
keeps its existing precedence; replacement is an explicit reinitialization option. There is no rollback of
environment assignments, initializer side effects, memory writes, or external actions if initialization fails.
Listener and authentication settings remain process-start-only. This does not run a process supervisor, restart a
container, or make local source files durable when a container is replaced.
API clients can use administrator-only GET /api/config/runtime, POST /api/config/runtime/apply
(version). Obtain the configuration version and opt-in state from GET /api/config. A newly admitted operation
returns HTTP 202 and is tracked in status. Outcomes distinguish busy, unsupported, version-conflict,
invalid-configuration, and restart-required. Authenticated non-admin clients can read readiness and generation only
at GET /api/runtime.
GET /api/health remains HTTP 200 for server responsiveness, even when runtime initialization fails.
It preserves status, timestamp, and service, and includes ready, state, and the serving ACA
revision (or null outside ACA) for deployment readiness checks. Responses are uncached and do not
expose configuration or exception details.
Registry API Migration Notes
Use /api/converters/types and /api/targets/types for registry build metadata.
These endpoints return the constructor parameters external callers can set, each
described in the form callers send it: a flat collection as a list, a union as its
first alternative callers can send (font_size: int | tuple[int, int] as int),
and a component reference as a name. They leave out types external callers can’t
create. Registry metadata keeps every parameter with its full annotation.
Create requests should supply an explicit registry name. Converter creation
returns the complete ConverterInstance; read its type from
identifier.class_name, not the old top-level converter_type field. Treat
returned IDs as opaque registry names, not UUIDs or identifier hashes.
Constructor parameters typed as Path accept base64 data-URI uploads through REST,
not server filesystem paths. Parameters typed as Path | str also accept Azure
Blob URLs. This applies to AddImageVideoConverter.video_path and
ImageOverlayConverter.base_image. Other local file inputs remain Path.
Uploads stay in backend-owned temporary storage until deletion or shutdown,
including with Azure-backed memory. Converter outputs still use configured result
storage. Uploads can contain any file type; the media endpoint renders only
allowlisted image, audio, and video extensions inline. Other files, including PDF,
SVG, HTML, text, and executables, download as application/octet-stream attachments.
Temporary compatibility, scheduled for removal with the chat migration:
target create requests without a name receive a generated compat_... name.
New clients should supply an explicit name.
Connection Health
CoPyRIT monitors the backend connection and shows a status banner:
Disconnected (red): Unable to reach the backend. Check that the server is running.
Degraded (yellow): Connection is unstable.
Reconnected (green): Briefly shown after a successful reconnection, then auto-dismissed.