Setting up Azure AI Services and Azure OpenAI resources for SynapseML
In order to use SynapseML's OpenAI or Azure AI Services features, specific Azure resources are required. This documentation walks you through the process of setting up these resources and acquiring the necessary credentials.
First, create an Azure subscription to create resources.
- A valid Azure subscription - Create one for free.
Azure OpenAI
The Azure OpenAI service can be used to solve a large number of natural language tasks through prompting the completion API. To make it easier to scale your prompting workflows from a few examples to large datasets of examples, we have integrated the Azure OpenAI service with the distributed machine learning library SynapseML. This integration makes it easy to use the Apache Spark distributed computing framework to process millions of prompts with the OpenAI service.
To set up your Azure OpenAI Resource for SynapseML usage you need to:
- Apply for access to Azure OpenAI if you do not already have access.
- Create an Azure OpenAI resource
- Get your Azure OpenAI resource's key. After your resource is successfully deployed, select Next Steps > Go to resource. Once at the resource, you can get the key from Resource Management > Keys and Endpoint. Copy the key and paste it into the notebook. Store keys securely and do not share them.
Azure AI Services
To set up Azure AI Services for use with SynapseML you first need to:
- Assign yourself the Azure AI Services Contributor role to agree to the responsible AI terms and create a resource.
- Create Azure AI service (Decision, Language, Speech, Vision) resource. You can follow the steps at Create a multi-service resource for Azure AI services.
- Get your Azure AI Services resource's key. After your resource is successfully deployed, select Next Steps > Go to resource. Once at the resource, you can get the key from Resource Management > Keys and Endpoint. Copy the key and paste it into the notebook. Store keys securely and do not share them.
Manage secrets with Azure Key Vault and access the secrets with find_secret
After you create an Azure AI resource, you will obtain a resource key. You can use this resource key directly in our notebooks as a string, but we recommend to manage secrets with Azure Key Vault. Azure Key Vault is a cloud-based service that allows you to store and manage cryptographic keys, certificates, and secrets used by cloud applications and services.
You can skip the following content if you want to use a secret string instead of Azure Key Vault. This is not recommended for production workloads.
Create Azure Key Vault
Refer to this article to create a key vault using Azure Portal
Save secret to Azure Key Vault
- Go to Access control (IAM) and assign Key Vault Administrator Role to yourself.
- Go to Secrets and choose + Generate/Import, create a key with the secret value obtained from Azure AI service.
- Choose Create.
Use find_secret on Microsoft Fabric / Power BI
- Go to Azure Key Vault, Select Access control (IAM), Select + Add, Add role assignment.
- Granted the Fabric or Power BI Service Account Get permissions in the Azure Key Vault.
Use find_secret on Azure Databricks
- In the Azure Portal, find and select the Azure Key Vault Instance. Select the Access configuration tab under Settings. Set Permission model to Vault access policy.
- On Databricks, go to
https://<databricks-instance>#secrets/createScope. This URL is case sensitive.
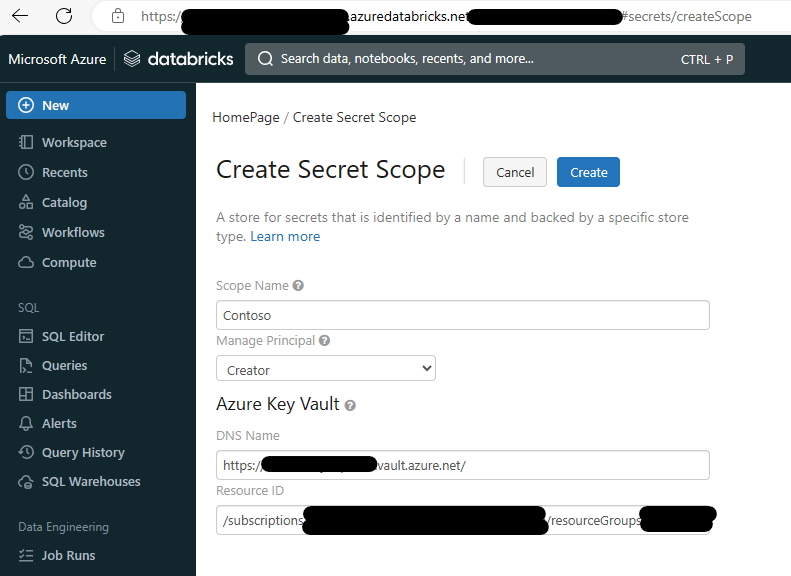
- Enter the name of the secret scope and choose desired Manage Principal.
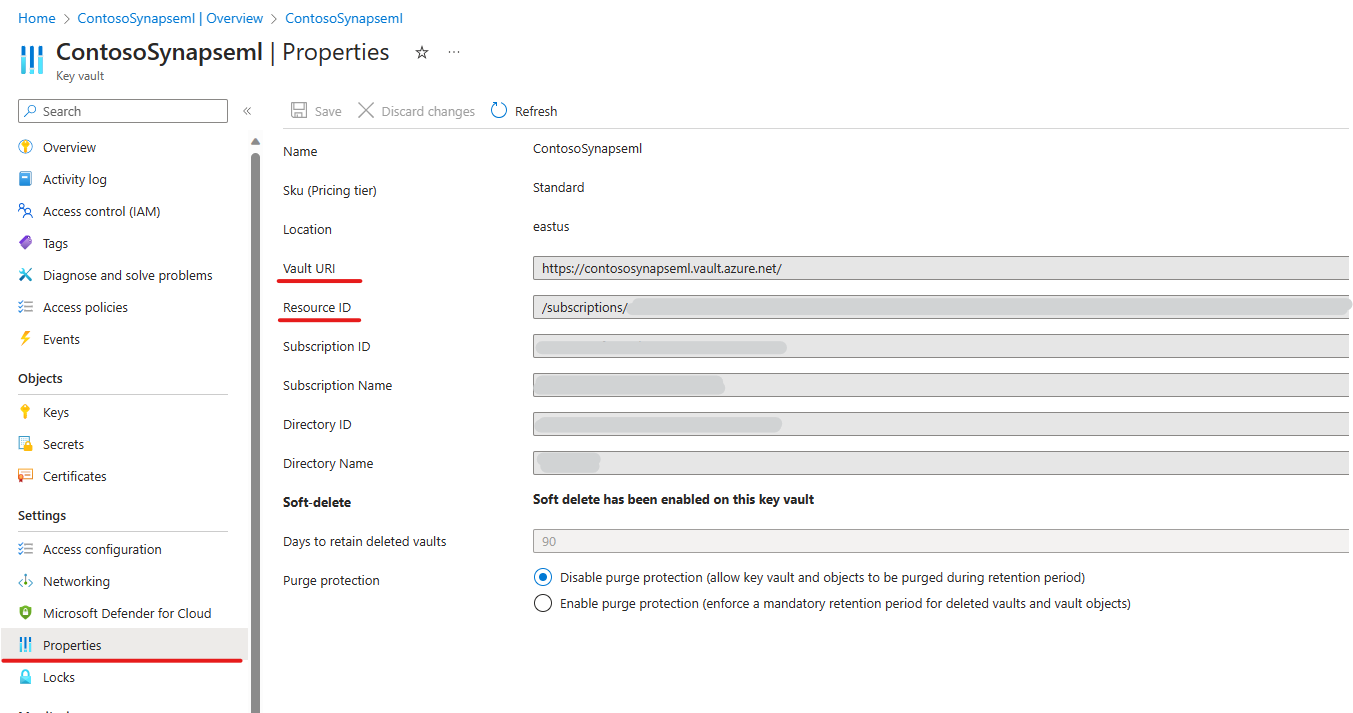
- Go to your Azure Key Vault -> Properties and find the DNS Name (Vault URI on Azure Key Vault) and Resource ID. Enter the DNS Name and Resource ID on Databricks createScope page.
- Click the Create Button.
Refer to this article for more details.
Use find_secret on Synapse
- Open the Synapse Studio and go to the Manage tab.
- Under External connections, select Linked services.
- To add a linked service, select New.
- Select the Azure Key Vault tile from the list and select Continue.
- Enter a linked service name and choose the key vault you want to connect to.
- Select Create
- Click Publish
- Go to Azure Key Vault, Select Access control (IAM), Select + Add, Add role assignment.
- Choose Key Vault Administrator in Role blade, select Next.
- In Members blade, choose Assign access to Managed identity. Select members, choose the subscription your Synapse Workspace in. For Managed identity, select Synapse workspace, choose your workspace.
- Select Review + assign.
Quick Test
from synapse.ml.services.language import AnalyzeText
from synapse.ml.core.platform import find_secret

ai_service_key = find_secret(
    secret_name="ai-services-api-key", keyvault="mmlspark-build-keys"
)  # use your own key vault name and api name
ai_service_location = "eastus"  # use your own AI service location

df = spark.createDataFrame(
    data=[
        ["en", "Dr. Smith has a very modern medical office, and she has great staff."],
        ["en", "I had a wonderful trip to Seattle last week."],
    ],
    schema=["language", "text"],
)

entity_recognition = (
    AnalyzeText()
    .setKind("EntityRecognition")
    .setLocation(ai_service_location)
    .setSubscriptionKey(ai_service_key)
    .setTextCol("text")
    .setOutputCol("entities")
    .setErrorCol("error")
    .setLanguageCol("language")
)

df_results = entity_recognition.transform(df)
display(df_results.select("language", "text", "entities.documents.entities"))
Your result should looks like
| language | text | entities |
|---|---|---|
| en | Dr. Smith has a very modern medical office, and she has great staff. | [{"category": "Person", "confidenceScore": 0.98, "length": 5, "offset": 4, "subcategory": null, "text": "Smith"}, {"category": "Location", "confidenceScore": 0.79, "length": 14, "offset": 28, "subcategory": "Structural", "text": "medical office"}, {"category": "PersonType", "confidenceScore": 0.85, "length": 5, "offset": 62, "subcategory": null, "text": "staff"}] |
| en | I had a wonderful trip to Seattle last week. | [{"category": "Event", "confidenceScore": 0.74, "length": 4, "offset": 18, "subcategory": null, "text": "trip"}, {"category": "Location", "confidenceScore": 1, "length": 7, "offset": 26, "subcategory": "GPE", "text": "Seattle"}, {"category": "DateTime", "confidenceScore": 0.8, "length": 9, "offset": 34, "subcategory": "DateRange", "text": "last week"}] |