Using Native UI
There are many options for adding native UI into your app.
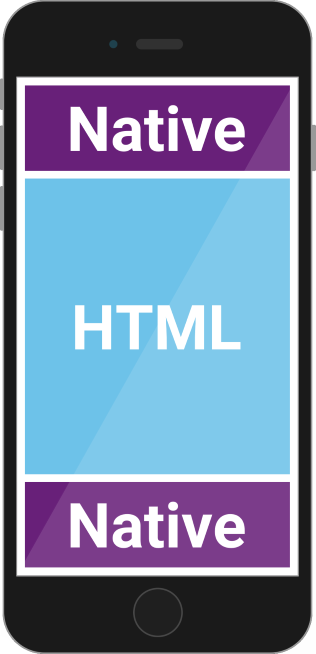
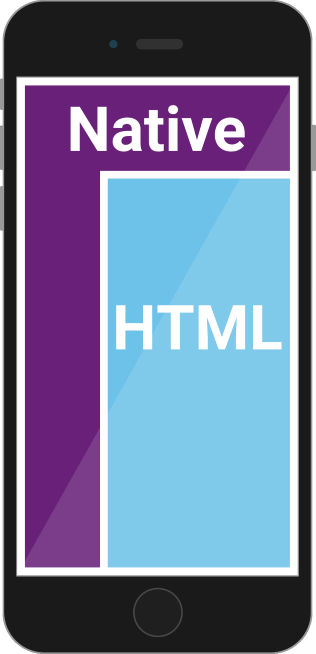
Docking Native UI
To set this up, you reparent the Cordova WebView inside arbitrary UI. The layout of your native UI dictates the layout of your page:
// Surround the WebView with native UI
ace.load("native://app.xaml", function (page) {
    // Replace the root UI with the loaded native page
    ace.getHostPage().setContent(page);

    // Reparent the WebView inside the native page
    page.setContent(ace.getHostWebView());
});
This assumes the app.xaml file defines a page. It could be one like the following that adds native tabs, plus a native action bar / navigation bar to show the page titile:
<Page xmlns:ace="using:run.ace" ace:Frame.Title="Schedule">
    <!-- A tab bar -->
    <Page.BottomAppBar>
        <ace:TabBar>
            <AppBarButton Icon="www/img/tabs/calendar-{platform}.png"
                          Label="Schedule"
                          ace:On.Click="onTabClick(this, 0)" />
            <AppBarButton Icon="www/img/tabs/people-{platform}.png"
                          Label="Speakers"
                          ace:On.Click="onTabClick(this, 1)" />
            <AppBarButton Icon="www/img/tabs/map-{platform}.png"
                          Label="Map"
                          ace:On.Click="onTabClick(this, 2)" />
            <AppBarButton Icon="www/img/tabs/info-{platform}.png"
                          Label="About"
                          ace:On.Click="onTabClick(this, 3)" />
        </ace:TabBar>
    </Page.BottomAppBar>
</Page>
Instead, the app.xaml file could define a 3x3 Grid:
<Grid>
    <!-- Define a 3x3 grid with a center cell twice the size -->
    <Grid.RowDefinitions>
        <RowDefinition />
        <RowDefinition Height="2*" />
        <RowDefinition />
    </Grid.RowDefinitions>
    <Grid.ColumnDefinitions>
        <ColumnDefinition />
        <ColumnDefinition Width="2*" />
        <ColumnDefinition />
    </Grid.ColumnDefinitions>

    <!-- Row 0 -->
    <Button                                     Background="Red"    />
    <Button                     Grid.Column="1" Background="Orange" />
    <Button                     Grid.Column="2" Background="Yellow" />
    <!-- Row 1 -->
    <Button        Grid.Row="1"                 Background="Green"  />
    <Button        Grid.Row="1" Grid.Column="2" Background="Aqua"   />
    <!-- Row 2 -->
    <Button        Grid.Row="2"                 Background="Purple" />
    <Button        Grid.Row="2" Grid.Column="1" Background="Brown"  />
    <Button        Grid.Row="2" Grid.Column="2" Background="Gray"   />
</Grid>
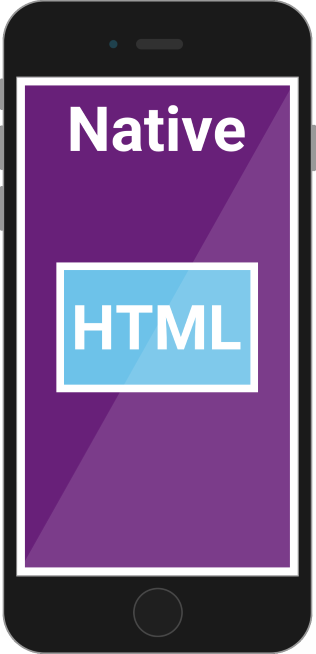
In this case, the JavaScript could plop the WebView into the center cell, surrounded by the colorful buttons:
ace.load("native://Grid.xaml", function (root) {
    // Replace the WebView with a Grid
    ace.getHostPage().setContent(root);

    var webView = ace.getHostWebView();

    // Place the WebView inside the Grid
    ace.Grid.setRow(webView, 1);
    ace.Grid.setColumn(webView, 1);
    root.getChildren().add(webView);
});
As always, this could all be done without XAML:
var grid = new ace.Grid();
grid.getRowDefinitions().add(new ace.RowDefinition());
...
var button2 = new ace.Button();
ace.Grid.setColumn(button2, 1);
button2.setBackground("orange");
grid.getChildren().add(button2);
...

// Replace the WebView with a Grid
ace.getHostPage().setContent(grid);

var webView = ace.getHostWebView();

// Place the WebView inside the Grid
ace.Grid.setRow(webView, 1);
ace.Grid.setColumn(webView, 1);
grid.getChildren().add(webView);
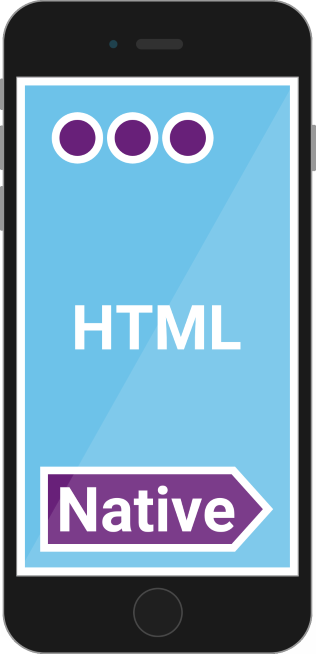
Overlaying Native UI
You accomplish this with the Popup class. You can create a popup, set its content to any UI object, and show/hide it. By default, popups are fullscreen, but they have methods for sizing and positioning them.
ace.load("native://content.xaml", function (root) {
    var popup = new ace.Popup();
    popup.setContent(root);
    popup.show();

    root.addEventListener("click", function () {
        popup.hide();
    });
});
Here’s an example that uses raw Android UI objects:
ace.load("android://vector_graphics.xml", function (root) {
    var popup = new ace.Popup();
    popup.setContent(root);
    popup.show();

    root.addEventListener("setOnClickListener", function () {
        popup.hide();
    });
});
Fullscreen Native UI
One way to accomplish fullscreen native UI is to replace the WebView, as shown in the Docking Native UI section, but then keeping the WebView hidden. Another way is to navigate to a new all-native page. See the Navigation topic for all the ways to perform navigation. Creating an Android WidgetCheck out the PhoneGap Day app for an example of this. Because Ace enables you to include arbitrary Java and resources in your app, you can build completely-custom widgets the same way you would in a pure native app. However, Ace provides some standard widget functionality that makes this even easier. 1. Define Widget(s) in AndroidManifest.xml.Copy the already-produced AndroidManifest.xml from your project’s platforms/android folder to the native/android/res folder so you can overwrite it with your custom entries. Add the following under the <application> element to get a list-based widget:
<receiver android:label="List" android:name="your.package.name.ListWidgetProvider">
  <intent-filter>
    <action android:name="android.appwidget.action.APPWIDGET_UPDATE" />
  </intent-filter>
  <meta-data android:name="android.appwidget.provider" android:resource="@xml/list_widget_info" />
</receiver>
<service android:exported="false" android:name="run.ace.AppWidgetService" android:permission="android.permission.BIND_REMOTEVIEWS" />
2. Add the Necessary Android ResourcesAdd a native/android/res/xml/list_widget_info.xml file with the following content: <?xml version="1.0" encoding="utf-8"?> <appwidget-provider xmlns:android="http://schemas.android.com/apk/res/android" android:minWidth="180dip" android:minHeight="180dip" android:updatePeriodMillis="3600000" android:previewImage="@drawable/list_widget_preview" android:initialLayout="@layout/list_widget_layout"> </appwidget-provider> Add an appropriate preview image as native/android/res/drawable/list_widget_preview.png. Add a native/android/res/layout/list_widget_layout file defining the widget layout:
<?xml version="1.0" encoding="utf-8"?>
<ListView xmlns:android="http://schemas.android.com/apk/res/android"
    android:id="@+id/list_widget_view"
    android:layout_width="match_parent"
    android:layout_height="match_parent"
    android:gravity="center"
    android:loopViews="true" />
Add a native/android/res/layout/list_widget_view file defining the layout of each widget item:
<?xml version="1.0" encoding="utf-8"?>
<FrameLayout xmlns:android="http://schemas.android.com/apk/res/android"
    android:id="@+id/list_widget_item"
    android:layout_width="match_parent"
    android:layout_height="match_parent">
  <TextView
    android:id="@+id/list_widget_item_text"
    android:layout_width="match_parent"
    android:layout_height="wrap_content"
    android:layout_margin="10dp"
    android:textColor="#ffffff"
    android:textSize="40px" />
</FrameLayout>
3. Add a WidgetProvider Java ClassPlace this anywhere under native/android/src. The class and package name must match what you specified in AndroidManifest.xml. This class tells Ace about the resources you’ve defined.
package your.package.name;

public class ListWidgetProvider extends run.ace.AppWidgetProvider {
  @Override protected int getLayoutResourceId(android.content.Context context) {
    return run.ace.NativeHost.getResourceId("list_widget_layout", "layout", context);
  }

  @Override protected int getViewResourceId(android.content.Context context) {
    return run.ace.NativeHost.getResourceId("list_widget_view", "id", context);
  }

  @Override protected int getItemResourceId(android.content.Context context) {
    return run.ace.NativeHost.getResourceId("list_widget_item", "id", context);
  }

  @Override protected int getItemTextResourceId(android.content.Context context) {
    return run.ace.NativeHost.getResourceId("list_widget_item_text", "id", context);
  }

  @Override protected int getItemLayoutResourceId(android.content.Context context) {
    return run.ace.NativeHost.getResourceId("list_widget_item", "layout", context);
  }
}
3. Populate Widget Data in JavaScriptWhen your app runs, you can populate your widget:
if (ace.platform == "Android") {
  setupWidget();
}

function setupWidget() {
  // Handle the app being resumed by a widget click:
  ace.addEventListener("android.intentchanged", checkForWidgetActivation);

  ace.android.appWidget.clear();

  for (var i = 0; i < 10; i++) {
    ace.android.appWidget.add("Item with index " + i);
  }
}
4. Handle Widget Item Clicks in JavaScriptWhen an item in a list-based widget is clicked, its index is stored in the Android activity’s intent. The code below shows how to retrieve this index. To handle your app being activated by a widget click, you should check for this data as your app initializes. However, to also handle your app being resumed by a widget click, you should attach an event handler to the global android.intentchanged event:
ace.addEventListener("android.intentchanged", checkForWidgetActivation);
function checkForWidgetActivation() {
  if (ace.platform != "Android") {
    return;
  }

  ace.android.getIntent().invoke("getIntExtra", "widgetSelectionIndex", -1, function (value) {
    // value is the index of the item clicked
    // or -1 if no item has been clicked
  });
}
Creating Floating UI on AndroidDocumentation coming soon. |