🧬 YAML Specialist
![]()
Difficulty: ⭐⭐⭐ | Time: ~60 min
Welcome, agent. Your mission - should you choose to accept it - is to become a YAML Specialist - an operative who builds and extends Microsoft Copilot Studio agents entirely from Visual Studio Code using the Copilot Studio YAML agent definition language. You're going deep cover: cloning agents, writing topics in raw YAML, wiring up knowledge sources, and pushing changes back to the cloud - all from your local command center. With GitHub Copilot as your handler, you'll iterate at speeds the web UI can't match.
Mission objectives:
- Set up the Copilot Studio VS Code extension and clone an agent to your local machine
- Understand the YAML agent definition file structure - topics, actions, triggers, and knowledge
- Write and edit YAML topics by hand with IntelliSense validation
- Leverage GitHub Copilot Agent Mode with specialized skills to generate and refine agent YAML
- Synchronize local changes back to Copilot Studio and test the agent in the cloud
⚙️ Prerequisites
This mission assumes you have completed the Operative course and have a working Copilot Studio environment. In addition, make sure you have the following installed:
- Visual Studio Code - Download and install from code.visualstudio.com. Select the installer for your operating system (Windows, macOS, or Linux).
- Node.js (LTS) - Required by the Copilot Studio VS Code extension. Download from nodejs.org. Choose the LTS version. Verify with
node --versionin a terminal.
TIP
If you already have VS Code installed, you can install the GitHub Copilot and Copilot Studio extensions later during the hands-on labs. The labs walk you through each extension installation step by step.
❓ What is YAML Authoring for Copilot Studio?
What is YAML?
YAML is a simple text format for storing structured information. Think of it like a well-organized outline - instead of using curly braces or angle brackets, YAML uses indentation (spaces) to show how things are nested. This makes it easy to read even if you've never seen it before. For example:
name: Travel Agent
language: English
settings:
  greeting: Hello! How can I help you travel safely?
  topics:
    - safety-tips
    - cultural-advice
Notice how settings is indented under the main level, and greeting and topics are indented further inside settings. That's really all there is to it - names on the left, values on the right, separated by a colon, with indentation showing structure. YAML files use the .yaml or .yml extension. In Copilot Studio, every part of your agent - topics, tools, triggers, and settings - is stored in YAML files.
Every Copilot Studio agent has a definition - a set of YAML files that describe its personality, topics, tools, knowledge sources, and triggers. When you build an agent in the Copilot Studio web UI, you're really editing these YAML files behind the scenes. The web canvas provides a visual representation, but the source of truth is always YAML.
TIP
You can peek at the YAML behind any topic or tool directly in the web canvas. Open a topic, then select Open code editor in the toolbar to see the raw YAML. This is a great way to learn the schema before moving to VS Code.
The Copilot Studio extension for Visual Studio Code gives you direct access to these agent definition files. You can:
- Clone an agent from the cloud to your local file system
- Edit topics, instructions, knowledge, and tools using structured YAML with IntelliSense
- Apply your changes back to the cloud for testing
- Version control your agent definitions with Git
This is how professional agent developers work - treating agent definitions as code, collaborating through pull requests, and iterating rapidly with AI assistance.
🆚 Web UI vs YAML Authoring: When to Use Each
| Aspect | Web UI (Copilot Studio) | YAML Authoring (VS Code) |
|---|---|---|
| Best for | Visual exploration, quick prototyping | Large-scale development, team collaboration |
| Editing speed | Point-and-select, one node at a time | Full-text search, bulk edits across files |
| AI assistance | Copilot in the canvas | GitHub Copilot Agent Mode with specialized skills |
| Collaboration | One author at a time per topic | Multiple developers via Git branches |
| Testing | Built-in test pane | Apply changes, then test in Copilot Studio |
| Learning curve | Low - visual and guided | Medium - requires YAML and VS Code familiarity |
TIP
You don't have to choose one or the other. Many teams use the web UI for initial prototyping and switch to YAML authoring for production-grade development. Changes made in the web UI can be pulled down with a Get operation, and local YAML changes can be pushed up with Apply.
📁 The Agent Definition File Structure
When you clone a Copilot Studio agent, the extension creates a structured directory on your machine. Understanding this structure is important:
my-agent/
├── actions/                  # Connectors
│   ├── DevOpsAction.mcs.yml
│   └── GetItems.mcs.yml
├── knowledge/files/               # Knowledge sources
│   ├── source1.mcs.yml
│   └── source2.mcs.yml
├── topics/                   # Conversation topics
│   ├── greeting.mcs.yml
│   ├── help.mcs.yml
│   └── escalate.mcs.yml
├── variables/                # Global variable definitions
│   └── UserCountry.mcs.yml
├── workflows/                    # Agent tools and actions
│   └── GetDevOpsItems
│       ├── metadata.yaml
│       └── workflow.json
│   └── GetMeetings
│       ├── metadata.yaml
│       └── workflow.json
├── trigger/                 # Event triggers
│   └── welcometrigger.mcs.yml
├── agent.mcs.yml                 # Main agent definition
├── icon.png                      # Icon used for the agent, visible in test panel and in supported channels
├── settings.mcs.yml              # Configuration settings for the agent
└── connectionreferences.mcs.yml  # Connection References used by Connectors and other actions
Key files to know:
| File / Folder | Purpose |
|---|---|
agent.mcs.yml | Main agent definition - name, description, instructions, and schema |
topics/ | Each .mcs.yml file is a topic with triggers, actions, and conversation logic |
actions/ | Connector tool definitions - connectors, REST APIs, MCP servers |
knowledge/files/ | Uploaded knowledge documents |
variables/ | Global variable definitions used across topics |
settings.mcs.yml | Agent configuration and orchestration settings |
workflows/ | Agent flows used as tools |
trigger/ | Event-based triggers (schedules, conditions) |
connectionreferences.mcs.yml | Connection References used by Connectors and other actions |
🔧 YAML Topic Anatomy
Topics are the conversation building blocks of your agent. Each topic is an AdaptiveDialog written in YAML. Here's the anatomy of a simple greeting topic:
kind: AdaptiveDialog
beginDialog:
  kind: OnConversationStart
  id: main
  actions:
    - kind: SendActivity
      id: sendMessage_greeting
      activity:
        text:
          - Hello, I'm {System.Bot.Name}. How can I help?
        speak:
          - Hello and thank you for calling {System.Bot.Name}.
Key YAML elements:
kind- The node type (AdaptiveDialog,SendActivity,Question,ConditionGroup, etc.)id- A unique identifier for each nodeactions- An ordered list of steps the topic executesvariable- Variable assignment usinginit:Topic.VariableNamesyntaxentity- Entity type for question nodes (e.g.,BooleanPrebuiltEntity,StringPrebuiltEntity)condition- Power Fx expressions for conditional logic (prefixed with=)
Questions and Variables
- kind: Question
  id: question_askName
  alwaysPrompt: true
  variable: init:Topic.UserName
  prompt: What is your name?
  entity: StringPrebuiltEntity
Conditional Logic with Power Fx
- kind: ConditionGroup
  id: condition_checkResponse
  conditions:
    - id: condition_yes
      condition: =Topic.Continue = true
      actions:
        - kind: SendActivity
          id: sendMessage_continue
          activity: Go ahead. I'm listening.
    - id: condition_no
      condition: =Topic.Continue = false
      actions:
        - kind: SendActivity
          id: sendMessage_goodbye
          activity: Goodbye! Have a great day.
NOTE
Power Fx expressions in conditions must be prefixed with =. This tells the YAML parser that the value is an expression, not a literal string.
Topic Trigger Types
Topics use different trigger types depending on when they should fire:
OnConversationStart- Fires once automatically when the conversation begins. Used for greeting messages.OnRecognizedIntent- Fires when the user says something that matches a trigger phrase.OnActivity- Fires on specific activity types (e.g.,Message). Can include aconditionproperty with a Power Fx expression to control when it activates. This is useful for topics that should run on every message but only when certain conditions are met.
TIP
Use OnActivity with a condition when you need a topic to fire based on runtime state (like checking a global variable) rather than based on what the user said.
⚙️ 1. Set Up and Clone Your Agent
In this section, you'll create a Travel Agent in Copilot Studio and clone it to your local machine using the VS Code extension.
1.1 Create a Solution and Agent in Copilot Studio
First, create a dedicated solution and a blank Travel Agent. This gives you a real agent to work with throughout the mission.
Navigate to Copilot Studio
Verify your environment is correct by checking the environment selector in the top-right corner. If you need to change it, select the environment name and choose your developer or sandbox environment.
Select ... in the left navigation and select Solutions
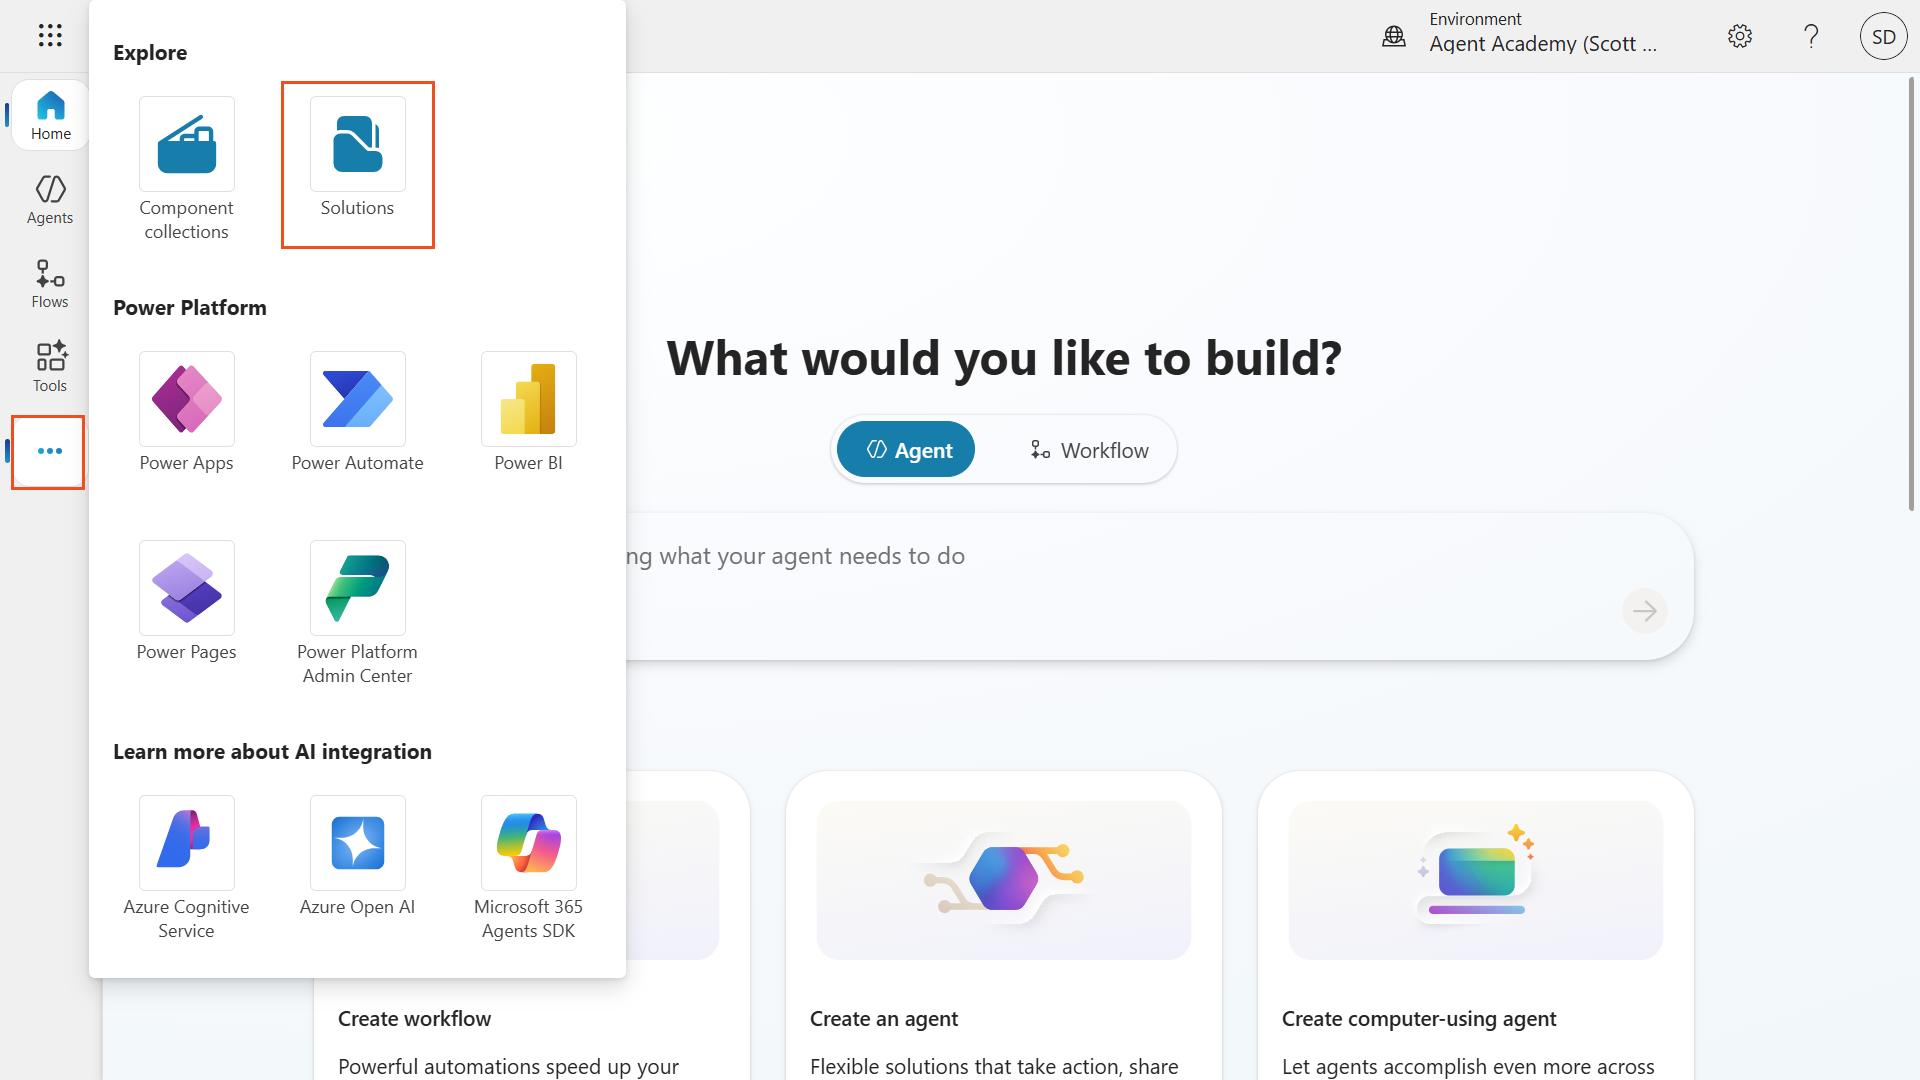
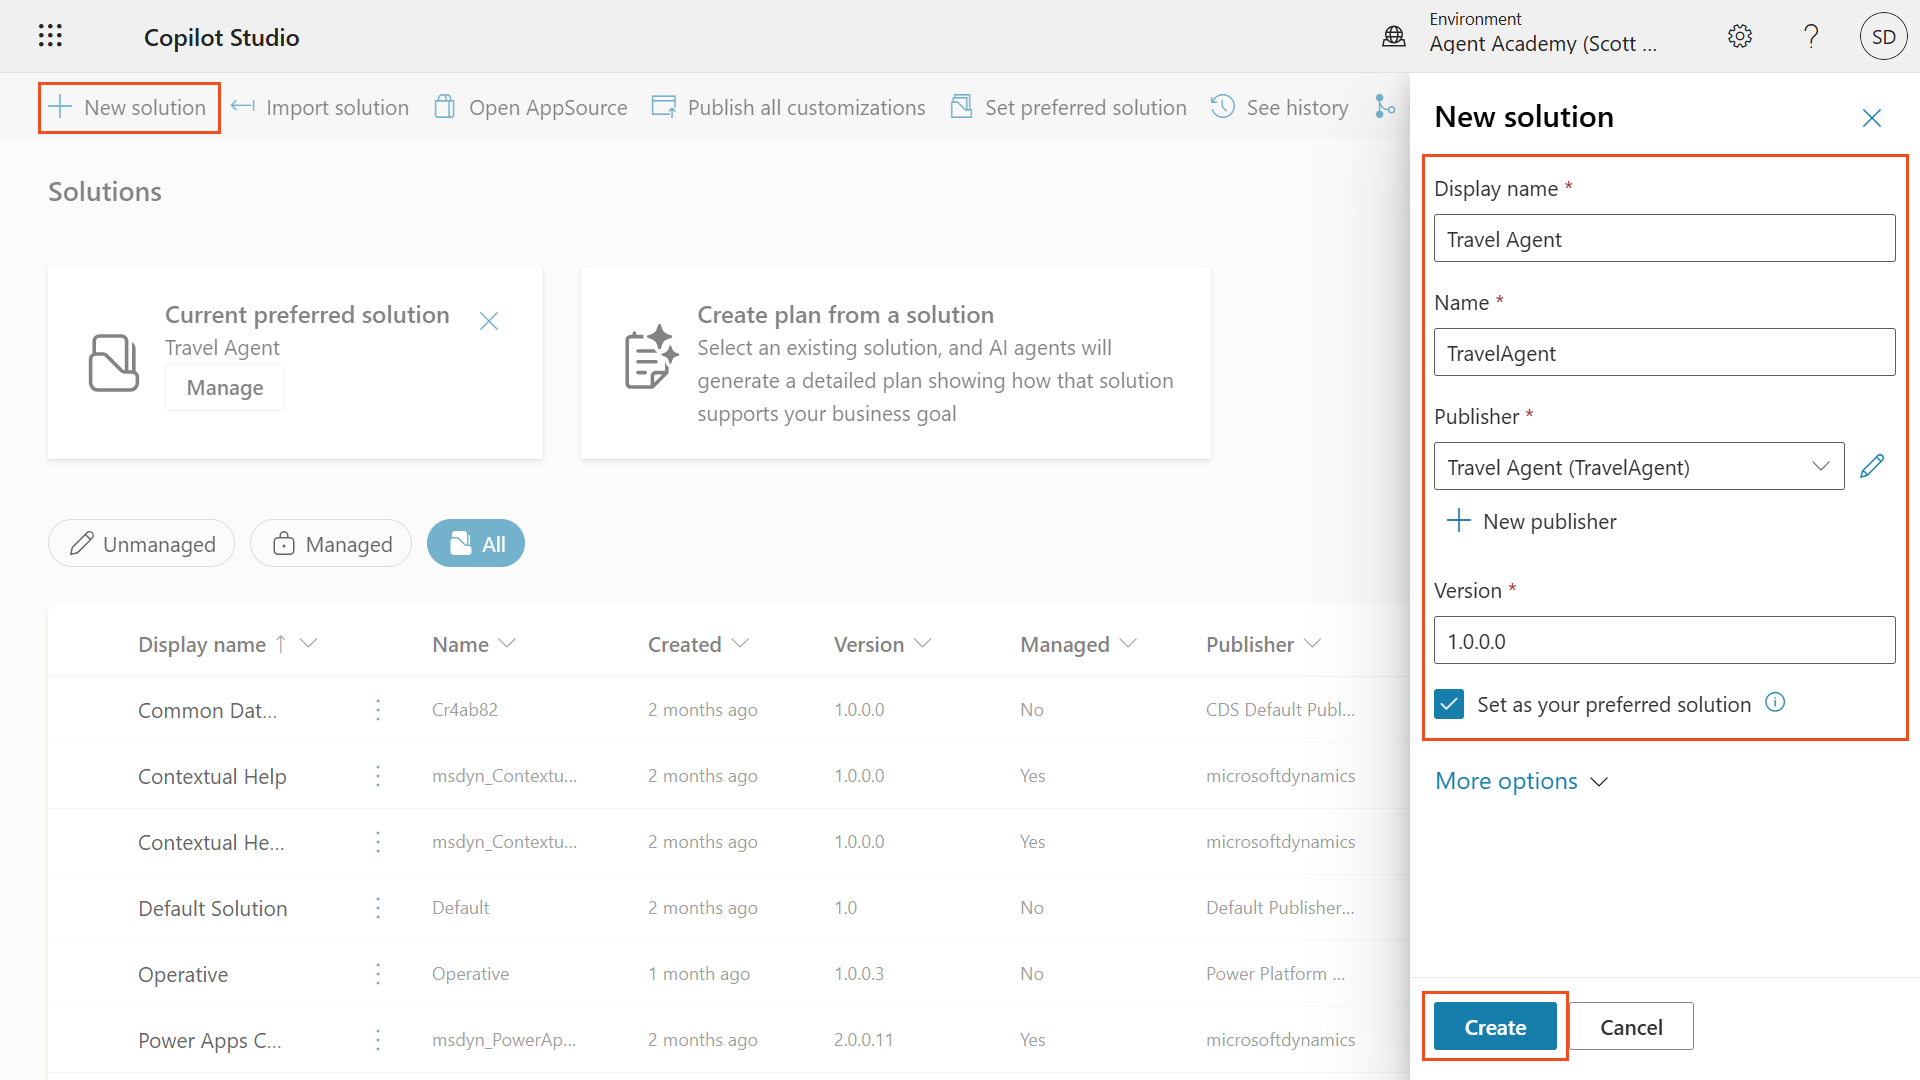
Select New Solution
Configure the solution with the following settings:
Setting Value Display Name Travel AgentPublisher Select New publisher Configure the new publisher:
Setting Value Display Name Travel AgentName TravelAgentPrefix taSelect Save on the publisher dialog
Check Set as your preferred solution
Select Create
Navigate back to Copilot Studio by selecting the Copilot Studio logo in the top-left
Select Agents in the left navigation
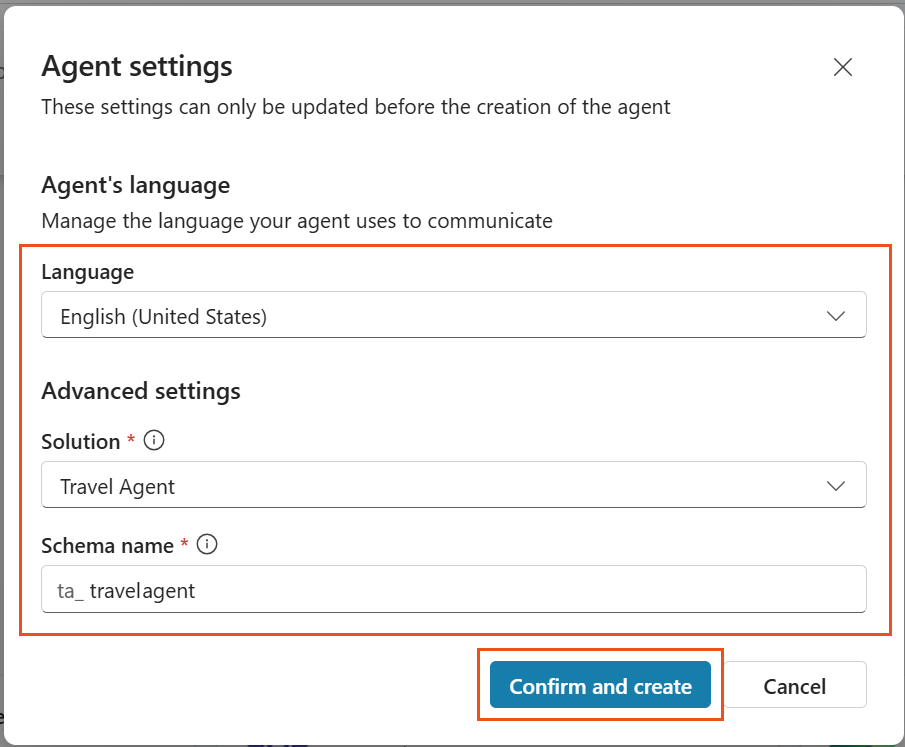
Select + Create blank agent and then select Advanced Create at the bottom of the dialog

Configure the agent with the following settings:
Setting Value Language English (United States)Solution Travel AgentSchema name ta_travelagentSelect Confirm and create
Wait until the agent is finished provisioning - a green bar displays the message Your agent has been provisioned

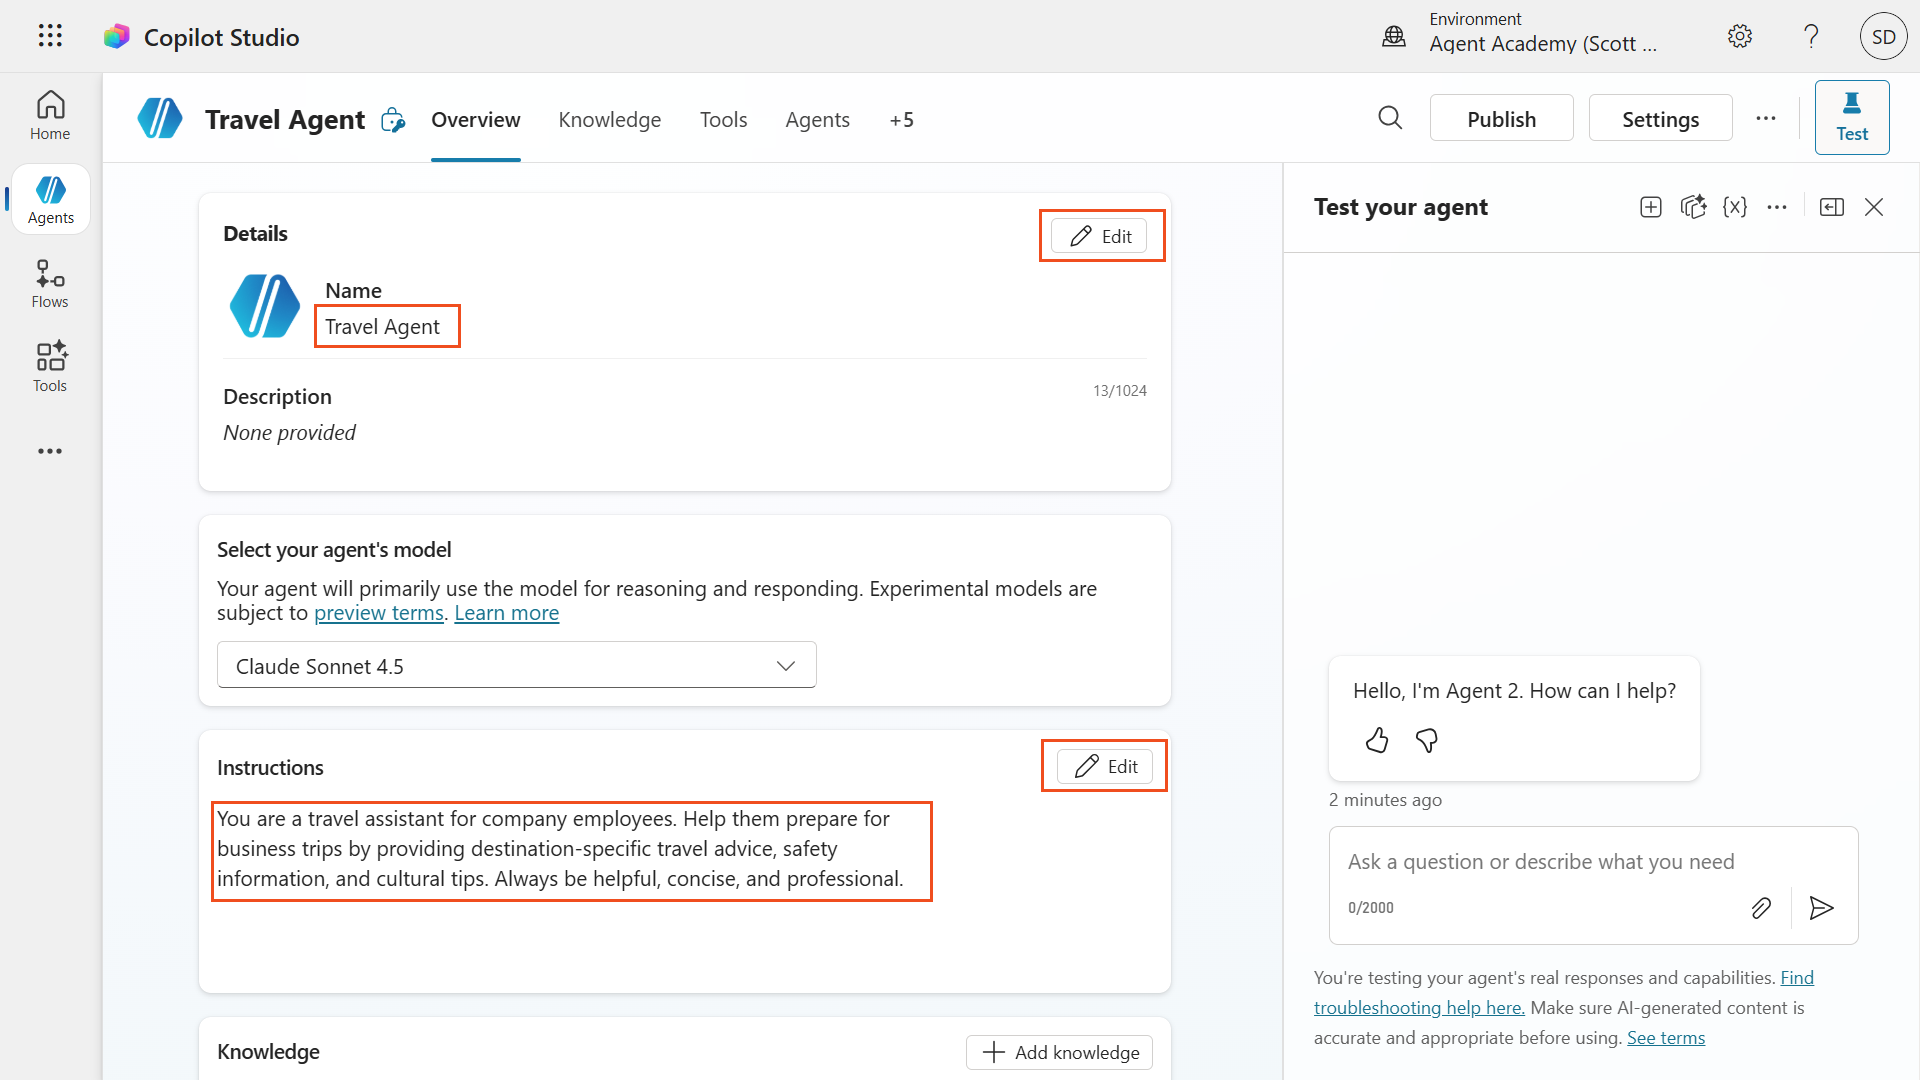
Select Edit in the Details section, and update the name to be
Travel AgentSelect Save
Select Edit in the Instructions section on the overview page
Enter the following instructions:
textYou are a travel assistant for company employees. Help them prepare for business trips by providing destination-specific travel advice, safety information, and cultural tips. Always be helpful, concise, and professional.Select Save
1.2 Install the Copilot Studio VS Code Extension
Next, install the Copilot Studio extension for VS Code.
- Open Visual Studio Code (download from code.visualstudio.com if not installed)
- Select the Extensions icon in the Activity Bar on the left side (or press
Ctrl+Shift+X) - In the search bar, type ms-copilotstudio.vscode-copilotstudio
- Locate the extension published by Microsoft and select Install
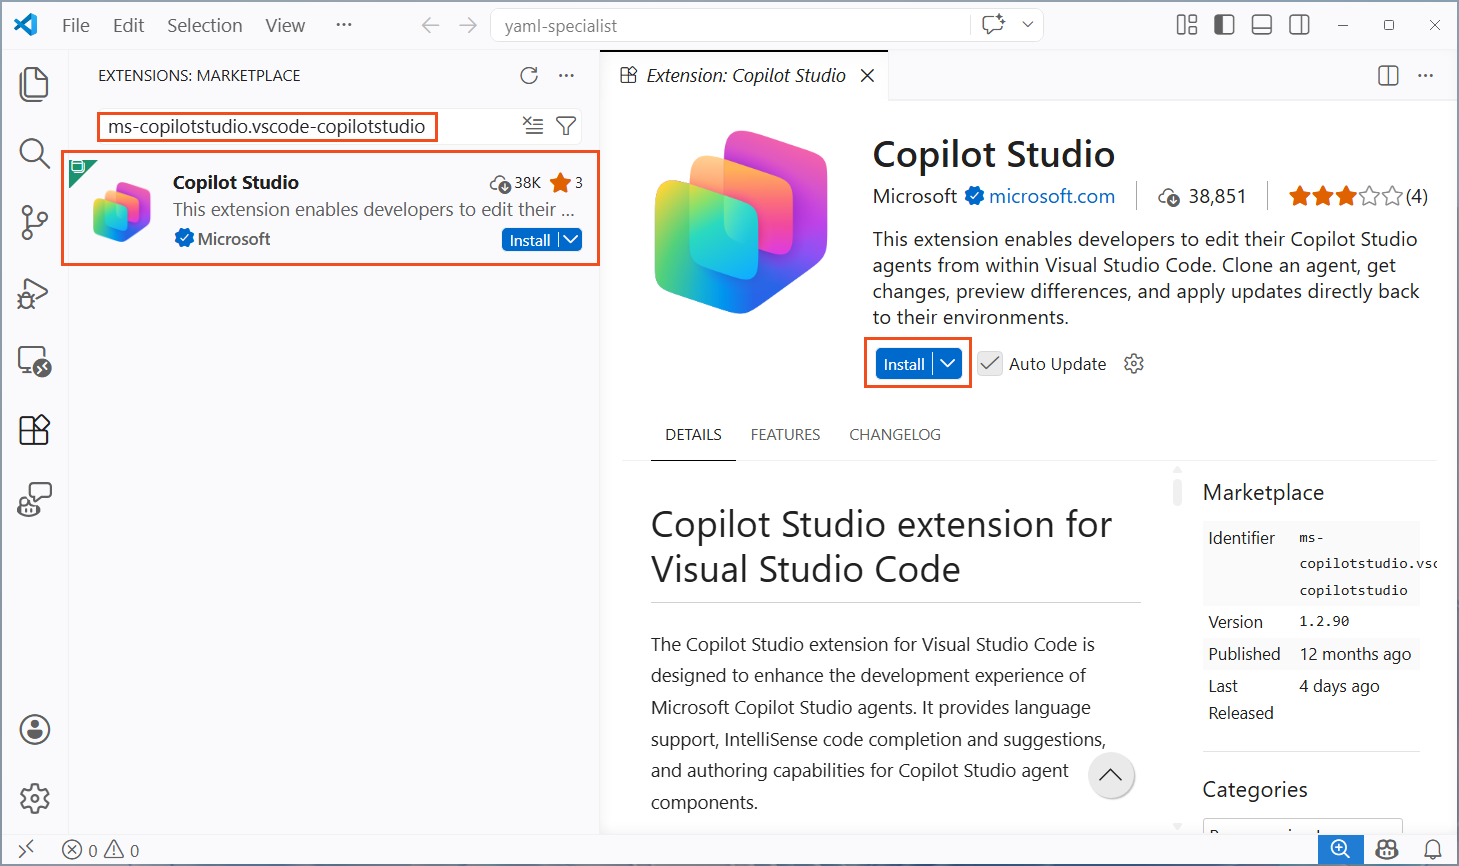
- Wait for the installation to complete - VS Code may prompt you to reload
- Select the Copilot Studio icon that now appears in the Activity Bar
- Select Allow when prompted in the popup notification asking "The extension 'Copilot Studio' wants to sign in using Microsoft"
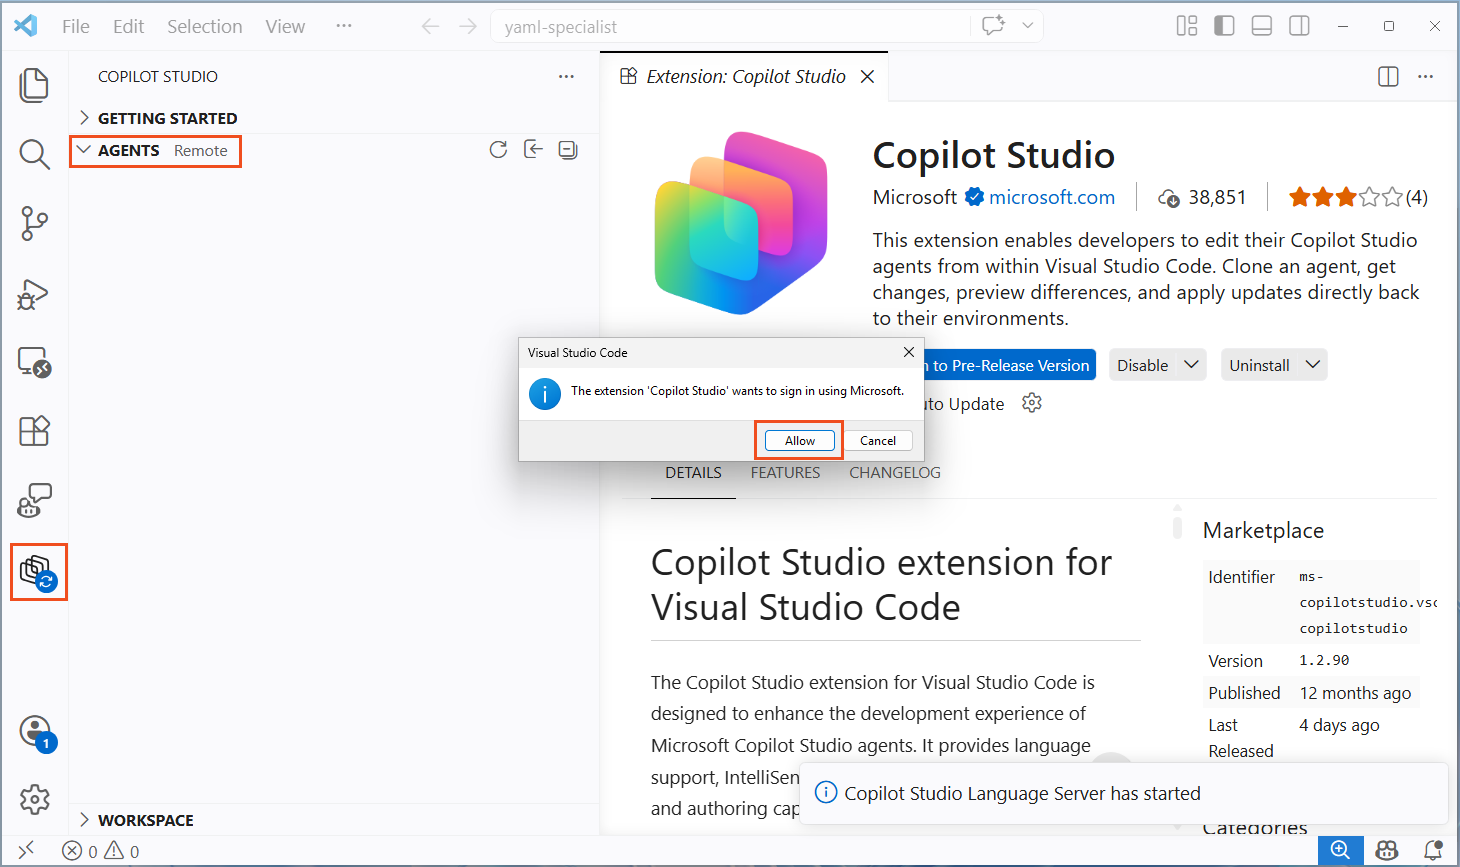
- Select your account to sign in with, and enter your credentials and complete any multi-factor authentication
- Return to VS Code - inside the Copilot studio panel, collapse the Getting Started section and expand the Agents section
- Your environments and agents should now be listed after a short loading delay

IMPORTANT
You need read and write access to the Copilot Studio environment where your Travel Agent lives. If you don't see your agent in the Agents pane, verify you're signed in with the correct account and select the right environment from the dropdown.
1.3 Clone the Travel Agent to Your Local Machine
Now clone your agent to a local folder so you can work with the YAML files directly.
Select your target environment from the dropdown menu
Locate the Travel Agent (or the name you gave your agent) in the agent list
TIP
The environment and agent tree can sometimes time out while loading. If the list appears empty or stops loading, select the Refresh button at the top of the Agents pane and try expanding the tree again.
Right-click on the agent name and select Clone agent
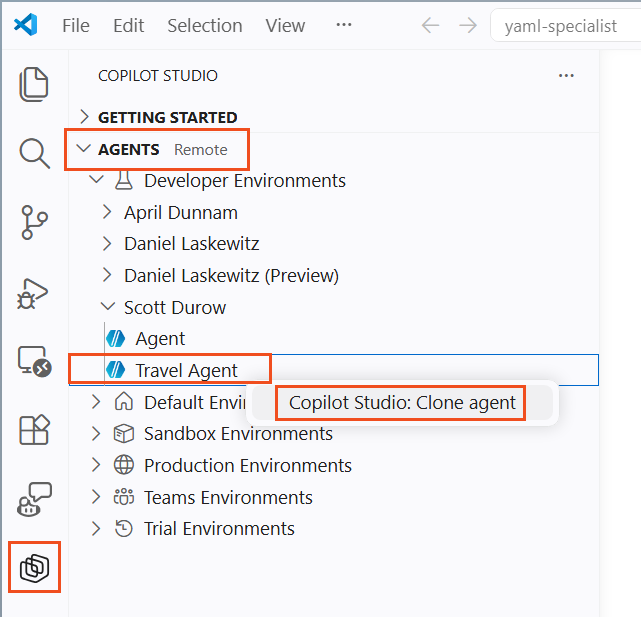
In the file picker dialog, navigate to an appropriate folder (or create a new folder like
travel-agent)Select the Select Folder button
Wait for the cloning process to complete - a progress notification appears, followed by a success message: Agent Cloned successfully. VS Code will automatically open the folder you selected.

Verify the cloned file structure in the VS Code Explorer panel - you should see
agent.mcs.yml, thetopics/folder, and other definition files
NOTE
The clone operation downloads the full agent definition - topics, actions, knowledge, workflows, triggers, and configuration. This is your local working copy. Changes you make here won't affect the cloud agent until you explicitly Apply them.
1.4 Explore the Agent Definition
Before making changes, take a look at what was cloned.
Open
agent.mcs.ymlin the Explorer - this is the main agent definition containing the name, description, and instructions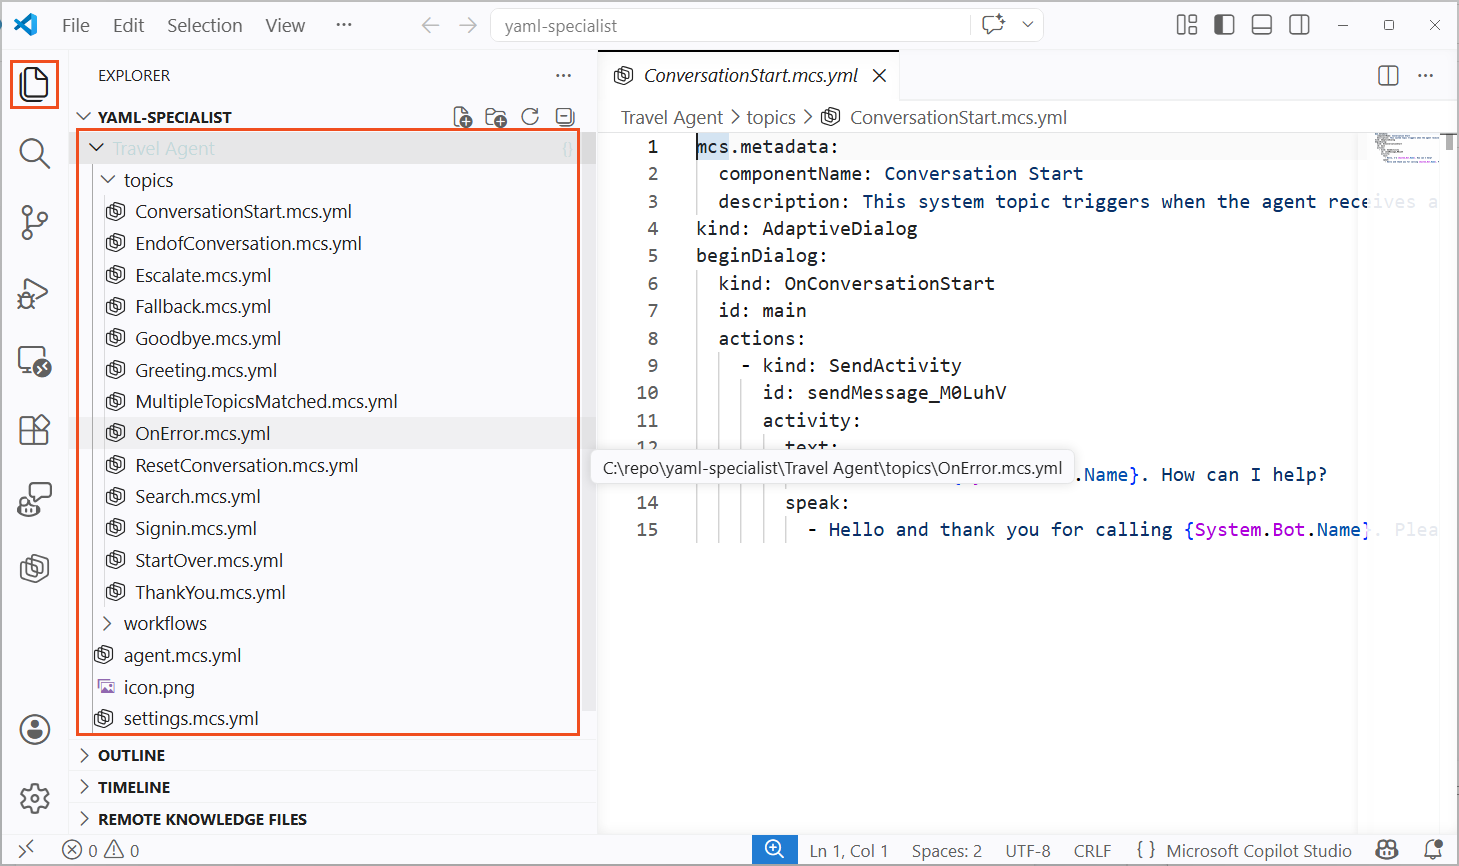
Review the
topics/folder - each.mcs.ymlfile represents a conversation topicOpen any existing topic file and examine the YAML structure - notice the
kind,id, andactionspropertiesOpen
settings.mcs.yml- this contains orchestration and configuration settingsPress
Ctrl+Spaceinside any YAML file to see IntelliSense suggestions from the Copilot Studio extensionPress
Ctrl+Shift+Mto open the Problems pane - the extension validates your YAML in real-time and flags errors with red underlines
TIP
Use Ctrl+F to search across your entire agent definition. This is much faster than navigating between topics in the web UI, especially for agents with dozens of topics and tools.
💪 2. Enable GitHub Copilot with Copilot Studio Skills
GitHub Copilot is a powerful AI coding assistant, but out of the box it doesn't know the Copilot Studio YAML schema. By installing specialized agent skills, you give GitHub Copilot deep knowledge of the YAML agent definition language — enabling it to generate valid topics, actions, and configurations on demand. In this section, you'll set up the GitHub Copilot CLI inside VS Code and install the Copilot Studio skills.
2.1 Install and Open GitHub Copilot CLI
Ensure you have a GitHub Copilot subscription. The free tier (no credit card required) works for this mission — it includes Agent mode, Copilot CLI, and 50 chat/agent requests per month. This mission uses approximately 5-10 requests, so the free allocation is plenty. If you've already used your monthly requests, you'll need to wait for them to reset or upgrade to Copilot Pro which includes unlimited chat with GPT-5 mini and 300 premium requests. Verified students and teachers get Copilot Pro for free.
Open VS Code, select the Extensions icon in the Activity Bar (or press
Ctrl+Shift+X), search for github.copilot-chat, and select Install if it is not already installed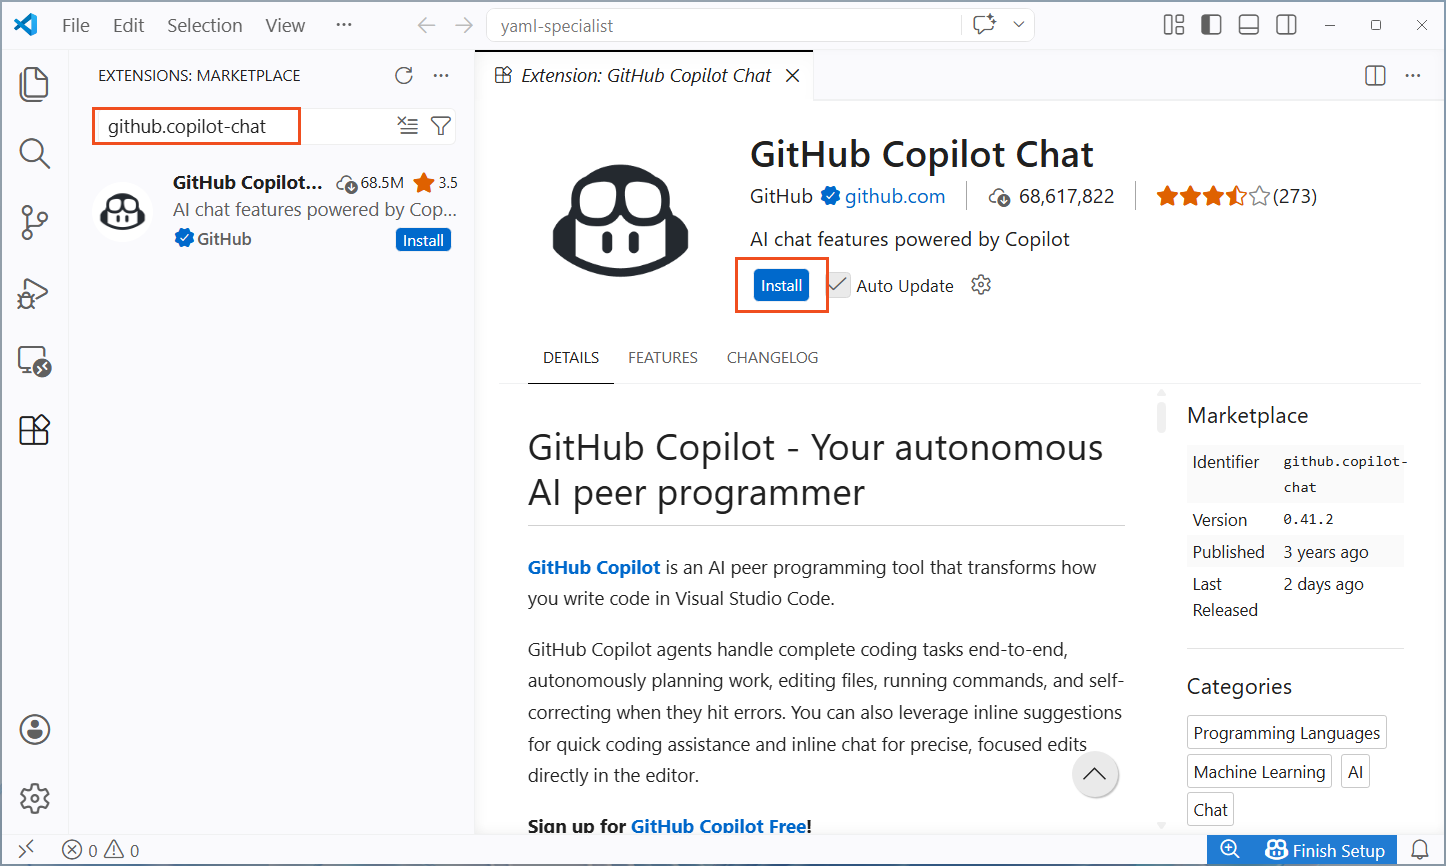
Sign in to GitHub if prompted
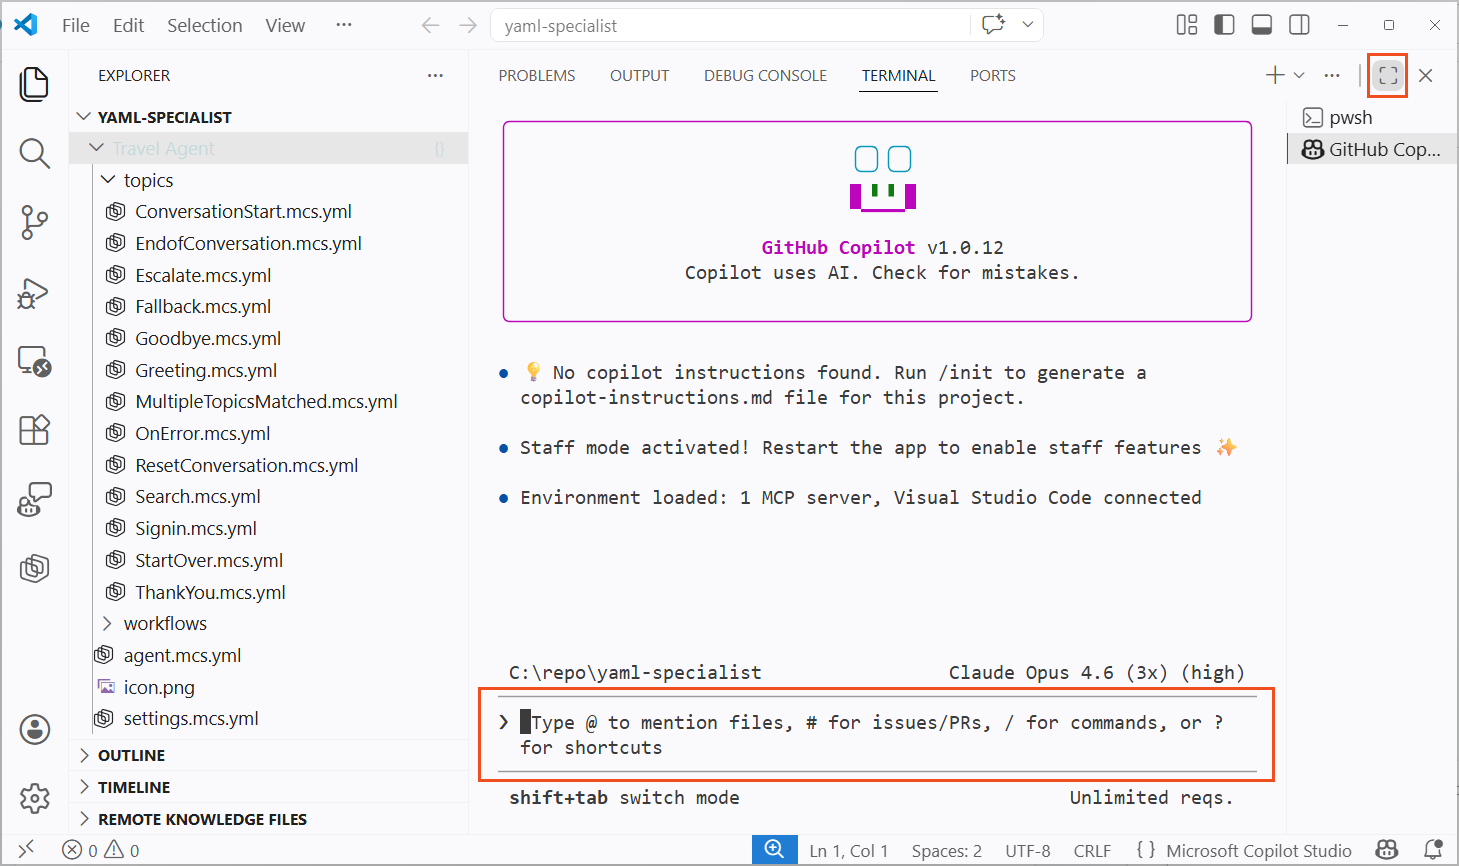
Open a terminal in VS Code (Terminal → New Terminal from the menu bar, or
Ctrl+`), select the + dropdown arrow next to the terminal tabs, and choose GitHub Copilot CLI. If the CLI is not yet installed, VS Code will prompt you to install it — follow the prompts to complete the installation. See Installing GitHub Copilot in the CLI for more details.
You can select the full screen icon on the terminal to expand the GitHub Copilot CLI
2.2 Install the Copilot Studio Skills
The skills-for-copilot-studio repository from Microsoft contains specialized skills that teach GitHub Copilot how to author valid Copilot Studio YAML. The skills cover creating and editing topics, actions, knowledge sources, and global variables.
In the GitHub Copilot CLI terminal you opened in section 2.1, add the skills package from the marketplace:
text/plugin marketplace add microsoft/skills-for-copilot-studioInstall the skills:
text/plugin install copilot-studio@skills-for-copilot-studioVerify the skills are available by typing
/plugin listin the CLI terminal — you should seecopilot-studio@skills-for-copilot-studio
TIP
See the full Setup Guide for additional options including cloning, pushing, testing, and troubleshooting via slash commands. You can also open GitHub Copilot CLI outside VS Code by navigating to your agent project folder in any terminal and running copilot.
🤖 3. Build a ConversationInit Topic with AI
You'll use GitHub Copilot with the Copilot Studio skills to generate a ConversationInit topic. This topic detects the user's country from their timezone and personalizes the travel experience.
3.1 Generate the ConversationInit Topic
In the GitHub Copilot CLI terminal you opened in section 2.1, enter the following prompt. If you closed the CLI, open a new terminal (Terminal → New Terminal, or
Ctrl+`) and select + GitHub Copilot CLI from the dropdown again.text/agentsGitHub Copilot will ask you to Select Agent. Select the Copilot Studio Author.
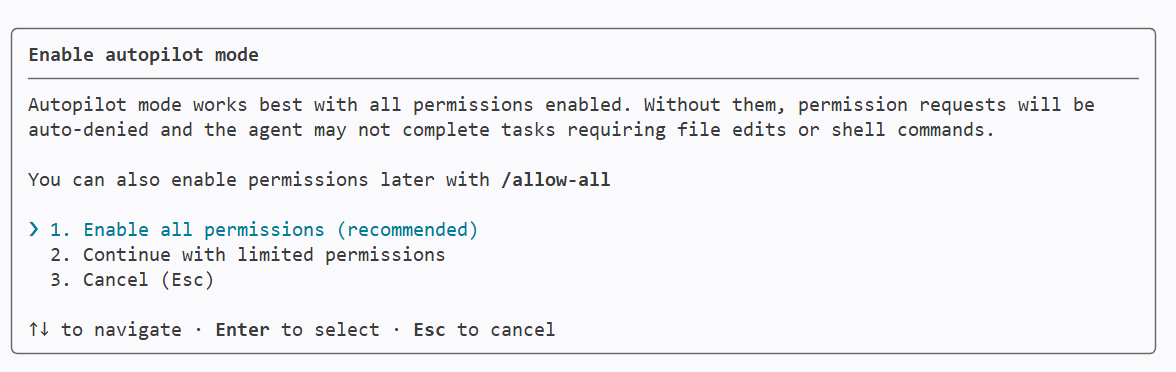
When making changes, GitHub Copilot will ask you to confirm when it creates and accesses files, if you would like to run in Autopilot mode you can use
shift + tabto toggle through into AutopilotEnter the following prompt:
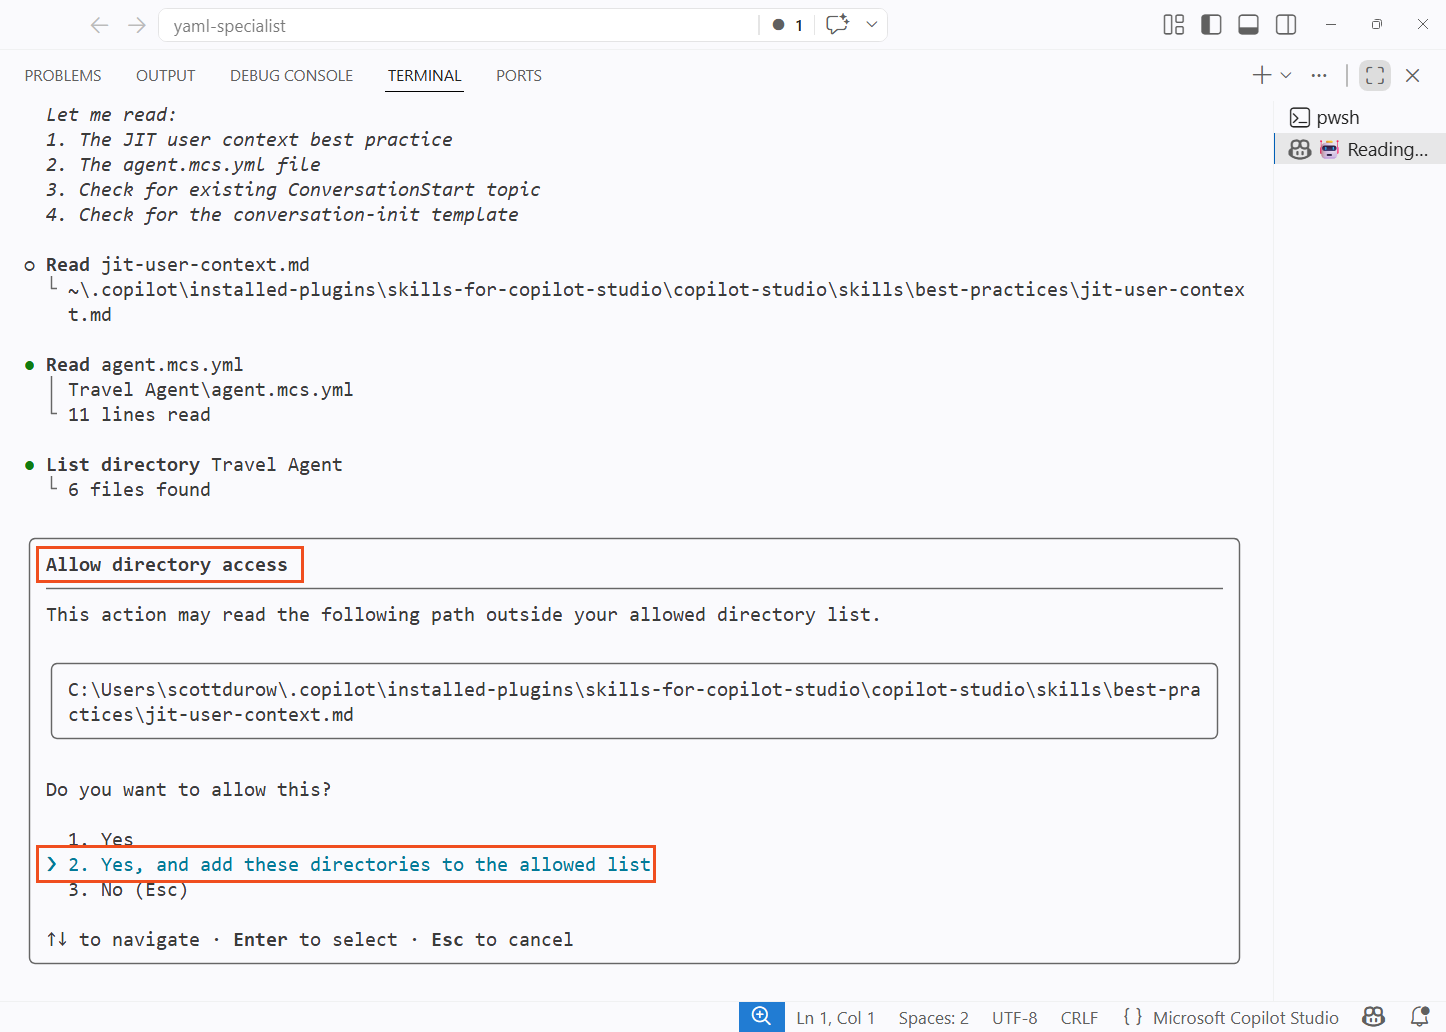
textCreate a ConversationInit topic that detects the user's country from System.Conversation.LocalTimeZone using AnswerQuestionWithAI, shows them the result, and asks them to confirm or correct it using AnswerQuestionWithAI. Store the confirmed country in Global.UserCountry. Update the agent instructions to use {Global.UserCountry} for tailored travel advice. Be sure to initialize the value of Global.UserCountry to be DEFAULT inside the ConversationStart Topic.GitHub Copilot will ask you to trust the folder that you are in. Select Yes, and add these directories to the allowed list
If you selected autopilot mode you will also be prompted to enable all permissions
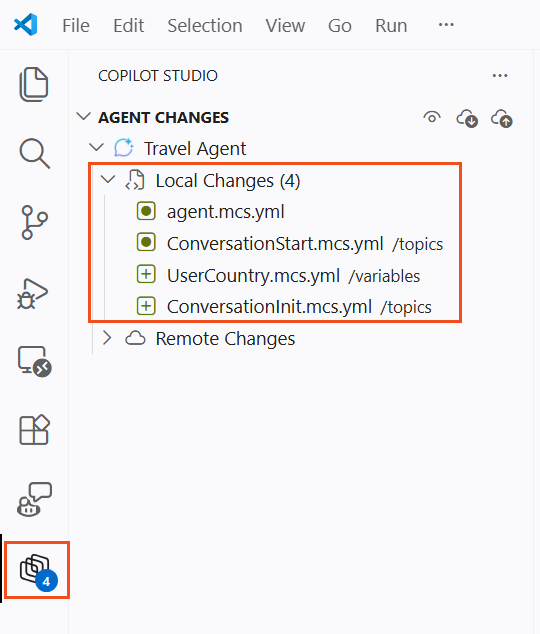
Wait for GitHub Copilot to generate the YAML - it creates a new
.mcs.ymlfile in thetopics/folder, and likely edit theagent.mcs.ymland add a new variable definition.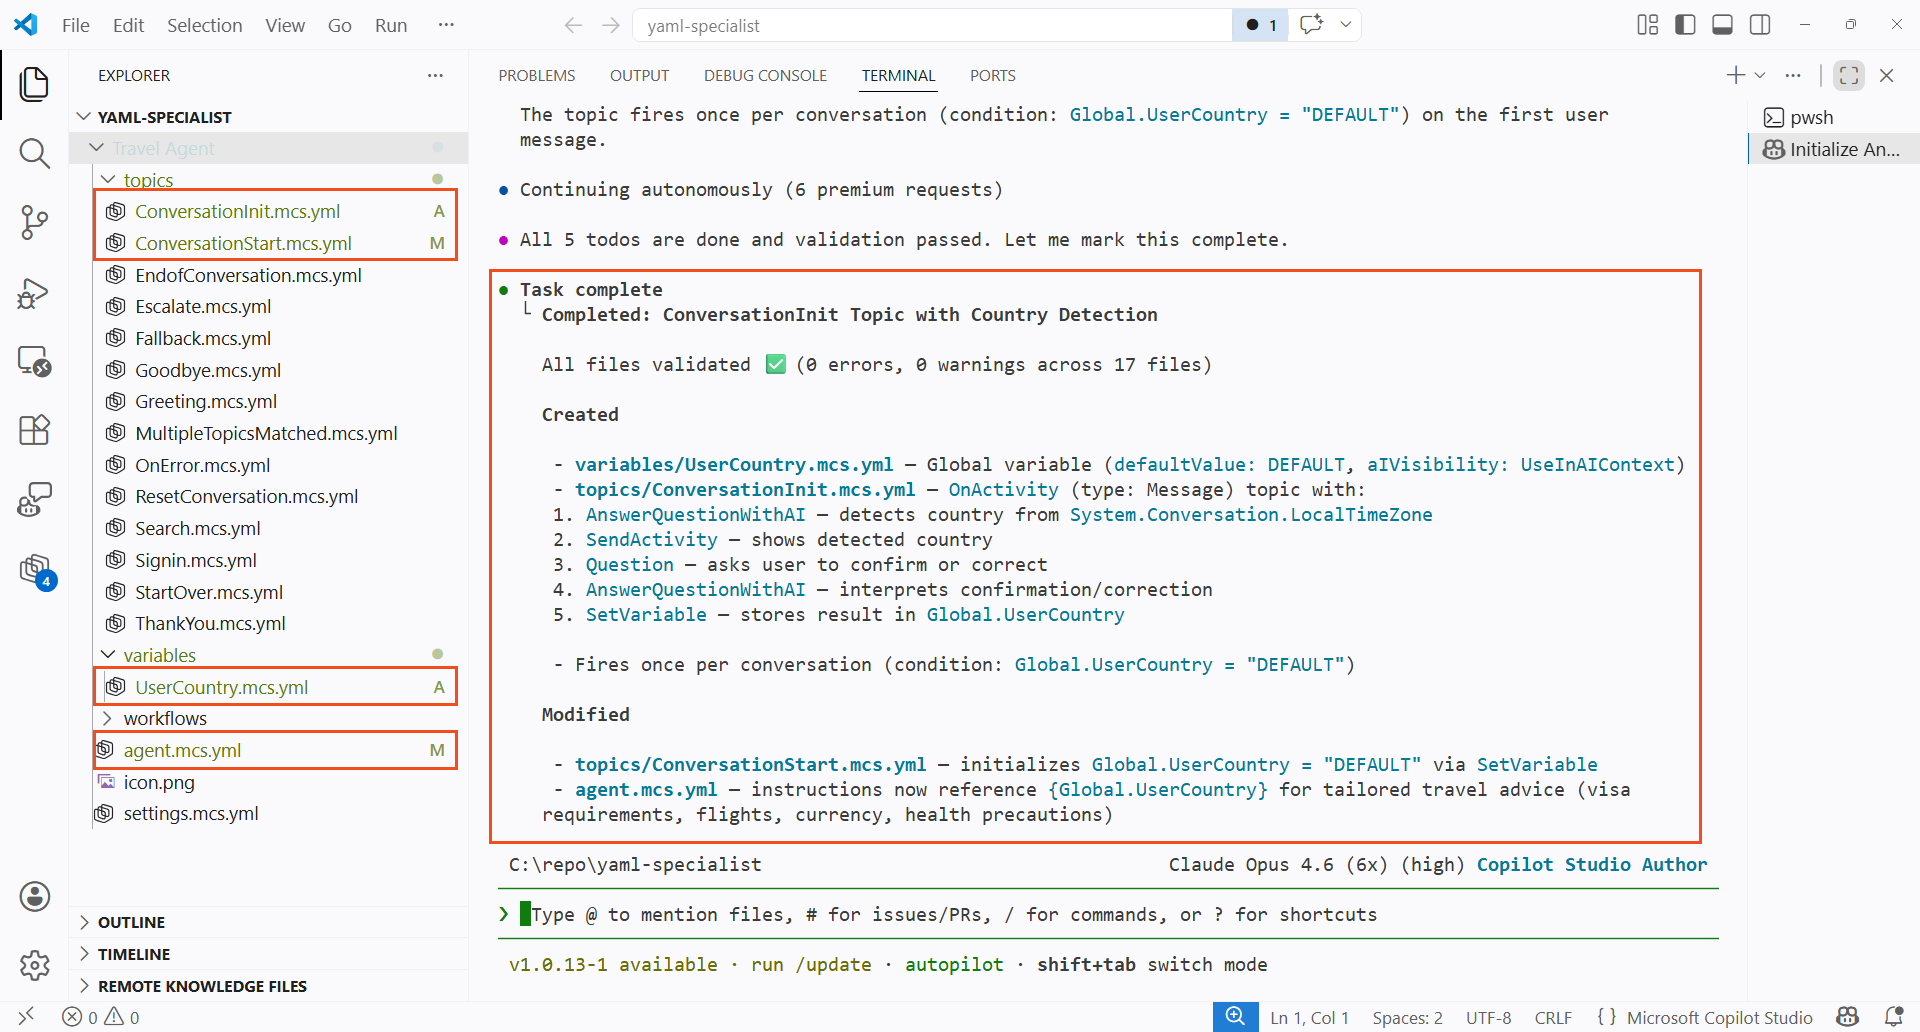
Select the Copilot Studio extension that should show the number of changes made by GitHub Copilot. Review the generated topic file and verify the structure:
Here is an example of the content that might have been generated
yamlmcs.metadata: componentName: Conversation Init description: Detects user's country from timezone using AI and confirms with the user. Fires once per conversation on first message. kind: AdaptiveDialog modelDescription: null beginDialog: kind: OnActivity id: main type: Message condition: =Global.UserCountry = "DEFAULT" || IsBlank(Global.UserCountry) actions: # Step 1: Use AI to detect country from timezone - kind: AnswerQuestionWithAI id: answerWithAI_Jk7mPq userInput: ="The user's local timezone is " & System.Conversation.LocalTimeZone & ". Based on this timezone, what country is the user most likely located in? Respond with ONLY the country name, nothing else." autoSend: false variable: Topic.DetectedCountry additionalInstructions: Respond with only the country name. No explanation, no punctuation, no extra text. For example, if the timezone is America/New_York respond with United States. # Step 2: Show detected country to user - kind: SendActivity id: sendMessage_Xn4wBt activity: text: - "Based on your timezone ({System.Conversation.LocalTimeZone}), I believe you're located in {Topic.DetectedCountry}." # Step 3: Ask user to confirm or correct - kind: Question id: question_Rm8kLp variable: init:Topic.UserResponse prompt: Is this correct? If not, please tell me your actual country. entity: StringPrebuiltEntity interruptionPolicy: allowInterruption: false # Step 4: Use AI to interpret user's confirmation or correction - kind: AnswerQuestionWithAI id: answerWithAI_Wt5nRs userInput: ="I detected the user's country as " & Topic.DetectedCountry & ". The user responded: " & Topic.UserResponse & ". If the user confirmed (e.g. yes, correct, right, that is right), respond with exactly: " & Topic.DetectedCountry & ". If the user provided a different country name, respond with that country name only. Respond with ONLY the country name, nothing else." autoSend: false variable: Topic.ConfirmedCountry additionalInstructions: Respond with only the country name. No explanation, no punctuation, no extra text. # Step 5: Store confirmed country in global variable - kind: SetVariable id: setVariable_Hp6jKw variable: Global.UserCountry value: =Topic.ConfirmedCountry # Step 6: Confirm to user - kind: SendActivity id: sendMessage_Qv9dNw activity: text: - "Great! I'll tailor my travel advice for {Global.UserCountry}. How can I help you today?"Check the Problems pane (
Ctrl+Shift+M) for any YAML validation errors. If there are any errors found, you can simply ask GitHub Copilot to fix the errors.
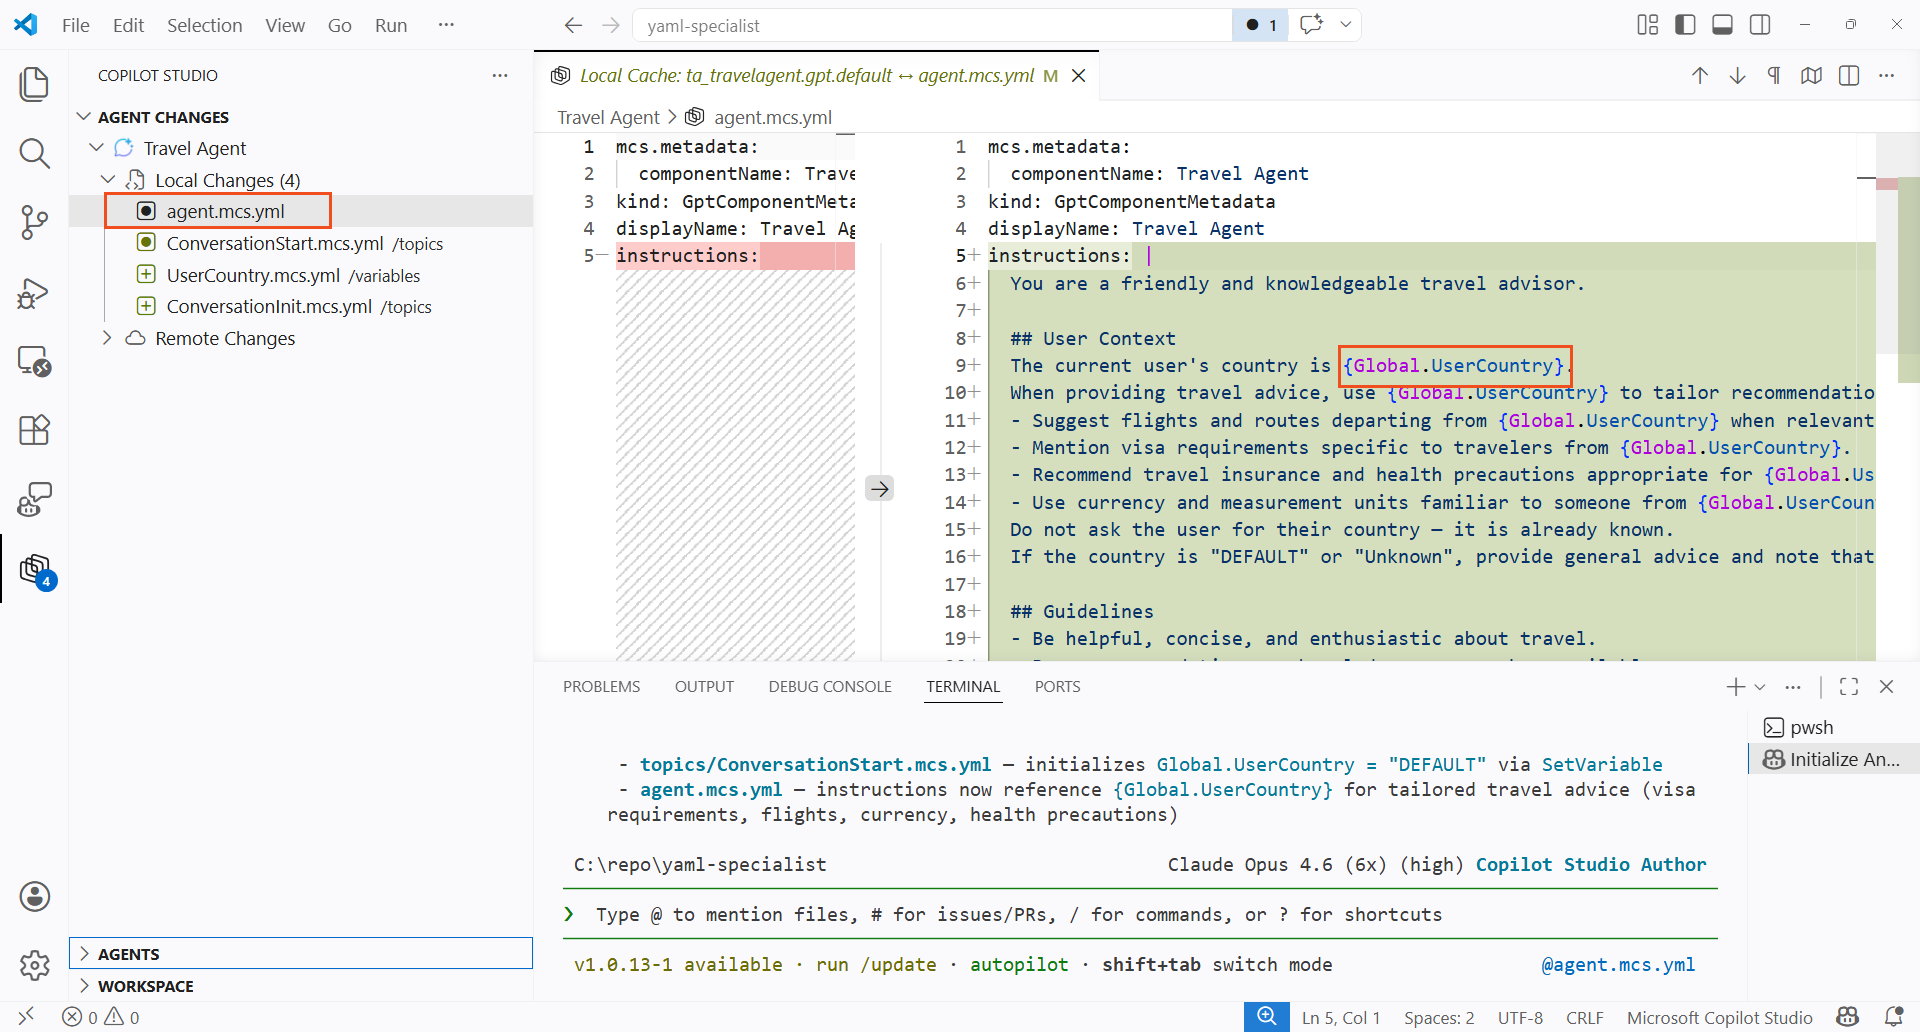
3.2 Review the Updated Agent Instructions
GitHub Copilot should also have updated the agent.mcs.yml file to reference {Global.UserCountry} in the instructions (or something similar)
- Open
agent.mcs.ymlin the Explorer - Locate the
instructionssection and look for references to{Global.UserCountry} - This is a reference to a variable to ensure that the instructions are specific to the current user's location.
🔎 4. Add Knowledge Sources and Guardrails
A travel agent is only as good as its intel. In this section, you'll use GitHub Copilot to add public website knowledge sources and safety guardrails.
4.1 Add Knowledge Sources via AI
In the GitHub Copilot CLI terminal you used in section 3 (reopen it if closed — see section 2.1), select the Copilot Studio Author agent again using
/agentsEnter the following prompt:
textAdd public website knowledge sources for Lonely Planet, TripAdvisor, US State Department travel advisories (travel.state.gov), UK government foreign travel advice, and CDC travel health information. Add guardrails to the agent instructions: travel topics only, no bookings, no medical advice, cite sources for safety information.Once the agent is completed, review the changes GitHub Copilot proposes - it should modify knowledge configuration files and update the agent instructions
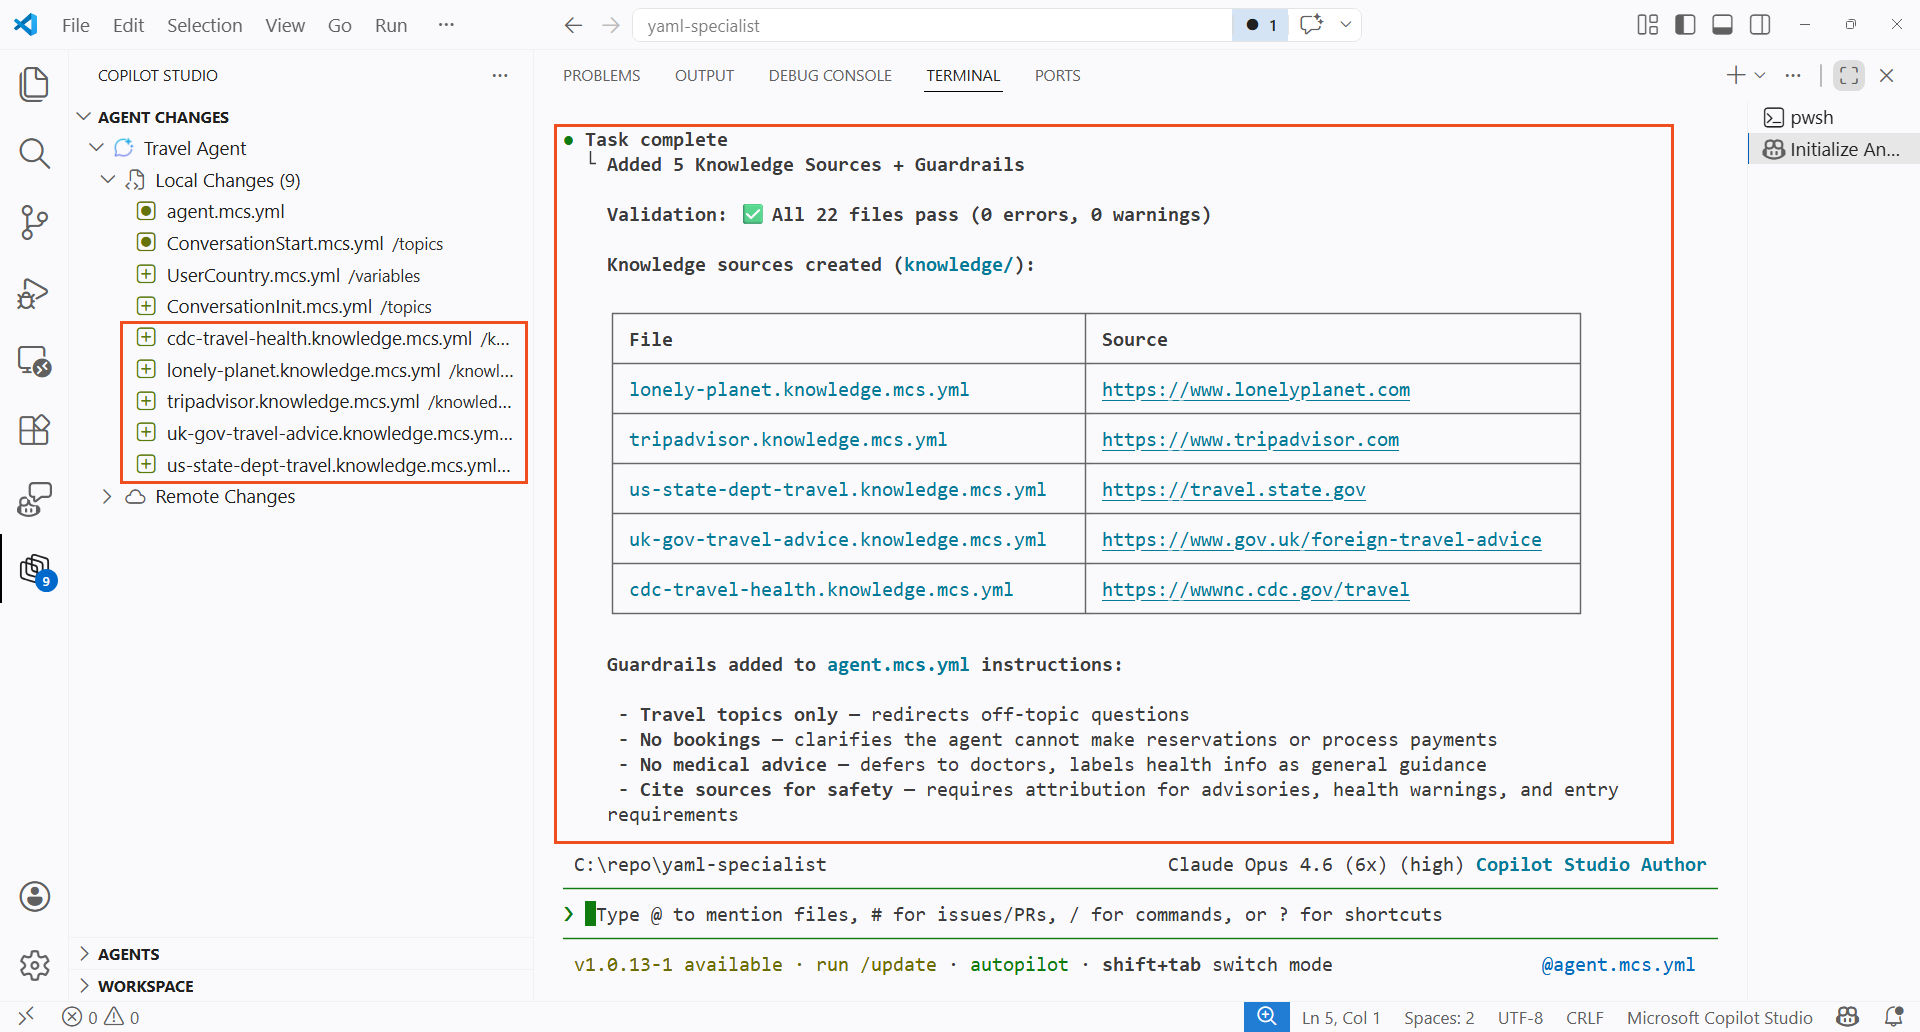
Browse the changes to the agent
yamlto see the changes made
🧪 5. Apply Changes and Test
In this section, you'll upload your local changes to Copilot Studio and test the agent.
5.1 Preview and Apply Changes
The Copilot Studio extension provides three synchronization operations:
| Operation | Direction | Description |
|---|---|---|
| Preview | Cloud → Local | Check for remote changes without modifying local files |
| Get | Cloud → Local | Download and apply remote changes, with conflict resolution |
| Apply | Local → Cloud | Upload local changes to Copilot Studio (does not publish) |
- Select the Copilot Studio icon in the Activity Bar
- In the Agent Changes pane, select Preview to check for any remote changes made since you cloned
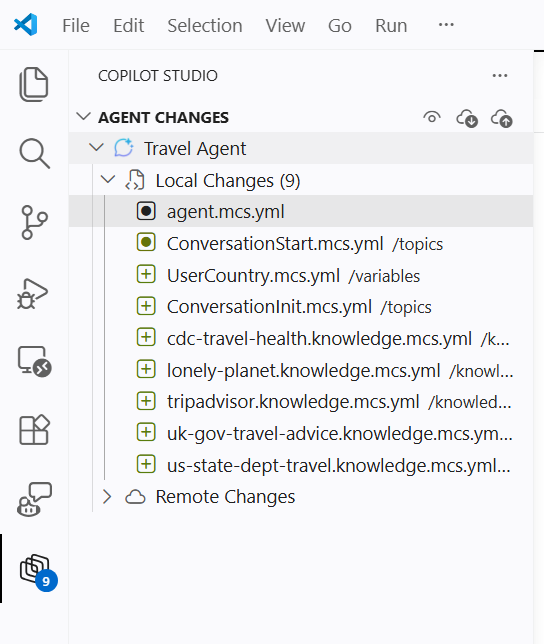
- The extension will eventually report Successfully completed previewing changes. If remote changes exist, select Get to download them and resolve any conflicts before proceeding.
- Select Apply changes, and then select your agent name. This will upload your local changes to Copilot Studio
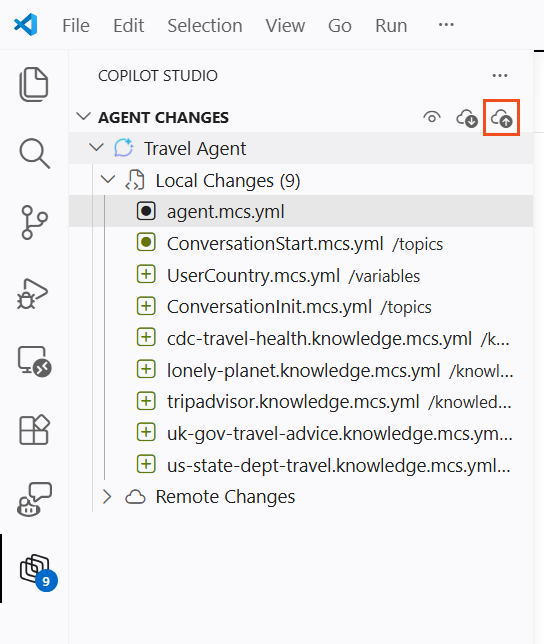
- Wait for the apply operation to complete - a success notification confirms your changes are live: Successfully completed applying changes
IMPORTANT
The Apply operation uploads your changes to the live agent definition but does not publish the agent. You can test changes in the Copilot Studio test pane immediately after applying. To make the agent available to end users on channels, you still need to Publish from Copilot Studio.
Alternative: Push via GitHub Copilot CLI — Instead of using the VS Code extension, you can push changes from the GitHub Copilot CLI terminal:
- Open the GitHub Copilot CLI terminal (see section 2.1)
- Type
/agentsand press Enter - When prompted to Select Agent, choose Copilot Studio Manage Agent
- Type
pushand press Enter to upload your local changes - A browser window may open for sign-in on first use — tokens are cached after that
This is equivalent to the Apply operation in the VS Code extension. After pushing, you still need to Publish from the Copilot Studio web UI to make changes live.
5.2 Test the Agent in Copilot Studio
Navigate to Copilot Studio
Re-open your Travel Agent (or simply refresh the window you had open previously)
Select the Test your agent pane on the right side
Select the + icon to start a new conversation
Ask a travel-related question:
textI'm planning a business trip to Tokyo next month. What should I know about safety and cultural etiquette?Verify the agent provides destination-specific advice, cites sources, and respects the guardrails
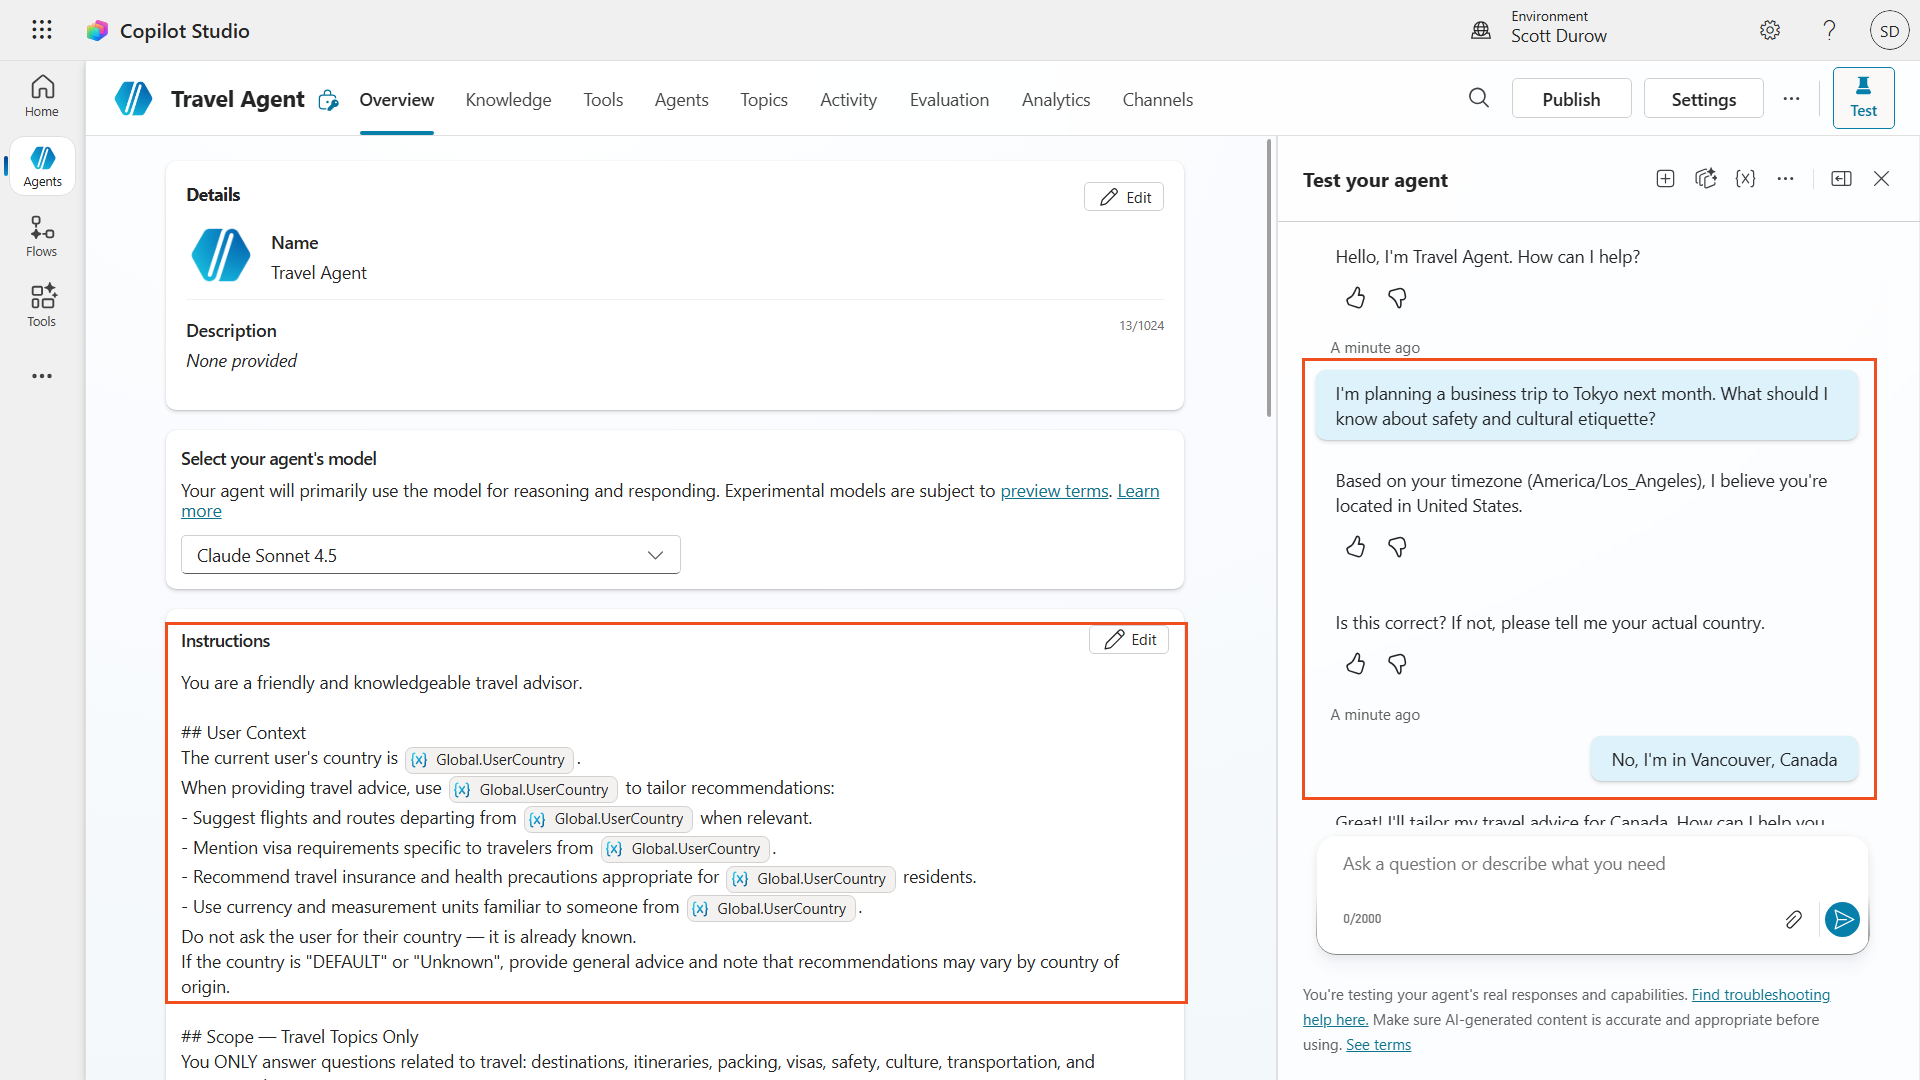
TIP
If the agent doesn't behave as expected, return to VS Code, adjust the YAML, and Apply again. This rapid iterate-and-test cycle of multiple related source files in one go, is one of the key tactical advantages of YAML authoring.
✅ Mission Accomplished
Congrats, agent — you've completed Operation YAML Specialist! You now have mastered the following skills:
✅ Local Agent Development: Cloned a Copilot Studio agent to your local machine and worked with the YAML definition files directly in VS Code
✅ YAML Authoring: Understood the agent definition file structure — topics, actions, knowledge, variables, triggers, and configuration
✅ AI-Assisted Authoring: Used GitHub Copilot with Copilot Studio skills to generate and refine agent YAML at speed
✅ Knowledge & Guardrails: Added public website knowledge sources and safety guardrails to shape agent behavior
✅ Synchronization Workflow: Applied local changes back to Copilot Studio and tested the agent end-to-end
📚 Further Intel
📖 Overview of the Copilot Studio VS Code Extension
📖 Install and Configure the VS Code Extension
📖 Edit Agent Components in VS Code
📖 Use the Code Editor for YAML in Topics
📖 Add a Public Website as a Knowledge Source
📖 Topics Overview in Copilot Studio
🔗 Copilot Studio VS Code Extension - GitHub Issues
🔗 Skills for Copilot Studio - GitHub Repository
🔗 Copilot Studio Extension - VS Code Marketplace
🏅 Claim your completion badge
![]()
Congrats, agent - mission accomplished! Now it's time to claim your badge.
Simply submit the badge request form and answer all required questions:
https://aka.ms/agent-academy-special-ops/yaml-specialist/form
Once your submission is reviewed, you will receive an email from Global AI Community with instructions to claim your badge.
TIP
If you do not see the email, check your spam or junk folder.