ai-agents-for-beginners
కోర్సు సెటప్
పరిచయం
ఈ పాఠం ఈ కోర్సు యొక్క కోడ్ నమూనాలను ఎలా నడపాలో వివరిస్తుంది.
ఇతర అభ్యాసకులు చేరండి మరియు సహాయం పొందండి
మీరు మీ రిపోజిటరీను క్లోన్ చేసుకోవడం మొదలుపెట్టకముందు, సెటప్ కోసం సహాయం పొందడం, కోర్సు గురించి ప్రశ్నలు అడగడం, లేదా ఇతర అభ్యాసకులతో కనెక్ట్ అయ్యే అవకాశం కోసం AI Agents For Beginners Discord channelలో చేరండి.
ఈ రిపోజిటరీని క్లోన్ లేదా ఫోర్క్ చేయండి
ప్రారంభించడానికి, దయచేసి GitHub రిపోజిటరీని క్లోన్ లేదా ఫోర్క్ చేయండి. ఇది కోర్సు మెటీరియల్ యొక్క మీ స్వంత సంస్కరణను తయారుచేస్తుంది, తద్వారా మీరు కోడ్ని నడపవచ్చు, పరీక్షించవచ్చు మరియు సవరించవచ్చు!
This can be done by clicking the link to రిపోజిటరీను ఫోర్క్ చేయండి
You should now have your own forked version of this course in the following link:

షాలో క్లోన్ (వర్క్షాప్ / Codespaces కోసం సిఫార్సు)
పూర్తి రిపోజిటరీ పూర్తి చరిత్ర మరియు అన్ని ఫైళ్లను డౌన్లోడ్ చేసినప్పుడు పెద్దదిగా (~3 GB) ఉండవచ్చు. మీరు వర్క్షాప్కు మాత్రమే హాజరవుతున్నట్లయితే లేదా కొన్ని పాఠాల ఫోల్డర్లు మాత్రమే అవసరం అయితే, షాలో క్లోన్ (లేదా స్పార్స్ క్లోన్) చరిత్రను త్రంకేట్ చేయడం ద్వారా మరియు/లేదా బ్లాబ్లను స్కిప్ చేయడం ద్వారా ఆ డౌన్లోడ్ ఎక్కువ భాగాన్ని తప్పించవచ్చు.
శీఘ్ర షాలో క్లోన్ — కనీస చరిత్ర, అన్ని ఫైళ్లు
Replace <your-username> in the below commands with your fork URL (or the upstream URL if you prefer).
To clone only the latest commit history (small download):
git clone --depth 1 https://github.com/<your-username>/ai-agents-for-beginners.git
To clone a specific branch:
git clone --depth 1 --branch <branch-name> https://github.com/<your-username>/ai-agents-for-beginners.git
భాగపూర్వక (స్పార్స్) క్లోన్ — కనీస బ్లాబ్స్ + మాత్రమే ఎంచుకున్న ఫోల్డర్లు
This uses partial clone and sparse-checkout (requires Git 2.25+ and recommended modern Git with partial clone support):
git clone --depth 1 --filter=blob:none --sparse https://github.com/<your-username>/ai-agents-for-beginners.git
Traverse into the repo folder:
cd ai-agents-for-beginners
Then specify which folders you want (example below shows two folders):
git sparse-checkout set 00-course-setup 01-intro-to-ai-agents
After cloning and verifying the files, if you only need files and want to free space (no git history), please delete the repository metadata (💀irreversible — you will lose all Git functionality: no commits, pulls, pushes, or history access).
# zsh/bash
rm -rf .git
# పవర్ షెల్
Remove-Item -Recurse -Force .git
GitHub Codespaces ఉపయోగించడం (లోకల్ భారీ డౌన్లోడ్లను నివారించడానికి సిఫార్సు)
-
Create a new Codespace for this repo via the GitHub UI.
- In the terminal of the newly created codespace, run one of the shallow/sparse clone commands above to bring only the lesson folders you need into the Codespace workspace.
- Optional: after cloning inside Codespaces, remove .git to reclaim extra space (see removal commands above).
- Note: If you prefer to open the repo directly in Codespaces (without an extra clone), be aware Codespaces will construct the devcontainer environment and may still provision more than you need. Cloning a shallow copy inside a fresh Codespace gives you more control over disk usage.
సూచనలు
- Always replace the clone URL with your fork if you want to edit/commit.
- If you later need more history or files, you can fetch them or adjust sparse-checkout to include additional folders.
కోడ్ నడపడం
ఈ కోర్సు AI ఏజెంట్లు నిర్మించడంలో ప్రాయోగిక అనుభవం కోసం నడపగలిగే పలు Jupyter నోట్బుక్స్ను అందిస్తుంది.
The code samples use Microsoft Agent Framework (MAF) with the AzureAIProjectAgentProvider, which connects to Azure AI Agent Service V2 (the Responses API) through Microsoft Foundry.
All Python notebooks are labelled *-python-agent-framework.ipynb.
అవసరాలు
- Python 3.12+
-
గమనిక: మీకు Python3.12 ఇన్స్టాల్ చేయబడకపోతే, దయచేసి దాన్ని ఇన్స్టాల్ చేయండి. అప్పుడు సరిగ్గా కావాల్సిన వెర్షన్లు requirements.txt ఫైల్ నుండి ఇన్స్టాల్ అవ్వడానికి python3.12ను ఉపయోగించి మీ venv తయారుచేసుకోండి.
ఉదాహరణ
Create Python venv directory:
python -m venv venvThen activate venv environment for:
# జెడ్ఎస్హెచ్/బాష్ source venv/bin/activate# Command Prompt for Windows venv\Scripts\activate
-
-
.NET 10+: For the sample codes using .NET, ensure you install .NET 10 SDK or later. Then, check your installed .NET SDK version:
dotnet --list-sdks - Azure CLI — ప్రమాణీకరణ కోసం అవసరం. Install from aka.ms/installazurecli.
- Azure Subscription — Microsoft Foundry మరియు Azure AI Agent Service కు యాక్సెస్ కోసం.
- Microsoft Foundry Project — ఒక ప్రాజెక్ట్ తో డిప్లాయ్ చేయబడిన మోడల్ (ఉదా.,
gpt-4o). See Step 1 below.
We have included a requirements.txt file in the root of this repository that contains all the required Python packages to run the code samples.
You can install them by running the following command in your terminal at the root of the repository:
pip install -r requirements.txt
We recommend creating a Python virtual environment to avoid any conflicts and issues.
VSCode సెటప్
Make sure that you are using the right version of Python in VSCode.
Microsoft Foundry మరియు Azure AI Agent Service సెటప్
దశ 1: Microsoft Foundry ప్రాజెక్ట్ సృష్టించండి
నోట్బుక్స్ నడపడానికి మీకు Azure AI Foundry hub మరియు project అవసరం, వాటిలో ఒక డిప్లాయ్ అయిన మోడల్ ఉండాలి.
- ai.azure.comకి వెళ్ళి మీ Azure ఖాతాతో సైన్ ఇన్ చేయండి.
- ఒక hub సృష్టించండి (లేదా ఇప్పటికే ఉన్నదిని ఉపయోగించండి). వివరాలకు: Hub resources overview.
- హబ్లో ఒక project సృష్టించండి.
- Models + Endpoints → Deploy model నుండి ఒక మోడల్ (ఉదా.,
gpt-4o) ని డిప్లాయ్ చేయండి.
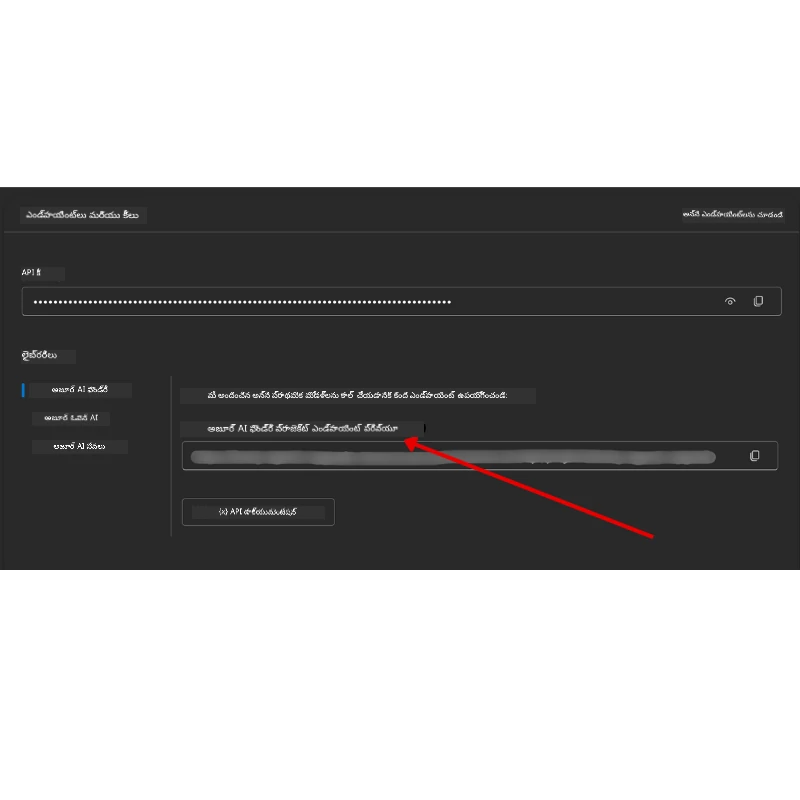
దశ 2: మీ ప్రాజెక్ట్ ఎండ్పాయింట్ మరియు మోడల్ డిప్లాయ్మెంట్ పేరు పొందండి
Microsoft Foundry పోర్టల్లోని మీ ప్రాజెక్ట్ నుండి:
- Project Endpoint — Overview పేజీకి వెళ్లి ఎండ్పాయింట్ URL ని కాపీ చేయండి.
- Model Deployment Name — Models + Endpointsకి వెళ్లి మీ డిప్లాయ్ చేసిన మోడల్ని ఎంచుకుని Deployment name (ఉదా.,
gpt-4o) గమనించండి.
దశ 3: az login తో Azureలో సైన్ ఇన్ చేయండి
All notebooks use AzureCliCredential for authentication — no API keys to manage. This requires you to be signed in via the Azure CLI.
-
Install the Azure CLI if you haven’t already: aka.ms/installazurecli
-
Sign in by running:
az loginOr if you’re in a remote/Codespace environment without a browser:
az login --use-device-code -
Select your subscription if prompted — choose the one containing your Foundry project.
-
Verify you’re signed in:
az account show
Why
az login? నోట్బుక్స్azure-identityప్యాకేజ్లోనిAzureCliCredentialను ఉపయోగించి ప్రమాణీకరణ చేస్తాయి. అంటే మీ Azure CLI సెషన్ క్రెడెన్షియల్స్ ని అందిస్తుంది — మీ.envఫైల్లో ఎలాంటి API కీలు లేదా సీక్రెట్లు అవసరం లేవు. ఇది ఒక security best practice.
దశ 4: మీ .env ఫైల్ సృష్టించండి
Copy the example file:
# జెడ్ఎస్హెచ్/బాష్
cp .env.example .env
# పవర్షెల్
Copy-Item .env.example .env
Open .env and fill in these two values:
AZURE_AI_PROJECT_ENDPOINT=https://<your-project>.services.ai.azure.com/api/projects/<your-project-id>
AZURE_AI_MODEL_DEPLOYMENT_NAME=gpt-4o
| Variable | Where to find it |
|---|---|
AZURE_AI_PROJECT_ENDPOINT |
Foundry పోర్టల్ → మీ ప్రాజెక్ట్ → Overview పేజీ |
AZURE_AI_MODEL_DEPLOYMENT_NAME |
Foundry పోర్టల్ → Models + Endpoints → మీ డిప్లాయ్ చేసిన మోడల్ యొక్క పేరు |
That’s it for most lessons! The notebooks will authenticate automatically through your az login session.
దశ 5: Python Dependencies ఇన్స్టాల్ చేయండి
pip install -r requirements.txt
We recommend running this inside the virtual environment you created earlier.
పాఠం 5 కోసం అదనపు సెటప్ (Agentic RAG)
Lesson 5 Azure AI Search ను retrieval-augmented generation కోసం ఉపయోగిస్తుంది. మీరు ఆ పాఠం నడపాలనుకోవడం అయితే, ఈ వేరియబుల్స్ను మీ .env ఫైల్లో జోడించండి:
| Variable | Where to find it |
|---|---|
AZURE_SEARCH_SERVICE_ENDPOINT |
Azure పోర్టల్ → మీ Azure AI Search రిసోర్స్ → Overview → URL |
AZURE_SEARCH_API_KEY |
Azure పోర్టల్ → మీ Azure AI Search రిసోర్స్ → Settings → Keys → ప్రైమరీ అడ్మిన్ కీ |
పాఠం 6 మరియు పాఠం 8 కోసం అదనపు సెటప్ (GitHub Models)
పాఠాలు 6 మరియు 8లోని కొన్ని నోట్బుక్స్ Azure AI Foundry బదులుగా GitHub Models ను ఉపయోగిస్తాయి. మీరు ఆ నమూనాలను నడపాలనుకుంటే, ఈ వేరియబుల్స్ను మీ .env ఫైల్లో జోడించండి:
| Variable | Where to find it |
|---|---|
GITHUB_TOKEN |
GitHub → Settings → Developer settings → Personal access tokens |
GITHUB_ENDPOINT |
Use https://models.inference.ai.azure.com (default value) |
GITHUB_MODEL_ID |
Model name to use (e.g. gpt-4o-mini) |
పాఠం 8 కోసం అదనపు సెటప్ (Bing Grounding Workflow)
పాఠం 8లోని conditional workflow నోట్బుక్ Bing grounding ను Azure AI Foundry ద్వారా ఉపయోగిస్తుంది. మీరు ఆ నమూనాను నడపాలనుకుంటే, ఈ వేరియబుల్ను మీ .env ఫైల్లో జోడించండి:
| Variable | Where to find it |
|---|---|
BING_CONNECTION_ID |
Azure AI Foundry పోర్టల్ → మీ ప్రాజెక్ట్ → Management → Connected resources → మీ Bing కనెక్షన్ → కనెక్షన్ ID కాపీ చేయండి |
సమస్య పరిష్కారం
macOSలో SSL సర్టిఫికేట్ నిర్ధారణ లోపాలు
If you are on macOS and encounter an error like:
ssl.SSLCertVerificationError: [SSL: CERTIFICATE_VERIFY_FAILED] certificate verify failed: self-signed certificate in certificate chain
This is a known issue with Python on macOS where the system SSL certificates are not automatically trusted. Try the following solutions in order:
ఒప్షన్ 1: Python యొక్క Install Certificates స్క్రిప్ట్ నడపండి (సిఫార్సు)
# మీ ఇన్స్టాల్ చేసిన Python సంస్కరణతో 3.XX ను మార్చండి (ఉదాహరణకు 3.12 లేదా 3.13):
/Applications/Python\ 3.XX/Install\ Certificates.command
ఒప్షన్ 2: మీ నోట్బుక్లో connection_verify=False ఉపయోగించండి (కేవలం GitHub Models నోట్బుక్స్ కోసం)
In the Lesson 6 notebook (06-building-trustworthy-agents/code_samples/06-system-message-framework.ipynb), a commented-out workaround is already included. Uncomment connection_verify=False when creating the client:
client = ChatCompletionsClient(
    endpoint=endpoint,
    credential=AzureKeyCredential(token),
    connection_verify=False,  # మీకు సర్టిఫికేట్ లోపాలు ఎదురైతే SSL తనిఖీని నిలిపివేయండి
)
⚠️ హెచ్చరిక: SSL నిర్ధారణ(
connection_verify=False)ని కంట్రోల్ చేయకపోవడం ద్వారా సర్టిఫికెట్ సరిపోవడం పరీక్షించకపోవడం వల్ల భద్రత తగ్గుతుంది. డెవలప్మెంట్ వాతావరణాల్లో తాత్కాలిక పరిష్కారంగా మాత్రమే దీనిని ఉపయోగించండి, ఉత్పత్తిలో కాదు.
ఒప్షన్ 3: truststore ఇన్స్టాల్ చేసి ఉపయోగించండి
pip install truststore
Then add the following at the top of your notebook or script before making any network calls:
import truststore
truststore.inject_into_ssl()
ఎక్కడైనా ఆగిపోతున్నారా?
If you have any issues running this setup, hop into our Azure AI Community Discord or ఇష్యూ సృష్టించండి.
తదుపరి పాఠం
You are now ready to run the code for this course. Happy learning more about the world of AI Agents!
AI ఏజెంట్ల పరిచయం మరియు ఏజెంట్ వినియోగ కేసులు
డిస్క్లైమర్: ఈ పత్రం AI అనువాద సేవ Co-op Translator ఉపయోగించి అనువదించబడింది. మేము ఖచ్చితత్వానికి ప్రయత్నించినప్పటికీ, ఆటోమెటెడ్ అనువాదాల్లో తప్పులు లేదా అసమగ్రతలు ఉండొచ్చు అని దయచేసి గమనించండి. స్థానిక భాషలో ఉన్న అసలు పత్రాన్ని అధికారిక మూలంగా పరిగణించాలి. కీలకమైన సమాచారం కోసం వృత్తిపరులైన మానవ అనువాదం చేయించుకోవాలని సూచించబడుతుంది. ఈ అనువాదం వాడకంవల్ల కలిగే ఏవైనా అపార్థాలు లేదా తప్పుదోవ పట్టుకునే అర్థాలపై మేము బాధ్యత వహించము.