Update experience configuration
CodePush provides Cordova and React Native developers with multiple options to configure the end users update experience.
This tutorial covers three potential “update modes” or deployment strategies for CodePush updates: Silent, Active and Custom. Leveraging these options allow developers to control when (and how often) to check for updates as well as how to present any update notifications to end users.
Note: This tutorial does not cover how to enable CodePush on an app. If you need help setting up CodePush, visit the Cordova or React Native “Getting Started” sections.
1. Silent mode
Silent mode updates are the simplest way to update an app and the least invasive experience for the end users.
codePush.sync();
If an update is available, it will be silently downloaded, and installed the next time the app is restarted (either explicitly by the end user or by the OS). However, developers can modify the install behavior if they so choose, by leveraging the installMode parameter:
- IMMEDIATE: The update will be applied to the running application immediately. The application will be reloaded with the new content immediately.
- ON_NEXT_RESTART: The update is downloaded but not installed immediately. The new content will be available the next time the application is started.
- ON_NEXT_RESUME: The update is downloaded but not installed immediately. The new content will be available the next time the application is resumed or restarted, whichever event happens first.
For example, to download and install an update immediately, developers can use the installMode parameter as follows:
codePush.sync({installMode: InstallMode.IMMEDIATE});
Recommendation
Depending on the complexity of the app, pushing an update immediately might be a jarring experience for end users (e.g. changing the UI or losing the current state can be frustrating and confusing). Because of this, we recommend updates are installed only after a certain period of app inactivity has been reached. To achieve this experience, developers can use the InstallMode.ON_NEXT_RESUME and minimumBackgroundDuration parameters as follows:
// Download the update silently, but install on next
// app resume and after 10 minutes of app inactivity
// We recommend doing this call on app start (e.g. `componentDidMount` event on React Native or `deviceready` on Cordova)
codePush.sync({ installMode: InstallMode.ON_NEXT_RESUME, minimumBackgroundDuration: 60 * 10 });
Note: If
codePush.sync()is not called on app start (e.g.componentDidMountevent on React Native ordevicereadyon Cordova), developers will need to notify the update was successfully installed by calling thecodePush.notifyApplicationReady()method. Otherwise the CodePush runtime will assume the installed update has failed and roll back to the previous version.Note: For Cordova, the first parameter that
codePush.sync()expects is asyncStatusCallback, so to do the same thing, you should insertnullas the first parameter to the call, i.e:
codePush.sync(null, { installMode: InstallMode.ON_NEXT_RESUME, minimumBackgroundDuration: 60 * 10 });
2. Active mode
In contrast to the silent mode updates, active mode updates prompt end users about available updates and thus require user interaction.
The difference is introduced by the usage of the updateDialog parameter.
codePush.sync({ updateDialog: true });
If an update is available, the app automatically launches a native prompt asking end users for permission to download and install the update. Once the user accepts, the update is silently downloaded and inmmediatly applied., and installed the next time the app is restarted (either explicitly by the end user or by the OS).
Update dialog customization
To customize the update dialog, developers can create an updateDialogOption object and pass it to the codePush.sync() call as follows:
    var updateDialogOptions = {
        updateTitle: "You have an update",
        optionalUpdateMessage: "Update available. Install?",
        optionalIgnoreButtonLabel: "Nop",
        optionalInstallButtonLabel: "Yep",
    };

    codePush.sync({ updateDialog: updateDialogOptions});
Visit the Cordova or React Native API Reference pages for a full description of all the avaiable UpdateDialogOptions options.
Note: While Apple’s developer agreement fully allows performing over-the-air updates of JavaScript and assets (which is what enables CodePush!), it is against their policy for an app to display an update prompt. Because of this, we recommend that App Store-distributed apps don’t enable the updateDialog option when calling sync, whereas Google Play and internally distributed apps (e.g. Enterprise, Fabric, HockeyApp) can choose to enable/customize it.
3. Custom mode
Custom mode provides the flexibility to customize any stage of the update experience such as providing a custom “checking for updates” or “downloading” notification.
Update cycle notifications
The codePush.sync() method allows the use of a call back to hook into the overall update process and thus provide a custom experience on each stage of the update process as follows.
var onSyncStatusChange = function(SyncStatus) {
    switch (SyncStatus) {
        case SyncStatus.CHECKING_FOR_UPDATE:
            // Show "Checking for update" notification
            break;
        case SyncStatus.AWAITING_USER_ACTION:
            // Show "Checking for update" notification
            break;
        case SyncStatus.DOWNLOADING_PACKAGE:
            // Show "downloading" notification
            break;
        case SyncStatus.INSTALLING_UPDATE:
            // Show "installing" notification
            break;
    }
}

// Prompt the user when an update is available and display a "downloading" modal
codePush.sync({ updateDialog: true }, onSyncStatusChange);
Visit the Cordova or React Native SyncStatus enum for a full description of all the available enum values.
Adding a “downloading” progress indicator
To provide an enhanced experience, developers can choose to provide a download progress indicator. The codePush.sync() method provides a different call back to make this possible.
var onError = function (error) {
    console.log("An error occurred. " + error);
};

var onDownloadProgress = function (downloadProgress) {
    if (downloadProgress) {
        console.log("Downloading " + downloadProgress.receivedBytes + " of " + downloadProgress
    }
};

codePush.sync({ updateDialog: true }, onSyncStatusChange, onDownloadProgress, onError);
Automate your deployments with VSTS
Continuous Integration (CI) and Continuous Deployment (CD) are key practices of DevOps. It requires the team to have a mindset to merge all working copies of developers’ code with a shared repository, producing a new build upon code commit. In turn this provides them with the opportunity to leverage the CI output, deploy it to one or more environments, and ultimately serve the end users via app updates.
This tutorial covers how to leverage Visual Studio Team Services (VSTS) and CodePush in order to create a CD environment to automate app updates from an existing CI environment. Even though a “proper” CI build not only compiles the code, but ideally runs code analysis, unit (and sometimes even integration) tests and even could package the code, those CI details won’t be discussed but instead go over the basics of CI integration as well as details of how to setup the CD environment.
Overview
VSTS is a collection of services that let teams share code, track work, and ship software—for any language.
From a high-level it provides developers with:
- Unlimited free private code repositories
- Ability to track bugs, work items, feedback, and more
- Agile planning tools
- Continuous integration builds
- Enterprise-grade services scale to any team size
- Free for up to five users
In addition, VSTS allows developers to extend the service by creating VSTS extensions that can help with tasks covering the full CI and CD spectrum.
The CodePush service provides a VSTS extension with a set of deployment tasks that allows the automation of releases and the promotion of app updates directly from your CI environment.
Leveraging the workflow discussed below can greatly reduce the effort needed to keep your dev/alpha/beta deployments up-to-date, since you can simply push changes to the configured source control branches, and let your automated build take care of the rest. No need to manually release, promote or rollout from the CodePush CLI!
Prerequisites
The following is required to complete this module:
- VSTS Account (Sign up for a free VSTS account here)
- CodePush Account (Follow these steps to create an account)
- React Native “CodePush ready” sample app (Use your own app or download the “bare bones” sample app to speed things up)
Note: For simplicity purposes, the steps covered below are done using the Android platform of the React Native sample project above. However, most of the steps also apply for both React Native iOS and Cordova projects.
1. Register your app with CodePush
Start by registering your app with the CodePush service:
code-push app add VSTSCDSample-Android android react-native
The CodePush CLI will provide you with a set of deployment keys:
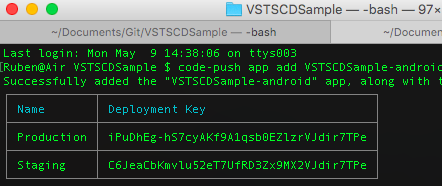
Save the Staging deployment key as it will be used to set up your project.
2. Add a CodePush deployment key
Download the React Native sample project and open the strings.xml file located under the sample app’s android > app > src > main > res > values.
Navigate to line #2 and add the previously recorded Staging deployment key:

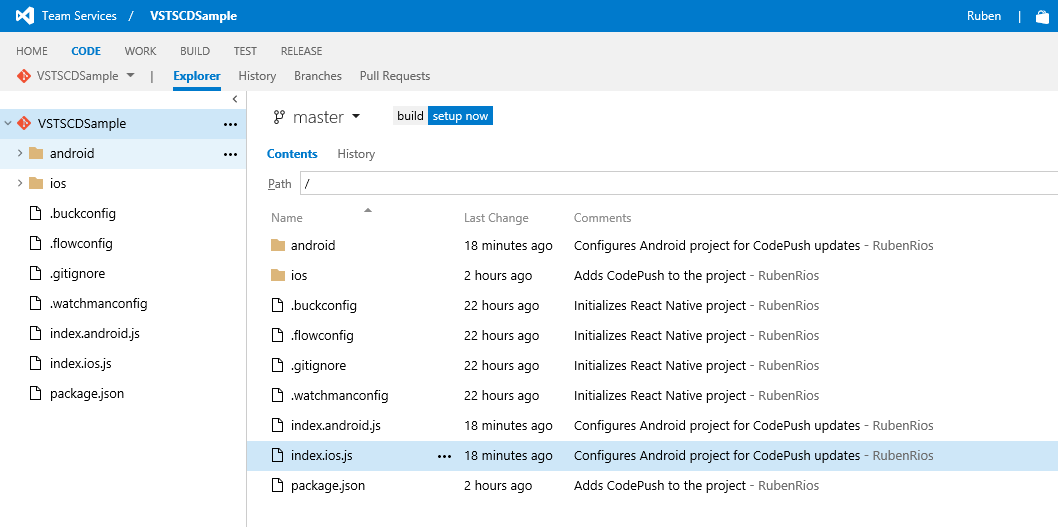
3. Push the source code to a VSTS team project
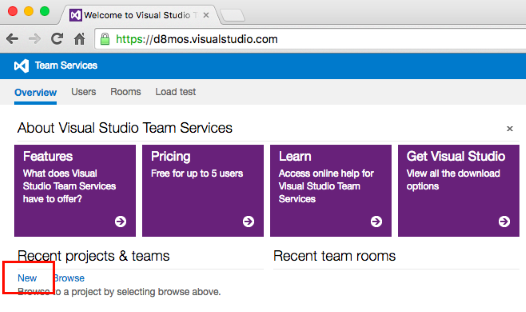
Create a new project in VSTS by clicking on New:
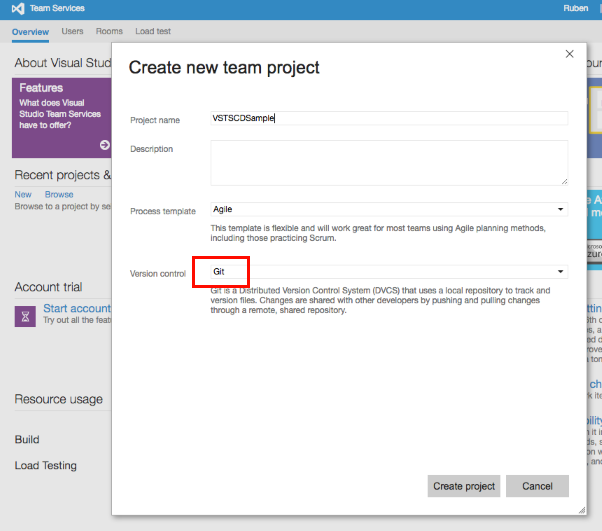
Give it a name and ensure Git is selected for Version control:
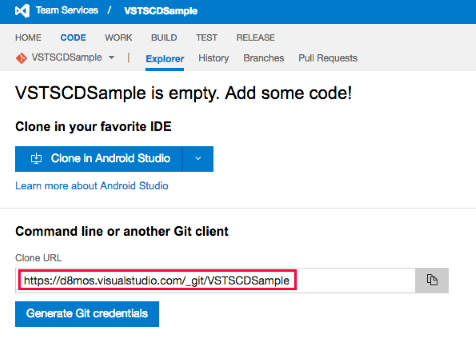
Once the project is created, copy the remote string as you will use it to update the local repository’s remote URL to point to your new VSTS project:
Update the repository’s remote URL using the following command:
git remote set-url origin replaceWithVSTSRepositoryURL
Once the new remote URL is set, push the repository to VSTS via Git push
git push -u origin --all
A few seconds later, the source will be added to your VSTS repository:
4. Configure the CI environment
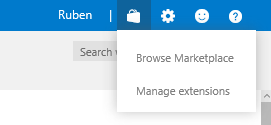
Install VSTS extension
To build the project you will need to install an extension from the VSTS Marketplace.
For React Native projects do the following:
- In the upper right corner, click the Basket icon and select Browse Marketplace.
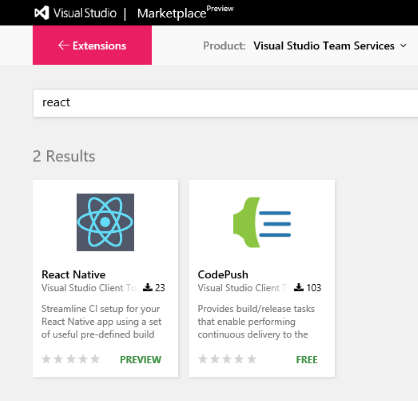
- Enter the term
reactin the search box and press enter. Open and install theReact NativeVSTS extension made by theVisual Studio Client Toolsteam:
Create a new build definition
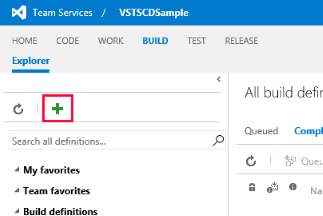
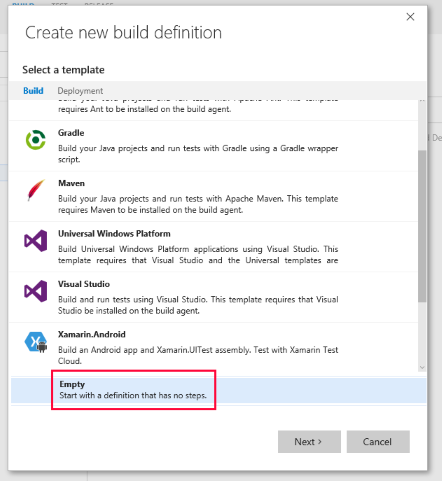
- In the top menu bar, click BUILD to open the build hub. In the menu on the left, click the green + button to create a new build definition.
- Select
Emptyfrom the list of build templates and clickNext.
- Make sure that the repo settings are correct (it should be the master branch on the VSTSCDSample repo). Check the
Continuous integrationcheckbox and ensure that the Default agent queue is set to Hosted and clickCreate.
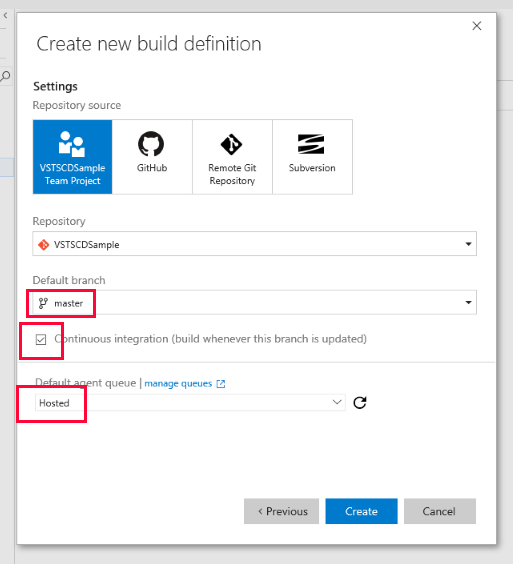
Note: The
Continuous Integrationtrigger tells VSTS to kick-off an instance of this build each time code is pushed to themasterbranch.
Configure the build task
As part of the CI build configuration process, you’ll add a series of steps that will build the project and publish an artifact (the Android bundle), which the CD environment will use to update the app.
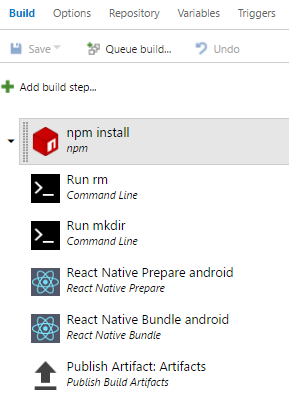
Create the described build definition by following these steps:
Install npm dependencies by clicking on
Add build step...and addingnpmfrom thePackagecategory. Select it and specify the following settings:- Use
installas theCommand
- Use
Add a new build step to remove any previously created “artifacts” folder by adding
Command Linefrom theutilitycategory. Select it and specify the following settings:- Use
rmas theTool - Use
-rf artifactsas theArguments
- Use
Add a new build step to make a new “artifacts” folder by adding a
Command Linefrom theutilitycategory. Select it and specify the following settings:- Use
mkdiras theTool - Use
artifactsas theArguments
- Use
Add a new build step to add
React Native Preparefrom theBuildcategory. Select it and specify the following settings:- Select
Androidas thePlatform - Use
android/app/build.gradleas thereact.gradle Path
- Select
Add a new build step to add
React Native Bundlefrom theBuildcategory. Select it and specify the following settings:- Select
Androidas thePlatform - Use
index.android.jsas theEntry File - Use
./artifacts/index.android.bundleas theBundle Output - Use
./artifactsas theAsset Destination Path
- Select
Add a new build step to publish the created artifacts (in this context the Android bundle created by running
React Native Bundle) by addingPublish Build Artifactsfrom theutilitycategory. Select it and specify the following settings:- Use
./artifactsas thePath to Publish - Use
Artifactsas theArtifact Name - Use
Serveras theArtifact Type
- Use
Save and name the build definition by pressing the
Savetoolbar button.
You can manually queue a new build to test the build process by pressing the Queue build... toolbar button.
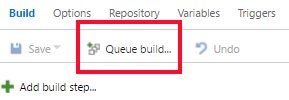
Pressing OK on the “Queue build” dialog starts the build process:
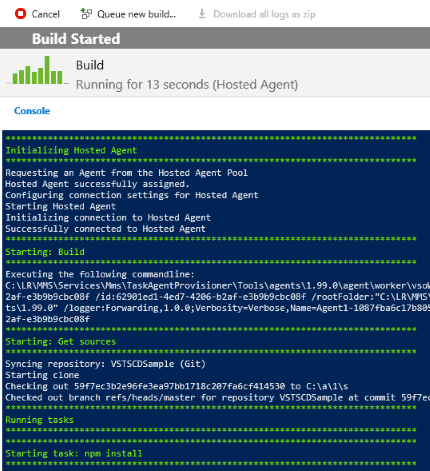
Note: The previously set
Continuous Integrationtrigger ensures new builds are automatically queued every time code is pushed to themasterbranch.
5. Configure the CD environment
As a best practice, we recommend creating three release environments: “Staging”, “Rollout” and “Production”. This configuration allows you to continuously deploy to “Staging”, rollout to a small percentage of production users and finally release to all production users when confidence is high.
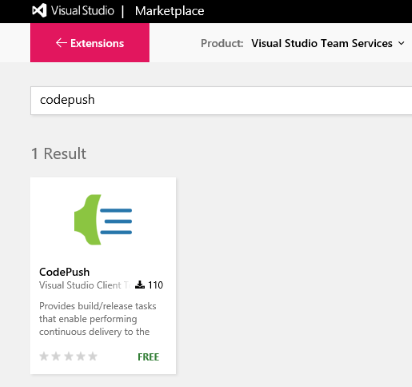
Install VSTS extension
To leverage the CodePush service as the release vehicle, you will need to install another extension from the VSTS Marketplace.
- In the upper right corner, click the Basket icon and select Browse Marketplace.
- Enter the term
codepushin the search box and press enter. Open and install theReact NativeVSTS extension made by theVisual Studio Client Toolsteam:
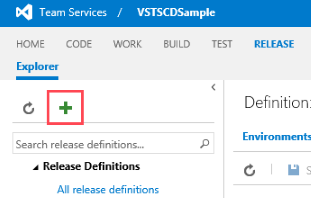
Create a new release definition
- In the top menu bar, click RELEASE to open the release hub. In the menu on the left, click the green + button to create a new release definition.
- Select
Emptyfrom the list of release templates and clickNext.
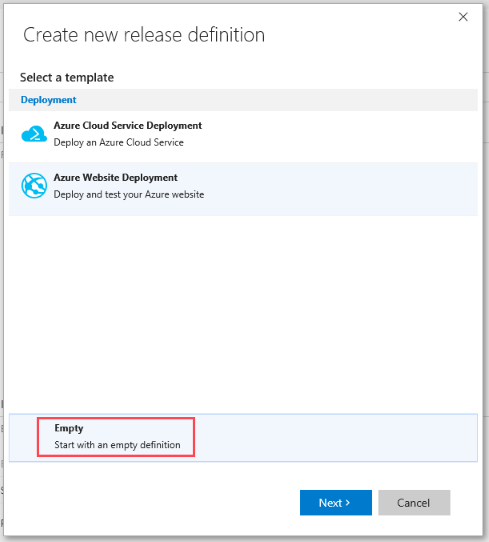
- Make sure that the project settings are correct (the source should point towards the previously created build definition). Check the
Continuous deploymentcheckbox and ensure that the agent queue is set toHostedand clickCreate.
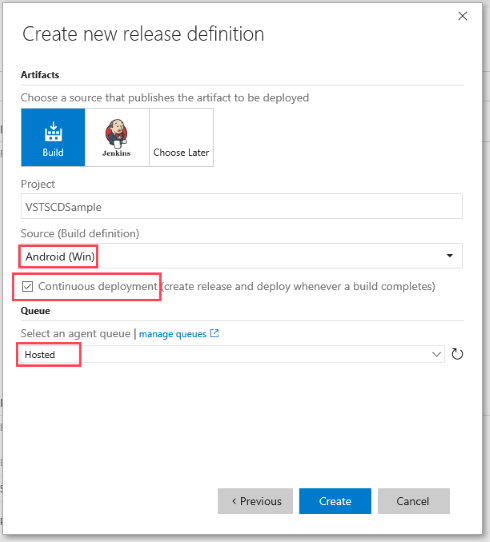
Note: The
Continuous deploymenttrigger tells VSTS to kick-off a release each time a successful build completes. This behavior can be modified to release automatically or after a release is formally approved.
Configure the deployment task
For the actual CD tasks, you’ll create a staging environment that will release updates via CodePush after every successful build. Followed by two production environments that will initially target a small fixed amount of production users and eventually all production users.
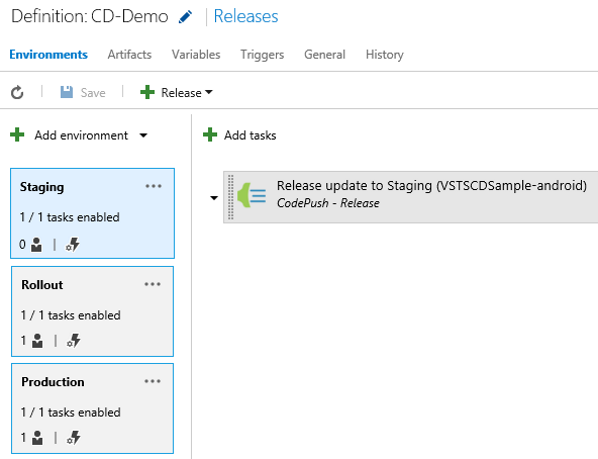
Create the described release definition by following these steps:
Rename the default environment to
Stagingby clicking on the “Environment 1” label, typing the new name and pressing enter.Use the
CodePush CLIto create an access key for VSTS by typingcode-push access-key add "VSTS integration". Save the key for the next step.Back to VSTS, configure the
Stagingenvironment to release CodePush updates to users in the “staging ring” by clicking onAdd tasksand selectingCodePush - Releasefrom theDeploycategory. Select it and specify the following settings:- Use
Access Keyas theAuthentication Method - Use the key created in the previous step as the
Access Key - Use
VSTSCDSample-android(or the app name used when registering the app with CodePush if different) as theApp Name - Use
Stagingas theDeployment - Use the browse button to set
Update Contents Pathto point towards the “Artifacts” folder created during the build process.
- Use
Add a second environment and name it
Rolloutby clicking onAdd environmentthen on “Create new environment”. SelectEmpty, pressNextand specify the following settings:- Set
Specific usersunderPre-deployment approvalto control what users decide to approve deployments to theRolloutenvironment. - Select the
triggerto ensure this step kicks off automatically after theStagingrelease completes.
- Set
Configure the environment to target only a fixed number of production users, by clicking on “Add tasks” and selecting
CodePush - Promotefrom theDeploycategory. Select it and specify the following settings:- Use
Access Keyas theAuthentication Method - Use the key created in the previous step as the
Access Key - Use
VSTSCDSample-android(or the app name used when registering the app with CodePush if different) as theApp Name - Use
Stagingas theSource Deployment - Use
Productionas theDestination Deployment - Use
20%forRolloutin order to deploy to only 20% of your production users
- Use
Save and name the release definition by pressing the Save toolbar button.
Add a third environment and name it
Productionby clicking onAdd environmentthen on “Create new environment”. SelectEmpty, pressNextand specify the following settings:- Set
Specific usersunderPre-deployment approvalto control what users decide to approve deployments to theRolloutenvironment. - Select the
triggerto ensure this step kicks off automatically after theRolloutrelease completes.
- Set
Configure the environment to target all remaining production users, by clicking on “Add tasks” and selecting
CodePush - Patchfrom theDeploycategory. Select it and specify the following settings:- Use
Access Keyas theAuthentication Method - Use the key created in the previous step as the
Access Key - Use
VSTSCDSample-android(or the app name used when registering the app with CodePush if different) as theApp Name - Use
Productionas theDeployment - Use
Latestas theRelease Label - Use
100%forRolloutin order to deploy to all remaining production users
- Use
Save and name the release definition by pressing the Save toolbar button.
Testing your Staging deployments
If you had both Staging and Production users, you could test the full release environment as configured. Since that’s not the case for this tutorial, you can focus on testing the Staging environment.
To test the automated workflow, you’ll need deploy a “release” version of the test app and push a change to the master branch in order to kick off a build and eventually a release.
You can create a “release” version of the app by generating a signed APK and installing the release build created with it. Instructions can be found on the React Native docs.
Deploy the app per the instructions linked above, do a small code change and commit the change to master.
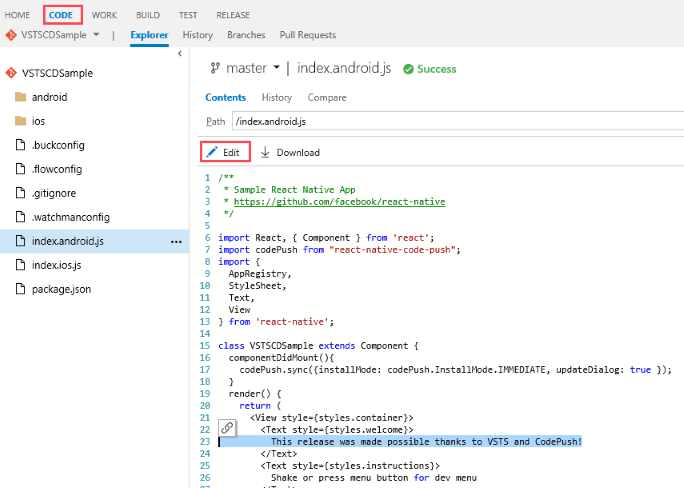
VSTS allows you to edit the source code on the CODE hub:
Summary
This tutorial shows how VSTS and CodePush make your developer experience better. From a high level, VSTS provides teams with great tools and allows them to fully automate the build and release process while CodePush provides the flexibility to deploy automated updates from Staging to Production.