Deep Dive: Instructions & Descriptions
Deep Dive: Instructions & Descriptions
See what the generative orchestration planner actually reads when it decides which agent, tool, and input to use - then watch the New Orchestrator drive the same decisions on its own.
Content last updated:
Deep Dive: Instructions & Descriptions
See what the generative orchestration planner actually reads when it decides which agent, tool, and input to use — then watch the New Orchestrator drive the same decisions on its own.
Lab Details
| Level | Persona | Duration | Purpose |
|---|---|---|---|
| 300 | Maker | 45 minutes | After completing this lab, participants will be able to locate every place the planner reads Instructions and Descriptions, explain which of the two shapes behaviour and which drives selection, debug a wrong routing decision from the activity tracker and Get rationale, and describe what the New Orchestrator’s Agentic Reasoning Loop changes. |
Table of Contents
- Why This Matters
- Introduction
- Core Concepts Overview
- Documentation and Additional Training Links
- Prerequisites
- Summary of Targets
- Use Cases Covered
- Instructions by Use Case
- Summary of learnings
- Conclusions and recommendations
Why This Matters
Makers and Architects — an agent that picks the wrong tool is almost never fixed by rewording the user’s prompt. The generative orchestration planner decides which child agent, tool, knowledge source, and input value to use on every turn, and it makes those decisions by reading text you wrote: the agent’s Instructions and the Descriptions on its children, tools, and inputs. Those fields are the actual program. Most “the agent is dumb” bugs are a description that never said the thing the planner needed to know.
The distinction is the whole lab: instructions always apply — descriptions decide what runs. Instructions govern how an agent behaves once it has been selected. Descriptions govern whether it gets selected at all. Confusing the two produces agents that are simultaneously over-instructed and under-described: expensive on every turn, and still routing to the wrong place.
Common challenges solved by this lab:
- “My agent picked the wrong tool and I don’t know which field to fix”
- “The right tool ran but it got called with the wrong argument”
- “I don’t know how Instructions differ from Descriptions in practice”
- “What does the New Orchestrator (Agentic Reasoning Loop) actually change?”
Pairs with: Module 5 — Deep Dive: Instructions & Descriptions.
Introduction
This is the hands-on companion to Module 5 — Deep Dive: Instructions & Descriptions.
You start by making sure a prebuilt sample agent — the Account Data Lookup Agent — is configured and working, because you cannot observe planner decisions against data that is not indexed. Then you walk the four levels at which the planner reads metadata, and run a multi-turn conversation where each turn is designed to expose one decision: which child agent it delegated to, which tool it called, and what argument it passed. Finally you build a new-type agent and watch the New Orchestrator make the same class of decisions repeatedly inside a single turn, without stopping to ask.
The through-line is inspectability. Every routing decision in this lab is visible — in the activity tracker, in the Get rationale explanation, and in the New Orchestrator’s train-of-thought. Once you can read those, tuning an agent stops being guesswork.
What You Will Learn
- The four levels the planner reads — agent Instructions, child agent Name + Description, tool Name + Description, and input Description — and the priority order between them
- Why names route, descriptions explain, and instructions force, and which lever to reach for first
- How input descriptions turn a user’s “Texas” into the
TXthe tool actually requires, and why that makes them the foundation of dynamic chaining - How to use the activity tracker and Get rationale as a debugger trace for your descriptions
- What the New Orchestrator’s Agentic Reasoning Loop changes, and when to choose it over standard generative orchestration
Core Concepts Overview
| Concept | Why it matters |
|---|---|
| Generative Orchestration | The engine that decides which tool, knowledge source, child agent, or connected agent handles each turn |
| Instructions | Guidance that applies whenever its owner is active. Parent Instructions run on every turn; a child agent’s Instructions run only when that child has been selected. They shape behaviour, not selection |
| Descriptions | Metadata the planner reads when deciding what to select — on child agents, on tools, and on individual tool inputs. Descriptions are how a component advertises itself |
| The four levels | Agent → child agent → tool → input. Weakness at any single level cascades into wrong routing or a wrong argument, even when the other three are perfect |
| Activity tracker / Get rationale | The planner’s decisions and its reasoning, rendered per turn. The fastest way to find out which description is underspecified |
| New Orchestrator (Agentic Reasoning Loop) | The default orchestrator in new-type agents — plans, acts, observes, and iterates within a single turn until the task is complete (previewed on classic agents as Enhanced Task Completion) |
Documentation and Additional Training Links
Prerequisites
- Access to Microsoft Copilot Studio
- A Power Platform environment where you can edit Dataverse table views and toggle environment settings (System Administrator or System Customizer)
- Sample data loaded into the Account and Contact Dataverse tables (the (sample) records used throughout Use Cases #1 and #2)
- The pre-loaded Account Data Lookup Agent available in your environment (Use Case #1 verifies and publishes it)
- Its Dataverse connection reference repointed to a connection you own — see Dataverse connection reference — do this first. Every Dataverse lookup in this lab fails silently without it.
- For Use Case #3 only: an environment where new-type agents (the New Orchestrator), Dataverse Intelligence (Work IQ), and Dataverse MCP servers can be used
[!NOTE] First time in Copilot Studio? A Welcome to Microsoft Copilot Studio dialog appears on first sign-in, followed by a short product tour. The Welcome dialog blocks the page behind it until you select Get Started, and the tour can be dismissed with Skip. Clear both before starting Use Case #1.
Dataverse connection reference — do this first
Do this before anything else in the lab. Your environment ships with the LAB: Account Lookup Agent solution, and the Dataverse connection reference inside it is owned by the workshop author, not by you — it arrives with Owner set to someone else and Status: Off. Until you point it at a connection of your own, anything that reaches Dataverse fails, and it fails quietly: the tool shows a healthy connection but lists no operations, and an agent that needs it will report that the Dataverse connector is “not available as a tool” rather than erroring.
[!NOTE] Already did this in another lab in this event? You do not need to repeat it — the fix is per environment, not per lab. Come back to this section only if a Dataverse tool starts misbehaving: no rows returned, a tool that lists no operations, or an agent that says it cannot reach Dataverse.
-
Go to make.powerapps.com and confirm the environment picker in the top right names your **DEV - User
** environment. -
Select Solutions, open LAB: Account Lookup Agent, then select Connection references in the left pane. There is exactly one, named
copilots_header_cref7_LookupDataAgent.shared_commondataserviceforapps.…. Note its Owner — it will not be you. -
Tick the row’s checkbox and choose Edit on the command bar.
-
In the Connection field, open the dropdown and choose New connection. A new browser tab opens on the connectors list.
[!WARNING] Two connectors are both called “Microsoft Dataverse.” Pick the modern one — its id is
shared_commondataserviceforapps. The other is the legacyshared_commondataserviceconnector, and a connection created from it can never satisfy this reference. If you are unsure, go straight tohttps://make.powerapps.com/environments/<your environment id>/connections/available/shared_commondataserviceforapps. -
Select Create, sign in with your lab account, and wait for the connection to show Connected.
-
Return to the connection reference tab, open the Connection dropdown again, and select the connection that now carries your account name.
[!TIP] If your new connection is not in the list, the dropdown is stale rather than empty — reload the page and reopen the reference. The field’s own Refresh button re-queries the service but does not re-open the list.
-
Select Save — and then confirm the follow-up screen that appears.
[!IMPORTANT] Save on its own does not commit the change. A confirmation screen follows it. If you close the panel or navigate away without confirming, the edit is discarded silently: nothing errors, and the reference simply shows the old connection again the next time you open it. Confirm, then reload the page and reopen the reference to check it now names your account. That reload is the only reliable proof the rebind stuck.
Summary of Targets
In this lab, you’ll learn to read and tune the text the orchestration planner actually acts on. By the end of the lab, you will:
- Have a working sample connected agent (the Account Data Lookup Agent) verified and published in your environment
- Be able to point at all four places the planner reads metadata, and say what each one decides
- Be able to diagnose a wrong routing decision or a wrong argument from the activity tracker, and know which field to fix
- Have used Get rationale to read the planner’s own account of its plan
- Have built a new-type agent and observed the New Orchestrator (Agentic Reasoning Loop) complete a multi-step task end to end
Use Cases Covered
| Step | Use Case | Value added | Effort |
|---|---|---|---|
| 1 | Get the Sample Connected Agent Working | Confirm the prebuilt connected agent and its data are ready before working with it | 10 min |
| 2 | See the Impact of Instructions and Descriptions on the Planner | Build intuition for how planner decisions track with Instructions and Descriptions | 20 min |
| 3 | New Orchestrator – Agentic Reasoning Loop | See how a new-type agent’s New Orchestrator completes multi-step tasks end to end | 15 min |
Instructions by Use Case
Use Case #1: Get the Sample Connected Agent Working
Verify that the Account and Contact Information agent (the sample connected agent we’ll build on throughout this lab) is fully configured to work in your environment.
[!NOTE] If you’ve already completed this verification in another lab (such as the Multi-Agent lab), you can skip this Use Case and continue to Use Case #2.
| Use case | Value added | Estimated effort |
|---|---|---|
| Get the Sample Connected Agent Working | Confirm the prebuilt connected agent and its data are ready before working with it | 10 minutes |
Summary of tasks
In this section, you’ll confirm that Dataverse Search is enabled, the Account and Contact tables are indexed, and the Account Data Lookup Agent is published and discoverable.
Scenario: Before exploring how Instructions and Descriptions shape orchestration, you need to make sure the agent and its underlying data are properly configured.
Objective
Confirm the environment is ready and the sample connected agent is published.
Step-by-step instructions
Make sure that Dataverse Search is set to on
-
In the upper right corner of Copilot Studio, select More options (⋯), then select Power Platform Admin Center (if you finished your previous lab in the previous Copilot Studio experience, the upper-right corner shows a Gear icon instead — select it, then select Go to Power Platform admin center)
-
In the Power Platform admin center (https://admin.powerplatform.microsoft.com), select the Manage tab, then select Environments
-
Select your environment from the list to open its details page
-
Select Settings on the top navigation bar of that page (the Settings command across the top of the environment — not the gear/global settings). Navigate to it through the admin center rather than pasting a direct URL.
-
Expand the Product group and select Features
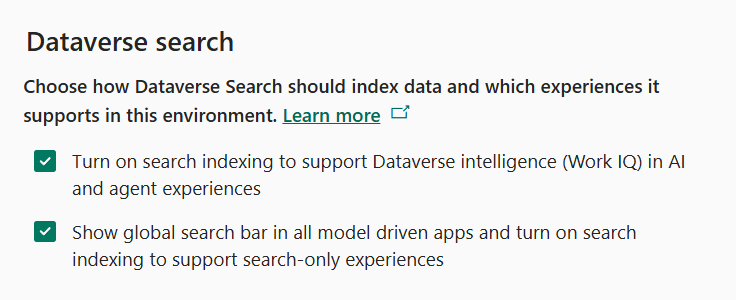
- In the Dataverse search section, verify that both check boxes are enabled:
- Turn on search indexing to support Dataverse intelligence (Work IQ) in AI and agent experiences
- Show global search bar in all model driven apps and turn on search indexing to support search-only experiences
- Select Save if you made any changes
Ensure that indexes are in place for our connected agent
[!IMPORTANT] This is not required for a connected agent to work, but to make sure that the one we have pre-loaded for you will return results we must index a few tables in your environment.
-
Go to the Power Apps maker portal https://make.powerapps.com
-
In the left menu select Tables
-
Select the Account table from the list
-
Select Views from the Data experiences section
-
Select Quick Find Active Accounts option from the list of Views
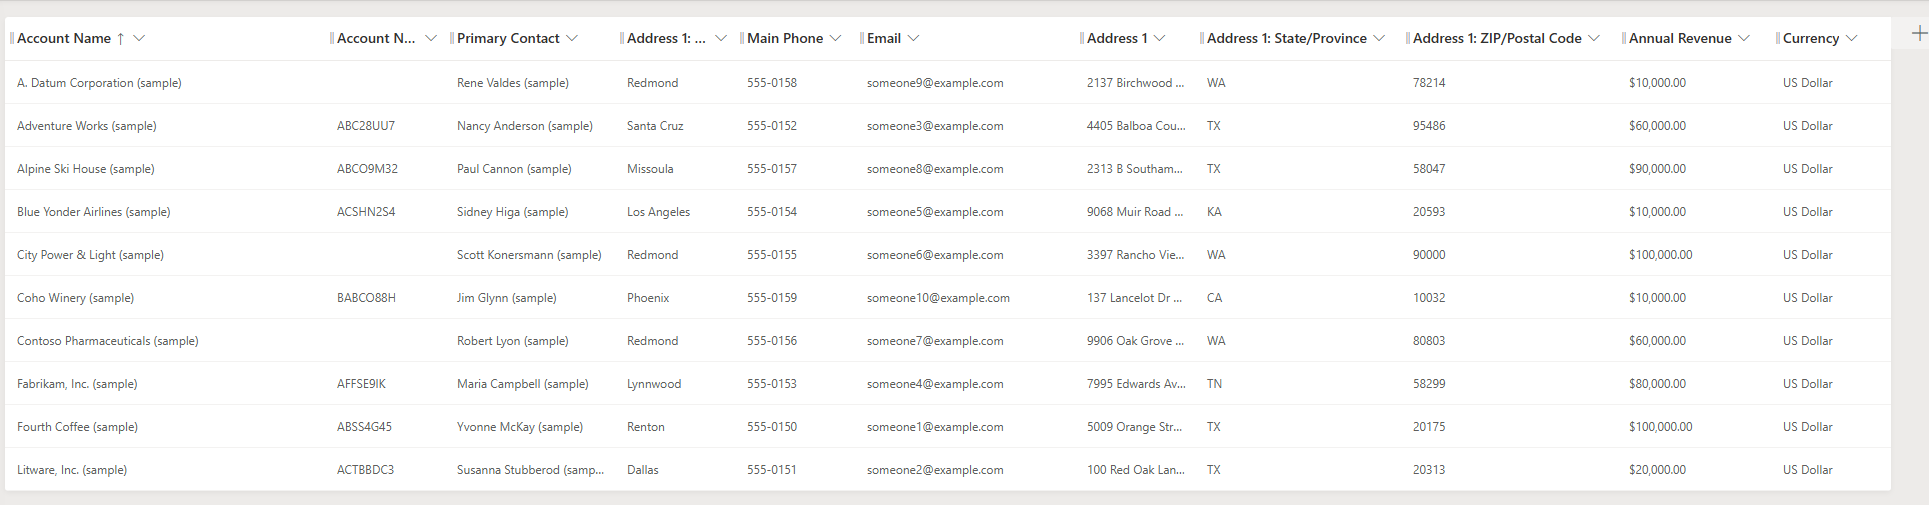
- Select View Column to verify the following list of columns are in the view, you may have to scroll to see all of the included columns:
- Address 1: State/Province
- Address 1: ZIP/Postal Code
- Address 1: City
- Annual Revenue
- Currency
-
To add any that are missing select + View column and then select the column from the list.
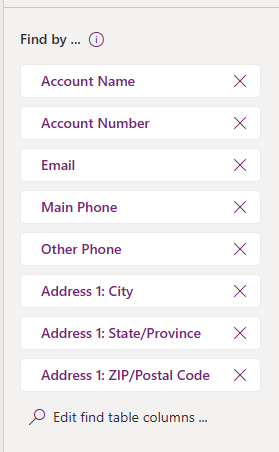
- Add the ability to search on certain fields by making sure that the following items are in the Find by on the bottom right. Select the Edit find table columns option to check:
- Address 1: State/Province
- Address 1: ZIP/Postal Code
- Address 1: City
-
Select Edit find table columns to add any missing columns.
-
Select Save and publish to update the index
[!IMPORTANT] DO NOT navigate away until the save and publish is completed!
-
Select Back in the upper left corner to go back to the Views list
-
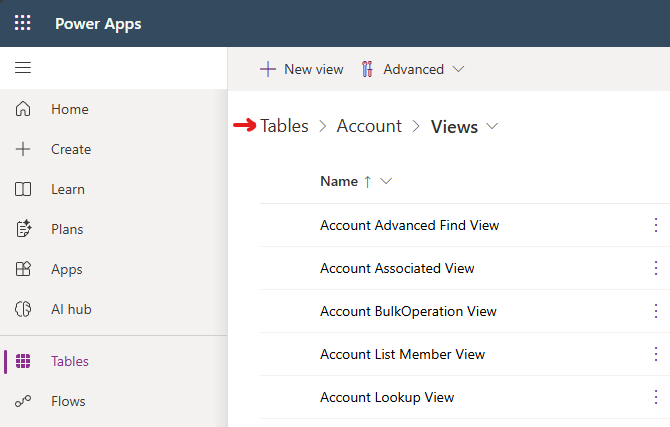
Select on Tables in the Views screen to go back to the list of Tables
-
Select Contact table from the list
-
Select Views from the Data experiences section
-
Select Quick Find Active Contacts option from the list of Views
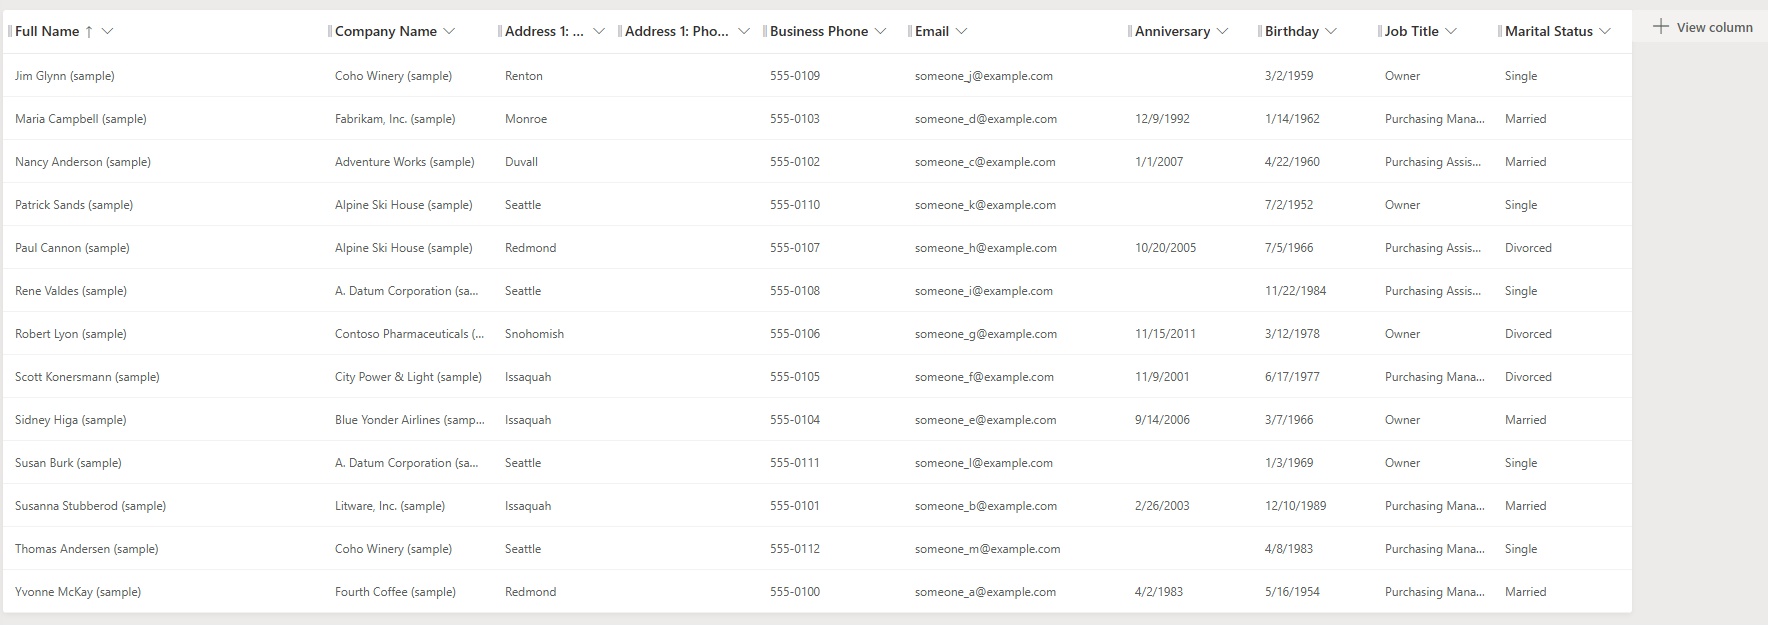
- Select View Column to verify the following columns are in the view:
- Anniversary
- Birthday
- Job Title
- Marital Status
-
Select + View column to add any that are missing.
-
Select Save and publish to update the index
[!IMPORTANT] DO NOT navigate away until the save and publish is completed!
Test and Publish the Account Data Lookup Agent
-
In the Copilot Studio tab in your browser, go to the Account Data Lookup Agent
-
Open the Test chat by Selecting Test in the upper right-hand corner
[!IMPORTANT] The first time you open this agent, the Test panel shows a Consent confirmation — “This agent was shared with you by another user…” — because the Account Data Lookup Agent is owned by the workshop author and shared with you rather than created by you. Select Confirm to continue; the test chat stays empty until you do.
-
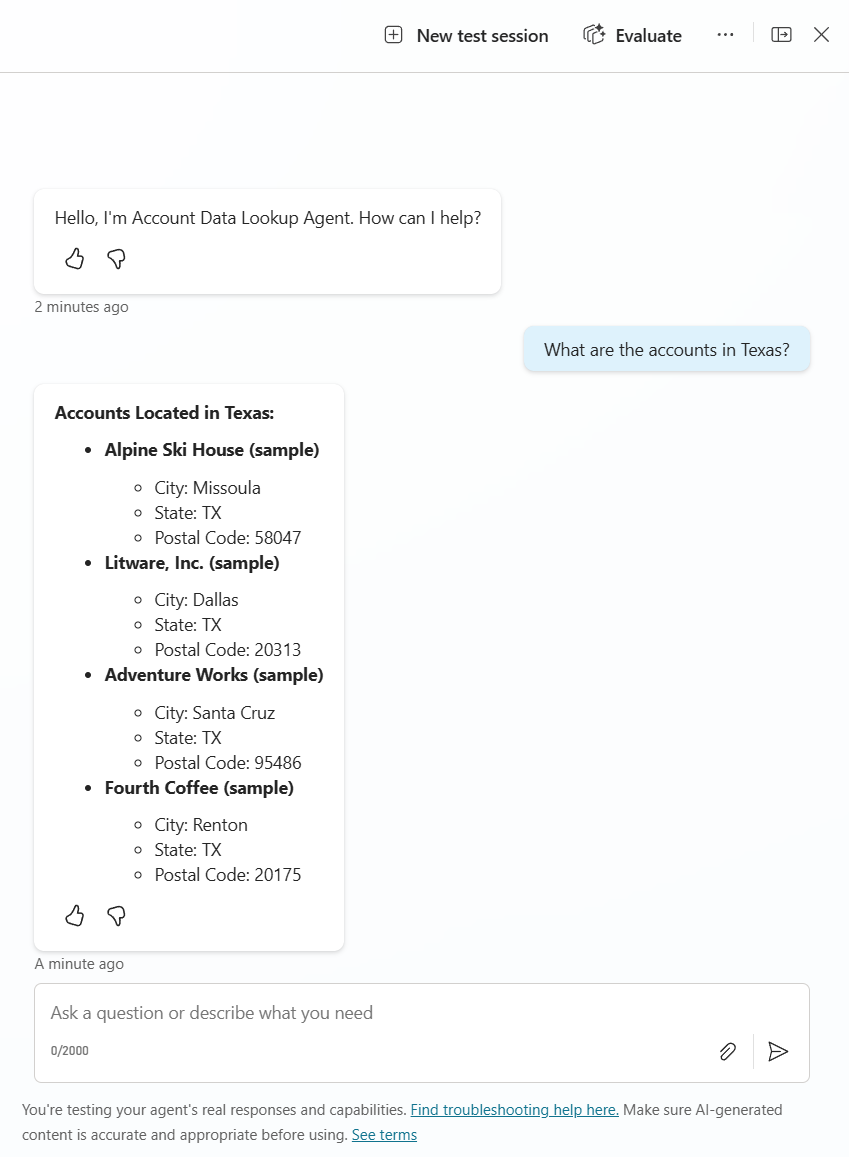
Enter
What are the accounts in Texas? -
Verify that you get a response showing that the agent is working and the data is indexed
-
Select Settings in the upper right menu
-
On the Generative AI settings page, scroll to the Connected agents section and make sure Let other agents connect to and use this one is set to On.
[!NOTE] Use the Connected agents section on the Generative AI page — not the separate Connected Agents item in the Settings left navigation. That left-nav item opens an input/output management page (“Manage input and output for the agent”) and does not contain this toggle.
-
Close the Settings menu by Selecting the X in the upper right-hand corner
-
Select Publish. In the Publish this agent dialog, make sure Force newest version is checked, then select Publish to confirm.
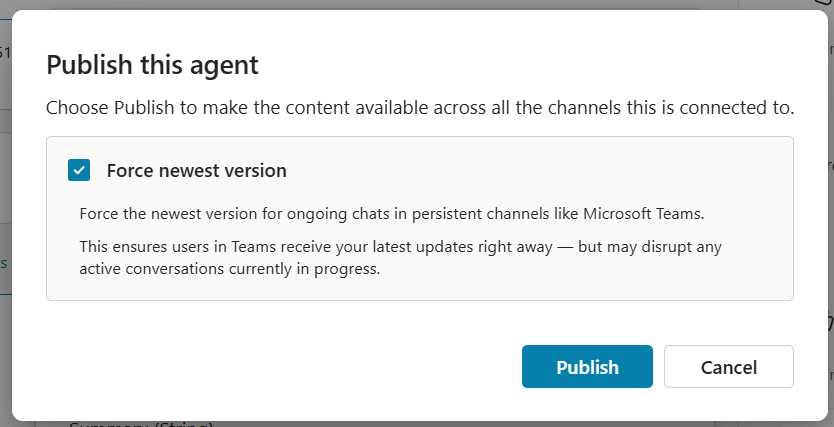
[!IMPORTANT] You can’t connect to an agent unless it is published. Forcing the newest version ensures any agent that connects to it picks up your latest changes.
Congratulations! You’ve completed Use Case #1!
Test your understanding
Key takeaways:
- Dataverse Search must be enabled – Connected agents that look up Dataverse data depend on Dataverse Search being on at the environment level.
- Quick Find indexes drive what’s searchable – The columns added to the Quick Find view determine which fields the agent can filter on at runtime.
- Publishing + sharing must both be on – A connected agent must be published and have “Let other agents connect to and use this one” enabled before it can be connected.
Lessons learned & troubleshooting tips:
- If Dataverse search returns no results, verify the Quick Find views have the correct columns added and the view is saved and published.
- If the agent can’t find account data, check that Dataverse Search is enabled in the Power Platform admin center for your environment.
Use Case #2: See the Impact of Instructions and Descriptions on the Planner
Walk through where Instructions and Descriptions live in the Account Data Lookup Agent, then run a series of test queries to observe how the generative orchestration planner uses them to pick the right child agent, tool, and inputs at each turn.
| Use case | Value added | Estimated effort |
|---|---|---|
| See the Impact of Instructions and Descriptions on the Planner | Build intuition for how planner decisions track with Instructions and Descriptions | 20 minutes |
Summary of tasks
In this section, you’ll review the four levels at which the planner reads agent metadata, then run a multi-turn test conversation. Each turn is designed to highlight a different planner decision — which child agent to delegate to, which tool to call, and which input values to pass.
Scenario: You verified the Account Data Lookup Agent in Use Case #1. Now you want to understand how the planner decides what to do at each turn. The answer lives in the Instructions and Descriptions configured throughout the agent.
Objective
Build intuition for how the generative orchestration planner reads Instructions and Descriptions to assemble a correct plan.
Step-by-step instructions
Review where Instructions and Descriptions are configured
Open the Account Data Lookup Agent in Copilot Studio and walk through each of the following locations. Each one is a hook the planner reads when deciding what to do next.
- Instructions in Overview
- Select the Overview page of the Account Data Lookup Agent
- Read the agent-level Instructions text. These are top-level instructions for the agent itself — they describe its purpose, behavioral rules, and any cross-cutting constraints.
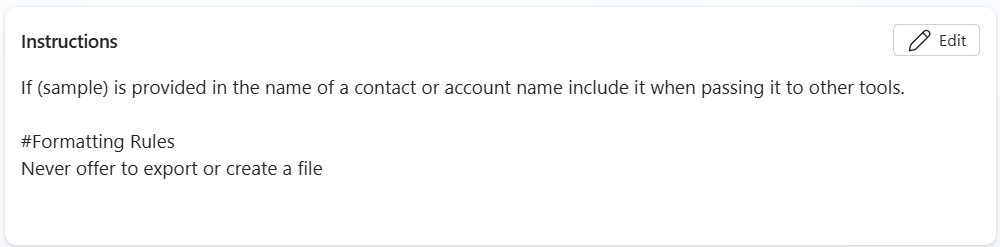
- Instructions run on every turn. Unlike a tool description (which the planner only reads when deciding whether to use that tool), agent-level Instructions are appended to the planner’s context for every turn of the conversation. That makes them the right place for rules that should always apply, regardless of which tool or child agent gets called.
- In the screenshot above, notice the two kinds of guidance:
- Argument-handling rule — “If (sample) is provided in the name of a contact or account name include it when passing it to other tools.” This tells the planner how to clean up a value before handing it off, on every turn.
- Formatting / behavior rules — under
#Formatting Rules, “Never offer to export or create a file.” This is a hard restriction on agent output applied to every response.
[!TIP] Agent-level Instructions are powerful but expensive: they consume planner context on every turn. Use them for rules that genuinely apply everywhere. For rules that only apply when a specific tool or child agent runs, prefer a description on that tool / child instead.
- Child Agents
- Select Agents from the top navigation
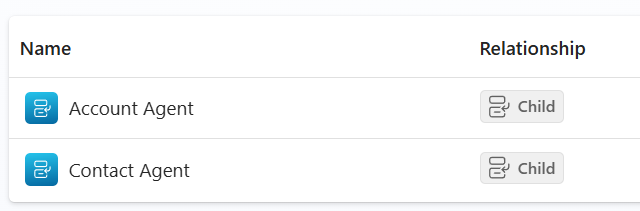
- Notice the child agents inside this connected agent: Account Agent and Contact Agent, both with a Child relationship. Each represents a specialized capability — looking up Accounts vs. looking up Contacts. The planner picks one of these children for each step that requires data lookup.
- Descriptions in Child Agents
- Open the Account Agent child agent and look at the Details panel — specifically the Name and Description fields.
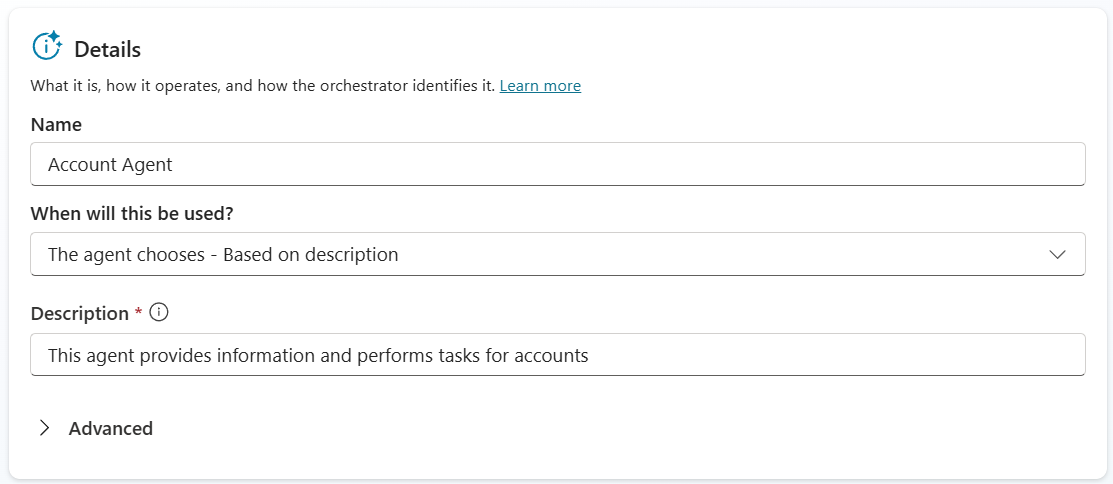
[!TIP] Look at the When will this be used? selector between Name and Description. It reads “The agent chooses - Based on description” — the product stating this lab’s thesis outright. That dropdown is what makes the Description field load-bearing rather than documentation.
- Names get higher priority than descriptions in the planner’s routing decision. A clear, intent-revealing name (e.g., “Account Agent”) does most of the work — the planner will match user intent against the name before it weighs description content.
- Descriptions add context and handling information that names alone can’t carry. They’re the right place for what kind of work this agent does (e.g., “This agent provides information and performs tasks for accounts”), special handling rules, and anything that helps the planner pick correctly when two child agent names sound similar.
- Explore both child agents inside the Account Data Lookup Agent. For each one, compare its Name and Description, and consider: if a user asked “show me the contacts for Coho Winery”, which child agent’s Name + Description combination most clearly signals it should handle the request? That’s the same reasoning the planner does at runtime.
[!TIP] If two child agents have similar names, the description becomes the tiebreaker. If you ever see the planner route to the wrong child, the first thing to check is whether the names are distinct enough — fix the name before fixing the description.
- Instructions in Child Agents
- On the same child agent, select Instructions from the left panel.
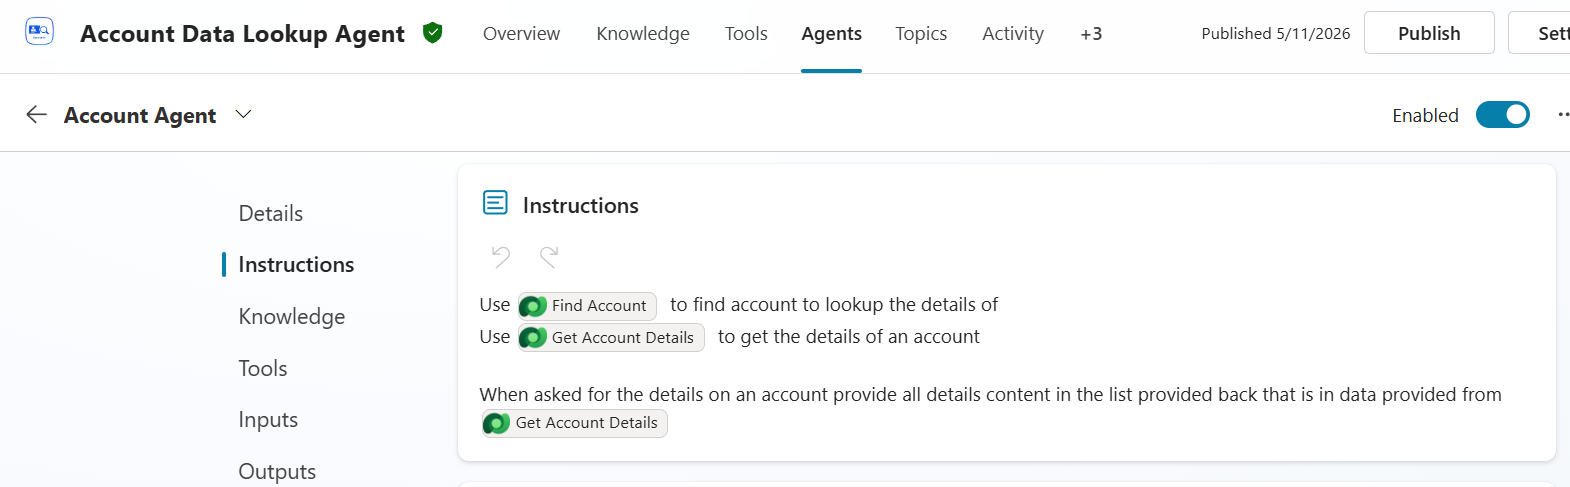
- Child-level Instructions only run when this child agent runs. Where the parent’s Instructions apply to every turn, a child’s Instructions narrow scope — they’re appended to the planner’s context only when this specific child has been selected for a step. That makes them the right place for rules and tool-selection guidance that should fire only inside this child’s responsibilities.
- In the screenshot, the Account Agent’s Instructions reference two specific tools — Find Account and Get Account Details — by name, and tell the planner exactly when to use each:
- “Use Find Account to find account to lookup the details of” — when the user’s intent is locate an account, this tool is the dispatch target.
- “Use Get Account Details to get the details of an account” — when the user’s intent is expand details on an account already in context, this tool is the dispatch target.
- “When asked for the details on an account provide all details content in the list provided back that is in data provided from Get Account Details” — a formatting / response rule: don’t summarize, return the full detail list.
- The green pills (
Find Account,Get Account Details) you see in the screenshot are not free text — they are explicit tool references inserted from a picker. The planner reads these as hard pointers to specific tools, not as suggestions.
[!TIP] If you can’t get what you’re looking for by updating the tool name or description, then using Instructions is a good way to force the child agent to properly leverage the right tool. Treat Instructions as a stronger lever — reach for the tool’s own name and description first, and use child-level Instructions to lock in the behavior when name and description tuning aren’t enough.
- Descriptions in Tools
- Select Tools from the top navigation, then open the Find Account tool.
[!IMPORTANT] The tool’s Inputs only populate once a Dataverse connection exists — the
entitiesandsearchrows are read from the connector’s schema, so with no connection you will see just Environment and Action Name. Setting the Connection in the tool’s Details panel and selecting Save does not reliably persist on this agent, because it is owned by the workshop author and only shared with you. Two routes fix that. The durable one is Dataverse connection reference — do this first: repointing the solution’s connection reference at a connection you own makes this tool populate normally, and holds for every later lab in the environment. The quick one is in-chat: run the first Demonstration prompt below, select Allow on the “Connect to continue” card the agent returns, then come back and reopen this tool.[!WARNING] Known environment issue. In some tenants the shared Account Data Lookup Agent ships without the
searchinput on Find Account. When that happens the tool call fails with “Required field ‘search’ is missing for RequestName=’searchquery’“, step 6 below has nothing to open, and the Demonstration cannot run. It cannot be repaired from a learner account — ask your workshop host to reprovision the sample agent or grant you co-owner rights on it.- Review the Details panel — the Name and Description fields.
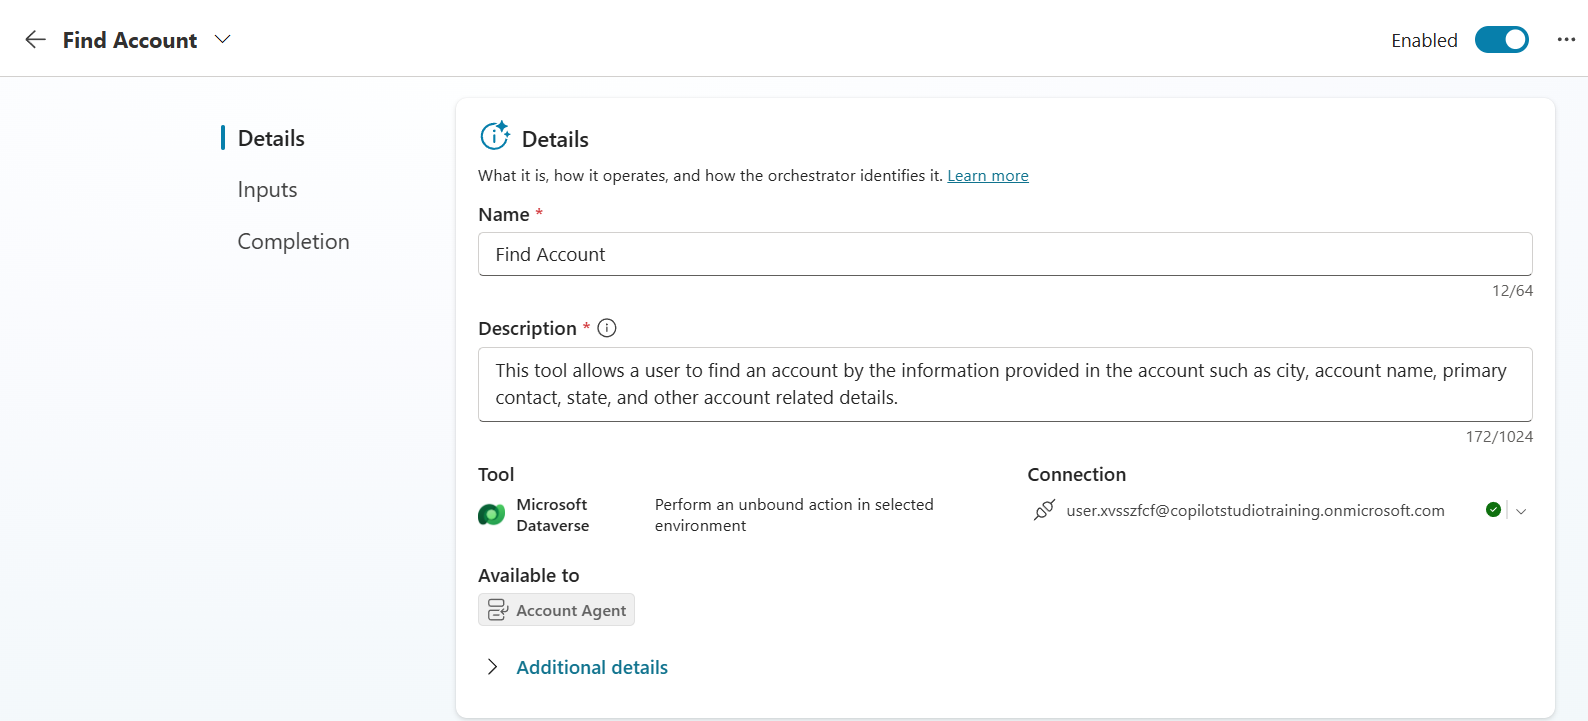
- Tool Name and Description follow the same priority pattern as child agents — Name takes priority, Description adds context. A short, intent-revealing tool name (“Find Account”) is what the planner matches against first. The description is the place to add what the name alone can’t carry.
-
The description is where you tell the planner what the tool actually does — and what inputs it accepts in plain language. Notice this tool’s description:
“This tool allows a user to find an account by the information provided in the account such as city, account name, primary contact, state, and other account related details.”
It does two important jobs:
- Names the operation — “find an account” — so the planner can match the user’s intent.
- Hints at the inputs in natural language — “city, account name, primary contact, state…” — so when a user says “accounts in Texas” or “the Coho Winery account”, the planner can recognize that those values map to inputs this tool accepts, before it even reads the formal input parameter list in step 6.
- Notice the tool is Available to: Account Agent — tool availability is scoped to specific child agents, which keeps the planner’s candidate set small and routing decisions cleaner.
[!TIP] If the planner keeps failing to call a tool when a user’s intent obviously matches it, the tool’s description is usually missing the right vocabulary. Add the user’s likely phrasing to the description (intent verbs + filterable attributes) before reaching for harder fixes like child Instructions.
- Descriptions in Inputs
- Still in the Find Account tool, select Inputs from the left panel. Expand the search input.
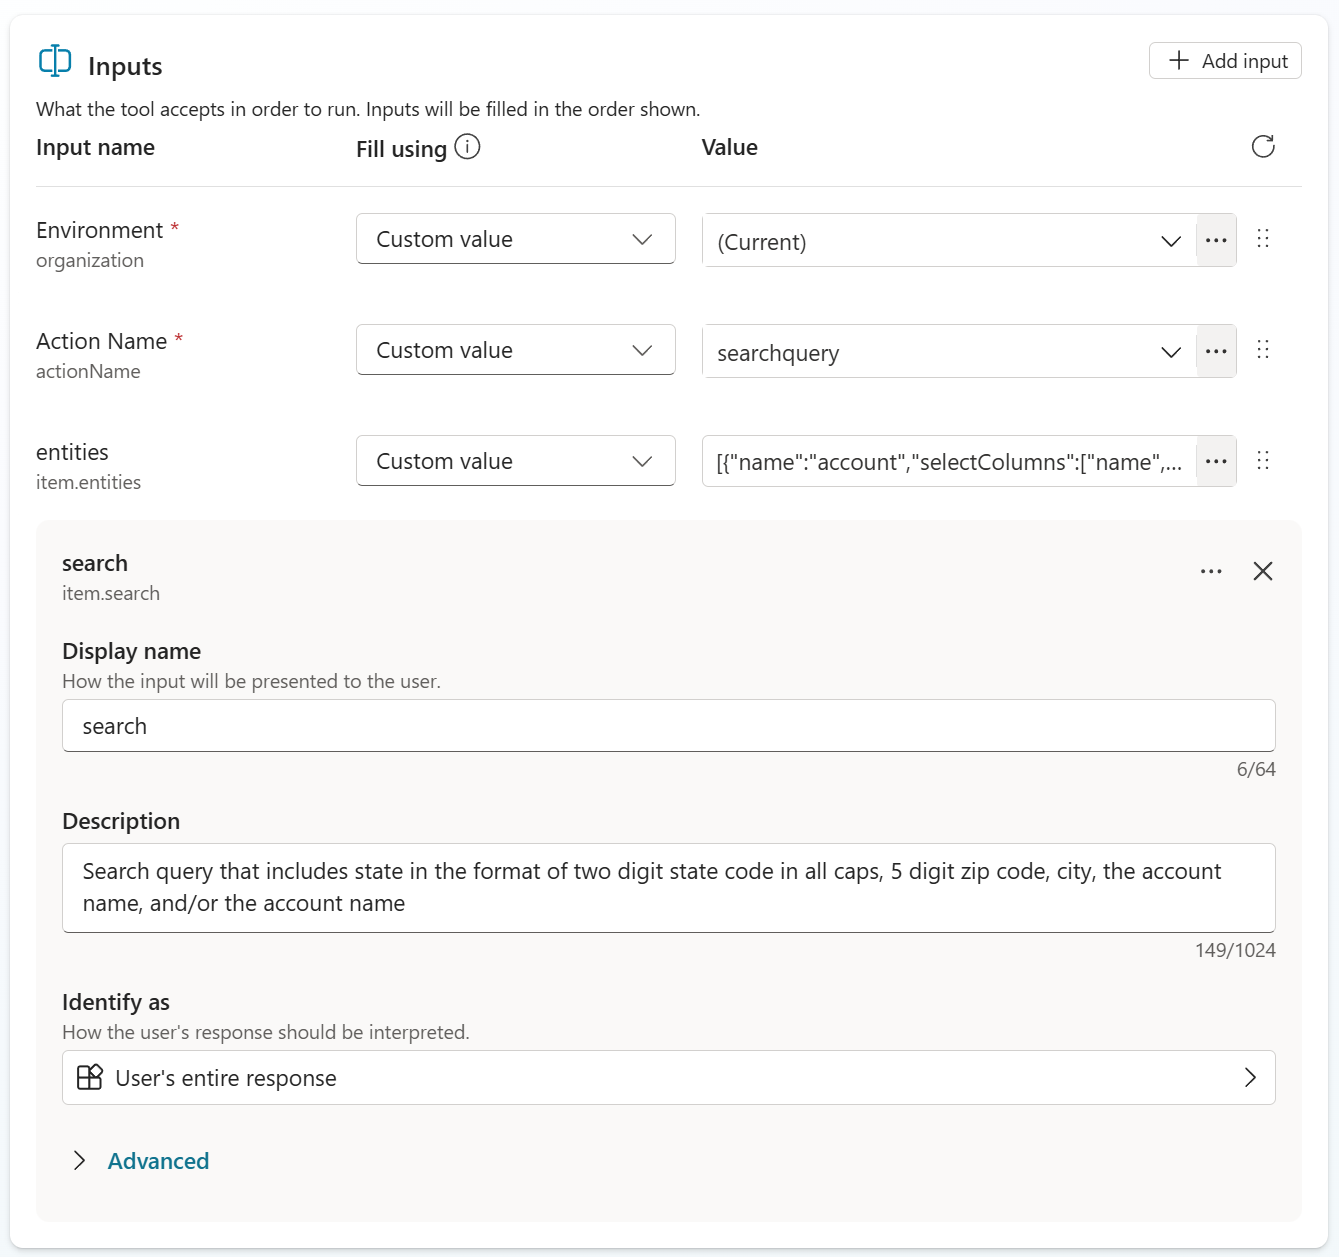
- Input descriptions tell the planner what value belongs in the input and how to format it. The planner uses this text to translate a user’s words into the exact value the tool expects to receive. Vague input descriptions are the most common reason a tool gets called with the wrong argument — even when the right tool was picked.
-
Read the description on the
searchinput carefully:“Search query that includes state in the format of two digit state code in all caps, 5 digit zip code, city, the account name, and/or the primary contact name”
Notice how strict the state code formatting requirement is: “two digit state code in all caps”. That single phrase tells the planner to translate the user’s word “Texas” into
TX, nottexas, notTexas, notTex. Dataverse search only matches if the value comes in correctly cased and formatted — so this description is what makes the difference between “agent returned all Texas accounts” and “agent returned no results.” - The
Fill usingcolumn (left of the Value column) controls how each input gets its value at runtime. The options include Custom value (the planner fills it from the conversation, guided by the description) and dynamically filled options that pull from variables or outputs of an earlier tool. The description matters in either case — when the value is dynamically filled from another tool’s output, the description tells the planner how to reshape that output to match this input’s expected format.
[!IMPORTANT] Input descriptions are the foundation of dynamic chaining — the pattern where the orchestrator uses one tool’s output as another tool’s input across turns. For dynamic chaining to work, every input in the chain needs a description clear enough for the planner to know what shape the value should arrive in. Skip this, and the planner has to guess how to transform data between steps; with good input descriptions, the transformation is deterministic.
[!TIP] When you author your own tool, write input descriptions in the form “<what the value is> in the format of <exact format>“. The
searchinput above is a good template — it names the field (state, zip, city, account name) and then specifies the format the field must arrive in. That two-part pattern is what gives the planner enough to format correctly across both user-driven and chained inputs.
Demonstration
[!TIP] As you run the demonstration below, watch for moments where the right answer depends on one of the descriptions reviewed above being clear. If the planner ever picks wrong, the fix is almost always at one of those levels — not at the user’s prompt.
-
Open the Test chat by selecting Test in the upper-right corner.
[!NOTE] On the first prompt that reaches a Dataverse tool, the agent returns a Connect to continue card — “I’ll use your credentials to connect and to get the information you’re looking for.” Select Allow. This is what creates the connection the tools need; it appears once per user.
-
Select the + in the Test chat to start a new conversation so no prior context influences the planner.
[!IMPORTANT] Run the following prompts in order without resetting the conversation again between turns. Several prompts depend on the planner remembering earlier results (e.g., “them”, “the 2nd one”), and resetting partway through will break those references.
After each response, expand the activity panel in the test chat to see which child agent and which tool the planner chose, and what arguments it passed.
-
Find accounts by location. Uses the Address 1: State/Province column we indexed in Use Case #1.
What are the accounts in Texas?Expand the activity tracker for this turn. You should see all three planner decisions land correctly, and — most importantly — see the input value transformation in action.
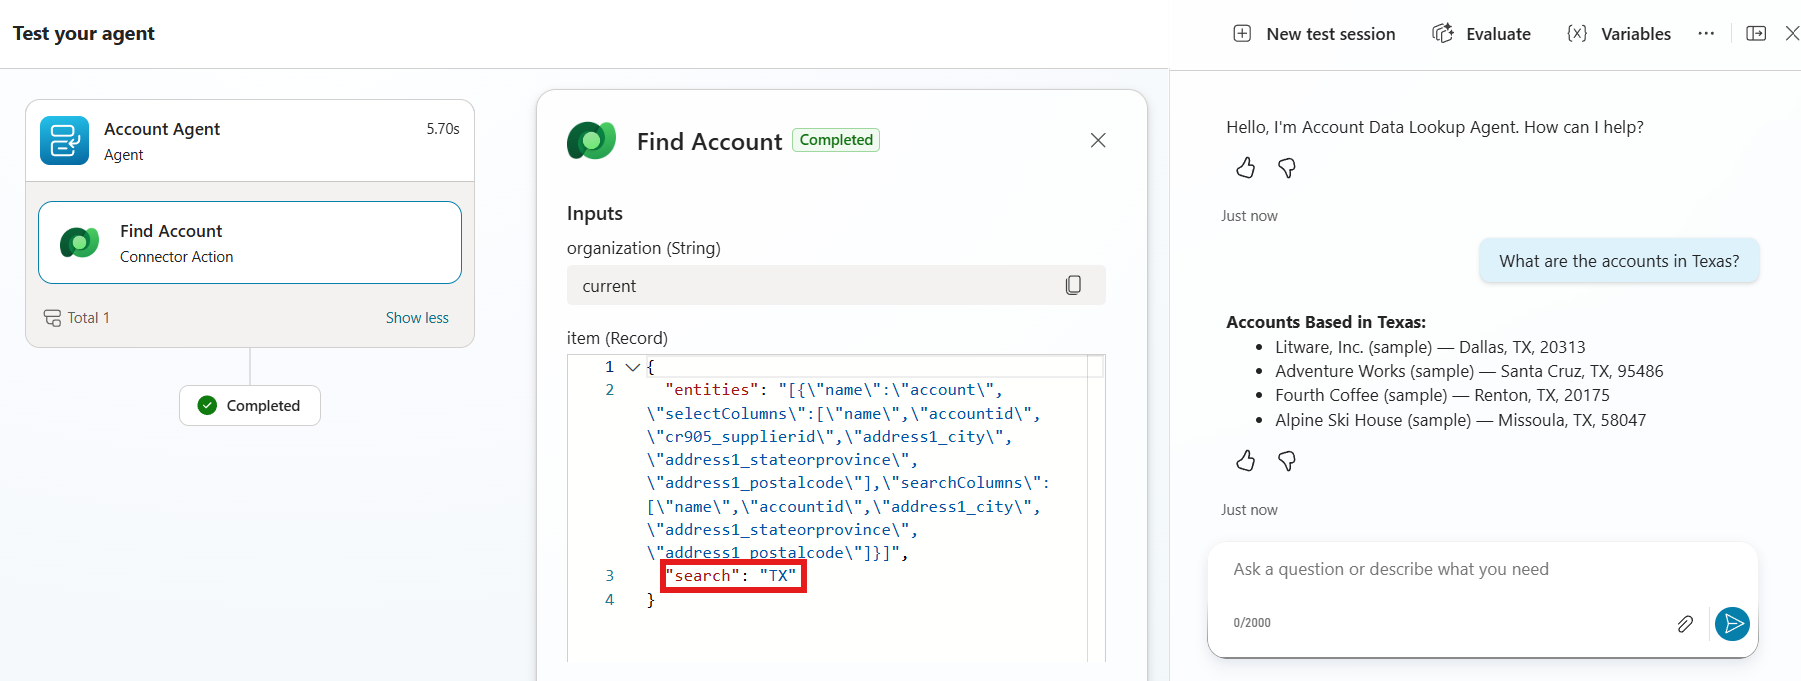
Notice in the screenshot:
- Right child agent picked:
Account Agent(left column). The name + description from step 3 of the review made this decision possible. - Right tool picked:
Find Account(left column, under Account Agent). The tool’s name + description from step 5 of the review steered the planner to this tool over any other Account tool. - Input value optimized to the required format: in the Inputs panel on the right, the
"search"value is"TX"— not"Texas". The user typed “Texas”, but the input description we reviewed in step 6 (“two digit state code in all caps”) told the planner to translate the user’s word into the format Dataverse search requires. Without that description, the search would have run with"search": "Texas"and returned nothing.
[!NOTE] This single turn shows every layer of the review working together: parent Instructions set the always-on rules, child agent Name + Description routed to the right child, tool Name + Description routed to the right tool, and the input Description formatted the value. Each layer is doing its own job, and the right answer only emerges when all four are clear.
- Right child agent picked:
-
Carry context across turns. Asks for more fields on the same accounts.
What are all the details on them?Expand the activity tracker for this turn. You should see something like the screenshot below — the planner did not re-run the search; instead it took the 4 accounts from the previous turn and called Get Account Details once per account.
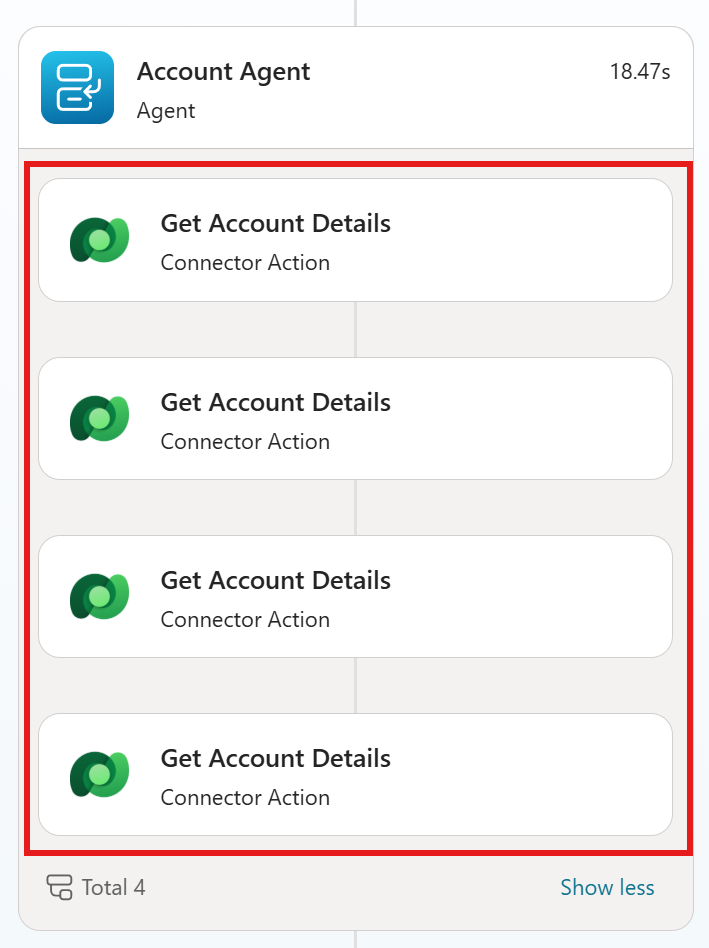
Notice in the screenshot:
- Same child agent: still
Account Agent— the planner stayed in the same child for a related follow-up question. - Different tool, different pattern: the previous turn called
Find Account(search). This turn callsGet Account Details— a different tool whose description told the planner “use me when expanding details on an account already in context”. - Four parallel calls, one per account:
Total 4. The planner walked the 4-account result from the previous turn and issued one details call per account, using each account’s identifier from the conversation context as the input. - Pronoun resolution worked: the word “them” was never sent to a tool. The planner resolved it to the specific 4 accounts and made the data flow deterministic.
[!TIP] This find → details pattern is one of the most important design choices in agent authoring. The search tool returns a minimal record per match (just enough to identify it). The details tool fetches the full payload only for the specific items the user asks about. The alternative — having one tool that returns every field for every match — would dump a huge amount of data into the LLM’s context on every search, blowing the token budget and making the prompt unmanageable. Splitting the work across two tools means only the data the user actually needs ever reaches the LLM.
- Same child agent: still
-
Drill into a related entity. Moves from Accounts to Contacts.
What is the job title of the primary contact of the 2nd one?Expand the activity tracker for this turn and click into the child agent block. You should see something like the screenshot below — the planner switched from
Account AgenttoContact Agent, and constructed a concrete task input from the conversation context.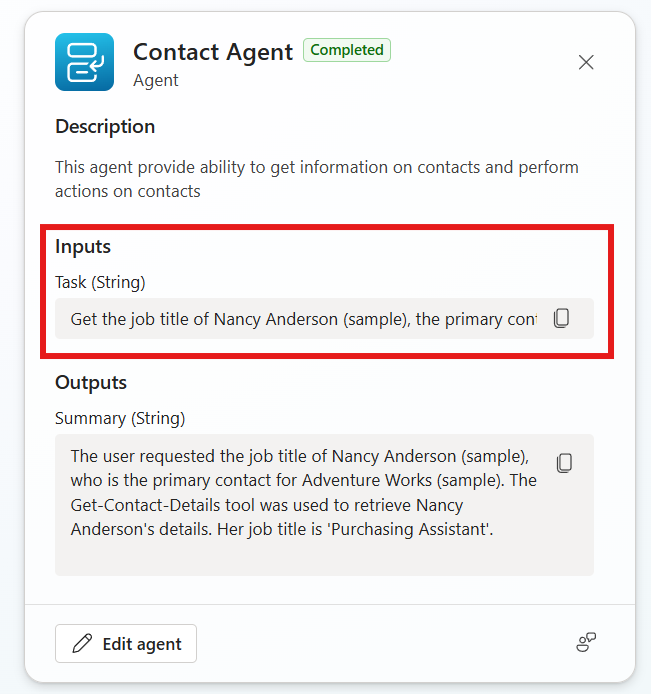
Notice in the screenshot:
- Right child agent picked: the planner moved out of
Account Agentand intoContact Agent. The Contact Agent’s Description (“This agent provide ability to get information on contacts and perform actions on contacts”) is what told the planner this child is the right home for a primary-contact / job-title question. - Context fully resolved into a concrete Task: the user said “the primary contact of the 2nd one.” Look at the Task input the parent’s planner sent to the Contact Agent — it isn’t “the 2nd one”; it’s “Get the job title of Nancy Anderson (sample), the primary contact for Adventure Works (sample).” The parent did the context resolution before dispatching to the child:
- “the 2nd one” →
Adventure Works (sample)(item 2 in the previous turn’s account list) - “the primary contact of” →
Nancy Anderson (sample)(resolved from the account record retrieved earlier)
- “the 2nd one” →
- Child agents take a natural-language Task, not structured parameters: the input to a child agent is a sentence describing what to do. That keeps the parent → child handoff flexible — the child decides which of its own tools to use to fulfill the Task.
- Summary output shows the reasoning trace: the Outputs panel returns a Summary that names the tool the child called (
Get-Contact-Details) and the answer ('Purchasing Assistant'). That summary is what the parent agent uses to compose its reply to the user.
- Right child agent picked: the planner moved out of
-
Use a derived field. Asks for a value (
age) that doesn’t exist in the database — it has to be calculated from a value that does (birthdate).How old are they?Expand the activity tracker, click into the
Contact Agentblock, and look at the Outputs Summary. You should see something like the screenshot below — the agent didn’t just hand back a birthday, it calculated the actual age in years using today’s date.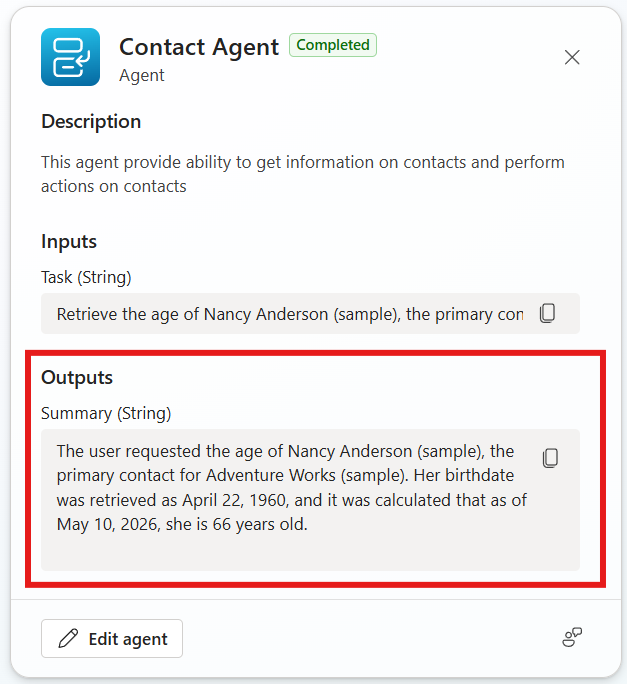
Notice in the screenshot:
- The Task input asks for age, not birthdate: the parent’s planner translated “How old are they?” into the Task “Retrieve the age of Nancy Anderson (sample), the primary con[tact for Adventure Works]”. Even though the underlying Dataverse column is Birthdate, the parent didn’t lower the user’s intent to match the column — it kept the Task at the intent level (
age). - The Summary walks through the derivation step-by-step: “Her birthdate was retrieved as April 22, 1960, and it was calculated that as of May 10, 2026, she is 66 years old.” That sentence is the LLM showing its work — fetch raw data, compute the derived value, return the answer.
- No “age” tool exists: the Contact Agent never called a
Get-Contact-Agetool, because there isn’t one. It calledGet-Contact-Details, retrieved the birthdate, and the LLM did the date math itself before composing the Summary. - Context still carrying: “they” resolved to Nancy Anderson from the previous turn, with no explicit re-introduction.
[!TIP] This turn shows an important orchestration capability: the planner is happy to derive answers from raw data rather than expecting a tool for every possible question. You don’t need a
Get-Contact-Agetool — exposingBirthdateis enough, because the LLM can reason about dates. Reach for a tool only when the calculation is something the LLM can’t do reliably (large datasets, exact business rules, anything requiring secrets or signed calls). For everything else, raw fields plus a clear Summary are usually all the planner needs. - The Task input asks for age, not birthdate: the parent’s planner translated “How old are they?” into the Task “Retrieve the age of Nancy Anderson (sample), the primary con[tact for Adventure Works]”. Even though the underlying Dataverse column is Birthdate, the parent didn’t lower the user’s intent to match the column — it kept the Task at the intent level (
-
Use a status field, then ask the planner to explain itself. Marital Status is one of the columns indexed in Use Case #1.
Are they married?Scroll to the bottom of the activity tracker item for this turn and select Get rationale. The agent will produce a plain-language explanation of why it chose the tools it chose and how it built the plan.
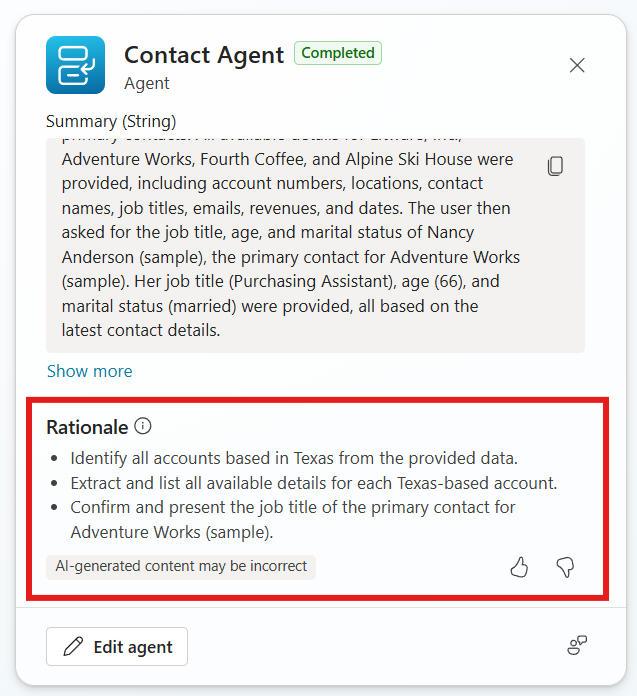
Notice in the screenshot:
- The Summary at the top recaps what happened across the recent turns — it names the accounts, the contact, and the specific values the agent retrieved (e.g.
Purchasing Assistant,66,married). - The Rationale section breaks the plan into discrete reasoning steps, in the planner’s own words:
- “Identify all accounts based in Texas from the provided data.”
- “Extract and list all available details for each Texas-based account.”
- “Confirm and present the job title of the primary contact for Adventure Works (sample).”
- This is the planner’s interpretation of your prompts back to you — not a generic post-hoc explanation. It tells you exactly which goals the planner thinks it was solving and the order it solved them in.
[!TIP] Get rationale is the most useful tuning tool in the entire orchestration story. When the planner does the wrong thing — picks the wrong tool, summarizes a value incorrectly, skips a step — the rationale tells you why it thought that was right. Read it side-by-side with your Instructions and Descriptions. If the rationale reflects the meaning you intended, your descriptions are doing their job. If it reflects something subtly wrong (“identify the largest account” when you meant “the most recently updated account”), you have a precise pointer to which description needs sharper wording. Treat the rationale as a debugger trace for your descriptions.
- The Summary at the top recaps what happened across the recent turns — it names the accounts, the contact, and the specific values the agent retrieved (e.g.
-
Pivot directly to a contact. Up to this point every prompt has started from accounts. This one enters from the contact side.
What is Marie Campbell's phone number?Expand the activity tracker for this turn and notice that the planner went directly to the Contact Agent — there is no
Account Agentblock, and noFind Accountcall.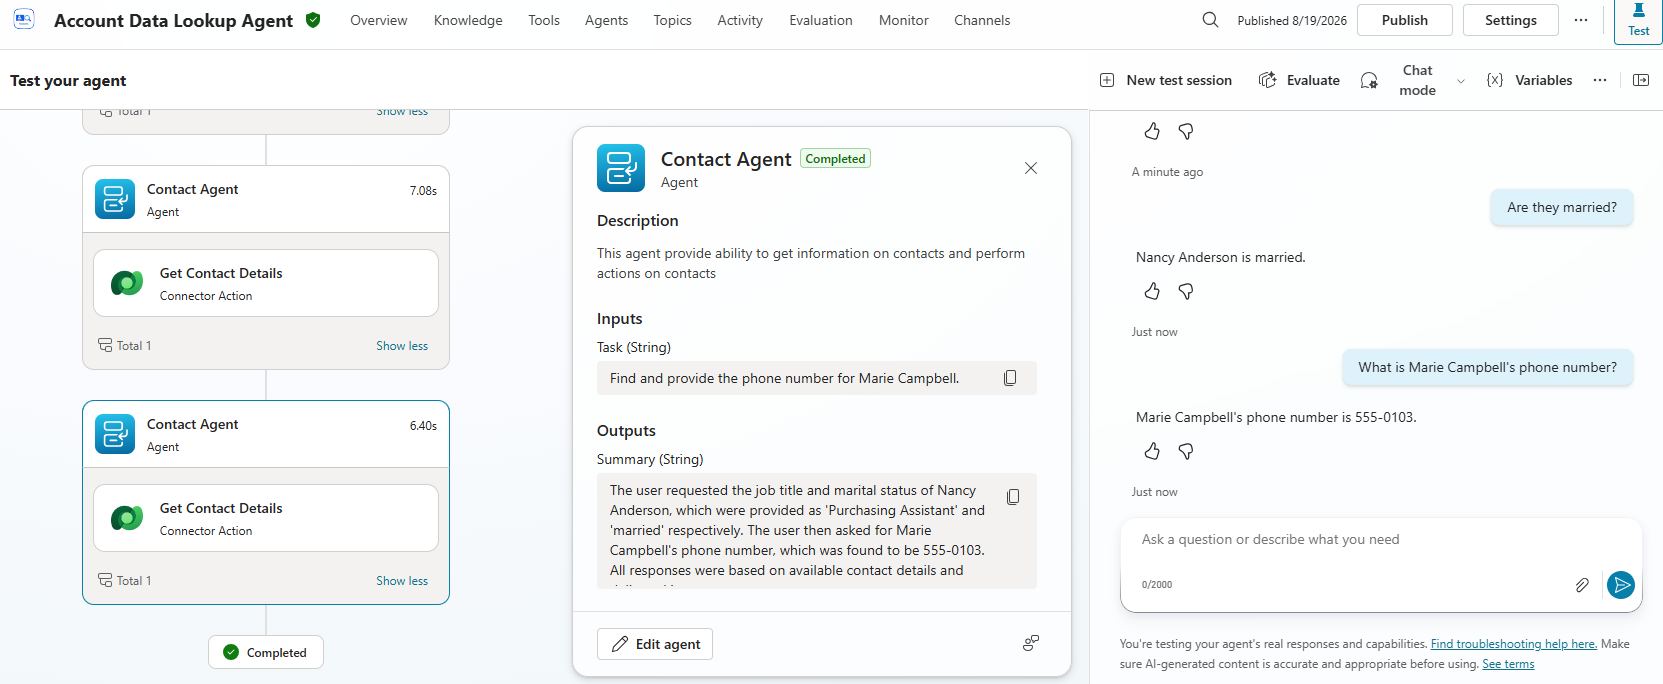
Notice in the screenshot:
- No Account Agent in the activity trace. The planner read the user’s request, recognized that the subject is a person (
Marie Campbell), and dispatched straight to theContact Agent. It didn’t search accounts first because the question doesn’t require one. - The Task input is a direct contact lookup: “Find and provide the phone number for Marie Campbell.” The planner didn’t need to resolve an account first — the contact name alone was enough to dispatch to the
Contact Agent. - The Summary mirrors the answer back to the parent — the phone number the Contact Agent found for Marie Campbell.
- Two Contact Agent calls visible — the activity tracker still shows the previous turn’s Contact Agent invocation as well, since the test session is the same conversation.
[!NOTE] This is the payoff of designing the agent the way it’s been designed. Because Account Agent and Contact Agent are peer child agents — neither one calls the other — the planner can enter from whichever side the user’s question naturally starts at:
- “What are the accounts in Texas?” →
Account Agent - “Who’s the primary contact for Adventure Works?” →
Account Agent→Contact Agent(chained) - “What is Marie Campbell’s phone number?” →
Contact Agentdirectly - “What’s the phone number of every primary contact in Texas?” →
Account Agent→Contact Agent(looped, one contact per account)
The same set of tools answers every direction of question. You don’t write a tool for each pivot — you write good descriptions on each tool, and the planner finds the path. That’s the difference between an agent you have to extend for every new question and one that flexes to whatever the user asks.
- No Account Agent in the activity trace. The planner read the user’s request, recognized that the subject is a person (
Congratulations! You’ve completed Use Case #2!
Test your understanding
Key takeaways:
- Instructions shape behavior; Descriptions shape routing. Instructions are how an agent (parent or child) behaves once selected. Descriptions are how the planner decides whether to select it in the first place.
- The planner reads descriptions at four levels — agent, child agent, tool, and input. Weakness at any one level cascades into wrong routing or wrong arguments.
- Conversation context carries through orchestration. Pronouns like “them” and ordinals like “the 2nd one” are resolved against prior turns, then handed to the right tool with the right argument — without the user repeating themselves.
Lessons learned & troubleshooting tips:
- If the planner picks the wrong child agent, the child’s Description is usually the place to fix it.
- If a tool gets called with the wrong argument, it’s almost always an input Description issue, not the user’s wording.
- If the planner re-searches when it should have used context, your tool descriptions may be unclear about which inputs are required vs. optional.
Use Case #3: New Orchestrator – Agentic Reasoning Loop
Build a brand-new Sales Account Assistant in Copilot Studio’s New experience, attach knowledge and a set of tools, and watch the New Orchestrator drive multi-step tasks with its Agentic Reasoning Loop — planning, calling a tool, observing the result, and iterating until the user’s task is complete, all in a single turn.
| Use case | Value added | Estimated effort |
|---|---|---|
| New Orchestrator – Agentic Reasoning Loop | See how a new-type agent’s native orchestrator completes multi-step tasks end to end | 30 minutes |
Summary of tasks
You’ll create a new-type agent (in the New experience), add a knowledge file and two tools (a public weather connector and the Microsoft Dataverse MCP Server), and run a series of prompts that exercise the Agentic Reasoning Loop — multi-tool reasoning, dynamic chaining, and train-of-thought inspection.
Scenario: You’re building a Sales Account Assistant that completes multi-step tasks for sales associates without stopping to prompt them at each step. A new-type agent uses the New Orchestrator natively, so the same prompts produce a finished result rather than a series of intermediate confirmations.
[!NOTE] What happened to “Enhanced Task Completion”? On classic agents, the Agentic Reasoning Loop was previewed behind a Settings → Generative AI → Enhanced task completion toggle. In the New experience, a new-type agent uses the New Orchestrator (Agentic Reasoning Loop) by default — there’s no toggle to flip. This Use Case builds a new-type agent so you see the orchestrator as it ships, not the preview. (Use Cases #1 and #2 deliberately use the classic Account Data Lookup Agent because they showcase the classic surfaces — child agents, the Activity Tracker, and Get rationale — which are specific to standard generative orchestration.)
Objective
Stand up a new-type agent and validate how the New Orchestrator’s Agentic Reasoning Loop drives multi-tool task completion.
Step-by-step instructions
Enable Dataverse Intelligence (Work IQ) and Dataverse MCP servers
[!NOTE] These environment features are required for the Dataverse MCP tool you’ll add below — they are not specific to the New Orchestrator.
-
Navigate to the Power Platform admin center the same way you did in Use Case #1 — in Copilot Studio, select the Gear icon in the upper right, then Go to Power Platform admin center.
-
Select the Manage tab, then Environments, choose your environment, then select Settings on the top navigation bar of the environment page (the same top-nav Settings command you used in Use Case #1).
-
Expand the Product group and select Features.
-
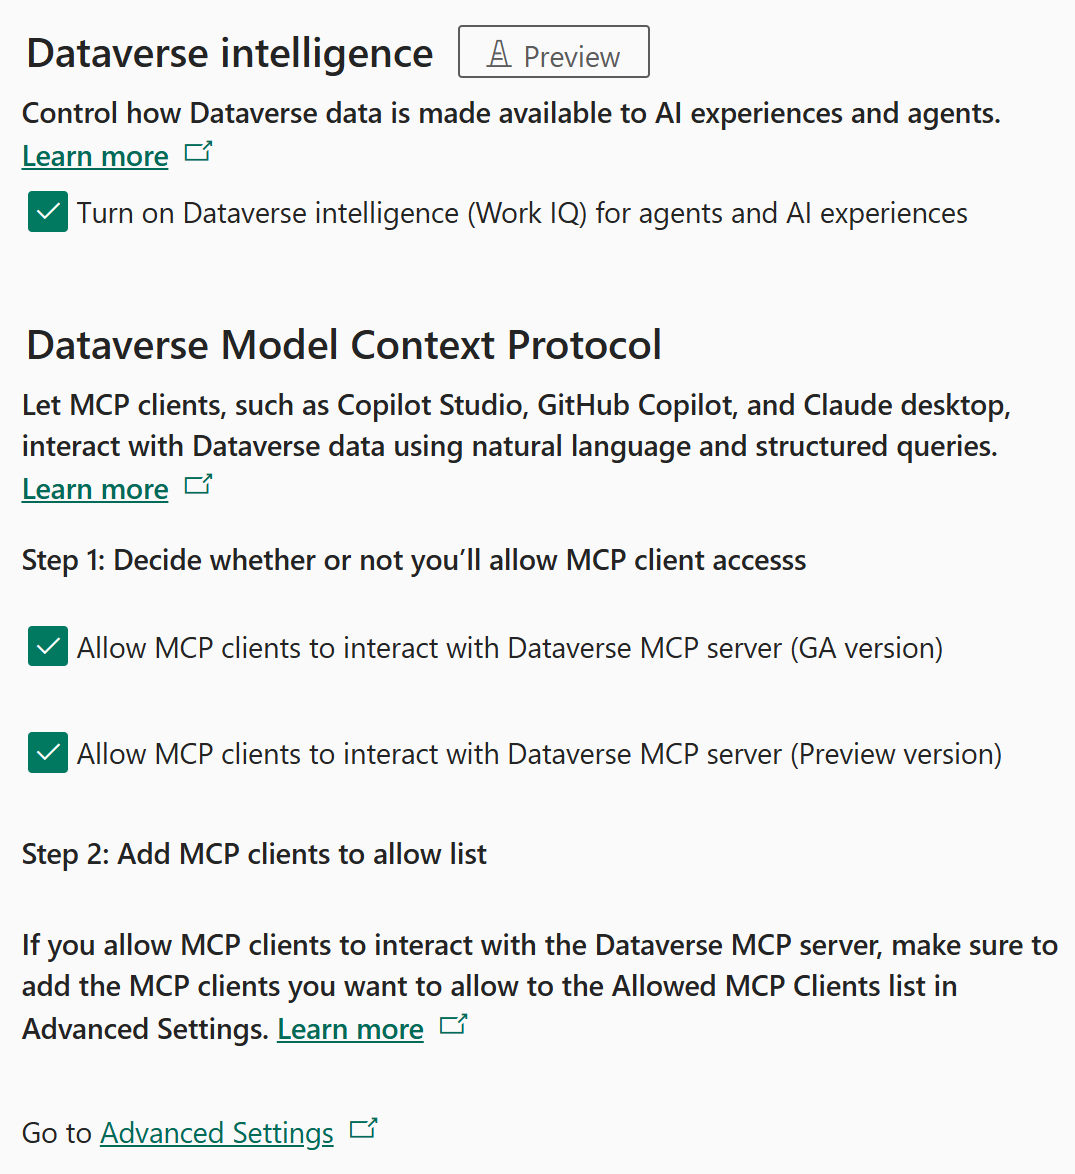
Under Dataverse intelligence, check Turn on Dataverse intelligence for agents and AI experiences. It is off by default, so this is a change you make rather than a setting you confirm.
[!NOTE] The “(Work IQ)” label has moved. It now sits on a different setting further down the page — Turn on search indexing to support Dataverse intelligence (Work IQ) in AI and agent experiences — which is typically already on. The one you need here is the shorter, unparenthesised label under Dataverse intelligence.
-
Under Dataverse Model Context Protocol (framed as “Step 1: Decide whether or not you’ll allow MCP client access”), check both MCP client options — (GA version) and (Preview version). Typically only the GA option is on by default, so expect to set the Preview one yourself.
-
Select Save if you made any changes.
Create the new-type Sales Account Assistant
-
In Copilot Studio, confirm the New experience toggle (top-right) is on — it is by default.
-
Select Agents in the left navigation pane, then select New Agent in the upper-right corner. Selecting New Agent itself creates a new-type agent in the new designer. (The More create options dropdown also offers Build using standard orchestration — that is the rule-based classic agent, and you do not want it here.)
[!NOTE] Creating an agent this way produces a new-type agent that runs on the New Orchestration engine — the one that leverages the Agentic Reasoning Loop (plan → act → observe → iterate within a single turn). That orchestration engine is what makes the multi-step behavior you’ll see later in this Use Case possible, and it’s enabled by default for new-type agents with no toggle to flip.
-
The new agent designer opens on the Build tab. Use the agent-name field (or the Rename agent control) to name it:
Sales Account Assistant -
In the Instructions box, paste a short set of instructions so the orchestrator knows how to use its tools:
You are a Sales Account Assistant for sales associates. Help users complete multi-step tasks end to end. Use your Dataverse tools to look up account and contact data and the weather tool for current weather. When a request touches gifts or spending, follow the company gifting policy in your knowledge. Complete the whole task before responding rather than stopping to ask at each step. -
Leave the Model at whatever default the designer selected — the specific model changes over time and nothing in this lab depends on it. Select Save in the command bar. The agent is assigned an ID and its URL changes from
/agents/newto that ID.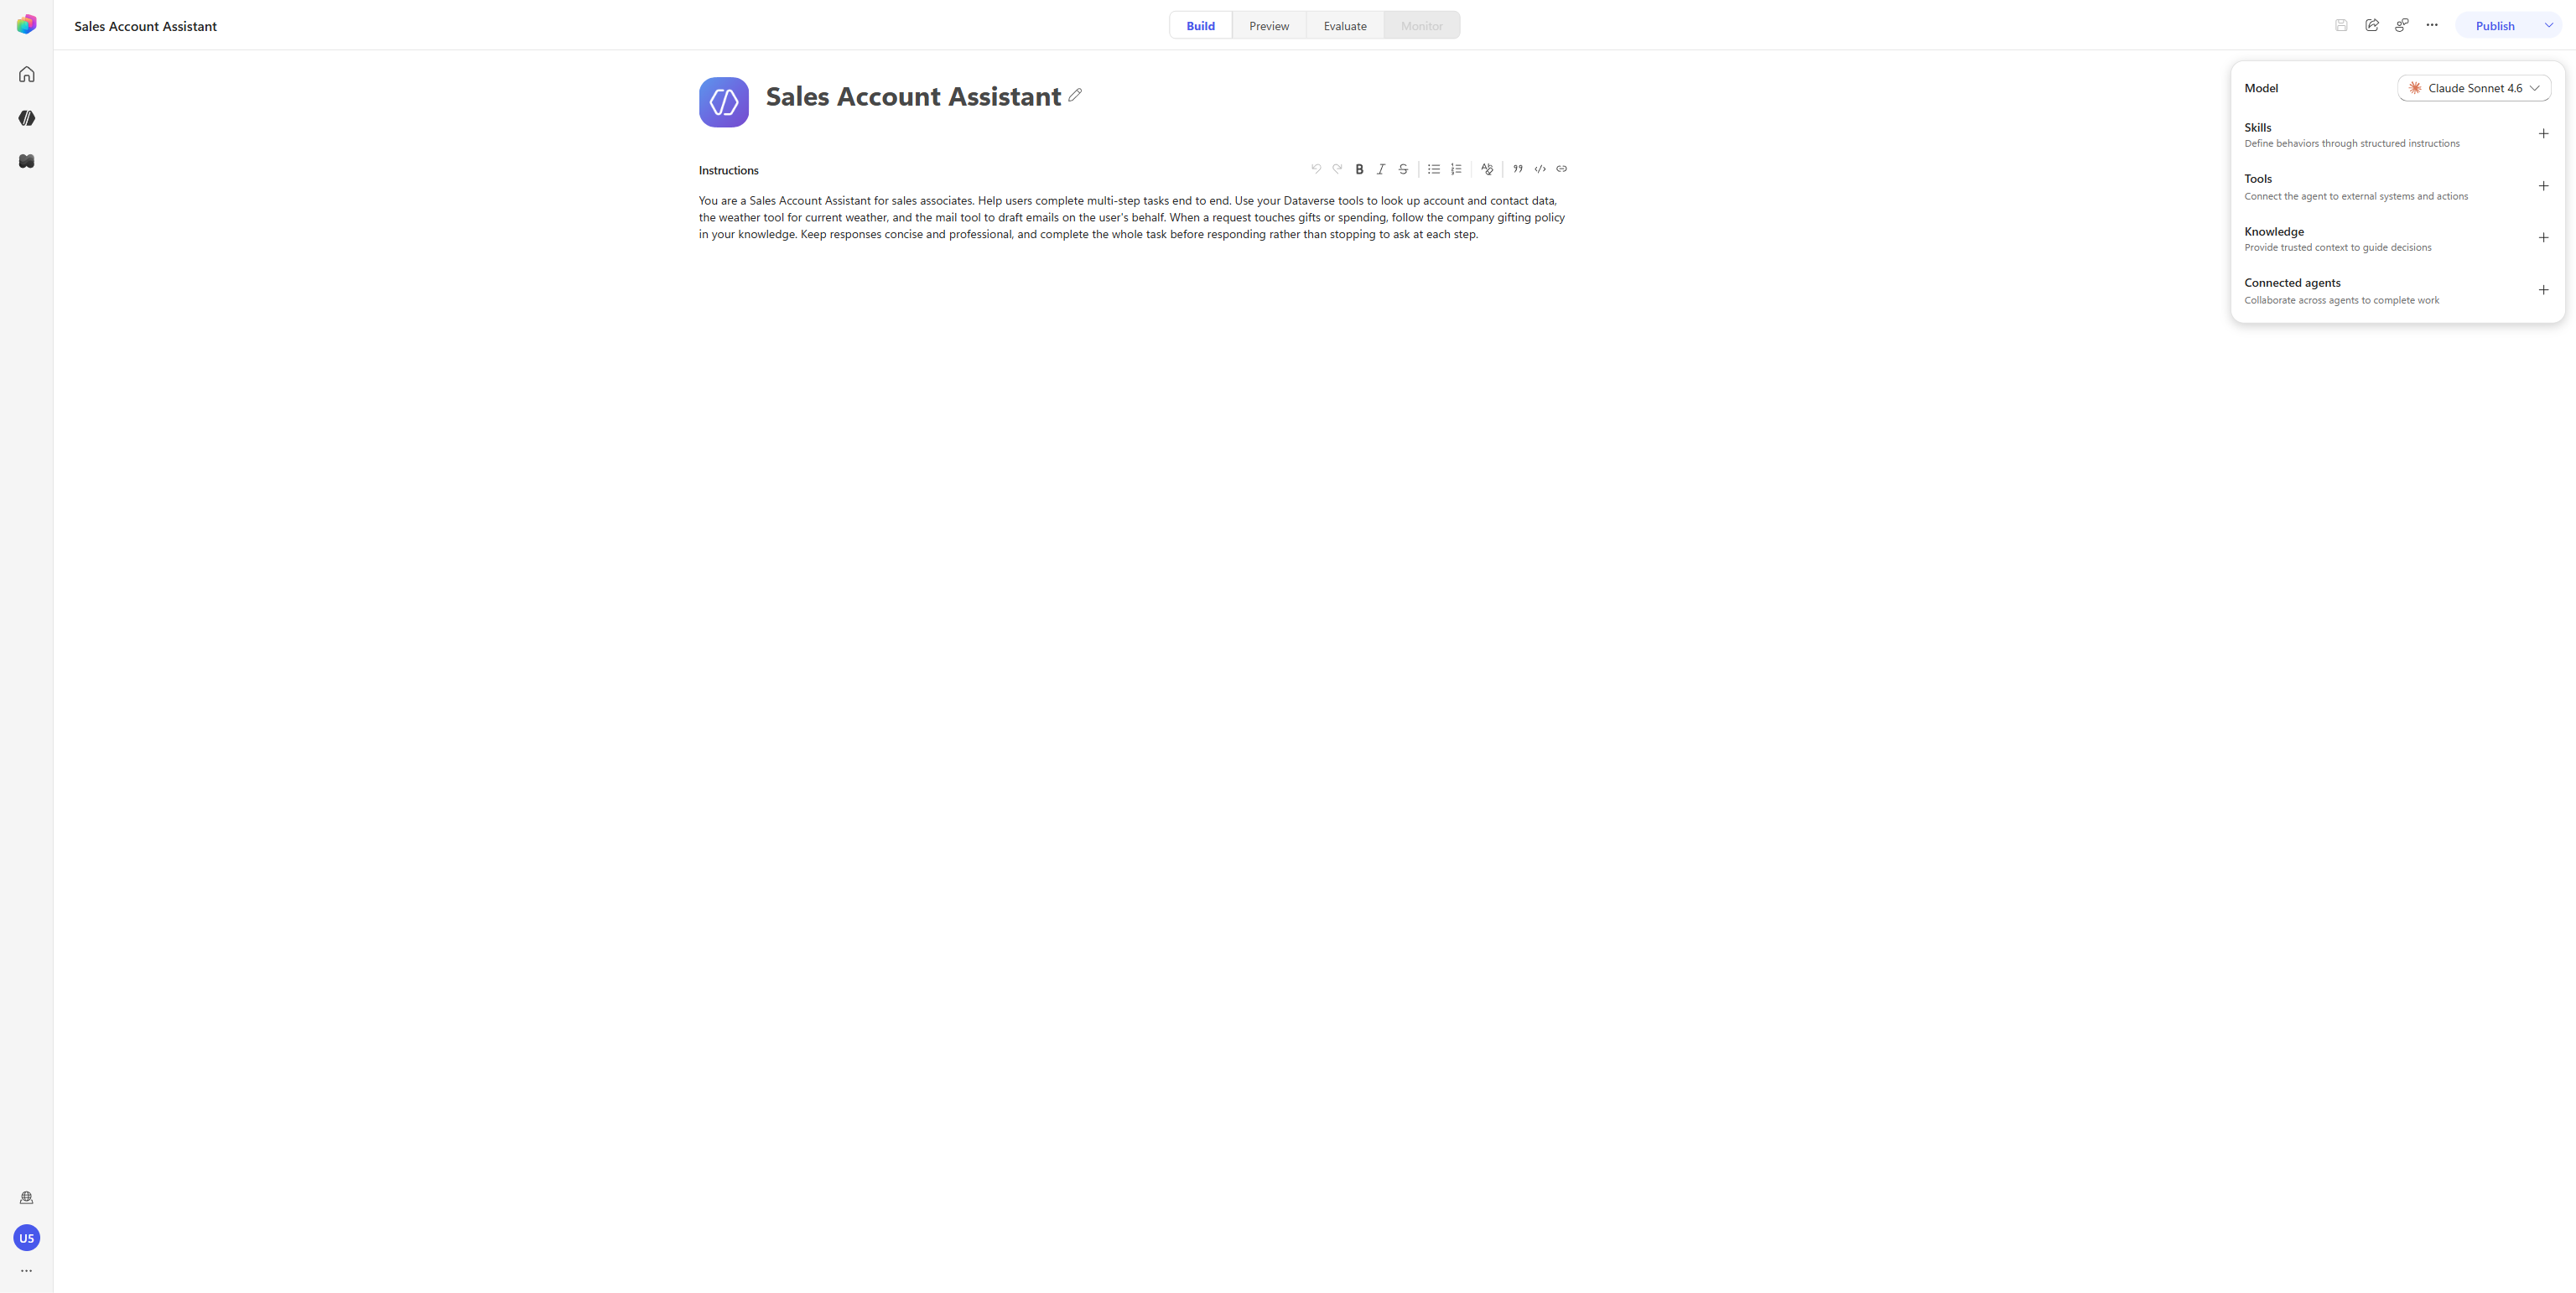
[!NOTE] Why a new agent rather than the description-driven creation flow? Starting from a named, lightly-instructed agent keeps the baseline clean — the behavior you observe in the test phase is the direct result of the tools you attach and the New Orchestrator driving them, not something a description-driven setup added on your behalf.
Add the tools the orchestrator will use
You’ll add two tools. In the new designer, adding a tool is Add tool → pick the tool → Add, and then you configure its connection and authentication mode from the tool’s Details panel.
Add the Weather tool (Maker authentication)
-
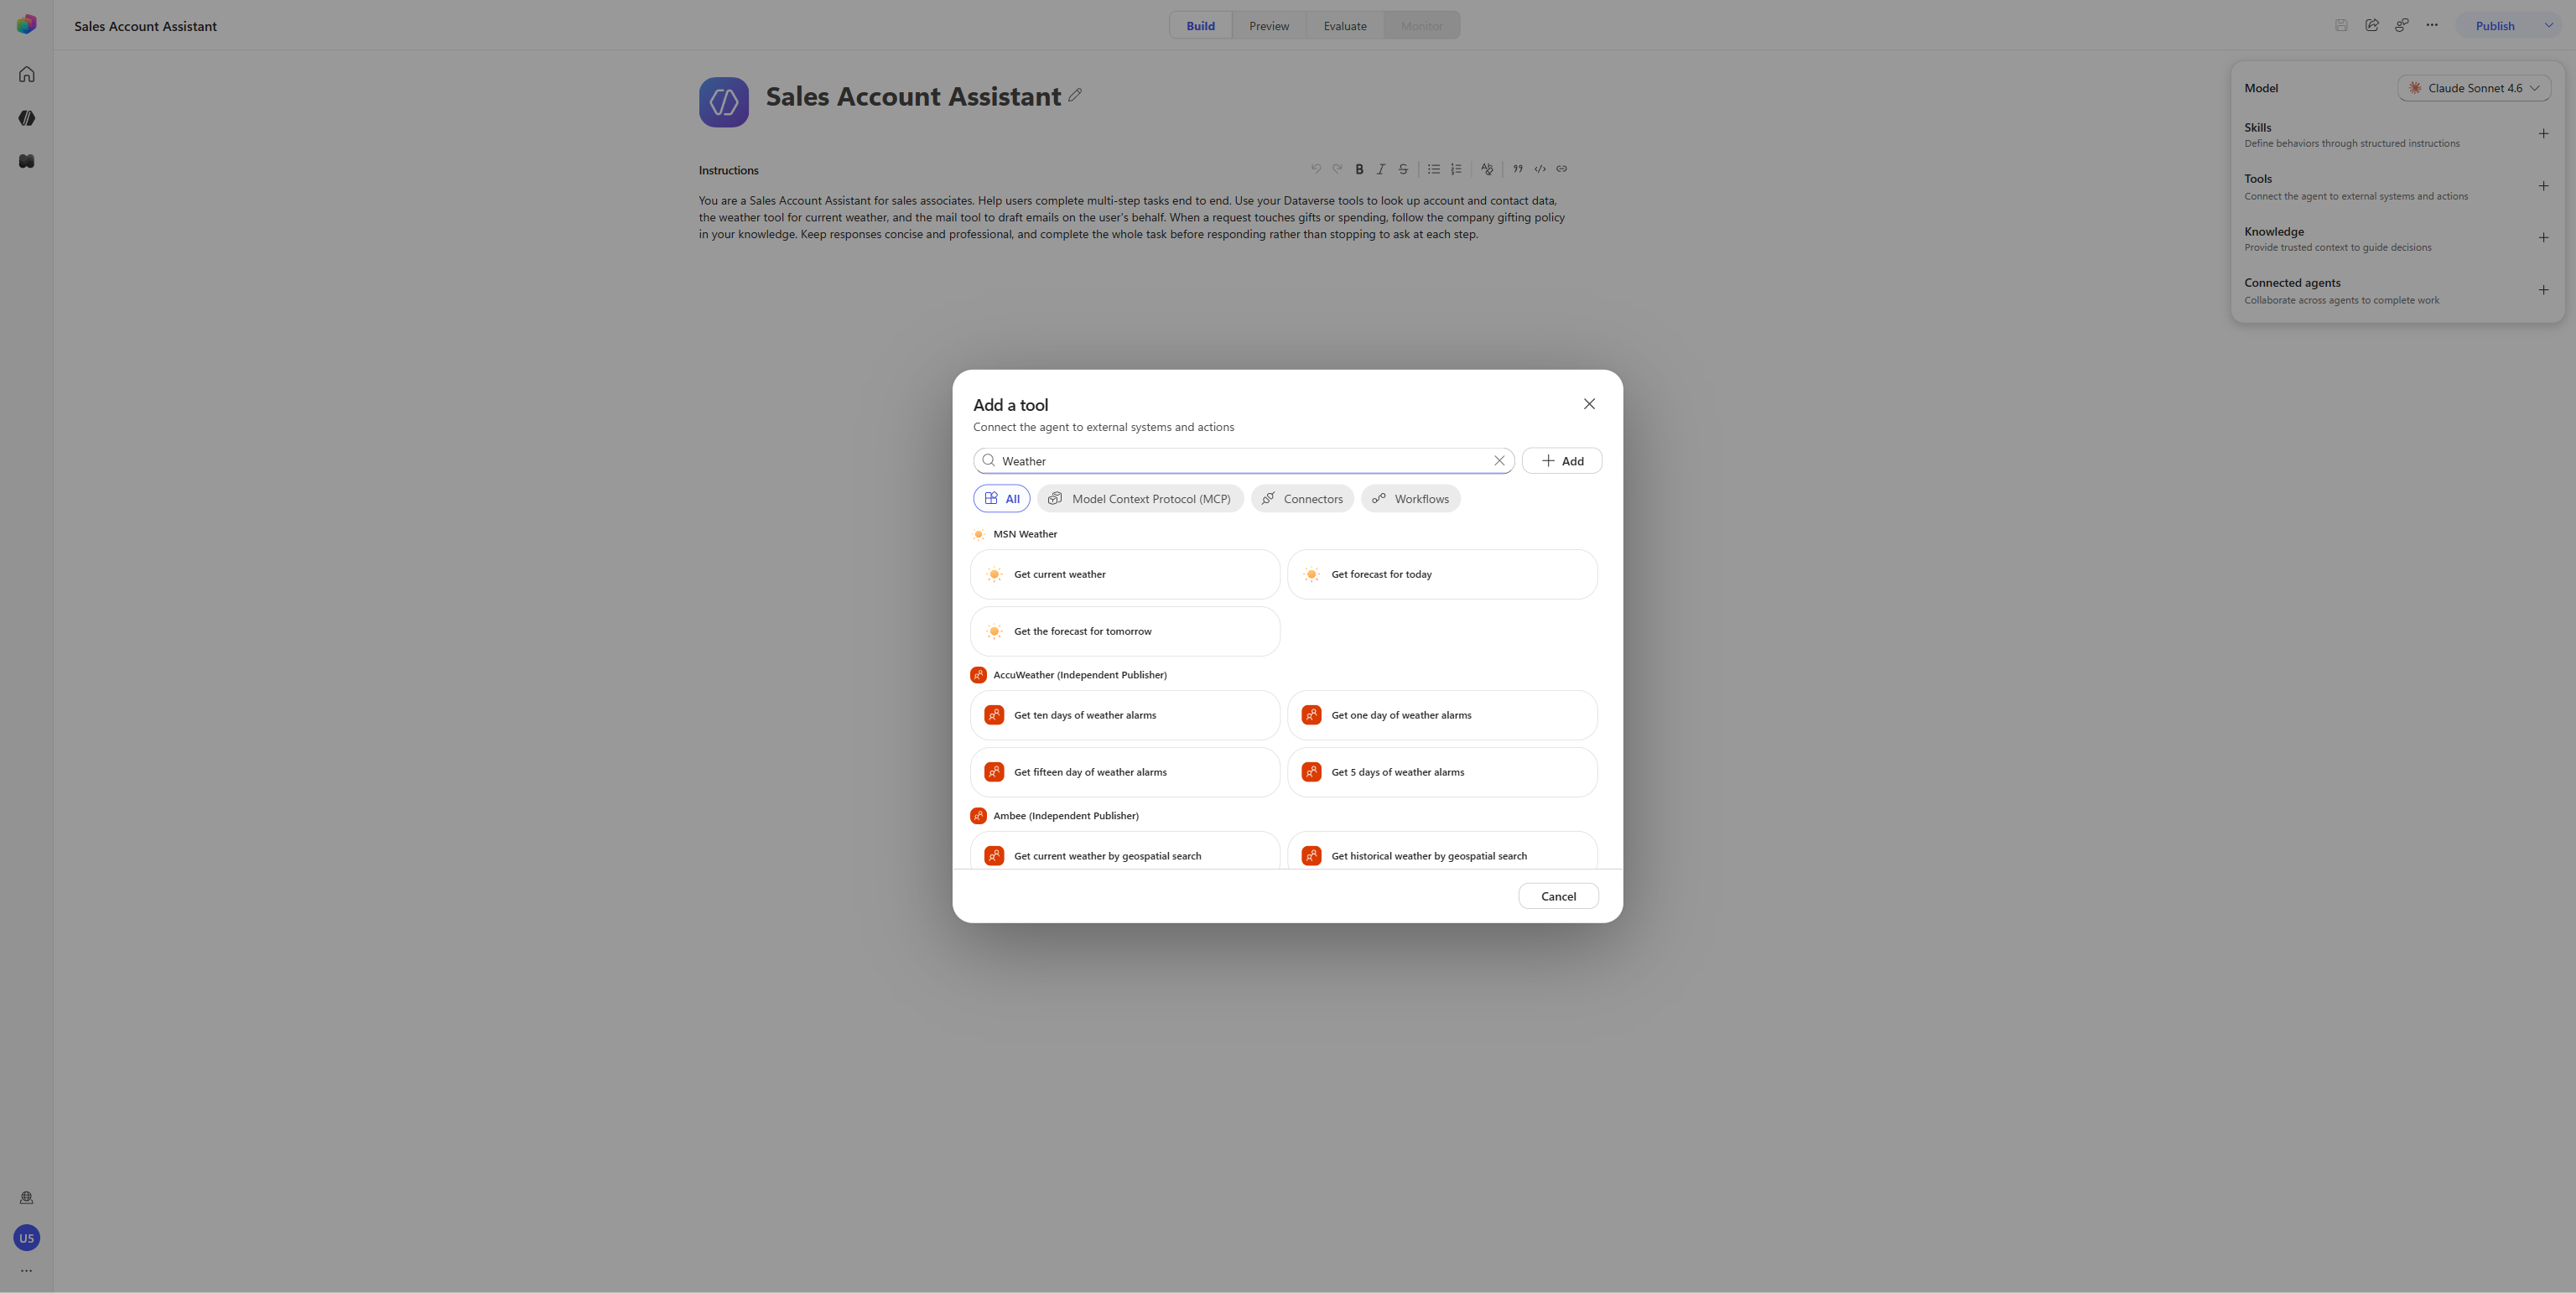
In the right rail, select Tools, then search for Weather. The search returns well over a hundred results grouped by publisher — scroll to the MSN Weather group and select its Get current weather, then select Add.
[!TIP] Do not take the first similar-looking hit. Ambee publishes a Get current weather by geospatial search that appears higher up the list. You want the one under the MSN Weather heading.
-
In the Tools list in the right rail, select the
Get current weathertool to open its Tool details. (Clicking a tool in this menu is how you configure it — there’s no separate settings button; the tool’s name opens its Details, Inputs, and Outputs panels.) -
Under Authentication mode, select Maker. A Connection field appears — select Not connected → Create new connection → Create. Once it shows your connection, select Done.
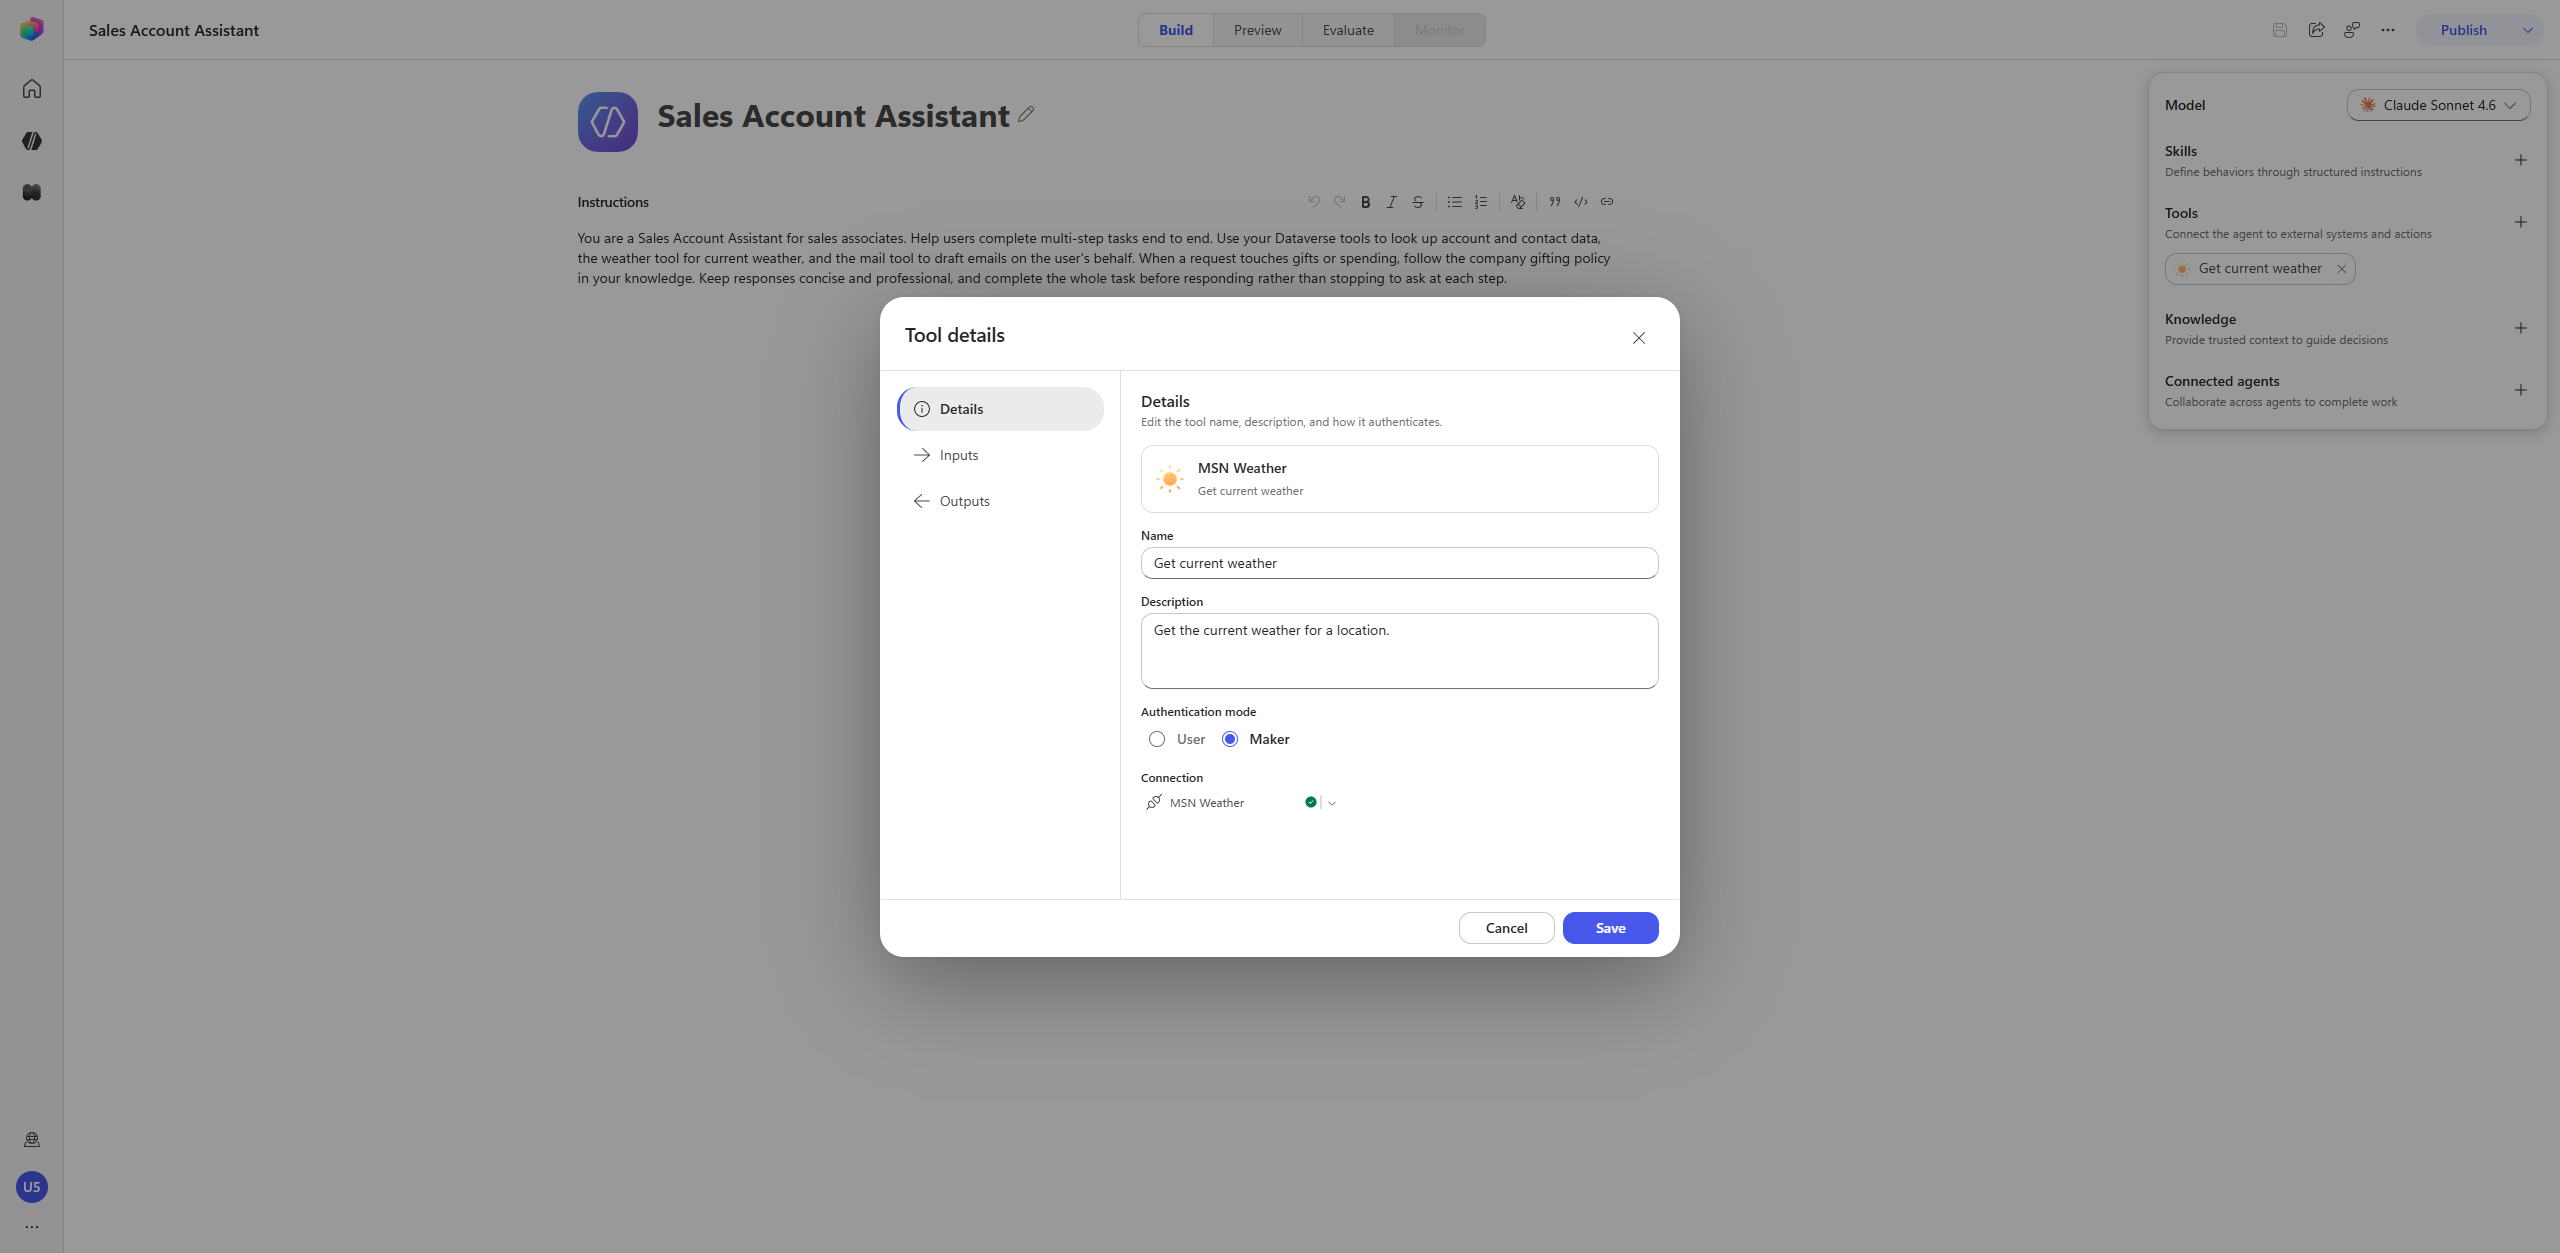
[!IMPORTANT] Use Maker for anonymous or API‑key / service‑account tools. The MSN Weather connector authenticates anonymously, so it should run as the maker — your connection is reused for every end user and no one is prompted to connect at runtime. The same rule applies to any connector that authenticates with a shared API key or service account rather than the end user’s identity: set those to Maker too. If you leave such a tool on User, the agent returns a “Connection Required” card the first time it tries to call it. (Tools that act as the signed-in user — e.g. a mailbox or files connector — would instead keep User authentication.)
-
Still in Tool details, select Inputs from the left panel. Leave Location set to AI (the agent infers the location from the conversation). For Units, change How is this filled? from AI to Value so you control the unit system, then bind it to a variable: open the Value picker, select + Add variable, and in the variable’s Value field click the chevron on the right — that chevron is where the unit options appear. Choose I (Imperial) for this lab, then Save.
[!NOTE] Units accepts
Ifor Imperial (°F) orCfor Celsius (°C). This lab usesI, but set whichever matches your preference — the agent reports temperatures in the unit you pick here.
Add the Microsoft Dataverse MCP Server tool
-
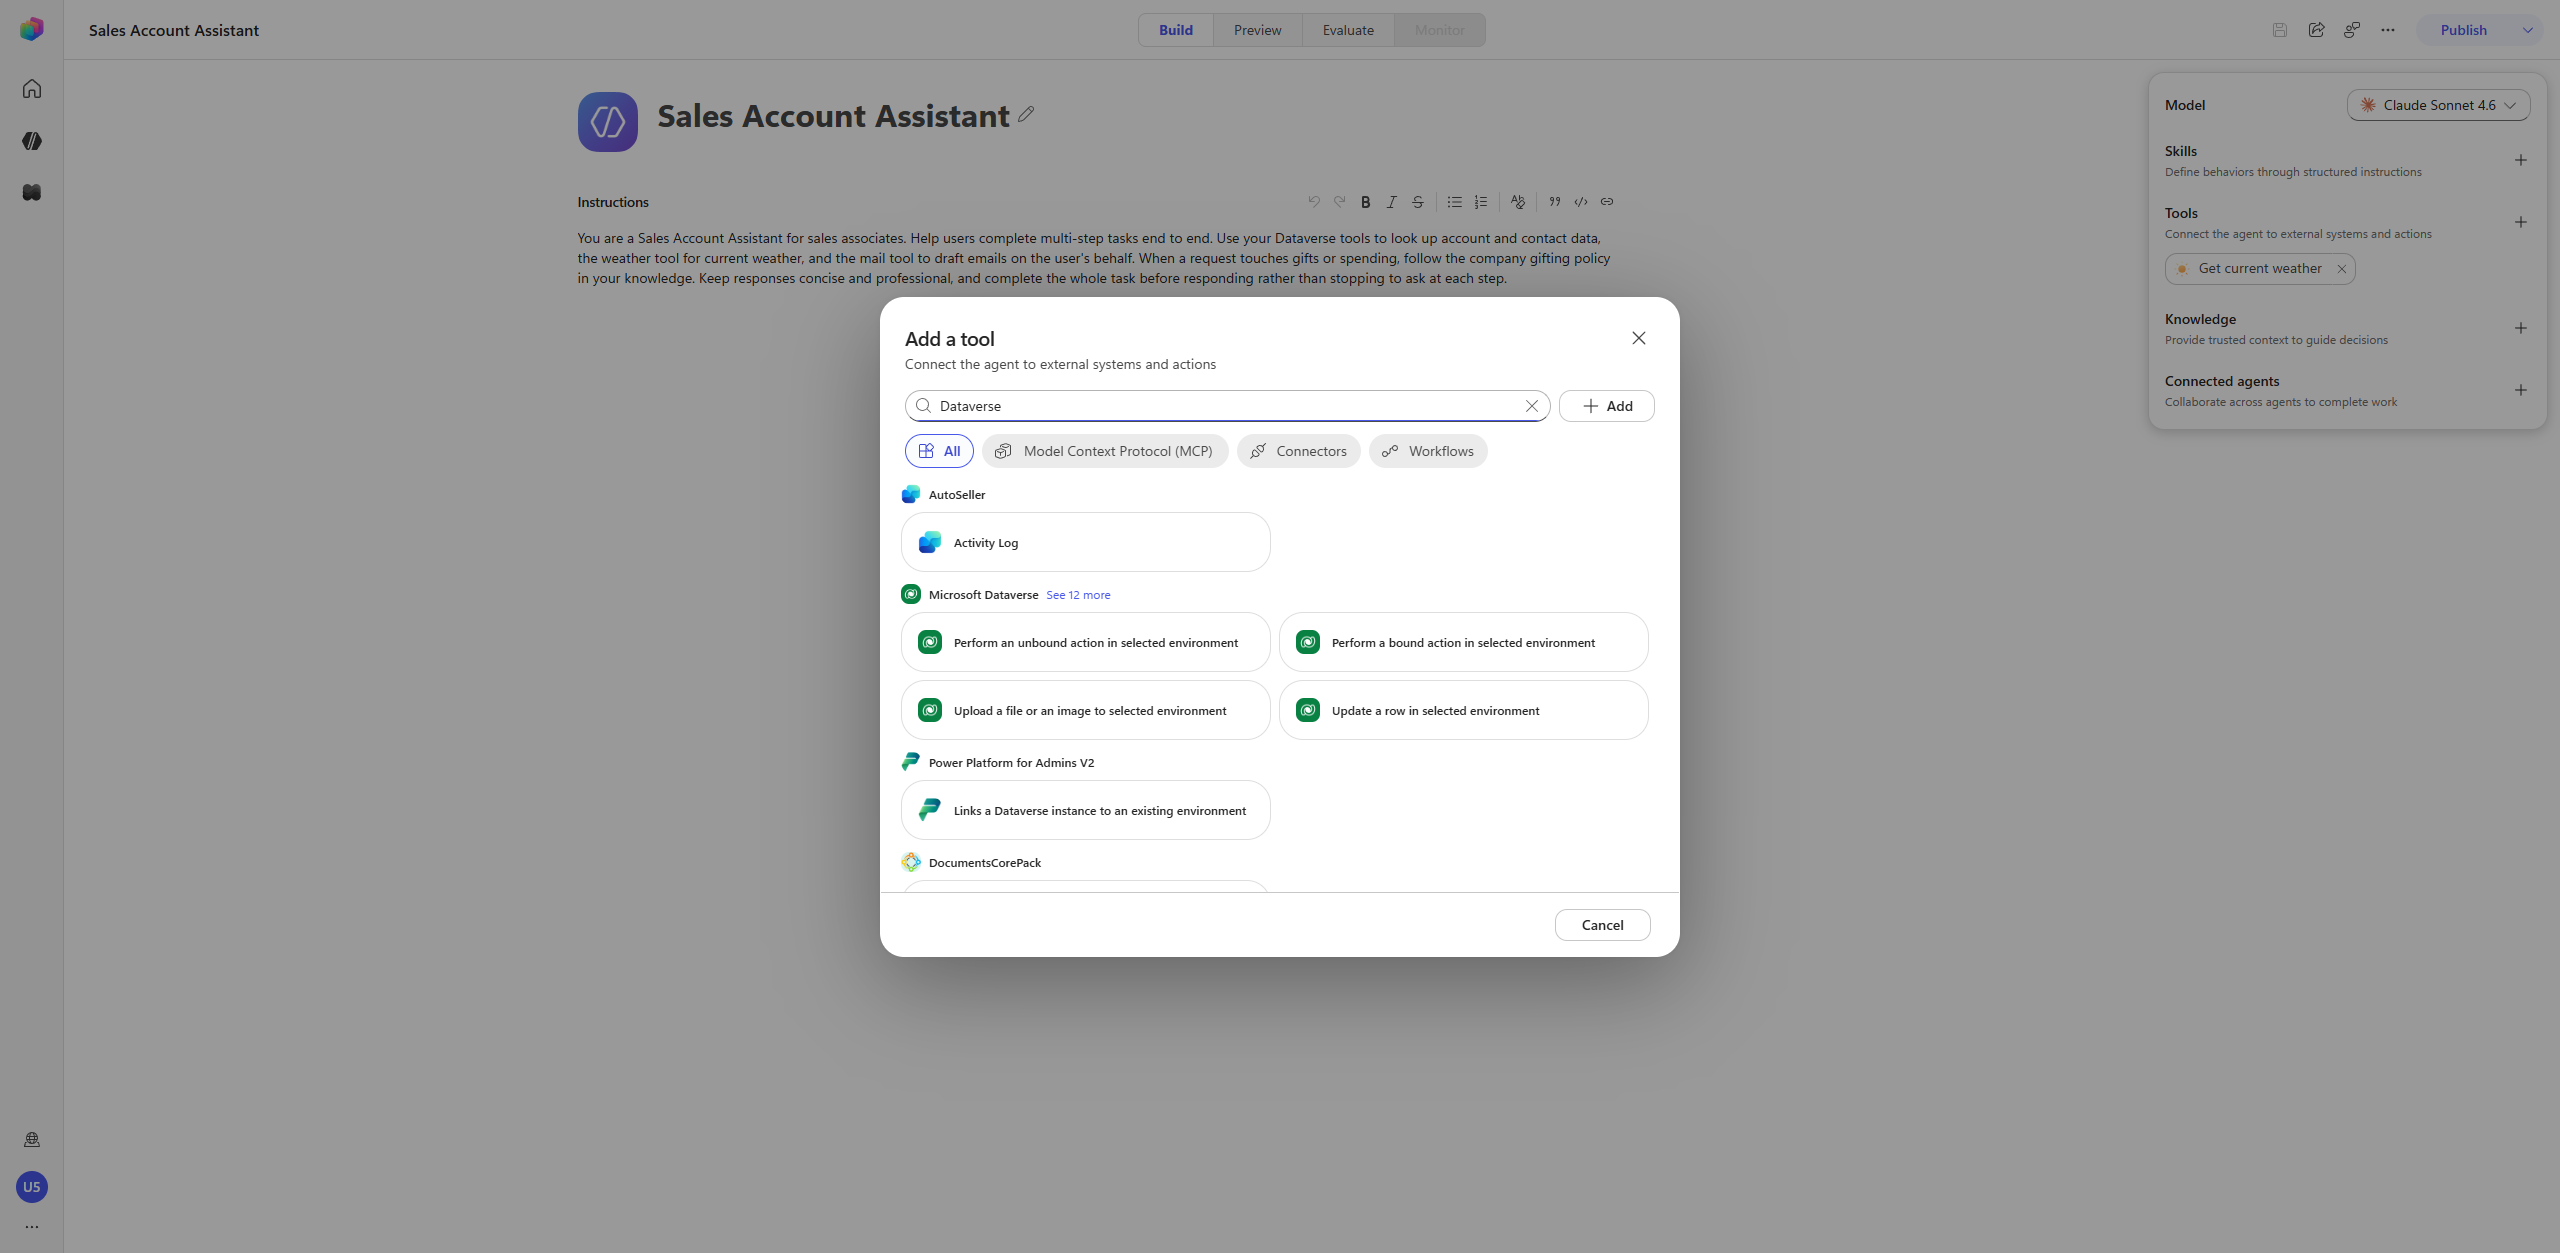
Select Add tool again. Search for Dataverse, apply the Model Context Protocol filter, and select Microsoft Dataverse MCP Server — the GA card, not the (Preview) variant.
-
On the Select a connection step, pick your Dataverse connection. If you created one in an earlier lab it’s already selected with a green check — just confirm it. Otherwise choose Not connected → Create new connection → Create, sign in / consent when the Entra popup appears. Then select Add.
-
Once the Microsoft Dataverse MCP Server is added, open the tool and observe the list of the MCP server’s actions (
read_query,search,create_table,update_record, and so on). Leave the default selection as-is, but note that these can be turned on/off. This lab only ever exercisesread_query(reading accounts and contacts) andsearch(schema discovery); the orchestrator won’t call the write/delete actions unless a prompt explicitly asks it to. -
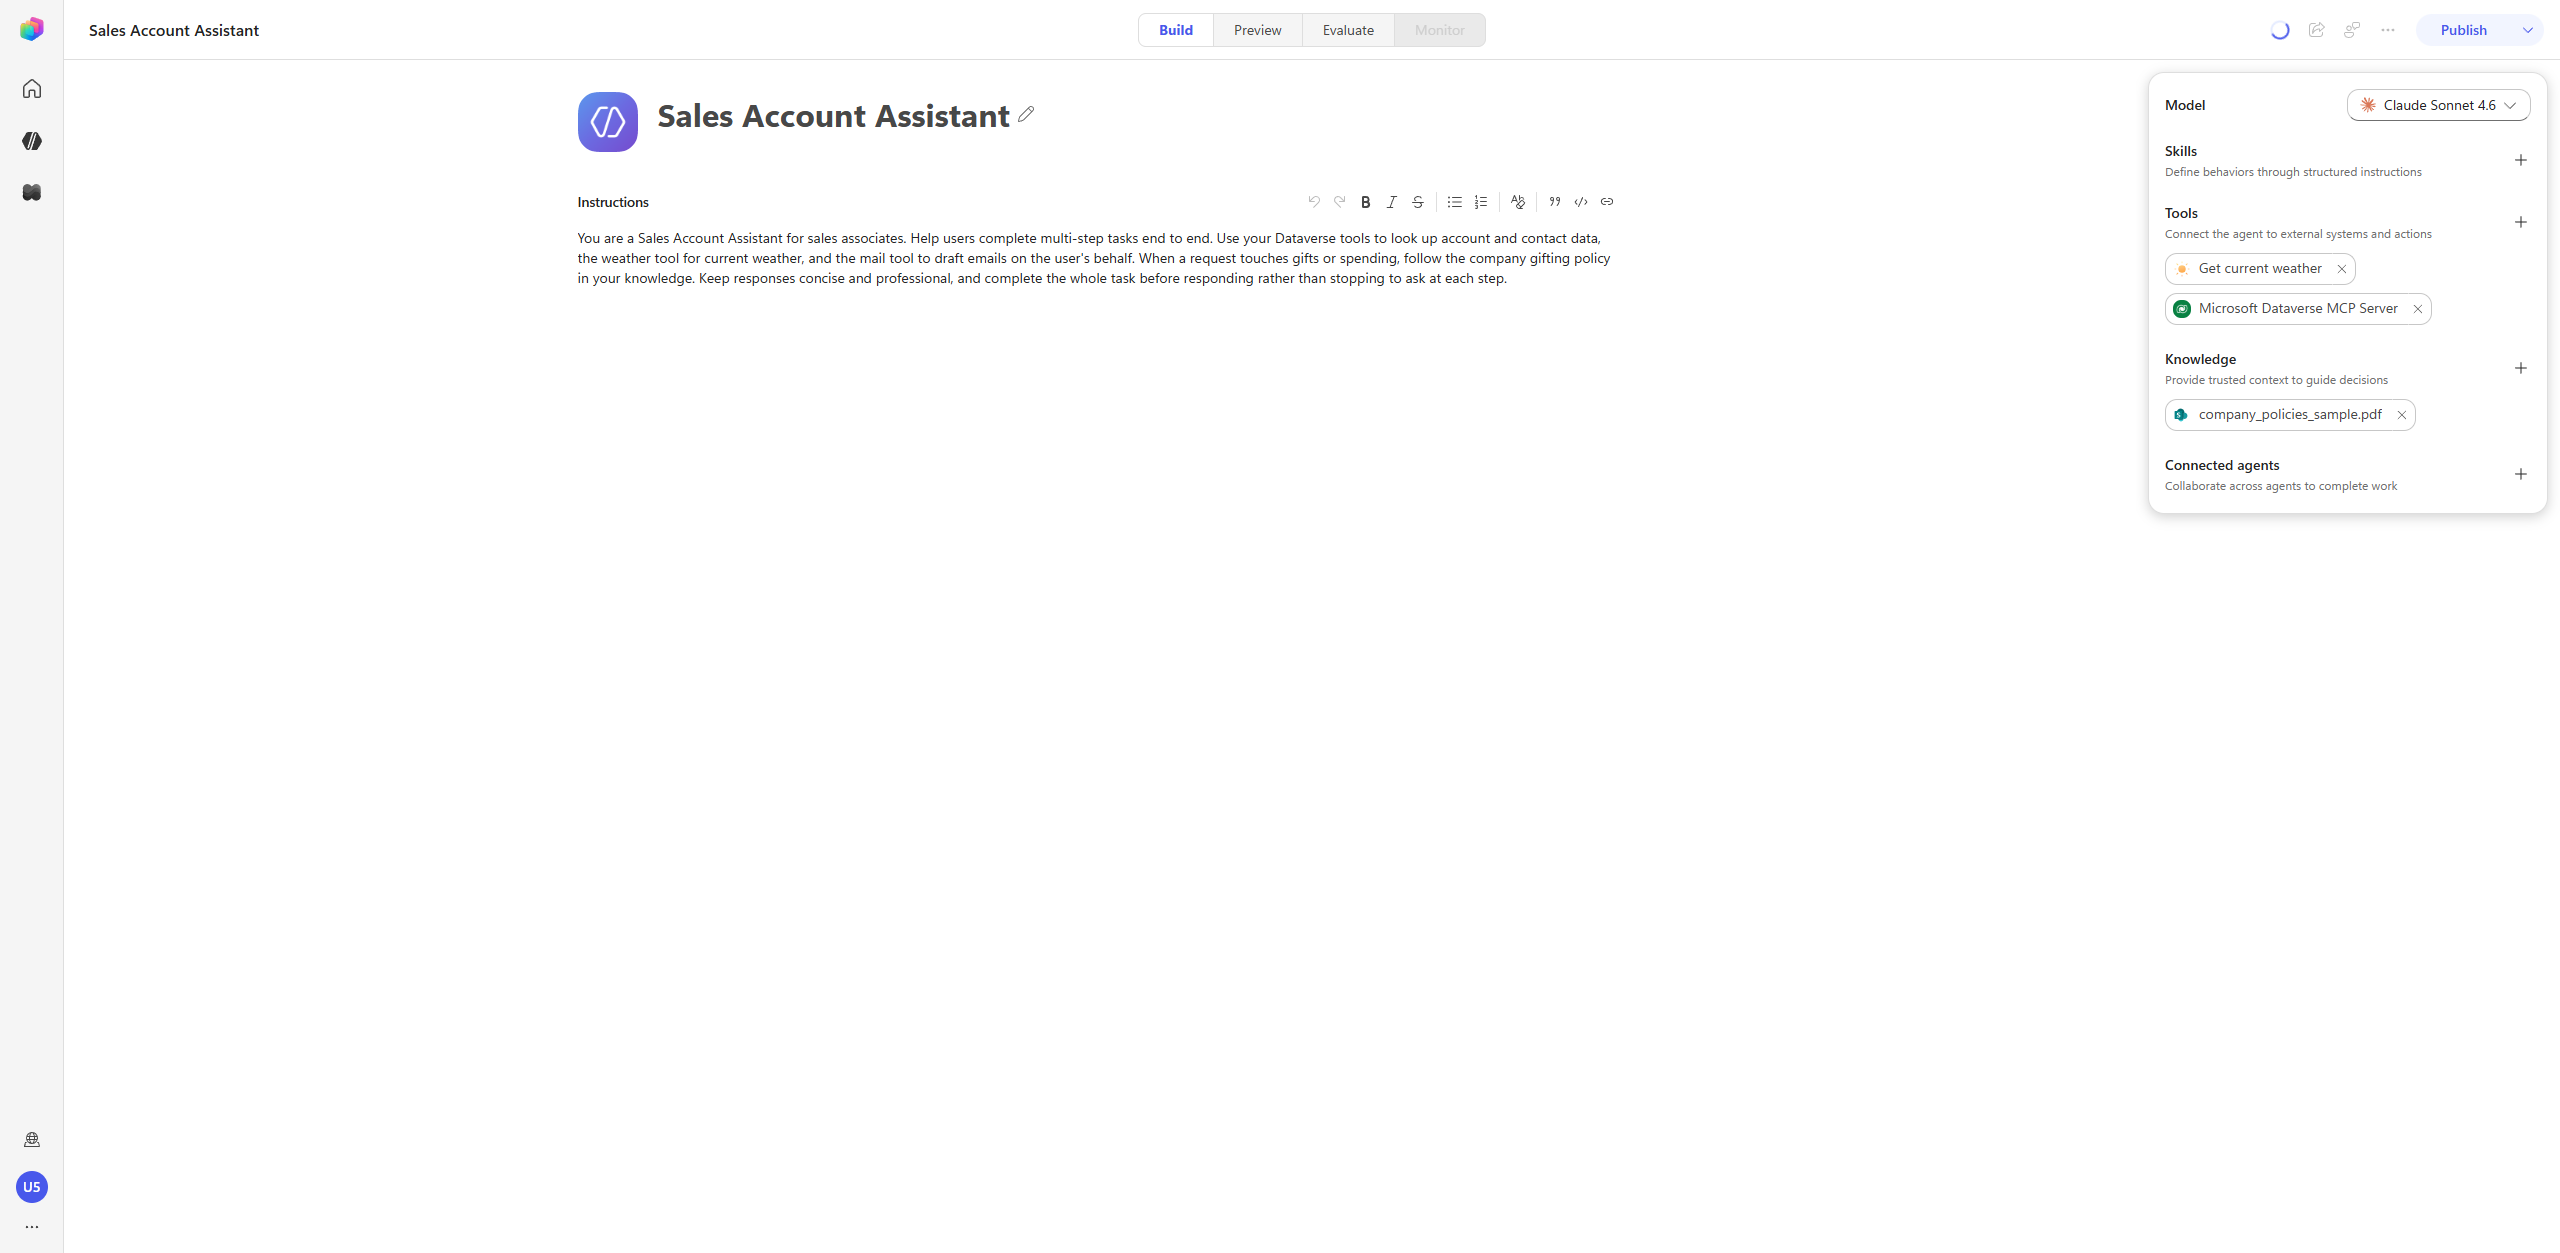
Close the Tool editing view. We now have Get current weather and Microsoft Dataverse MCP Server configured.
Add knowledge to the agent
Add the workshop’s sample policy document so the agent has a body of knowledge to reason against.
-
On the Build tab, select Add knowledge in the right rail.
-
In the Add knowledge dialog, select the SharePoint card, choose Browse items, and navigate OnePlace → Documents → HR → company_policies_sample.pdf, then Confirm selection and Add to agent. (The Work IQ SharePoint path queries SharePoint live, so the source is Ready almost immediately — no Dataverse indexing wait.)
-
Confirm the file appears in the Knowledge section.
-
Select Save in the command bar to save the agent with its new knowledge source.
Test the Agentic Reasoning Loop
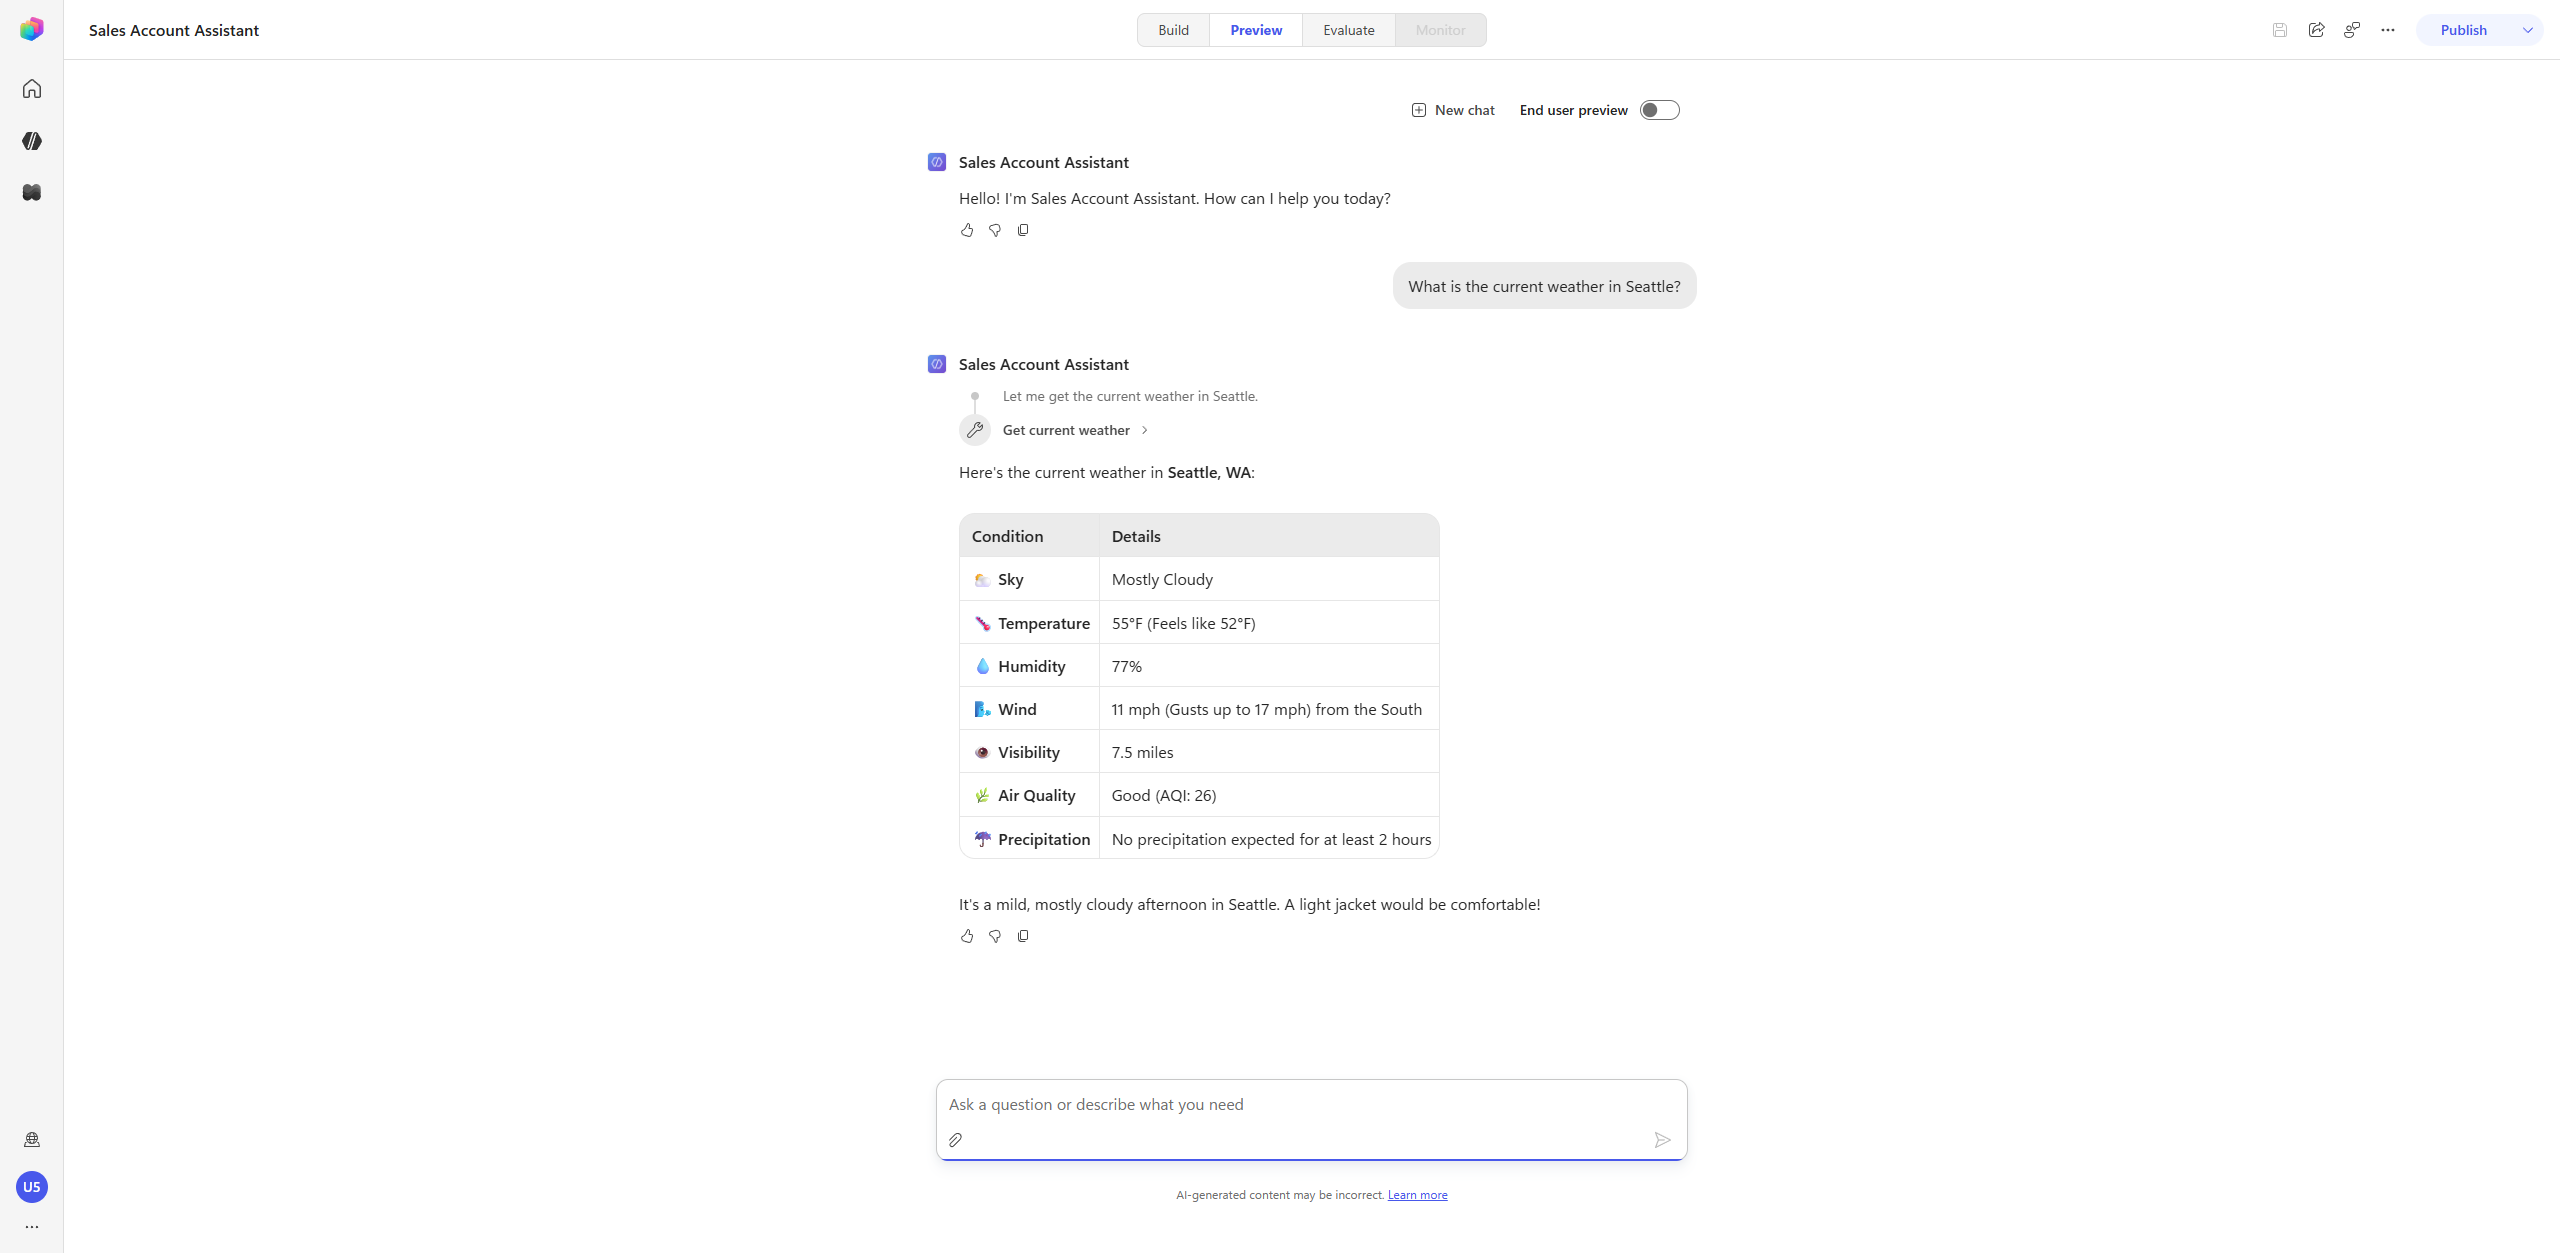
Open the Preview tab. The New Orchestrator surfaces its work inline in the Preview pane — you’ll see a “Thought for N seconds” line you can expand, a sentence of reasoning, and the name of each tool it calls before the final answer.
-
A single tool call. Send:
What is the current weather in Seattle?The reasoning trace shows the agent deciding to call Get current weather, then returning the conditions.
-
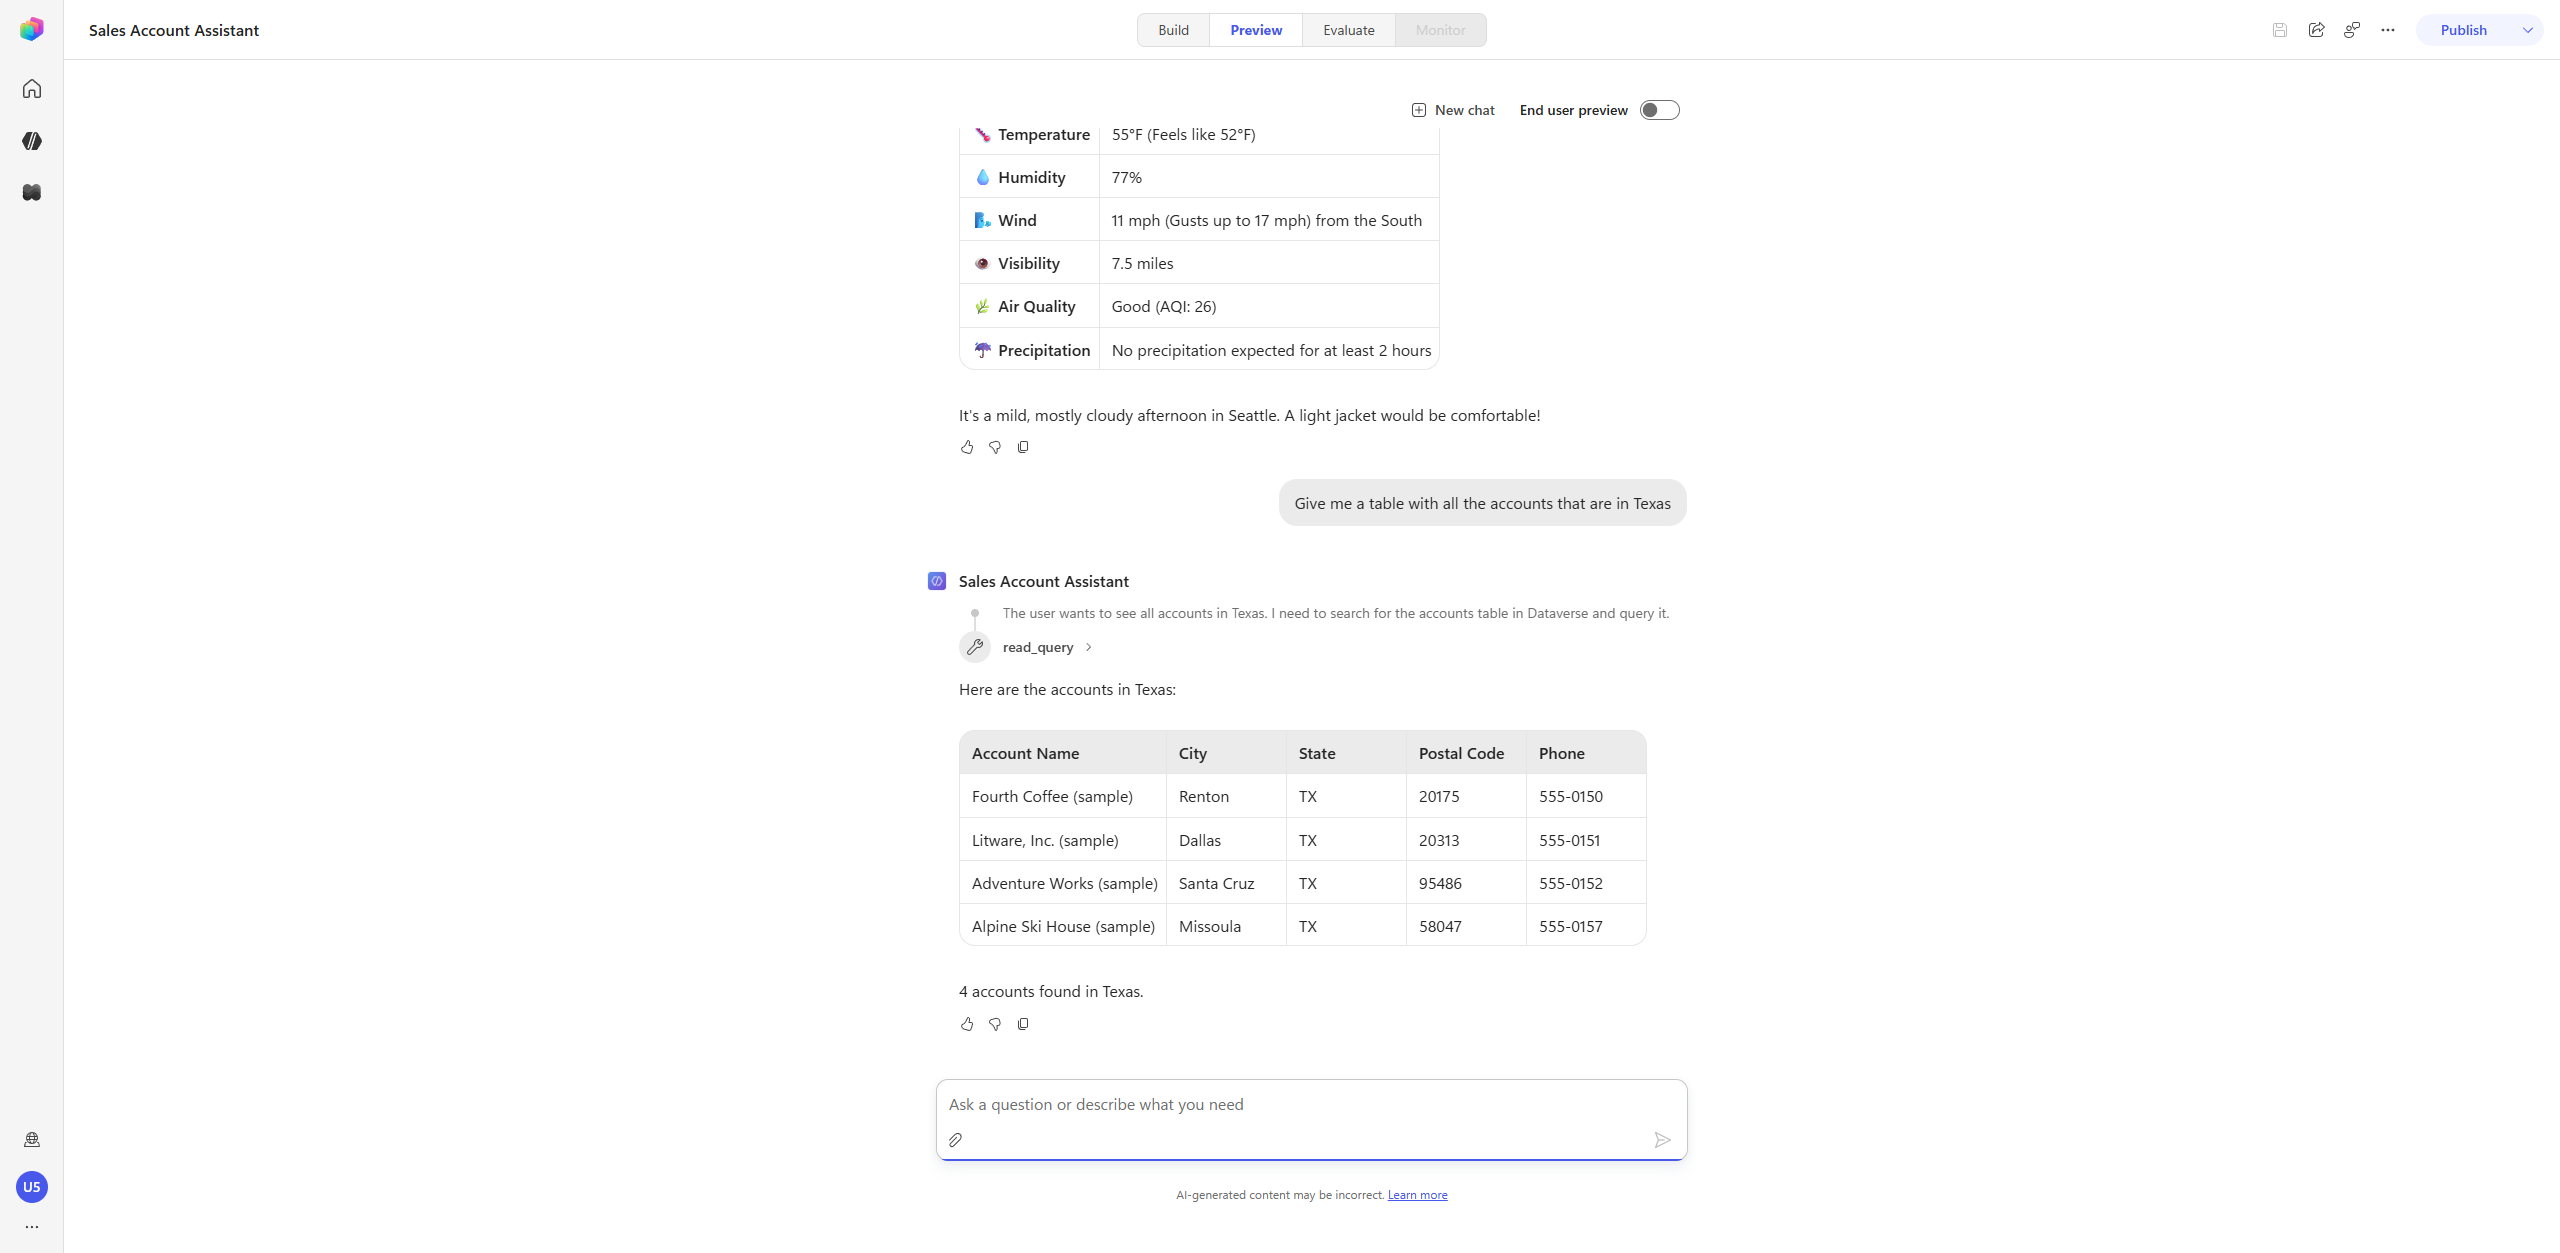
Query structured data via the Dataverse MCP server. Send:
Give me a table with all the accounts that are in TexasThe trace shows the agent reasoning “I need to search the accounts table in Dataverse and query it,” calling read_query, and rendering the Texas accounts as a Markdown table.
-
Modify the previous result. Send:
Add the account number to the listThe agent re-renders the table with an Account Number column, reusing the prior turn’s context (it may issue a second
read_queryto fetch the new field — you’ll see that in the trace).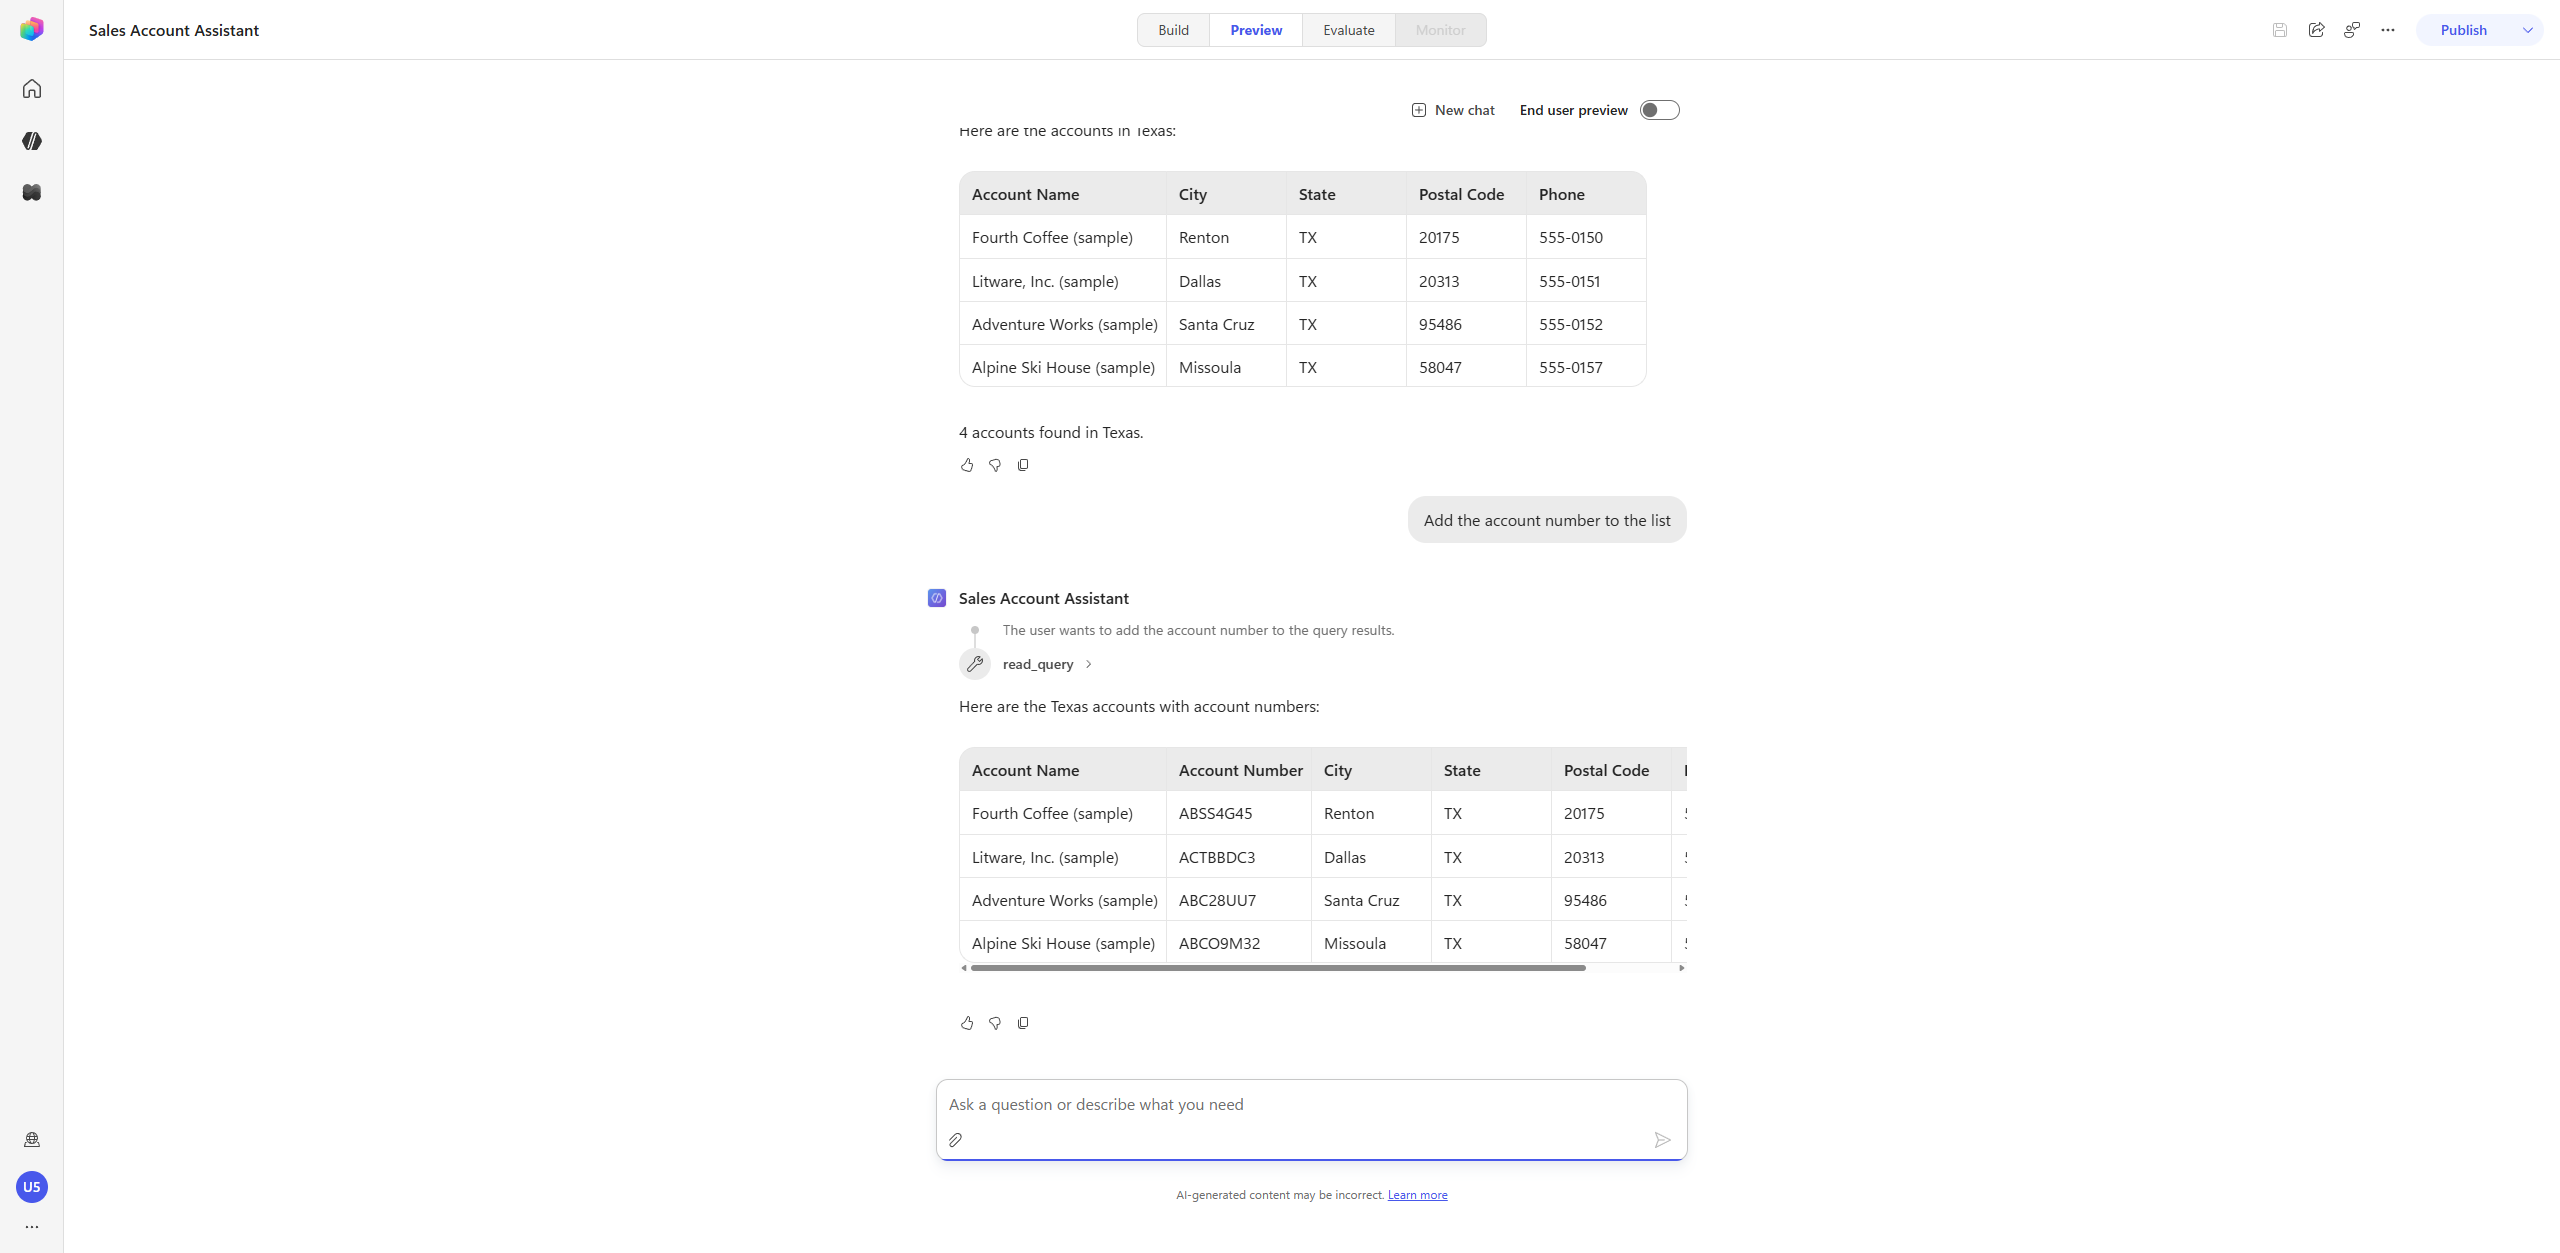
-
Multi-tool reasoning (knowledge + Dataverse + weather). Send:
I need to get a gift for the primary account contact for Litware. Can you propose an appropriate gift that takes into consideration our gifting policies and their weather to make some good recommendations for an appropriate gift.Watch the loop drive through several steps in one turn: search the gifting policy (knowledge), read_query the Litware account and its primary contact (Dataverse MCP), Get current weather for the contact’s city, then synthesize a policy-compliant, weather-appropriate recommendation — complete with a citation back to
company_policies_sample.pdf.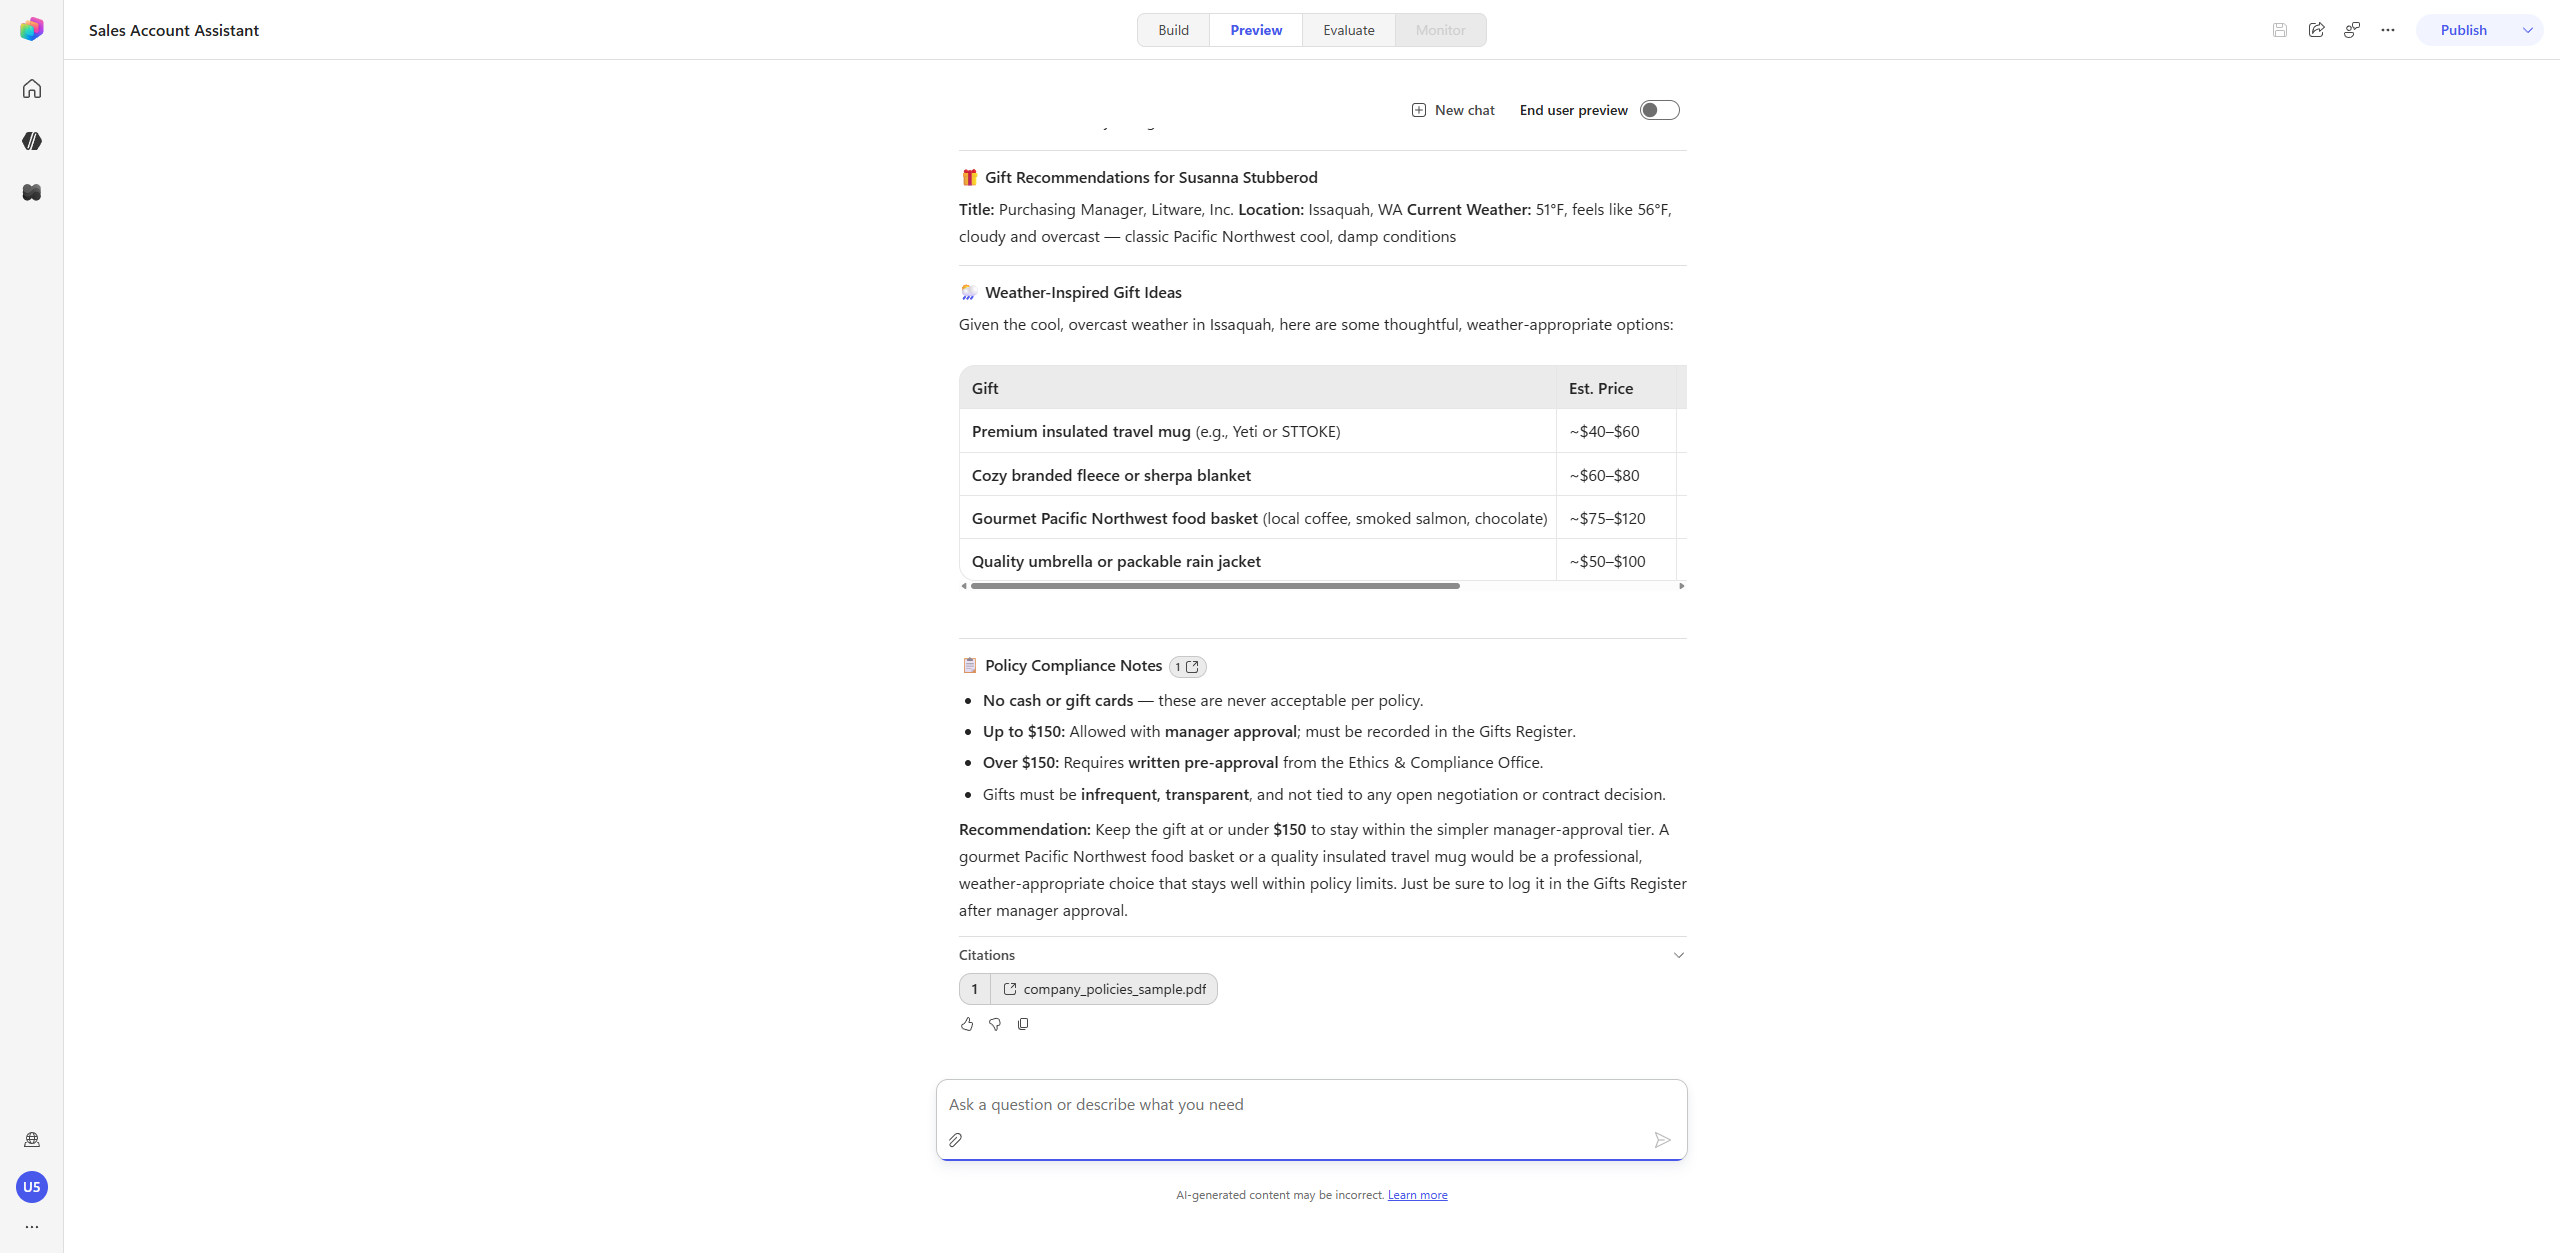
-
Inspect a single step in the train of thought. Any tool step in the trace is expandable — select one to open it. The example below uses a
read_querystep from the Texas-accounts turn, but pick whichever step you like (asearch, aGet current weather, or anyread_query); they all expand the same way. You’ll see the exact parameters the orchestrator sent (for aread_query, the generated SQL — e.g.SELECT name, address1_city, address1_stateorprovince, … FROM account WHERE address1_stateorprovince = 'Texas' OR address1_stateorprovince = 'TX'; the exact query varies per step) and the raw result it reasoned over.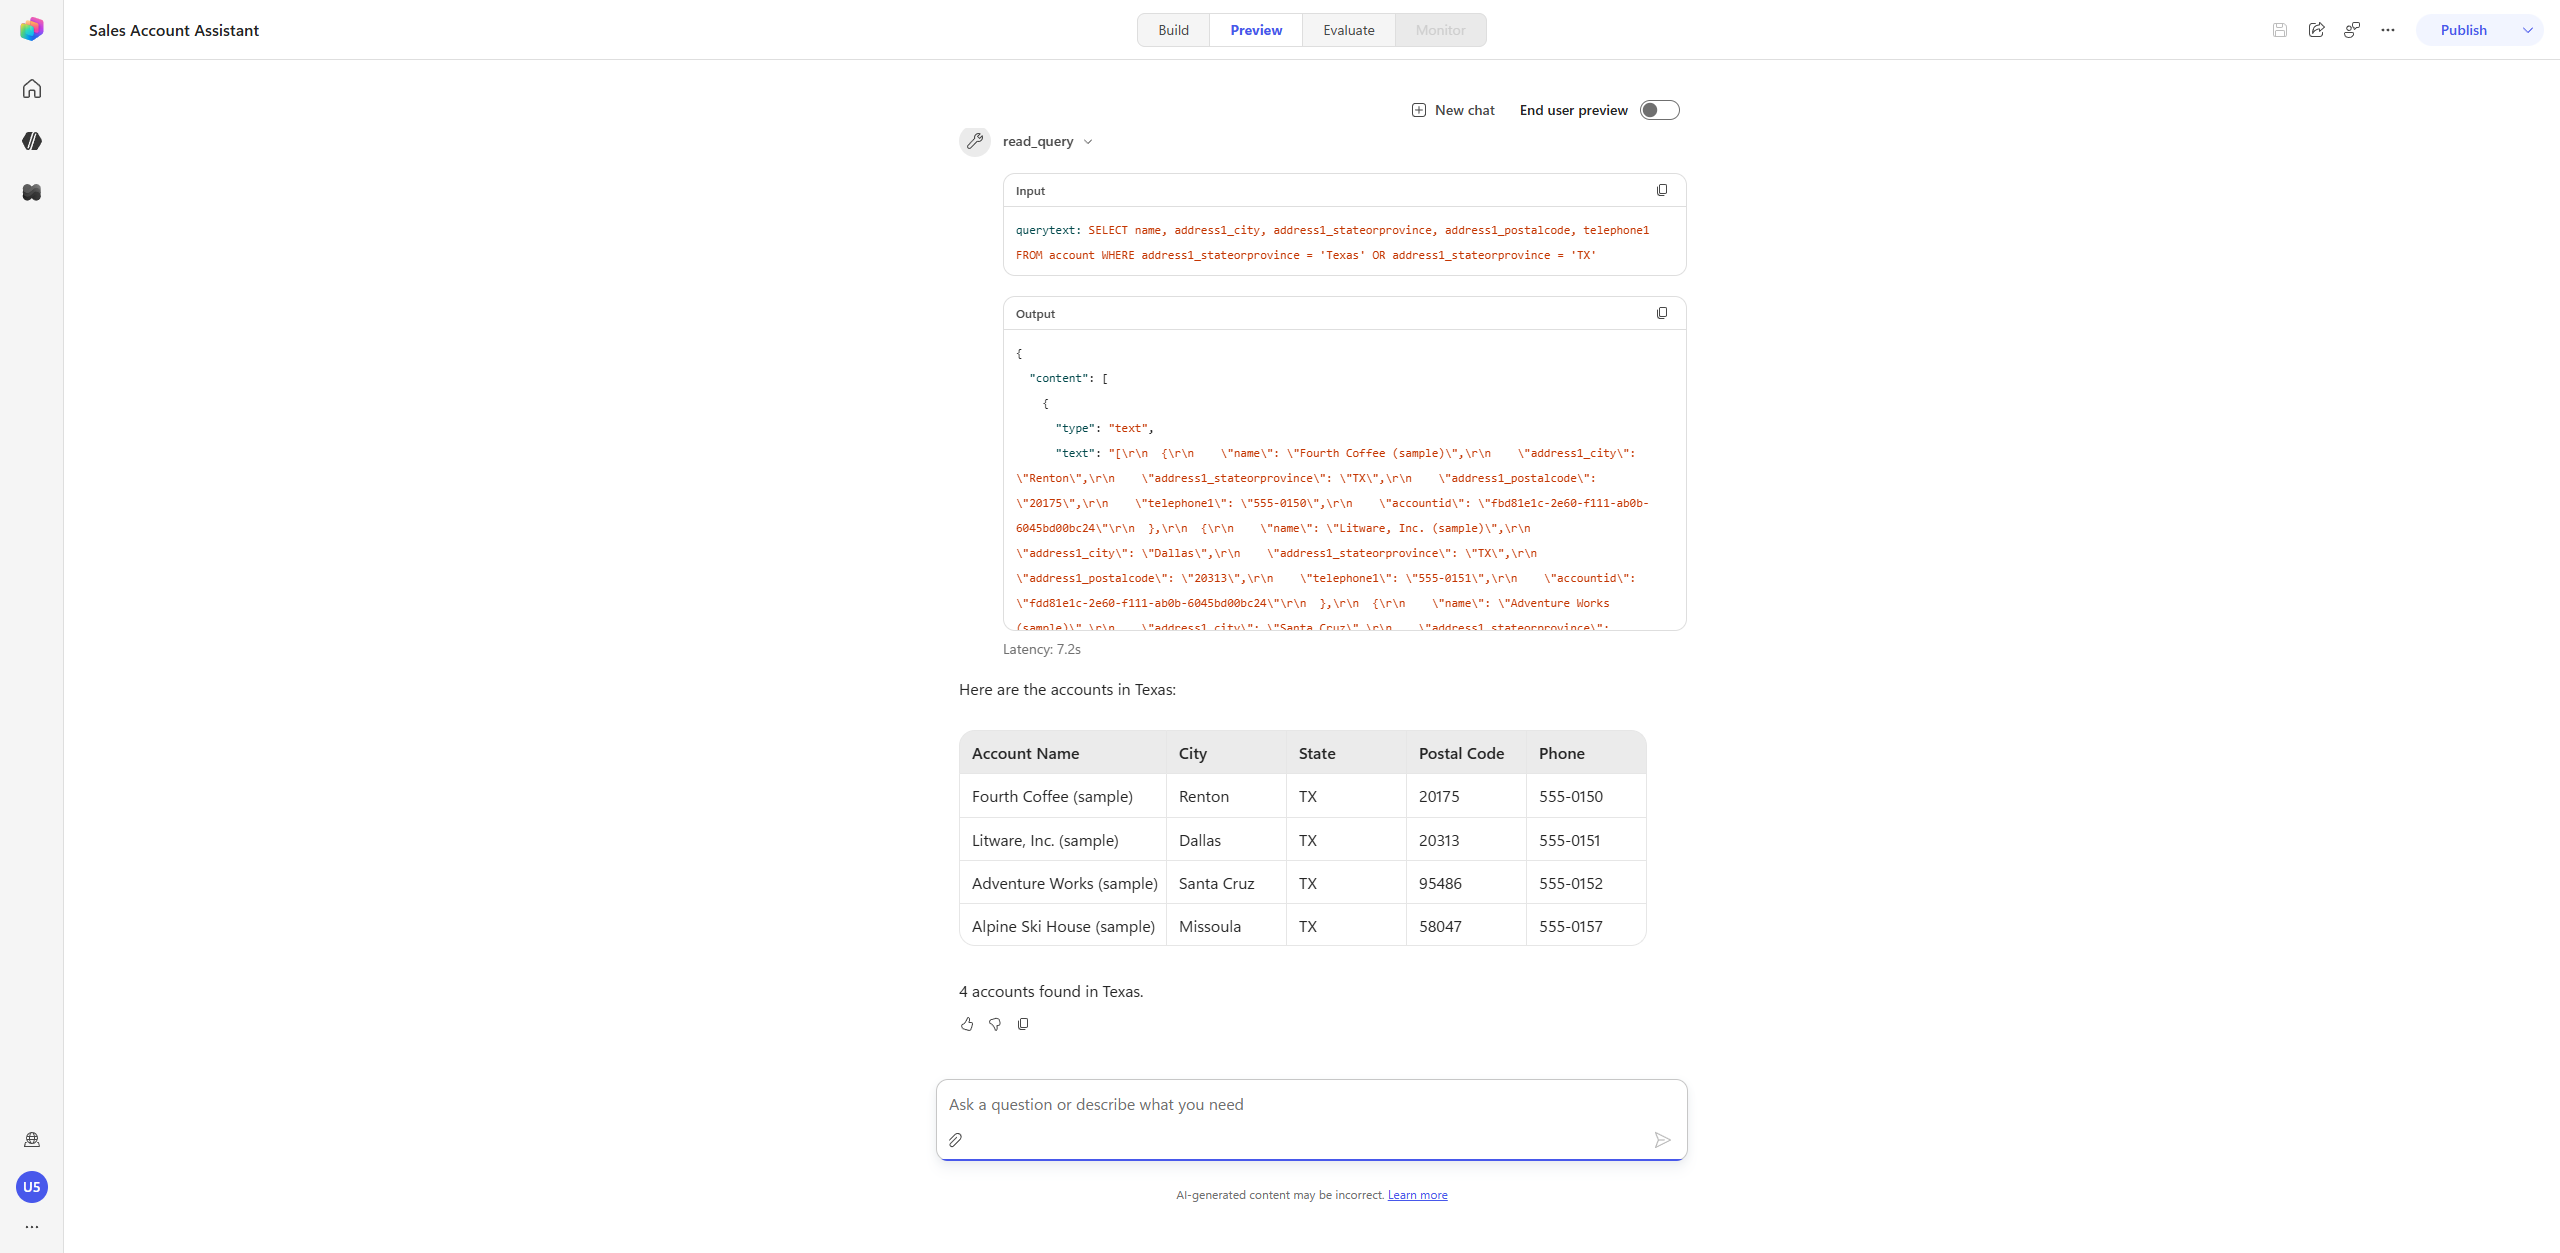
[!NOTE] Reasoning Loop vs. standard orchestration (Use Case #2). Standard generative orchestration (the classic Account Data Lookup Agent) is single-pass and highly inspectable — every decision shows up in the Activity Tracker, and Get rationale reads the plan back to you. The New Orchestrator optimizes for the user’s end goal: it plans → acts → observes → iterates within one turn until the task is complete, surfacing its work inline in the Preview pane rather than in a separate Activity Tracker. Choose standard orchestration when authors and users need to inspect every step; choose a new-type agent (New Orchestrator) when users want a finished outcome.
Congratulations! You’ve completed Use Case #3!
Test your understanding
Key takeaways:
- A new-type agent uses the New Orchestrator (Agentic Reasoning Loop) by default. It plans → acts → observes → iterates within a single turn until the user’s task is complete, instead of stopping at the next tool call. This is what Enhanced Task Completion previewed on classic agents.
- The trade-off is visibility. The classic Activity Tracker and Get rationale (Use Case #2) aren’t the surface here — the Preview pane shows the train of thought inline, and you expand a step to see its parameters and result.
- Match the credential pattern to the tool. Anonymous / API-key / service-account tools (like MSN Weather) use Maker authentication; tools that act as the signed-in user (e.g. a mailbox connector) use User authentication.
- The New Orchestrator chains tools across knowledge, Dataverse, and mail in one turn — multi-tool reasoning, dynamic chaining, and reformat-from-context all happen without prompting the user at each step.
Lessons learned & troubleshooting tips:
- If a tool returns a “Connection Required” card at runtime, open the tool’s Details and confirm its Authentication mode and Connection are set (Weather should be Maker with a connection).
- If the agent can’t query Dataverse, confirm the Dataverse MCP environment feature is on and that you completed the Entra connection for the Microsoft Dataverse MCP Server tool.
- If a policy-dependent answer looks generic, confirm
company_policies_sample.pdfshows in the Knowledge section.
Challenge: Apply this to your own use case
- Identify a workflow in your organization that gathers information from multiple systems and then takes an action (compose an email, draft a document, file a ticket). Sketch the tools it would need and decide, for each, whether Maker or User authentication is correct — and why.
Summary of learnings
True learning comes from doing, questioning, and reflecting. Across this lab you saw the same orchestration engine from two angles, and one idea underneath both of them.
- Instructions shape behaviour; Descriptions shape routing. Instructions are how a component behaves once selected. Descriptions are how the planner decides to select it in the first place. Almost every routing bug is a description problem wearing an instructions costume.
- The planner reads four levels — agent, child agent, tool, and input. They are not interchangeable, and weakness at any one of them cascades. The Texas →
TXturn in Use Case #2 is the clearest demonstration: the right child agent and the right tool still return nothing if the input description never specified the format. - Standard generative orchestration (Use Case #2) is a single-pass planner that picks one tool, child, or knowledge source per turn. Its great virtue is inspectability — every decision appears in the activity tracker, and Get rationale reads the plan back to you in the planner’s own words.
- New Orchestrator – Agentic Reasoning Loop (Use Case #3) is the default in new-type agents. It plans, acts, observes, and iterates inside a single turn until the task is done. Better when users want a finished outcome; worse when authors or users need to watch each step.
- The descriptions matter more, not less, under the New Orchestrator. A loop that makes five decisions per turn reads your descriptions five times. Everything Use Case #2 teaches is a prerequisite for Use Case #3 behaving well.
The single most important shift between the two orchestrators: standard orchestration optimizes for the next correct step; the New Orchestrator optimizes for the user’s end goal. Pick the orchestrator based on which behaviour your users actually want — then make sure the text it reads is worth acting on.
Conclusions and recommendations
Instructions and Descriptions golden rules:
- Names route, Descriptions explain, Instructions force. Tune the cheapest signal first — a tool’s or child agent’s name — then its description, and escalate to child or parent Instructions only when name and description tuning is not enough.
- Put a rule at the narrowest scope that still covers it. Parent Instructions consume planner context on every turn. If a rule only applies when one child or one tool runs, it belongs on that child or tool instead.
- Write input descriptions as “<what the value is> in the format of <exact format>.” That two-part pattern is what lets the planner translate a user’s words into the value the tool requires, and it is the foundation of dynamic chaining between tools.
- Use Get rationale as a debugger trace for your descriptions. When the planner does the wrong thing, the rationale tells you what it thought it was solving. If the rationale reflects something subtly wrong, you have a precise pointer to the description that needs sharper wording.
- Design child agents as peers, not chains. Peer children let the planner enter from whichever side the user’s question starts at. You don’t write a tool for every pivot — you write good descriptions and let the planner find the path.
- Match credential pattern to tool intent. Anonymous / API-key / service-account tools belong on Maker-provided credentials. Tools that act as the user belong on End-user credentials.
- Choose your orchestrator deliberately. Standard generative orchestration where transparency matters; the New Orchestrator where finished outcomes matter.
By following these principles you’ll build agents that route to the right work the first time — and when they don’t, you’ll know exactly which field to open.