Bundling
When you're done here, you'll be able to bundle and ship your apps with Metro, the React Native bundler. The tools you'll use in this guide enhance Metro, making it easier to use, type-safe, and fast.
This guide is meant to be used with one React Native app at a time, though you can repeat it for all of your apps.
Setting up the Tools
Install the tools you'll need for bundling.
- Yarn
- pnpm
- npm
yarn add @rnx-kit/cli @rnx-kit/babel-preset-metro-react-native @rnx-kit/metro-config @rnx-kit/metro-resolver-symlinks --dev
pnpm add -D @rnx-kit/cli @rnx-kit/babel-preset-metro-react-native @rnx-kit/metro-config @rnx-kit/metro-resolver-symlinks
npm add --save-dev @rnx-kit/cli @rnx-kit/babel-preset-metro-react-native @rnx-kit/metro-config @rnx-kit/metro-resolver-symlinks
Add @rnx-kit/babel-preset-metro-react-native as a preset in your Babel
configuration:
module.exports = {
  presets: ["@rnx-kit/babel-preset-metro-react-native"],
};
Configure Metro using @rnx-kit/metro-config. Add support for symlinks, too,
since all major package managers make use of them.
const { makeMetroConfig } = require("@rnx-kit/metro-config");
const MetroSymlinksResolver = require("@rnx-kit/metro-resolver-symlinks");

module.exports = makeMetroConfig({
  resolver: {
    resolveRequest: MetroSymlinksResolver(),
  },
  // Add your existing Metro configuration here! It will be merged in.
});
If your app was already using Metro, it may have mappings in its config which compensate for Metro's lack of symlink support. They probably look something like this:
const fooLocal = path.resolve(__dirname, "node_modules", "foo");
const barHoisted = path.resolve(__dirname, "..", "..", "node_modules", "foo");

module.exports = {
  resolver: {
    extraNodeModules: {
      foo: fooLocal,
      bar: barHoisted,
    },
  },
  watchFolders: [fooLocal, barHoisted],
};
Good news! You can get rid of all these mappings now! 🎉
Creating Bundler Commands
The bundler is integrated with the React Native CLI:
react-native rnx-bundle ...
react-native rnx-start ...
It's time to put together an rnx-bundle command for your app. Start with
react-native rnx-bundle, and add the parameters listed in this table:
| Parameter | Explanation |
|---|---|
| --entry-file | The source file at the root of your app. It usually has a call to AppRegistry.registerComponent. |
| --platform | Pick your target platform: android, ios, macos, or windows. |
| --bundle-output | Choose a file name and path for the bundle file. |
| --sourcemap-output | Choose a file name and path for the source map. Usually named <bundle-file>.map. |
| --assets-dest | Choose a directory for storing assets like strings, images, audio, and video. |
Add --dev false if you want to make an optimized, production bundle.
Put it all together into a single command. Here's an example which creates an iOS developer bundle:
react-native rnx-bundle \
    --entry-file index.js \
    --platform ios \
    --bundle-output dist/main.ios.jsbundle \
    --sourcemap-output dist/main.ios.jsbundle.map \
    --assets-dest dist
If you're curious about the rest of the command-line parameters, you can find the complete list in the CLI bundle documentation.
Now is a good time to try out your rnx-bundle command.
Are you seeing TypeScript warnings or errors, or messages about duplicate or cyclic dependencies? That's ok! The tools in this guide enhance Metro to add type safety and protection from dependency problems. They're helping you root out potential bugs in your app. Ignore them for now. A bit later, you'll learn what they mean, why they're important, and how you can fix them.
The next step is putting together an rnx-start command for your app.
Parameters aren't typically needed for this command. You should take a look at
the CLI server documentation to see
the full list of command-line parameters, and decide if you need any of them.
Here's an example command which starts a Metro bundle server:
react-native rnx-start
Try out your rnx-start server command!
You might see warnings or errors, as you did when you ran the rnx-bundle
command. Ignore them for now. You'll work through them a bit later.
Assign both rnx-bundle and rnx-start commands to scripts in your app. A good
practice is to have one bundle script per platform, an "umbrella" bundle script
which runs them all, and one server command.
{
  "scripts": {
    "bundle": "yarn bundle:ios && yarn bundle:android",
    "bundle:ios": "react-native rnx-bundle --platform ios ...",
    "bundle:android": "react-native rnx-bundle --platform android ...",
    "start": "react-native rnx-start"
  }
}
Using App Configuration
Now you're getting to the good stuff! 🍰
Your app knows how to bundle itself. It knows which platforms it supports. It knows what to name the bundle file, and where to store assets, so that the native host app can find them at runtime. And it knows how these things vary across each platform.
All of this knowledge is encoded in the command-lines you've written for your app.
App configuration is a declarative, structured way to express these decisions as defaults for how your app is bundled. All the knowledge is captured in one easy-to-read format, without duplication.
Take a look at this example iOS bundling command:
react-native rnx-bundle \
    --entry-file index.js \
    --platform ios \
    --bundle-output dist/main.ios.jsbundle \
    --sourcemap-output dist/main.ios.jsbundle.map \
    --assets-dest dist
Here's what it looks like as app defaults in configuration:
{
  "rnx-kit": {
    "bundle": {
      "entryFile": "index.js",
      "targets": ["android", "ios"],
      "platforms": {
        "android": {
          "bundleOutput": "dist/main.android.bundle",
          "sourcemapOutput": "dist/main.android.bundle.map",
          "assetsDest": "dist/res"
        },
        "ios": {
          "bundleOutput": "dist/main.ios.jsbundle",
          "sourcemapOutput": "dist/main.ios.jsbundle.map",
          "assetsDest": "dist"
        }
      }
    }
  }
}
And here's what the command reduces to, once the defaults are in place:
react-native rnx-bundle
You can override default using command-line parameters, either in your terminal or in package scripts:
react-native rnx-bundle --entry-file test.js
Now it's time to convert your rnx-bundle commands into app defaults. Use the
example above as a guide. Refer to the
BundleConfig schema
for a complete list of configuration properties.
Do the same thing for your rnx-start command, but only if you added
command-line parameters. Use the
ServerConfig schema as a reference. If you
don't needing any ServerConfig, the server will use bundler defaults so you
end up serving the same way you bundle.
Beyond the Command-Line
Remember that bit at the start of this guide about enhancing Metro? You've arrived. :car:
This section of the guide will introduce you to a number of features and explain why they are important. Most of them are on by default. You can explicitly control each one through app configuration.
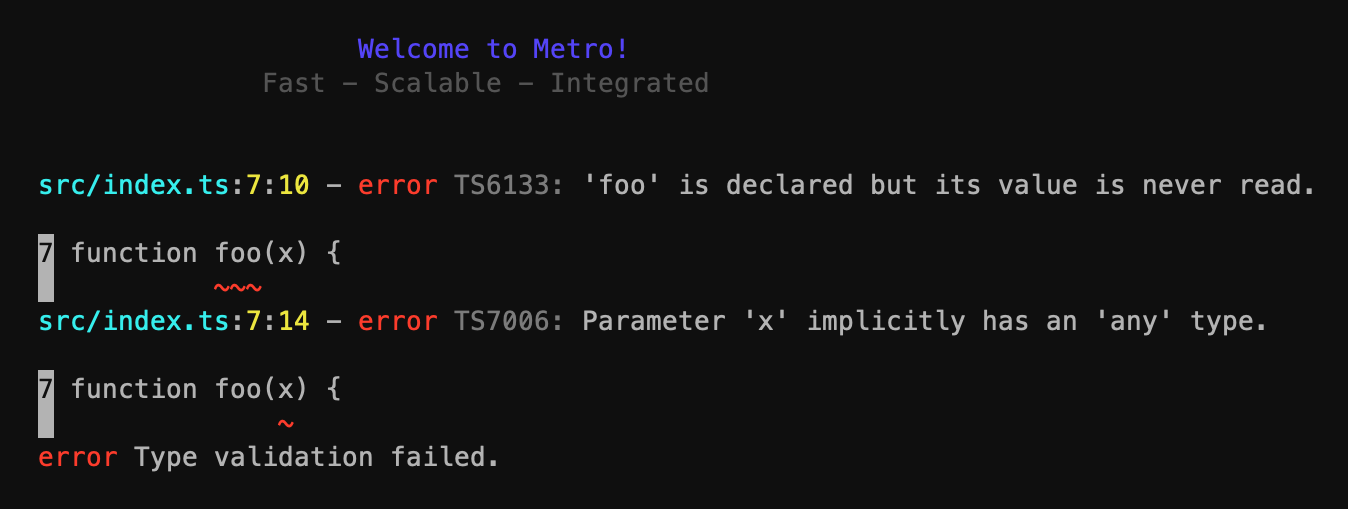
Type Safety with TypeScript
TypeScript validation with Metro. 😎
When you bundle or serve your app, TypeScript will validate your code and tell you about any type safety issues. You'll see the familiar, colorful TS messages you're used to, right in the Metro output:
TypeScript validation is on by default. You can configure it by passing
options with the @rnx-kit/metro-plugin-typescript entry in
plugins configuration property.
 {
   "rnx-kit": {
     "bundle": {
       "plugins": [
         "@rnx-kit/metro-plugin-cyclic-dependencies-detector",
         "@rnx-kit/metro-plugin-duplicates-checker",
+        ["@rnx-kit/metro-plugin-typescript", { "throwOnError": true }]
       ]
     }
   }
 }
Tree Shaking
Tree shaking makes your app bundle smaller by eliminating unused code. Sometimes, a LOT smaller. 📉
Tree shaking is off by default. You can control it with the treeShake configuration property.
{
  "rnx-kit": {
    "bundle": {
      "treeShake": true
    }
  }
}
For setup details, options, bundle-size checks, and known limitations, see the
@rnx-kit/metro-serializer-esbuild documentation.
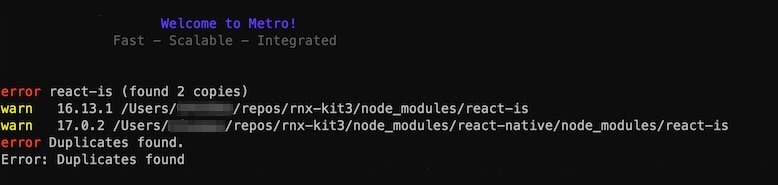
Duplicate Dependencies
Did you know that your app bundle can have multiple copies of a single package in it? Yes, this is a thing that happens. Sometimes, the duplicates are even the same version of the package! 📦 📦 📦
Clearly, this is bad because the bundle is larger than it needs to be. More importantly, though, duplicates can lead to runtime problems, especially when the duplicated package has global state.
Duplicate detection is on by default. You can configure it by passing
options with the @rnx-kit/metro-plugin-duplicates-checker entry in
plugins configuration property.
 {
   "rnx-kit": {
     "bundle": {
       "plugins": [
         "@rnx-kit/metro-plugin-cyclic-dependencies-detector",
+        ["@rnx-kit/metro-plugin-duplicates-checker", { "throwOnError": true }],
         "@rnx-kit/metro-plugin-typescript"
       ]
     }
   }
 }
Cyclic Dependencies
If your dependency graph has a cycle (loop), then you are at risk for app hangs. 🔄
A cycle in your dependency graph will look somthing like this: logger requires
file-appender which requires fs-utils which then requires logger.

Cycles can be bad news. Detecting them is on by default. You can configure
it by passing options with the
@rnx-kit/metro-plugin-cyclic-dependencies-detector entry in
plugins configuration property.
 {
   "rnx-kit": {
     "bundle": {
       "plugins": [
+        [
+          "@rnx-kit/metro-plugin-cyclic-dependencies-detector",
+          { "throwOnError": true }
+        ],
         "@rnx-kit/metro-plugin-duplicates-checker",
         "@rnx-kit/metro-plugin-typescript"
       ]
     }
   }
 }
Running the Bundler
It's now time to get bundling and serving working for your app. This part of the guide will help you work through issues related to type safety, duplicate dependencies, and cyclic dependencies.
Run the bundler:
- Yarn
- pnpm
- npm
yarn bundle
pnpm bundle
npm run bundle
Start the bundle server, and request a bundle from it using your native host app:
- Yarn
- pnpm
- npm
yarn start
pnpm start
npm run start
Did both commands succeed? If so, great! Skip to the next section.
Are you seeing TypeScript errors?
Type safety matters. It lets you reason about your app without running it to find flaws, see patterns, and do automated transformations.
You should fix these now, or plan on fixing them soon. To defer until later,
configure the bundler so it reports the errors without failing. Set
throwOnError to false:
 {
   "rnx-kit": {
     "bundle": {
       "plugins": [
         "@rnx-kit/metro-plugin-cyclic-dependencies-detector",
         "@rnx-kit/metro-plugin-duplicates-checker",
+        ["@rnx-kit/metro-plugin-typescript", { "throwOnError": false }]
       ]
     }
   }
 }
It's also a good idea to open a new issue for tracking the type errors, and to
remind you to re-enable throwOnError. In the meantime, keeping the errors
visible in the Metro output helps everyone be aware of danger-areas in the app.
Are you running into duplicate package errors?
You may be wondering how this even happens. Metro sees each copy of a duplicate package as unique because it has a unique filesystem path. How does that happen? pnpm isolation does this by design when versions differ or peerDependencies vary in parent packages. yarn hoisting also does this by design, allowing for a hoisted version and different local versions.
So what can you do? The goal is to "collapse" the duplicate packages down to a single version. That means getting yarn/pnpm to look at all the places a duplicate package is named, and decide that one single version can be used to satisfy all constraints. That will lead to only one copy showing up on the filesystem.
Below are some helpful tricks you can try:
- (Easy) Make sure your packages all depend on the same version of the duplicate package.
- (Easy) If you are using yarn, run the
yarn-deduplicatepackage to collapse away duplicate entries in your yarn.lock file. These aren't cleaned up automatically as yarn runs. - (Hard) In your lock file, find the set of external packages that are pulling in the duplicate package. See if you can upgrade or downgrade them so they all bring in the same version of the duplicate package. This may not be possible.
- (Hard) If you are using pnpm, trace the duplicates through the maze of parent
dependencies. If any of them have common peerDependencies, like
reactorreact-native, make sure the semver constraints match. "^17.0.0" and "^17.0.2" will cause pnpm to fork the dependency tree to isolate (encapsulate) this difference. - (Easy but Dangerous). Force yarn/pnpm to use a specific version of the
duplicate package whenever they see it, regardless of what is in package.json.
yarn has a
resolutionsproperty which does this. pnpm has areadPackagehook which you can use to do this. Both are dangerous because you can break the packages that depend on the package version you are changing.
If you can't get rid of the duplicate package, and your app seems to be working,
you can choose to live with it. Add the duplicate package name to the
ignoredModules option, e.g. to ignore duplicates of react-is:
 {
   "rnx-kit": {
     "bundle": {
       "plugins": [
         "@rnx-kit/metro-plugin-cyclic-dependencies-detector",
+        [
+          "@rnx-kit/metro-plugin-duplicates-checker",
+          { "ignoredModules": ["react-is"] }
+        ],
         "@rnx-kit/metro-plugin-typescript"
       ]
     }
   }
 }
Are you seeing cyclic dependency errors?
A cycle in your dependency graph will look somthing like this: logger requires
file-appender which requires fs-utils which then requires logger. The
logger package depends on itself.
Cycles are bad because they can lead to an infinite loop at runtime.
Here are some approaches you can use to fix a cycle:
- If any of the packages live in your repo, refactor them to break the cycle.
- If they're all external packages, you can submit a PR, though it may take time
to be accepted and published. If you're impatient, you can use
patch-packagewhile you wait for the PR to land. - Try looking for a different package, or group of packages, that does roughly what you want.
If none of this is appealing, you can take a closer look at the code involved to
understand if and how an infinite loop might occur. If you can avoid triggering
it, then document that in your code, and live with the cycle. Set throwOnError
to false:
 {
   "rnx-kit": {
     "bundle": {
       "plugins": [
+        [
+          "@rnx-kit/metro-plugin-cyclic-dependencies-detector",
+          { "throwOnError": false }
+        ],
         "@rnx-kit/metro-plugin-duplicates-checker",
         "@rnx-kit/metro-plugin-typescript"
       ]
     }
   }
 }
Integrating with Gradle (Android)
We highly recommend that you disable the
"createBundle<targetName>JsAndAssets" tasks from Gradle and instead run
react-native rnx-bundle separately. That way, you avoid re-bundling when no
changes has been made to the JavaScript code.
This is currently the official way to disable them. Add the following block
somewhere in your app's build.gradle:
// We don't want the React plugin to bundle.
tasks.whenTaskAdded { task ->
    // The task name can be found in `react-native-gradle-plugin`:
    // https://github.com/react/react-native/blob/0.71-stable/packages/react-native-gradle-plugin/src/main/kotlin/com/facebook/react/TaskConfiguration.kt#L54
    if (task.name.startsWith("createBundle") && task.name.endsWith("JsAndAssets")) {
        task.enabled = false
    }
}
You can also have a look at how it's done in
react-native-test-app.
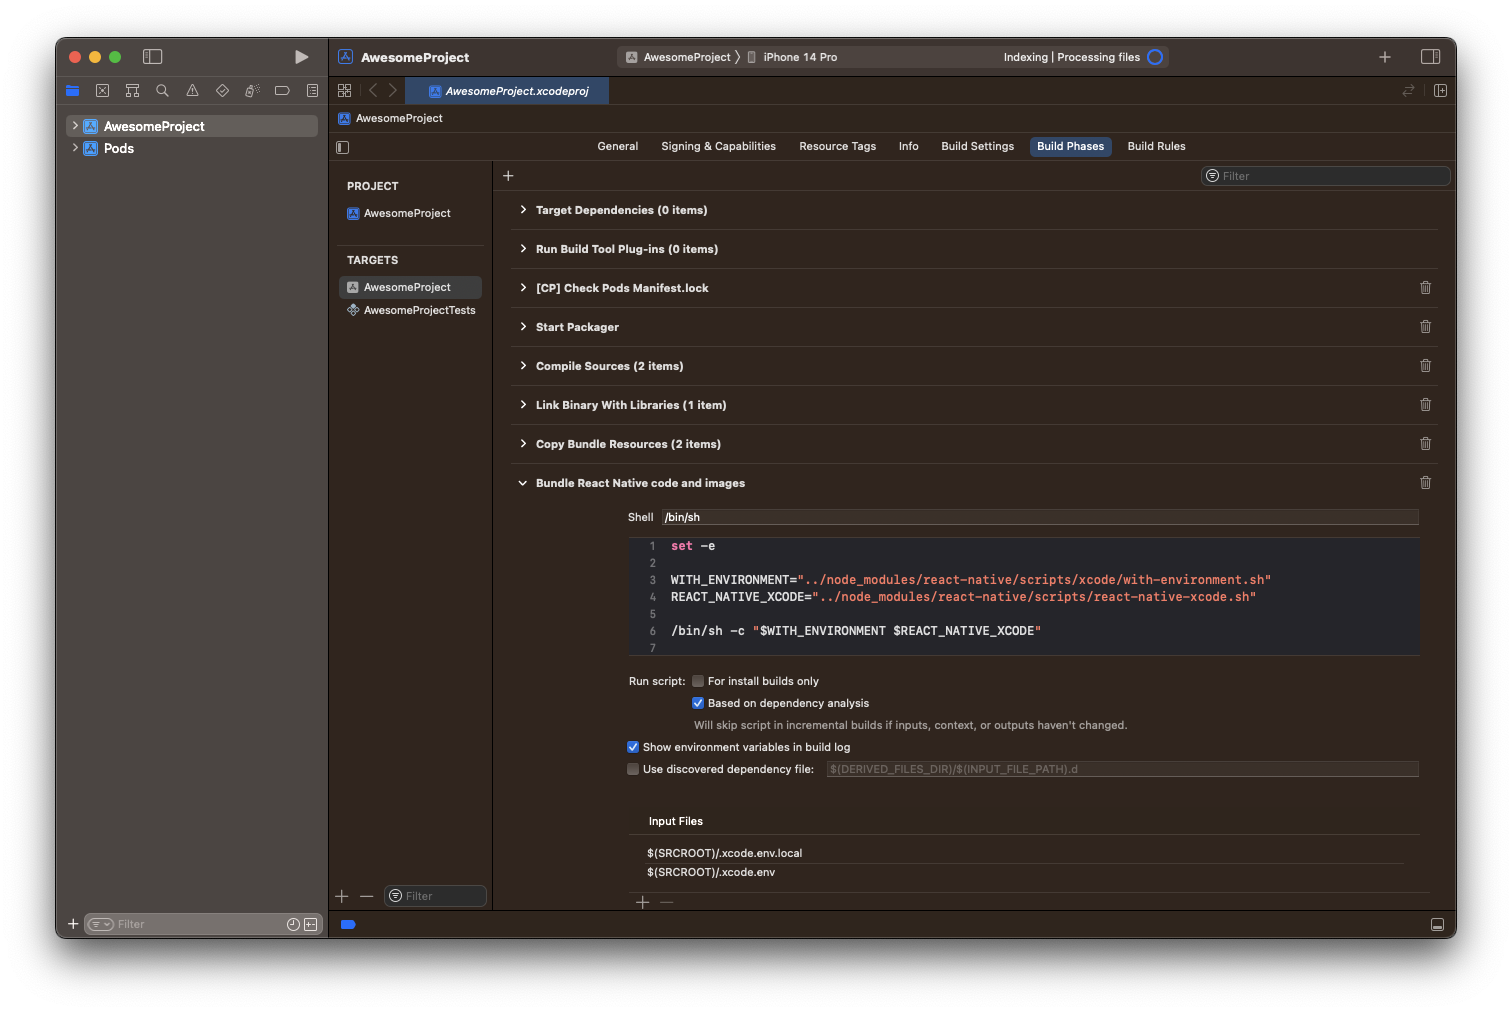
Integrating with Xcode (iOS and macOS)
We highly recommend that you remove the "Bundle React Native code and images"
phase from Xcode and instead run react-native rnx-bundle separately. That way,
you avoid re-bundling when no changes has been made to the JavaScript code.
Click on your app's project in Xcode, and navigate to the "Build Phases" tab. Find the "Bundle React Native code and images" phase, and click on the trash can icon on the far right to remove it.
Integrating with PRs and Builds
You've done the hard part, and you're close to the finish line! The last step is to add automation which guards your app against bundling errors in future PRs. 🛡
If you use Lerna, you can run one command from the root of your repo to bundle all packages:
- Yarn
- pnpm
- npm
yarn lerna run bundle
pnpm lerna run bundle
npx lerna run bundle
If you're using a task runner like Nx, Lage or Gulp, you can go for a more
sophisticated integration. The advantage being that bundle runs as its own
task with isolated logging and error handling. And, you can run it in parallel
with other tasks.
You should now have a command you can run from the root of the repo which bundles every app package. Add it to the root package.json file:
{
  "scripts": {
    "bundle": "lerna run bundle"
  }
}
And then call that top-level command from your PR and Build CI loop definitions:
jobs:
  build:
    steps:
      - name: Bundle all packages
        run: yarn bundle
Easy, right? Now your PRs and Builds will protect the source tree from code that breaks bundling!
Wrapping Up
You've done it! You are bundling and serving your React Native apps with Metro, using enhancements to make the process fast and safe! And your customers will thank you when there are fewer errors (type safety) and smaller bundles (tree shaking)!
Was this helpful? Help spread the word on Twitter.
See room for improvement? Please make your voice heard! 💬 Contribute your ideas in a new issue, a discussion topic, or through a pull request.