Publish to Partner Center
Publish to Partner Center
Section titled “Publish to Partner Center”You’ve built your declarative agent and tried it with early users. Now you want everyone to be able to find it. wiqd publish pc takes your supported declarative-agent package from your project folder to Partner Center. It creates the offer, fills in the Draft, uploads your package, logo, and screenshots, and, with separate authorization, sends it to certification. Use status to follow progress; acceptance is not a guarantee of certification or Live publication. Standalone skill/connector-only plugins still use portal submission.
wiqd prepares, uploads, submits, and tracks your offer. Partner Center verifies your account and certifies your plugin.
How it works
Section titled “How it works”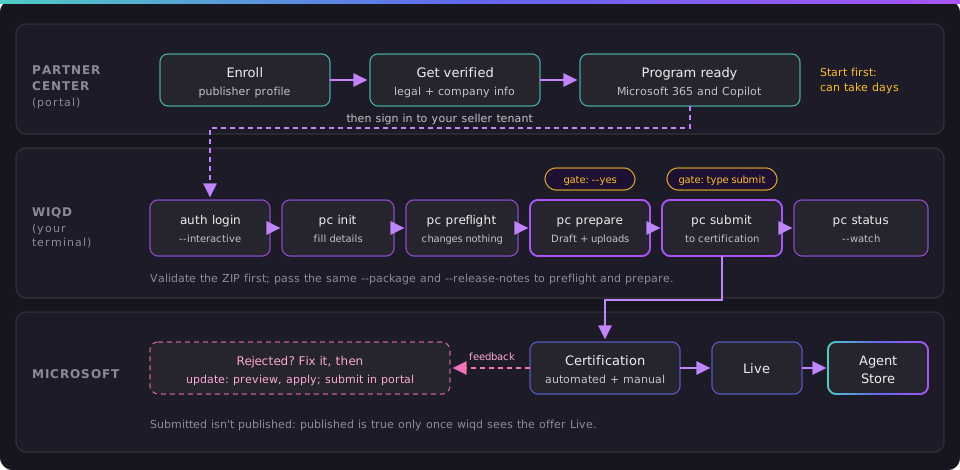
- Enroll and get verified in Partner Center. This happens in the portal, not in wiqd.
- Sign in with
wiqd auth login --interactive. The first time, this createspartner-center.jsonin your project. - Fill in your offer details with
wiqd publish pc init, then replace the placeholders. - Check everything with
wiqd publish pc preflight. It doesn’t change anything. - Prepare the Draft with
wiqd publish pc prepare --yes. - Submit for certification with
wiqd publish pc submit --product-id product/<GUID> --yes --interactive. You typesubmitto confirm. - Track it with
wiqd publish pc status. - Find it in the Agent Store once it’s certified and Live.
In short: enroll → sign in → init → preflight → prepare → submit → status → Agent Store.
Prerequisites
Section titled “Prerequisites”a. Your Partner Center account is enrolled and verified
Section titled “a. Your Partner Center account is enrolled and verified”Before you begin, you need:
- Authority to sign legal agreements on your company’s behalf
- Your company’s legal business name, address, and primary contact. Microsoft verifies these.
- A Microsoft Entra ID work or school account
Pick your starting point:
| Your situation | What to do |
|---|---|
| No Partner Center registration yet | Sign up for a new account with your work or school account. |
| Already in another Partner Center program with a work account | Reuse that account, or create a new one. |
| Registered with a personal Microsoft account | Associate your Entra work account with the existing seller account. |
| Existing Office developer on a personal Microsoft account | Associate your work account, or keep the existing Office developer account. |
Enroll in the Microsoft 365 and Copilot program:
- New to Partner Center: go to the Partner Center enrollment page and sign in with your work account. Complete the publisher profile (company, publisher, and contact info), then accept the Microsoft Office Agreement. If you’re new to the program, you’ll also accept the Microsoft AI Cloud Partner Program Agreement.
- Already a partner: go to Settings > Account settings > Programs > Microsoft 365 and Copilot > Get Started. Pick or create a publisher under Identifiers > Publisher (you need the Owner role on an existing publisher), then accept the Microsoft Publisher Agreement.
Confirm you’re verified and ready:
- Verification shows as complete in Settings > Account settings (legal info, publisher, and contact)
- Microsoft 365 and Copilot shows as registered under Settings > Account settings > Programs
- Whoever runs
wiqd publish pchas a seller role that can create and submit offers. See Roles and permissions. - You know your seller tenant GUID. You’ll pass it to
wiqd auth login --tenant.
Want the setup links in your terminal? Run:
wiqd publish pc accessIt’s read-only. It doesn’t sign in or call any service, so it can’t tell you what’s missing. Its readiness is always unverified.
More on Microsoft Learn: Open a developer account · Manage account settings and profile · Add new publishers
b. wiqd is ready
Section titled “b. wiqd is ready”- Use a public release containing direct publishing. The launch branch targets
@microsoft/wiqd0.25.0. Checkwiqd --version,wiqd doctor, andwiqd publish pc --help; the version alone does not prove that your installed artifact contains this capability or that rollout is complete. See Installation. - The Partner Center commands are on by default in the public launch build.
wiqd ext listshowsmicrosoft.marketplaceasactive. Explicit removal or a disabledpartner-center-publishingflag is preserved. If you deliberately want to restore the bundled extension or re-enable the flag:Terminal window wiqd ext add microsoft.marketplacewiqd config flags set partner-center-publishing true - The wiqd EULA is accepted. Any real (non-
--mock) run needs it. If the extension is not bundled, install the approved public release rather than switching to an internal package. Portal submission remains an alternative. - Sign-in works on your machine. Windows prefers WAM when available. Browser sign-in, and any non-Windows machine, needs Microsoft Edge and a free local port 8400. Protected OS storage through
keytaris required; Linux also needs a working libsecret keyring. There is no plaintext fallback.
c. Your plugin project is ready
Section titled “c. Your plugin project is ready”- Your plugin is built and previewed. See Build a plugin.
- Your saved source validates:
wiqd plugin validate --mode source --path . --env local appPackage/manifest.jsonhas aname.short. That’s your default offer title.- Listing images are inside the project folder: a logo and 1 to 5 screenshots, each non-empty, 200 MB or smaller, and not behind a symlink.
- You have your listing details: a privacy policy URL, an
https://support page, terms (standardMicrosoftor your own), and release notes for reviewers (1 to 2,500 characters). Decide whether your plugin needs a separate service purchase or has in-app purchases. Partners have to answer this one explicitly. - Your project is in a local folder that isn’t synced. wiqd keeps a lock in
.wiqd/partner-center/, and OneDrive can break it (PC_RESERVATION_LOST).
Path 1: Publish it conversationally
Section titled “Path 1: Publish it conversationally”Open GitHub Copilot CLI in your plugin project and tell wiqd what you want. It runs the checks, explains what it finds, and stops for your OK before anything changes in Partner Center.
What to say
Section titled “What to say”“Help me publish this plugin using
wiqd publish pc” · “Publish my plugin to Partner Center” · “Check my Partner Center submission” · “Why did certification fail?”
Walkthrough
Section titled “Walkthrough”| You say | wiqd does |
|---|---|
| ”Publish this plugin to Partner Center.” | Checks that publish pc is on, and that you’re in a plugin project with a name.short. |
Asks you to run wiqd auth login --interactive --tenant <seller-tenant-guid>. Sign-in is yours. | |
Runs wiqd publish pc init. It never prints your hide key. | |
| ”Help me fill it in.” | Walks you through each placeholder in partner-center.json: title, description, categories, legal URLs, logo, and screenshots. |
| ”Is it ready?” | Runs source validation, builds a final ZIP, requires package validation to pass, then runs preflight with that same --package and approved --release-notes. Marketplace policy findings are advisory. |
| ”Looks good, prepare it.” | For a fresh offer, runs wiqd publish pc prepare --yes with that exact ZIP and release notes after your OK, and shows you what it uploaded. Existing/rejected offers use update. |
Hands you the exact submit command. You run it and type submit. | |
| ”Where’s my submission?” | Runs wiqd publish pc status and explains where it is. |
Two ways to run it
Section titled “Two ways to run it”| Ask the agent | Run it yourself | |
|---|---|---|
| Best for | Your first submission, or figuring out what’s missing | Repeat submissions and pipelines |
| Sign-in | You run it | You run it |
| Draft changes | Agent asks, then runs prepare --yes | You run prepare --yes |
| Submission | You run submit and type submit | You run submit, or use --authorize-submit in CI |
Path 2: Use the CLI directly
Section titled “Path 2: Use the CLI directly”Run these from your plugin project folder:
# 1. Sign in (creates partner-center.json the first time)wiqd auth login --interactive --tenant <seller-tenant-guid>
# 2. Add the missing sections to partner-center.json, then replace every placeholderwiqd publish pc init#    or link an offer that already existswiqd publish pc init --product-id product/<GUID>
# 3. Validate saved source, build once, then validate the exact upload ZIPwiqd plugin validate --mode source --path . --env localwiqd plugin package --path . --env local --output ./release.zipwiqd plugin validate --mode package --package-file ./release.zip --json
# Continue only when package validation reports PASSED.wiqd publish pc preflight --package ./release.zip --release-notes "First release." --json
# 4. Create the offer, fill in the Draft, and upload the package, logo, and screenshotswiqd publish pc prepare --package ./release.zip --release-notes "First release." --yes --json
# 5. Send it to certification (you'll type "submit")wiqd publish pc submit --product-id product/<GUID> --yes --interactive --json
# 6. Follow progresswiqd publish pc status --job-id <job-id> --watch
Save the productId from prepare and the jobId from submit. You’ll need them for the next steps.
Want one command? After validating the ZIP, wiqd publish pc --package ./release.zip --release-notes "First release." --interactive runs preflight, prepare, and submit in order, and stops at the first failure. Use it only for a fresh offer, not an update.
Just trying it out? wiqd publish pc preflight --mock --json returns sample results without reading your project or calling Partner Center.
Which package goes out? Keep the validated ZIP unchanged and pass it explicitly to both commands. Without --package, preflight and prepare each build fresh bytes from --package-env (default local); these are not automatically the ZIP you validated. Revalidate whenever the ZIP changes. Marketplace policy checks are advisory; package validation passing is the hard gate, not a certification guarantee.
Marketplace authentication in automation
Section titled “Marketplace authentication in automation”--authorize-submit is consent for this invocation, not an authentication method.
Marketplace does not consume the core pipeline inputs CI_ENABLED,
M365_ACCOUNT_NAME, M365_ACCOUNT_PASSWORD, or M365_REFRESH_TOKEN. The
core CI/CD authentication examples
do not sign in this extension. There is no supported clean-runner,
service-principal, or workload-identity bootstrap for Marketplace in this build.
On a trusted persistent runner, first sign in interactively as the same OS user that will run the job, from the intended project:
wiqd auth login --interactive --tenant <seller-tenant-guid>Complete seller/binding confirmation, accept the WIQD EULA through its supported flow, and retain access to that user’s protected OS credential store. An interactive desktop session succeeding does not prove a runner service can unlock that store. Do not copy caches or export credentials as artifacts. Preserve the intended project’s binding and receipts securely.
After independent package validation and explicit submission approval, that runner can use:
wiqd publish pc --path ./agent-project --package ./release.zip --release-notes "Approved release." --authorize-submit --jsonHere release.zip is inside the selected project. Commands silently acquire
separate Graph and Marketplace tokens from the saved session and recheck
publisher identity. If interaction is required, stop and have the publisher
sign in again in a real terminal under that runner identity. Do not call
auth login in CI or automatically retry an uncertain mutation.
Ephemeral hosted runners without such a session should validate/package in CI
and hand off publishing to an authenticated operator. No live pipeline
acceptance is implied by these instructions.
After you submit
Section titled “After you submit”- Wait for certification. Microsoft runs automated checks and a manual review. AI-powered plugins get extra review for responsible AI and data handling. Follow along in Partner Center, or with
wiqd publish pc status --job-id <job-id> --watch. If--watchtimes out withPC_VERIFICATION_PENDING, that’s not a rejection. Check again later. - Find it in the Agent Store. Once it’s Live, open the Microsoft 365 Copilot Agent Store, find your plugin, and add it.
Update an existing or rejected offer
Section titled “Update an existing or rejected offer”prepare is for fresh offers. Check state first, and link an existing Product
only when it is not already saved in this project’s partner-center.json:
wiqd publish pc status --product-id product/<GUID> --json# Only for an unlinked project:wiqd publish pc init --product-id product/<GUID>Wait while certification is in progress. For a live, draft-attached, or rejected offer, fix the certification findings and edit the supported listing fields or package source. For example, to correct the store description and reviewer notes:
wiqd publish pc update --fields listing.description,listing.certification.notesToReviewer --dry-run --jsonwiqd publish pc update --fields listing.description,listing.certification.notesToReviewer --yes --jsonReview the preview before applying. These field updates also bump the manifest
version and build/upload the local package, so review all local package changes.
For a package correction where you need to validate the exact upload bytes,
first set appPackage/manifest.json to a new plain MAJOR.MINOR.PATCH version
higher than the current local/recorded successful version, and build the ZIP.
Then restore the source manifest’s original baseline version without modifying
the ZIP: prebuilt updates must be higher than that local baseline as well.
Validate the new ZIP before applying it:
wiqd plugin validate --mode source --path . --env localwiqd plugin package --path . --env local --output ./corrected-release.zip# Restore only the source manifest version to its previous baseline here.wiqd plugin validate --mode package --package-file ./corrected-release.zip --json# Continue only for PASSED, and keep the ZIP unchanged.wiqd publish pc update --package ./corrected-release.zip --dry-run --jsonwiqd publish pc update --package ./corrected-release.zip --yes --jsonYou can combine --package with --fields for listing and package corrections.
Alternatively, --update-package --dry-run, followed by
--update-package --yes, automatically bumps/builds the package, but does not
validate those generated ZIP bytes for you. --listing-only does not bypass
the required package/version change.
For listing media, preview and apply --logo and/or
--screenshots --screenshot-mode add|replace. Ask before choosing replacement;
--yes does not choose the screenshot mode. See the update options.
Finish in Partner Center: after applied: true, inspect the Draft package,
listing, images and Notes for certification, then submit or resubmit through the
portal. update never submits, update --submit is unsupported, and it
invalidates earlier CLI preparation authorization. Do not rerun prepare,
bare pc, or standalone submit as an update shortcut. A no-change preview
does not upload anything. For pending or unknown outcomes, inspect status and
the portal before retrying.
Common errors
Section titled “Common errors”| Code | What to do |
|---|---|
PC_LISTING_MISSING | No partner-center.json yet. Run wiqd auth login --interactive from your project folder, then pc init. |
PC_MISSING_REQUIRED_FIELD | Fill in the fields the message lists. |
PC_SUBMIT_AUTHORIZATION_REQUIRED | Use --yes --interactive in a real terminal, or --yes --authorize-submit for unattended runs. |
PC_UPDATE_REQUIRED | The offer already has files or a submission. Use pc update --dry-run, and check pc status first. |
PC_OUTCOME_UNKNOWN | wiqd couldn’t confirm what happened. Don’t retry yet. Check pc status or Partner Center first. |
PC_RESERVATION_LOST | wiqd lost its local lock. Stop, preserve receipts, and inspect pc status and Partner Center before any manually approved rerun; use a non-synced project folder. |
PC_AUTH_* | Sign-in problem. Rerun wiqd auth login --interactive --tenant <seller-tenant-guid>. |
See the full list in the CLI reference.
Publishing paths
Section titled “Publishing paths”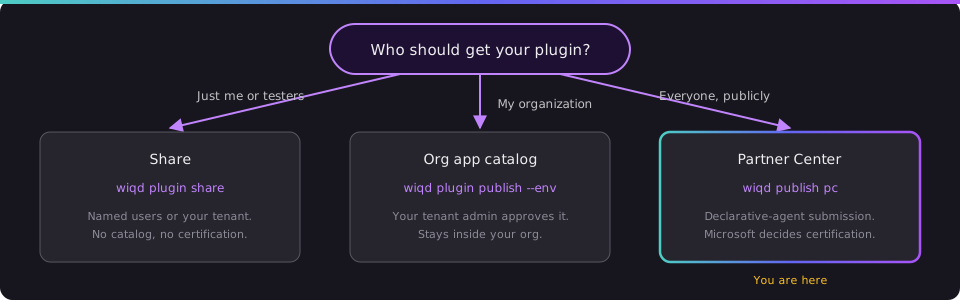
| Who gets it | Command | What happens |
|---|---|---|
| You and a few testers | wiqd plugin share | Shared with named users or your tenant. No catalog, no certification. |
| Your organization | wiqd plugin publish --env <env> | Submitted to your org’s app catalog for your admin to approve. |
| Everyone, with a supported declarative-agent package | wiqd publish pc | Submitted for certification; Microsoft decides certification and store publication. |
Where wiqd stops
Section titled “Where wiqd stops”wiqd prepares, uploads, submits, and tracks your offer. Partner Center verifies your account, certifies your plugin, and owns your listing. wiqd never accepts legal terms or agreements for you, and setting termsConditions in partner-center.json doesn’t accept anything either.
What’s next?
Section titled “What’s next?”- Build a plugin: build and preview before you publish
wiqd publish pcreference: every subcommand, flag, and error- CI/CD pipelines: core lifecycle automation, separate from Marketplace authentication
- Partner Center documentation: sellers, offers, and certification