Comparing image classification models side by side on the Raspberry Pi
by Byron Changuion and Ofer Dekel
This tutorial shows you how to run two different ELL models side-by-side on a Raspberry Pi. Some of the models in the Embedded Learning Library (ELL) gallery are slower and accurate, while others are faster but less accurate. Running two models side-by-side can give you a sense of their relative speeds and accuracies. Specifically, you will compare a standard (real valued) Convolutional Neural Network to a faster and less accurate Neural Network that contains binarized layers.
Before you begin
Complete the following steps before starting the tutorial.
- Install ELL on your computer (Windows, Ubuntu Linux, macOS).
- Follow the instructions for setting up your Raspberry Pi device.
- Complete the Getting started with image classification on Raspberry Pi tutorial to learn how to produce a Python wrapper for an ELL model.
Required materials
- Laptop or desktop computer (Windows, Linux, or macOS)
- Raspberry Pi 3
- Raspberry Pi camera or USB webcam
- Optional: Active cooling attachment (see our tutorial on cooling your Pi)
Activate your Anaconda environment and create a tutorial directory
If you followed the setup instructions, you should have an Anaconda environment named py36. Open a terminal window and activate this environment.
[Linux/macOS] source activate py36
[Windows] activate py36
Create a directory for this tutorial anywhere on your computer and cd into it.
Download two pretrained models
Download this real-valued ELL model and this binarized ELL model into the directory. For convenience, rename them model1.ell.zip and model2.ell.zip.
curl --location -o model1.ell.zip https://github.com/Microsoft/ELL-models/raw/master/models/ILSVRC2012/d_I160x160x3CMCMCMCMCMCMC1AS/d_I160x160x3CMCMCMCMCMCMC1AS.ell.zip
curl --location -o model2.ell.zip https://github.com/Microsoft/ELL-models/raw/master/models/ILSVRC2012/d_I160x160x3CMCMBMBMBMBMC1AS/d_I160x160x3CMCMBMBMBMBMC1AS.ell.zip
Unzip the compressed files.
Note On Windows, the unzip utility is distributed as part of Git. For example, you might find it in \Program Files\Git\usr\bin. On Linux computers, you can install unzip using the apt-get install unzip command.
unzip model1.ell.zip
unzip model2.ell.zip
Rename the files to model1.ell and model2.ell, respectively.
[Linux/macOS] mv d_I160x160x3CMCMCMCMCMCMC1AS.ell model1.ell && mv d_I160x160x3CMCMBMBMBMBMC1AS.ell model2.ell
[Windows] ren d_I160x160x3CMCMCMCMCMCMC1AS.ell model1.ell && ren d_I160x160x3CMCMBMBMBMBMC1AS.ell model2.ell
Next, download the file of category names that correspond to these models.
curl --location -o categories.txt https://github.com/Microsoft/ELL-models/raw/master/models/ILSVRC2012/categories.txt
At this point, the files model1.ell, model2.ell, and categories.txt should all be in your directory.
Compile the models and create Python wrappers
Use the wrap.py tool to compile the models and create Python wrappers. Use the --outdir option to put the models into different directories. Make sure to replace <ELL-root> with the path to the ELL root directory (the directory where you cloned the ELL repository).
python <ELL-root>/tools/wrap/wrap.py --model_file model1.ell --language python --target pi3 --outdir model1
python <ELL-root>/tools/wrap/wrap.py --model_file model2.ell --language python --target pi3 --outdir model2
The output will be similar to the following:
compiling model...
generating python interfaces for model1 in model1
running opt...
running llc...
success, now copy the 'model1' folder to your target machine and build it there
...
compiling model...
generating python interfaces for model2 in model2
running opt...
running llc...
success, now copy the 'model2' folder to your target machine and build it there
Copy a few helper functions to the directory.
[Linux/macOS] cp <ELL-root>/docs/tutorials/shared/tutorial_helpers.py .
[Windows] copy <ELL-root>\docs\tutorials\shared\tutorial_helpers.py .
To speed up the transfer of files to the Raspberry Pi device, delete the .zip and .ell files before copying the folder:
[Linux/macOS] rm -f *.zip *.ell
[Windows] del *.zip *.ell
You should now have a directory containing the categories.txt file, model1 and model2 directories, and some helpful python utilities, which will be used later in this tutorial.
Call your models from a Python script
You will now write a Python script that reads images from the camera, invokes the models one at a time, and displays the two frames side-by-side. If you just want the full script, copy it from here. Otherwise, create an empty text file named side_by_side.py and copy in the code snippets below.
First, import dependencies, including system utilities, OpenCV, and NumPy.
import time
import numpy as np
import cv2
Import the helper code that you copied over. You must do this before your import the model because it helps find the requisite compiled model files.
import tutorial_helpers as helpers
Next, import the models.
import model1
import model2
Add a function that reads an image from the camera.
def get_image_from_camera(camera):
    if camera:
        ret, frame = camera.read()
        if not ret:
            raise Exception("your capture device is not returning images")
        return frame
    return None
Define the main entry point and use the camera as an image source.
def main():
    camera = cv2.VideoCapture(0)
The argument 0 in the function call above selects the default camera. If you have more than one camera connected to your Pi device, choose which camera to use by changing this argument. Read the file of category names.
    with open("categories.txt", "r") as categories_file:
        categories = categories_file.read().splitlines()
Define a list to hold the model wrappers.
model_wrappers = [model1.model1.Model1Wrapper(), model2.model2.Model2Wrapper()]
Define a list to hold the model module references
model_modules = [model1.model1, model2.model2]
The models expect input in a certain shape. For each model, get this shape and store it for use later on.
input_shapes = [model_wrapper.GetInputShape() for model_wrapper in model_wrappers]
Models may need specific preprocessing for particular datasets, get the preprocessing metadata for the models for use later.
preprocessing_metadata = [helpers.get_image_preprocessing_metadata(model_wrapper) for model_wrapper in model_wrappers]
Define an array to hold each model’s output.
prediction_arrays = [None, None]
Create a tiled image that will be used to display the two frames side-by-side. This function is provided by the helper module that you imported earlier.
tiled_image = helpers.TiledImage(len(model_wrappers))
Next, set up a loop that keeps going until OpenCV indicates that it is done, which is when the user hits any key. At the start of every loop iteration, read an image from the camera.
    while (cv2.waitKey(1) & 0xFF) == 0xFF:
        image = get_image_from_camera(camera)
Iterate over the models. Randomize the order so that, on average, neither model has an advantage over the other.
        model_indices = np.arange(len(model_wrappers))
        np.random.shuffle(model_indices)

        for model_index in model_indices:
            model_wrapper = model_wrappers[model_index]
For each model, prepare the image as input to the model wrapper’s Predict function.
            input_data = helpers.prepare_image_for_model(
                image, input_shapes[model_index].columns,
                input_shapes[model_index].rows,
                preprocessing_metadata=preprocessing_metadata[model_index])
Wrap the resulting numpy array in a FloatVector
input_data = model_modules[model_index].FloatVector(input_data)
With the processed image input handy, call the Predict method to invoke the model.
prediction_arrays[model_index] = model_wrapper.Predict(input_data)
As before, the Predict method stores an array of scores in predictions_array[modelIndex]. Each element of this array corresponds to one of the 1000 image classes recognized by the model. Extract the top five predicted categories by calling the helper function get_top_n, selecting predictions with a 10% or higher confidence. A threshold of 10% will show more predictions from the binarized model for comparison purposes.
            top_5 = helpers.get_top_n(
                prediction_arrays[model_index], n=5, threshold=0.10)
top_5 is an array of tuples, where the first tuple element is the category index and the second tuple element is the probability of that category. Match the category indices in top_5 with the category names in categories.
            header_text = "".join(["({:.0%}) {}  ".format(
                element[1], categories[element[0]]) for element in top_5])
Use the draw_header helper function to write the predicted category on the image. Since each model modifies the input image, make a copy of it.
            model_frame = np.copy(image)
            helpers.draw_header(model_frame, header_text)
The model has now produced a frame that has the input image and the model’s prediction results. Set this as one of the tiles in the tiled image and show the result.
            tiled_image.set_image_at(model_index, model_frame)
            tiled_image.show()
Finally, write the code that invokes the main function and runs your script.
if __name__ == "__main__":
    main()
Build the Python wrappers on the Raspberry Pi device
Note For this step, you’ll be working with the Raspberry Pi device. If your Pi is accessible over the network, you can copy the directory using the Unix scp tool or the Windows WinSCP tool
Log into your Raspberry Pi, find the directory you just copied over, and build the two CMake projects.
cd model1
mkdir build
cd build
cmake .. -DCMAKE_BUILD_TYPE=Release
make
cd ../..
cd model2
mkdir build
cd build
cmake .. -DCMAKE_BUILD_TYPE=Release
make
cd ../..
Classify live video on the Raspberry Pi
If you followed the Raspberry Pi Setup Instructions, you should have an Anaconda environment named py34. Activate this environment and run your script.
source activate py34
python side_by_side.py
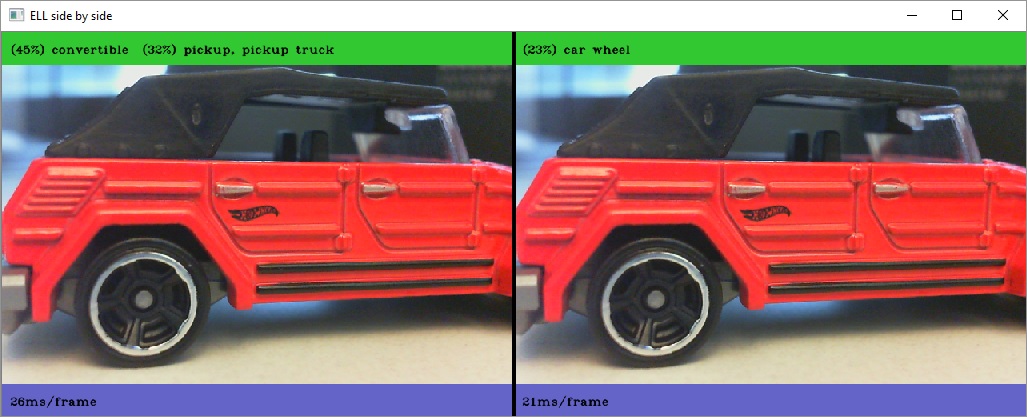
If you have a camera and display connected to your Pi device, you will see a window similar to the screenshot at the top of this page. Point your camera at different objects and see how the model classifies them.
If you downloaded the full side_by_side.py script from here, you can see the average time (in milliseconds) it takes each model to process a frame. Try to get a sense of the relative accuracy and speed of each model. The Python wrapper adds some overhead that slows the models down. For optimal performance, consider bypassing Python and invoking the model from a C++ application.
Troubleshooting
Look for tips in the Troubleshooting section of the Raspberry Pi Setup Instructions.