This notebook demonstrates the process of importing models from the Hugging Face hub and registering them into Azure Machine Learning (Azure ML) for further use in various machine learning tasks.
Why Hugging Face Models in PyRIT?
The primary goal of PyRIT is to assess the robustness of LLM endpoints against different harm categories such as fabrication/ungrounded content (e.g., hallucination), misuse (e.g., bias), and prohibited content (e.g., harassment). Hugging Face serves as a comprehensive repository of LLMs, capable of generating a diverse and complex prompts when given appropriate system prompt. Models such as:
are particularly useful for generating prompts or scenarios without content moderation. These can be configured as part of a red teaming attack in PyRIT to create challenging and uncensored prompts/scenarios. These prompts are then submitted to the target chat bot, helping assess its ability to handle potentially unsafe, unexpected, or adversarial inputs.
Important Note on Deploying Quantized Models
When deploying quantized models, especially those suffixed with GGML, FP16, or GPTQ, it’s crucial to have GPU support. These models are optimized for performance but require the computational capabilities of GPUs to run. Ensure your deployment environment is equipped with the necessary GPU resources to handle these models.
Supported Tasks
The import process supports a variety of tasks, including but not limited to:
Text classification
Text generation
Question answering
Summarization
Import Process
The process involves downloading models from the Hugging Face hub, converting them to MLflow format for compatibility with Azure ML, and then registering them for easy access and deployment.
Prerequisites
An Azure account with an active subscription. Create one for free.
An Azure ML workspace set up. Learn how to set up a workspace.
Install the Azure ML client library for Python with pip.
   pip install azure-ai-ml
   pip install azure-identity
Execute the
az logincommand to sign in to your Azure subscription. For detailed instructions, refer to the “Authenticate with Azure Subscription” section here
1. Connect to Azure Machine Learning Workspace
Before we start, we need to connect to our Azure ML workspace. The workspace is the top-level resource for Azure ML, providing a centralized place to work with all the artifacts you create.
Steps:
Import Required Libraries: We’ll start by importing the necessary libraries from the Azure ML SDK.
Set Up Credentials: We’ll use
DefaultAzureCredentialorInteractiveBrowserCredentialfor authentication.Access Workspace and Registry: We’ll obtain handles to our AML workspace and the model registry.
1.1 Import Required Libraries
# Import the Azure ML SDK components required for workspace connection and model management.
import os

# Import necessary libraries for Azure ML operations and authentication
from azure.ai.ml import MLClient, UserIdentityConfiguration
from azure.ai.ml.dsl import pipeline
from azure.ai.ml.entities import AmlCompute
from azure.core.exceptions import ResourceNotFoundError
from azure.identity import DefaultAzureCredential, InteractiveBrowserCredential
from dotenv import load_dotenv
1.2 Load Environment Variables
Load necessary environment variables from an .env file.
To execute the following job on an Azure ML compute cluster, set AZURE_ML_COMPUTE_TYPE to amlcompute and specify AZURE_ML_INSTANCE_SIZE as STANDARD_D4_V2 (or other as you see fit). When utilizing the model import component, AZURE_ML_REGISTRY_NAME should be set to azureml, and AZURE_ML_MODEL_IMPORT_VERSION can be either latest or a specific version like 0.0.22. For Hugging Face models, the TASK_NAME might be text-generation for text generation models. For default values and further guidance, please see the .env_example file.
Environment Variables
For ex., to download the Hugging Face model cognitivecomputations/Wizard-Vicuna-13B-Uncensored into your Azure environment, below are the environment variables that needs to be set in .env file:
AZURE_SUBSCRIPTION_ID
Obtain your Azure Subscription ID, essential for accessing Azure services.
AZURE_RESOURCE_GROUP
Identify the Resource Group where your Azure Machine Learning (Azure ML) workspace is located.
AZURE_ML_WORKSPACE_NAME
Specify the name of your AZURE ML workspace where the model will be registered.
AZURE_ML_REGISTRY_NAME
Choose a name for registering the model in your AZURE ML workspace, such as “HuggingFace”. This helps in identifying if the model already exists in your AZURE ML Hugging Face registry.
HF_MODEL_ID
For instance,
cognitivecomputations/Wizard-Vicuna-13B-Uncensoredas the model ID for the Hugging Face model you wish to download and register.
TASK_NAME
Task name for which you’re using the model, for example,
text-generationfor text generation tasks.
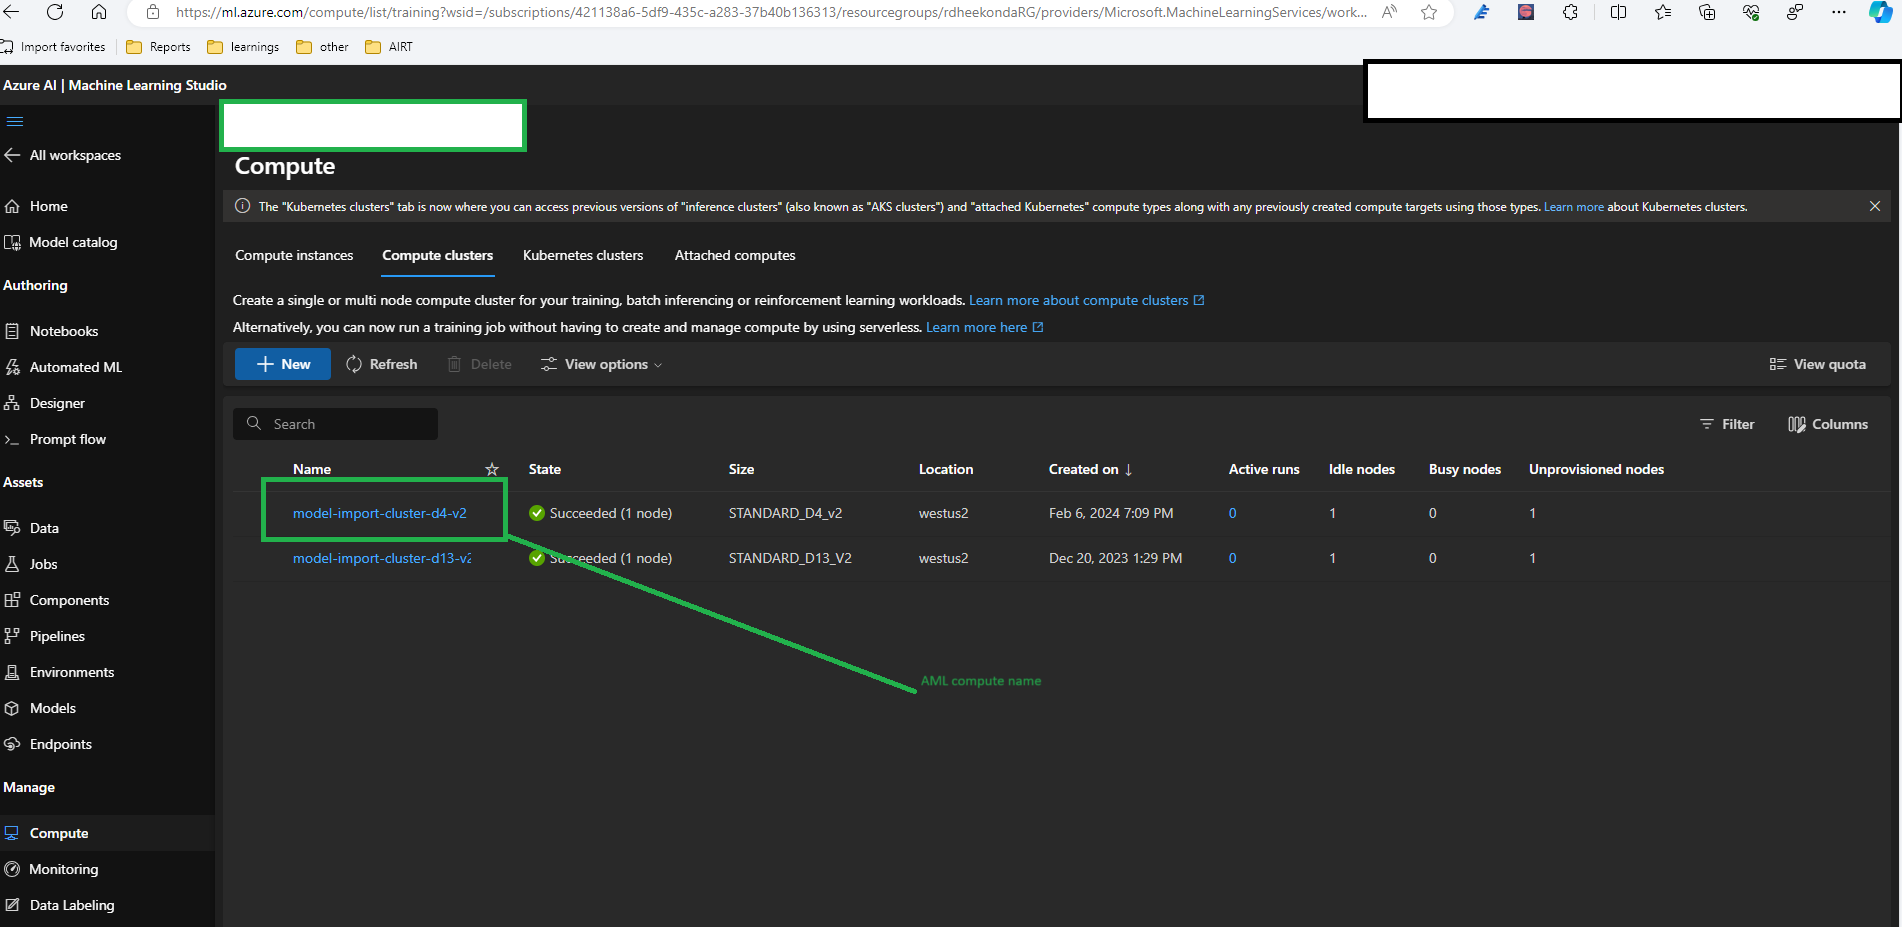
AZURE_ML_COMPUTE_NAME
AZURE ML Compute where this script runs, specifically an Azure ML compute cluster suitable for these tasks.
AZURE_ML_INSTANCE_SIZE
Select the size of the compute instance of Azure ML compute cluster, ensuring it’s at least double the size of the model to accommodate it effectively.
AZURE_ML_COMPUTE_NAME
If you already have an Azure ML compute cluster, provide its name. If not, the script will create one based on the instance size and the specified minimum and maximum instances.
IDLE_TIME_BEFORE_SCALE_DOWN
Set the duration for the Azure ML cluster to remain active before scaling down due to inactivity, ensuring efficient resource use. Typically, 3-4 hours is ideal for large size models.
# Load the environment variables from the .env file
load_dotenv()

subscription_id = os.getenv("AZURE_SUBSCRIPTION_ID")
resource_group = os.getenv("AZURE_RESOURCE_GROUP")
workspace_name = os.getenv("AZURE_ML_WORKSPACE_NAME")
registry_name = os.getenv("AZURE_ML_REGISTRY_NAME")
aml_import_model_version = os.getenv("AZURE_ML_MODEL_IMPORT_VERSION")  # values could be 'latest' or any version

# Model and Compute Configuration
model_id = os.getenv("HF_MODEL_ID")
task_name = os.getenv("TASK_NAME")
aml_compute_type = os.getenv("AZURE_ML_COMPUTE_TYPE")
instance_size = os.getenv("AZURE_ML_INSTANCE_SIZE")
compute_name = os.getenv("AZURE_ML_COMPUTE_NAME")
experiment_name = f"Import Model Pipeline Hugging Face model {model_id}"
min_instances = int(os.getenv("AZURE_ML_MIN_INSTANCES"))
max_instances = int(os.getenv("AZURE_ML_MAX_INSTANCES"))
idle_time_before_scale_down = int(os.getenv("IDLE_TIME_BEFORE_SCALE_DOWN"))
print(f"Subscription ID: {subscription_id}")
print(f"Resource group: {resource_group}")
print(f"Workspace name: {workspace_name}")
print(f"Registry name: {registry_name}")
print(f"Azure ML import model version: {aml_import_model_version}")
print(f"Model ID: {model_id}")
print(f"Task name: {task_name}")
print(f"Azure ML compute type: {aml_compute_type}")
print(f"Instance size: {instance_size}")
print(f"Compute name: {compute_name}")
print(f"Experiment name: {experiment_name}")
print(f"Min instance count: {min_instances}")
print(f"Max instance count: {max_instances}")
print(f"Idle time before scale down in seconds: {idle_time_before_scale_down}")1.3 Configure Credentials
Set up the DefaultAzureCredential for seamless authentication with Azure services. This method should handle most authentication scenarios. If you encounter issues, refer to the Azure Identity documentation for alternative credentials.
# Setup Azure credentials, preferring DefaultAzureCredential and falling back to InteractiveBrowserCredential if necessary
try:
    credential: DefaultAzureCredential | InteractiveBrowserCredential = DefaultAzureCredential()
    # Verify if the default credential can fetch a token successfully
    credential.get_token("https://management.azure.com/.default")
except Exception as ex:
    print("DefaultAzureCredential failed, falling back to InteractiveBrowserCredential:")
    credential = InteractiveBrowserCredential()
1.4 Access Azure ML Workspace and Registry
Using the Azure ML SDK, we’ll connect to our workspace. This requires having a configuration file or setting up the workspace parameters directly in the code. Ensure your workspace is configured with a compute instance or cluster for running the jobs.
# Initialize MLClient for Azure ML workspace and registry access
try:
    # Attempt to create MLClient using configuration file
    ml_client_ws = MLClient.from_config(credential=credential)
except Exception:
    ml_client_ws = MLClient(
        credential,
        subscription_id=subscription_id,
        resource_group_name=resource_group,
        workspace_name=workspace_name,
    )
# Initialize MLClient for Azure ML model registry access
ml_client_registry = MLClient(credential, registry_name=registry_name)
1.5 Compute Target Setup
For model operations, we need a compute target. Here, we’ll either attach an existing AmlCompute or create a new one. Note that creating a new AmlCompute can take approximately 5 minutes.
Existing AmlCompute: If an AmlCompute with the specified name exists, we’ll use it.
New AmlCompute: If it doesn’t exist, we’ll create a new one. Be aware of the resource limits in Azure ML.
Important Note for Azure ML Compute Setup:
When configuring the Azure ML compute cluster for running pipelines, please ensure the following:
Idle Time to Scale Down: If there is an existing Azure ML compute cluster you wish to use, set the idle time to scale down to at least 4 hours. This helps in managing compute resources efficiently to run long-running jobs, helpful if the Hugging Face model is large in size.
Memory Requirements for Hugging Face Models: When planning to download and register a Hugging Face model, ensure the compute size memory is at least double the size of the Hugging Face model. For example, if the Hugging Face model size is around 32 GB, the Azure ML cluster node size should be at least 64 GB to avoid any issues during the download and registration process.
# Setup or retrieve the compute target for model training
try:
    # Check if the compute target already exists
    _ = ml_client_ws.compute.get(compute_name)
    print("Found existing compute target.")
except ResourceNotFoundError:
    # If not found, create a new compute target
    print("Creating a new compute target...")
    compute_config = AmlCompute(
        name=compute_name,
        type=aml_compute_type,
        size=instance_size,
        min_instances=min_instances,
        max_instances=max_instances,
        idle_time_before_scale_down=idle_time_before_scale_down,
    )
    ml_client_ws.begin_create_or_update(compute_config).result()
2. Create an Azure ML Pipeline for Hugging Face Models
In this section, we’ll set up a pipeline to import and register Hugging Face models into Azure ML.
Steps:
Load Pipeline Component: We’ll load the necessary pipeline component from the Azure ML registry.
Define Pipeline Parameters: We’ll specify parameters such as the Hugging Face model ID and compute target.
Create Pipeline: Using the loaded component and parameters, we’ll define the pipeline.
Execute Pipeline: We’ll submit the pipeline job to Azure ML and monitor its progress.
2.1 Load Pipeline Component
Load the import_model pipeline component from the Azure ML registry. This component is responsible for downloading the Hugging Face model, converting it to MLflow format, and registering it in Azure ML.
import_model = ml_client_registry.components.get(name="import_model", version=aml_import_model_version)def get_max_model_version(models: list) -> str:
"""
Finds the maximum model version number in the given list of models.
Args:
models (list): A list of model objects, each having a 'version' attribute as a string.
Returns:
str: The maximum version number found among the models as a string.
"""
# Find the model with the maximum version number
max_version = max(models, key=lambda x: int(x.version)).version
return str(int(max_version))def check_model_in_registry(client, model_id: str):
"""
Checks for the existence of a model with the specified model_id in the given client registry and retrieves its maximum version.
This function lists all models with the given name in the registry using the provided client. If one or more models are found,
it determines the model with the highest version number and returns that version. If no models are found, it indicates that the model
does not exist in the registry.
Args:
client: The client object used to interact with the model registry. This can be an Azure ML model catalog client or an Azure ML workspace model client.
model_id (str): The unique identifier of the model to check in the registry.
Returns:
tuple:
- bool: True if the model exists in the registry, False otherwise.
- str: The maximum version of the model found in the registry as a string. Returns '0' if the model is not found.
"""
models = list(client.models.list(name=model_id))
if models:
model_version = get_max_model_version(models)
return True, model_version
return False, "0"# Check if Hugging Face model exists in both the Azure ML Hugging Face model catalog registry and the AML workspace model registry
# Initially assume the model does not exist in either registry
huggingface_model_exists_in_aml_registry = False
registered_model_id = model_id.replace("/", "-") # model name in registry doesn't contain '/'
try:
# Check in Azure ML model catalog registry
exists_in_catalog, catalog_version = check_model_in_registry(ml_client_registry, registered_model_id)
if exists_in_catalog:
print(
f"Model already exists in Azure ML model catalog with name {registered_model_id} and maximum version {catalog_version}"
)
huggingface_model_exists_in_aml_registry = True
else:
# If not found in the model catalog, check in AML workspace model registry
exists_in_workspace, workspace_version = check_model_in_registry(ml_client_ws, registered_model_id)
if exists_in_workspace:
print(
f"Model already exists in Azure ML workspace model registry with name {registered_model_id} and maximum version {workspace_version}"
)
huggingface_model_exists_in_aml_registry = True
# If the model doesn't exist in either registry, indicate it needs to be imported
if not huggingface_model_exists_in_aml_registry:
print(f"Model {registered_model_id} not found in any registry. Proceeding with model import.")
except Exception as e:
print(f"Model {registered_model_id} not found in registry. Please continue importing the model.")2.2 Create and Configure the Pipeline
Define the pipeline using the import_model component and the specified parameters. We’ll also set up the User Identity Configuration for the pipeline, allowing individual components to access identity credentials if required.
# Define a Azure ML pipeline for importing models into Azure ML


@pipeline
def model_import_pipeline(model_id, compute, task_name, instance_type):
    """
    Pipeline to import a model into Azure ML.

    Parameters:
    - model_id: The ID of the model to import.
    - compute: The compute resource to use for the import job.
    - task_name: The task associated with the model.
    - instance_type: The type of instance to use for the job.

    Returns:
    - A dictionary containing model registration details.
    """
    import_model_job = import_model(
        model_id=model_id, compute=compute, task_name=task_name, instance_type=instance_type
    )
    import_model_job.settings.continue_on_step_failure = False  # Do not continue on failure

    return {"model_registration_details": import_model_job.outputs.model_registration_details}
# Configure the pipeline object with necessary parameters and identity
pipeline_object = model_import_pipeline(
model_id=model_id, compute=compute_name, task_name=task_name, instance_type=instance_size
)
pipeline_object.identity = UserIdentityConfiguration()
pipeline_object.settings.force_rerun = True
pipeline_object.settings.default_compute = compute_name# Determine if the pipeline needs to be scheduled for model import
schedule_huggingface_model_import = (
not huggingface_model_exists_in_aml_registry and model_id not in [None, "None"] and len(model_id) > 1
)
print(f"Need to schedule run for importing {model_id}: {schedule_huggingface_model_import}")2.3 Submit the Pipeline Job
Submit the pipeline job to Azure ML for execution. The job will import the specified Hugging Face model and register it in Azure ML. We’ll monitor the job’s progress and output.
# Submit and monitor the pipeline job if model import is scheduled
if schedule_huggingface_model_import:
    huggingface_pipeline_job = ml_client_ws.jobs.create_or_update(pipeline_object, experiment_name=experiment_name)
    ml_client_ws.jobs.stream(huggingface_pipeline_job.name)  # Stream logs to monitor the job