🚨 Mission 07: Extracting Resume Contents with Multimodal Prompts
NOTE
This lab has been updated for the new Copilot Studio experience (2026-06-29). The standalone AI Builder Prompt tool no longer exists in Copilot Studio — the UI now states "Prompt is now called Agent." In the new experience the agent's model is natively multimodal (Claude Sonnet 4.6 by default), so the resume-extraction "prompt" is rebuilt as an agent Skill (Build → Skills → Add skill). When a learner uploads a PDF/image, the agent reads it directly — no AI Builder prompt asset required. The Dataverse persistence half (create/update records) is handled by a Workflow tool (the successor to Agent Flows). See evaluation.md for the full comparison.
🎯 Mission Brief
Welcome, Operative. Your previous missions have equipped you with powerful agent orchestration skills, but now it's time to unlock a game-changing capability: multimodal document analysis.
Your assignment, should you choose to accept it, is Document Resume Recon - extracting structured data from any document with precision. While your agents can process text with ease, the real world requires handling PDFs, images, and complex documents daily. Resumes pile up, invoices need processing, and forms require instant digitization.
This mission will transform you from a text-only agent builder into a multimodal expert. You'll learn to configure AI that reads and understands documents like a human analyst - but with AI speed and consistency. By mission's end, you'll have built a complete resume extraction system that integrates with your hiring workflow.
The techniques you learn here will be essential for the advanced data grounding operations in your next mission.
NOTE
This lab uses the new Copilot Studio experience (the New experience toggle in the upper-right is on). The screenshots and steps below reflect that experience.
🔎 Objectives
In this mission, you'll learn:
- What multimodal document analysis is and how the agent's native model handles documents
- How to capture document-extraction behavior as an agent Skill
- How to ask the skill to return structured JSON for downstream processing
- Best practices for instruction design with document analysis
- How to persist extracted data to Dataverse using a Workflow tool
🧠 Understanding multimodal prompts
What makes a prompt "multimodal"?
Traditional prompts work with text only. But multimodal prompts can process multiple types of content:
- Text: Written instructions and content
- Images: Photos, screenshots, charts, and diagrams (.PNG, .JPG, .JPEG)
- Documents: Invoices, resumes, forms (.PDF)
This capability opens up powerful scenarios like analyzing resumes, processing invoices, or extracting data from forms.
Why multimodal matters for your workflows
Every day, your organization faces these document processing challenges:
- Resume screening: Manually reading hundreds of resumes takes valuable time
- Invoice processing: Extracting vendor details, amounts, and dates from varied document formats
- Form analysis: Converting paper forms into digital data
Multimodal prompts eliminate these bottlenecks by combining AI's language understanding with visual analysis capabilities. This gives your AI the ability to process documents as effectively as text.
Common business scenarios
Here are some examples of how multimodal prompts can be applied:
| Scenario | Task | Example Output Fields |
|---|---|---|
| Resume screening | Extract candidate name, email, phone, current title, years of experience, and key skills. | Candidate Name, Email Address, Phone Number, Current Job Title, Years of Experience, Key Skills |
| Invoice processing | Extract vendor information, invoice date, total amount, and line items from this invoice. | Vendor Name, Invoice Date, Total Amount, Invoice Line Items |
| Form analysis | Analyze this application form and extract all filled fields. | Field Name (e.g., Applicant Name), Entered Value (e.g., John Doe), ... |
| ID document verification | Extract name, ID number, expiration date, and address from this identification document. Verify that all text is clearly readable and flag any unclear sections. | Full Name, Identification Number, Expiration Date, Address, Unclear Sections Flag |
⚙️ Model selection
In the new experience you don't pick an AI Builder prompt model — the agent's own model does the document analysis. Set it from the Model dropdown on the agent's Build page (top of the right rail). The default is Claude Sonnet 4.6, which is multimodal (it can read PDFs and images natively). Other models (the GPT-5 family, Claude Opus 4.6–4.8, and Mistral) are available from the same dropdown.
NOTE
The AI Builder model table below is from the classic AI Builder Prompt experience and is retained for background only. In the new experience, model selection happens once at the agent level (Build → Model), not per prompt. For document analysis you still want a low-temperature, accurate model — the default Claude Sonnet 4.6 works well.
Model comparison (classic AI Builder — background)
All of the following models support vision and document processing
| Model | 💰Cost | ⚡Speed | ✅Best for |
|---|---|---|---|
| GPT-4.1 mini | Basic (most cost-effective) | Fast | Standard document processing, summarization, budget-conscious projects |
| GPT-4.1 | Standard | Moderate | Complex documents, advanced content creation, high accuracy needs |
| o3 | Premium | Slow (reasons first) | Data analysis, critical thinking, sophisticated problem-solving |
| GPT-5 chat | Standard | Enhanced | Latest document understanding, highest response accuracy |
| GPT-5 reasoning | Premium | Slow (complex analysis) | Most sophisticated analysis, planning, advanced reasoning |
Temperature settings explained
Temperature controls how creative or predictable your AI responses are:
- Temperature 0: Most predictable, consistent results (best for data extraction)
- Temperature 0.5: Balanced creativity and consistency
- Temperature 1: Maximum creativity (best for content generation)
For document analysis, use temperature 0 to ensure consistent data extraction.
📊 Output formats: Text vs JSON
Choosing the right output format is critical for downstream processing.
When to use text output
Text output works well for:
- Human-readable summaries
- Simple classifications
- Content that doesn't need structured processing
When to use JSON output
JSON output is essential for:
- Structured data extraction
- Integration with databases or systems
- Power Automate flow processing
- Consistent field mapping
JSON best practices
- Define clear field names: Use descriptive, consistent naming
- Provide examples: Include sample output and values for each field
- Specify data types: Include examples for dates, numbers, and text
- Handle missing data: Plan for null or empty values
- Validate structure: Test with various document types
Document quality considerations
- Resolution: Ensure images are clear and readable
- Orientation: Rotate documents to proper orientation before processing
- Format support: Test with your specific document types (PDF, JPG, PNG)
- Size limits: Be aware of file size restrictions in your environment
Performance optimization
- Choose appropriate models: Upgrade models only when needed
- Optimize prompts: Often, shorter, clearer instructions perform better
- Error handling: Plan for documents that can't be processed
- Monitor costs: Different models consume different amounts of AI Builder credits
🧪 Lab 7 - Building a resume extraction system
Time to put your multimodal knowledge into practice. You'll build a comprehensive resume extraction system that analyzes candidate documents and transforms them into structured data for your hiring workflow.
Prerequisites to complete this mission
You'll need to:
- Have completed Mission 06 and have your multi-agent hiring system ready
- Download sample resume documents from Test Resumes
7.1 Create the resume-extraction Skill
Your first objective: capture the resume-analysis behavior as an agent Skill. In the new experience the agent's model is multimodal, so the skill just needs clear instructions — when a learner uploads a resume, the agent reads the document and applies the skill.
Sign in to Copilot Studio and open your Hiring Agent.
On the Build page, find the Skills card in the right rail and select + (Add skill).
In the Add skill dialog, select Create from blank.
Set the Name to
summarize-resume.Set the Description to:
textExtracts candidate name, email, and a structured profile summary from an uploaded resume (and optional cover letter) so it can be matched to open job roles and reviewed.Copy and paste the following as the Instructions:
textYou extract candidate information from an uploaded resume (and optional cover letter) so it can be matched to open job roles and reviewed. When the user uploads or references a resume document: 1. Read the attached resume (PDF or image) and any cover letter text. 2. Extract the candidate's full name and email address. 3. Produce a concise profile summary (max 2000 characters) with these sections: Candidate name; Role(s) applied for if present; Contact and location; One-paragraph summary; Experience snapshot (last 2-3 roles with outcomes); Key projects (1-3 with metrics); Education and certifications; Top skills (top 10); Availability and work authorization. Guidelines: - Use information only from the provided resume and cover letter. - Be accurate with contact details and skills. - Keep the summary concise but informative, suitable for quick application review.
Why a Skill instead of a Prompt
The classic lab built an AI Builder Prompt with a
/documentand/textinput. In the new experience the agent's model is natively multimodal — it reads the uploaded PDF/image directly, so you don't declare document/text input parameters. The skill simply describes the behavior.
7.2 Ask the skill for structured JSON output
The classic prompt had a separate Output → JSON toggle. A skill has no output-format setting, so you specify the JSON shape directly in the instructions.
Reopen the summarize-resume skill (Skills card → select the skill) and append this to the end of the Instructions:
textReturn the result as valid JSON with this structure: { "CandidateName": "string", "Email": "string", "Summary": "string max 2000 characters", "Skills": [{"item": "Skill 1"}, {"item": "Skill 2"}], "Experience": [{"item": "Experience 1"}, {"item": "Experience 2"}] }Select Save / Update to save the skill.
Text vs JSON
Ask for JSON when another tool/workflow will consume the result (e.g., to write to Dataverse). Ask for a readable summary when a human is reading the chat directly. You can include both — a JSON block plus a friendly summary.
7.3 Persist extracted data with a Workflow tool
The skill extracts data, but a skill (instructions only) cannot write to Dataverse. To create/update Candidate and Resume records you still need a tool. In the new experience the classic Agent Flow is now a Workflow (Workflows hub → New Workflow), attached to the agent via Build → Tools → Add a tool → Workflows.
You'll create a Workflow that uses the extracted data to update resumes stored in Dataverse. This is the optional, advanced half of the mission — the conversational skill from 7.1/7.2 already delivers multimodal extraction; this section adds Dataverse persistence.
Workflow Connector nodes
In the new experience, each classic Agent Flow action (Dataverse List rows, Download a file or an image, Add a new row, Update a row) is added on the Workflow canvas as a Connector node using the Microsoft Dataverse connector. The field mappings and fx expressions in the tables below are unchanged from the classic Agent Flow — only the node-adding gesture differs. The classic Condition action is the If/Else node, and Respond to the agent is configured from the When an agent calls the workflow trigger's outputs.
Workflow Expressions
It is very important that you follow the instructions for naming your nodes and entering expressions exactly because the expressions refer to the previous nodes using their name! Refer to the Agent Flow mission in Recruit for a quick refresher!
From the left navigation, open Workflows, then select New Workflow.
Select the Start (trigger) node, open the Trigger type dropdown, and choose When an agent calls the workflow (Trigger as a tool from an agent). Use + Add an input to add the following parameter:
Type Name Description Text ResumeNumber Be sure to use [ResumeNumber]. This must always start with the letter R 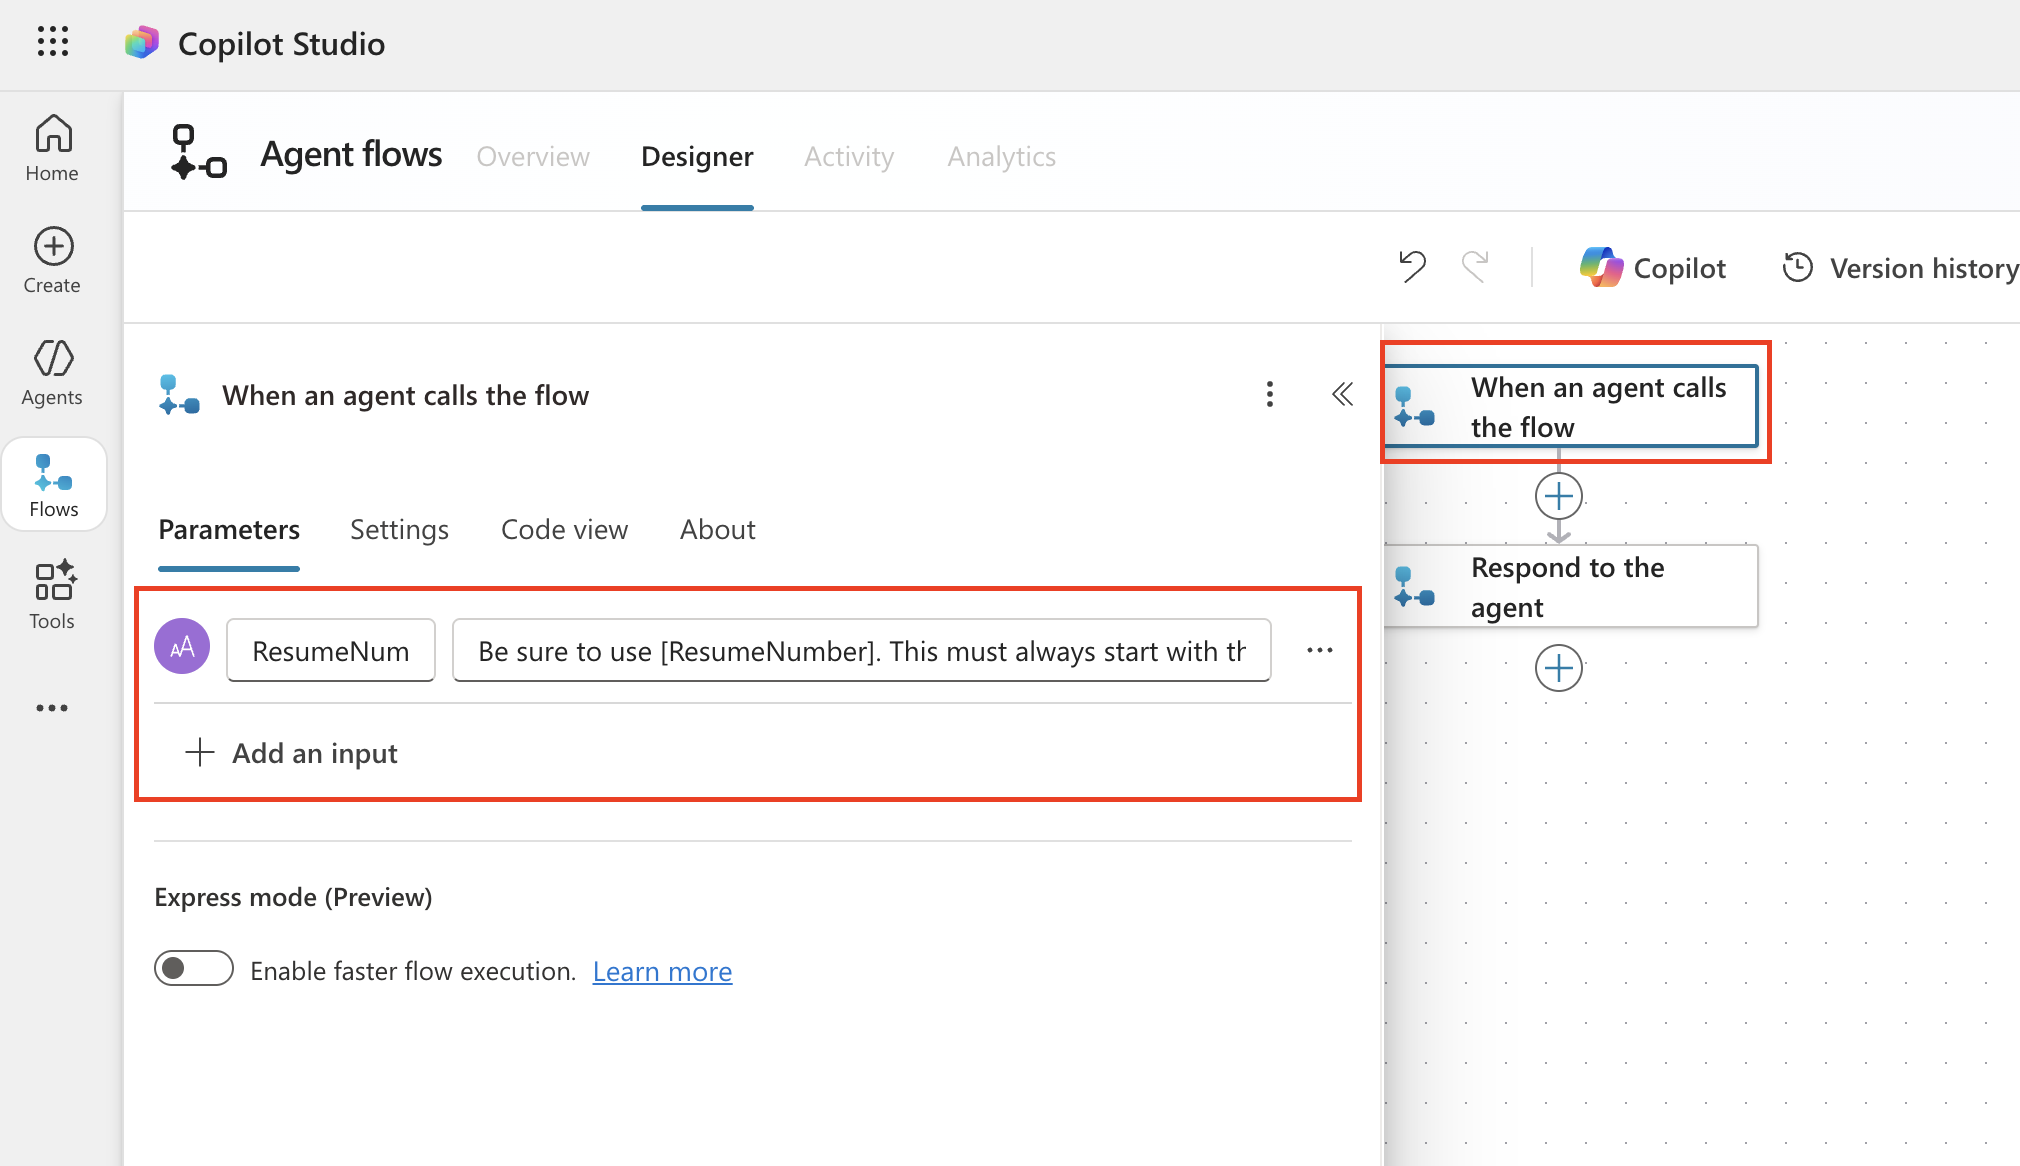
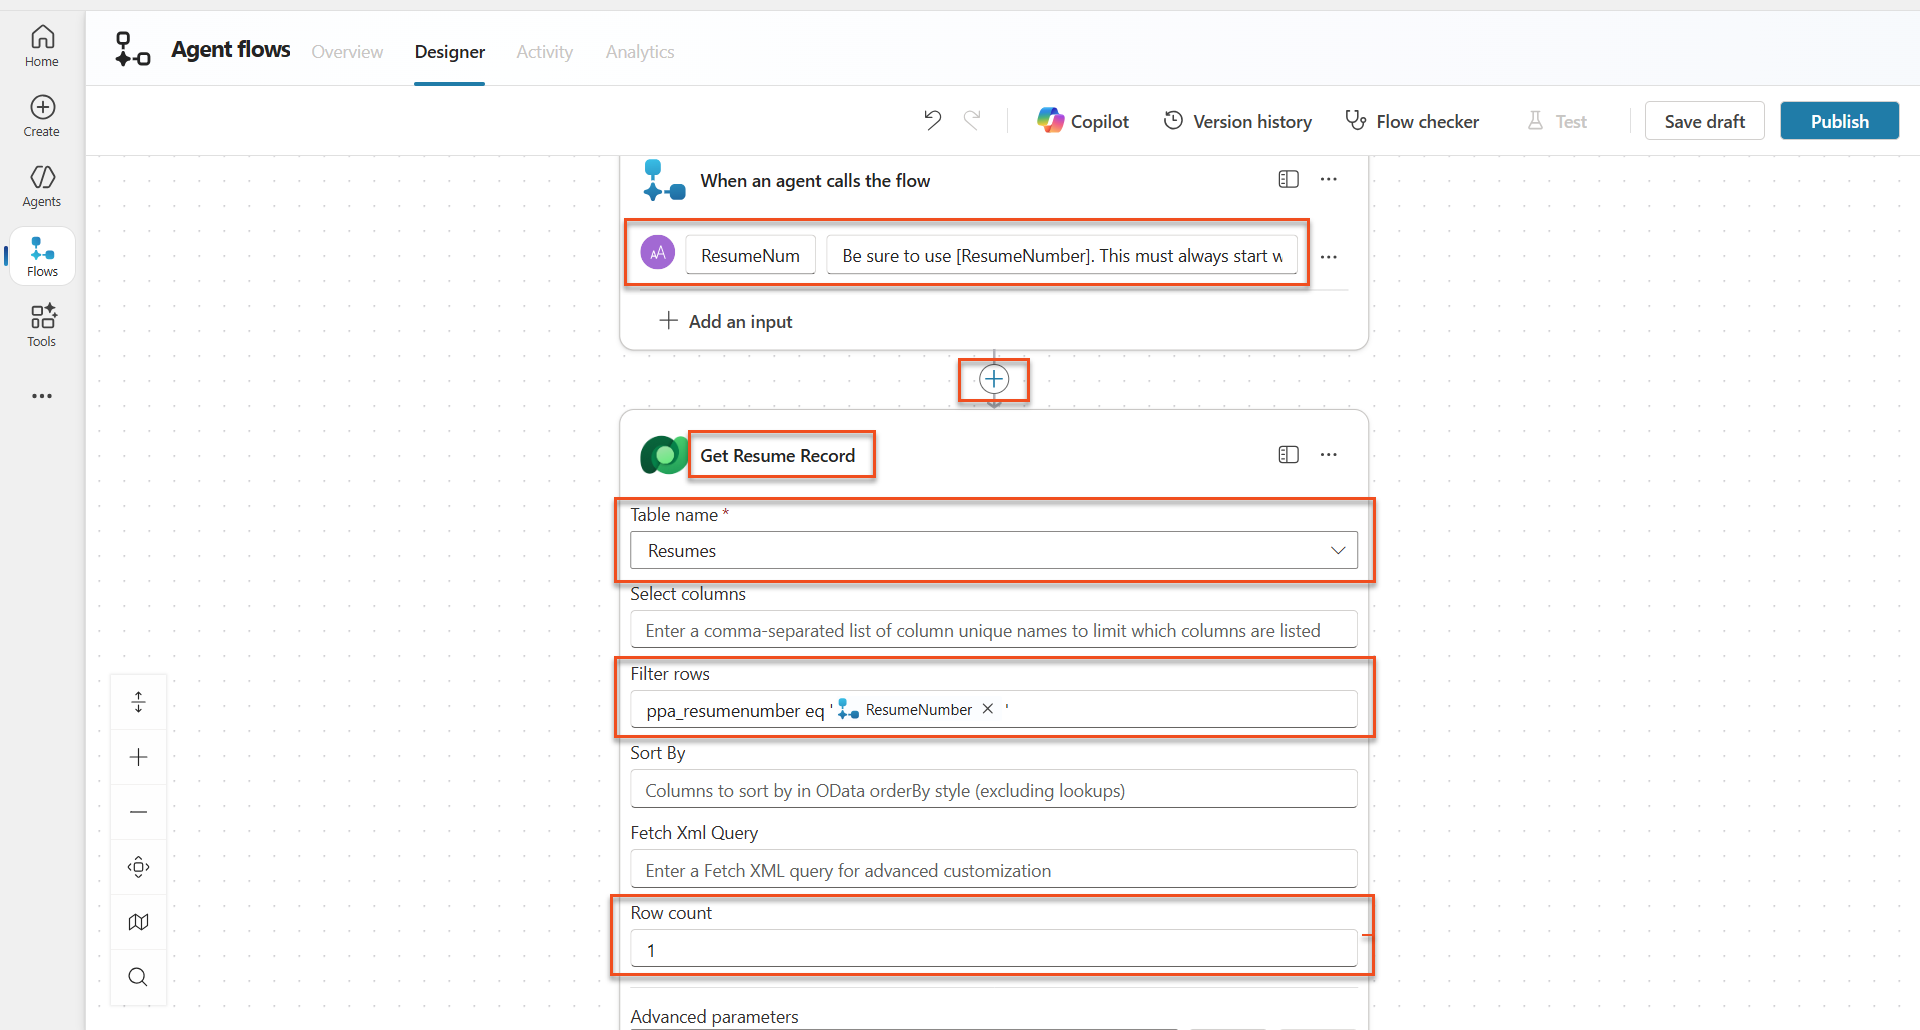
Add a Connector node, search for Microsoft Dataverse, and select the List rows action
Select the ellipsis (...) on the List rows node, and select Rename to
Get Resume Record, and then set the following parameters:Property How to Set Value Table name Select Resumes Filter rows Dynamic data (thunderbolt icon) ppa_resumenumber eq 'ResumeNumber'Replace ResumeNumber with When an agent calls the flow → ResumeNumberRow count Enter 1 Optimize those queries!
When using this technique in production, you should always limit the columns being selected to only those required by the Agent Flow.
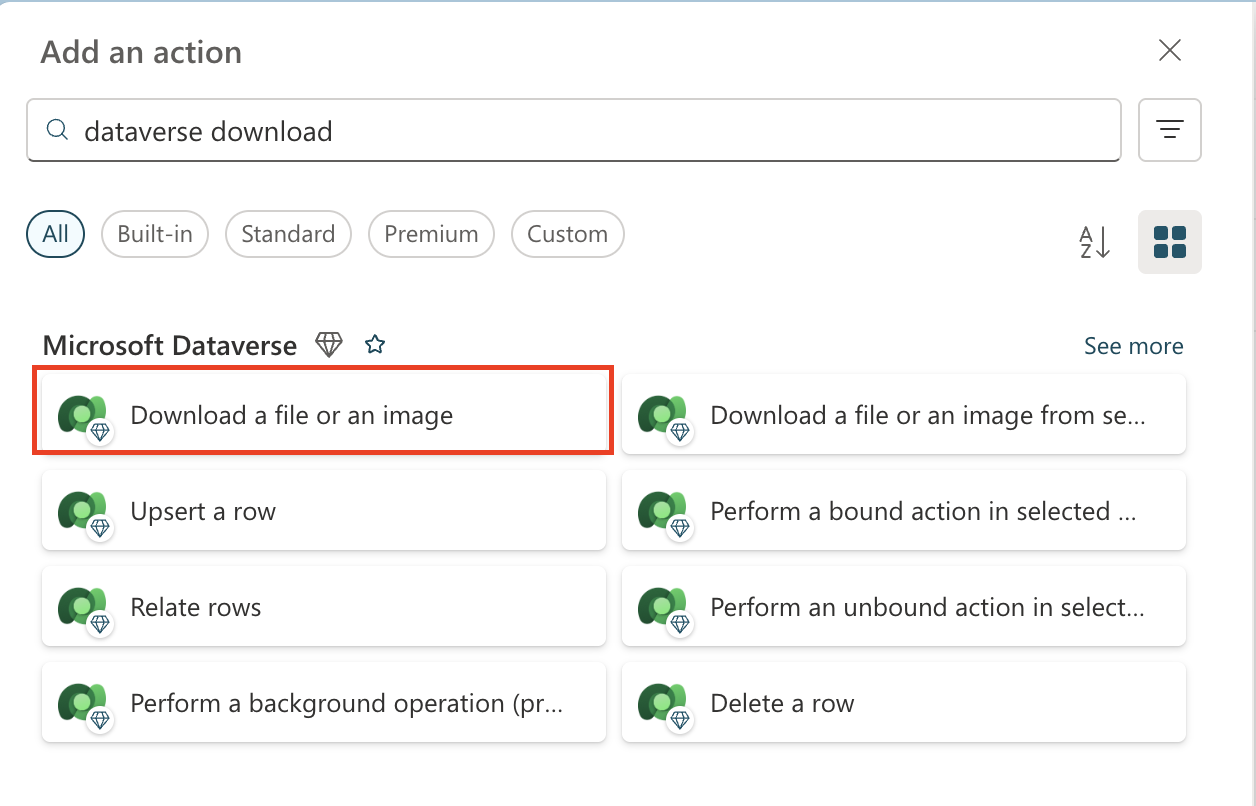
Select the + Insert action icon below the Get Resume Record node, search for Dataverse download, and select the Download a file or an image action.
Pick the correct action!
Be sure not to select the action that ends in "from selected environment"
As before, rename the action
Download Resume, and then set the following parameters:Property How to Set Value Table name Select Resumes Row ID Expression (fx icon) first(body('Get_Resume_Record')?['value'])?['ppa_resumeid']Column name Select Resume PDF 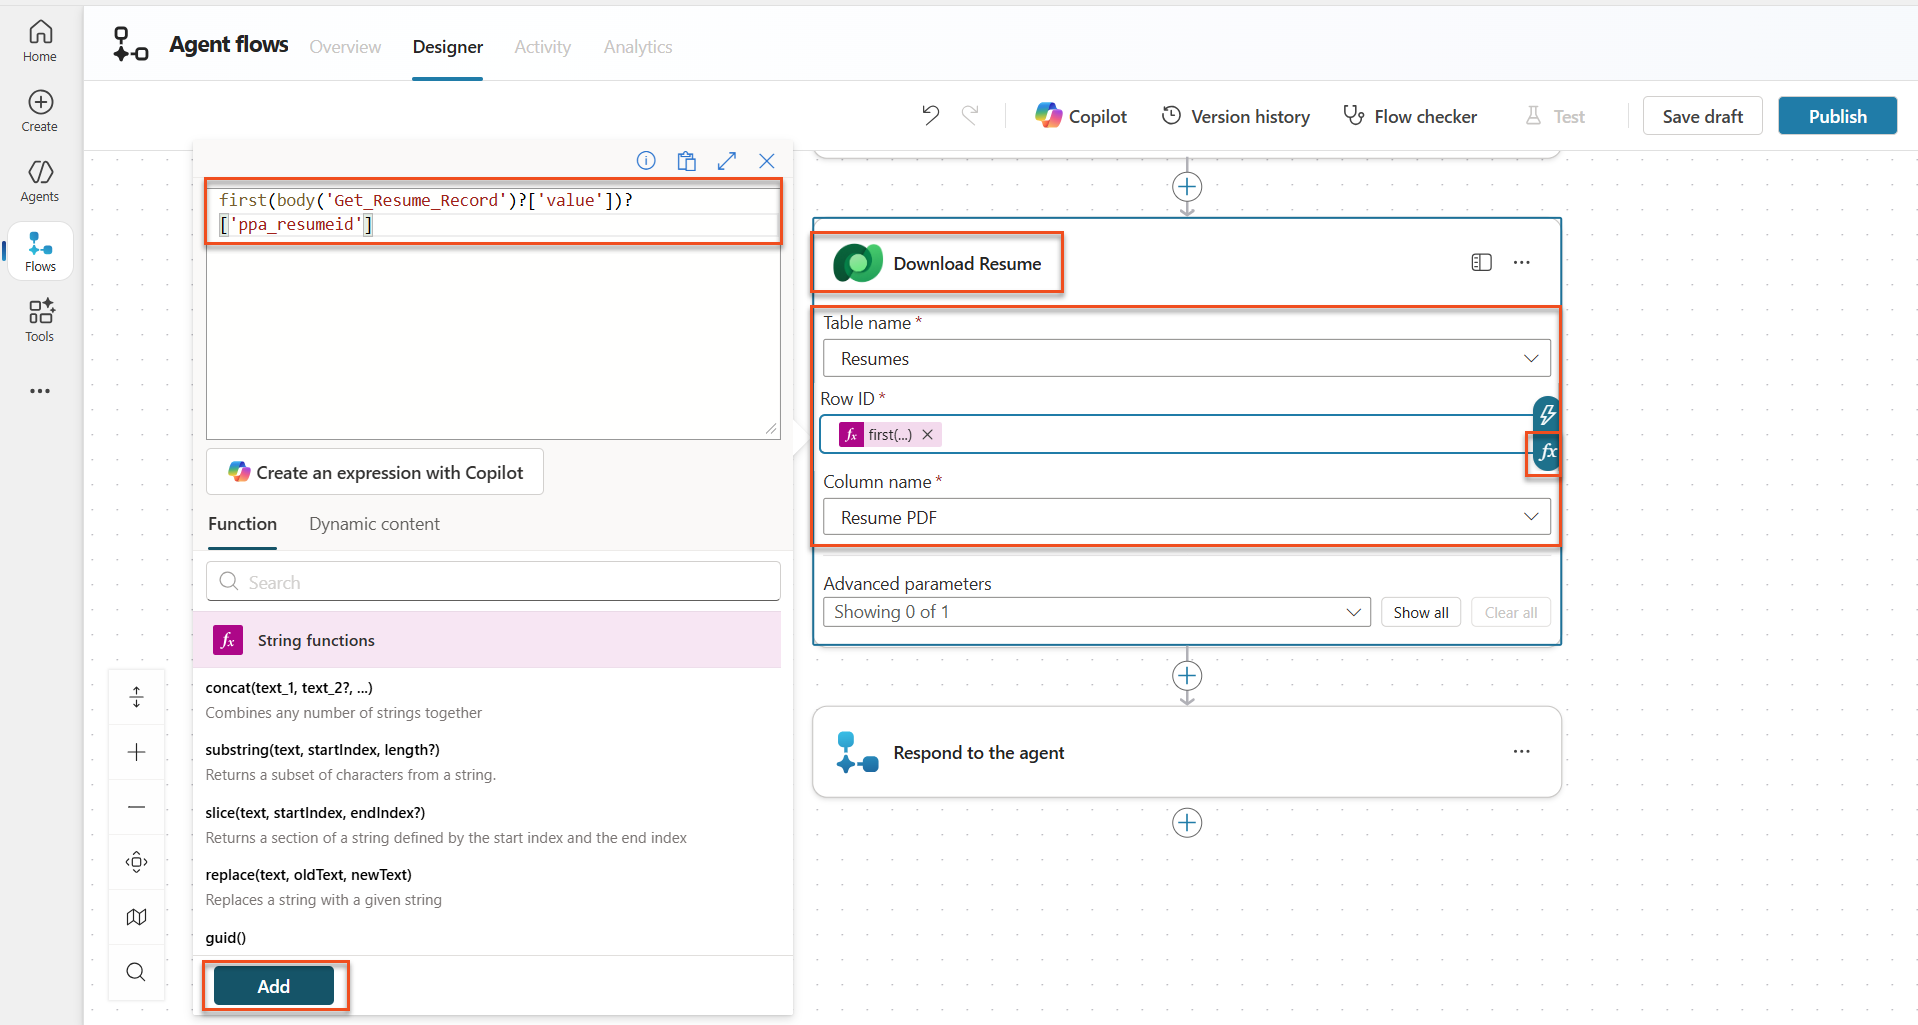
Add an Agent node ("Connect to Agent") below Download Resume, name it
Summarize Resume, and connect it to your Hiring Agent. Pass the Download Resume → File or image content as the message attachment and instruct it (in the node's message) to apply the summarize-resume skill and return the structured JSON. The downstream nodes reference this node's output the same way the classic flow referenced the prompt output.Why the change?
In the classic lab a dedicated AI Builder Prompt did the extraction. In the new experience that construct is replaced — the agent model reads the document natively and the summarize-resume Skill describes the extraction. The workflow simply orchestrates Dataverse persistence around that result.
7.4 Create candidate record
Next, you need to take the information that the Prompt gave you and create a new candidate record if it doesn't already exist.
Select the + Insert action icon below the Summarize Resume node, search for Dataverse list, and select the List rows action
Rename the node as
Get Existing Candidate, and then set the following parameters:Property How to Set Value Table name Select Candidates Filter rows Dynamic data (thunderbolt icon) ppa_email eq 'Email'ReplaceEmailwith Summarize Resume → EmailRow count Enter 1 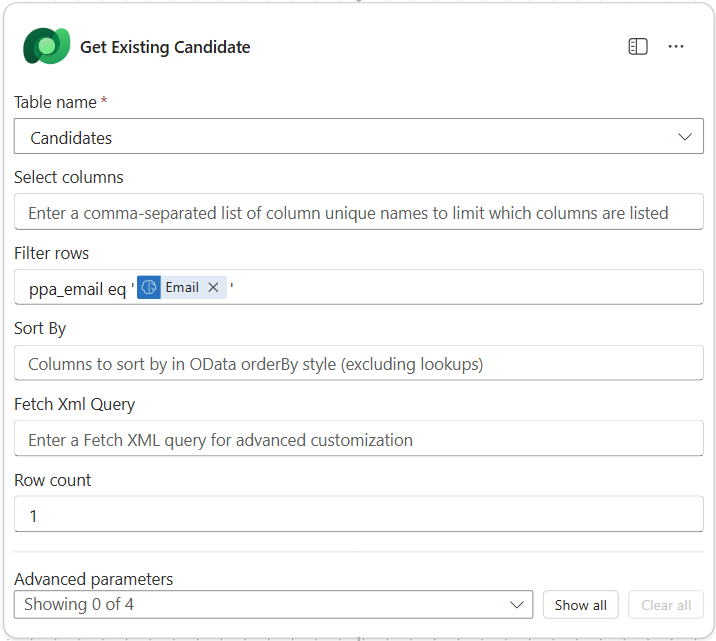
Add an If/Else node below the Get Existing Candidate node (the new-experience equivalent of the classic Condition control).
In the If/Else condition, set the following:
Condition Operator Value Expression (fx icon): length(outputs('Get_Existing_Candidate')?['body/value'])is equal to 0 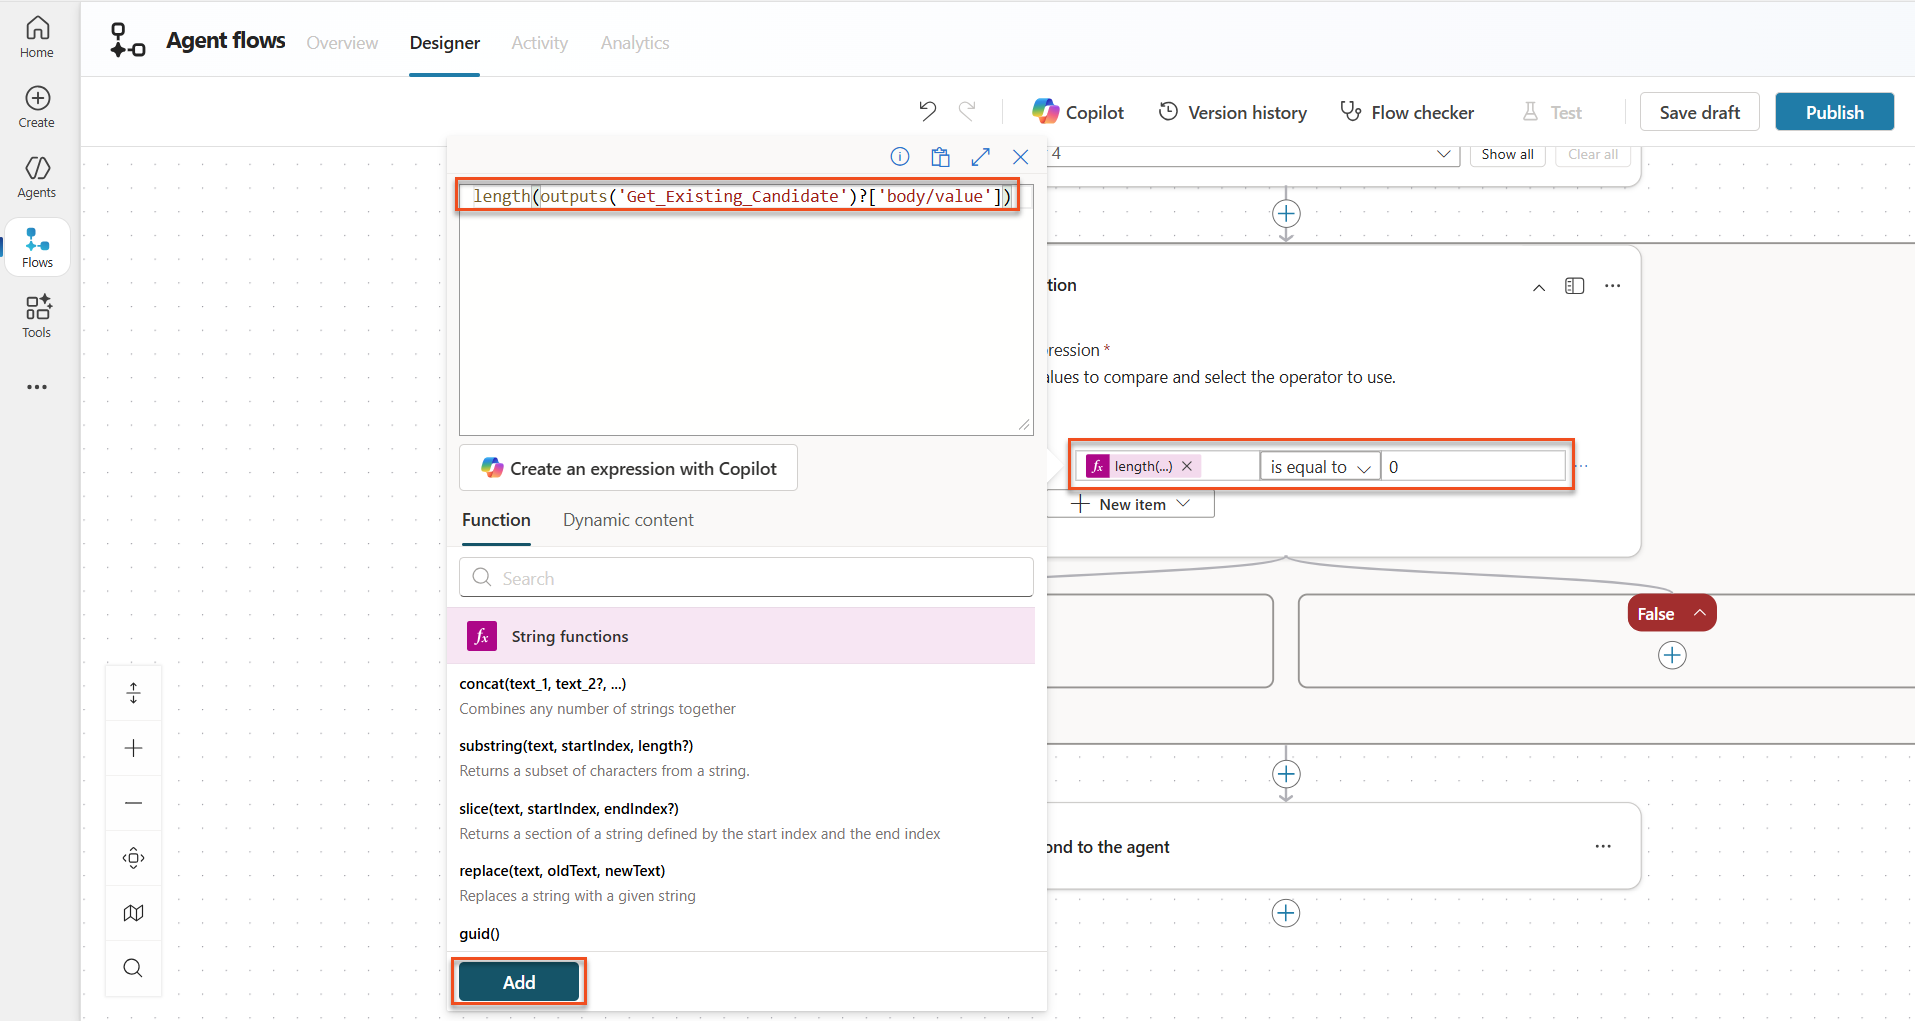
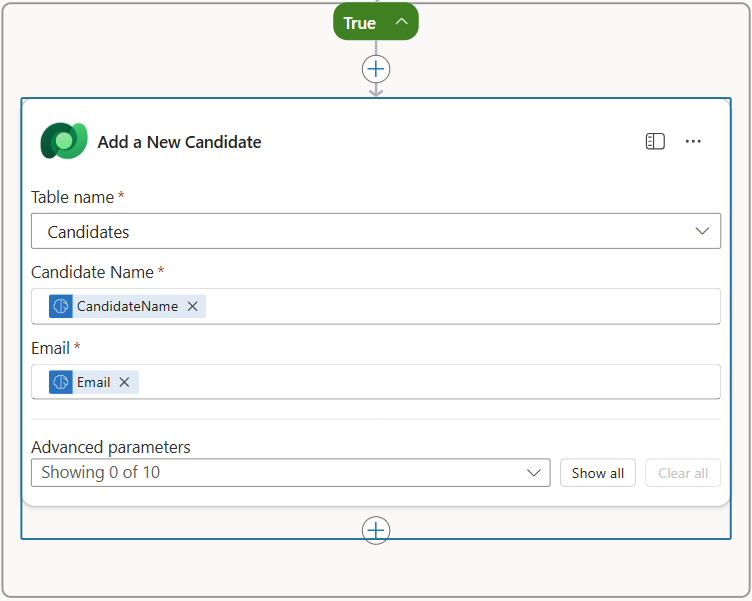
Select the + Insert action icon in the True branch, search for Dataverse add, and select the Add a new row action.
Rename the node as
Add a New Candidate, and then set the following parameters:Property How to Set Value Table name Select Candidates Candidate Name Dynamic data (thunderbolt icon) Summarize Resume → CandidateNameEmail Dynamic data (thunderbolt icon) Summarize Resume → Email
7.5 Update resume and configure flow outputs
Complete the flow by updating the resume record and configuring what data to return to your agent.
Select the + Insert action icon below the condition, search for Dataverse update, and select the Update a row action
Select the title to rename the node as
Update Resume, select Show all, and then set the following parameters:Property How to Set Value Table name Select Resumes Row ID Expression (fx icon) first(body('Get_Resume_Record')?['value'])?['ppa_resumeid']Summary Dynamic data (thunderbolt icon) Summarize Resume → Text Candidate (Candidates) Expression (fx icon) concat('ppa_candidates/',if(equals(length(outputs('Get_Existing_Candidate')?['body/value']), 1), first(outputs('Get_Existing_Candidate')?['body/value'])?['ppa_candidateid'], outputs('Add_a_New_Candidate')?['body/ppa_candidateid']))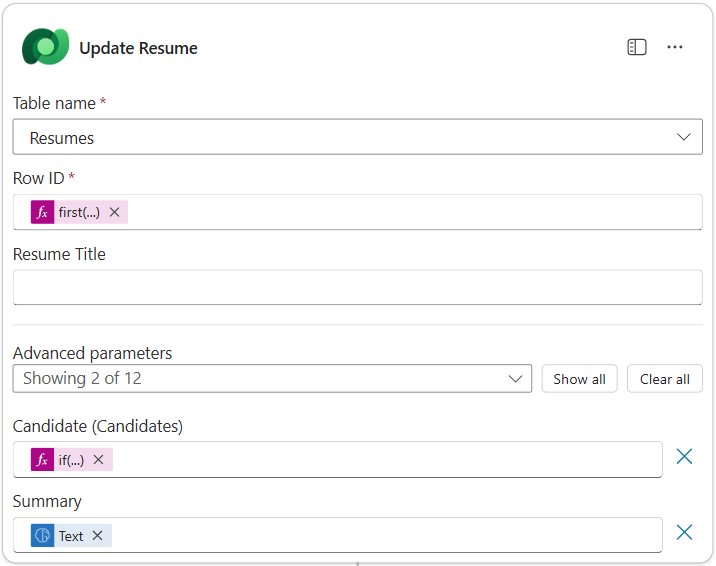
Select the Respond to the agent node (auto-added by the When an agent calls the workflow trigger) and then use + Add an output to configure:
Type Name How to Set Value Description Text CandidateNameDynamic data (thunderbolt icon) Summarize Resume → See more → CandidateName The [CandidateName] given on the Resume Text CandidateEmailDynamic data (thunderbolt icon) Summarize Resume → See more → Email The [CandidateEmail] given on the Resume Text CandidateNumberExpression (fx icon) if(equals(length(outputs('Get_Existing_Candidate')?['body/value']), 1), first(outputs('Get_Existing_Candidate')?['body/value'])['ppa_candidatenumber'], outputs('Add_a_New_Candidate')?['body/ppa_candidatenumber'])The [CandidateNumber] of the new or existing candidate Text ResumeSummaryDynamic data (thunderbolt icon) Summarize Resume (Agent node) → response text (the structured JSON the skill returned) The resume summary and details in JSON form 
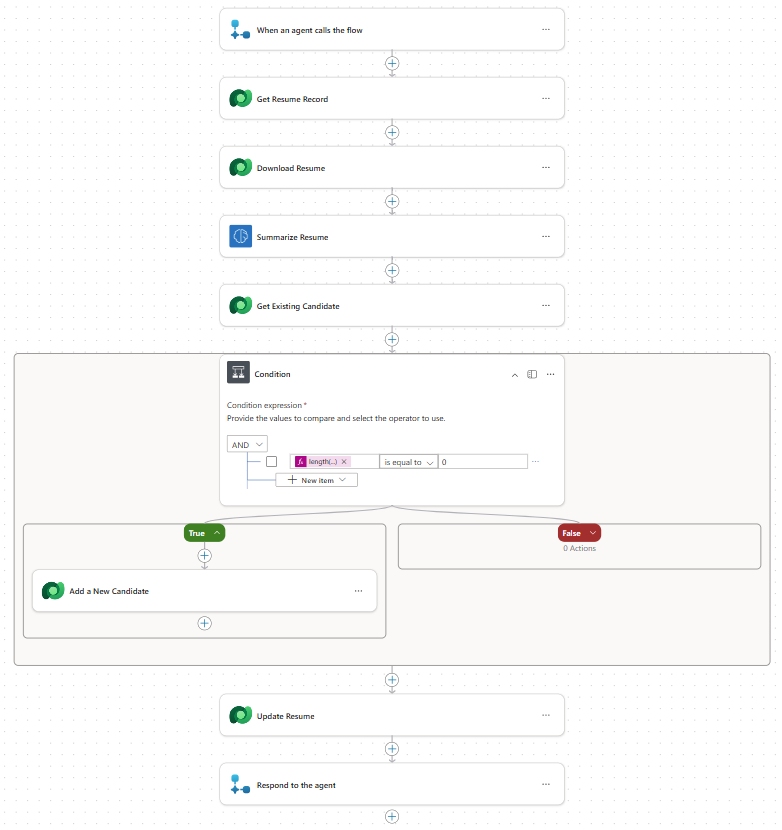
Select Save draft on the top right. Your Workflow should look like the following image. Make sure that your Update Resume step is outside the If/Else block.
Rename the workflow to
Summarize Resume(select the workflow name at the top of the canvas) and give it this description:textSummarize an existing Resume stored in Dataverse using a [ResumeNumber] as input, return the [CandidateNumber], and resume summary JSONSelect Publish to make the workflow available as an agent tool.
7.6 Connect the flow to your agent
Now you'll add the workflow as a tool and configure your agent to use it.
Open your Hiring Agent inside Copilot Studio.
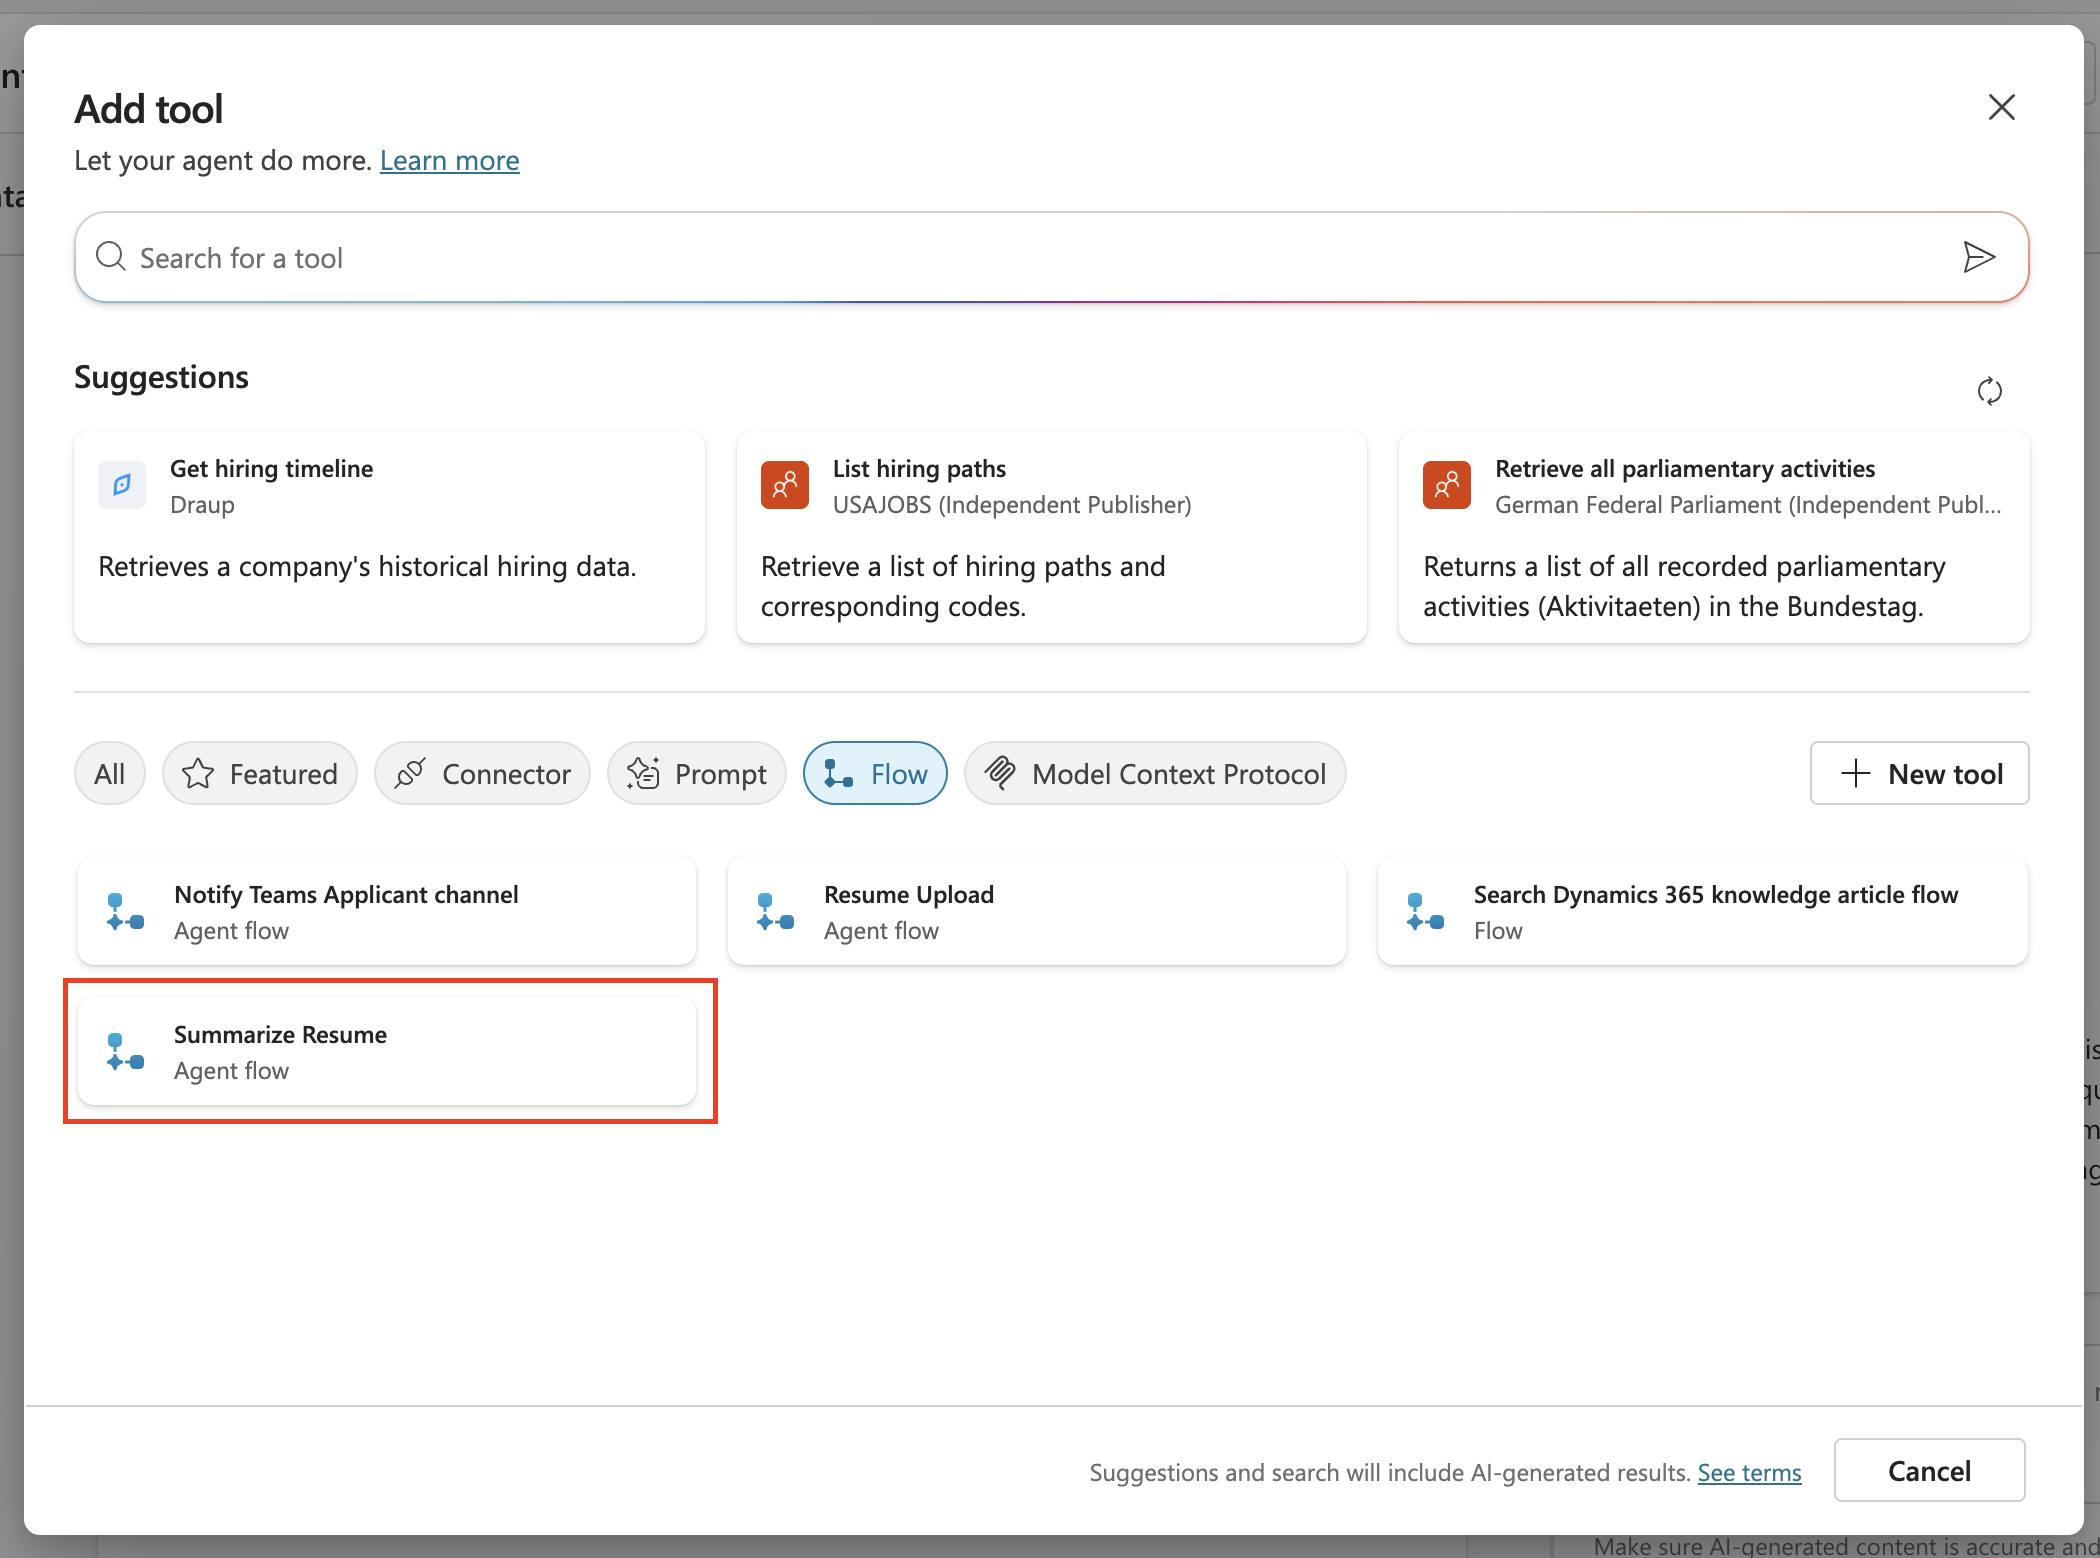
On the Build page, locate the Tools card and select + Add a tool.
In the gallery, select the Workflows tab, then choose Summarize Resume.
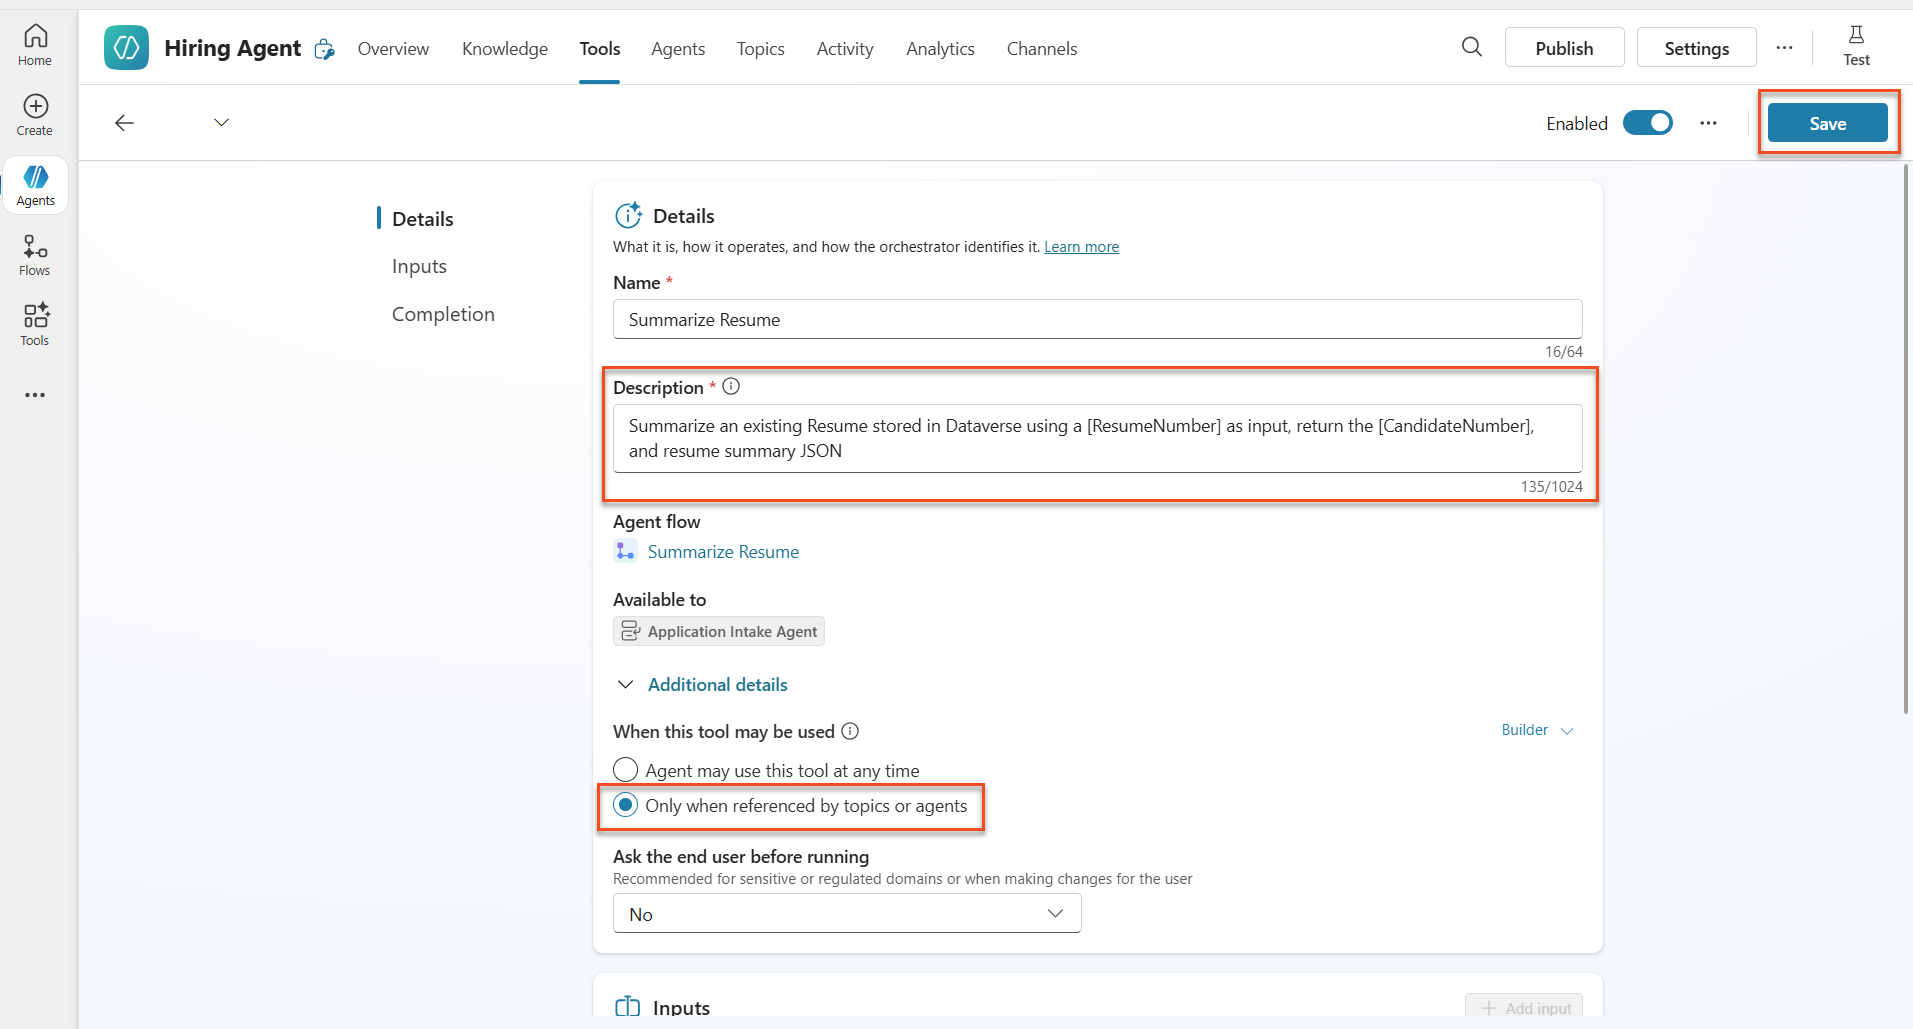
Select Add and configure and set:
Setting Value Description Summarize an existing Resume stored in Dataverse using a [ResumeNumber] as input, return the [CandidateNumber], and resume summary JSON When this tool may be used Only when referenced by instructions or agents Select Save.
The agent now has both the resume-upload workflow and the Summarize Resume workflow, plus your summarize-resume Skill (Lab 7.1) and the application-intake Skill.
Open the Skills card and edit the application-intake skill instructions (this is the migrated child agent). Remove the two paragraphs that begin with
2.Post-UploadandProcess for Resume Upload via Email, then append:text2. Post-Upload Processing - After uploading, be sure to also output the [ResumeNumber] in all messages - Pass [ResumeNumber] to Summarize Resume - Be sure to use the correct value that will start with the letter R. - Be sure to also output the [CandidateNumber] in all messages - Use the [ResumeSummary] to output a summary of the processed Resume and candidate - For document content extraction, apply the summarize-resume skill to the uploaded file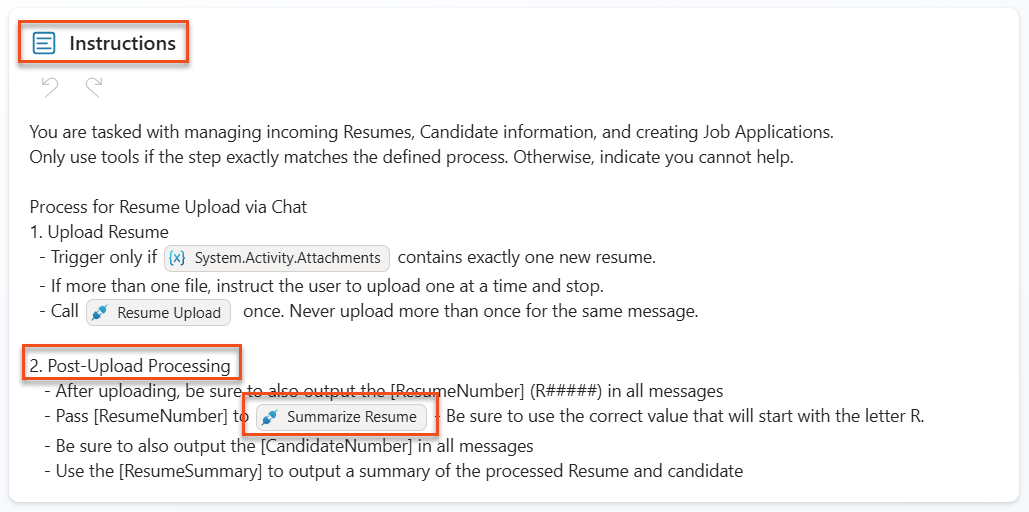
Select Save.
7.7 Test your agent
Test your complete multimodal system in the Preview tab. The conversational skill path (extraction) was validated live; verify it end-to-end here.
Start testing:
- Select the Preview tab to open the test panel.
- Select Attach file and upload one of the sample resumes from Test Resumes.
- Wait a few seconds for the attachment to register, then send a message such as
Here is a candidate Resume.
Attachment timing
After attaching the file, pause a few seconds before sending — sending immediately can silently drop the attachment.
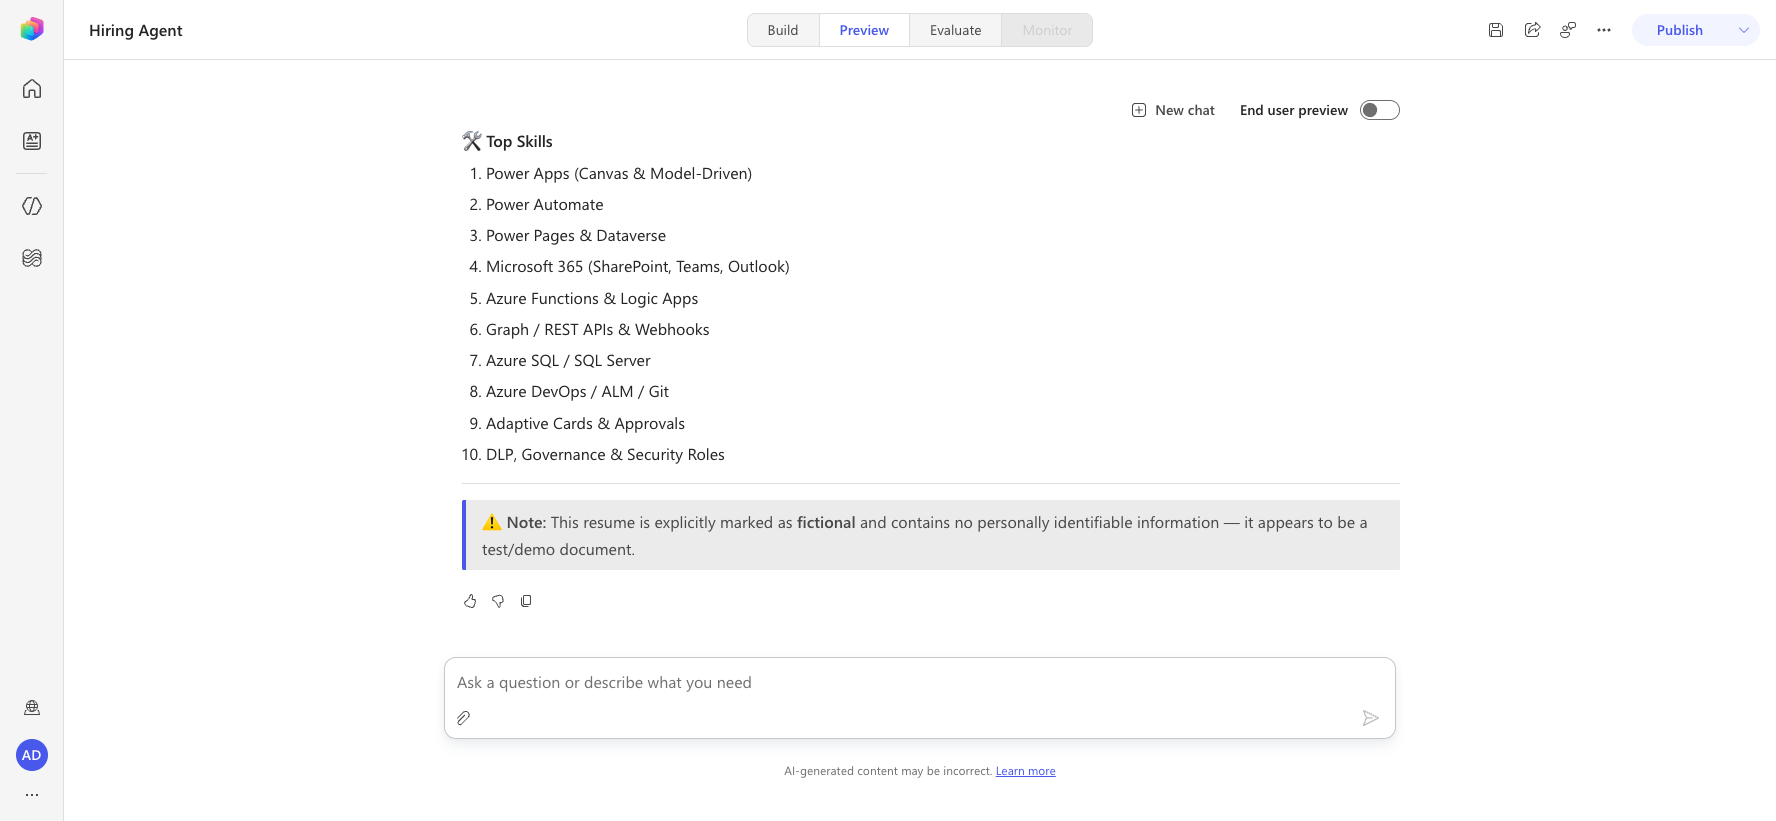
Verify the extraction (validated live): the agent loads the summarize-resume Skill, reads the PDF natively (multimodal), and returns the candidate's email, top skills, experience, projects, education, and a summary.
(Optional, advanced) Verify Dataverse persistence — only if you built the Summarize Resume workflow in 7.3–7.5:
- Check that you receive a Resume Number (format: R#####), a Candidate Number, and a summary.
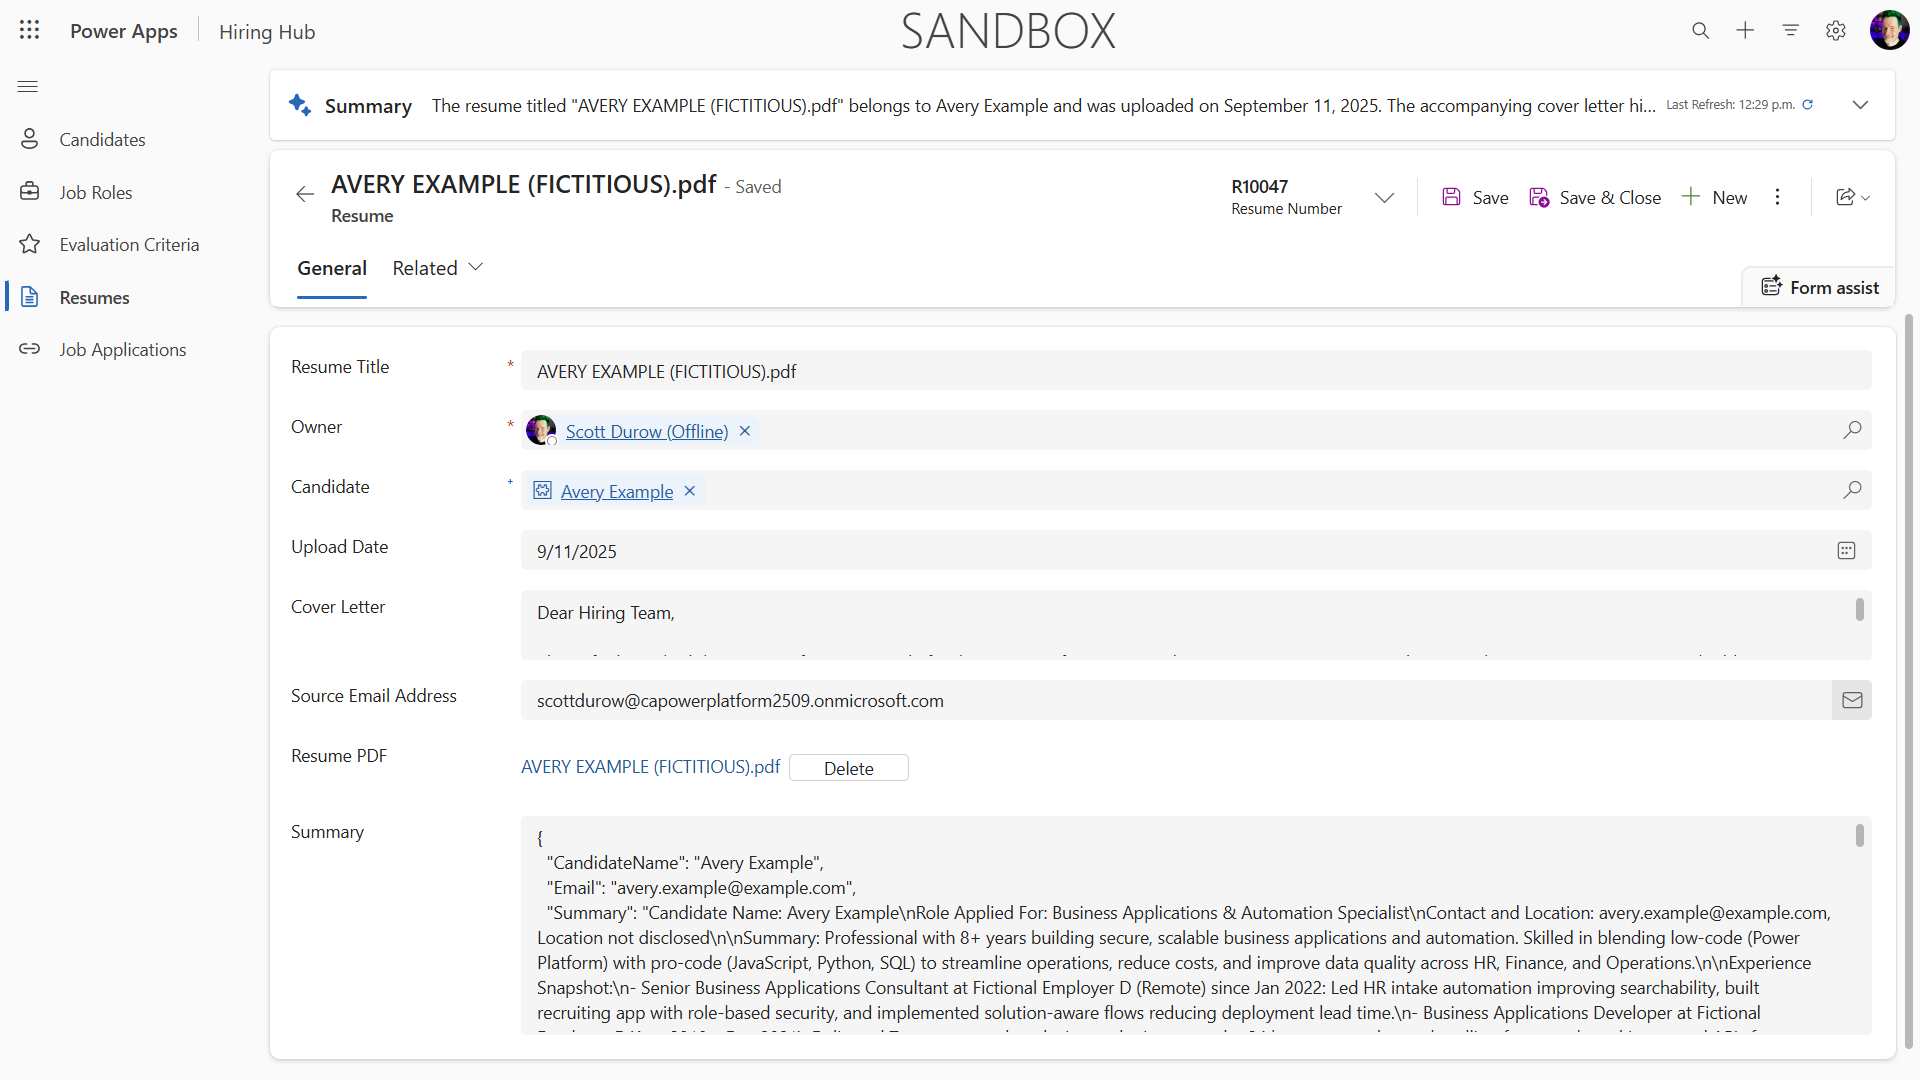
- Navigate to Power Apps → Apps → Hiring Hub → Play.
- Go to Resumes to verify the resume has summary information and an associated candidate record; check Candidates for the extracted candidate. Running again should reuse the existing candidate (matched on email).
Troubleshooting
- Attachment dropped: Wait a few seconds after attaching before selecting Send.
- Resume not processing: Ensure the file is a PDF and under size limits.
- No candidate created: Check that the email was extracted correctly from the resume.
- Output not strict JSON: The agent model may return a friendly markdown summary instead of raw JSON. Strengthen the Skill instructions ("respond with ONLY valid JSON, no prose") if a downstream system needs machine-readable output.
- Workflow errors: Check that all Dataverse connections and expressions are configured correctly.
Production readiness
Although not part of this mission, to make this agent flow production ready you might also consider the following:
- Error handling - If the Resume Number was not found, or the prompt failed to parse the document, error handling should be added to return a clear error to the agent.
- Updating existing Candidates - The candidate is found using the email, then the name could be updated to match that on the resume.
- Splitting the Resume summarization and the Candidate creation - This functionality could be split into smaller agent flows to make them easier to maintain, and then the agent given instructions to use them in turn.
🎉 Mission Complete
Excellent work, Operative! Document Resume Recon is now complete. You've successfully mastered multimodal prompts and can now extract structured data from any document with precision.
Here's what you've accomplished in this mission:
✅ Multimodal prompt mastery
You now understand what multimodal prompts are and when to use different AI models for optimal results.
✅ Document processing expertise
You've learned that the agent's native multimodal model reads uploaded PDFs and images directly, and you described the extraction behavior as a Skill — including a JSON output structure for structured data extraction.
✅ Resume extraction system
You've built a complete resume extraction system: a summarize-resume Skill for multimodal extraction plus an optional Workflow tool that persists results to Dataverse and integrates with your hiring workflow.
✅ Best practices implementation
You've applied best practices for instruction/skill design with document analysis and integrated multimodal extraction with Workflows (the successor to Agent Flows).
✅ Foundation for advanced processing
Your enhanced document analysis capabilities are now ready for the advanced data grounding features we'll add in upcoming missions.
🚀 Next up: In Mission 08, you'll discover how to enhance your prompts with real-time data from Dataverse, creating dynamic AI solutions that adapt to changing business requirements.
⏩ Move to Mission 08: Enhanced prompts with Dataverse grounding
📚 Tactical resources
📖 Add text, image, or document input to your prompt
📖 Process responses with JSON output
📖 Model selection and temperature settings
📖 Use your prompt in Power Automate
📺 AI Builder: JSON outputs in prompt builder