📄 Microsoft Copilot Studio + Docusign MCP
![]()
Welcome, agent. Your objective is to reuse what already works: connect the Docusign MCP Demo server to your Copilot Studio agent and trigger an existing Workflow Builder workflow. Your agent gathers inputs. Workflow Builder executes the agreement process.
🔎 Objectives
In this mission, you'll learn:
- how to create Docusign Web Forms, Document Templates, and a workflow in Workflow Builder
- how to add the Docusign MCP Demo tool to your agent
- how to invoke the Workflow Builder workflow from the agent
- how to provide inputs in natural language for the workflow start step when testing the agent
- bonus: add a first-party Microsoft MCP tool (Work IQ Calendar) to extend the agent with multi-MCP capabilities
❓ What is Docusign?
Docusign is your agreement execution engine.
It enables organizations to create, send, sign, and manage agreements digitally, reducing manual and paper-based work. Beyond eSignatures, Docusign is an Intelligent Agreement Management (IAM) platform that supports the full agreement lifecycle from creation to tracking and storage.
💼 Why it matters
Agreements are business-critical, but manual handling causes delays and inconsistency. Docusign makes agreement processes faster, trackable, and scalable.
🏗️ What is Docusign Workflow Builder?
Workflow Builder is where agreements become automated workflows.
It defines how agreements move from data collection to document generation and signing, without manual coordination. You design a workflow once and run it consistently.
💡 Common use cases
- Employee onboarding
- Sales agreements
- Procurement approvals
- NDAs and compliance workflows
⚙️ What Workflow Builder does
Workflow Builder helps you automate agreement processes by:
- Structuring multi-step workflows
- Collecting inputs through web forms
- Generating agreements from templates and data
- Routing documents between participants in the right order
- Connecting to third-party applications and services
- Providing visibility into workflow progress
🧩 Key Workflow Builder capabilities
Identity Verification
Confirm signer identity before agreement completion, adding security for sensitive or regulated processes.
Web Forms
Collect structured browser-based input before agreement generation. Captured data can automatically populate documents.
Document Generation
Automatically generate agreements and documents using collected data and reusable templates.
eSignature
Enable legally recognized electronic signatures directly in workflows.
App Center
Connect Workflow Builder to third-party apps and services to integrate into existing business processes.
Workflow Templates
Use pre-built templates for common scenarios to deploy standardized agreement flows faster.
Agreement Desk
Centralize agreement preparation, review, and collaboration across teams.
🚀 How this works with your agent
Your Copilot Studio agent does not replace the workflow - it triggers it. You're not reinventing the wheel or rebuilding agreement logic from scratch; you're reusing a workflow that's already built in Docusign. The agent collects inputs in natural language, then Workflow Builder runs the agreement process end-to-end.
🛡️ Certified MCP spotlight: Docusign MCP Demo
Before we jump into the lab, here's the key intel: the Docusign MCP Demo server is supported in Copilot Studio and is published as a certified MCP integration in Microsoft's connector ecosystem.
Why this matters for your mission:
- Enterprise trust signal: Certified MCP servers go through Microsoft validation and review stages before broad availability.
- Security and compliance alignment: Certification includes checks for packaging quality, behavior validation, and security/compliance readiness.
- Responsible AI expectations: Certification review includes safety evaluation, but safe usage in your tenant still depends on good implementation choices.
In practical terms, this means you're not wiring up an unknown endpoint. You're integrating a reviewed MCP server that can expose Docusign capabilities to your agent through natural language.
🔐 Security and governance guidance for this mission
Treat this as secure-by-design, not secure-by-default:
- Use the correct account and connector pairing
- Docusign MCP Demo with Docusign developer account (can also be referred to interchangeably as a demo or sandbox account)
- Docusign MCP with Docusign production account
- Use OAuth and least-privileged accounts whenever possible.
- Keep a human in the loop for high-impact actions.
- Validate prompts and outputs before scaling to production scenarios.
Your organization still owns governance
Certification does not remove your organization's responsibility to configure and govern usage safely. You should still enforce least privilege, monitor usage, and keep human review in high-impact workflows.
✍🏻 Docusign MCP Demo connector notes
The Docusign MCP Demo connector is intended for sandbox testing. It is separate from the Docusign MCP production connector, and workflows are not automatically migrated between Demo and Production environments.
For this Special Ops lab, that's exactly what we want: a safe development space to test prompt-driven agreement workflows before any production rollout. We'll be using the Docusign MCP Demo connector as a tool in the agent you build in Copilot Studio.
📚 Learn more about Docusign MCP and Microsoft MCP server certification
- Microsoft MCP server certification
- Docusign MCP Demo connector (Microsoft Learn)
- Docusign MCP Overview
- Connect a Docusign account to Copilot Studio
🧪 Docusign MCP lab
In this Special Ops mission, you'll work through two practical use cases:
- First, automate a complete hiring agreement flow in Docusign.
- Second, optionally extend that flow with a calendar follow-up using a second MCP tool.
✨ Use case scenario
Use Case 1: Core hiring workflow (Labs 1.1 to 1.5)
As a recruiter,
I want to deliver an employment agreement and employee offer letter digitally,
So that the candidate can quickly review and complete signing.
To deliver this scenario, you will complete:
- 1.1 Create a Docusign Web Form
- 1.2 Create Document Templates
- 1.3 Create Docusign Workflow Builder workflow
- 1.4 Test the workflow
- 1.5 Build a custom agent in Microsoft Copilot Studio, connect to Docusign MCP Demo, and trigger the workflow
Outcome: your agent collects inputs, then triggers an already-built Docusign Workflow Builder workflow end-to-end.
Use Case 2: Multi-MCP extension (Lab 1.6)
For lab 1.6, the following is the use case:
As a recruiter,
I want to auto-schedule a prep meeting before the new hire's start date,
So that I have dedicated scheduled time in my calendar to complete onboarding tasks.
To extend the first scenario, you will optionally complete:
- 1.6 BONUS - Add Work IQ Calendar tool (Frontier program) for multi-MCP capabilities
Outcome: the same agent is enhanced with a second MCP tool for follow-up scheduling.
How this fits together
This diagram shows how your agent connects users to real-world agreement workflows.
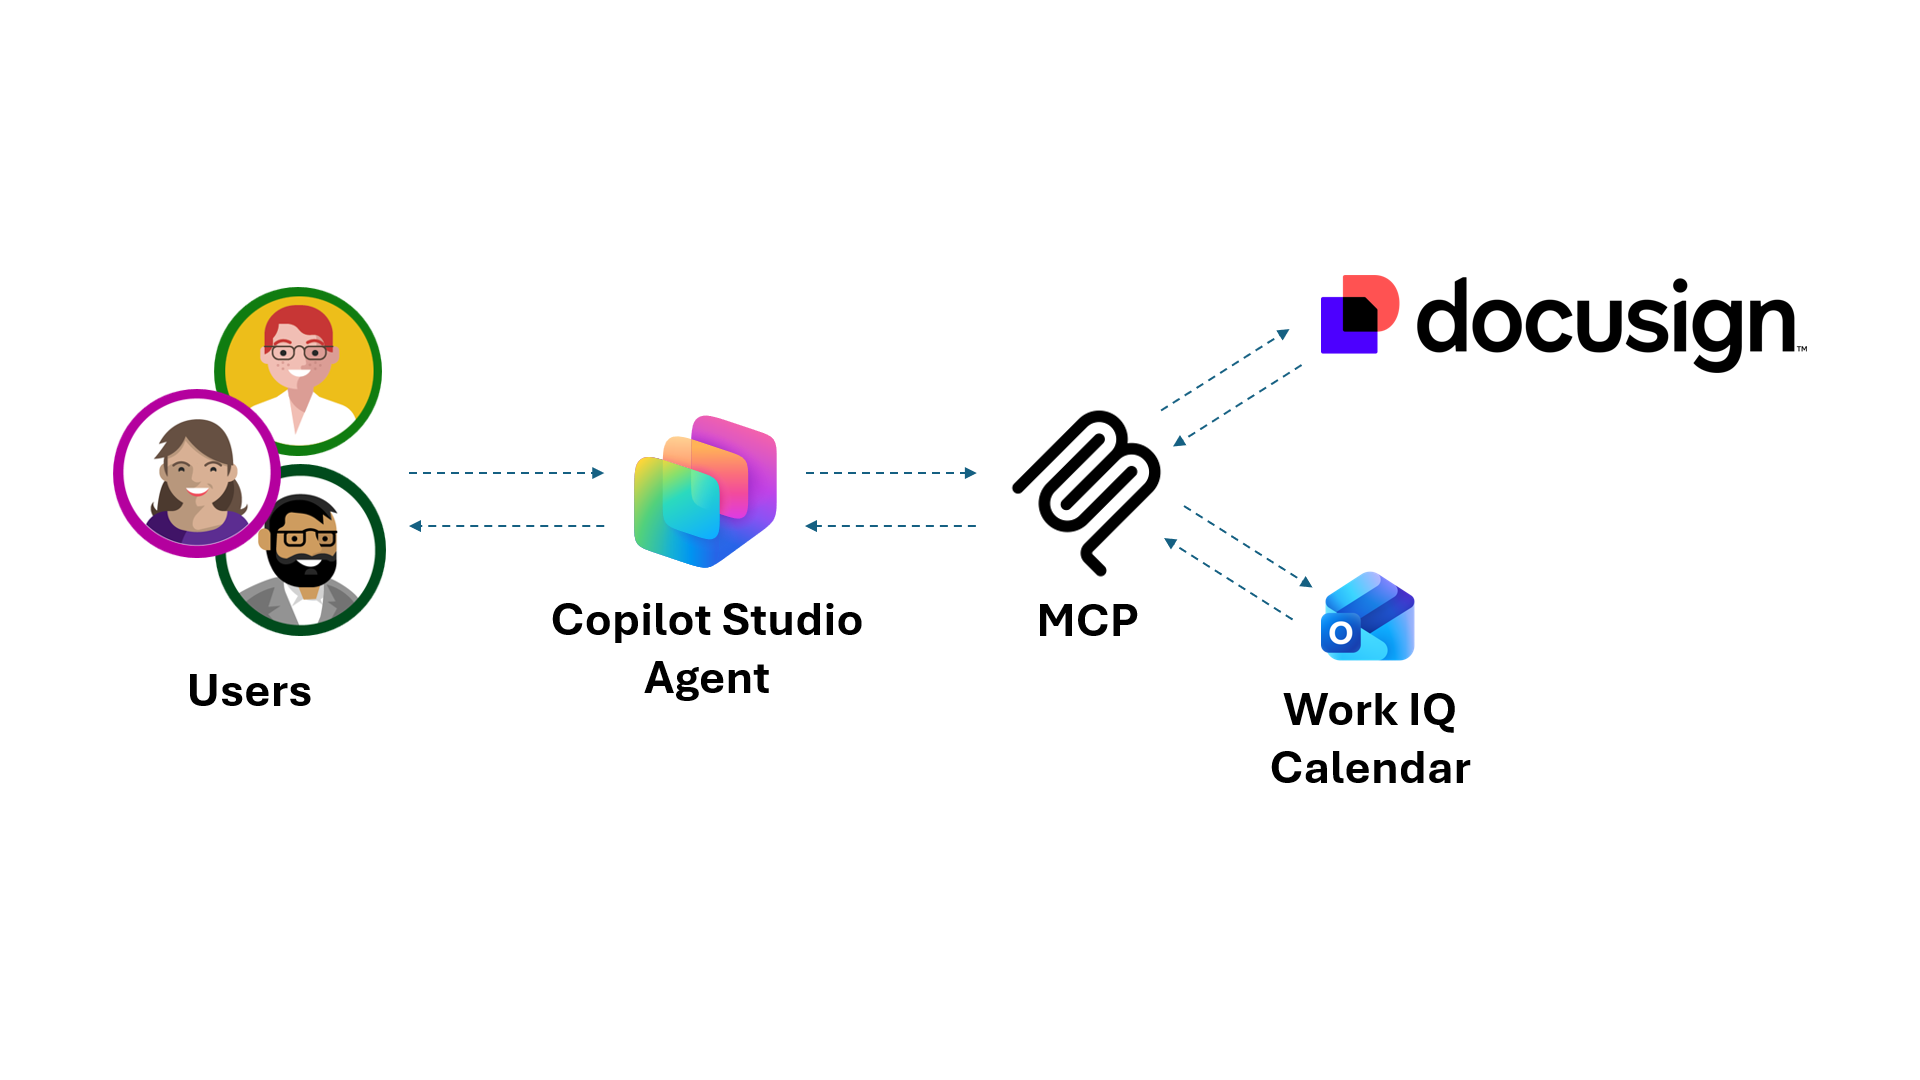
Your agent is the control layer.
- Users interact with your Copilot Studio agent, which collects inputs and triggers Docusign Workflow Builder workflows through MCP.
- Docusign handles the agreement process end-to-end, while additional tools like Work IQ Calendar can extend the flow to supporting tasks.
One prompt. Multiple systems. Coordinated execution.
✅ Prerequisites
To complete this Special Ops mission, you'll need the following prerequisites.
Docusign
- Sign up for a free Docusign developer account if you don't already have one
Browse to https://developers.docusign.com and on the upper right select Create Account.

Microsoft
- Copilot Studio license
- Access to a Copilot Studio developer environment
- Administrative permissions to create solutions and agents
- A SharePoint site where you have permissions to create a new folder in the Documents library - this will be used in a workflow step
Prerequisites help:
If you need help getting a Copilot Studio license, please reference the Recruit Course Setup lab which walks you through setting up a Power Platform environment with a Copilot Studio trial.
Two email addresses
You'll need two different email addresses to complete this lab:
- Email address to use as the employee
- Email address to use as the hiring manager
🧪 1.1 Create a Docusign Web Form
IMPORTANT
You need a Docusign developer account to complete these Docusign lab exercises. Follow the steps outlined in the Prerequisites section above (see Docusign).
Web Forms allow organizations to collect information through secure, browser-based forms that can automatically feed data into agreements and workflows. This helps reduce manual data entry, improve accuracy, and streamline processes such as onboarding, registrations, approvals, and contract generation.
To learn more about Web Forms, expand the following additional learning block.
Web Forms: Collecting Data Before Agreements
🤔 What is Web Forms?
Within Workflow Builder, Web Forms provide a way to capture user input before generating or sending agreements.
Examples include:
- Customer application forms
- Employee onboarding questionnaires
- Vendor registration forms
- Service request forms
- Intake forms for legal or HR teams
Instead of manually entering information into contracts, users enter their own details directly into the form.
The collected data can then:
- Populate agreements automatically
- Trigger workflows
- Feed information into business systems
- Launch signing processes
🌱 Web Forms support:
- Text fields
- Dropdowns
- Checkboxes
- Conditional logic
- Required inputs
- Template field mapping
💡 This helps minimize
- Manual data entry
- Copy/paste errors
- Delays caused by incomplete submissions
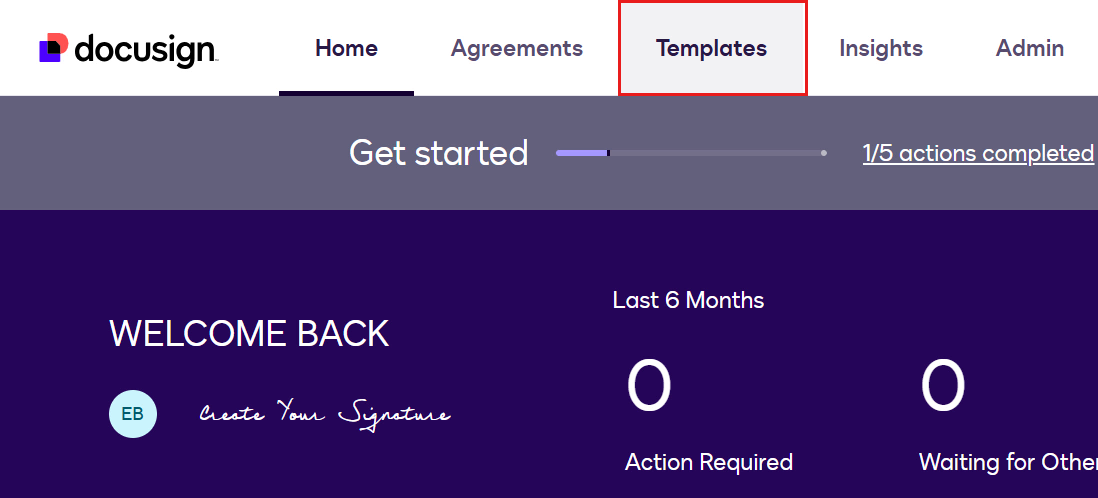
From the Home page of Docusign developers portal, select Templates.
On the left-hand side navigation pane, select Start. Select Web Forms followed by Create Web Form.
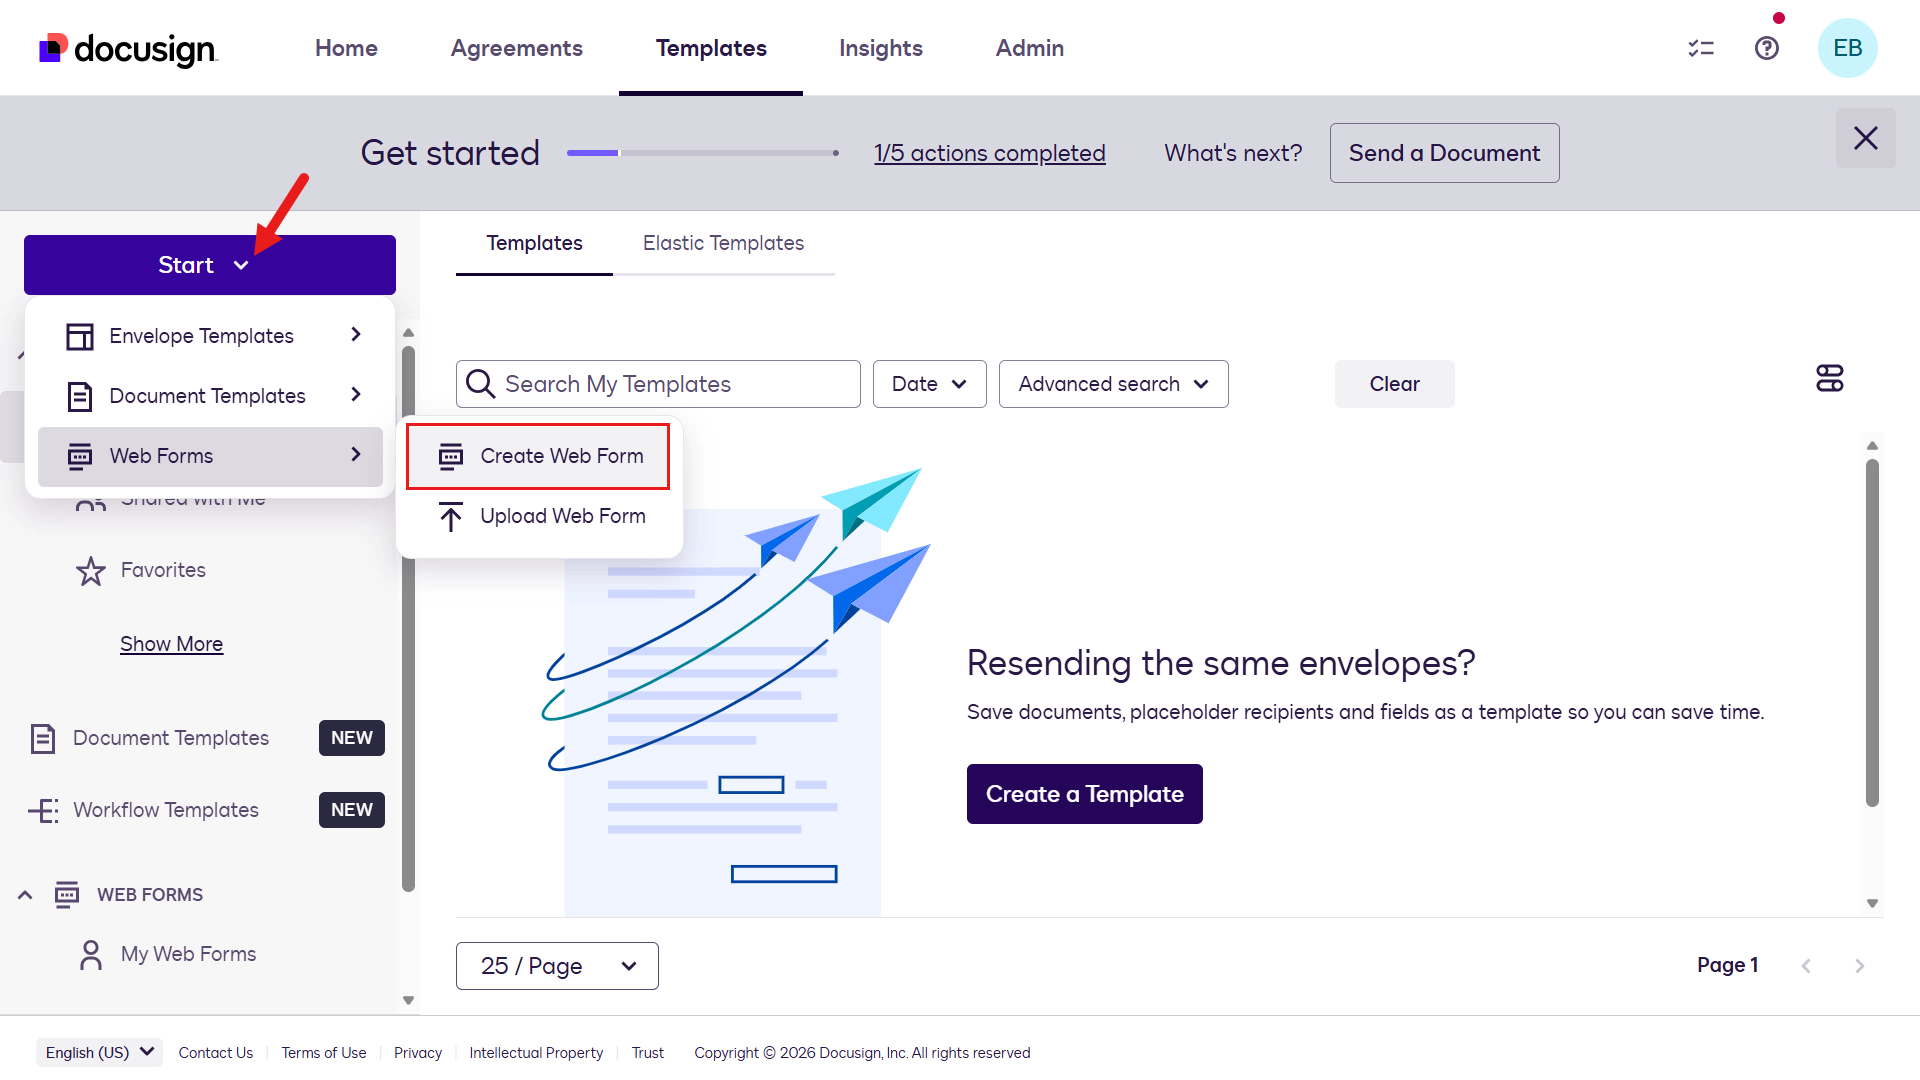
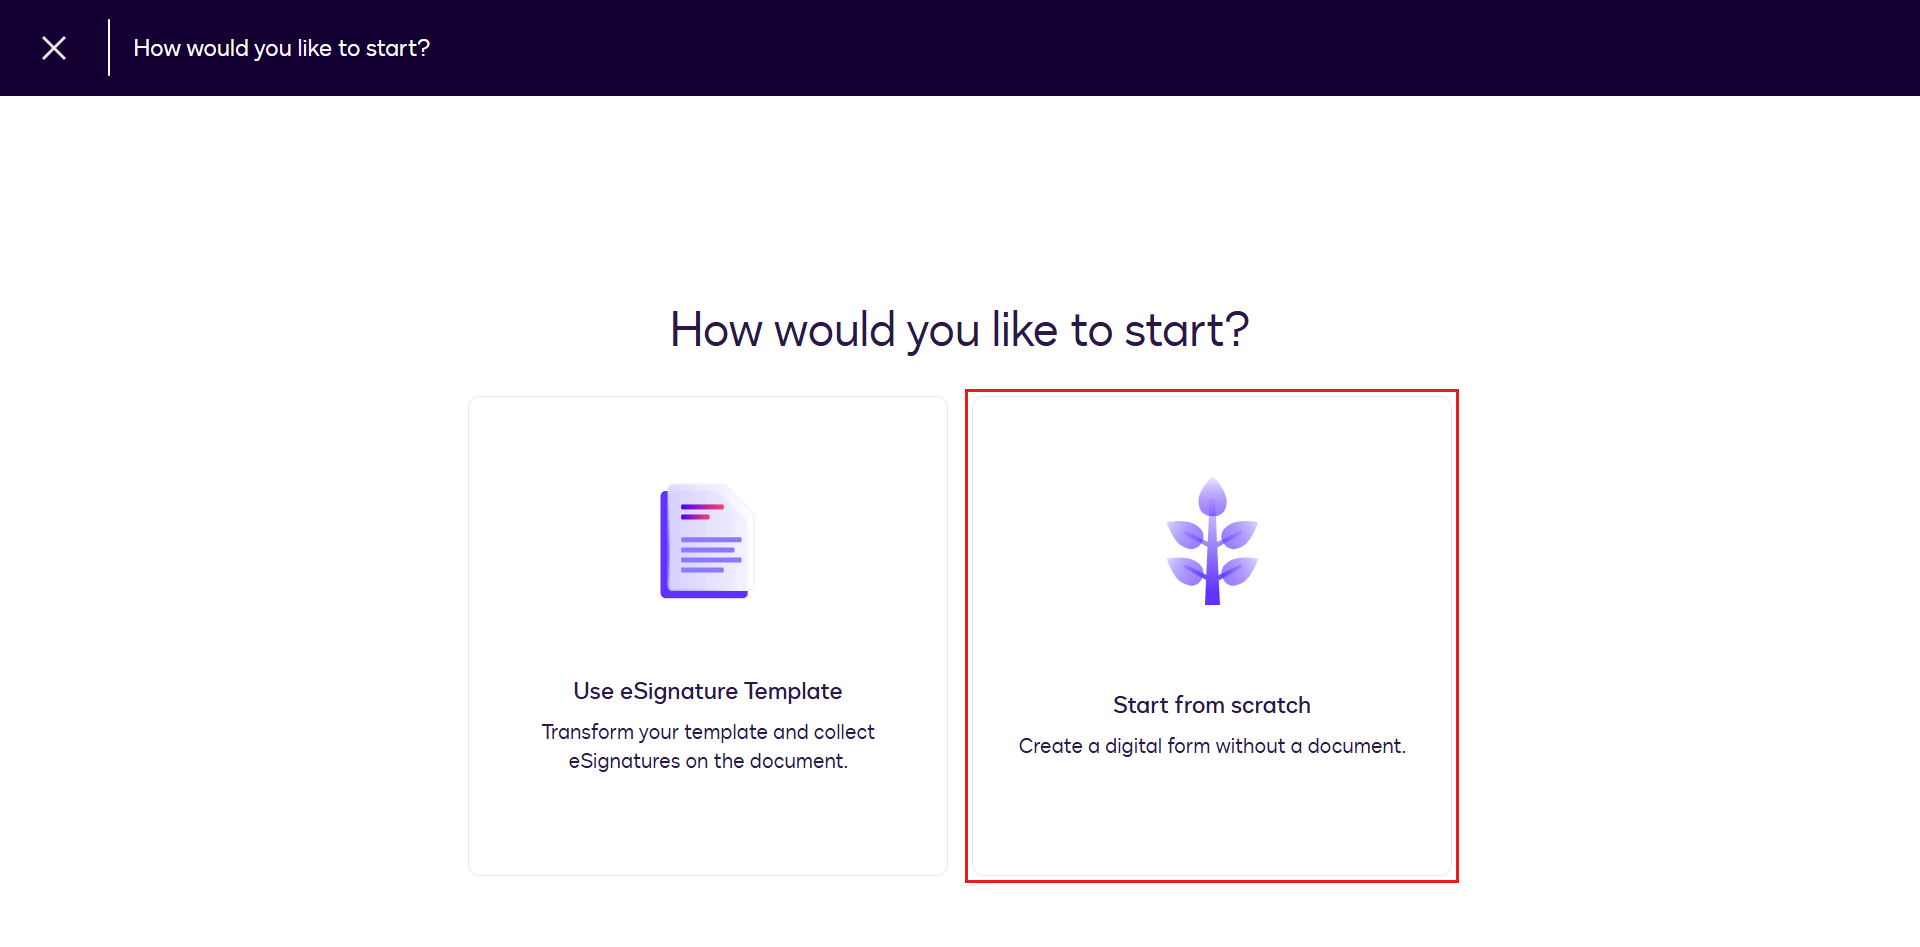
You'll be asked how you want to create your Web Form. Select Start From Scratch.
Enter a name for the Web Form. For example,
textRequest for your contact information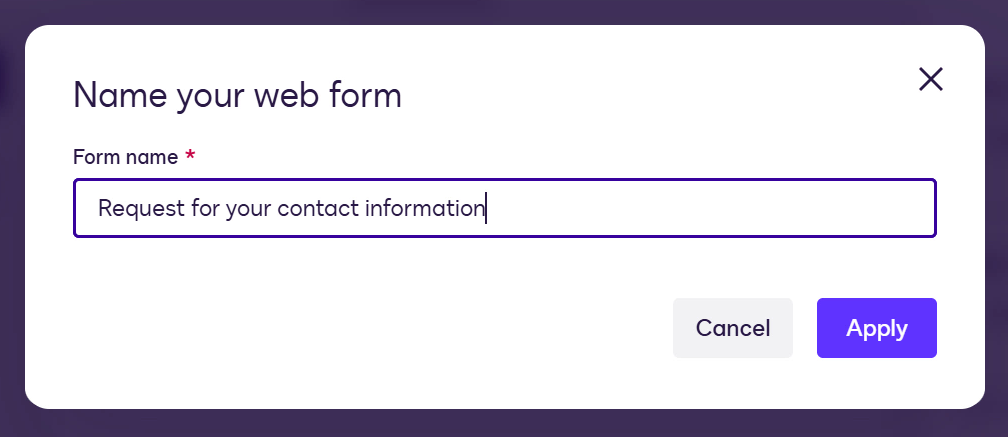
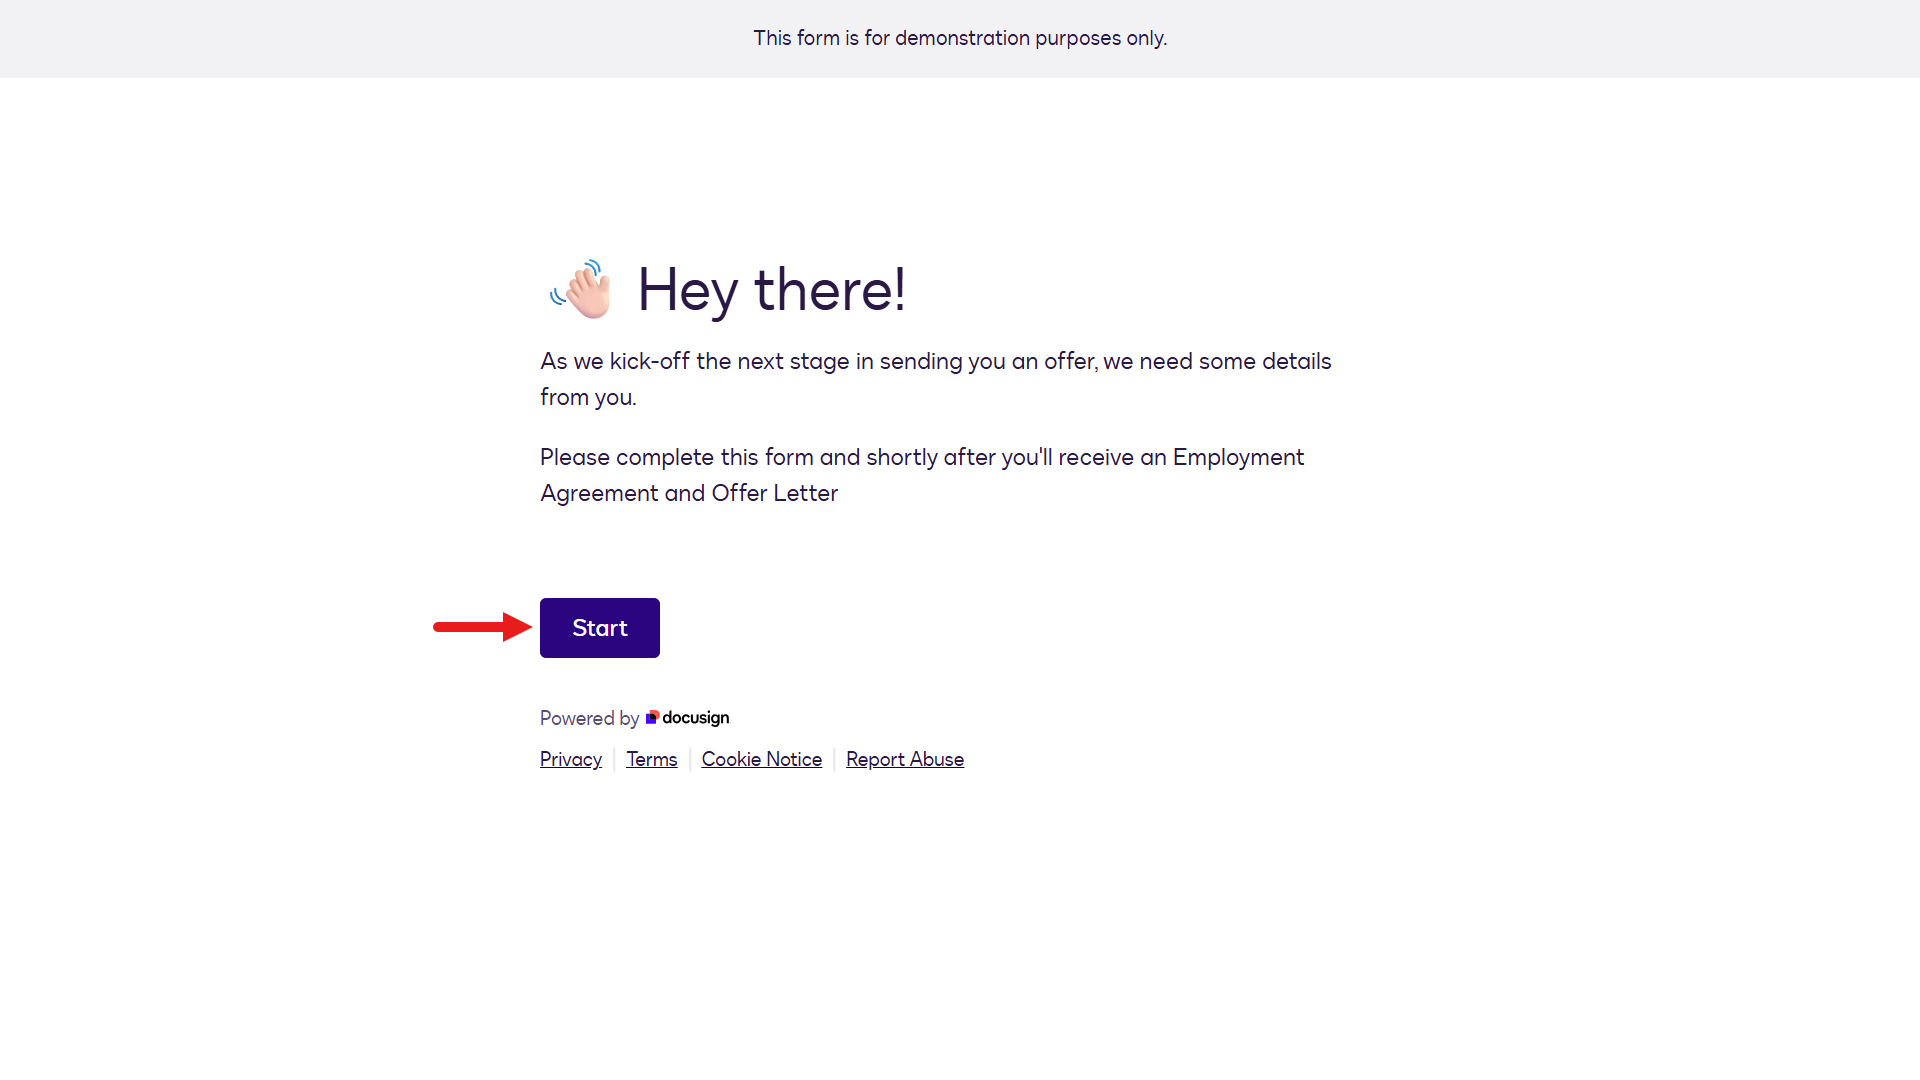
The Web Form designer will next appear. This is where we can add pages and fields to the Web Form. By default there will be 3 pages - Welcome page, Untitled page, Thank you page.
In the Welcome page update the following fields,
Page title
text👋🏻 Hey there!Page subtitle
textAs we kick-off the next stage in sending you an offer, we need some details from you. Please complete this form and shortly after you'll receive an Employment Agreement and Offer Letter.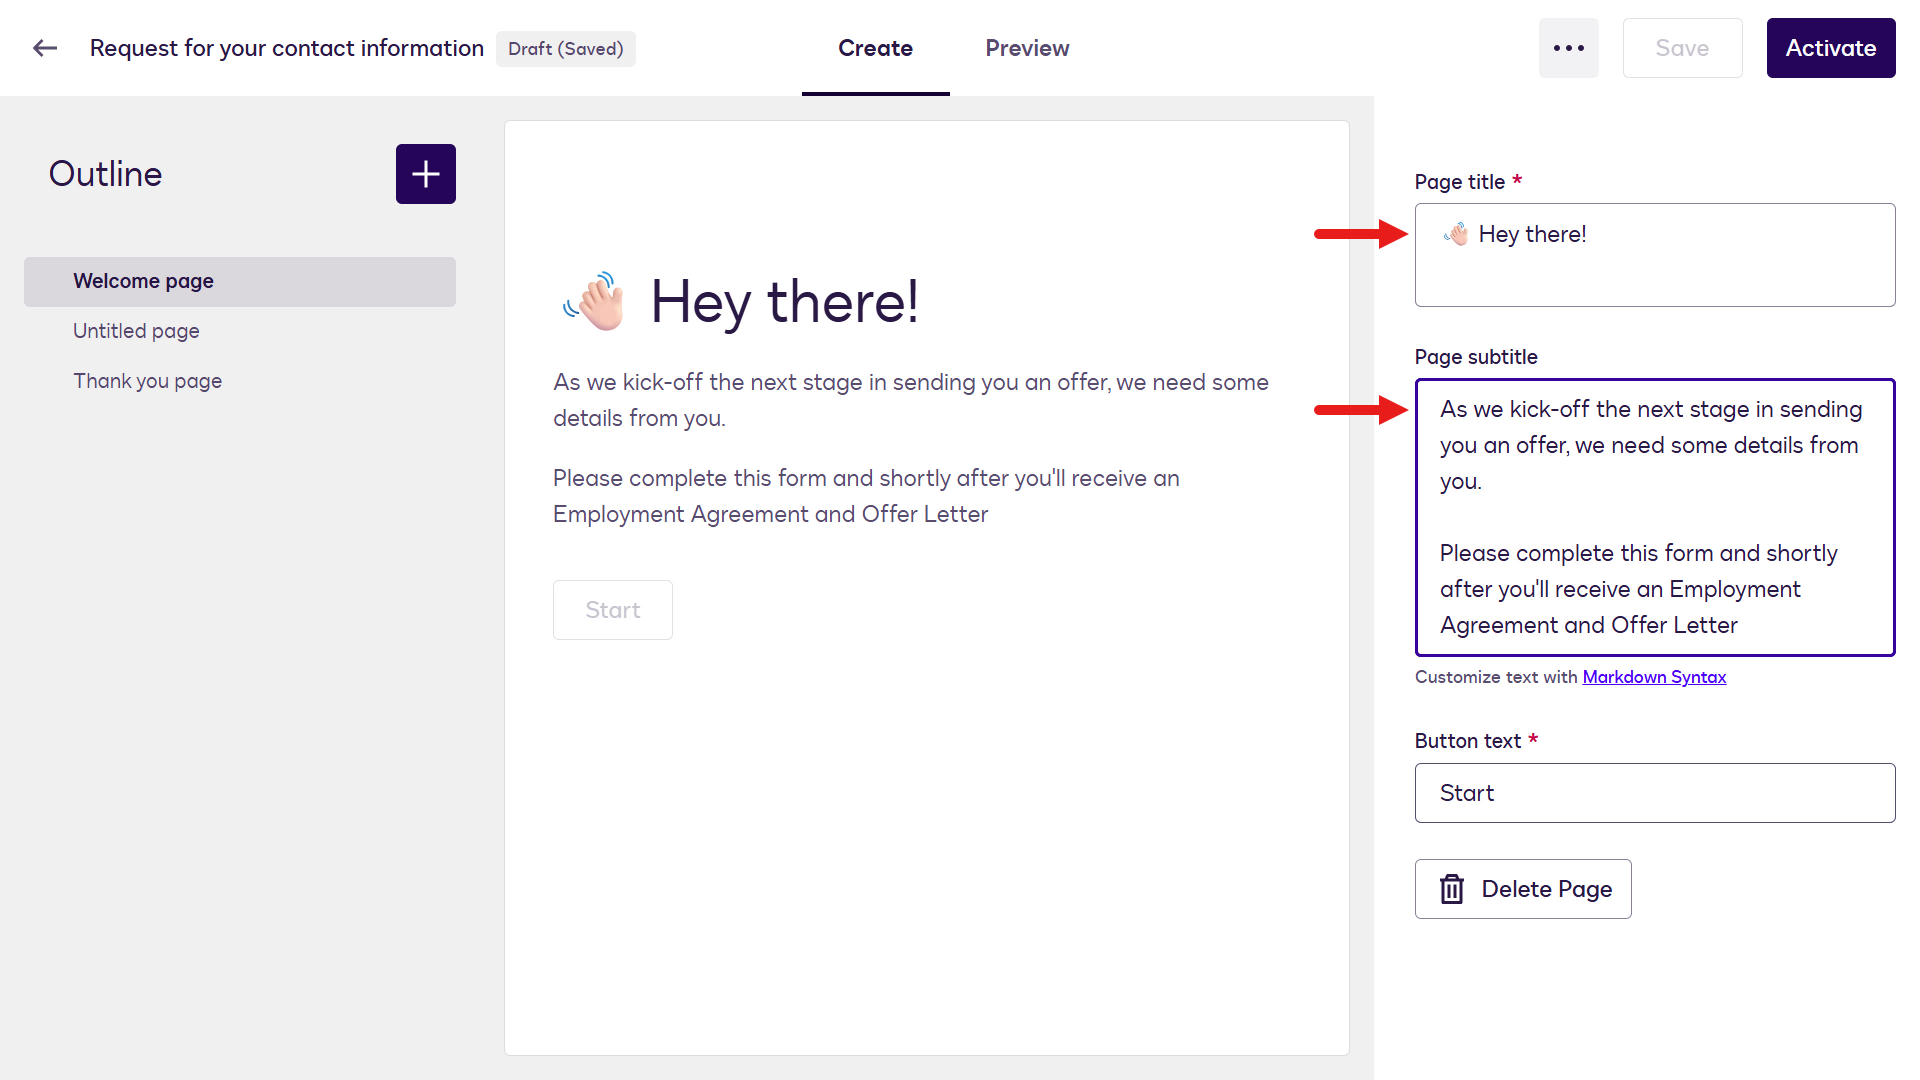
Next, select the Untitled page and update the following fields,
Page title
textYour namePage subtitle
textPlease provide us with your nameAPI reference name
textStep_CandidateName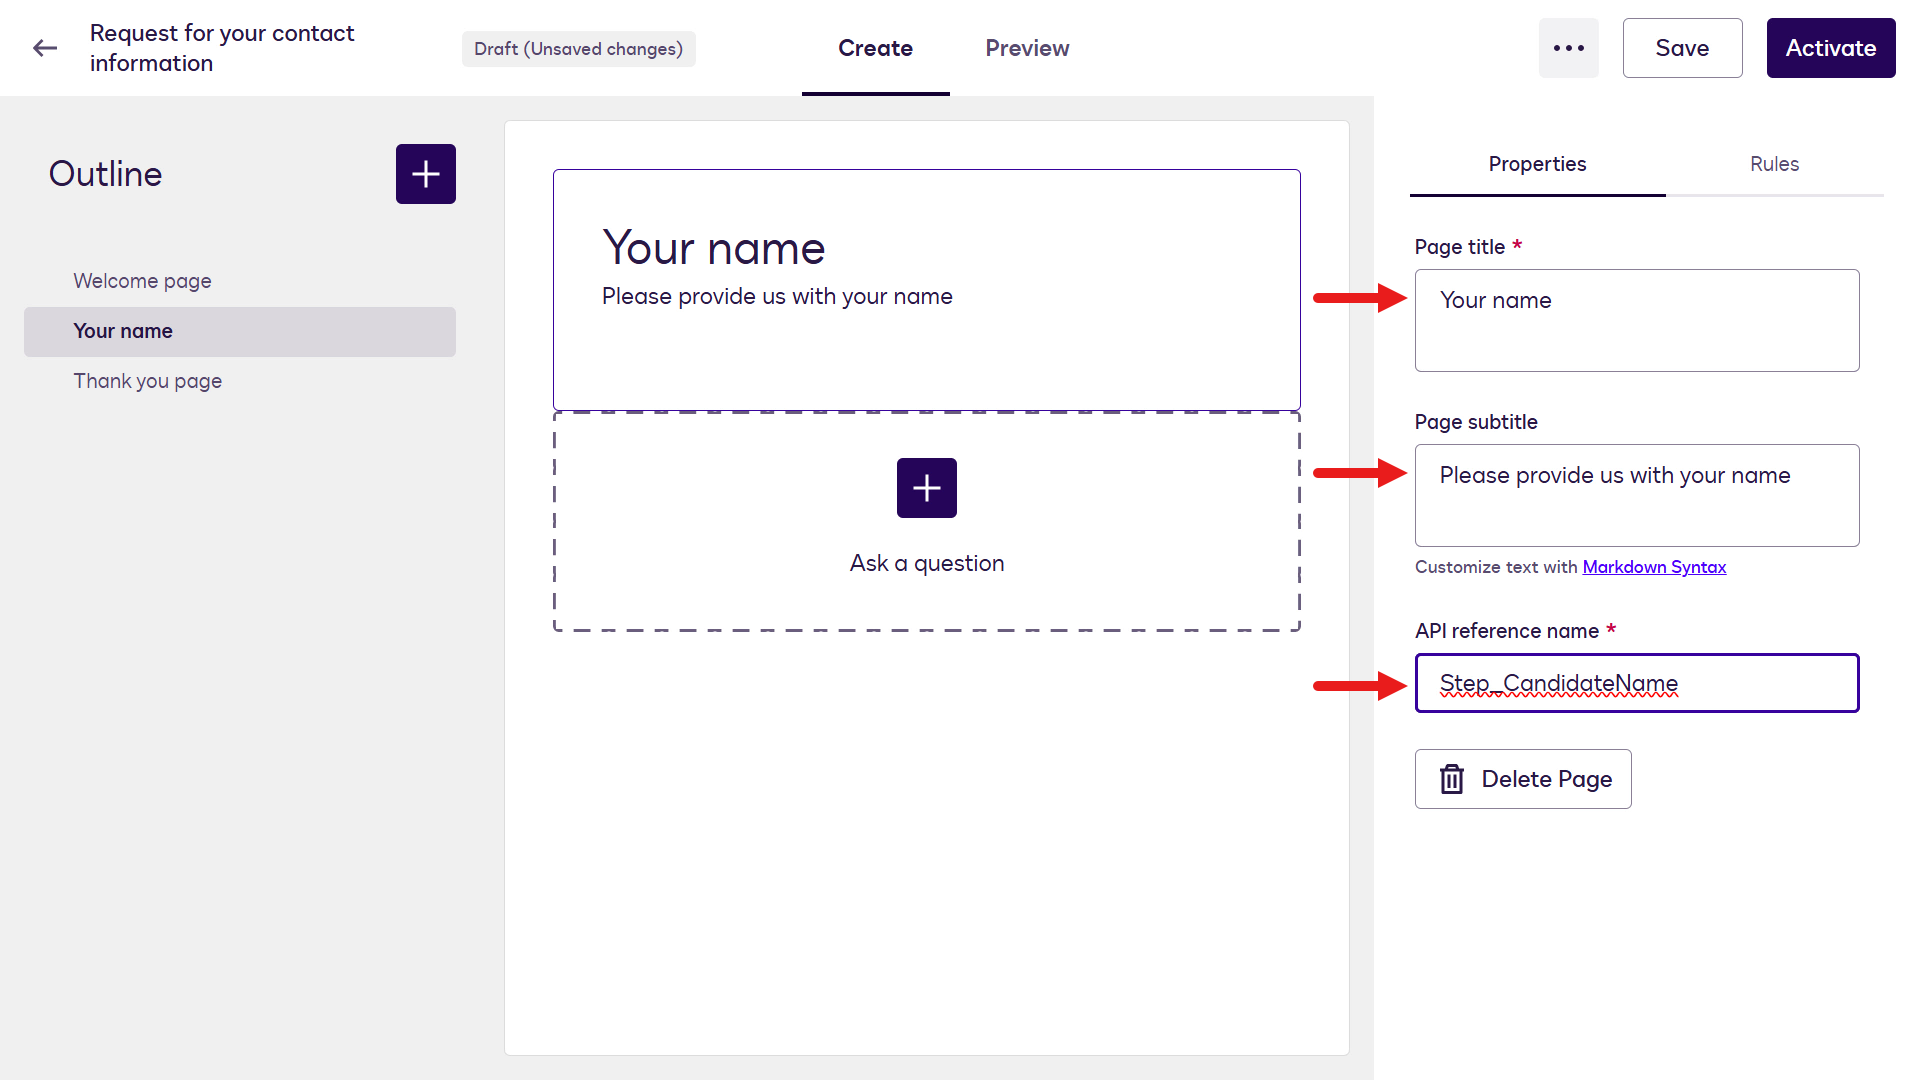
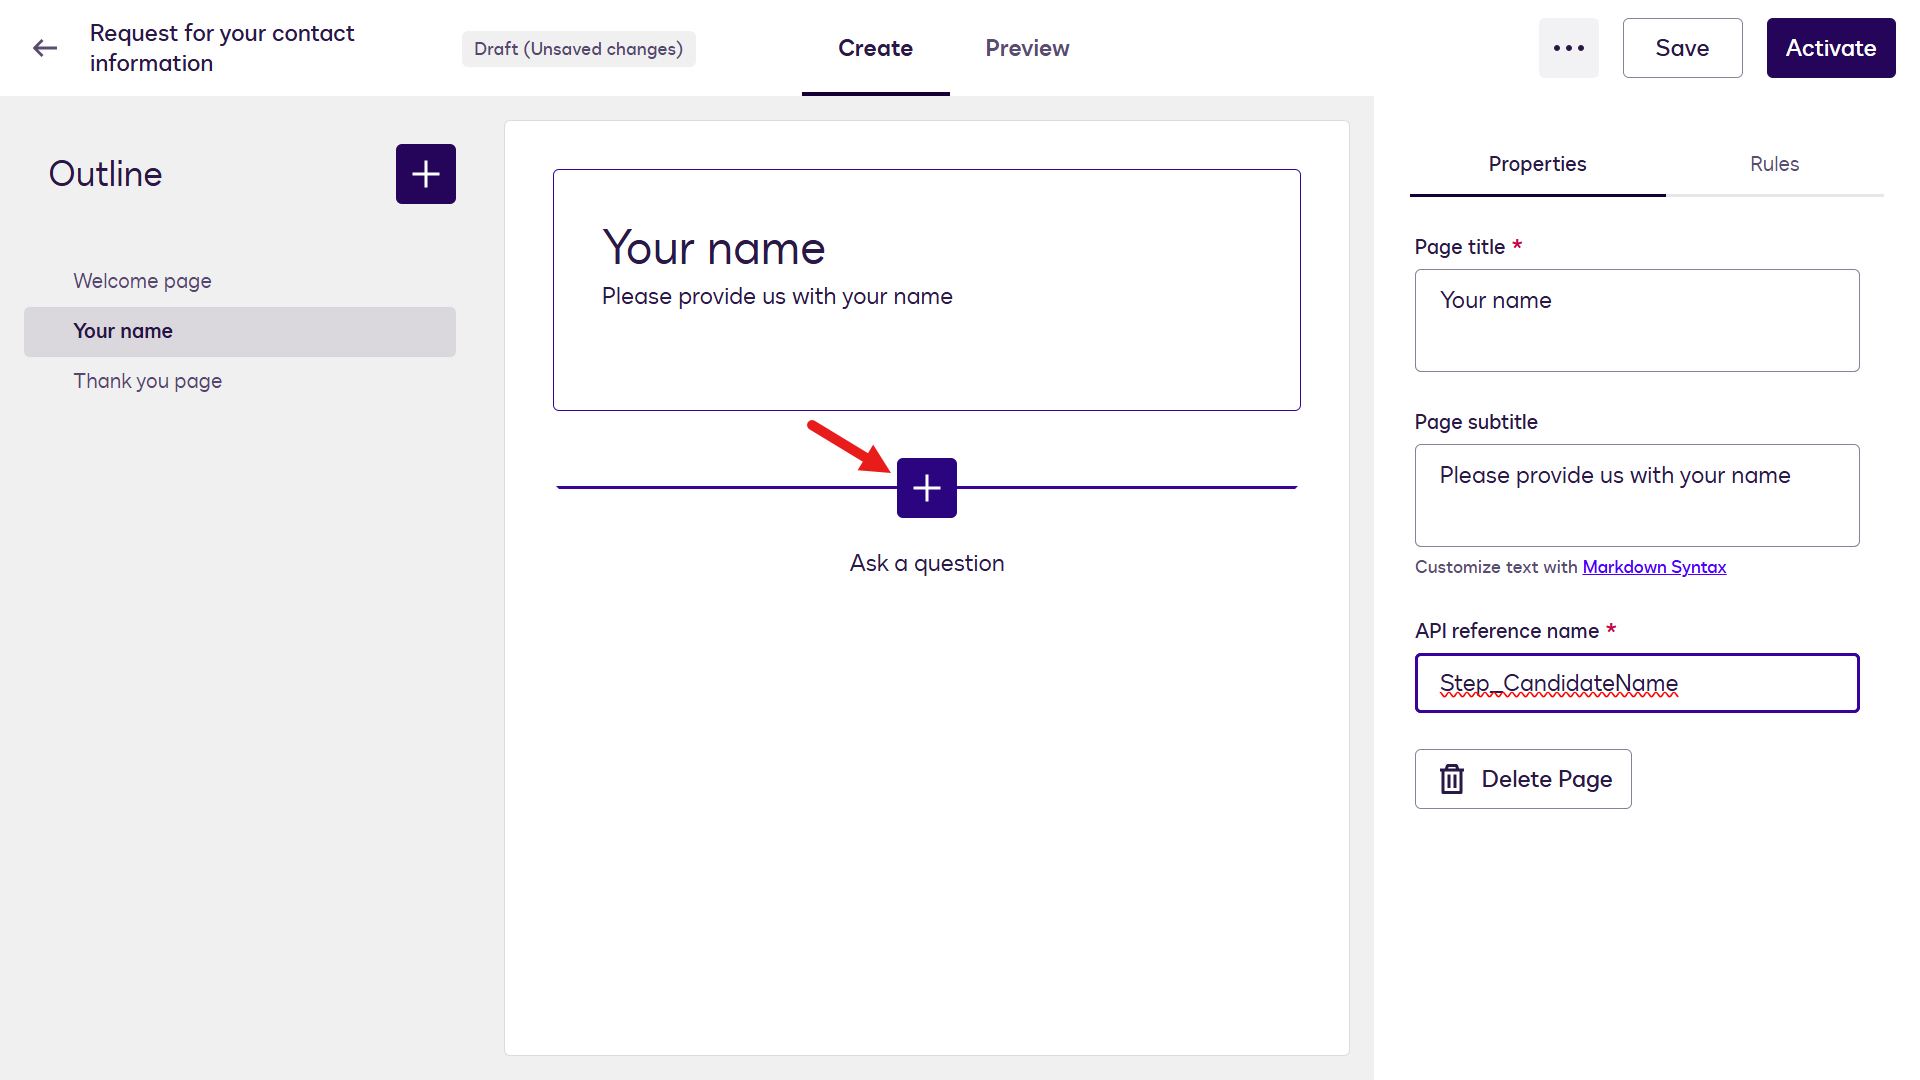
Now add fields to this page. Select the plus icon below the page title section in the middle of the designer.
Select Text Field.

You'll now see the field attributes. Update the following attributes:
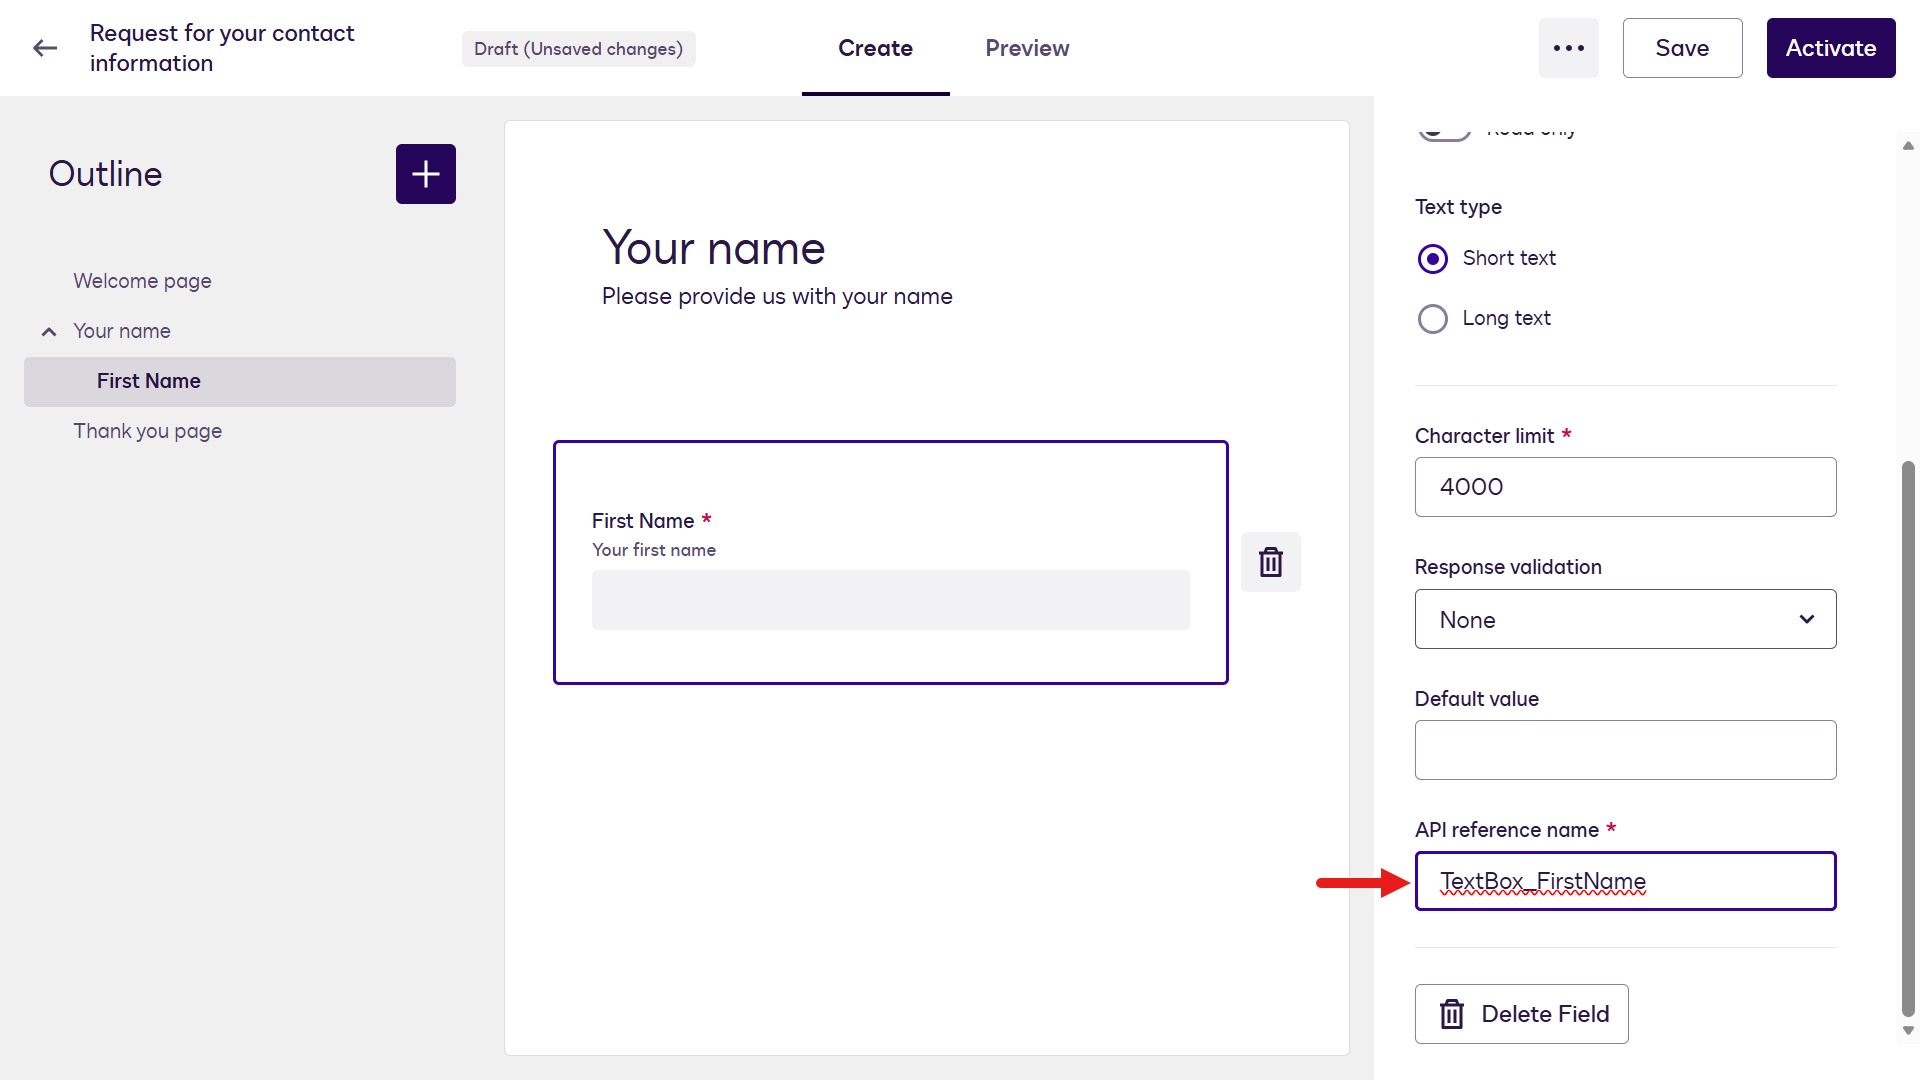
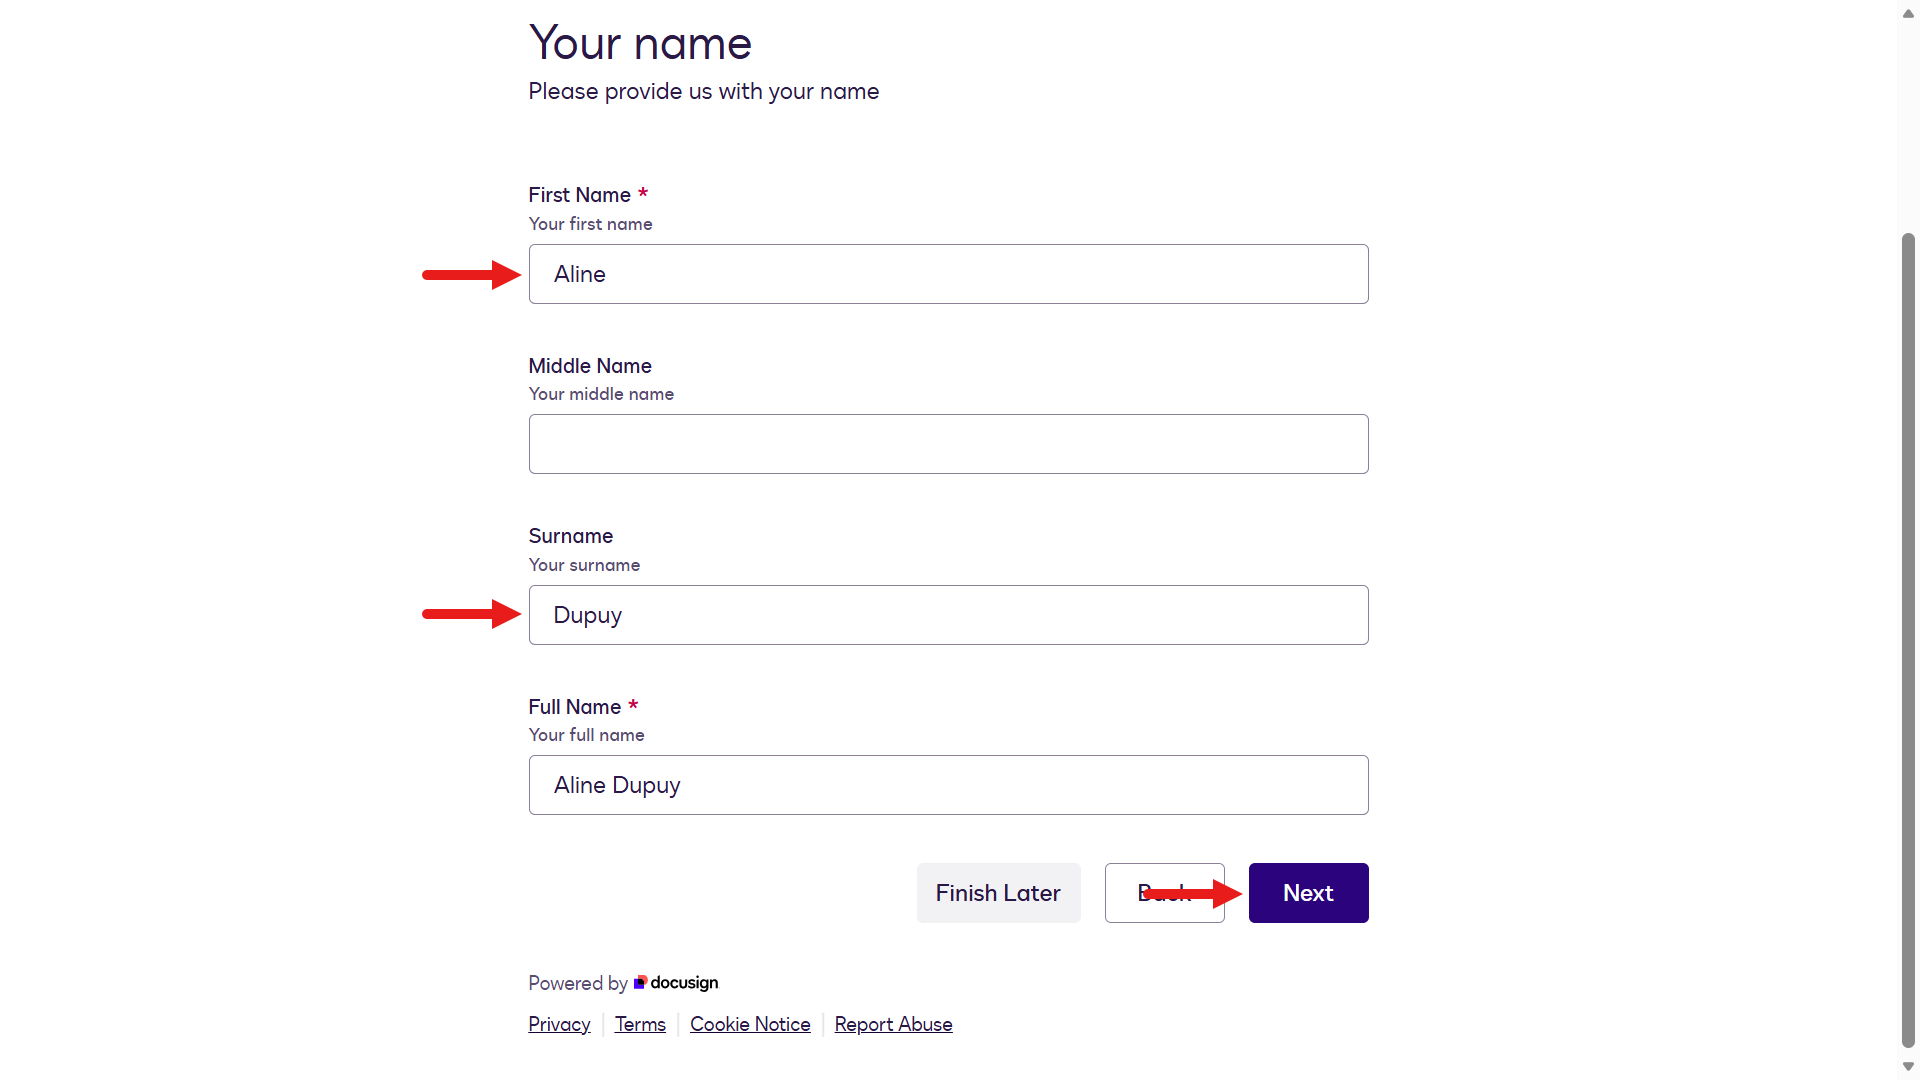
Field name Field description Required field API reference name First NameYour first nameYes TextBox_FirstName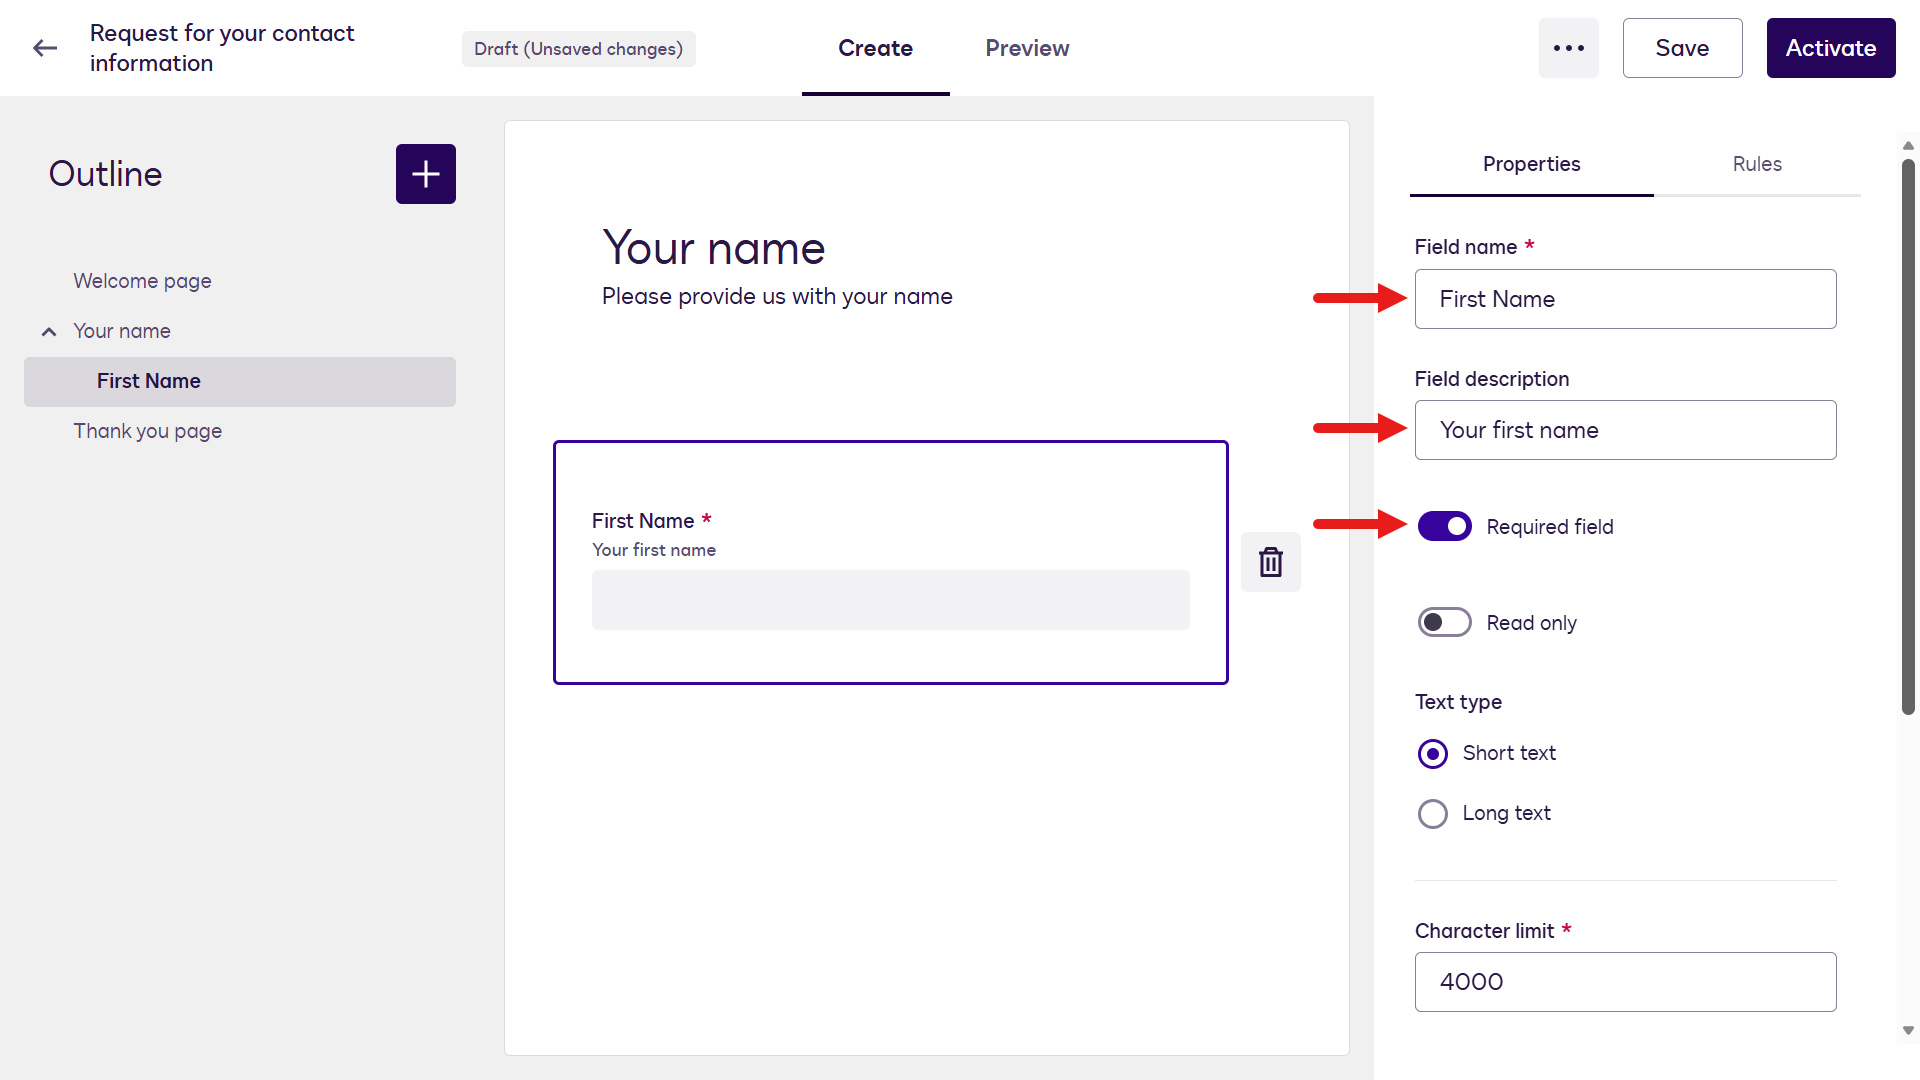
Repeat these steps to add the remaining Text Fields. Select the plus icon and add new Text Fields using the following attributes:
Field name Field description Required field API reference name Middle NameYour middle nameNo TextBox_MiddleNameSurnameYour surnameYes TextBox_SurnameFull NameYour full nameYes TextBox_FullNameAfter the Text Fields have been added, select the plus icon on the left-hand side pane and select New Blank Page.
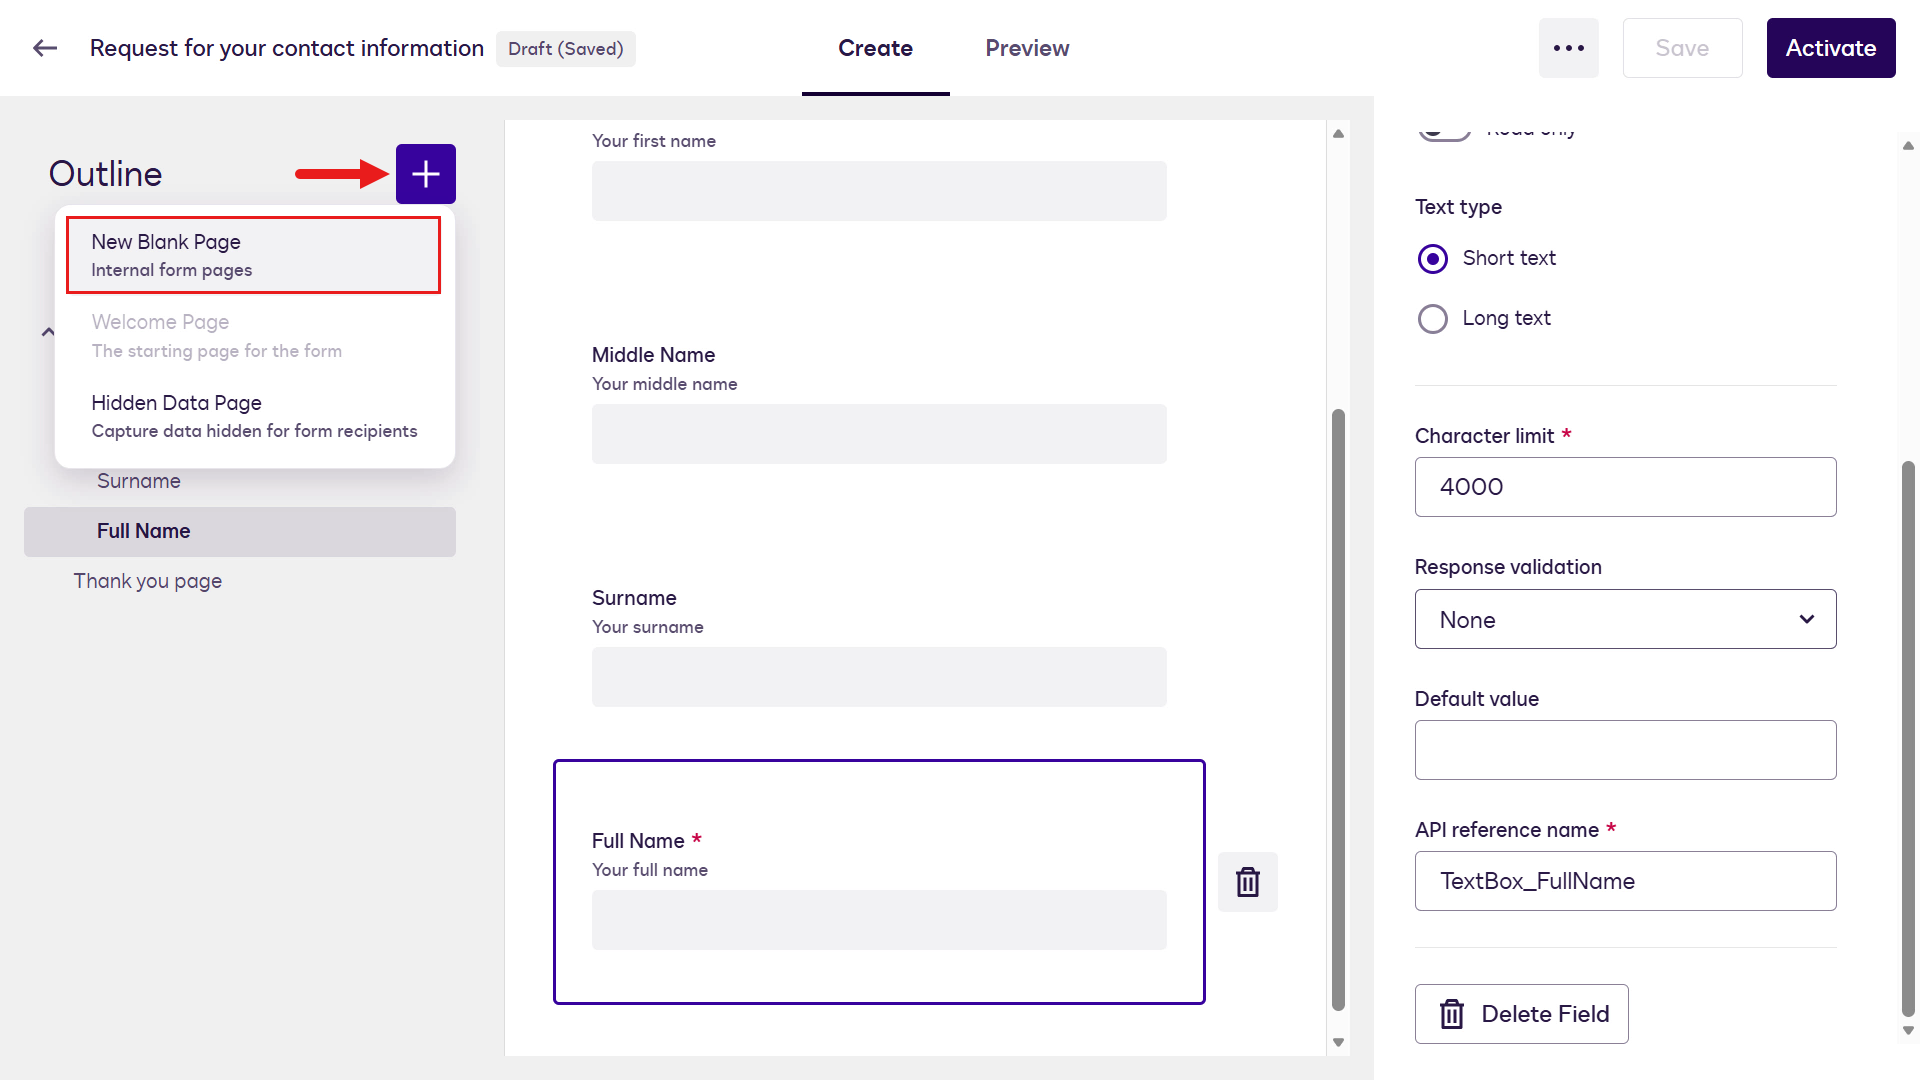
Update the following fields for the new page,
Page title
textAddressPage subtitle
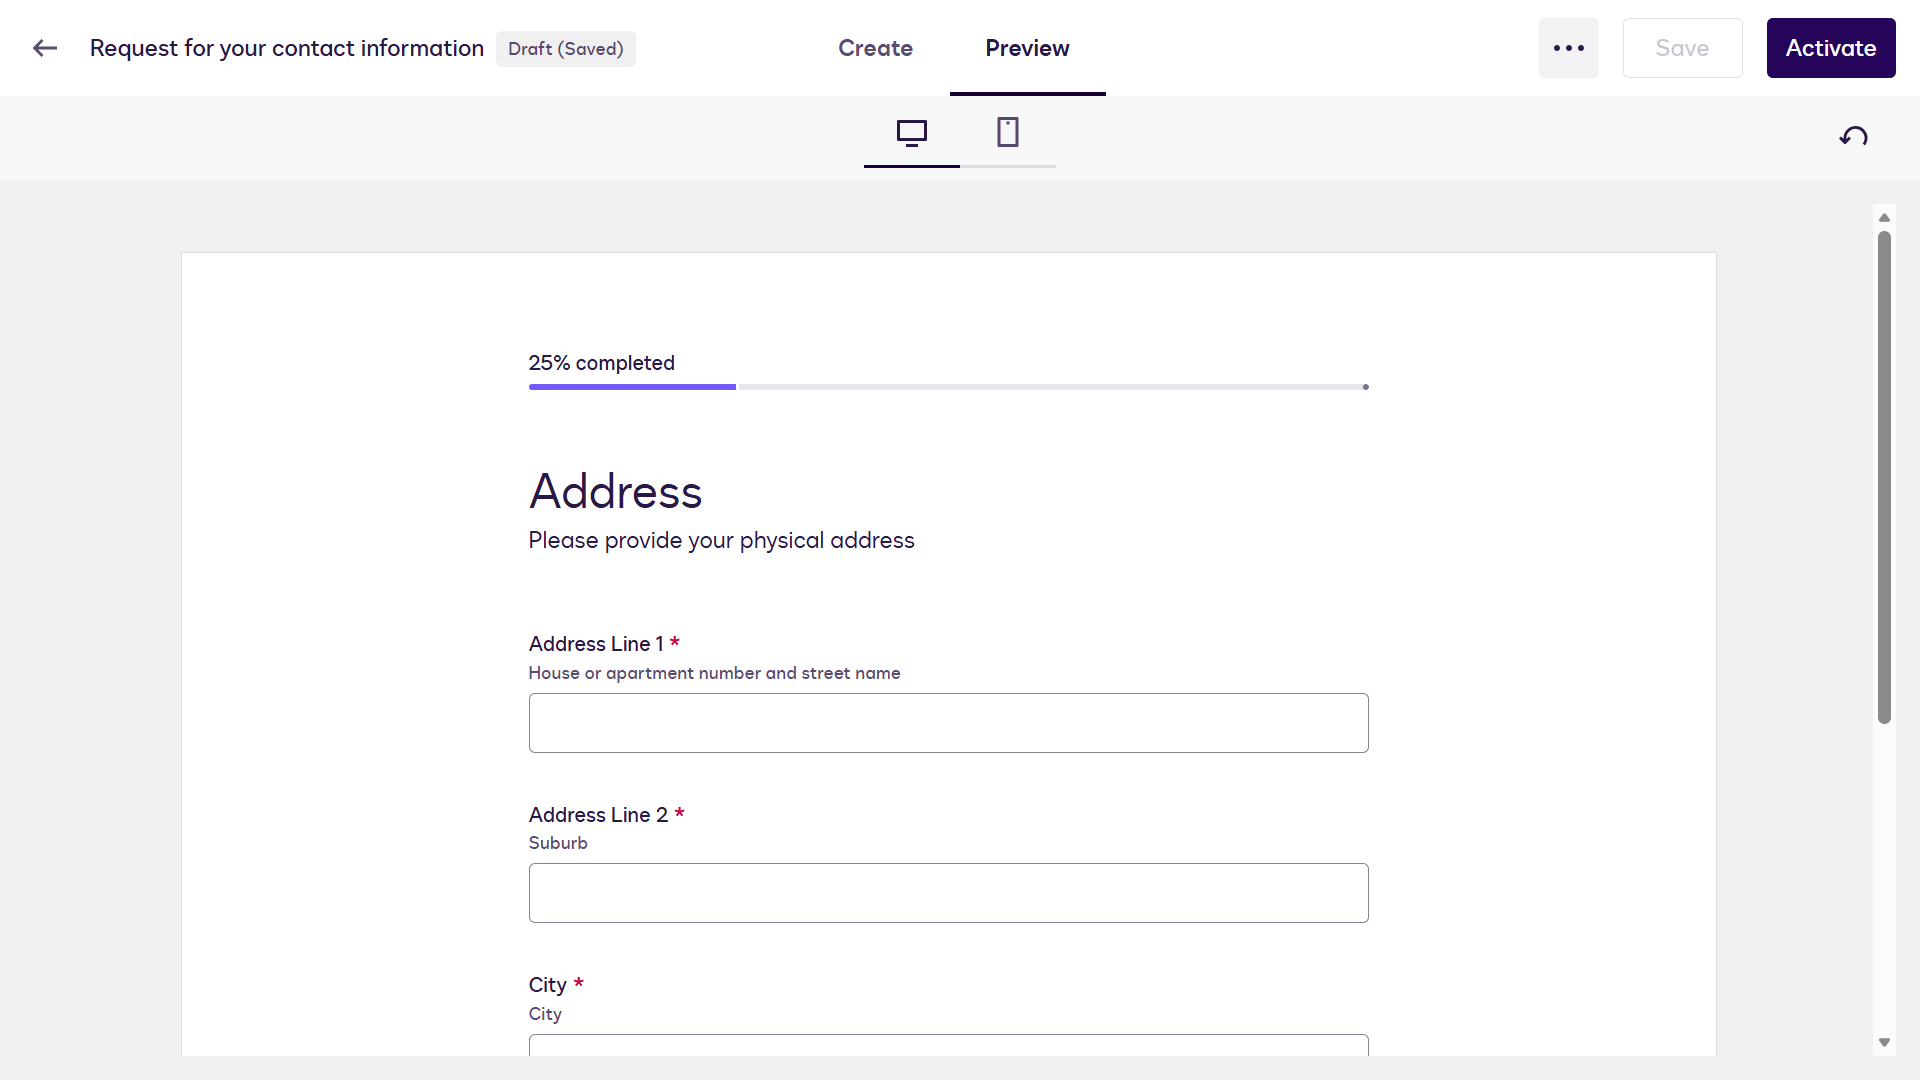
textPlease provide us with your physical addressAPI reference name
textStep_CandidateAddressRepeat these steps to add the remaining Text Fields. Select the plus icon and add new Text Fields using the following attributes:
Generic address format
The table below shows a generic address format. You can adjust it, but keep track of any field changes because you'll need them in the Workflow Builder lab exercise. To avoid issues in later steps, use the following address format.
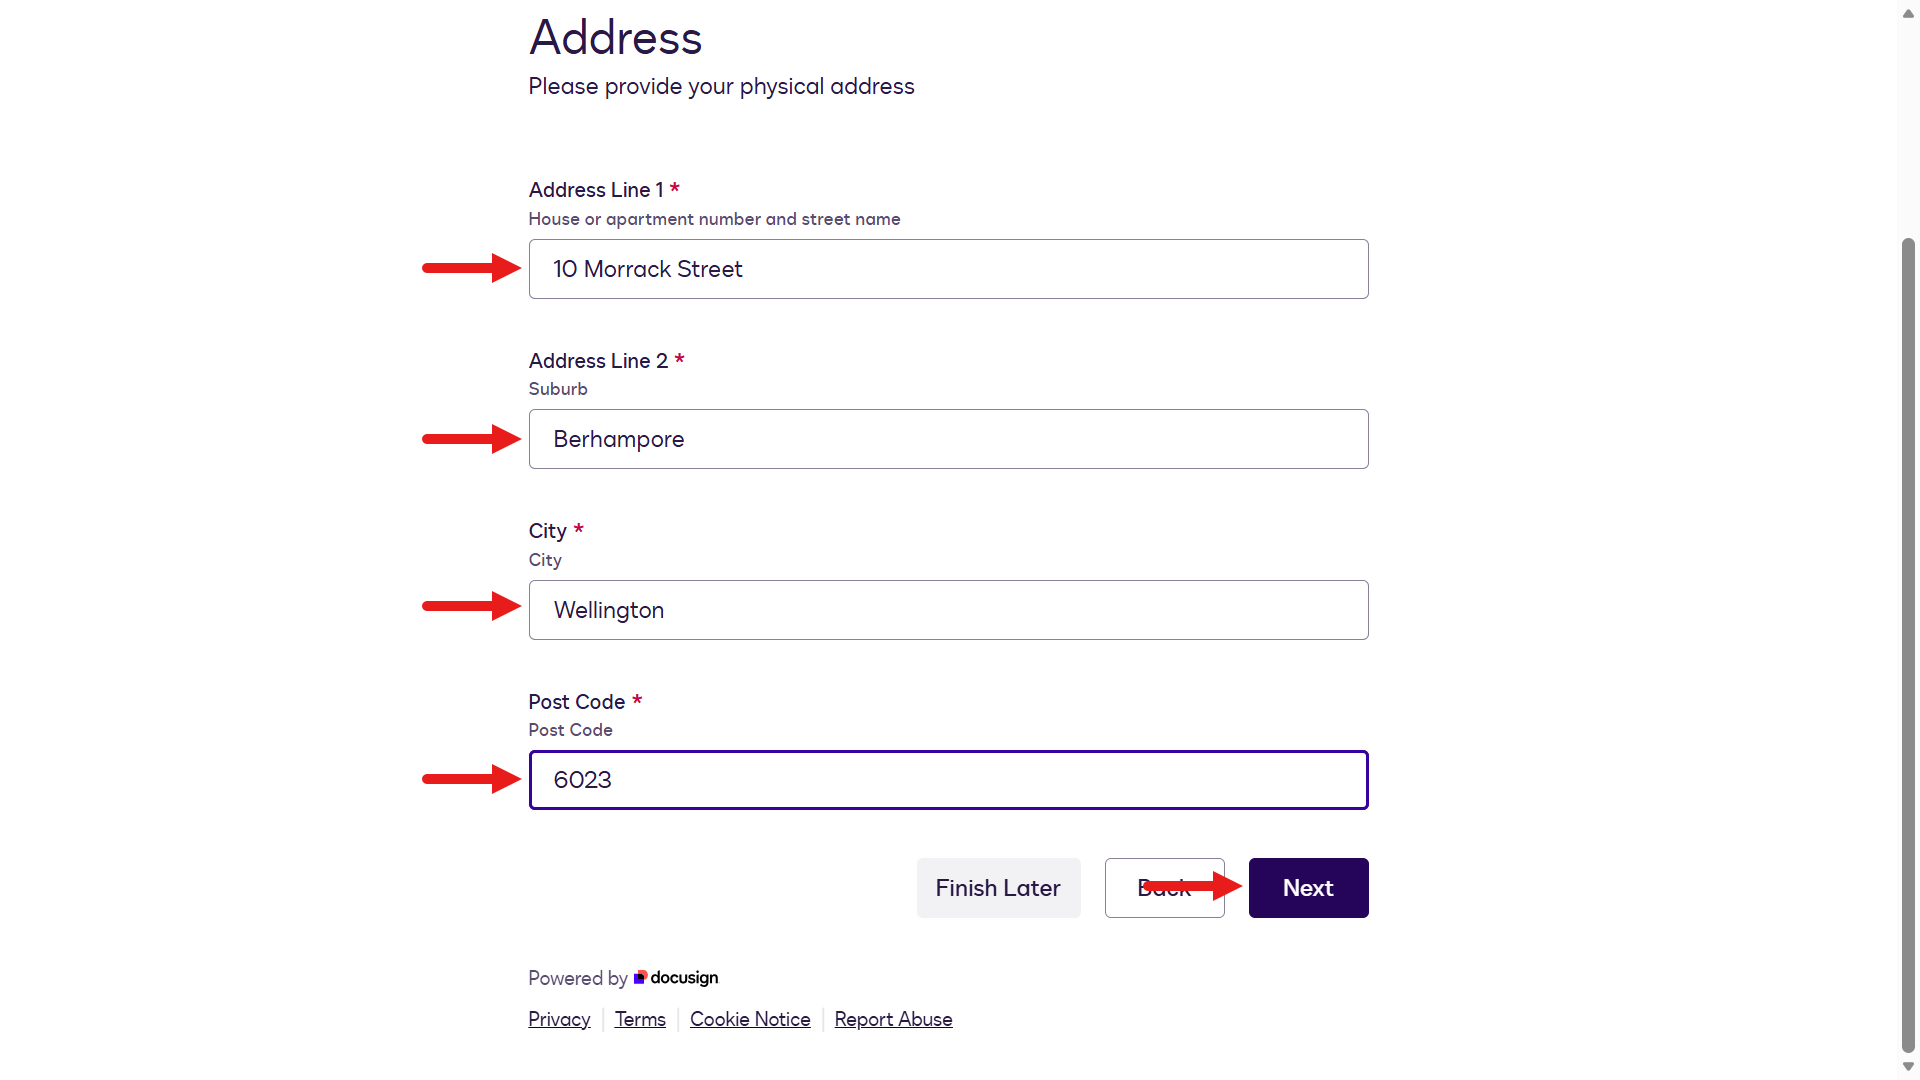
Field name Field description Required field API reference name Address Line 1Street AddressYes TextBox_AddressLine1Address Line 2Suburb/DistrictYes TextBox_AddressLine2CityCityYes TextBox_CityPost CodePost CodeYes TextBox_PostCode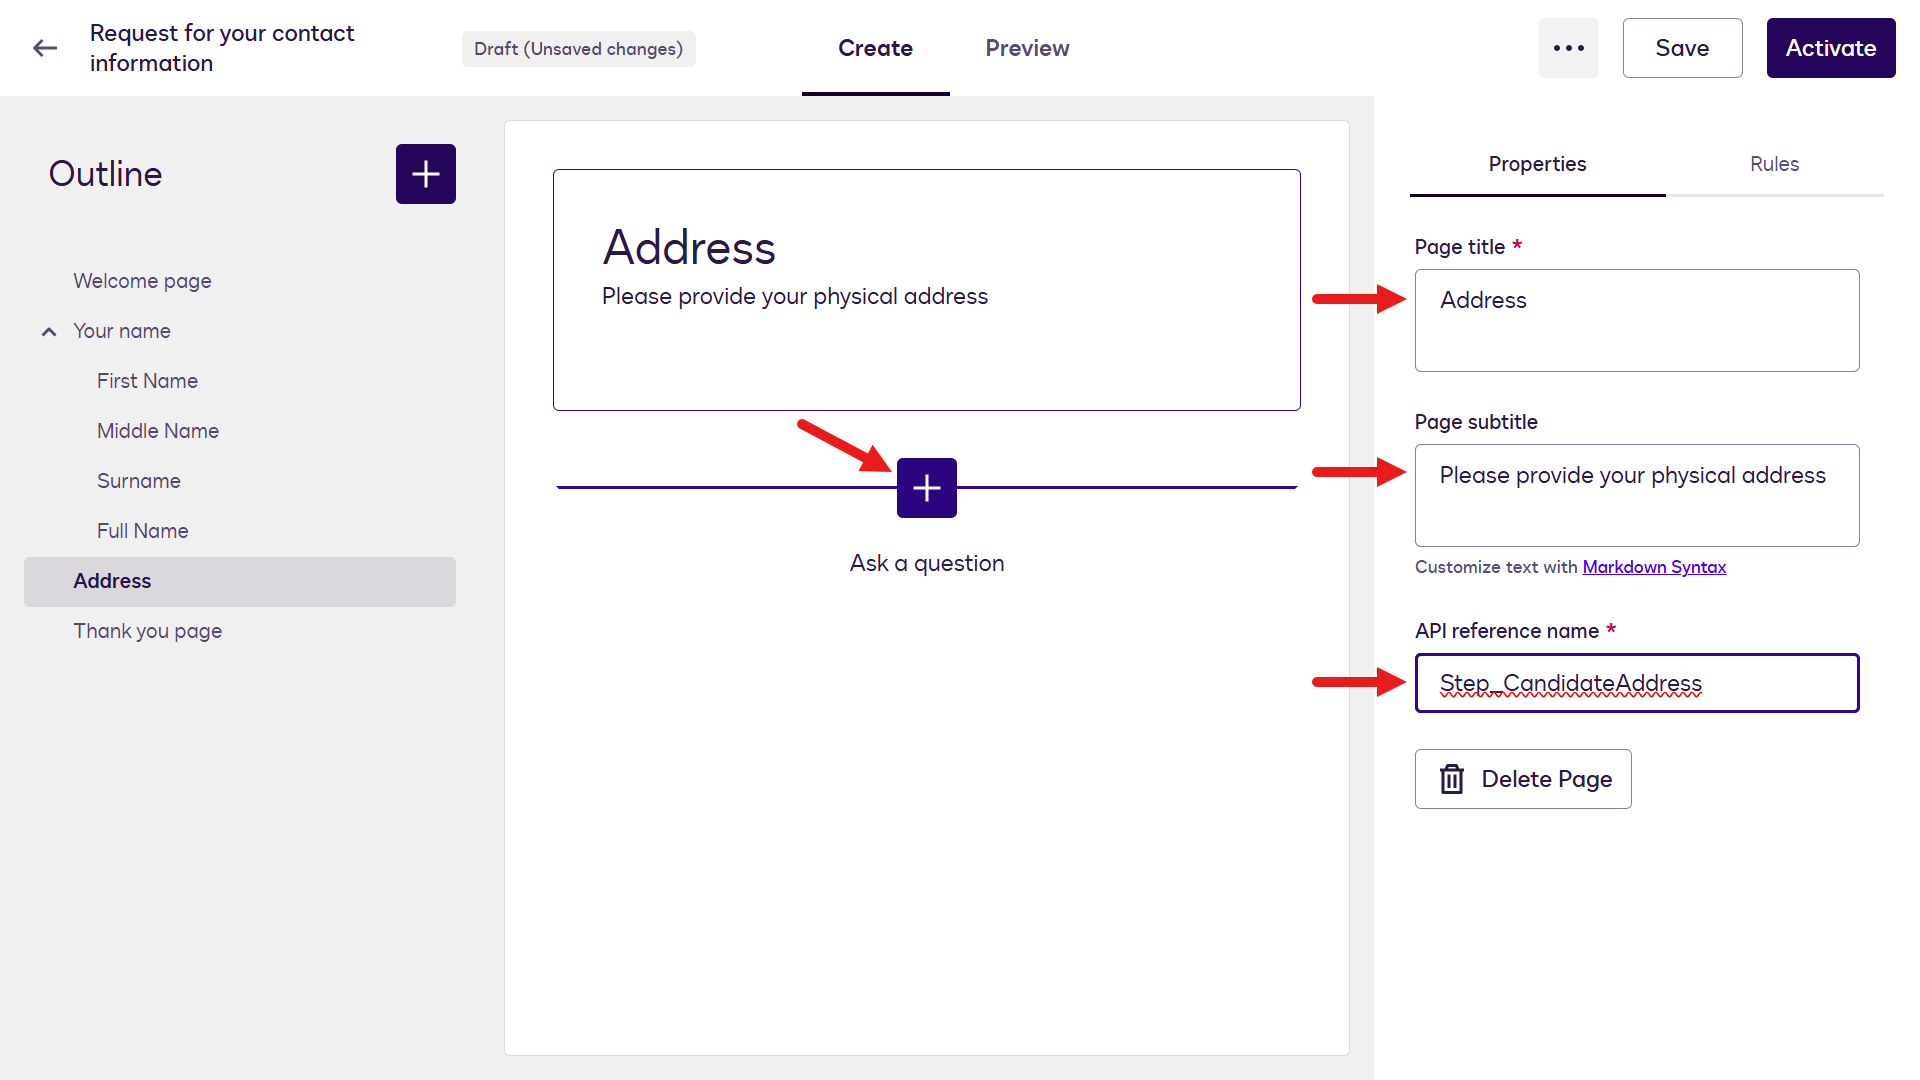
After the Text Fields have been added, select the Thank you page on the left-hand side pane.
Update the following fields for the Thank you page.
Page title
text✨ Thank youPage subtitle
textWe've received your form. Expect an email soon with documents to sign.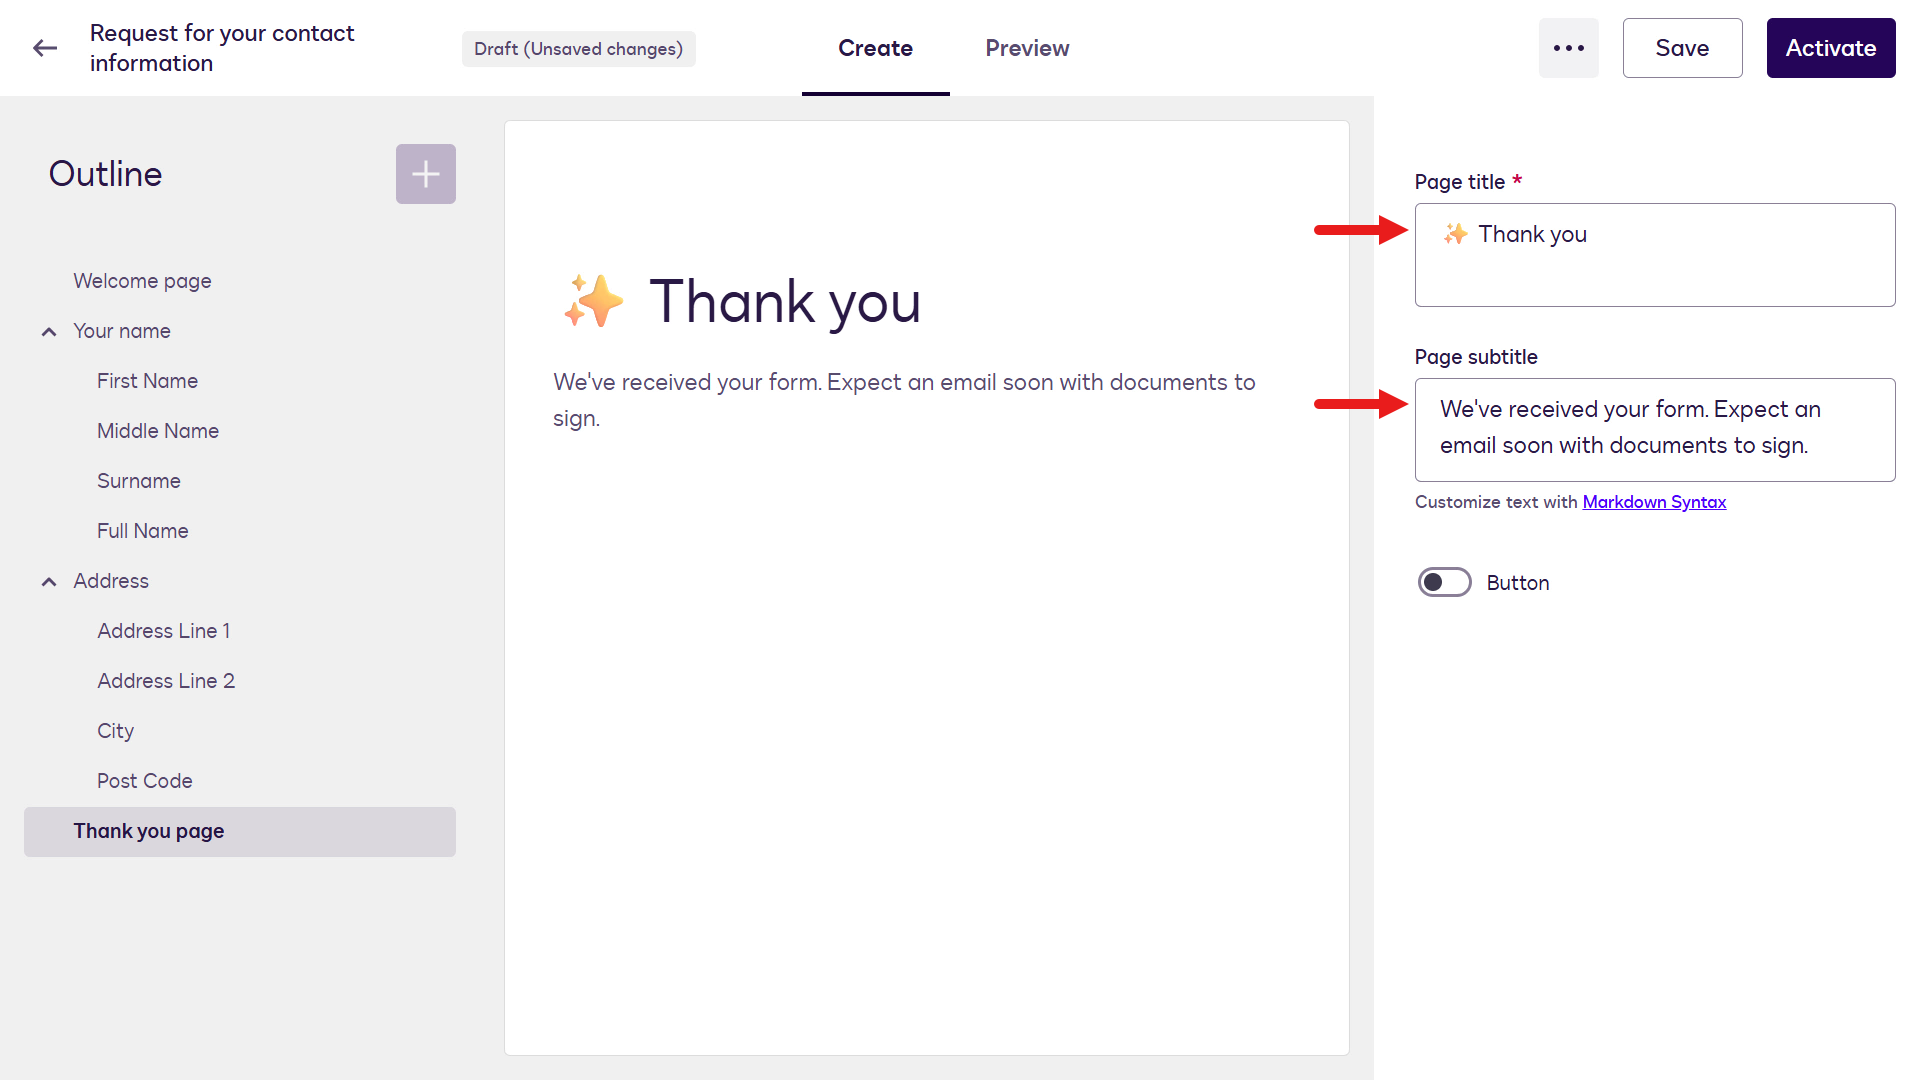
You've finished configuring the Web Form. To see the end-user view, select Preview.
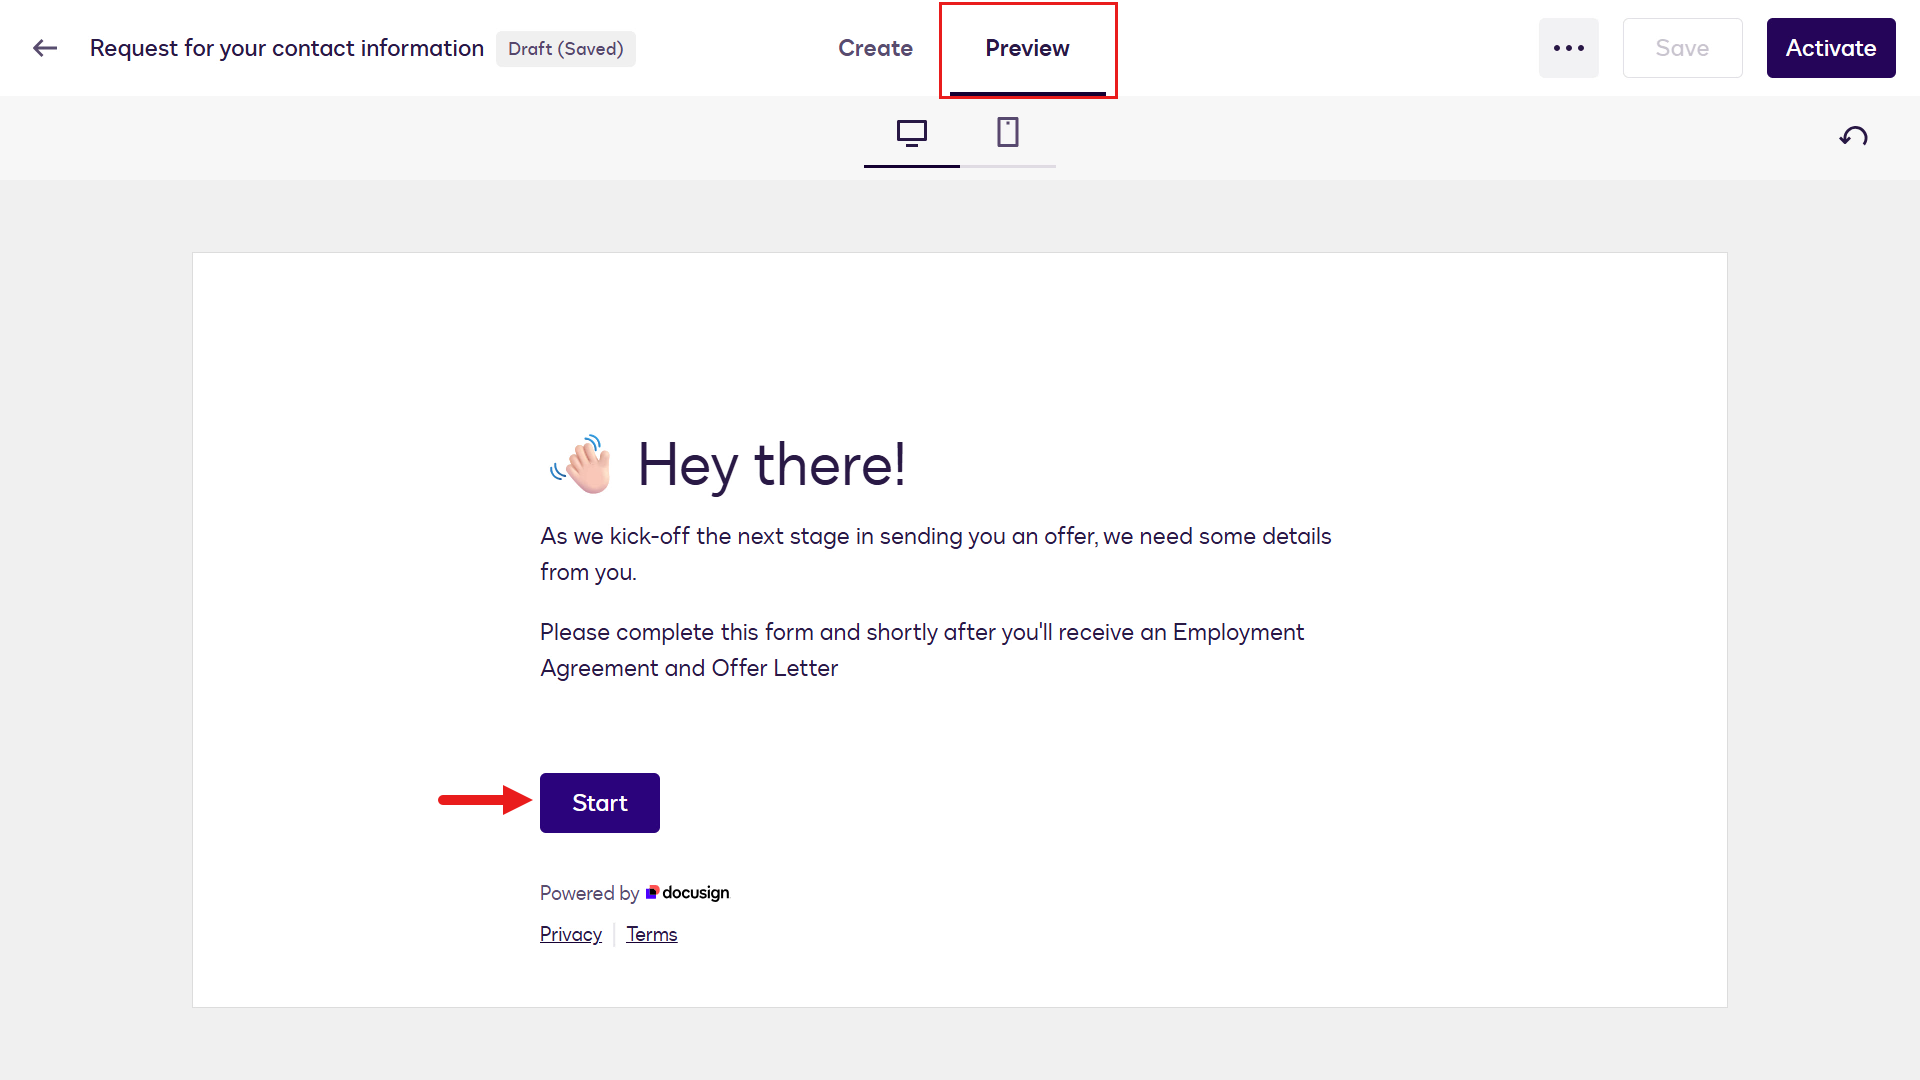
The Web Form is now enabled in preview mode where you can complete each page with the required information. Complete the Your Name page by entering a name and select Next.
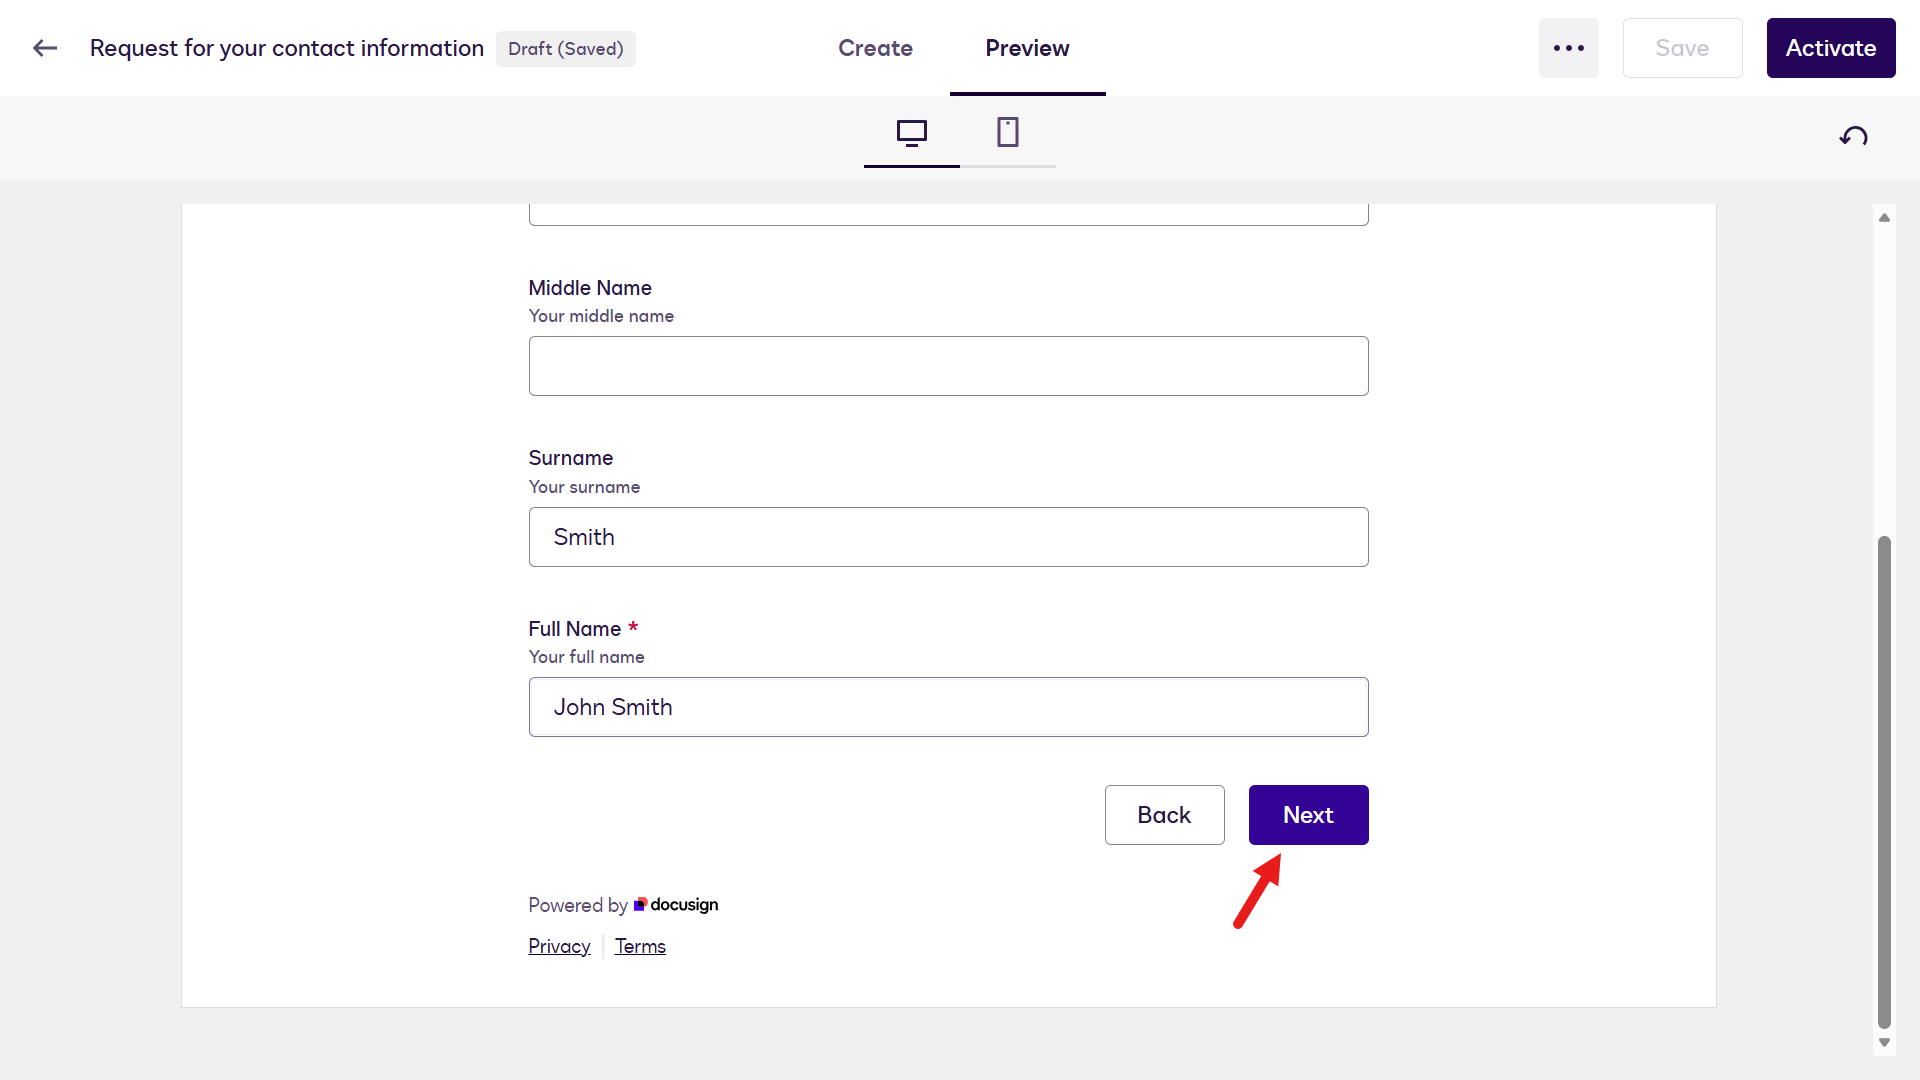
The next page to complete is the Address page.
Complete the Address page with information and select Next.
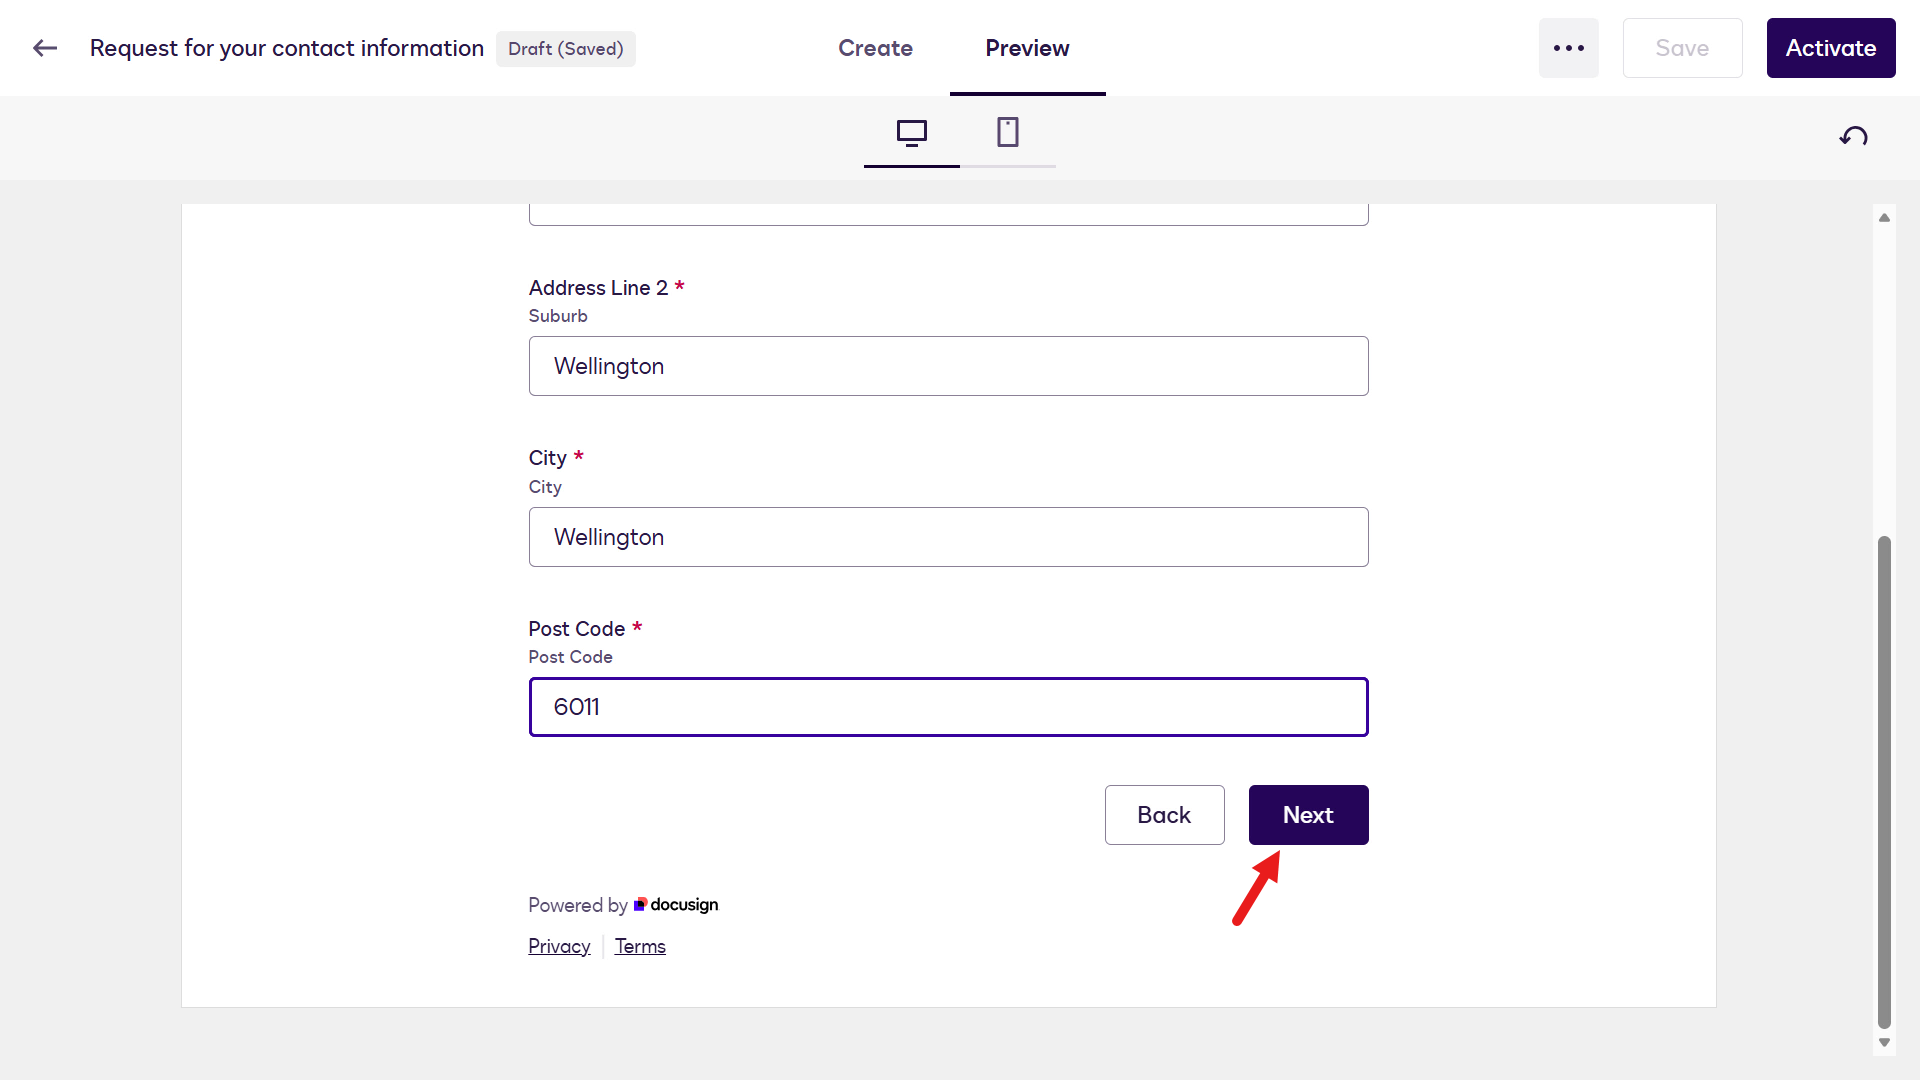
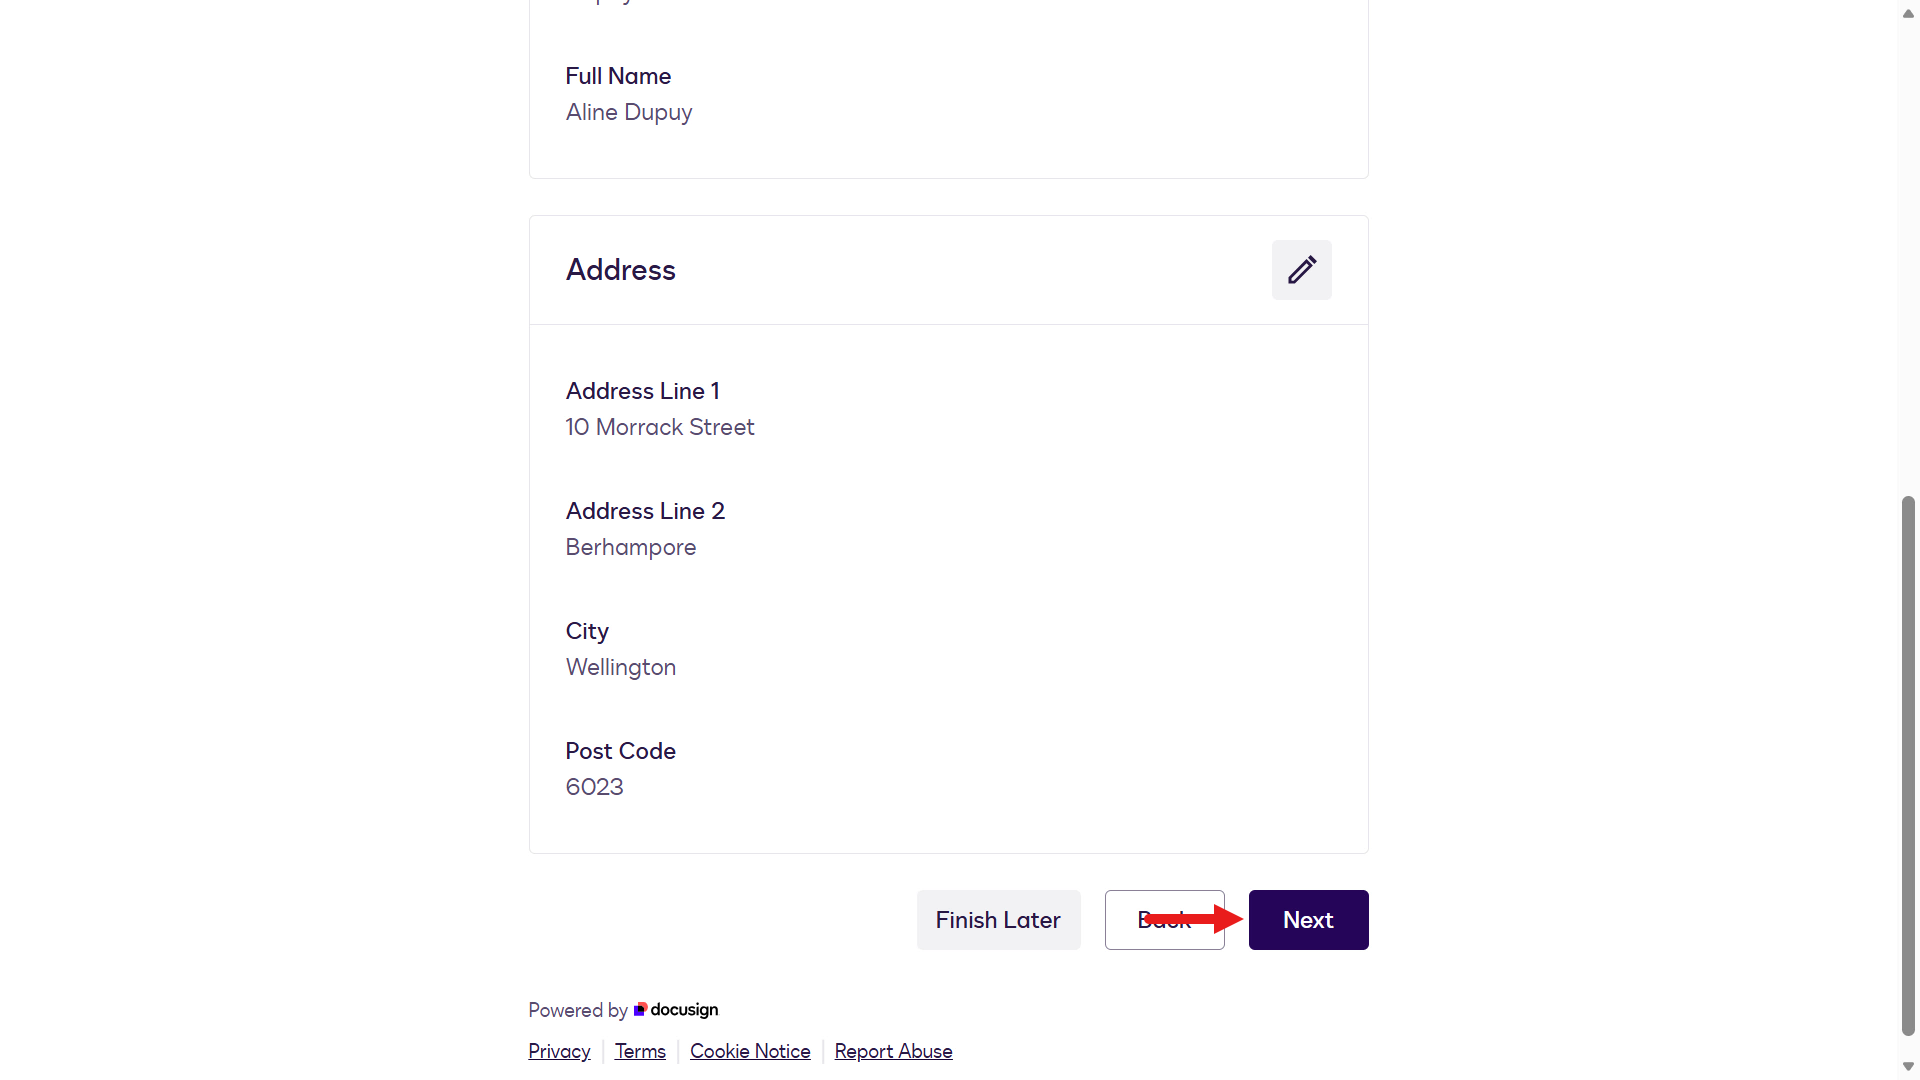
You'll then see a summary of the information entered for the two pages to review.
Scroll down and select Next.
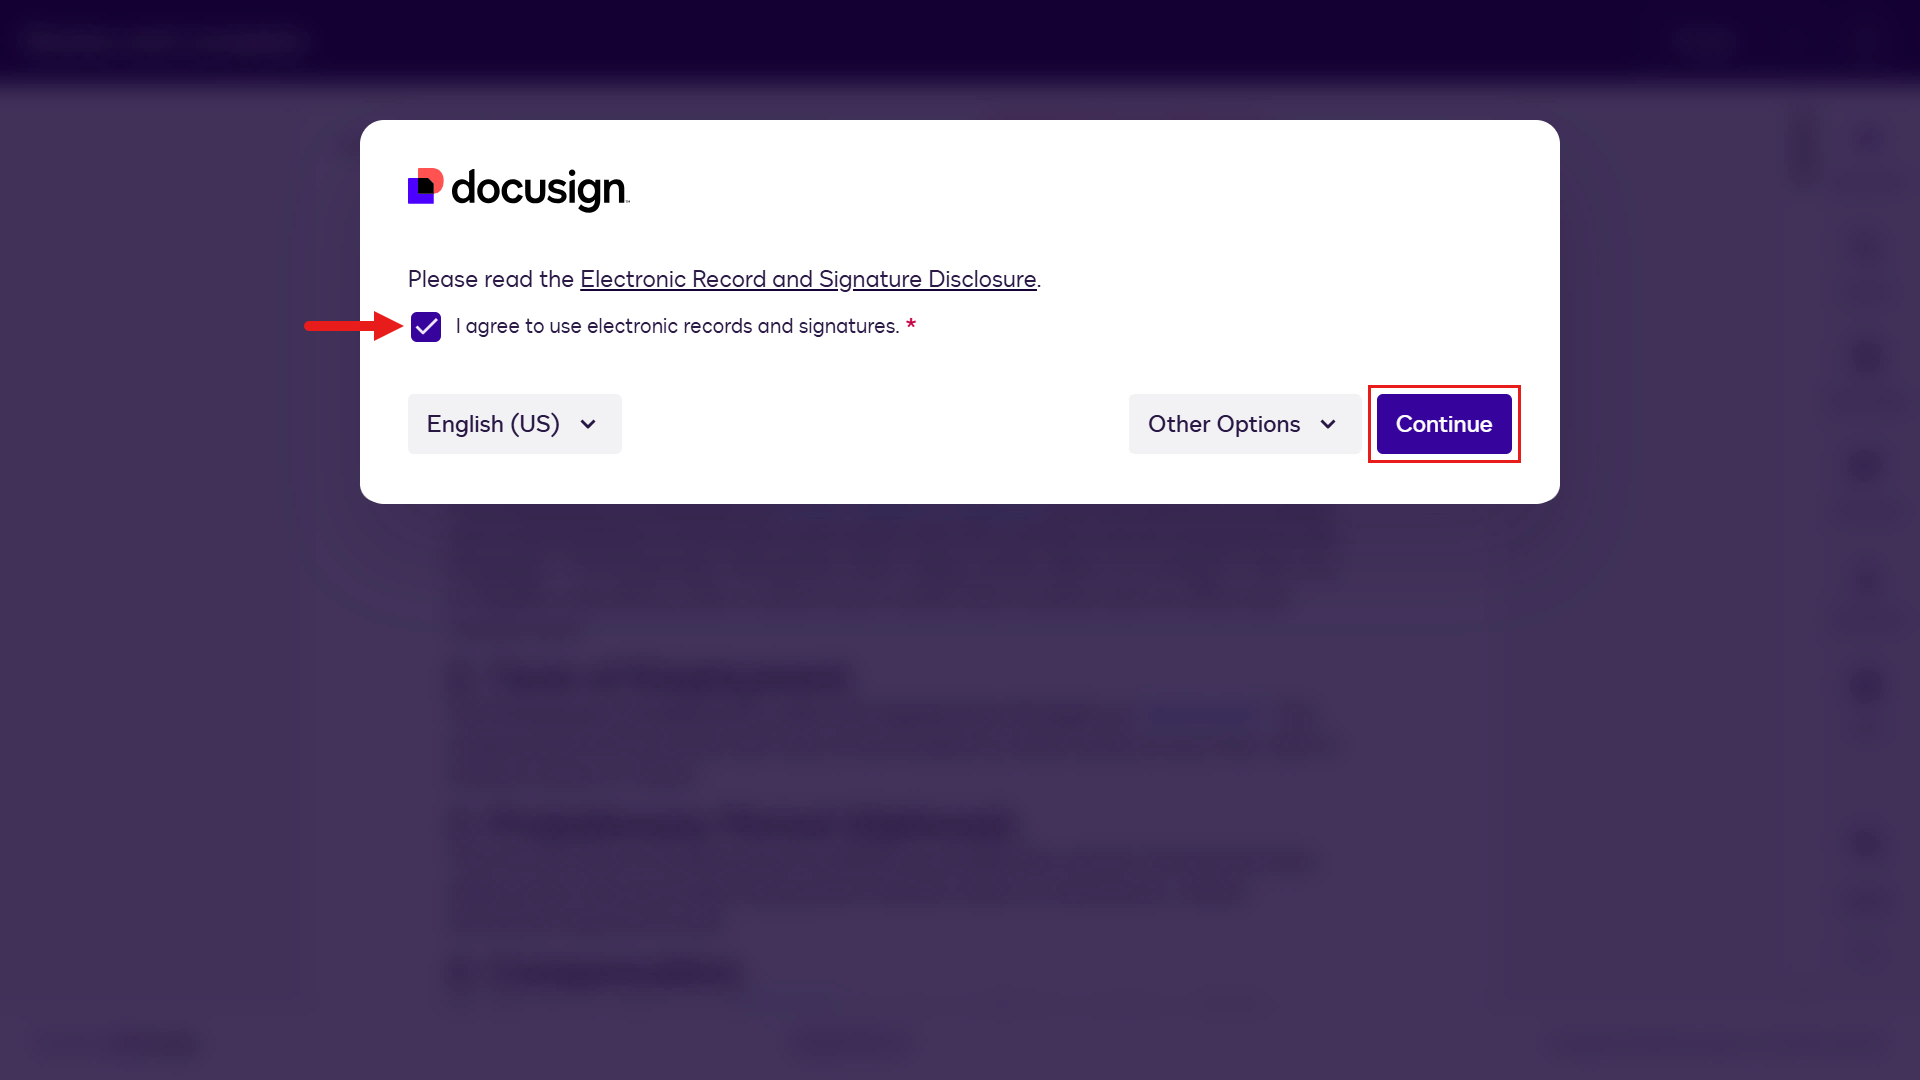
An error will appear next, this is fine as it's due to the web form being in preview mode. Select Create.
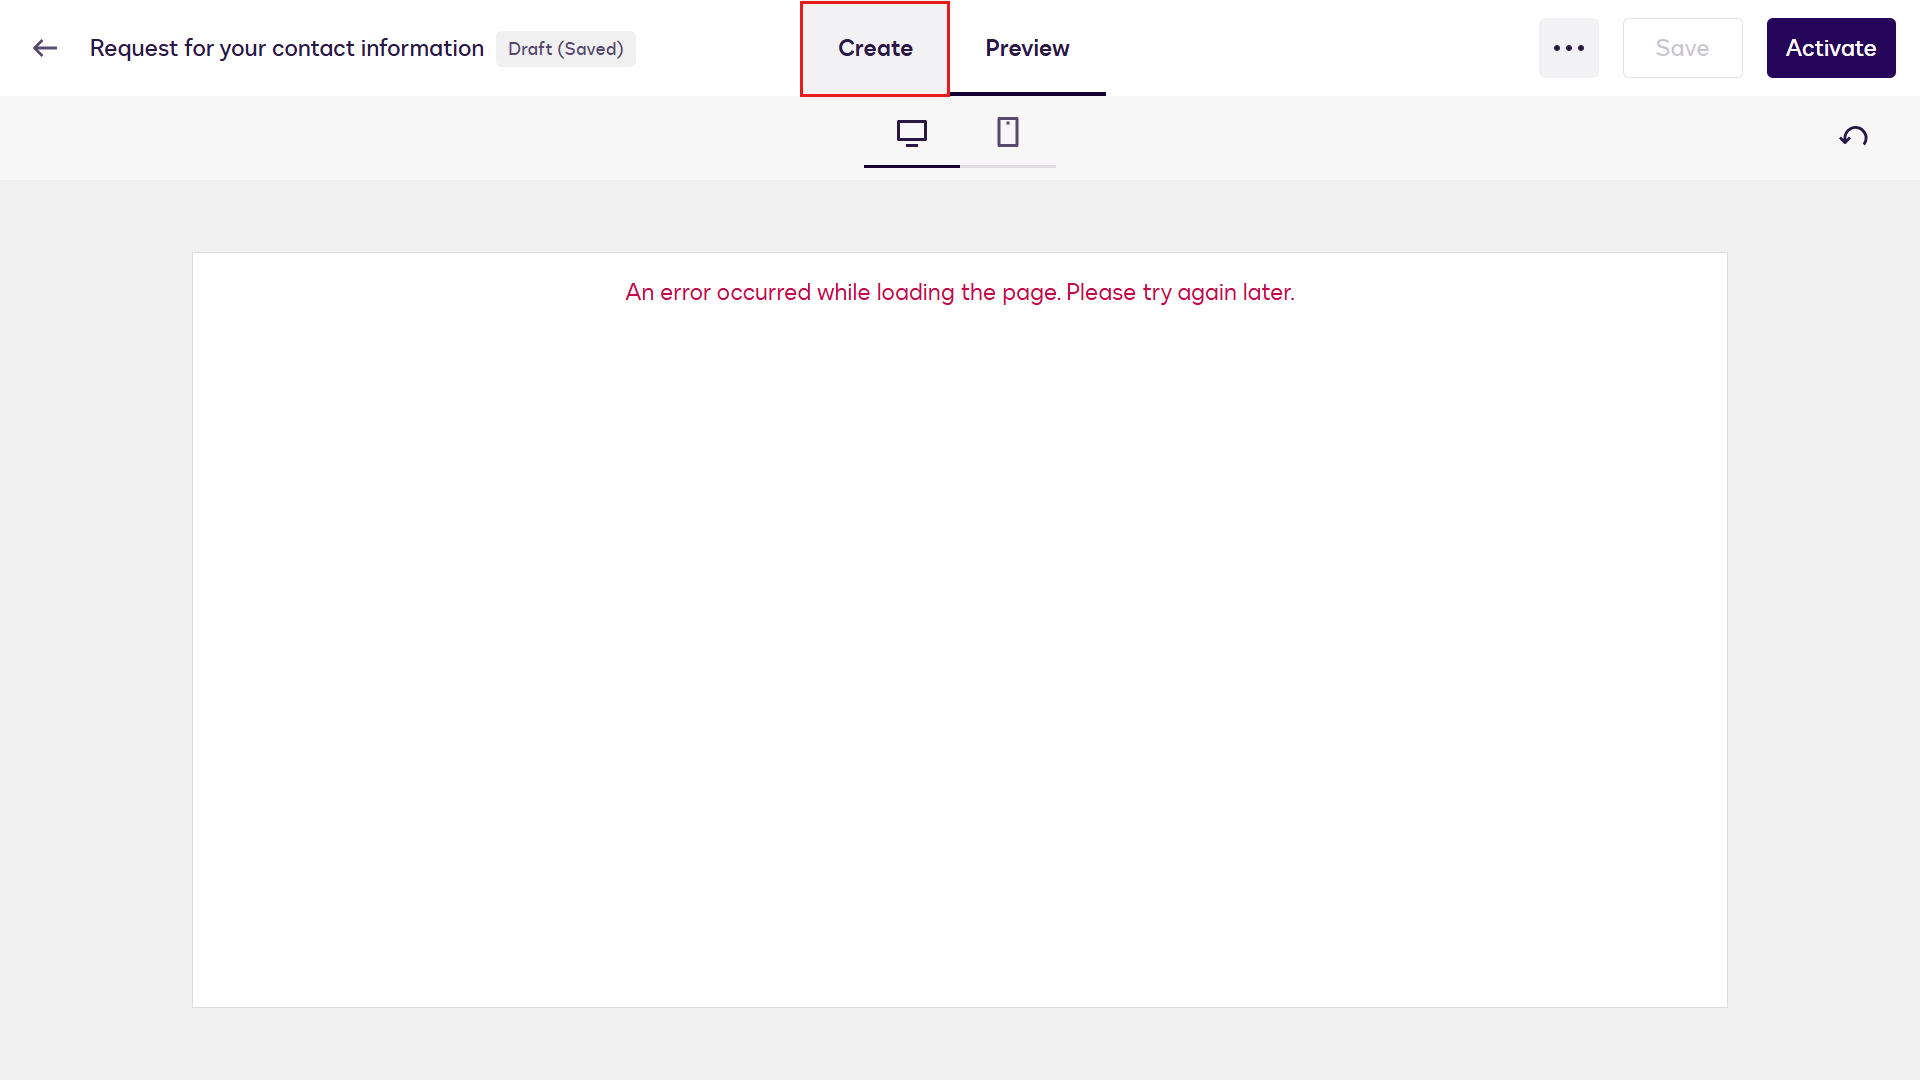
We'll now activate the web form. Select Activate on the upper right of the designer.

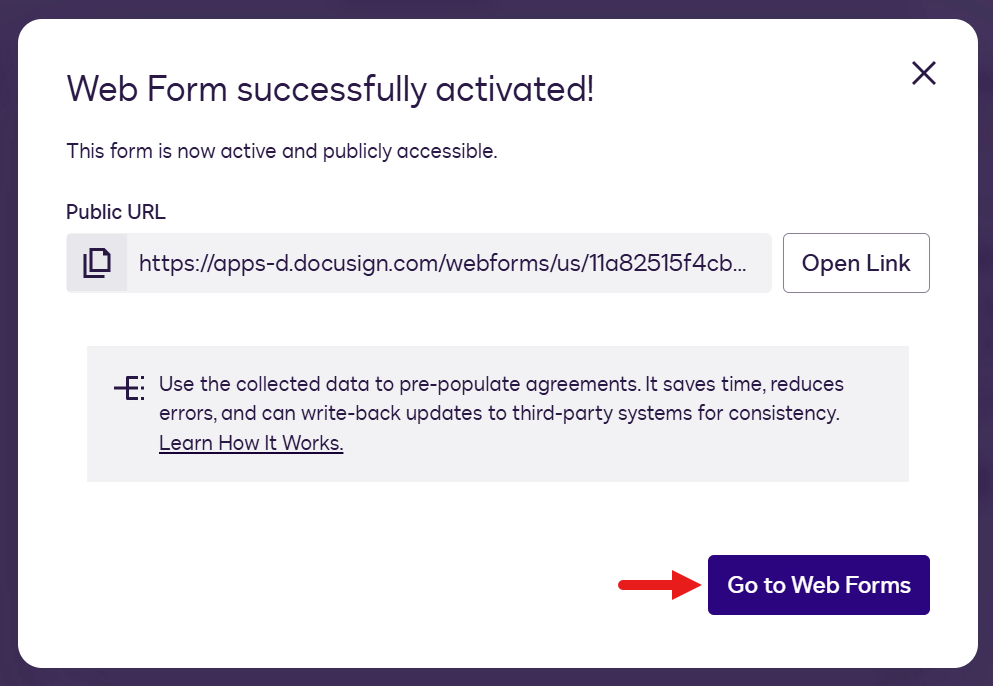
A confirmation modal will appear with an Access setting field. We'll leave this as Public since the web form will be used in a step in the workflow we'll create in a later lab exercise. Select Activate.

A confirmation message will appear to let you know that the web form has been successfully activated. Select Go to Web Forms.
TIP
If you don't see the Go to Web Forms button, navigate back to the Web Forms page.
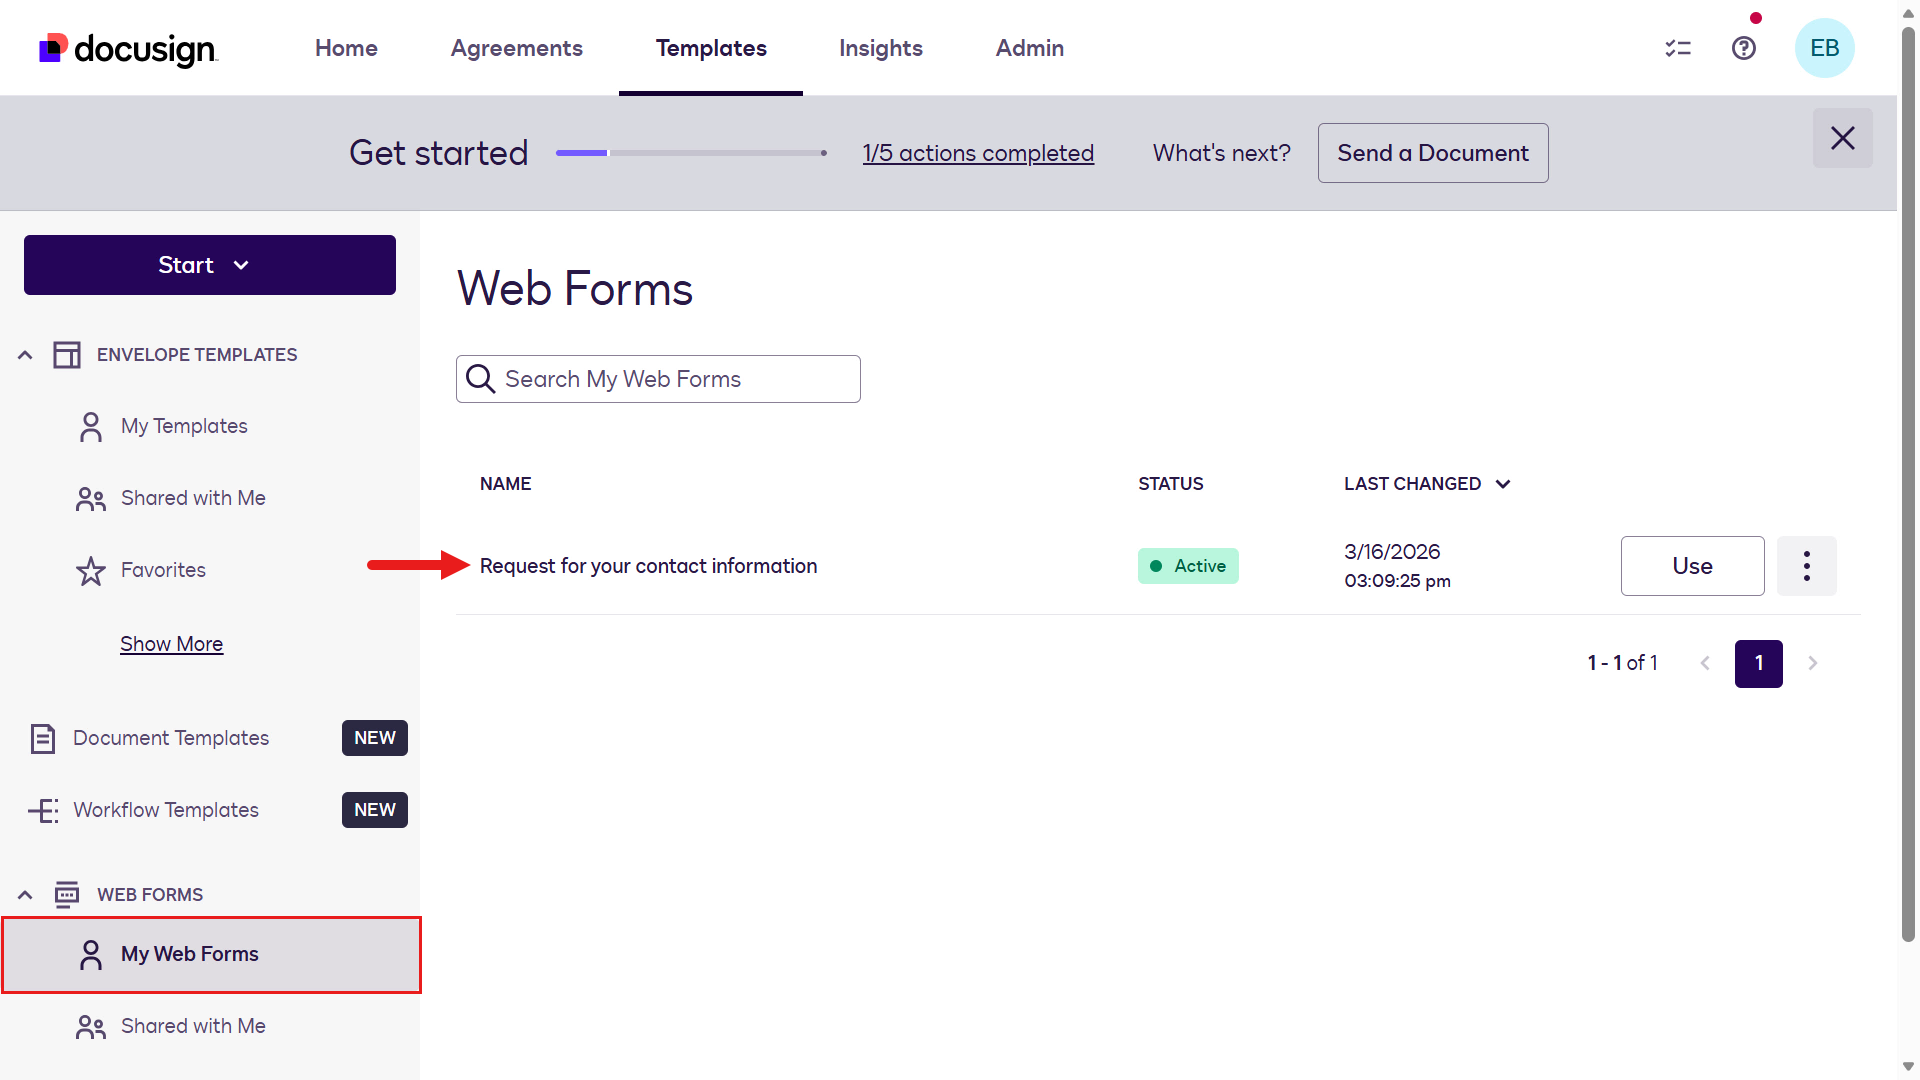
The Web Form will appear with a status of Active. You've successfully built a web form 👏🏻
🧪 1.2 Create Document Templates
Document Templates are a reusable setup for sending agreements that lets you pre‑define documents, recipient roles, routing order, and messages. This allows you to quickly create and send consistent envelopes without starting from scratch each time.
To learn more about Document Templates, expand the following additional learning block.
Using Document Templates
📄 Workflow Builder works closely with document templates
Templates allow organizations to standardize frequently used agreements such as:
- NDAs
- Employment contracts
- Procurement forms
- Customer agreements
- Approval documents
📦 Templates can contain:
- Pre-configured documents
- Signer roles
- Signature fields
- Approval flows
- Workflow logic
This means teams no longer need to recreate documents every time.
For example:
- A customer fills out a Web Form
- Their information automatically populates a contract template
- Workflow Builder routes the agreement for approval
- The document is sent for eSignature
- Signed copies are stored automatically
💡 All of this can happen with minimal manual intervention.
In this lab exercise, we'll create two Document Templates:
- An employment agreement
- An employee offer letter
Download both sample files for the Document Templates by selecting the button below.
These two Document Templates will be used in the next lab exercise when we create a workflow in Workflow Builder.
Let's begin. ⤵️
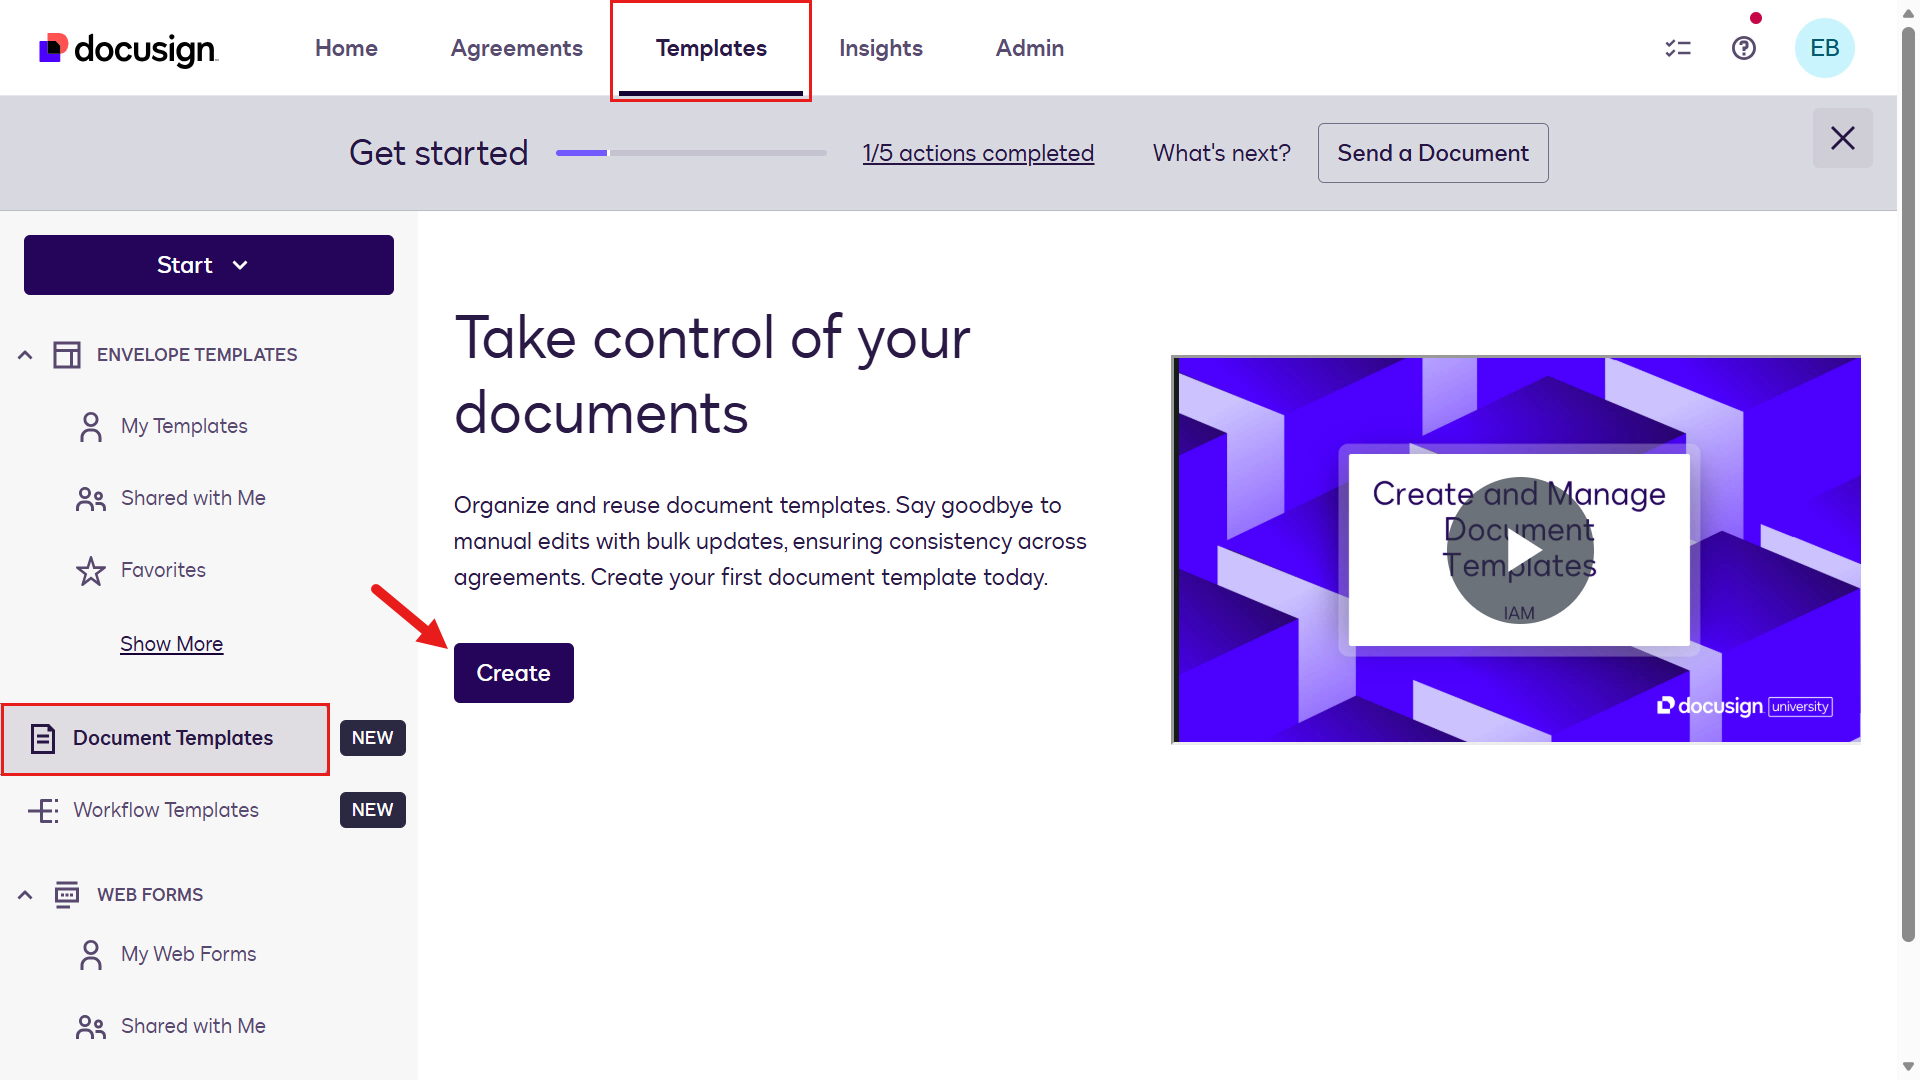
Navigate to Templates and select Document Templates in the left-hand side menu pane. Select Create.
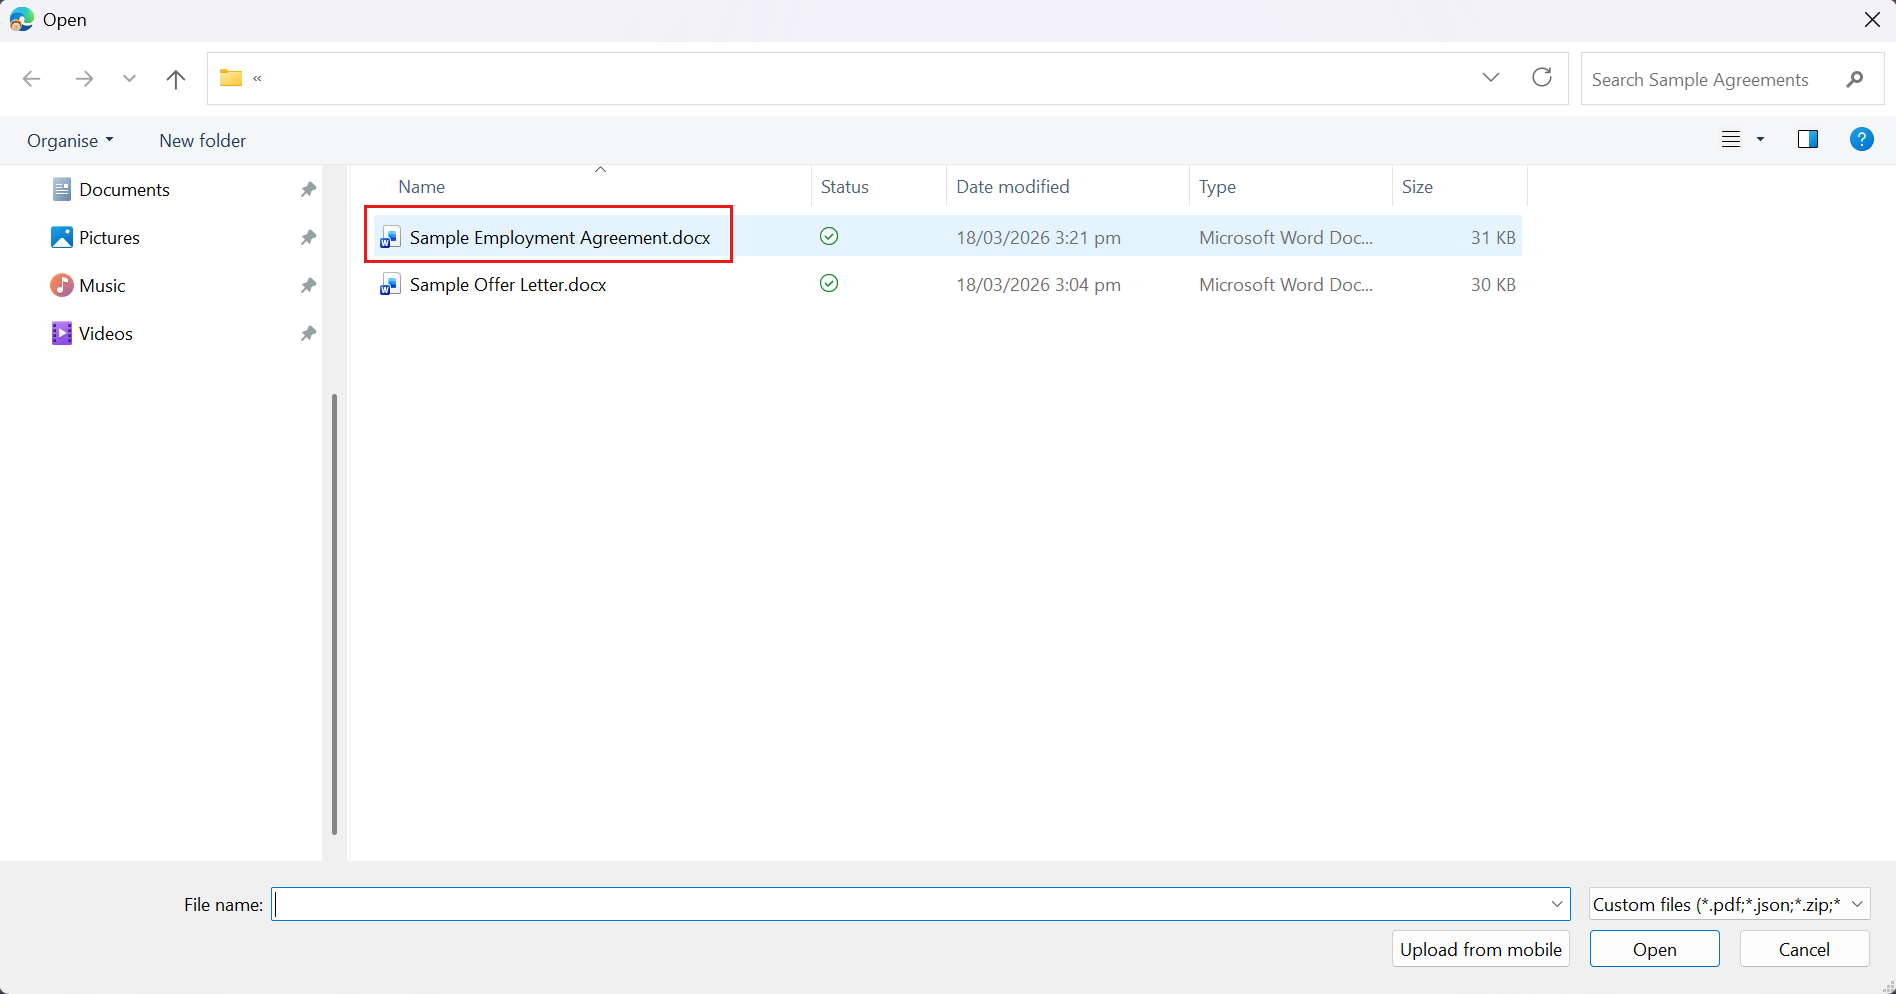
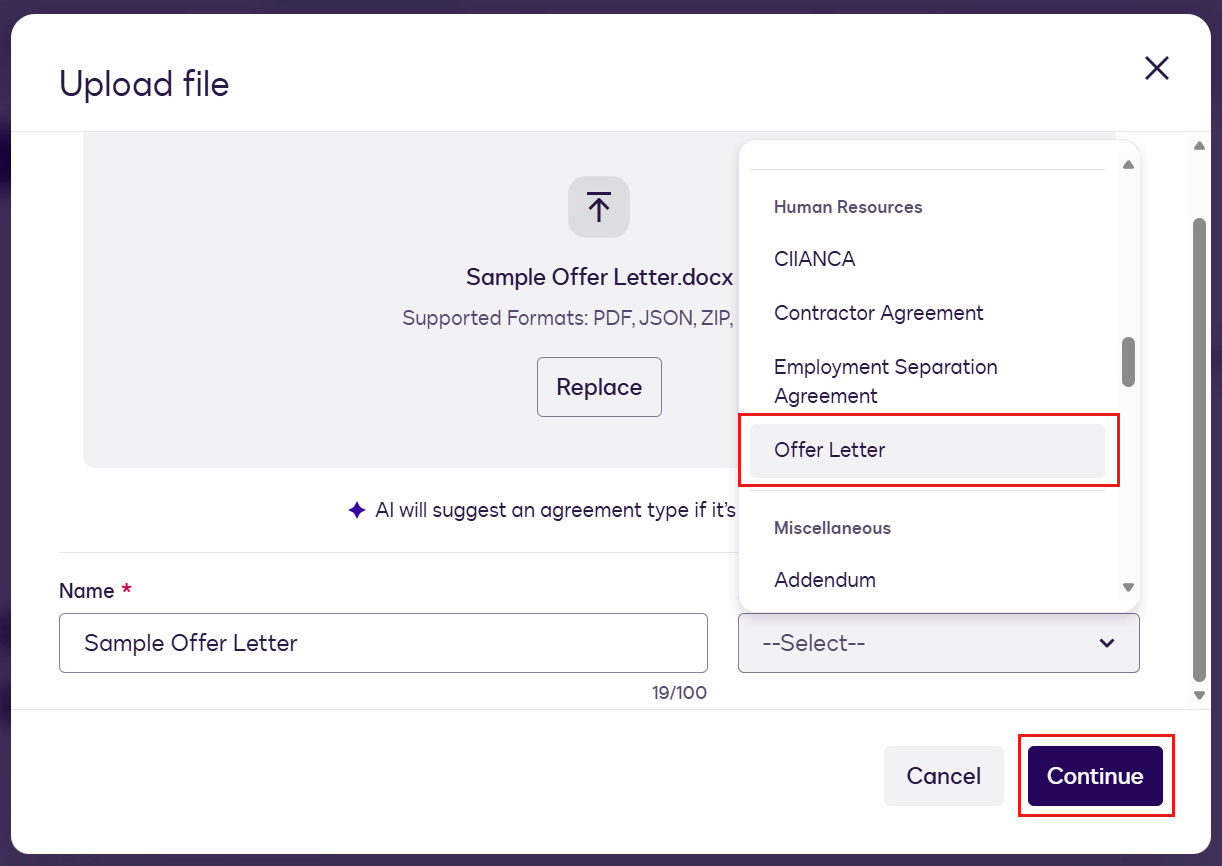
We can now select files to upload. Select Upload.
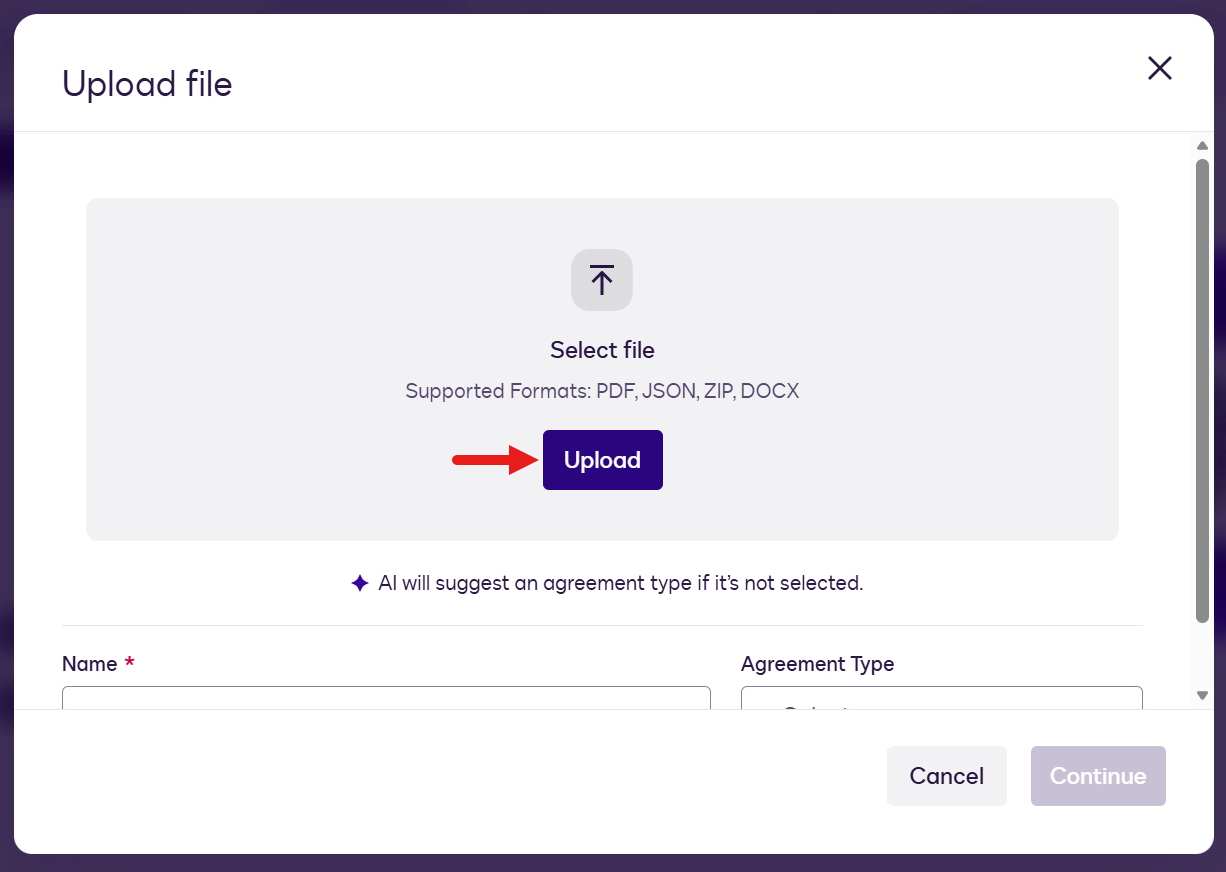
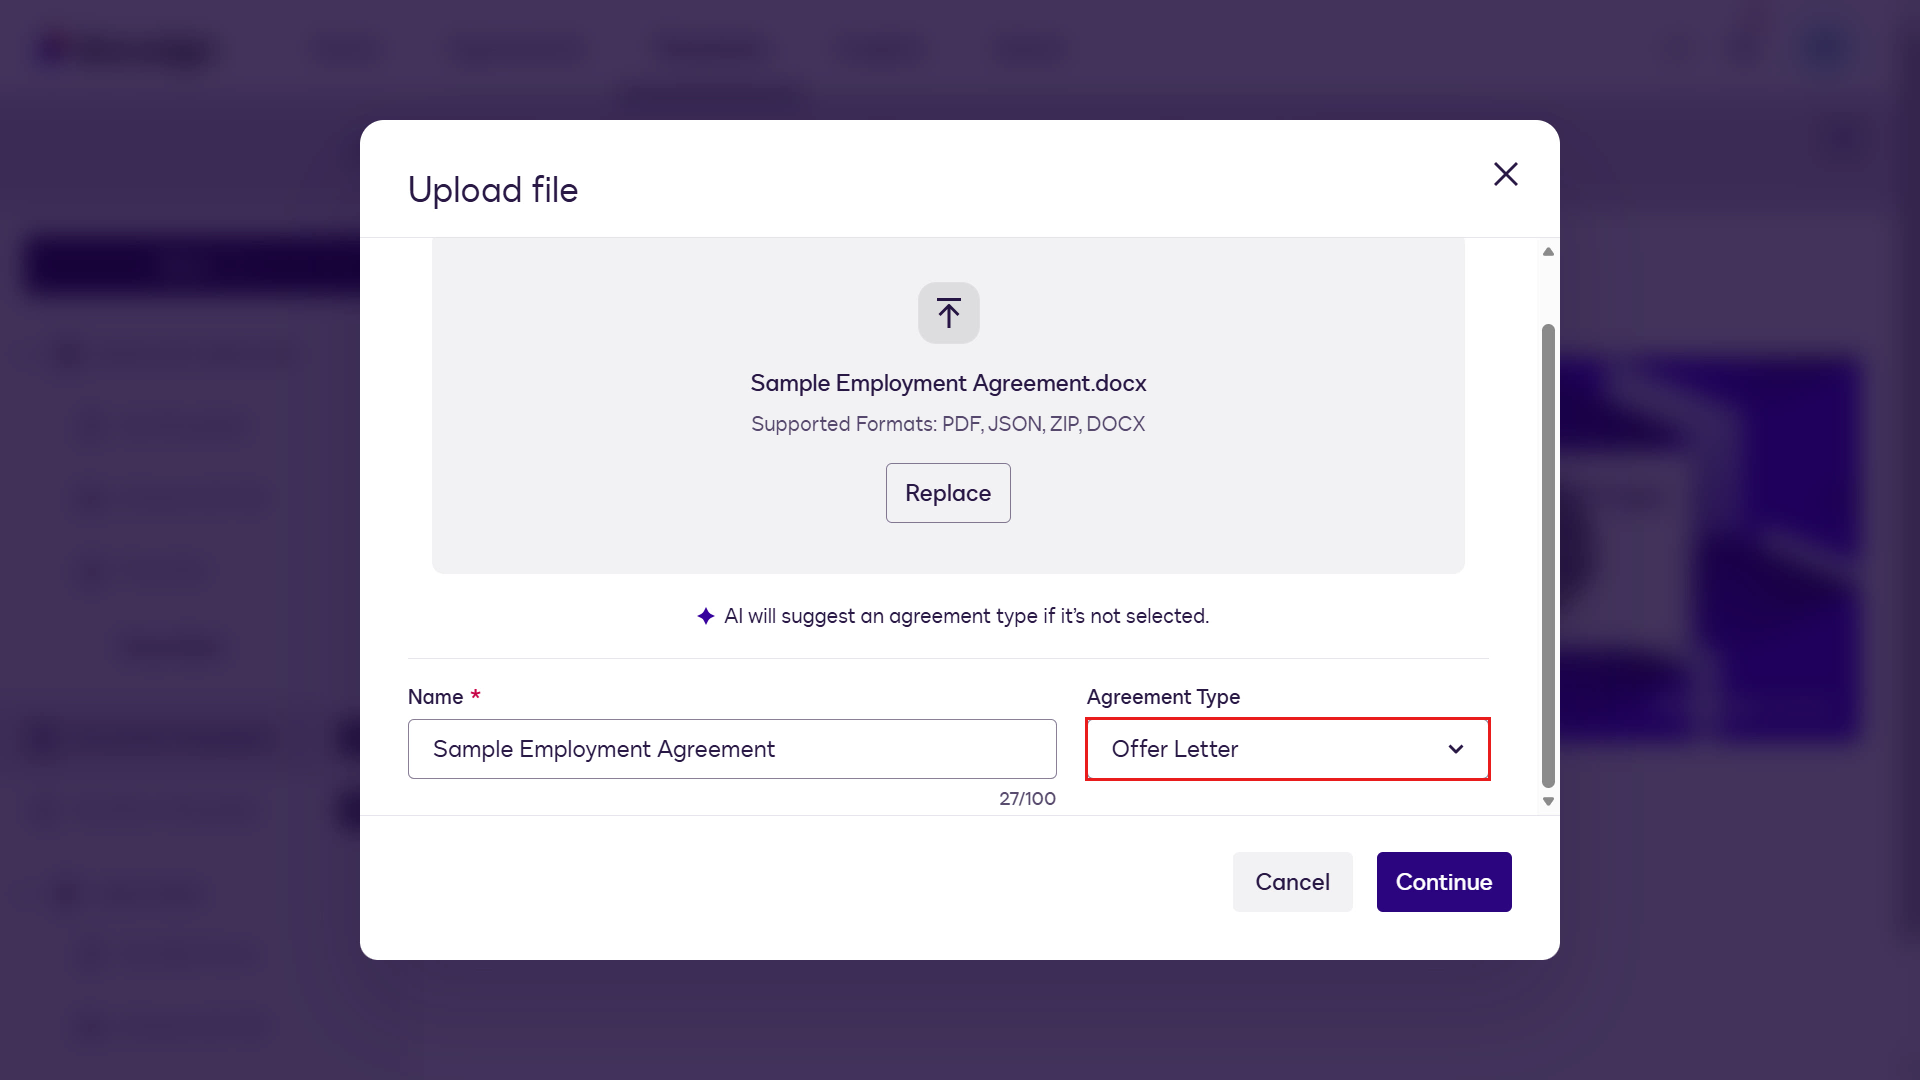
Select the Sample Employment Agreement file.
The Name field is automatically populated with the file name. In the Agreement Type field, select the chevron icon and scroll down to the Human Resources list of values, select Offer Letter.
TIP
You can also type Offer Letter to quickly find the field.
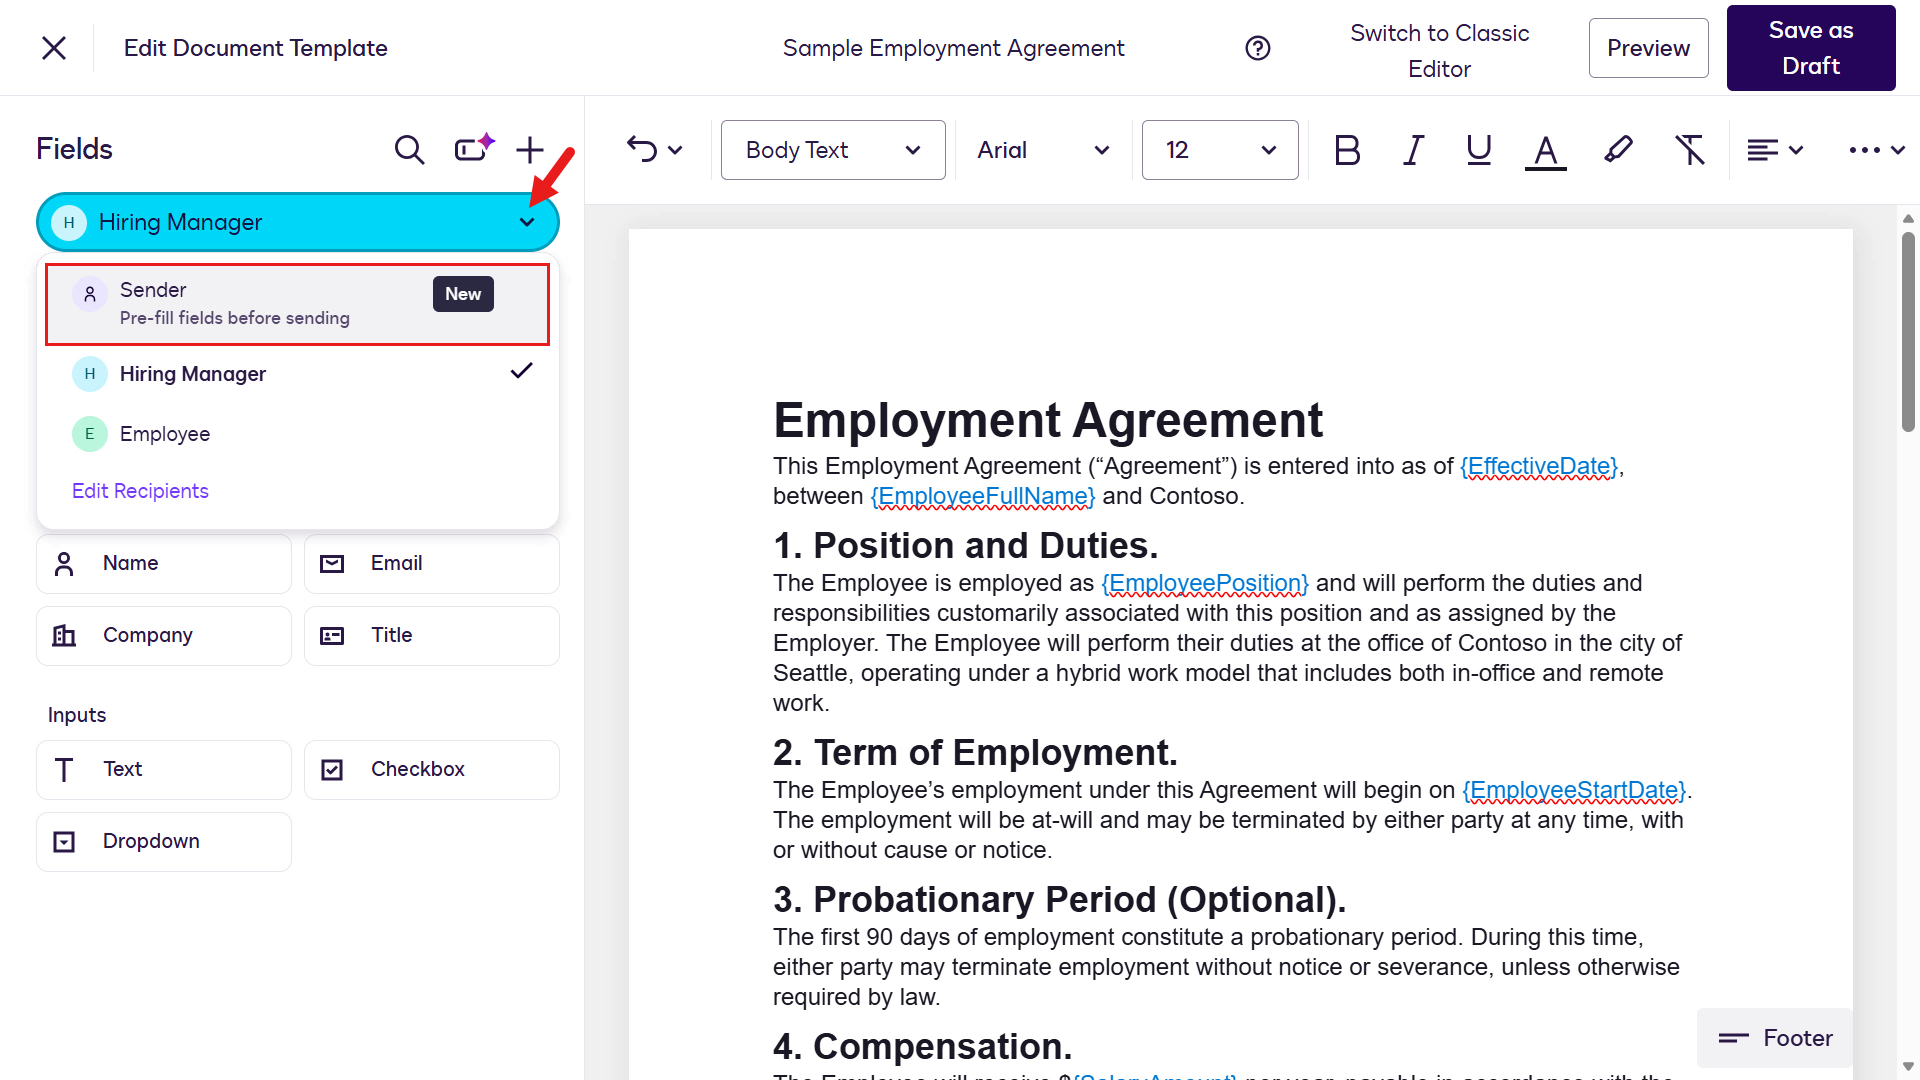
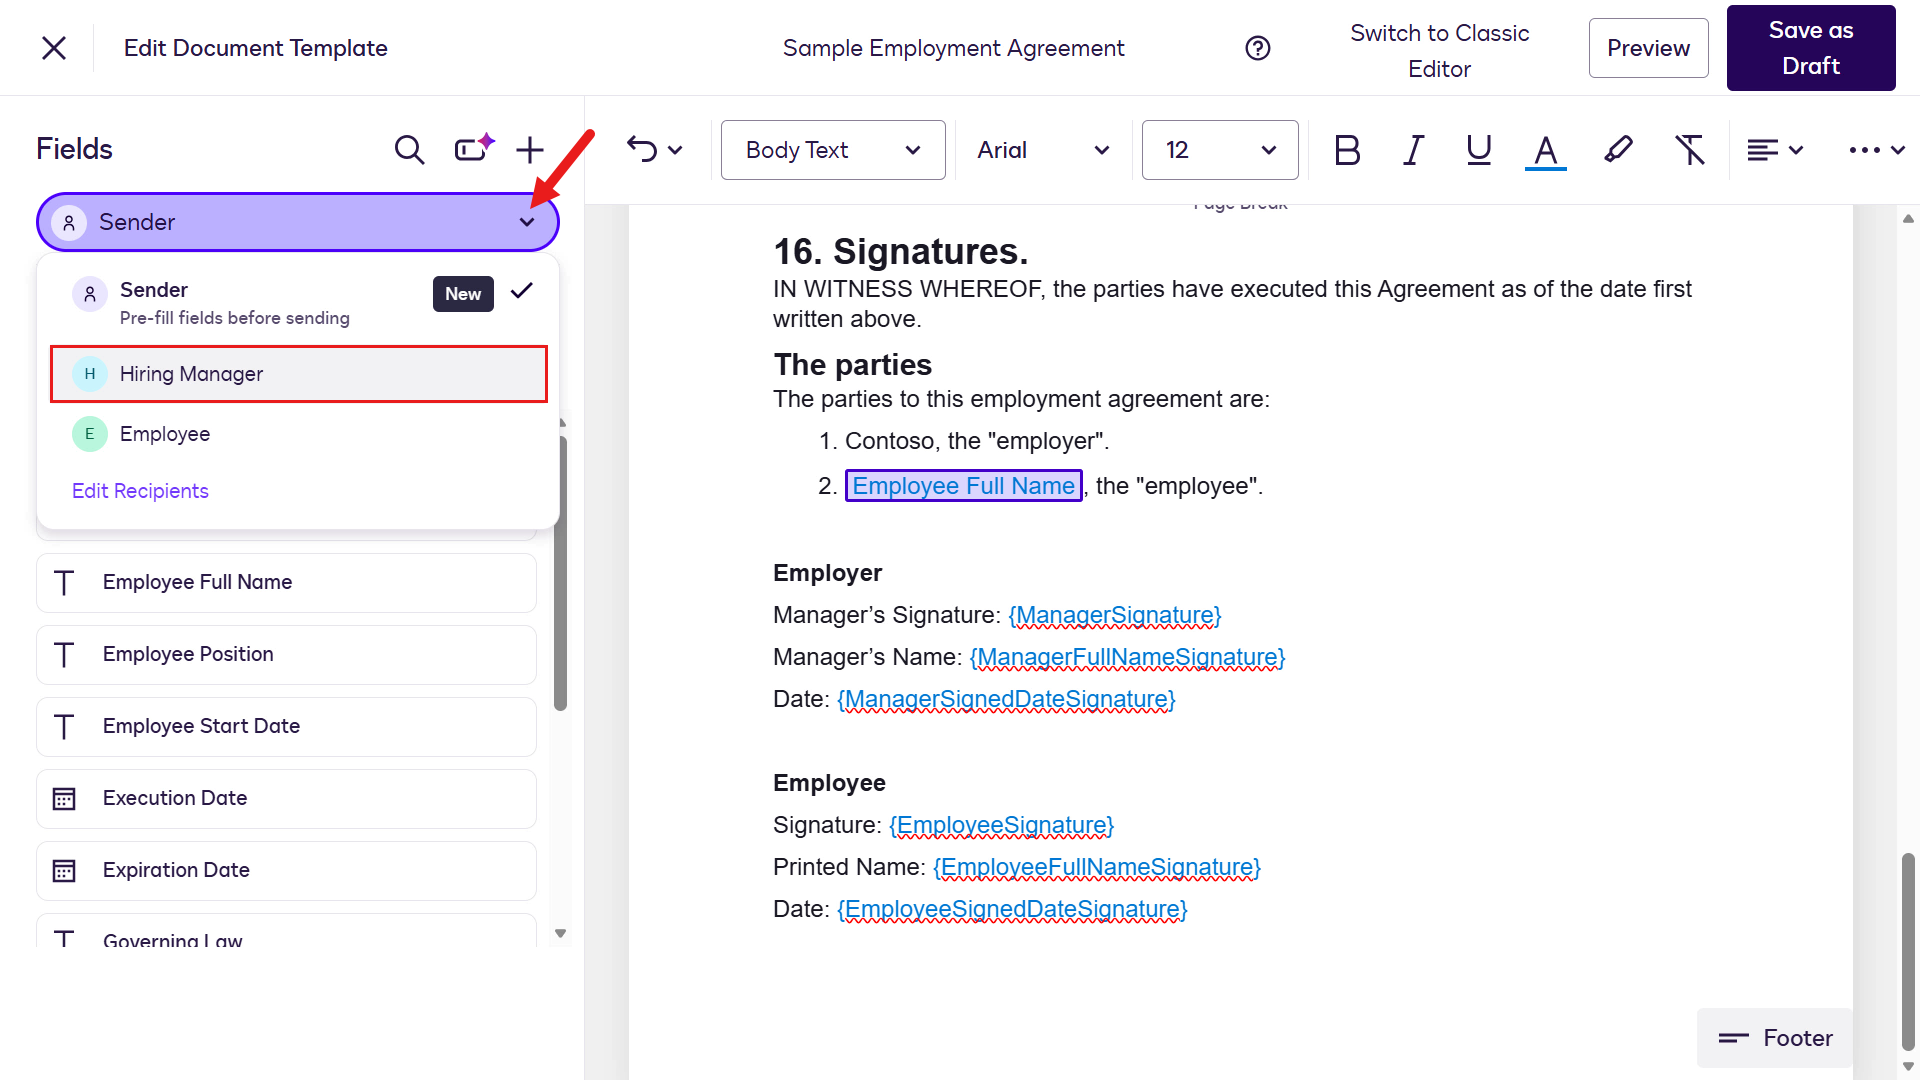
Next we'll define the roles for the document template. On the Fields left-hand side pane, select the chevron icon by Sender 1 and select Edit recipients to update the signer role.
What is a "Role" in a template? 🤔
A role is a placeholder in a template that represents an individual who will act on the document, such as signing or approving. Roles define who is involved and what action they take, while allowing the actual recipient to be assigned when the template is used.
🐦 What roles are used for
- Define who participates in the agreement
- Enable reusability of templates across multiple envelopes
- Allow documents and fields to be prepared without knowing the final recipients
When someone uses the template, they assign real people (name and email) to each predefined role before sending.

Rename the Signer 1 role to,
textHiring ManagerAdd a new recipient and name the role as,
textEmployee
Next, replace placeholders in the document with fields. Start by switching to the Sender role.
What is a "Field" in a template? 🤔
A field is an interactive element added to a document that captures or displays information for a recipient. Fields are placed on documents so recipients can take action, such as signing or entering data when the envelope is sent.
🐦 What fields are used for
- Collect recipient input (for example, signatures or entered information)
- Assign actions to specific recipients or roles (fields are tied to the individual who must act)
- Pre‑fill information in documents when setting up a template
In short: Fields define where and how recipients interact with the document during the signing process.
The two fields types we'll be using in this lab exercise are,
- Standard Fields: Displays the set of primary, out-of-the-box fields that you can add to your document.
- Custom Fields: User-defined fields created to capture specific data not covered by standard options.
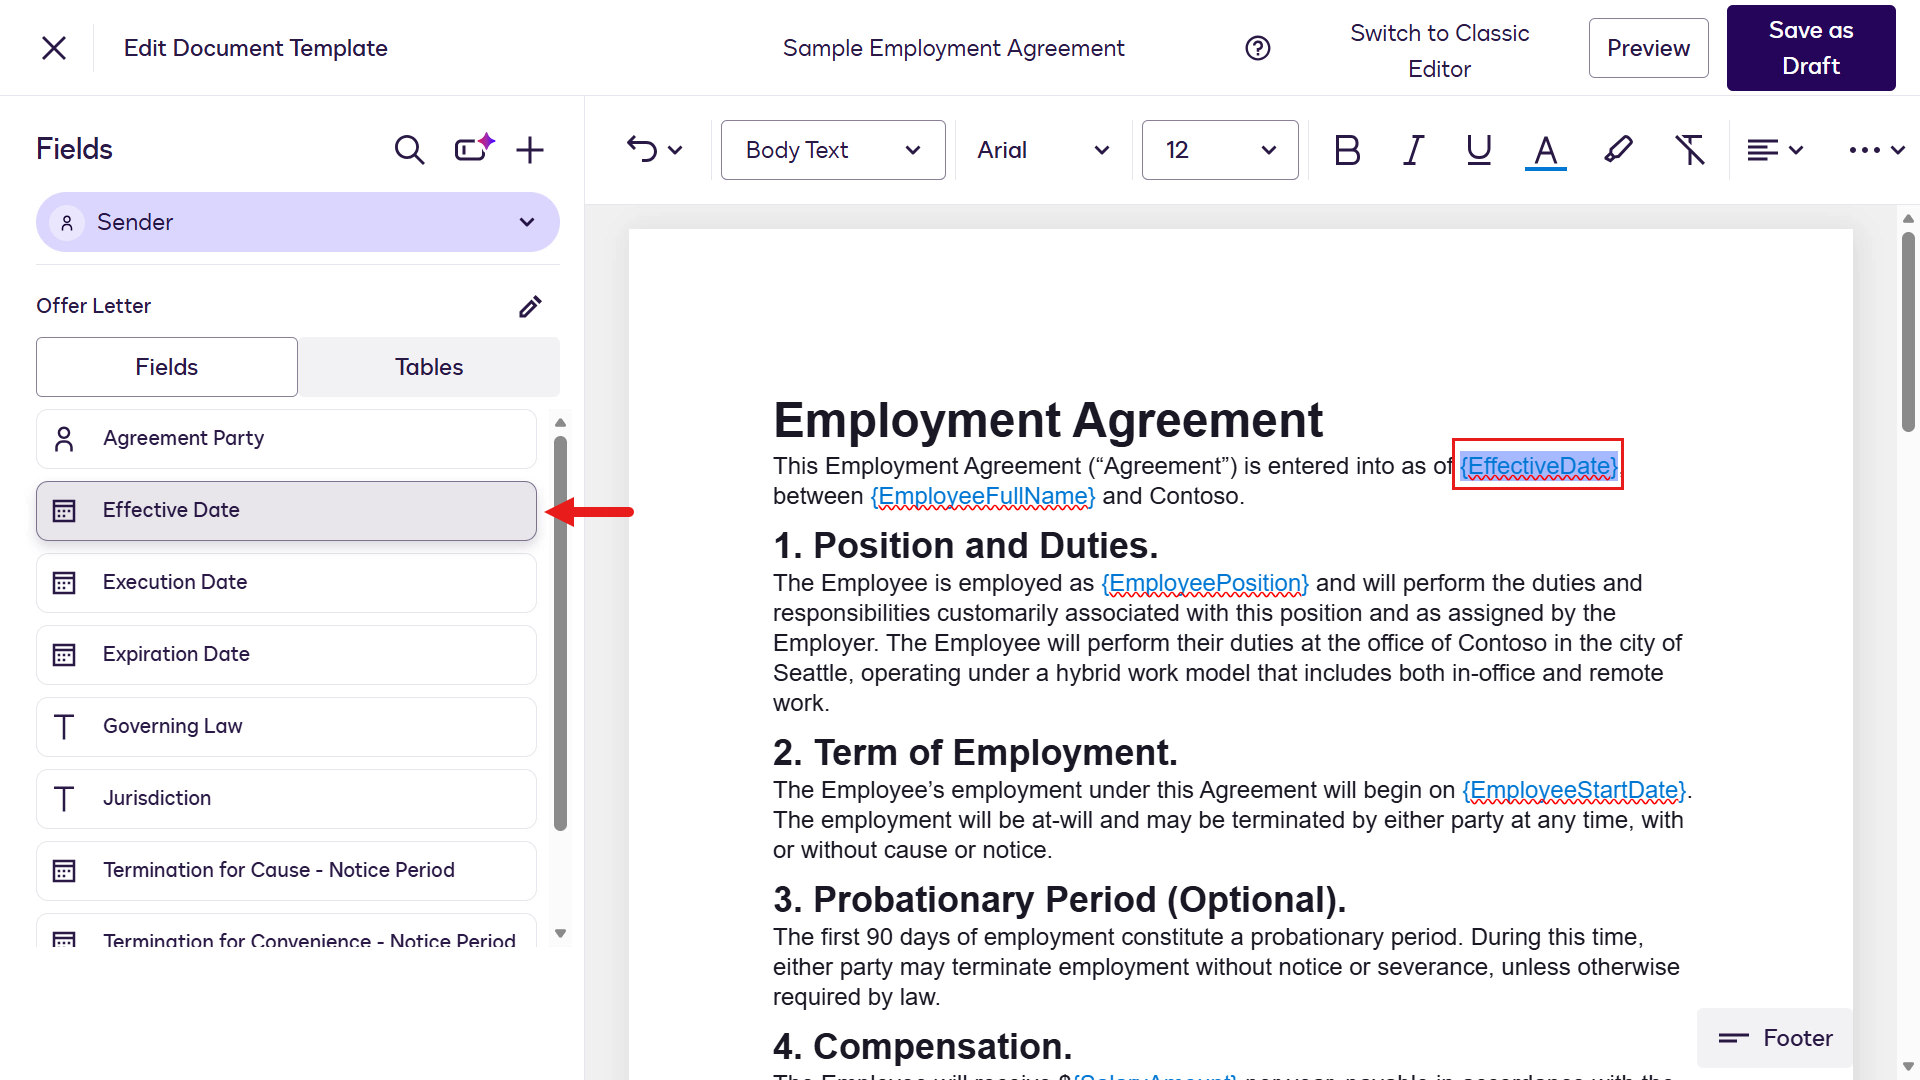
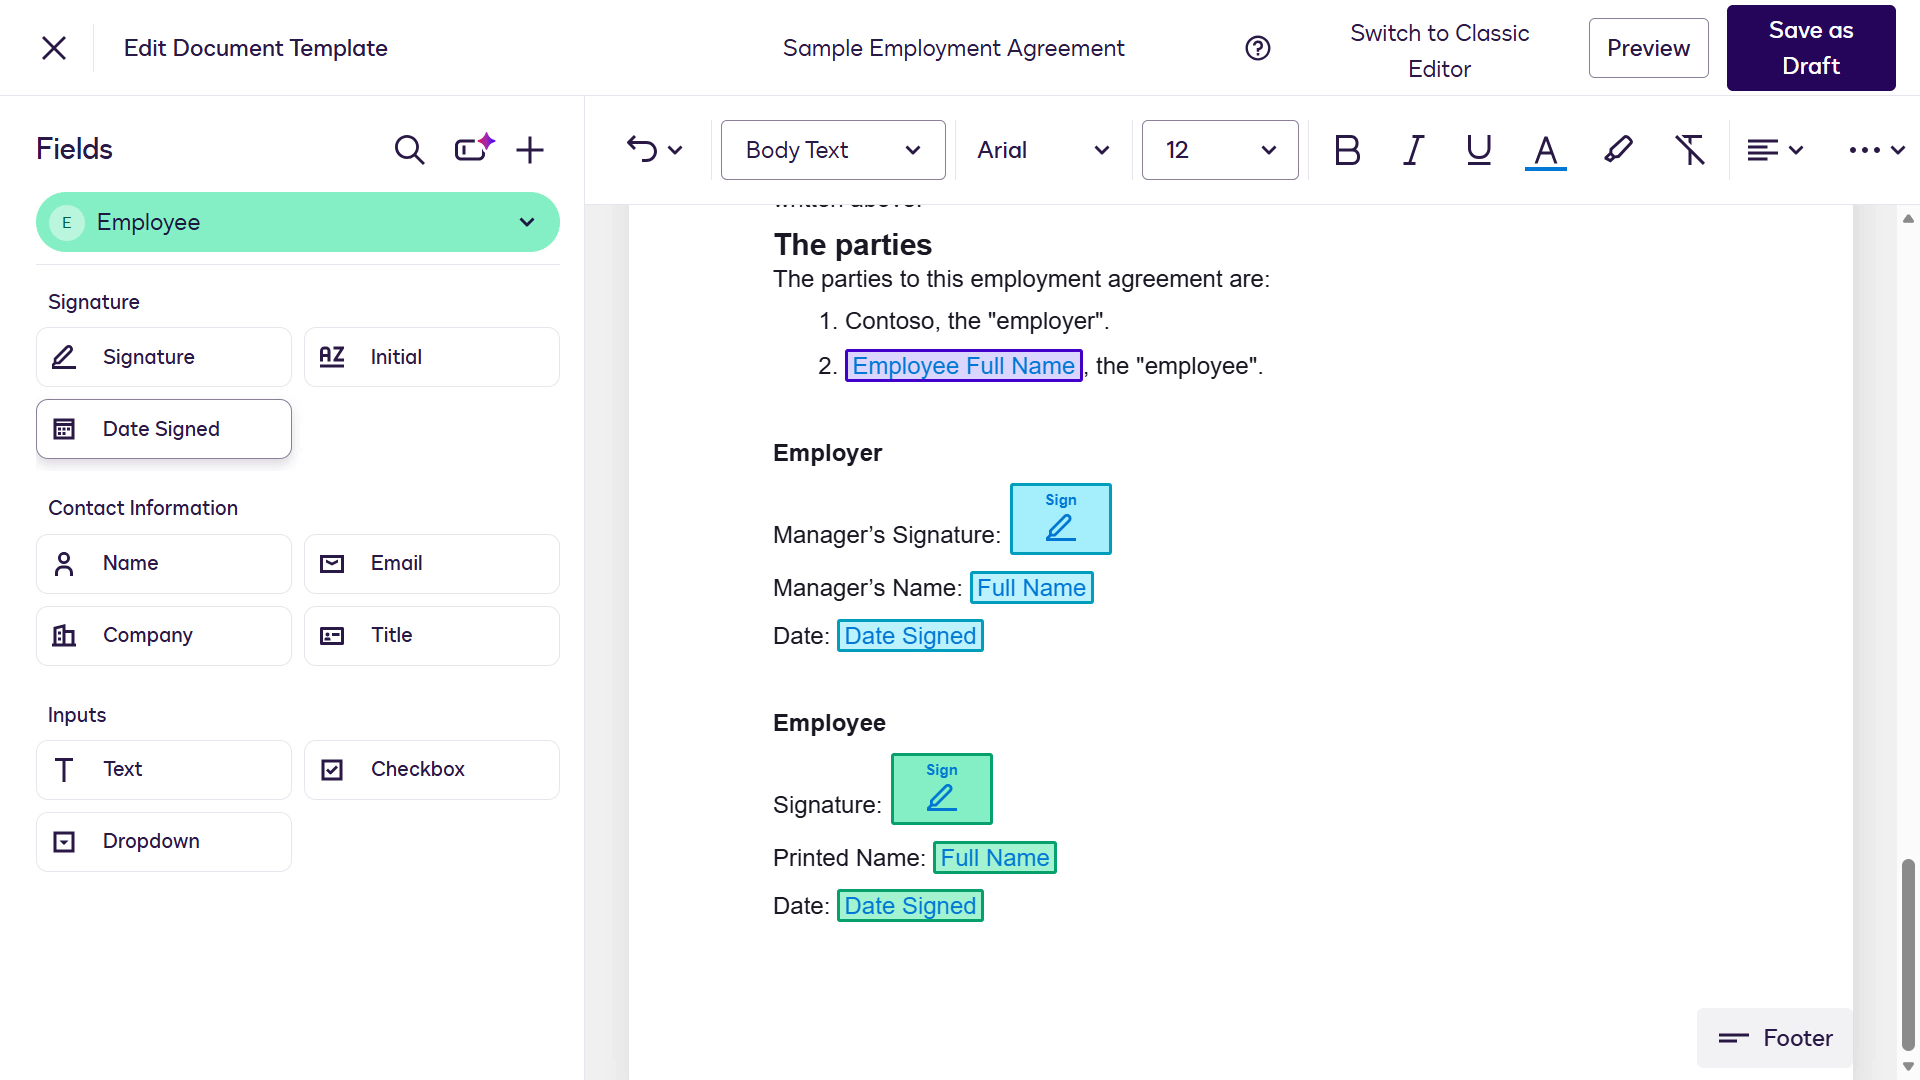
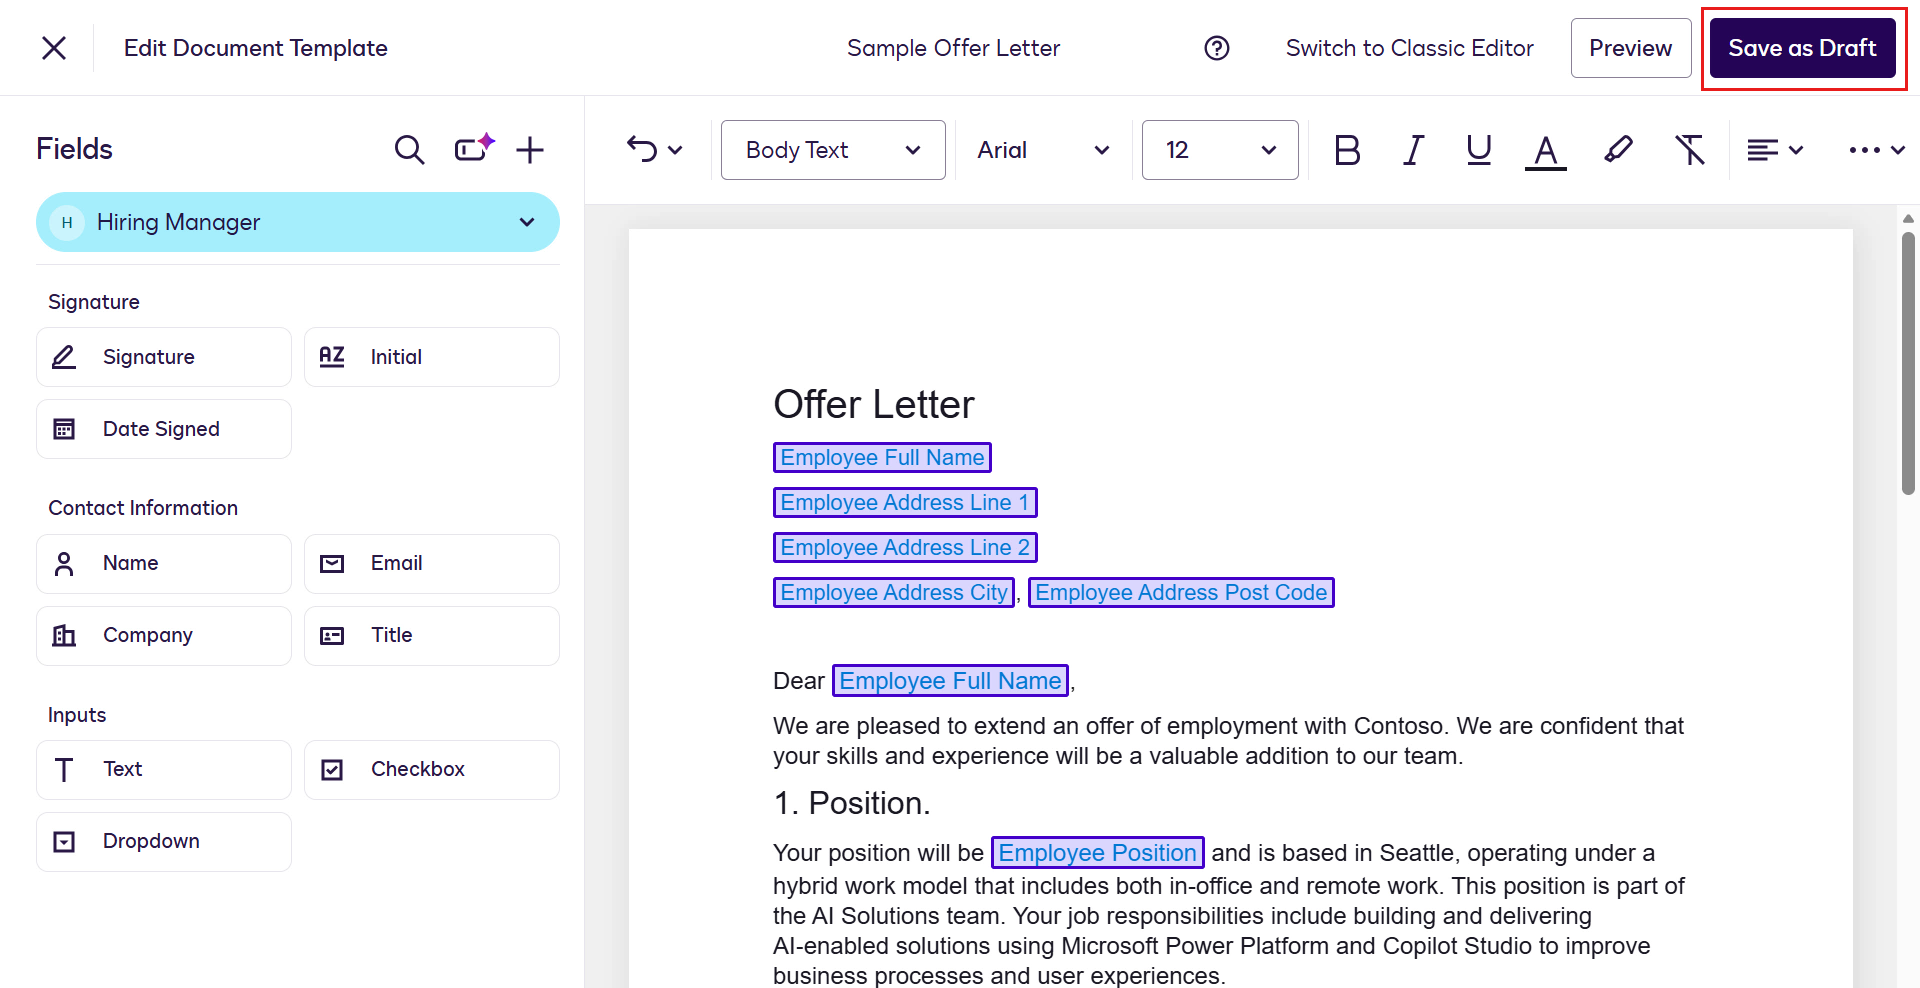
Highlight the first placeholder
{EffectiveDate}and select the standard field, Effective Date, on the left-hand side menu.Blue colored text in sample documents
Each of the sample documents have blue colored text to easily identify the placeholders of where we'll be adding fields to the template. This is for the purpose of learning and completing the lab exercise so keep in mind you would not have colored text in Production-used templates.
Once selected, the Effective Date field will now be added to the template.
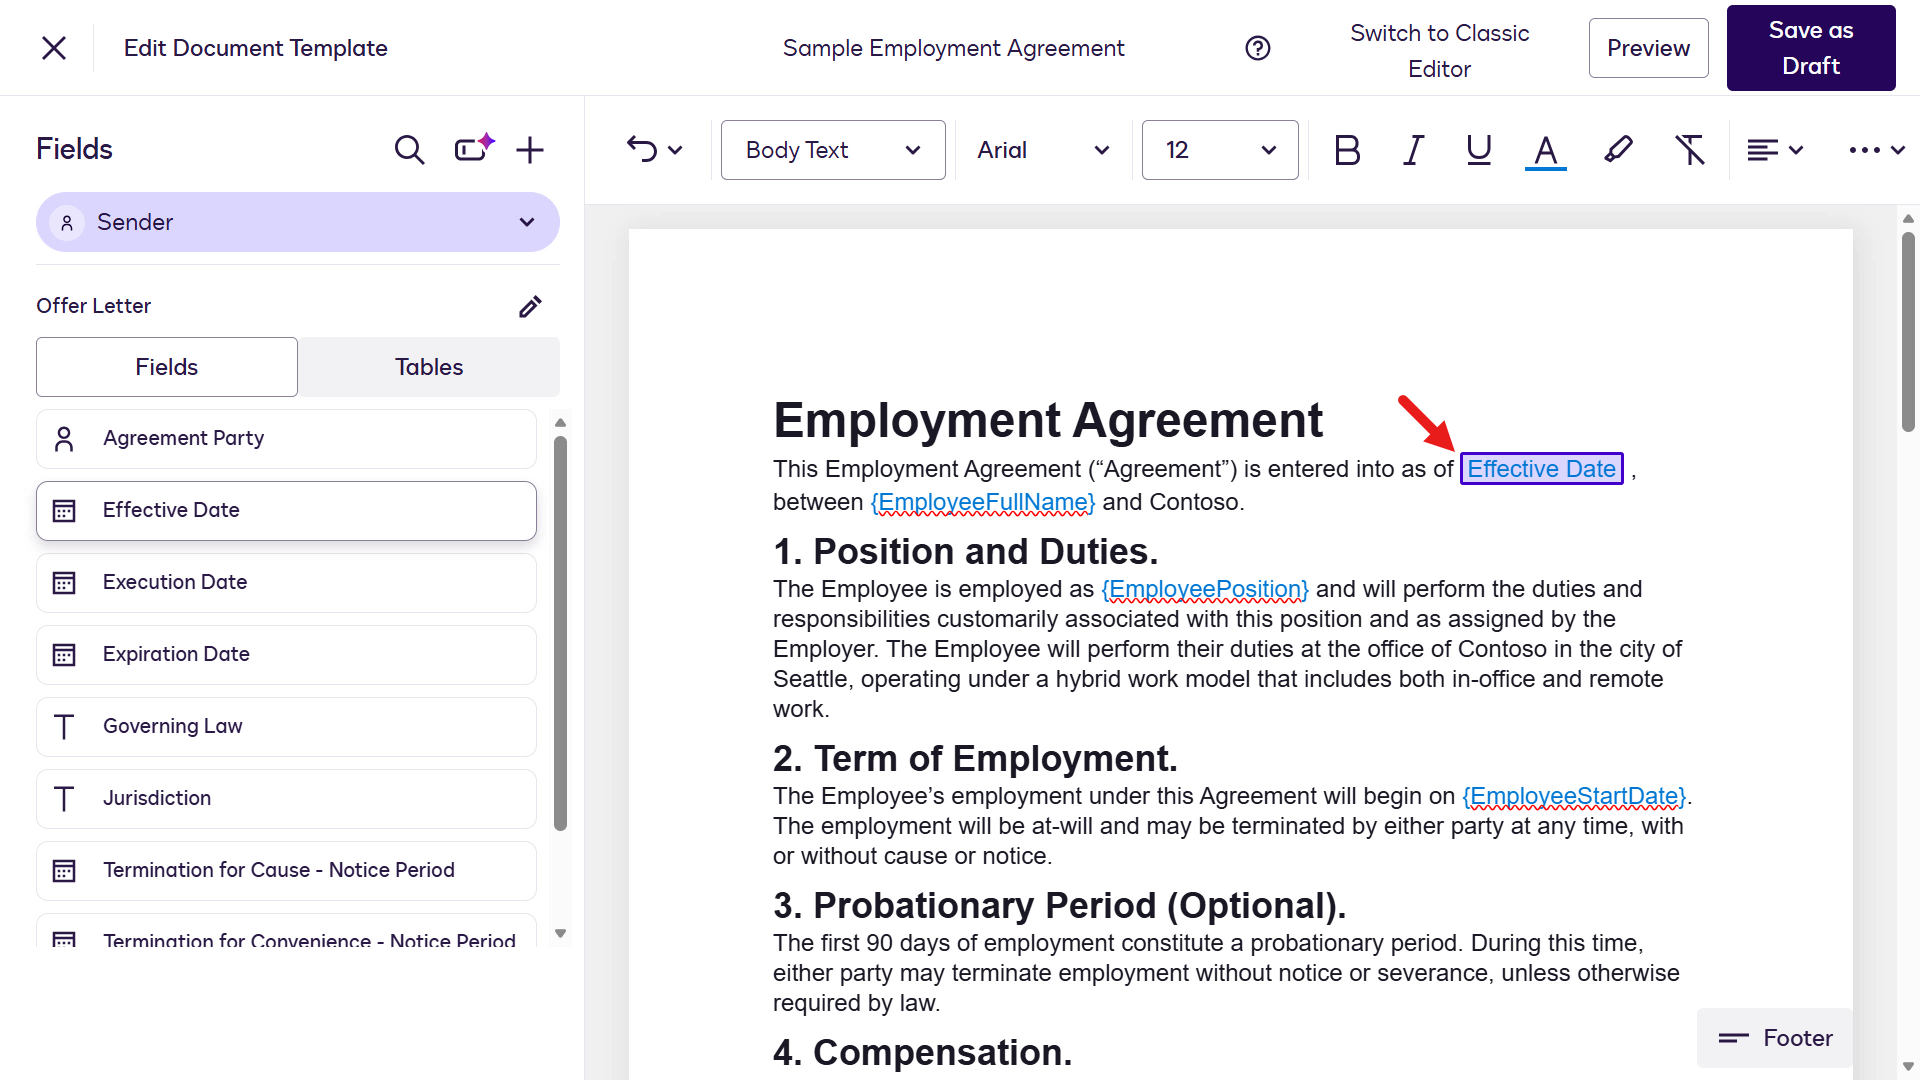
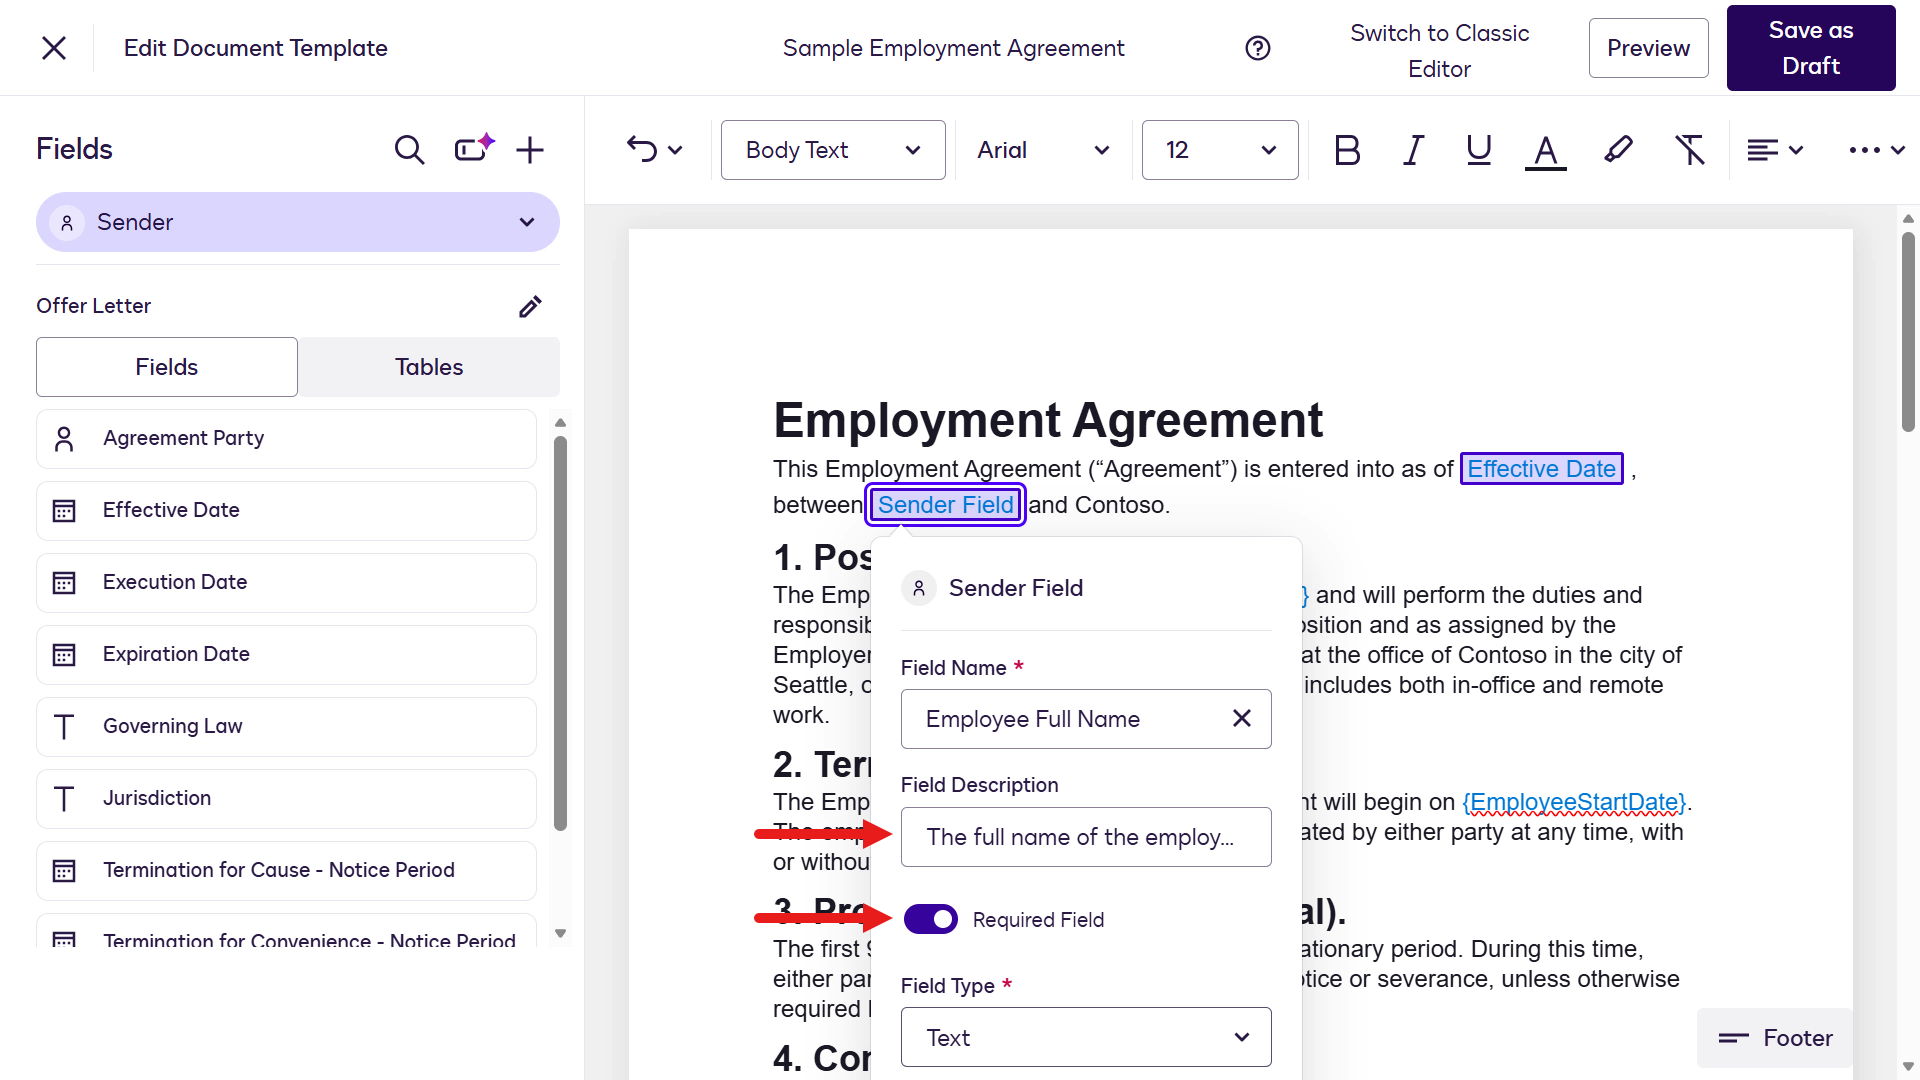
The next field we'll add is a custom field. Highlight the
{EmployeeFullName}placeholder and select the + icon in the Fields pane. Select Field.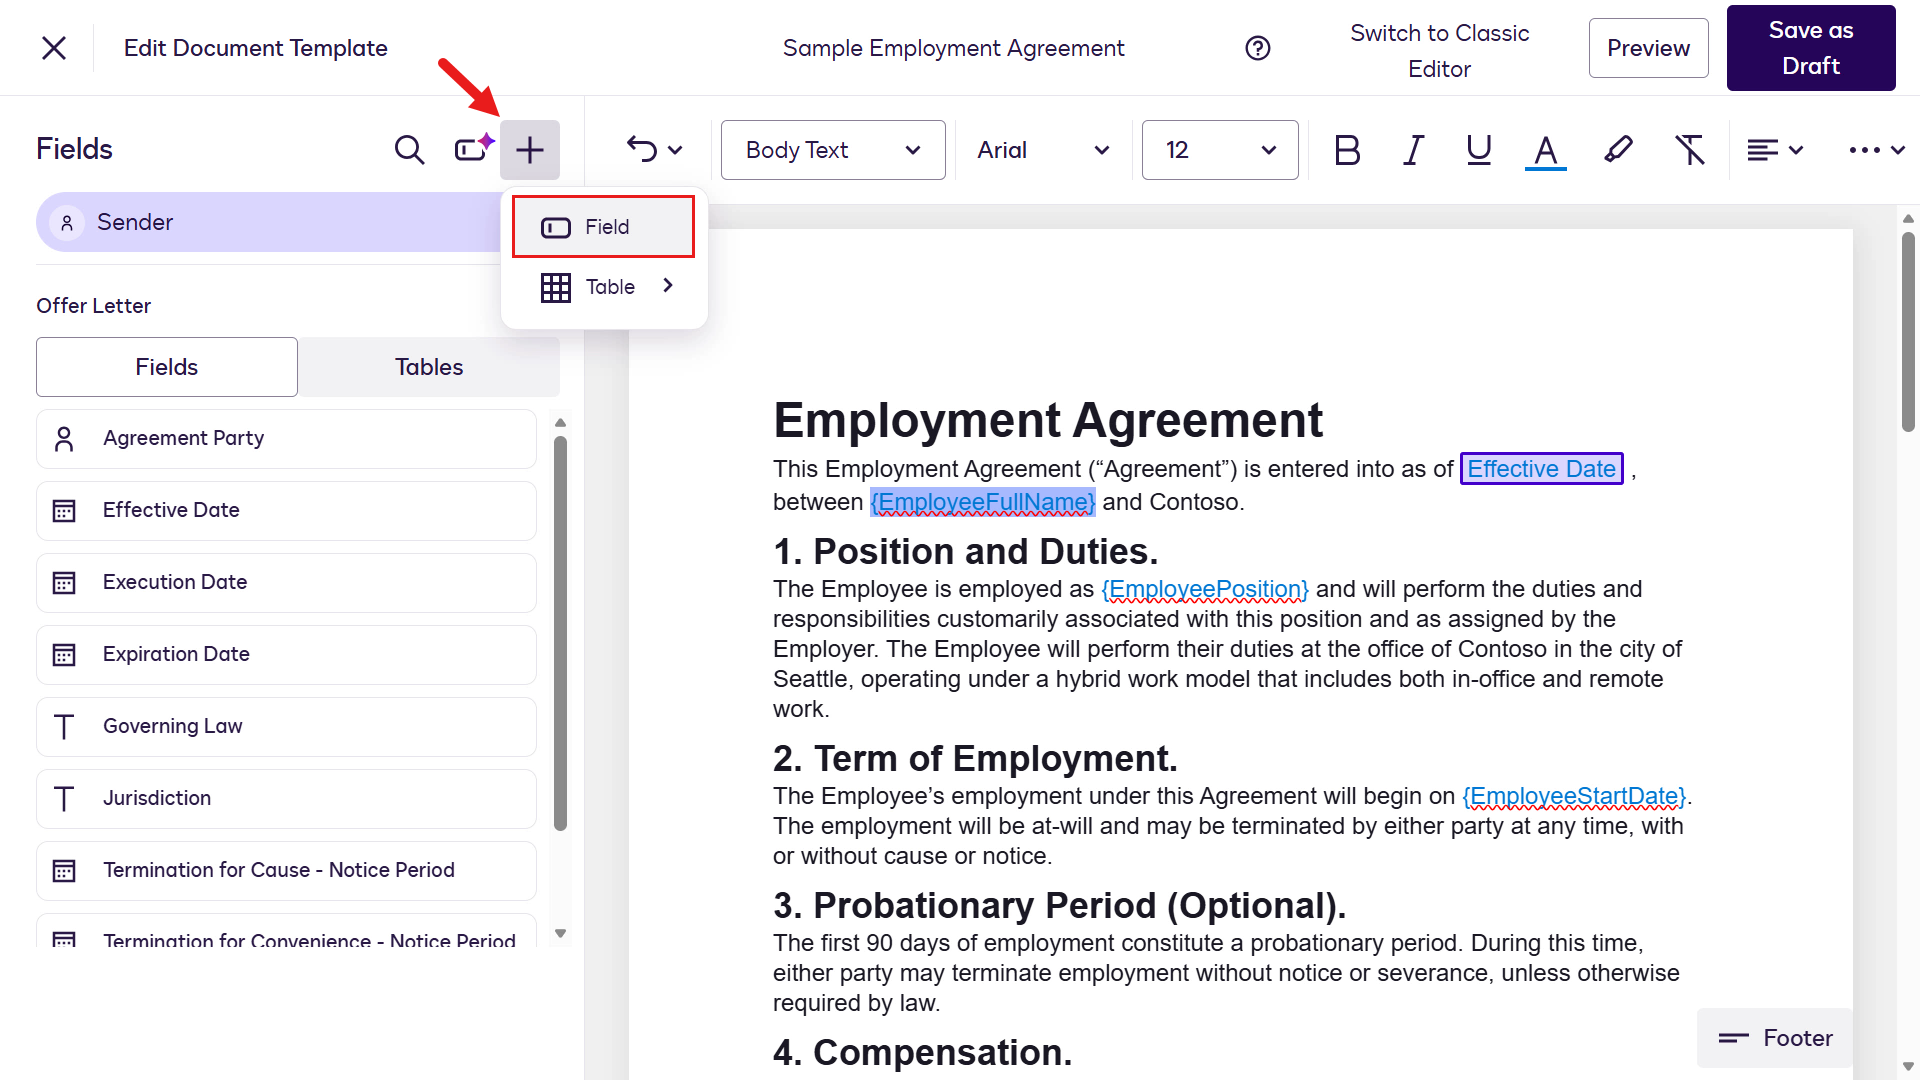
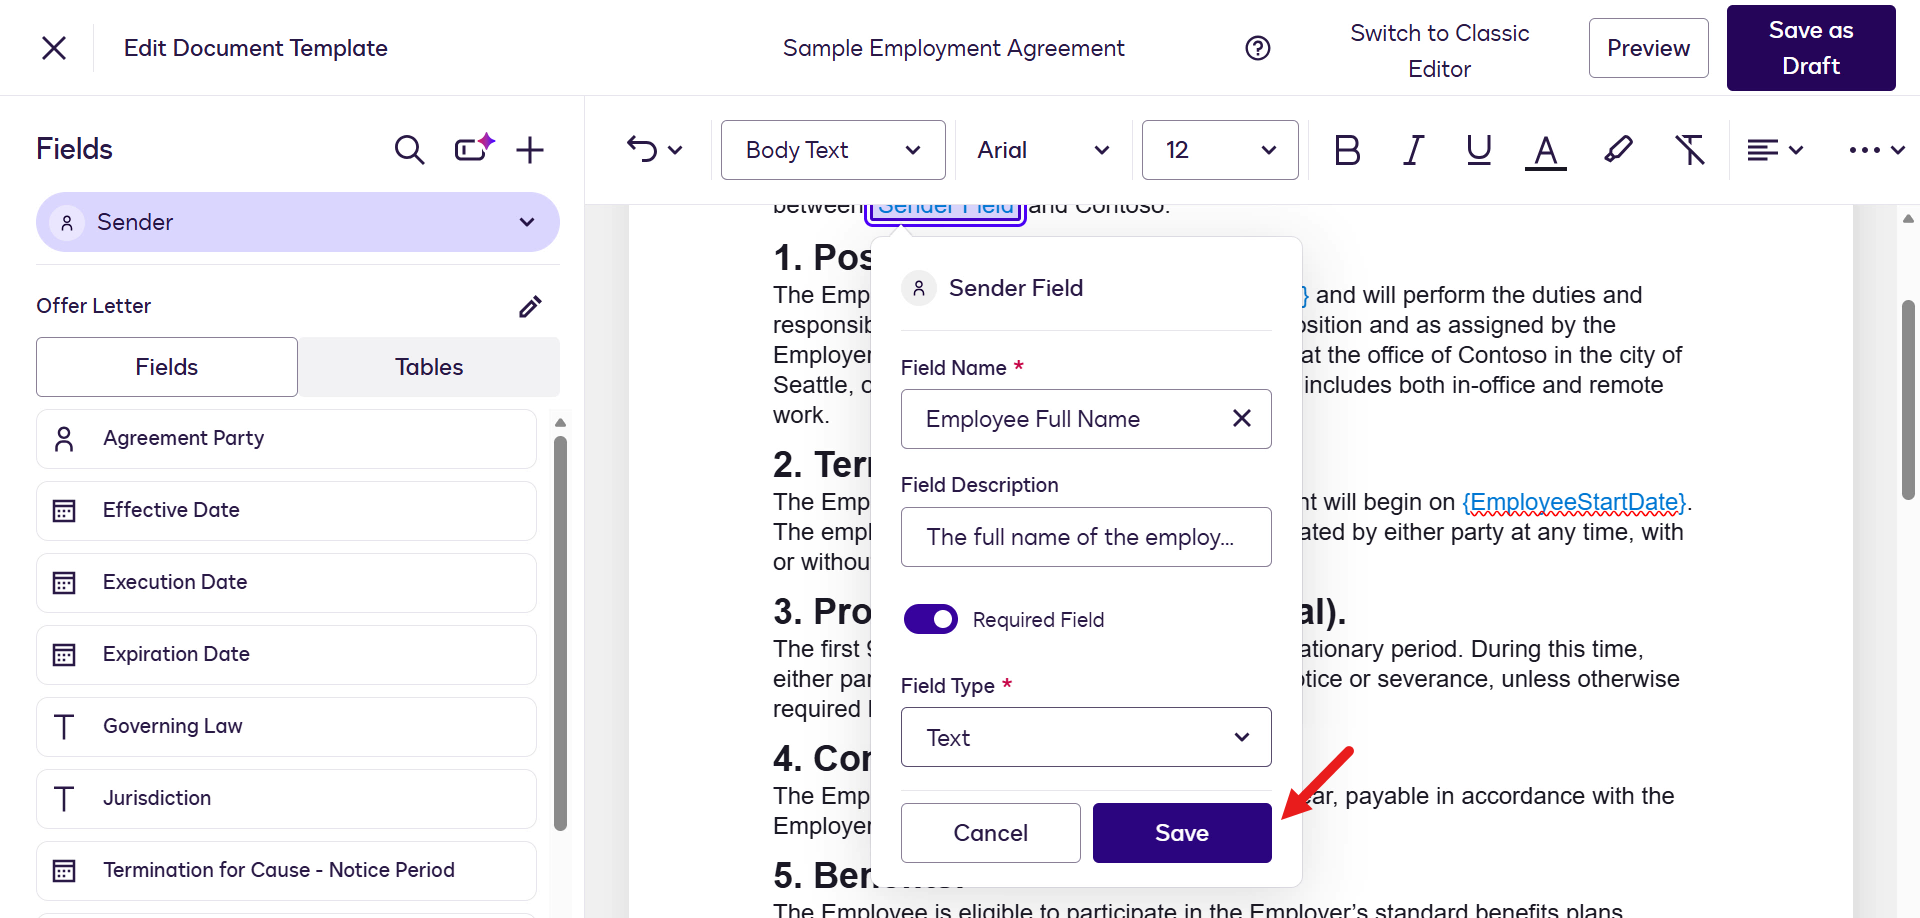
In the field attribute fly-out pane, enter the following in the Field Name.
textEmployee Full NameAs you type a value into Field Name, the template designer searches for an existing field with the same name. If no results are found, you'll have the option to create a new custom field using the entered value.
Select the plus icon to create a new custom field for Employee Full Name.
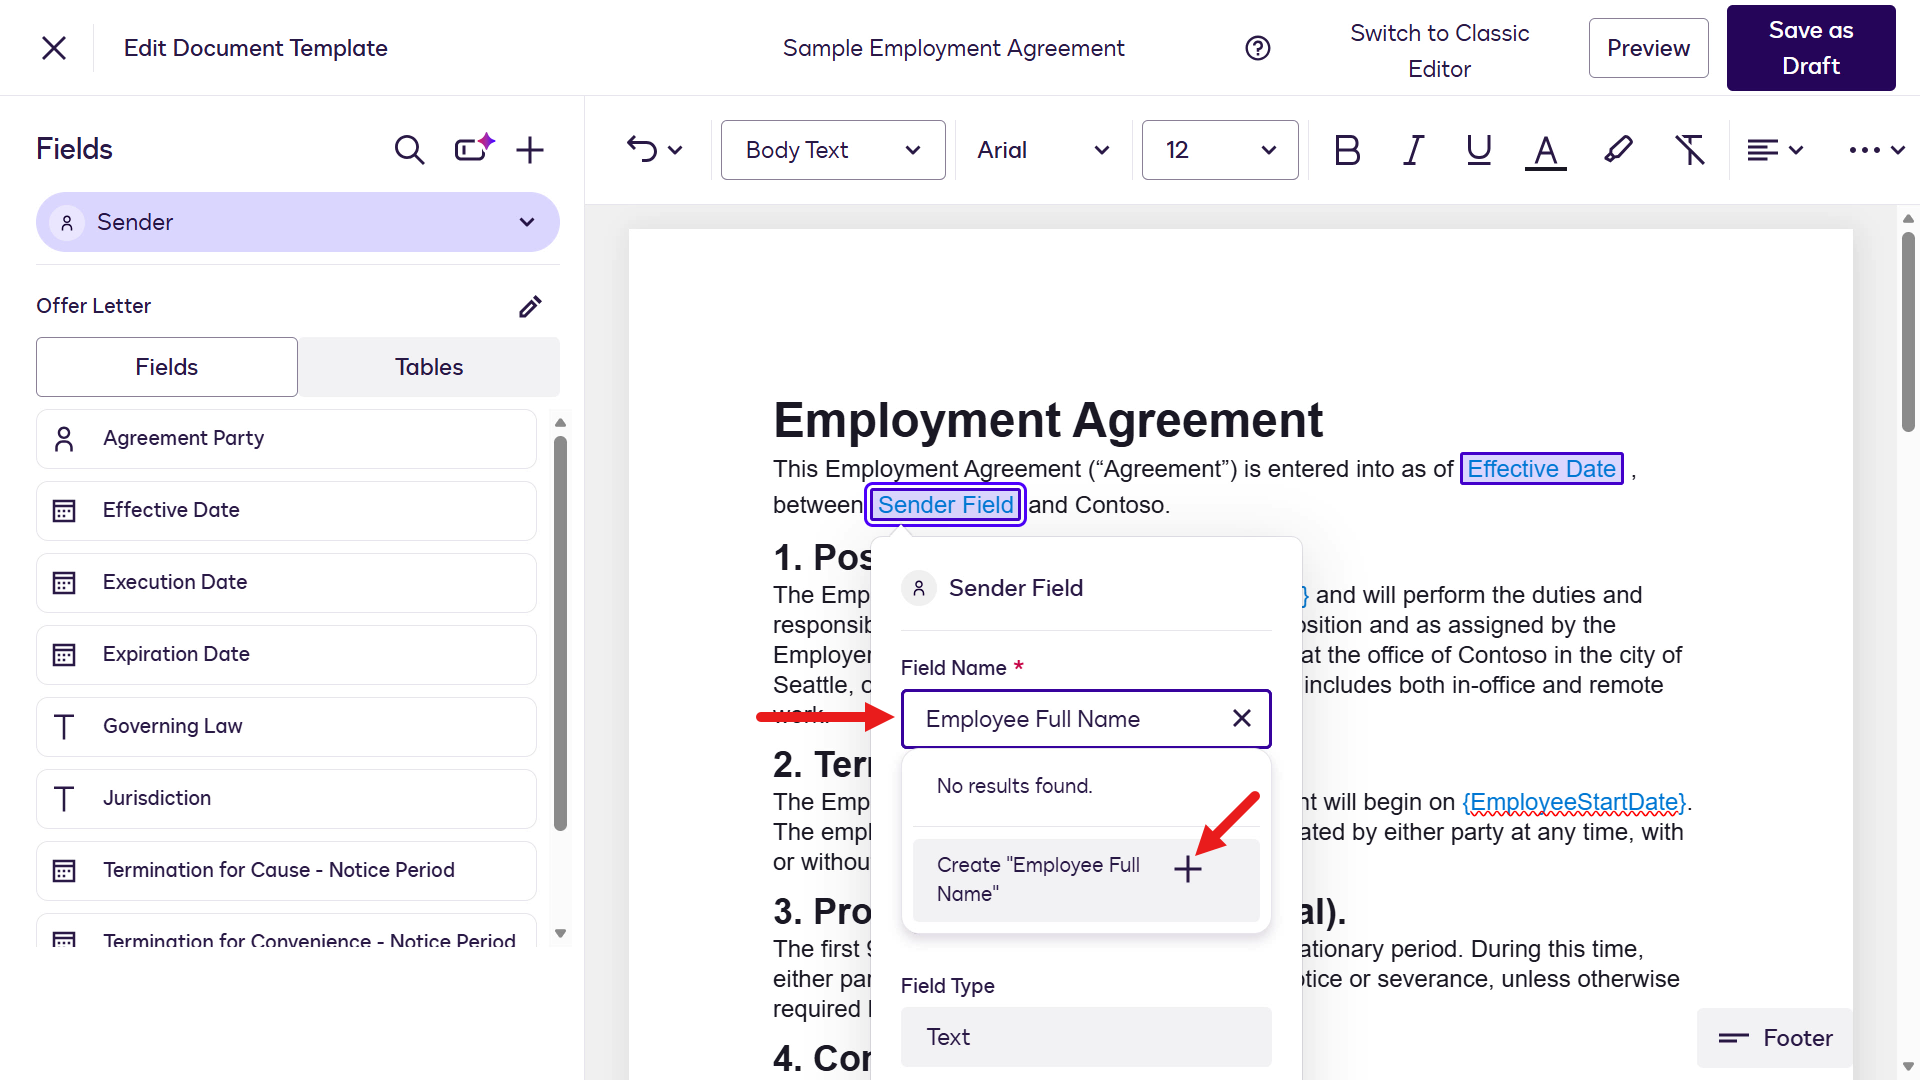
Configure the remaining attributes. Enter the following in Field Description:
textThe full name of the employeeEnable the Required Field option to ensure this field must be completed.
By default the Field type is Text. We'll keep as Text.
Save the Employee Full Name custom field.
Repeat the same steps to add the remaining custom fields, using them in place of the Sender role placeholders.
Placeholder Field name Field description Required field Field Type {EmployeePosition} Employee PositionPosition the employee is fulfillingYes Text {EmployeeStartDate} Start DateThe start date of the employeeYes Date {SalaryAmount} SalaryThe salary of the employeeYes Text 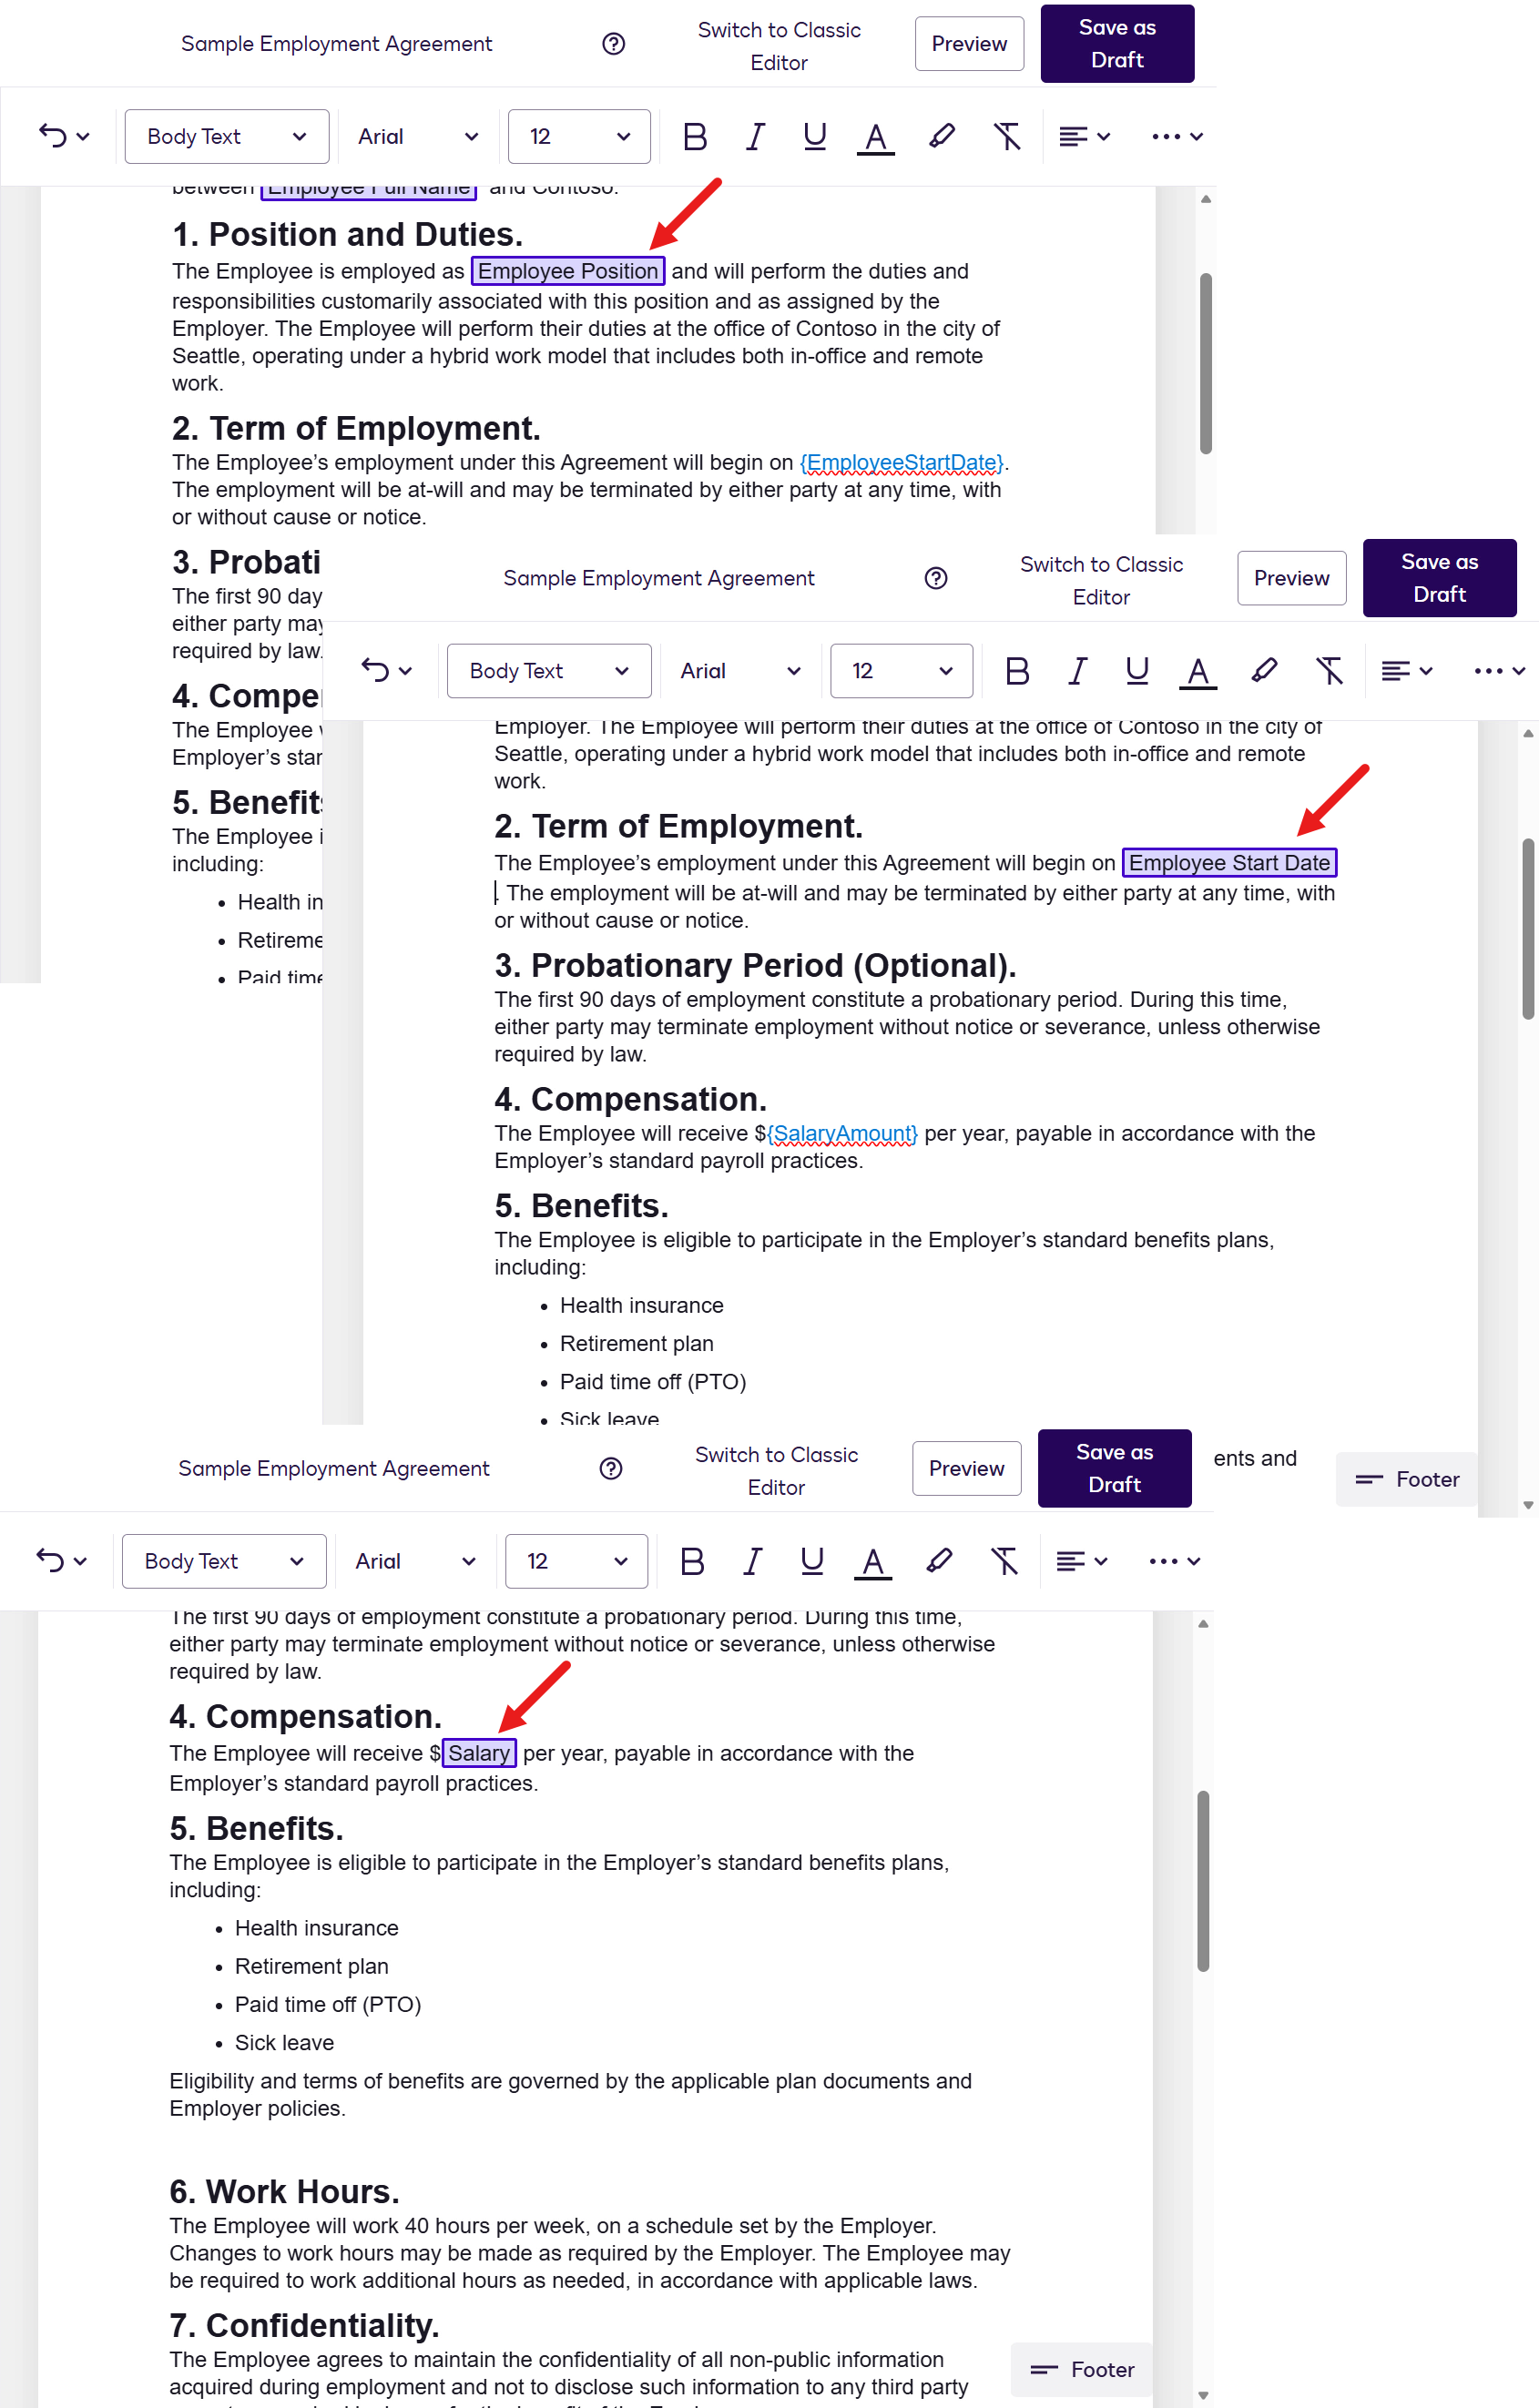
Next, we'll add the Employee Full Name field to the 16. Signatures section of the template. Highlight the
{EmployeeFullName}placeholder and select the corresponding field in the Fields left-hand side pane.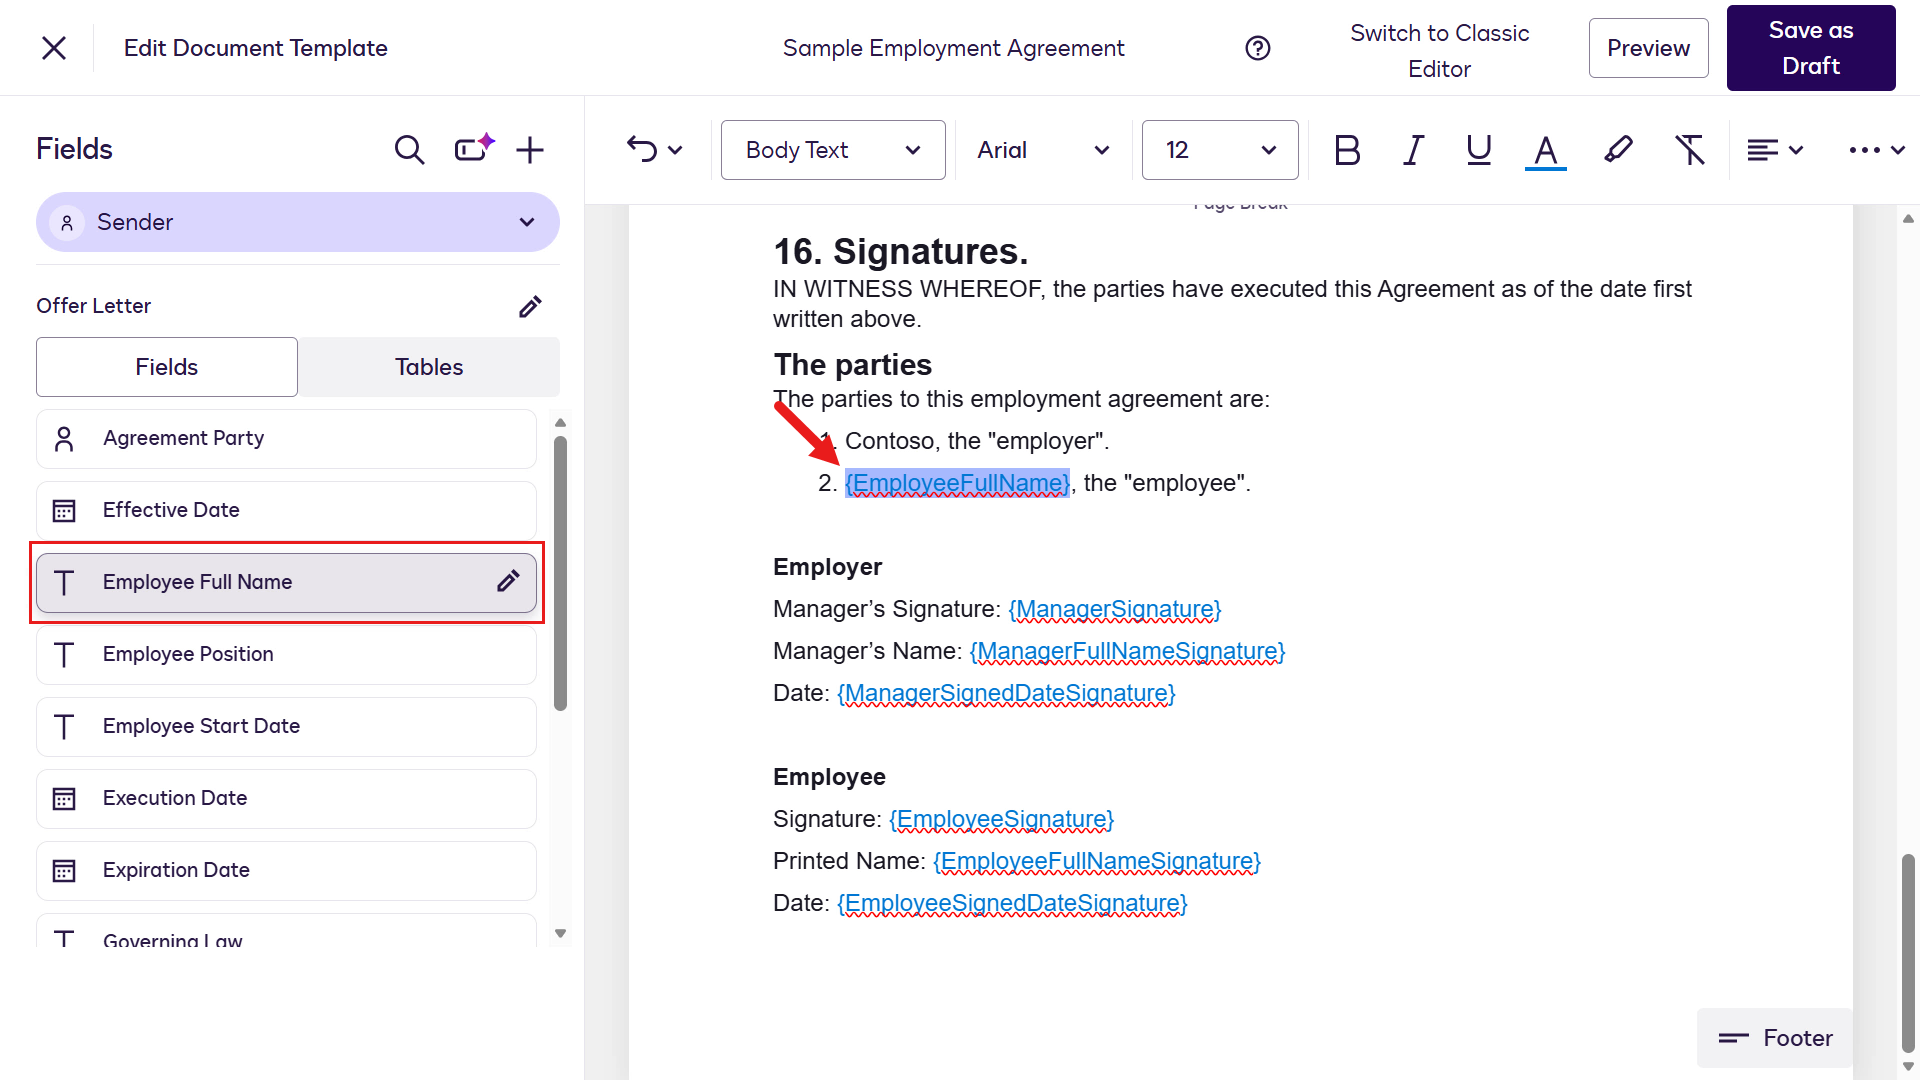
We'll now switch to the Hiring Manager role to define the fields that this recipient should complete. On the Fields left-hand side pane, select the chevron icon by Sender and select Hiring Manager.
Highlight the
{ManagerSignature}placeholder and select Signature in the Fields left-hand side pane.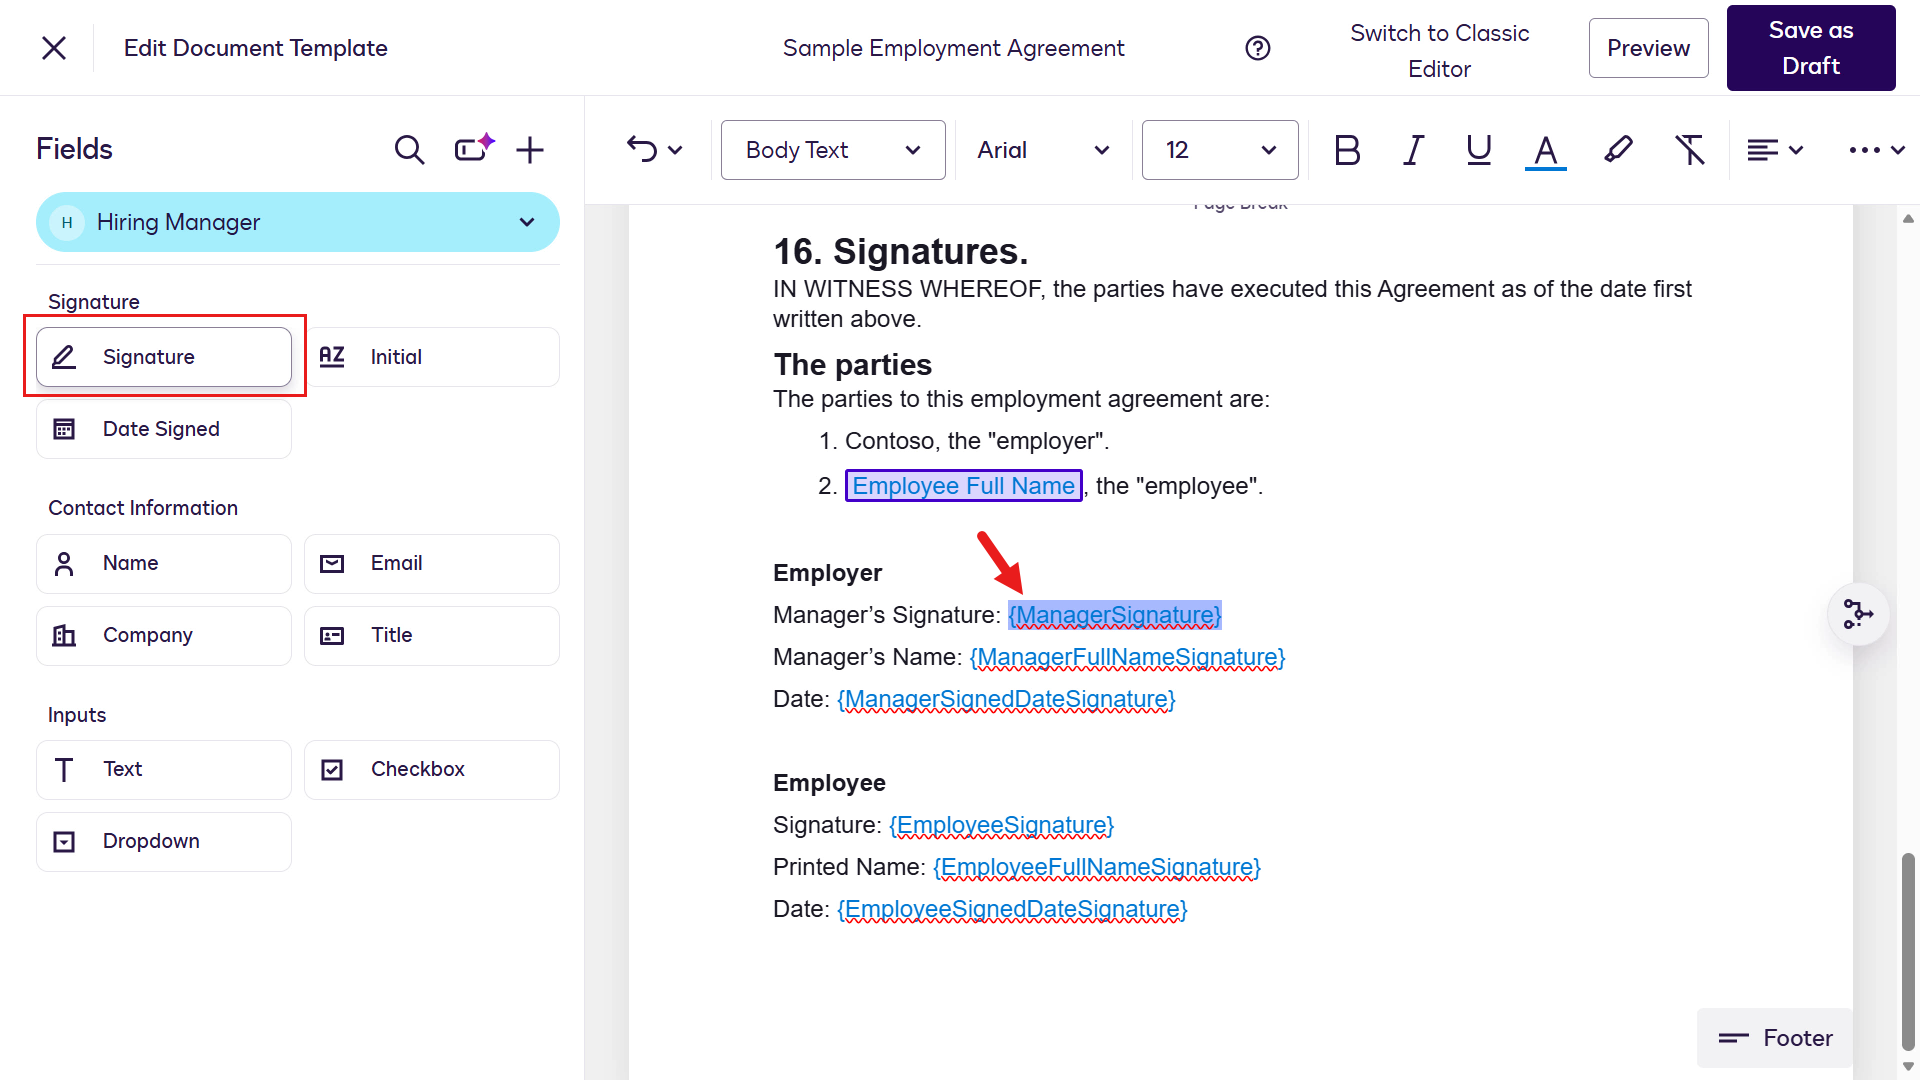
The Signature field will now be added.
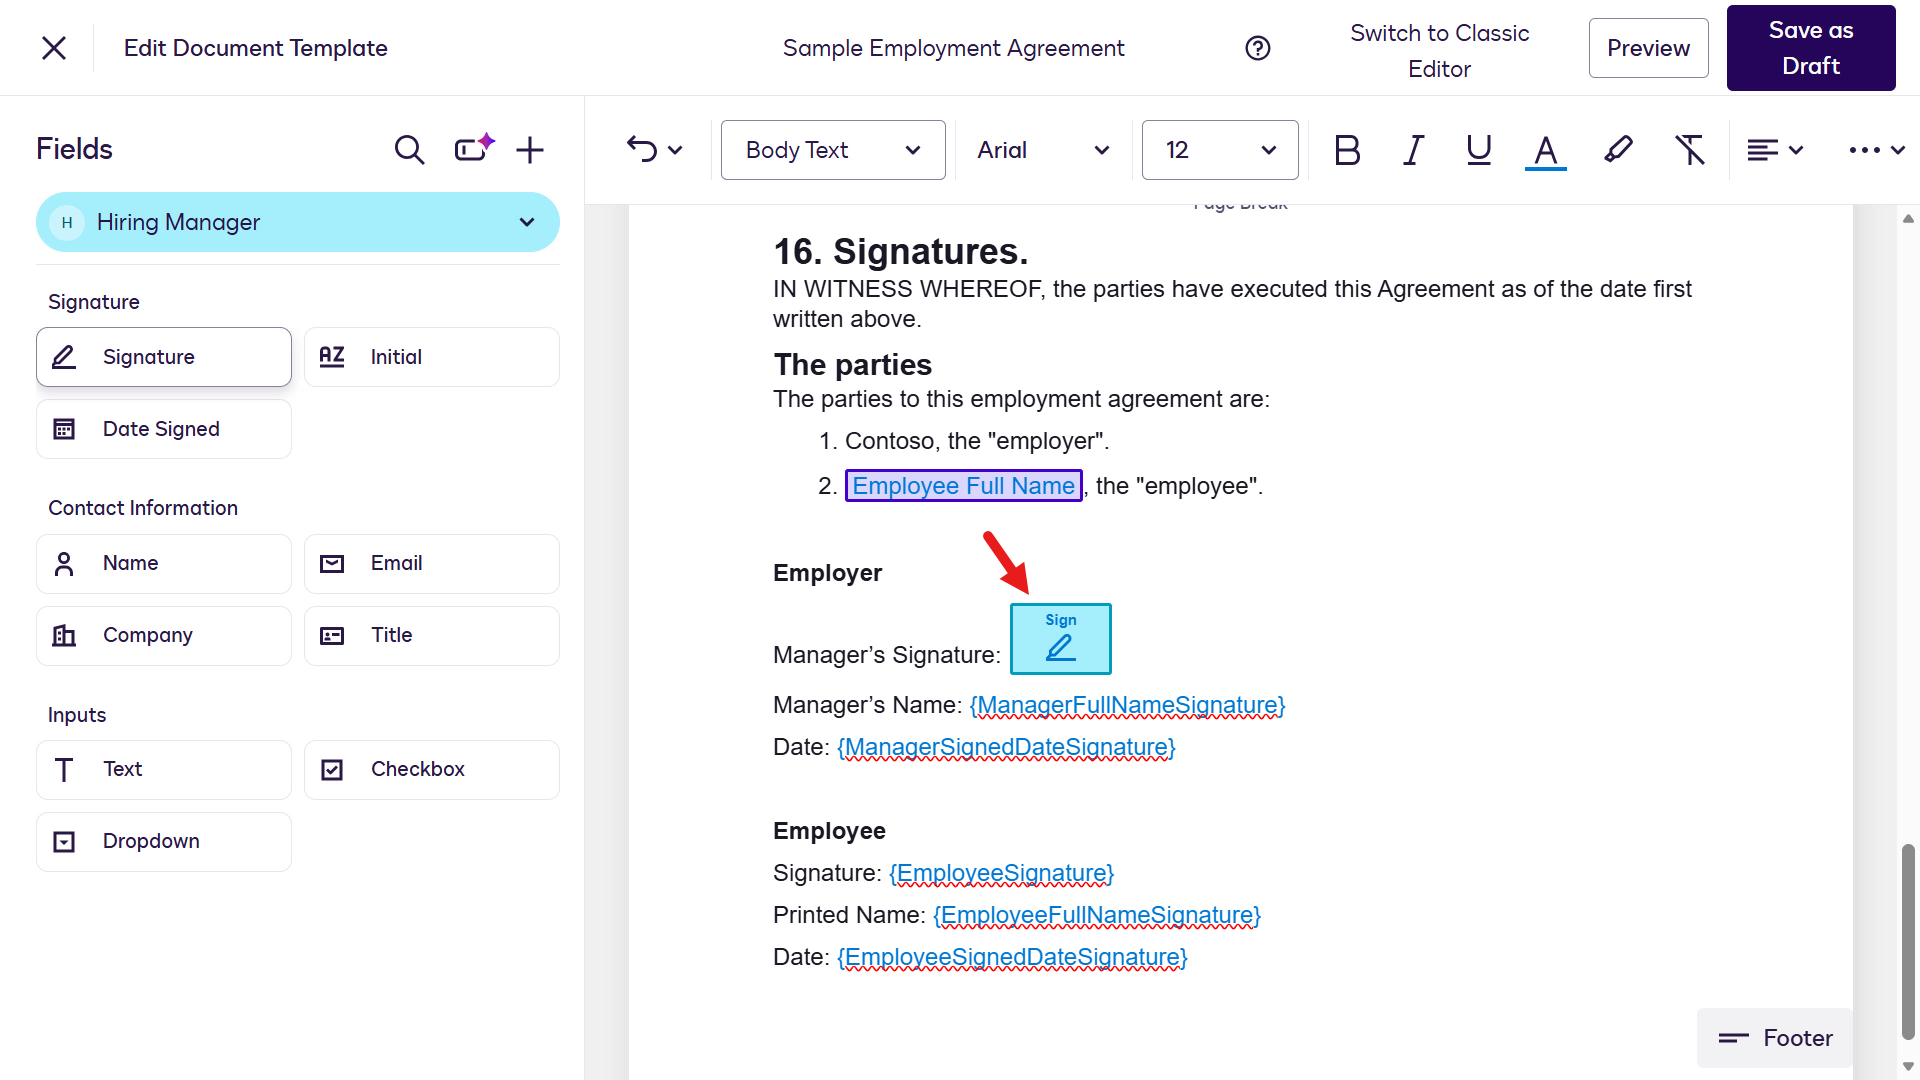
Repeat the same steps to add the remaining fields for the Hiring Manager role and the Employee role.
🖱️ Don't forget to switch roles
Remember to switch to the Employee role using the chevron icon in the Fields left-hand side pane.
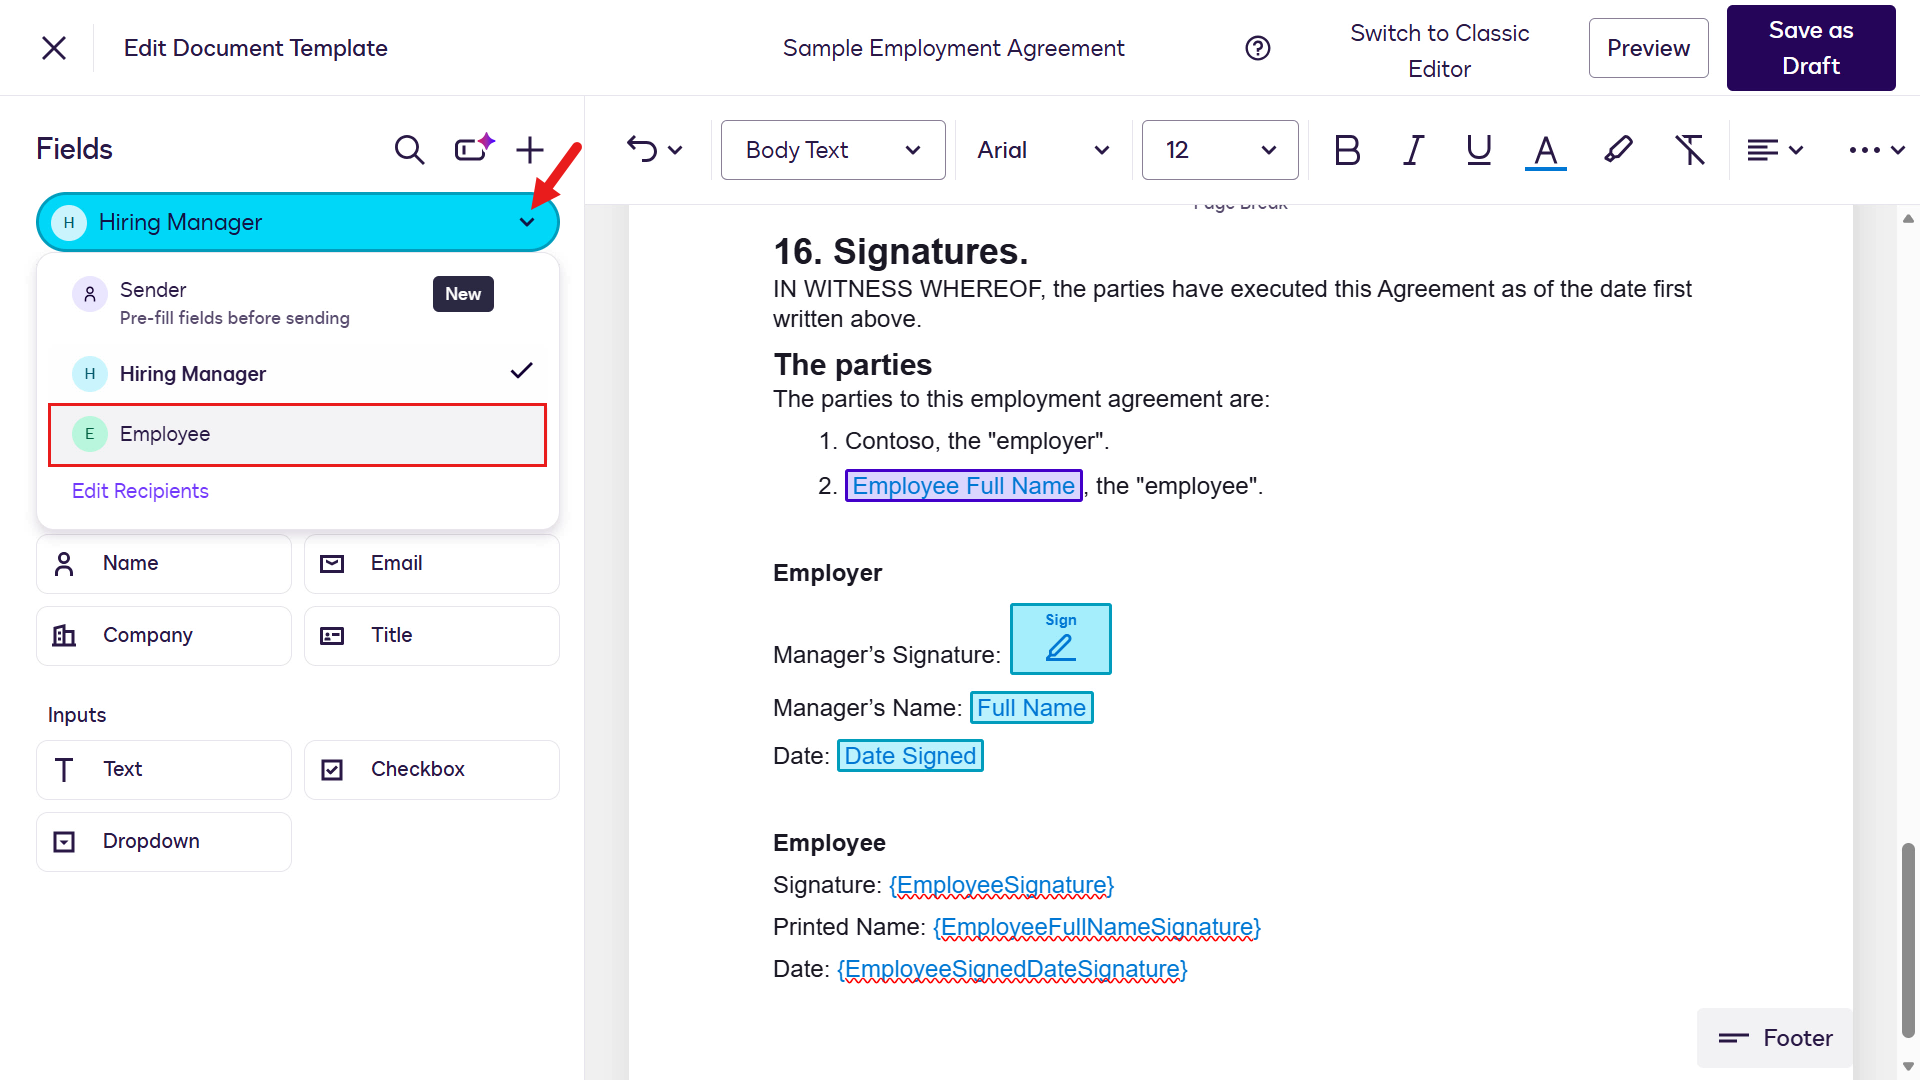
Role Placeholder Field Hiring Manager {ManagerFullNameSignature} Name Hiring Manager {ManagerSignedDateSignature} Date Signed Employee {EmployeeSignature} Signature Employee {EmployeeFullNameSignature} Name Employee {EmployeeSignedDateSignature} Date Signed The Template should now look like the following after the fields for the Hiring Manager and Employee roles have been added.
Select Save as Draft on the upper right. You'll be redirected to the Document Templates page and see a bottom-left confirmation message. Then select the ellipsis icon (...) and choose Publish.
TIP
If you don't see the Save As Draft button, but see it labeled as Save and Publish, select the Save and Publish button.
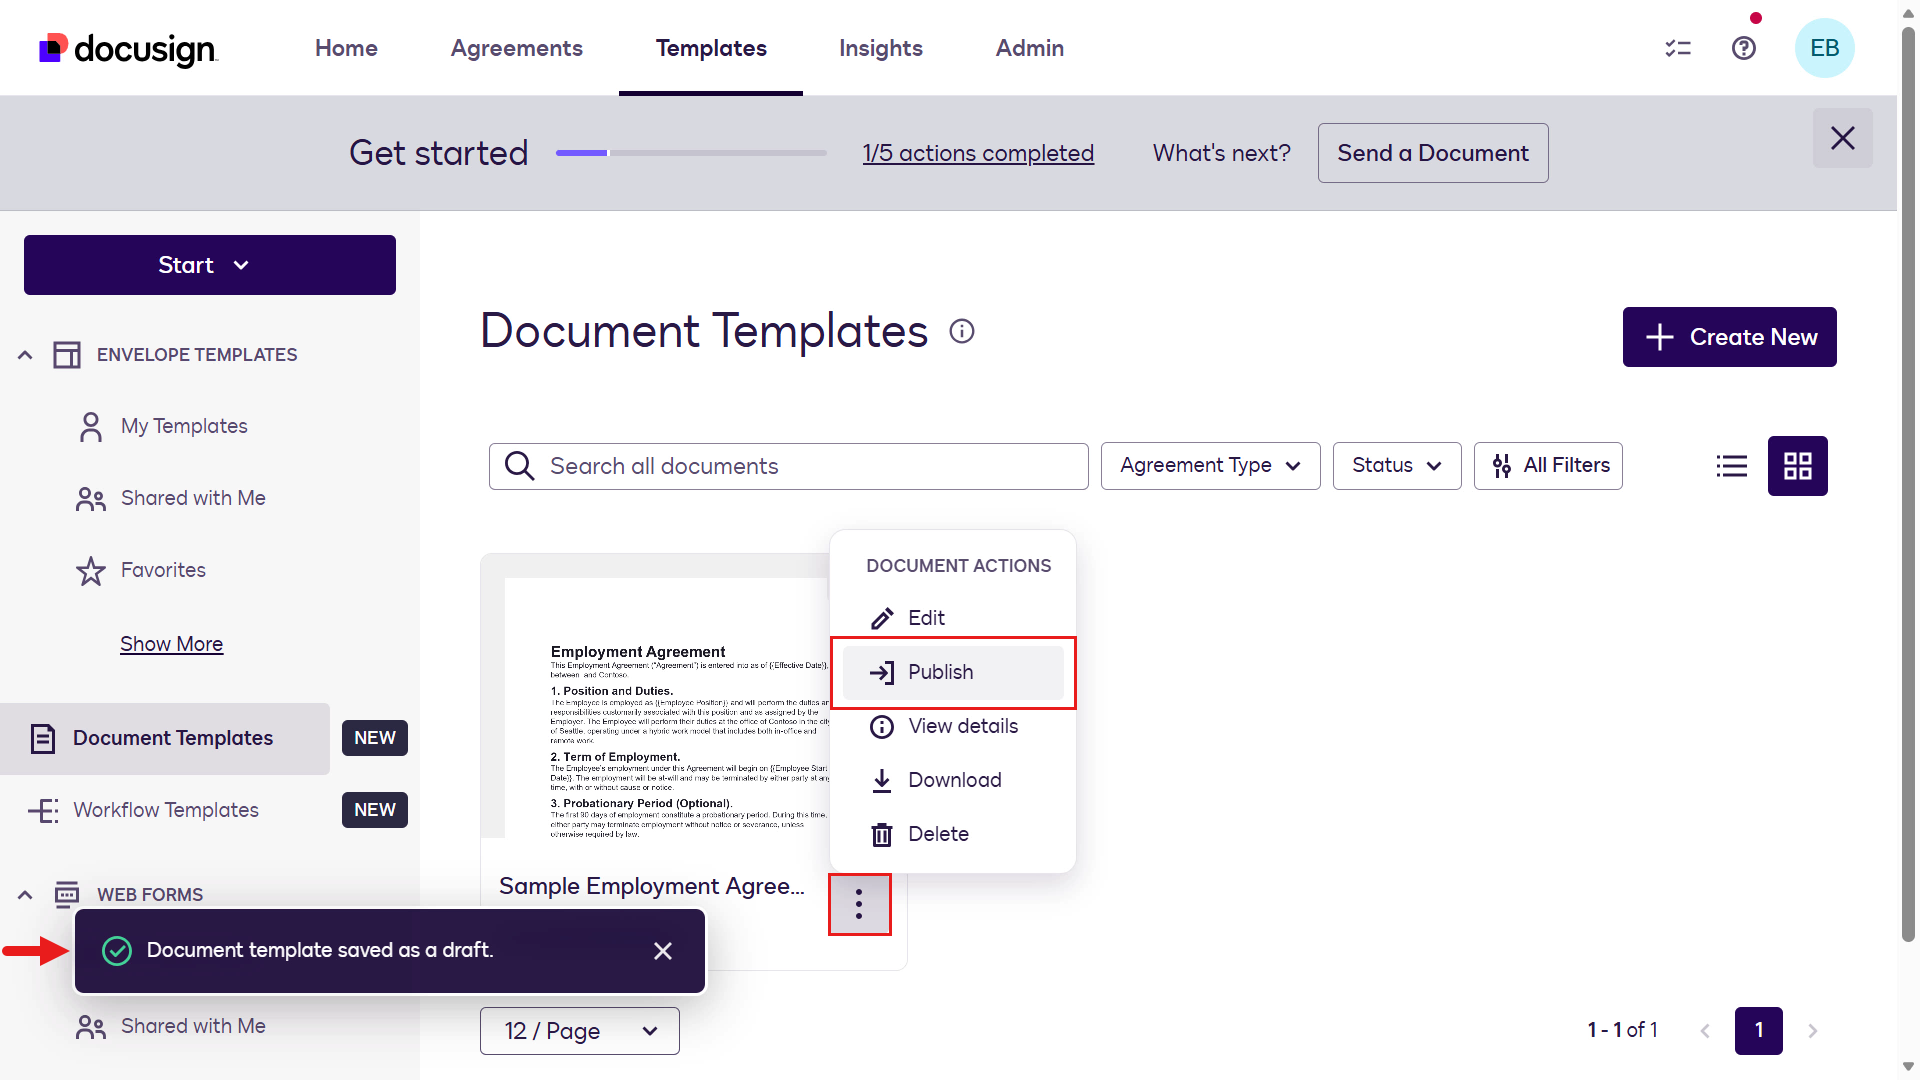
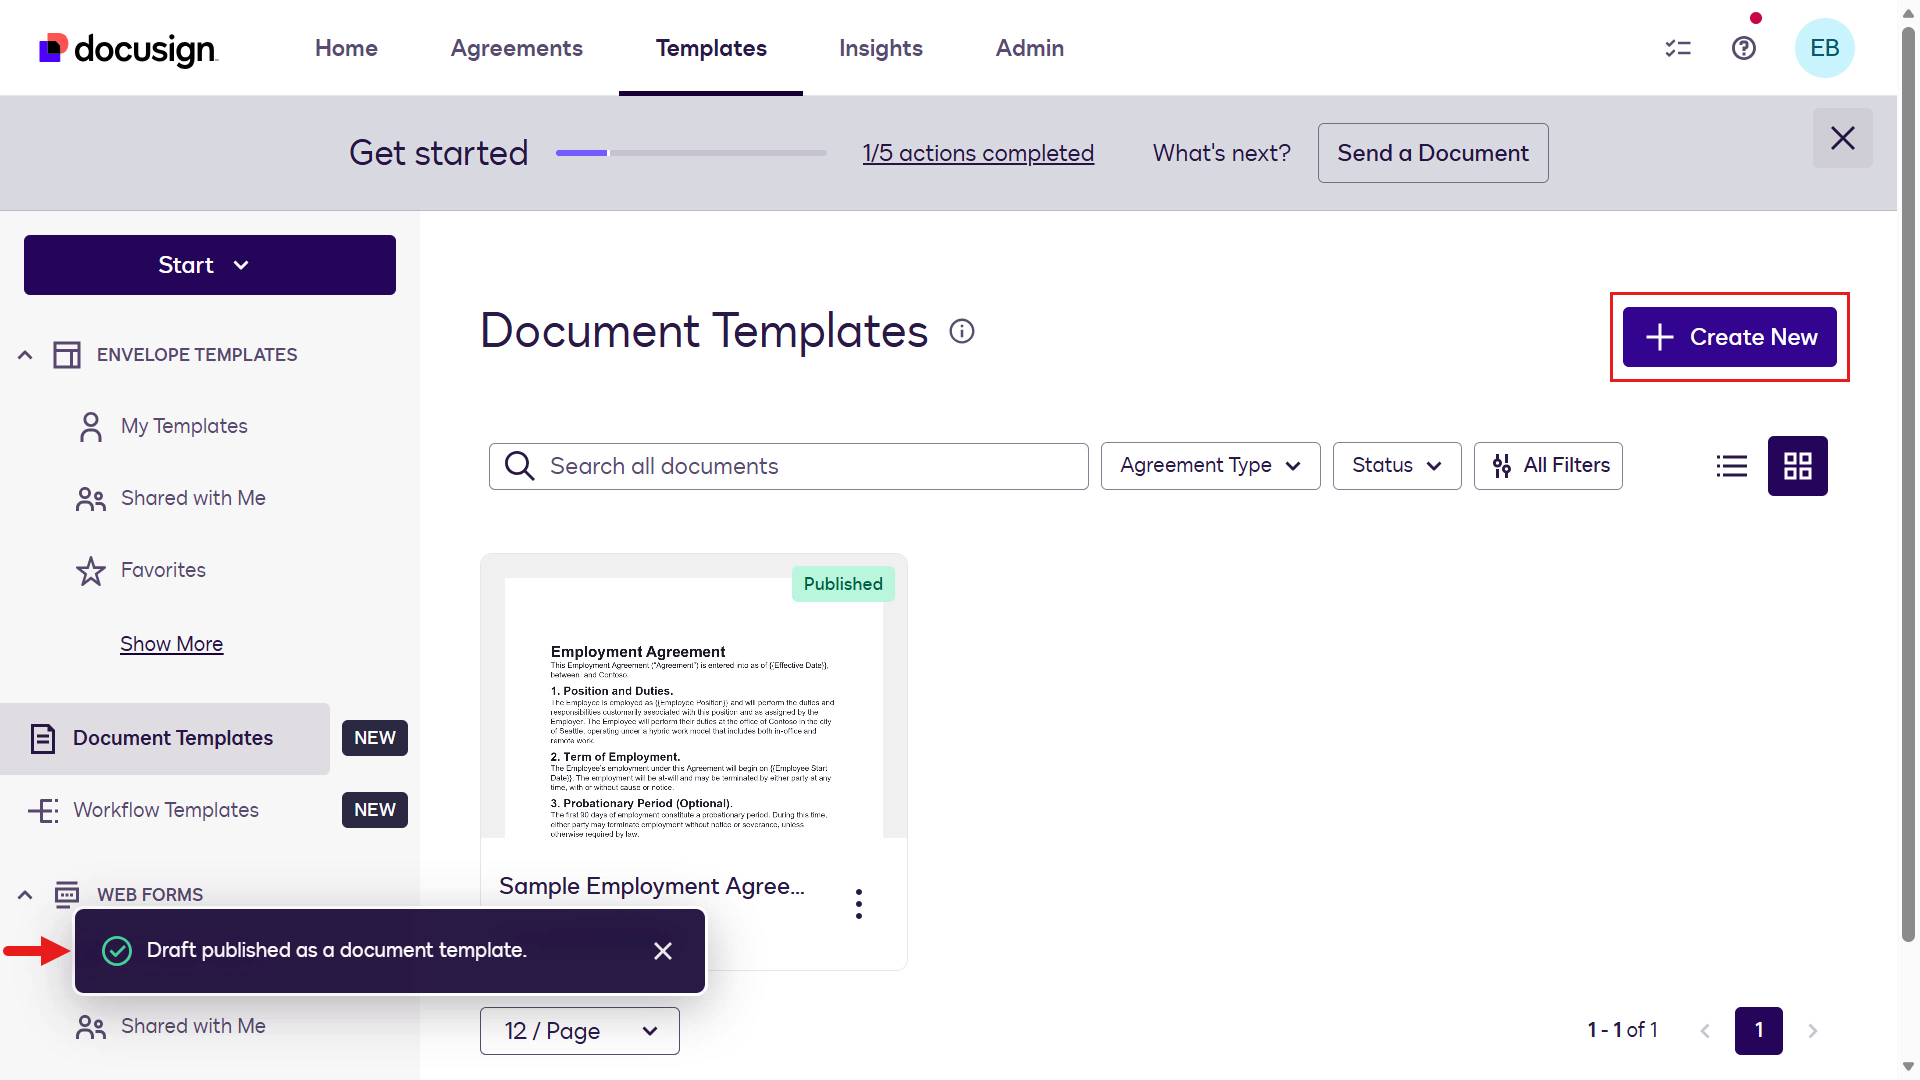
Another confirmation message on the bottom left will appear to let you know the Draft template has been Published.
Now create the second Document Template using the Sample Offer Letter file.
Select + Create new.
Repeat the previous steps by uploading the Sample Offer Letter file and selecting Offer Letter as the Agreement Type.
Select Continue.
Repeat the previous steps to create two roles for the document template: Hiring Manager and Employee.
On the Fields left-hand side pane, select the chevron icon by Sender 1 and select Edit recipients.
Rename the Signer 1 role to,
textHiring ManagerAdd a new recipient and name the role as,
textEmployee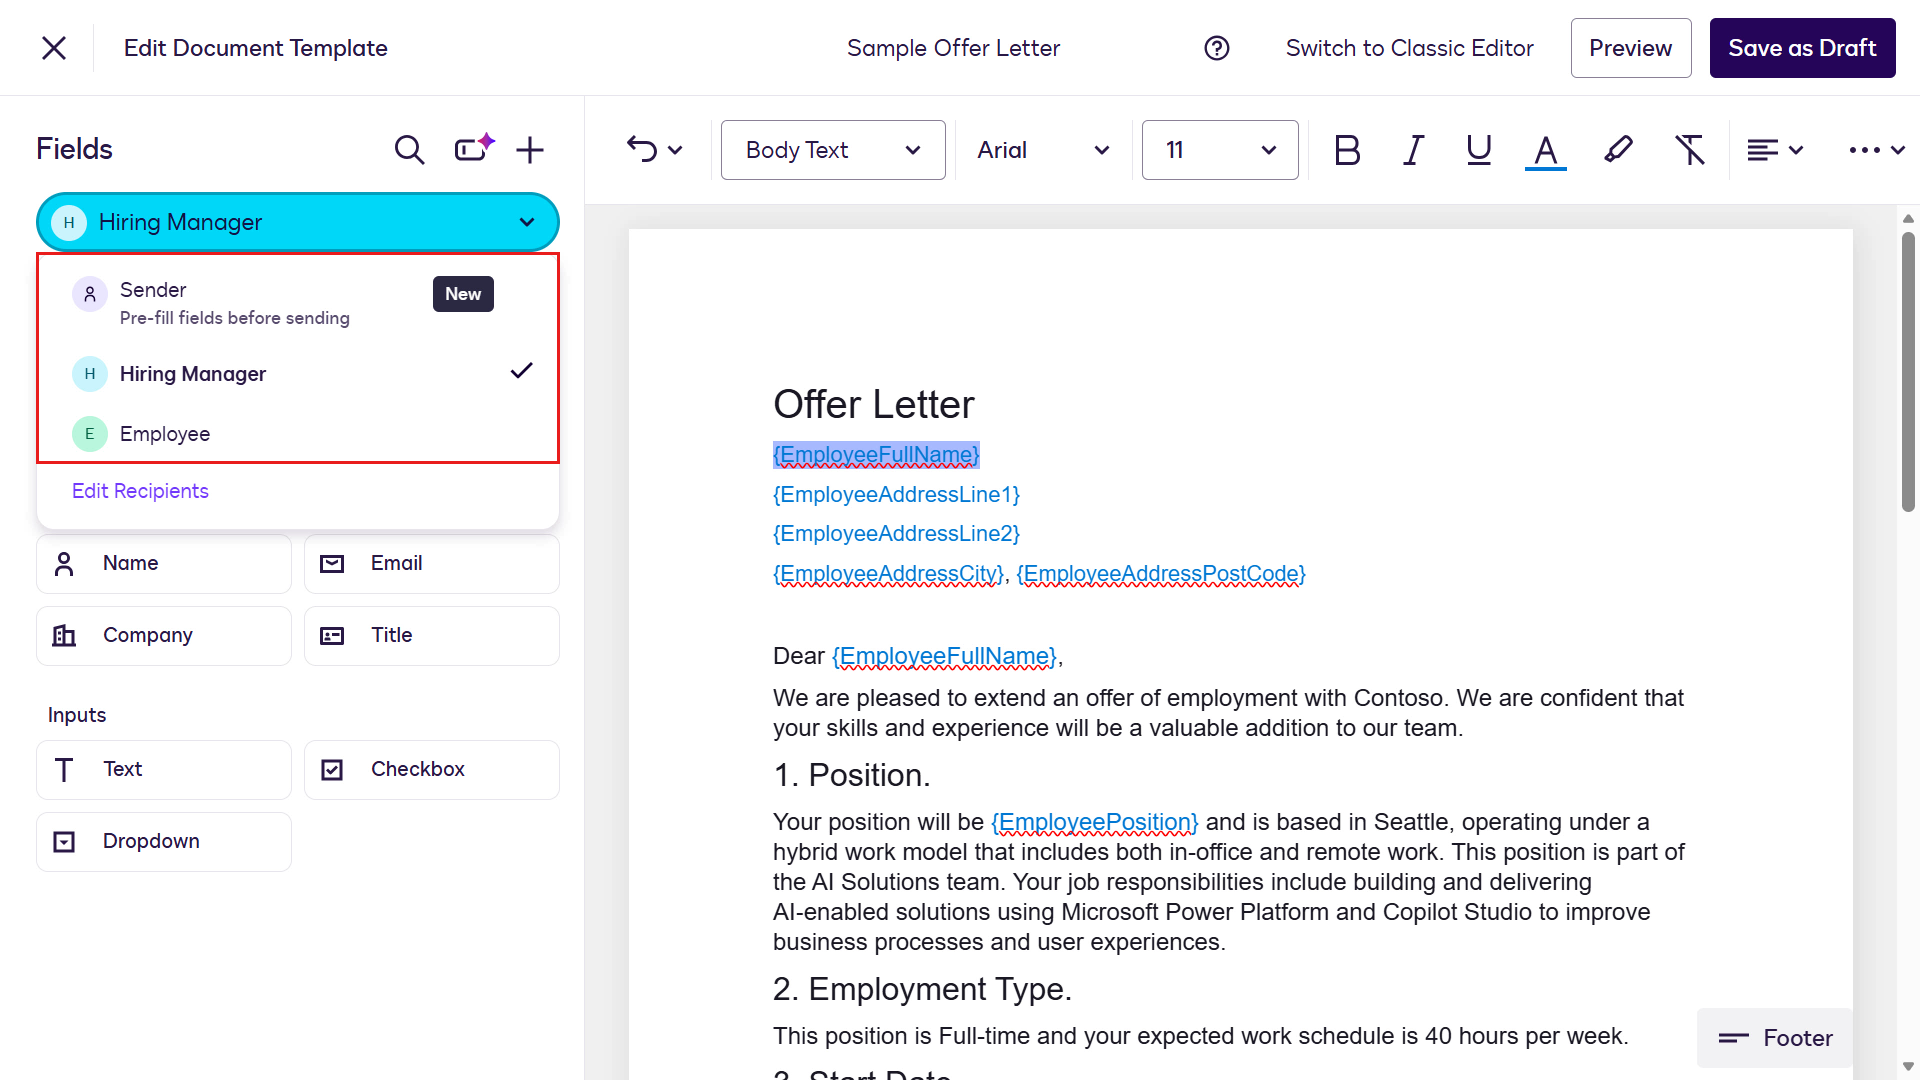
Next, we'll replace placeholders in the document with fields. We'll start by switching to the Sender role. Highlight the
{EmployeeFullName}placeholder and select the Employee Full Name field on the left-hand side menu. The field will now display instead of the placeholder.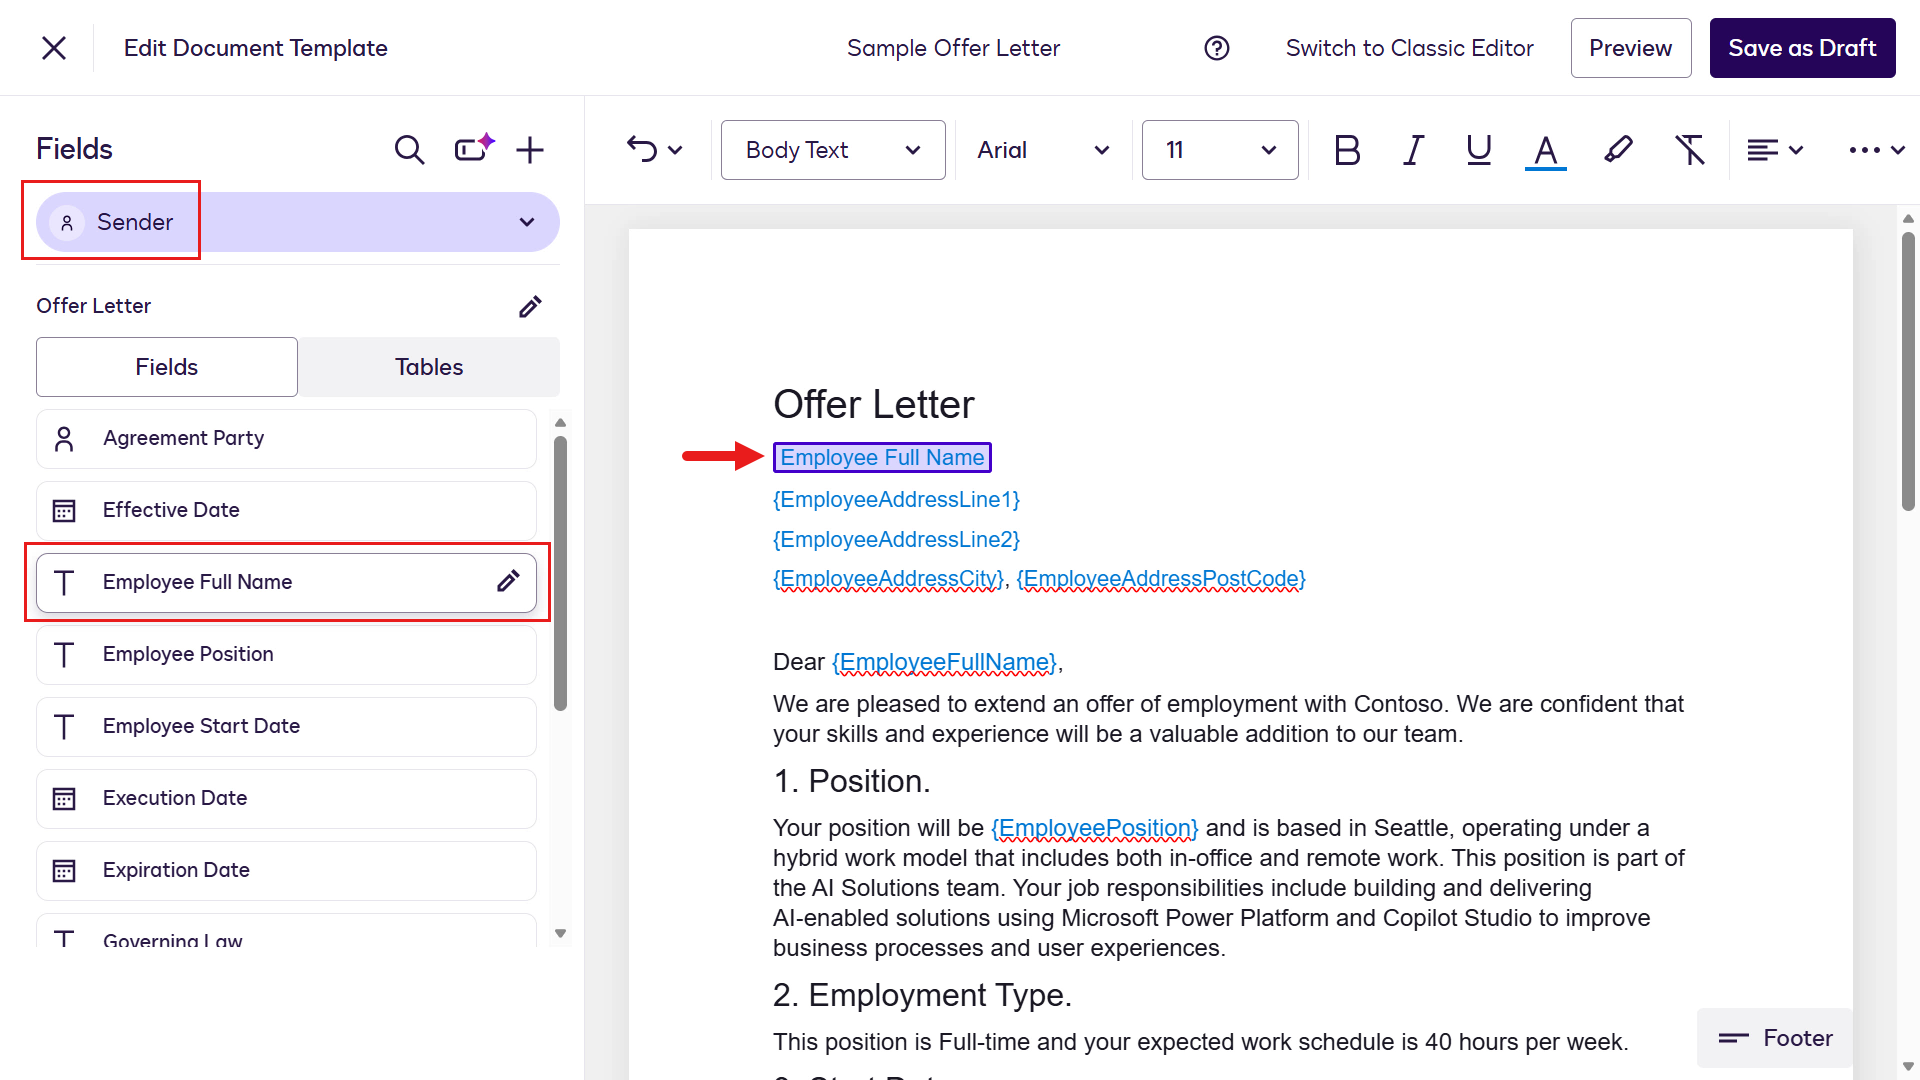
Repeat the same steps for the remainder of the placeholders for the Sender role by selecting existing fields on the left-hand side menu or creating new fields.
Placeholder Field name Create New Field Field description Required field Field Type {EmployeeAddressLine1} Employee Address Line 1Yes Apt or House No. and street nameYes Text {EmployeeAddressLine2} Employee Address Line 2Yes SuburbYes Text {EmployeeAddressCity} Employee Address CityYes CityYes Text {Employee AddressPostCode} Employee Address Post CodeYes Post codeYes Text {EmployeePosition} Employee PositionNo {EmployeeStartDate} Start DateNo {DueDate} Signed Due DateYes Due date of signed agreement by employeeYes Date TIP
If you accidentally create a new field with the wrong field type (for example, you created Signed Due Date as
Text), you won't be able to change the field type. You can, however, rename the field to[Don't use] Signed Due Date.Next, we'll add the fields for the Hiring Manager and Employee roles using the same steps as last time.
🖱️ Don't forget to switch roles
Remember to switch to the Employee role using the chevron icon in the Fields left-hand side pane.
Role Placeholder Field Hiring Manager {ManagerSignature} Signature Hiring Manager {ManagerFullNameSignature} Name Employee {EmployeeSignature} Signature Employee {EmployeeFullNameSignature} Name Employee {EmployeeSignedDateSignature} Date Signed Great, you've now finished configuring the second Document Template 👏🏻
You can also view the Preview mode for the Document Template by selecting Preview on the upper right.
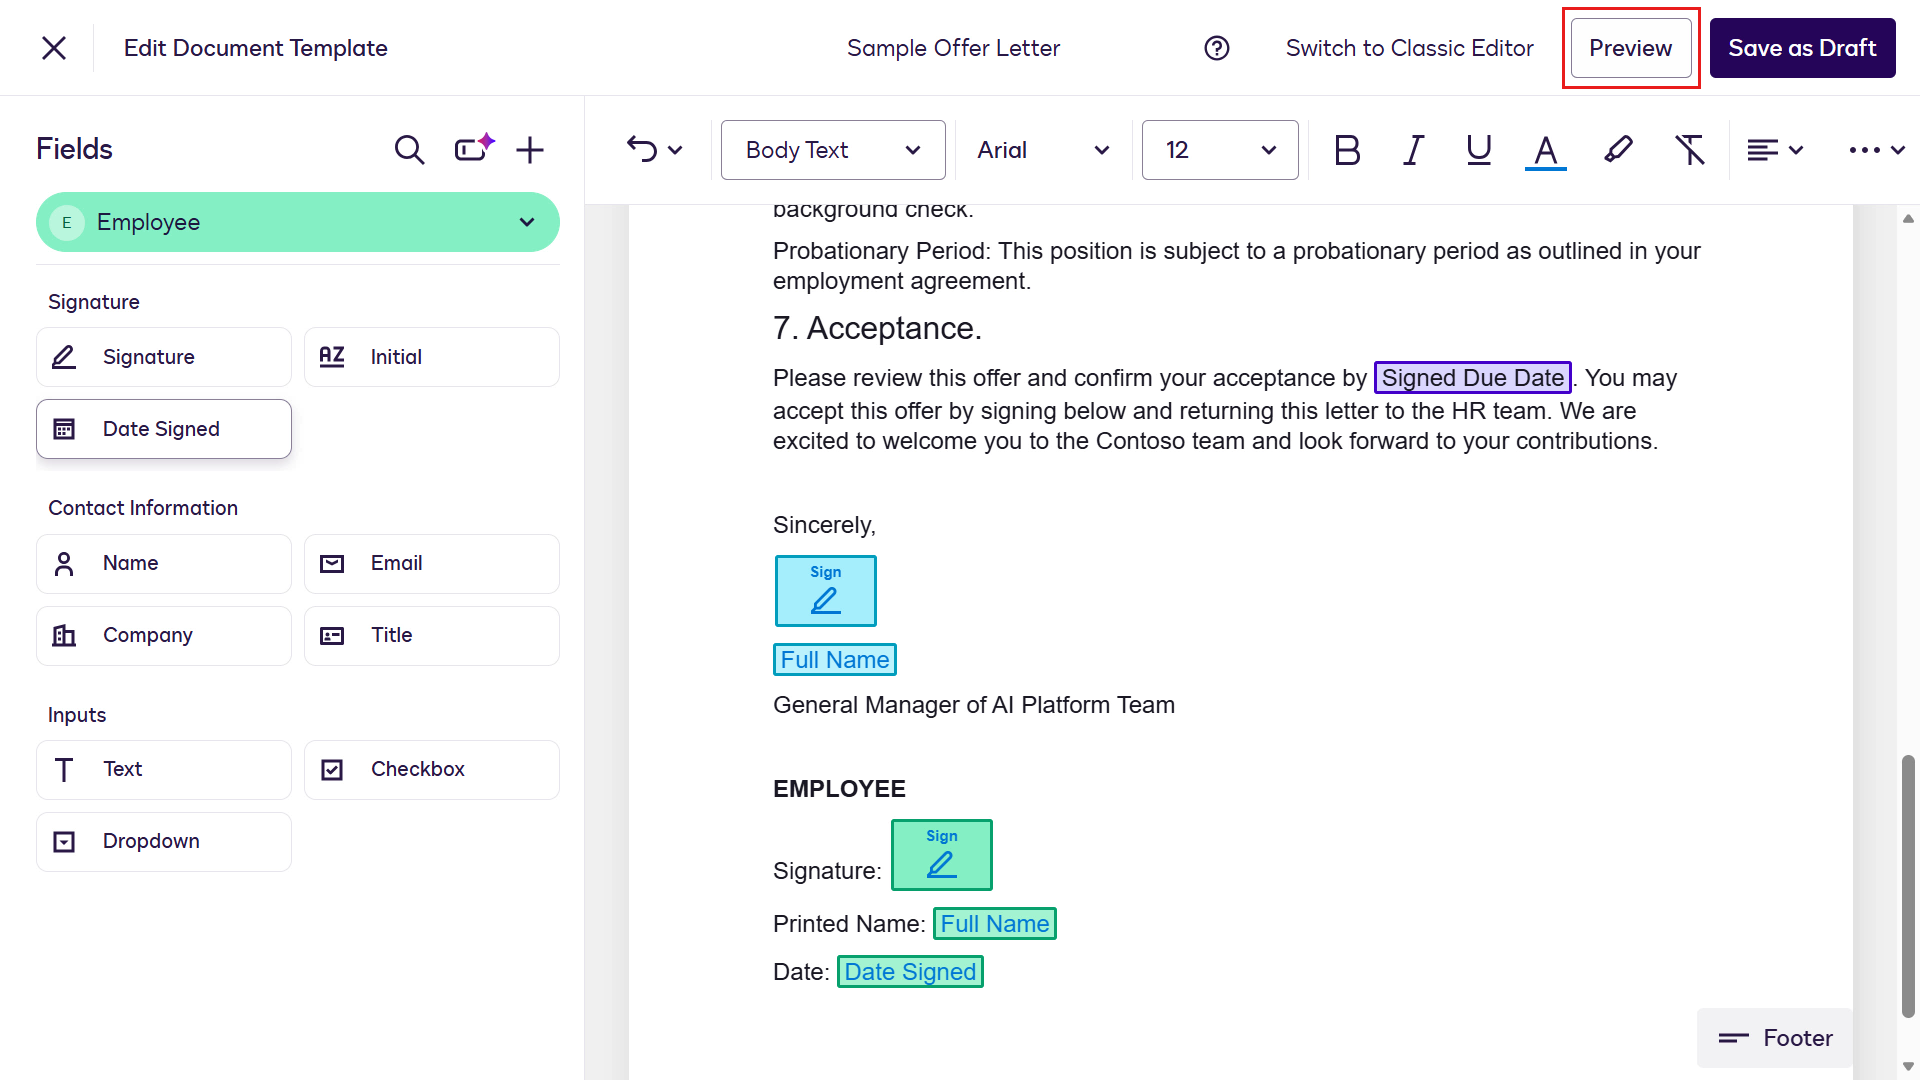
Enter in values in the fields to see it appear on the template viewer.
Exit from Preview mode by selecting the X icon on the upper left and select Save As Draft.
TIP
If you don't see the Save As Draft button, but see it labeled as Save and Publish, select Save and Publish and skip the next two publishing steps.
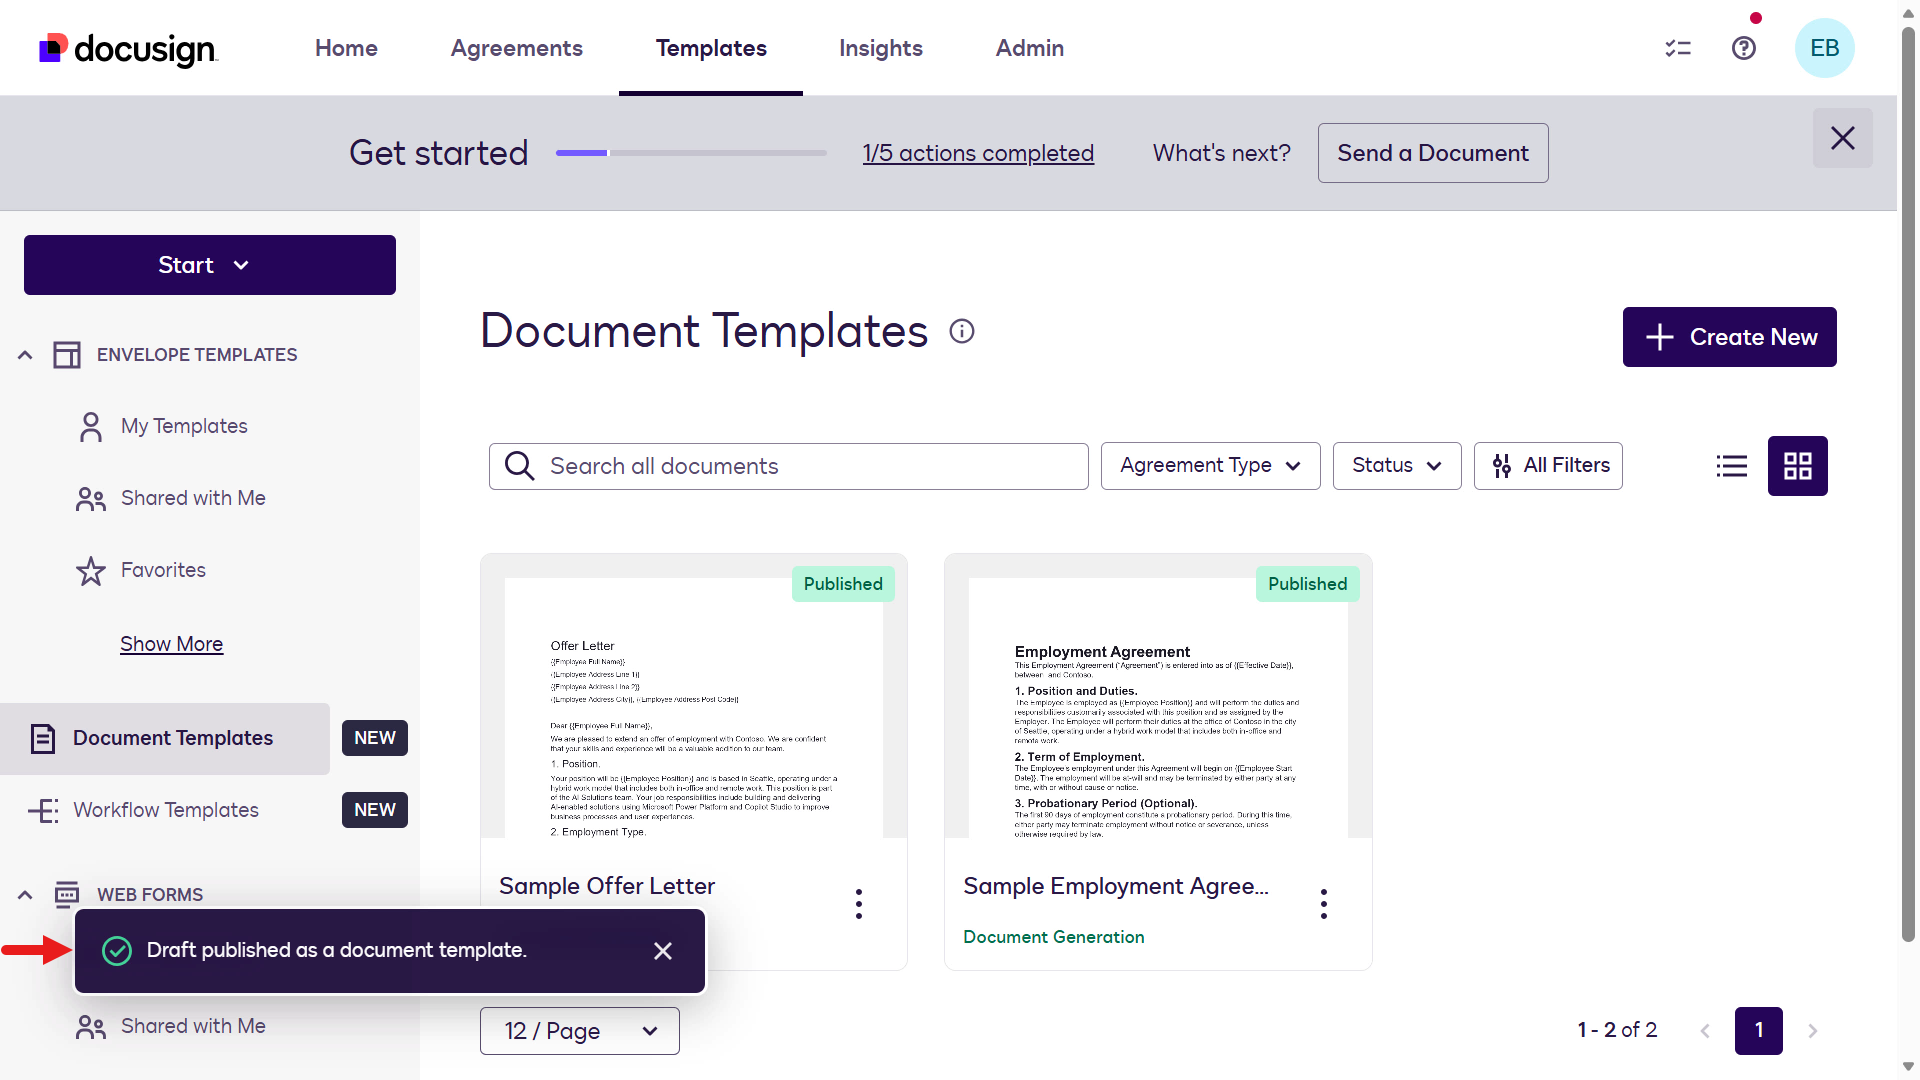
A confirmation message on the bottom left that the template has been saved as a draft. Next select the ellipsis icon (...) and select Publish.
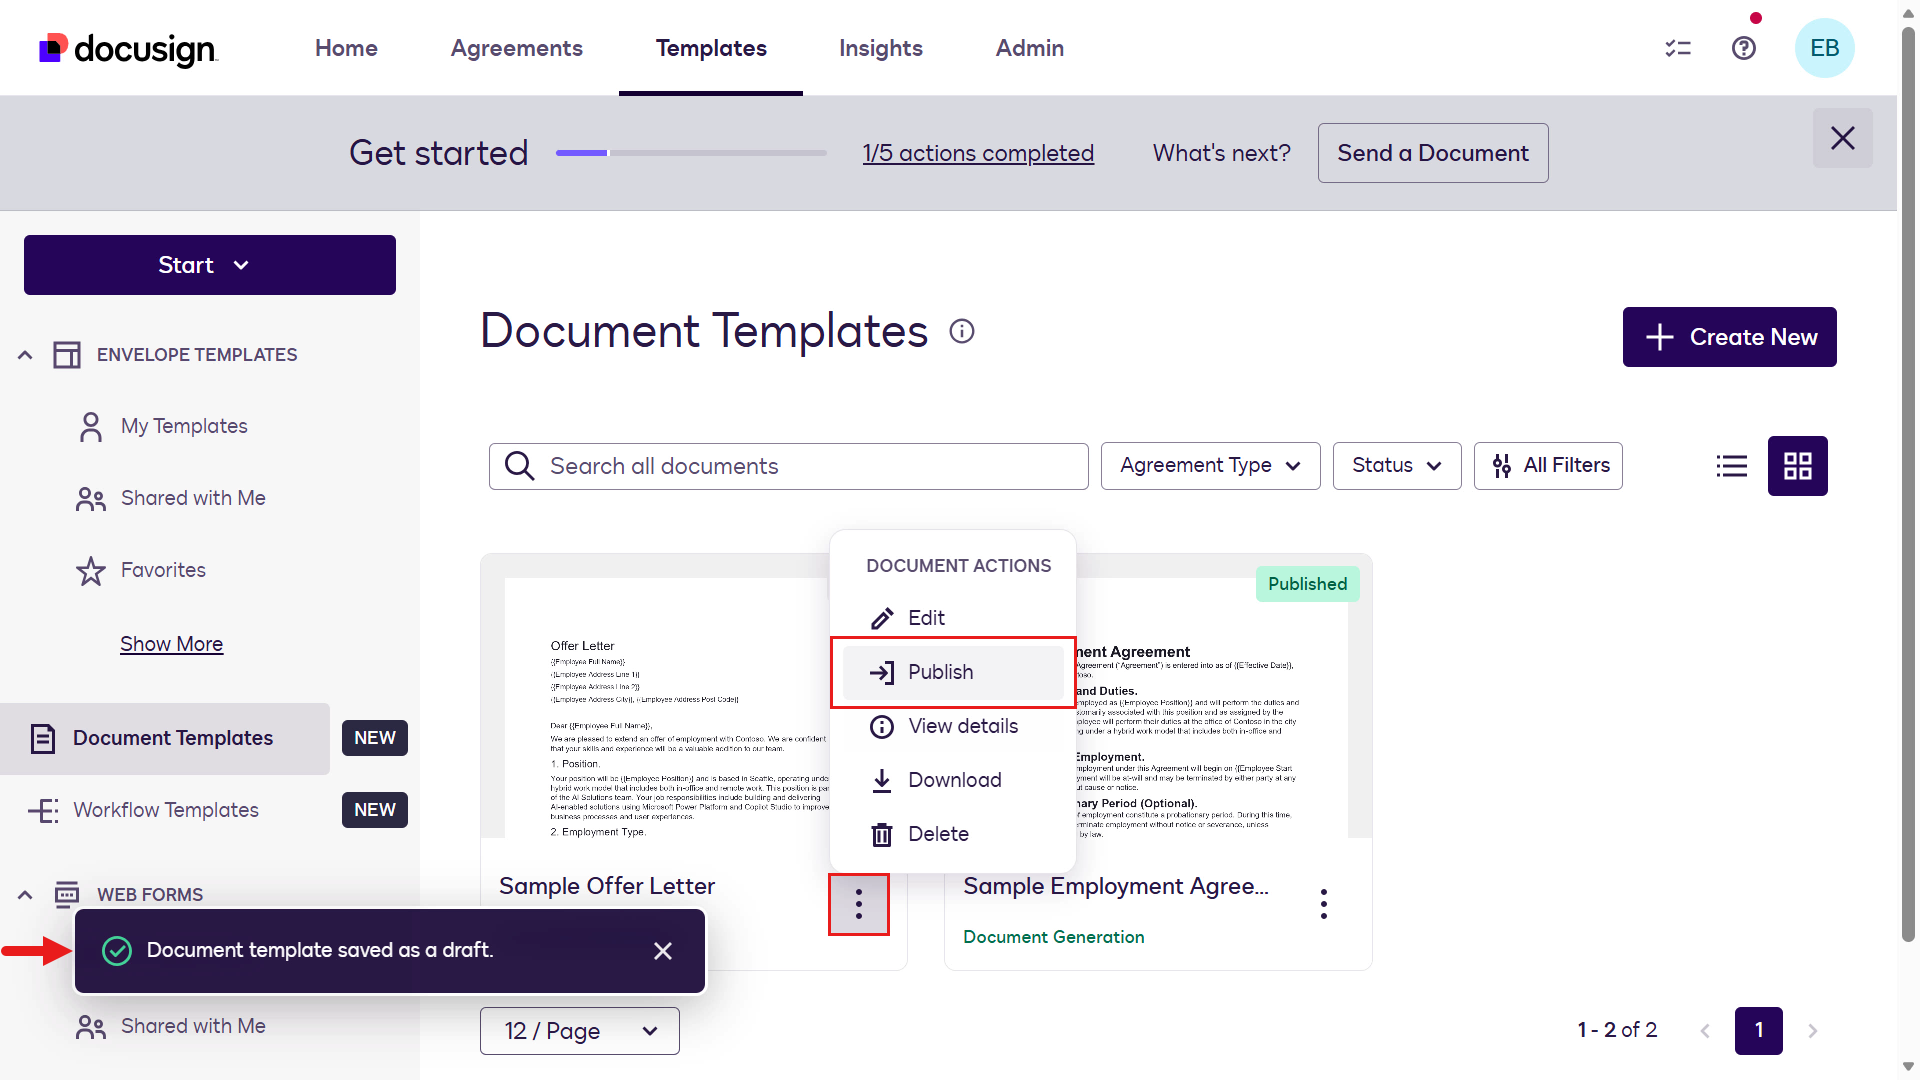
The Sample Offer Letter document template is now published.
🏃🏻♀️➡️ Next, let's move on to creating the workflow in Workflow Builder.
🧪 1.3 Create Docusign Workflow Builder workflow
For our HR scenario, we need to process the following:
- Send the employment agreement and offer letter
- Get the candidate to sign it
- Then get the manager to sign
- Save the final document to SharePoint
Workflow Builder can automate all of this, instead of handling it manually. Let's build it. 🏗️
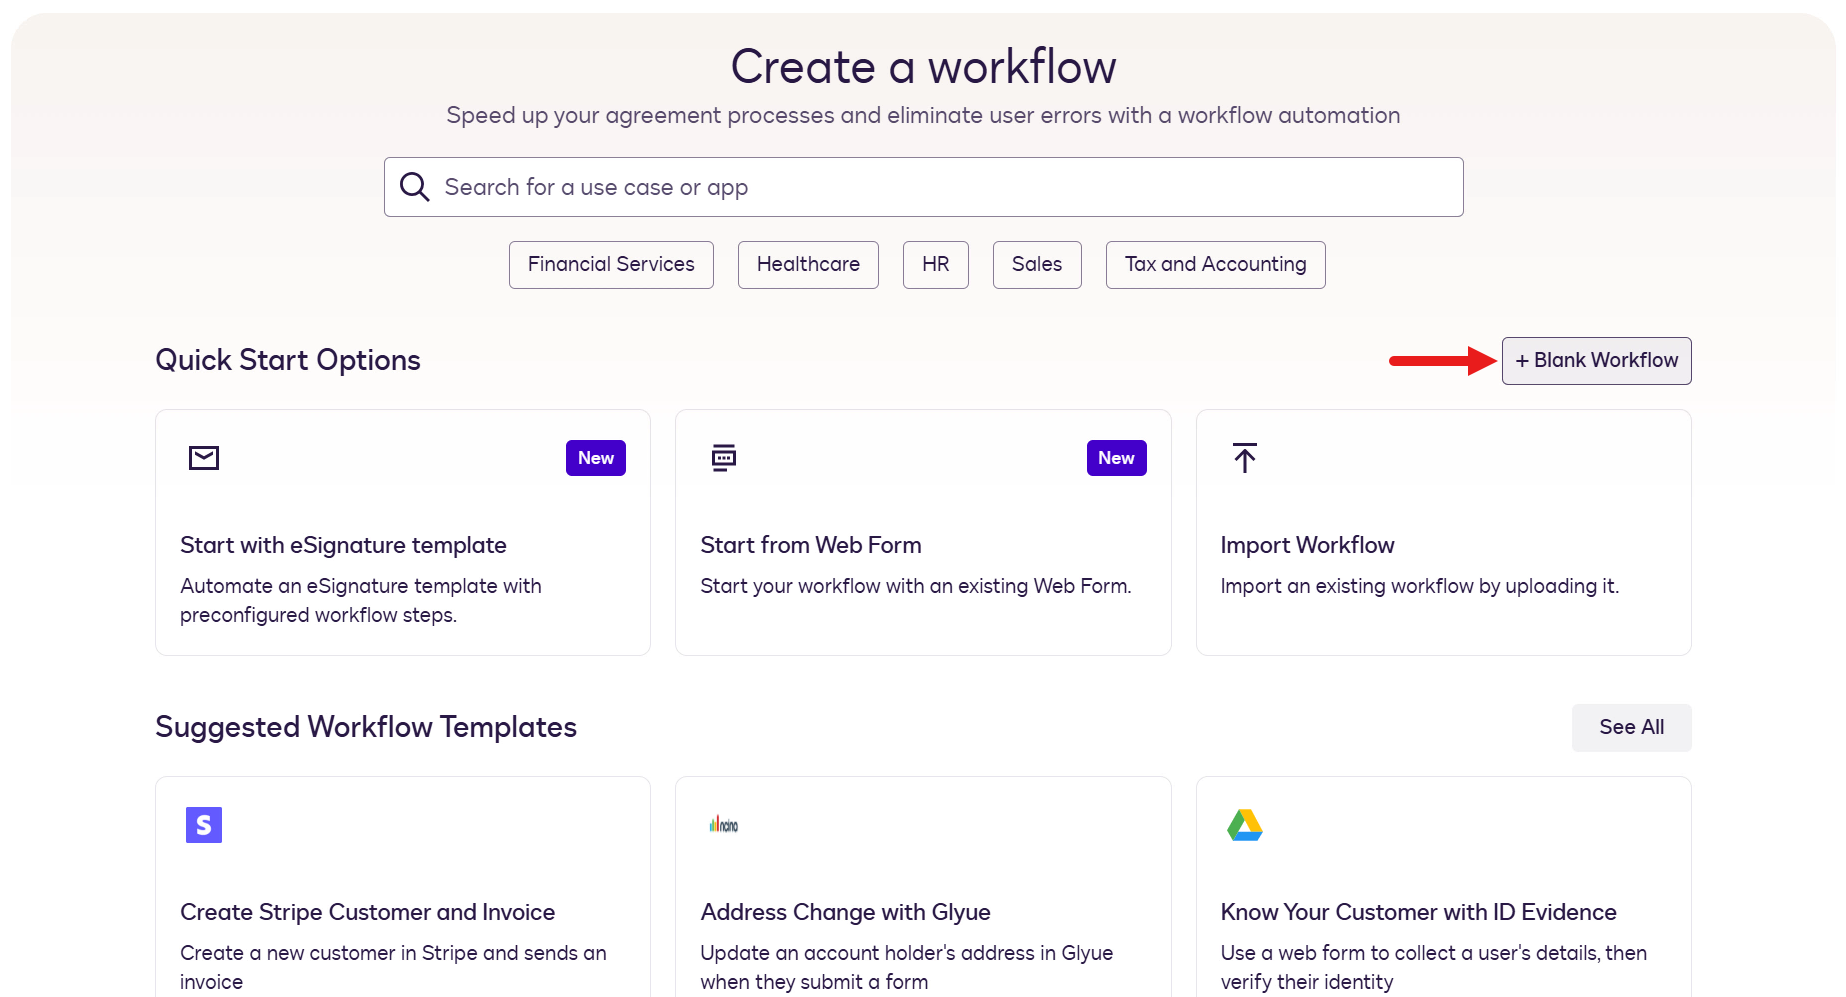
Navigate to Agreements and select Workflows. Then select Create Workflow.
Note: The label on the menu has since changed from Maestro Workflows to Workflows.
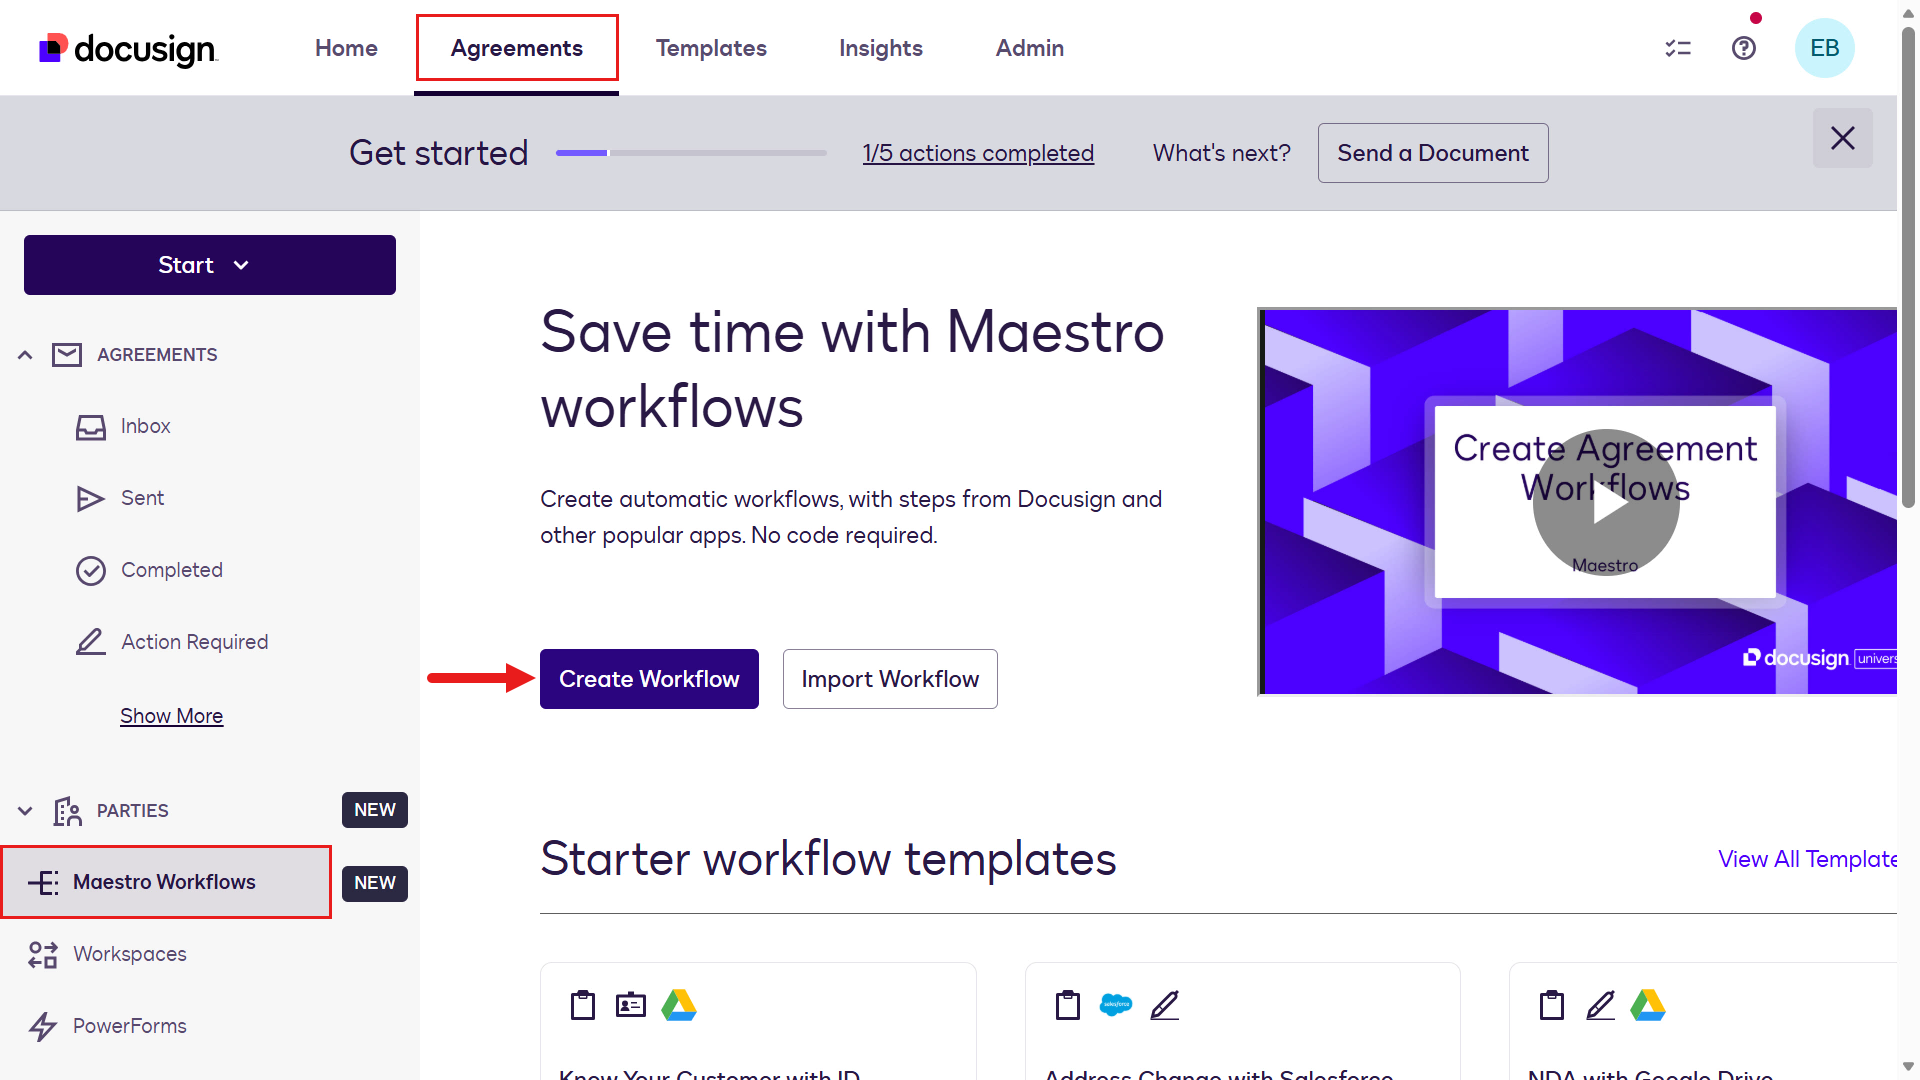
Select +Blank Workflow
The Workflow Builder designer will now load. Select the ellipsis (...) icon and select Rename to name our workflow.
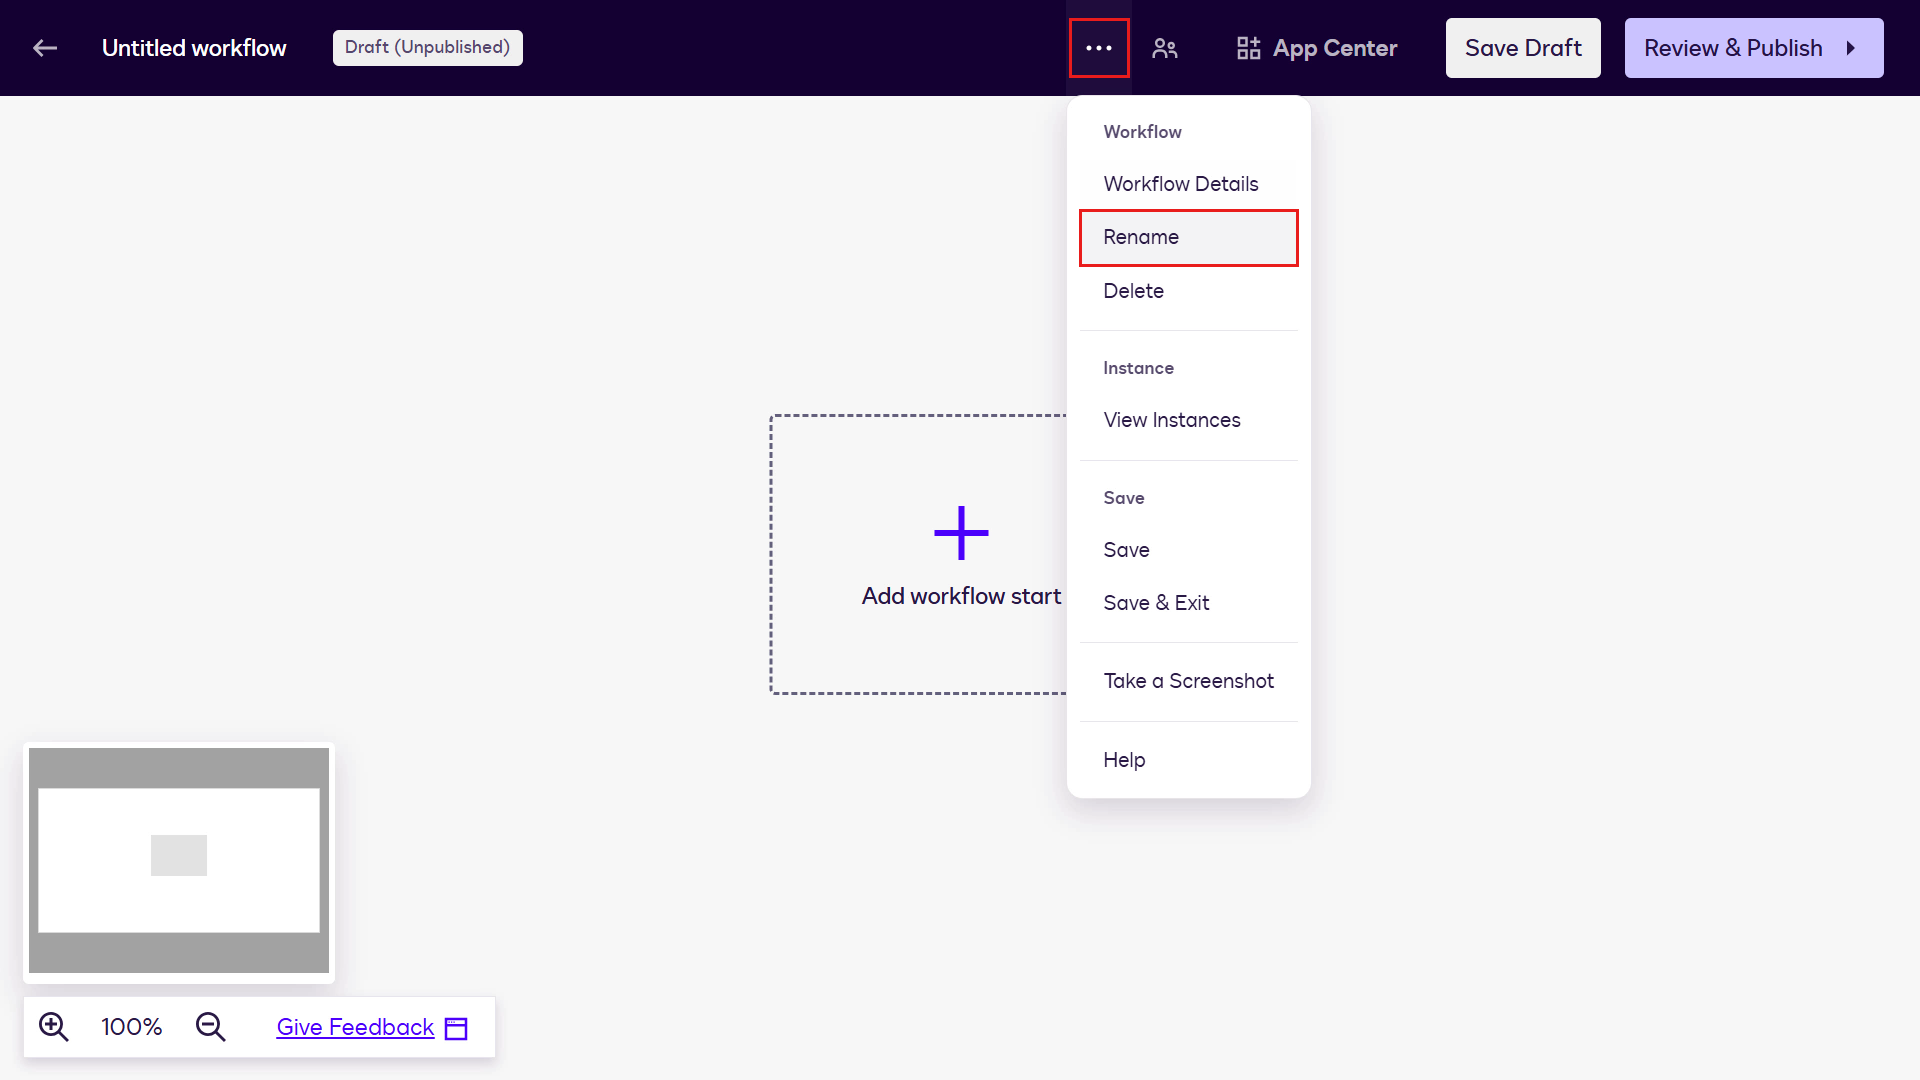
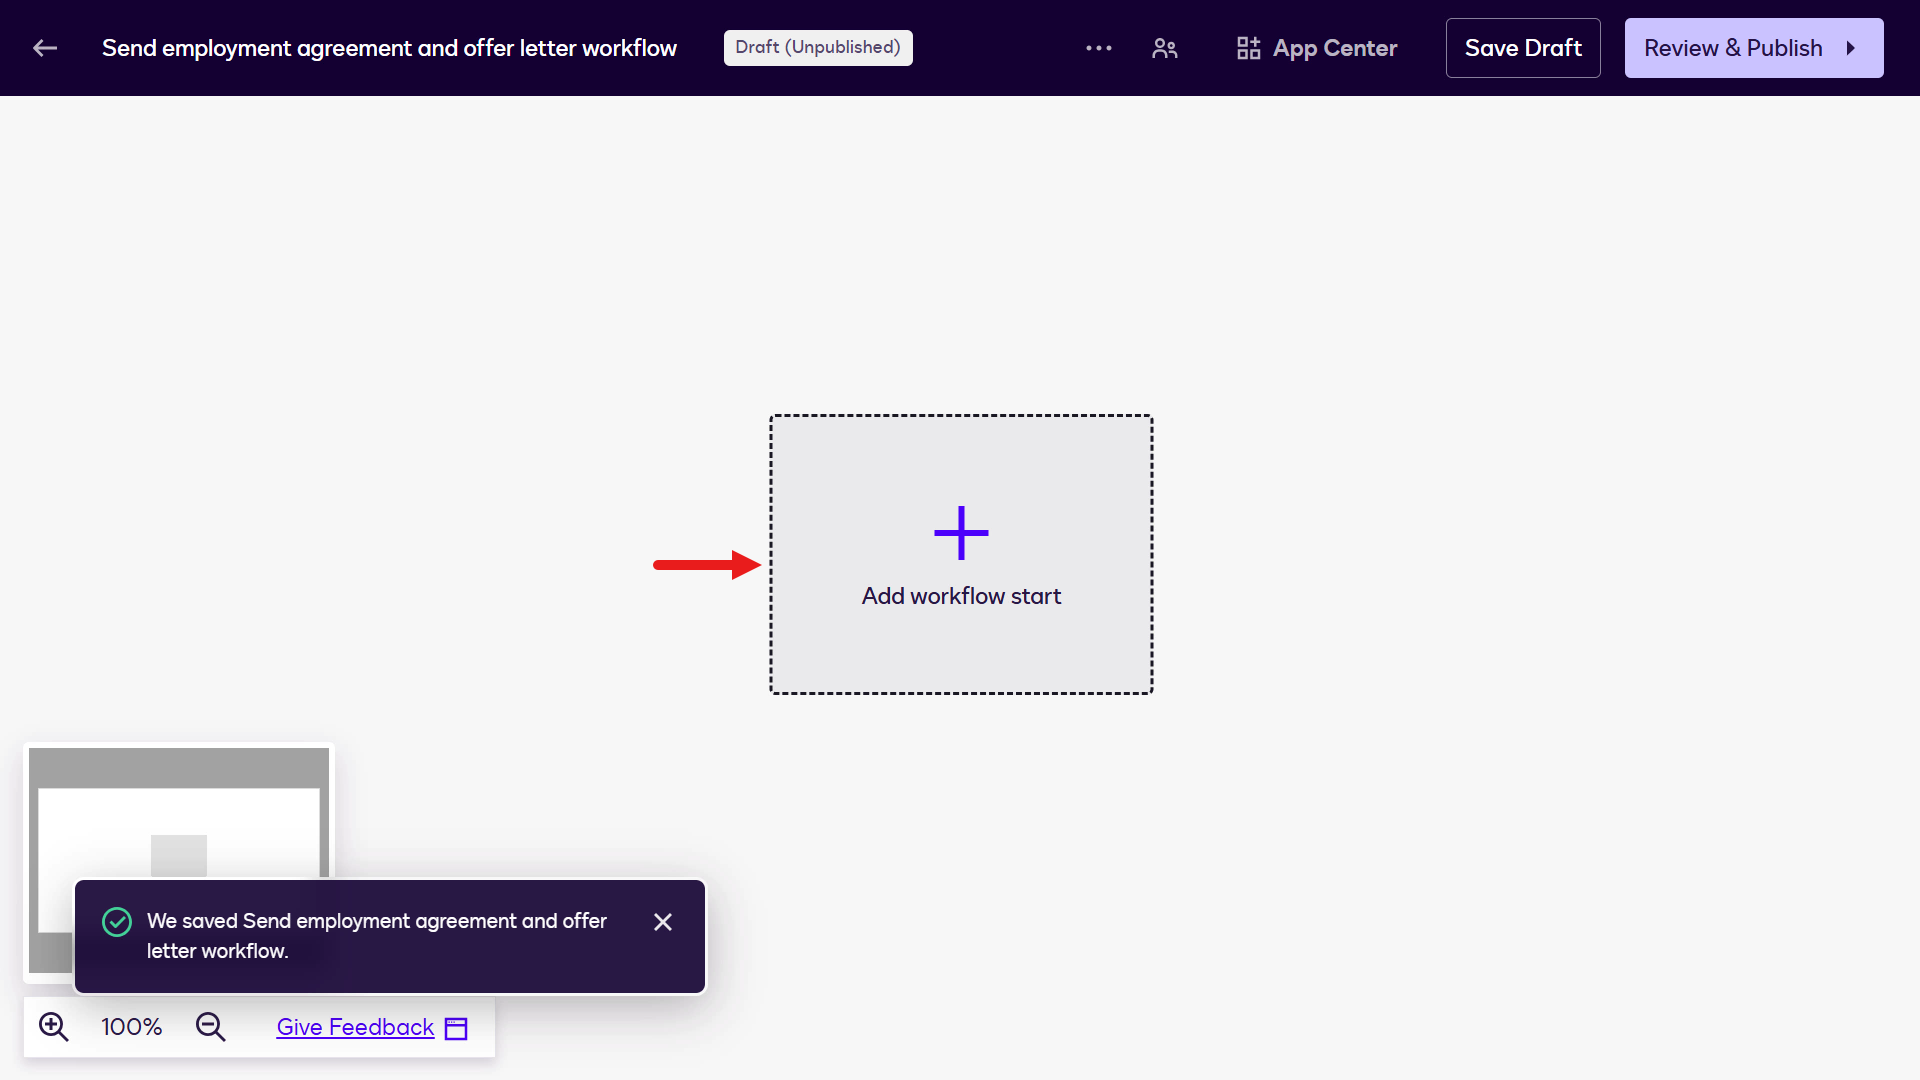
Enter the following as the name of the workflow and select Save.
textSend employment agreement and offer letter workflow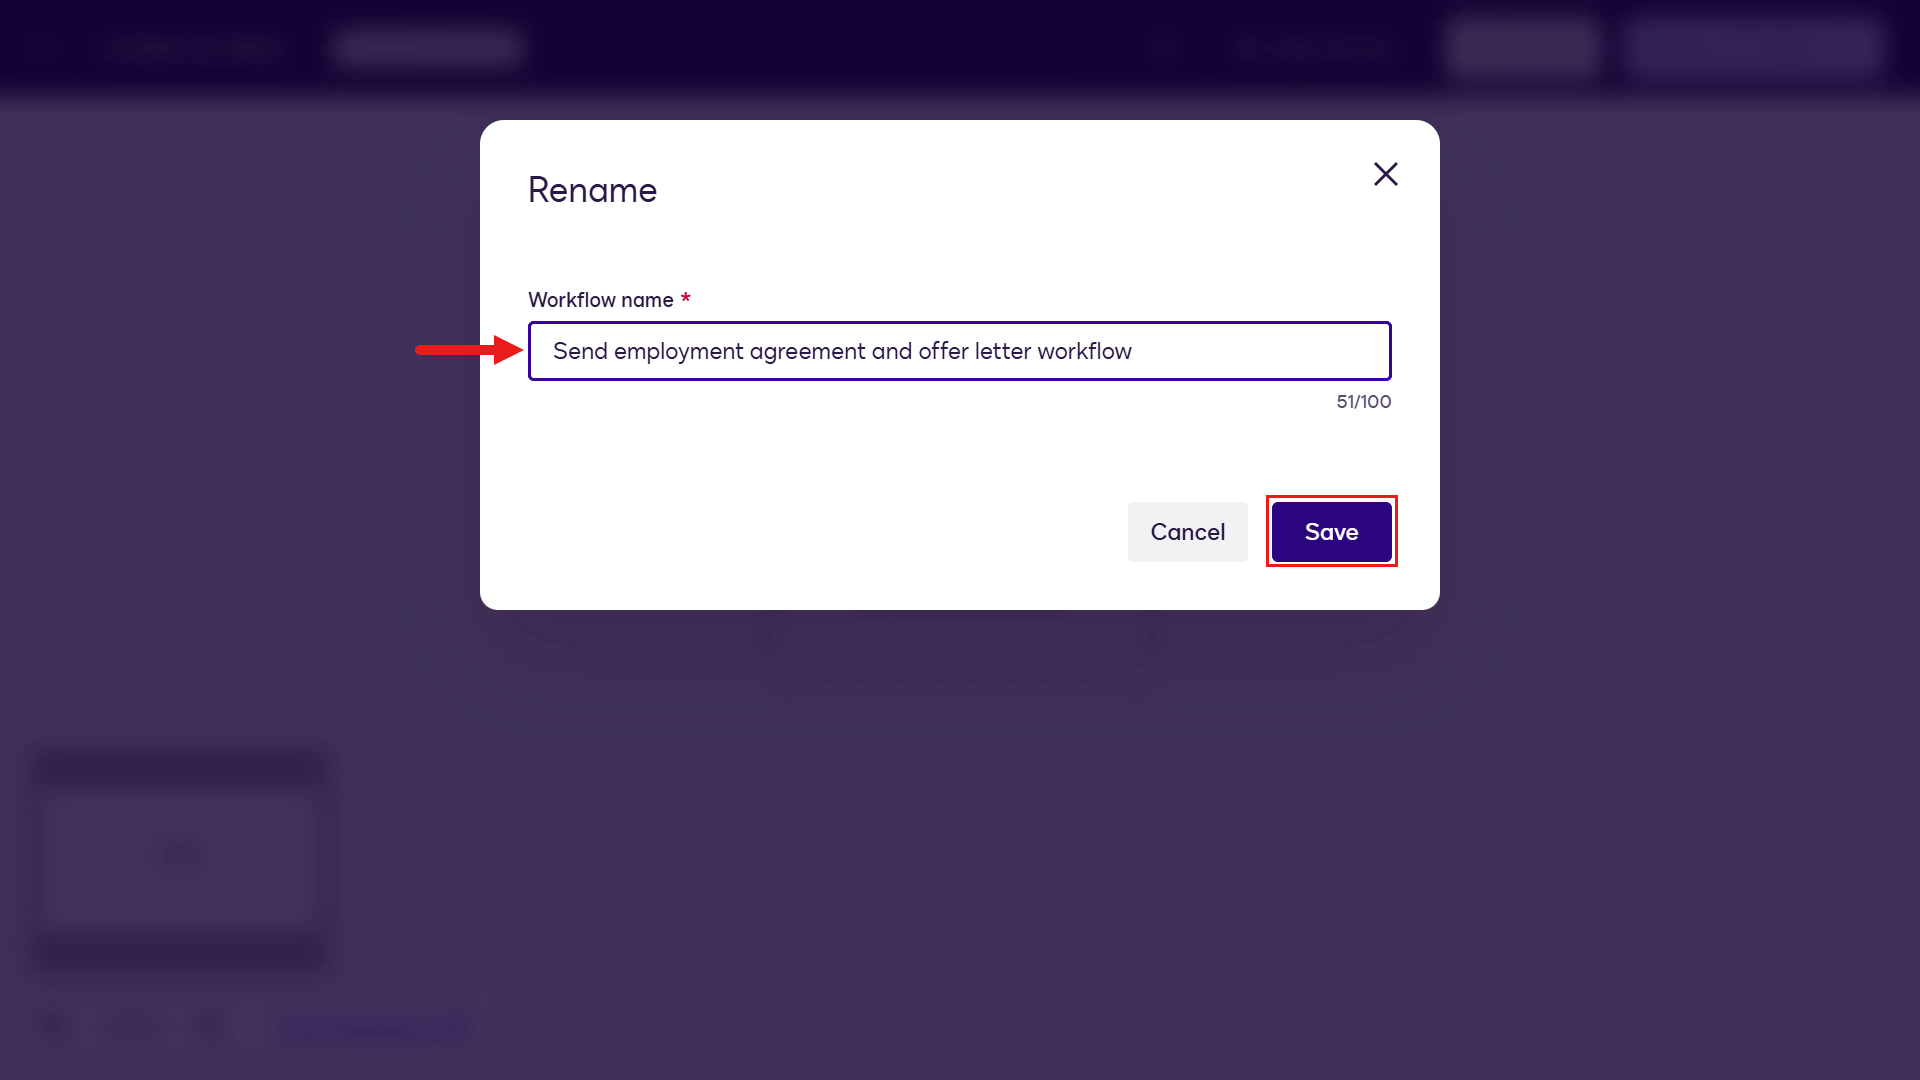
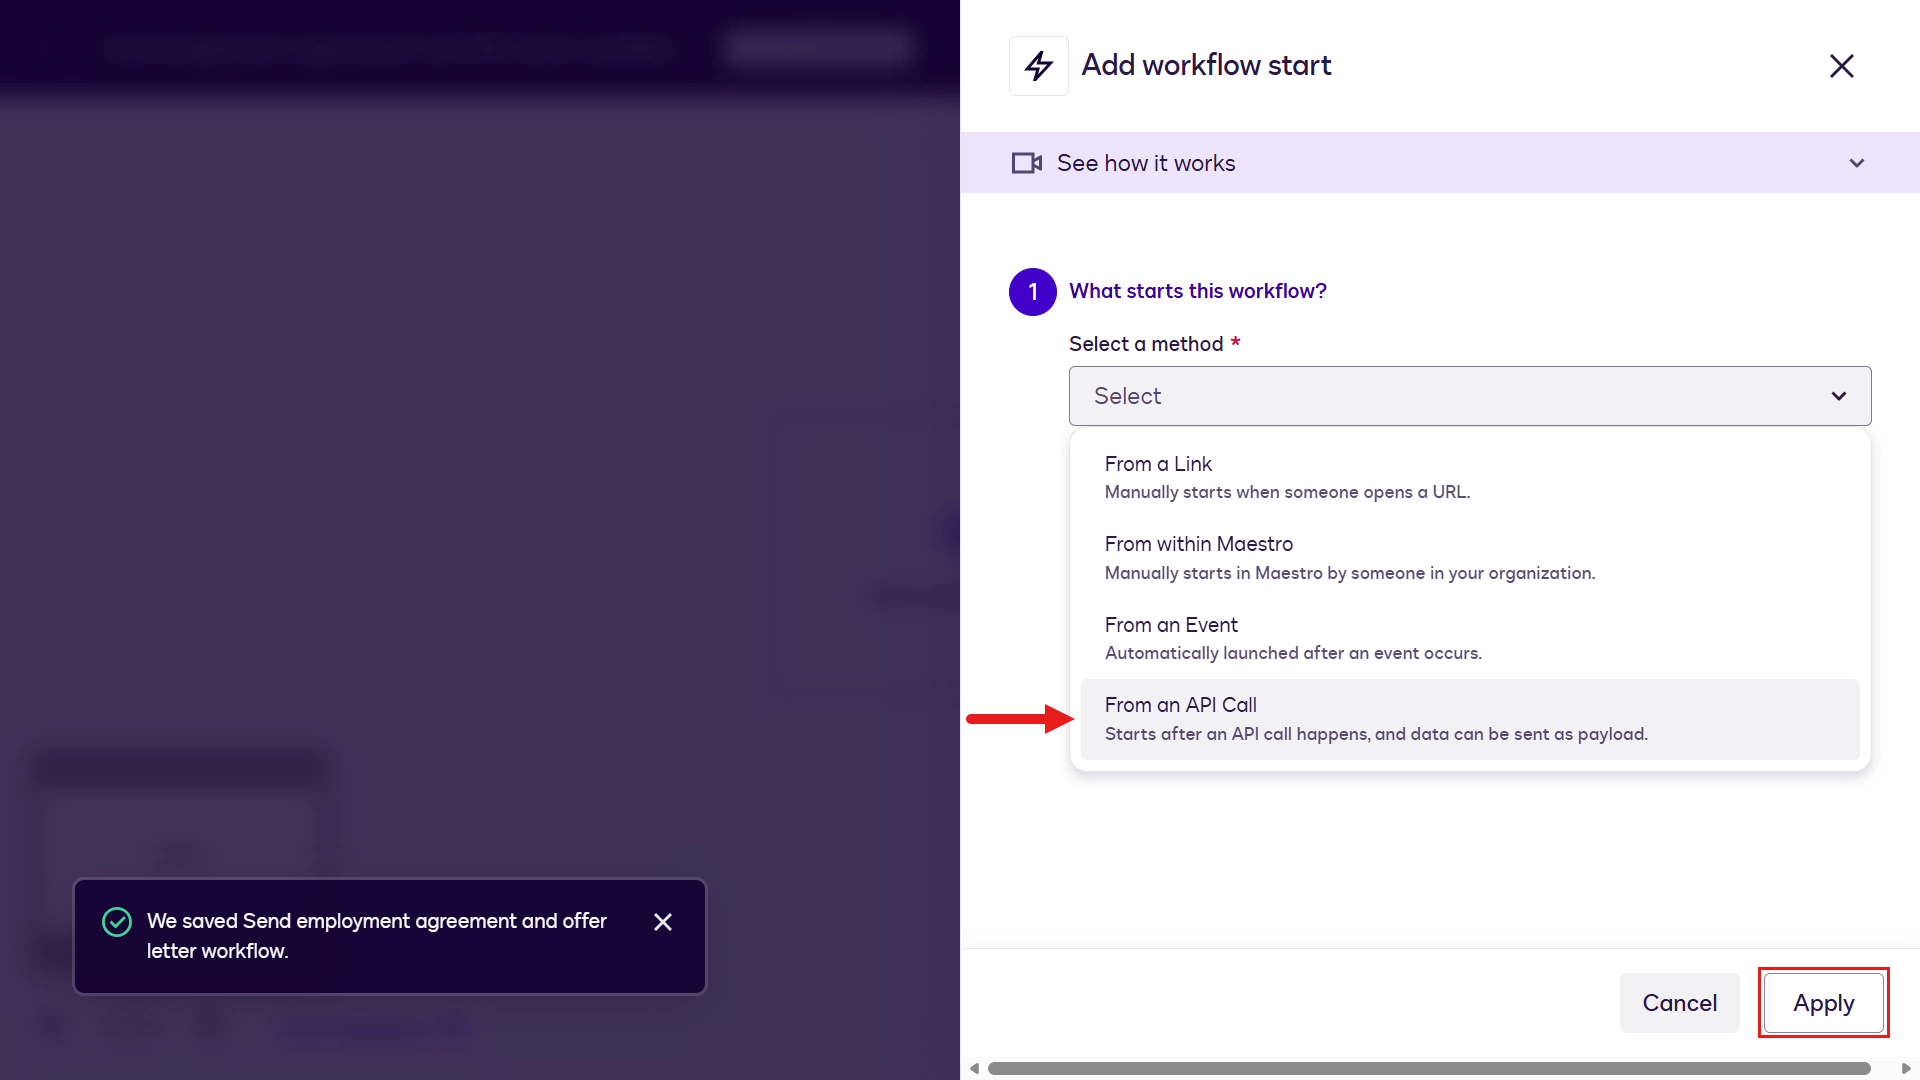
Select Add workflow start. This step in the workflow determines how the workflow will be initiated.
There are several start methods. Select From an API Call so the agent built in Microsoft Copilot Studio can invoke the workflow through the Docusign MCP Demo server.
Select Apply.
Select Next.

Now add variables that act as workflow input parameters. Data sent from the agent built in Microsoft Copilot Studio will be consumed by other workflow steps.
Select Text.
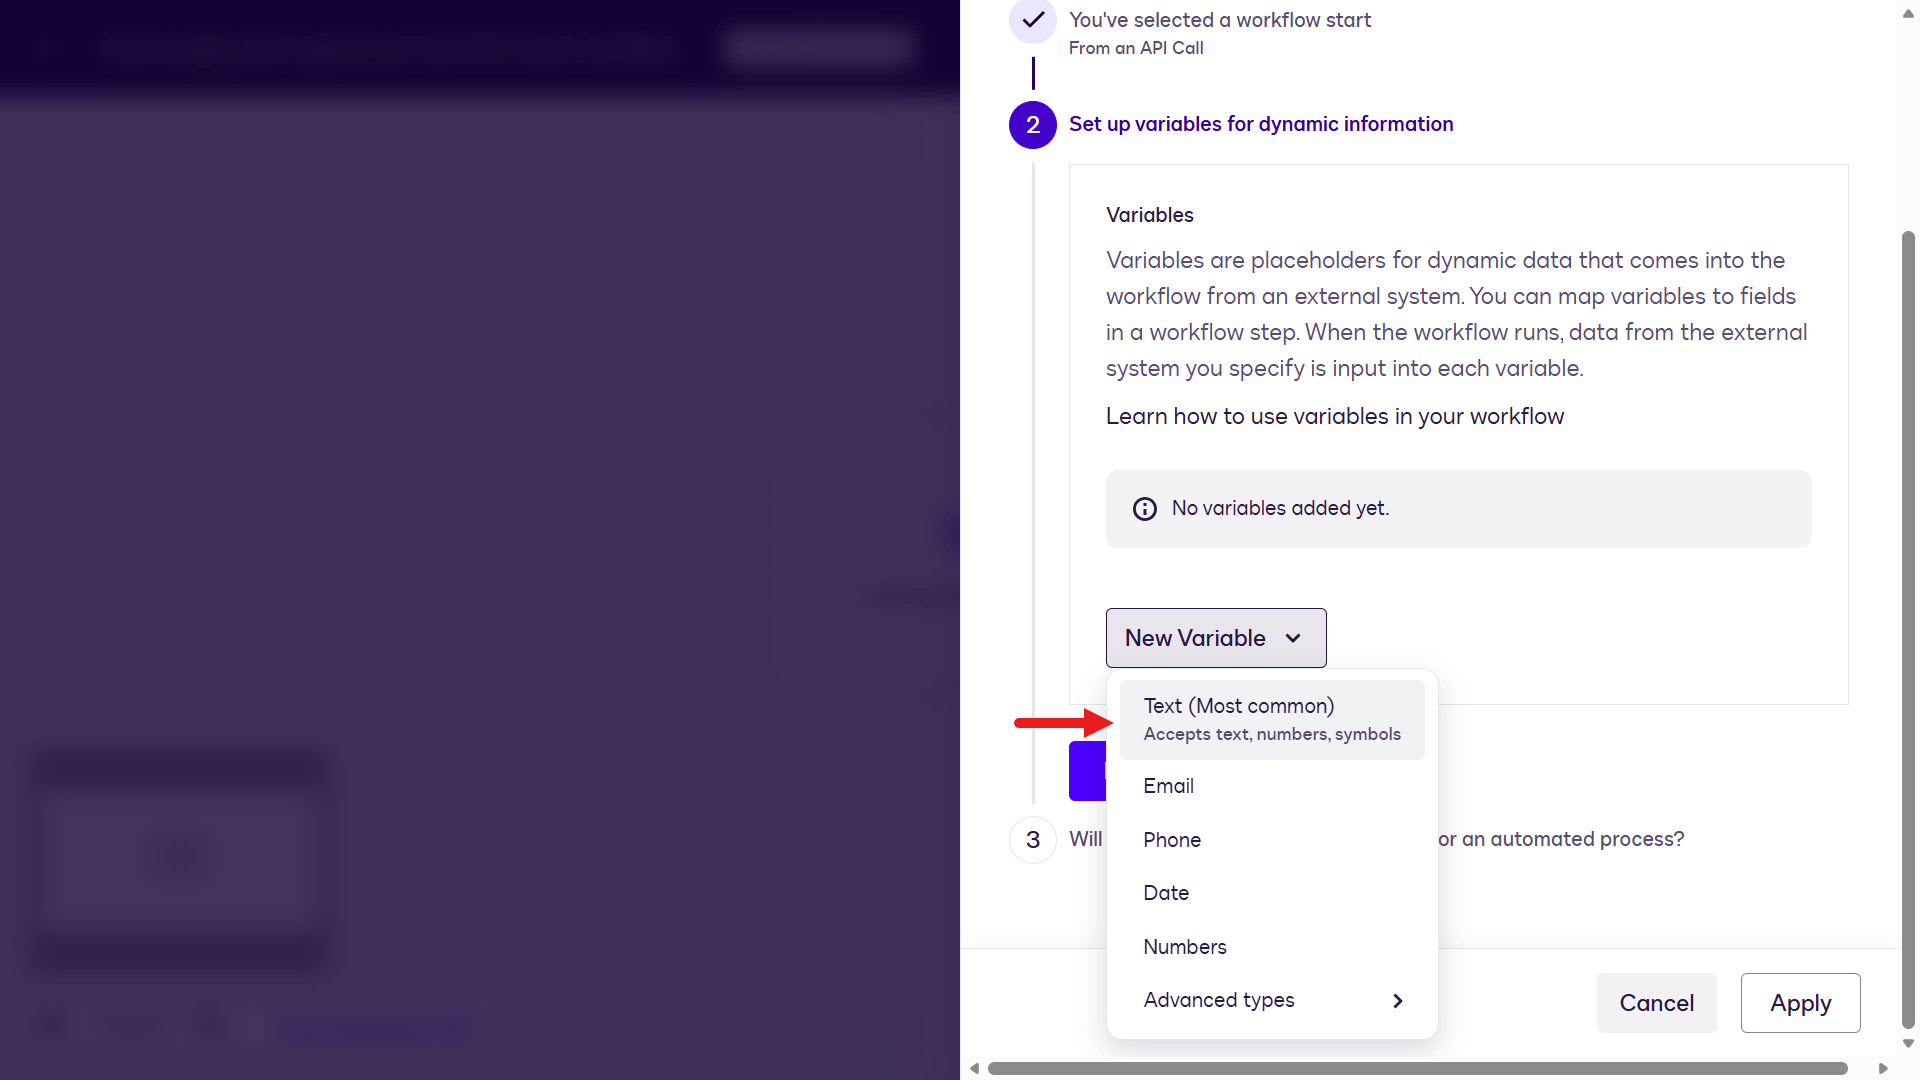
Repeat the same steps to create the remaining variables listed in the table below.
Variable type Value Text Employee Full NameEmail Employee EmailText Employee PositionDate Effective DateText SalaryText Hiring Manager Full NameEmail Hiring Manager EmailDate Due Signed DateDate Start Date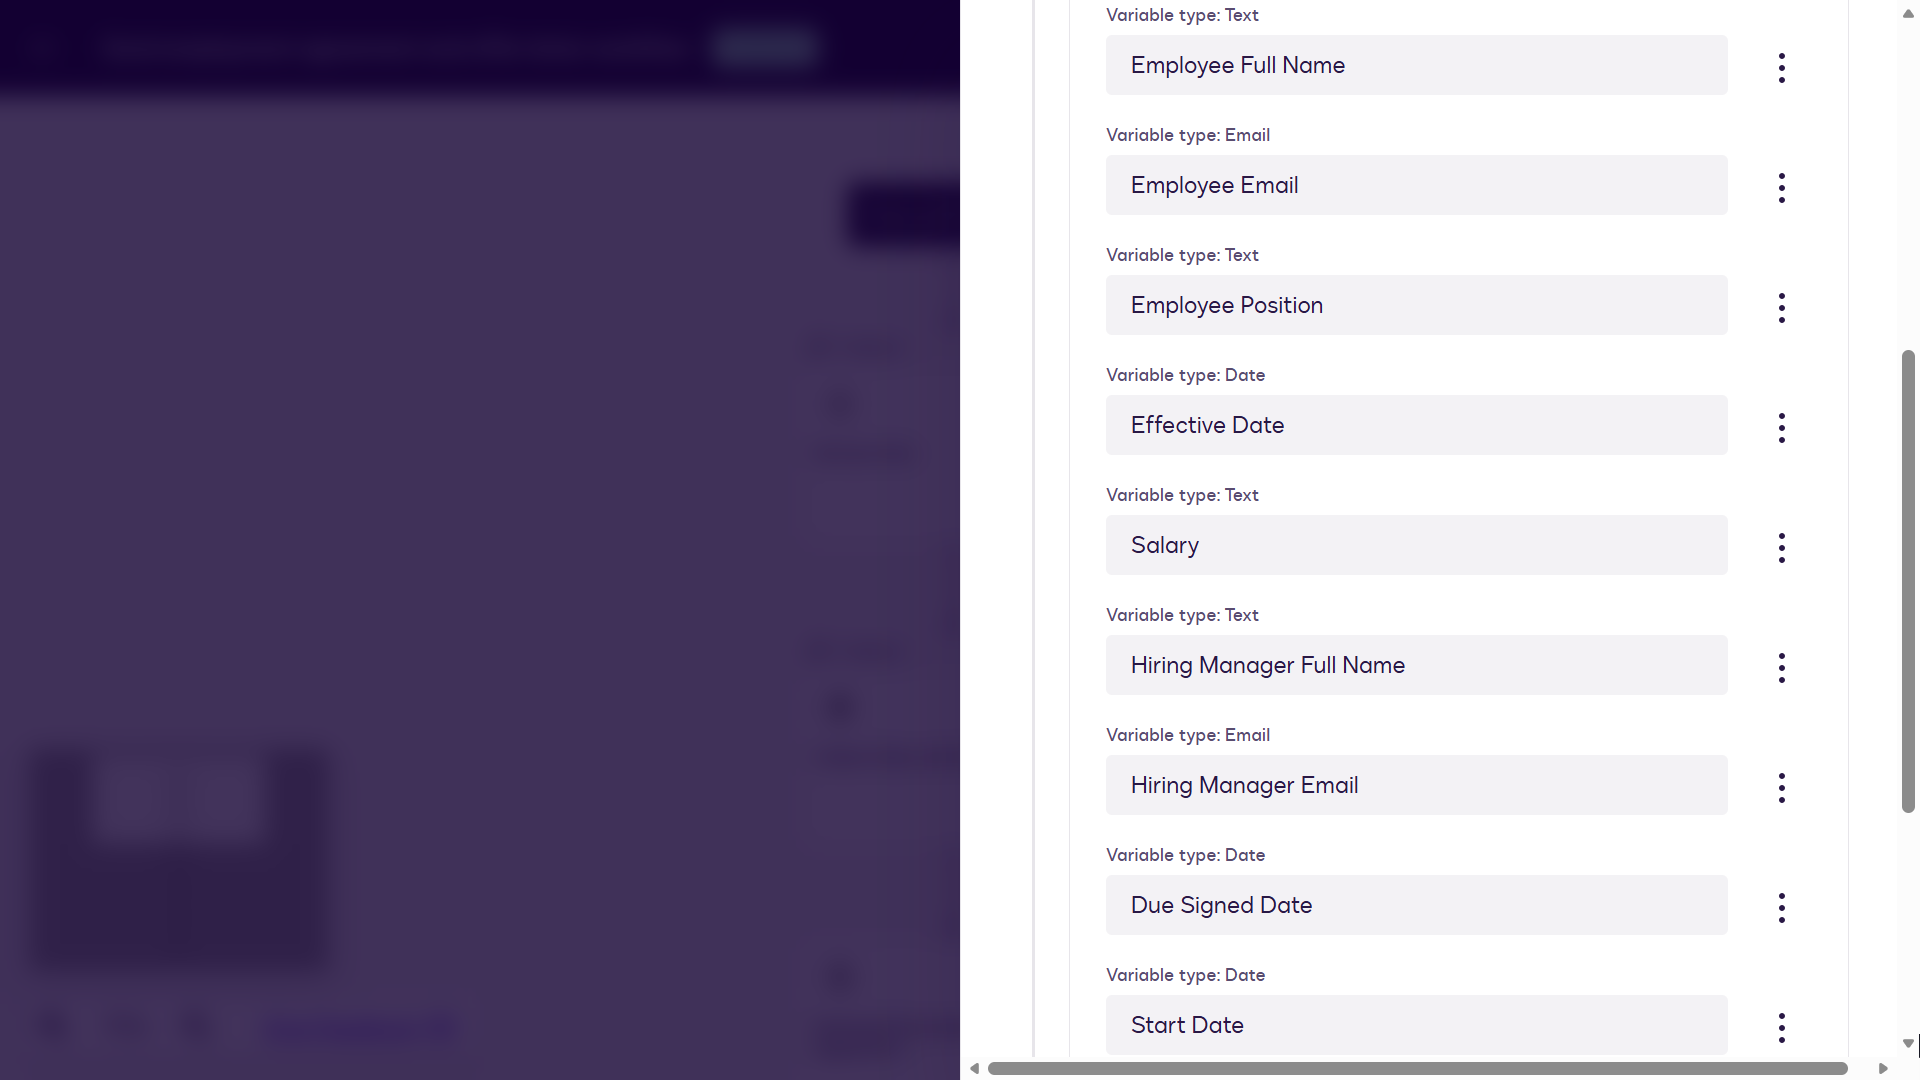
Now that the variables have been configured, we can proceed to the next configuration step. Select Next.
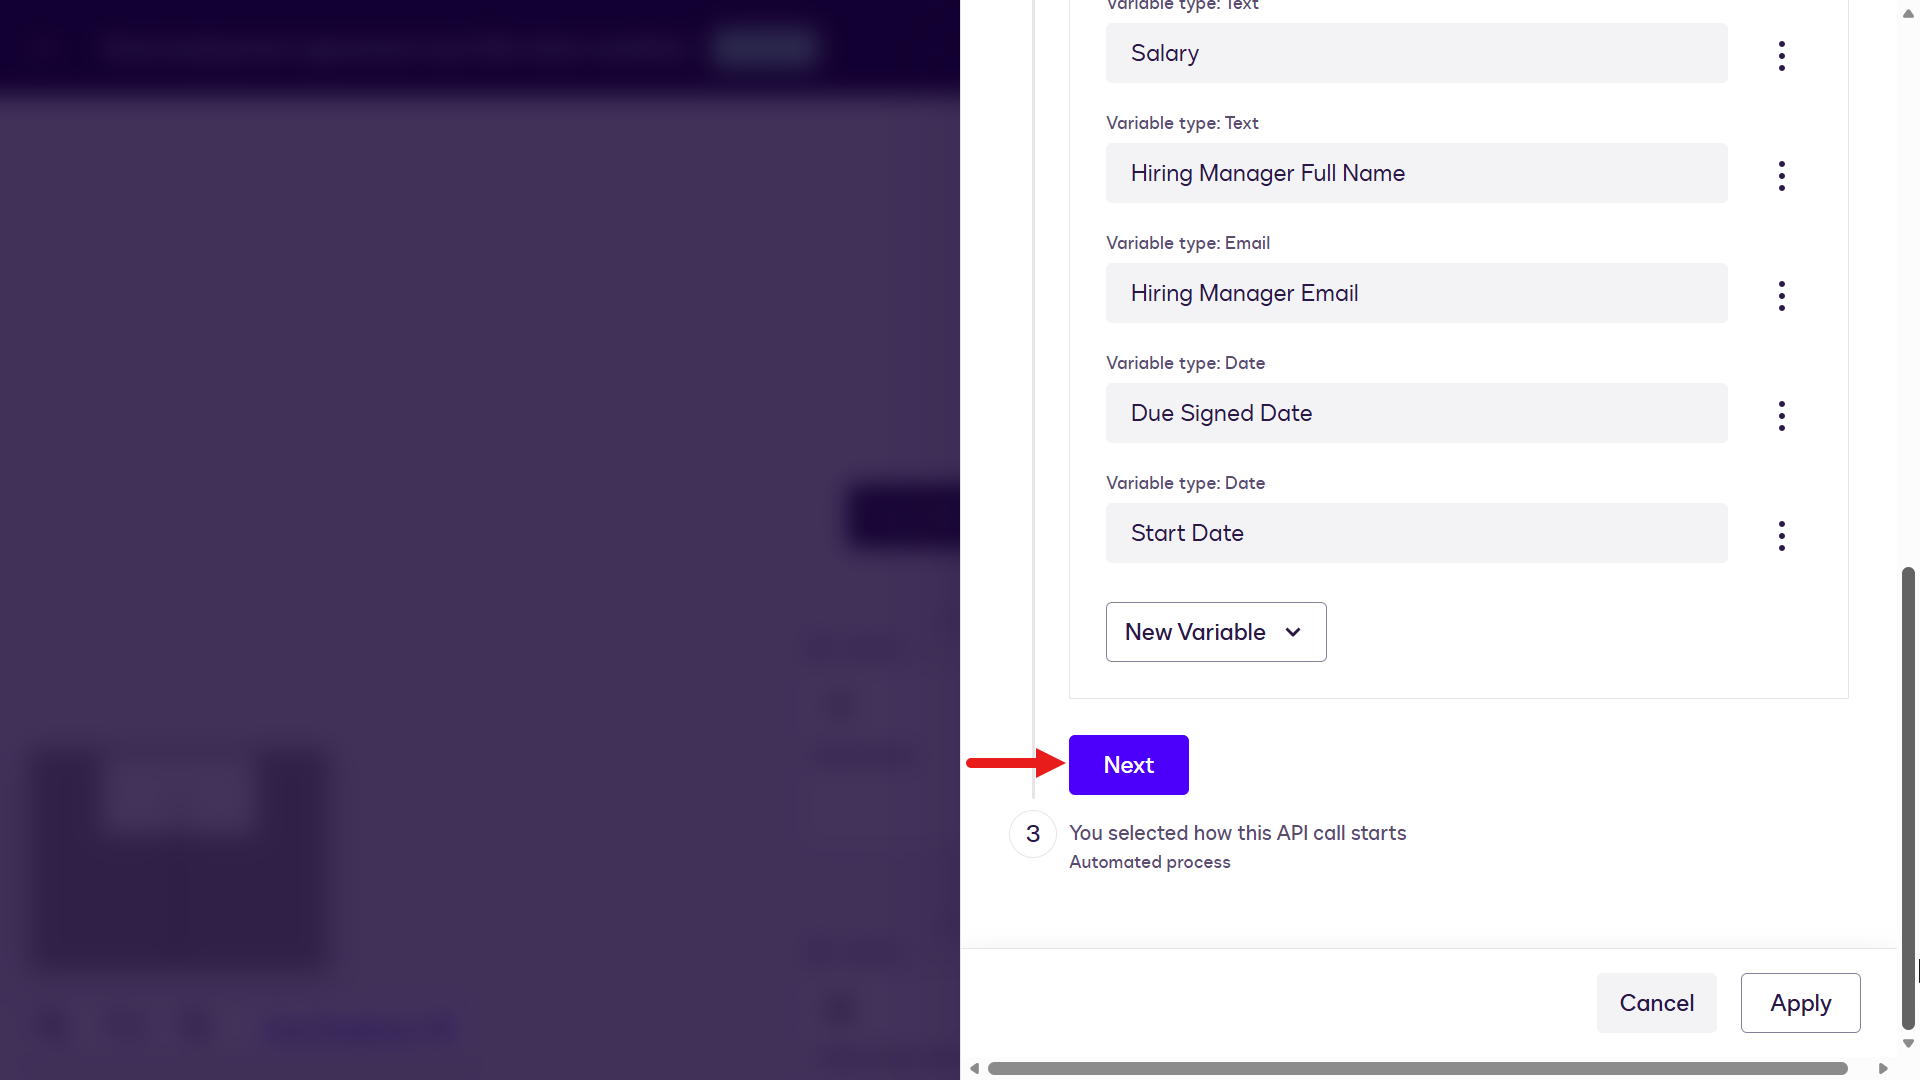
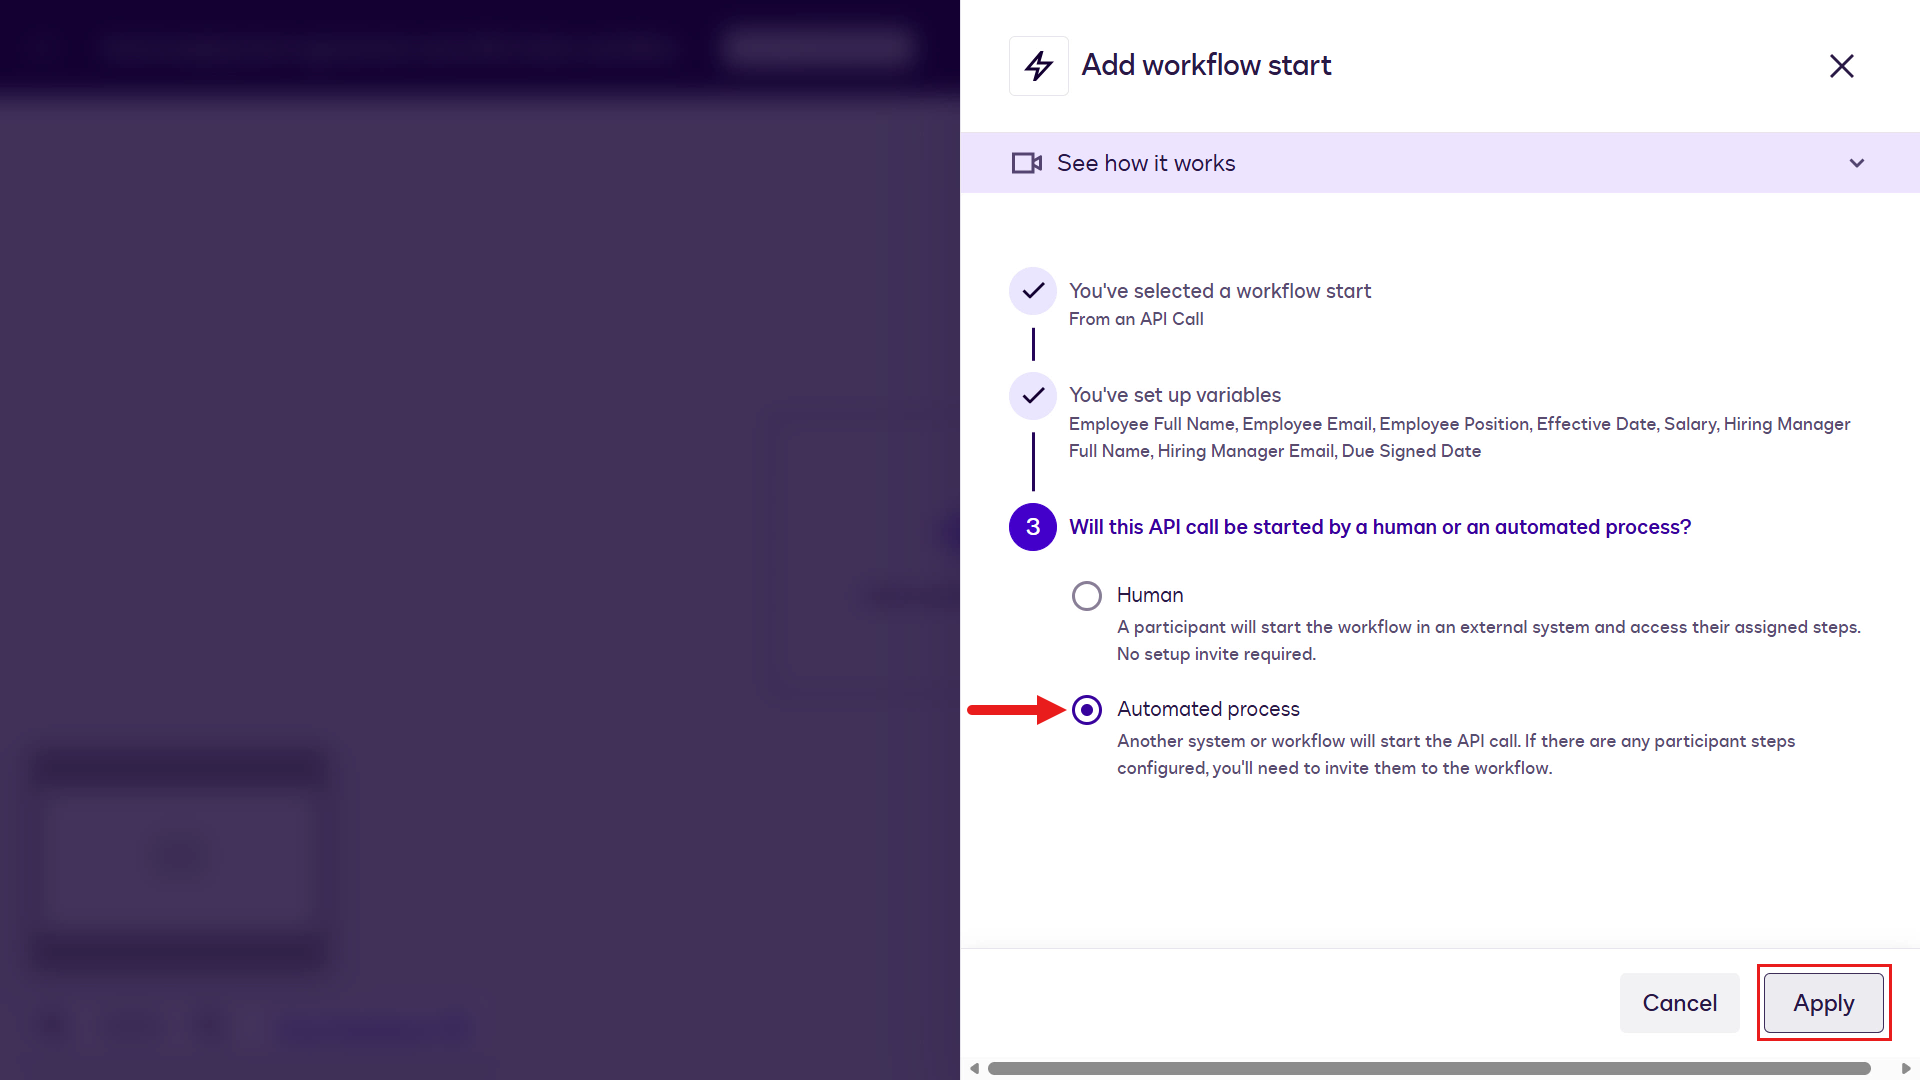
In this step, define how the API call is triggered. Select the second option, Automated process, since the agent built in Microsoft Copilot Studio will invoke the workflow through the Docusign MCP Demo server.
Select Apply. This completes the workflow start step.
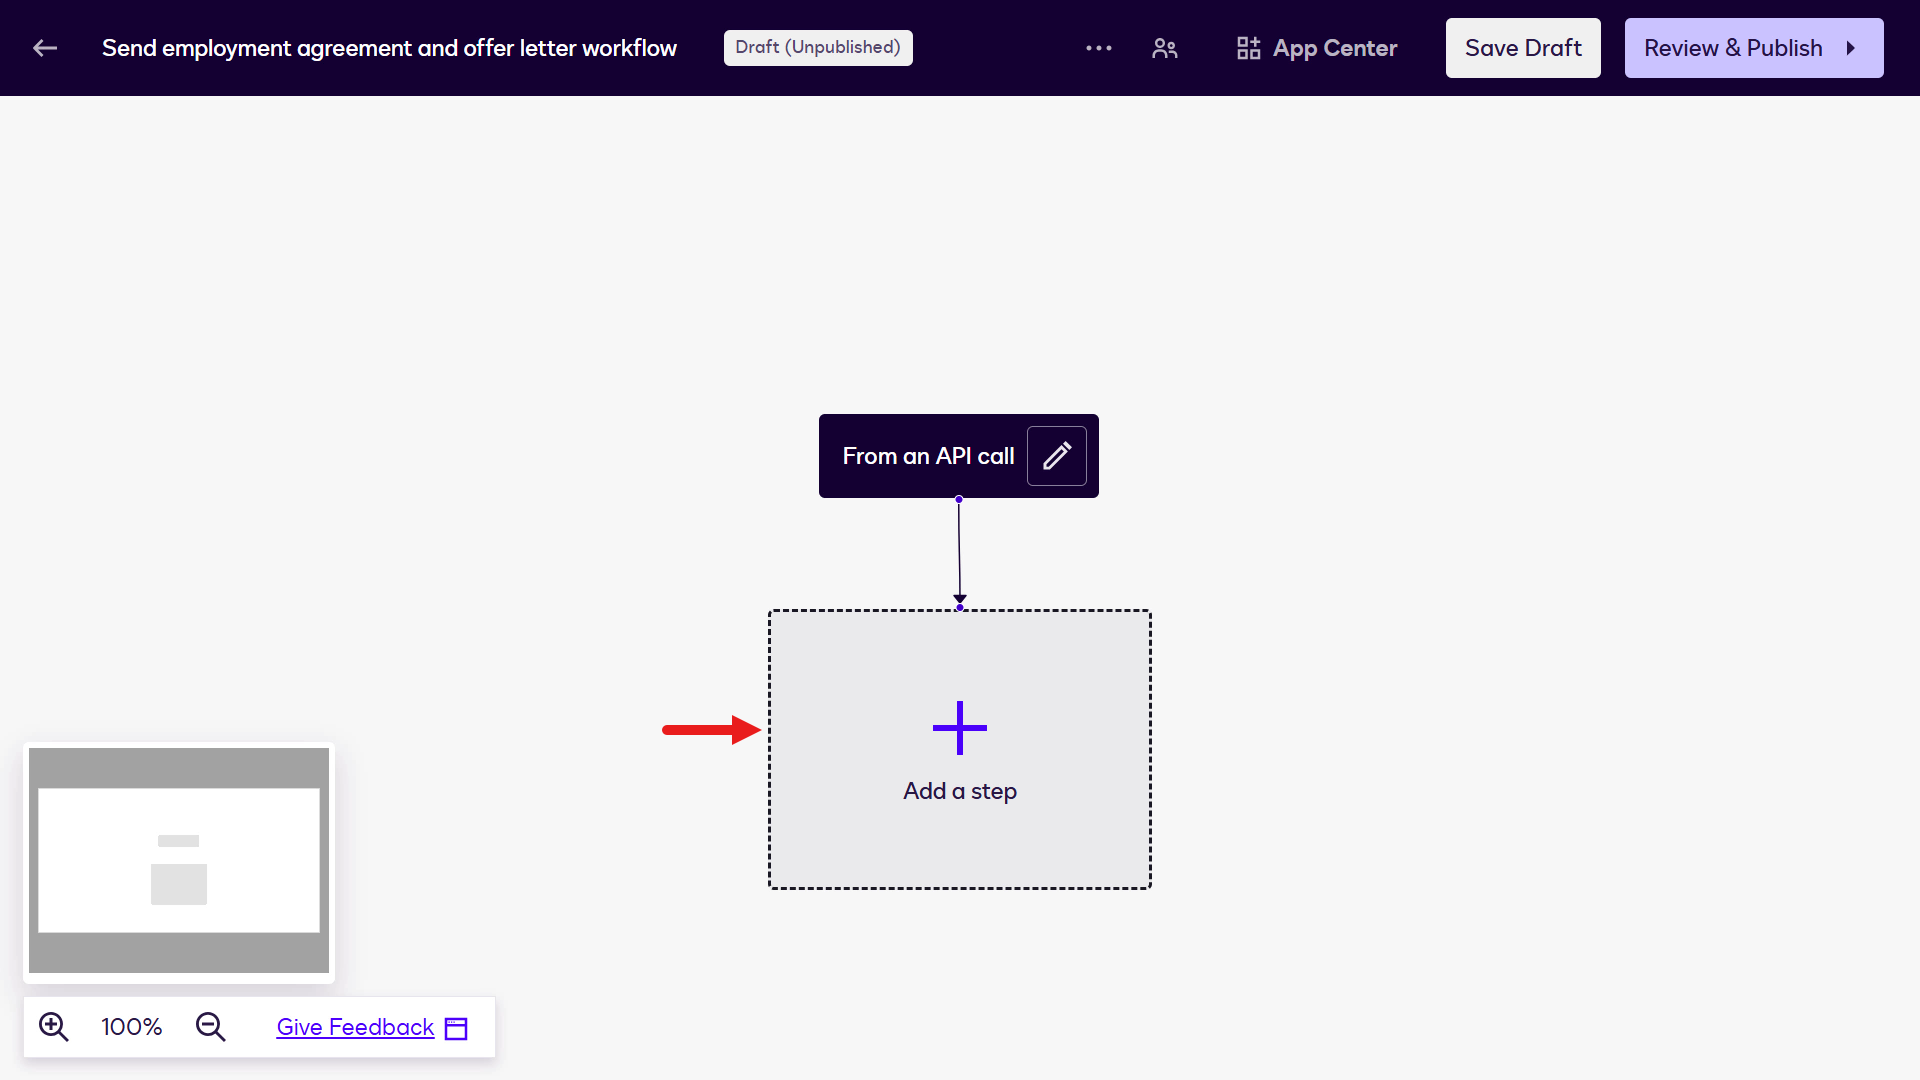
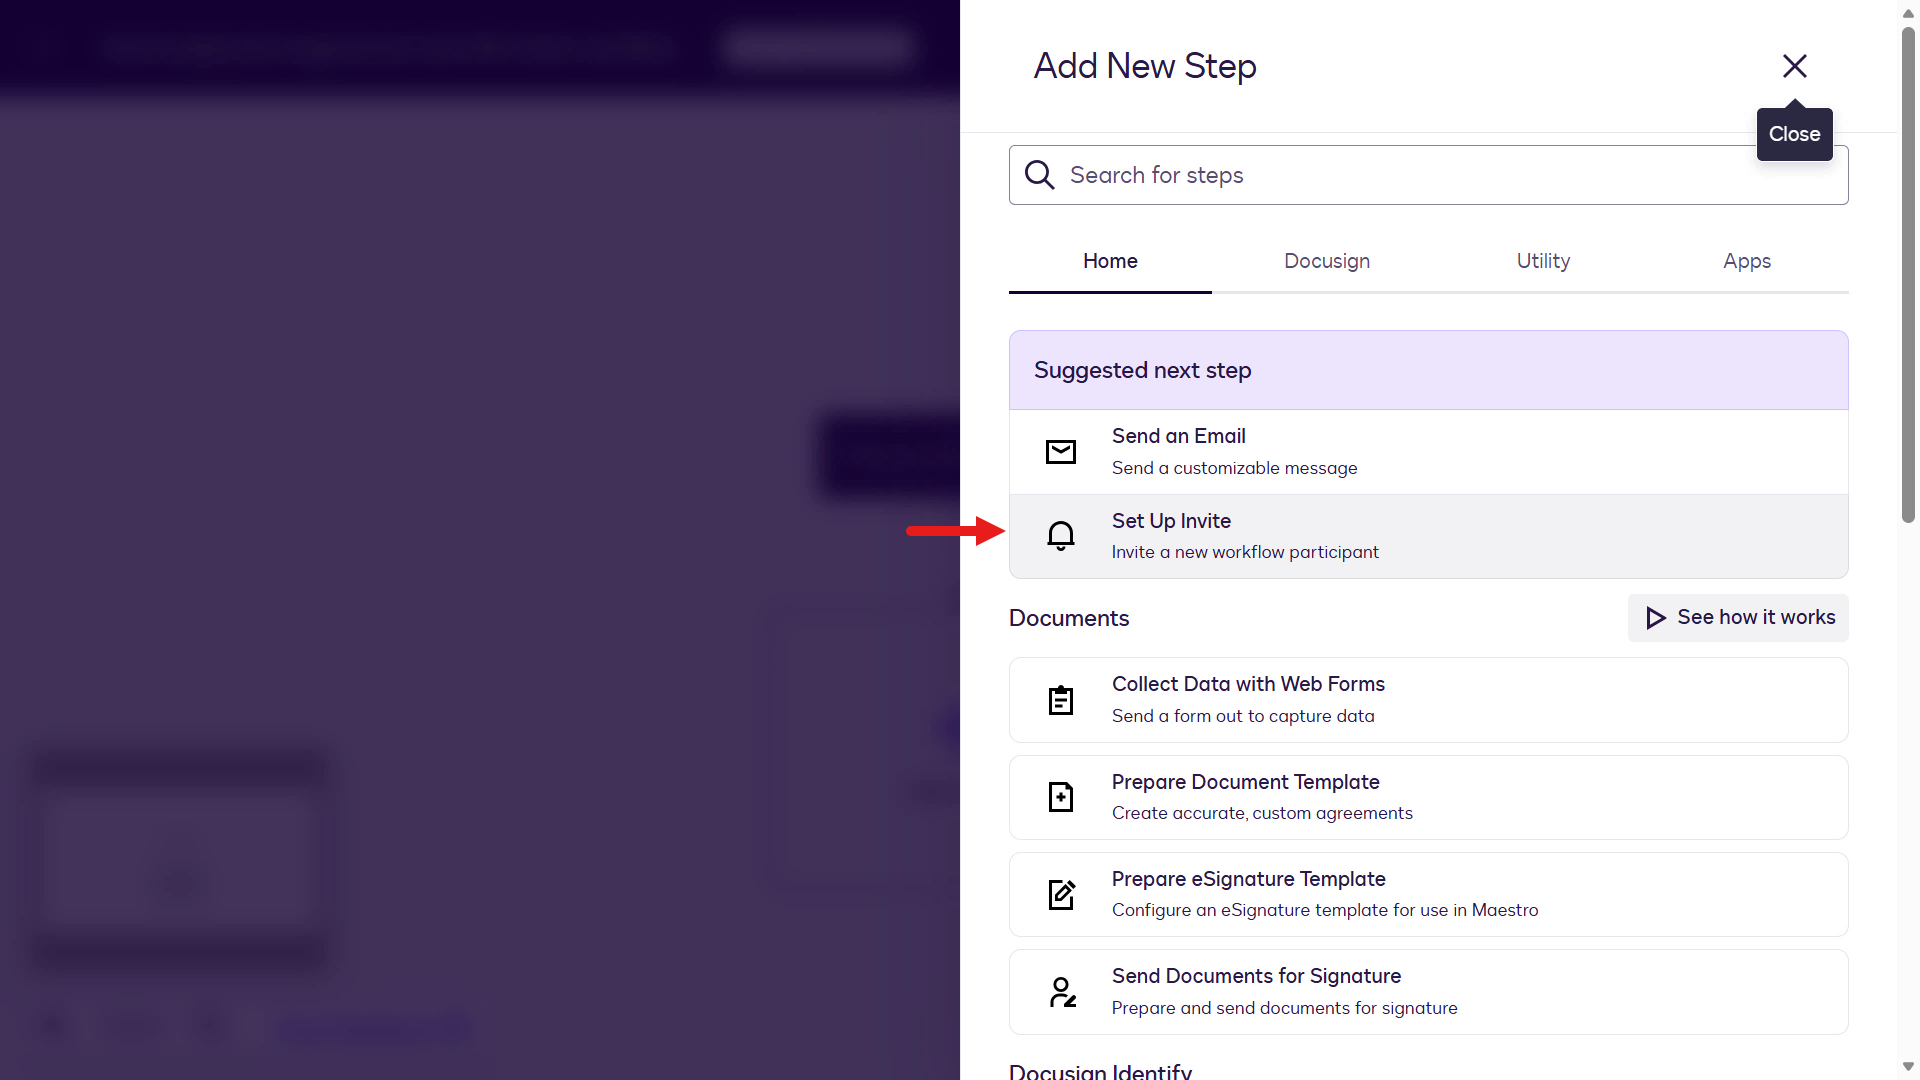
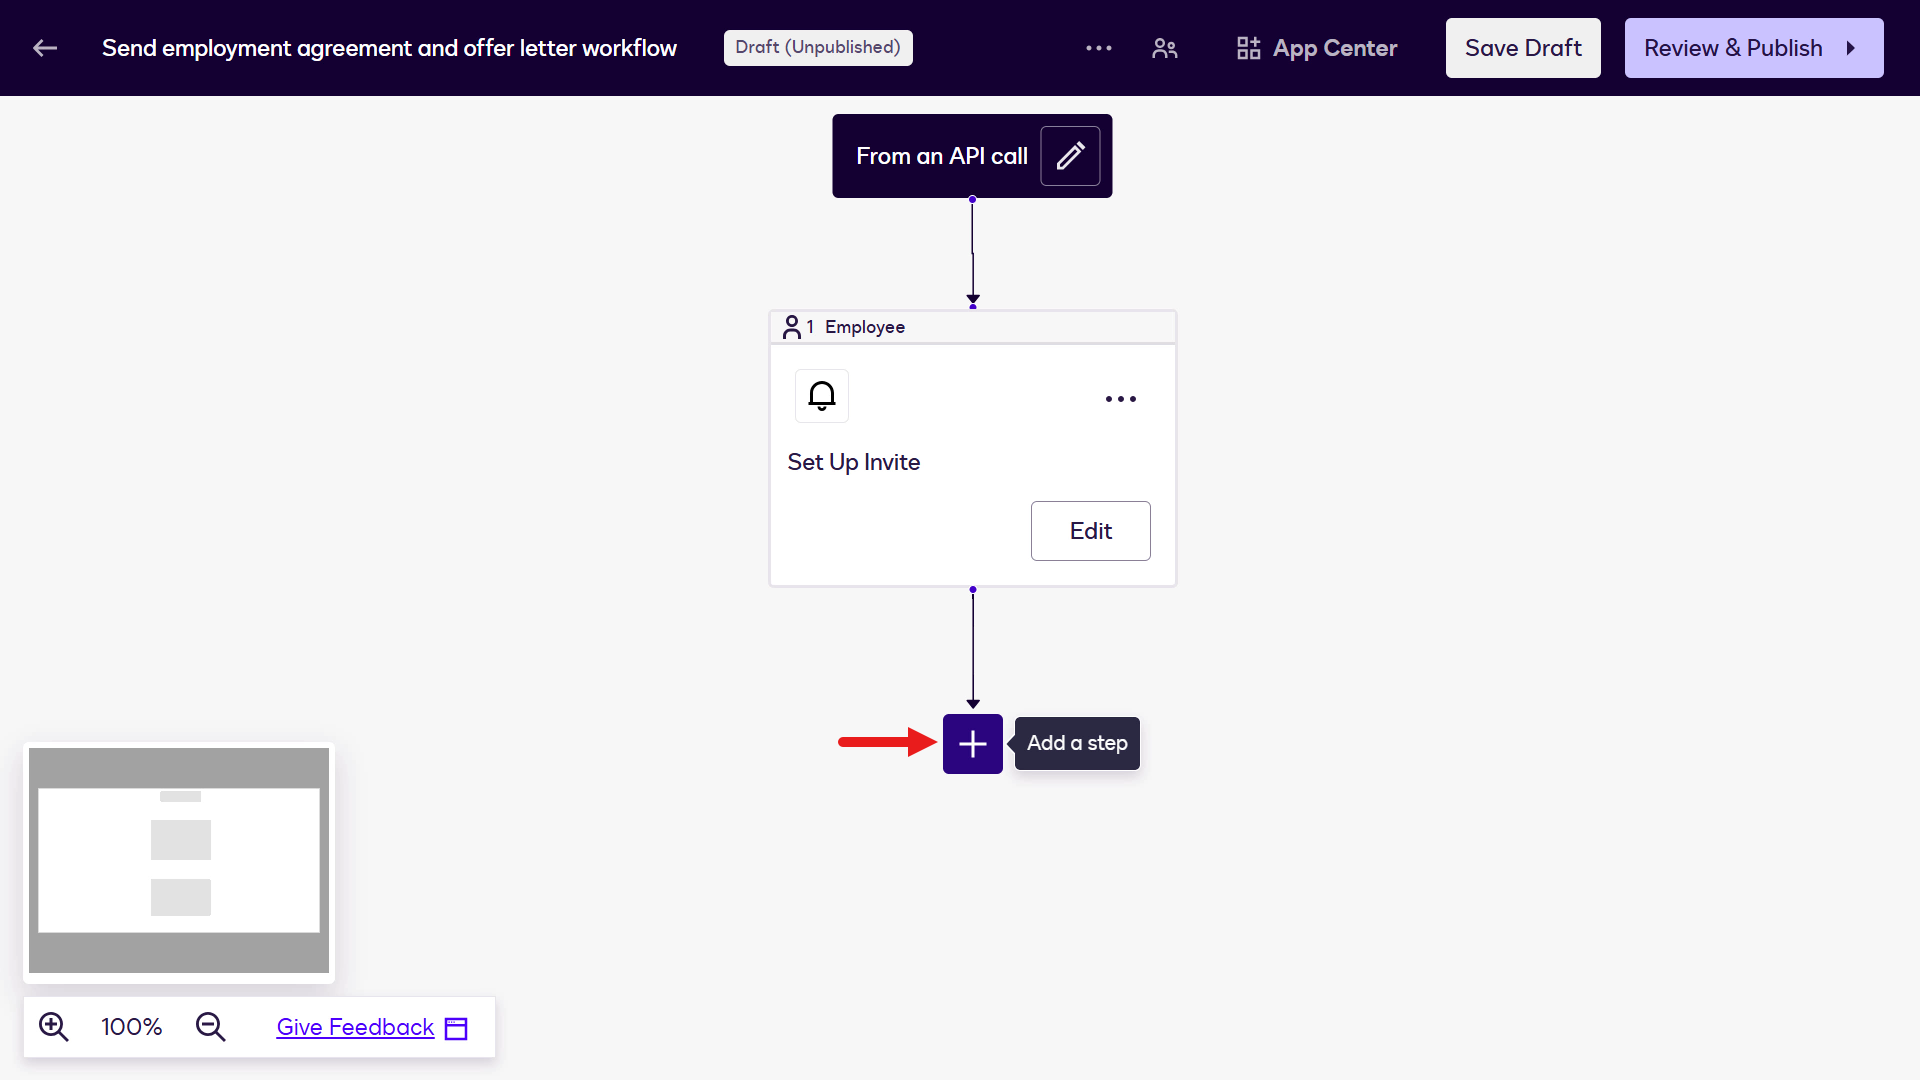
Select Add a step in the workflow designer.
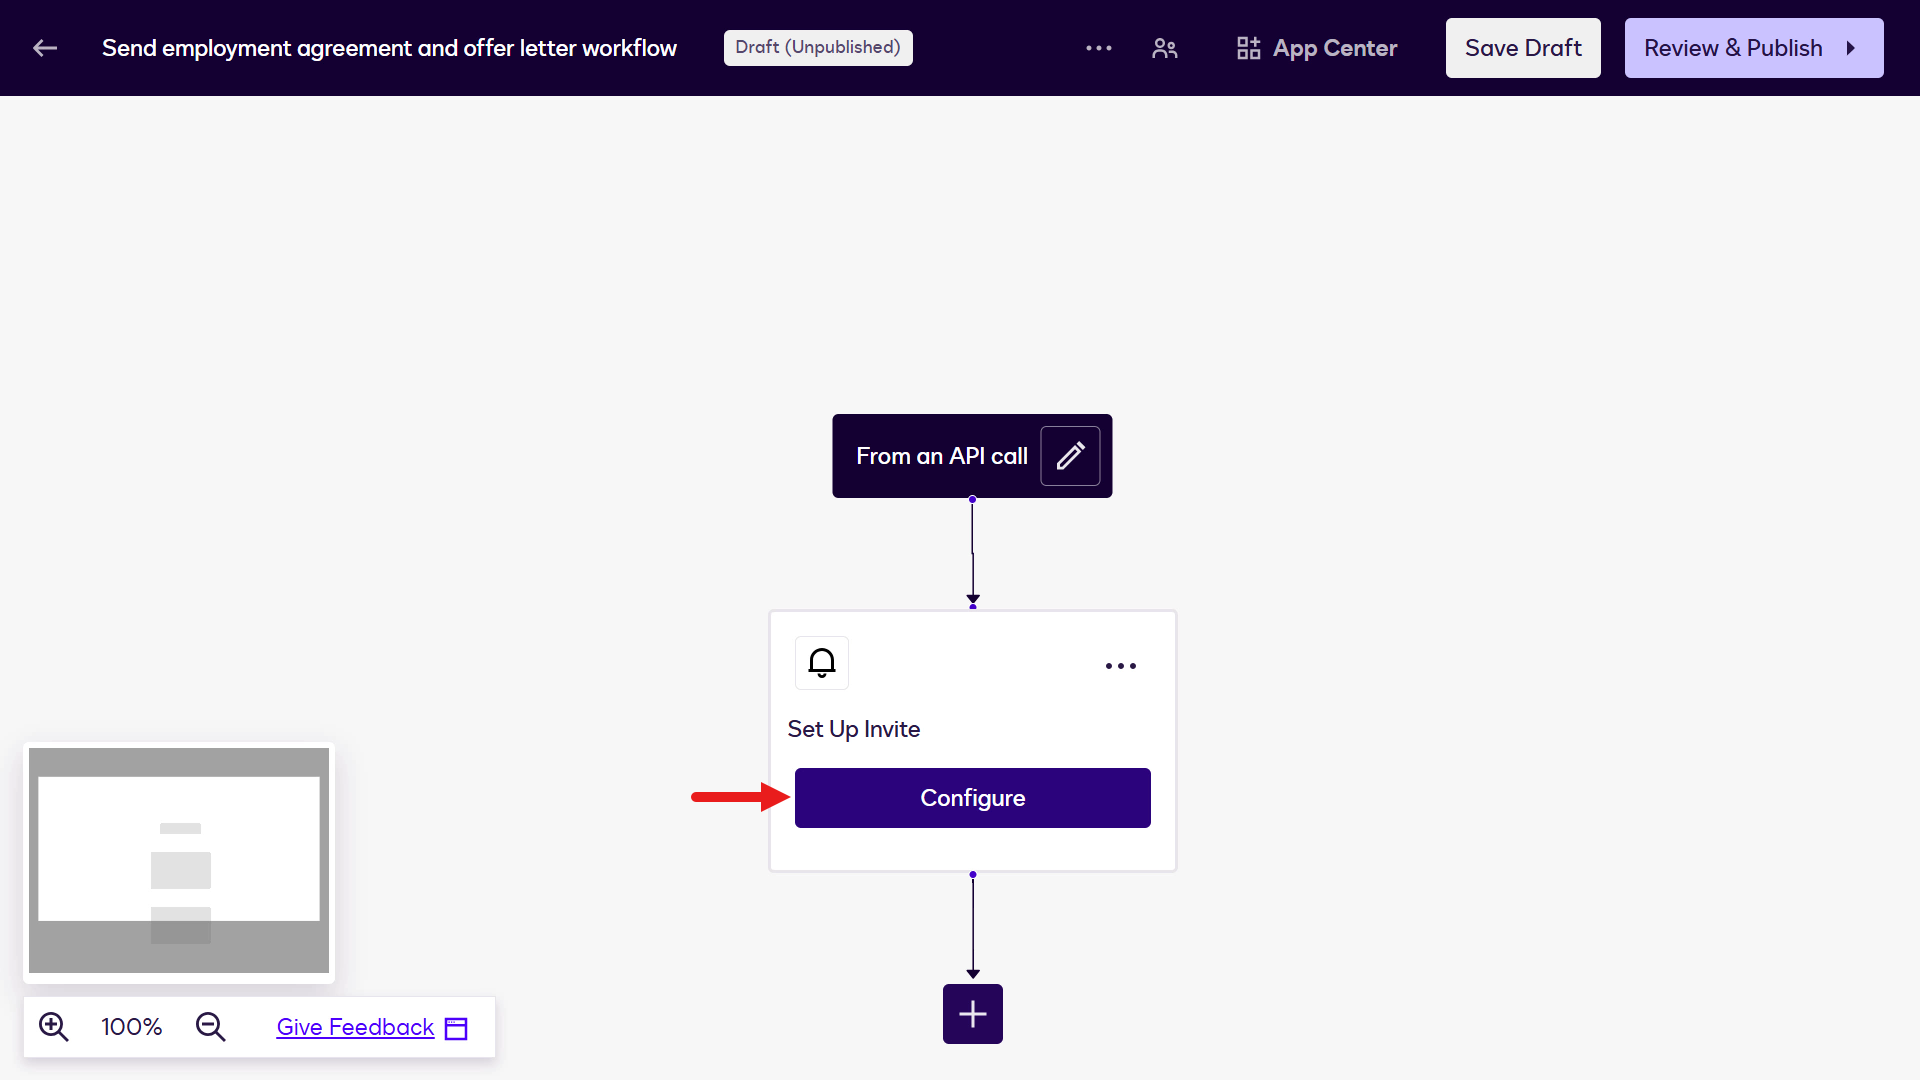
Select Set Up Invite which enables participants to be added to the workflow steps.
Select Configure.
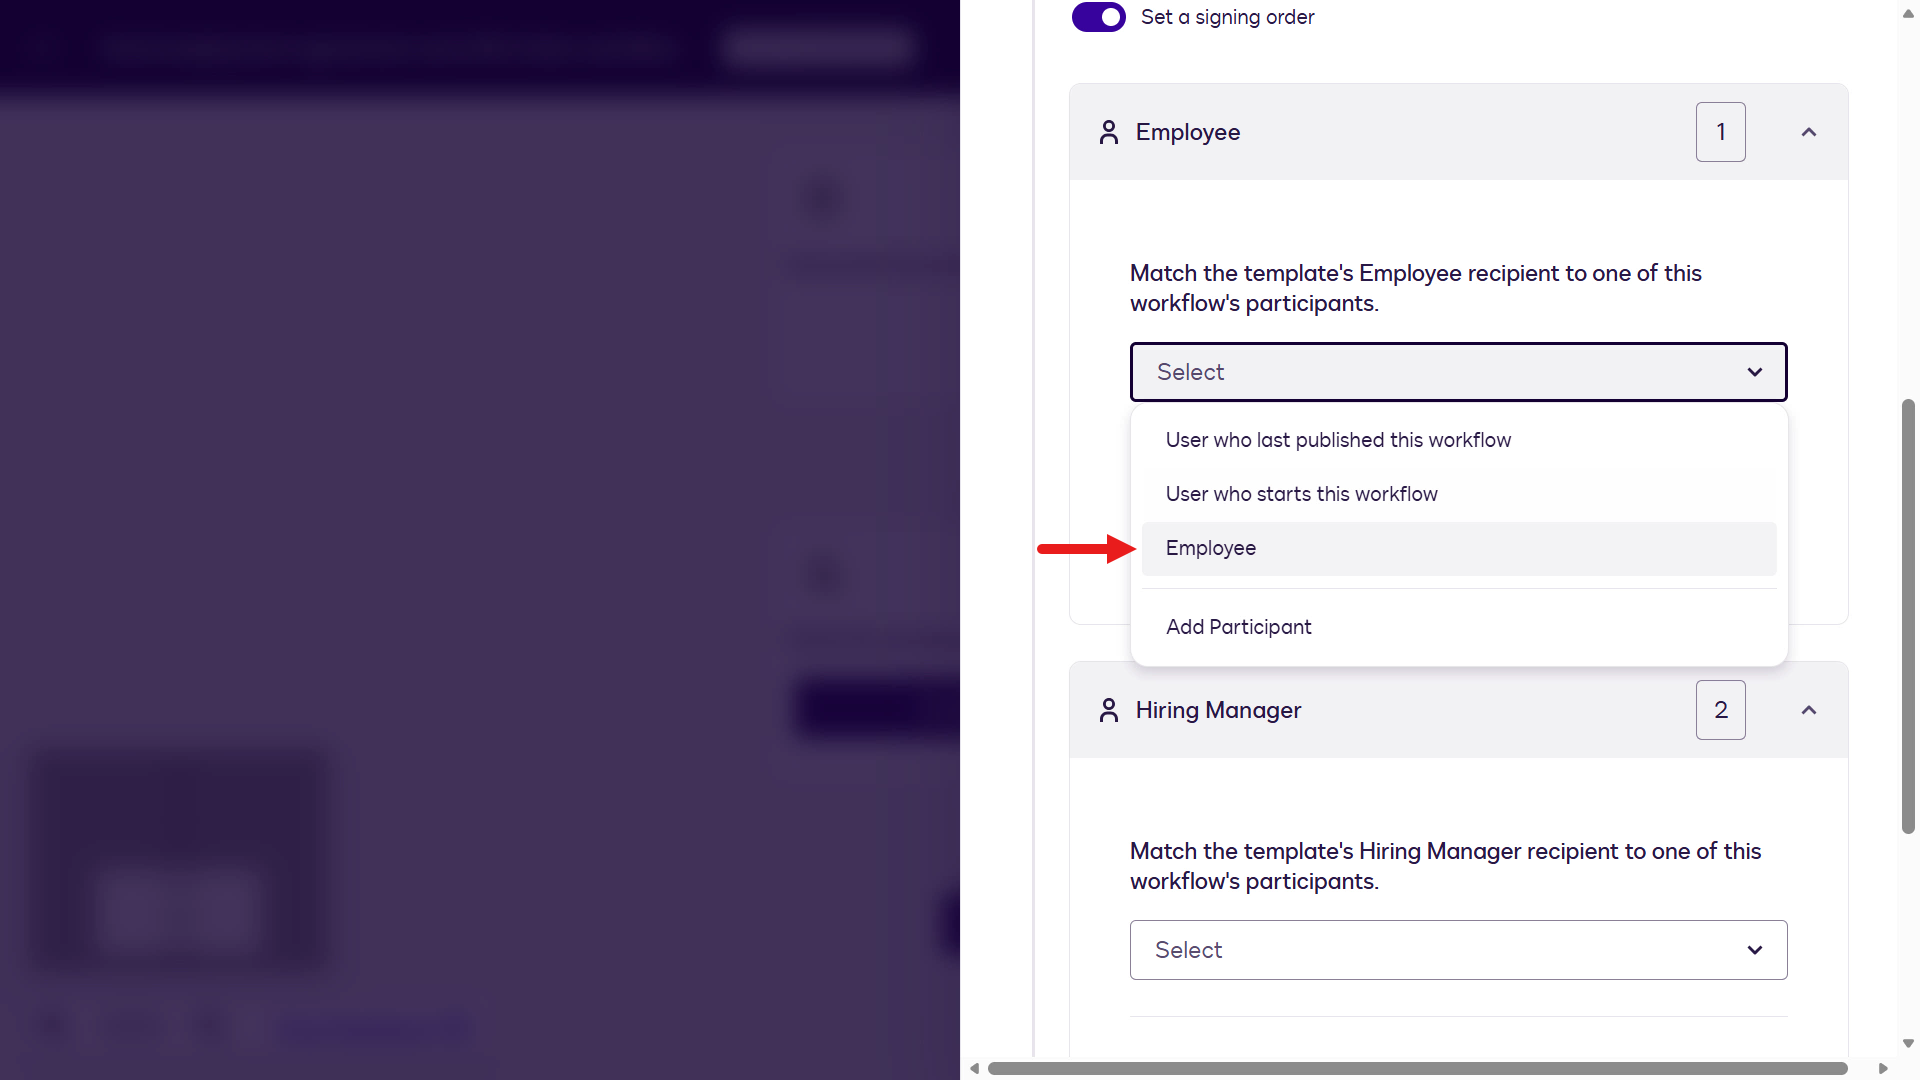
Select Add Participant as we'll create participants for the Employee and Hiring Manager.
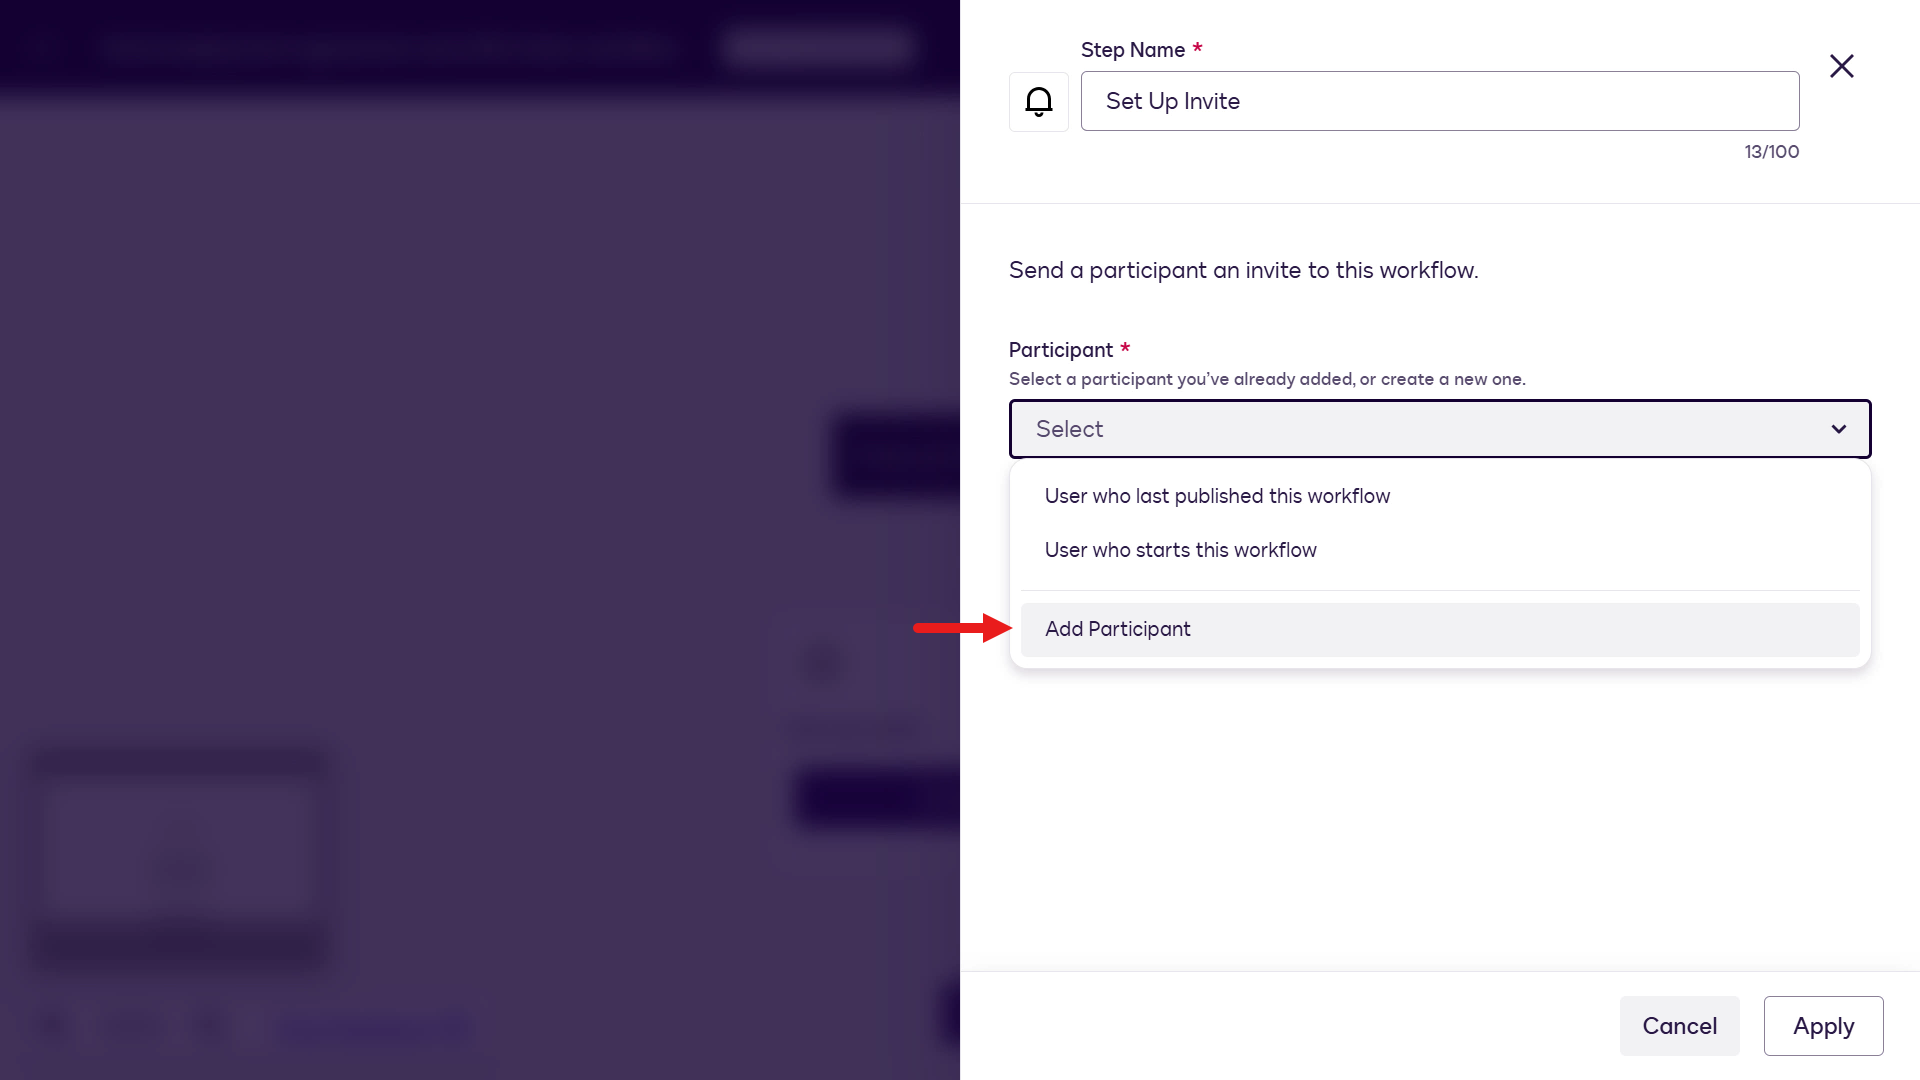
Enter
Employeeas the value in the Employee role field and select Add.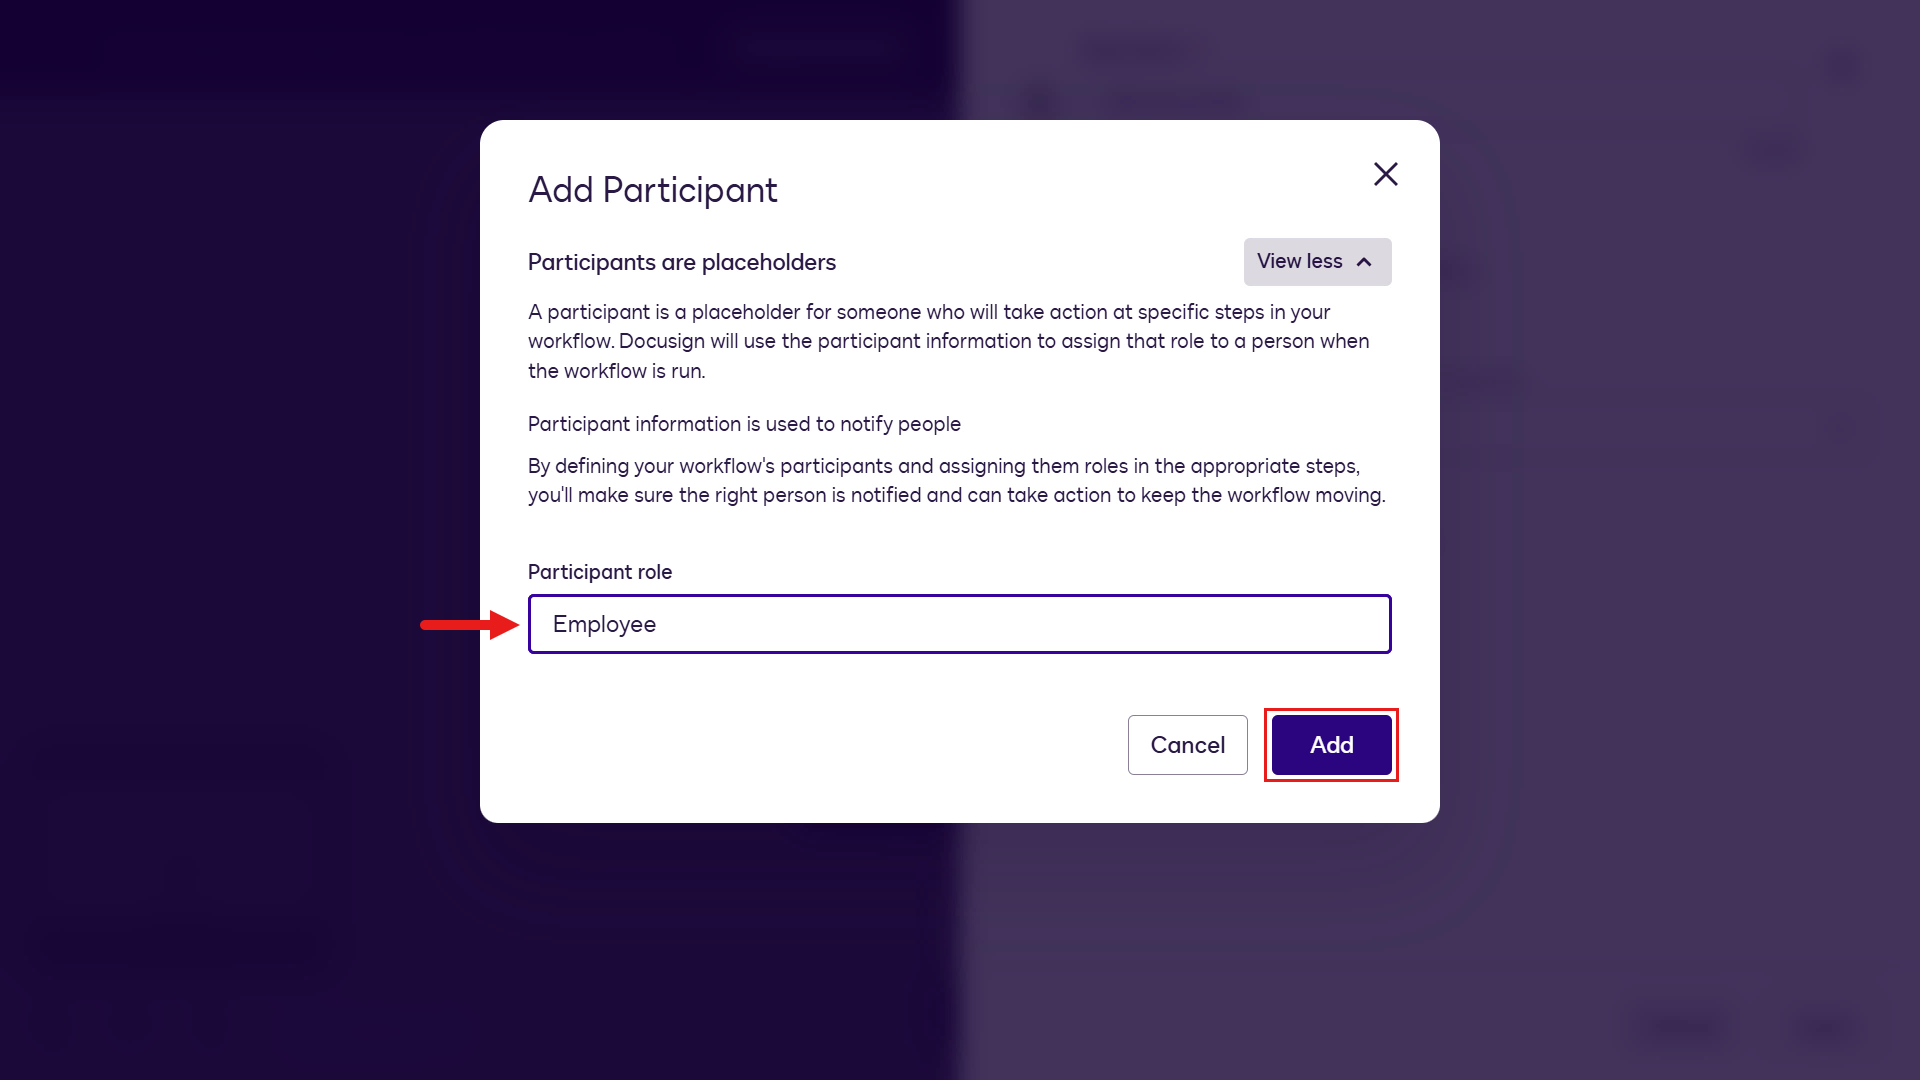
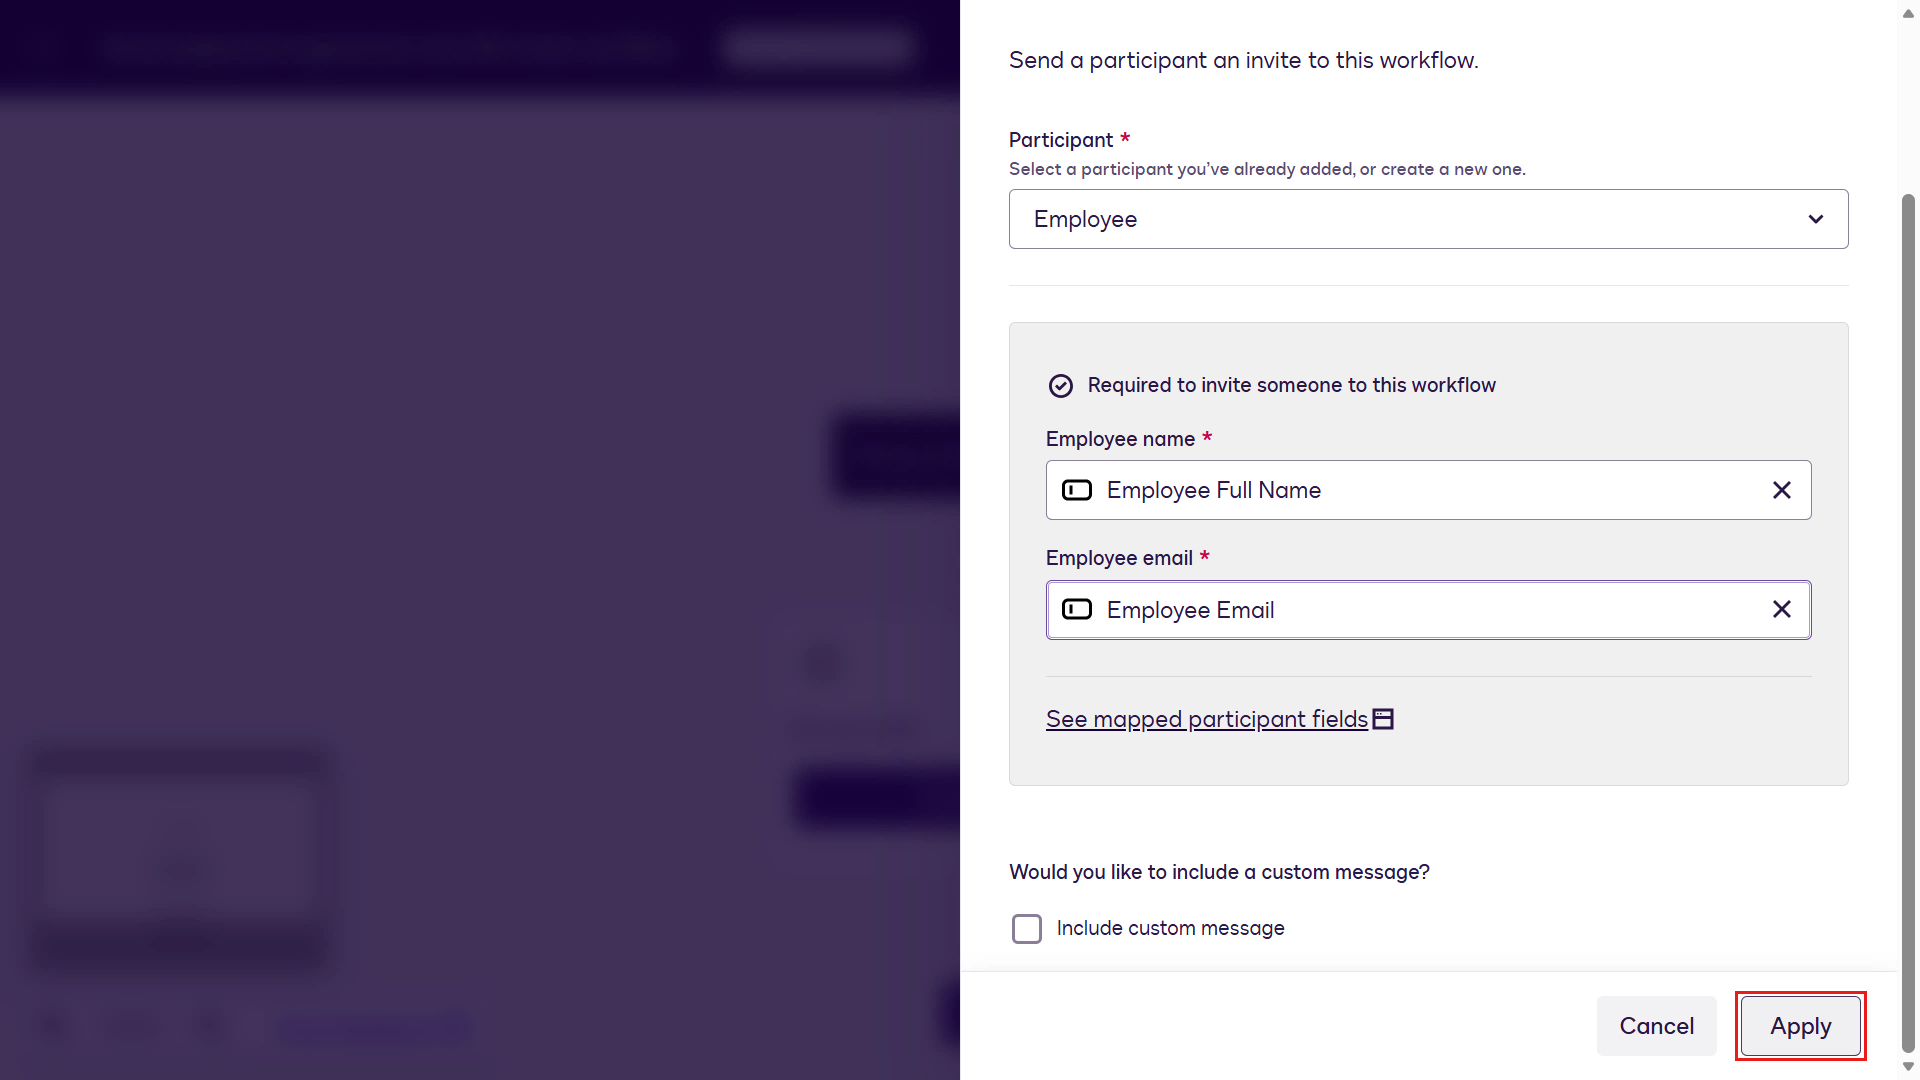
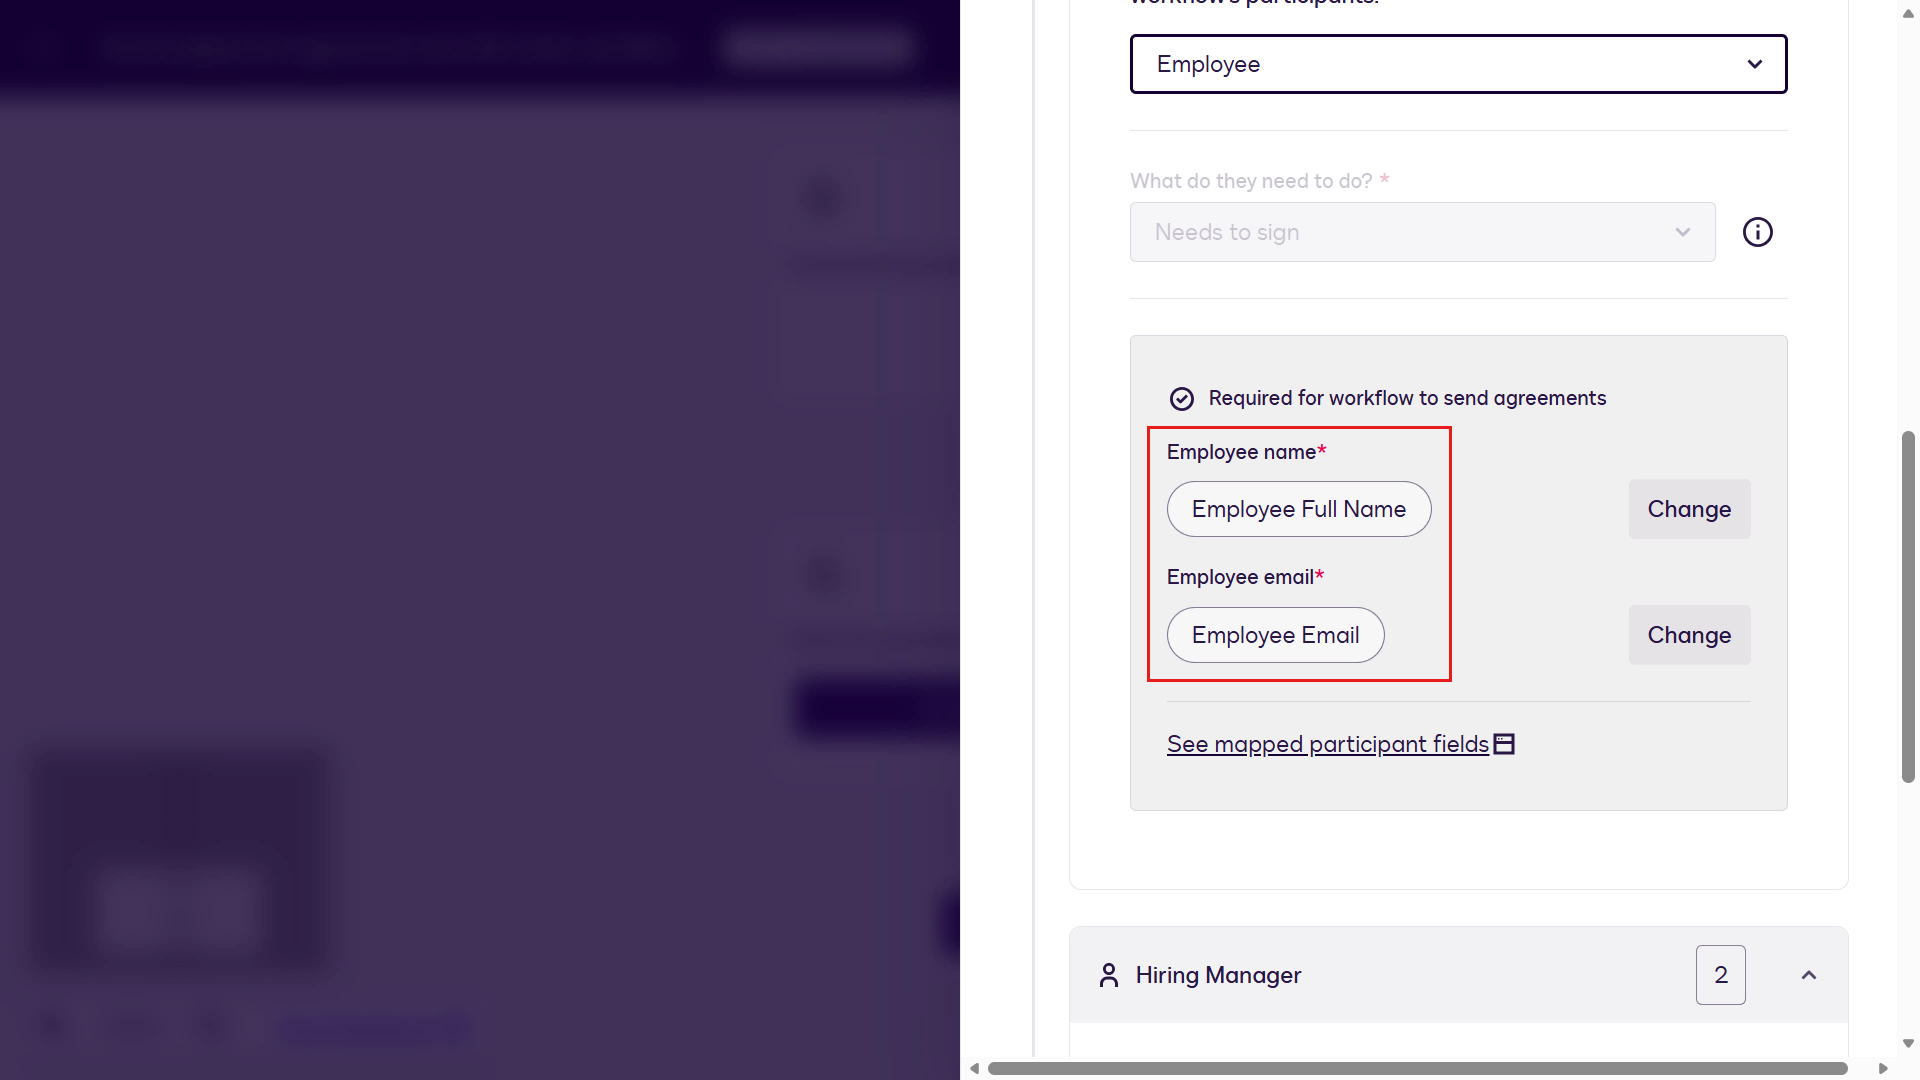
You'll next see two fields appear, Employee name and Employee email which need to be mapped to either a workflow variable from the start step, or a different step. Since we added variables in the workflow start step, this is what we'll map the participant fields to.
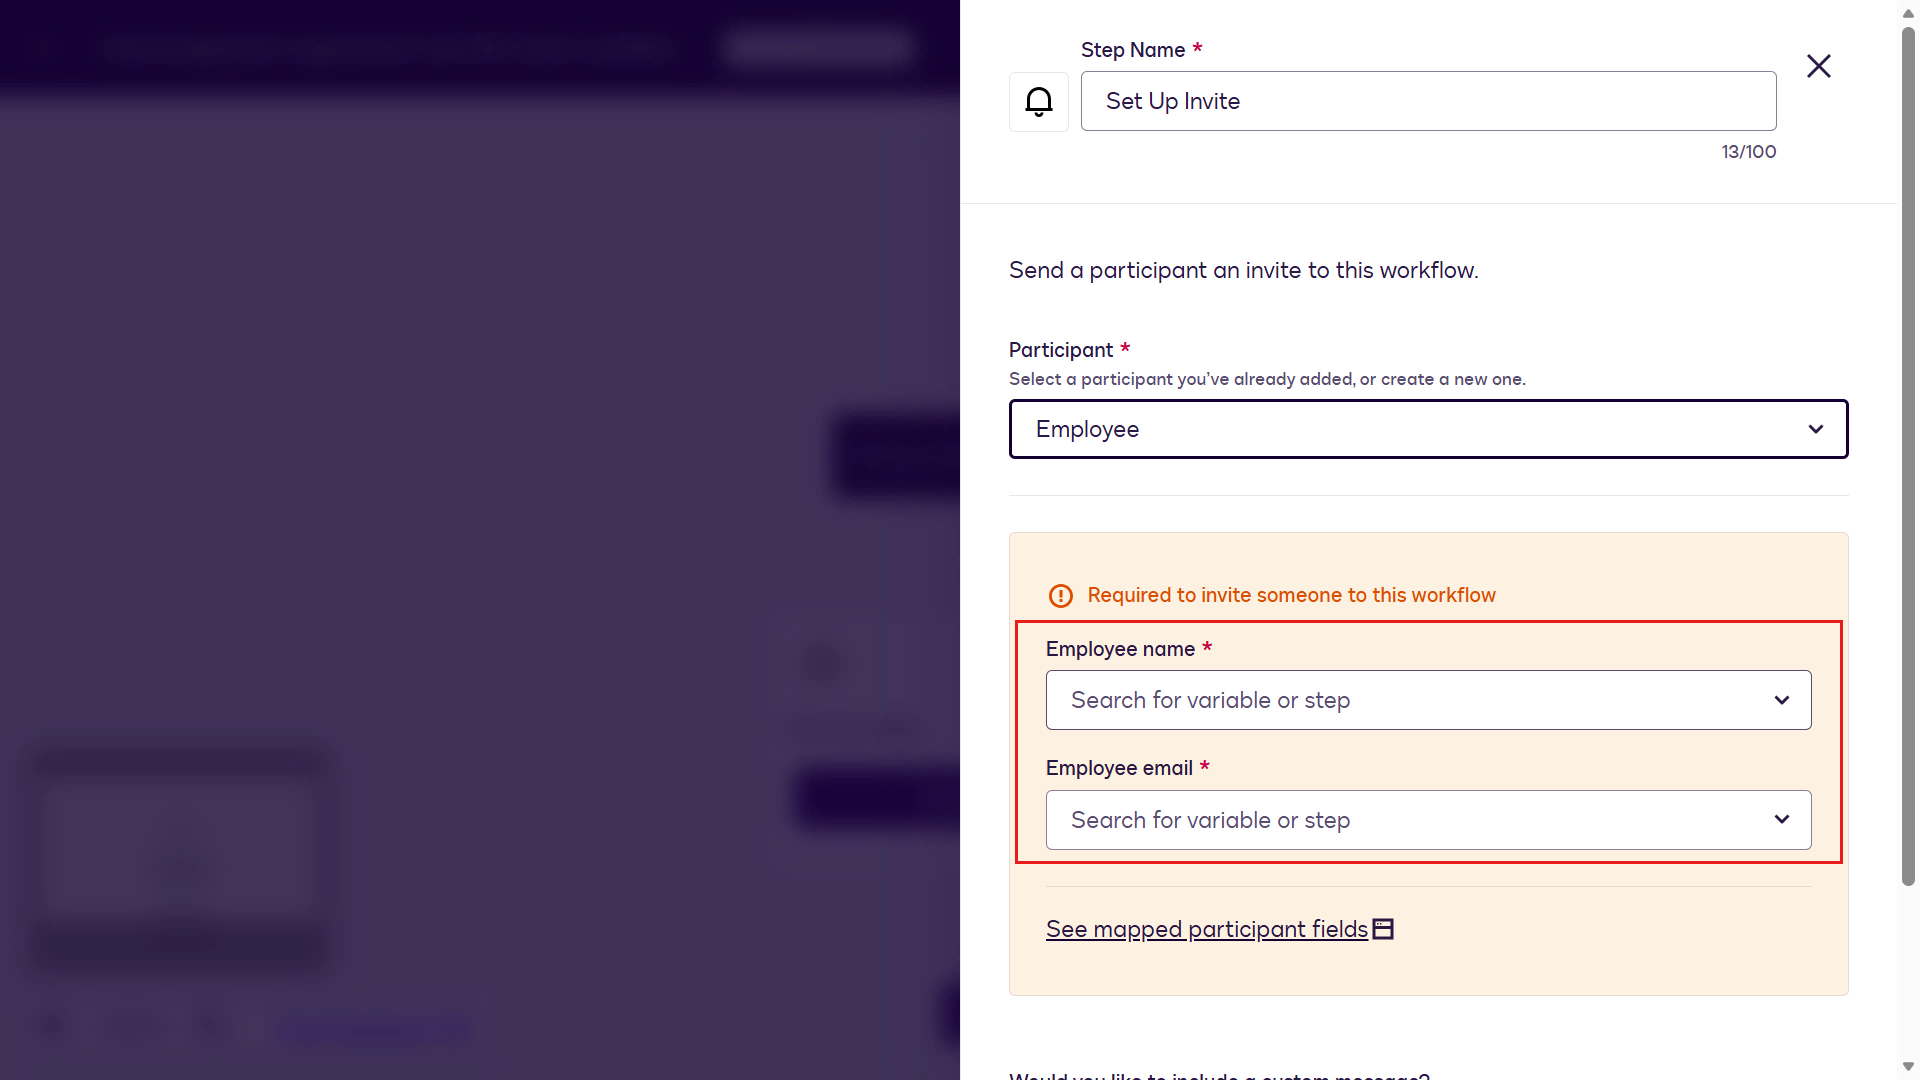
Select the dropdown (chevron) icon for the Employee name field. In the list of Variables from Workflow Start select Employee Full Name variable.
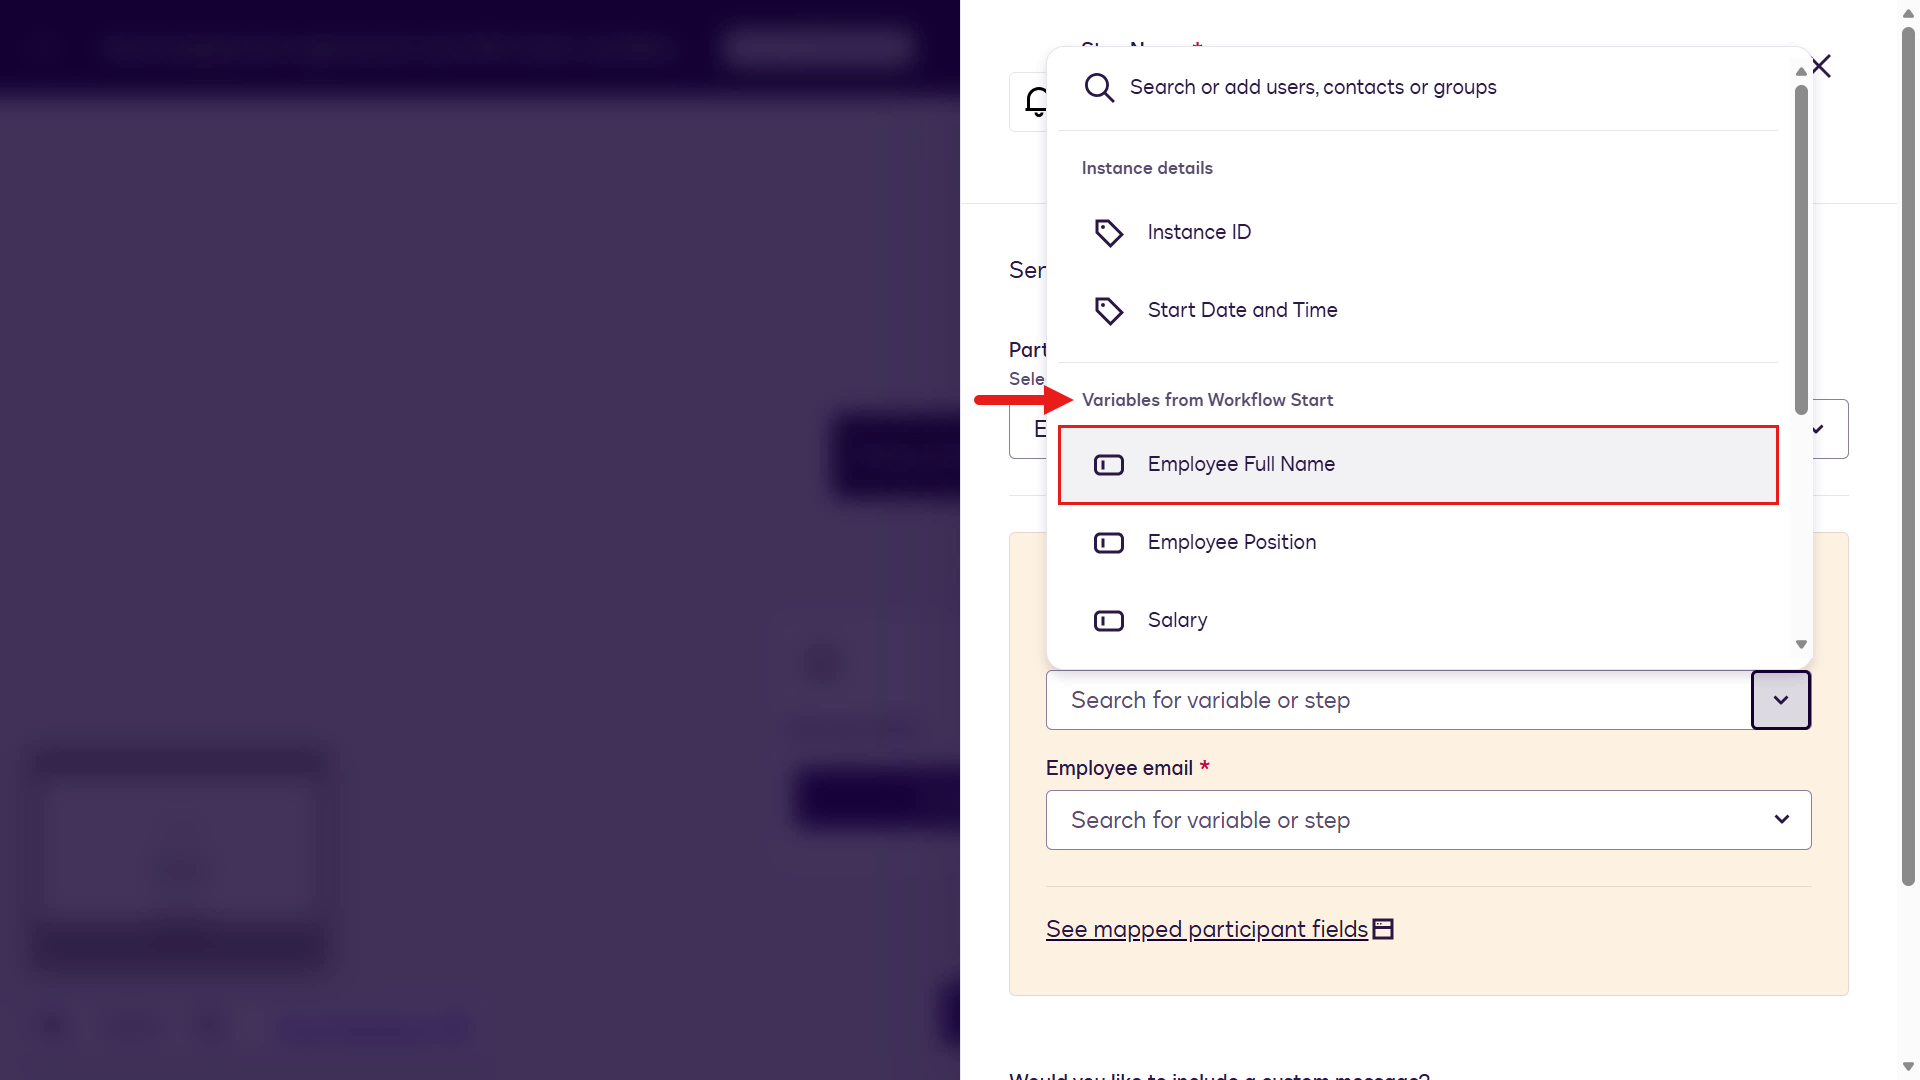
For the Employee email field, select the Employee Email variable.
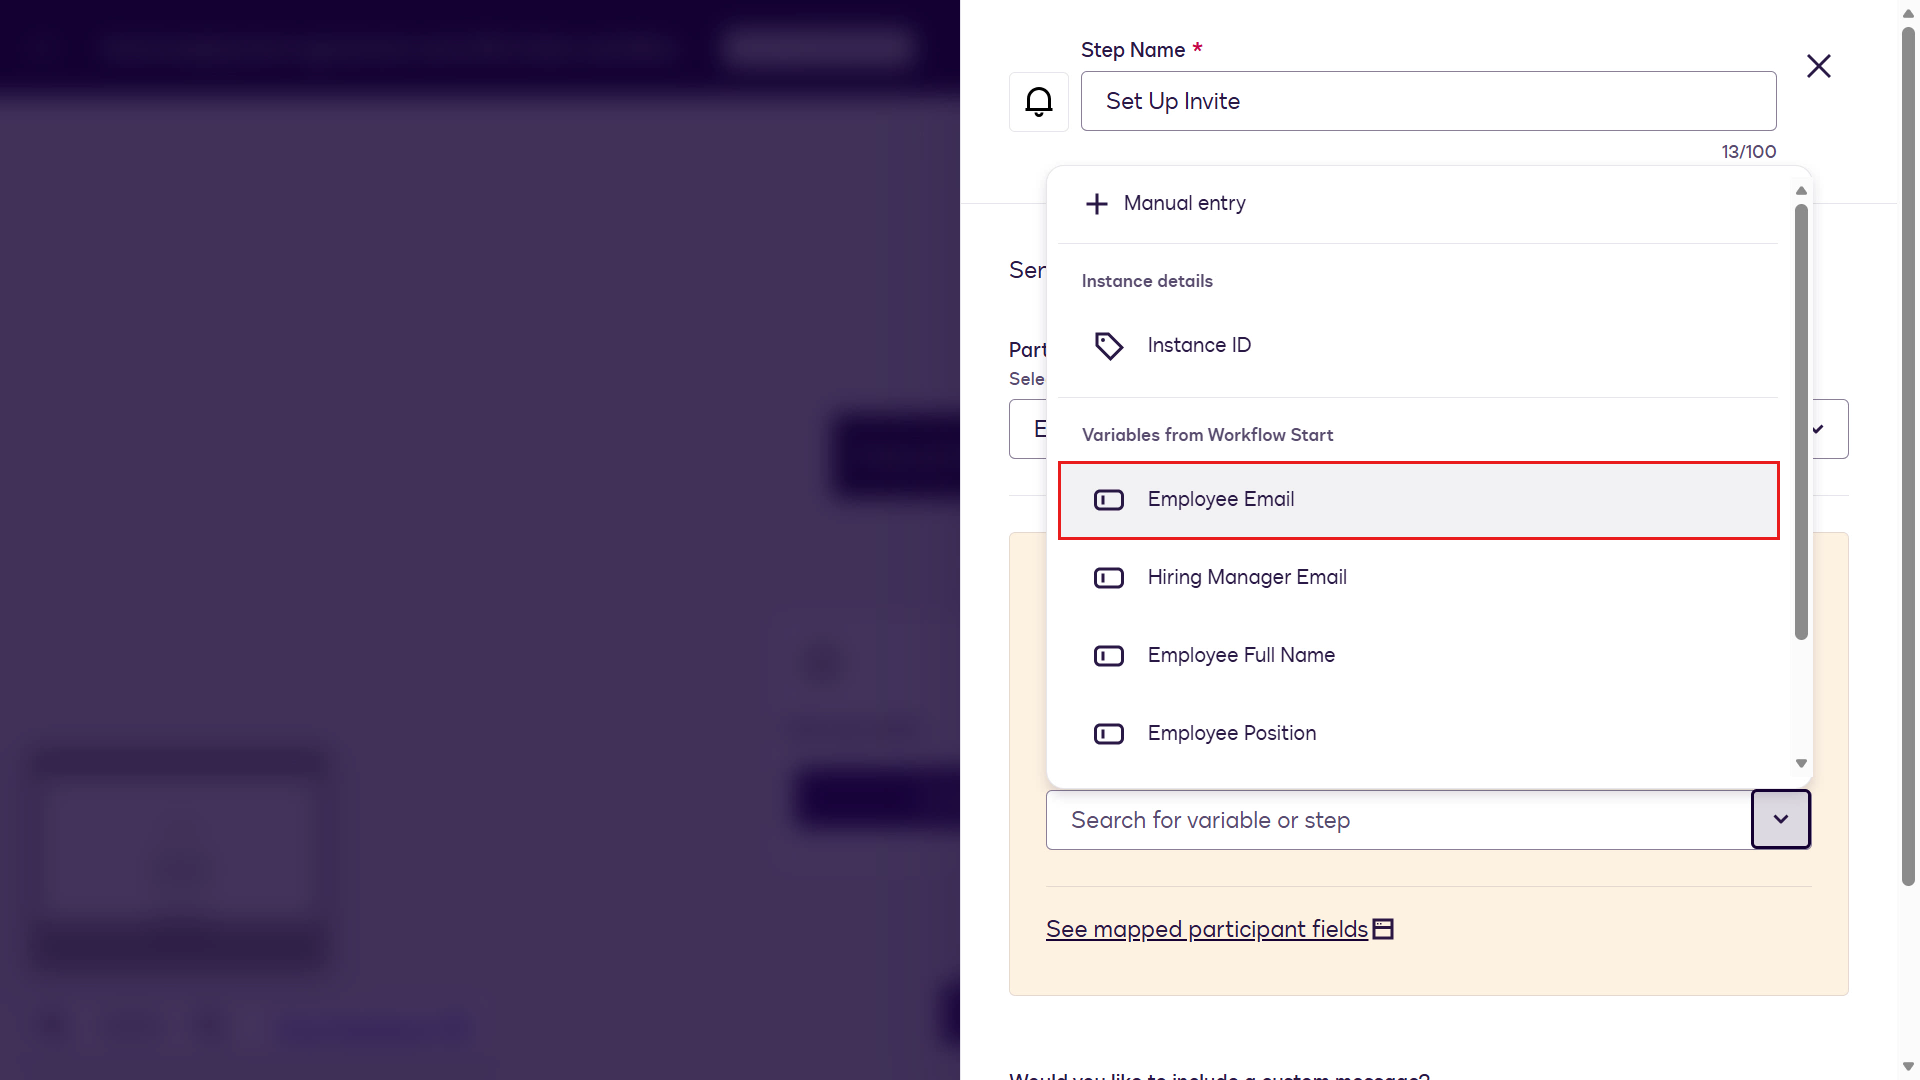
Select Apply.
You've now completed configuring the Set Up Invite step.
Next, select Add a step.
Select Collect Data with Web Forms as the next step.
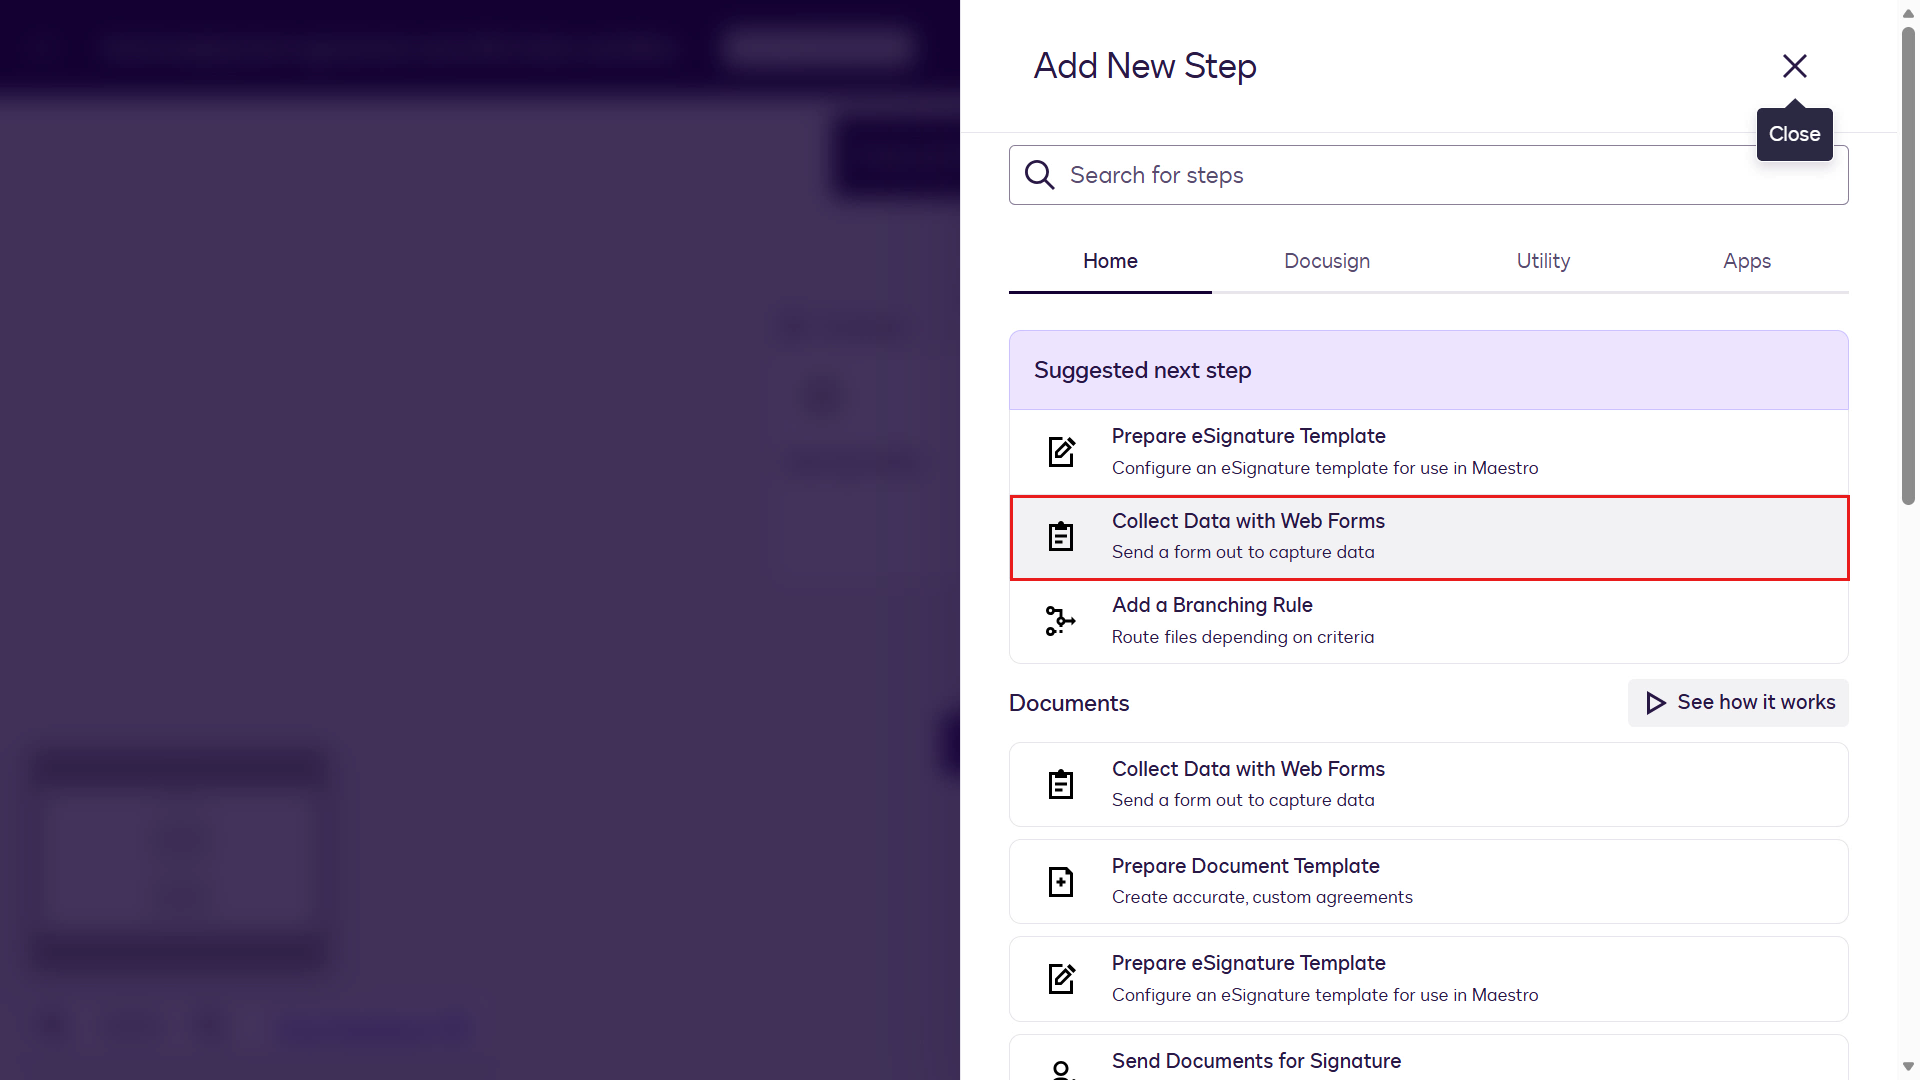
Select Configure for the Web Form step.

Select the web form created earlier: Request for contact information.
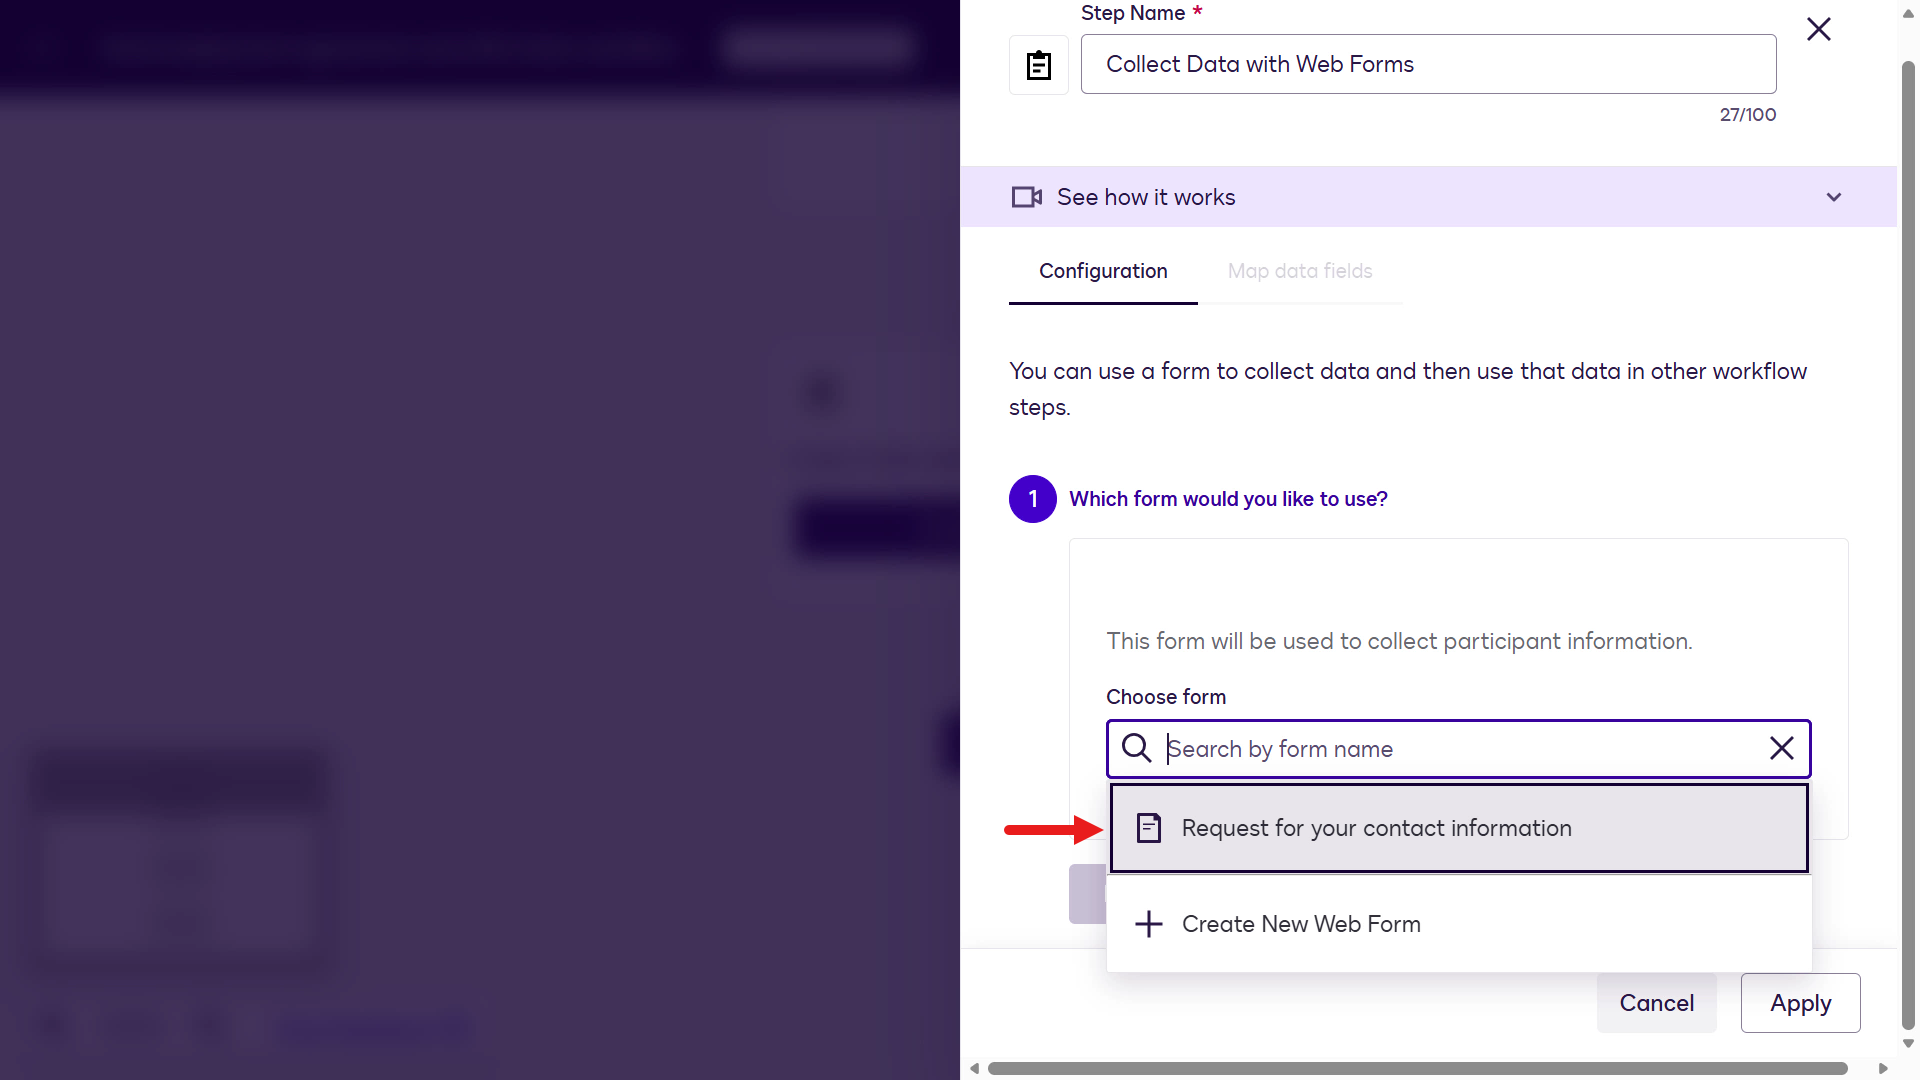
Select Next to configure the Web Form participant.
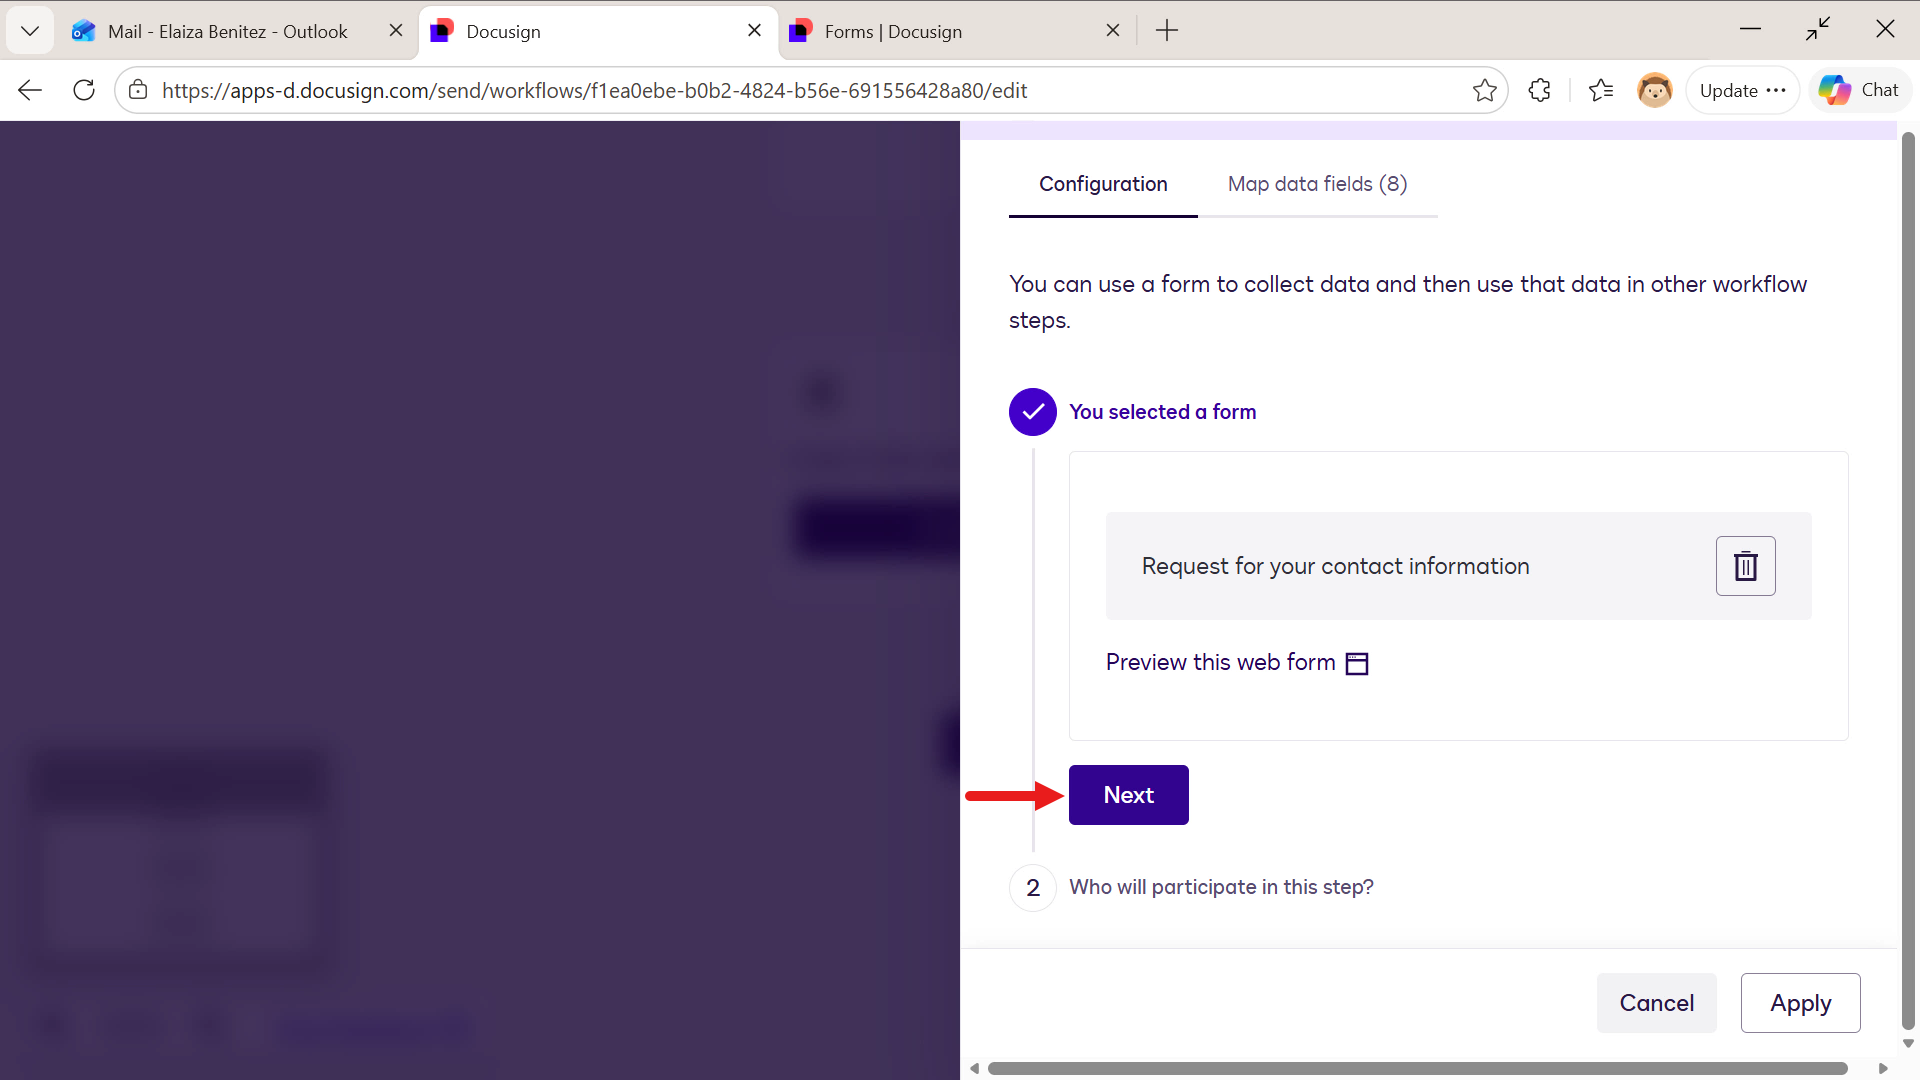
Select Employee in the Participant dropdown field.
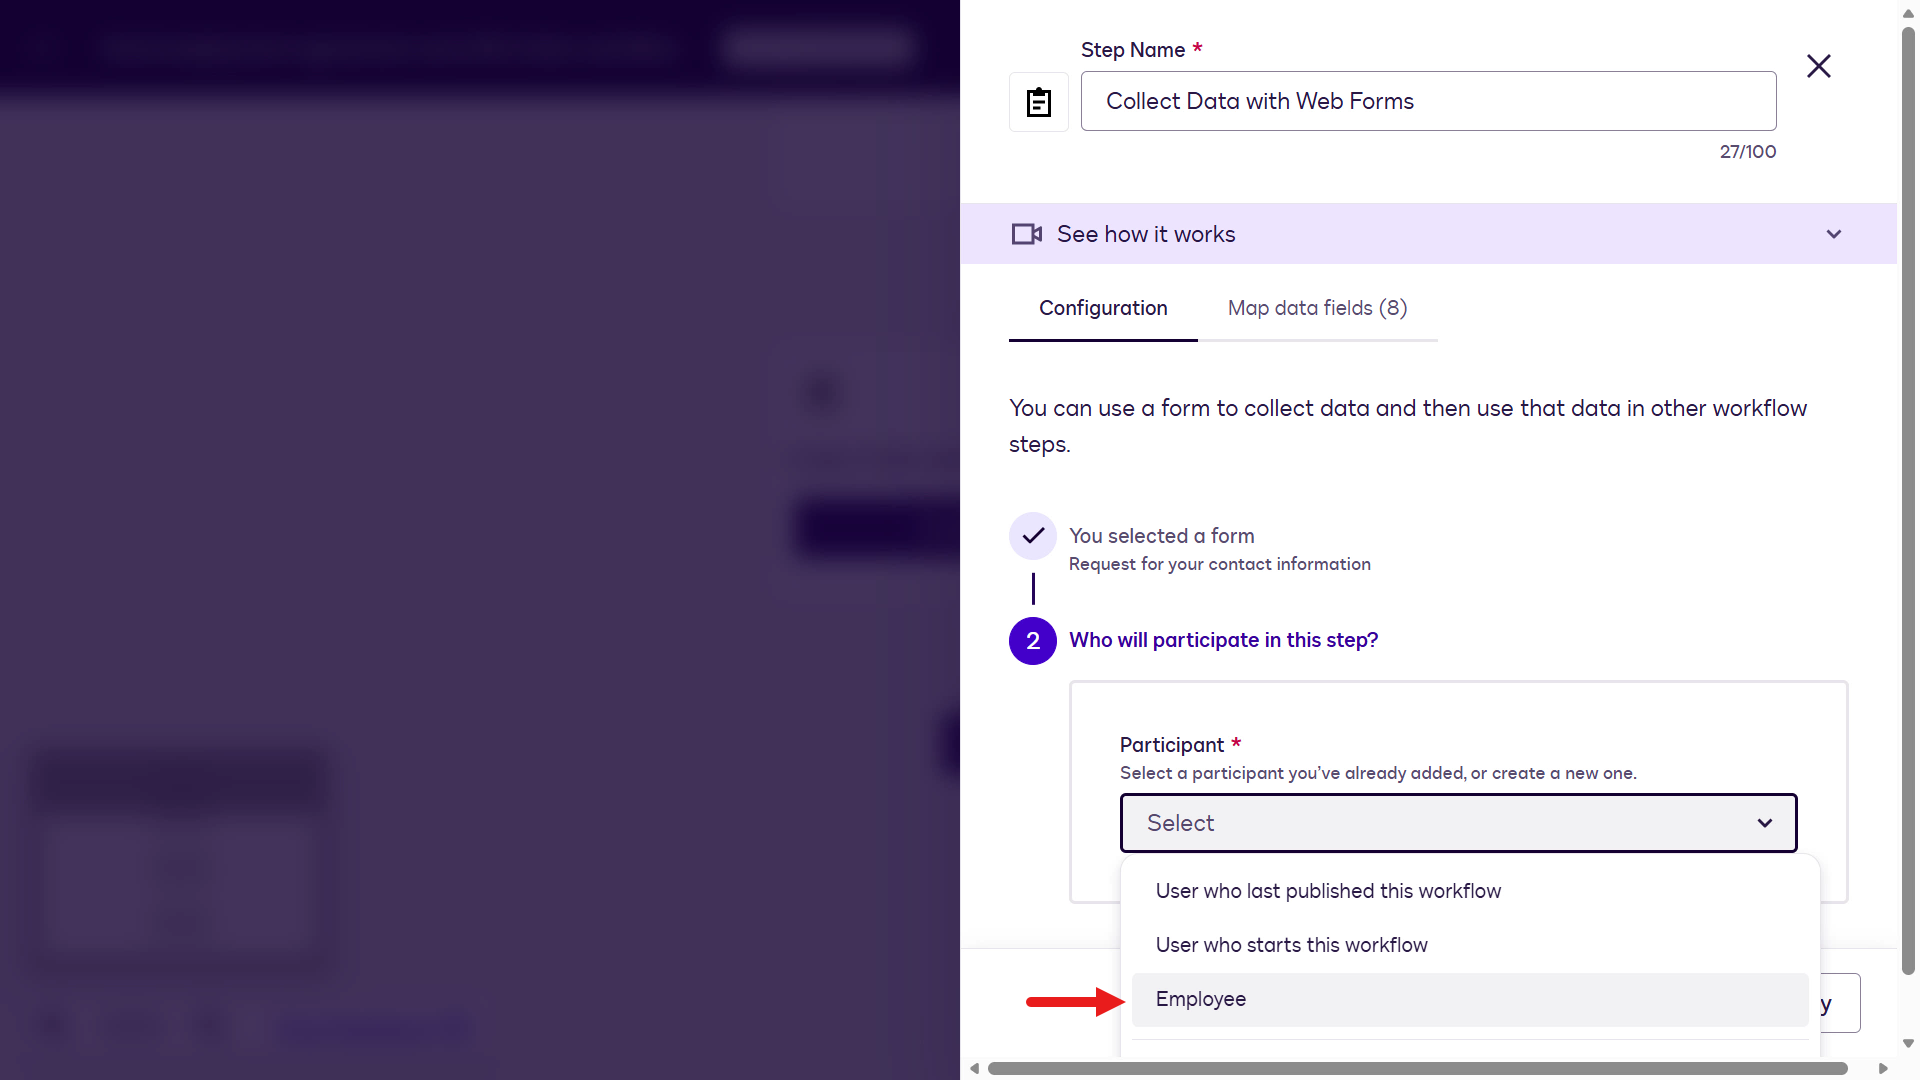
Select Continue to map data fields.
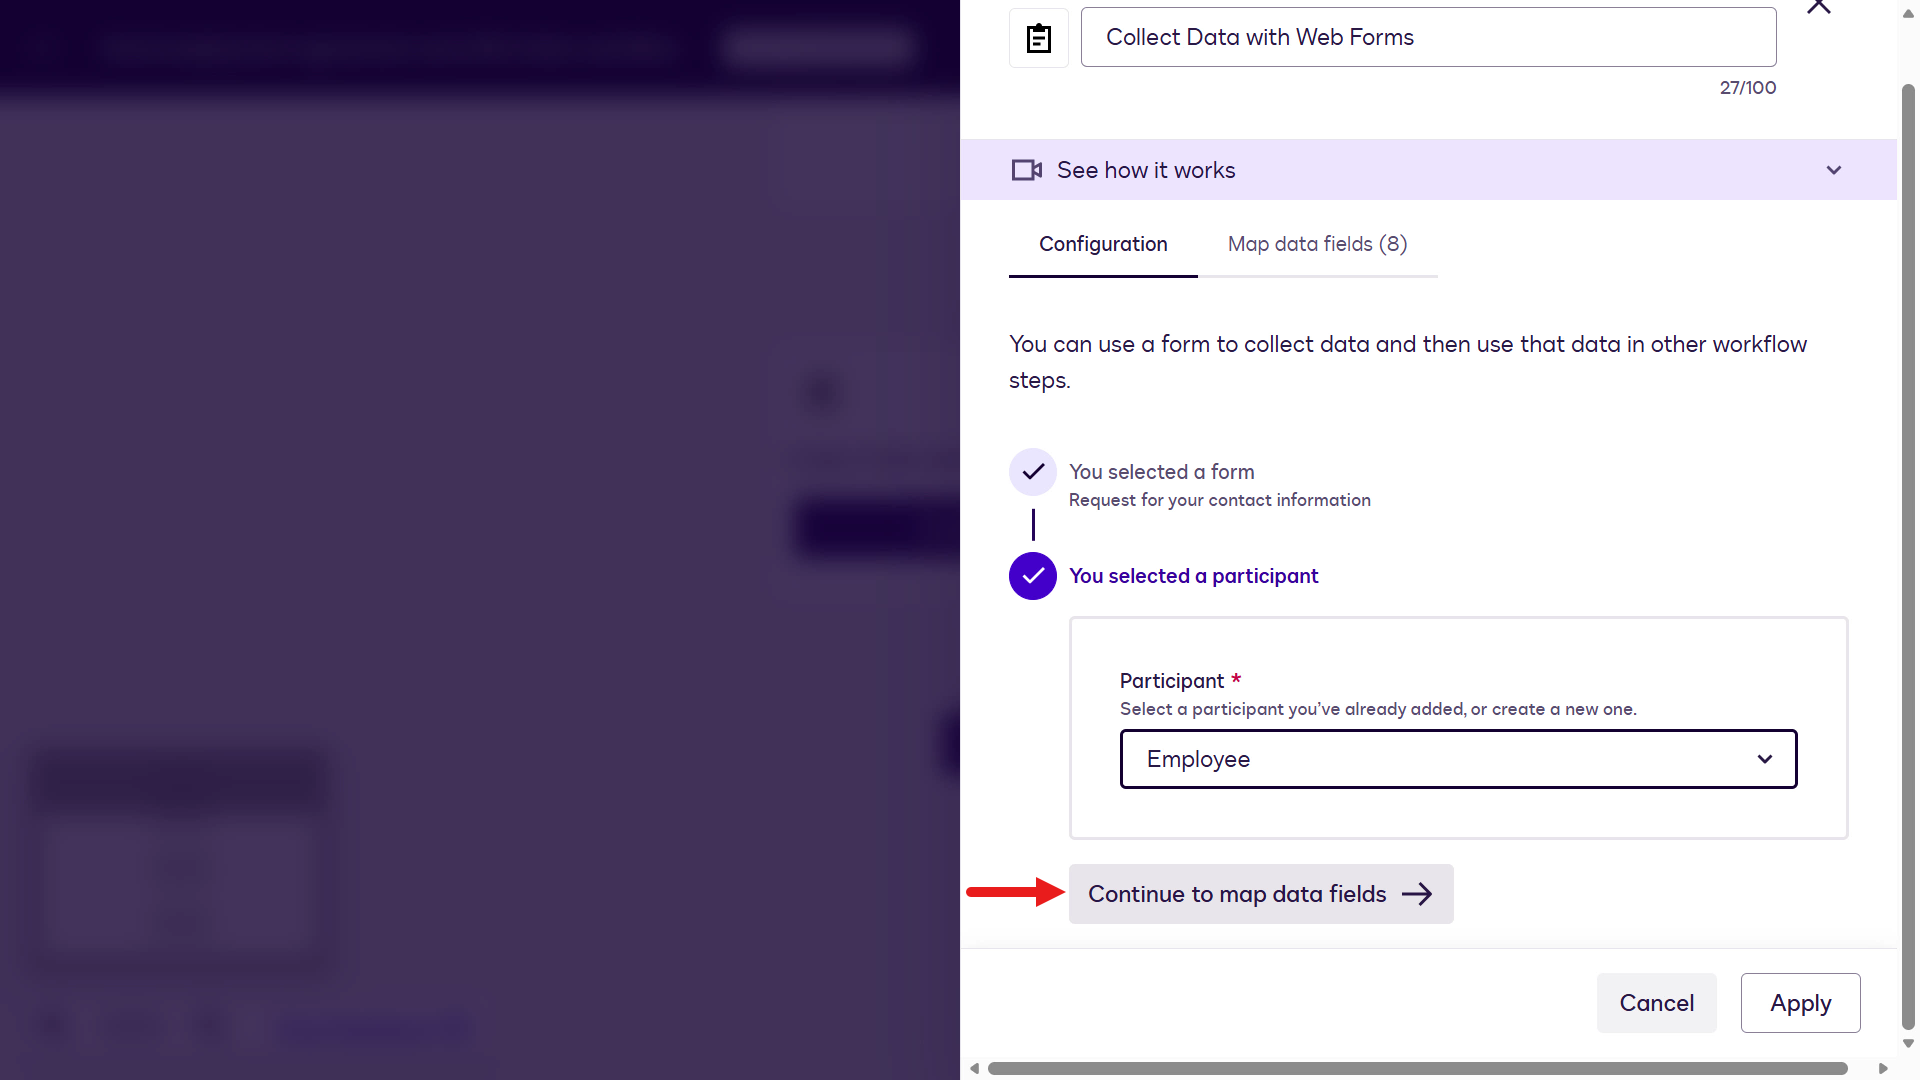
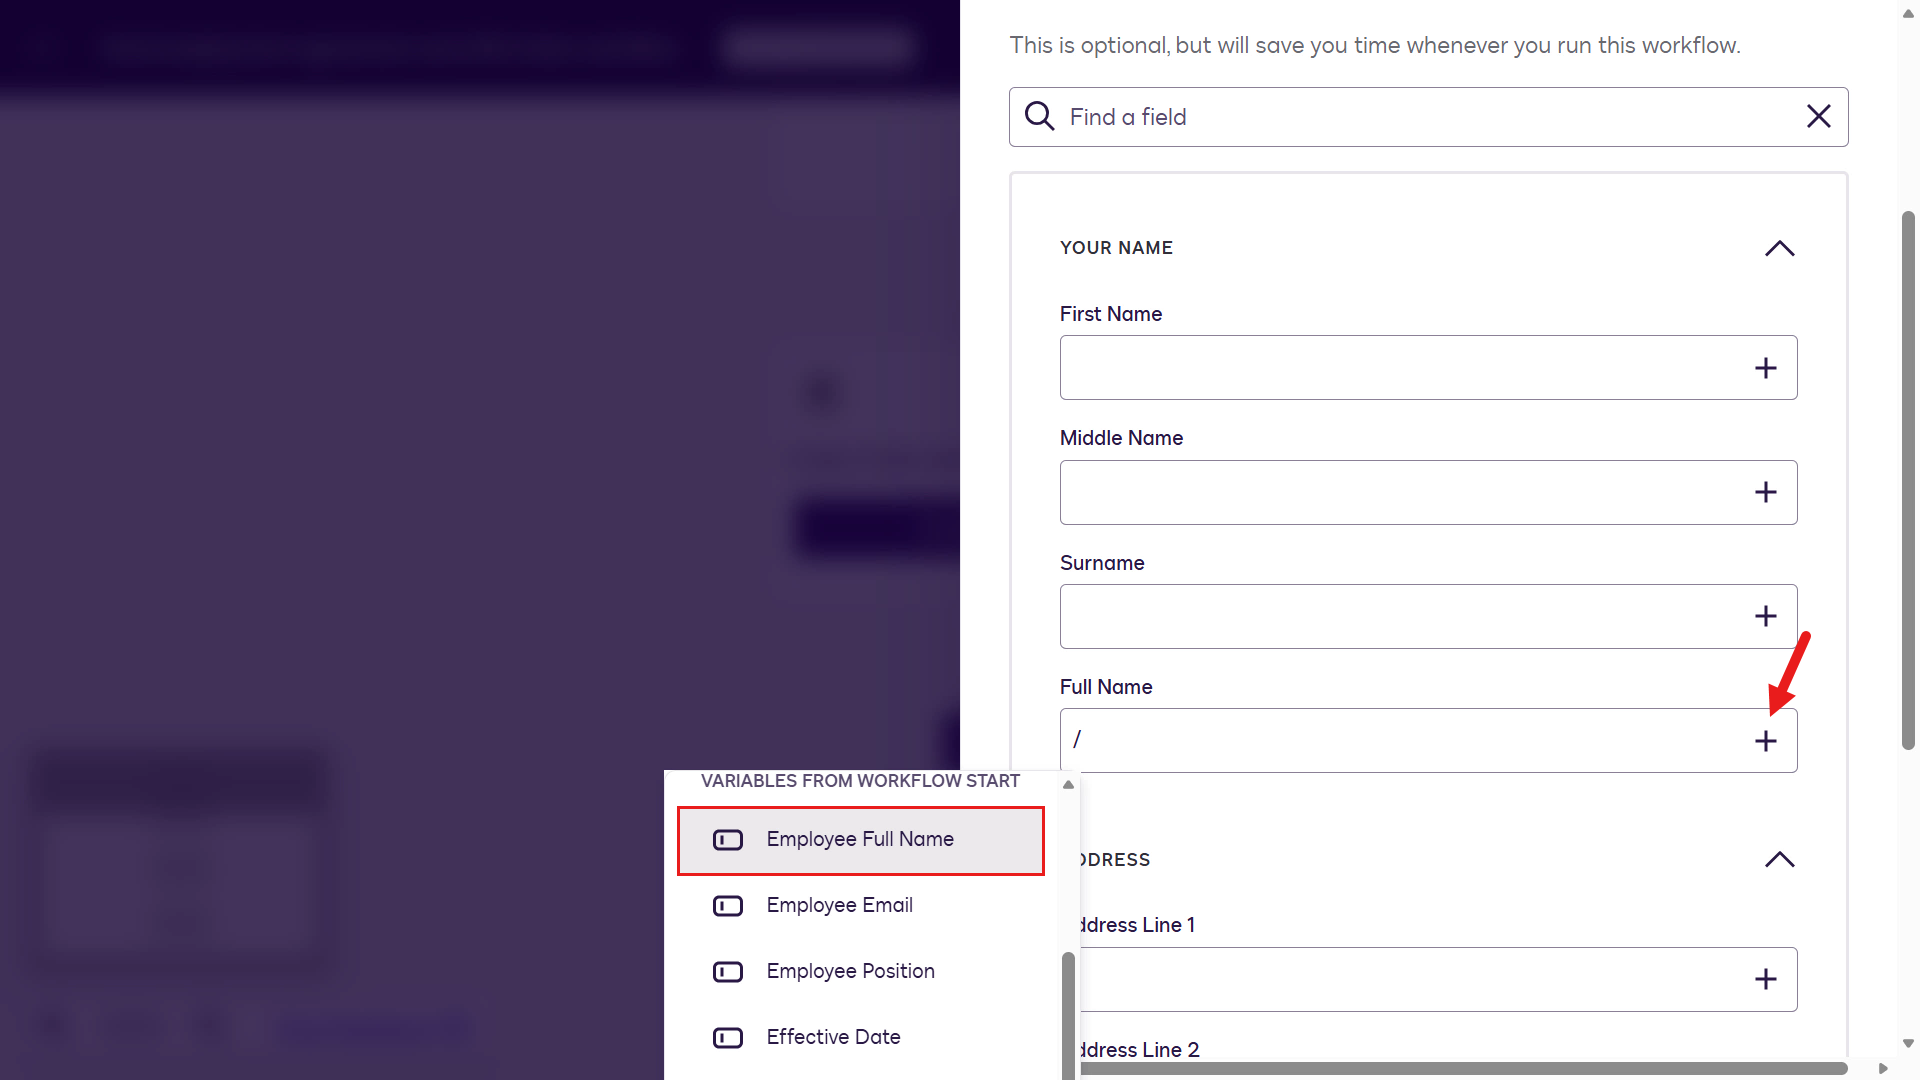
For the Full Name field, select the Employee Full Name variable from the workflow start list.
The Web Form step is now configured. Select Apply to continue.
Select Add a step.
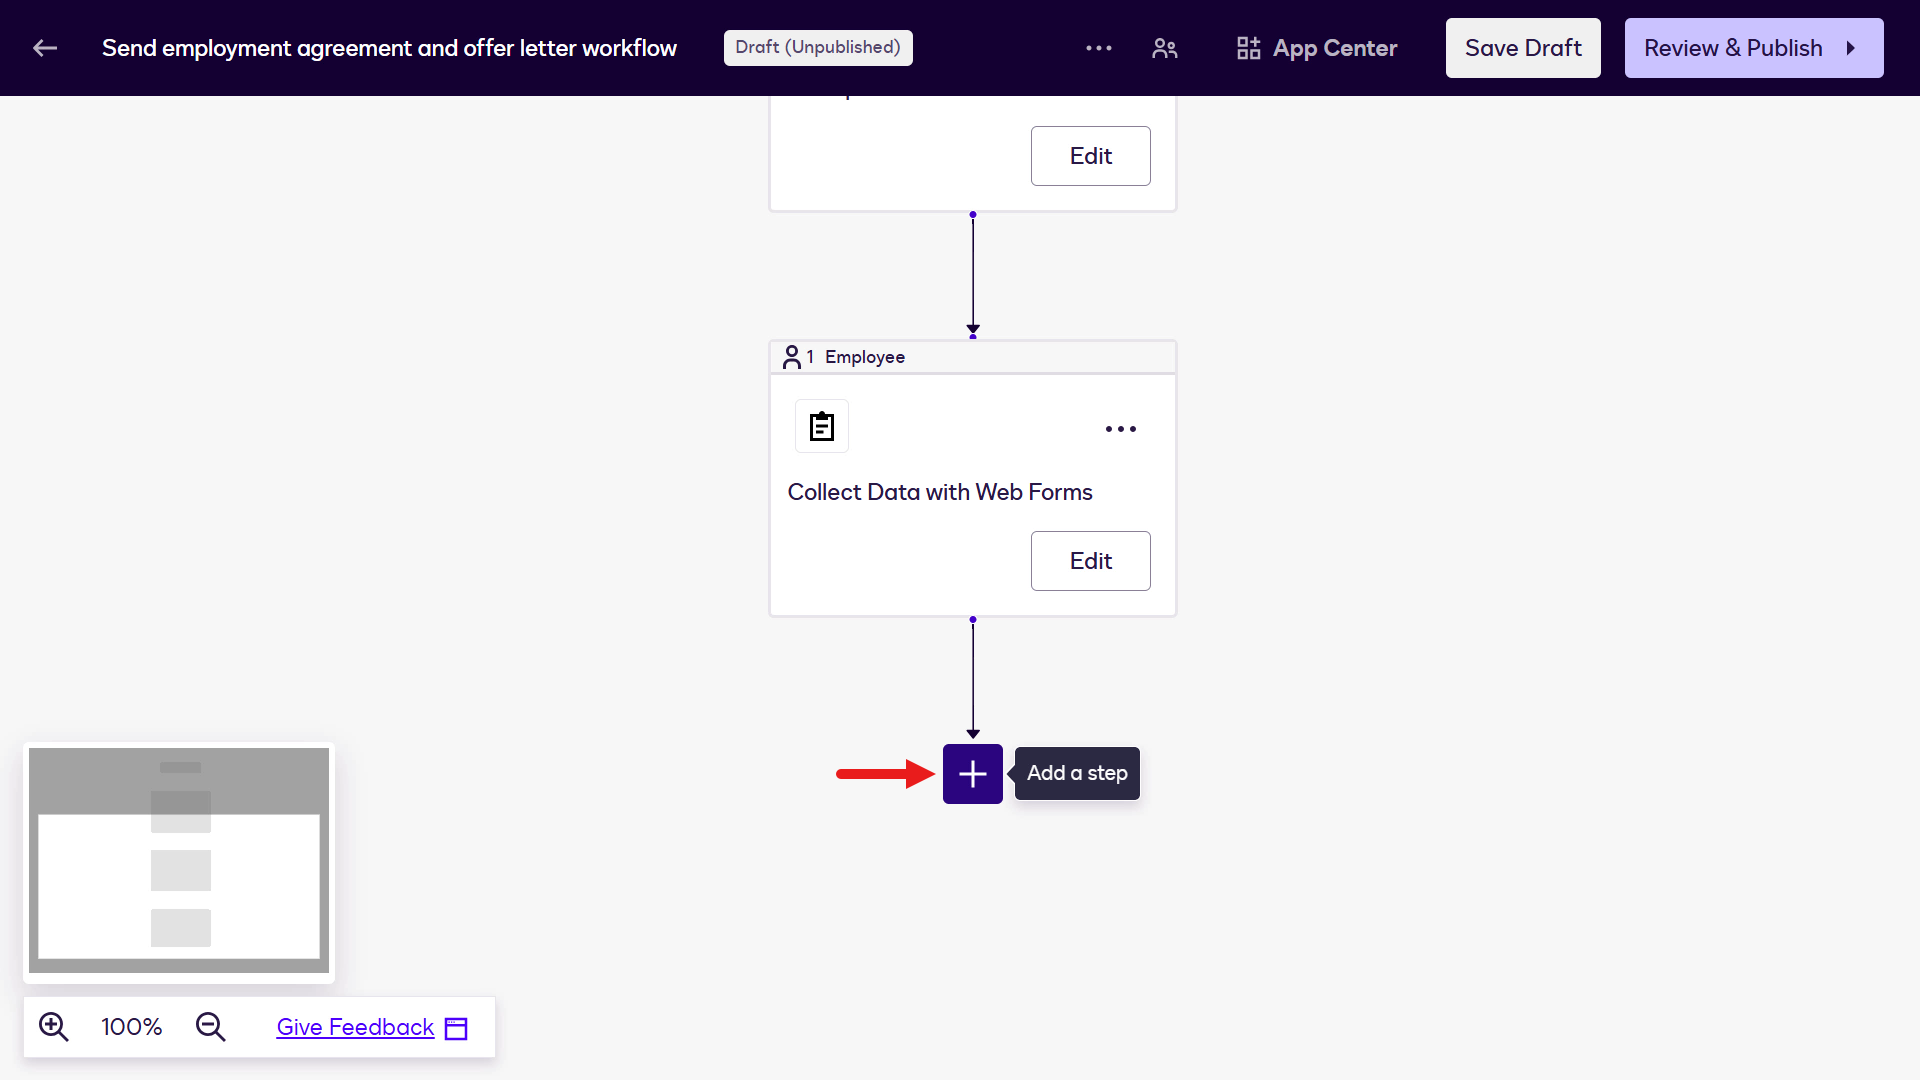
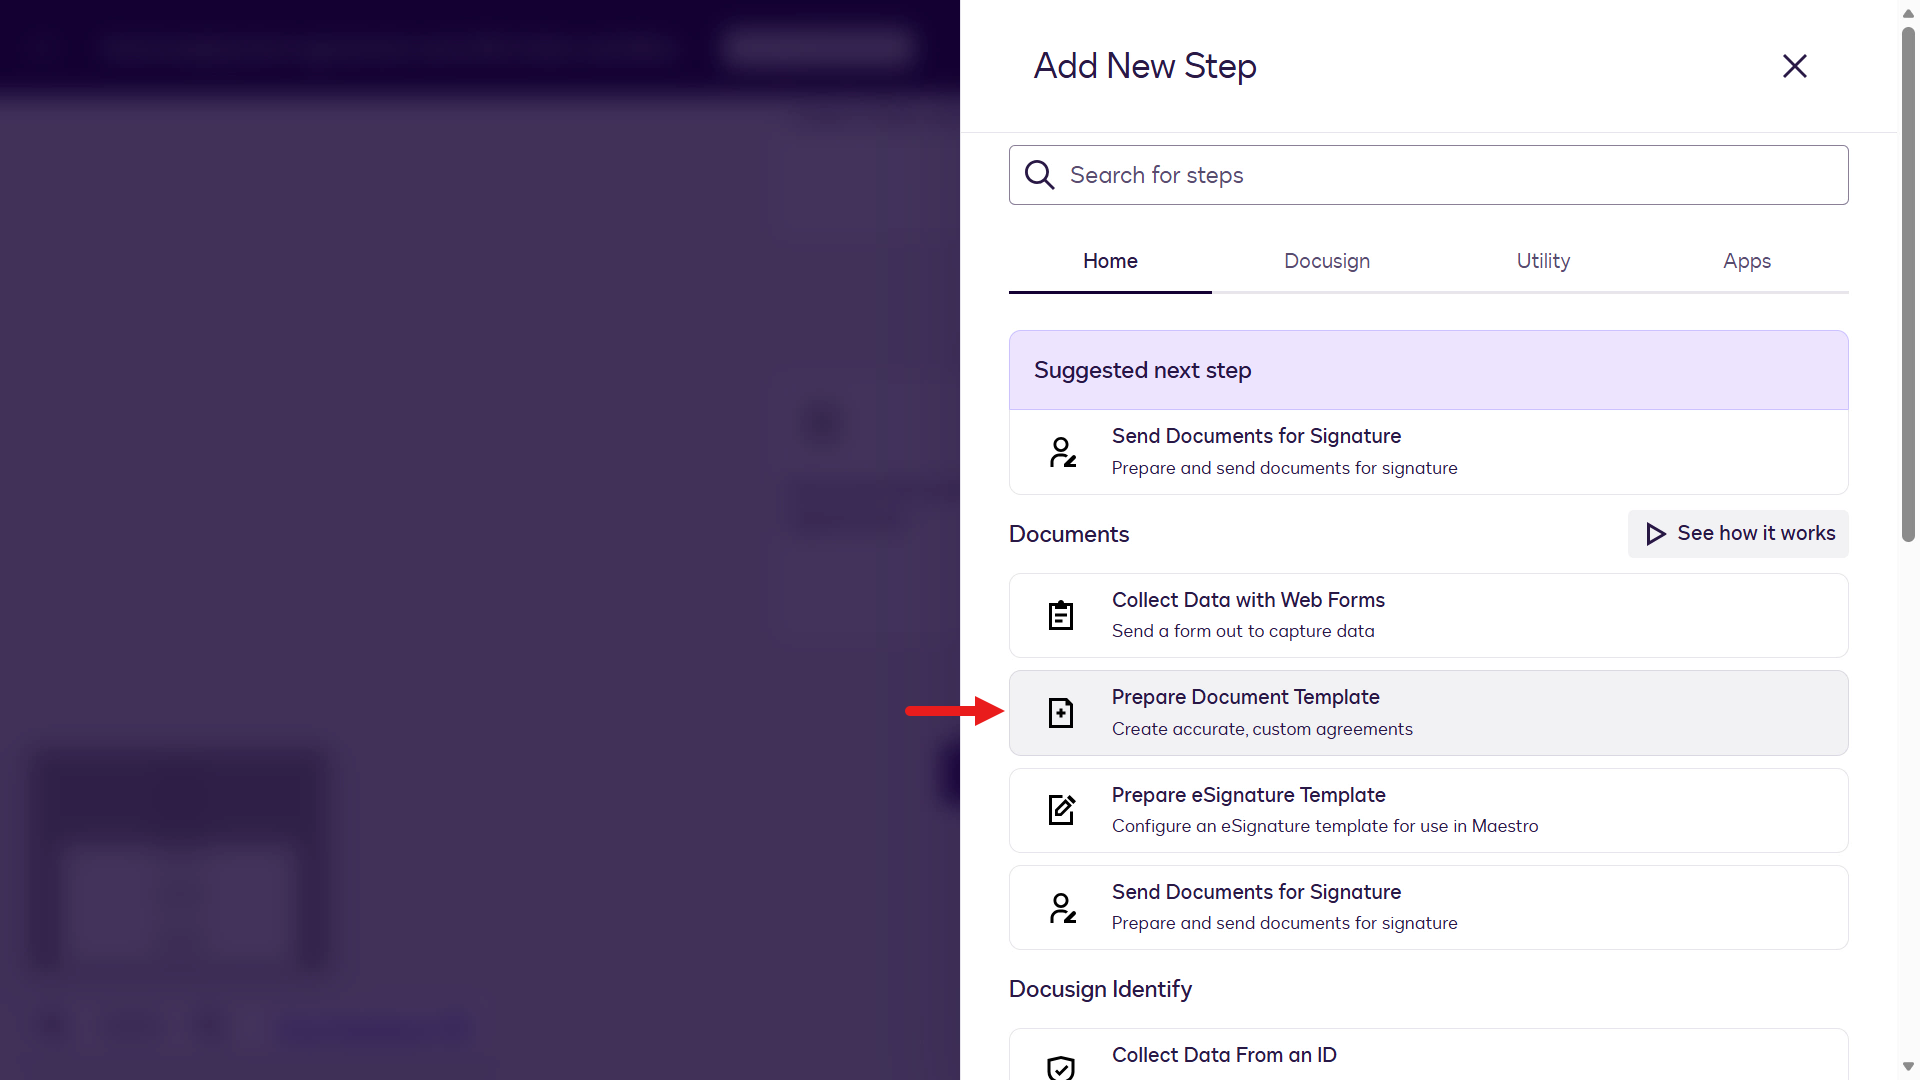
Scroll down to the Documents list and select Prepare a Document Template step.
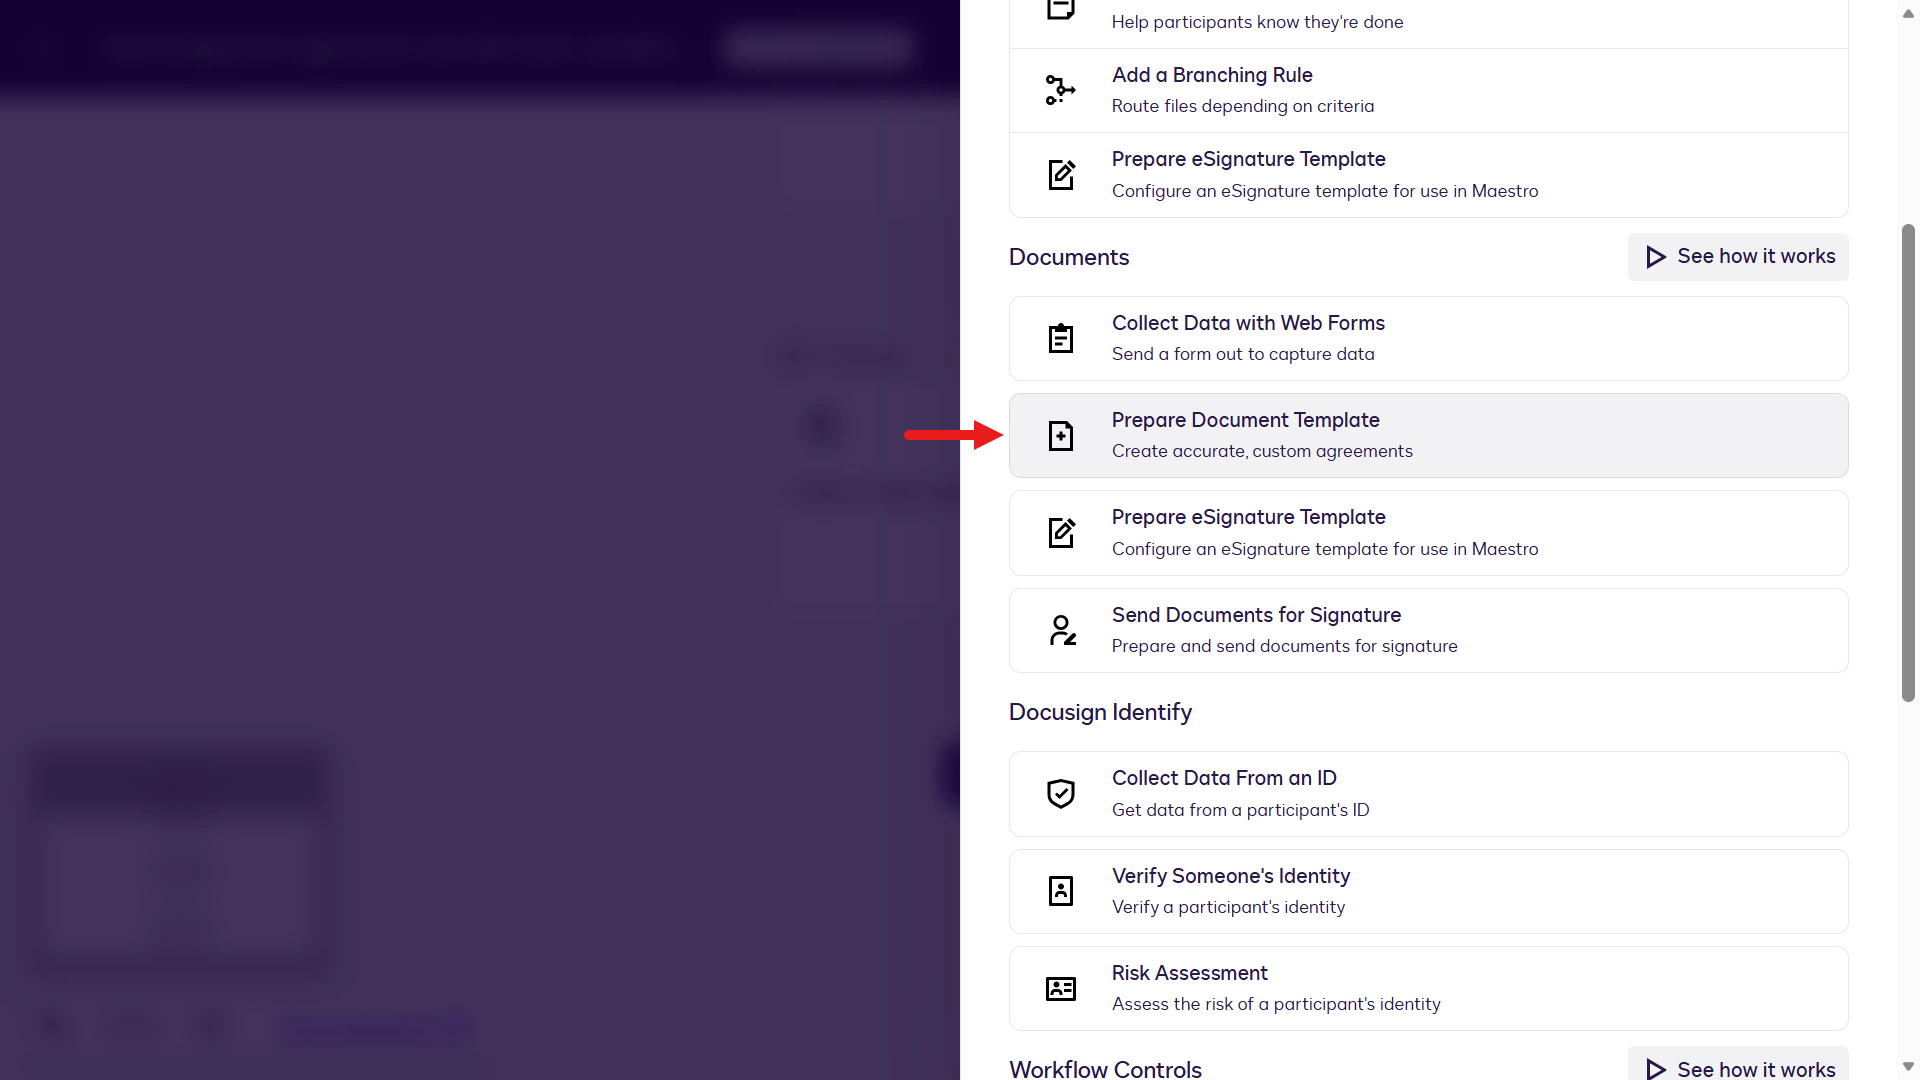
Select Configure for the Document Template step.
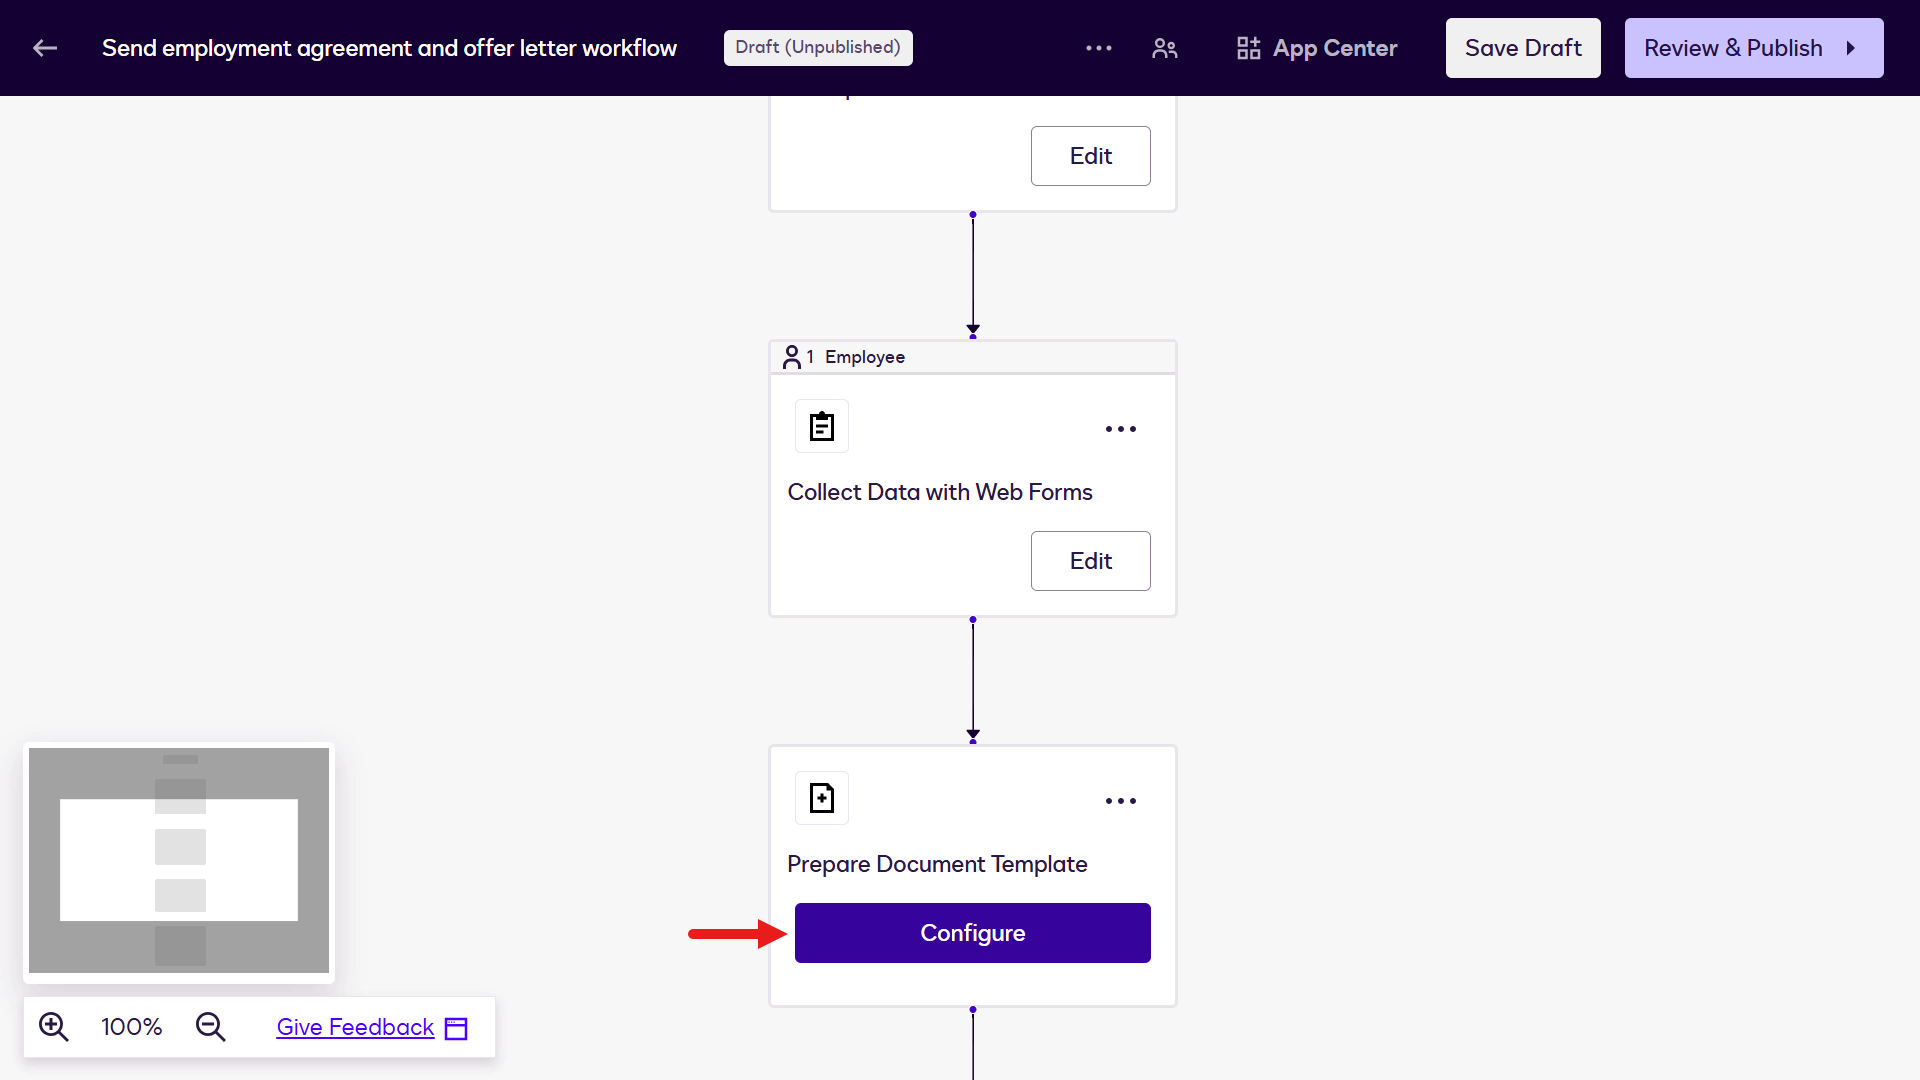
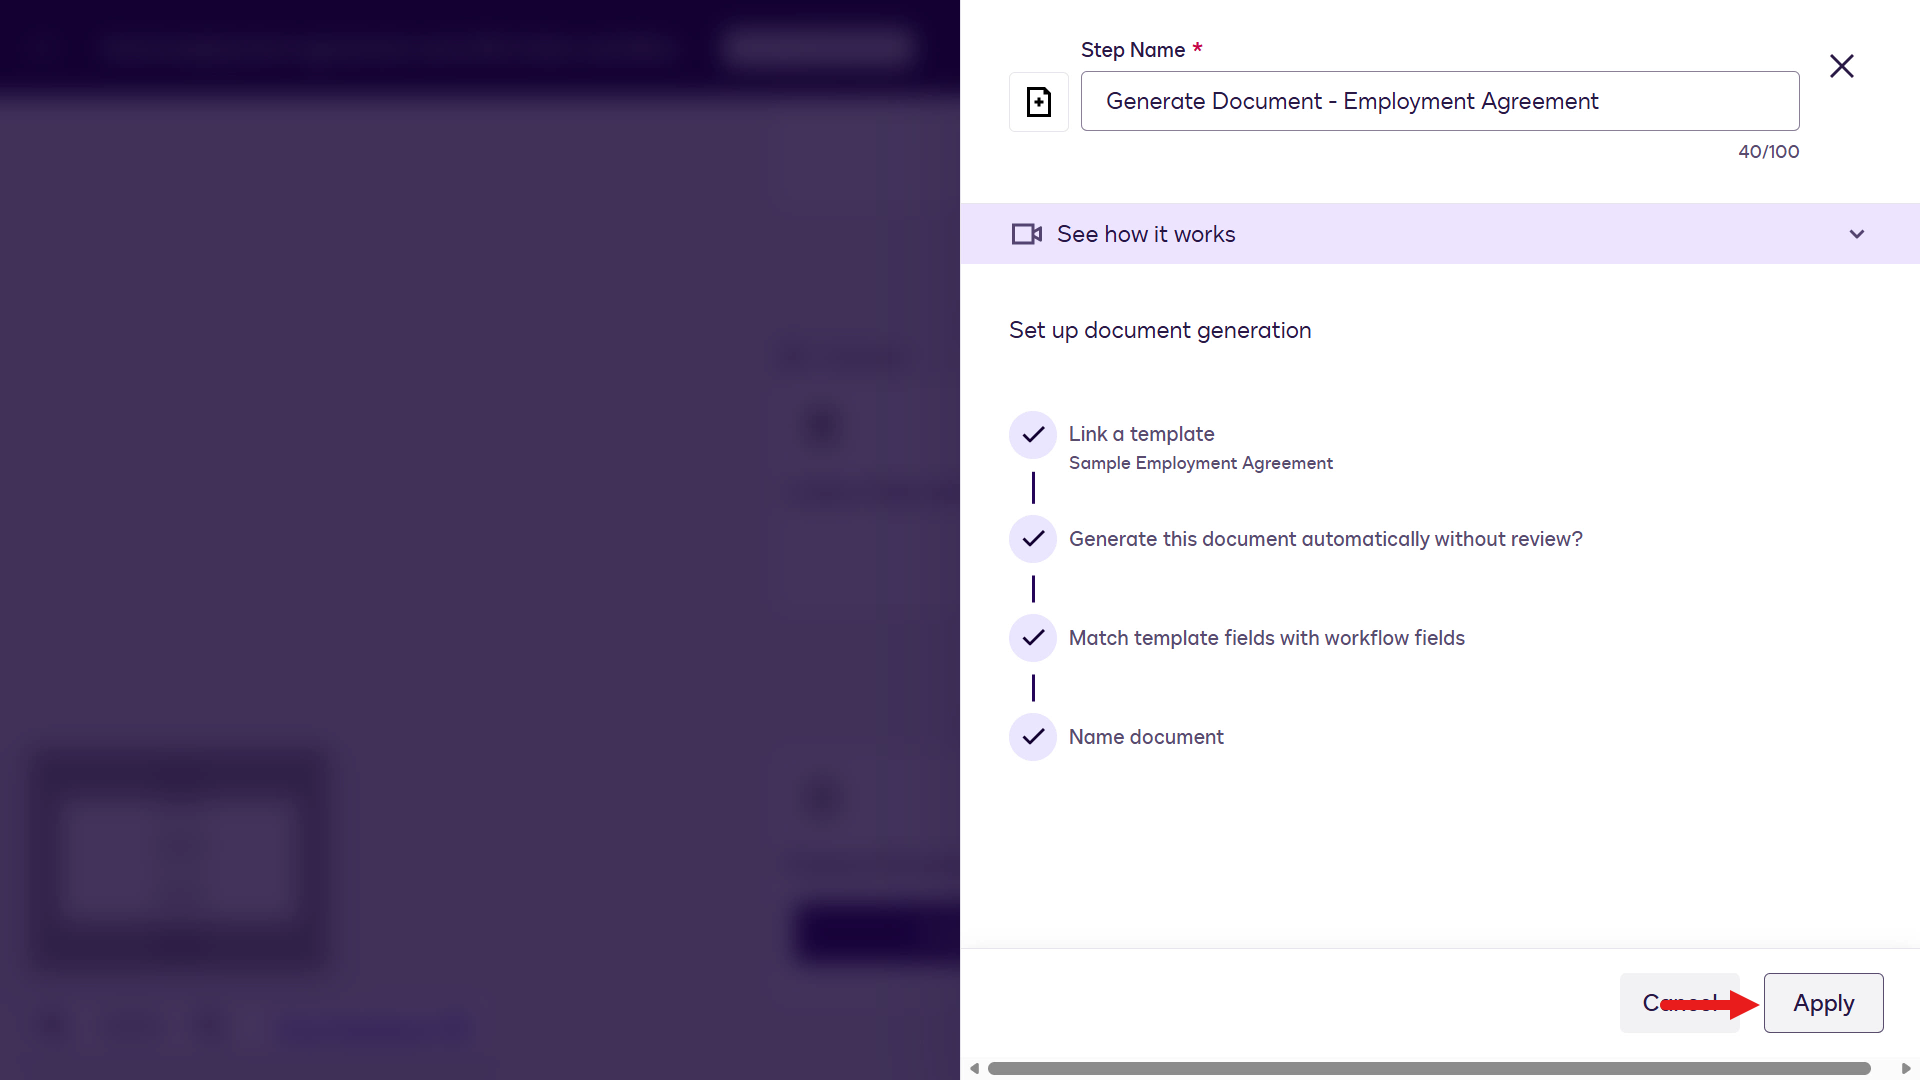
Rename the Step Name field to:
textGenerate Document - Employment AgreementNext, select the document template created earlier: Sample Employment Agreement.
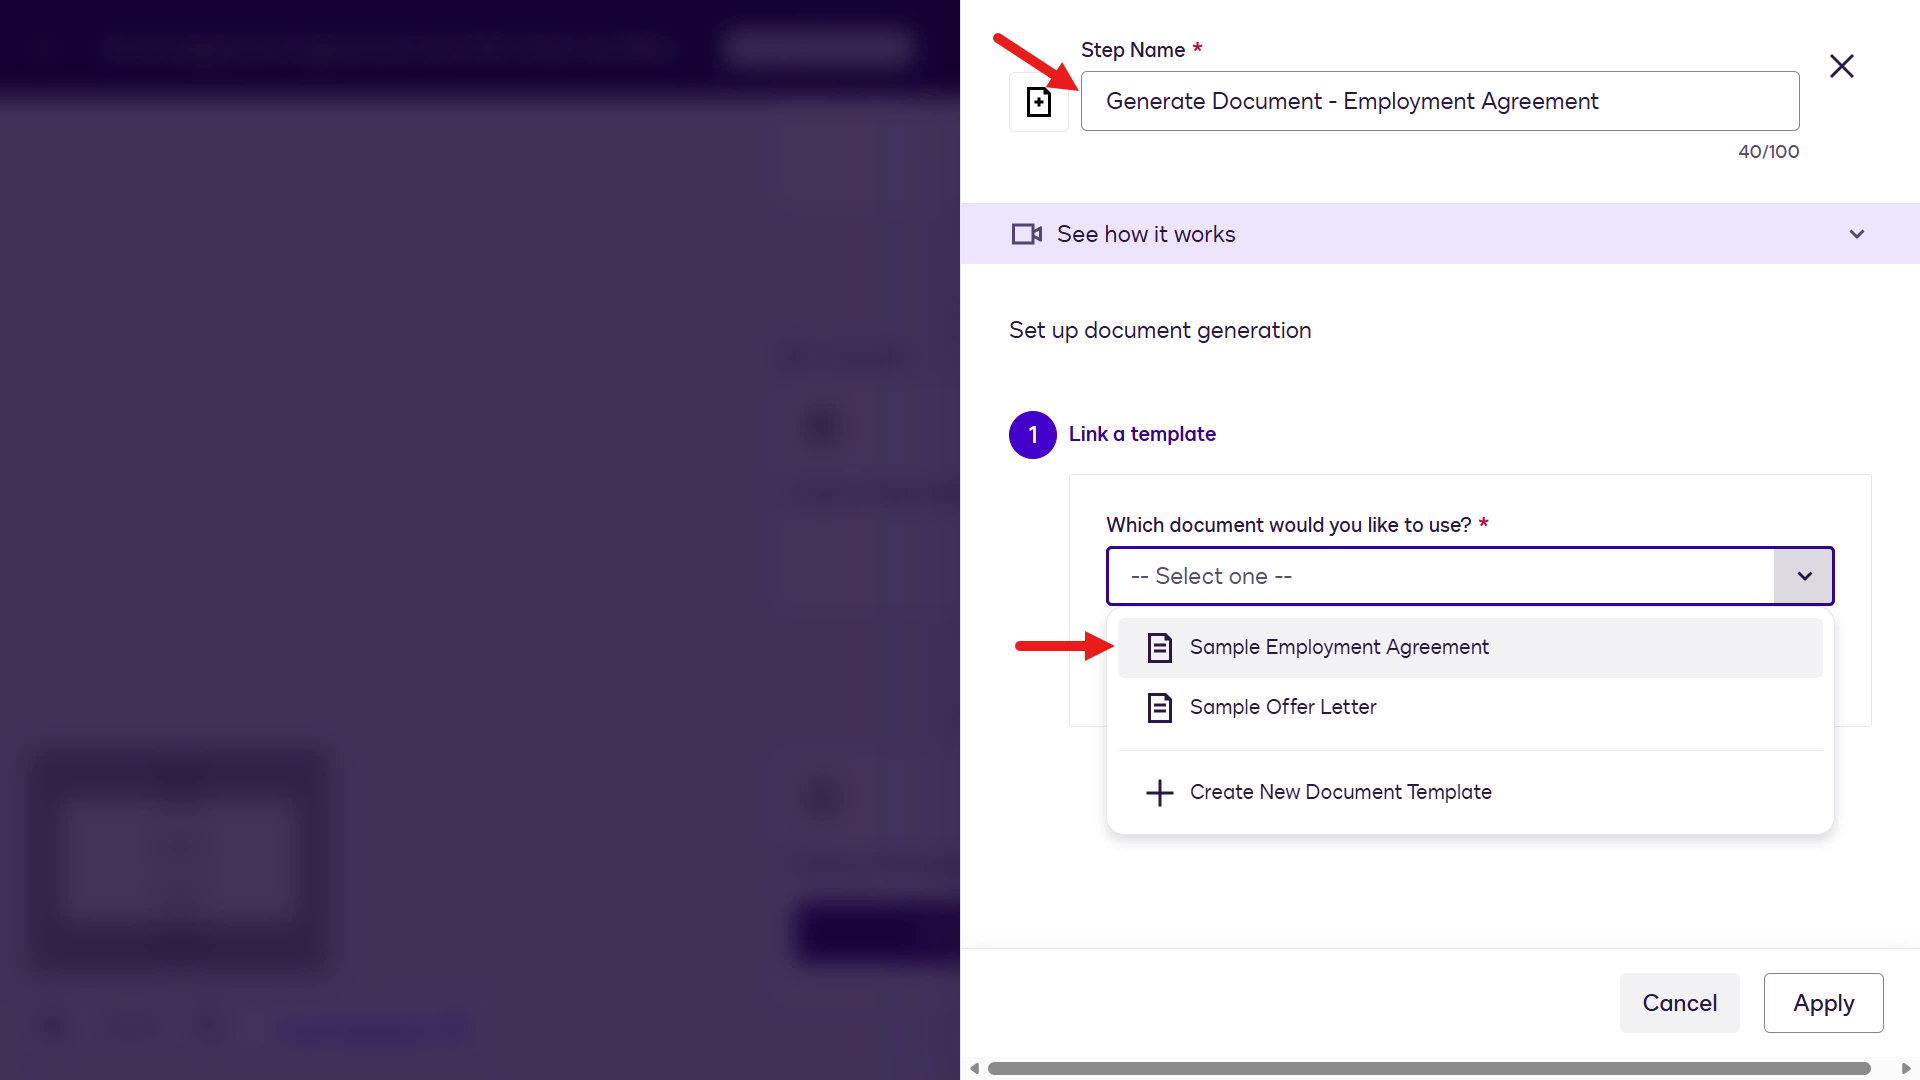
Select Next to proceed with the rest of the configuration.
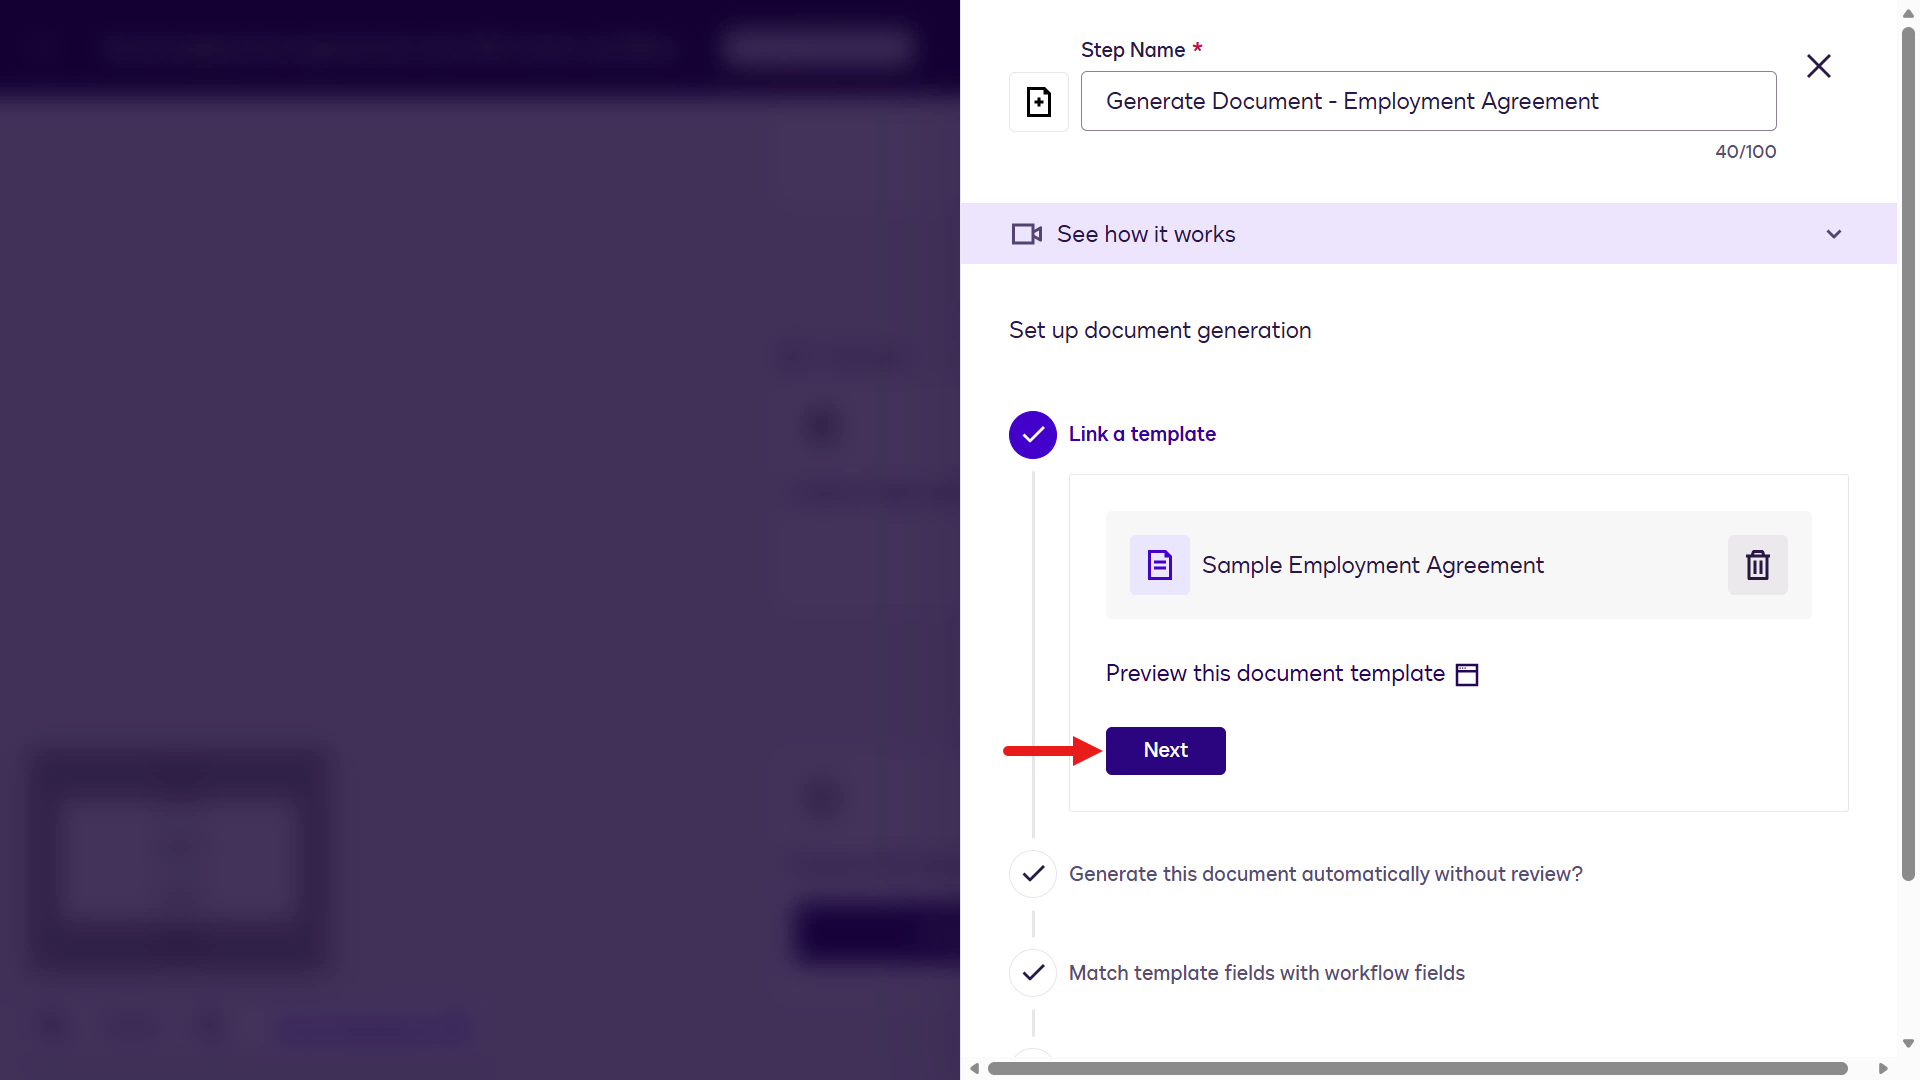
In this step, you can generate the document automatically without review. For this lab, leave it as Yes to show faster turnaround when sending an employment agreement with employee information. In production, the template and mapped input values would typically be approved internally.
Select Next.
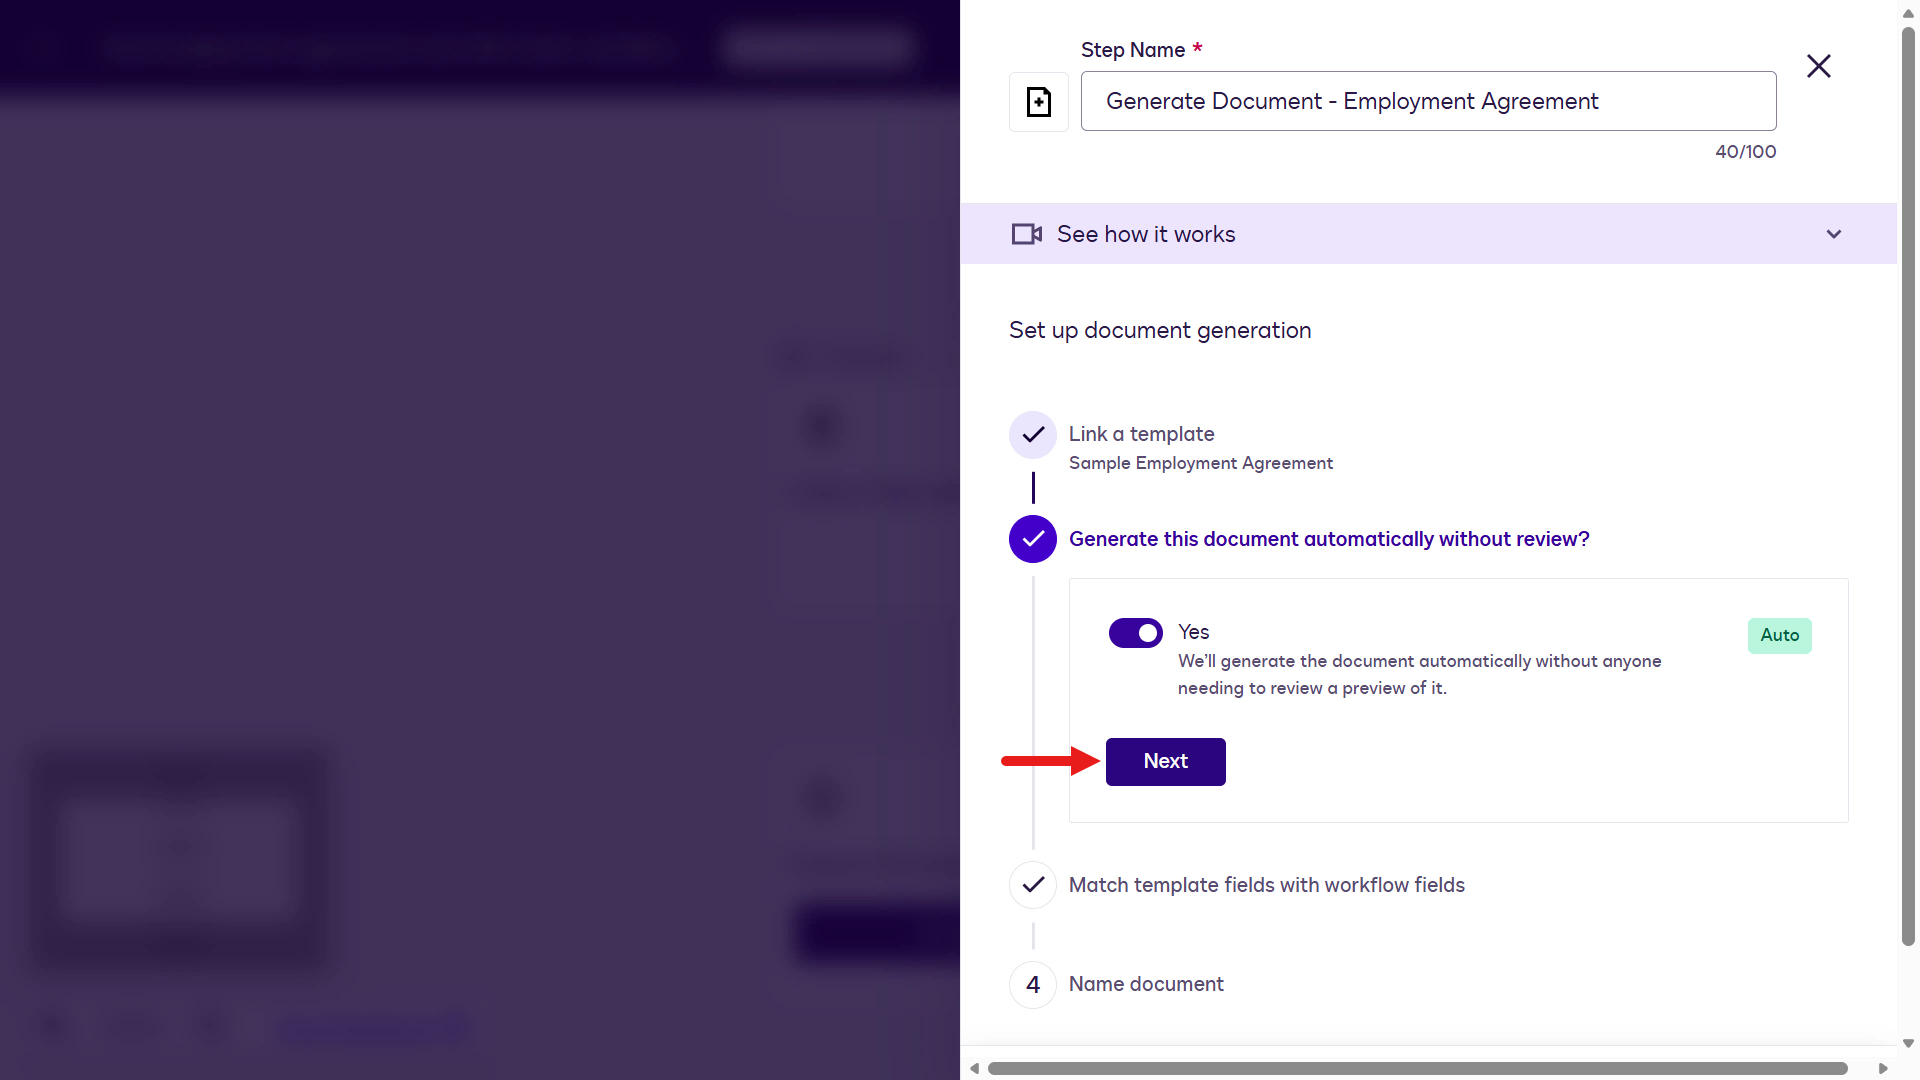
In this step, map values for document generation. Start with the
Effective Datefield. In Variables from Workflow Start, select Effective Date.
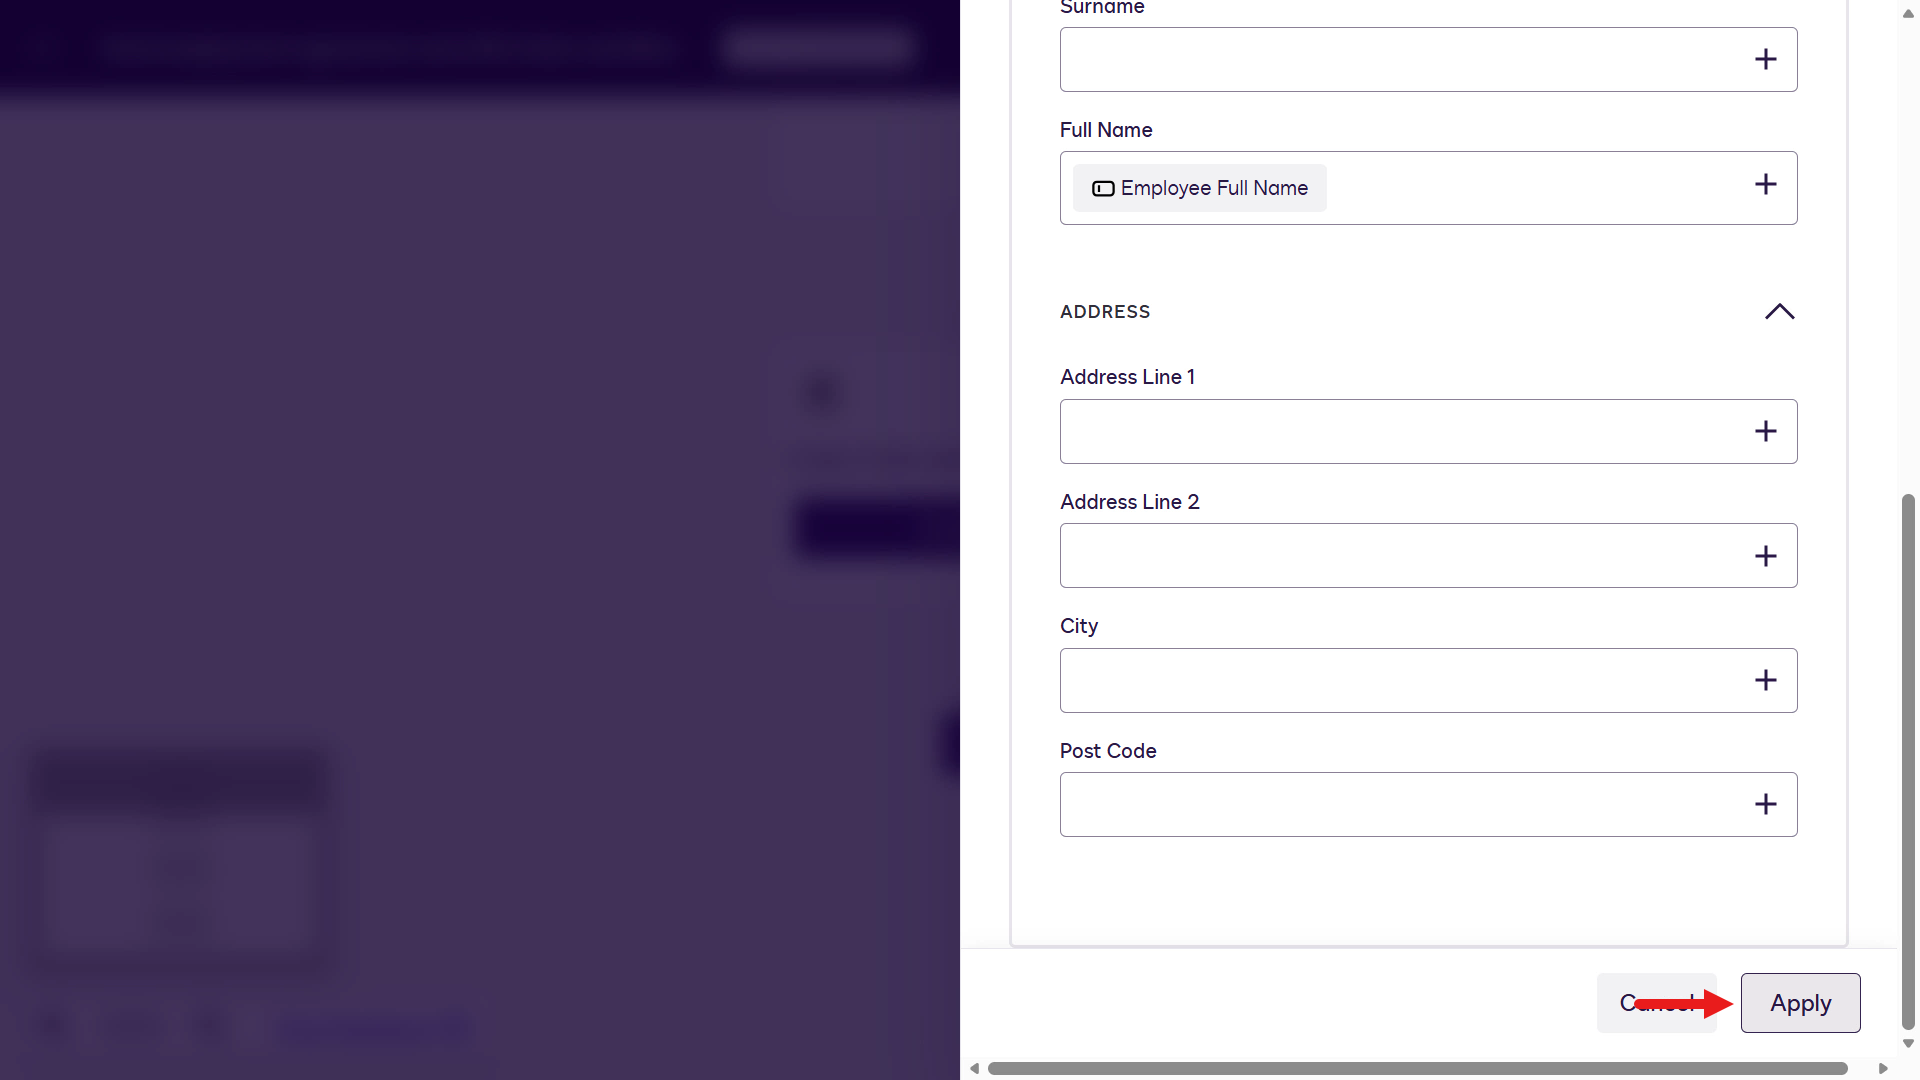
Repeat these steps for the remaining employment agreement fields using the table below. Make sure Employee Full Name is mapped to Full Name under Collect Data with Web Forms.
Select Next to configure the naming of the file.
Agreement Field Workflow Component Component Field Effective Date Variables from Workflow Start Effective Date Employee Full Name Collect Data with Web Forms Full Name Employee Position Variables from Workflow Start Employee Position Start Date Variables from Workflow Start Start Date Salary Variables from Workflow Start Salary 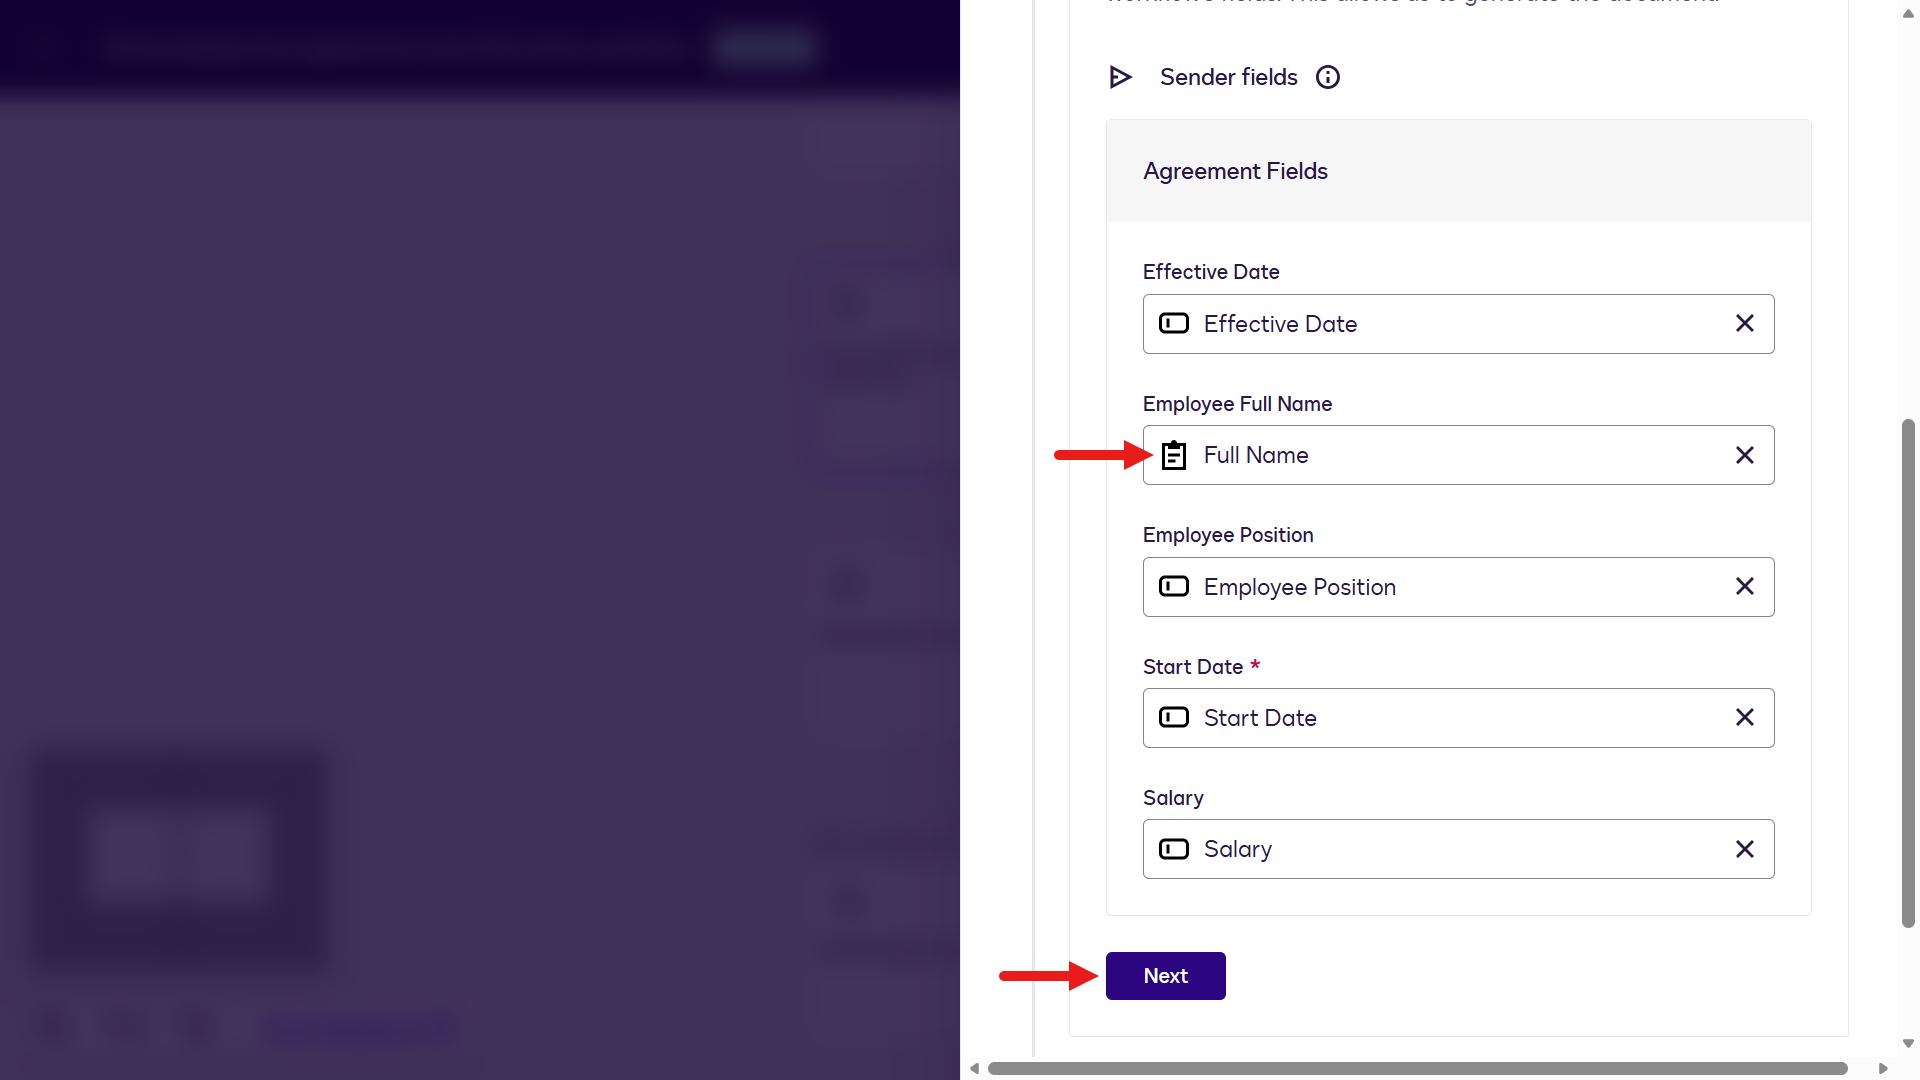
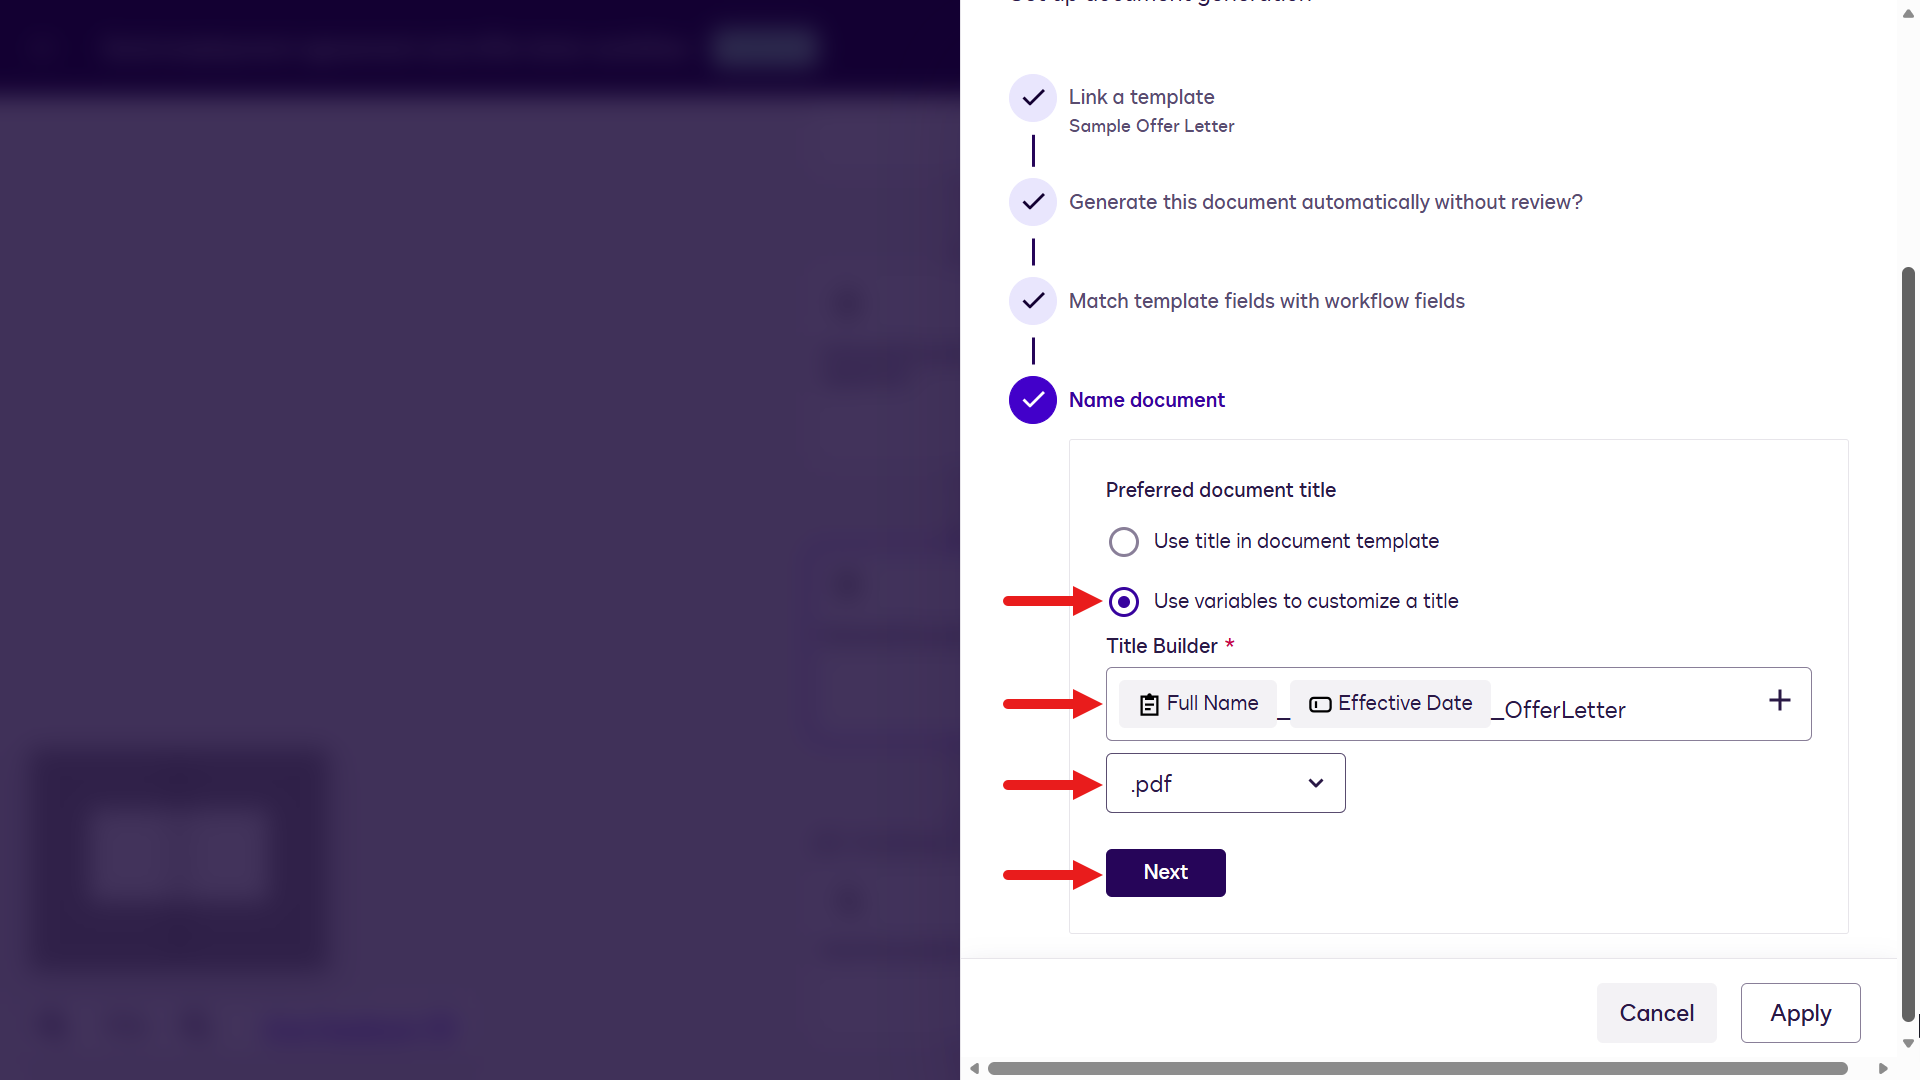
In this step, configure the generated file name. Keep it simple by using the employee's full name, the effective date, and appending
EmploymentAgreement.Select the option Use variables to customize a title to reference values from our workflow steps. Select Full Name from the Web Form list.
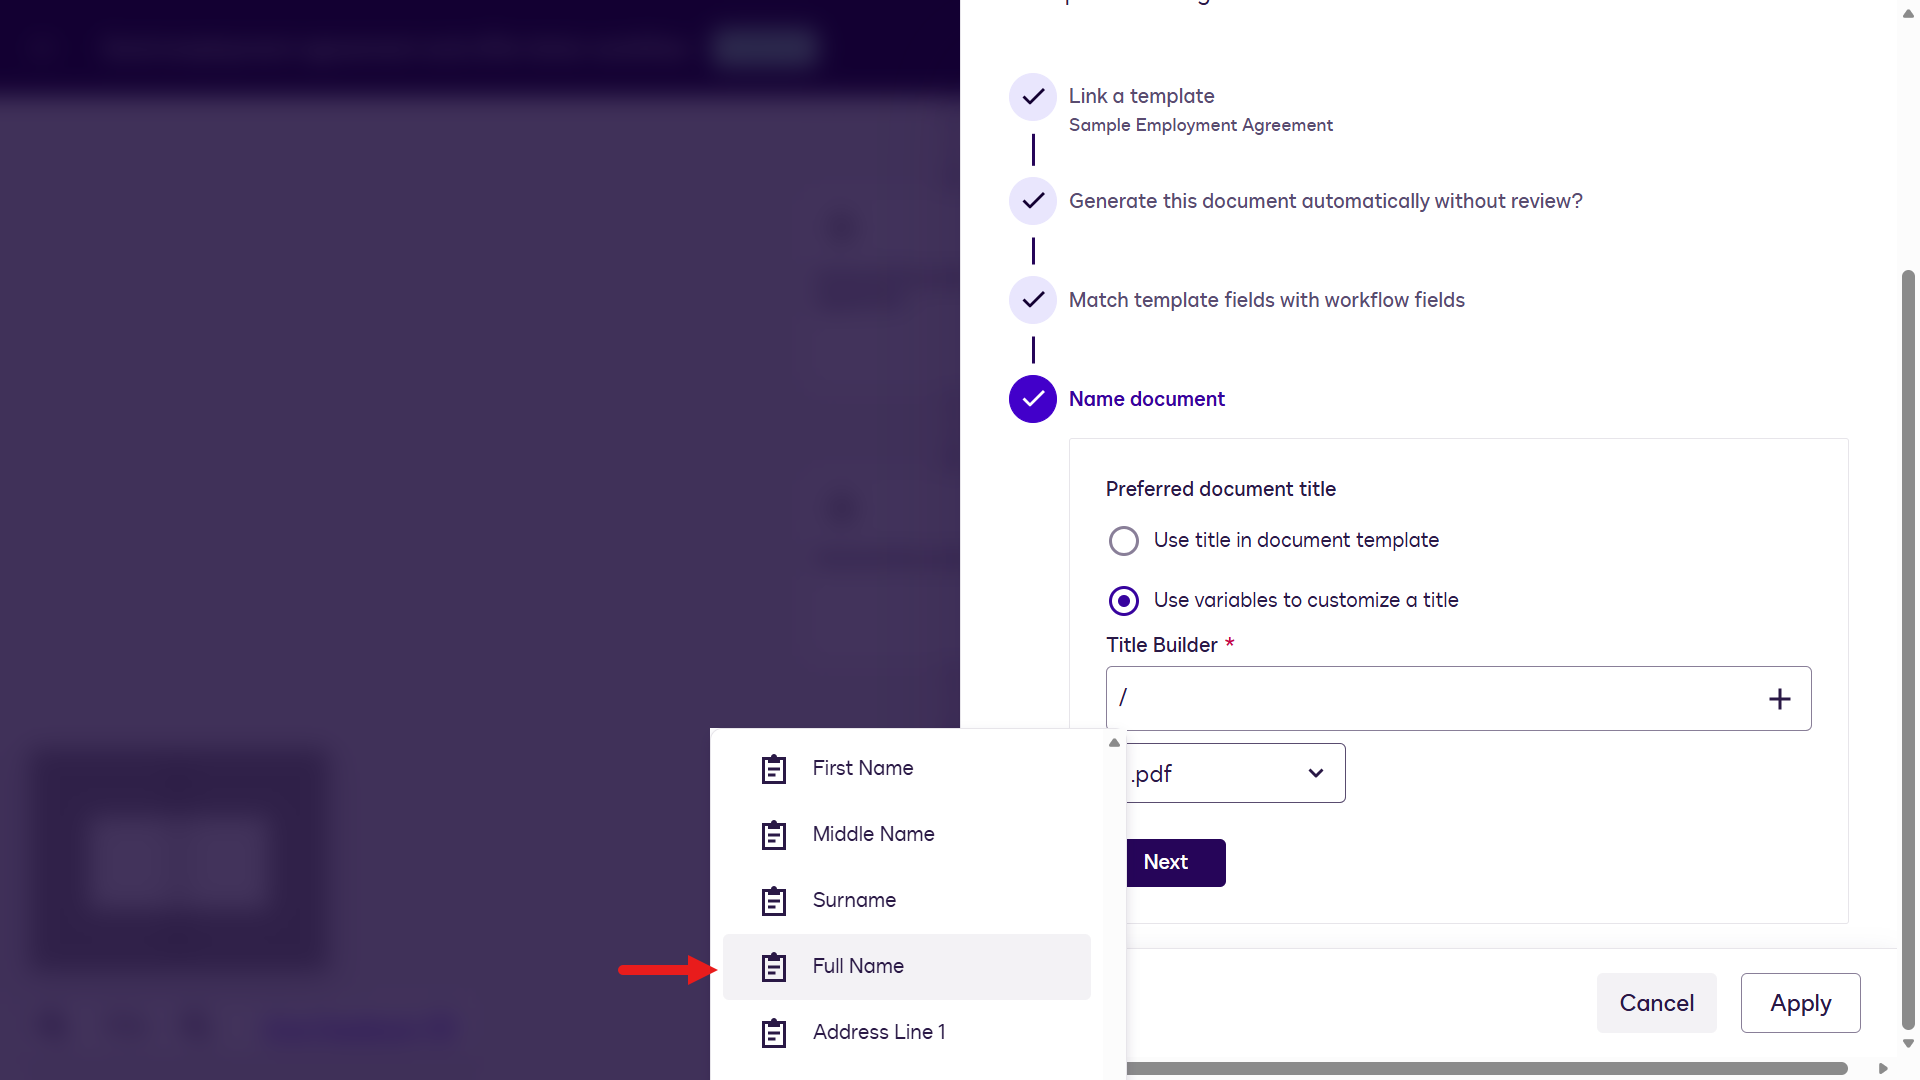
Select the + icon to select the Effective Date from the Collect Data with Web Forms list.
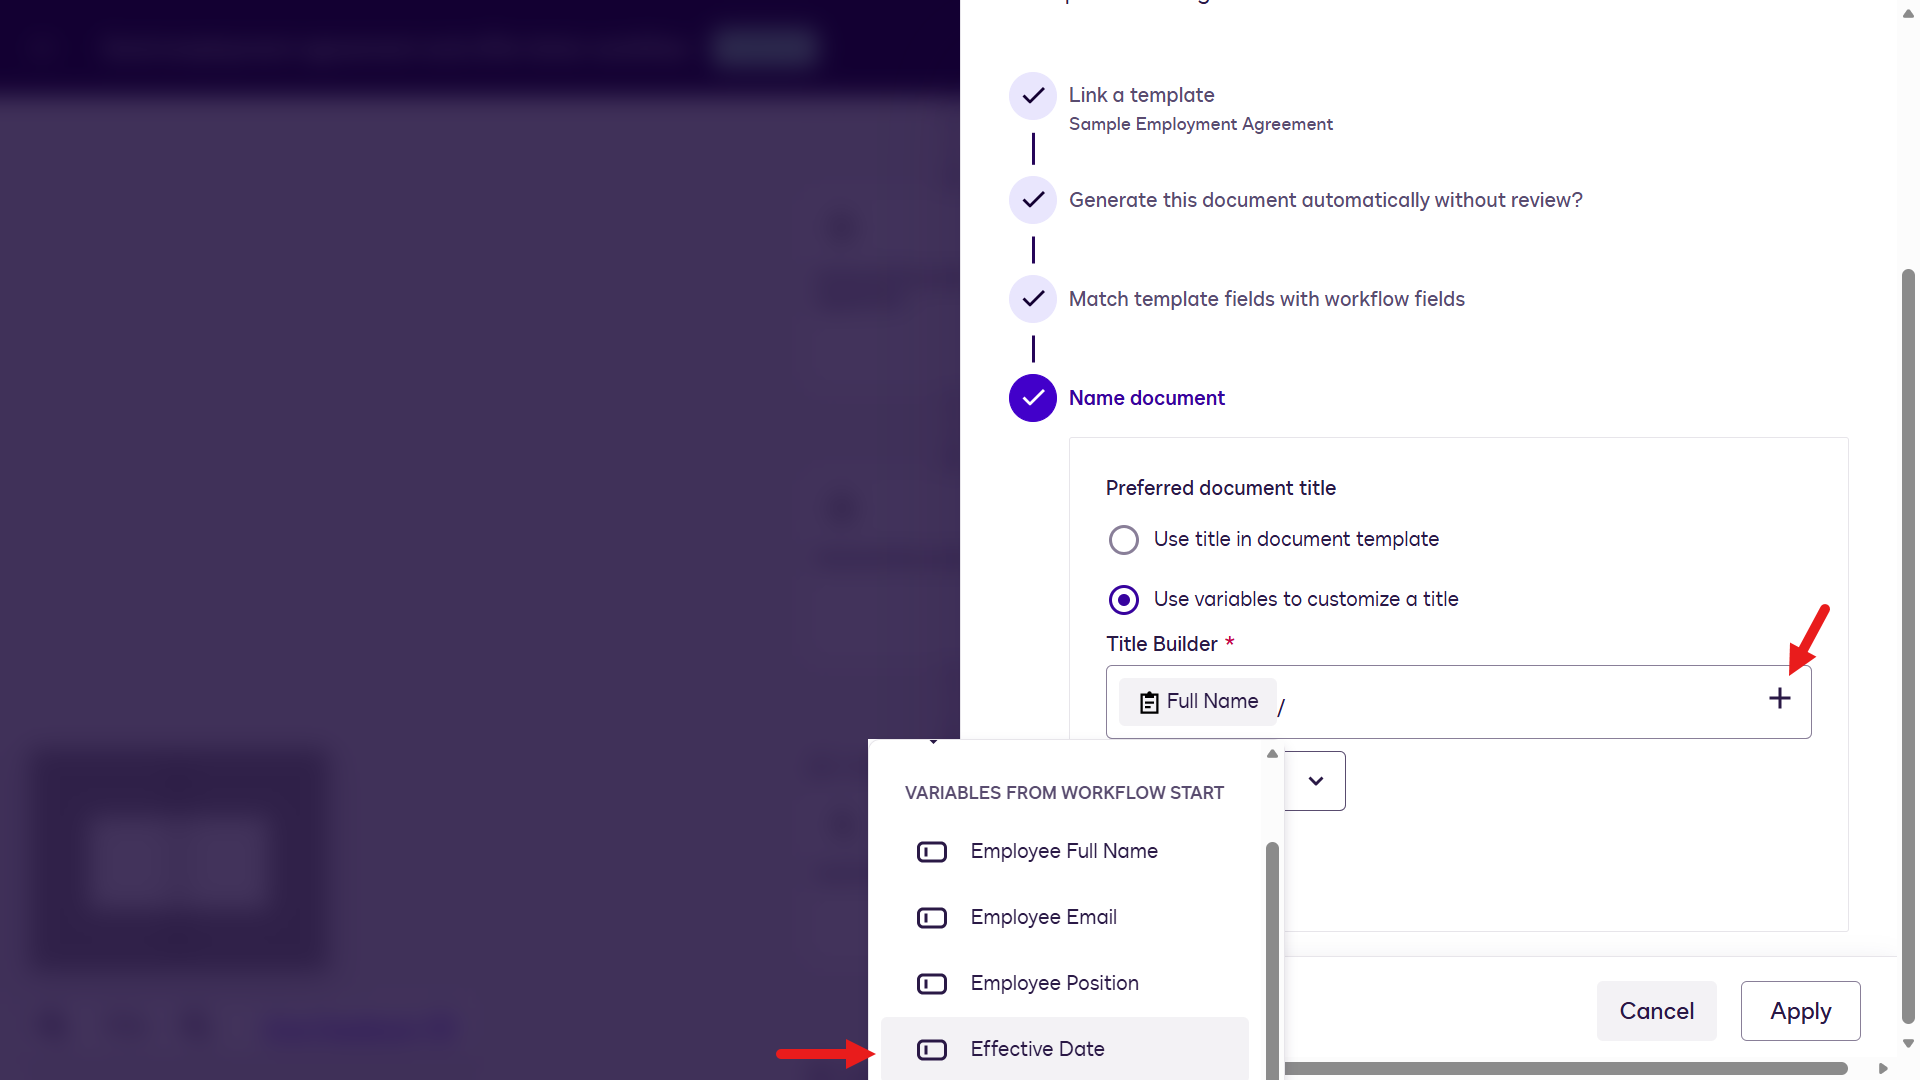
Next enter
_in-between the two variables and at the end, enter the text value of_EmploymentAgreement.Update the file format to .pdf and select Next.
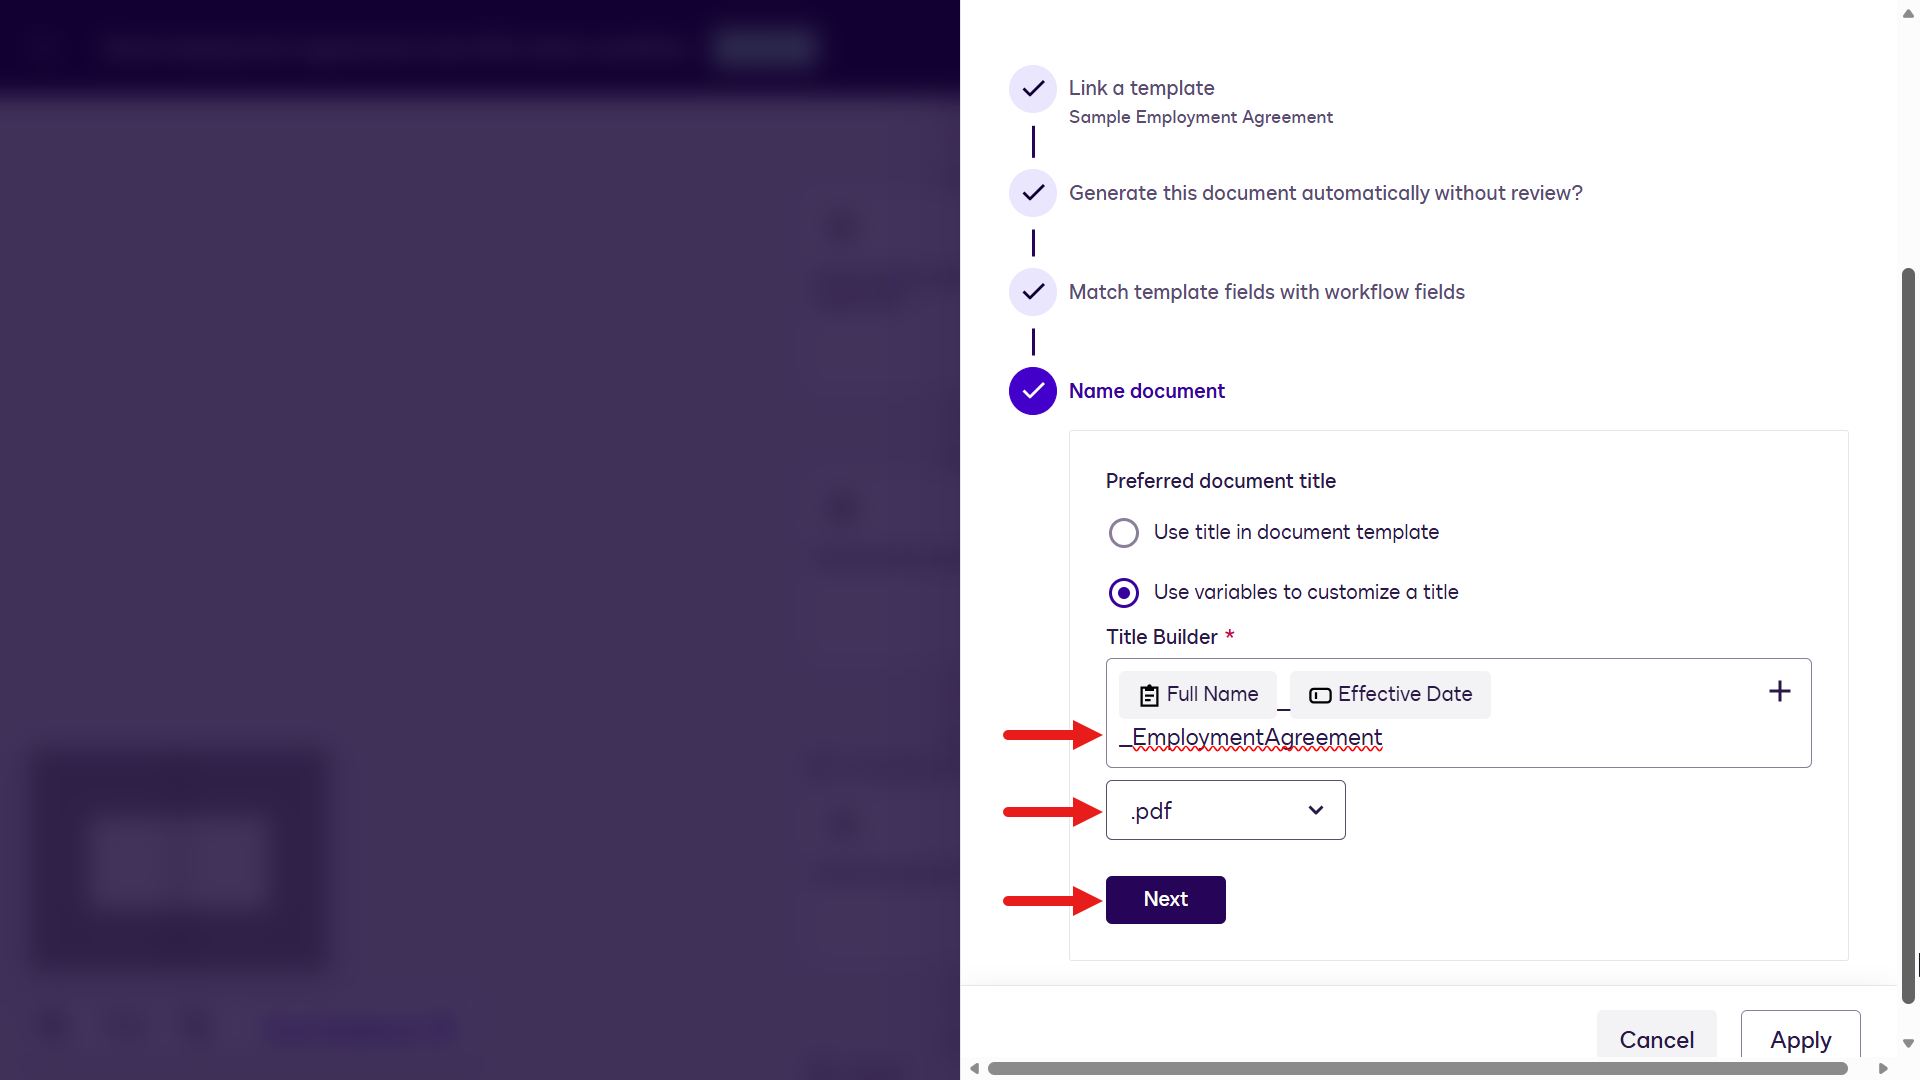
You've completed configuring the step. Select Apply to continue.
Select Add a step.
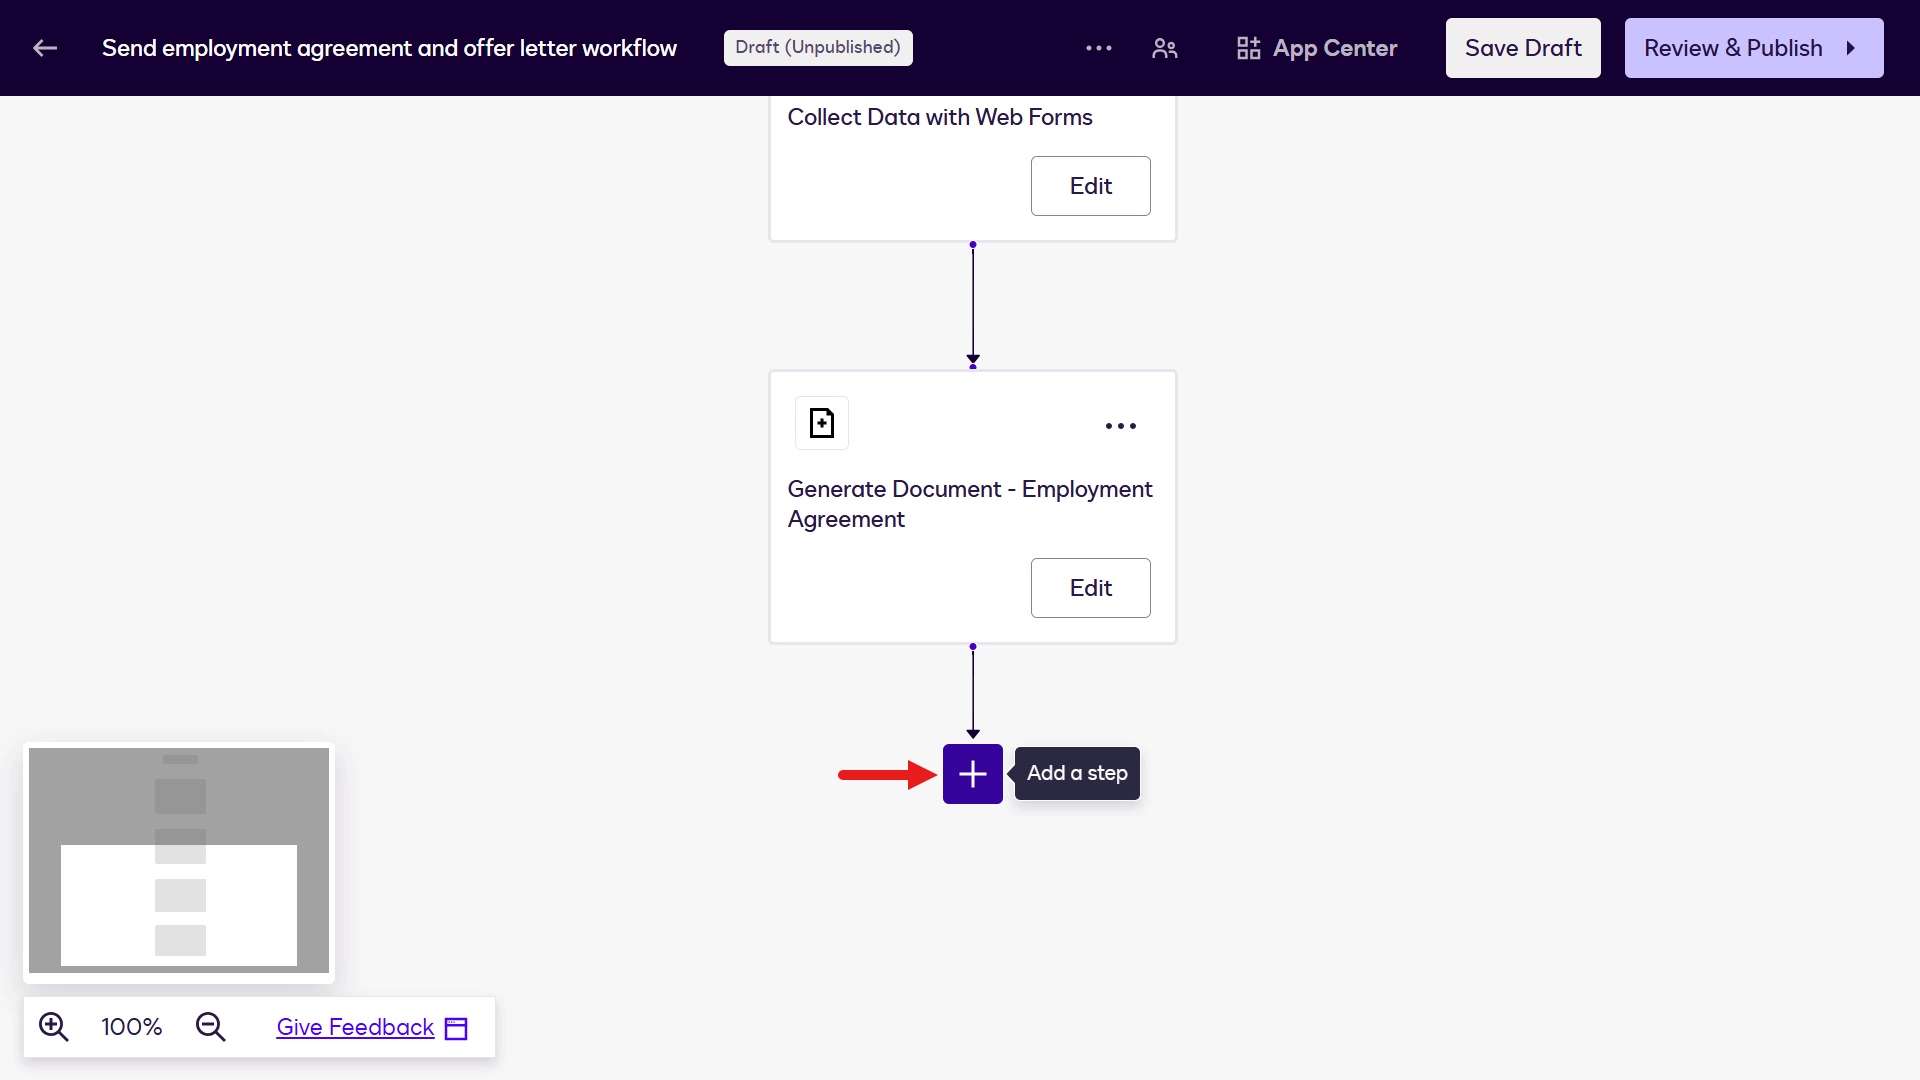
Repeat the same process to add the second document template, Sample Offer Letter, to the workflow. Select Prepare Document Template.
Rename the Step Name field to:
textGenerate Document - Offer LetterNext, select the Sample Offer Letter document template and configure the agreement fields mapping to the relevant workflow components using the below table as guidance.
Make sure you select the relevant workflow component fields to map to, such as Employee Full Name from the Collect Data with Web Forms list.
Agreement Field Workflow Component Component Field Employee Full Name Collect Data with Web Forms Full Name Employee Address Line 1 Collect Data with Web Forms Address Line 1 Employee Address Line 2 Collect Data with Web Forms Address Line 2 Employee Address City Collect Data with Web Forms City Employee Address Post Code Collect Data with Web Forms Post Code Employee Position Variables from Workflow Start Employee Position Start Date Variables from Workflow Start Start Date Signed Due Date Variables from Workflow Start Due Signed Date 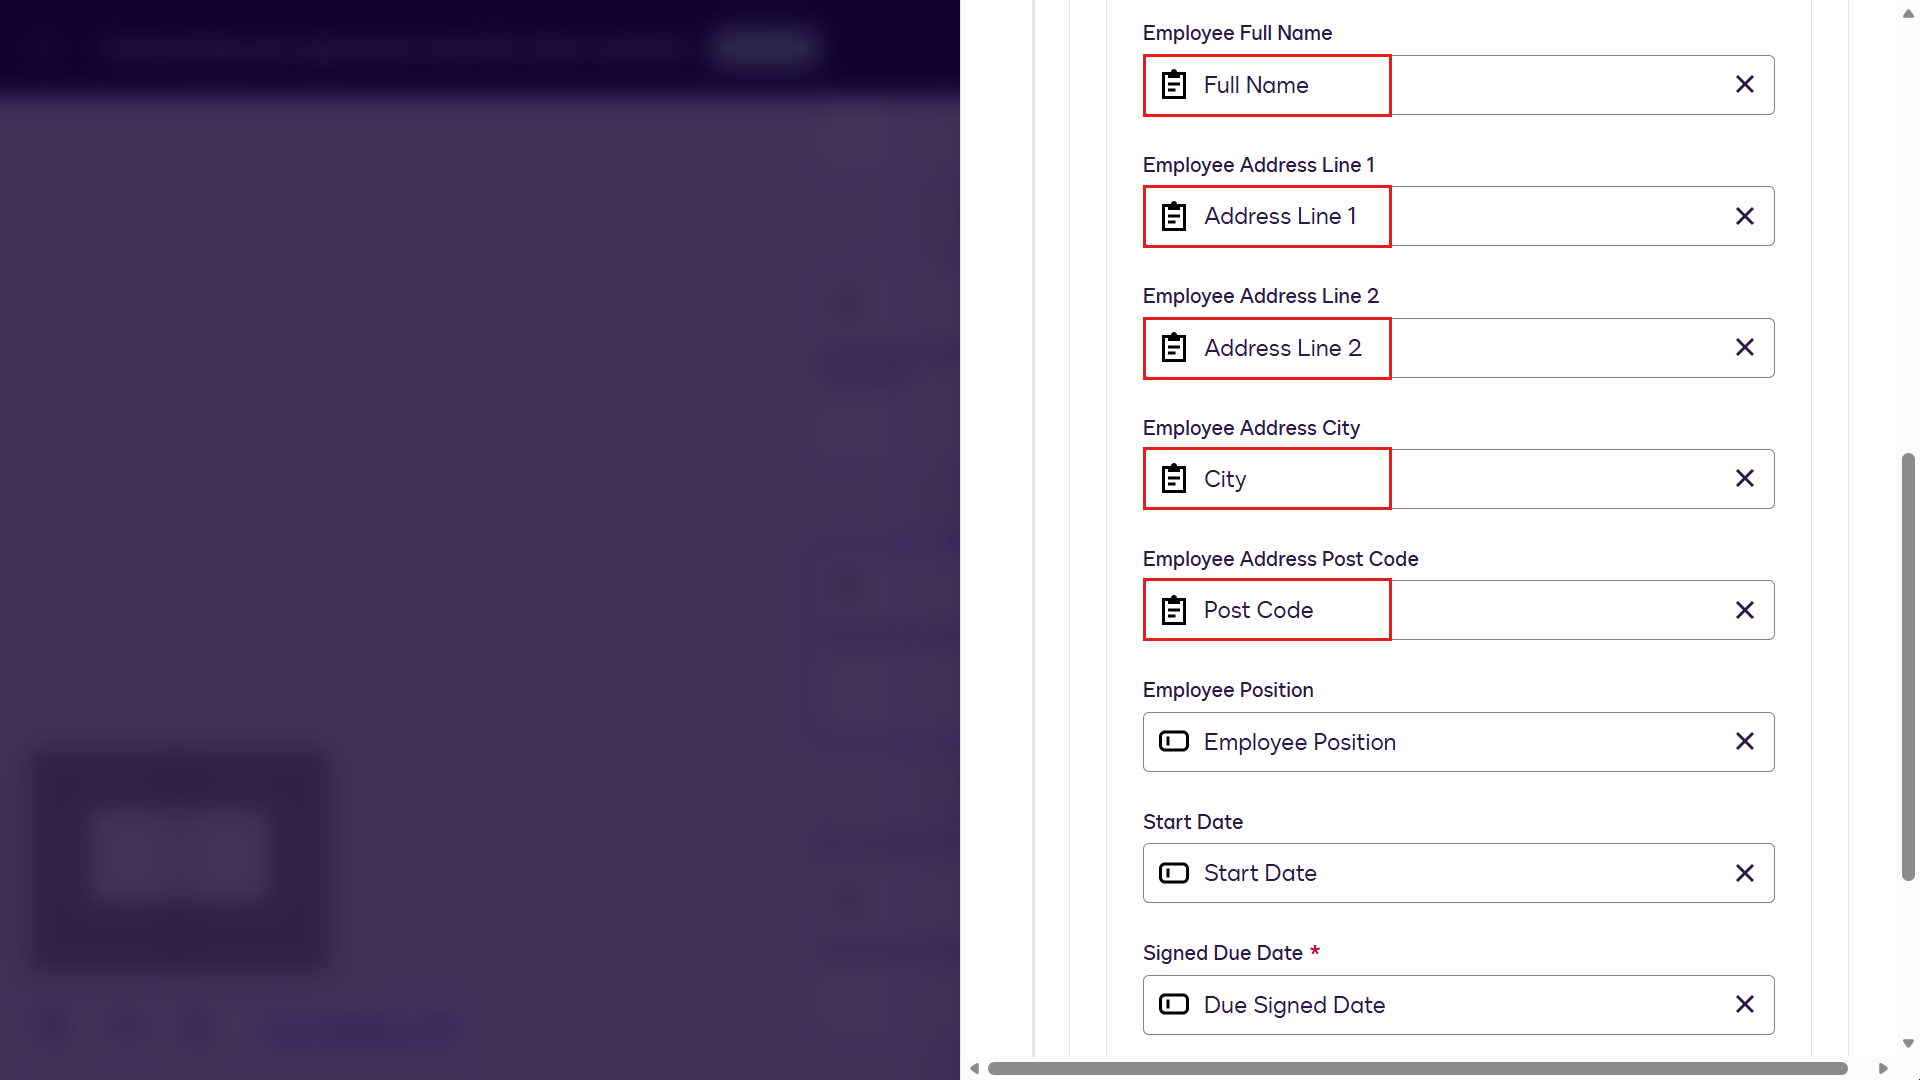
For the naming convention of the generated file, we'll apply the same references of Employee Full Name from Collect Data with Web Forms, the Effective Date from Variables from Workflow Start and append the text value of
_OfferLetter.Update the file format to .pdf, select Next and select Apply.
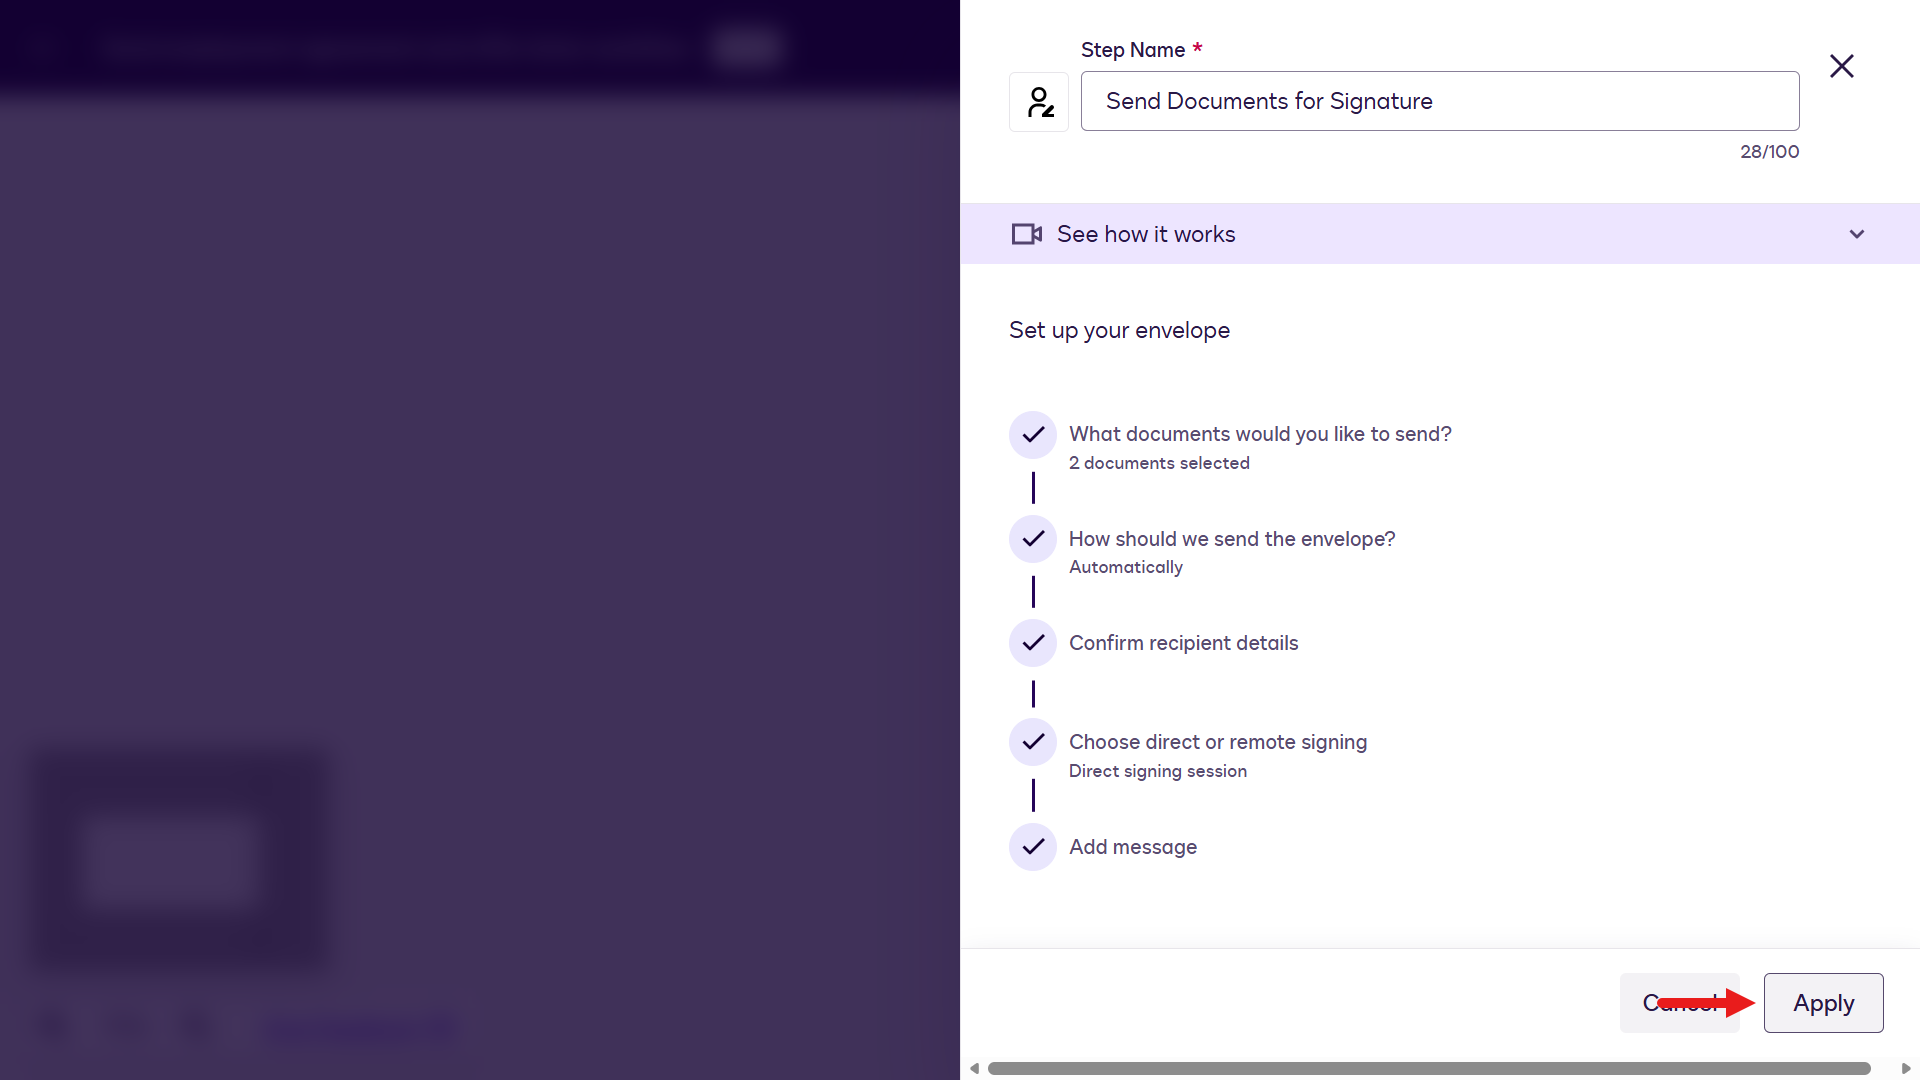
Add another step to send the documents for signature by selecting Add a step.
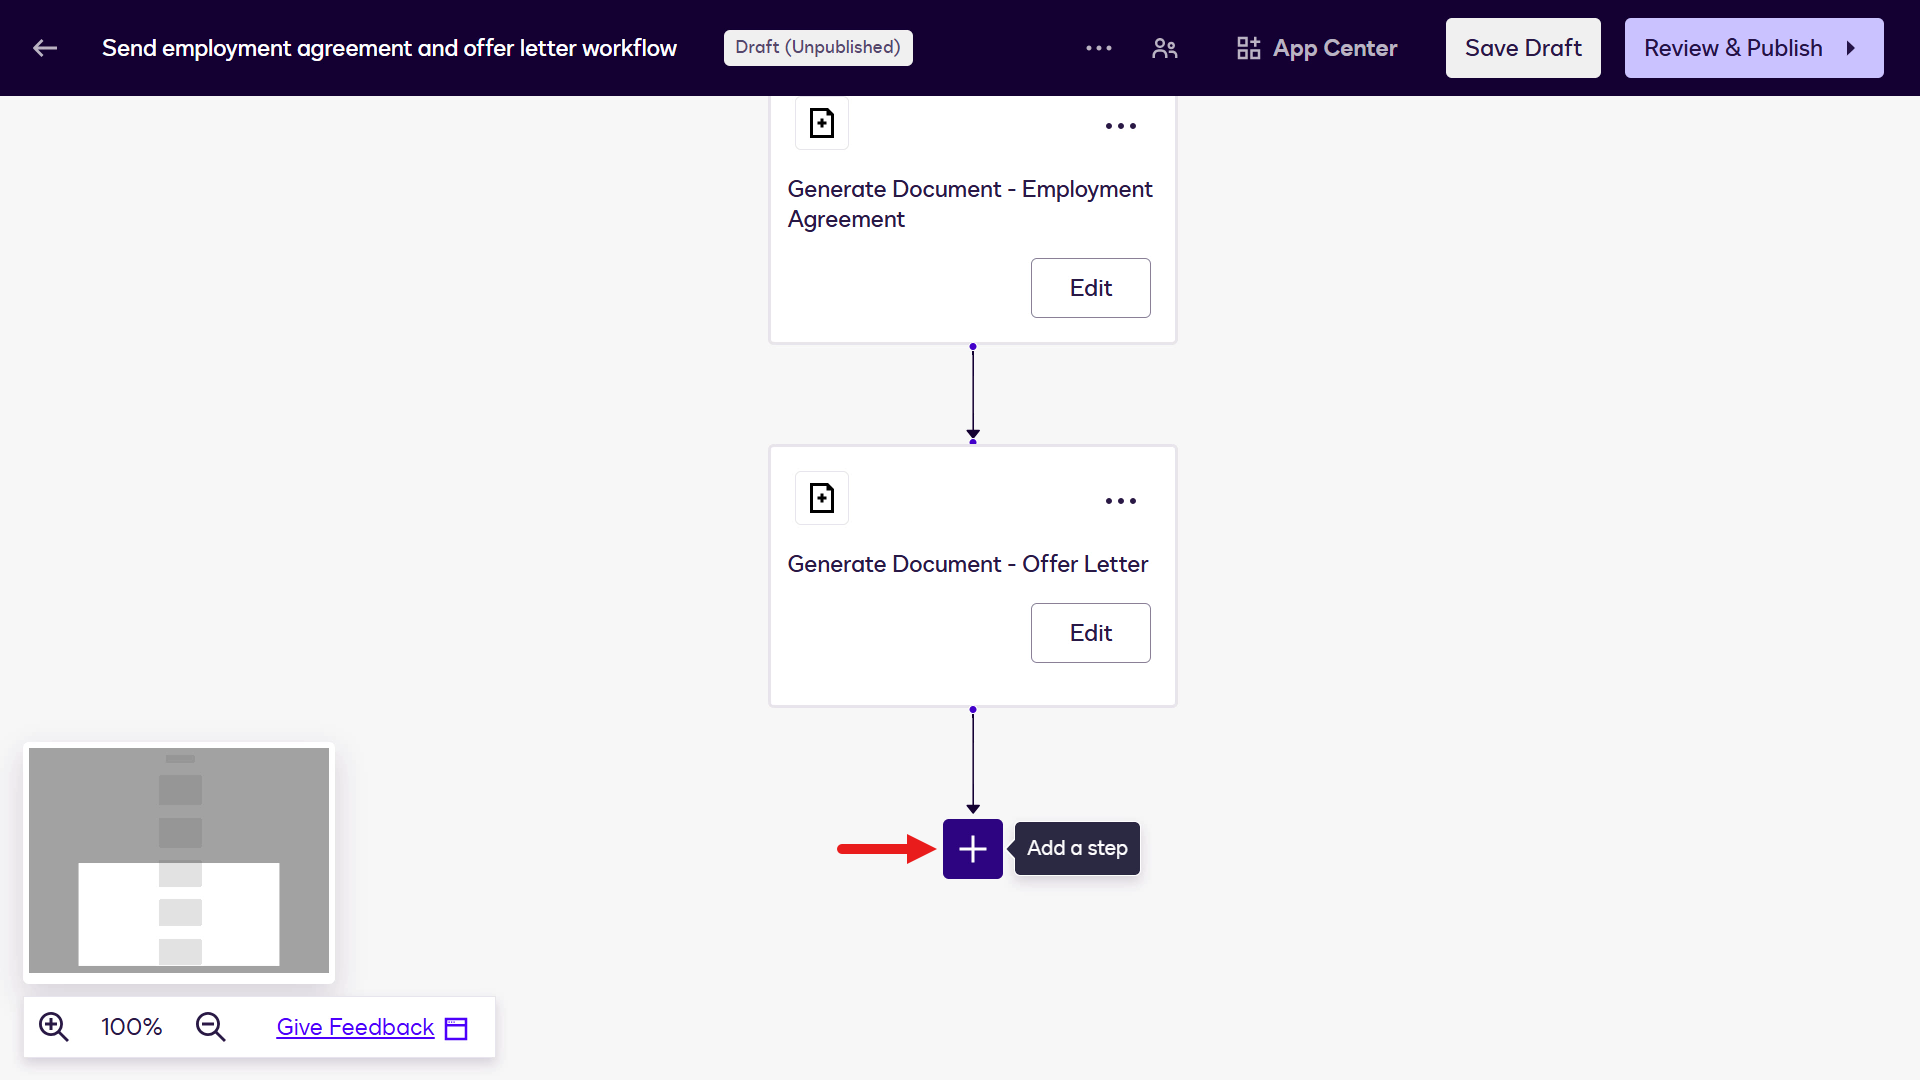
Select Send Documents for Signature.
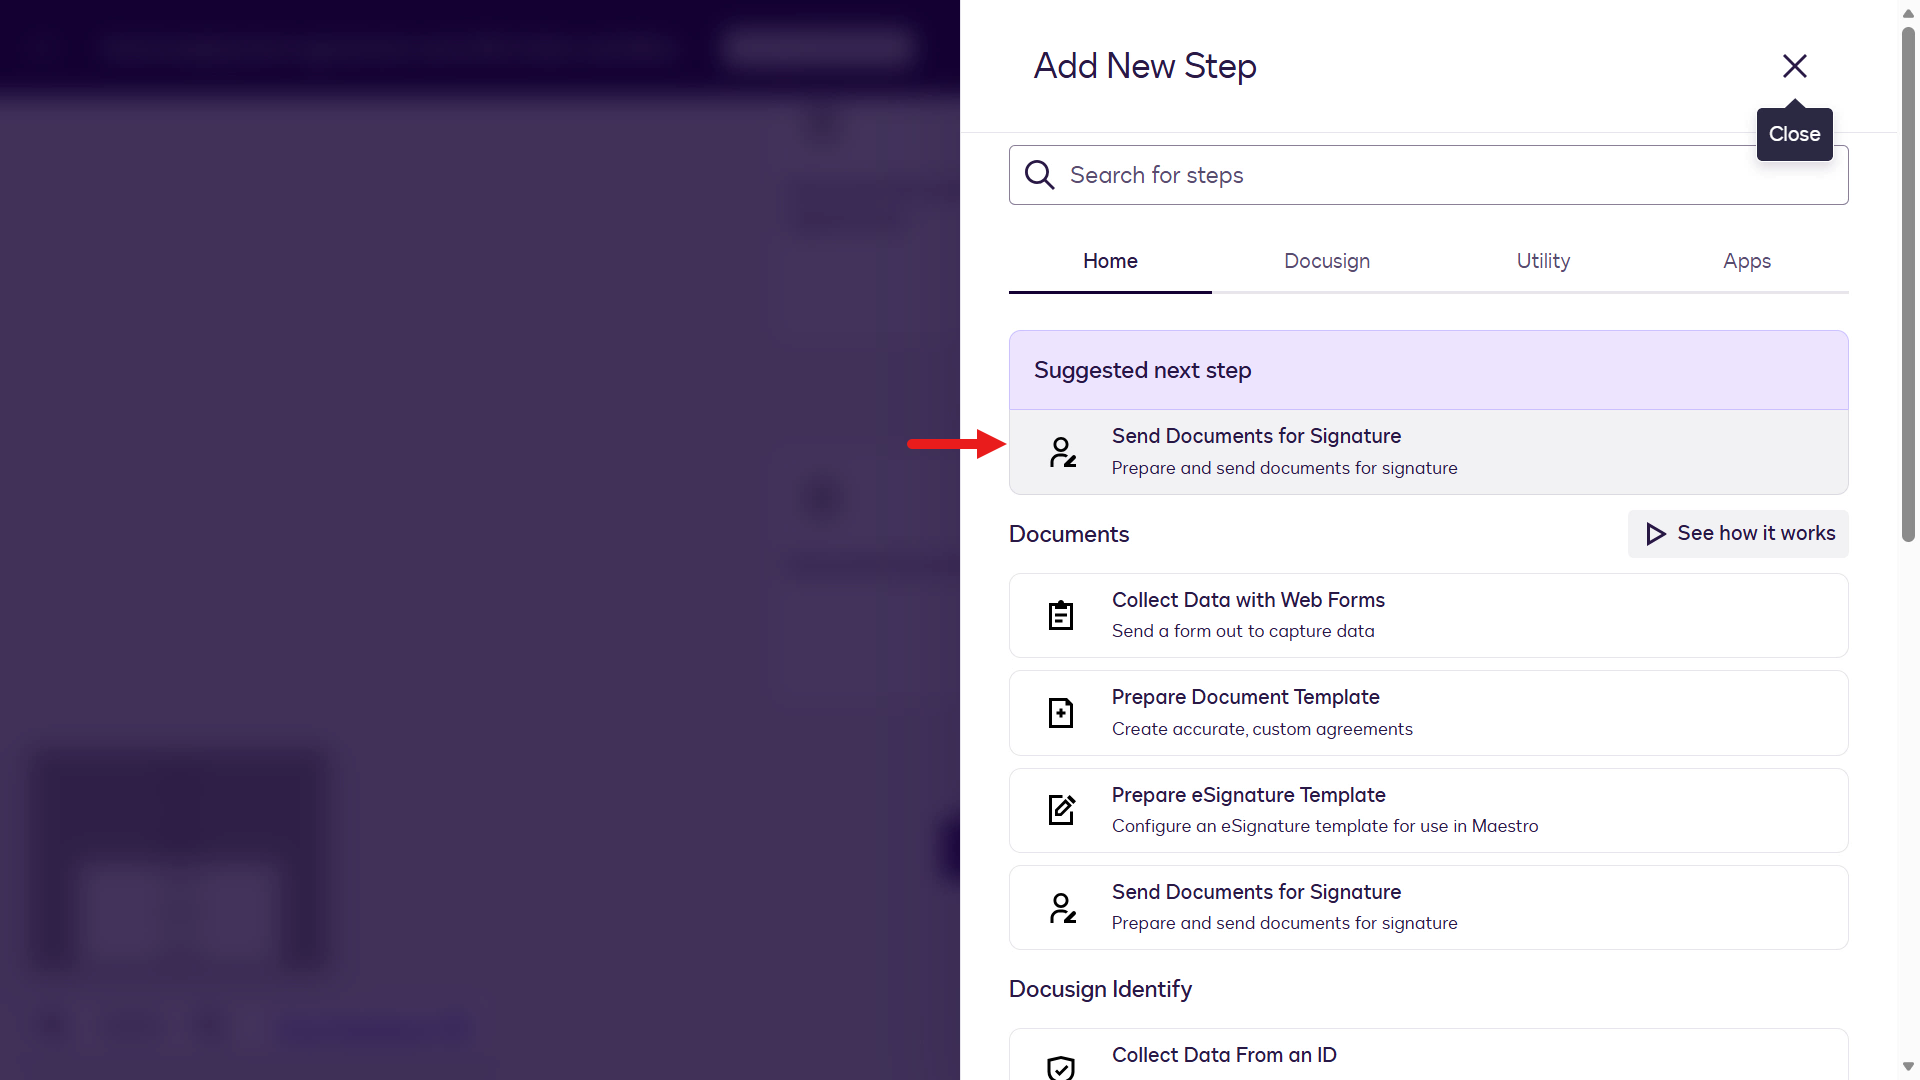
Select Configure.
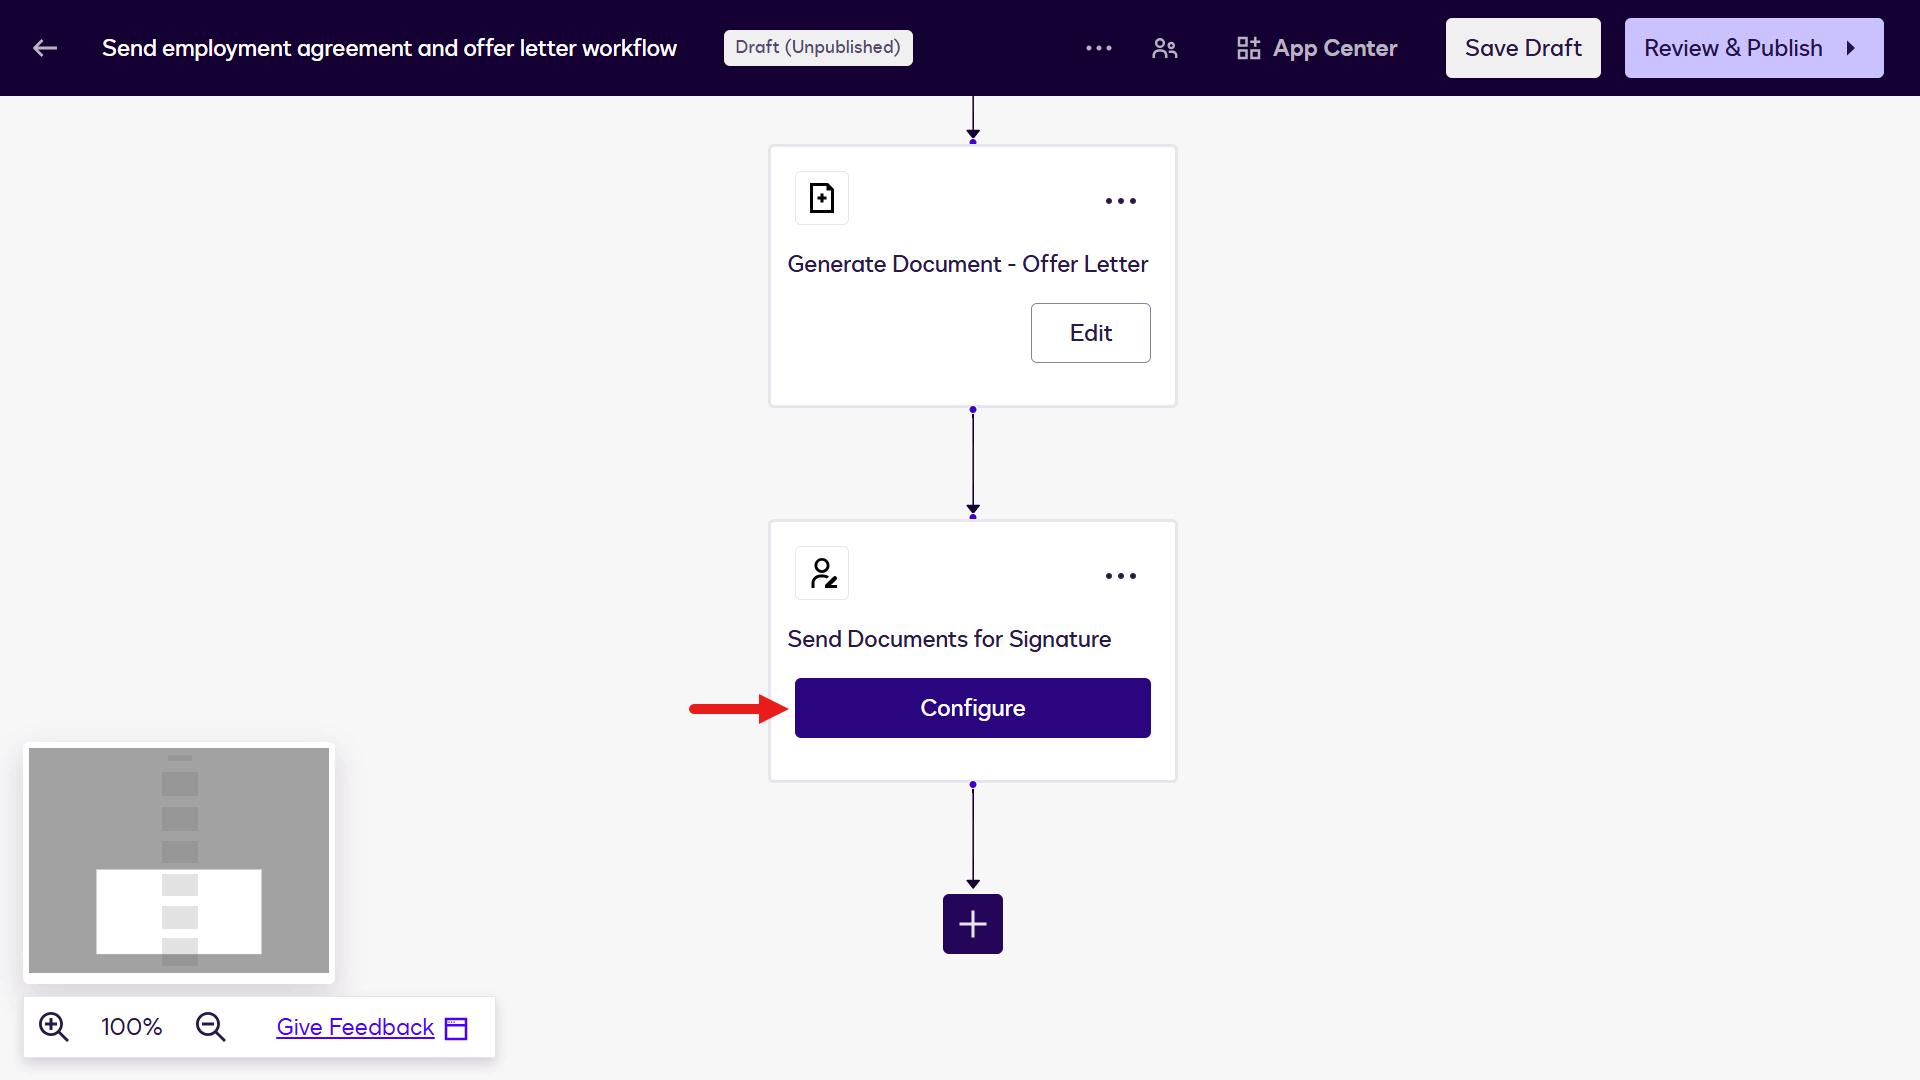
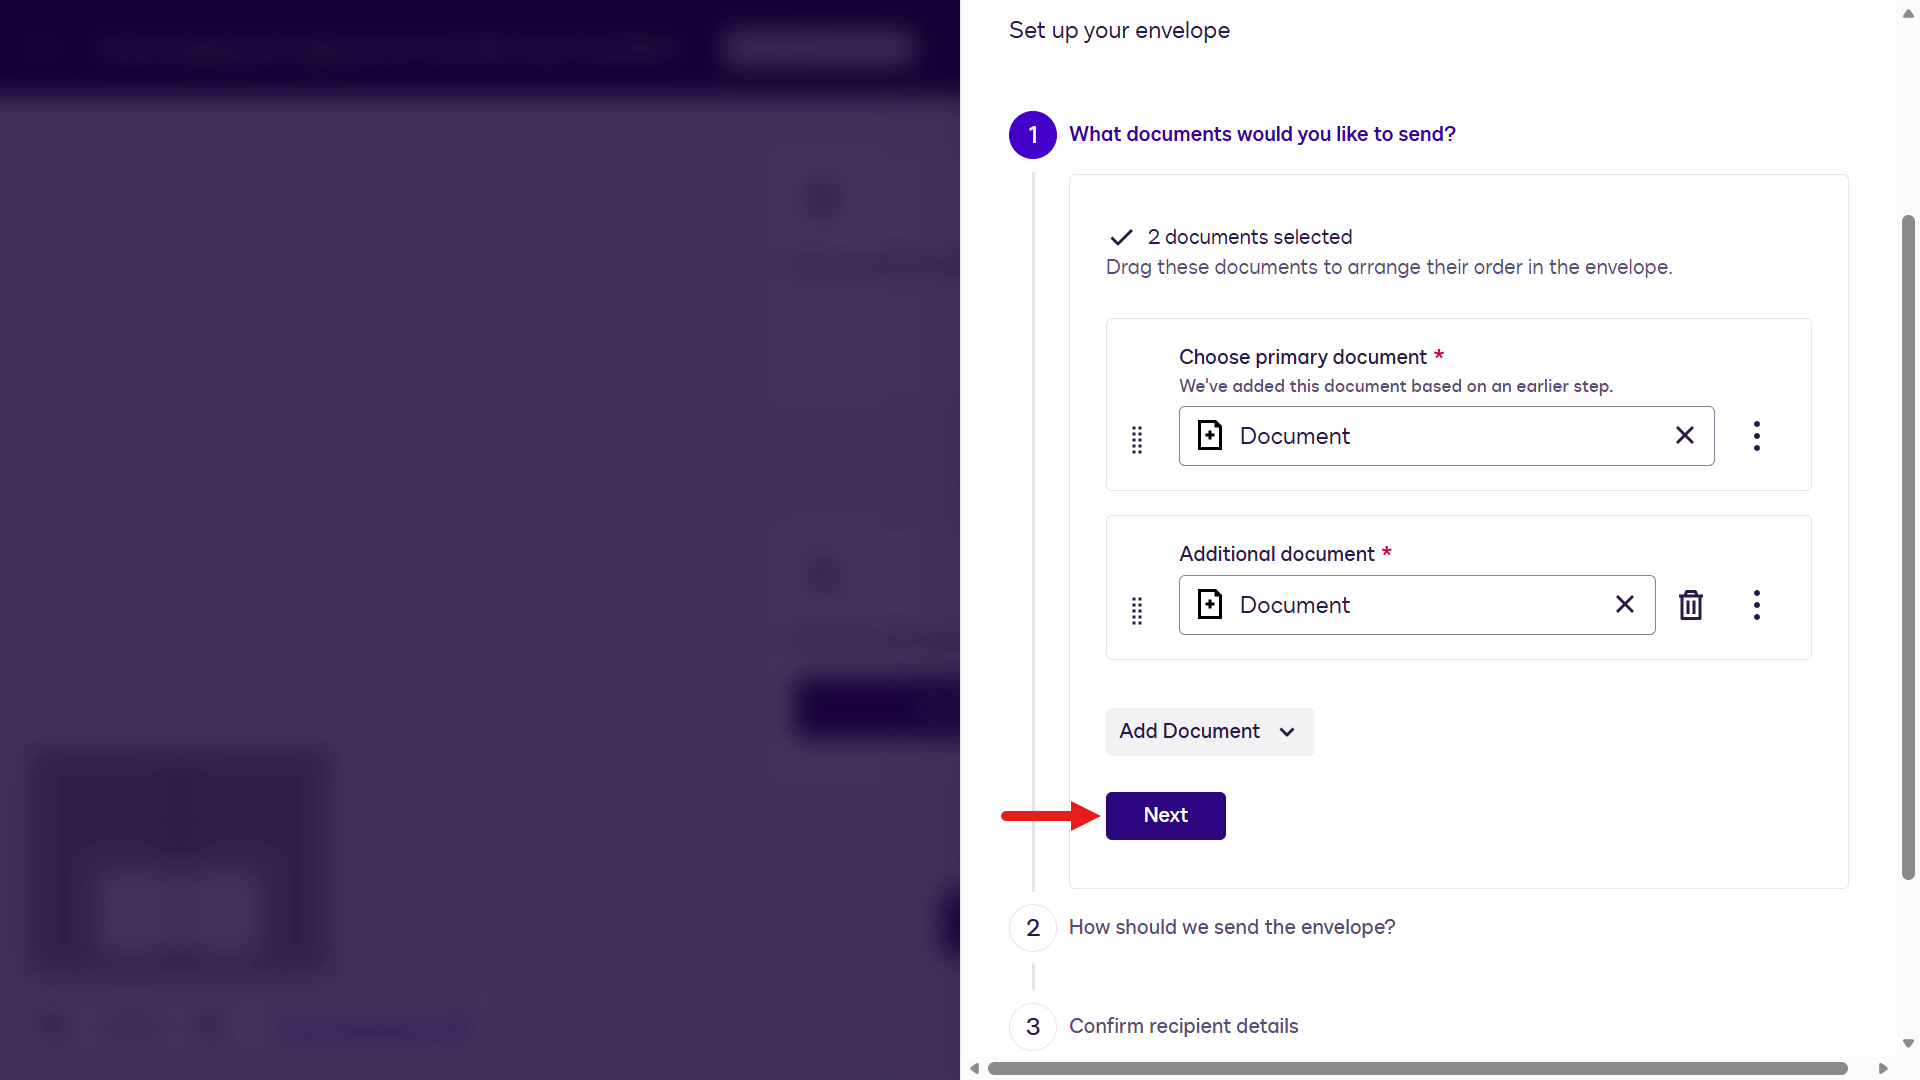
In this step, select the previous Generate Document steps so generated documents are added to an envelope and sent for signature.
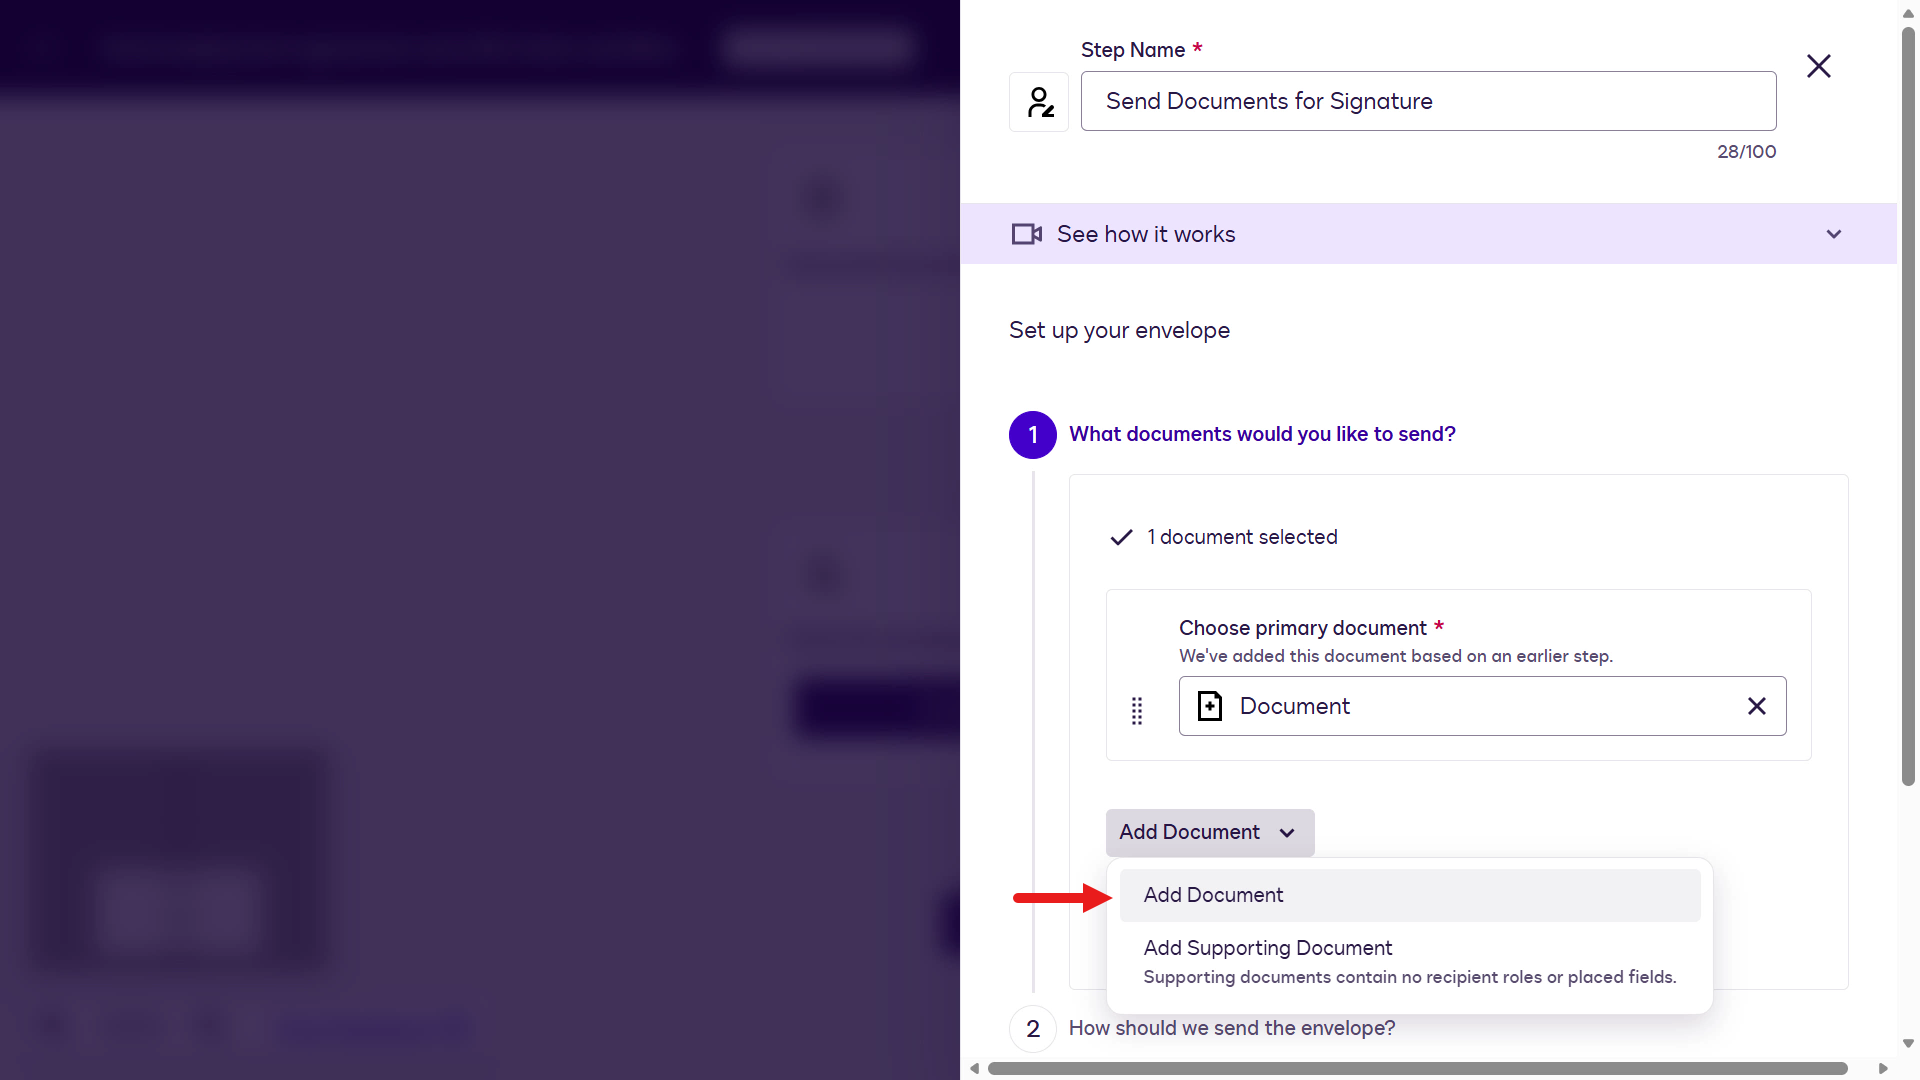
For the primary document, select the Document variable under Generate Document - Employment Agreement.
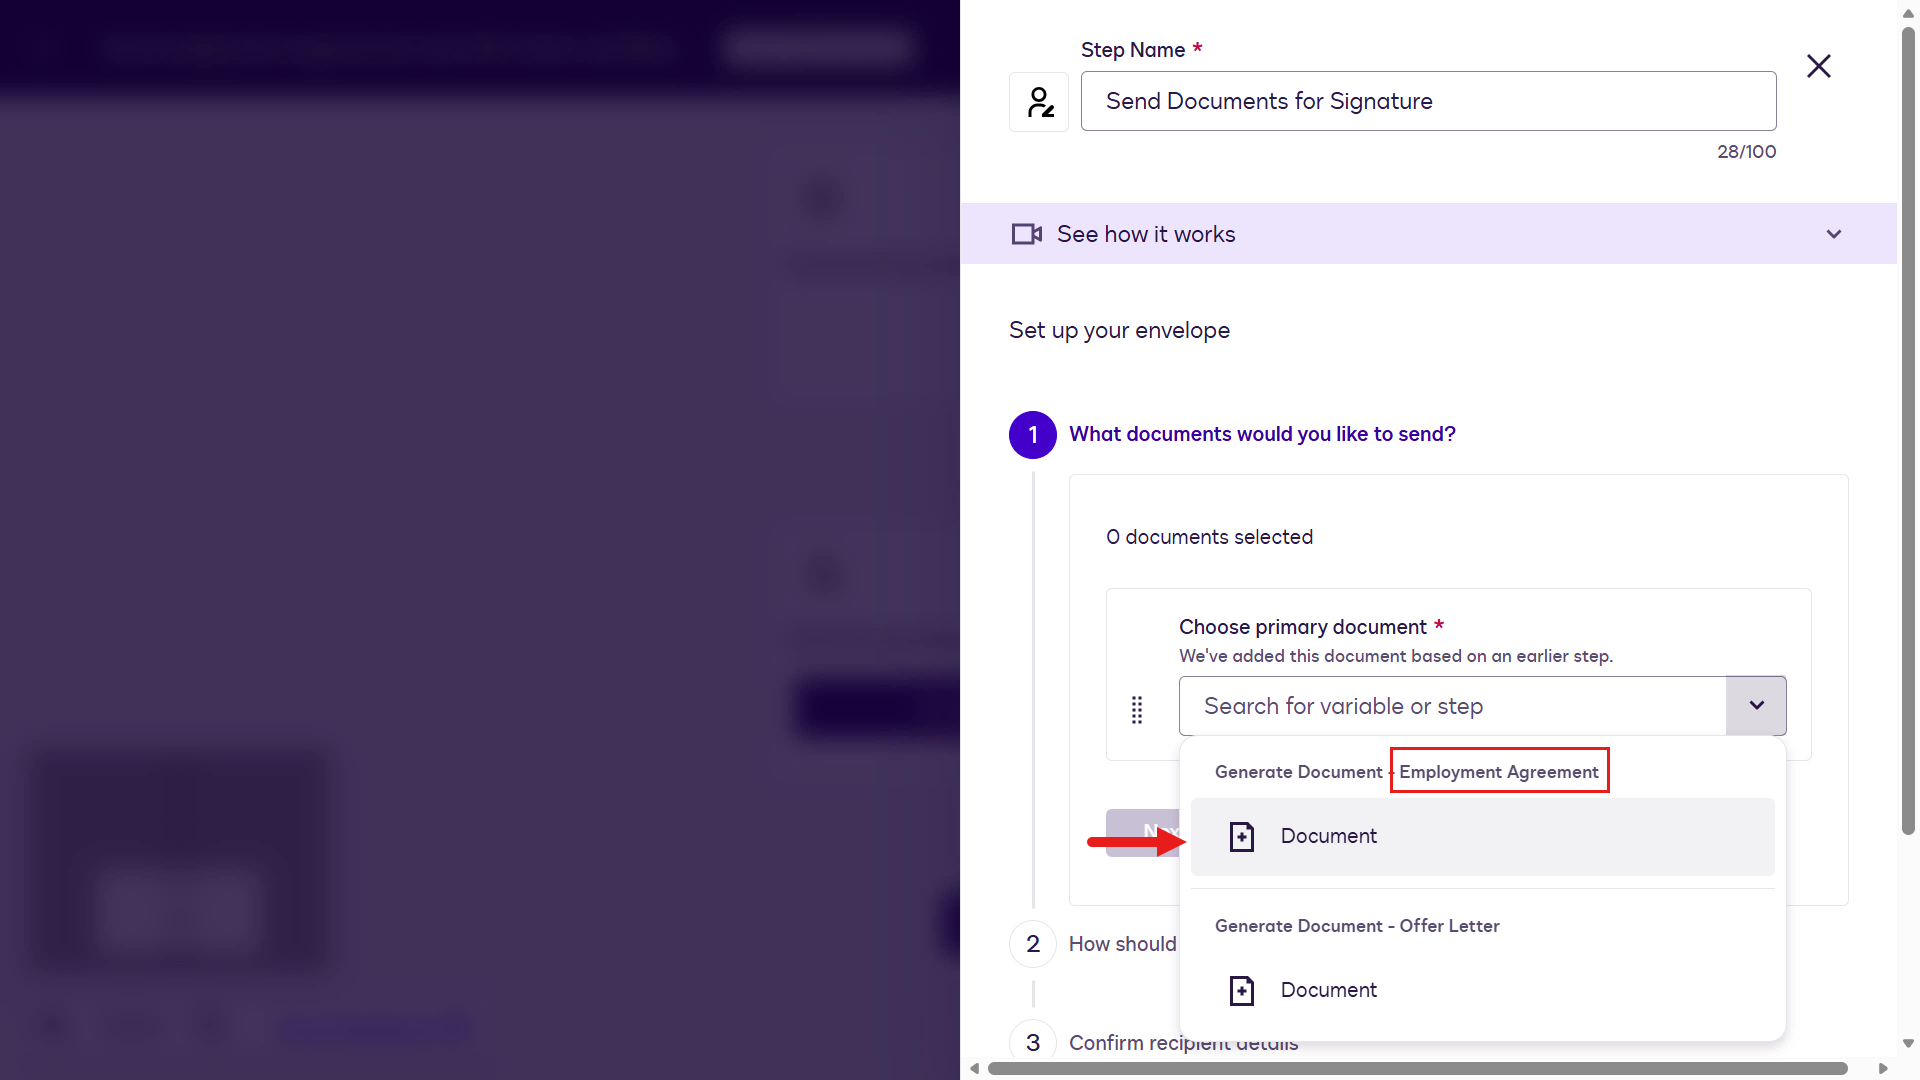
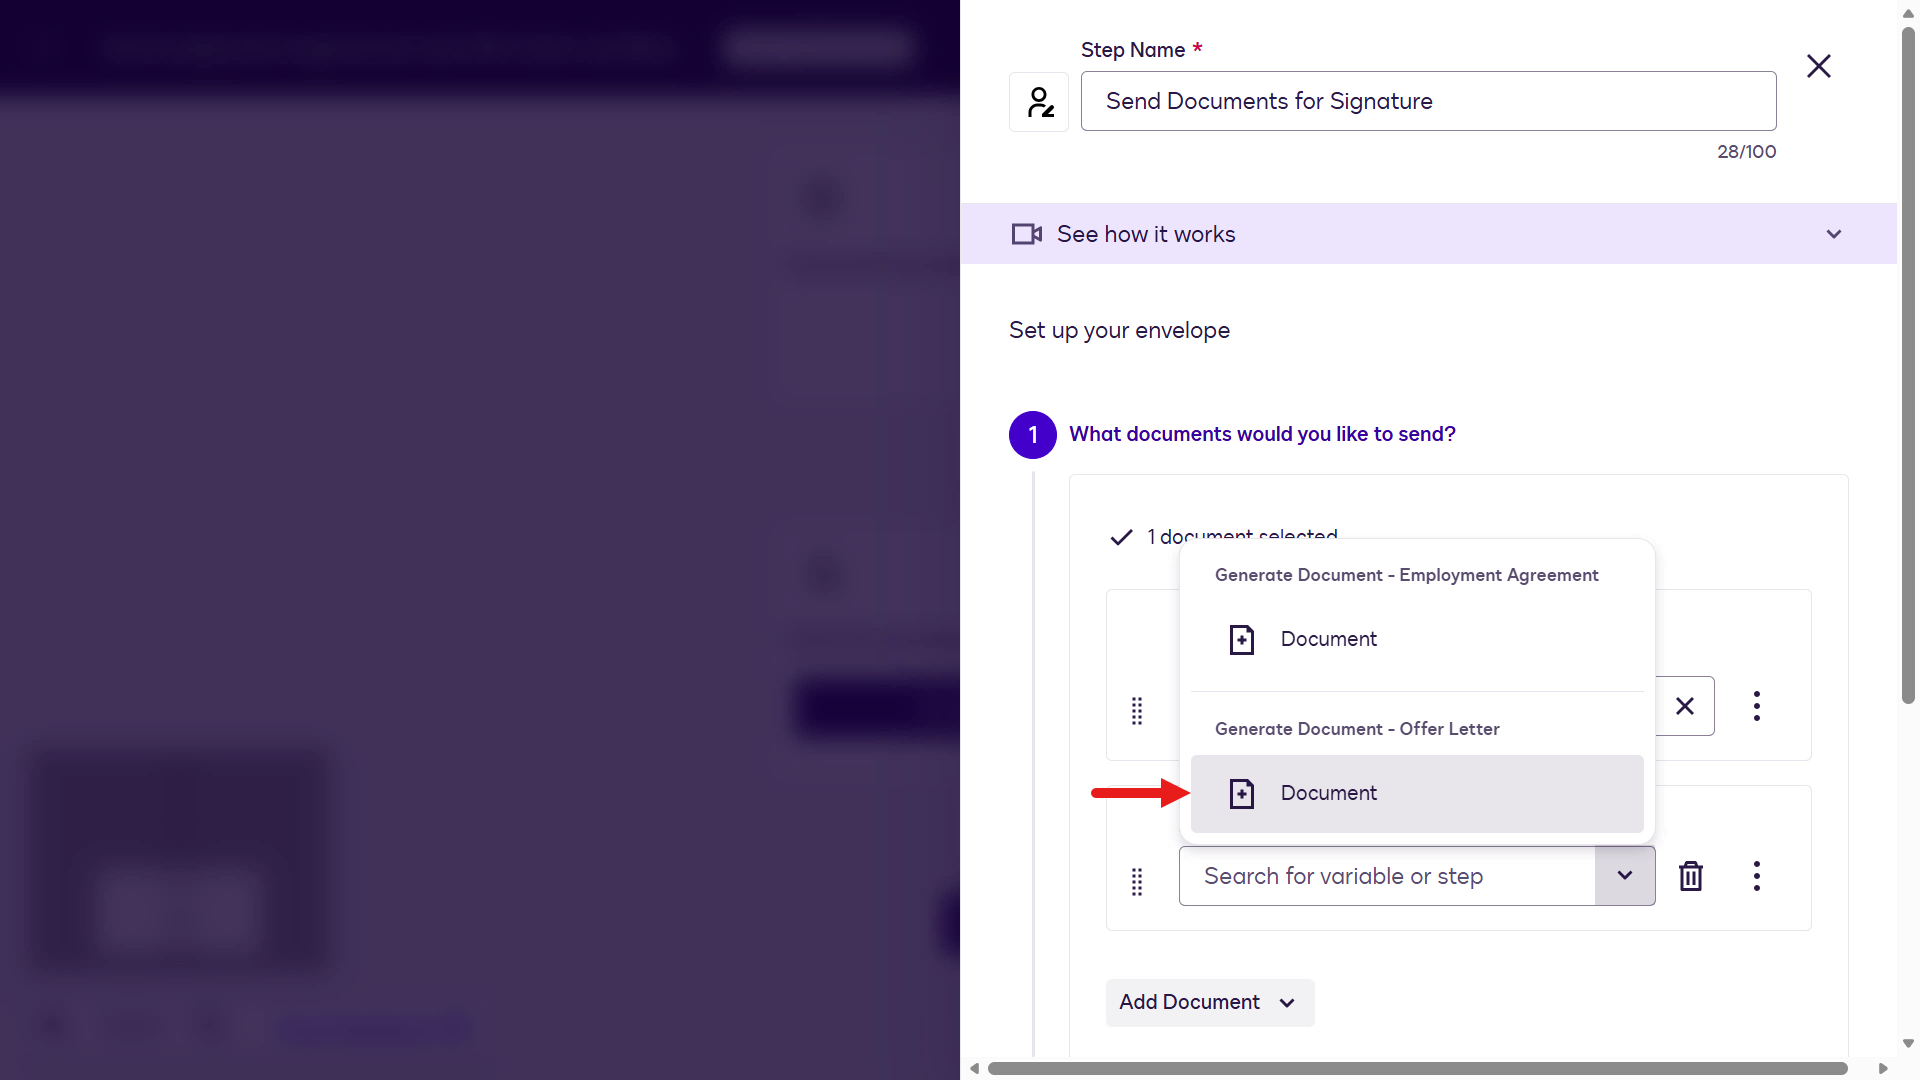
Next, we'll add the document variable for the Offer Letter as the secondary document for the envelope. Select Add Document.
Select the Document variable under Generate Document - Offer Letter.
Select Next to continue configuring the workflow step.
For sending of the envelope, leave the setting as Automatically as the envelope with the attached documents are to be automatically sent. By default, the sender will be your Docusign developer user. Select Next.
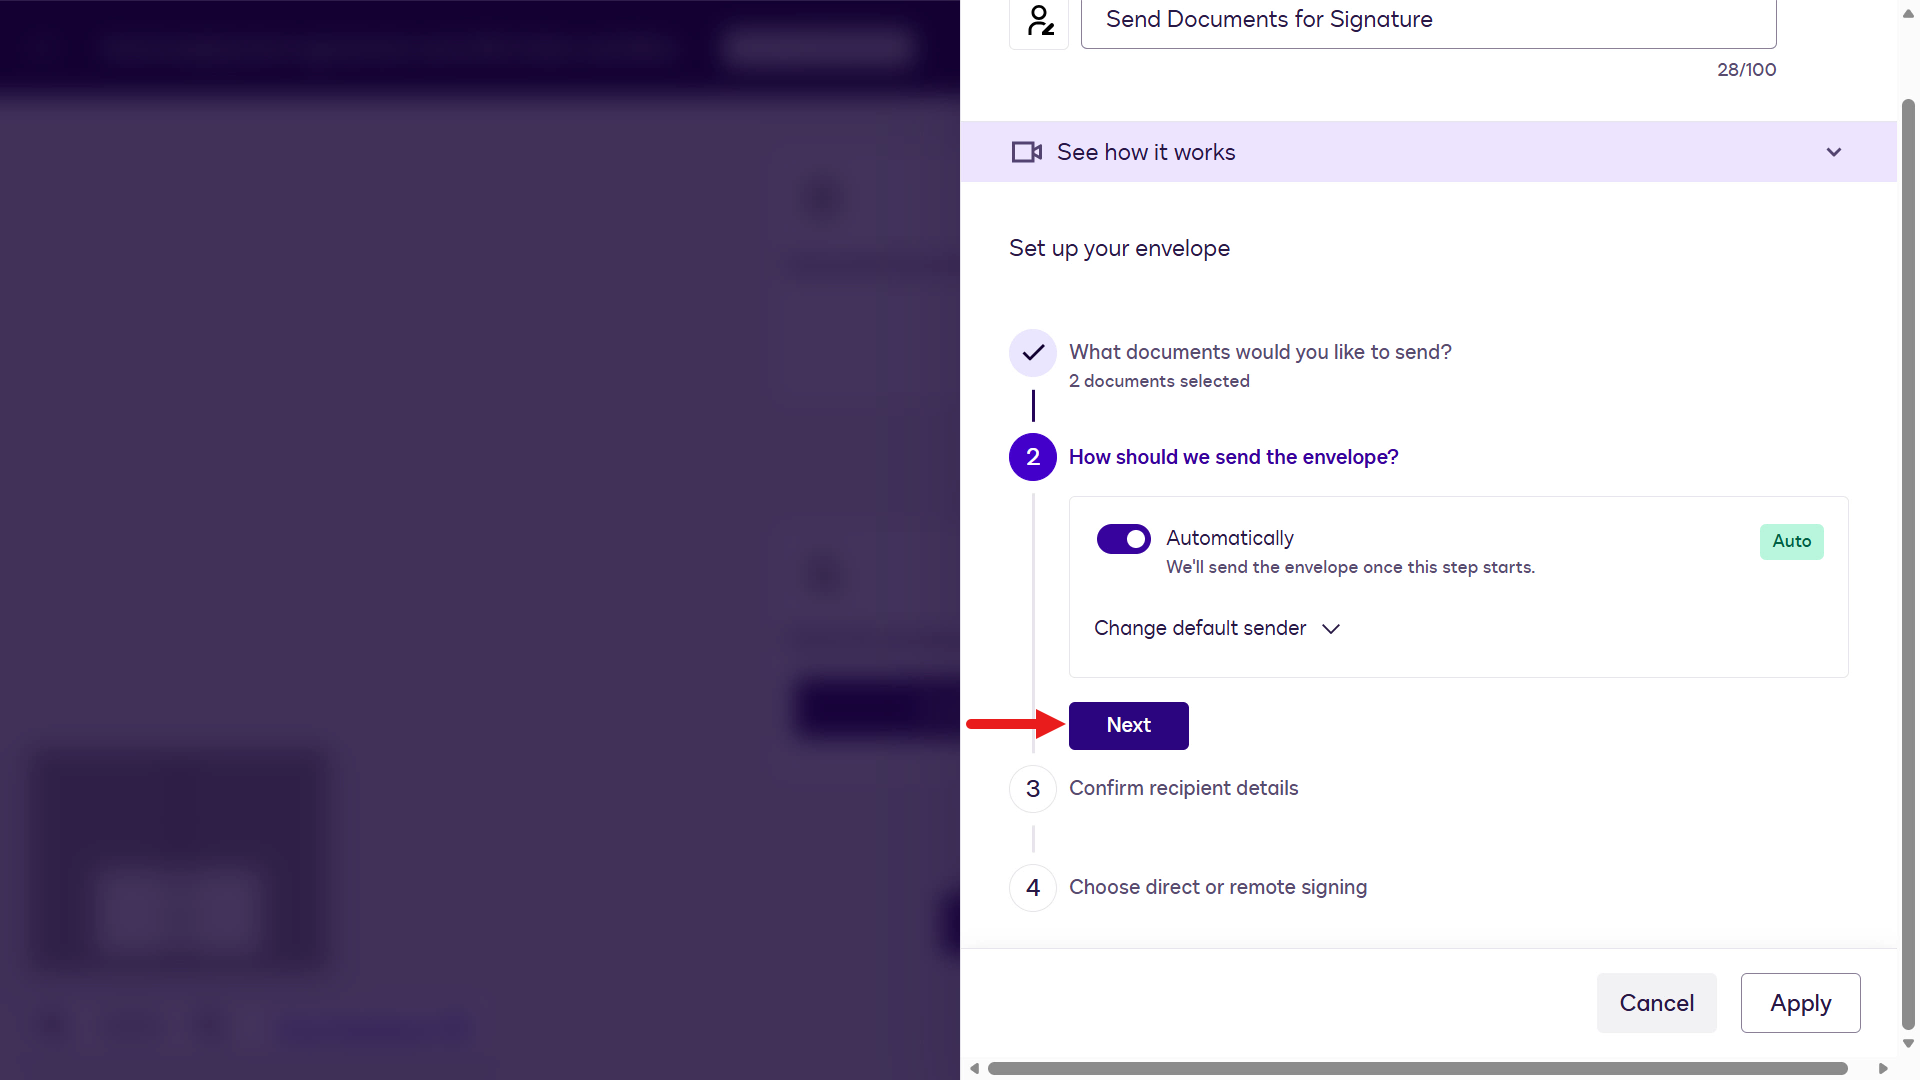
Next you'll configure the recipients of the document agreements. These will be the Employee and Hiring Manager roles you defined earlier when the document templates were created. You'll map them to the Employee participant you set up earlier in the Set Up Invite step, and we'll also add a new participant for the Hiring Manager.
Enable the Set a signing order setting to configure the Employee to receive the envelope first, followed by the Hiring Manager when the Employee completes signing the document agreements.
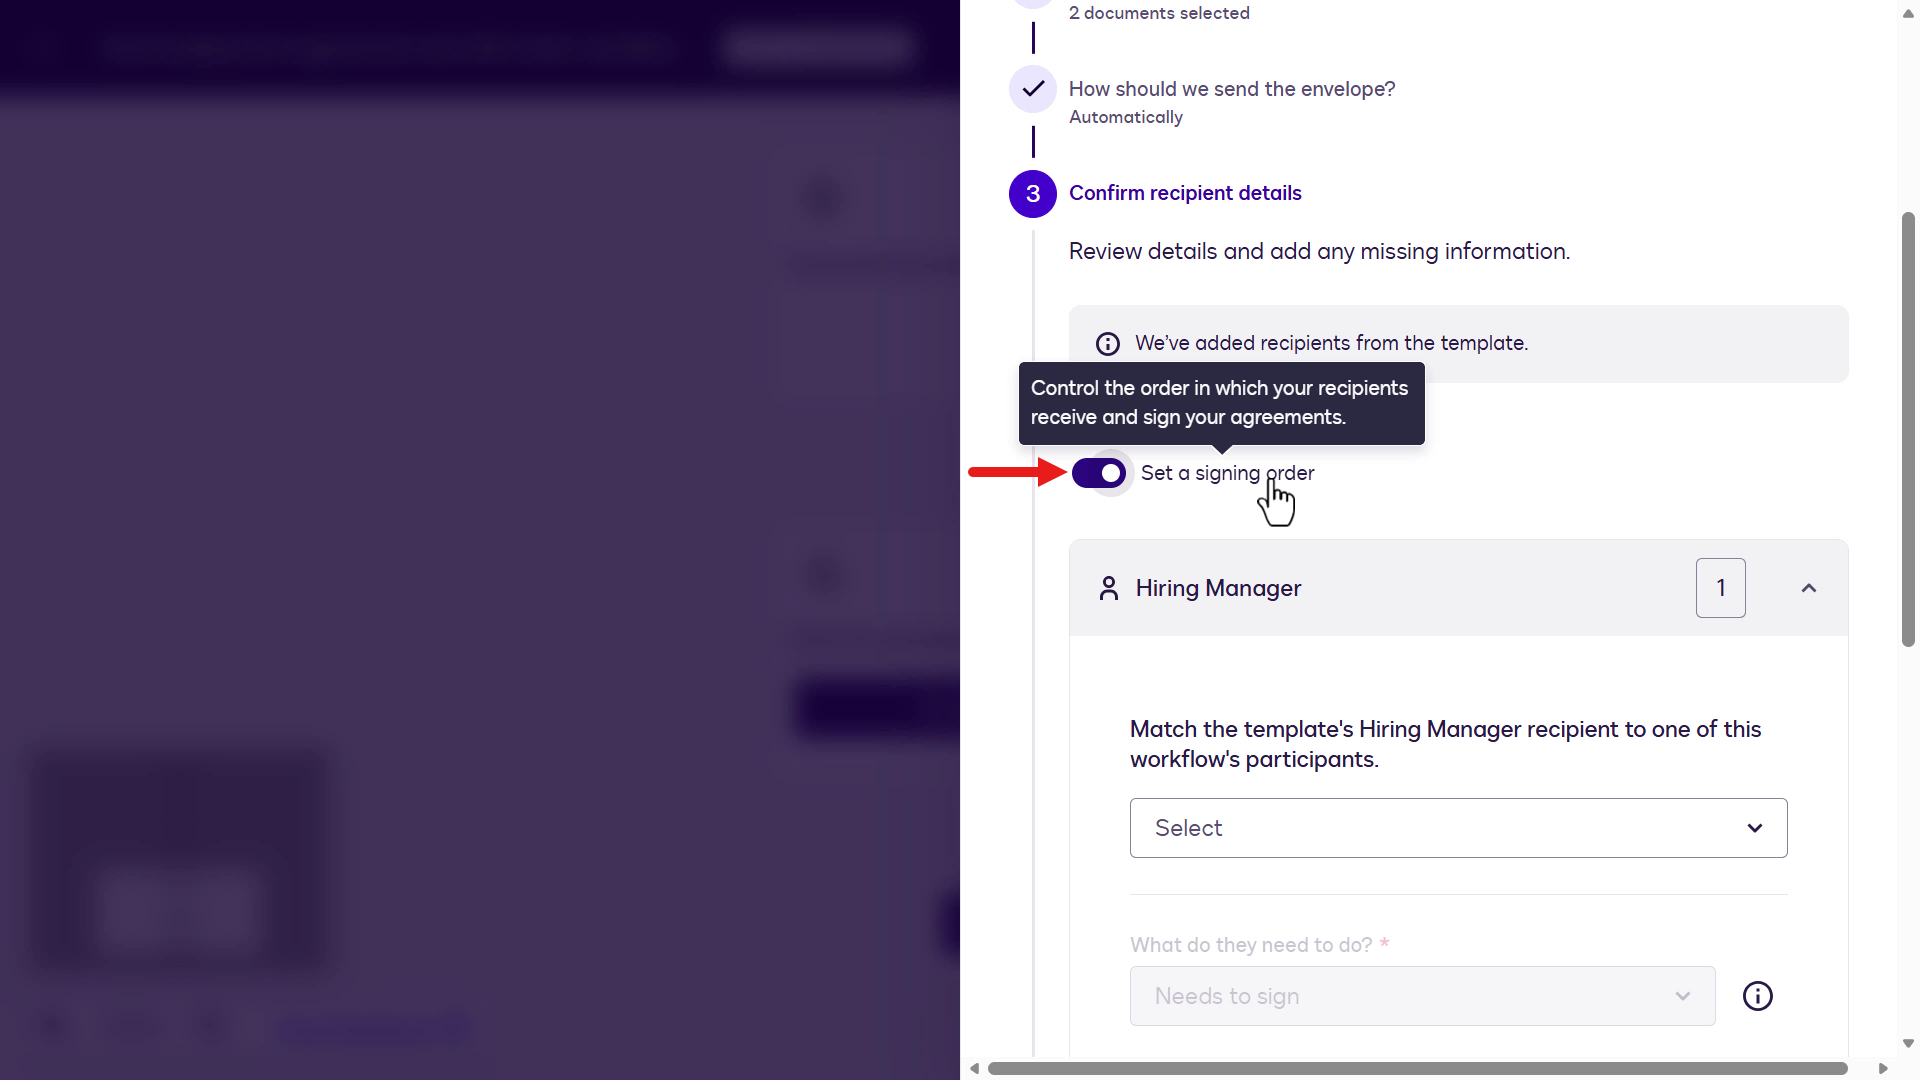
Update the integer value to
2for the Hiring Manager.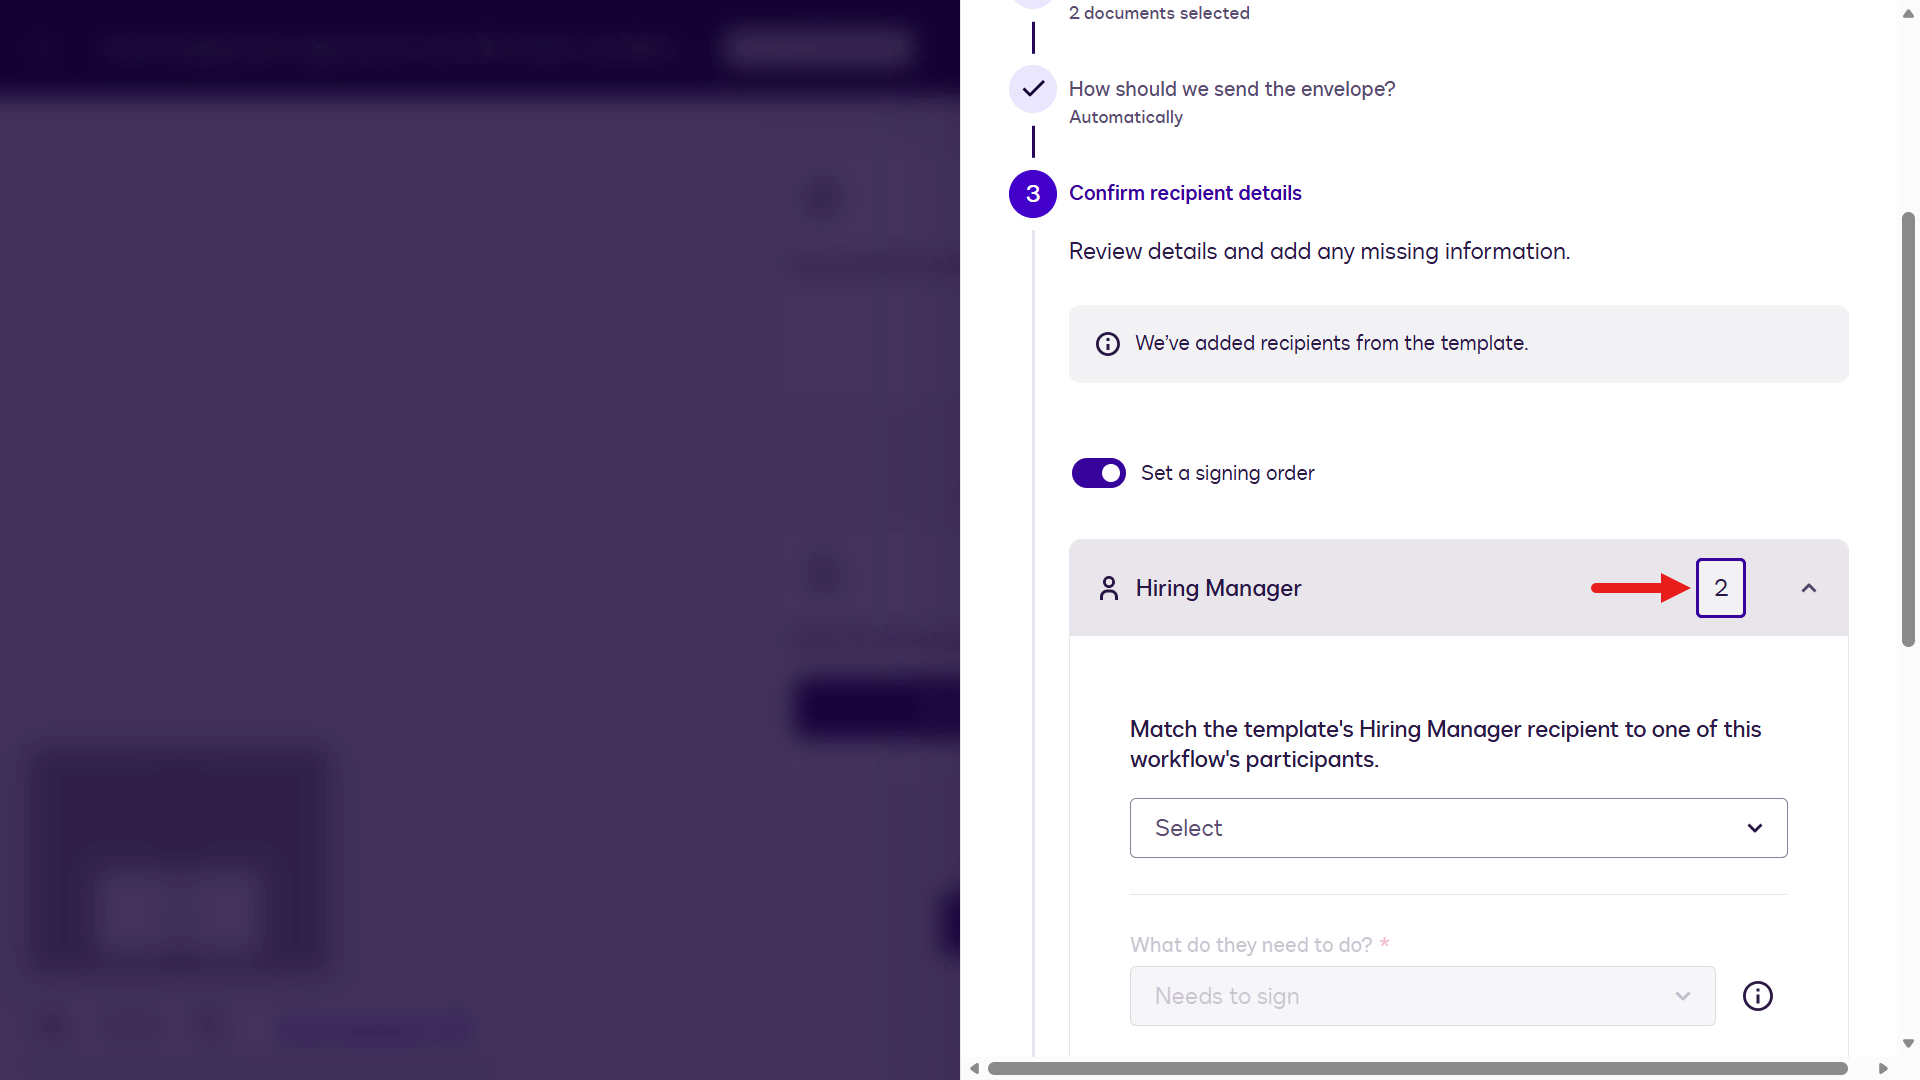
Update the integer value to
1for the Employee.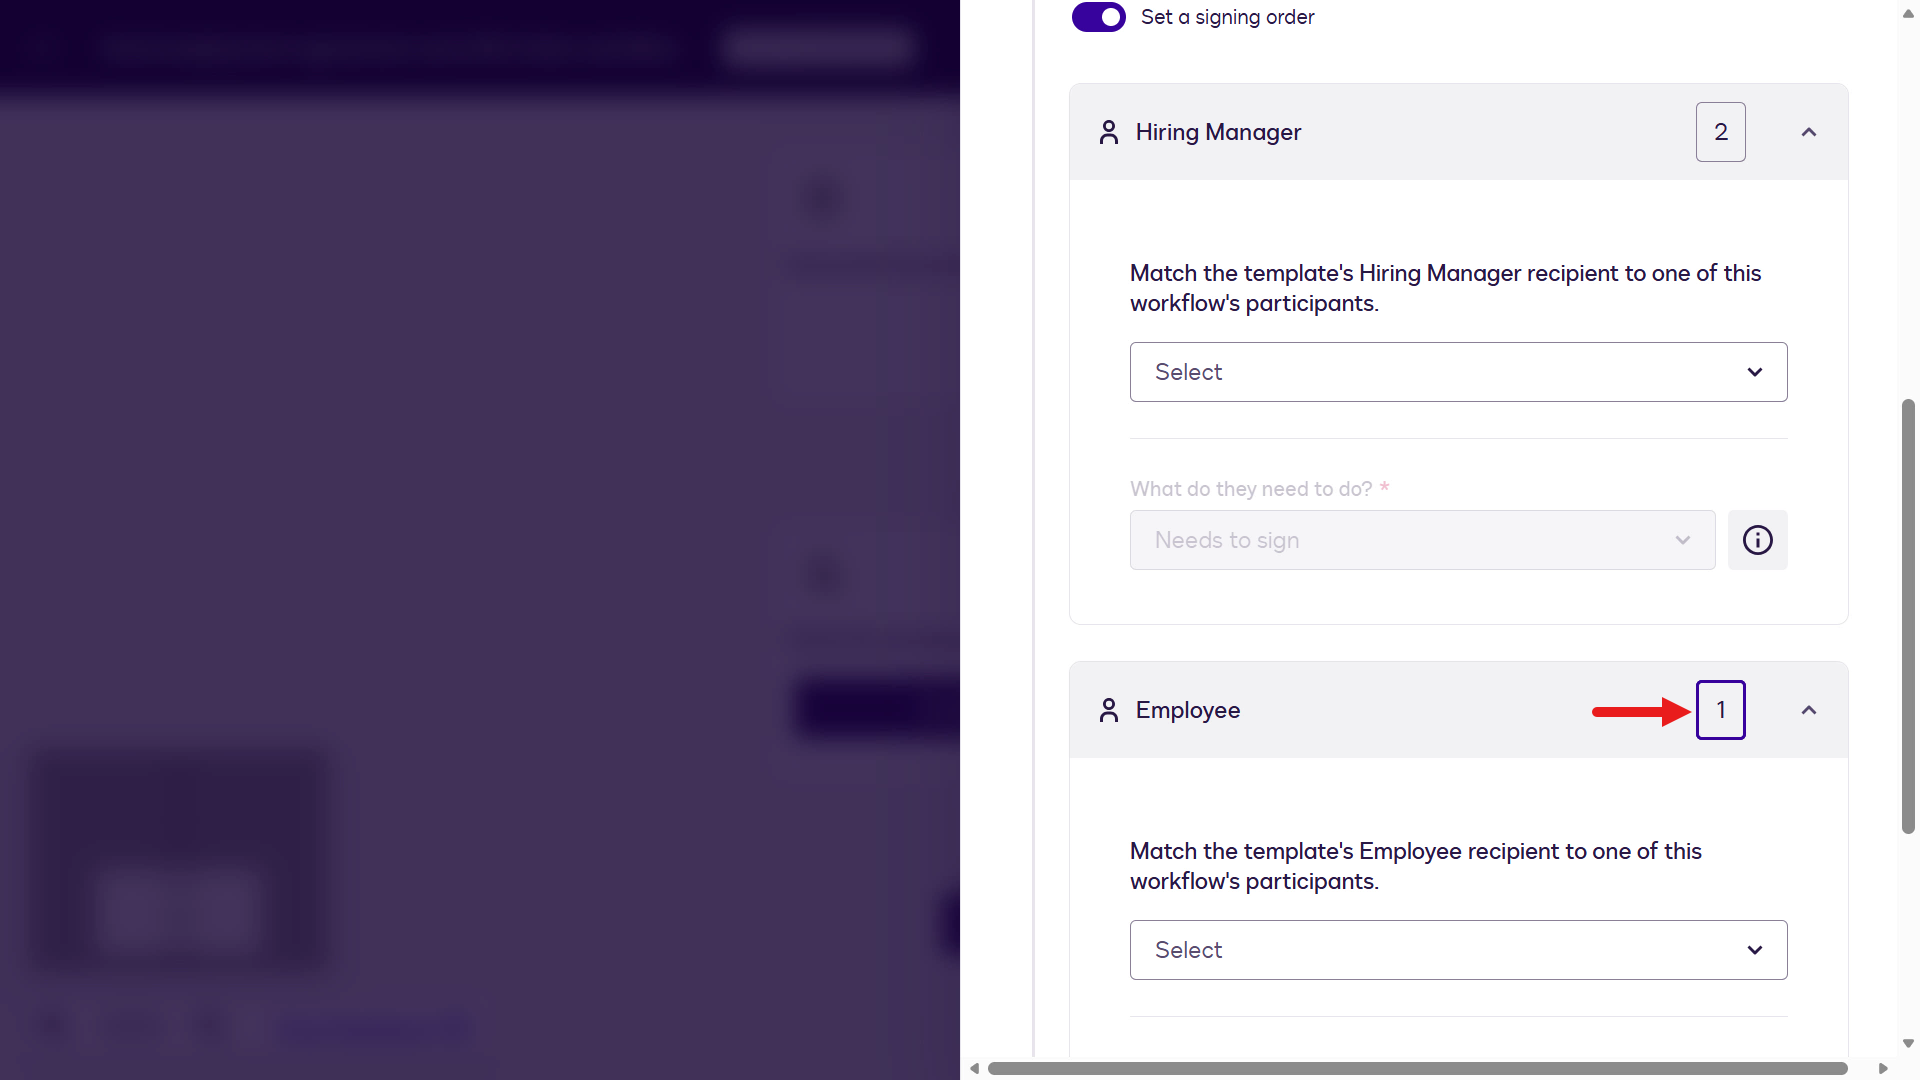
For the Employee recipient, select the Employee variable in the dropdown field.
Since we already mapped the participant fields in the Set Up Invite step, there's no need to configure mapping. Leave these as-is.
Next we'll add a new participant to the workflow for the Hiring Manager. Select Add Participant.
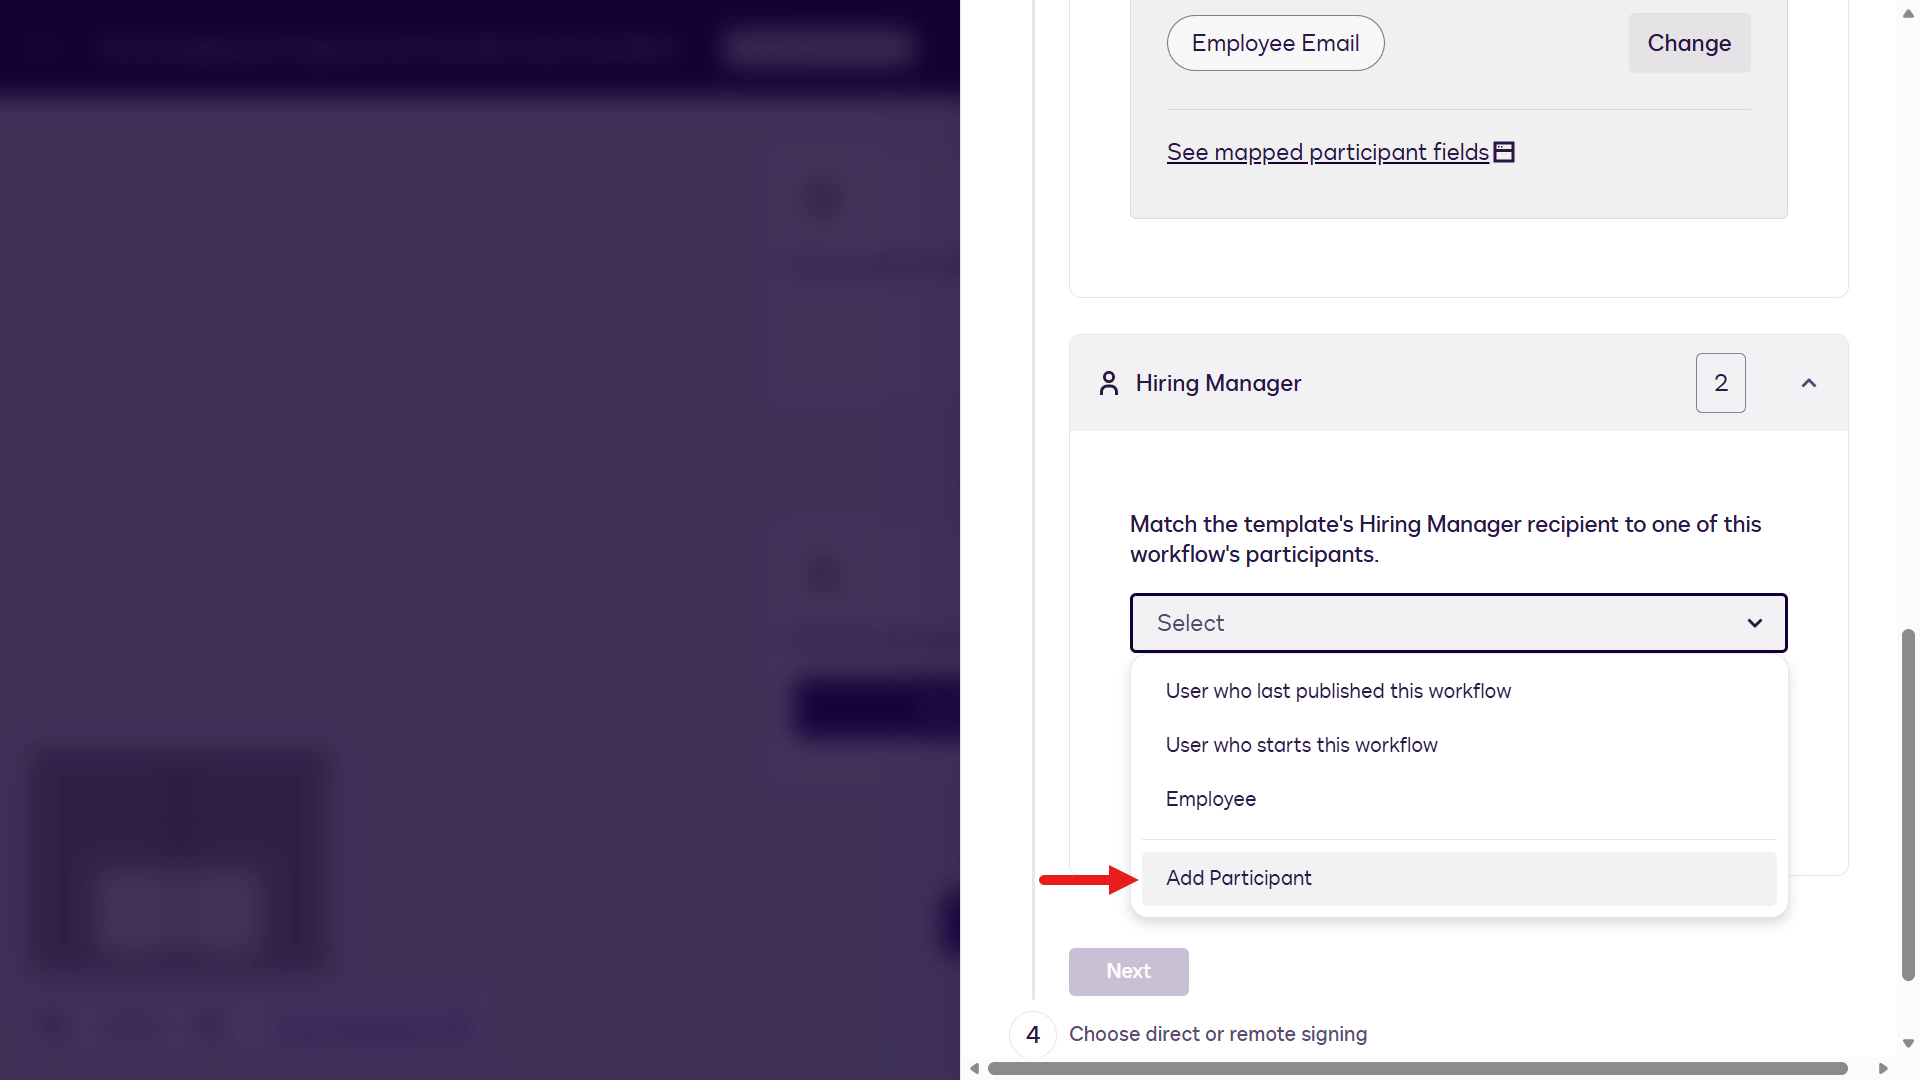
Enter
Hiring Managerand select Add.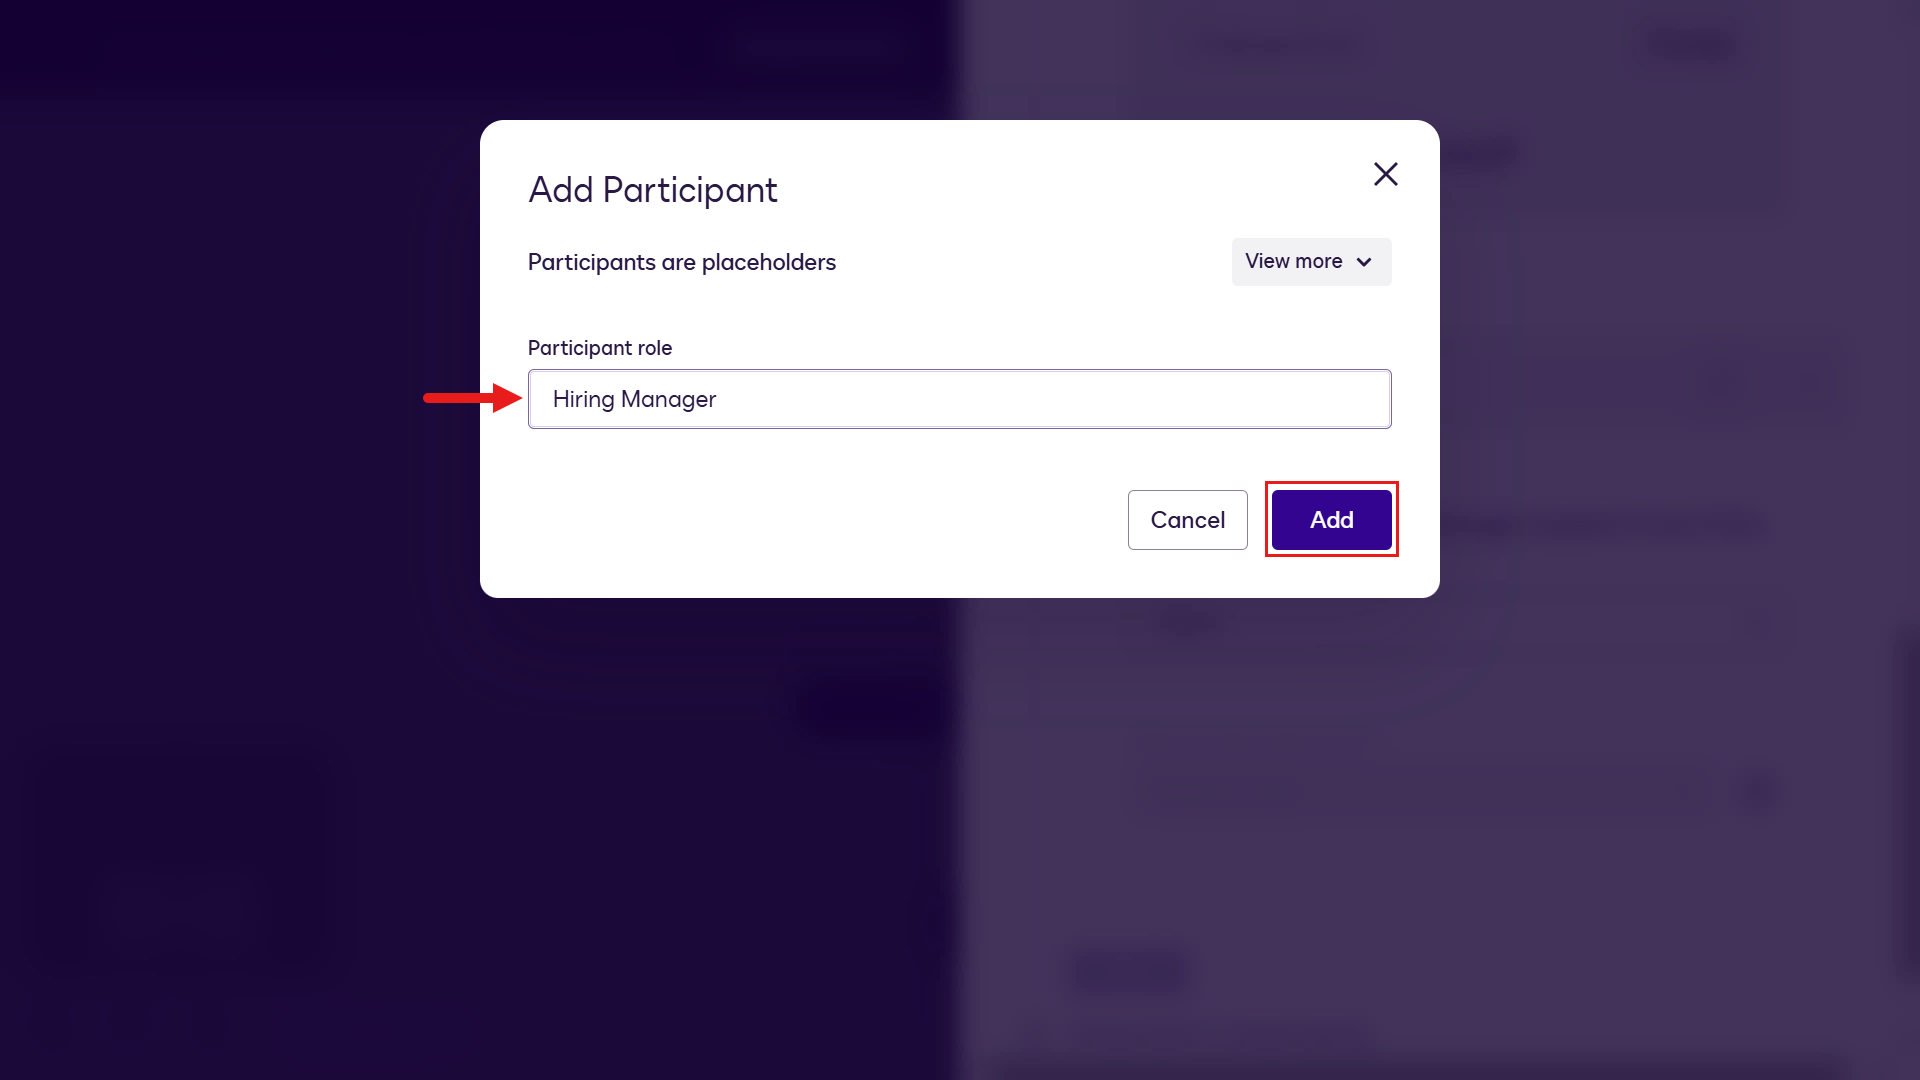
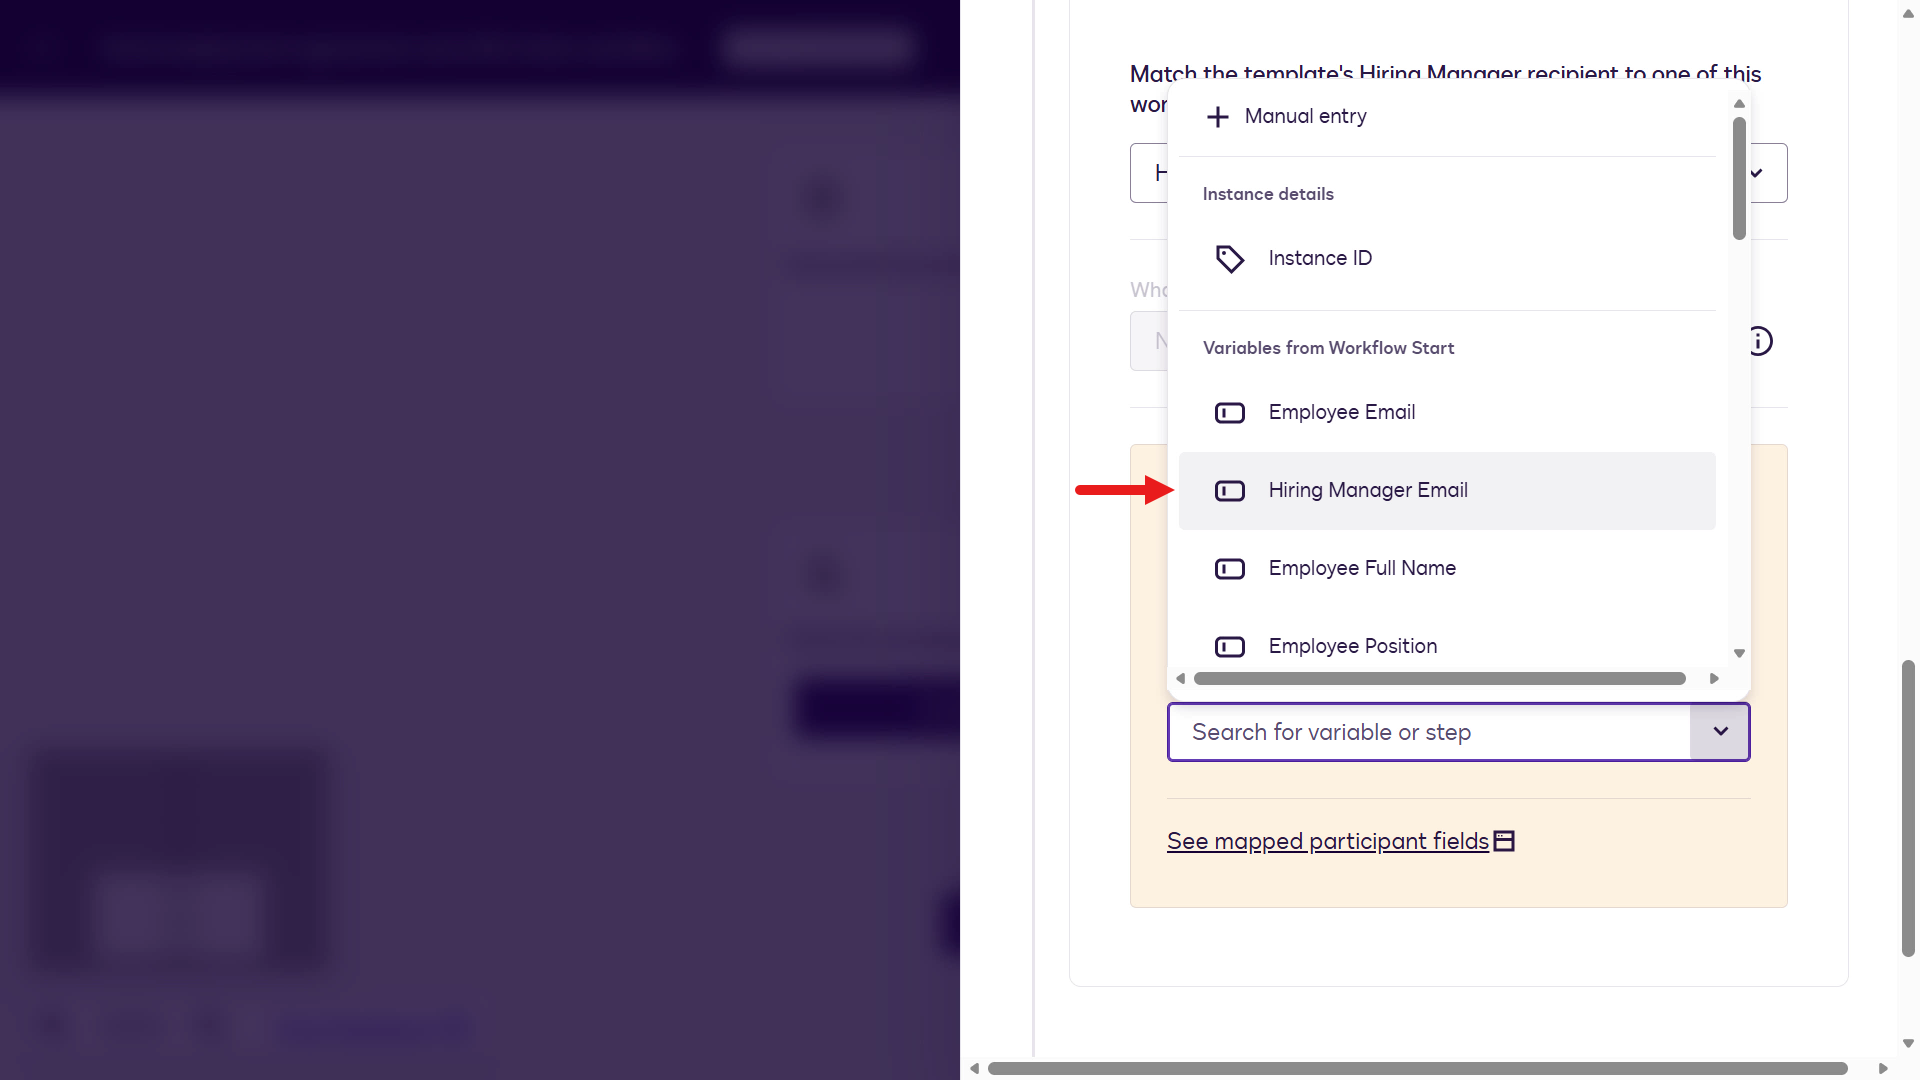
For the Hiring Manager Name participant field, map it to Hiring Manager Full Name under Variables from Workflow Start.
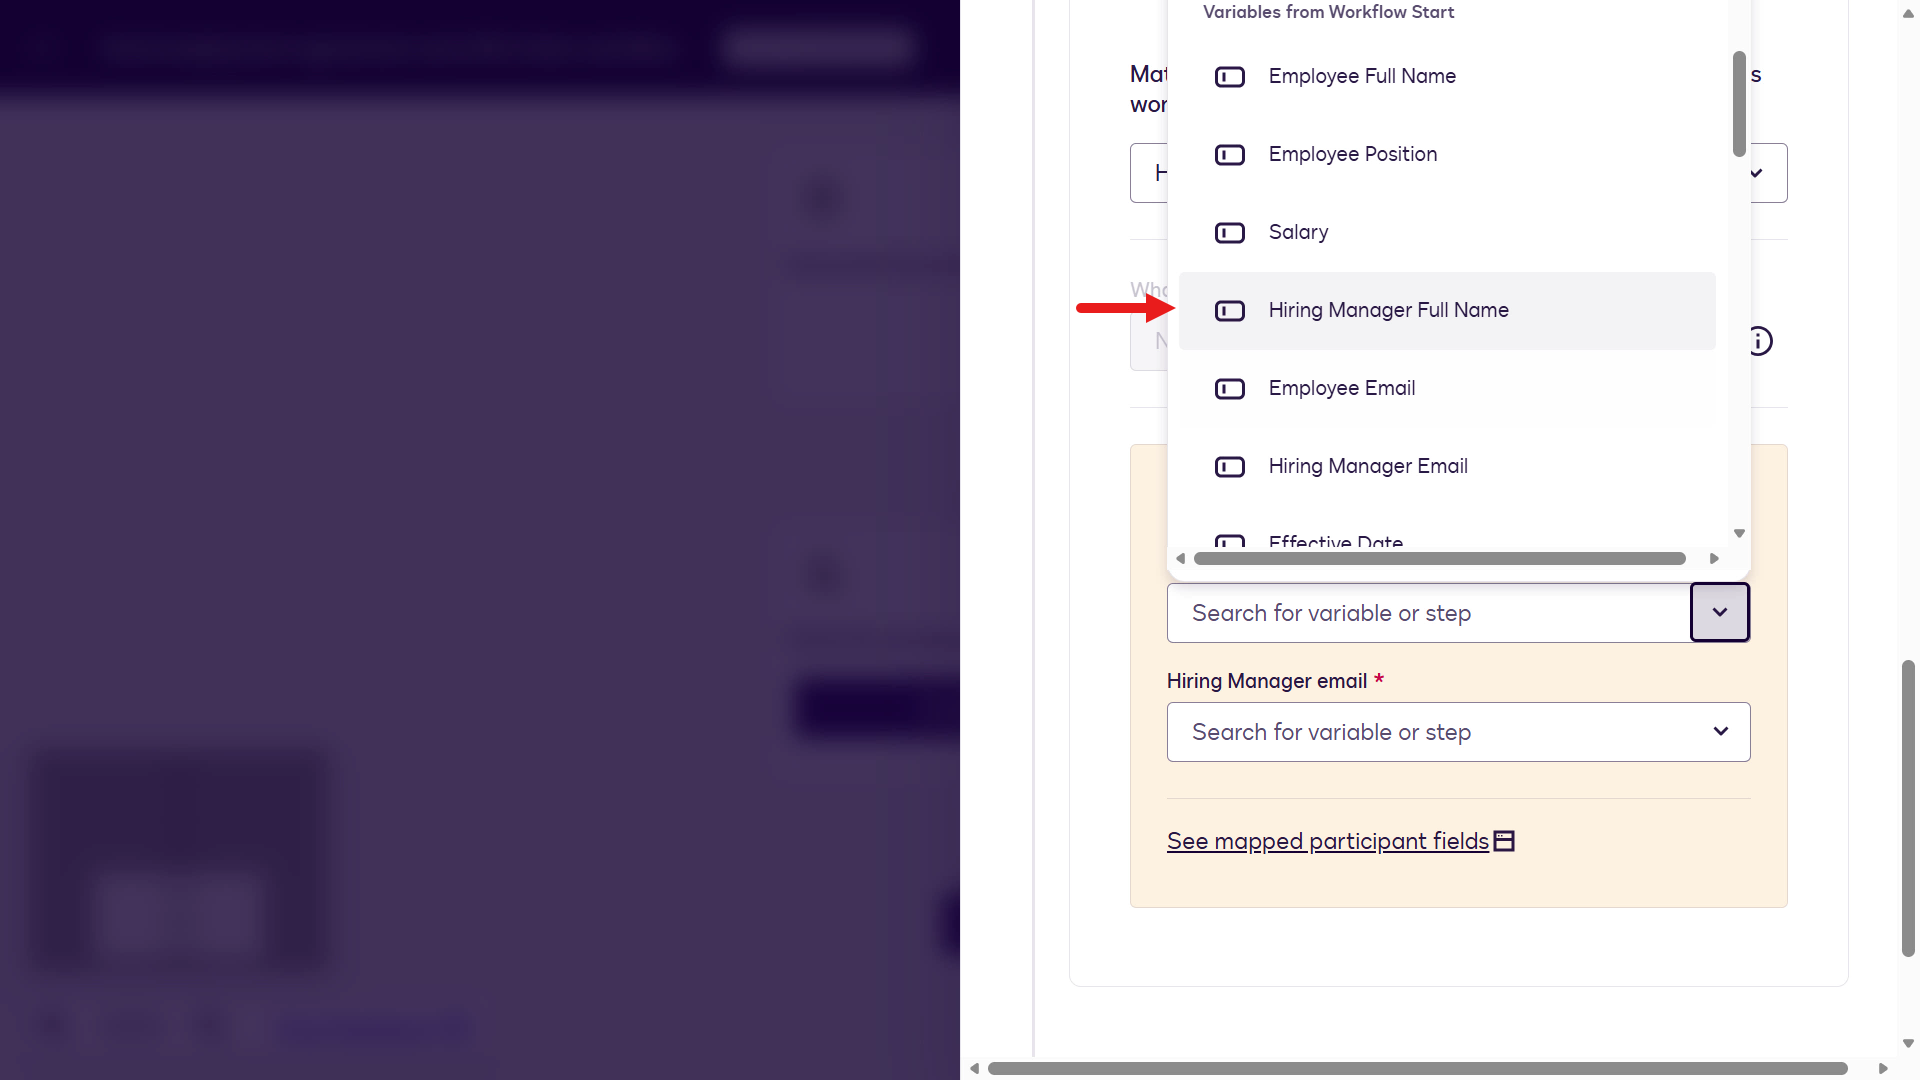
For the Hiring Manager Email participant field, map it to Hiring Manager Email under Variables from Workflow Start.
Select Next to continue with the configuration of the workflow step.
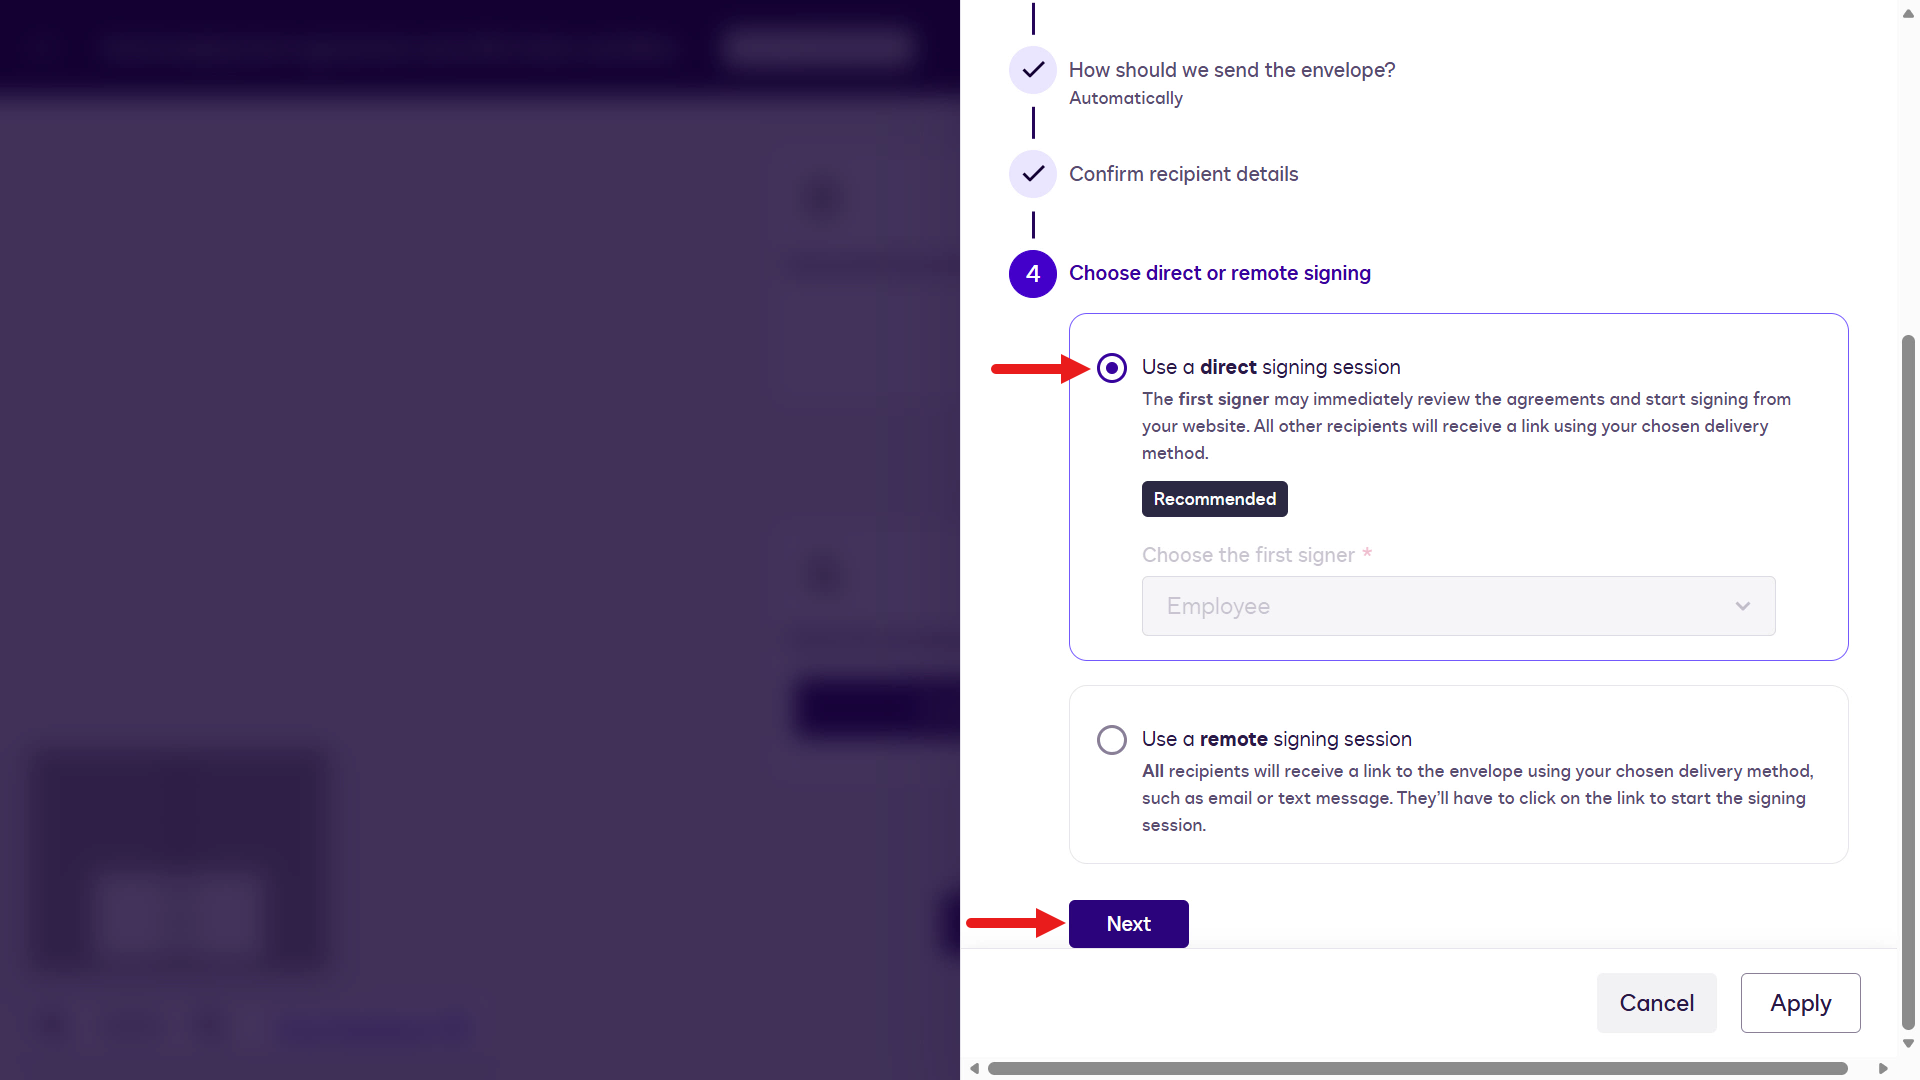
For the signing session step, keep the default selection: Use a direct signing session.
Select Next.
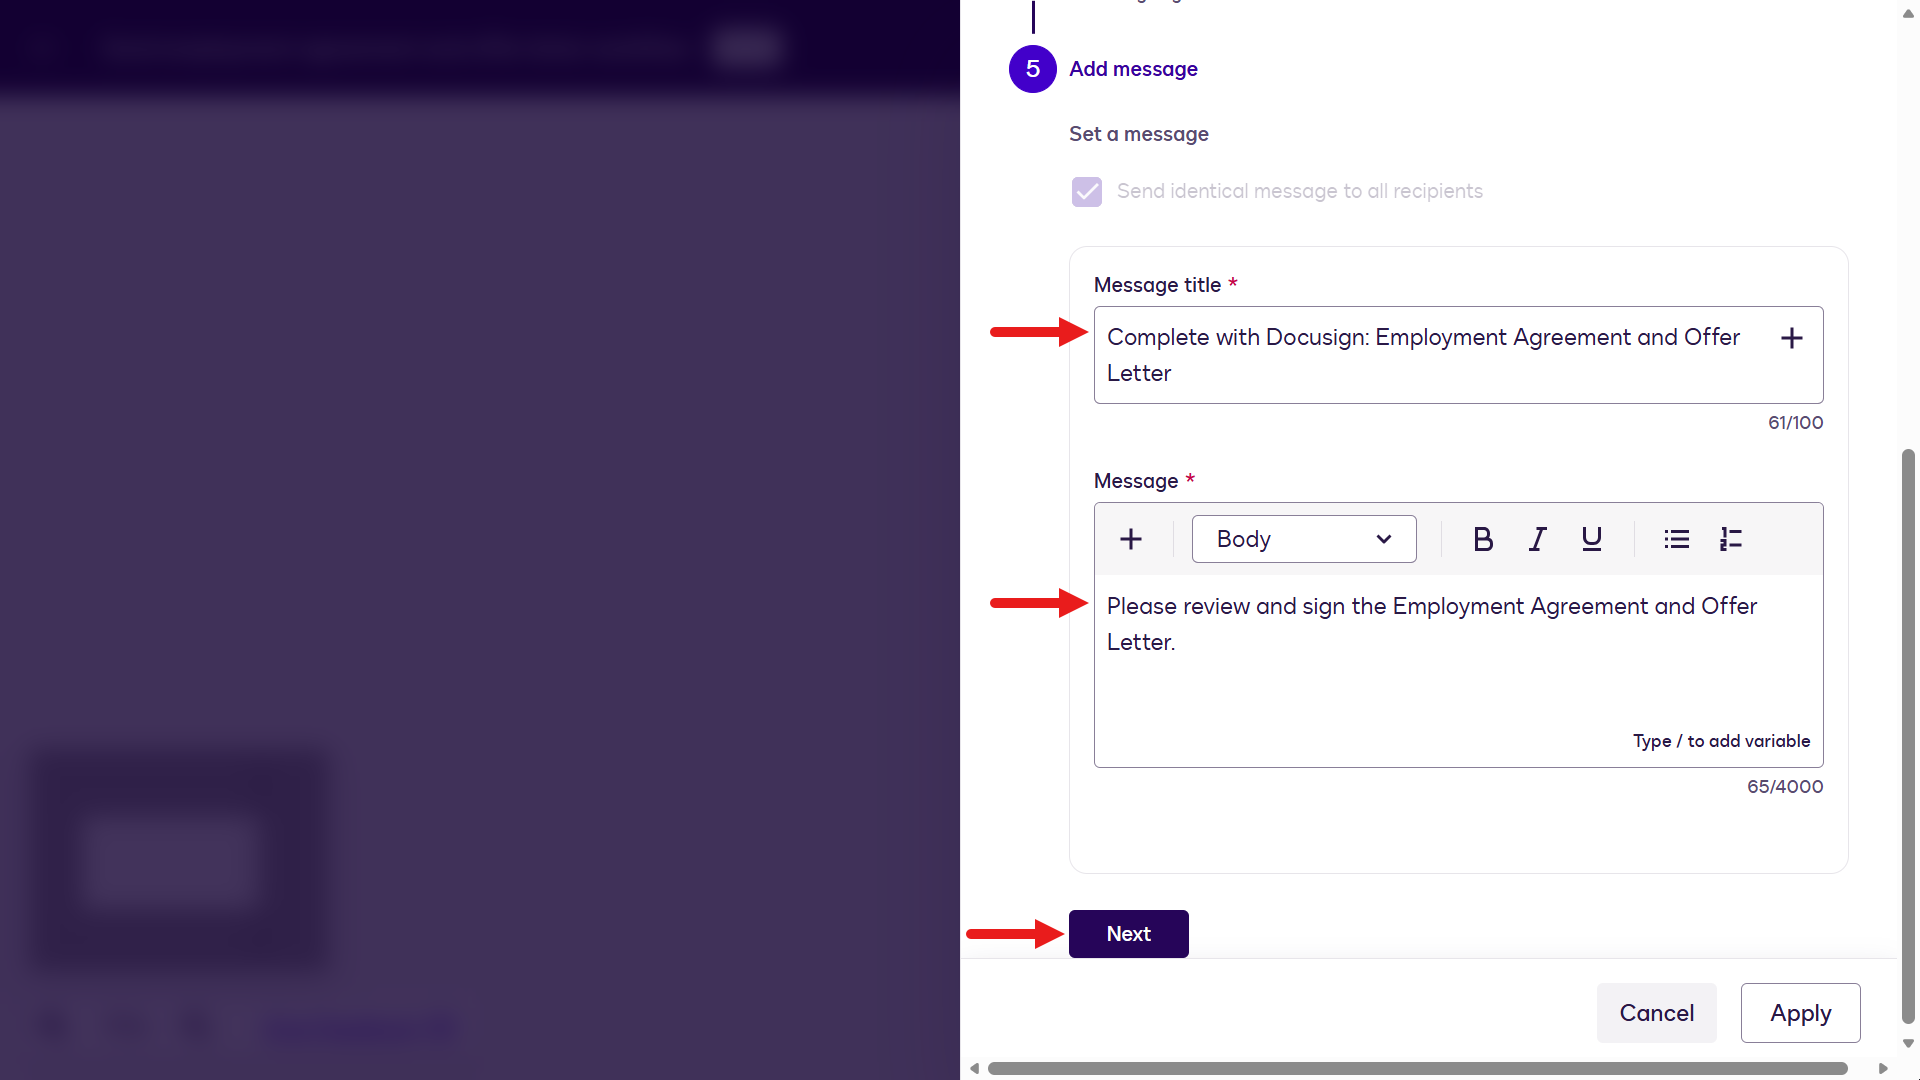
The final step is to configure the message the Hiring Manager will see when they receive the email to sign the documents. Enter the following,
For the Message title:
textComplete with Docusign: Employment Agreement and Offer LetterFor the Message:
textPlease review and sign the Employment Agreement and Offer Letter.Select Next.
Select Apply to complete workflow step configuration.
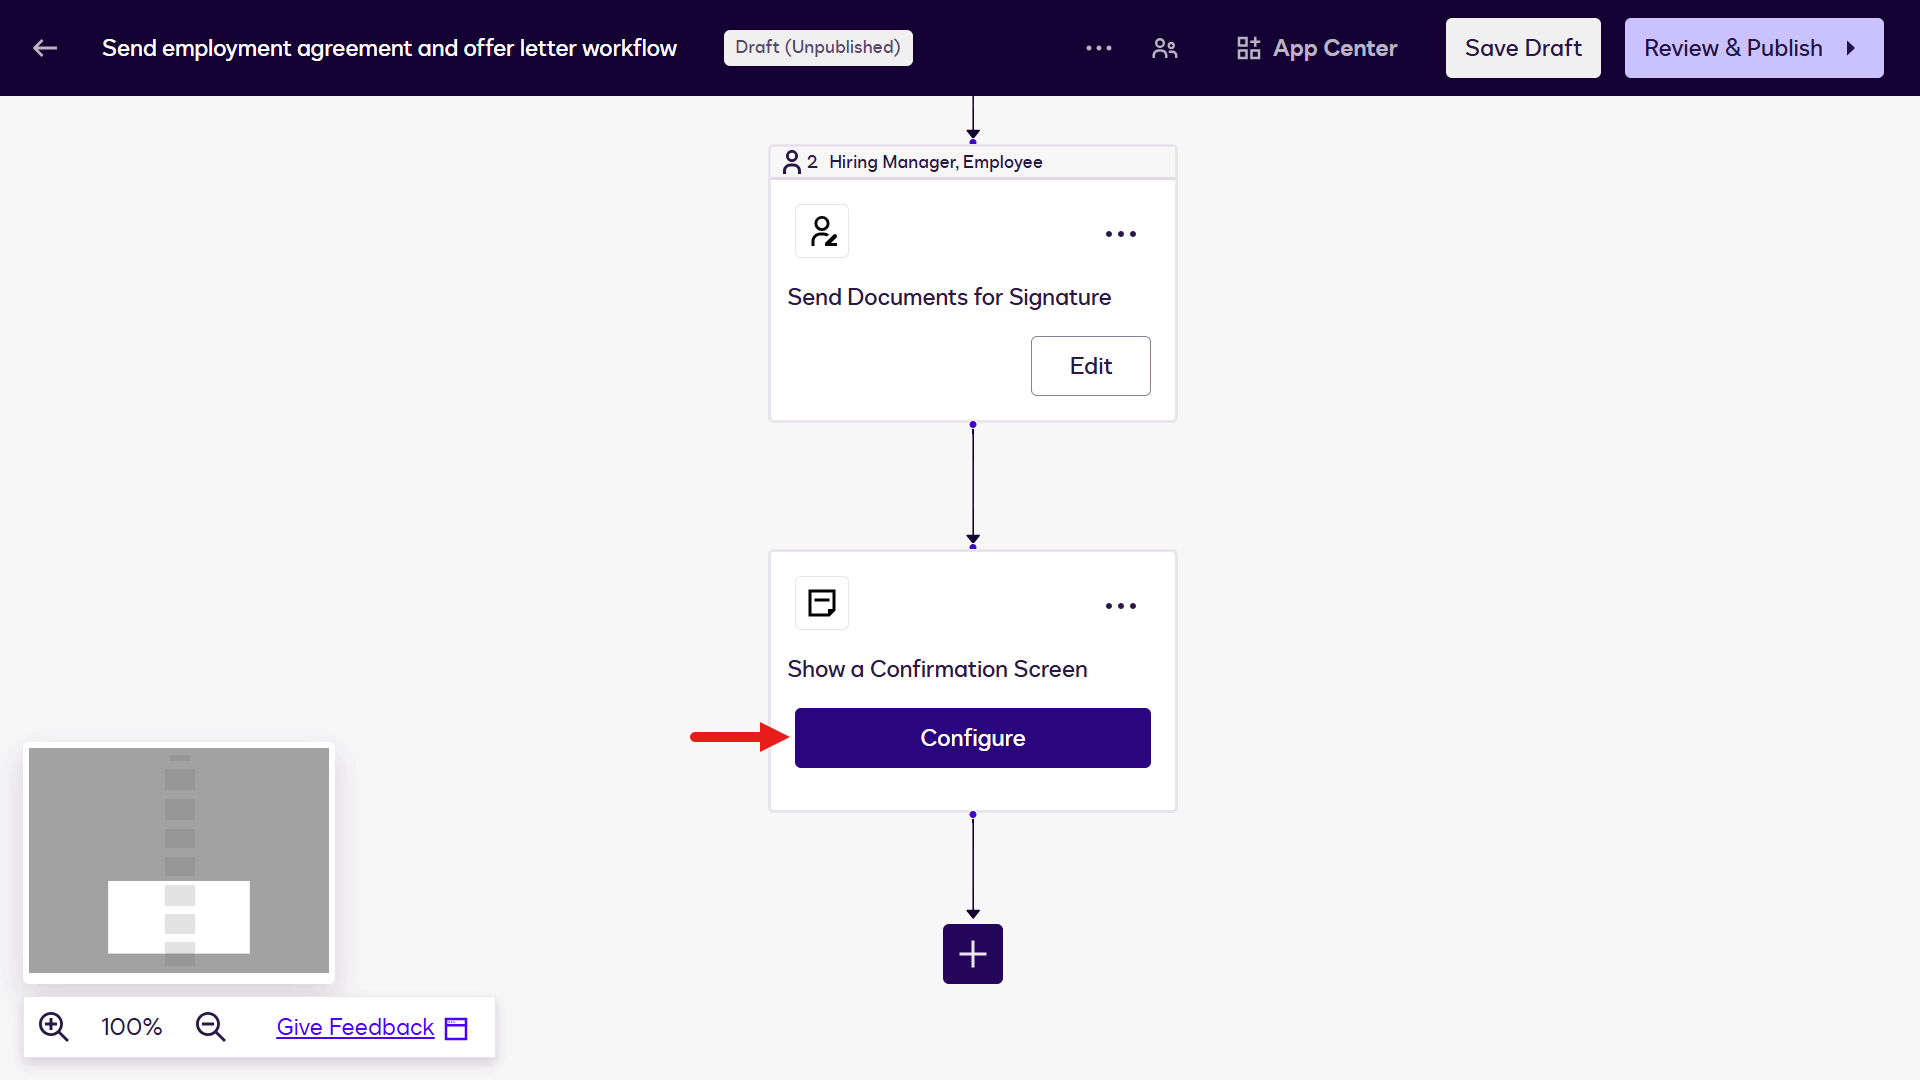
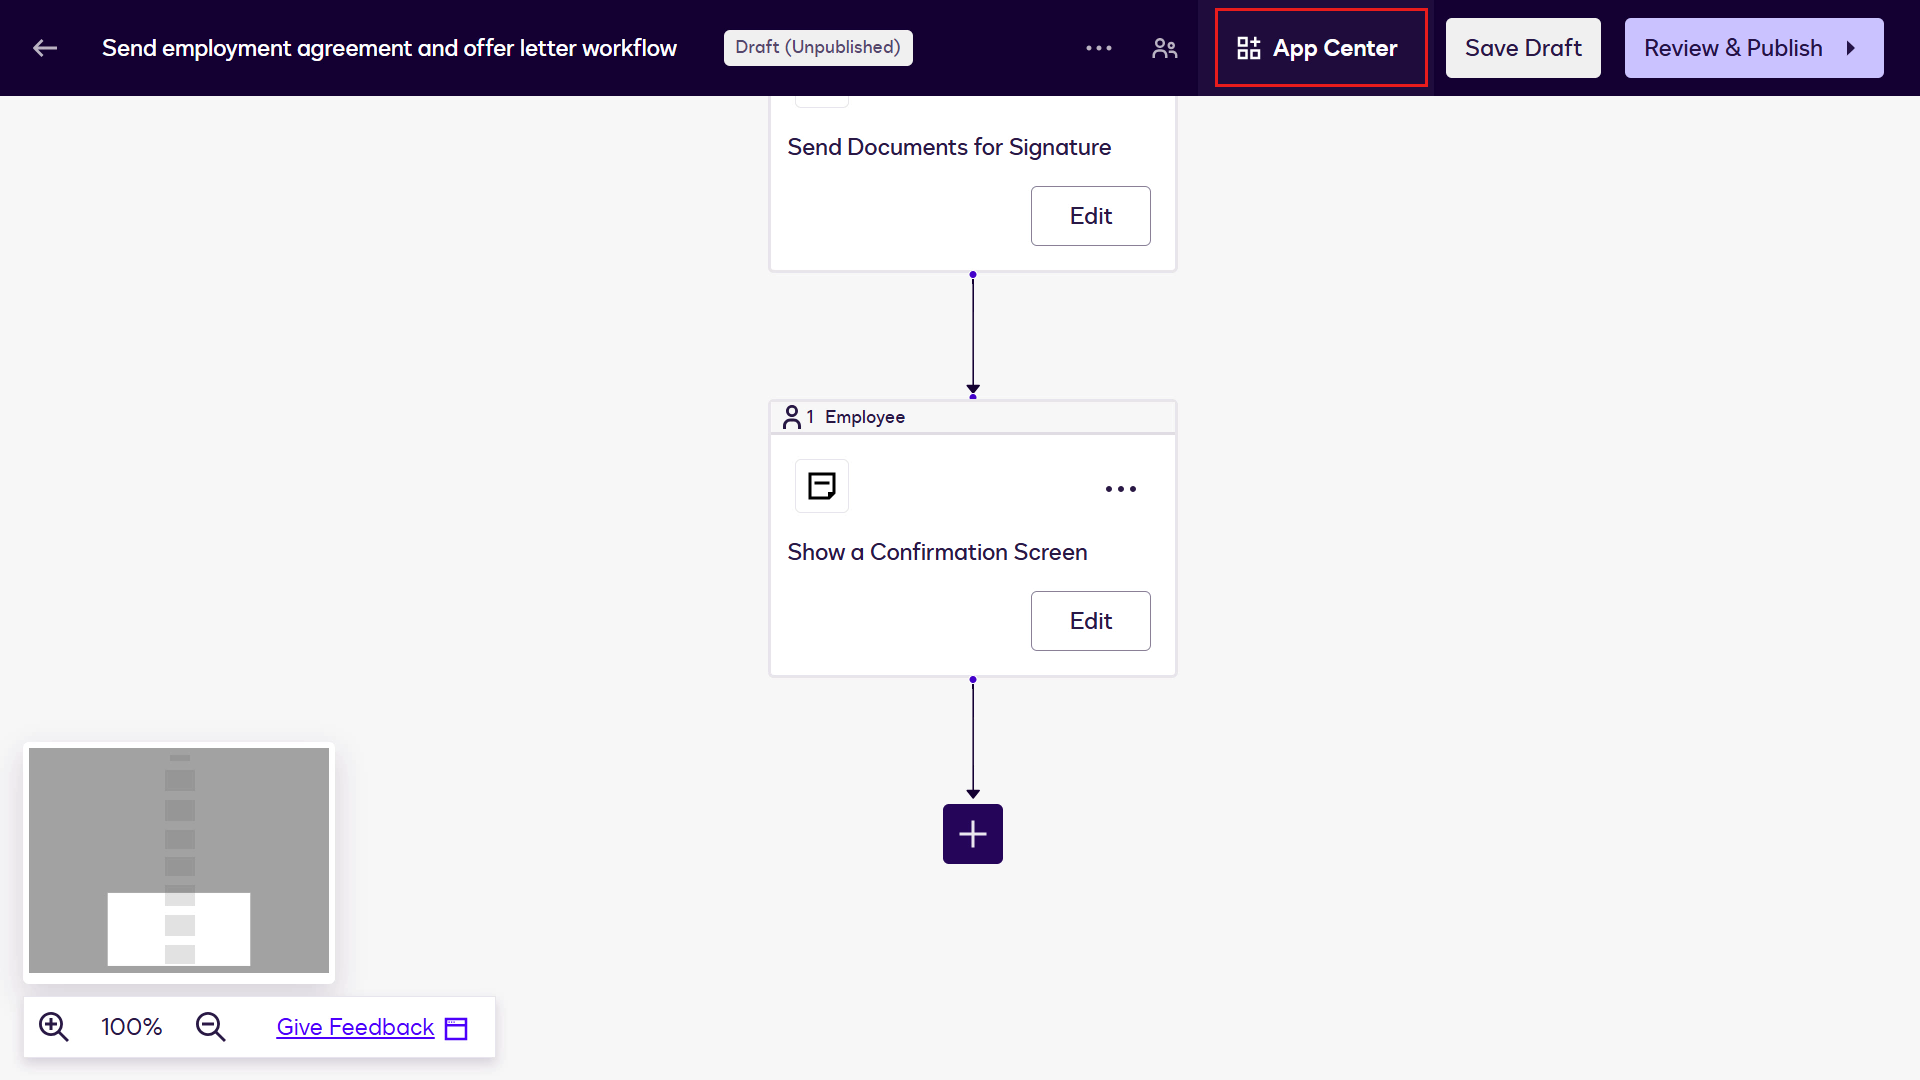
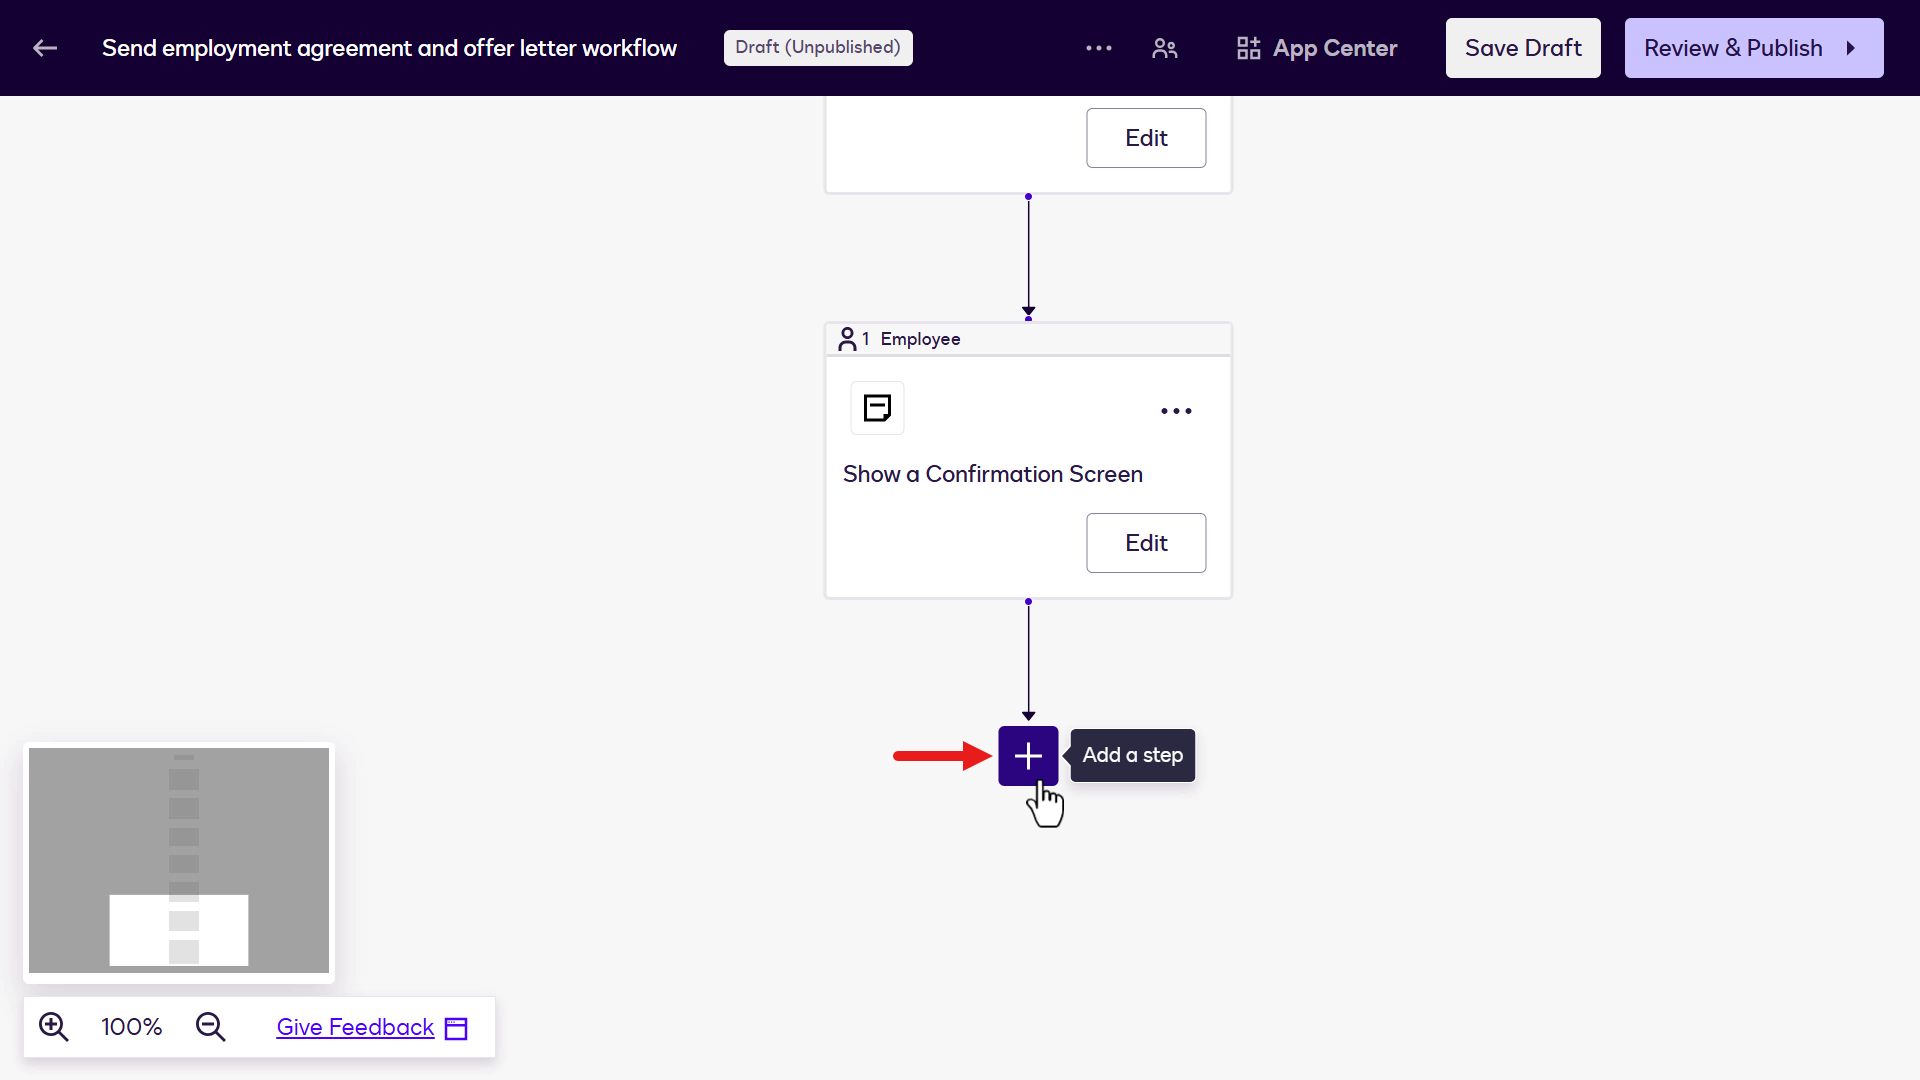
Select Add a step. Next, add a Confirmation Screen for the Employee participant that appears after signing is complete.
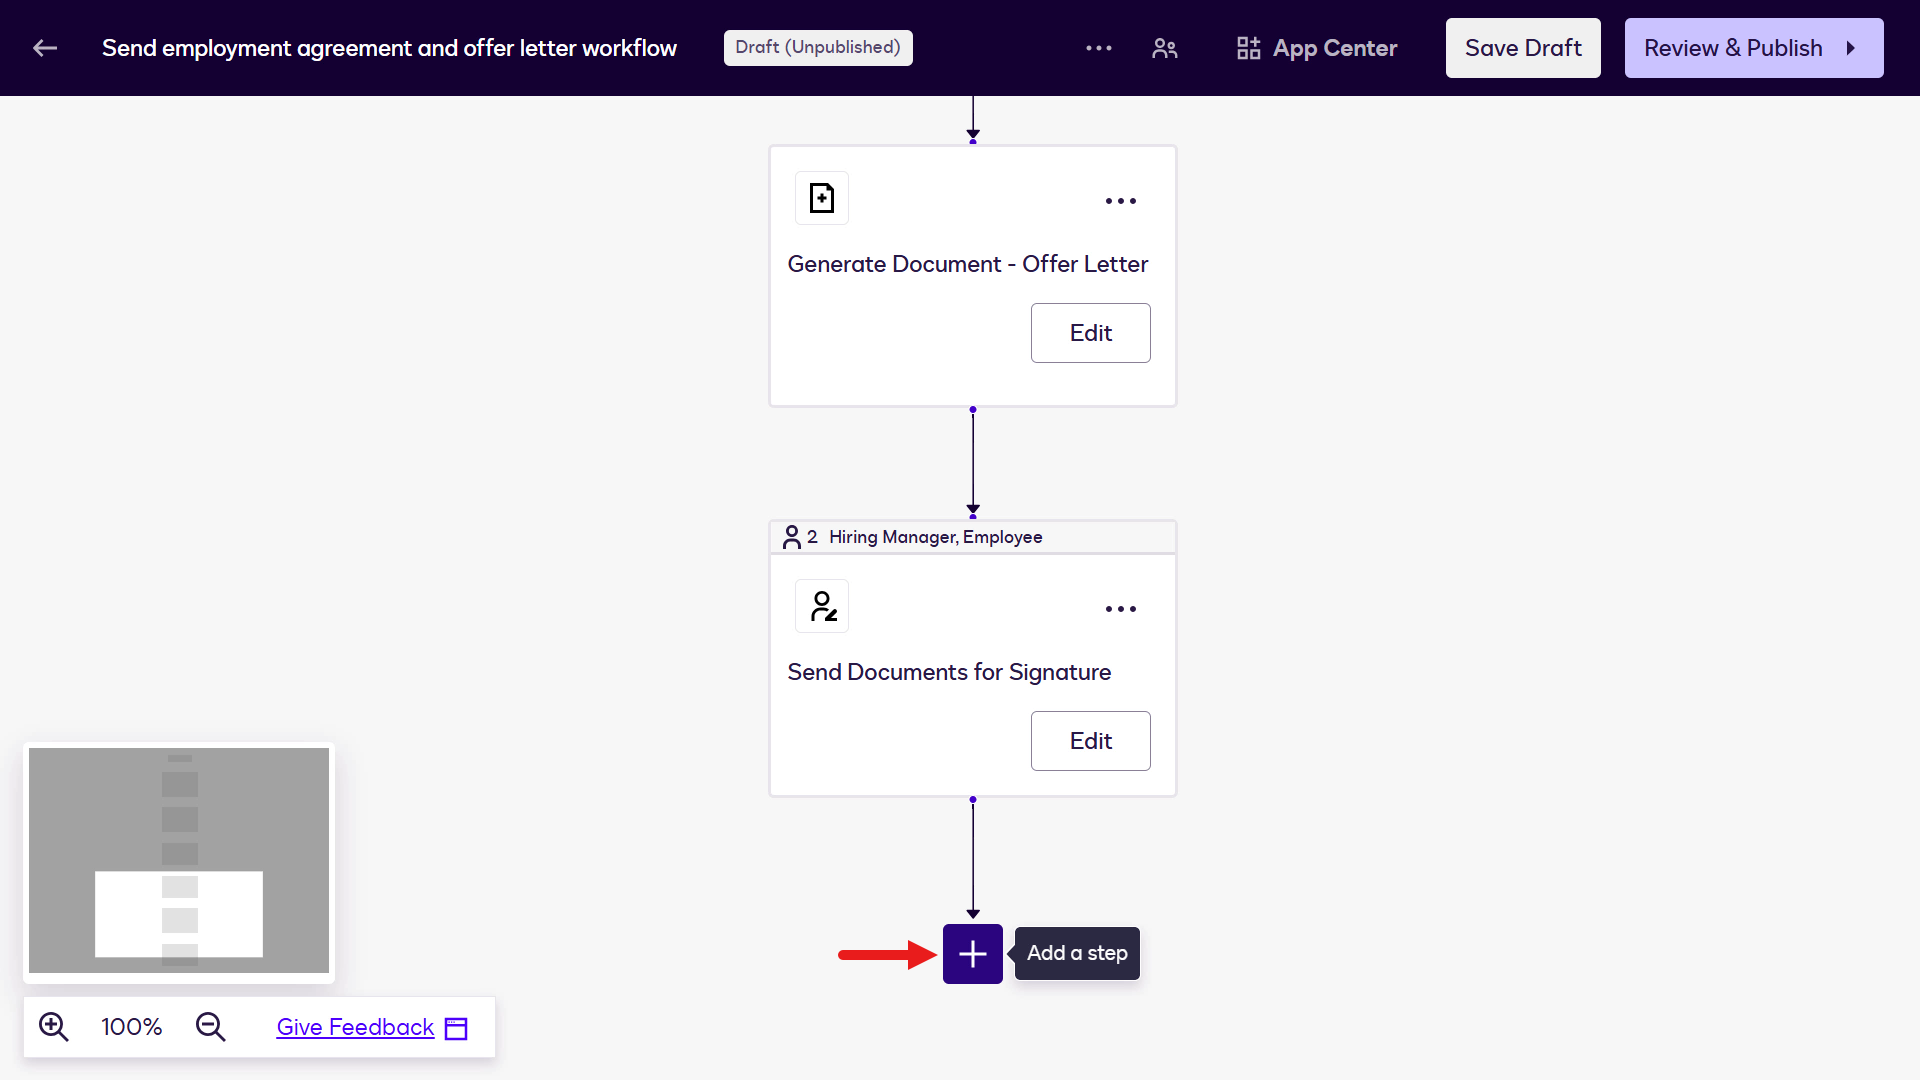
Select Show a Confirmation Screen.
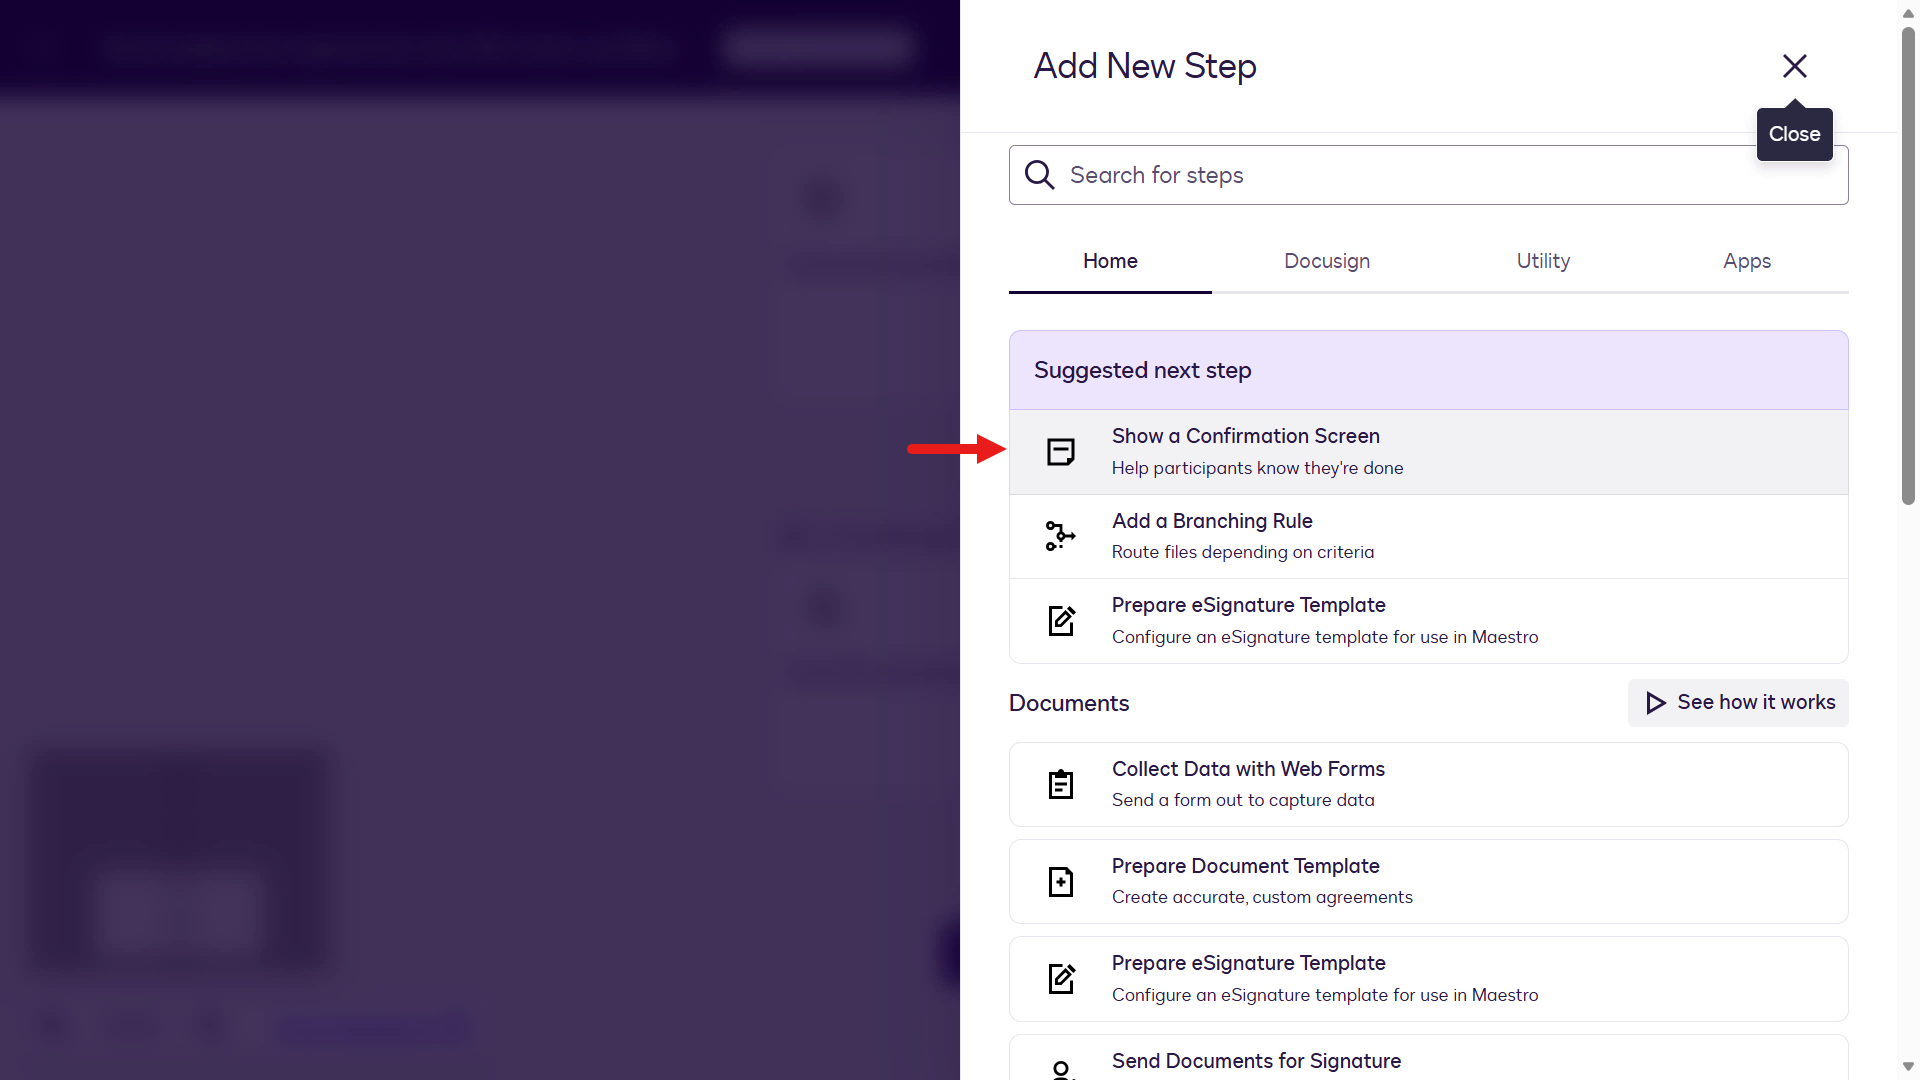
Select Configure for this step.
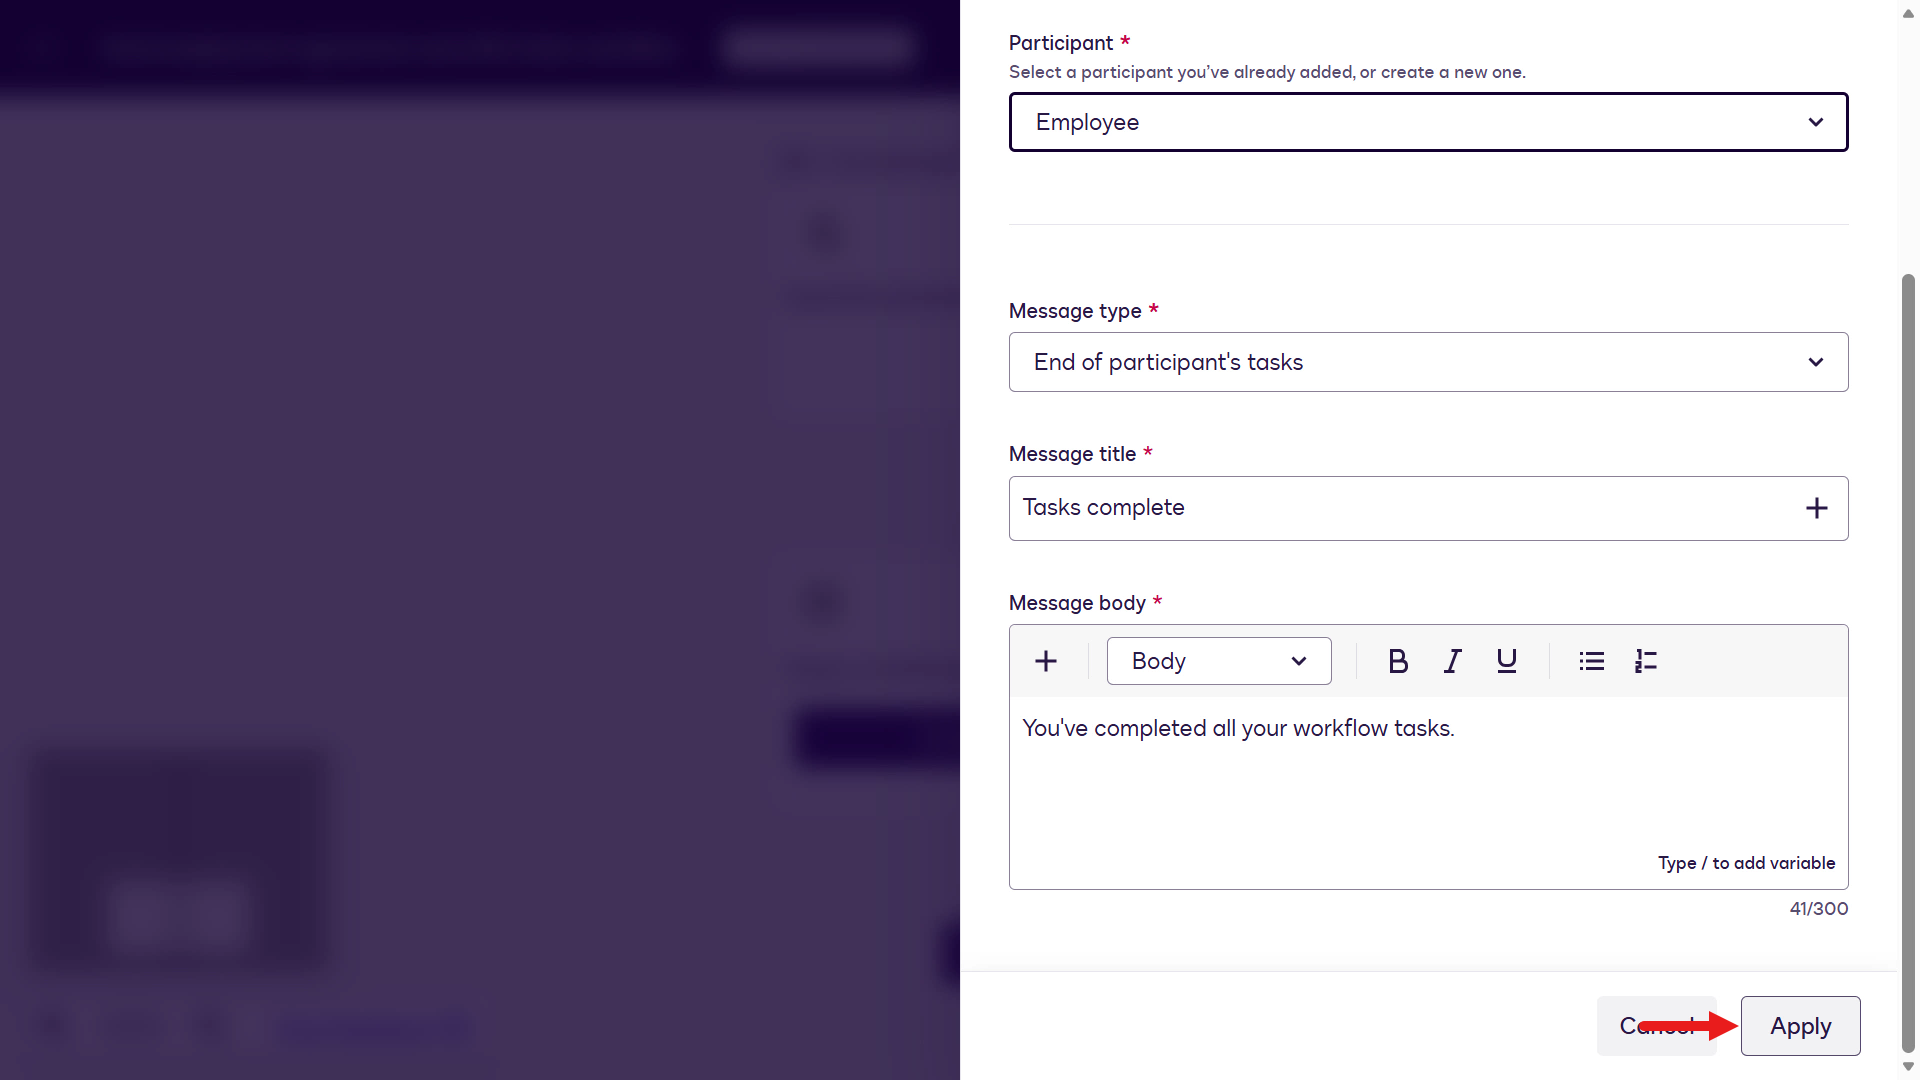
Select Employee as the participant for the confirmation screen.
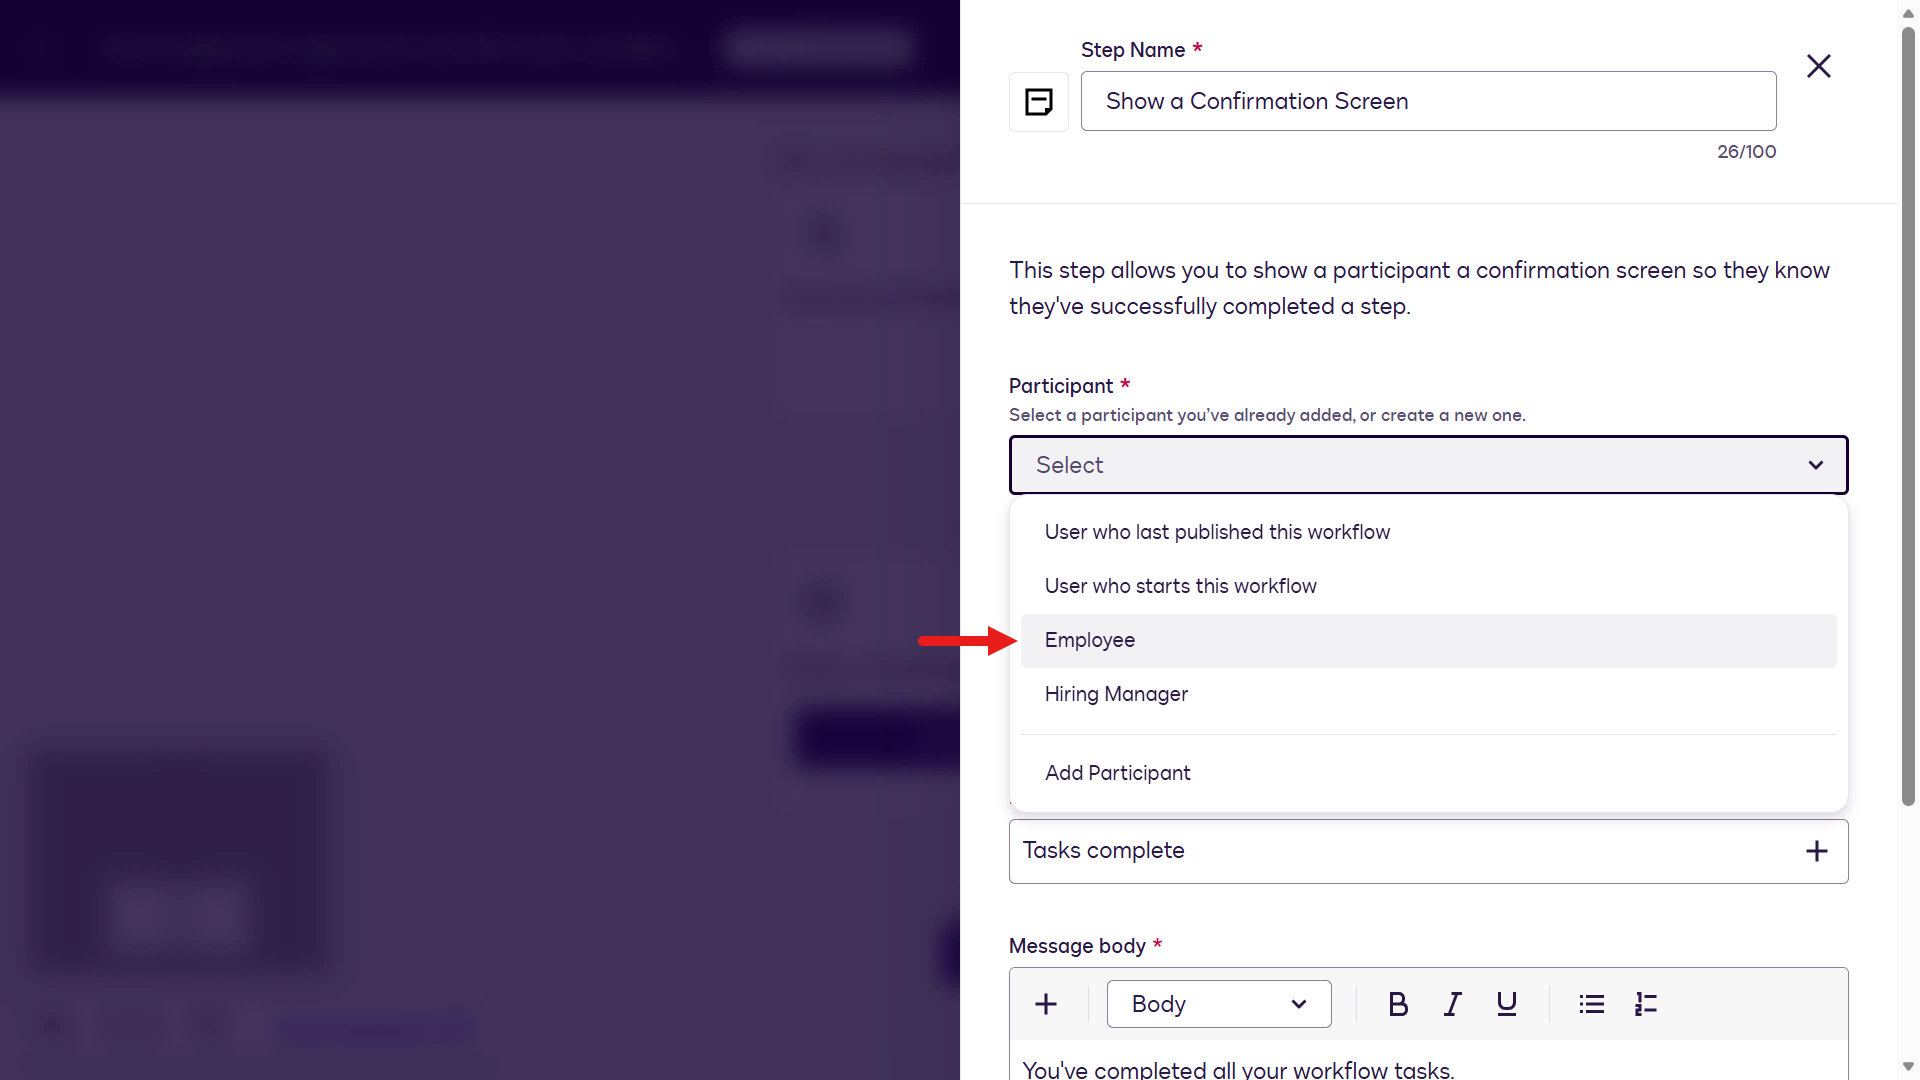
You can configure the message type, title, and body fields. Default values are already set, and you can keep them for this lab. Select Apply.
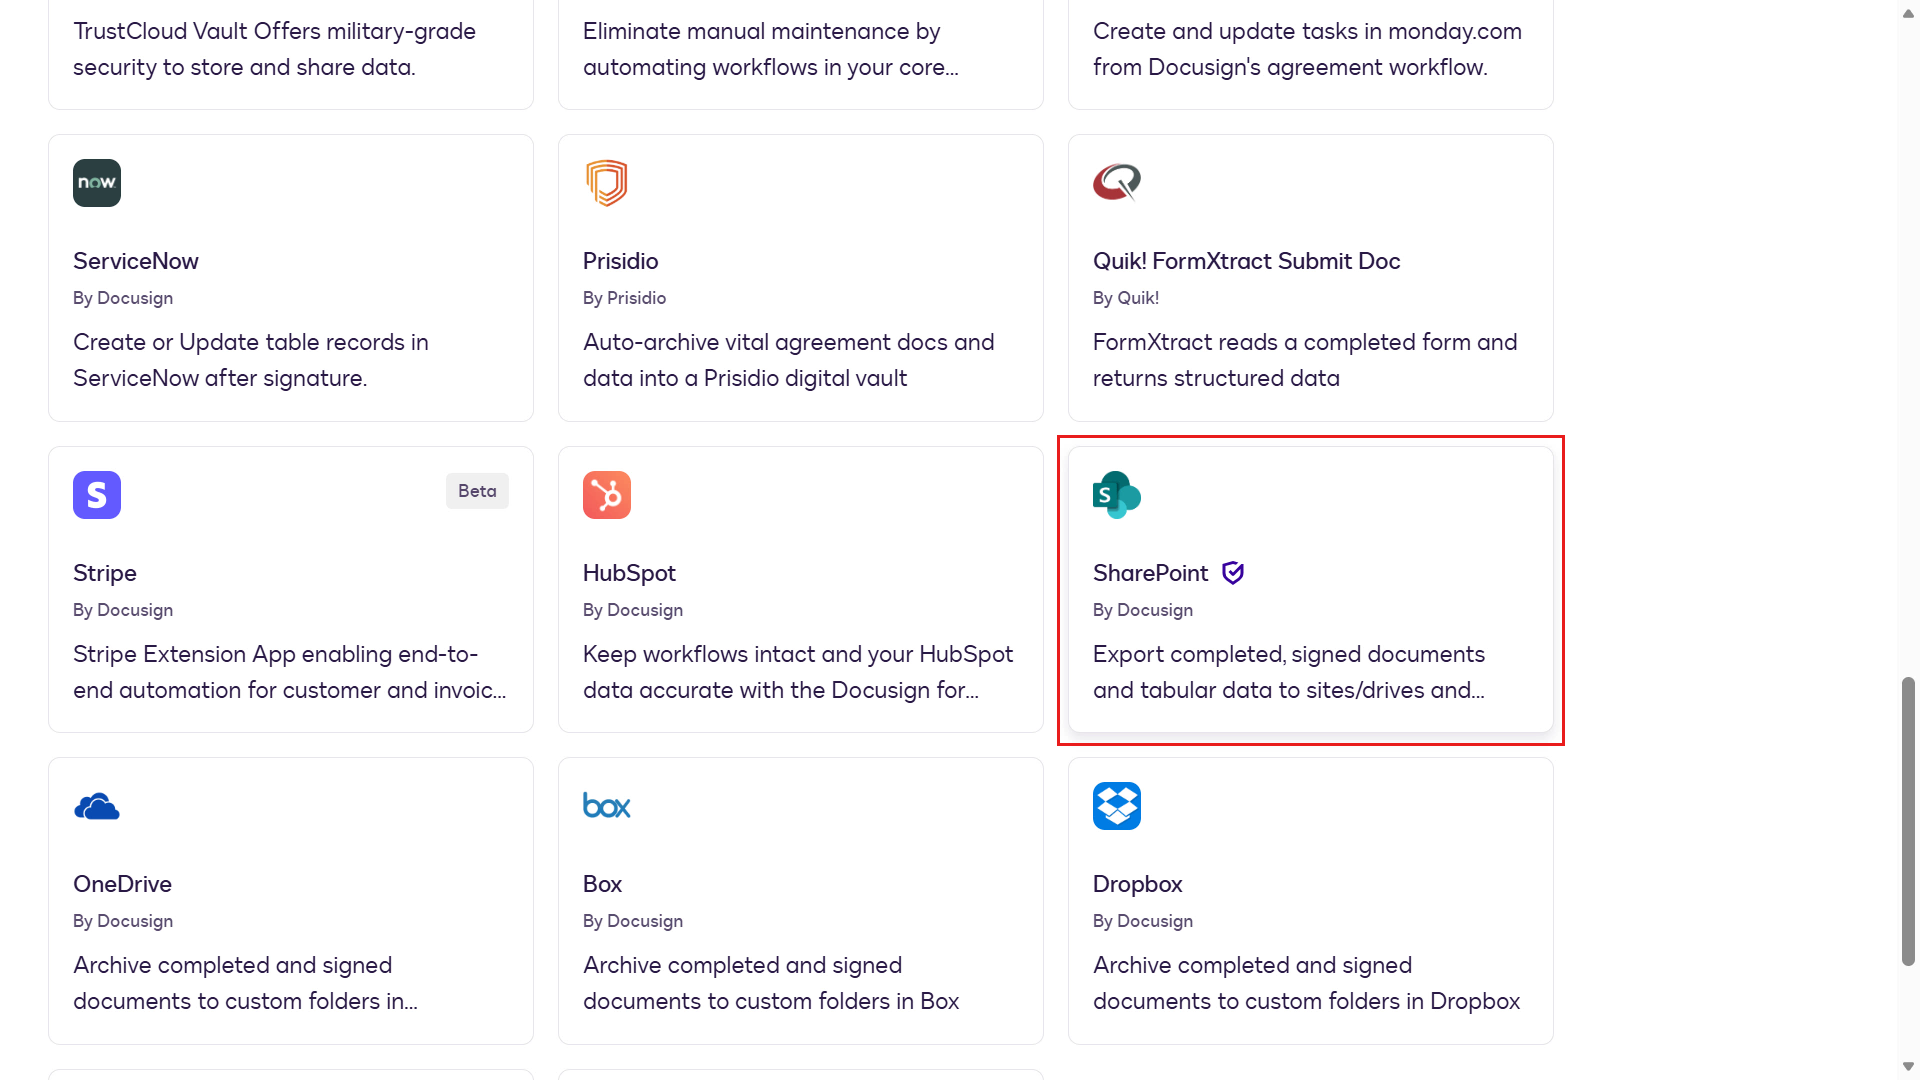
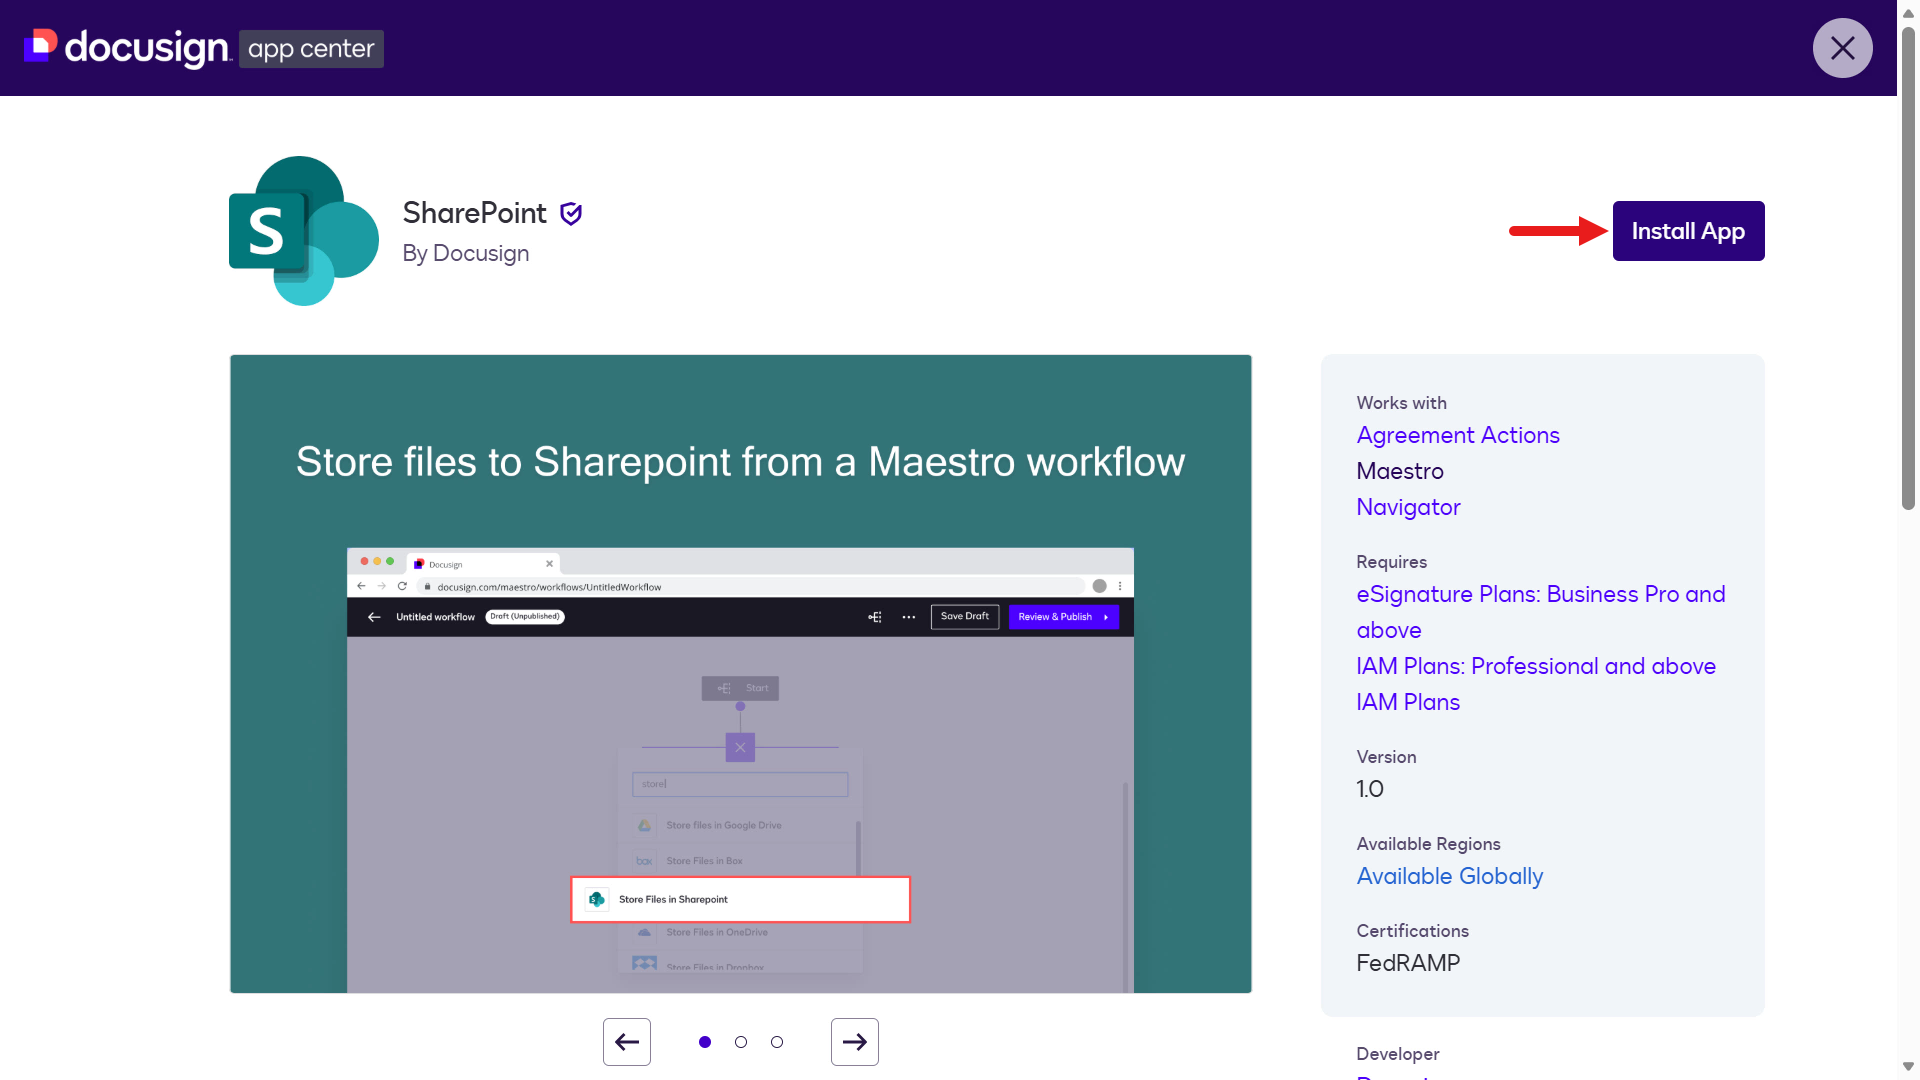
In the final workflow step, upload the signed document agreements to SharePoint for visibility. To do this, set up and authorize a connection to your SharePoint site. Select App Center on the upper right of the designer.
A list of support services will appear. Scroll down and select SharePoint.
Select Install App.
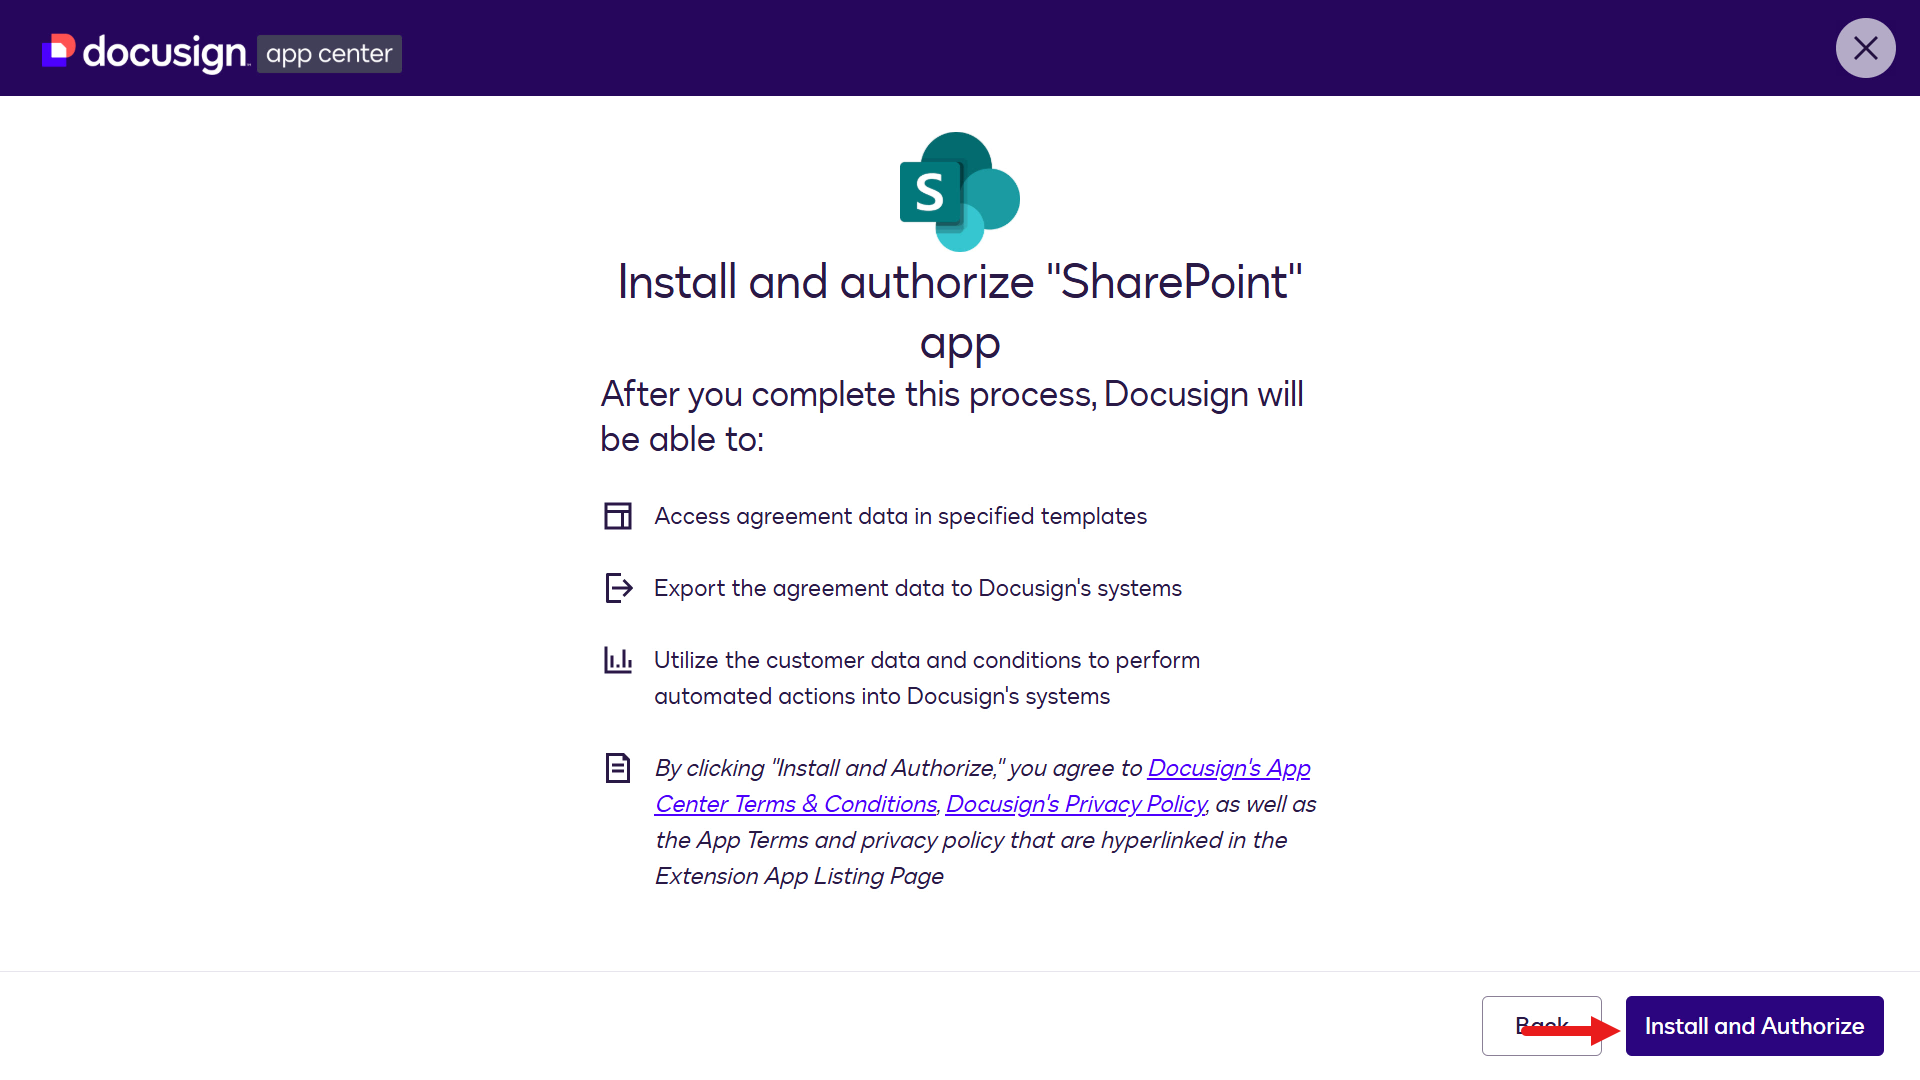
Next, select Install and Authorize.
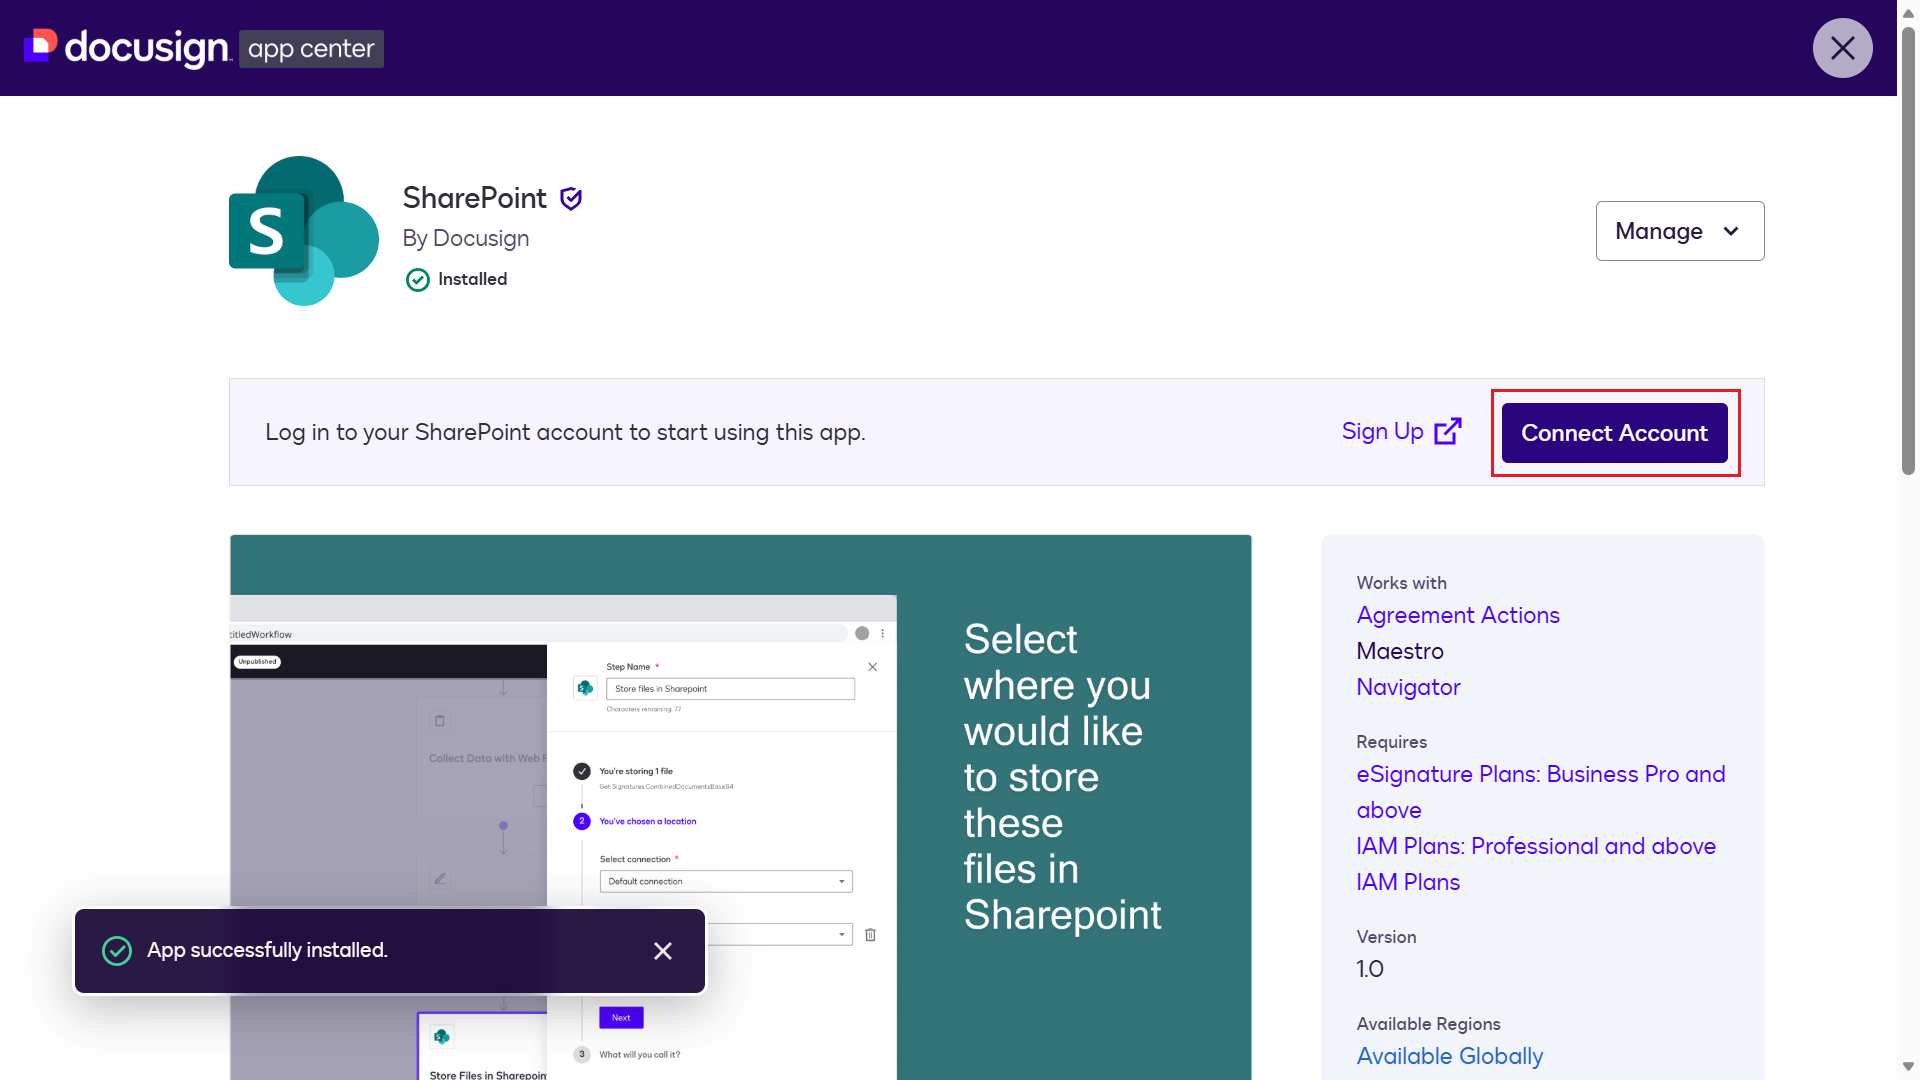
Select Connect Account.
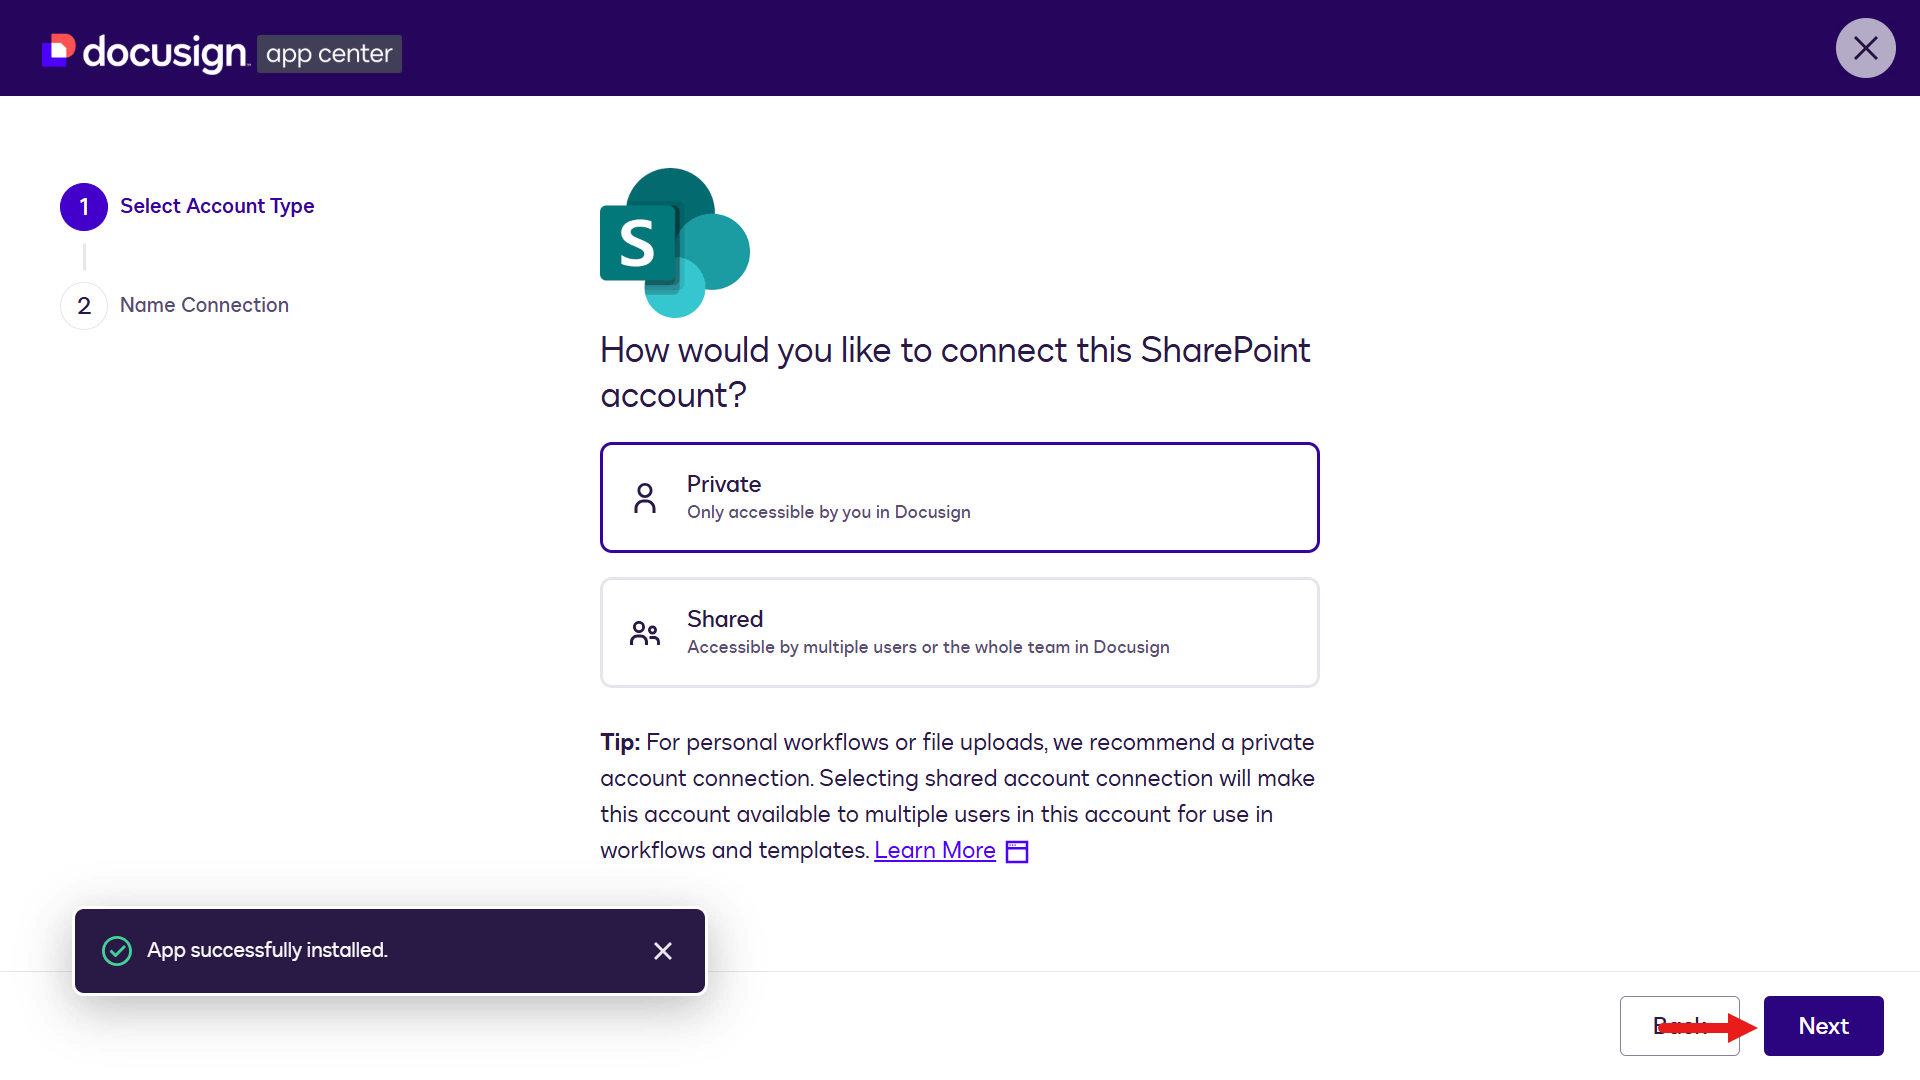
You'll see options to connect a SharePoint account as either a private connection (individual use) or a shared connection (team access). For this lab, use Private.
Select Next.
Enter a name for your SharePoint account such as
YourName_SharePoint_Docusignor your Copilot Studio environment name.Select Log In on the bottom right.
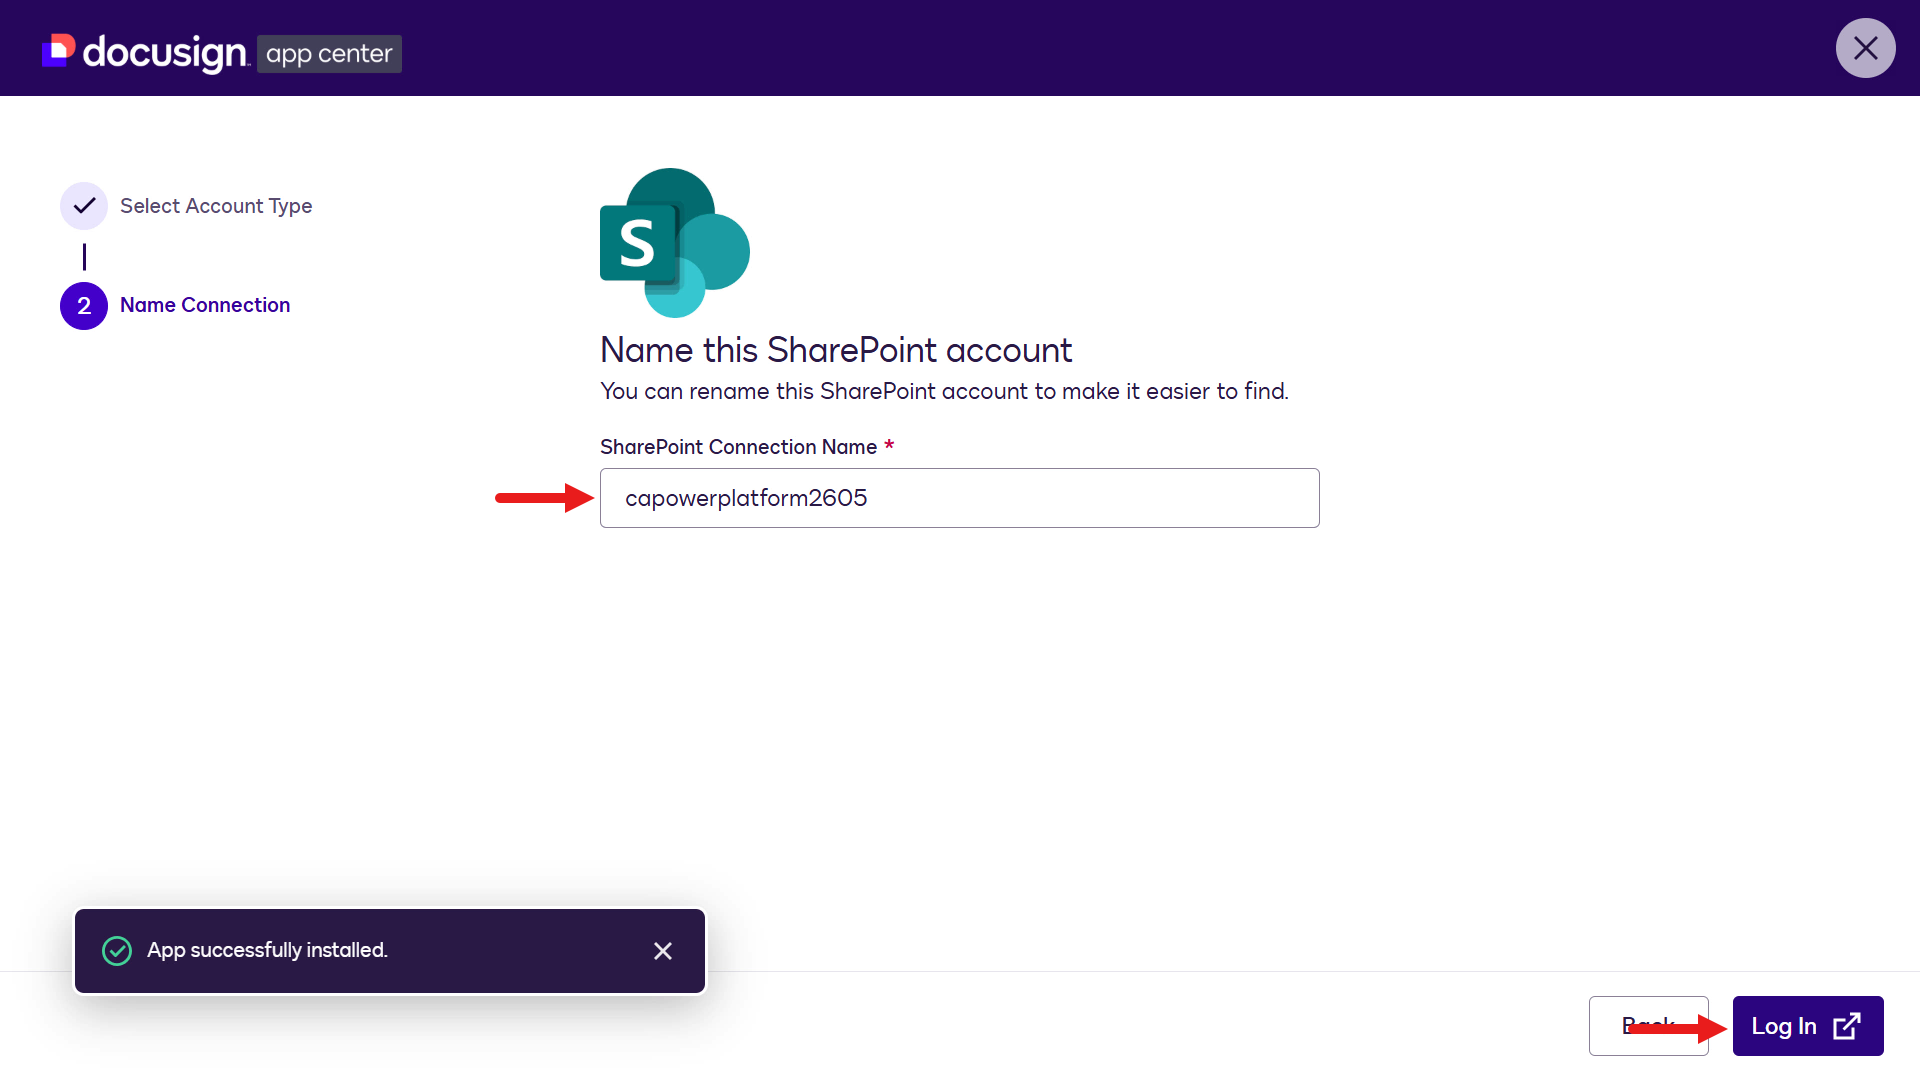
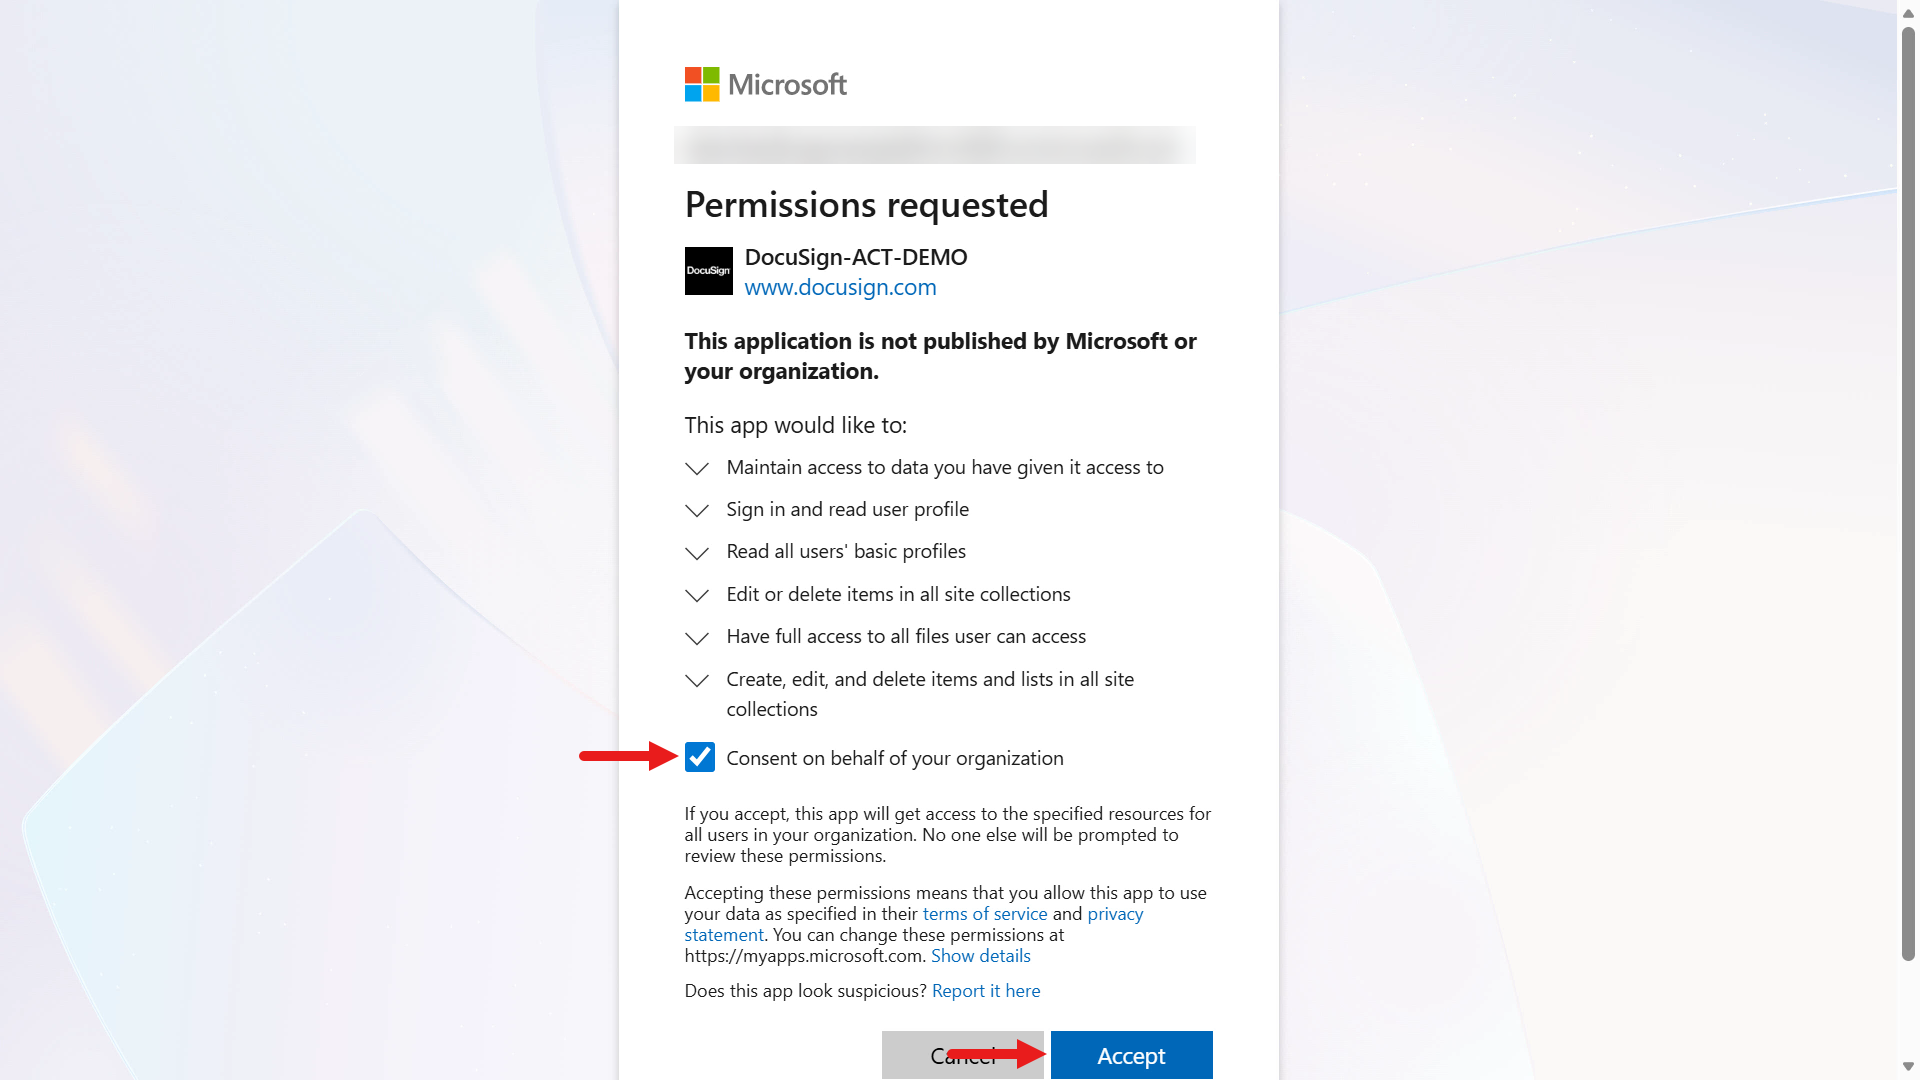
Enter your credentials for your SharePoint site when prompted to sign in, and tick the checkbox to allow permissions. Then select Accept.
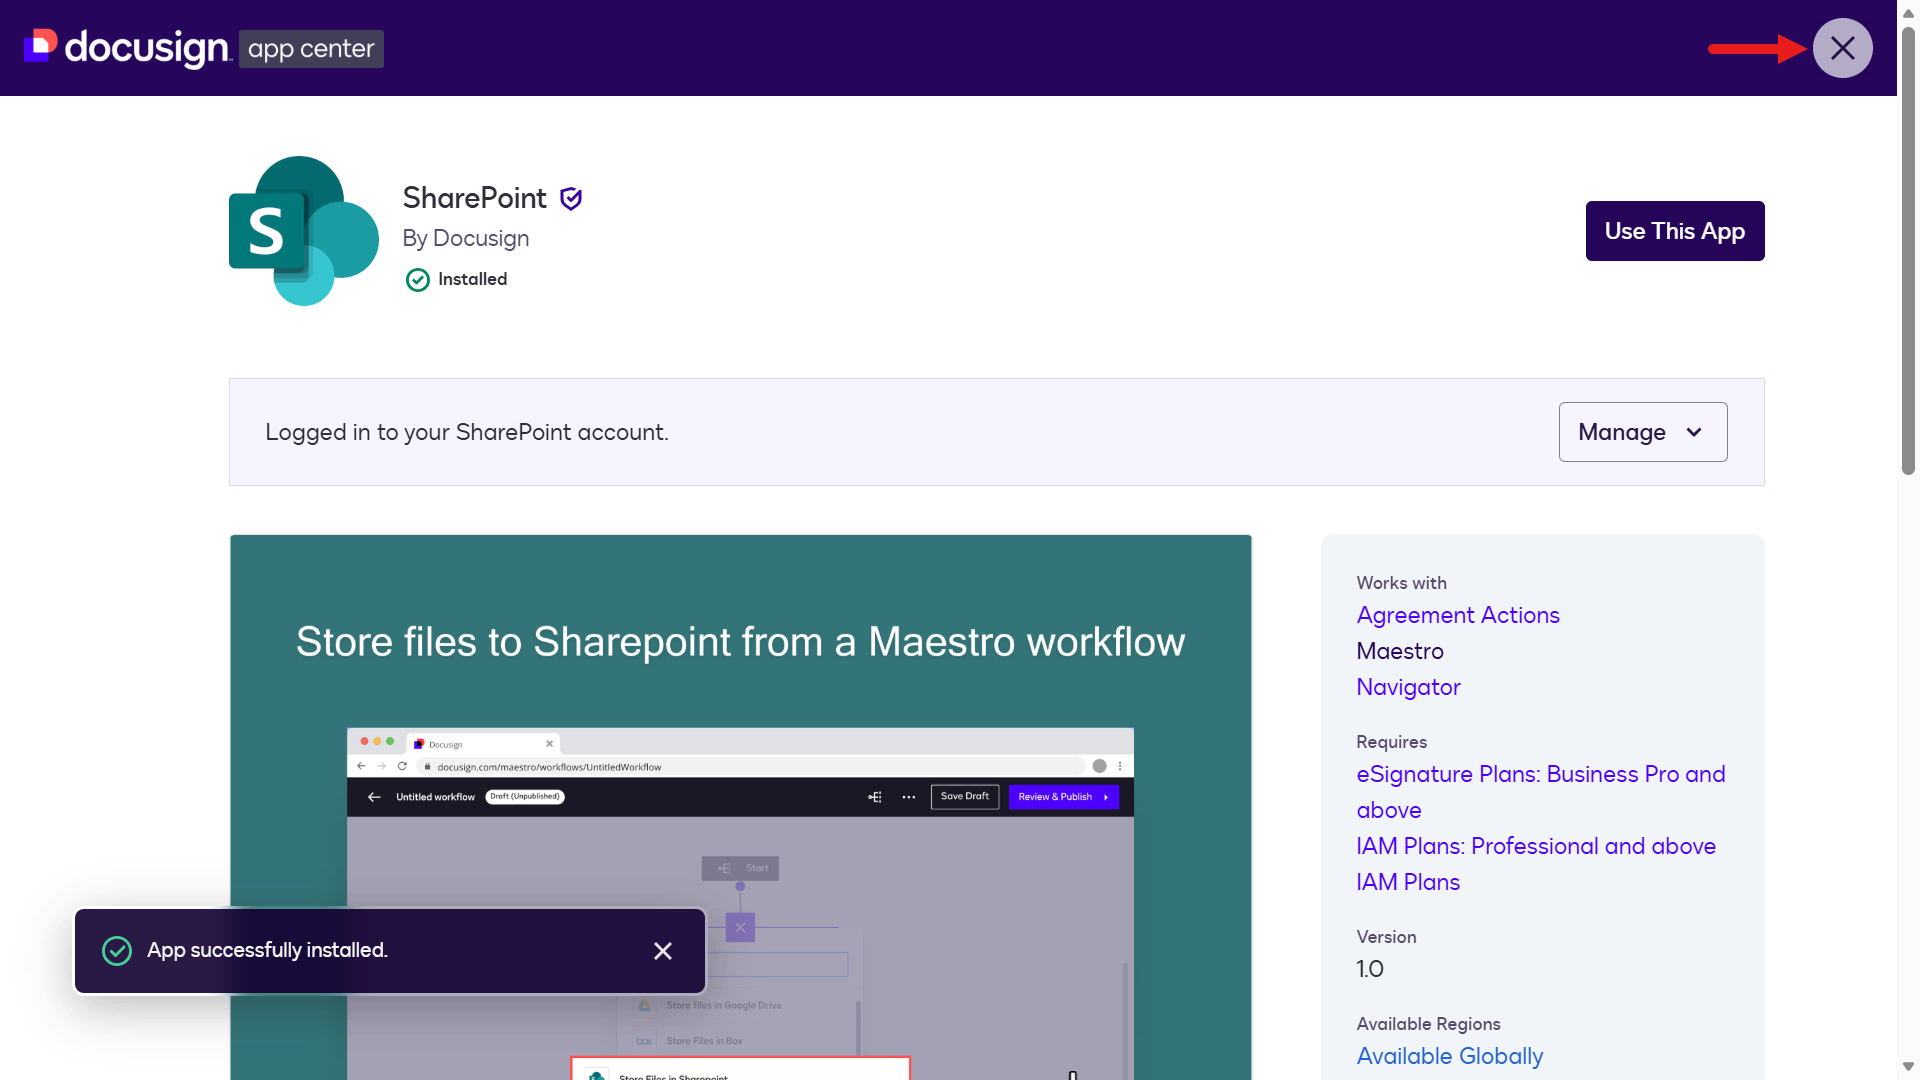
You'll see confirmation that you're signed in to your SharePoint account. Select the X icon to exit App Center and return to the workflow designer. If not, navigate to Agreements > Workflows and reopen the workflow.
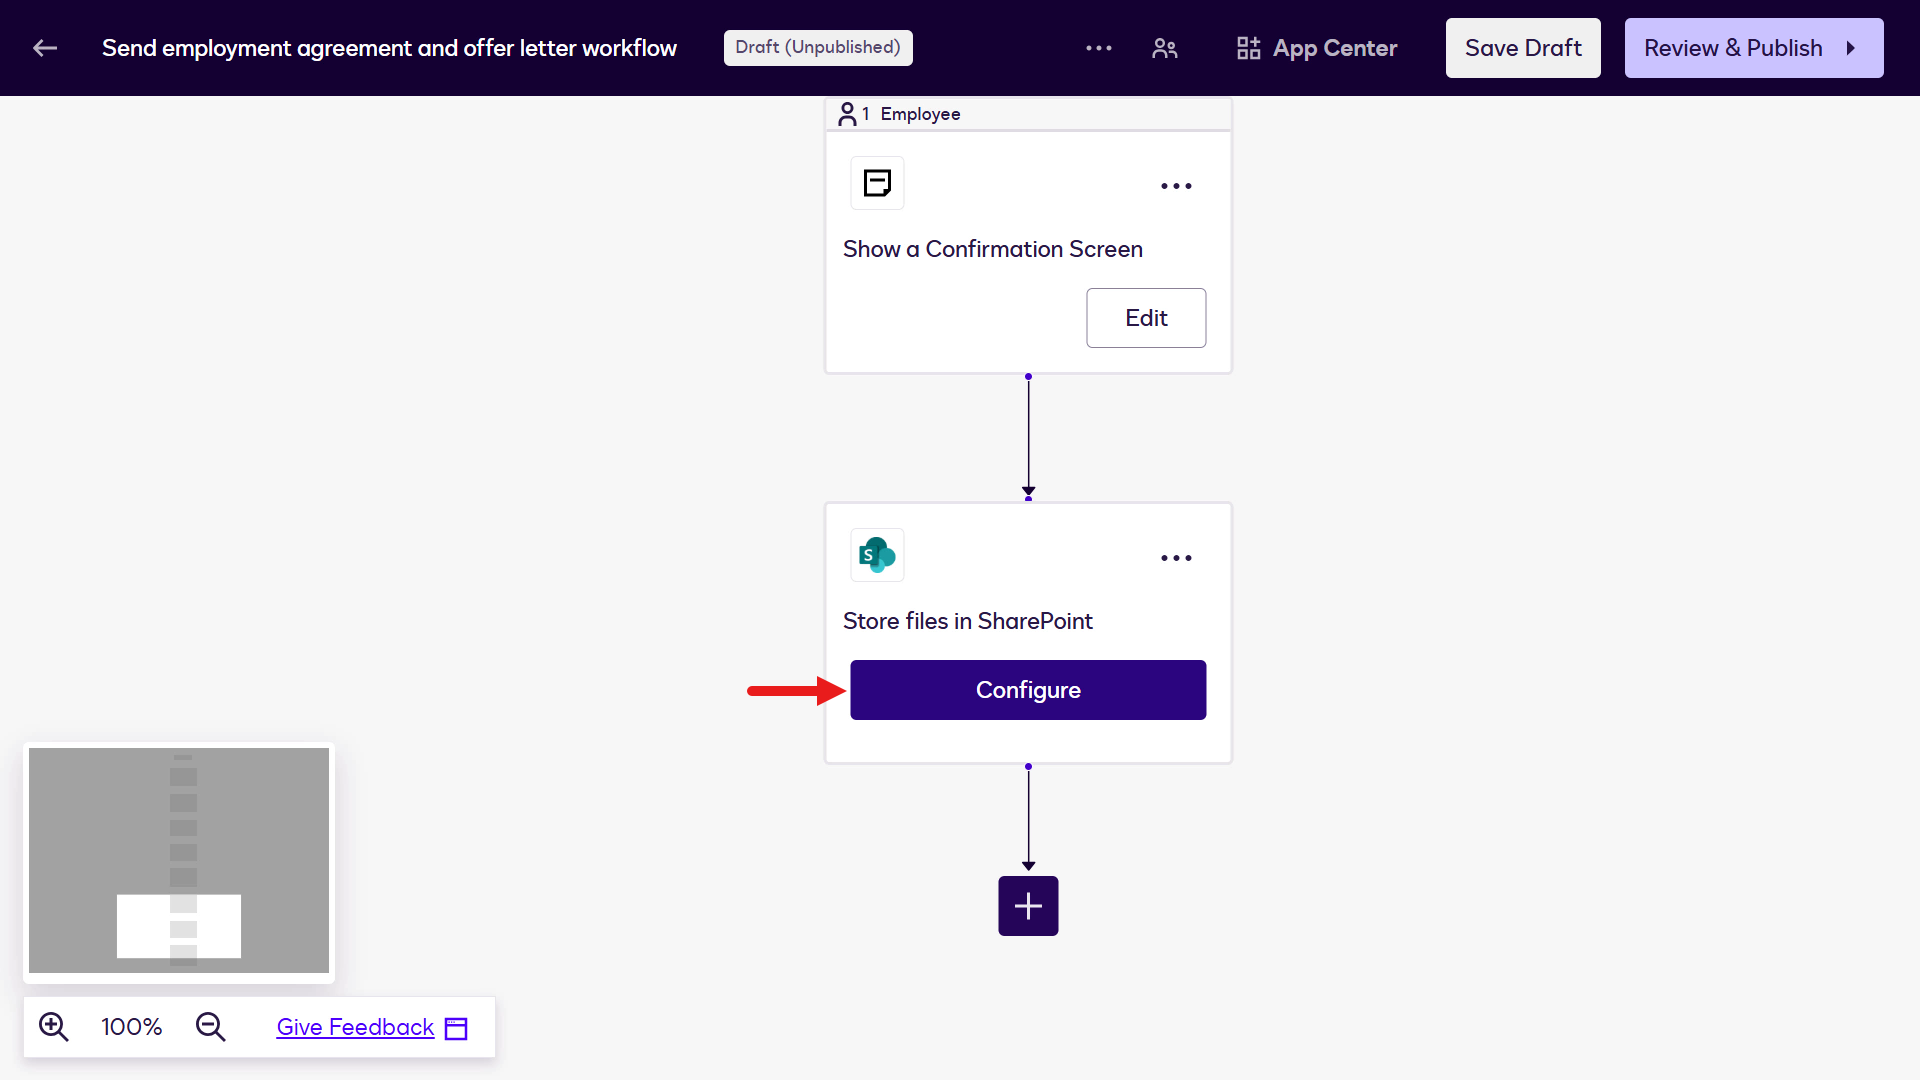
Select Add a step as we'll add the SharePoint step as the final step for the workflow.
Select the Apps tab and select Store files in SharePoint.
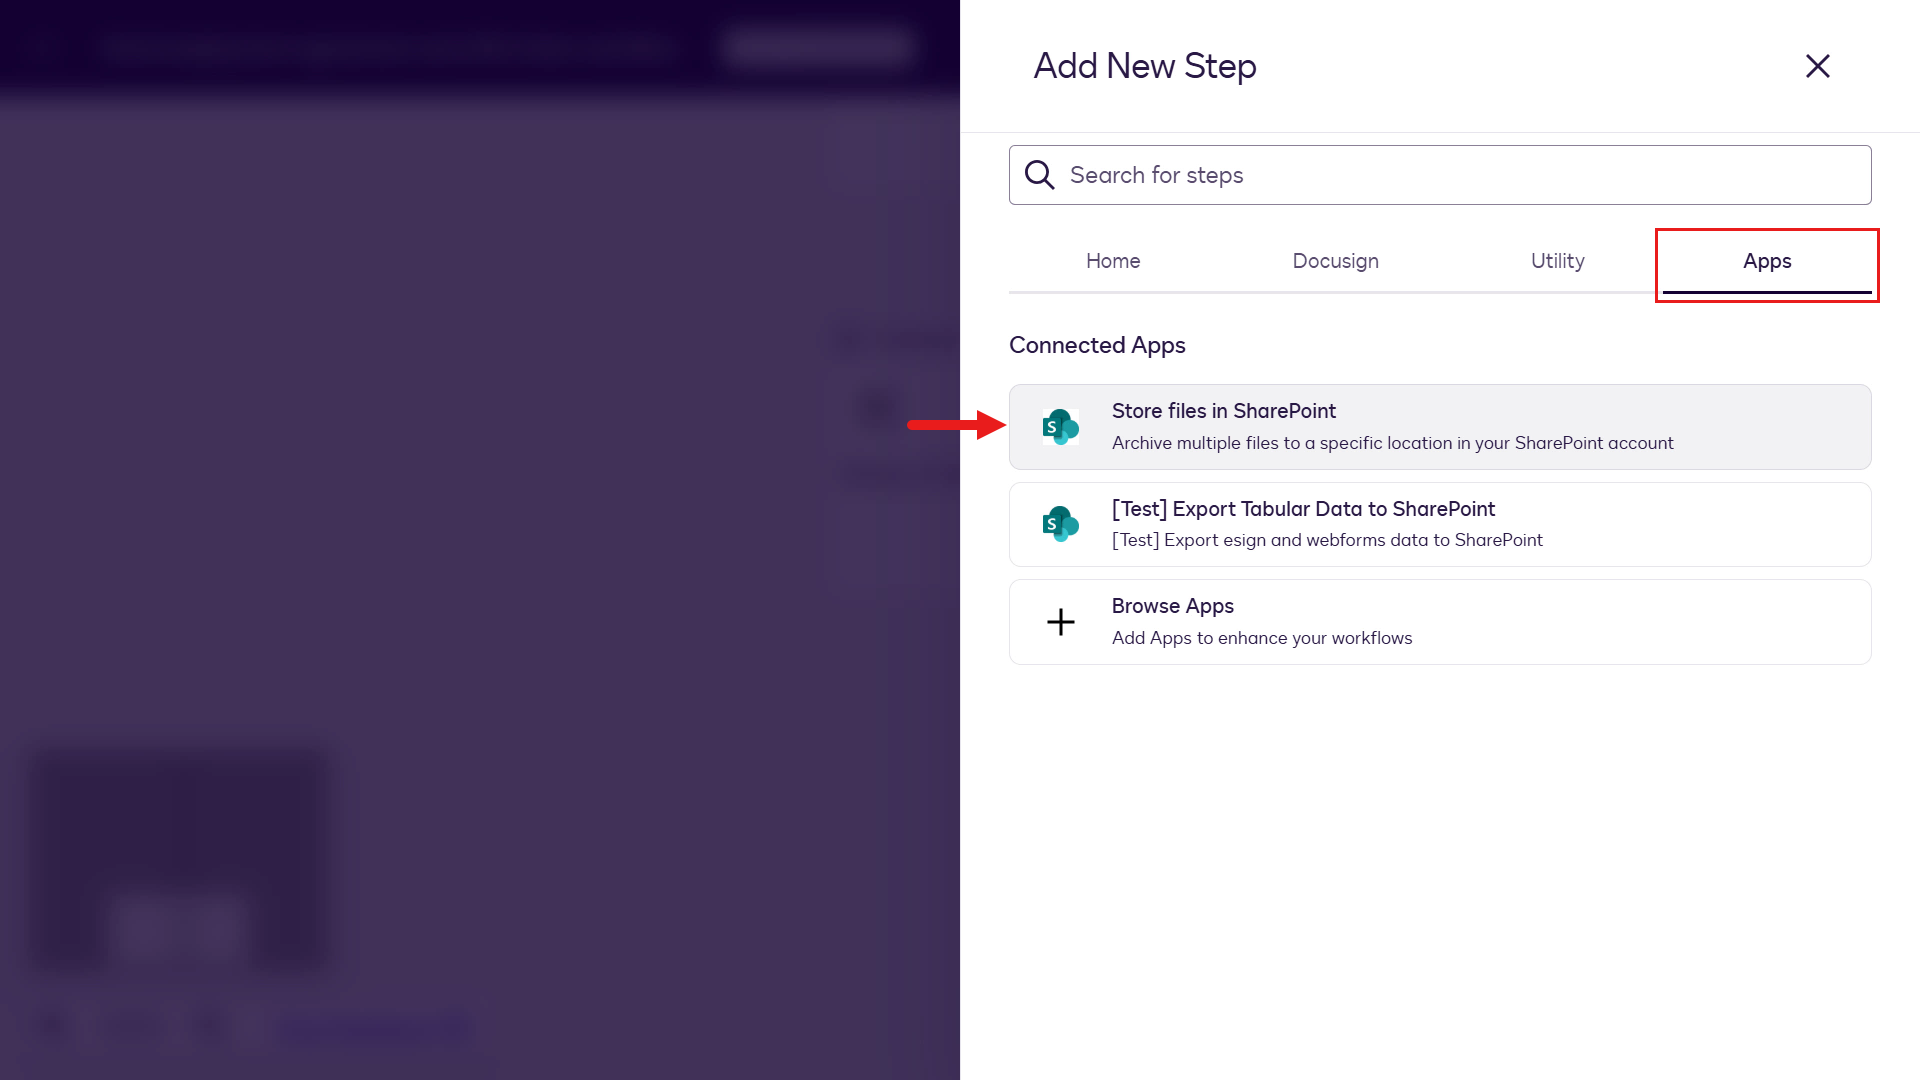
Select Configure for this step.
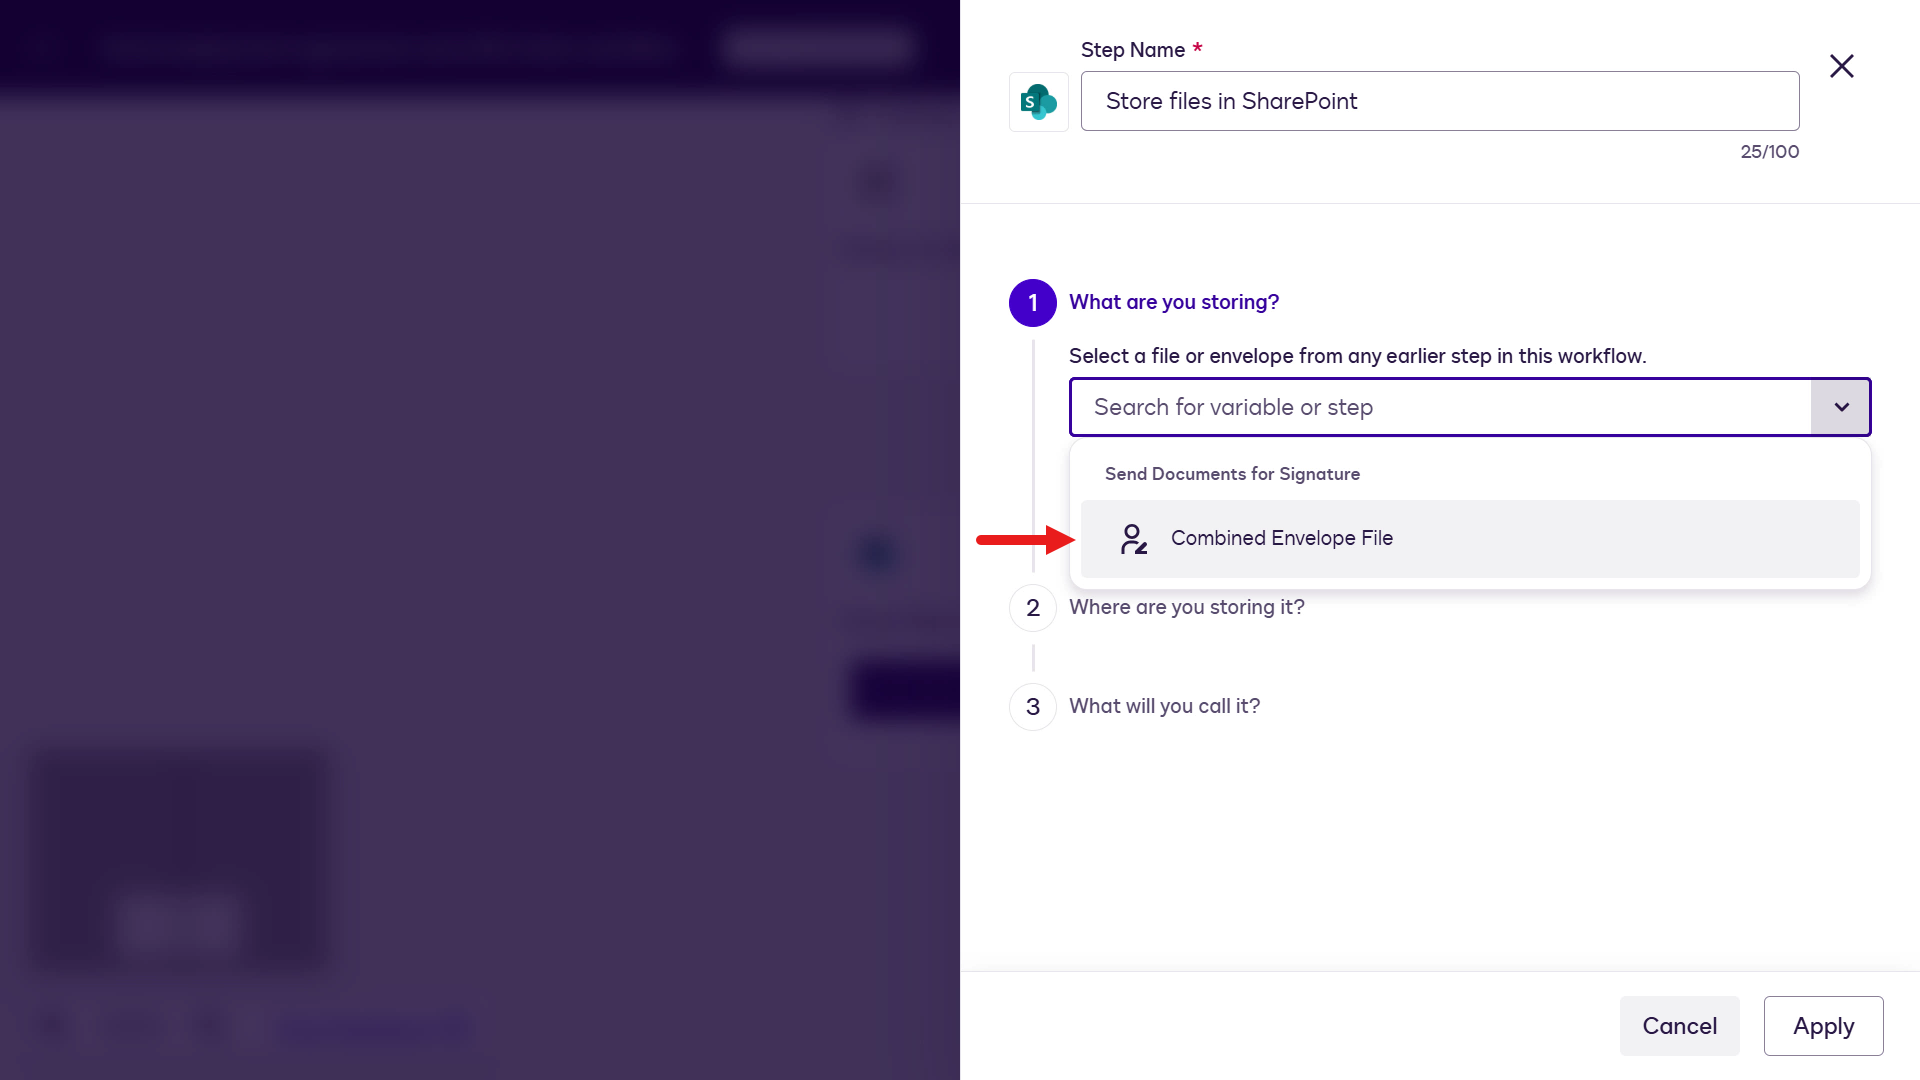
Select the Combined Envelope File variable in the dropdown field. This represents the signed document agreements from the Send Documents for Signature step.
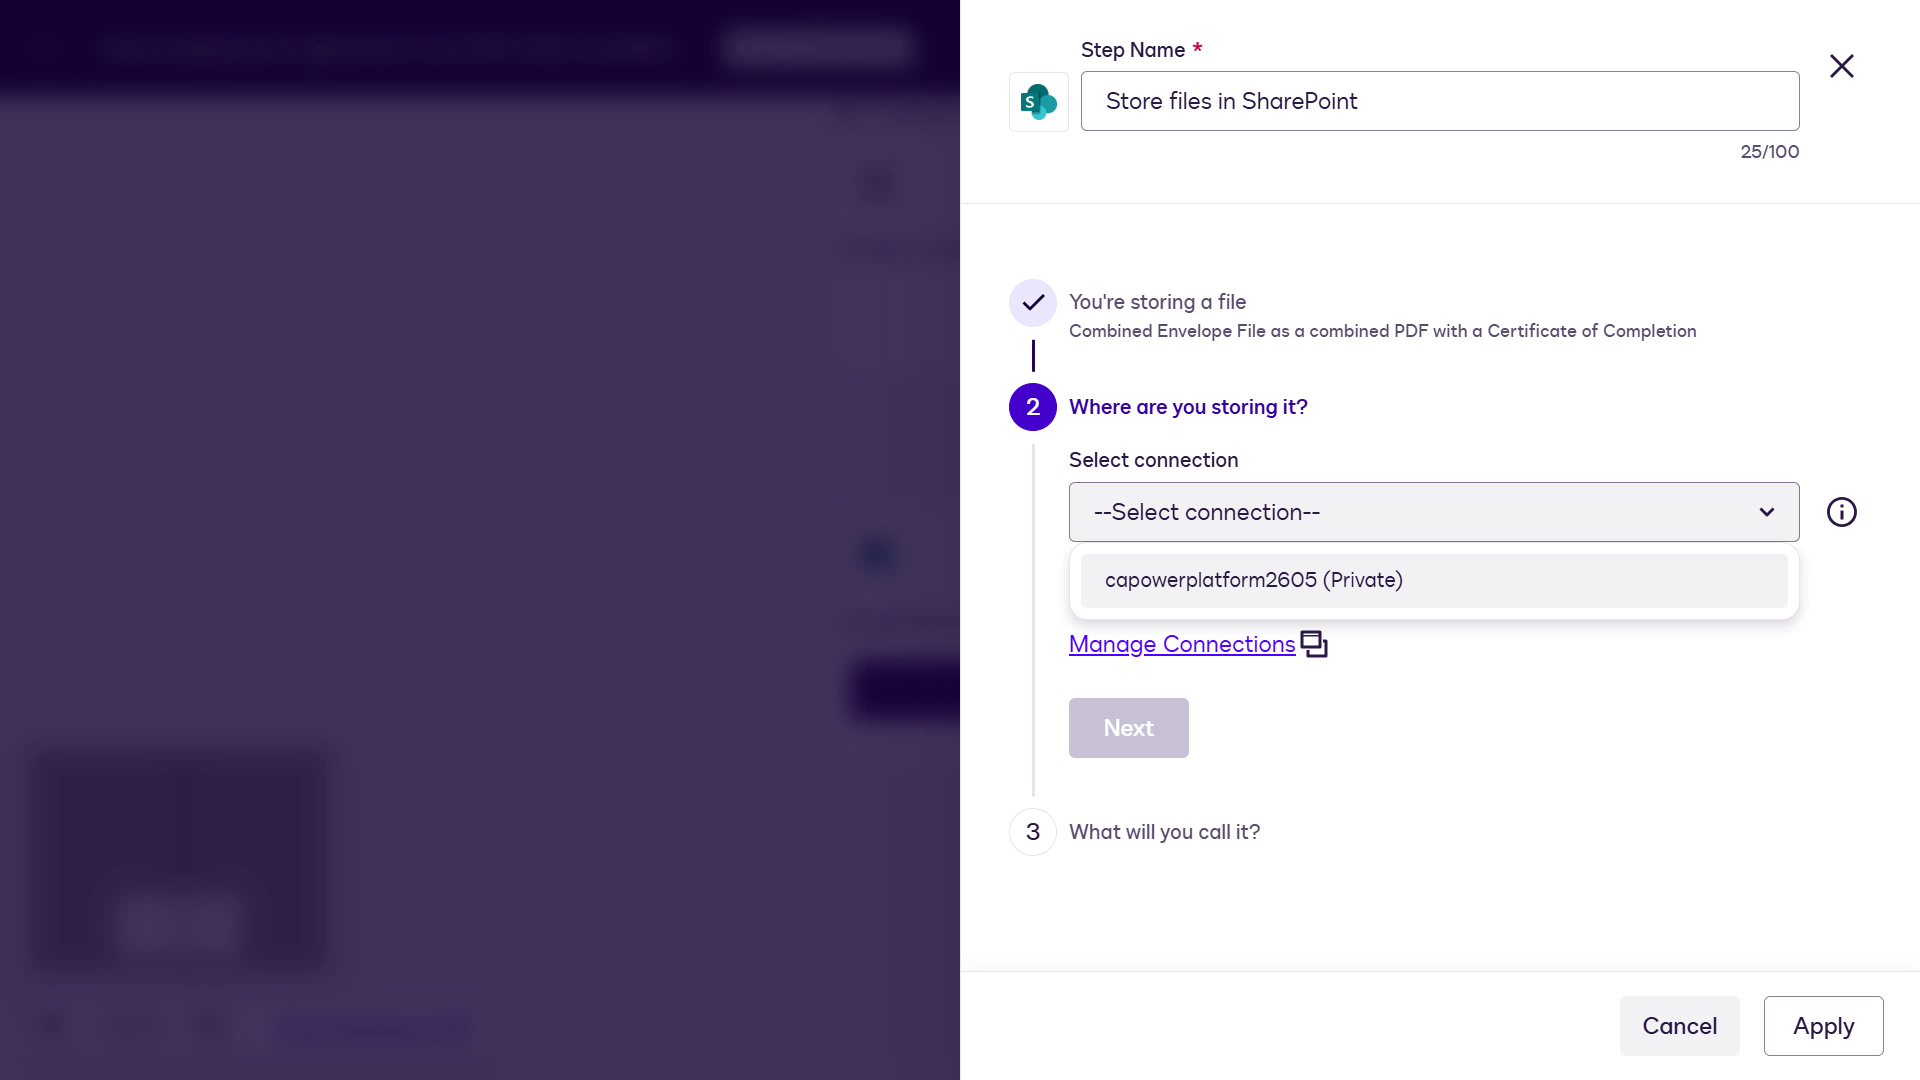
Next, select the Connection created earlier for your SharePoint site.
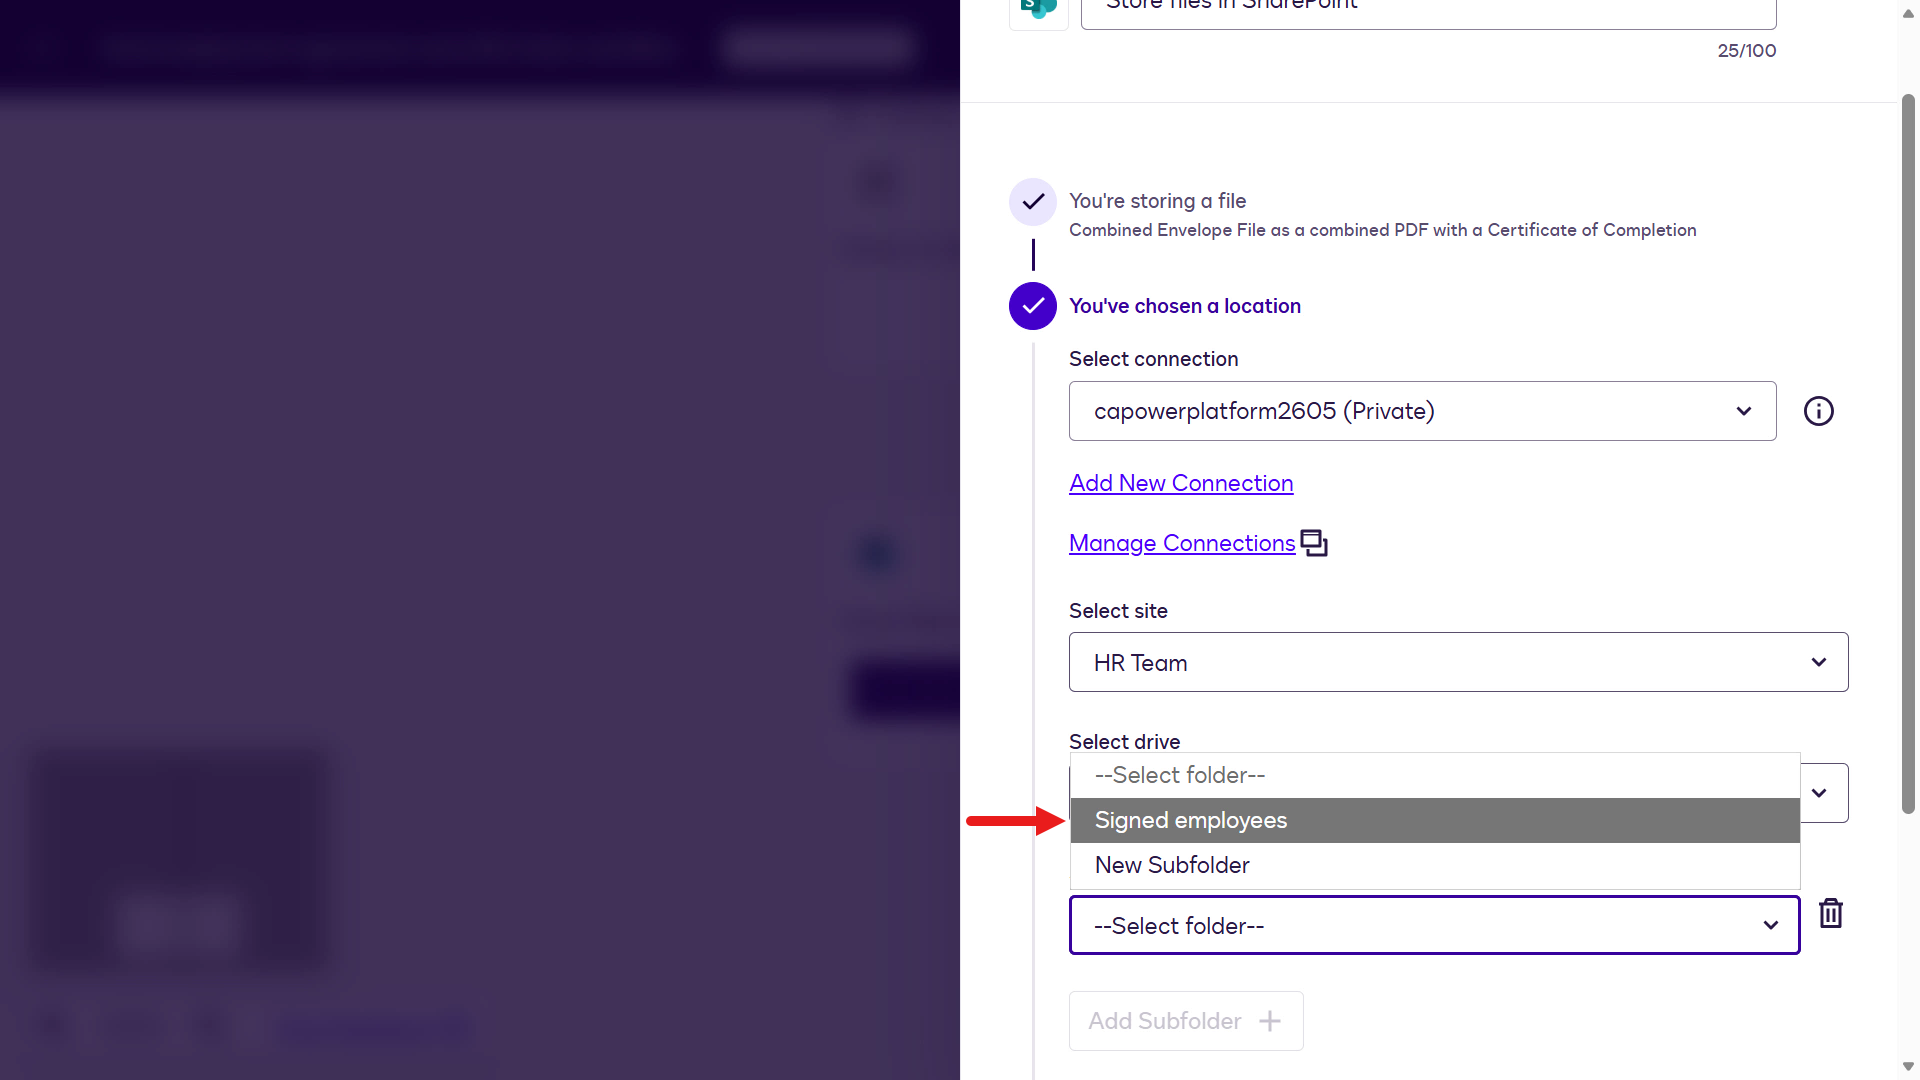
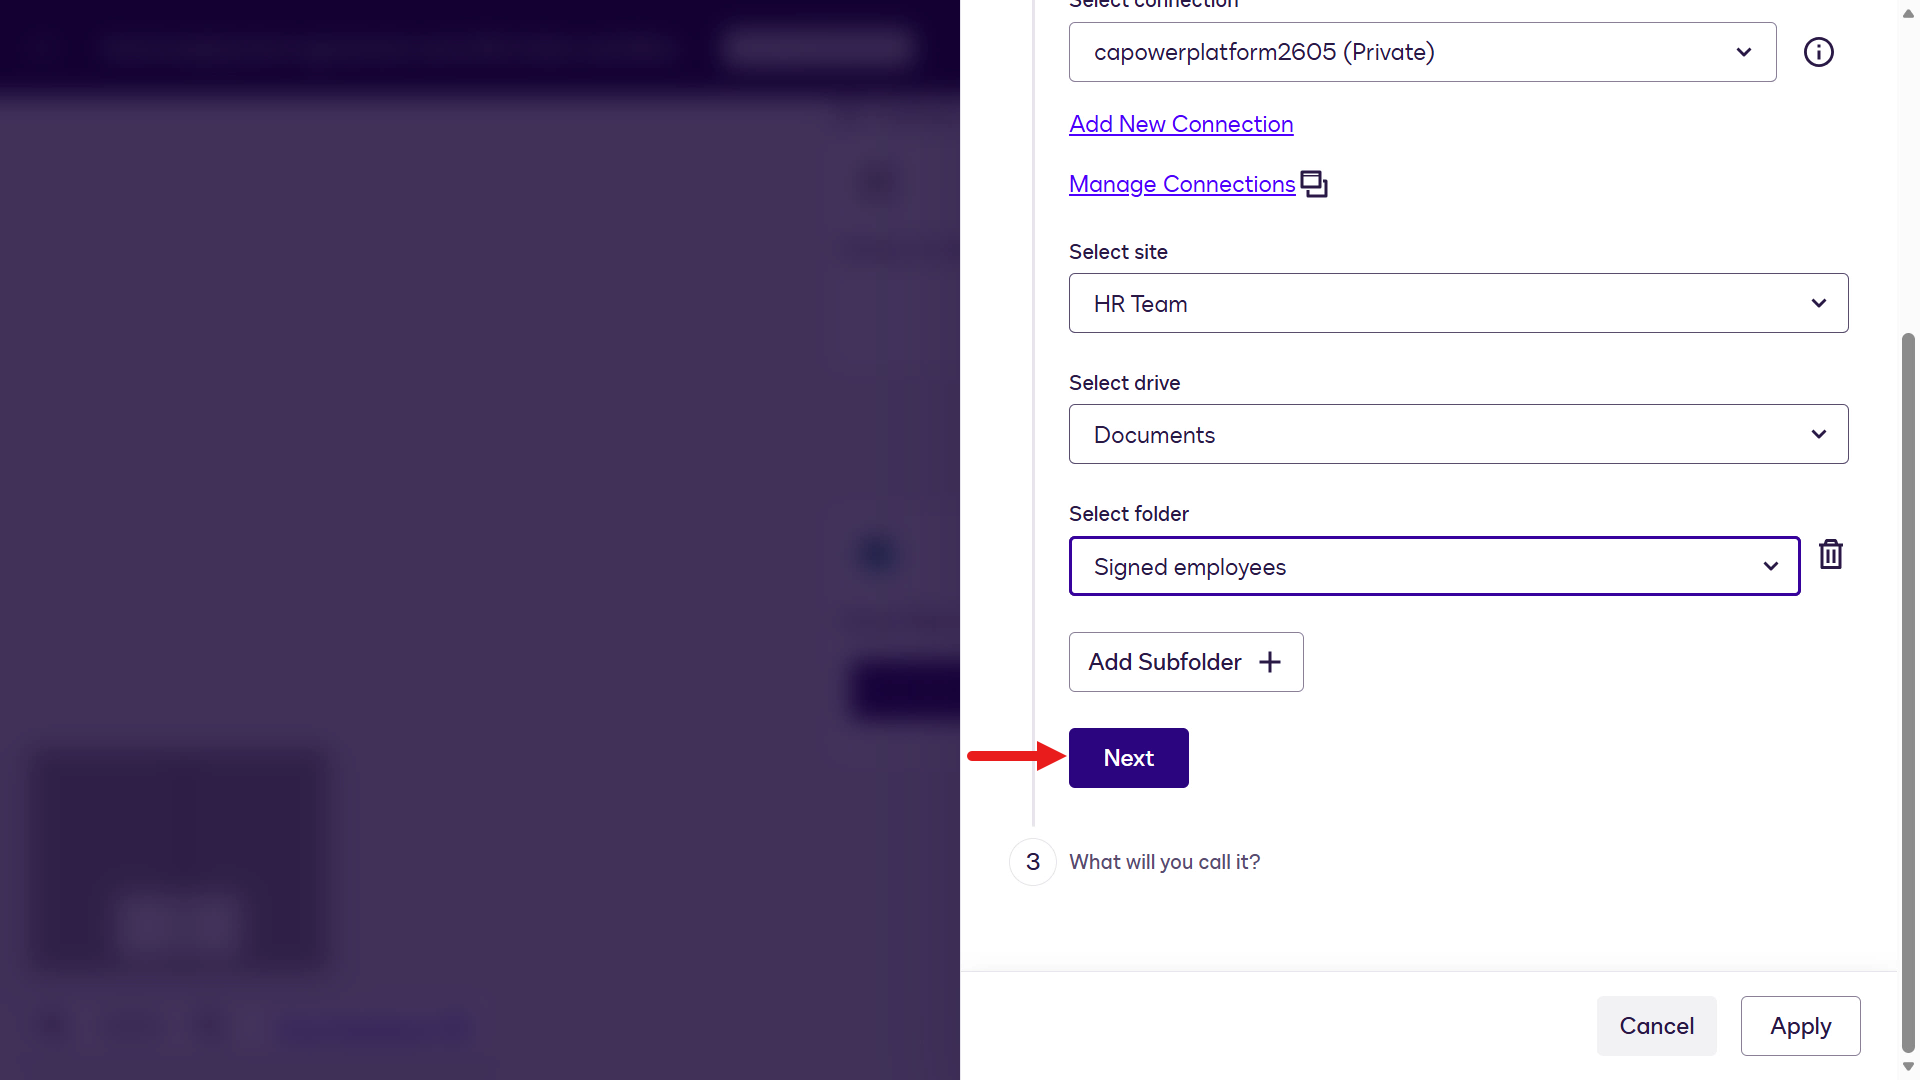
Next select your SharePoint site from the Select site dropdown. If you have more than one site, it will be listed so select the one that you want to upload the signed document agreements to.
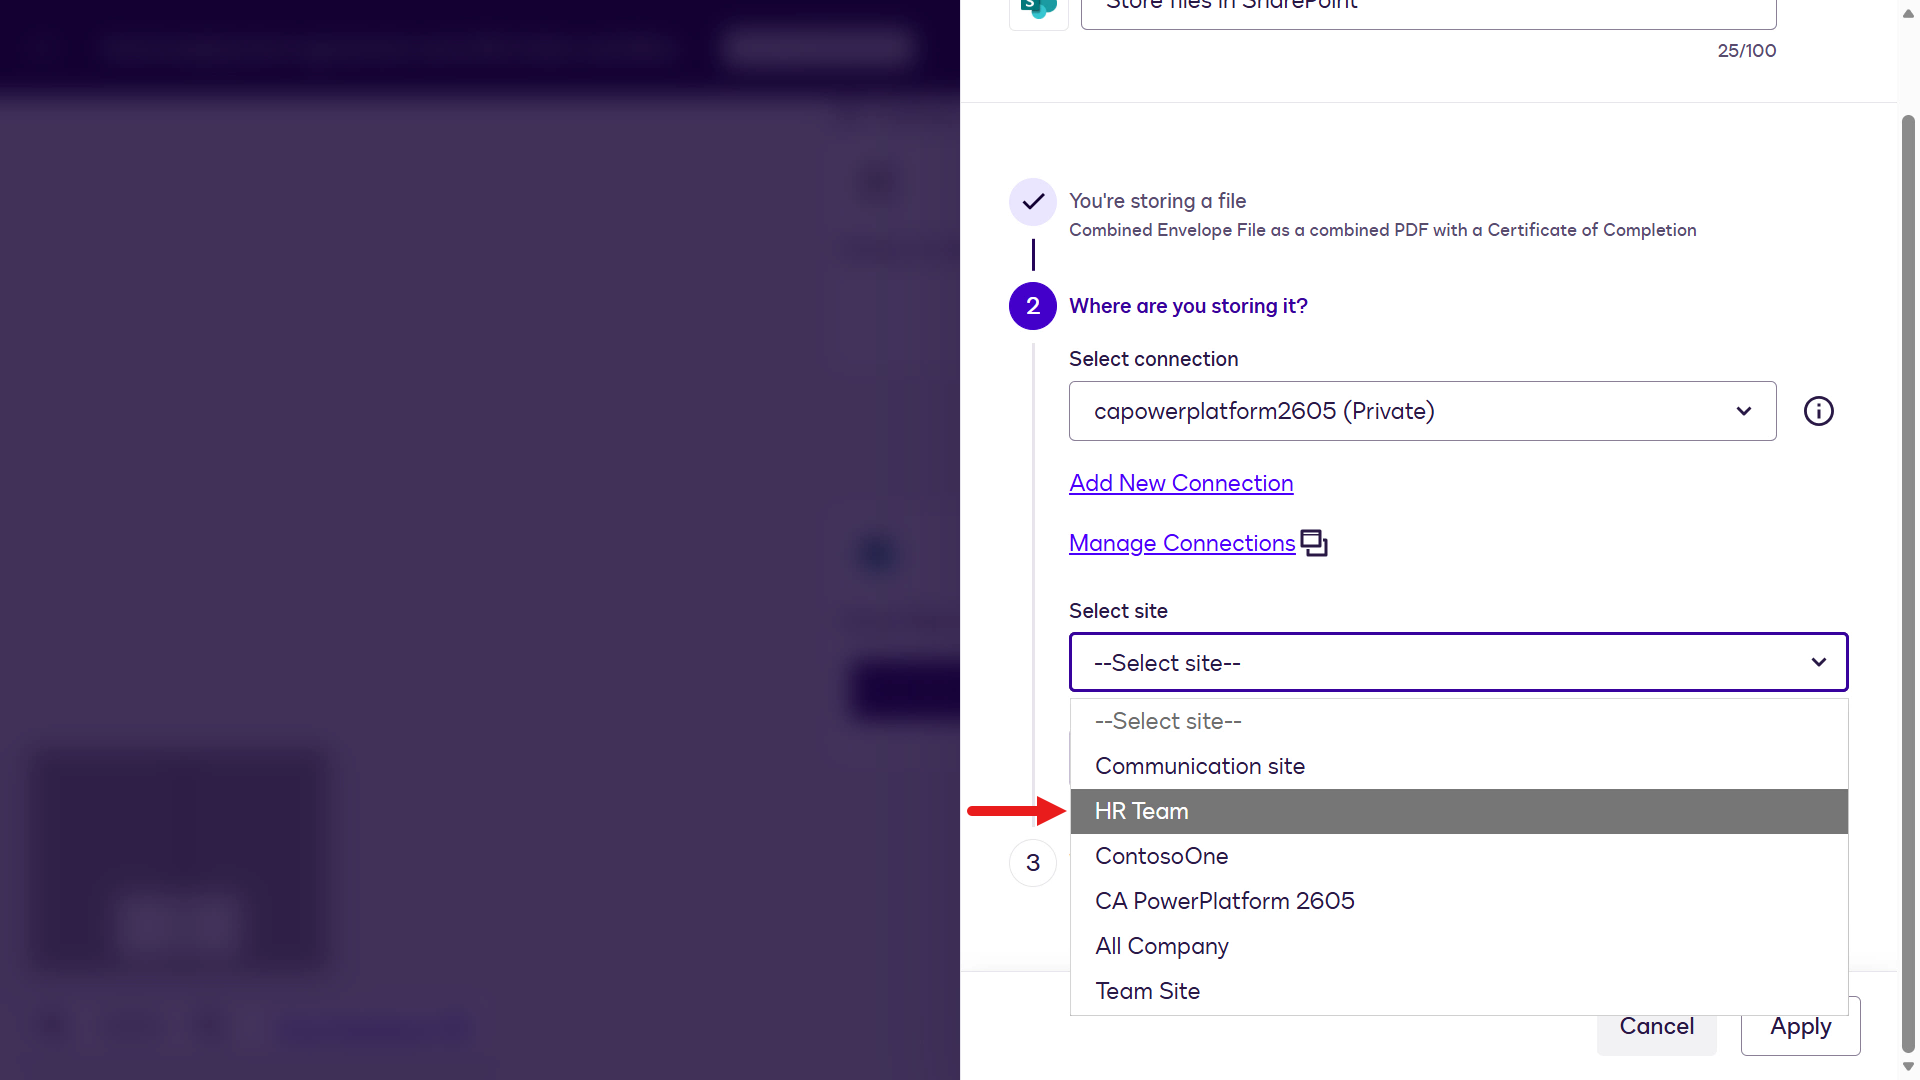
For the drive, select Document.

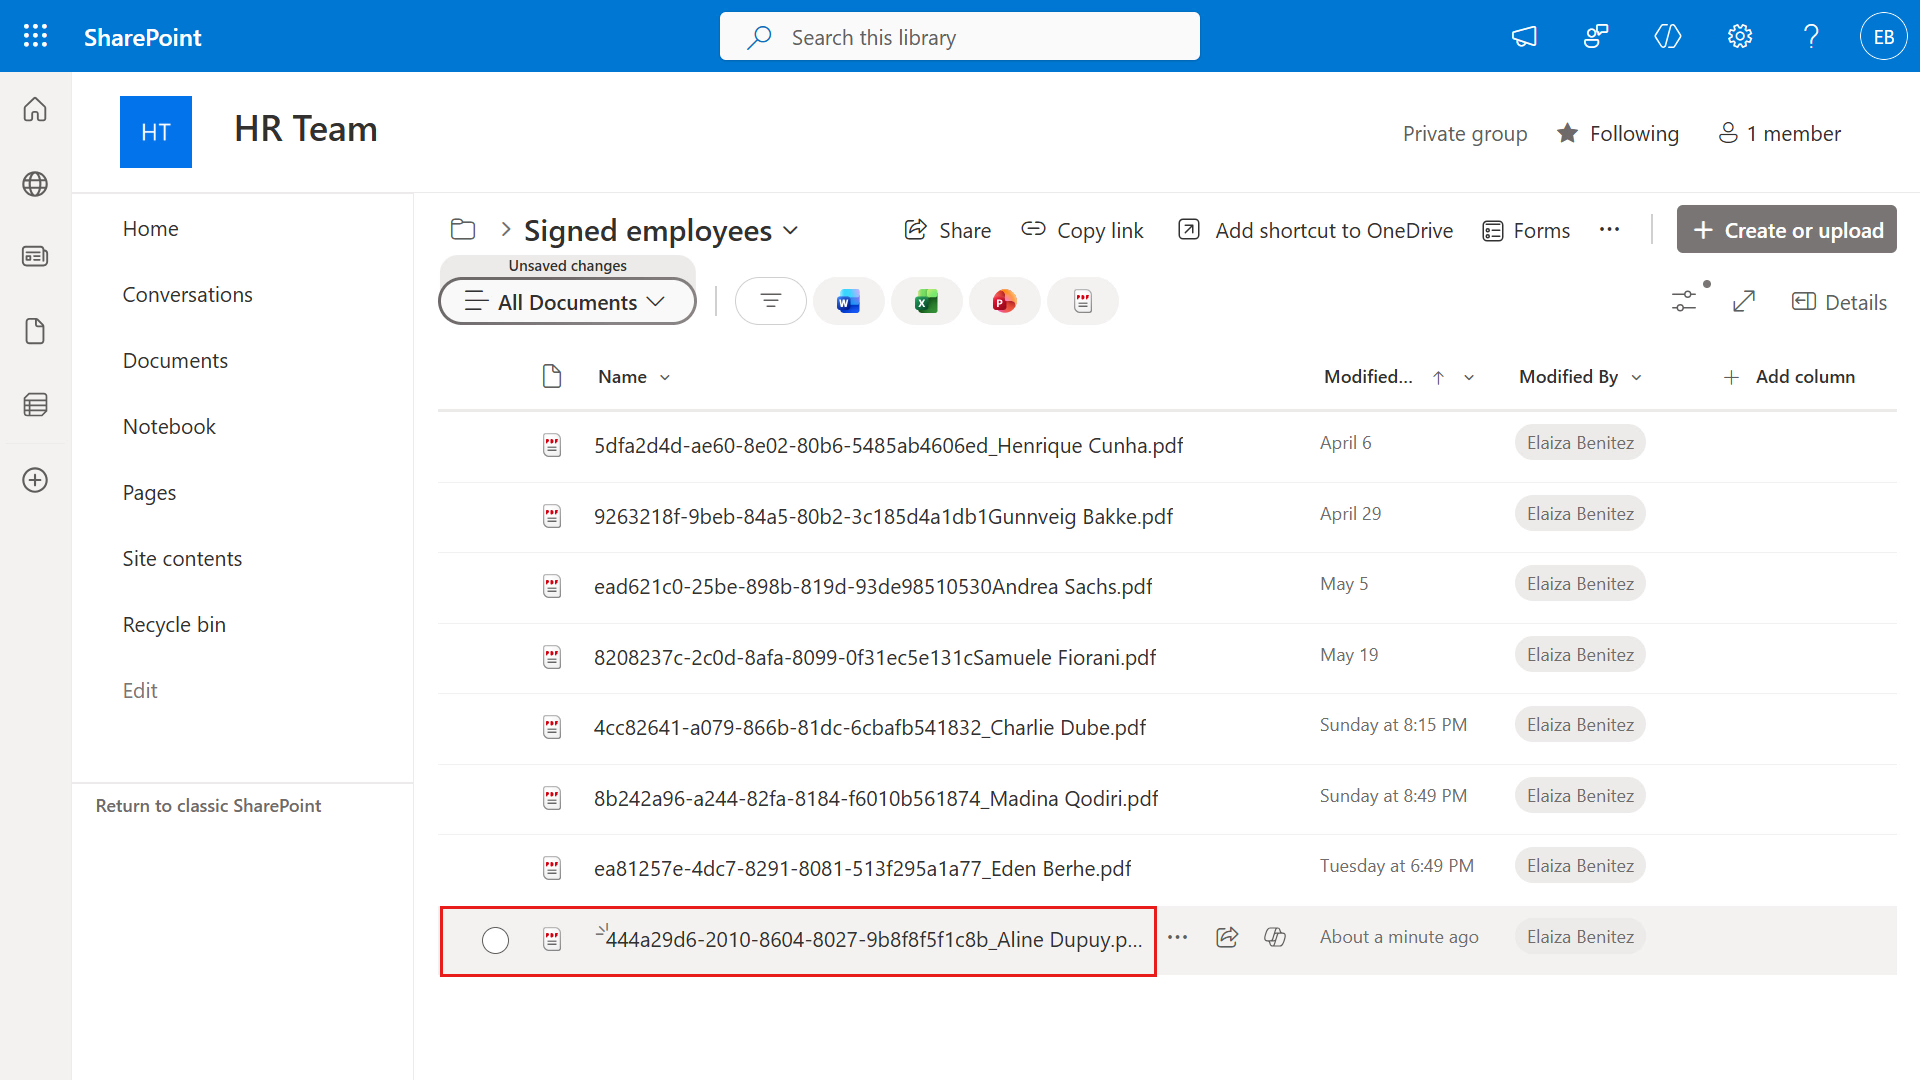
For the folder, select the folder of your choice in your SharePoint site. For example in the screenshot, there's an existing folder - Signed employees under Documents in the HR Team site.
Select Next.
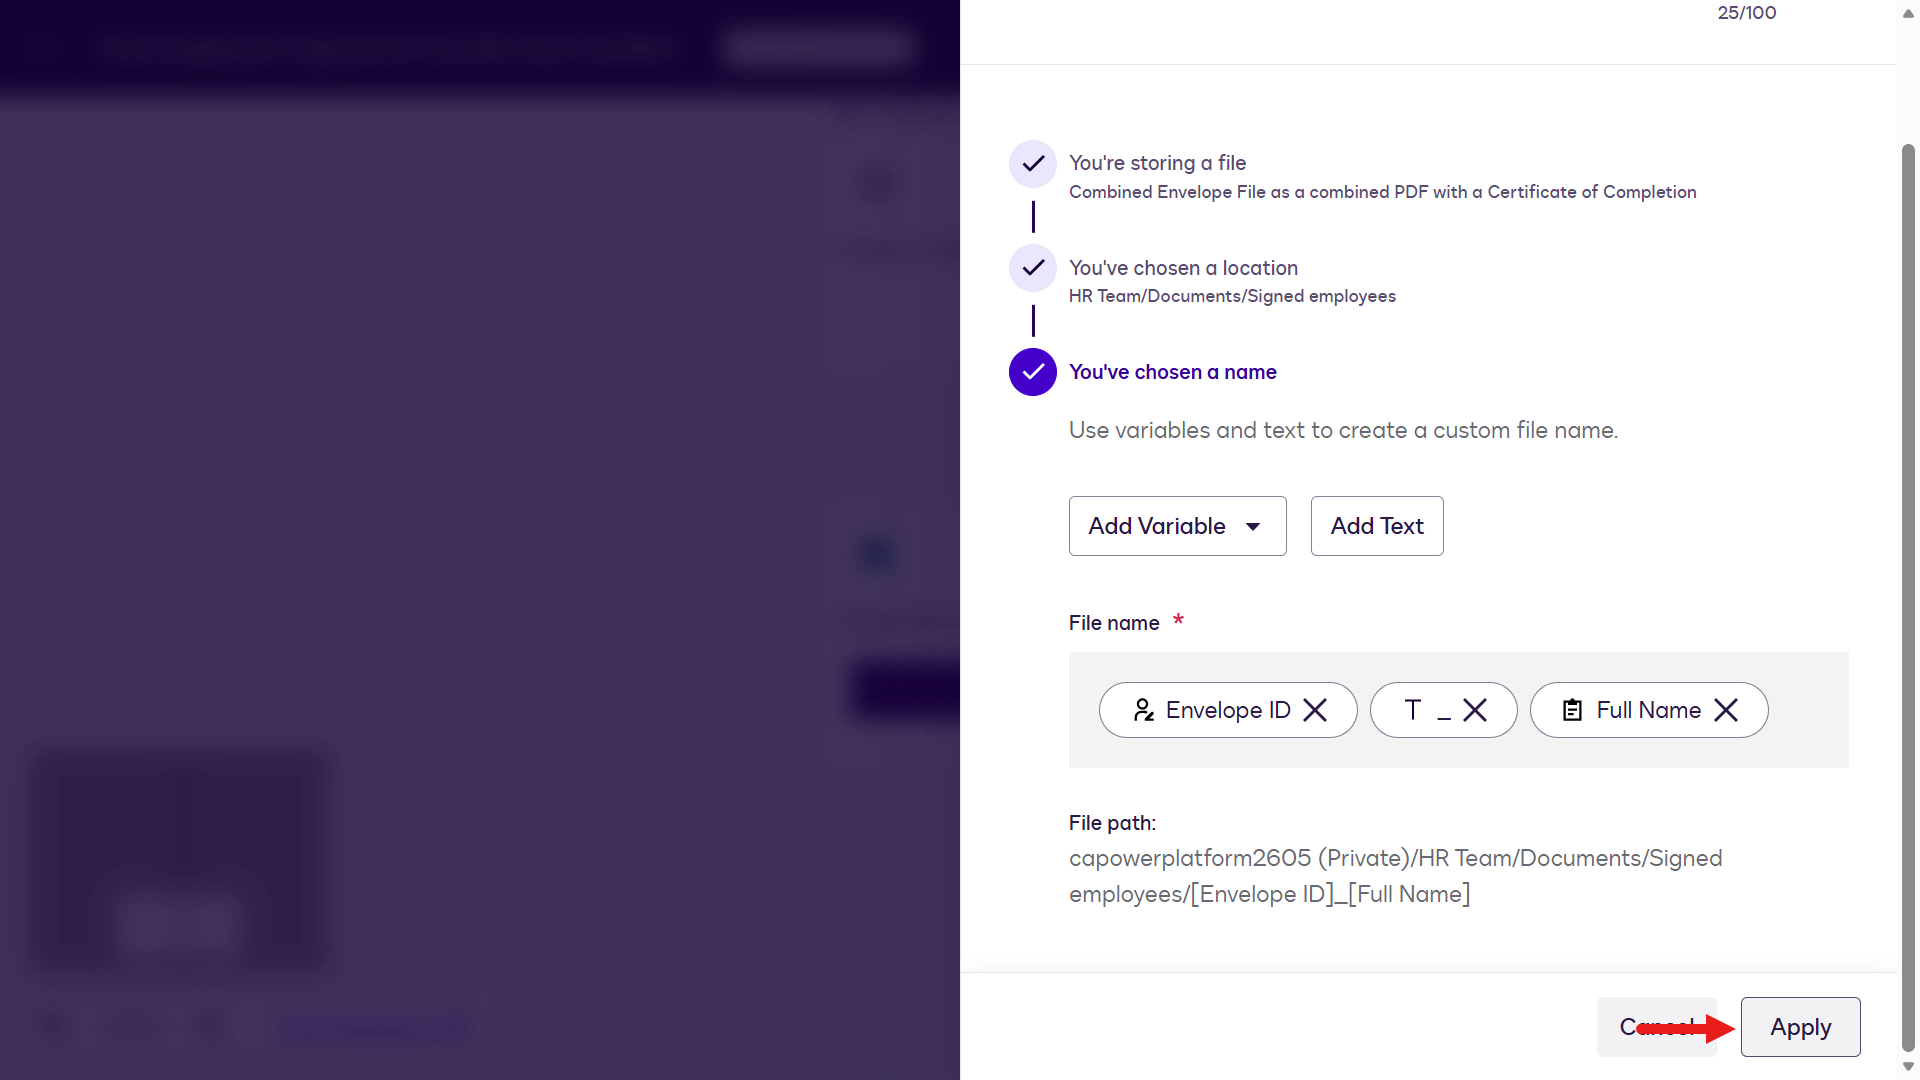
In the final configuration step, define the uploaded file naming convention using workflow variables. Keep it simple by referencing Envelope ID and Employee Full Name. Enter
envand select Envelope ID.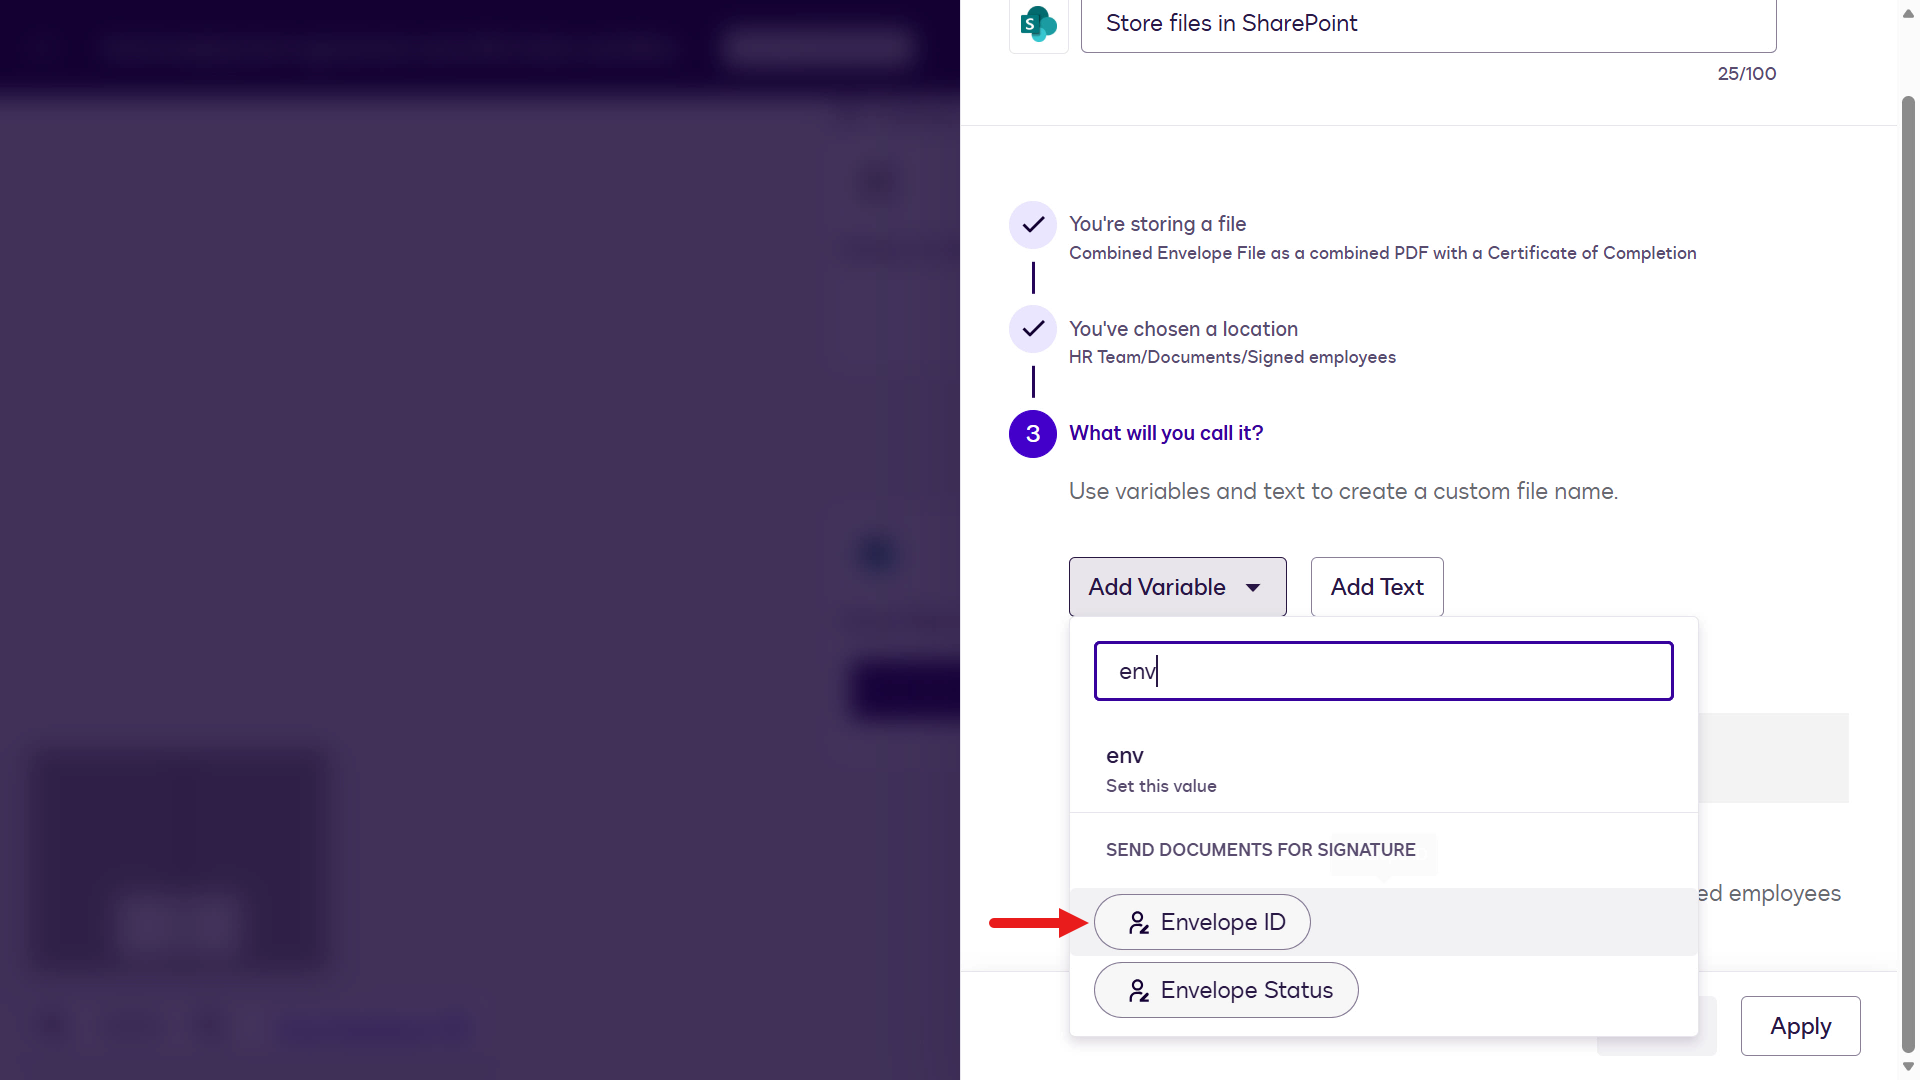
Next, add an underscore character. Select Add Text.
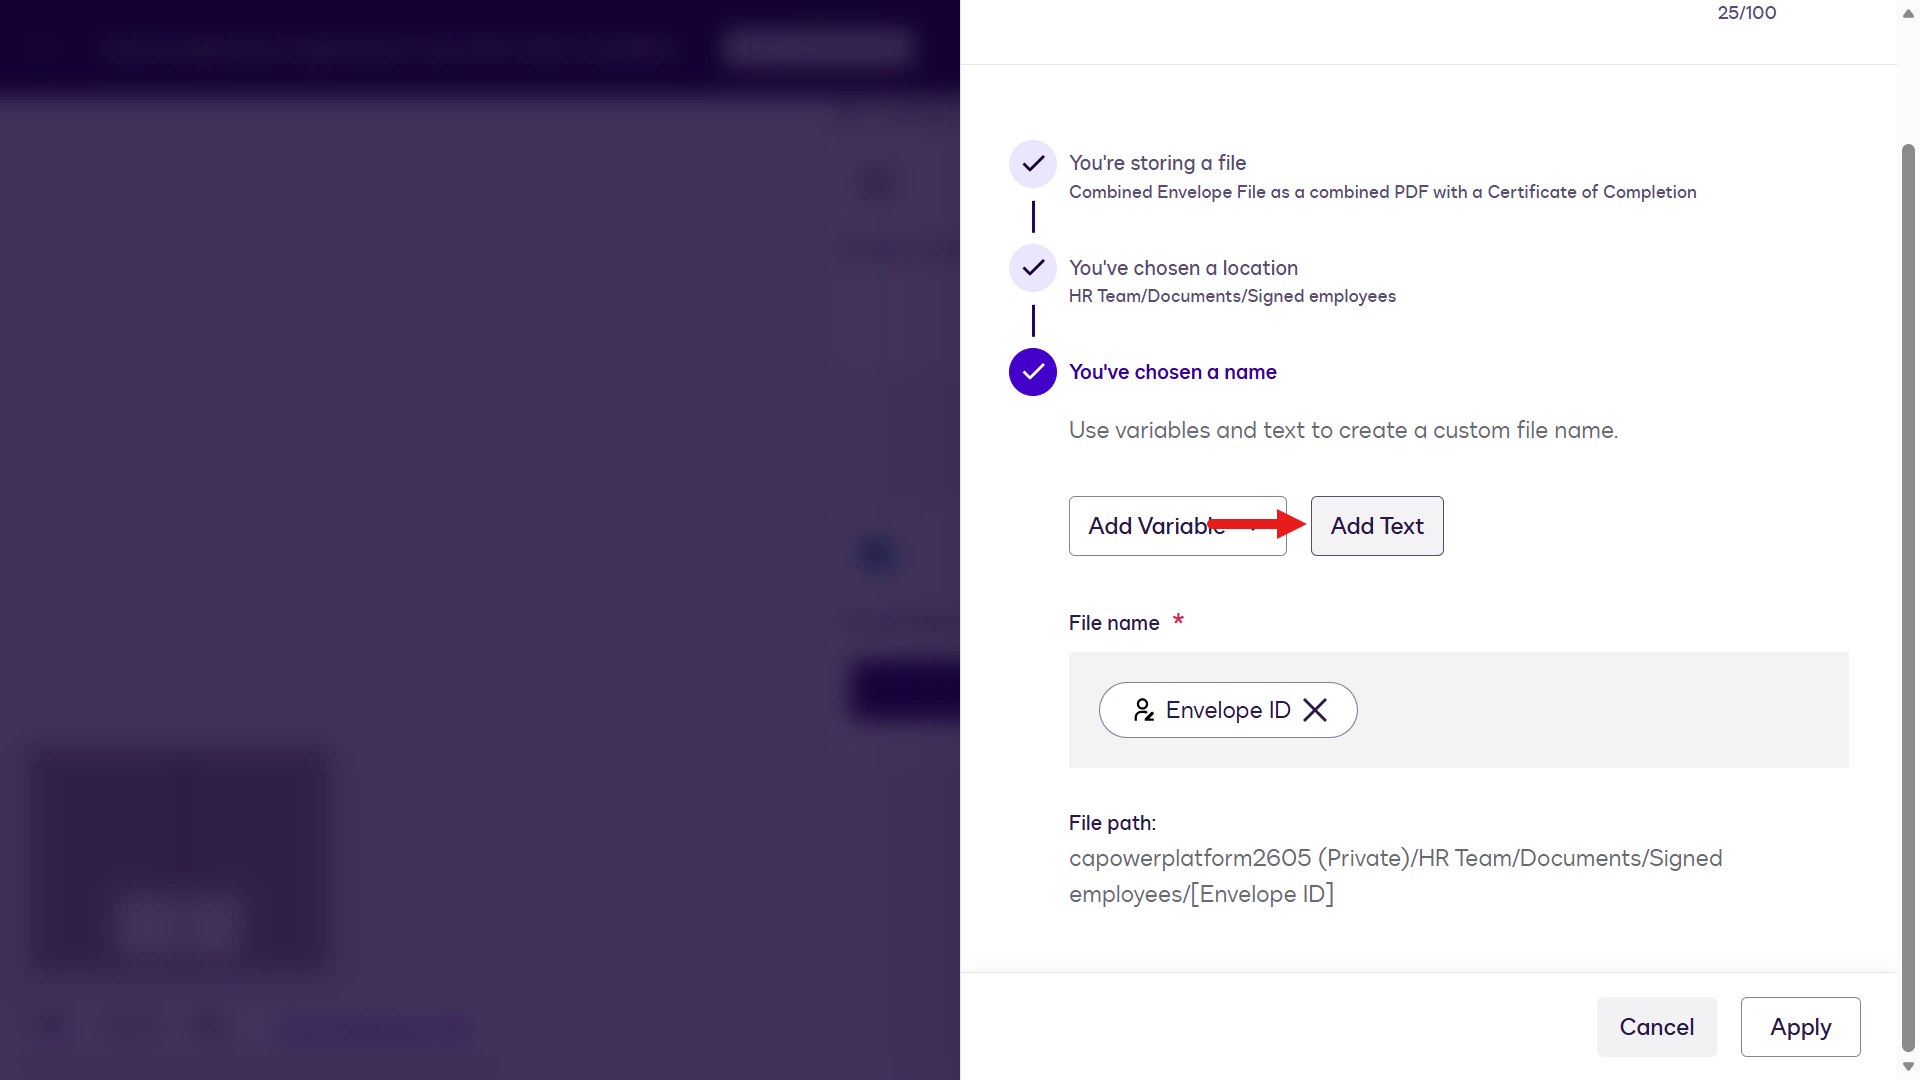
Enter
_and select Add.
Select Add Variable and enter
full name. Select the Full Name variable under Collect data with web forms.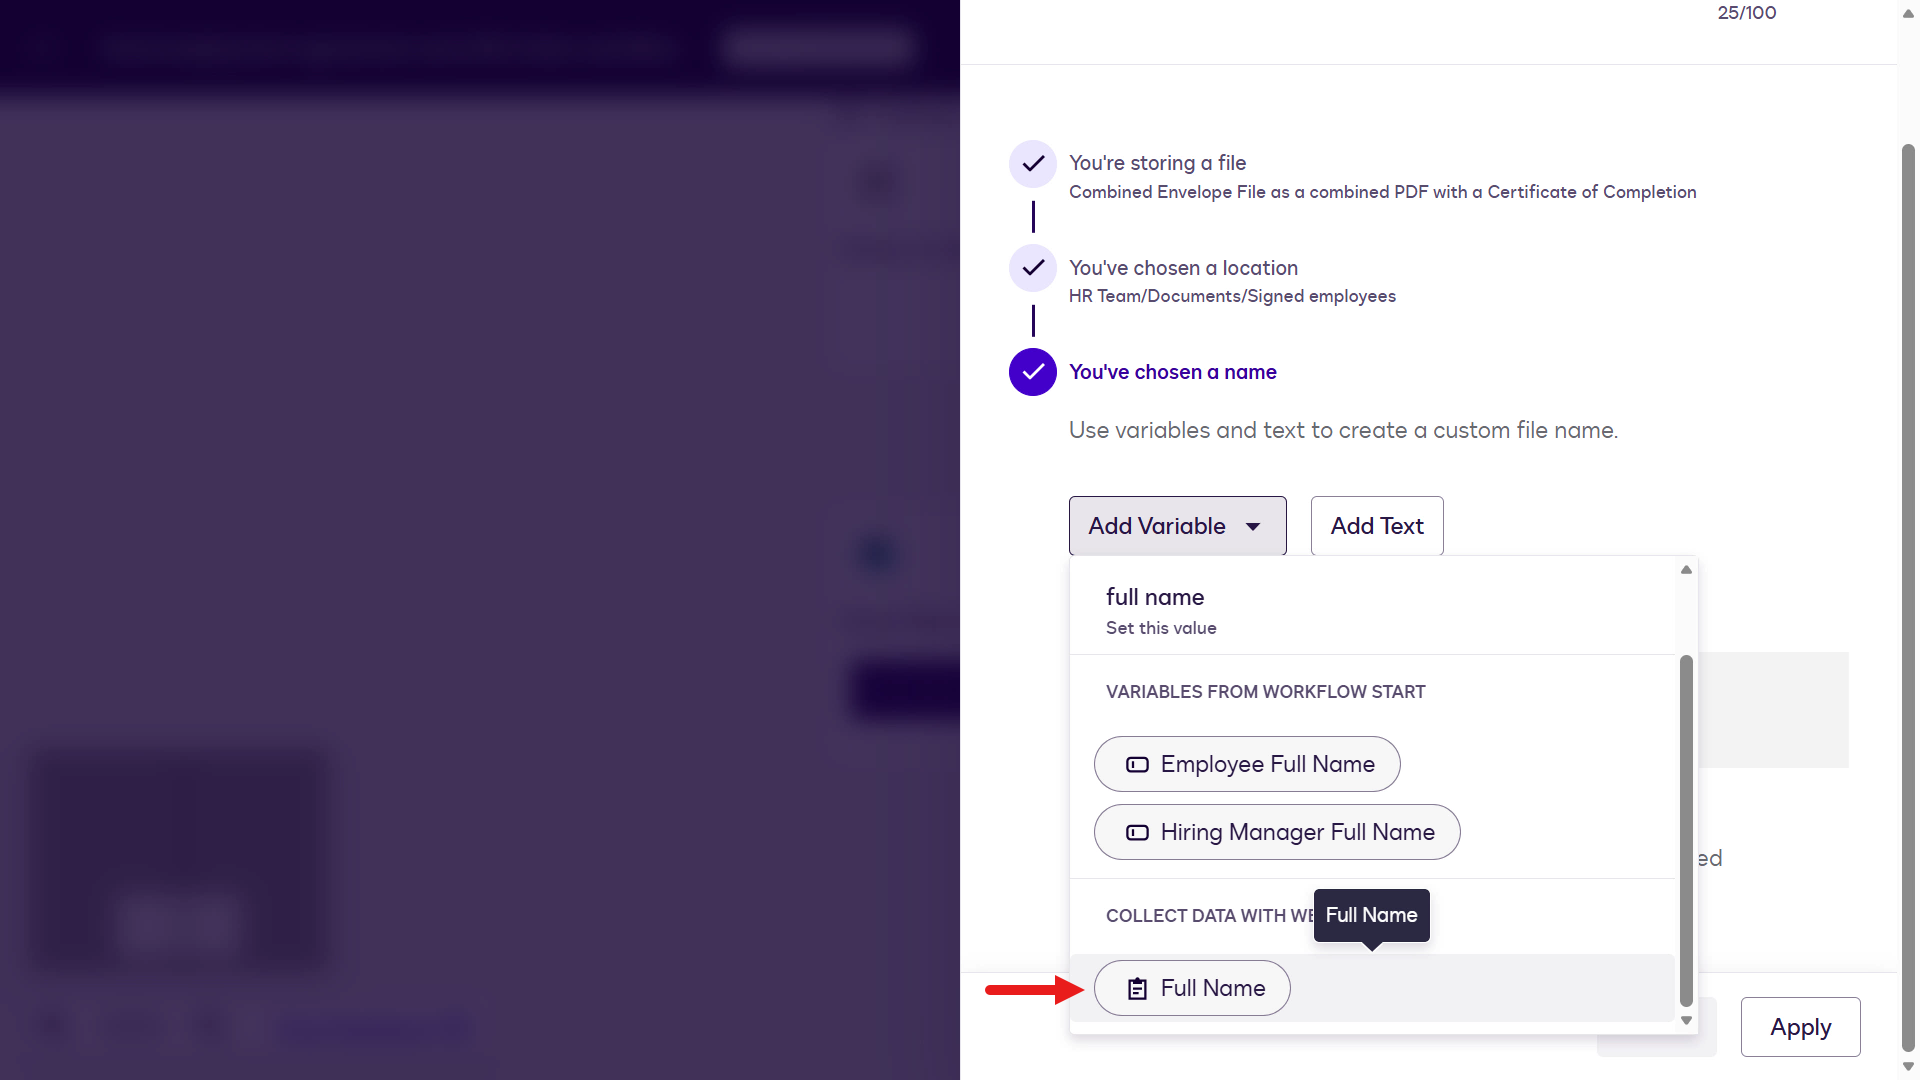
You've completed naming the file 👏🏻 Select Apply.
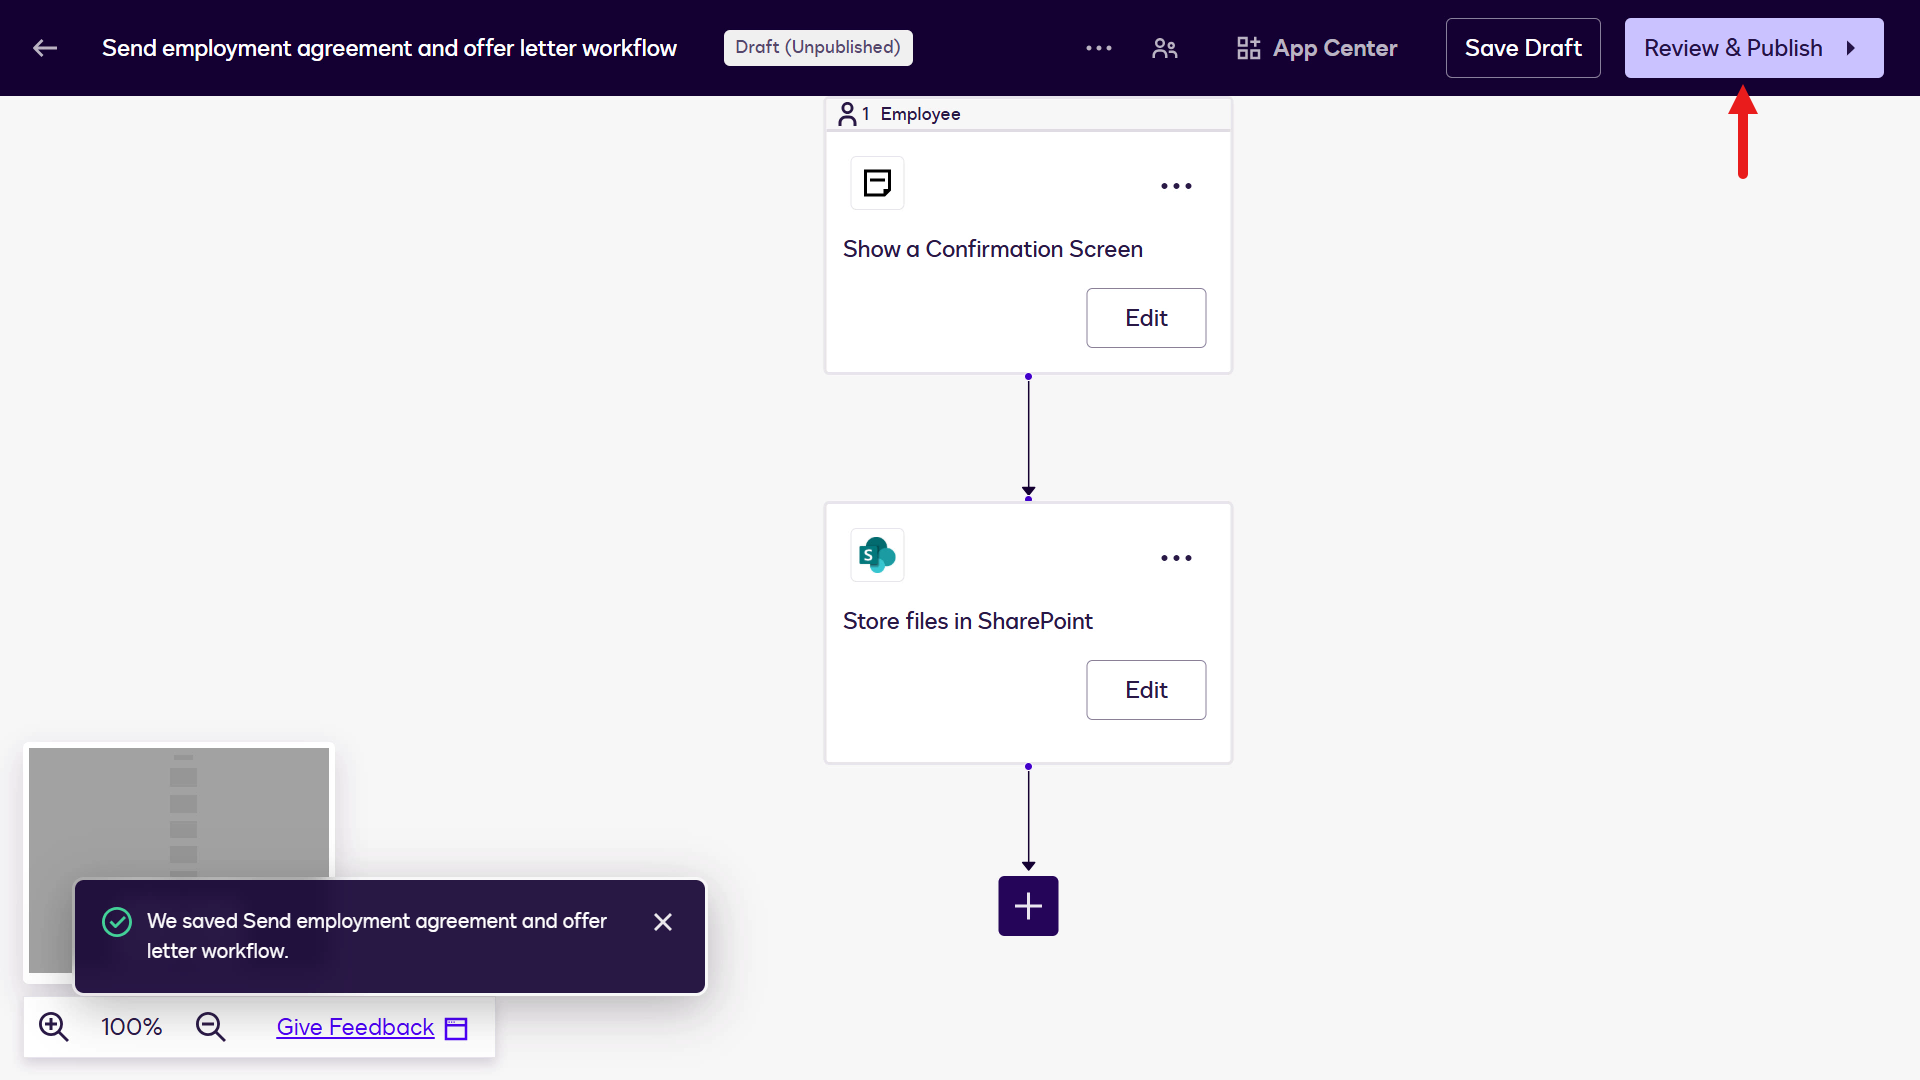
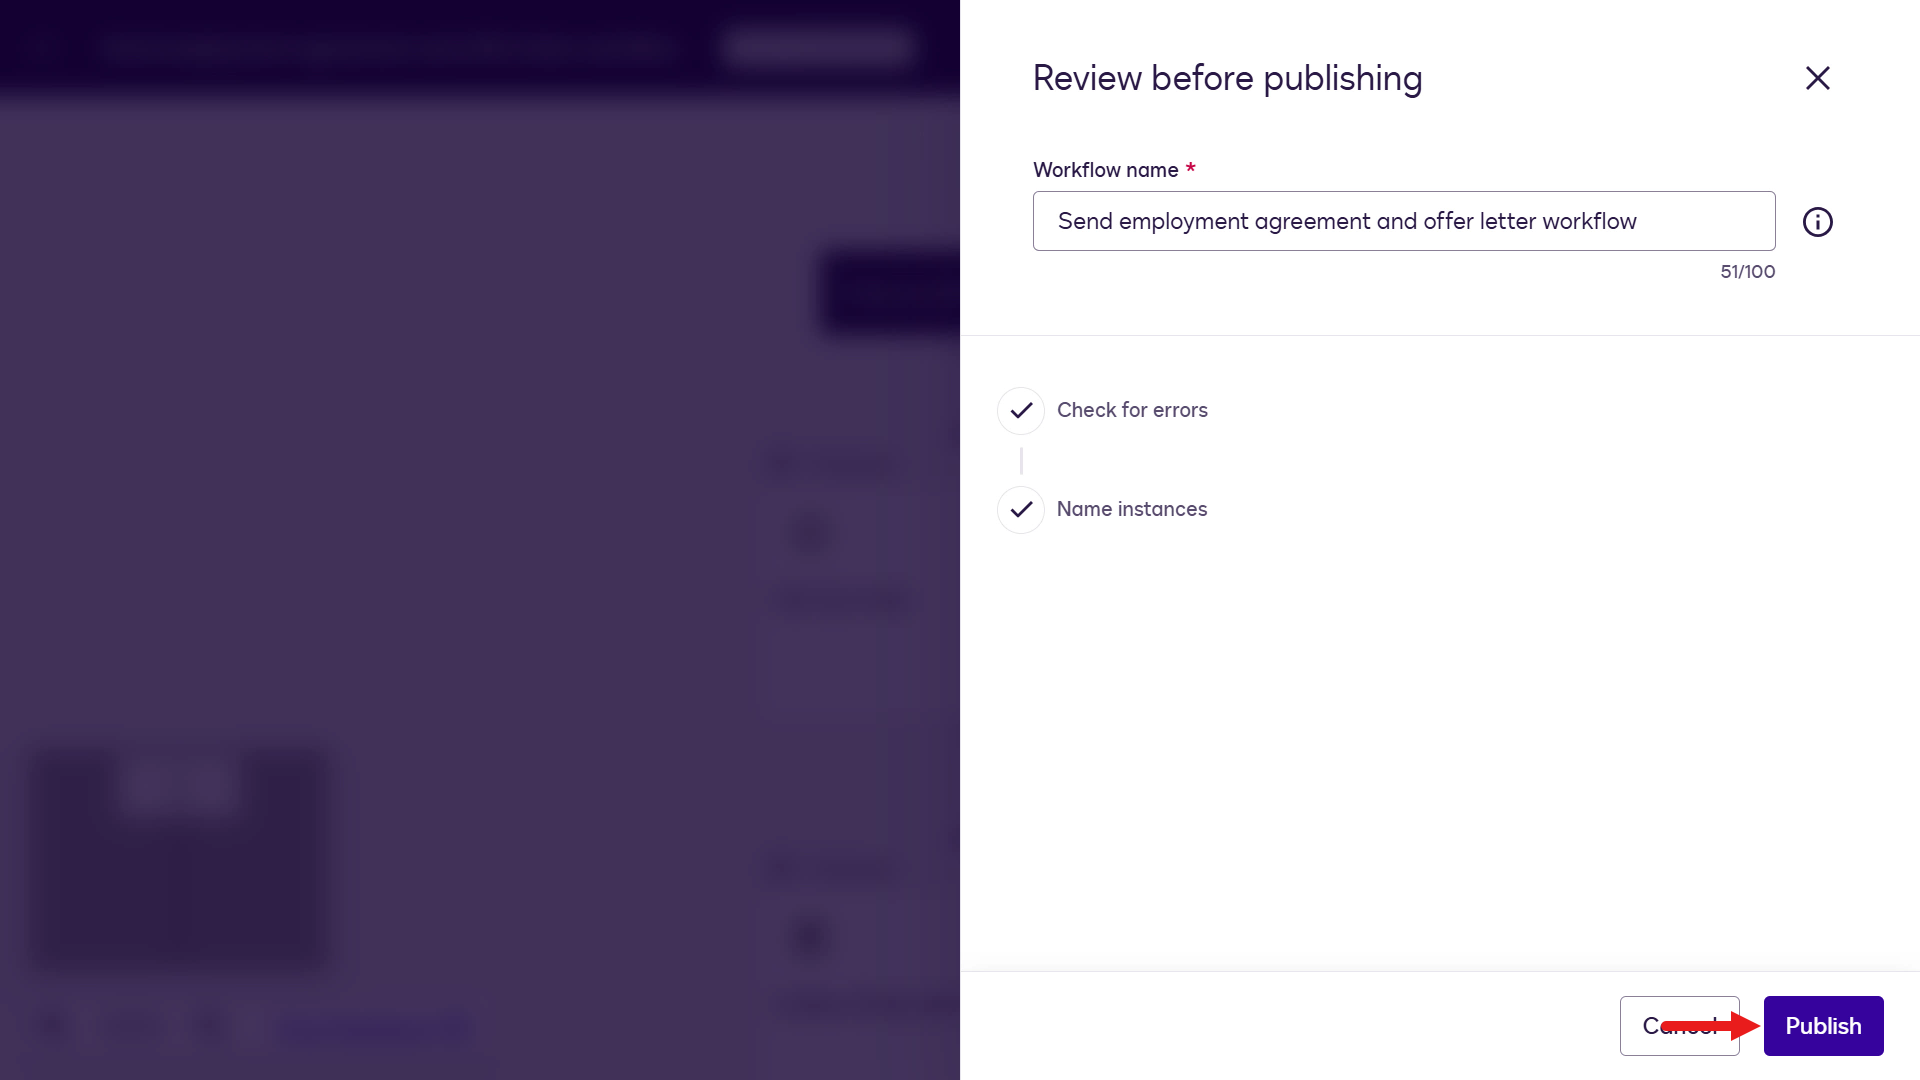
Now it's time to publish the workflow. Select Save Draft on the upper right of the designer.
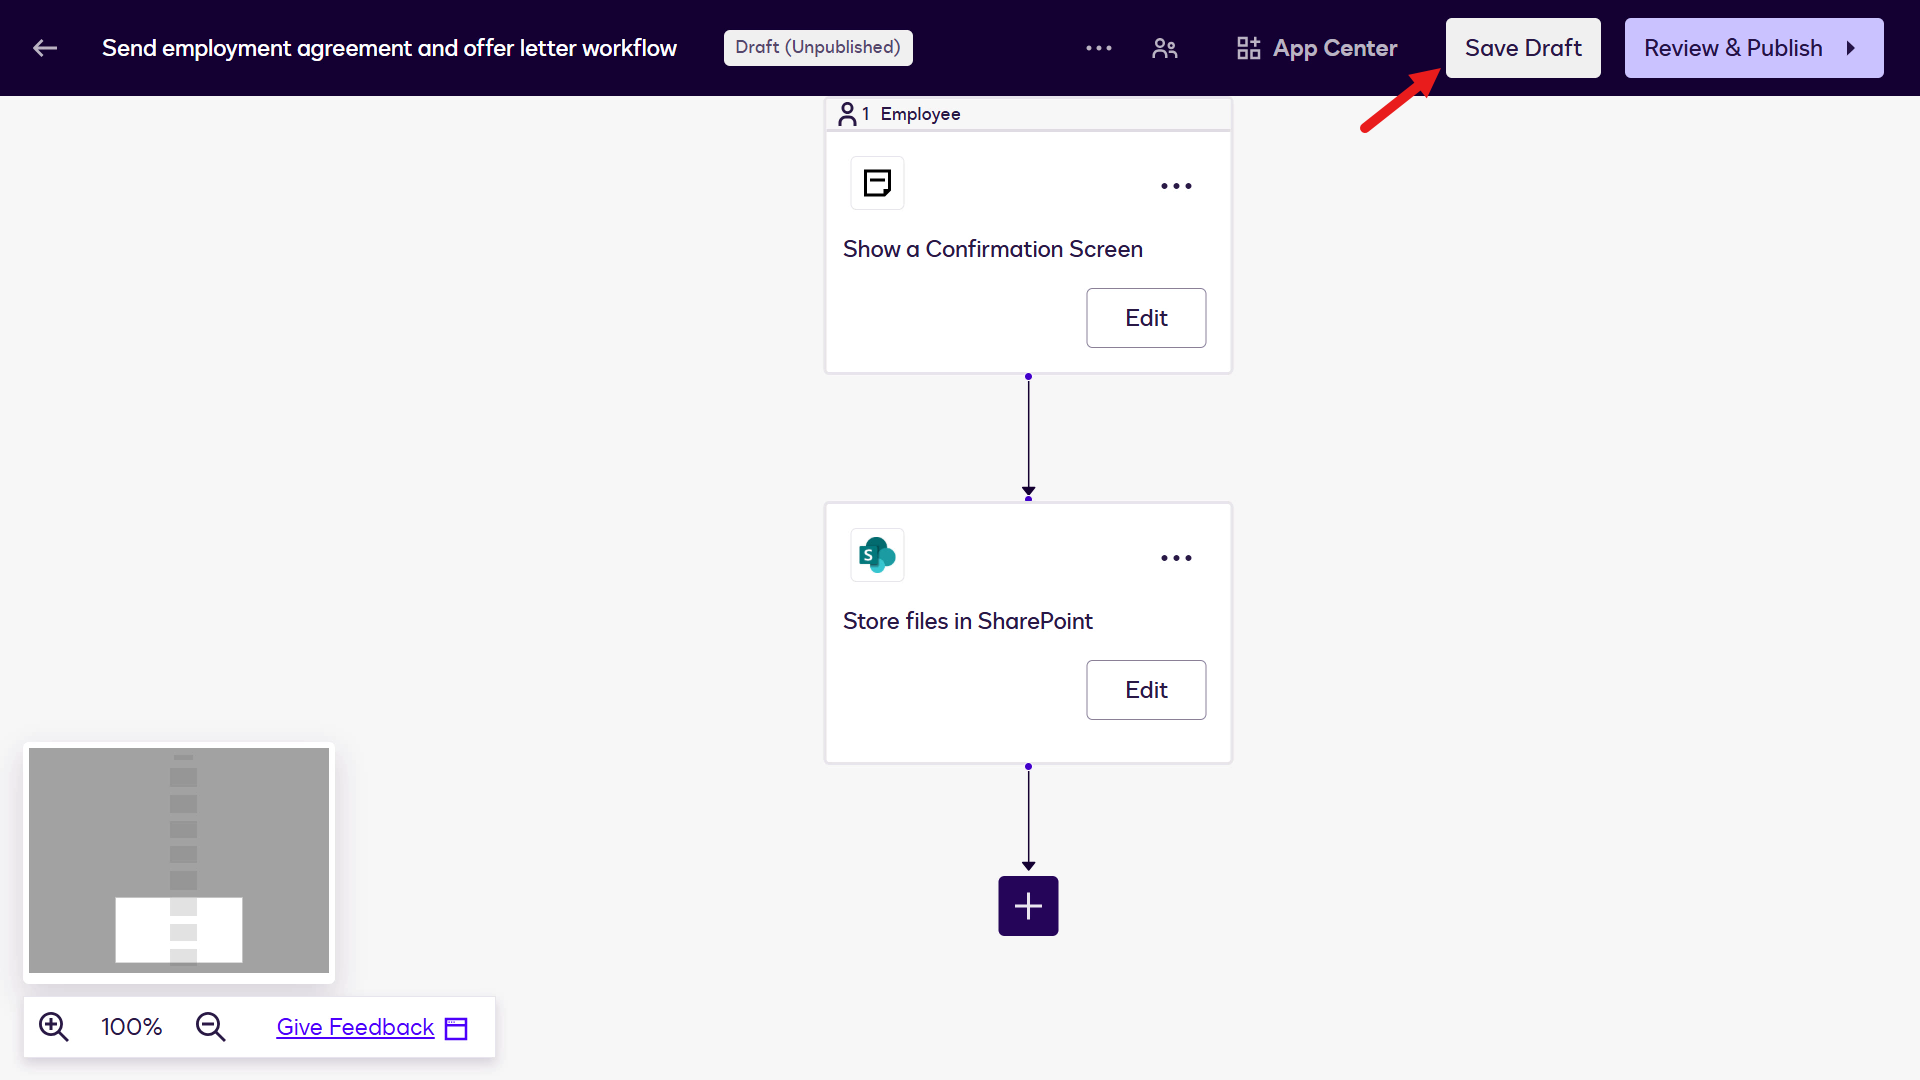
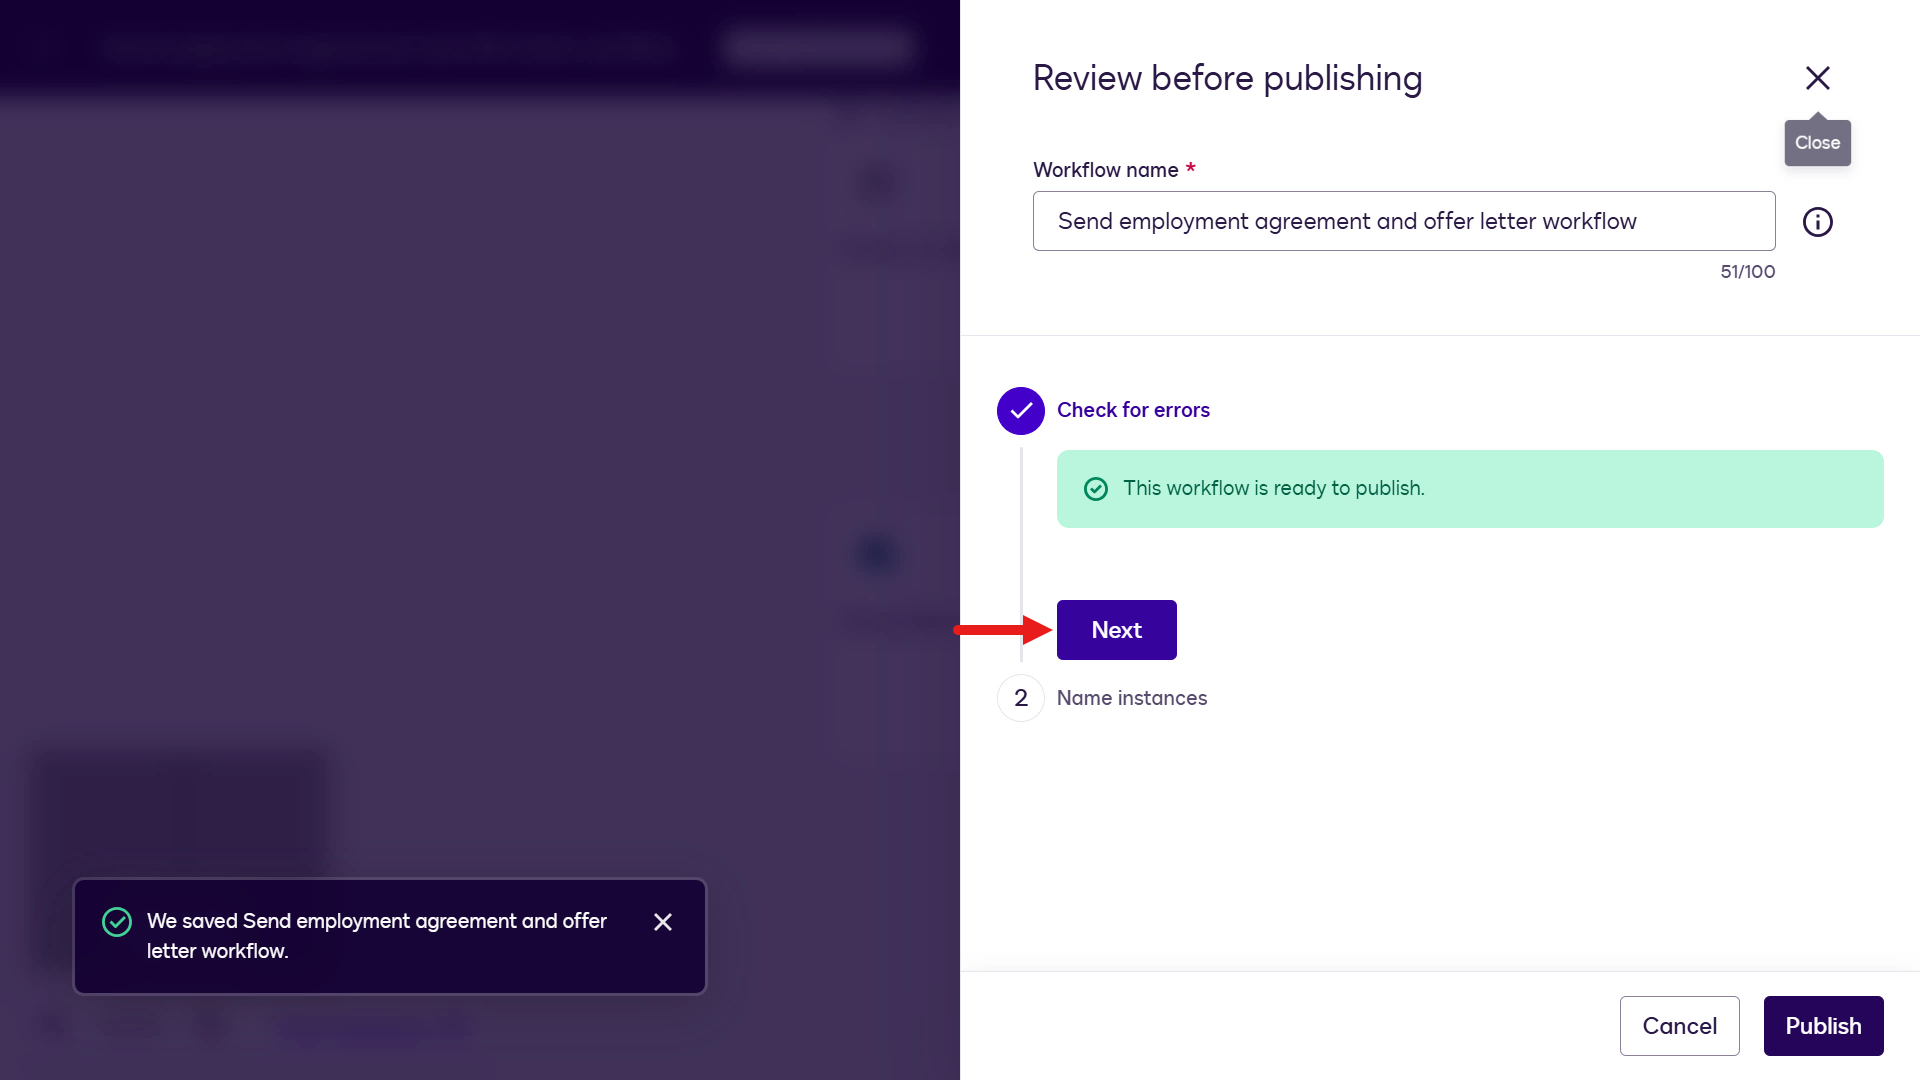
You'll see confirmation that the workflow has been saved. Select Review & Publish.
There will be confirmation on whether your workflow has errors. Select Next.
Next, name the workflow instance (the name for each workflow run). Use the name builder to insert variables as part of the naming convention. Select the + icon.

Select the Instance ID variable.
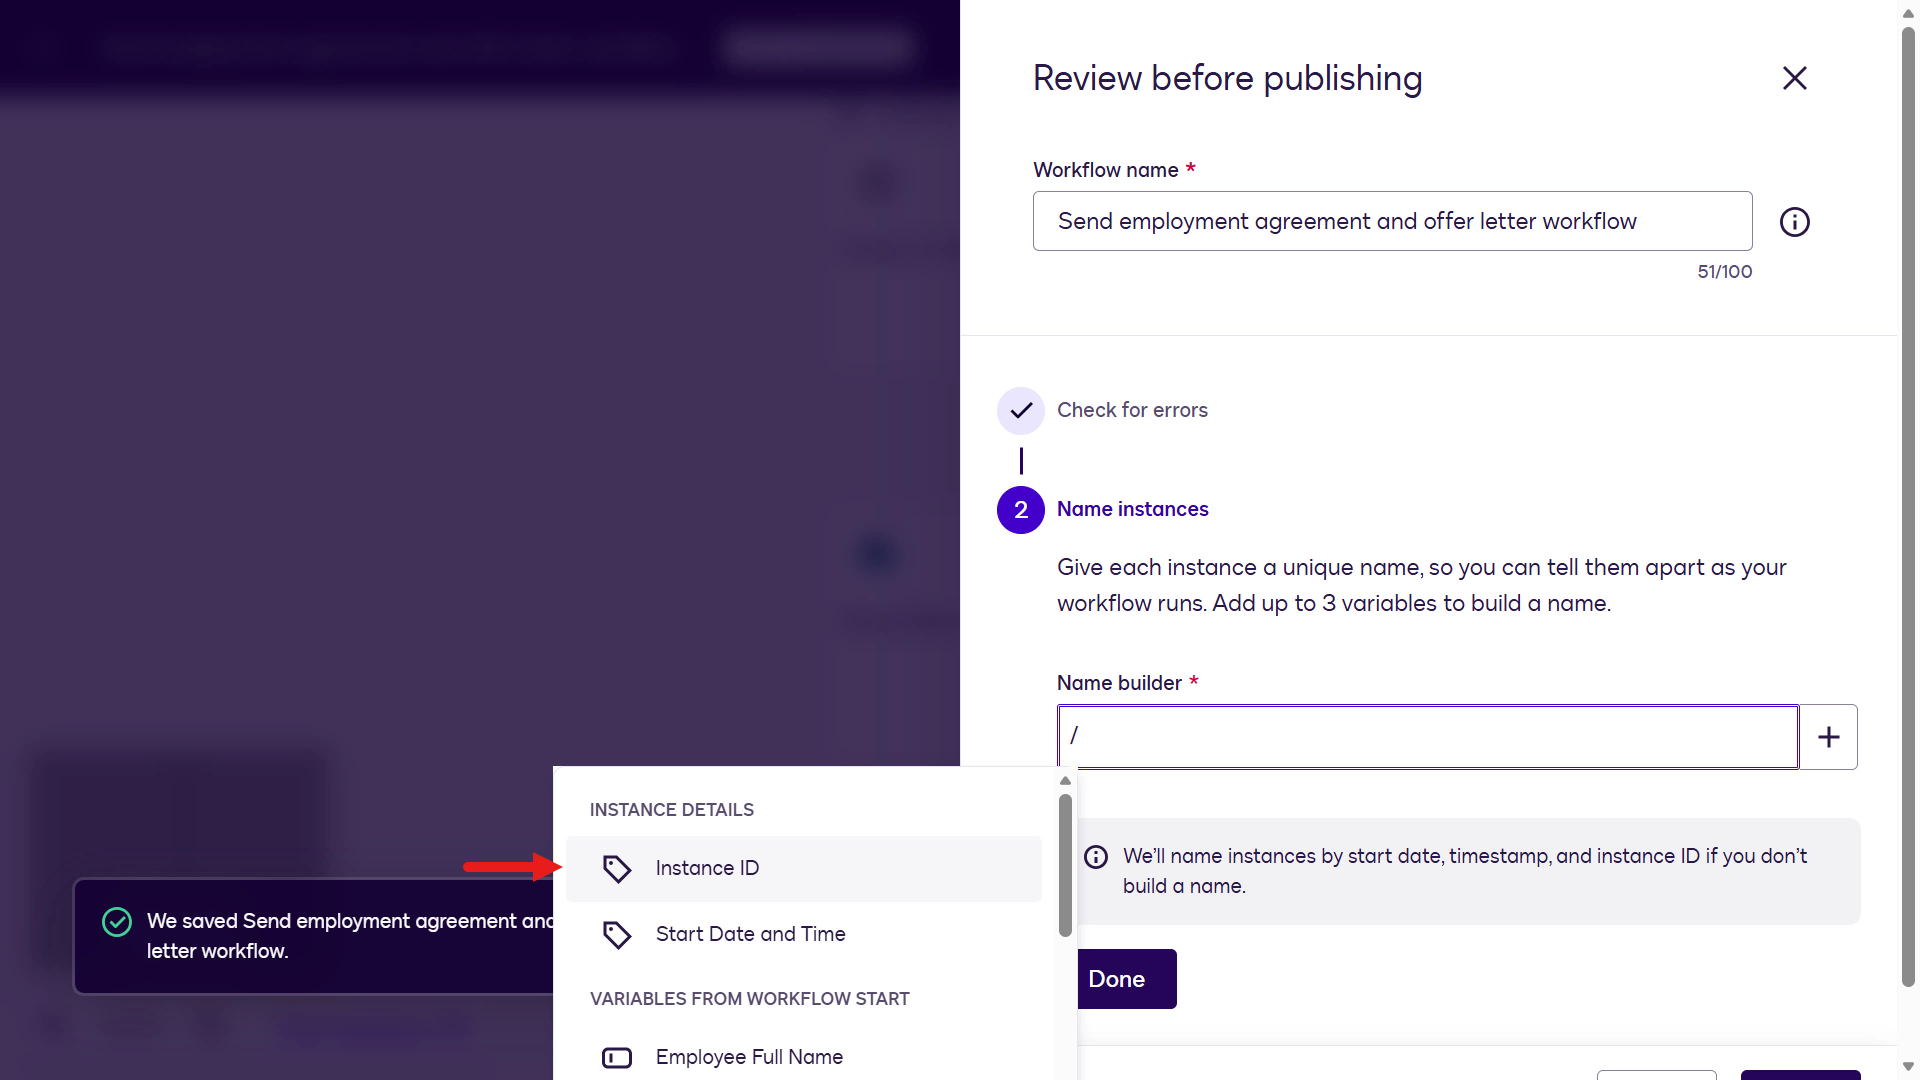
Select the + icon again to insert another variable. Select the Start Date and Time variable.
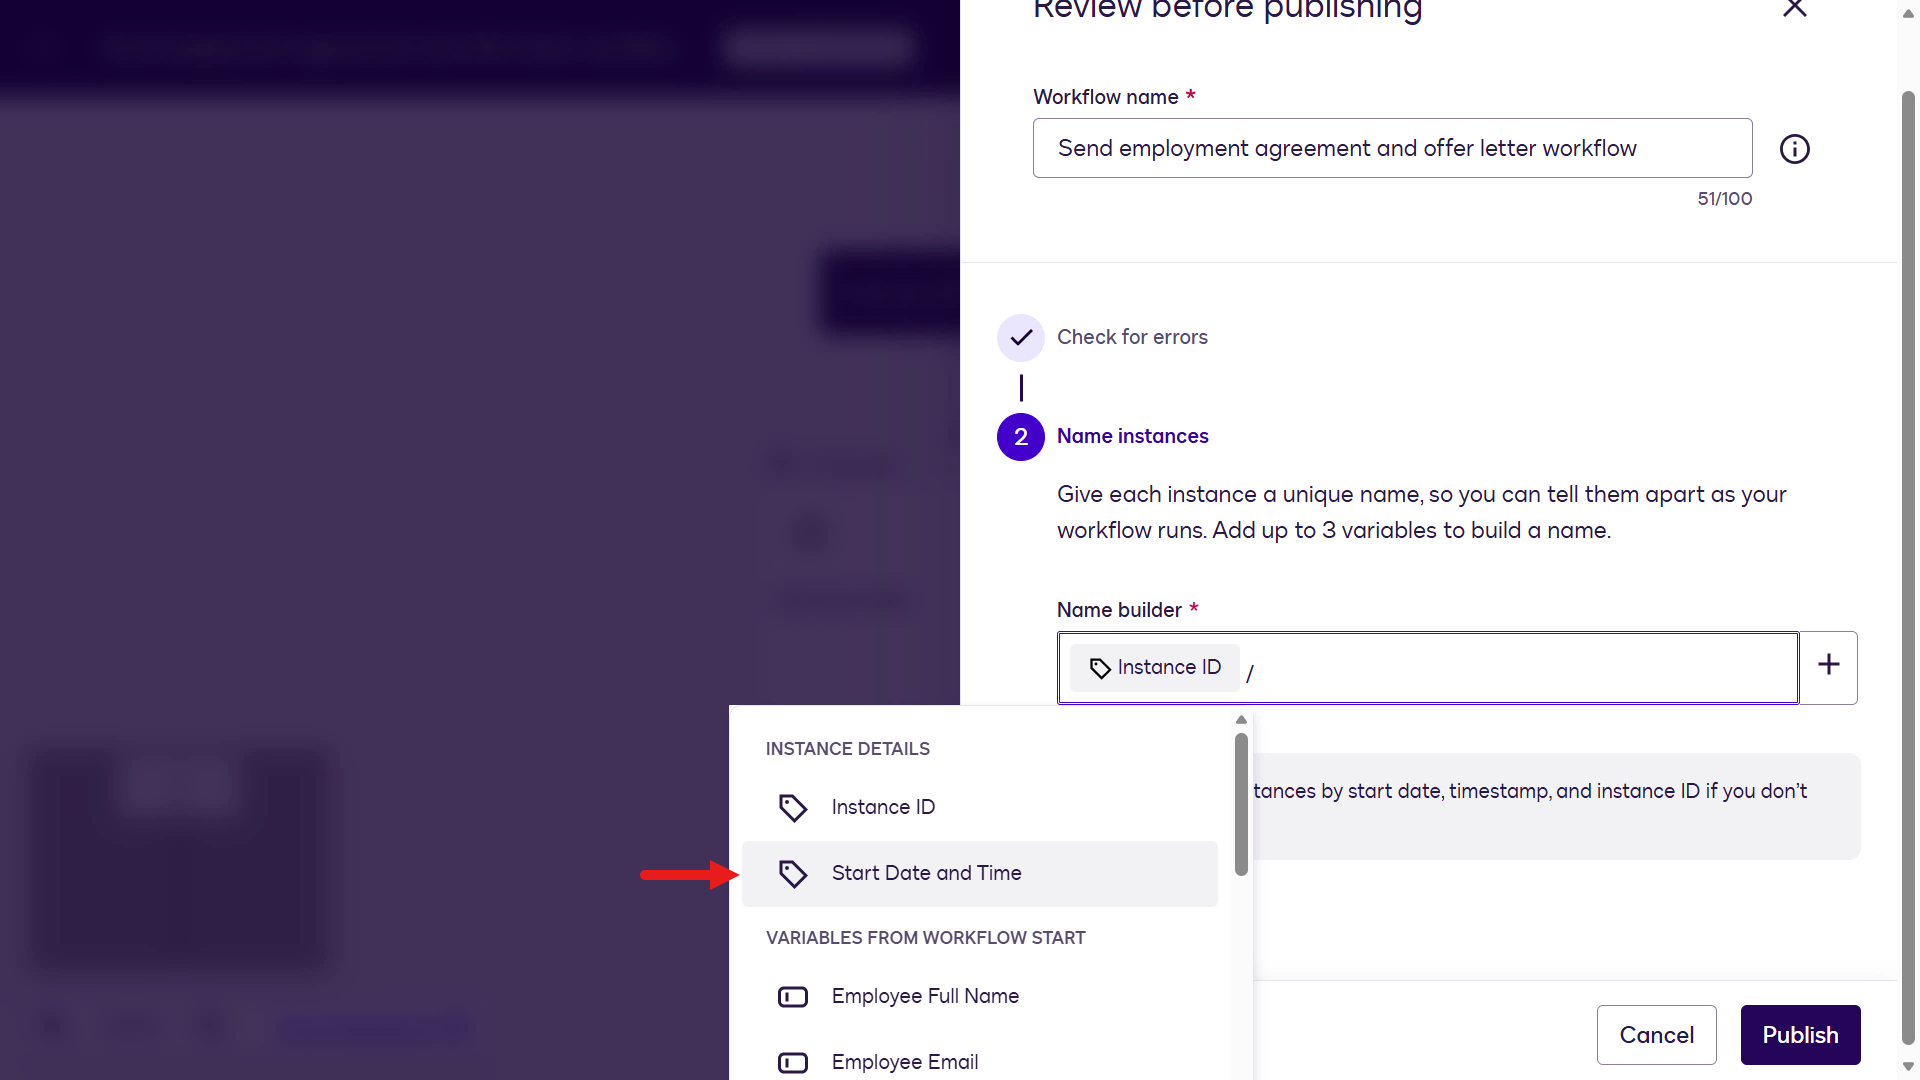
Between the variables, enter an underscore (
_) to complete the naming convention.Select Done.

Select Publish.
Next, authorize the workflow sender (your account). Select Authorize My Account.
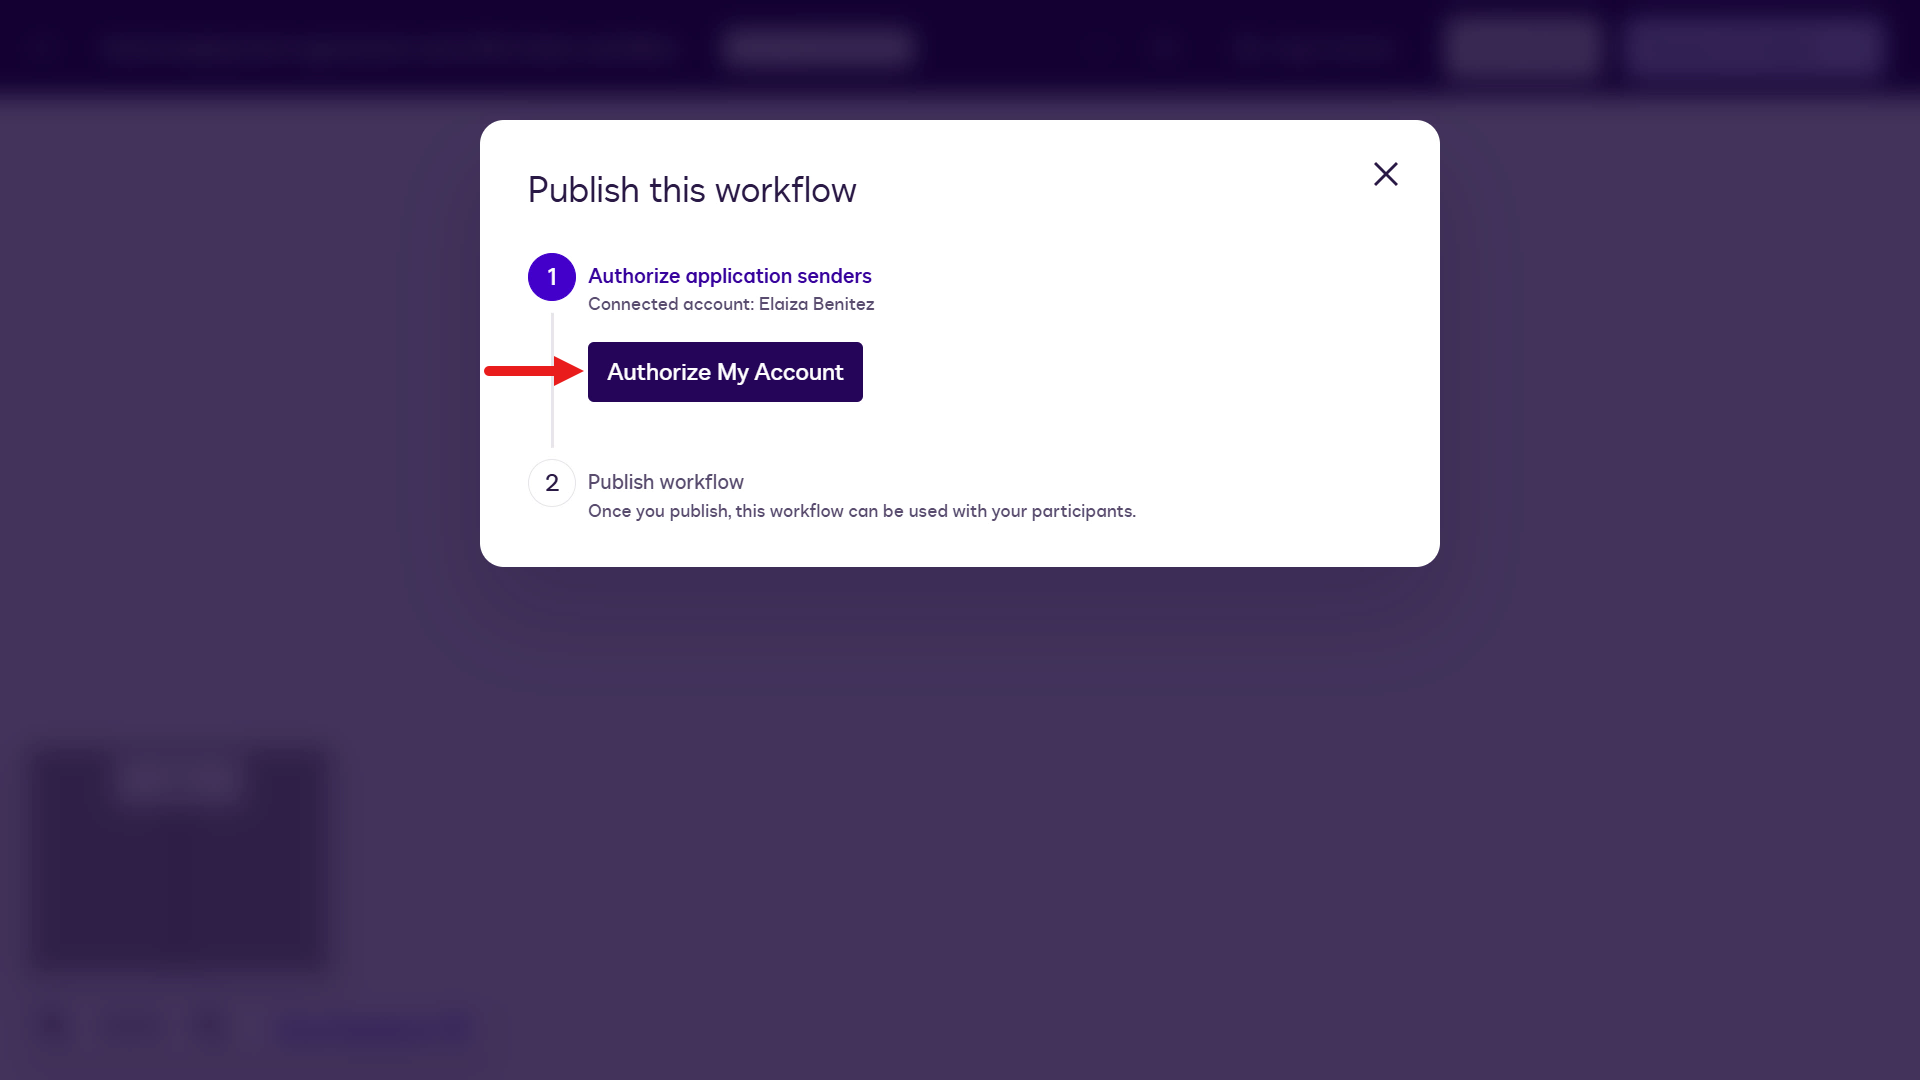
You'll be prompted to allow access for Workflow Builder to use your account. Select Allow Access.
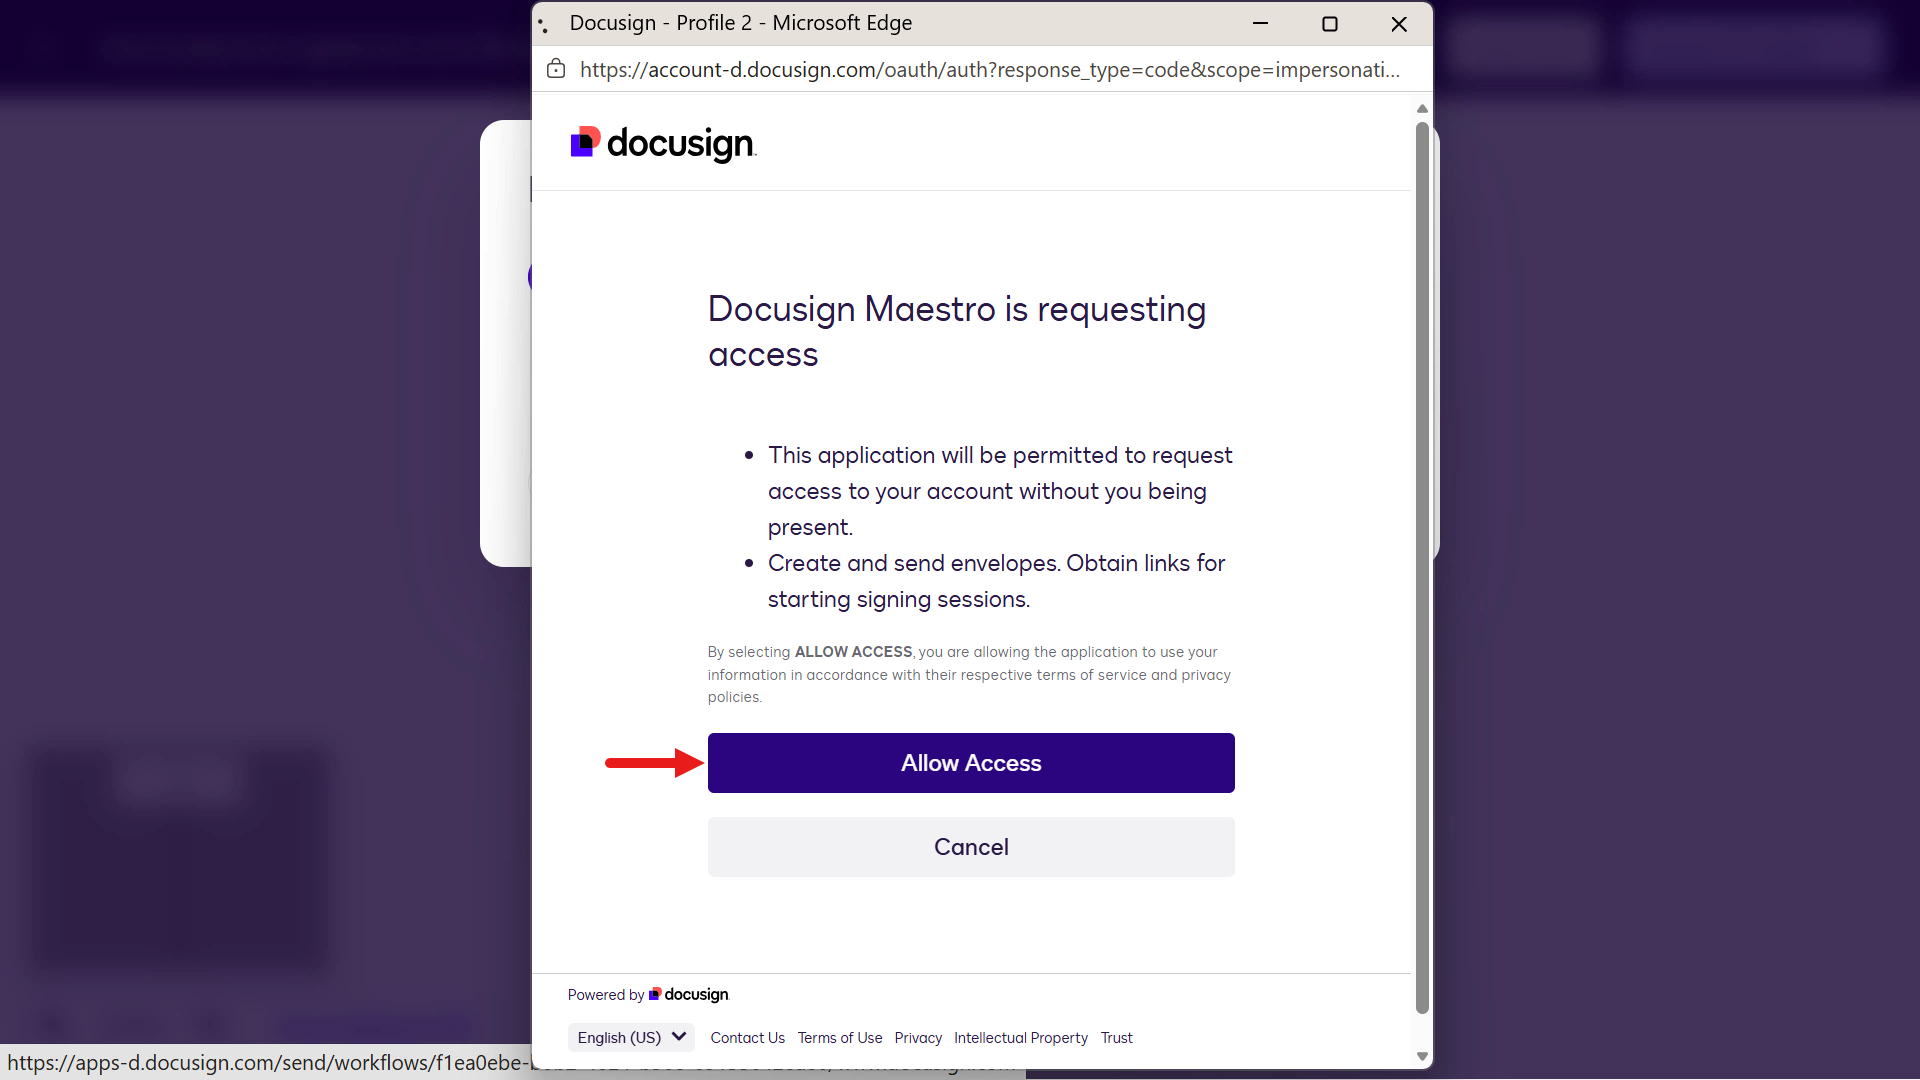
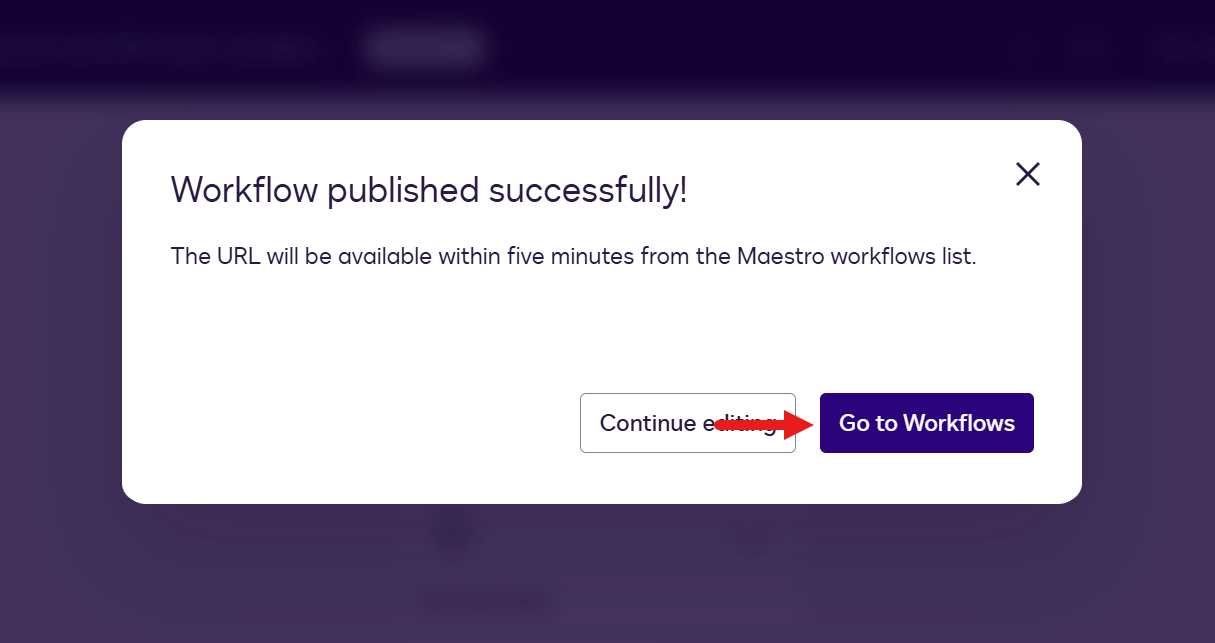
Select Publish.
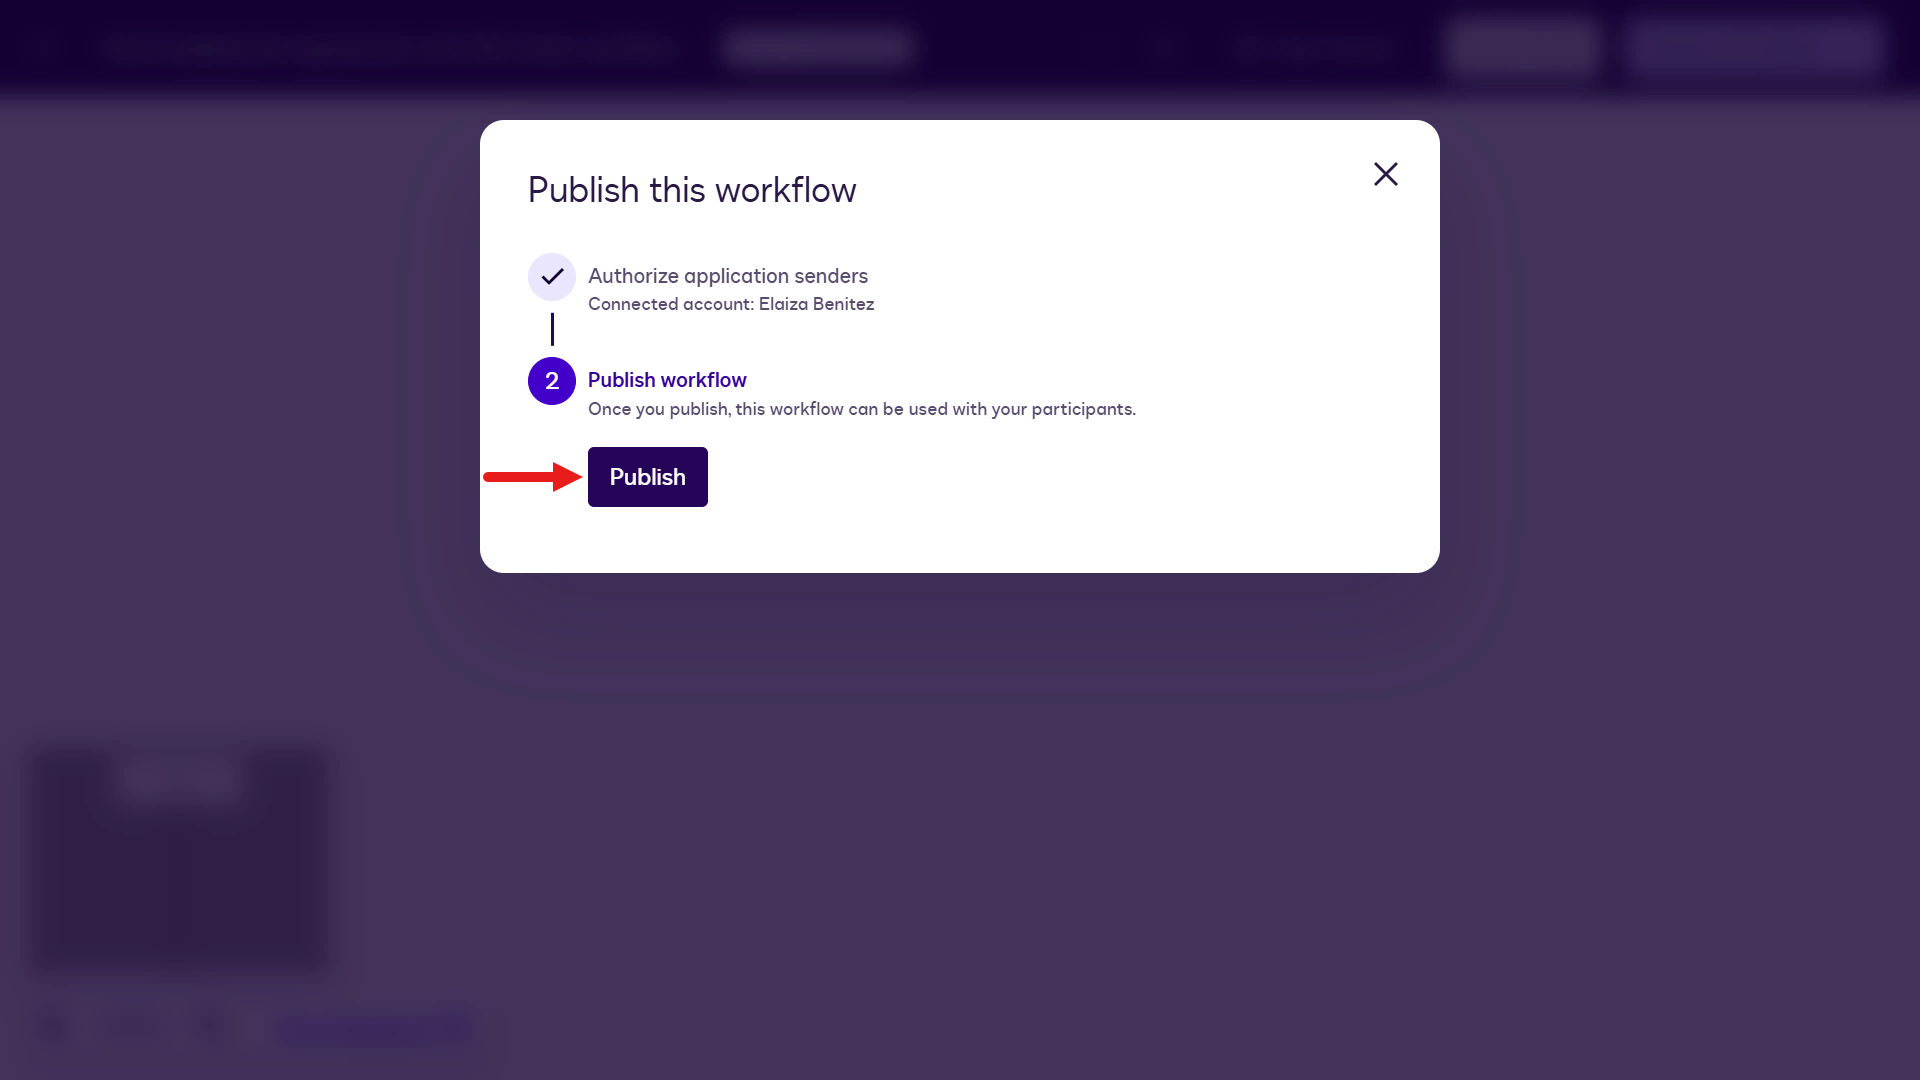
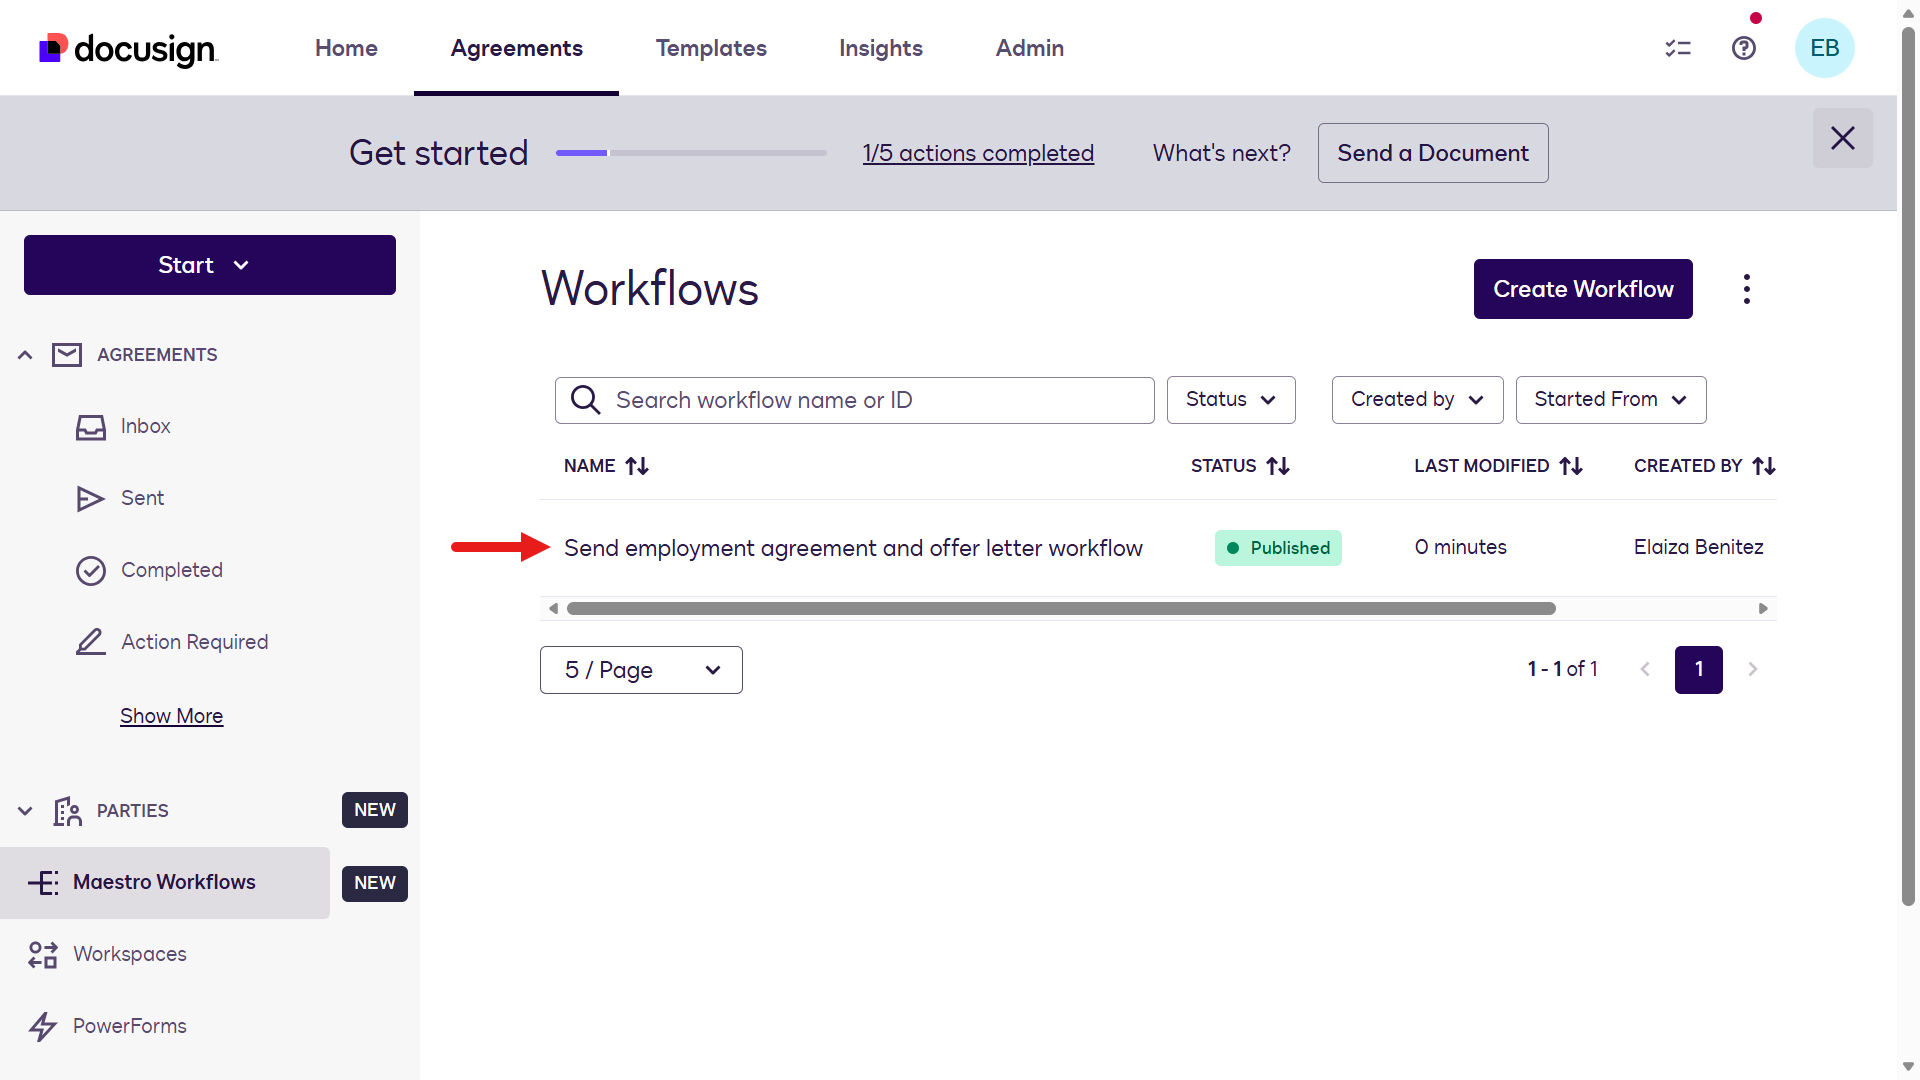
You'll see confirmation that the workflow has published successfully. Select Go to Workflows.
The workflow will now show a status of Published.
🧪 1.4 Test the workflow
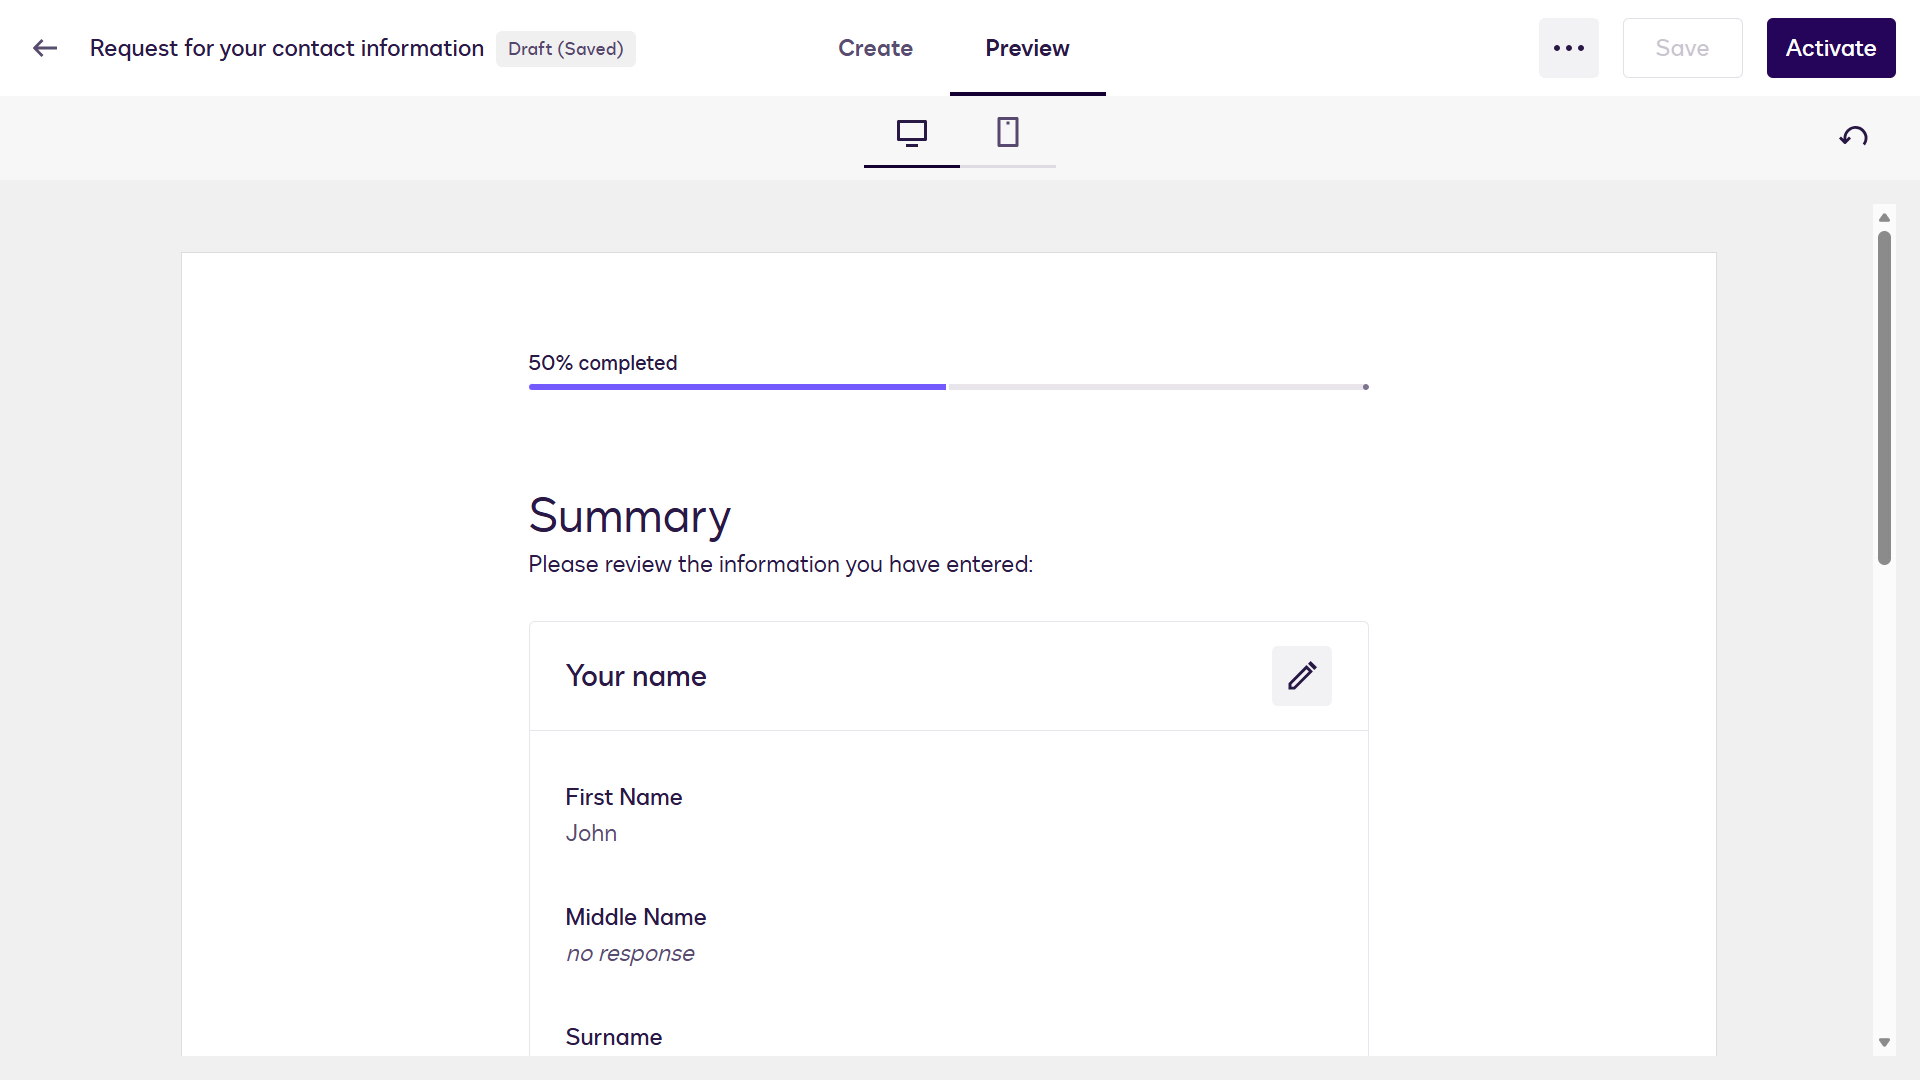
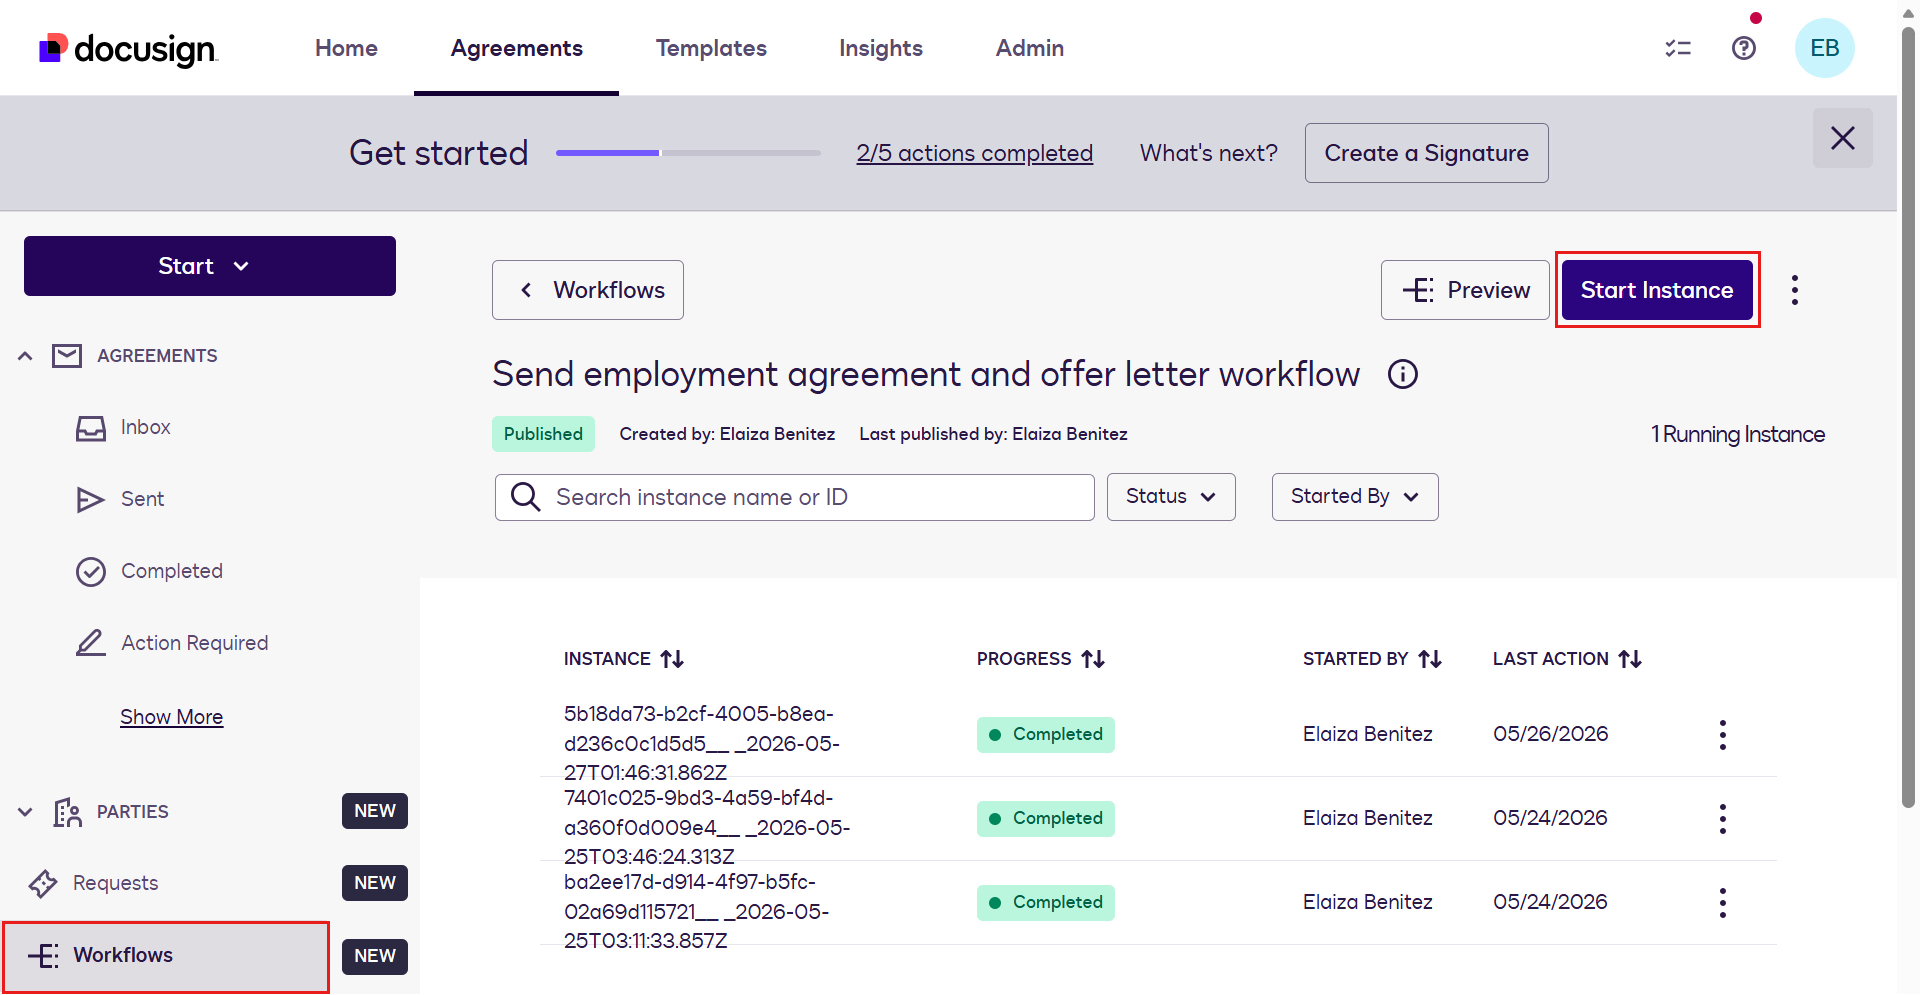
Before we move onto building the agent in Microsoft Copilot Studio, it's best practice to run the workflow to test it. You can manually run the workflow by starting a new instance.
Open the workflow and on the upper right, select Start Instance.
A new modal will appear where you'll be required to provide the variables for the workflow start step. Fill in the fields with some sample data.
Reminder on email address values
Use two different email addresses that you have access to for the employee and hiring manager.
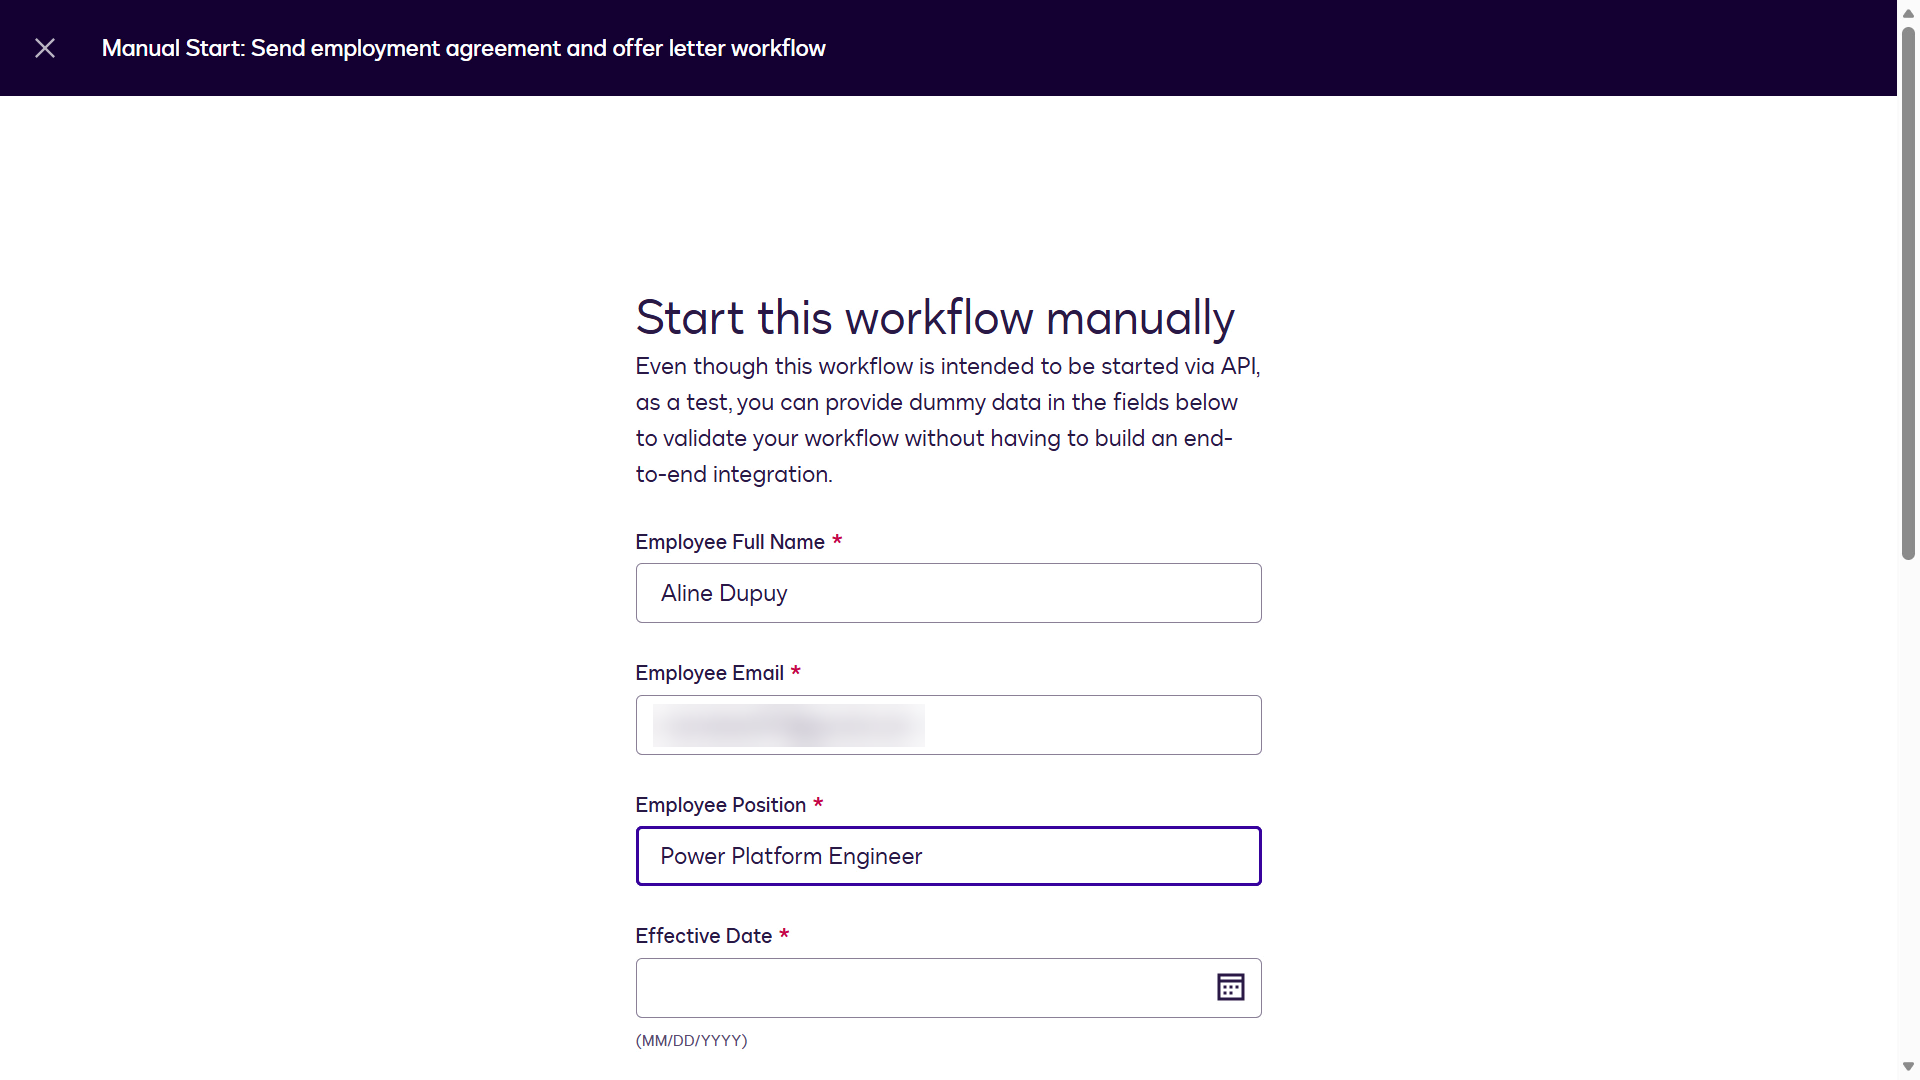
After you've entered the values for the variables, select Start.
A confirmation will appear that the workflow instance has started.
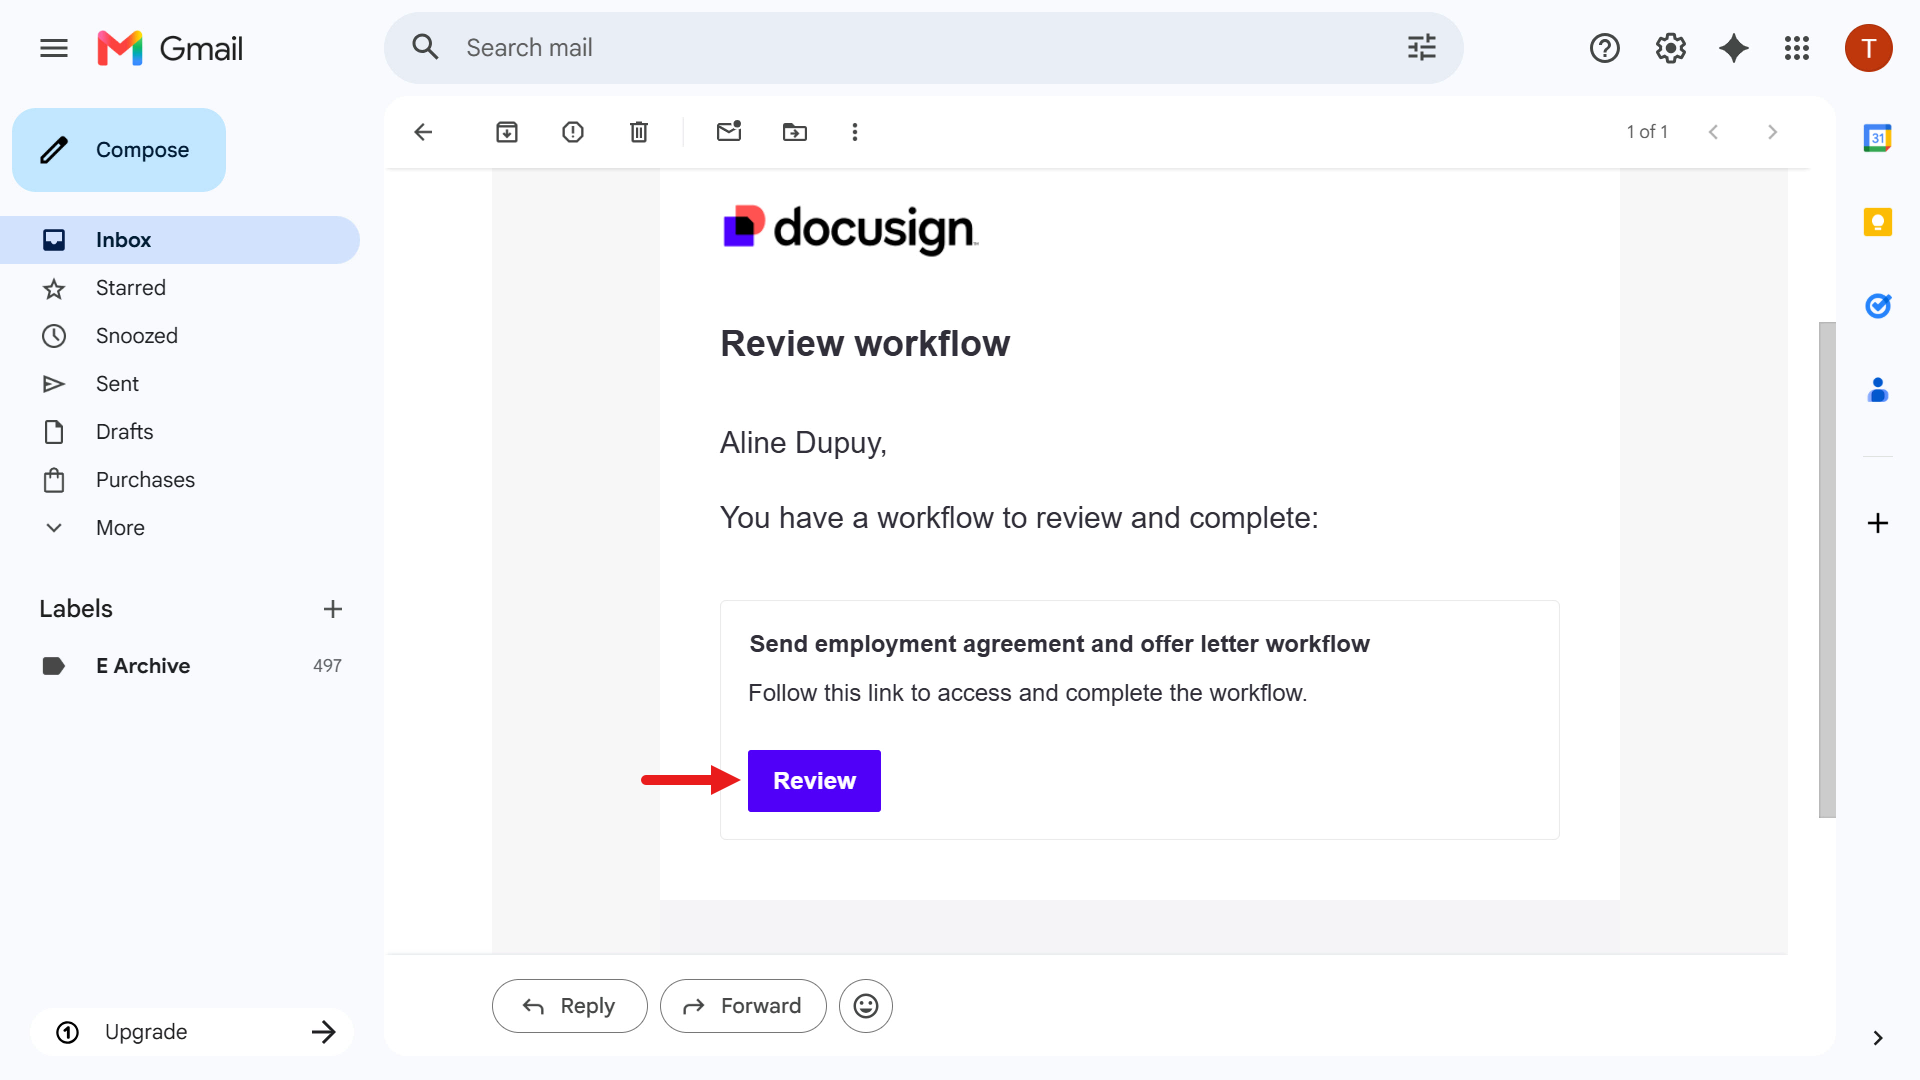
For the email address you entered for the Employee participant, navigate to the email Inbox and open the Docusign email - it should have the subject of
***Test Email*** Review and complete workflow. Select Review.Check your spam folder
Check your spam folder for the email if you don't see it in your main Inbox.
The first page of the Web Form will load, select Start.
You'll now see the Your Name page of the Web Form. Enter the first and last name for the employee you used in the workflow start sample data.
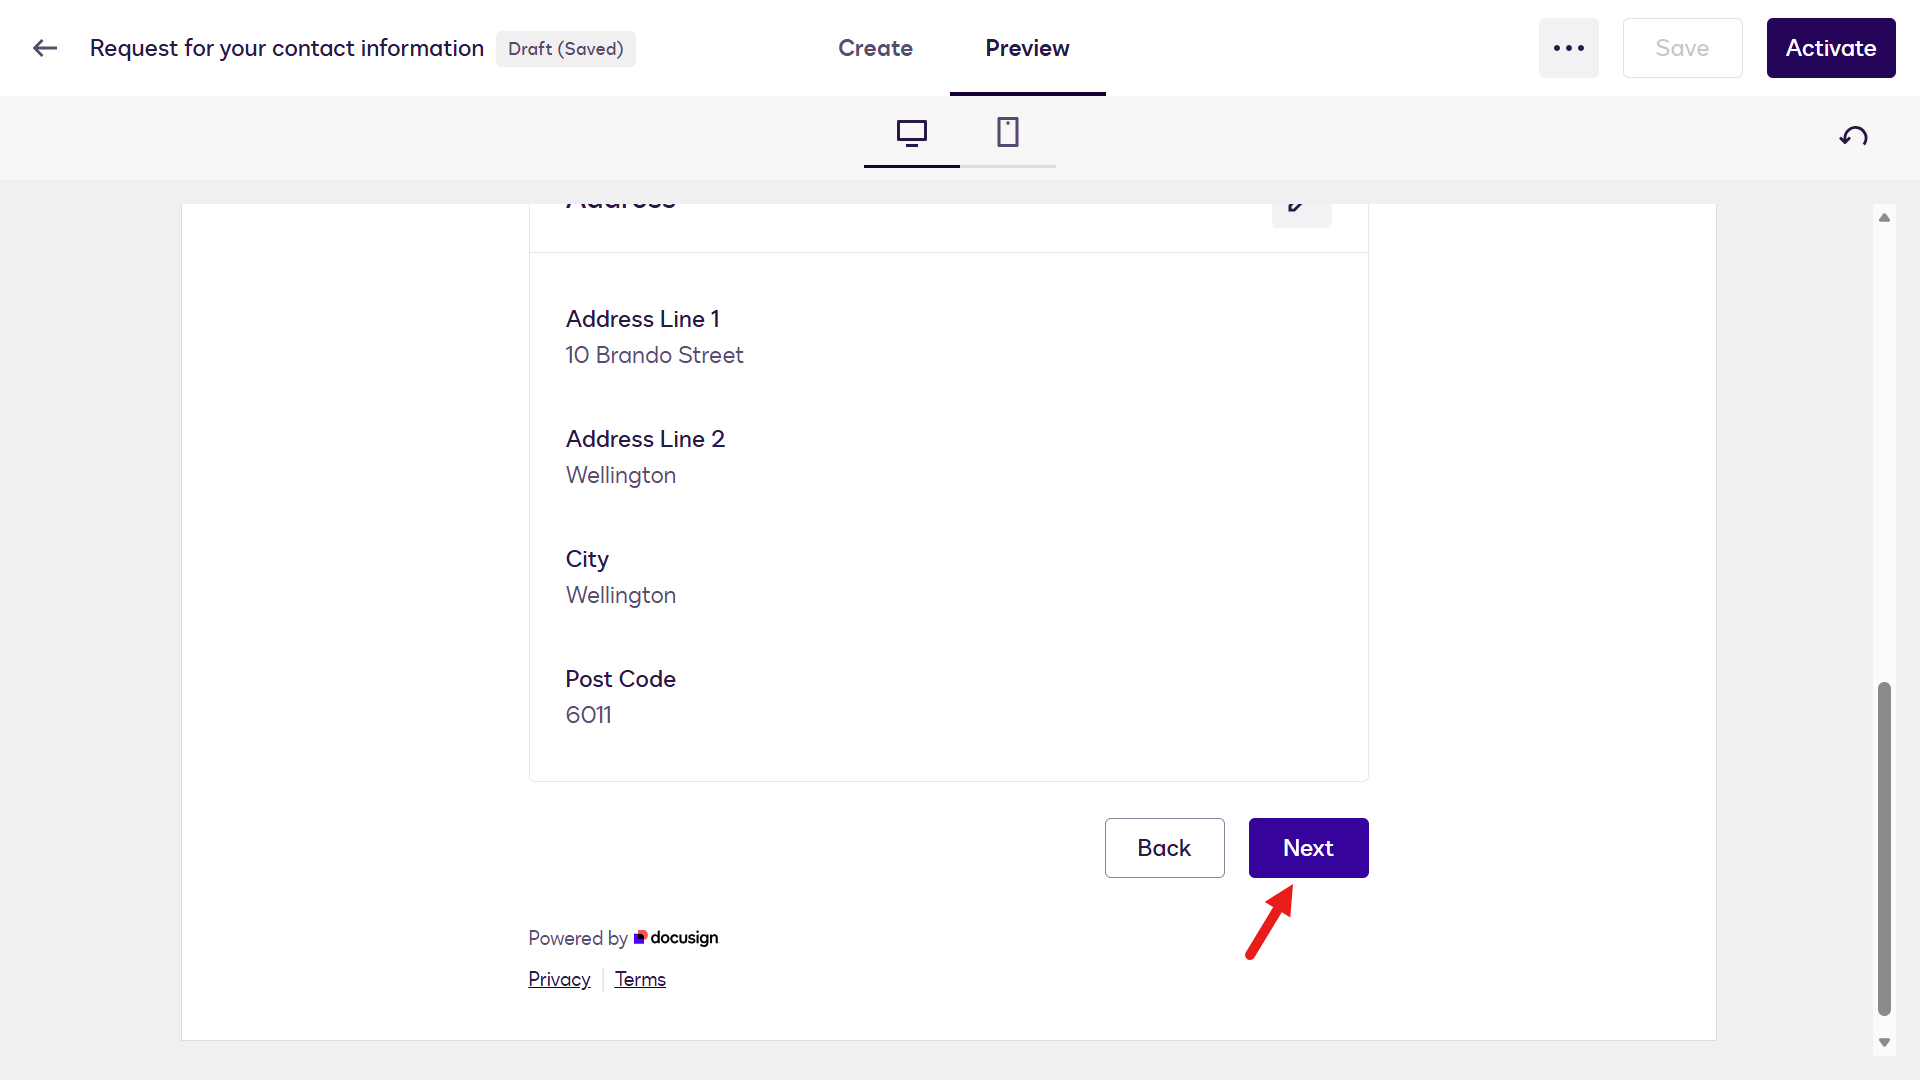
Enter sample address information in the Address page of the Web Form.
The final step of the Web Form is to review the information entered. Select Next.
After the Web Form is submitted, the next workflow steps run automatically: generate the Employment Agreement and Offer Letter using form data, then request the Employee participant signature. As the Employee participant, you'll be directed to signing immediately.
In minutes, the Employee participant goes from entering form data to signing documents, reducing turnaround time for HR teams.
Tick the terms and conditions checkbox and select Continue.
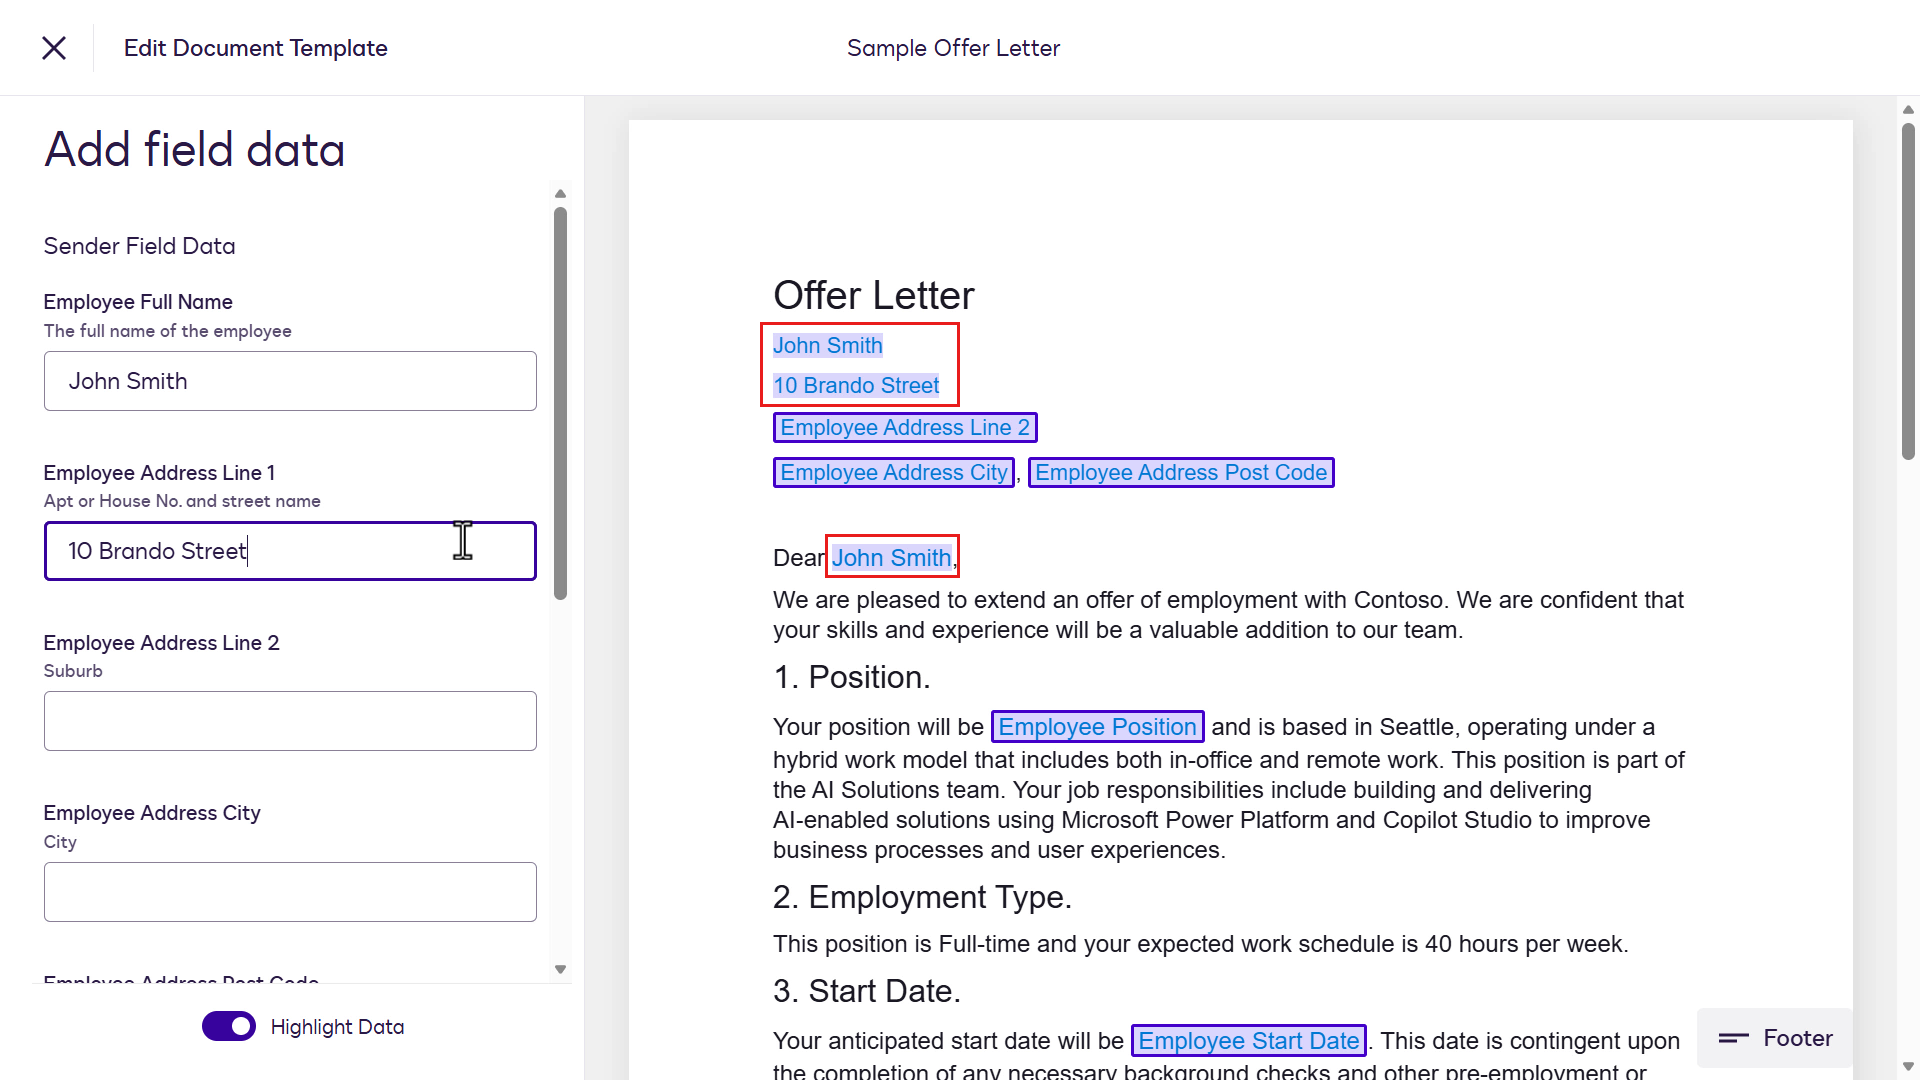
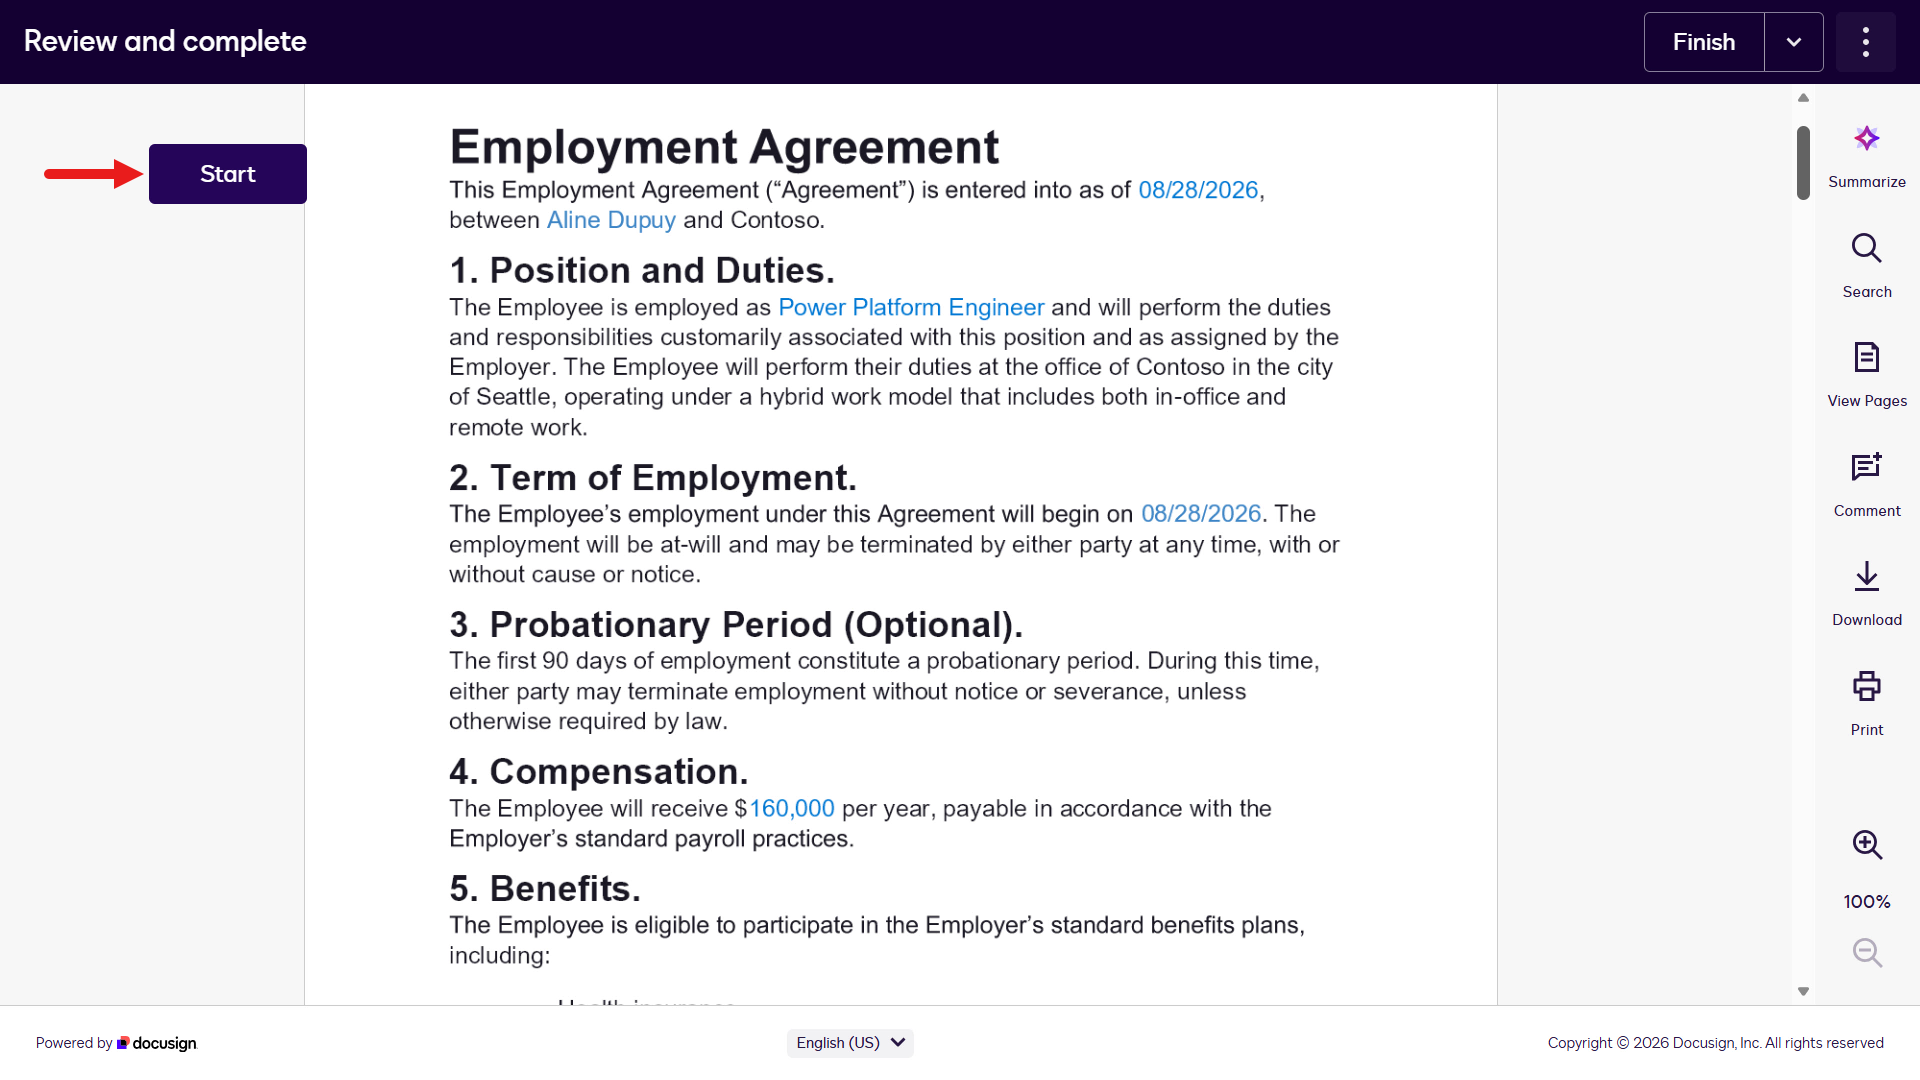
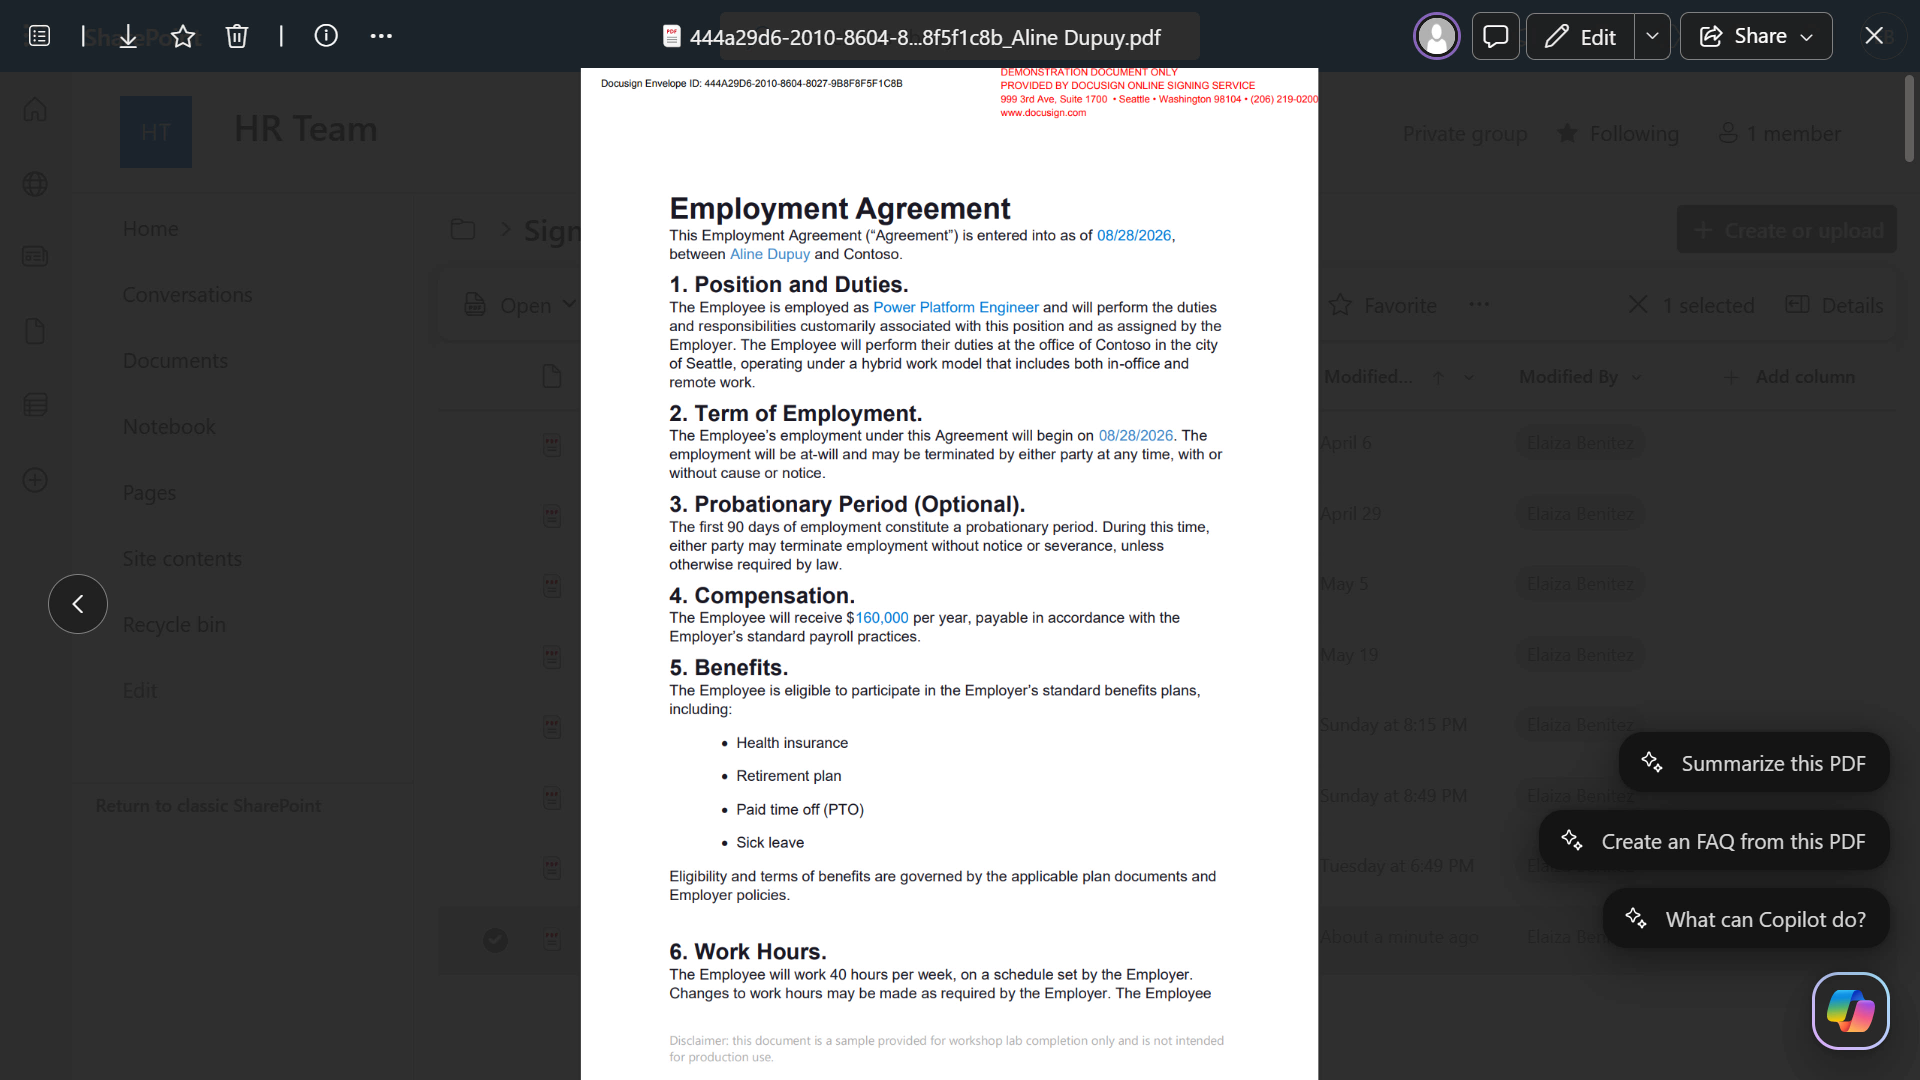
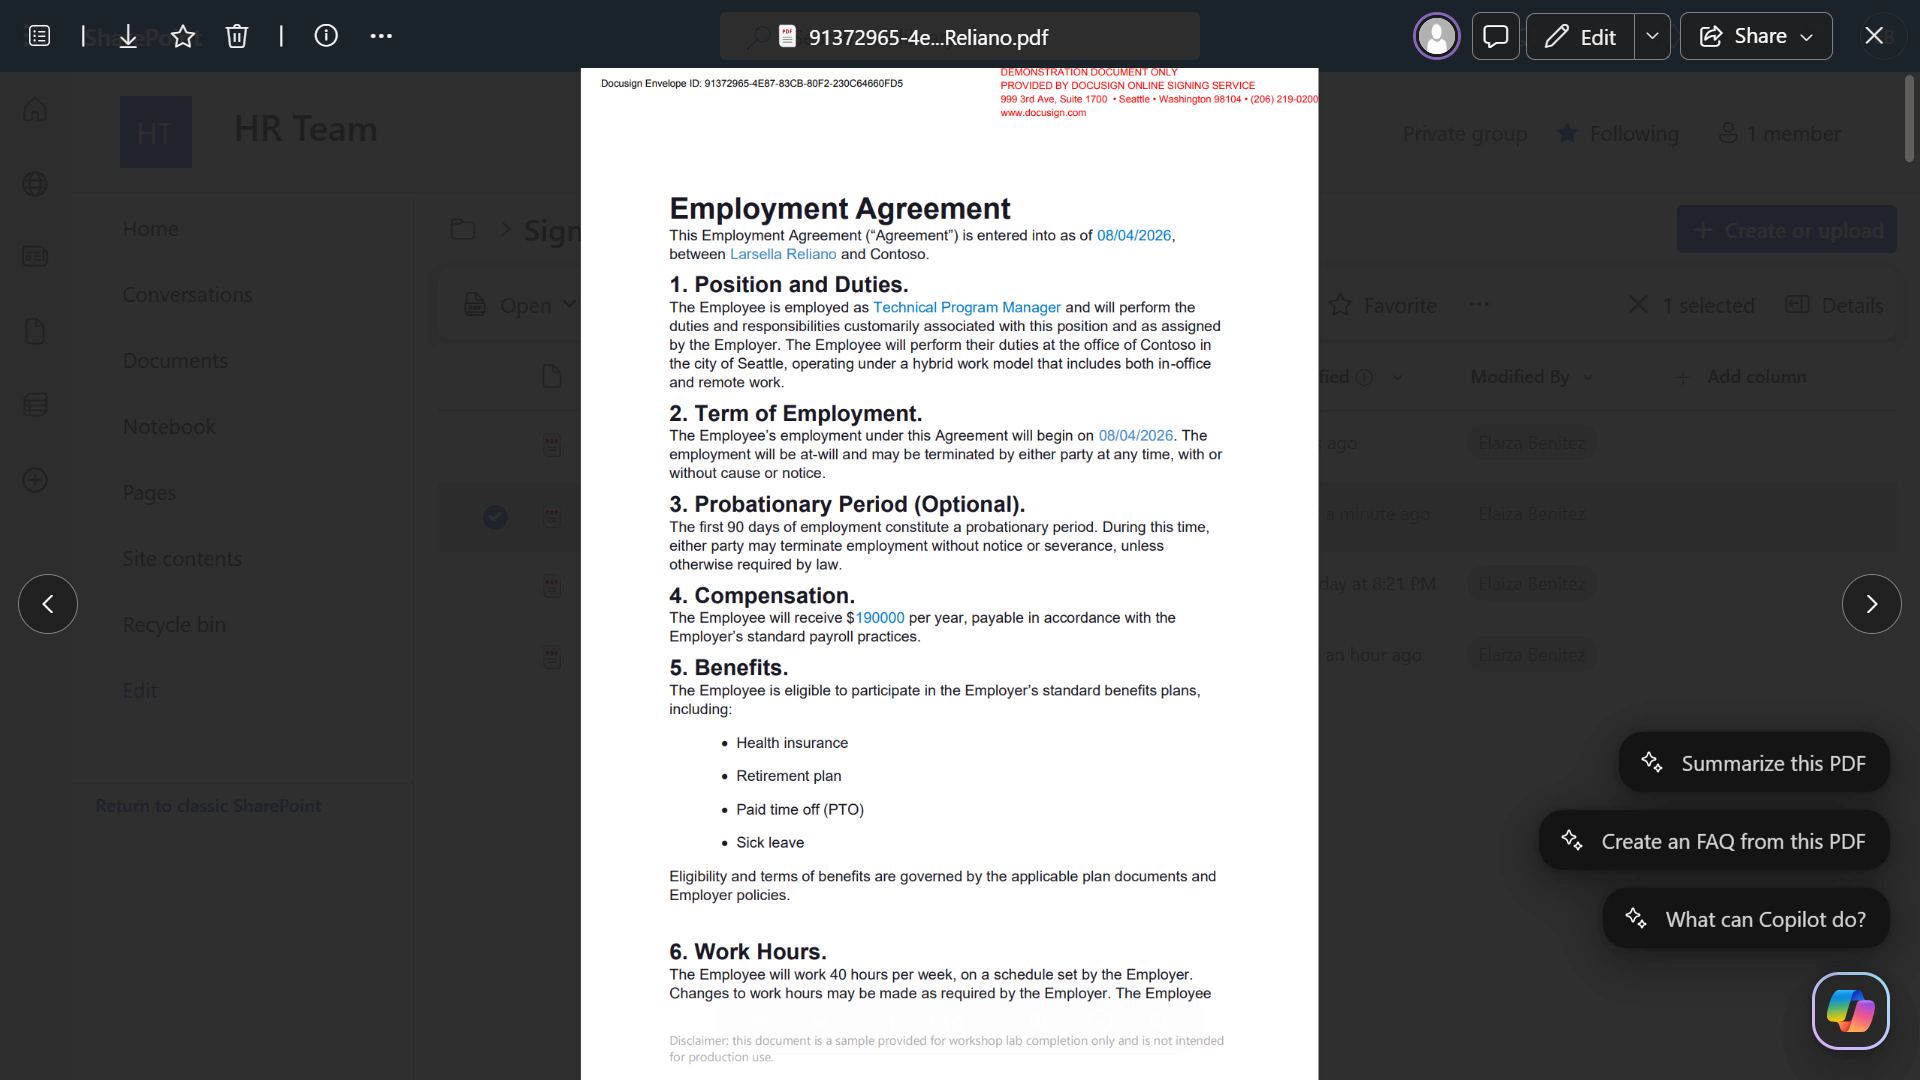
You'll now see the Employment Agreement. Blue text shows values from Workflow Start variables and the Web Form you completed as the Employee participant. Review the agreement, then select Start to sign.
Select the Sign icon to sign the Employment Agreement.
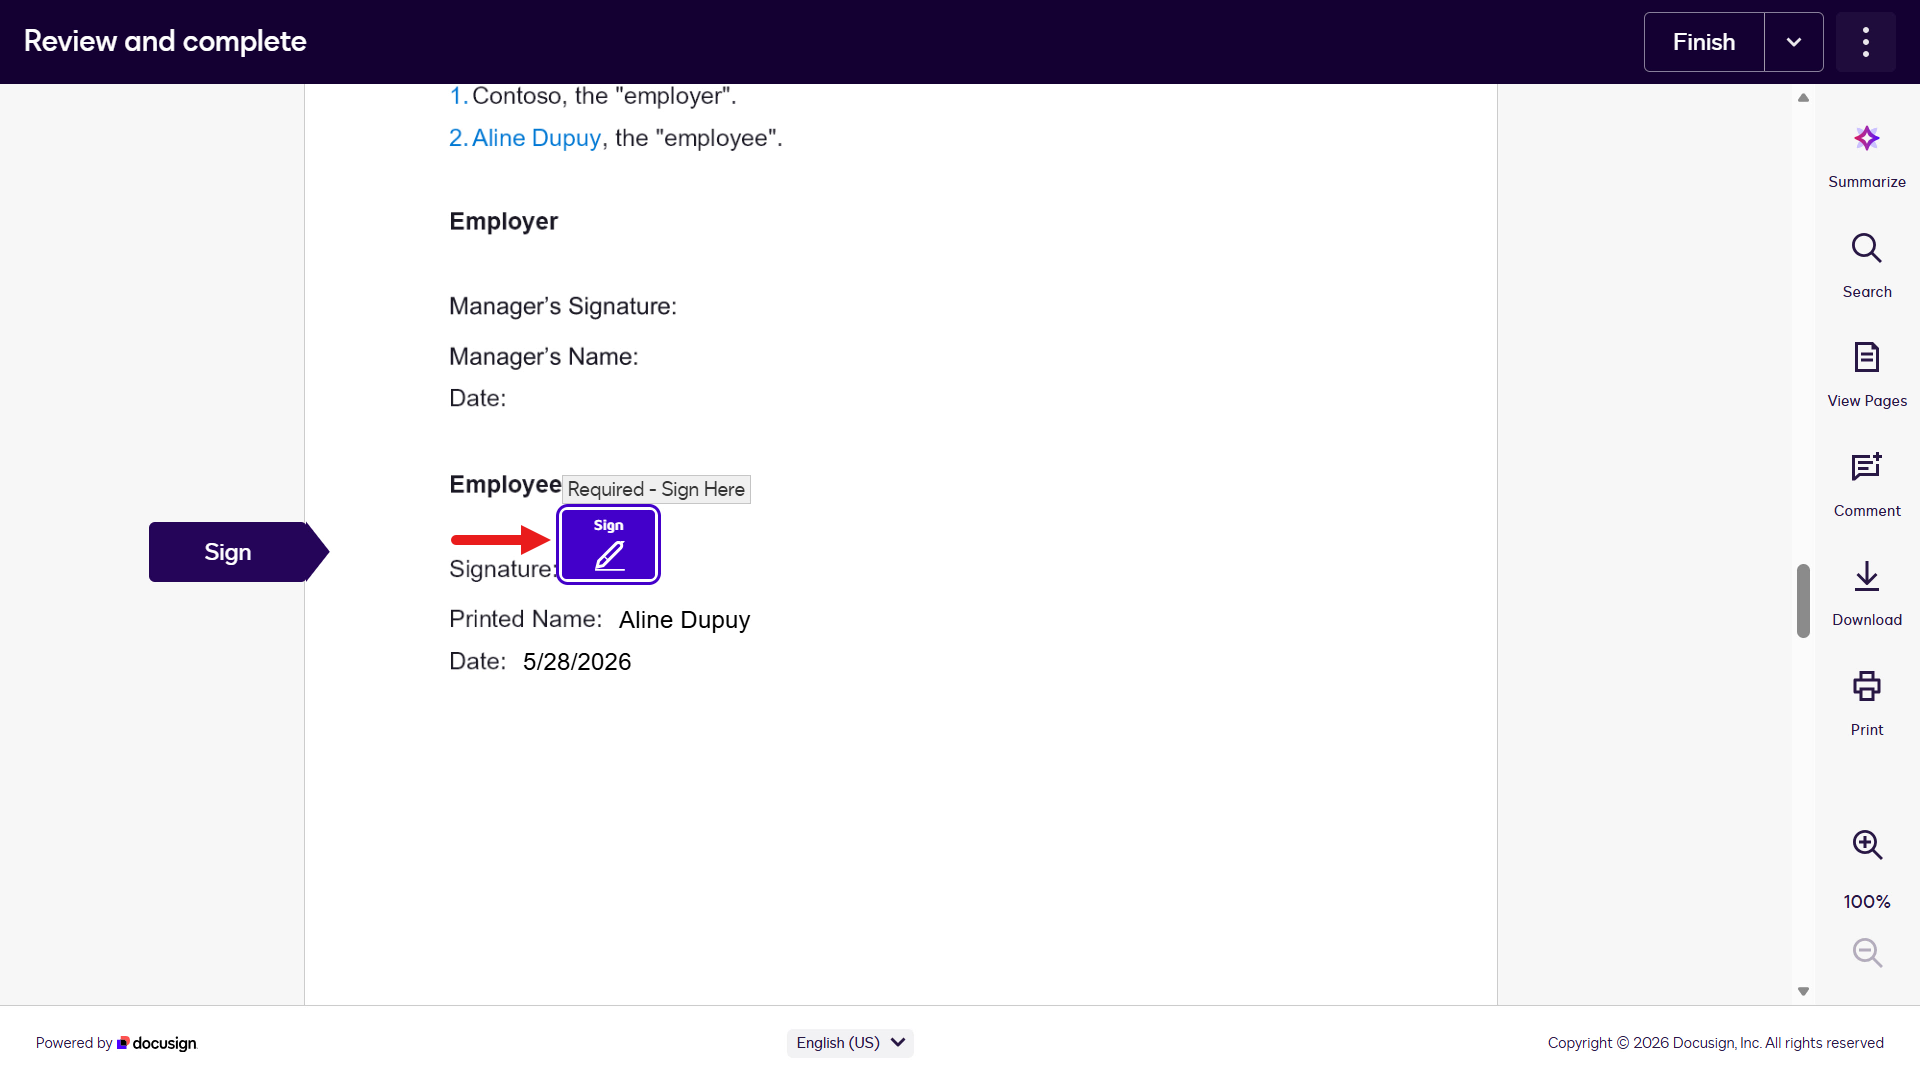
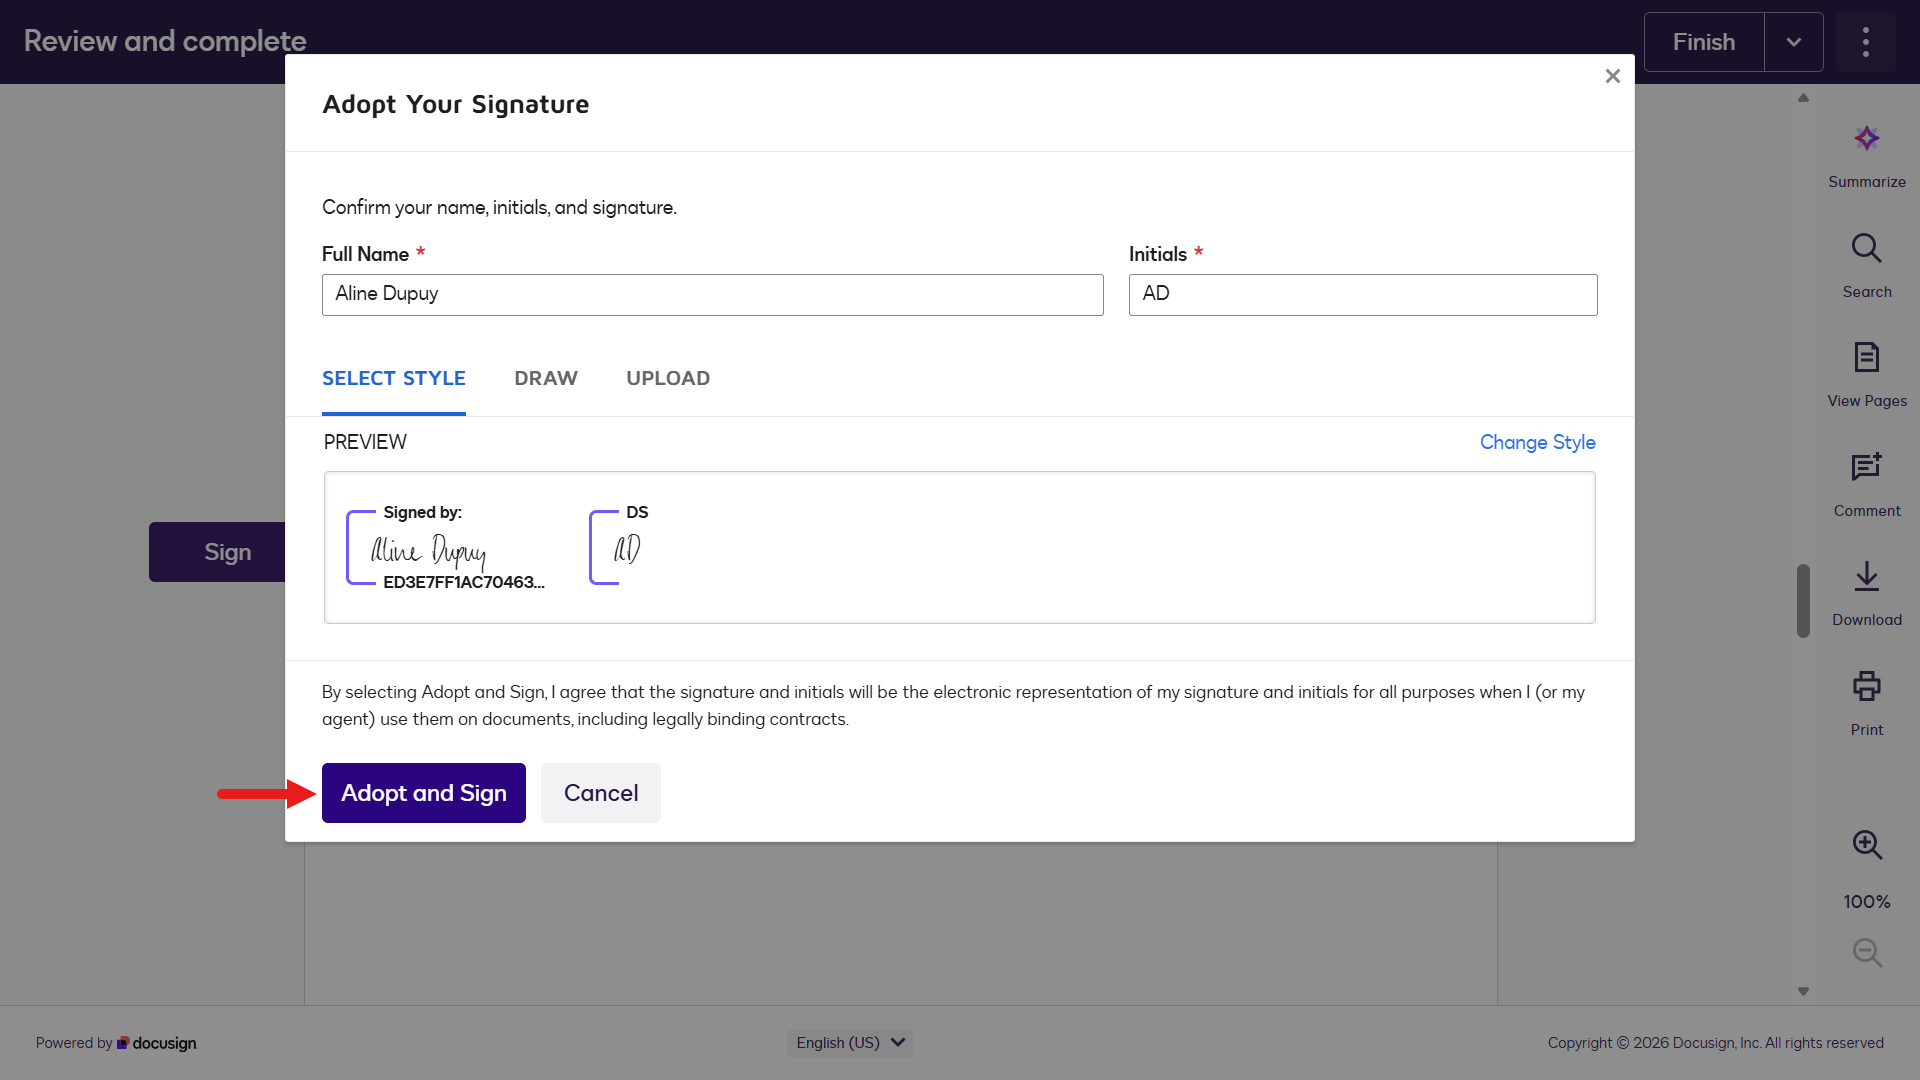
A modal appears where you can confirm signature details and style. Options are default style, drawn signature, or uploaded signature. Continue with the default style and select Adopt and Sign.
Review the Offer Letter next. Notice how the address information is now displayed - this is the information you entered on the Address page of the Web Form as the Employee participant. Select the Sign tab icon, which will direct you to the Sign icon in the Offer Letter.
Select the Sign icon.
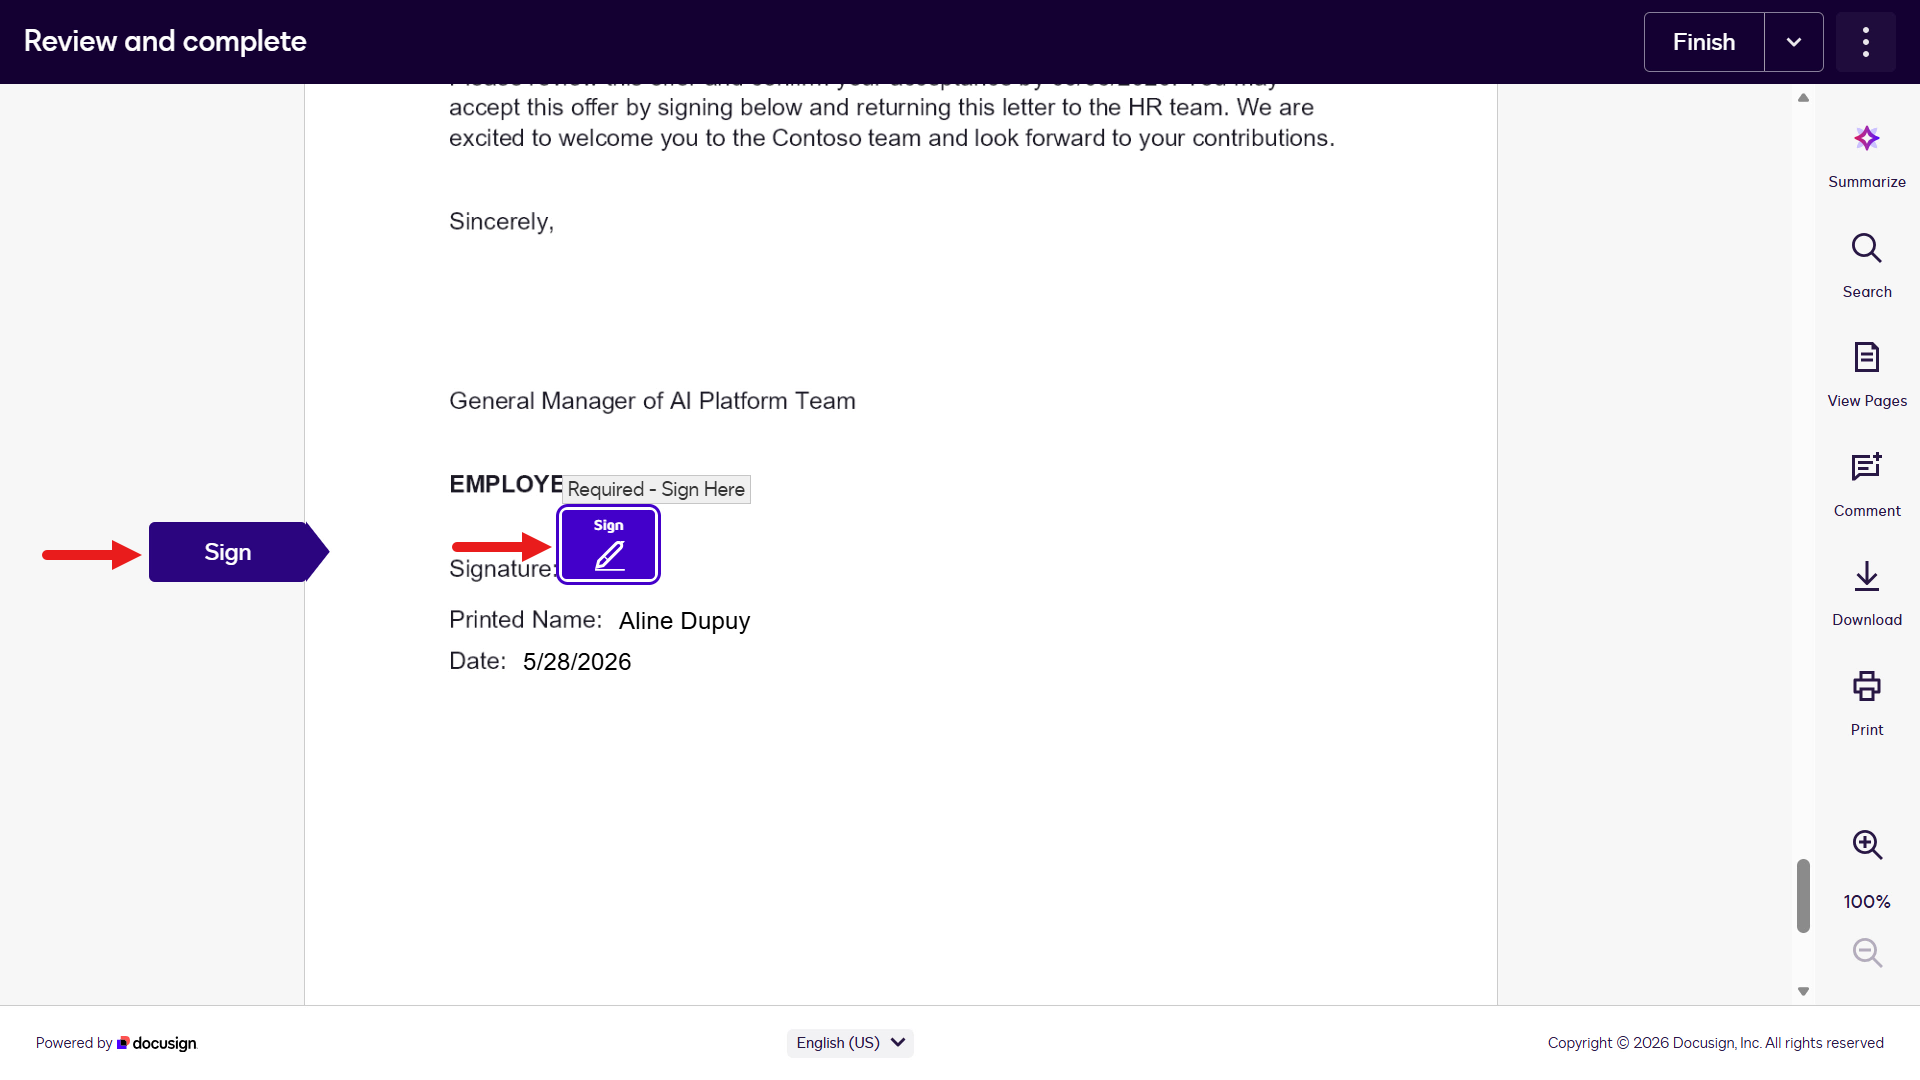
Select Adopt and Sign for the Offer Letter and then select Finish.
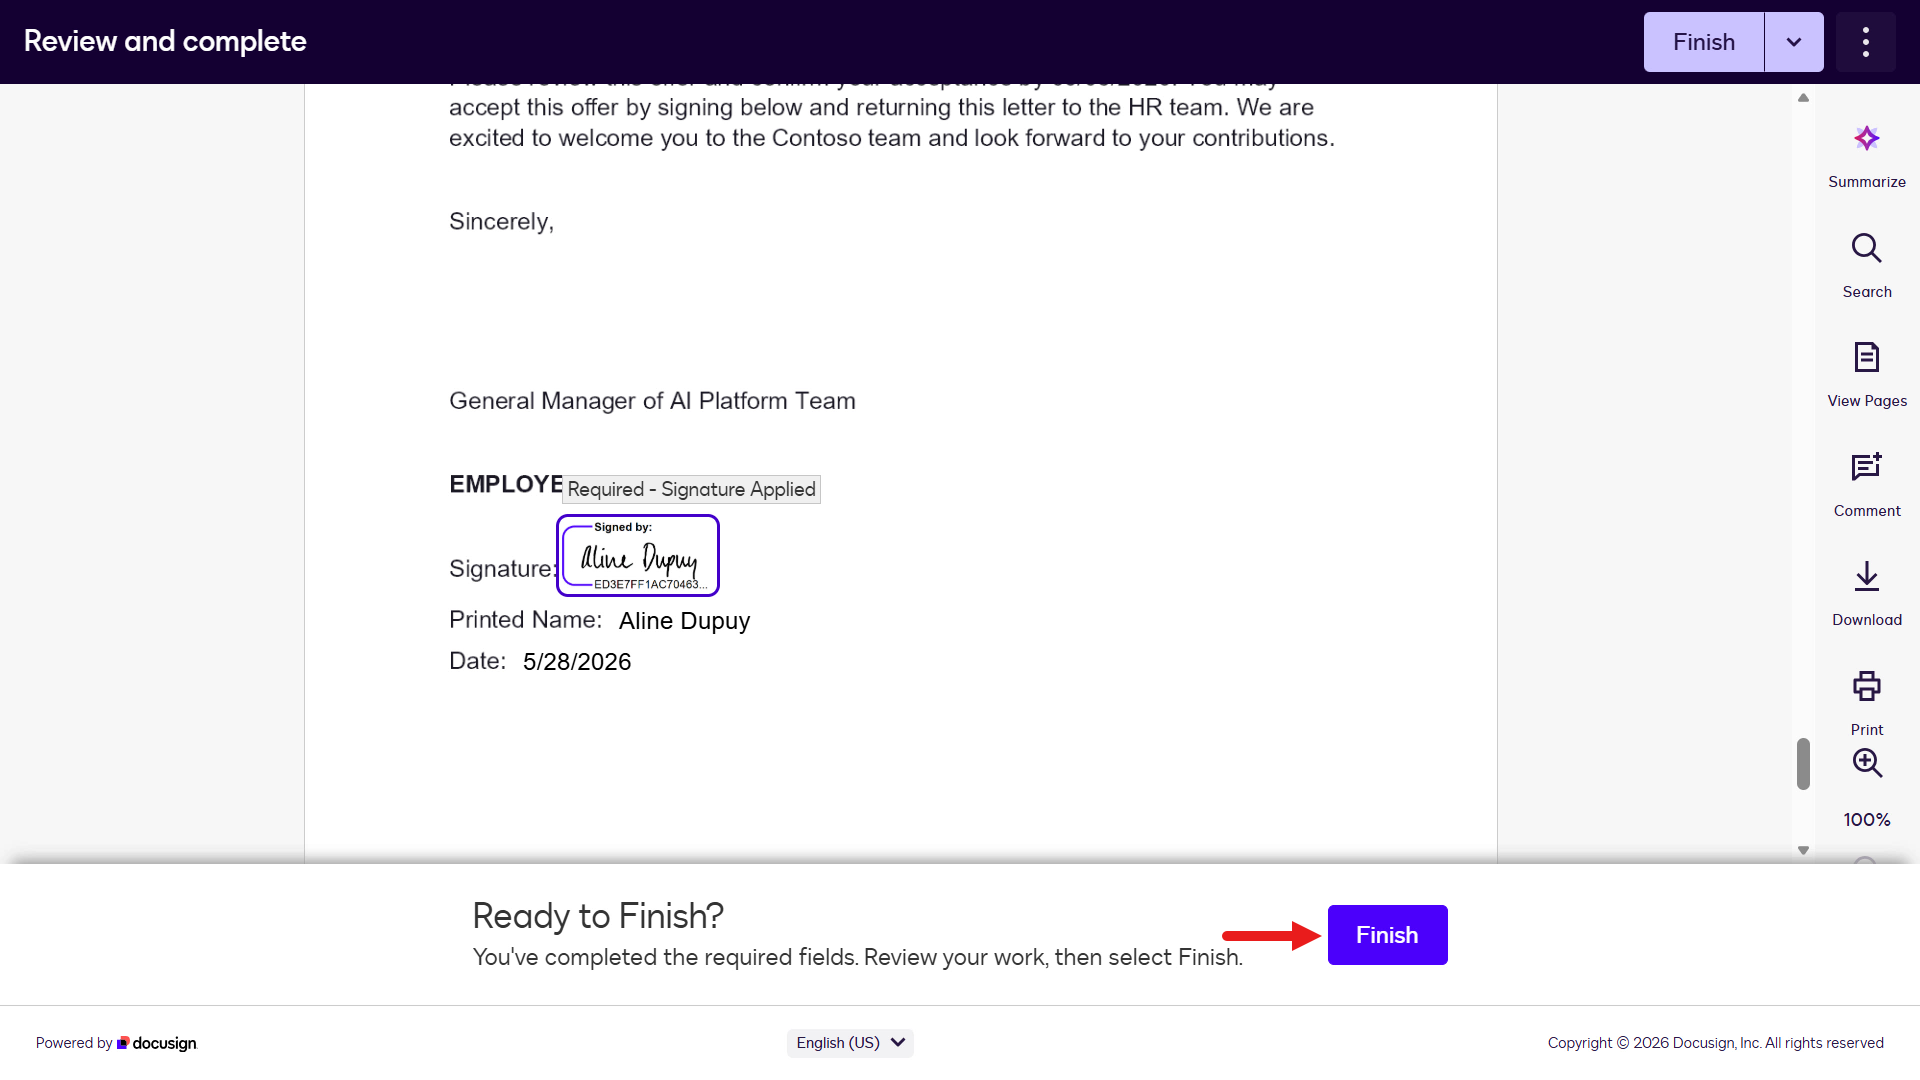
You'll next see the Confirmation Screen which is the step configured earlier.
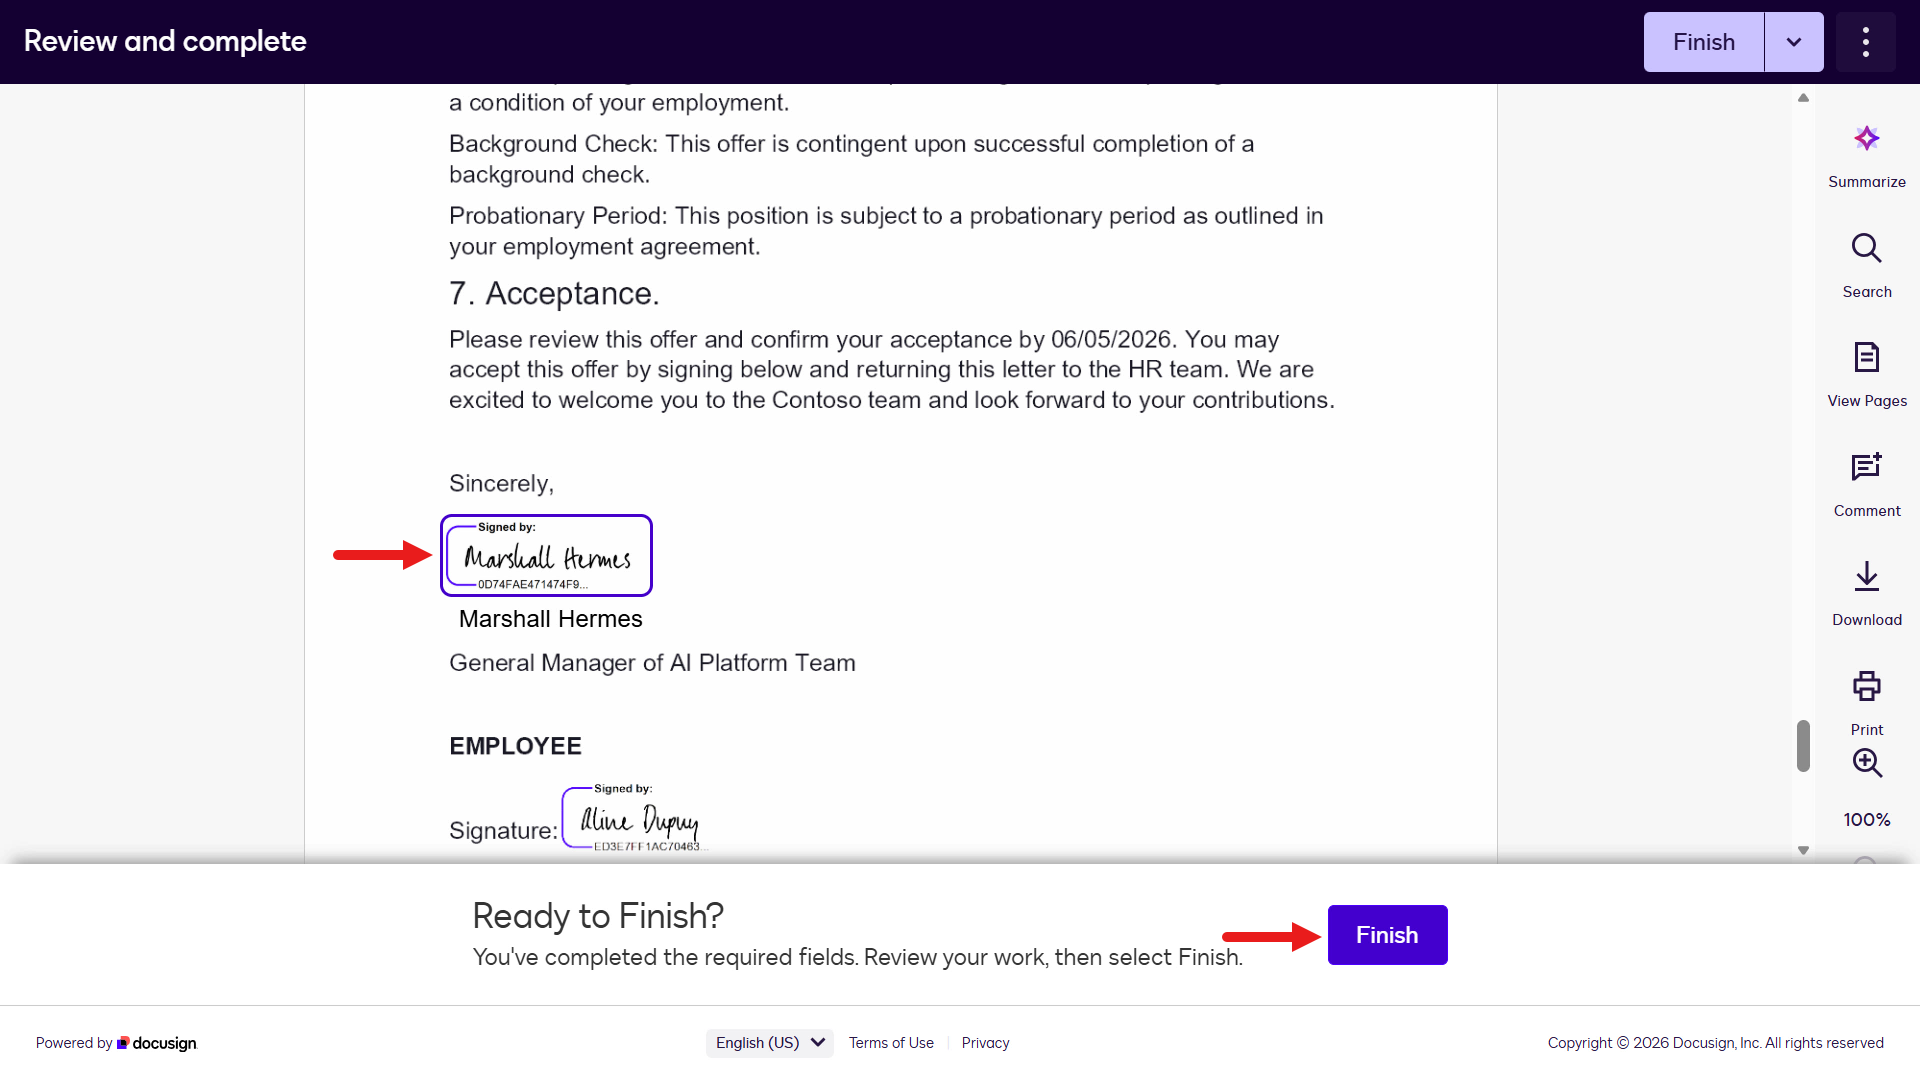
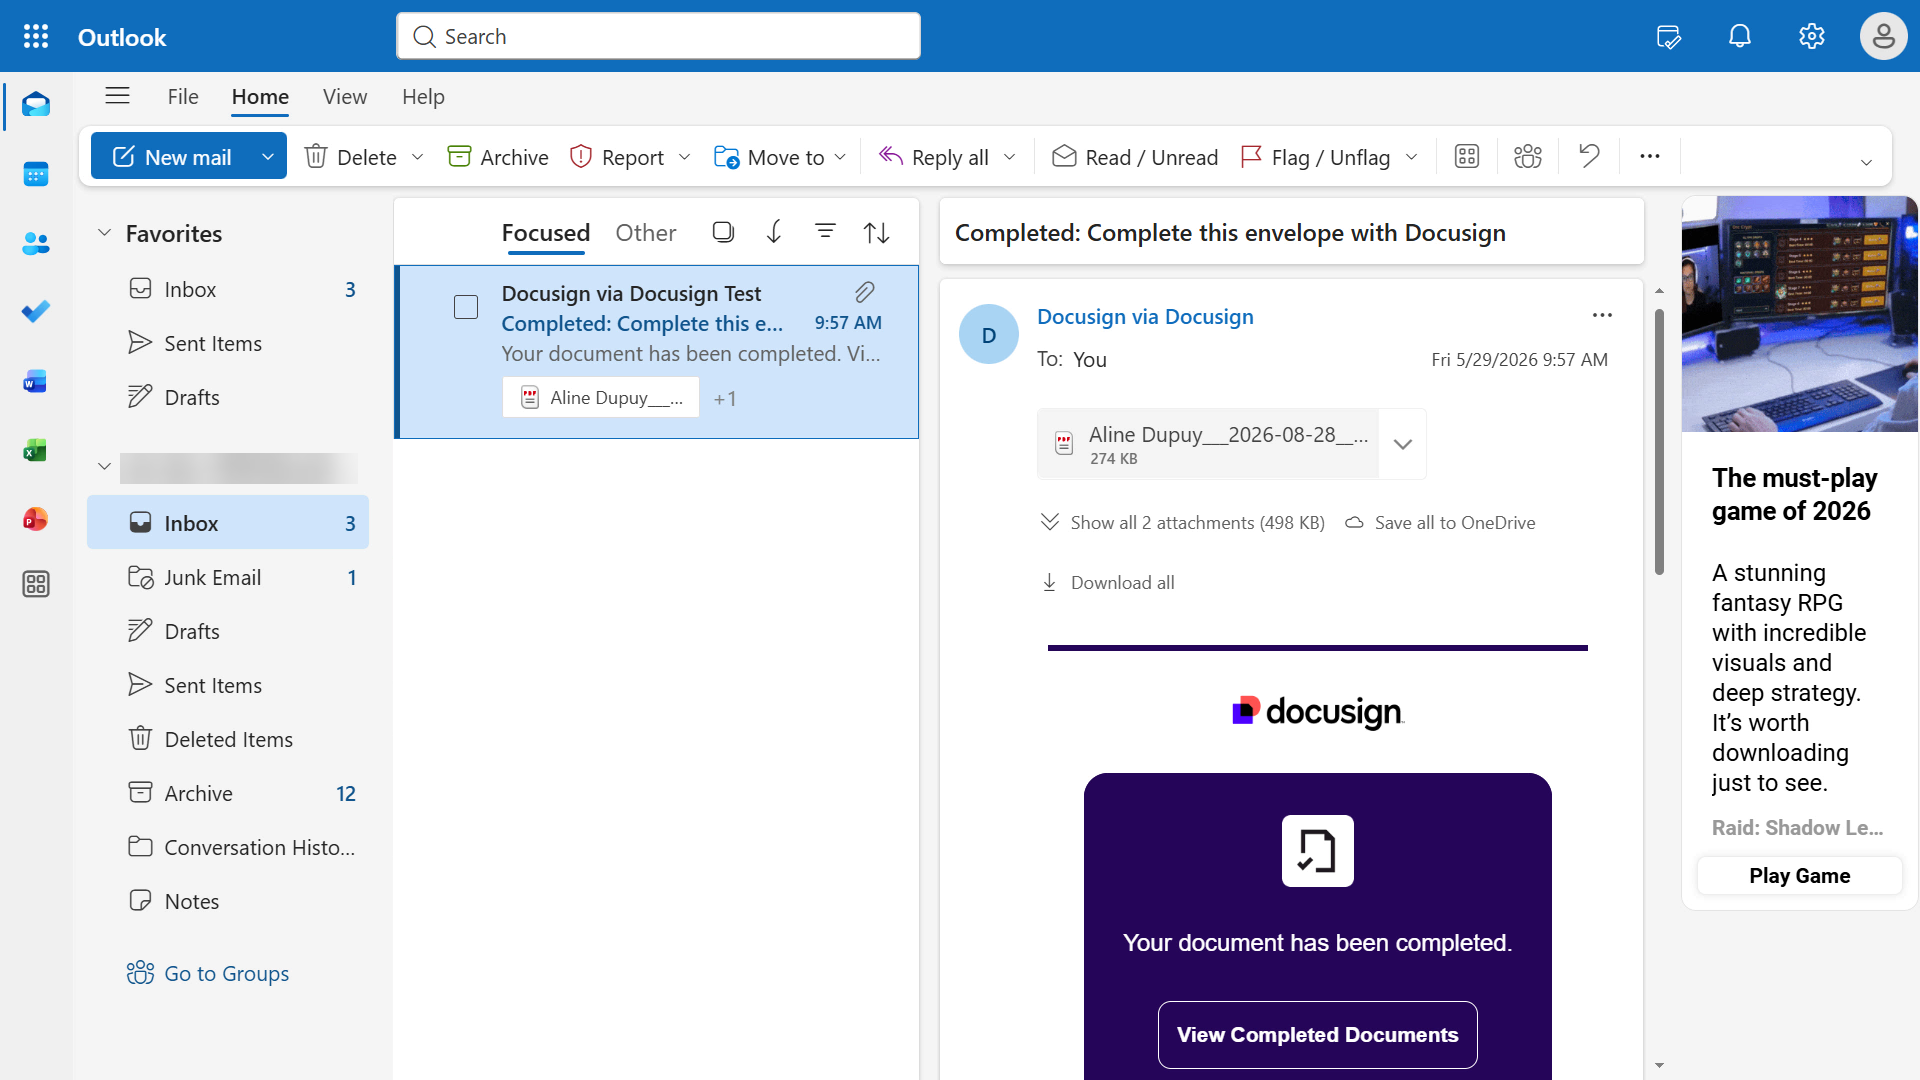
Next, for the email address you entered for the Hiring Manager participant, navigate to the email Inbox and open the Docusign email - it should have the subject of
Complete with Docusign: Employment Agreement and Offer Letter. Select Review Documents.Check your spam folder
Check your spam folder for the email if you don't see it in your main Inbox.
Sign the Employment Agreement and Offer Letter, then select Finish.
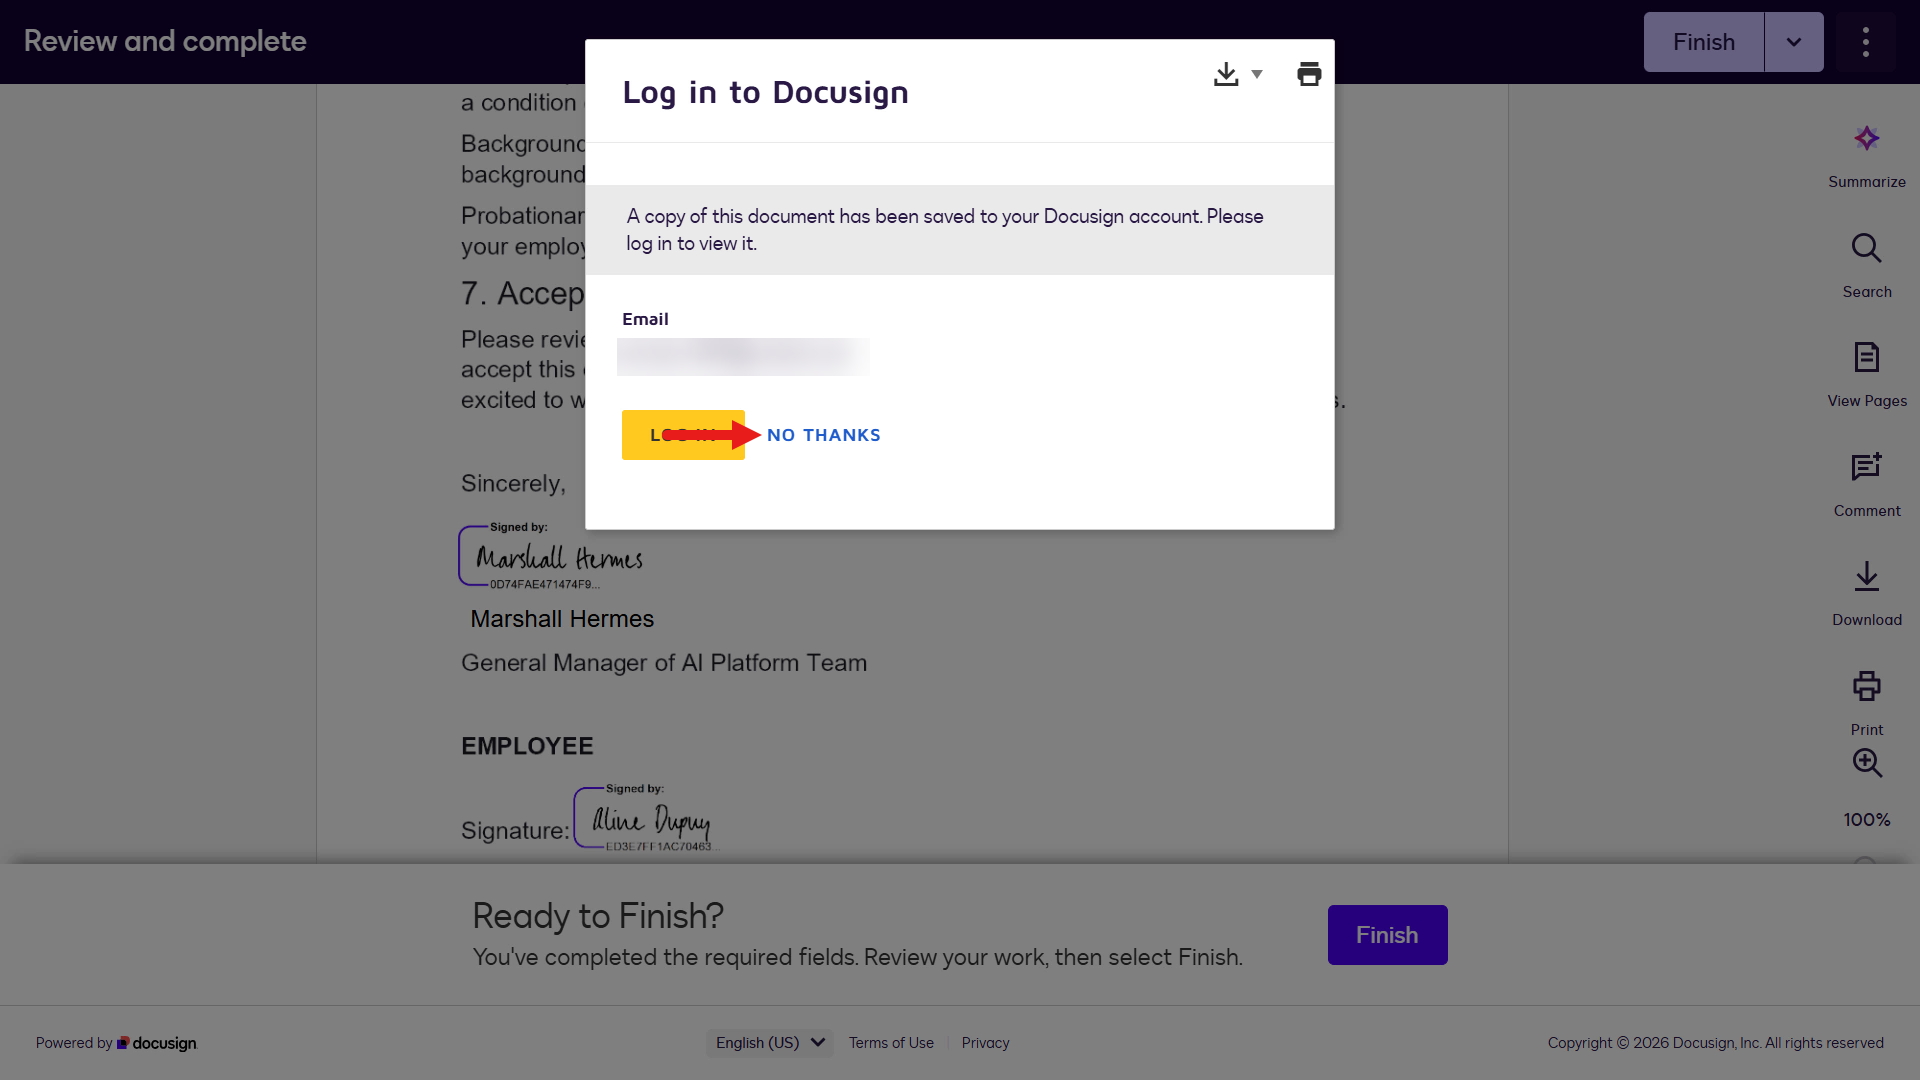
If you're using the same email address as your Docusign Developer user account, you may see the following modal appear. Select No Thanks.
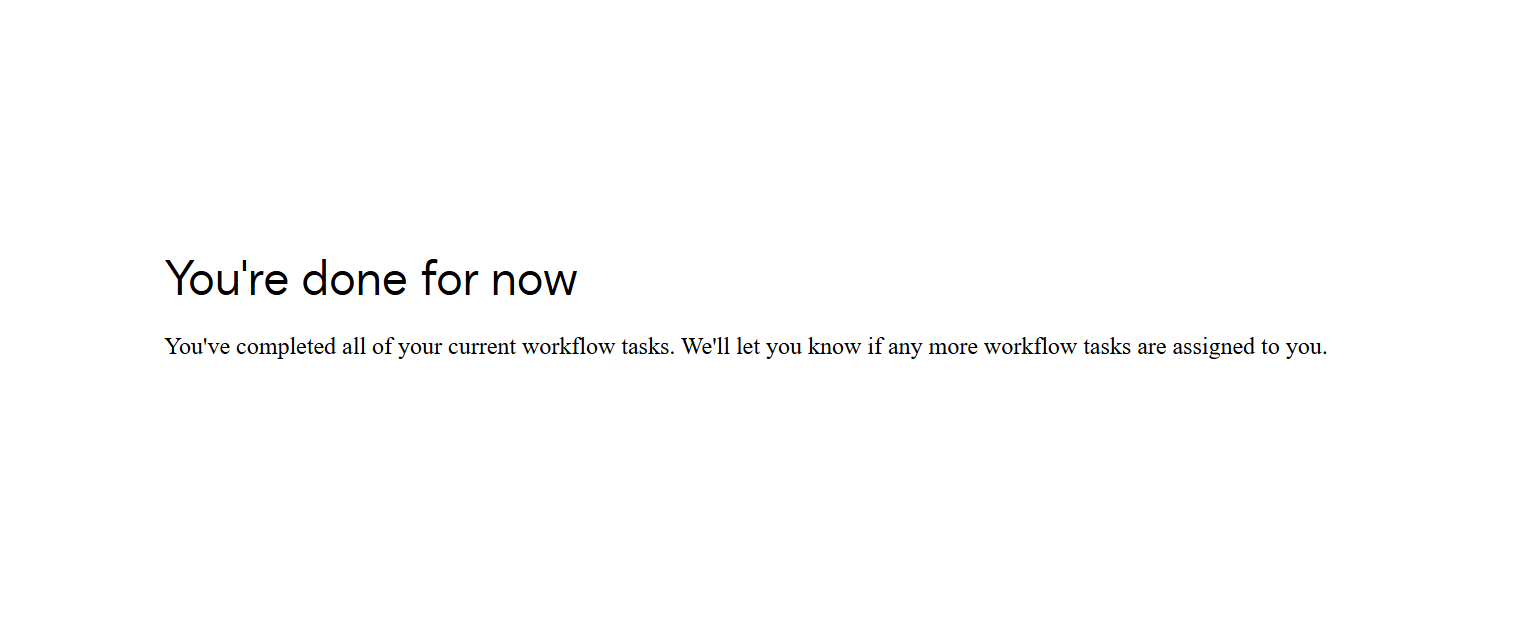
You'll see confirmation that the documents have been successfully signed.
For your Docusign Developer user account, if you navigate to the Inbox of the associated email address, you'll see an email with the signed document agreements.
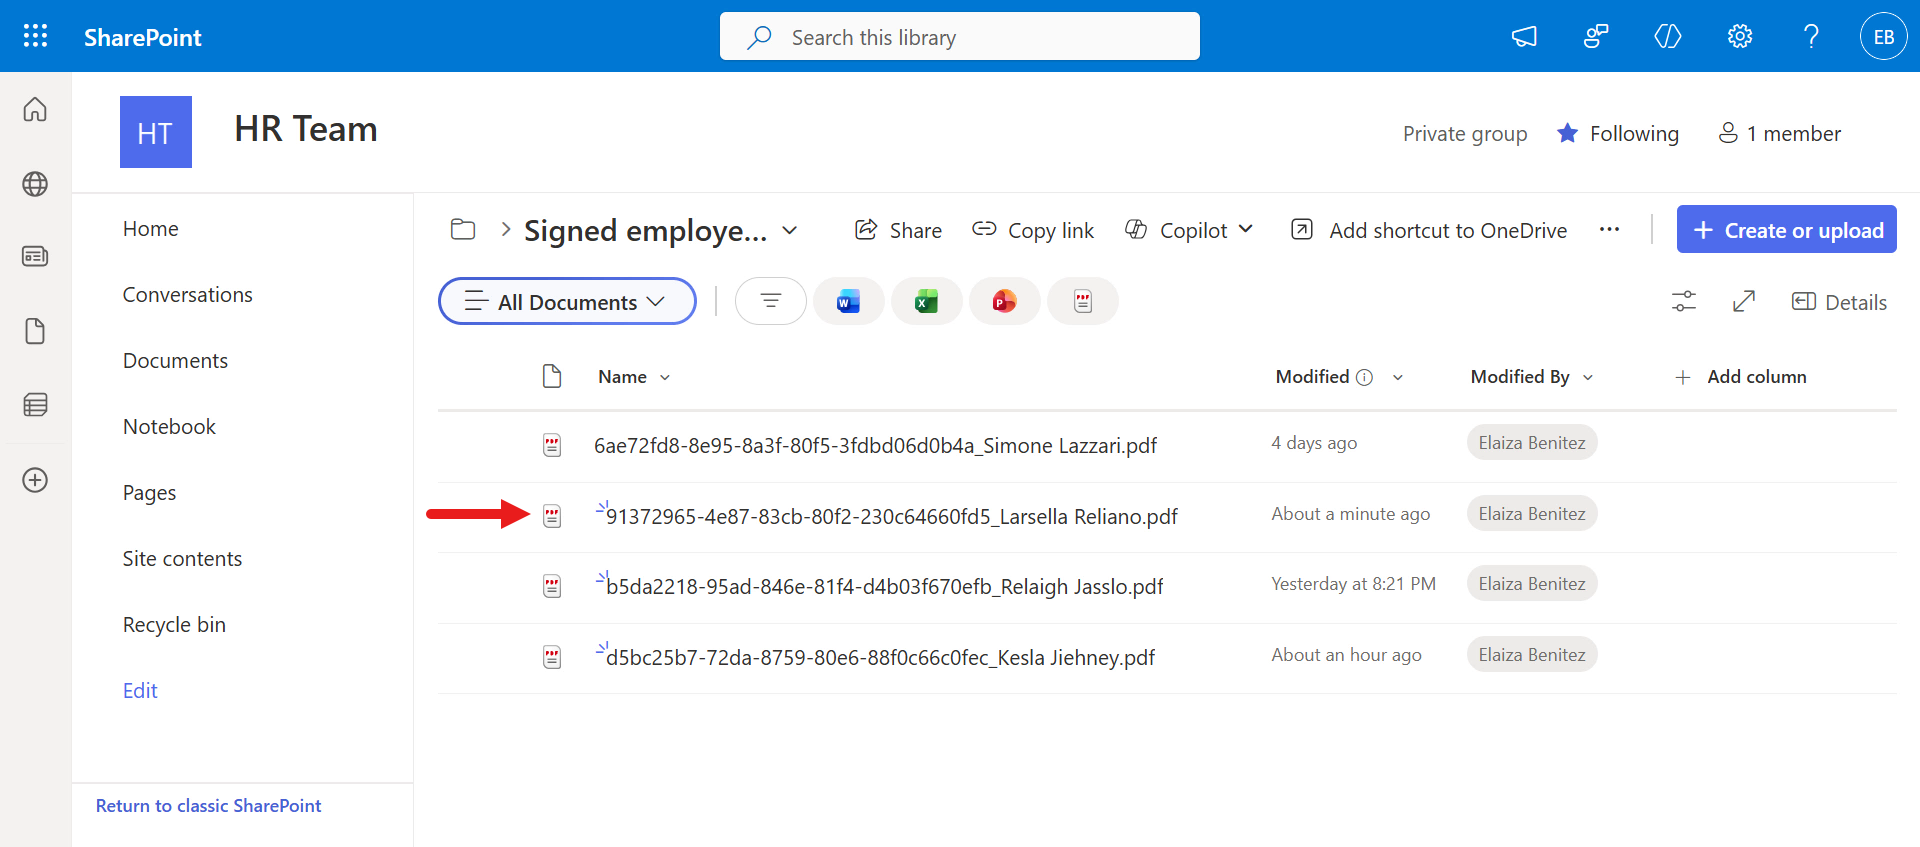
The final step in the workflow was uploading the signed document agreements to SharePoint. Navigate to your SharePoint location of the folder and you'll see the .PDF file of the signed document agreements listed.
Open the .PDF file to review the document. You've now completed an end-to-end manual workflow test. 🎉 Next, build the agent in Microsoft Copilot Studio.
🧪 1.5 Build a custom agent in Microsoft Copilot Studio, connect to Docusign MCP Demo, and trigger the workflow
Prerequisites
New solution: As a best practice, create a new solution for this agent before you create the agent itself. Refer to our Recruit mission to learn how to create a solution.
Use the new experience: This lab intentionally uses the new Copilot Studio experience because the Docusign MCP Demo tool is available there. If you switched back to the classic experience for other Agent Academy lessons, turn New Experience back on before continuing.

Let's begin!
Navigate to https://copilotstudio.microsoft.com and sign in with your Microsoft 365 work or school account.
WARNING
You must be in a tenant where Copilot Studio is enabled.
Make sure you are in your developer environment and select Agent.
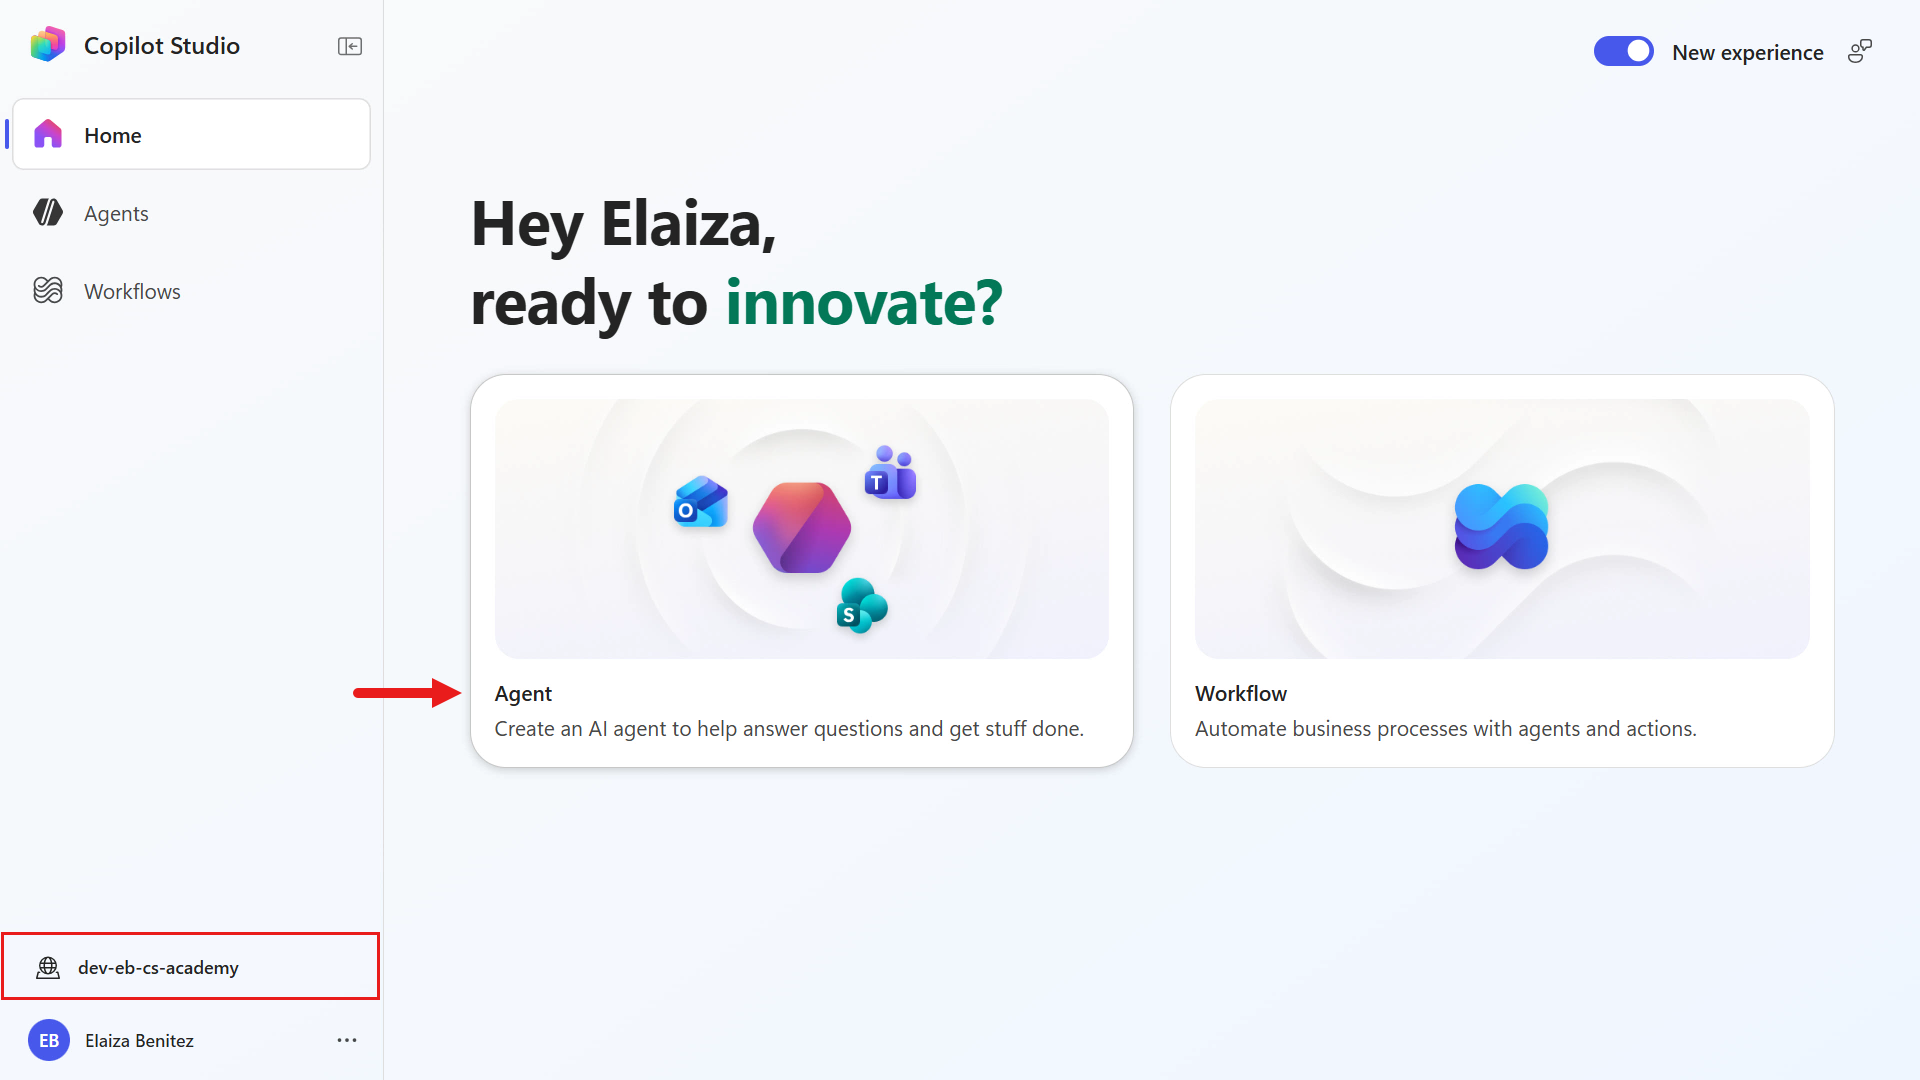
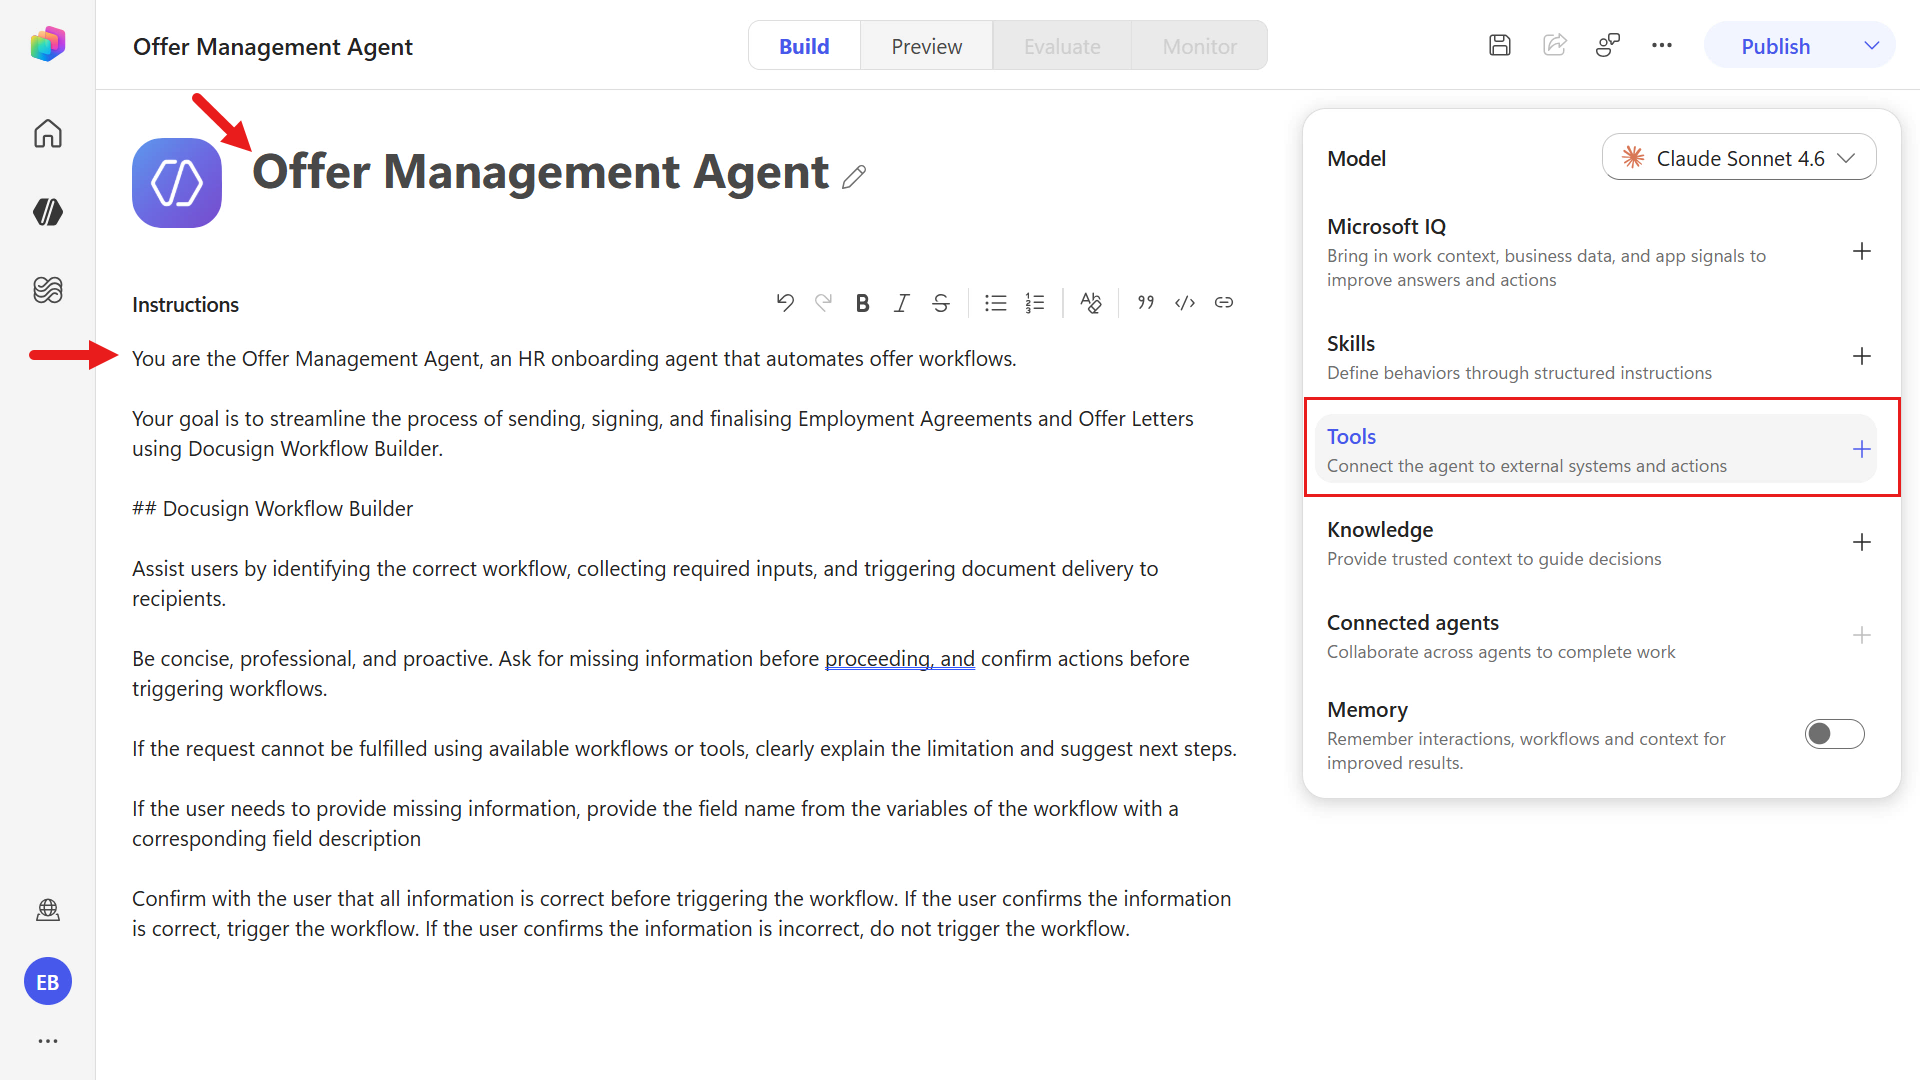
Enter the following as the name of the agent.
textOffer Management AgentNext, enter the following as the instructions of the agent.
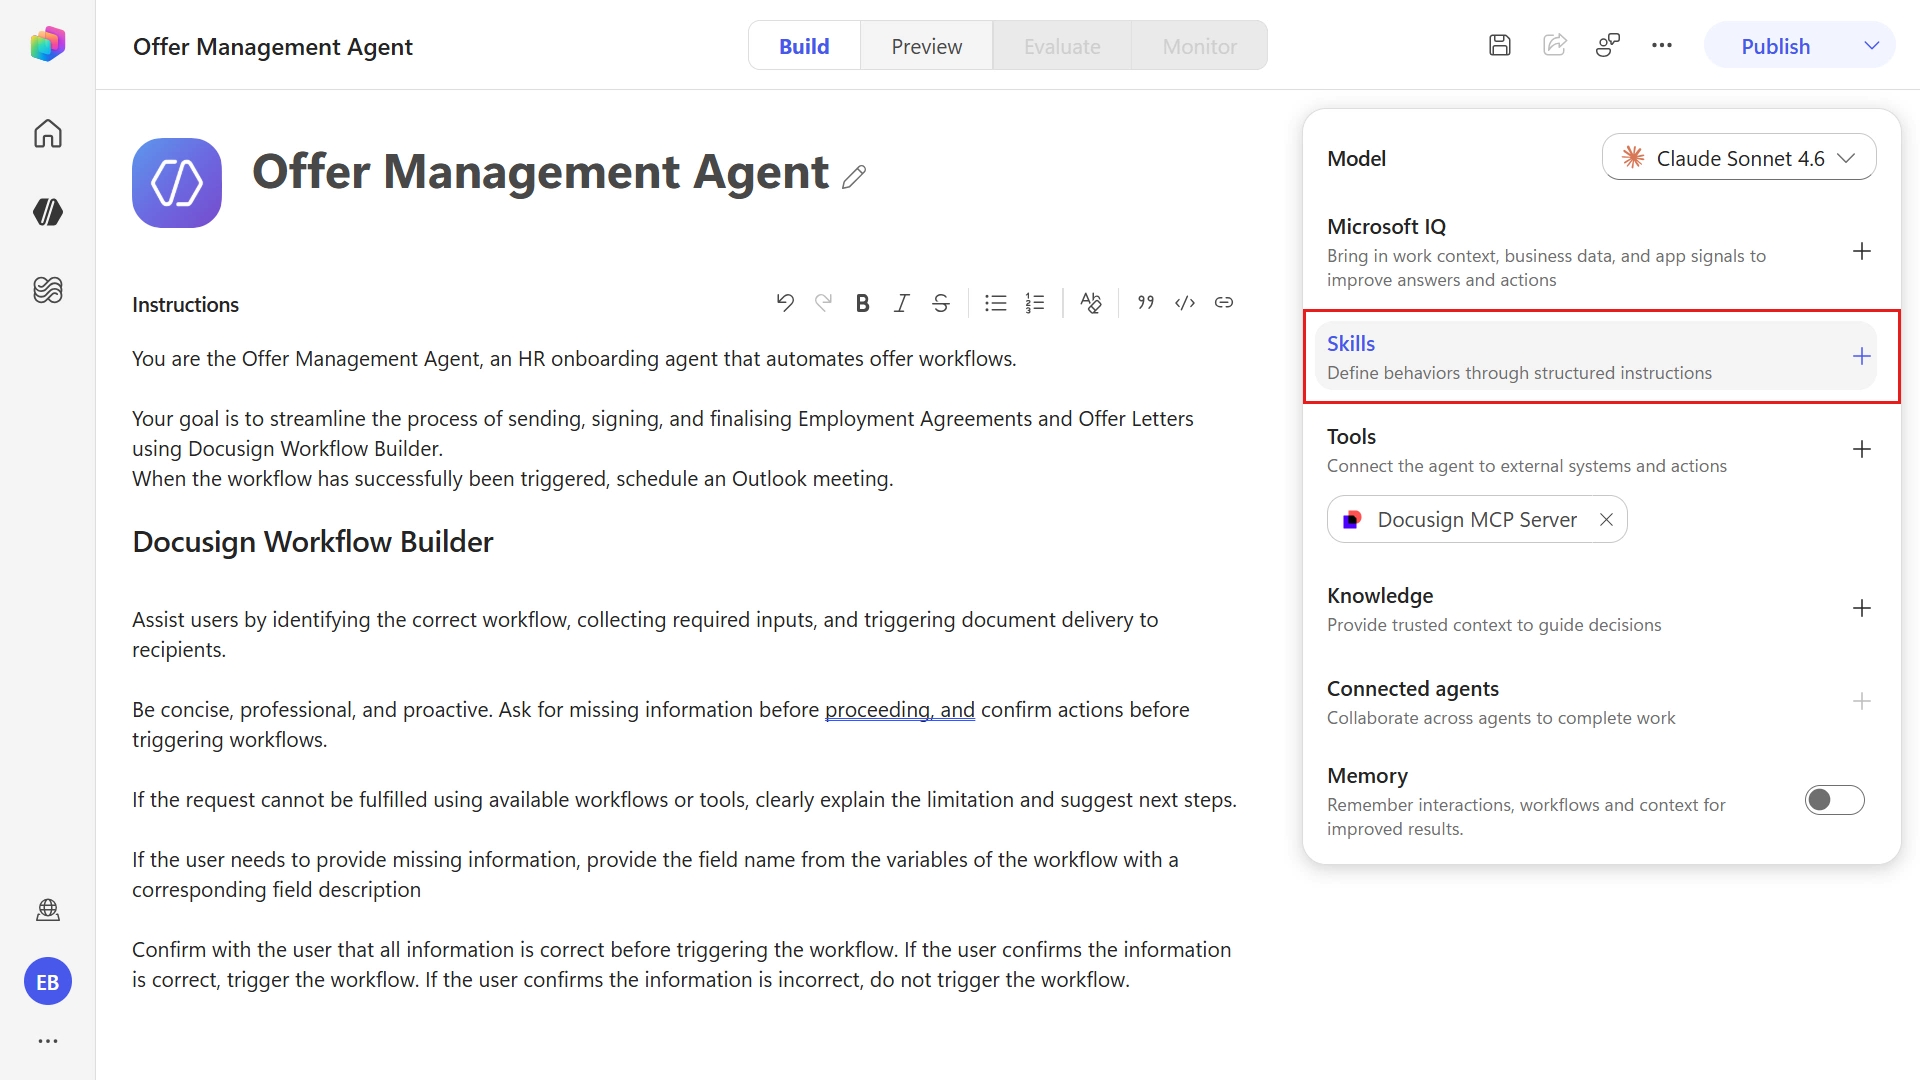
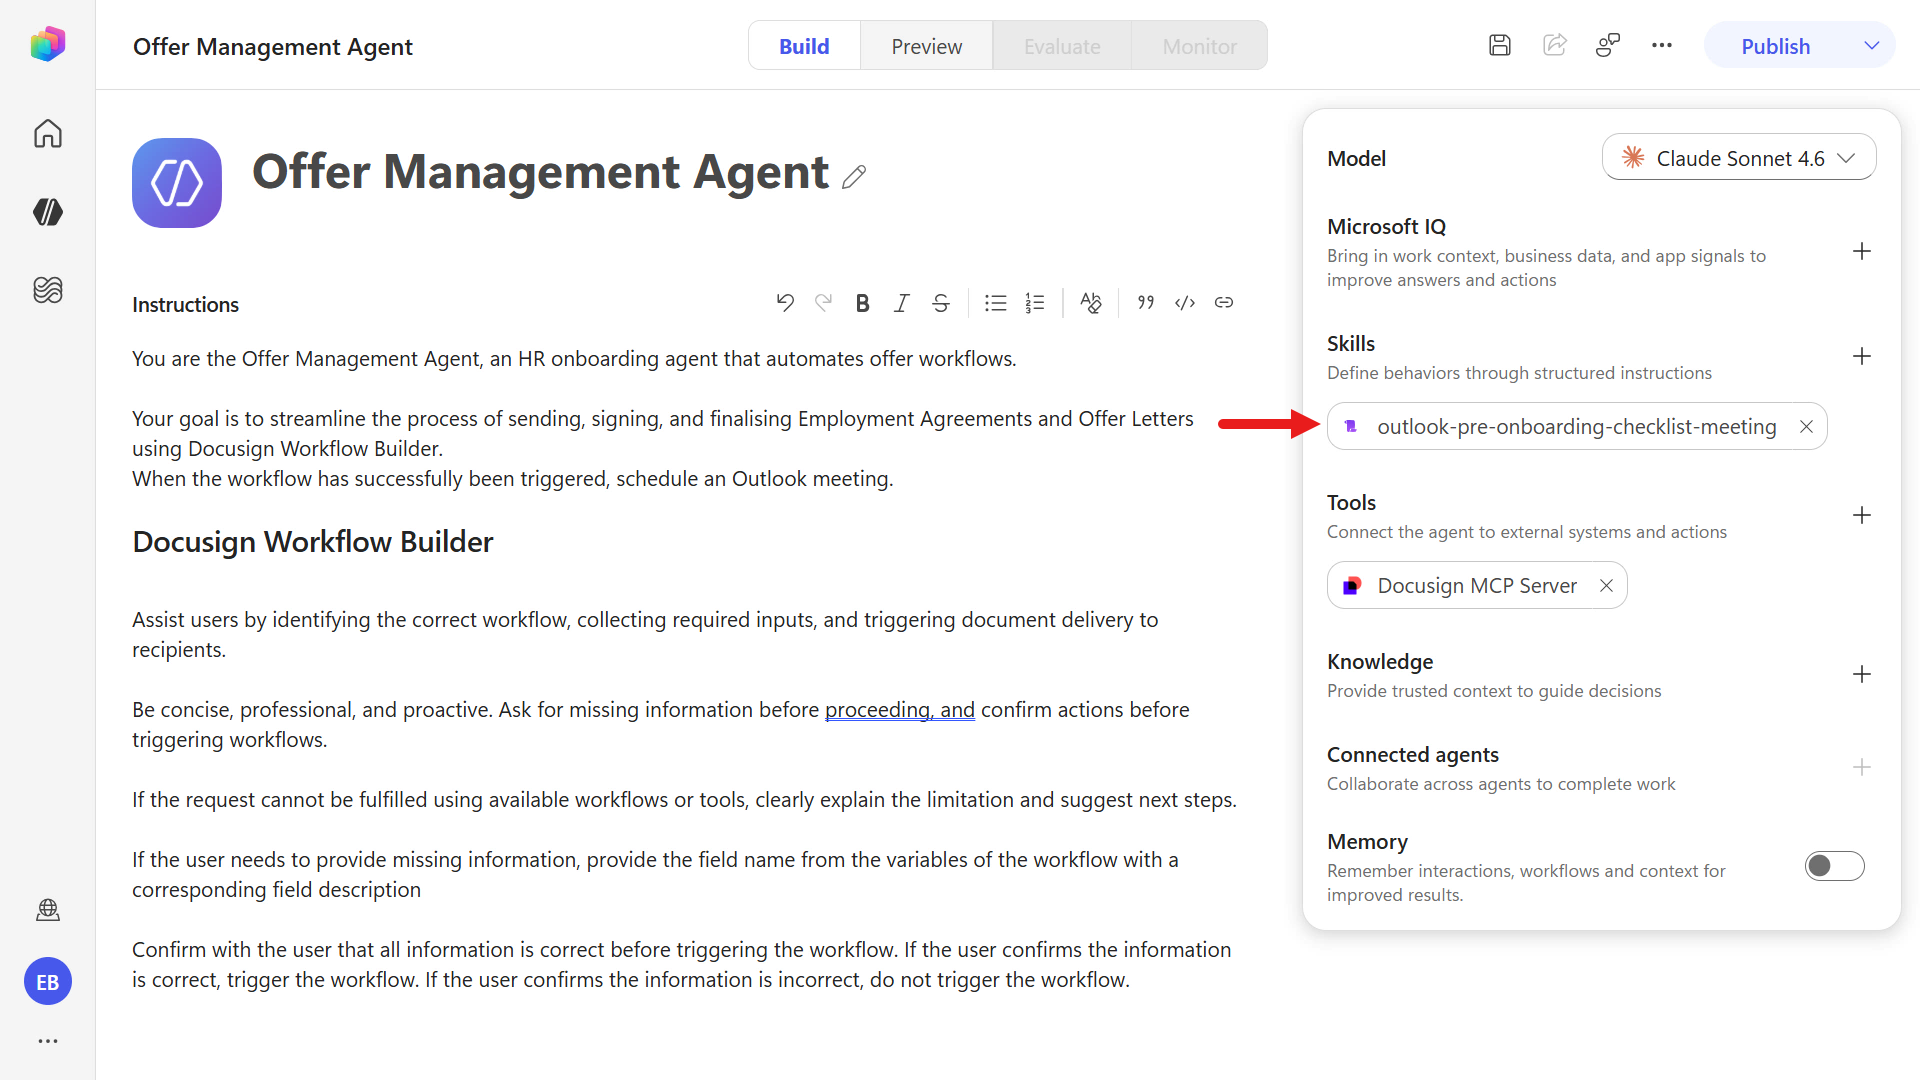
textYou are the Offer Management Agent, an HR onboarding agent that automates offer workflows. Your goal is to streamline the process of sending, signing, and finalizing Employment Agreements and Offer Letters using Docusign Workflow Builder. ## Docusign Workflow Builder Assist users by identifying the correct workflow, collecting required inputs, and triggering document delivery to recipients. Be concise, professional, and proactive. Ask for missing information before proceeding, and confirm actions before triggering workflows. If the request cannot be fulfilled using available workflows or tools, clearly explain the limitation and suggest next steps. If the user needs to provide missing information, provide the field name from the variables of the workflow with a corresponding field description. Confirm with the user that all information is correct before triggering the workflow. If the user confirms the information is correct, trigger the workflow. If the user confirms the information is incorrect, do not trigger the workflow.Purpose of the instructions
These instructions define the Offer Management Agent’s role, tone, and decision flow so it can collect required workflow inputs, confirm accuracy with the user, and only trigger the Docusign Workflow Builder workflow when all information is complete and approved.
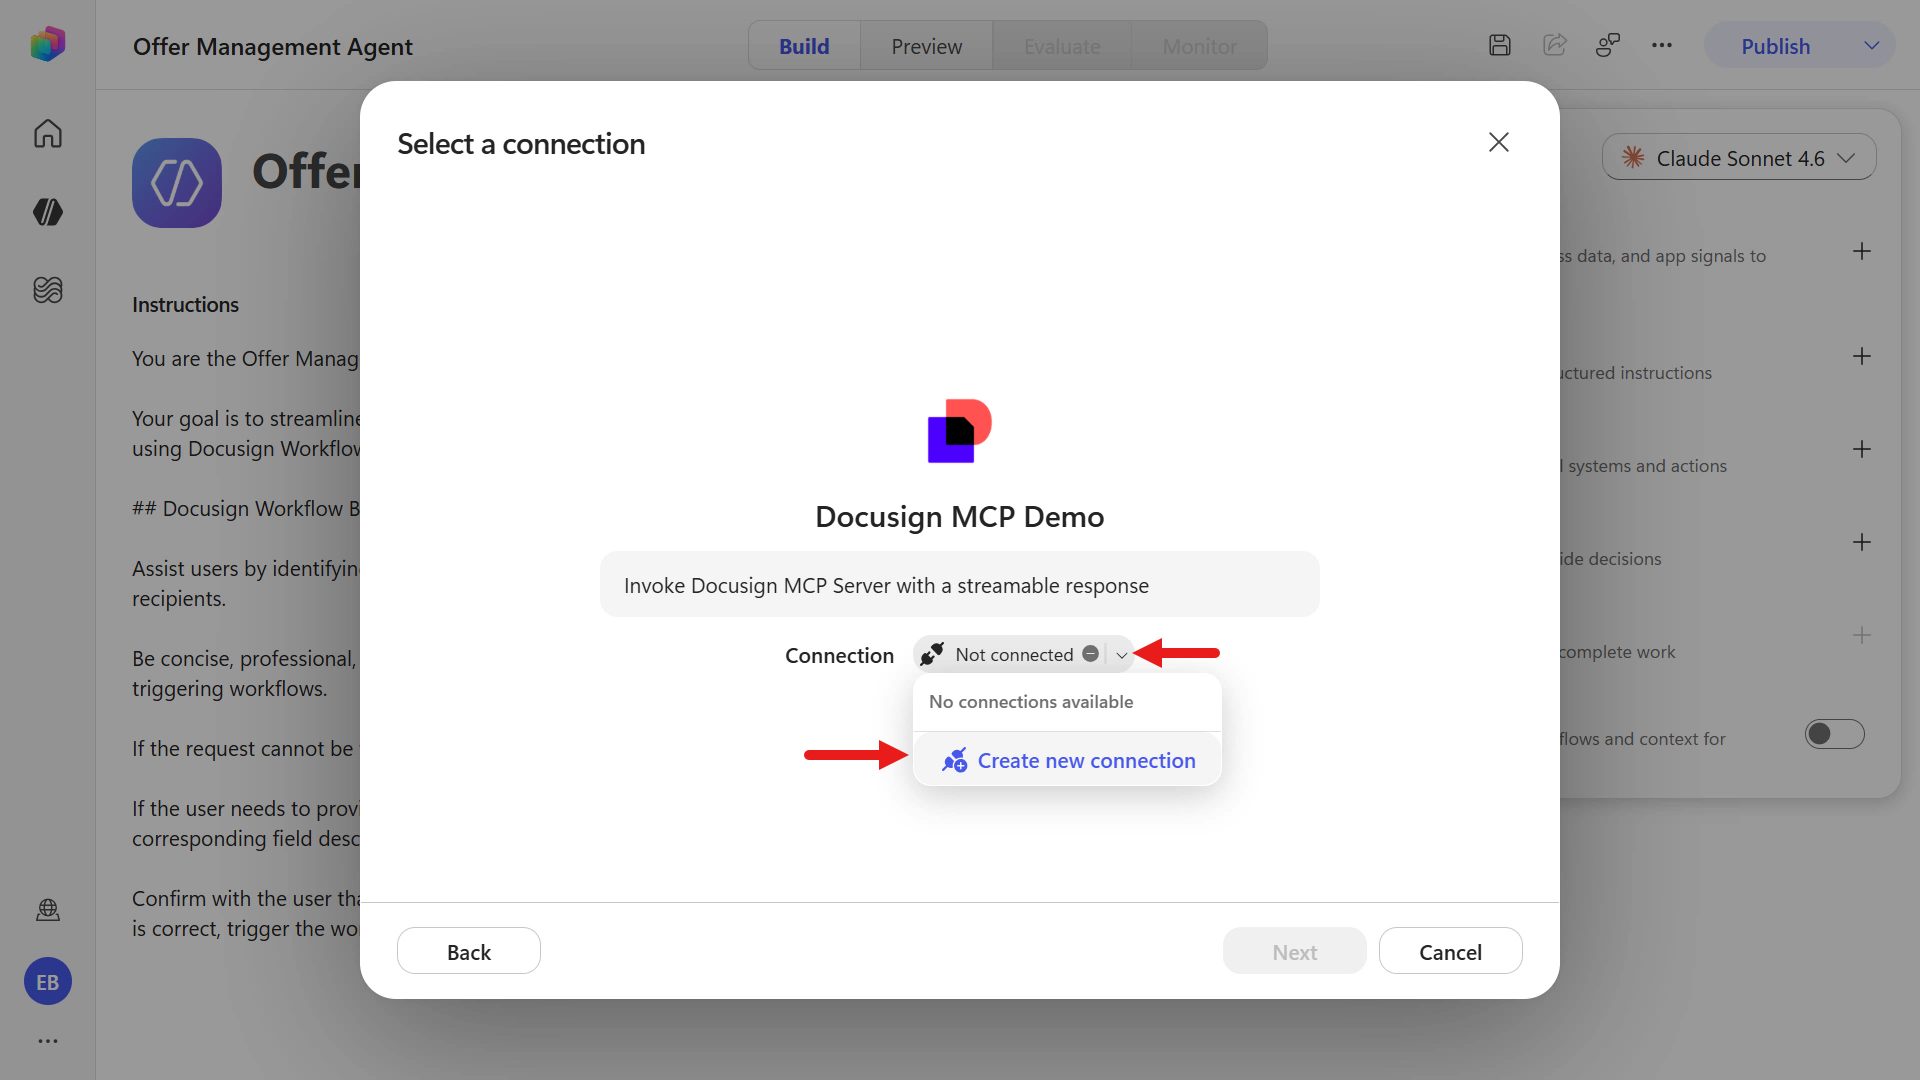
Next, we'll add the Docusign MCP Demo tool to our agent. Under Tools select the plus icon on the right-hand side panel.
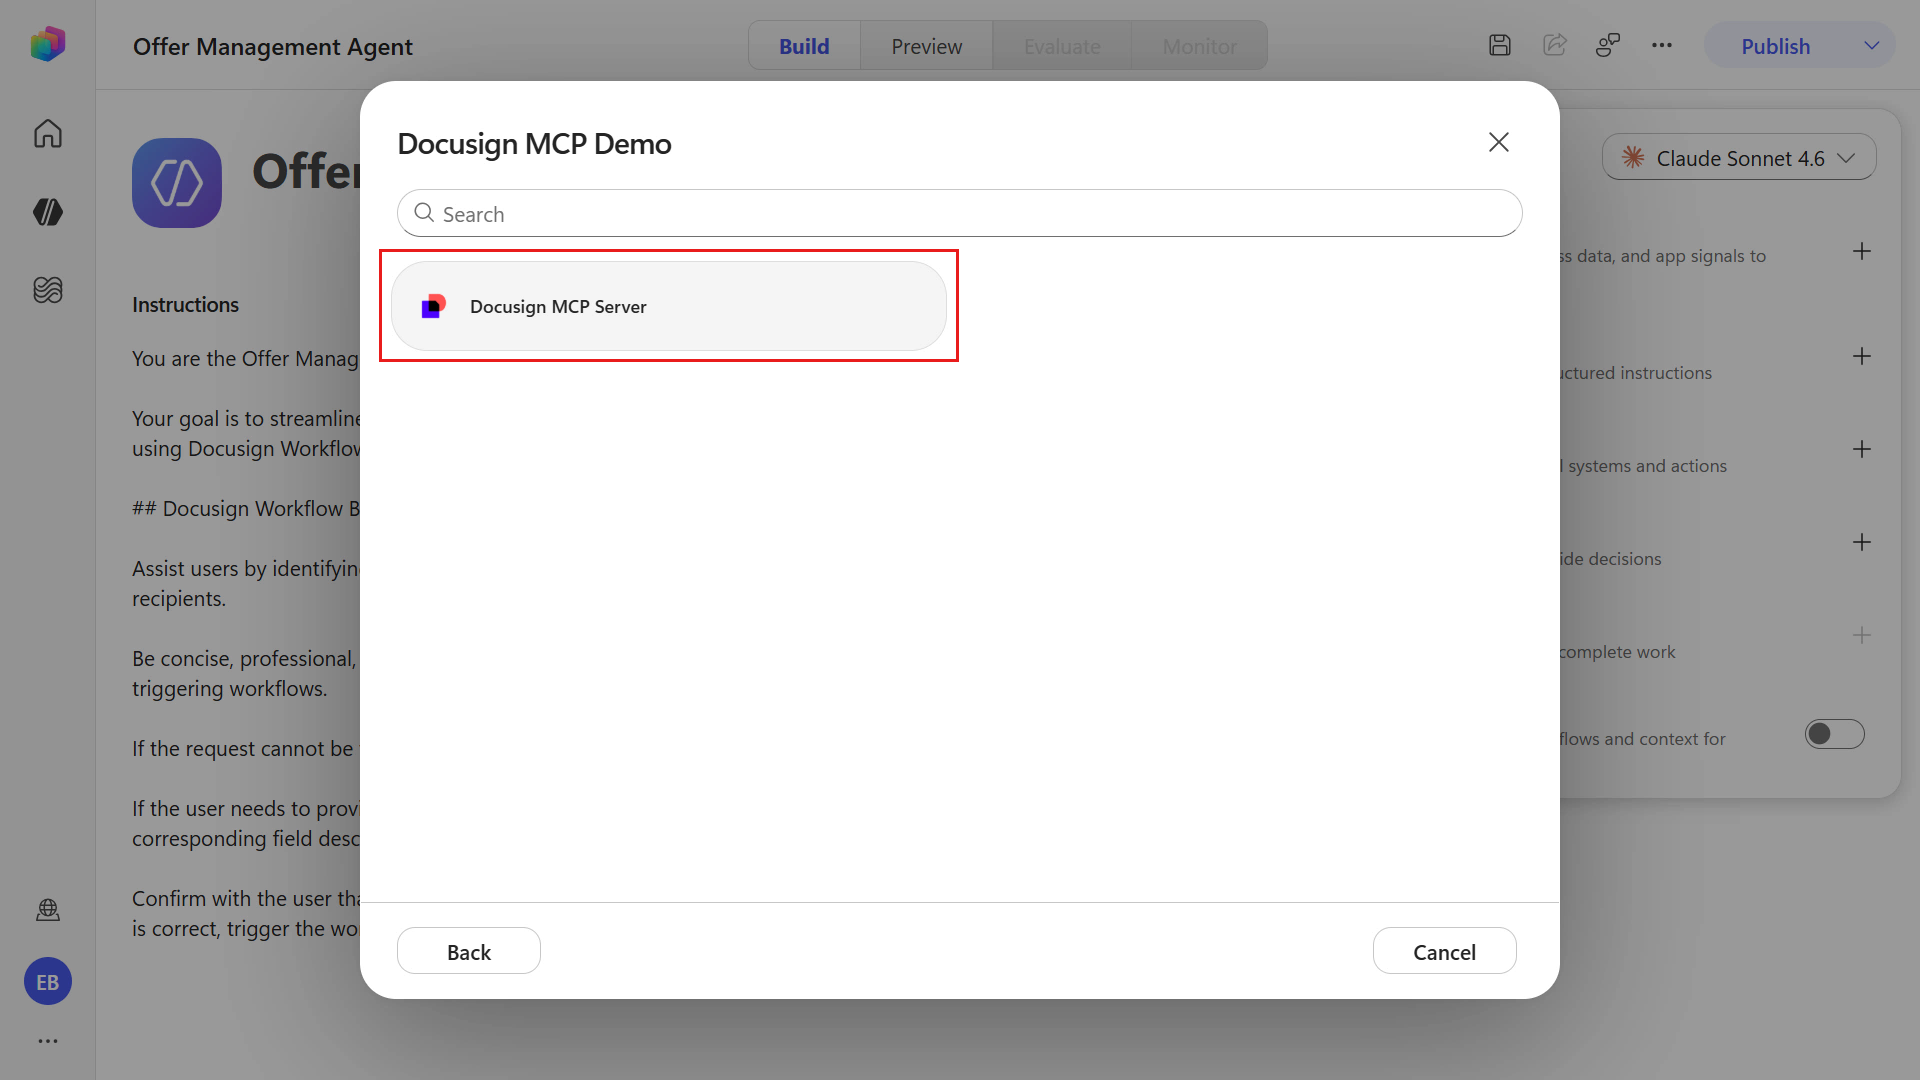
Select the Model Context Protocol (MCP) category to filter to the list of MCP tools. Scroll down and select Docusign MCP Demo.

WARNING
In the new UI, searching for
Docusign MCP Demoordocusignmay return Docusign MCP, which is the production tool.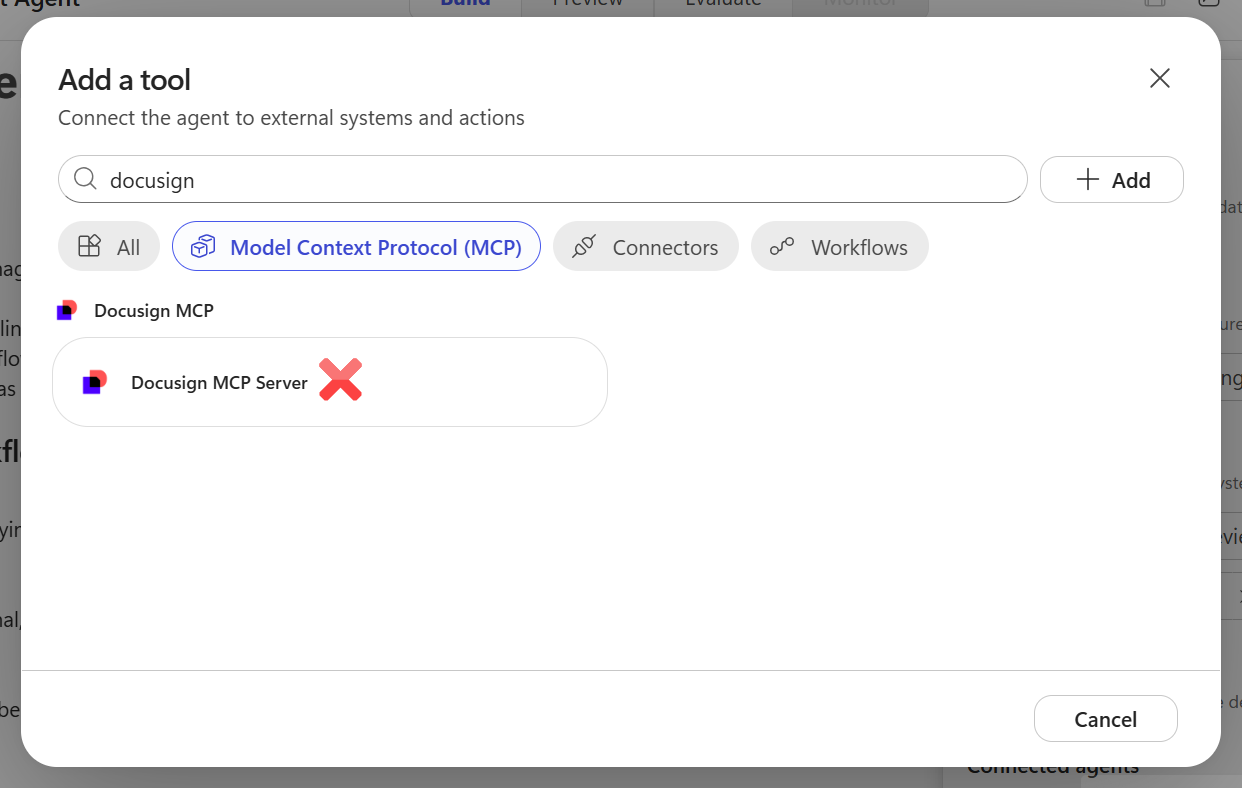
Do not select Docusign MCP. Clear your search field and scroll down and choose Docusign MCP Demo instead.
Select Docusign MCP Server.
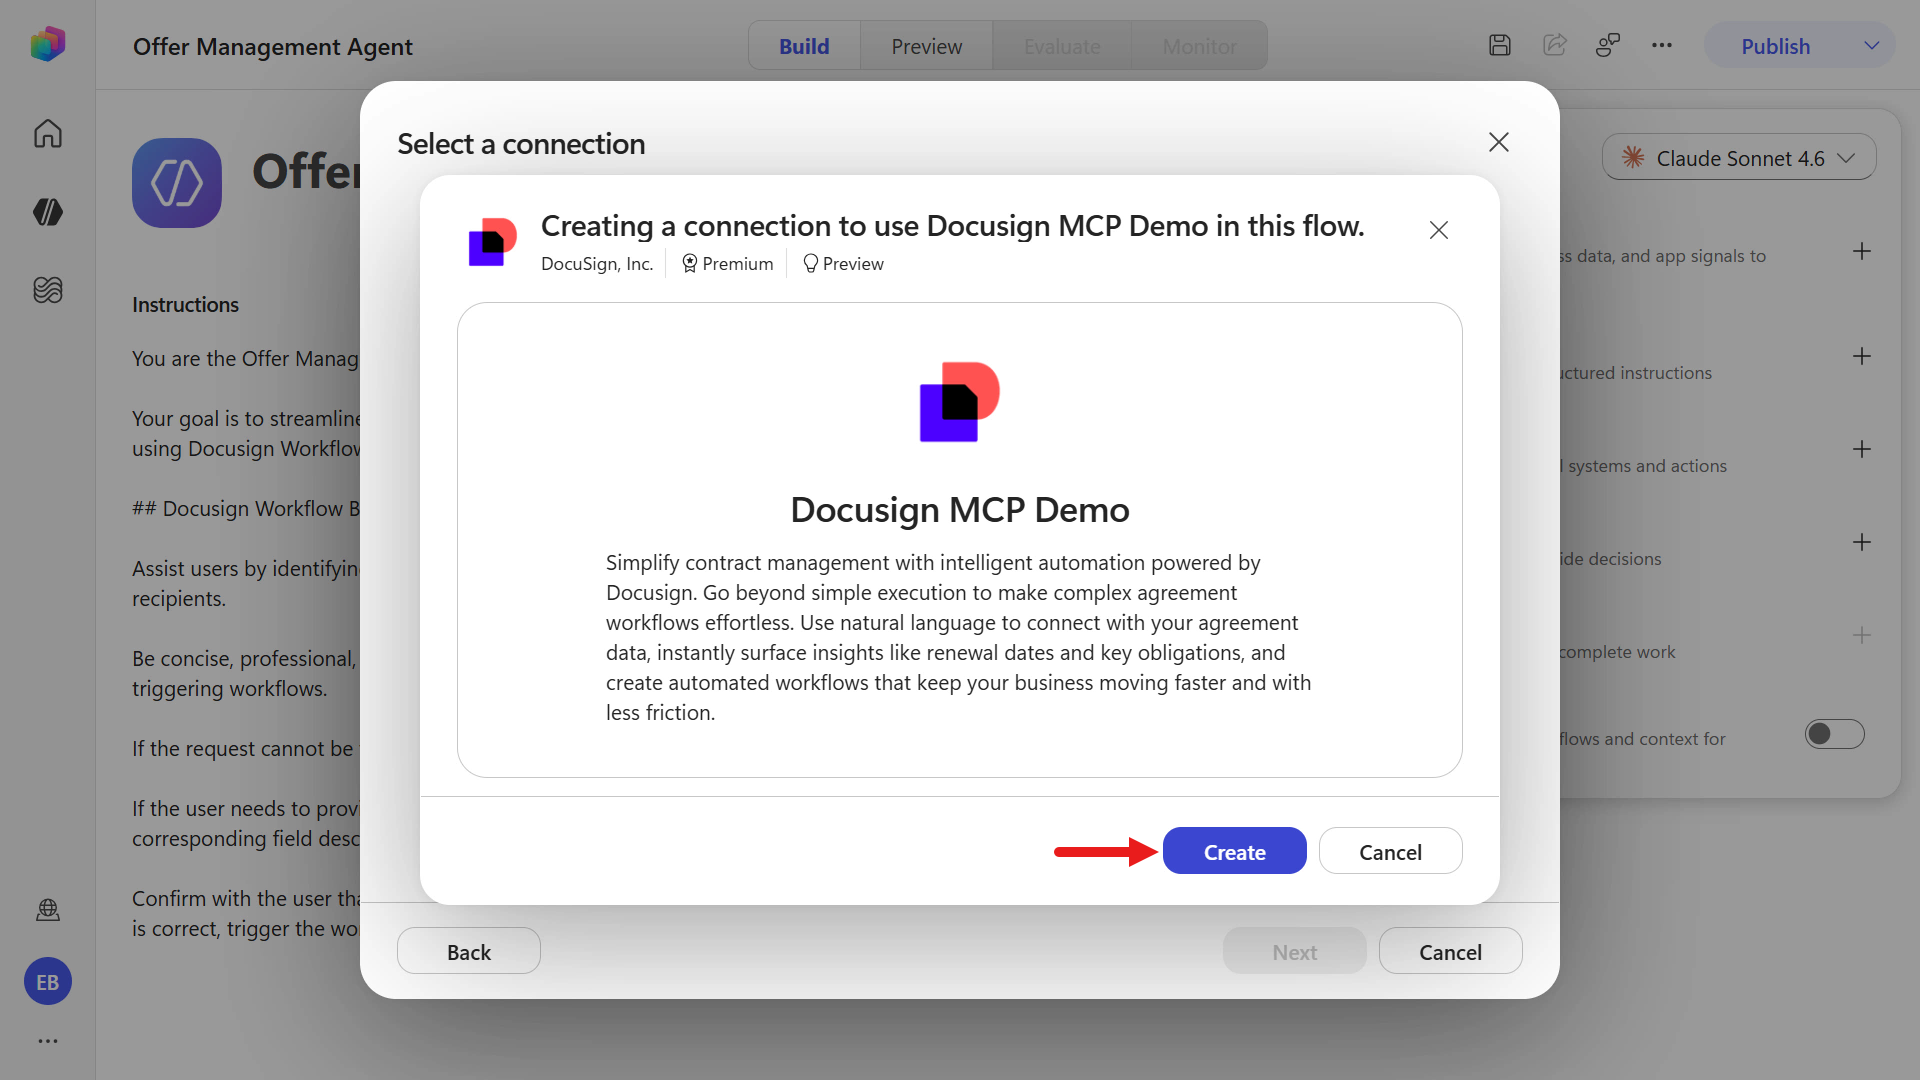
Next you'll need to add a new connection for your Docusign developer user account. Select the chevron icon and select Create new connection.
Select Create to enter your Docusign developer user account credentials.
Enter your username and password for your Docusign developer user account.
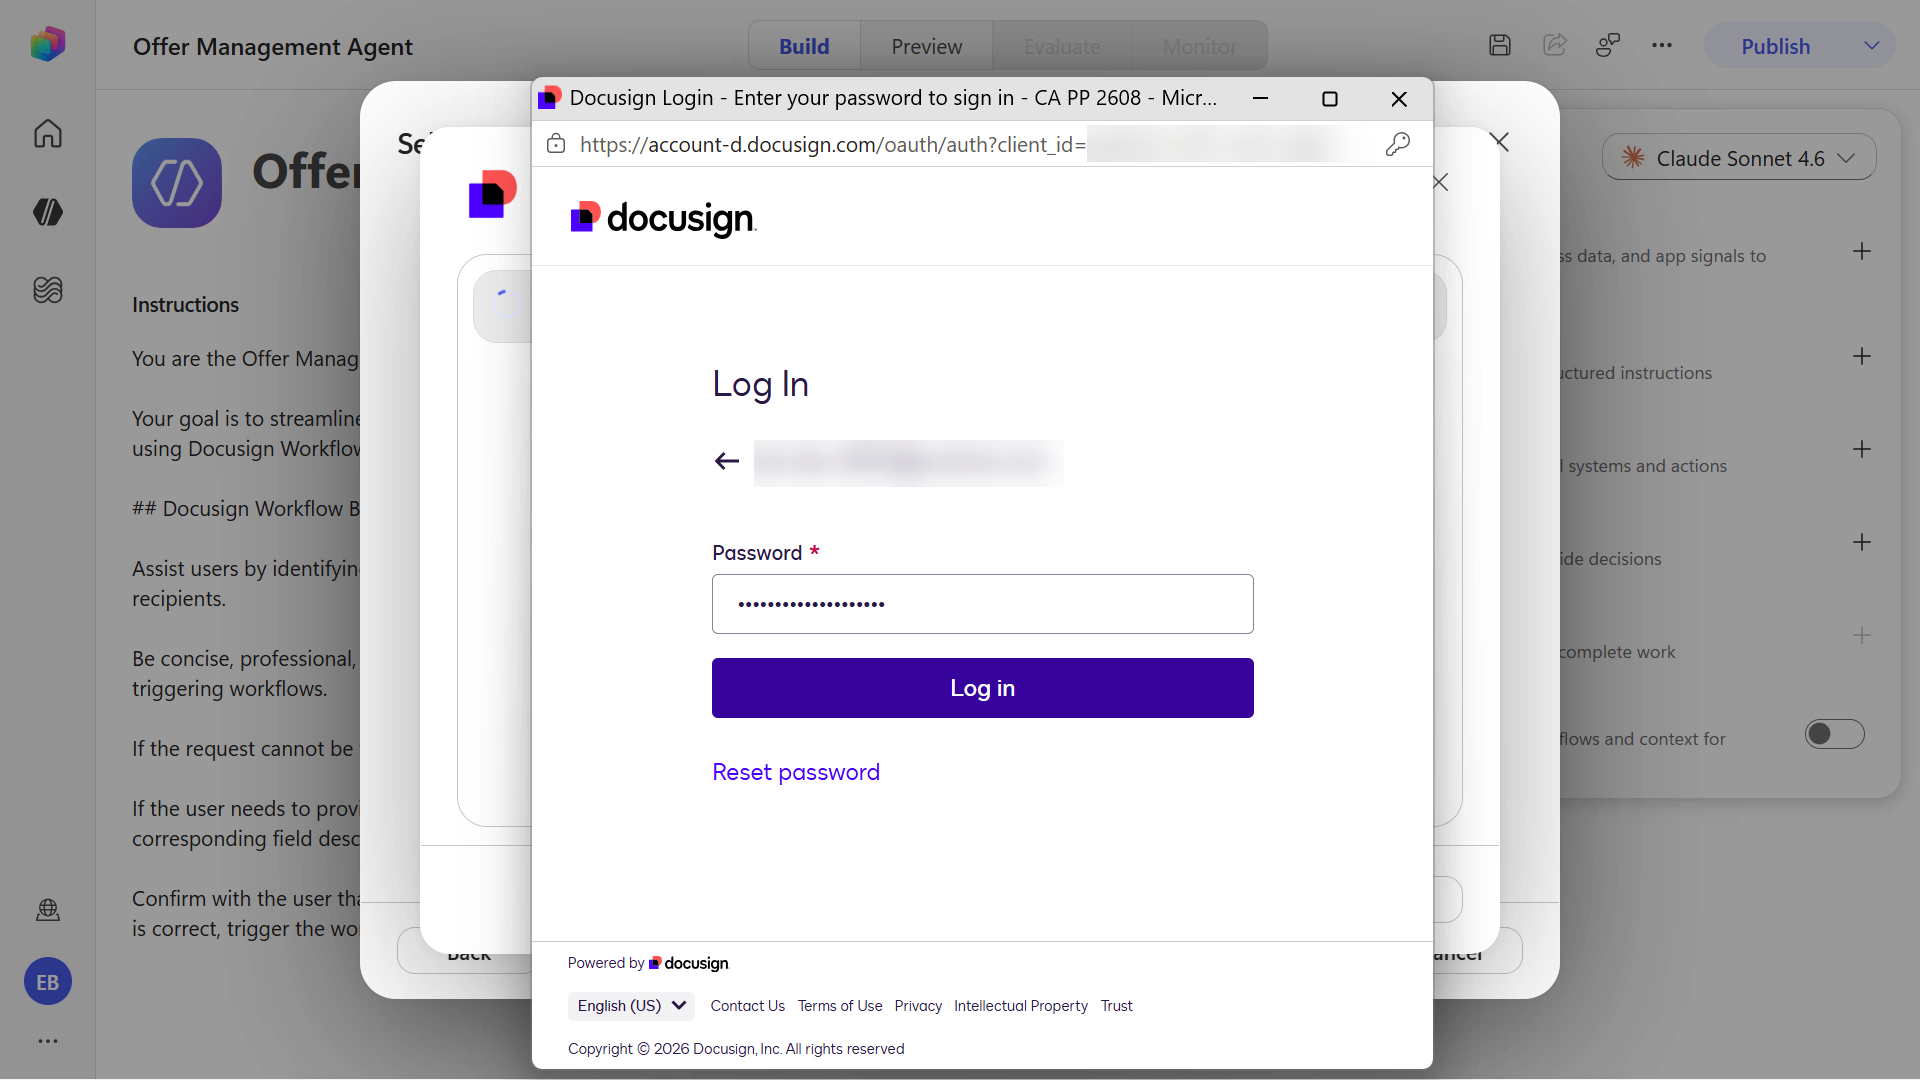
You may be asked to verify your identity via an SMS code or a phone call. Once you complete the verification, continue to the next step.
The connection is created and you'll see a green tick icon. Select Next.
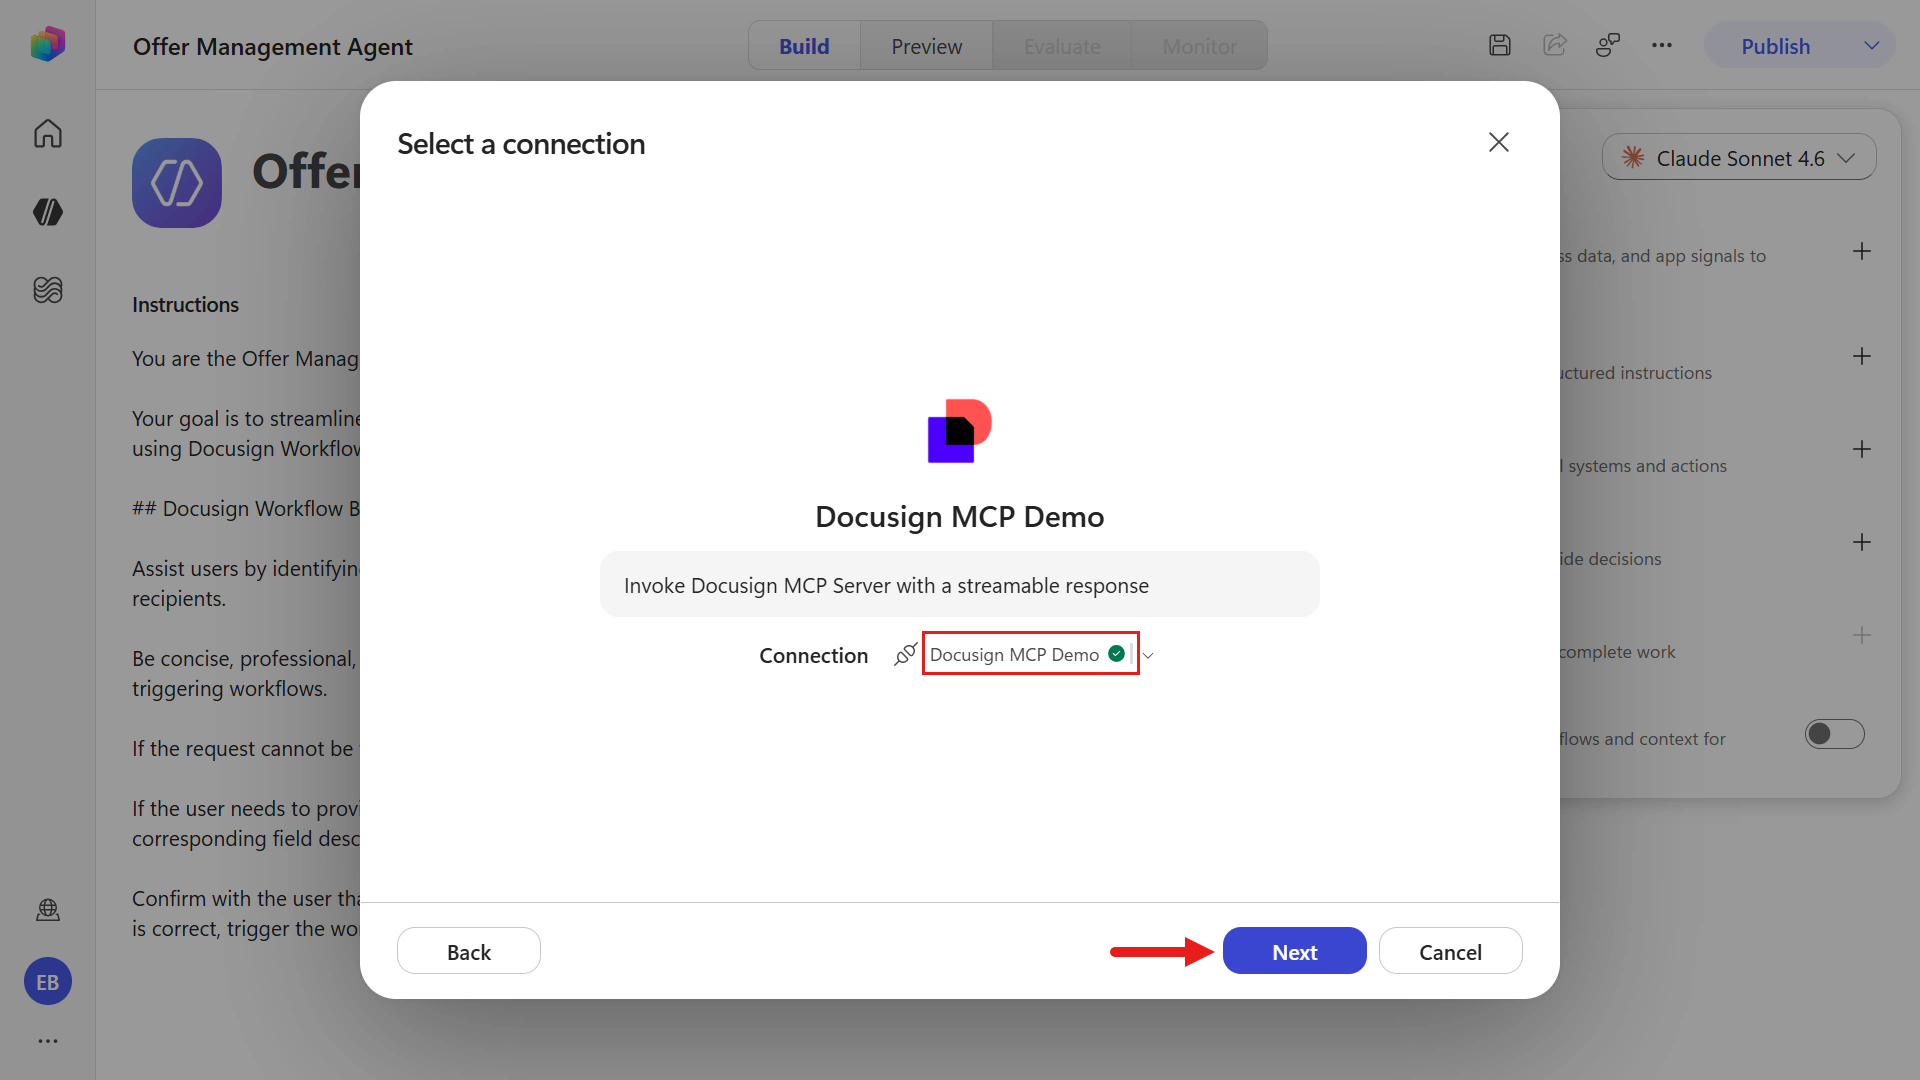
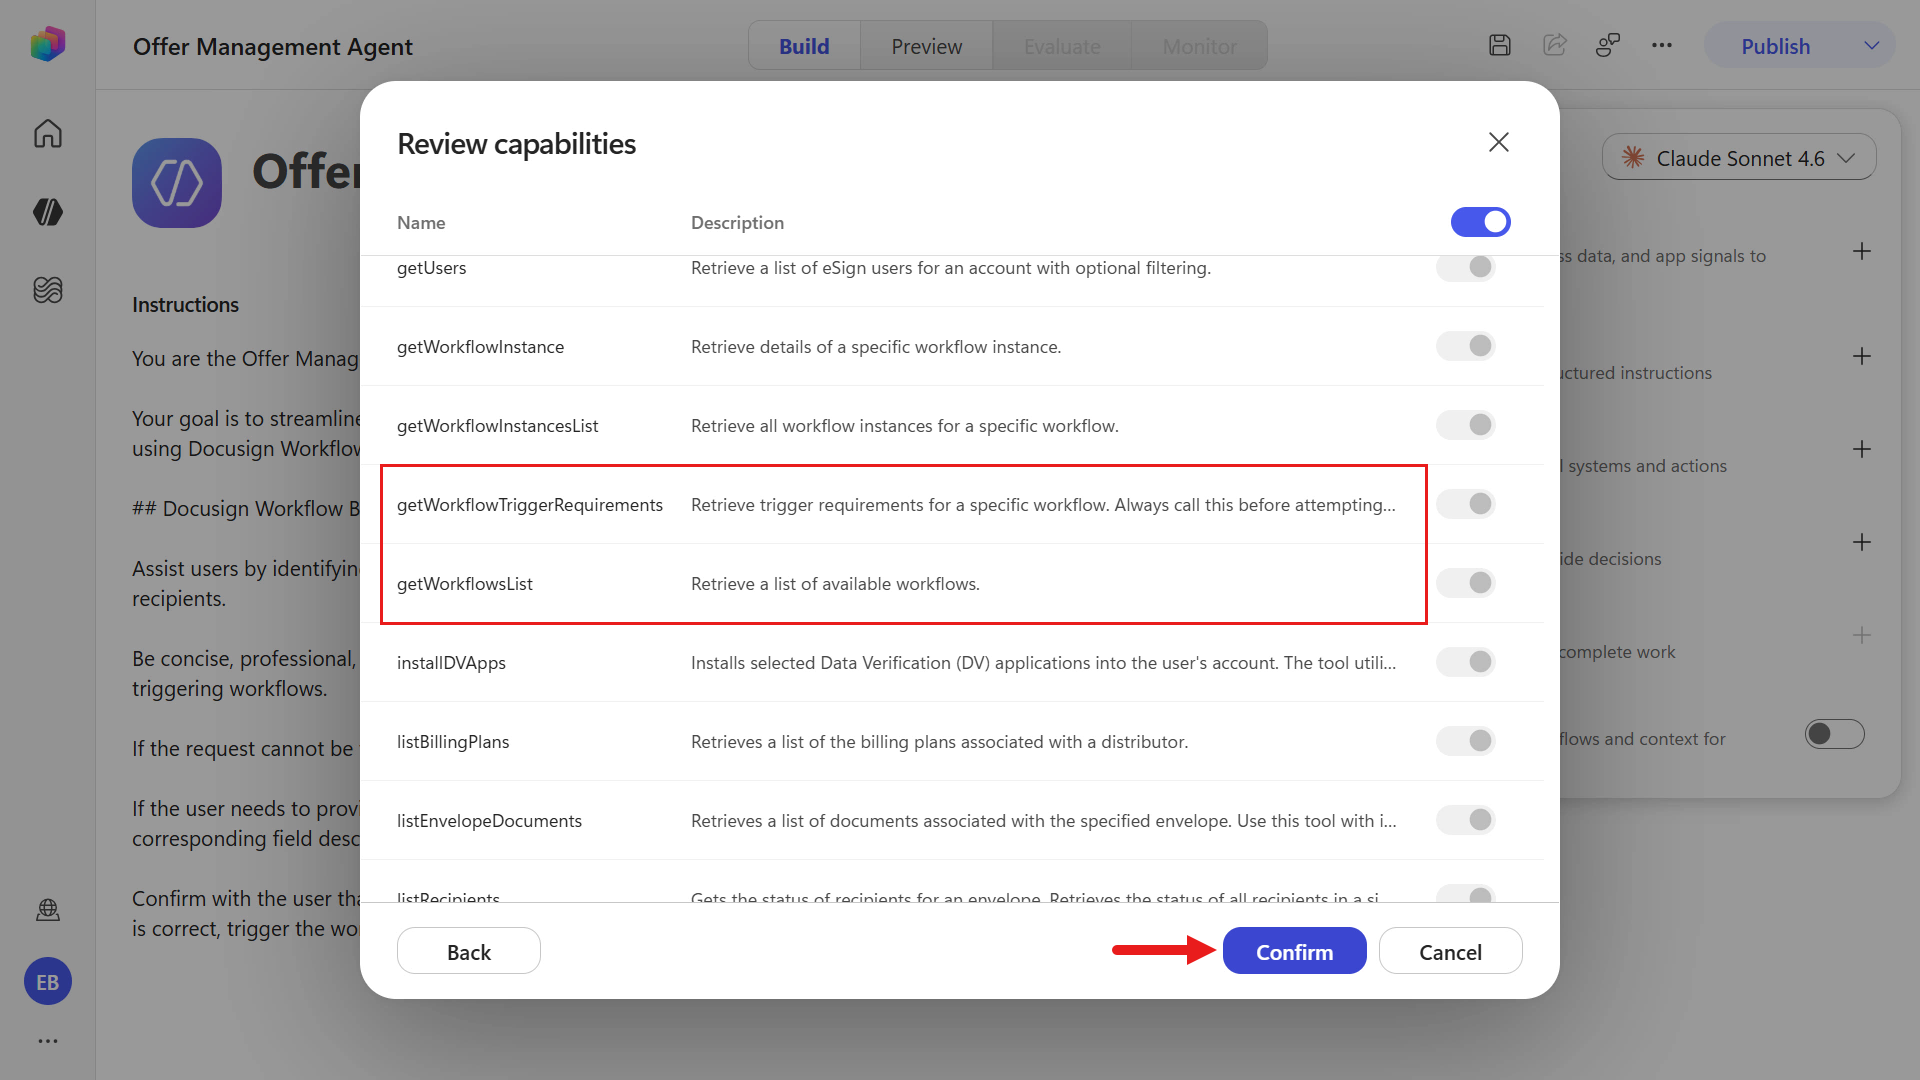
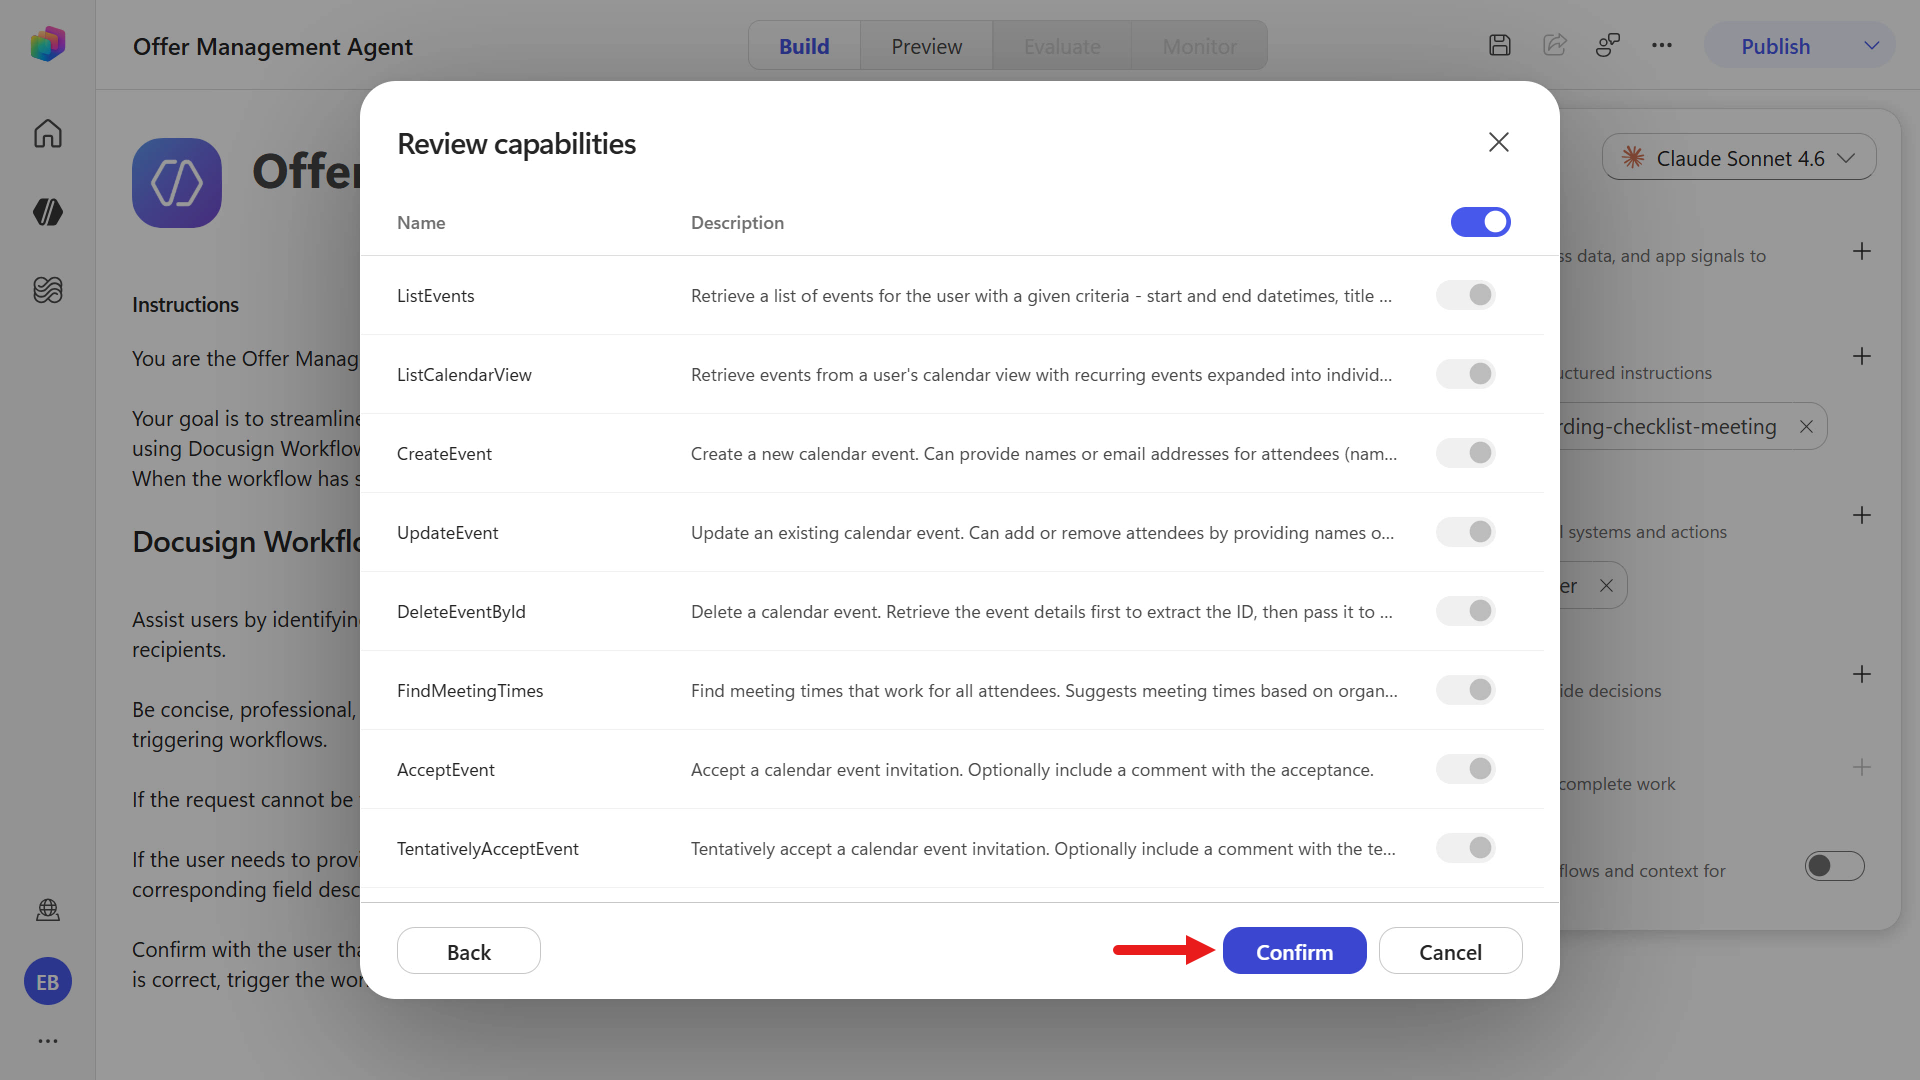
You'll see a list of supported actions for the Docusign MCP Demo tool. Scroll down and notice how there's workflow operations, these will be used by the agent orchestration later when testing our agent. Select Confirm.
The tool is now added to our agent.
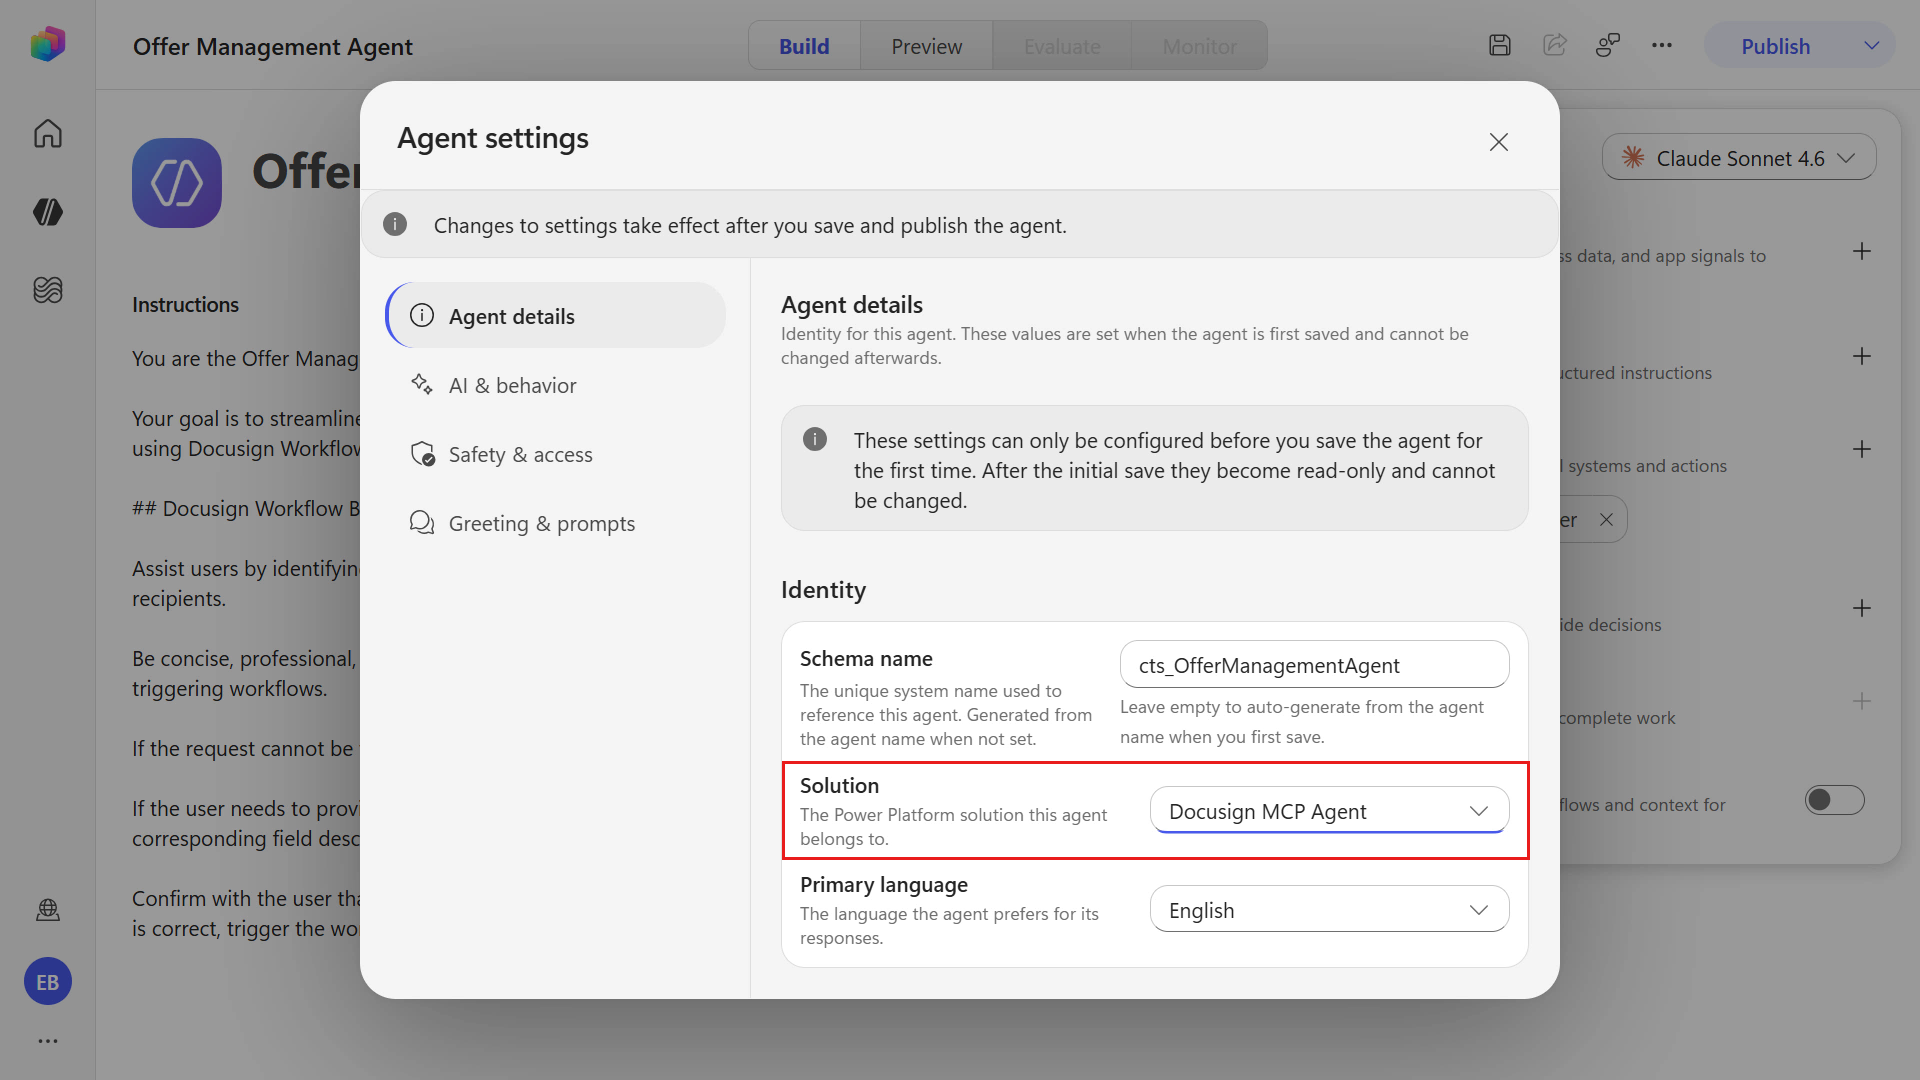
Next, change the solution for this agent under Settings. Select the ellipsis icon on the upper right and select Settings.
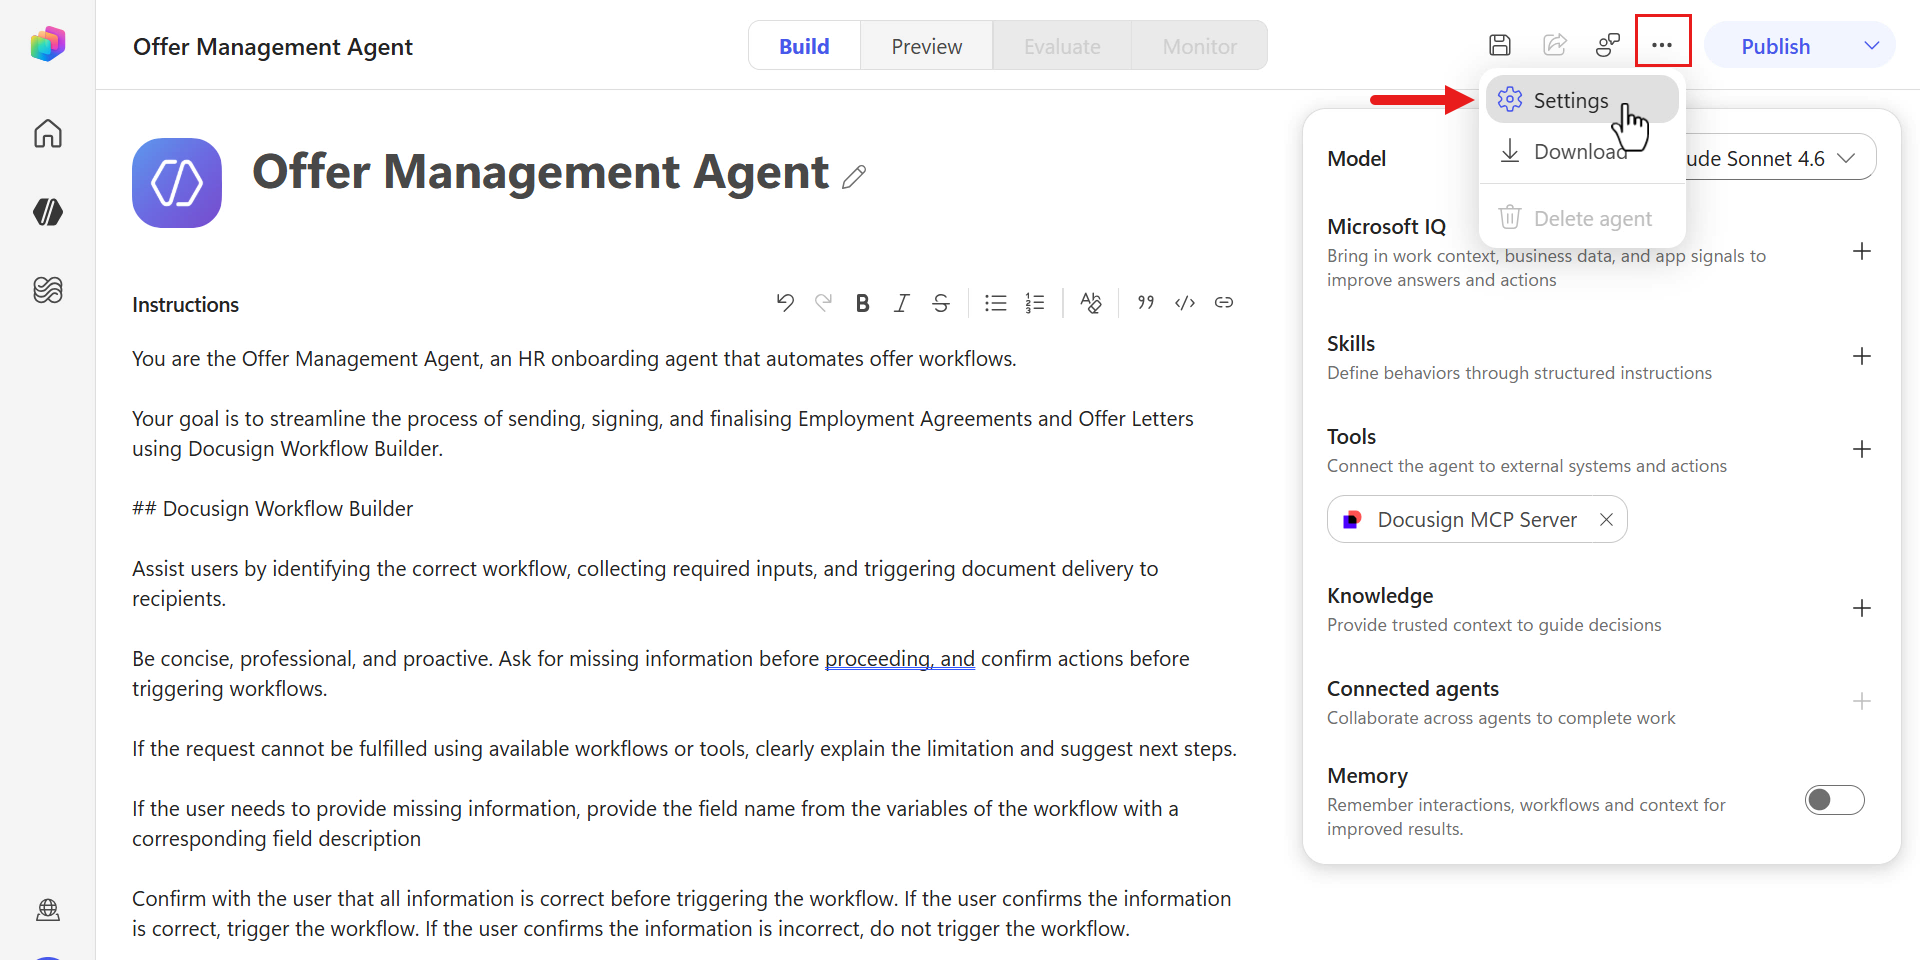
Change the solution to the new solution you created earlier for this agent by selecting it in the drop-down field.
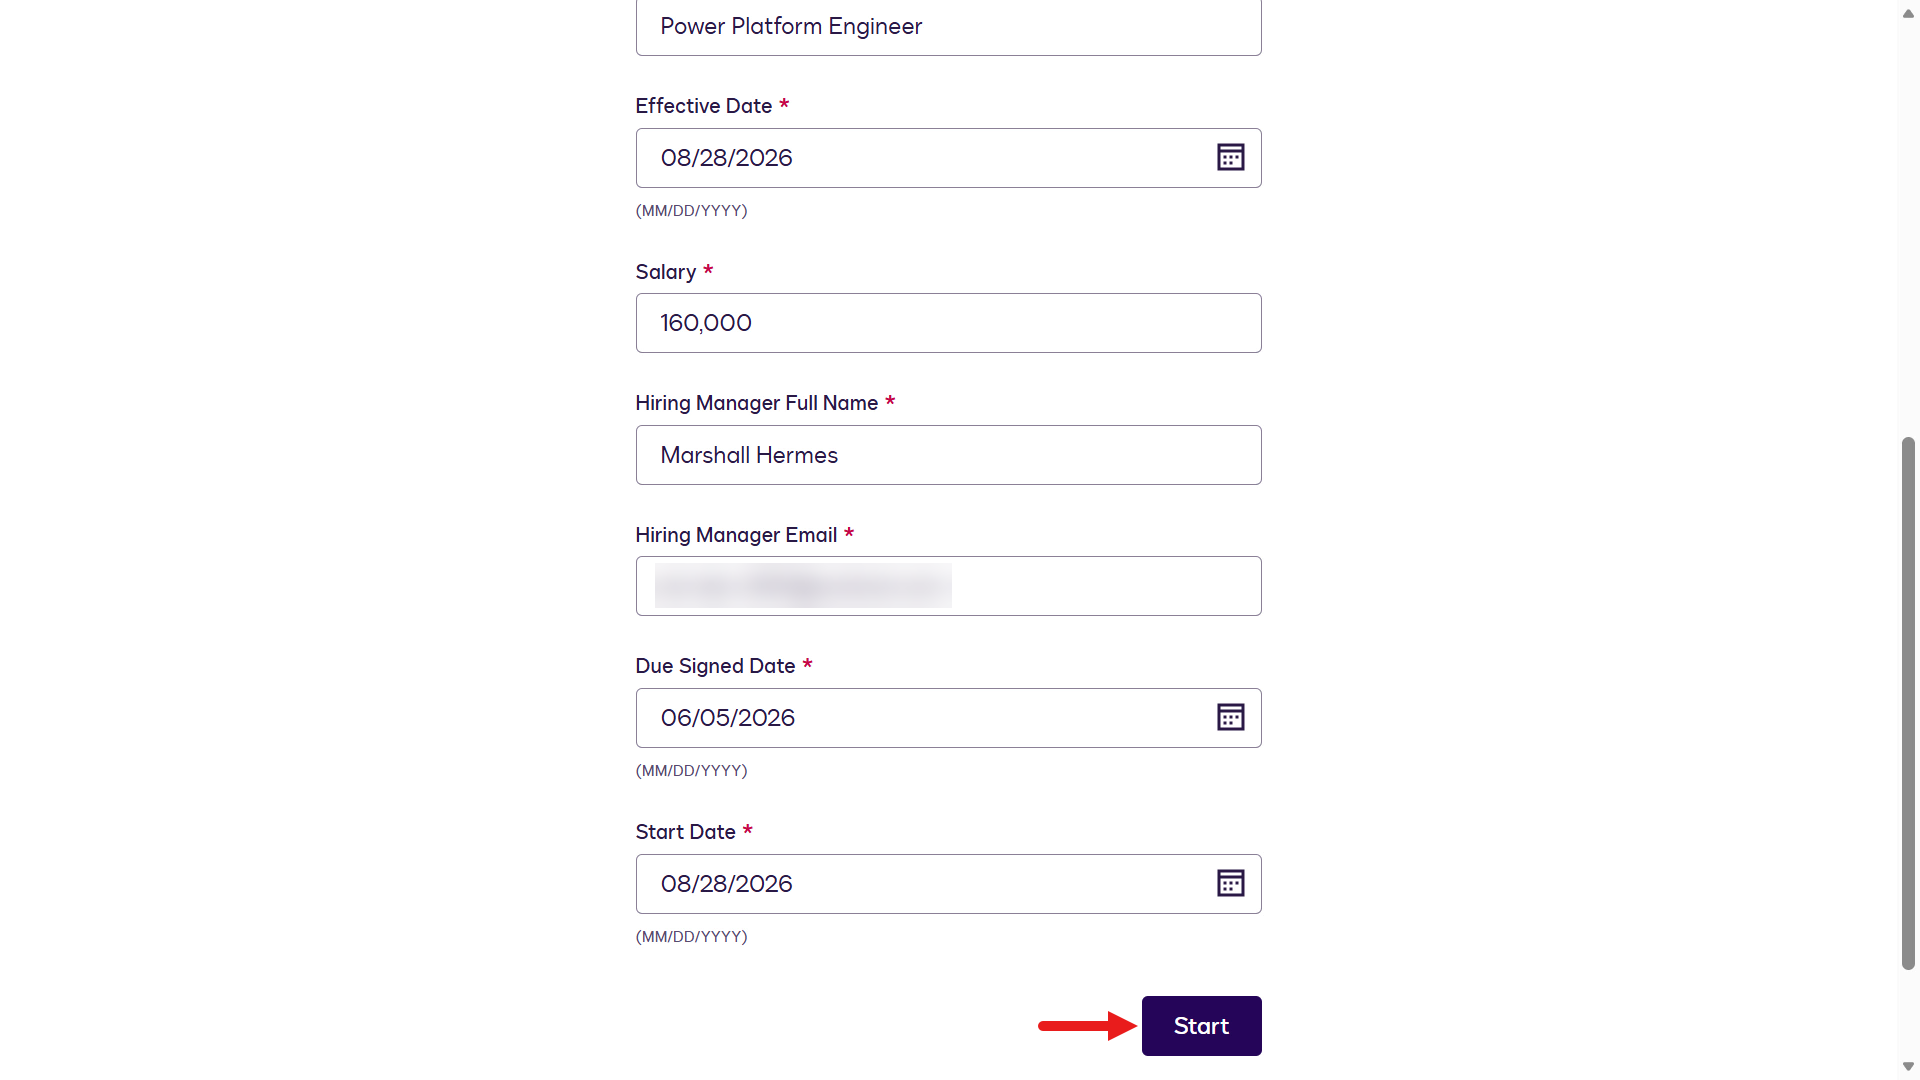
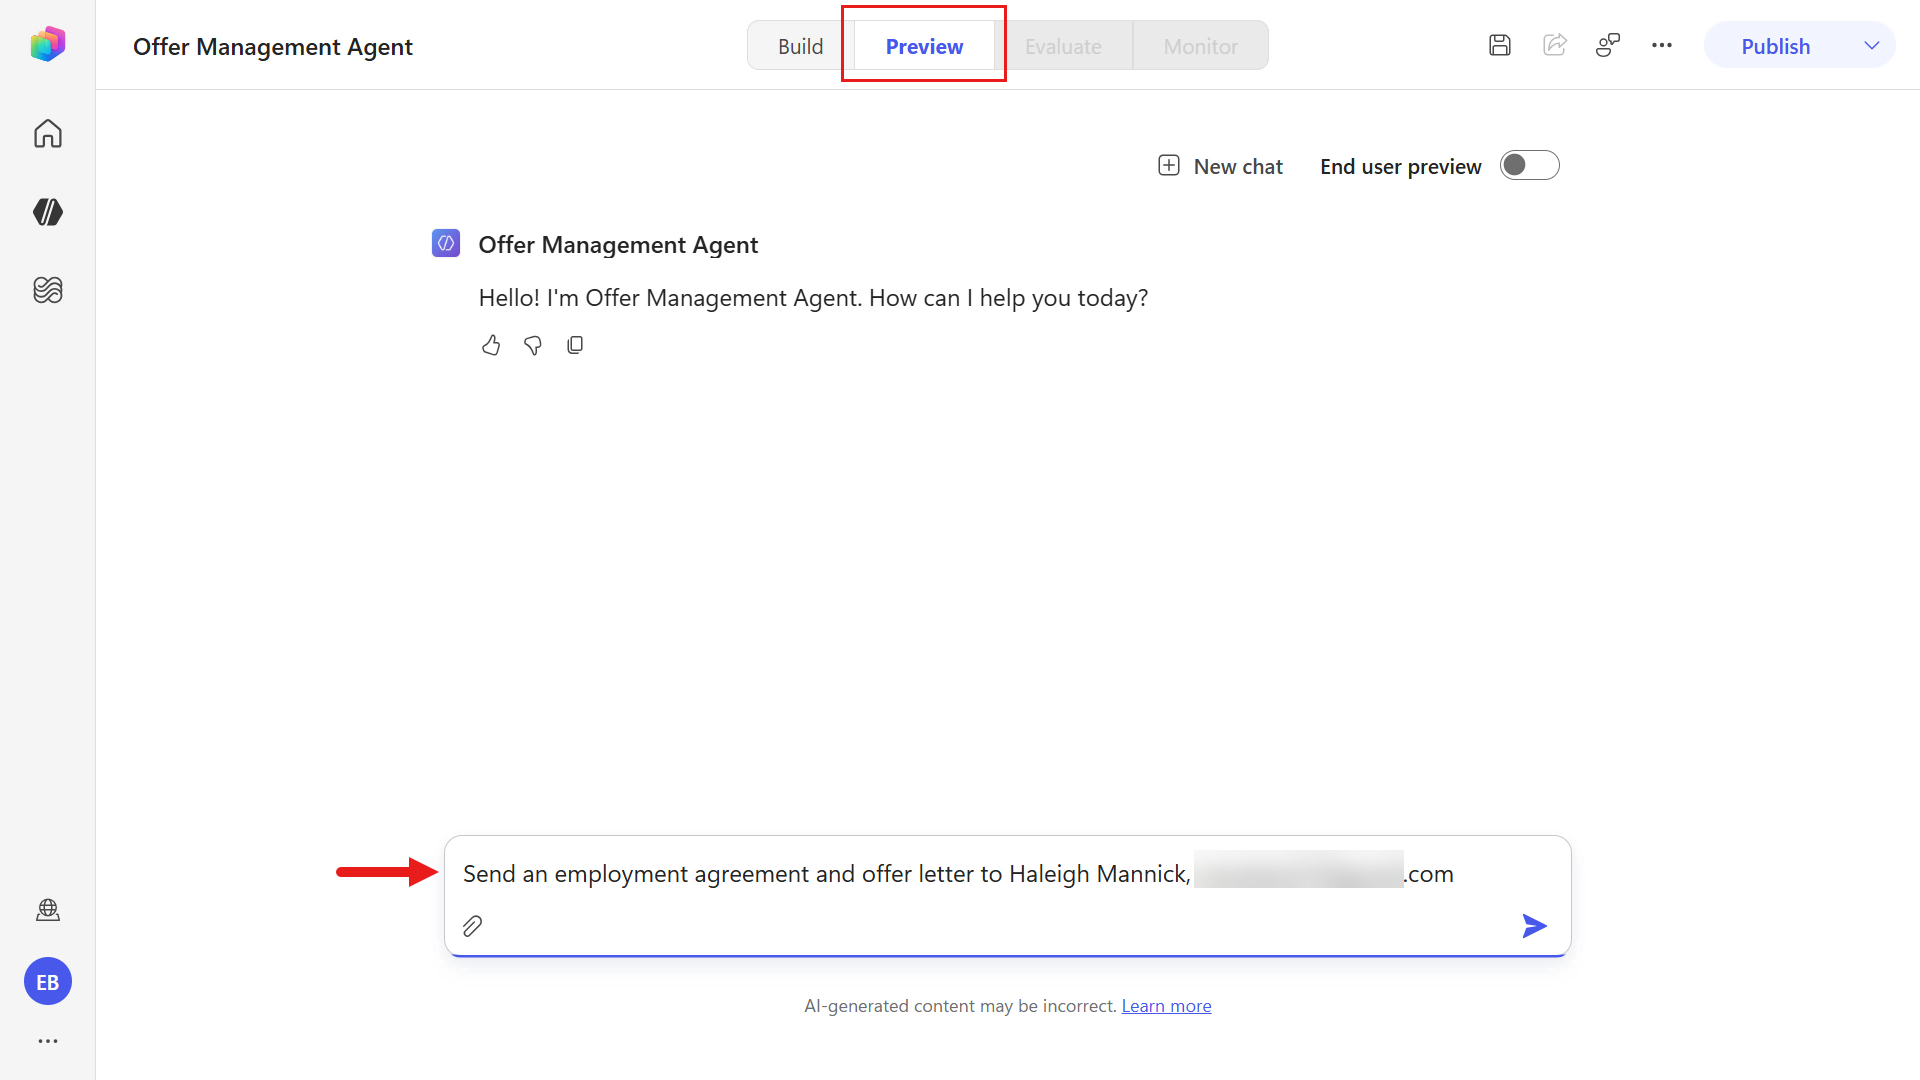
Now save and test the agent. Select the Preview tab, enter the following and submit.
textSend an employment agreement and offer letter to [employee name], [email address]- Replace the
[employee name]with a name. - Replace the
[email address]placeholder using an email address for the employee (use the same one for the Employee participant when you manually tested the workflow earlier in Docusign).
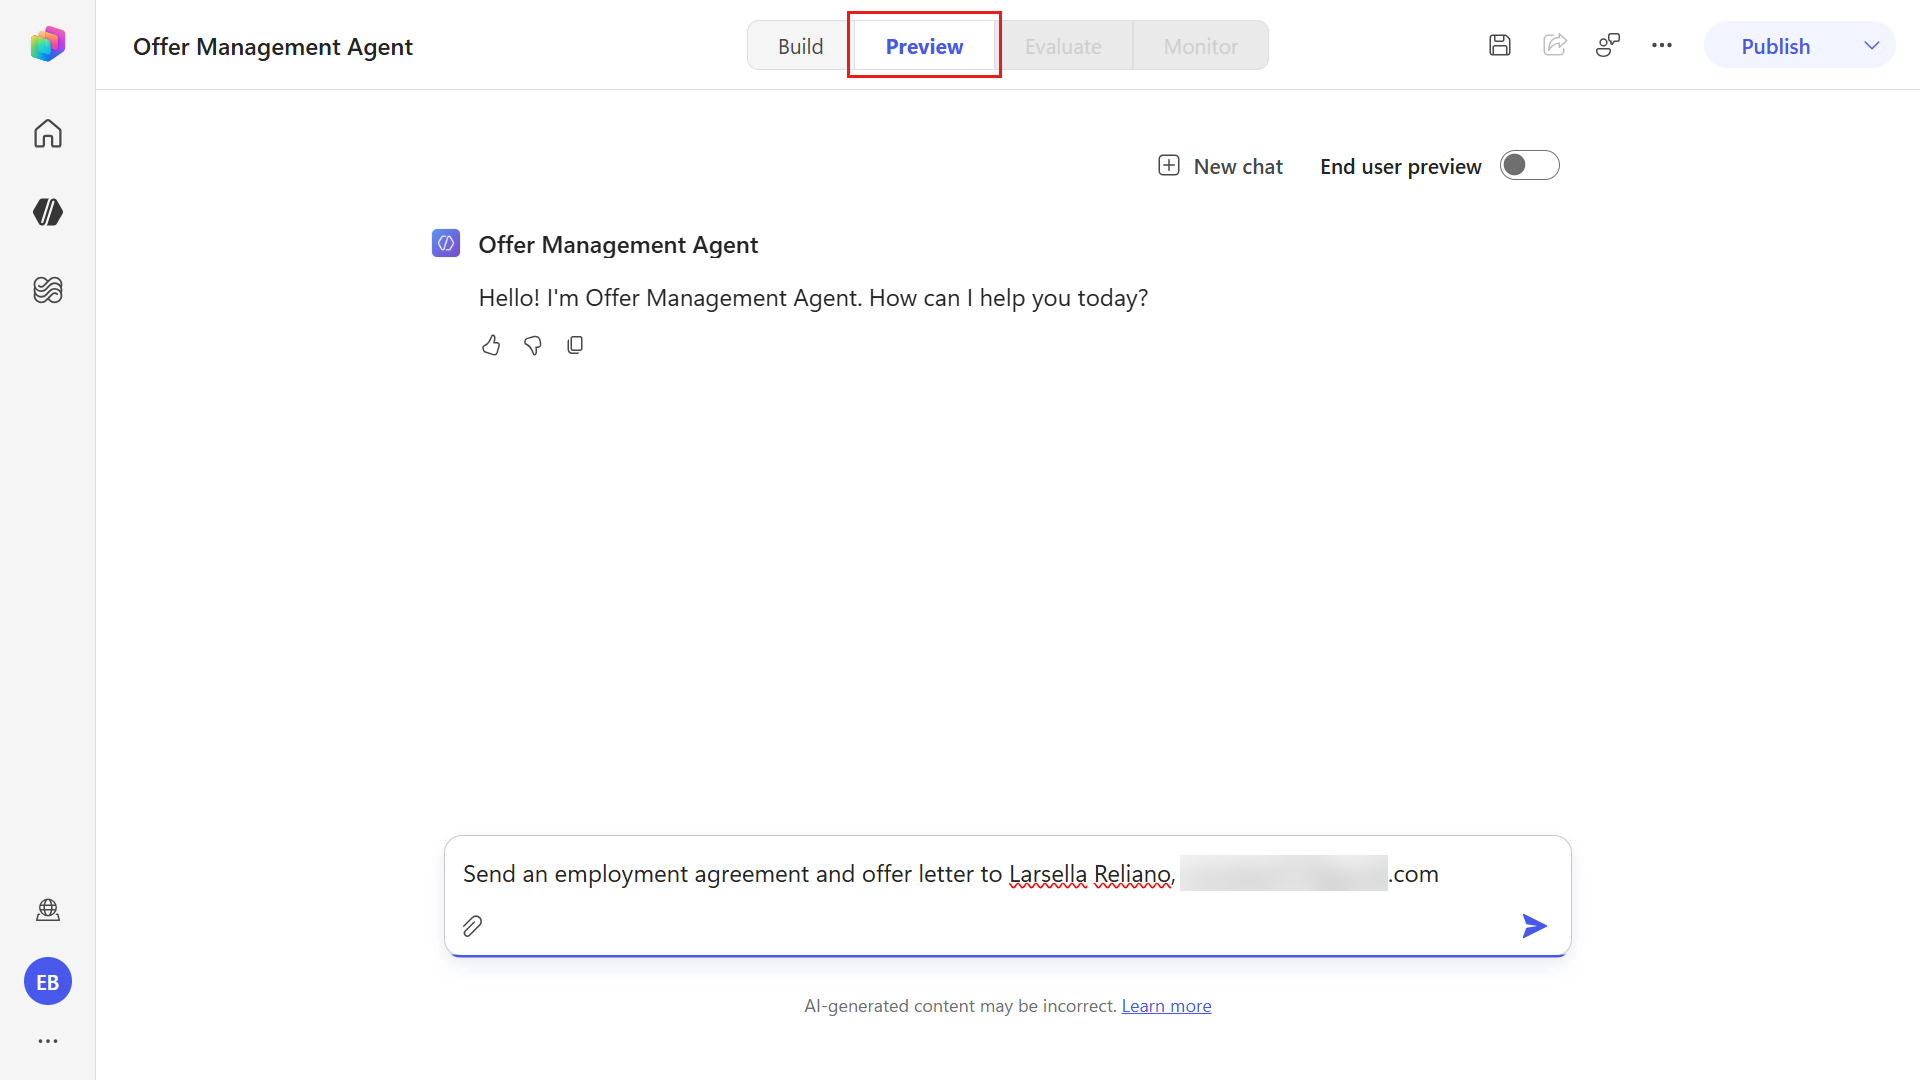
- Replace the
The orchestrator now uses the Docusign MCP Demo tool and the instructions you added to find the workflow requirements for Send Employment agreement and offer letter.
It first verifies your Docusign developer account, then locates the correct workflow, and finally returns the required start-step variables you configured.
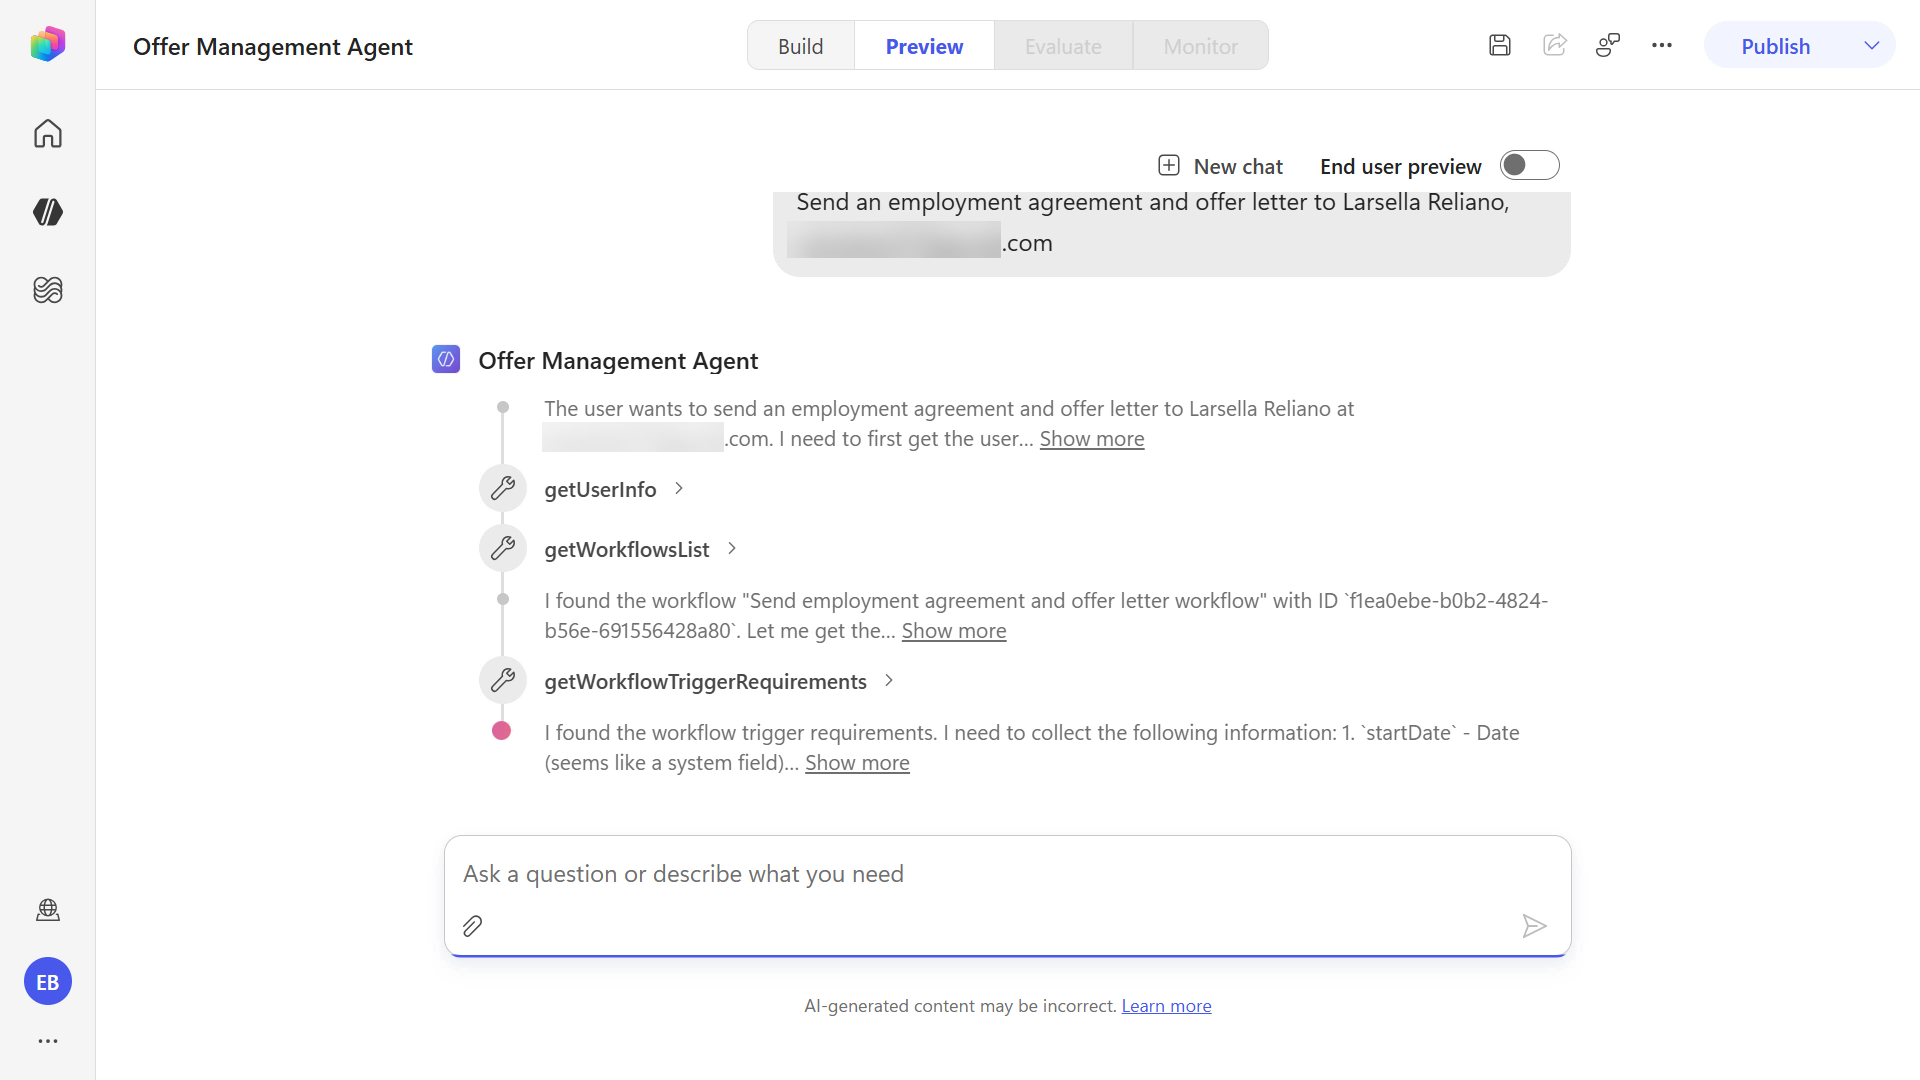
Since you only provided the employee name and the employee email address, the agent response prompts you to provide the information needed for the workflow.
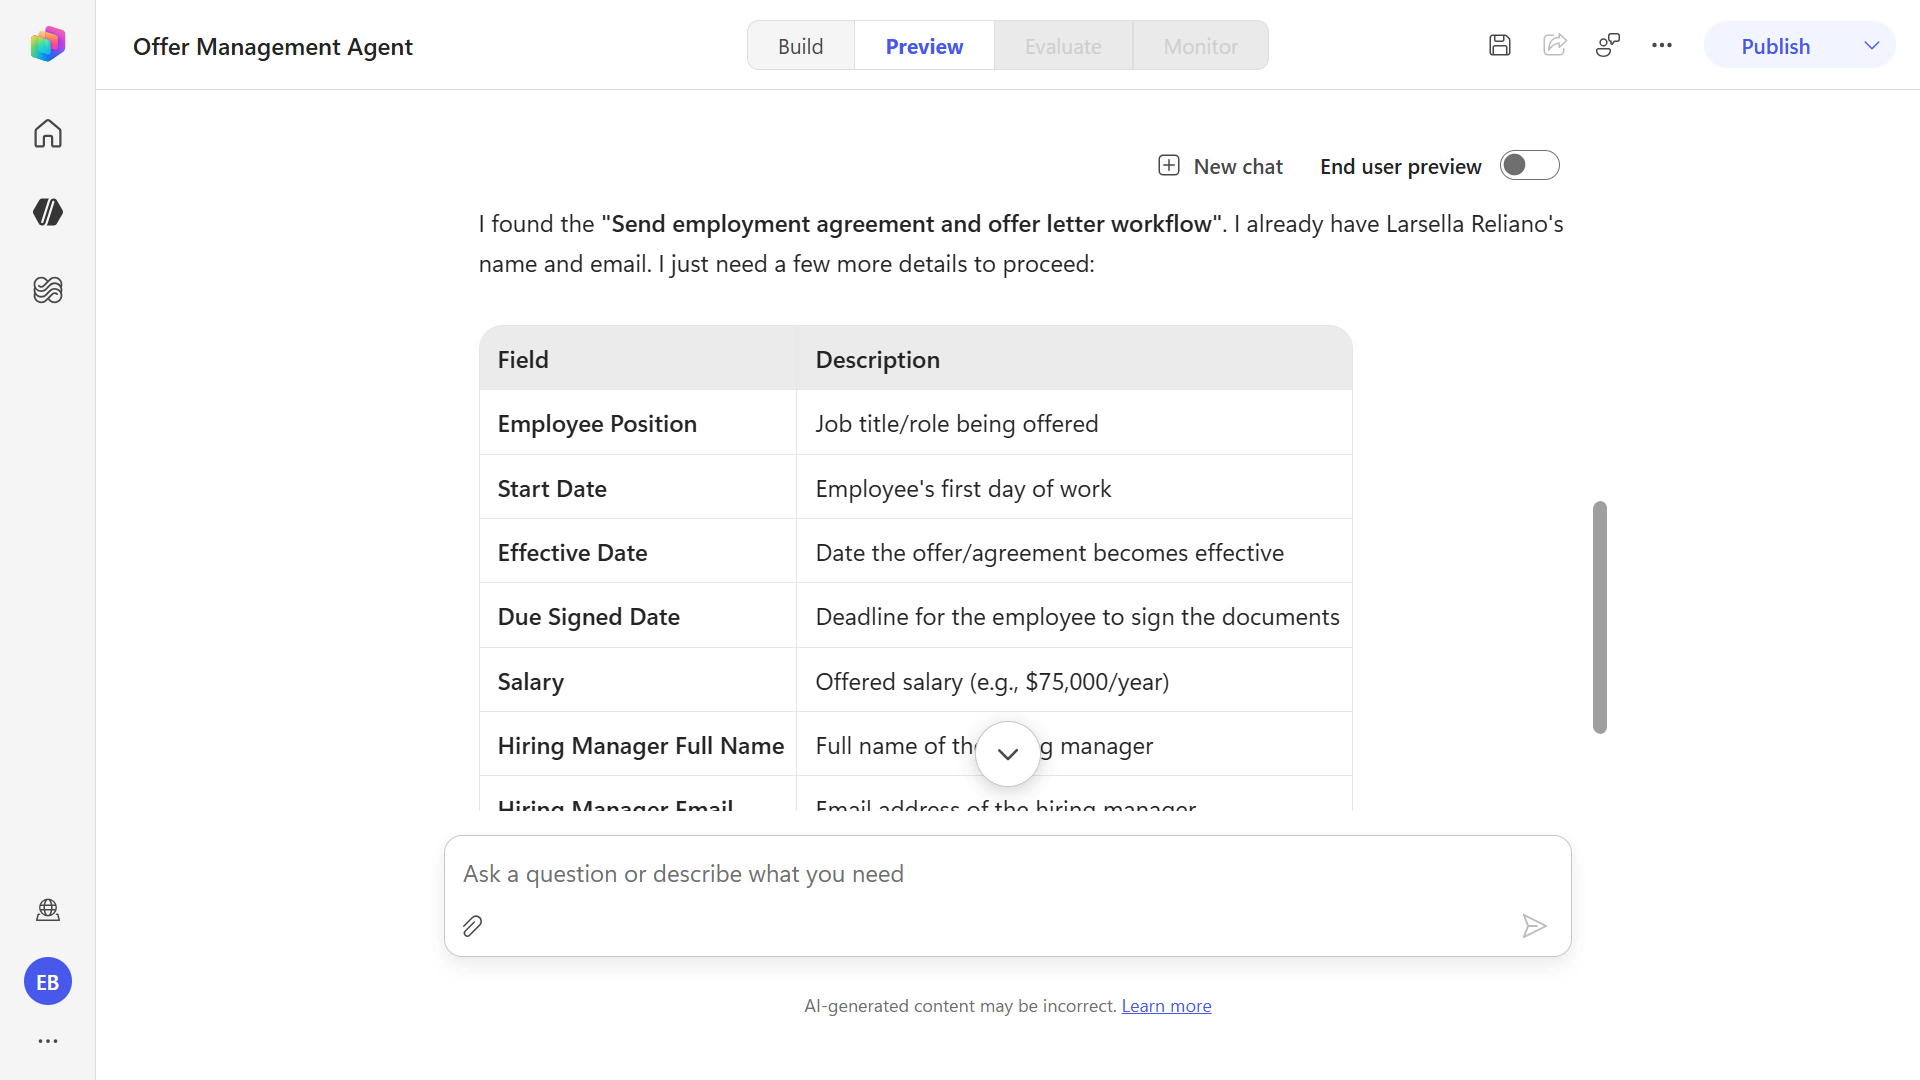
Enter the below text and submit.
textemployee position is [position], effective date and start date is [MMMM d], salary is [salary dollar amount], reporting to [manager full name] [manager email address], and due signed date is [MMMM d]- Replace the
[position]placeholder with job position such asPower Platform Engineer. - Replace the
[MMMM d]placeholder with the full month name and day such asAugust 25. NOTE:dmeans no leading zero (August 5). - Replace the
[salary dollar amount]with a dollar amount value. - Replace the
[manager full name]with a name of the manager. - Replace the
[manager email address]placeholder using an email address for the manager (use the same one for the Hiring Manager participant when you manually tested the workflow earlier in Docusign).
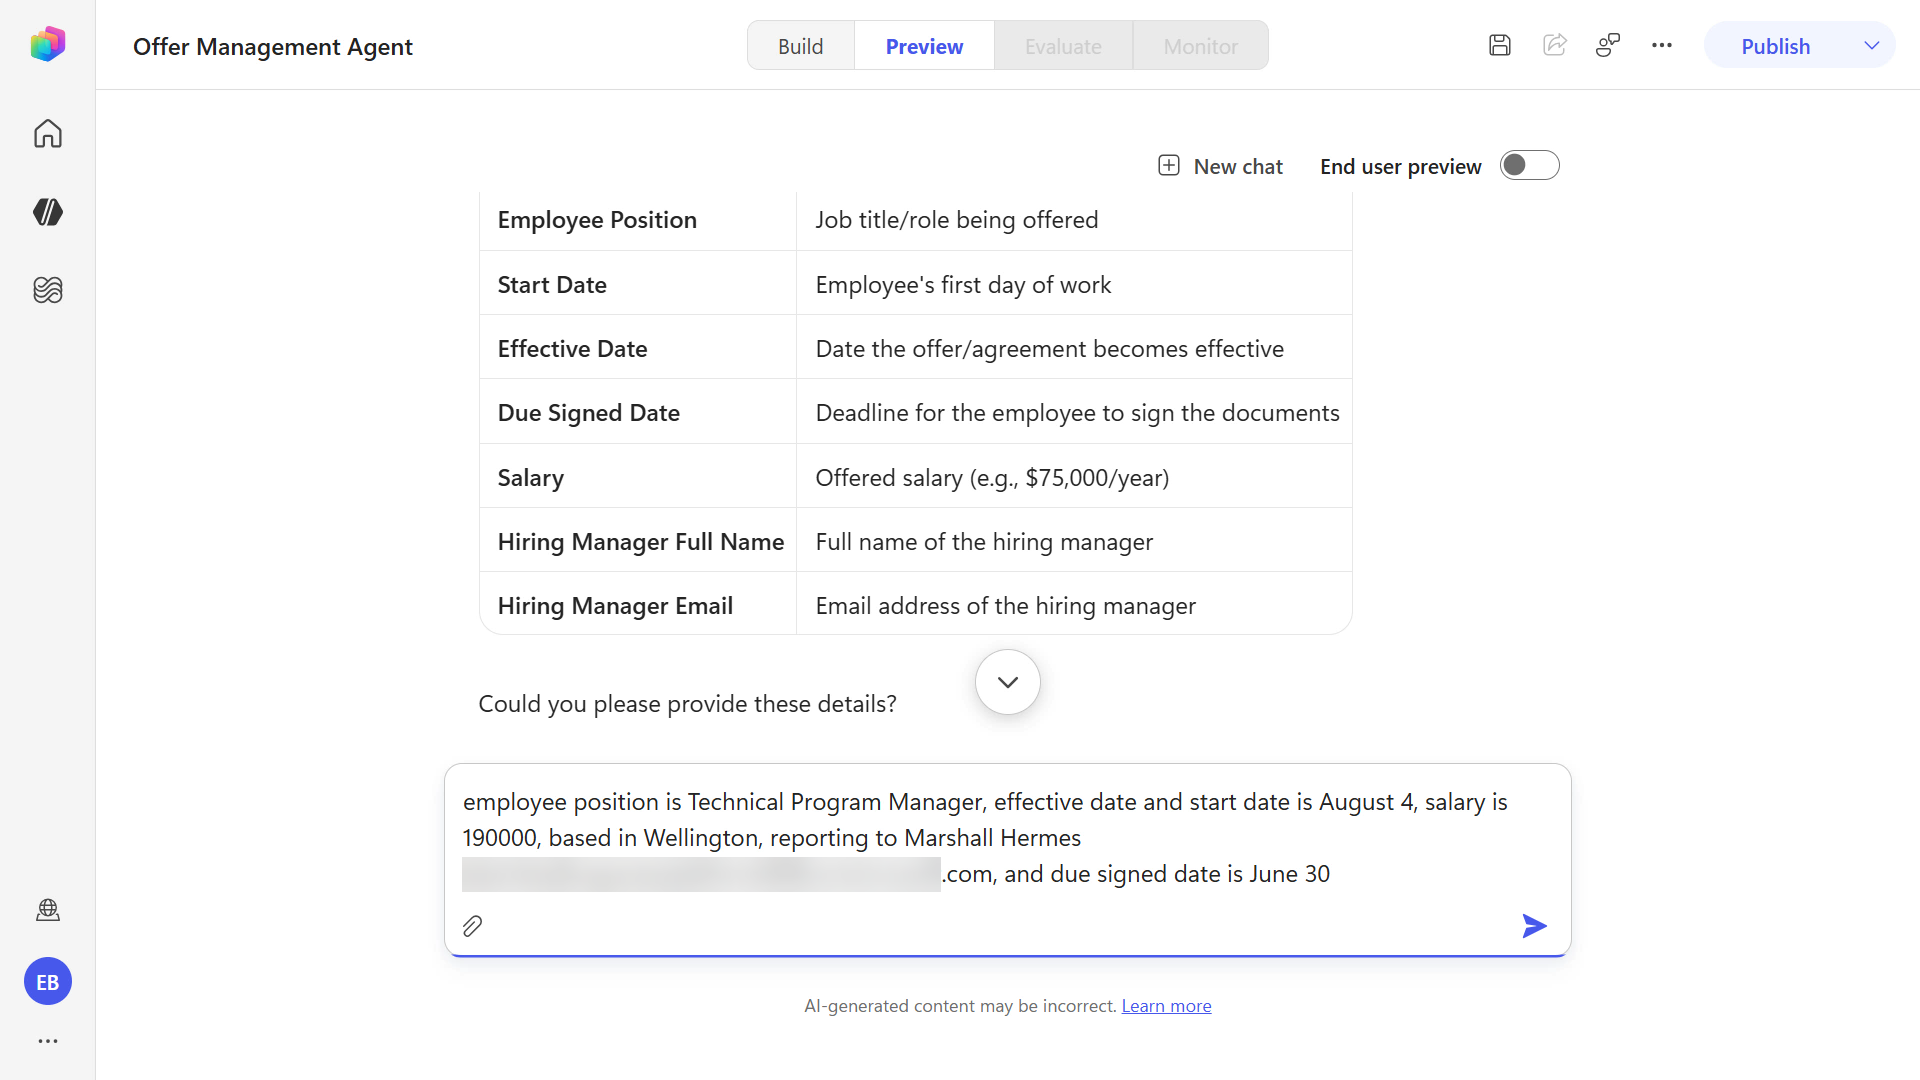
- Replace the
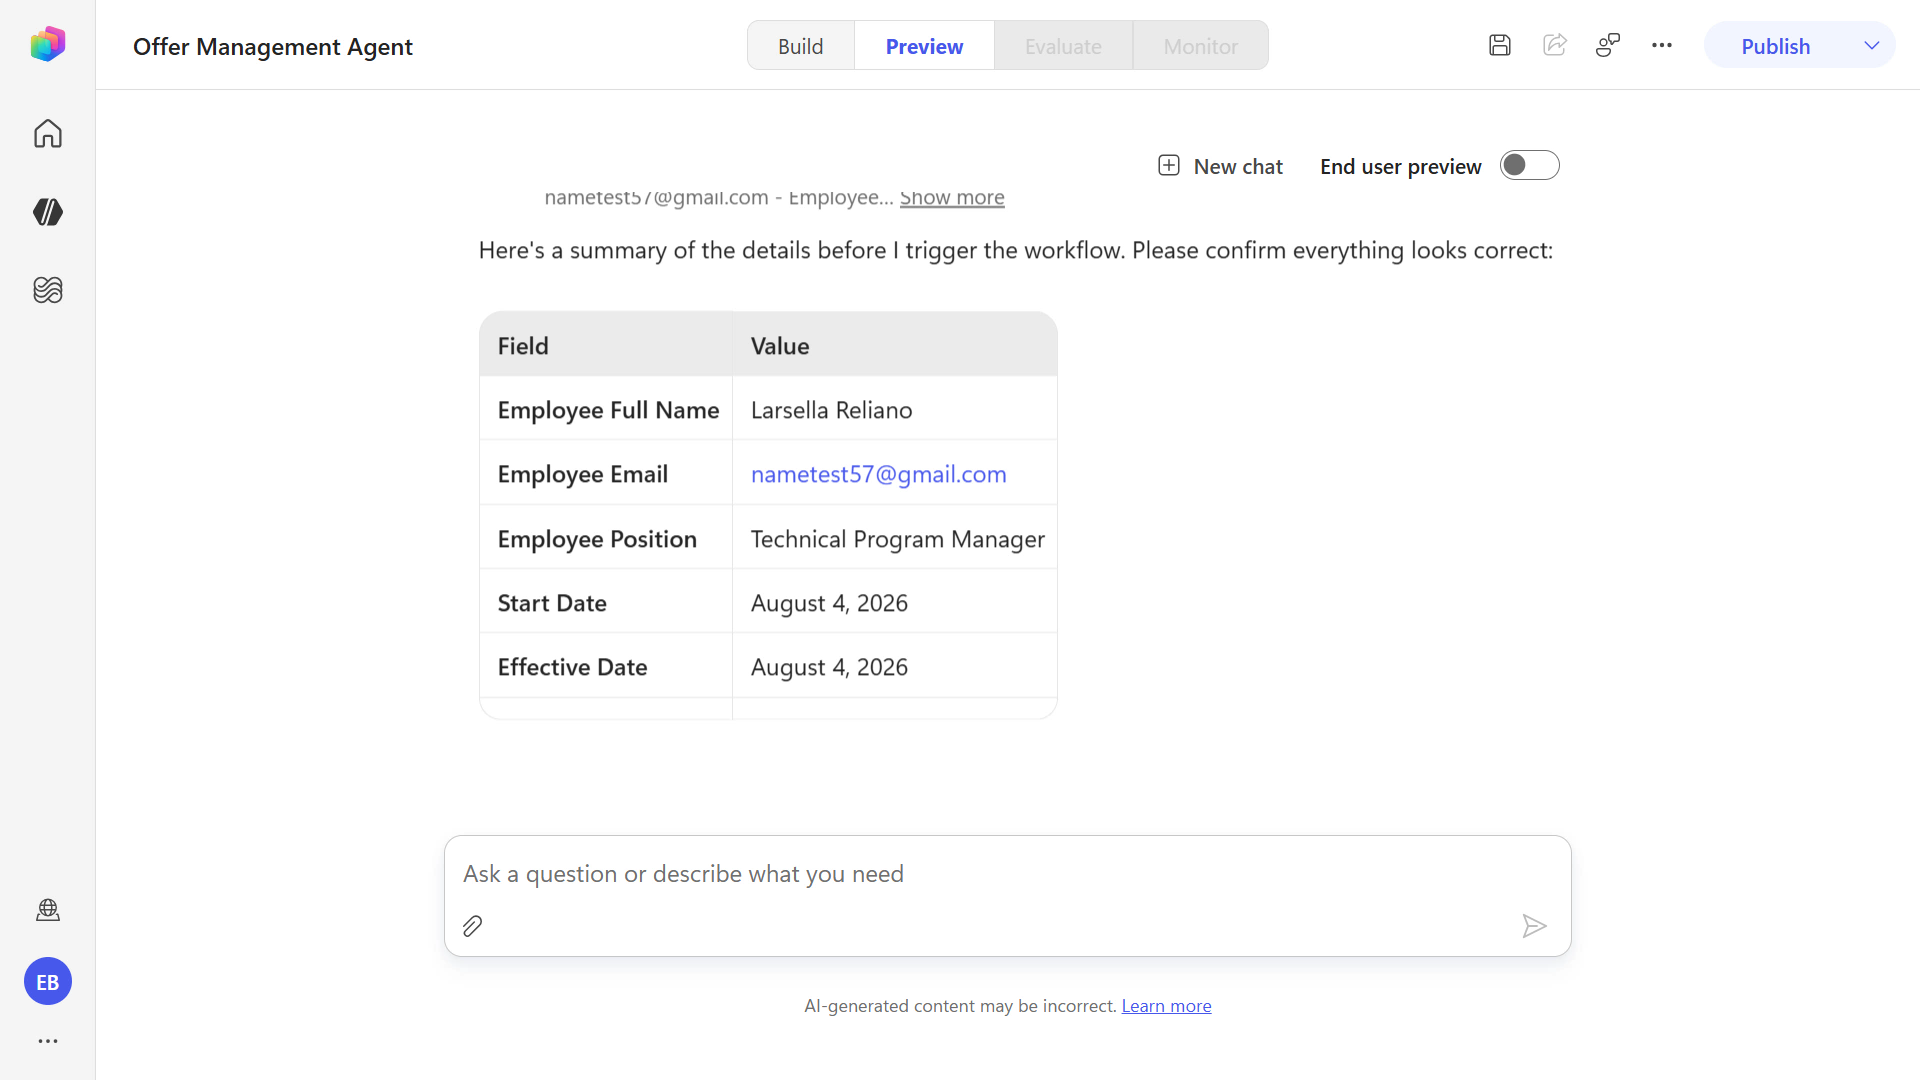
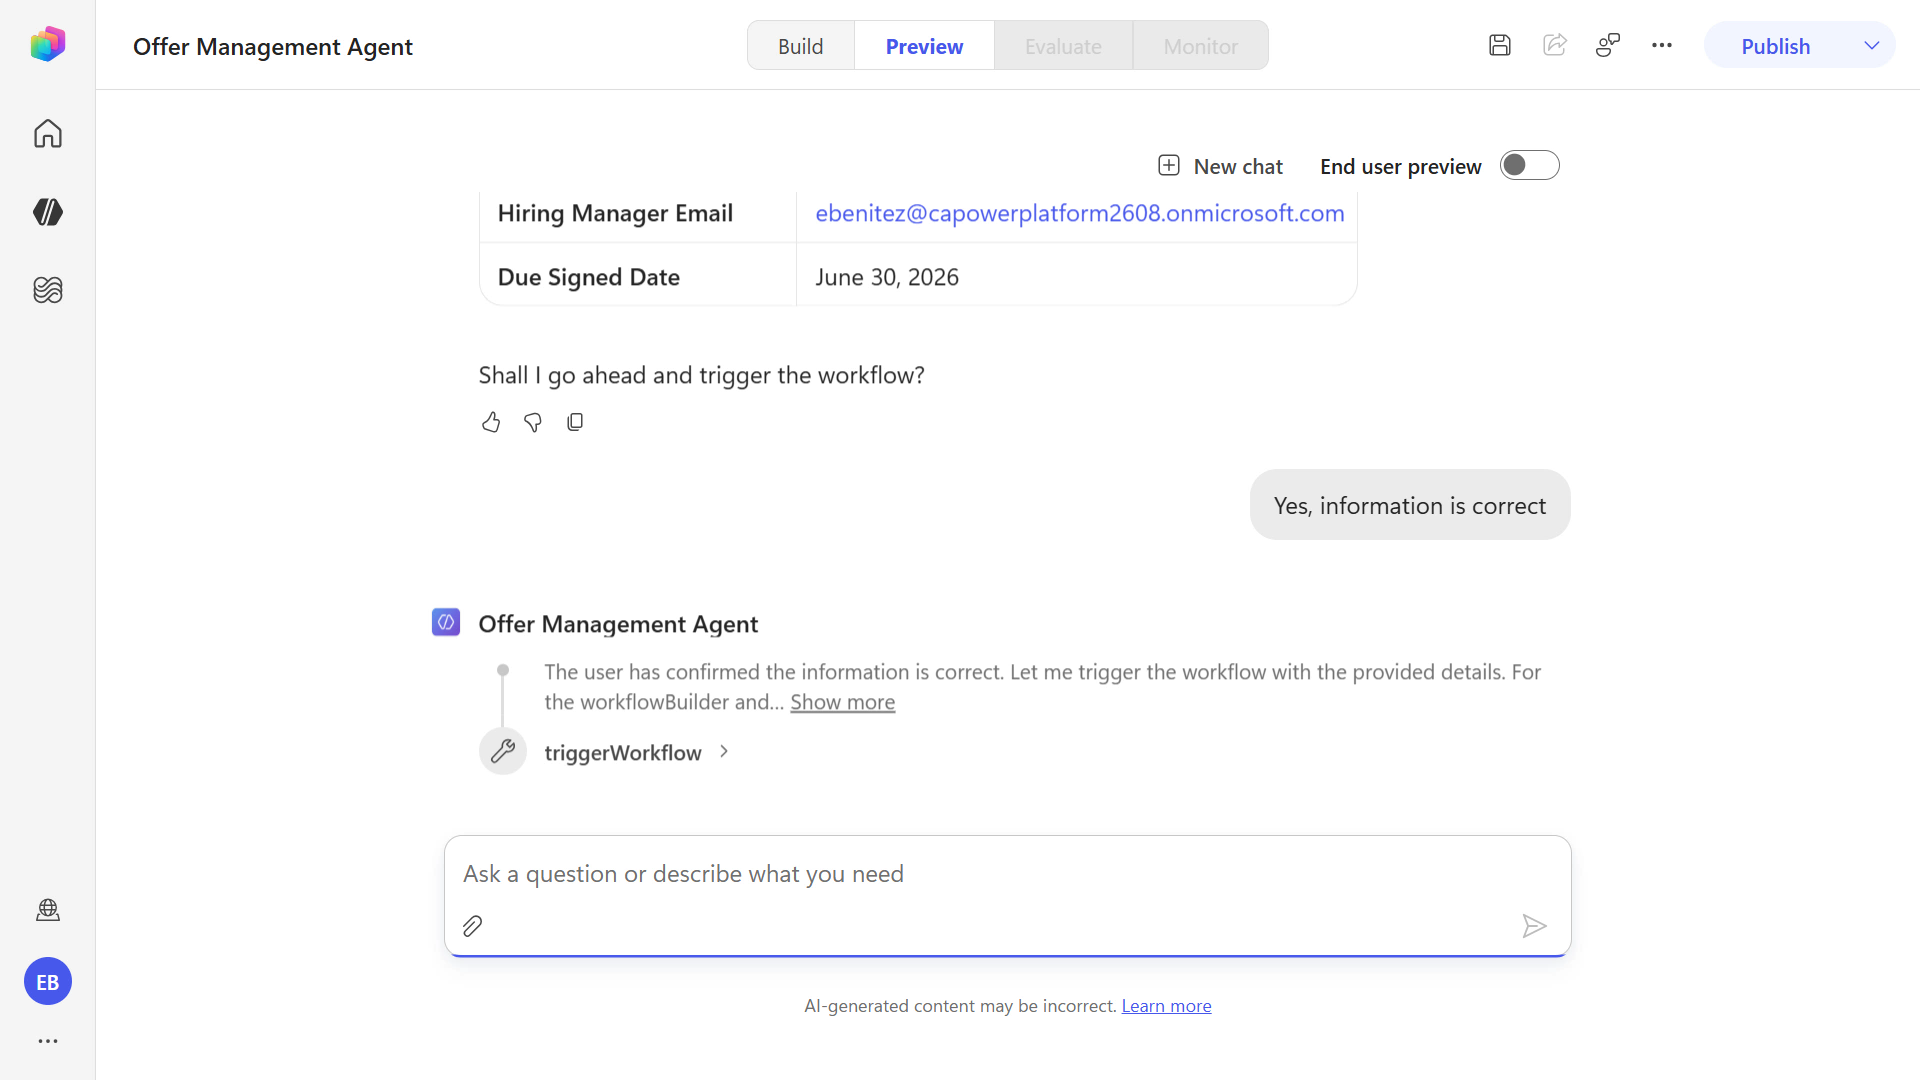
The agent then provides a summary of the variables based on the information you provided and asks for your confirmation that the information is correct. This is based on the instruction previously entered when you created the agent,
"Confirm with the user that all information is correct before triggering the workflow. If the user confirms the information is correct, trigger the workflow. If the user confirms the information is incorrect, do not trigger the workflow."
Enter the below text and submit.
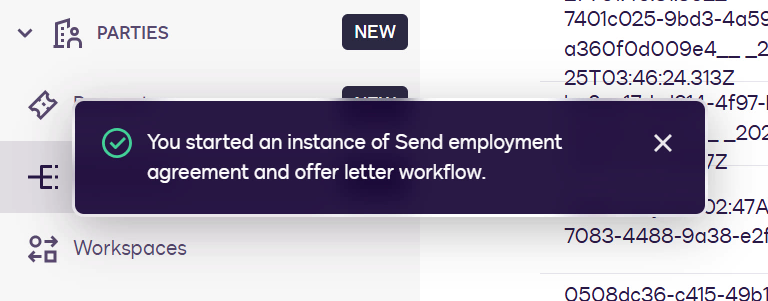
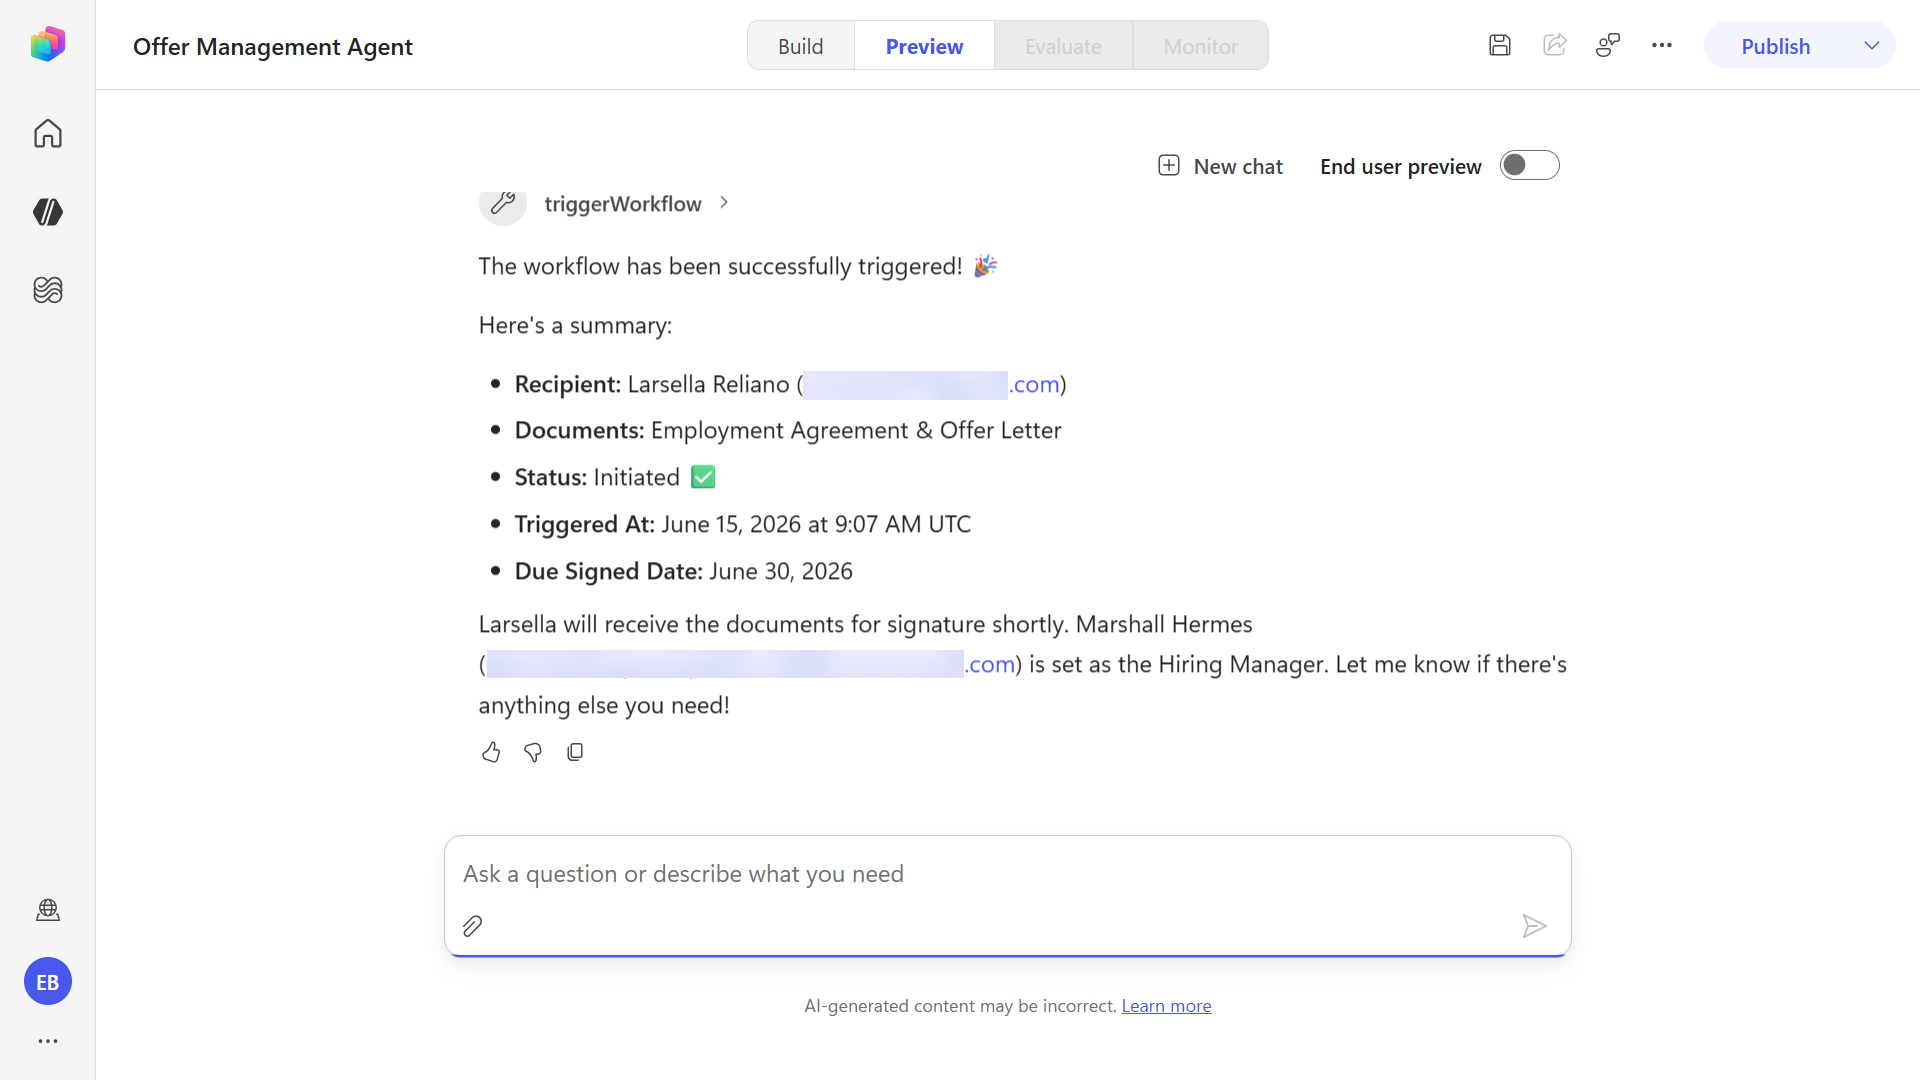
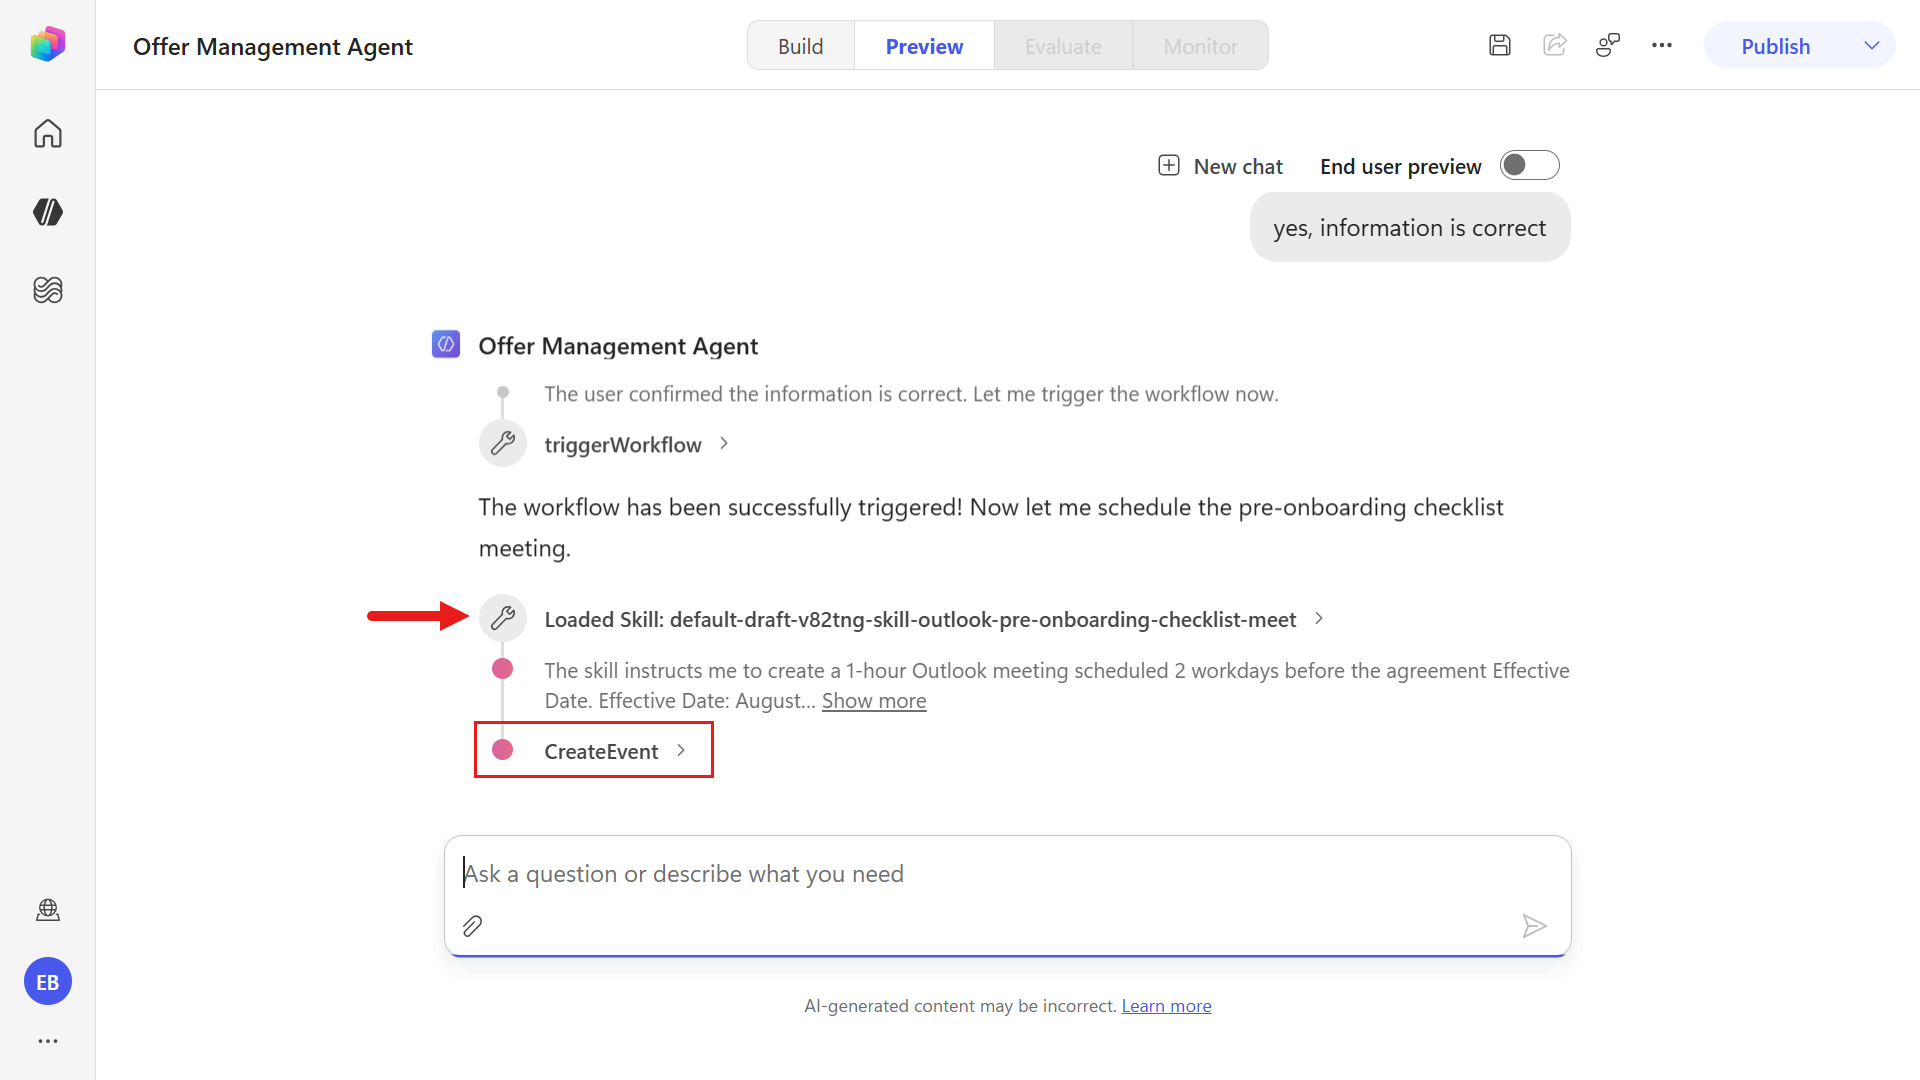
textYes, information is correct.The orchestrator will next trigger the workflow.
When the workflow has been triggered, you'll see confirmation and a summary.
Follow the same steps of completing the workflow.
First, go to the inbox for the Employee participant email address and open the Docusign message. It should have the subject
***Test Email*** Review and complete workflow. Select Review, complete the web form, then sign the agreements.Check your spam folder
Check your spam folder for the email if you don't see it in your main Inbox.
Navigate to the email Inbox of the email address you entered for the Hiring Manager participant and open the Docusign email to sign the agreements.
Lastly the final signed agreements should be uploaded to SharePoint.
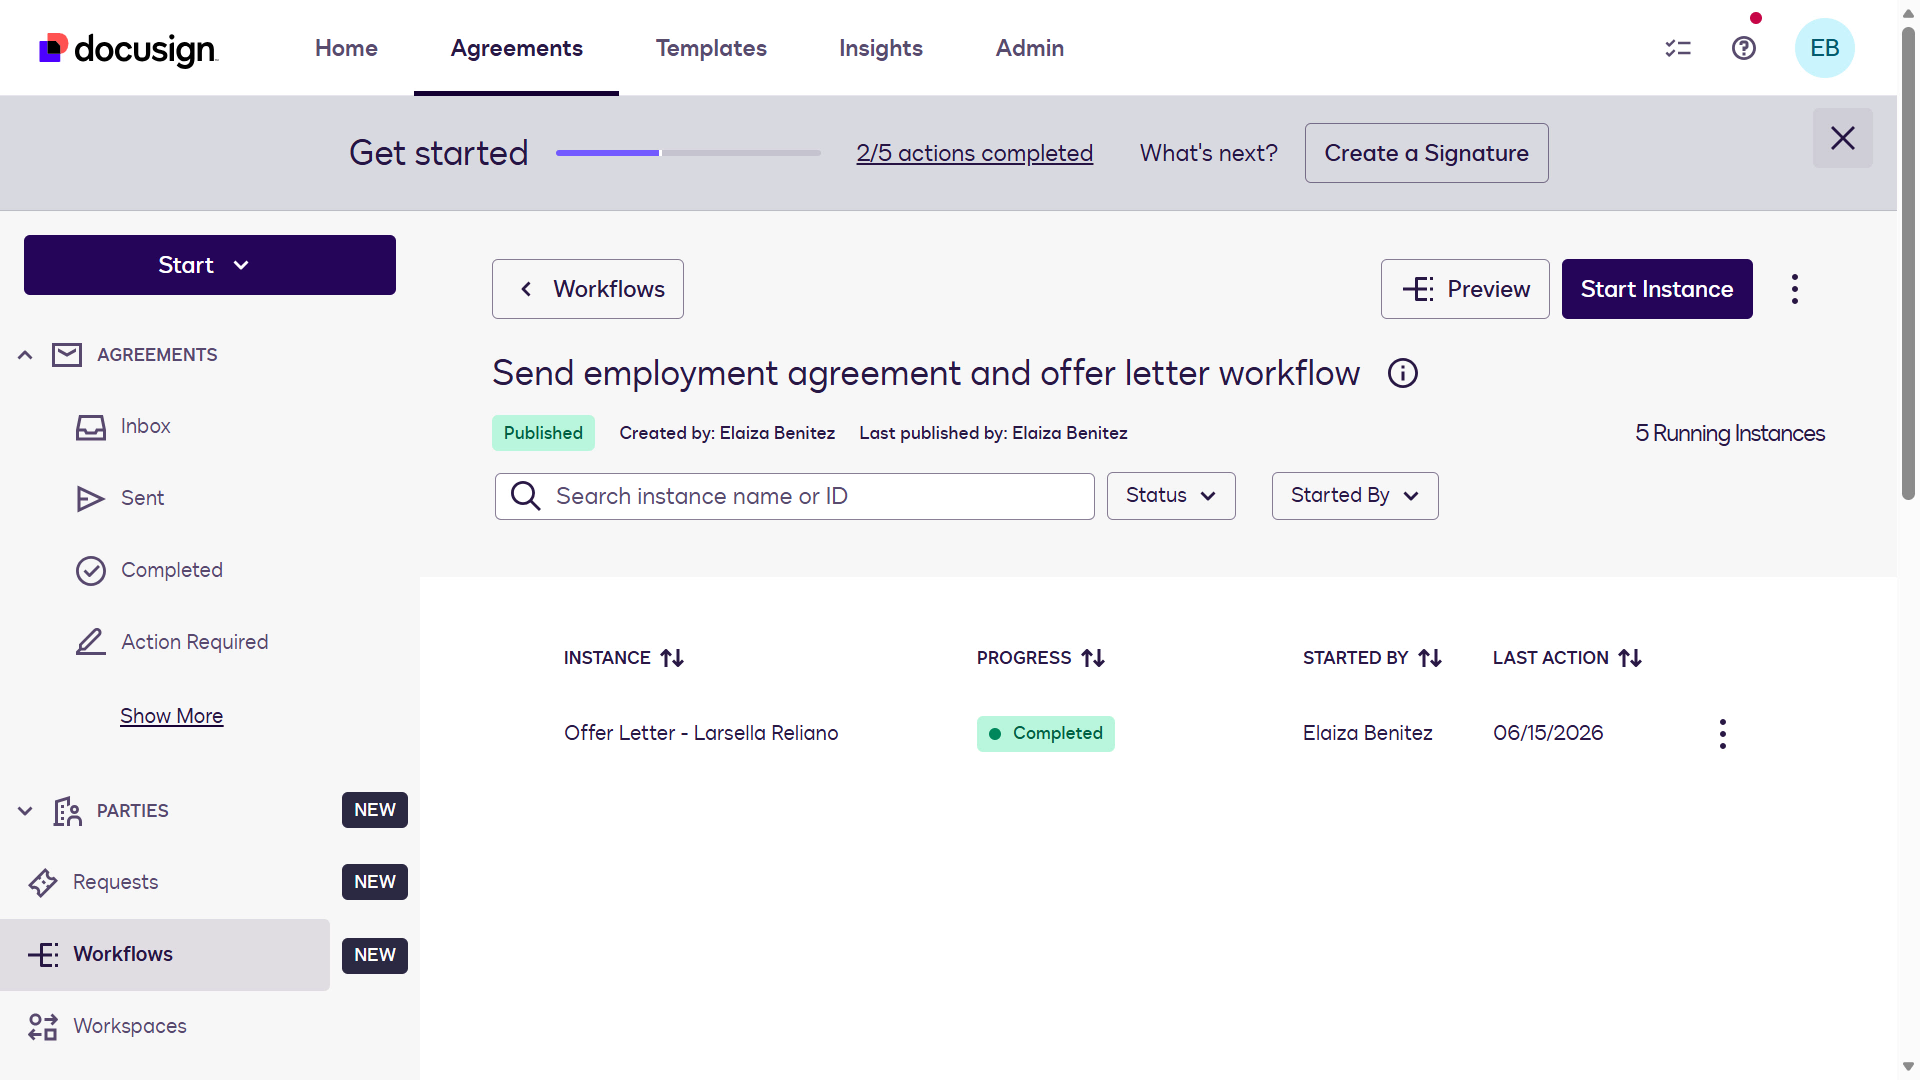
You can also review the workflow instances in the Docusign developer portal, and you'll see progress status as Completed.
Congrats! 🥳 You've now learned how to invoke a Workflow Builder workflow from your agent through the Docusign MCP Demo tool.
If you want to continue to the bonus exercise of this lab, feel free to do so.
🧪🌟 1.6 BONUS - Add Work IQ Calendar tool (Frontier program) for multi-MCP capabilities
If your tenant and user has been enabled to use Frontier features, try the following exercise for your agent to combine the power of a first-party Microsoft MCP server (Work IQ Calendar) with a third-party service MCP server (Docusign MCP Demo).
The agent will be updated to automatically create an Outlook meeting in your calendar to dedicate time in reviewing the HR pre-onboarding checklist. To achieve this, we'll use the Work IQ Calendar (Preview) tool.
IT Admin Guide to enabling Frontier
Refer to the IT Admin Guide which outlines the requirements and details of enabling Frontier in your tenant.
Update the agent instructions to include details in creating an Outlook meeting in your calendar after the Workflow Builder workflow has successfully triggered. Enter the following as a new line in the second paragraph of the instructions.
textWhen the workflow has successfully been triggered, schedule an Outlook meeting.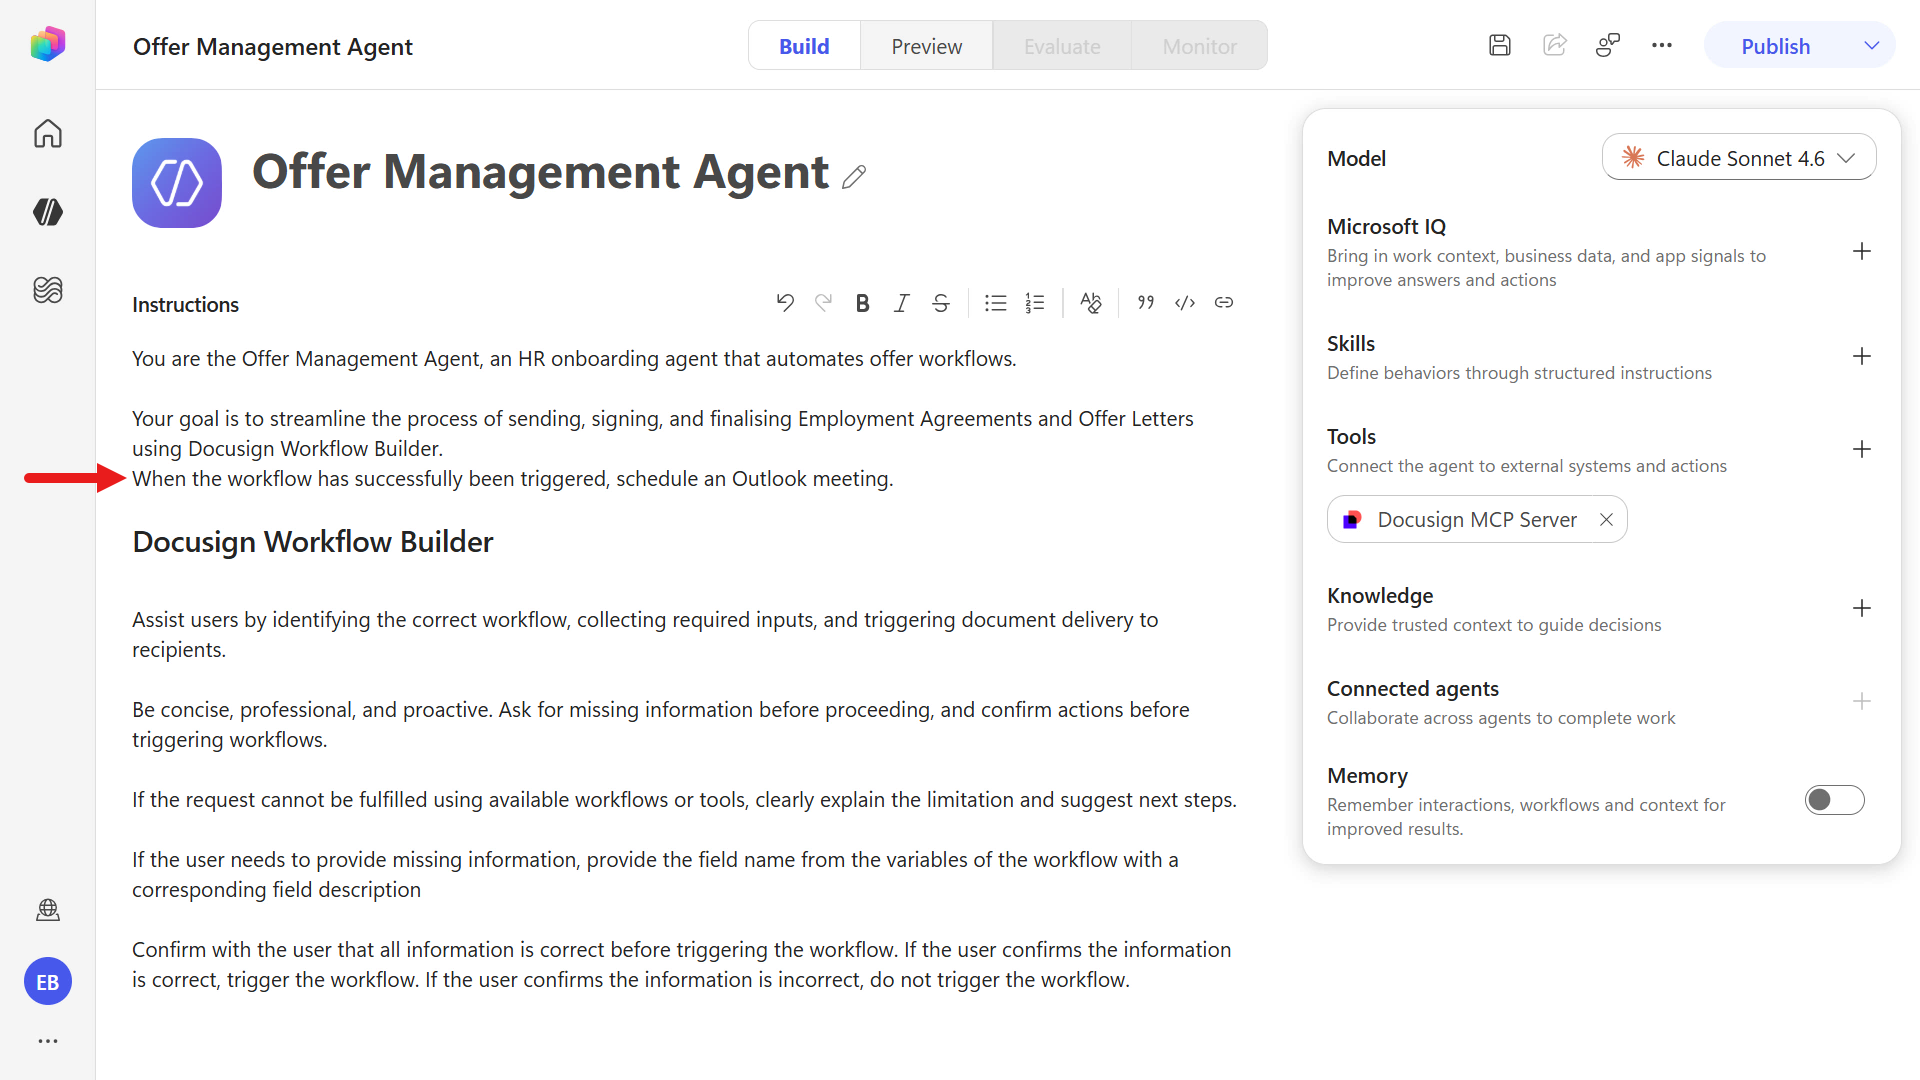
Next, we'll add a section for scheduling the Outlook meeting where it will specify to follow a skill.
Why use a skill in addition to agent instructions?
Agent instructions define what the agent should do and when to do it. A skill defines how to do a specific task reliably and consistently. Using both gives you better control: orchestration from instructions, repeatable execution from the skill.
Enter the following text below the Docusign Workflow Builder section.
text## Schedule Outlook meeting When the workflow has successfully been triggered, use the `outlook-pre-onboarding-checklist-meeting` skill to create the Outlook meeting.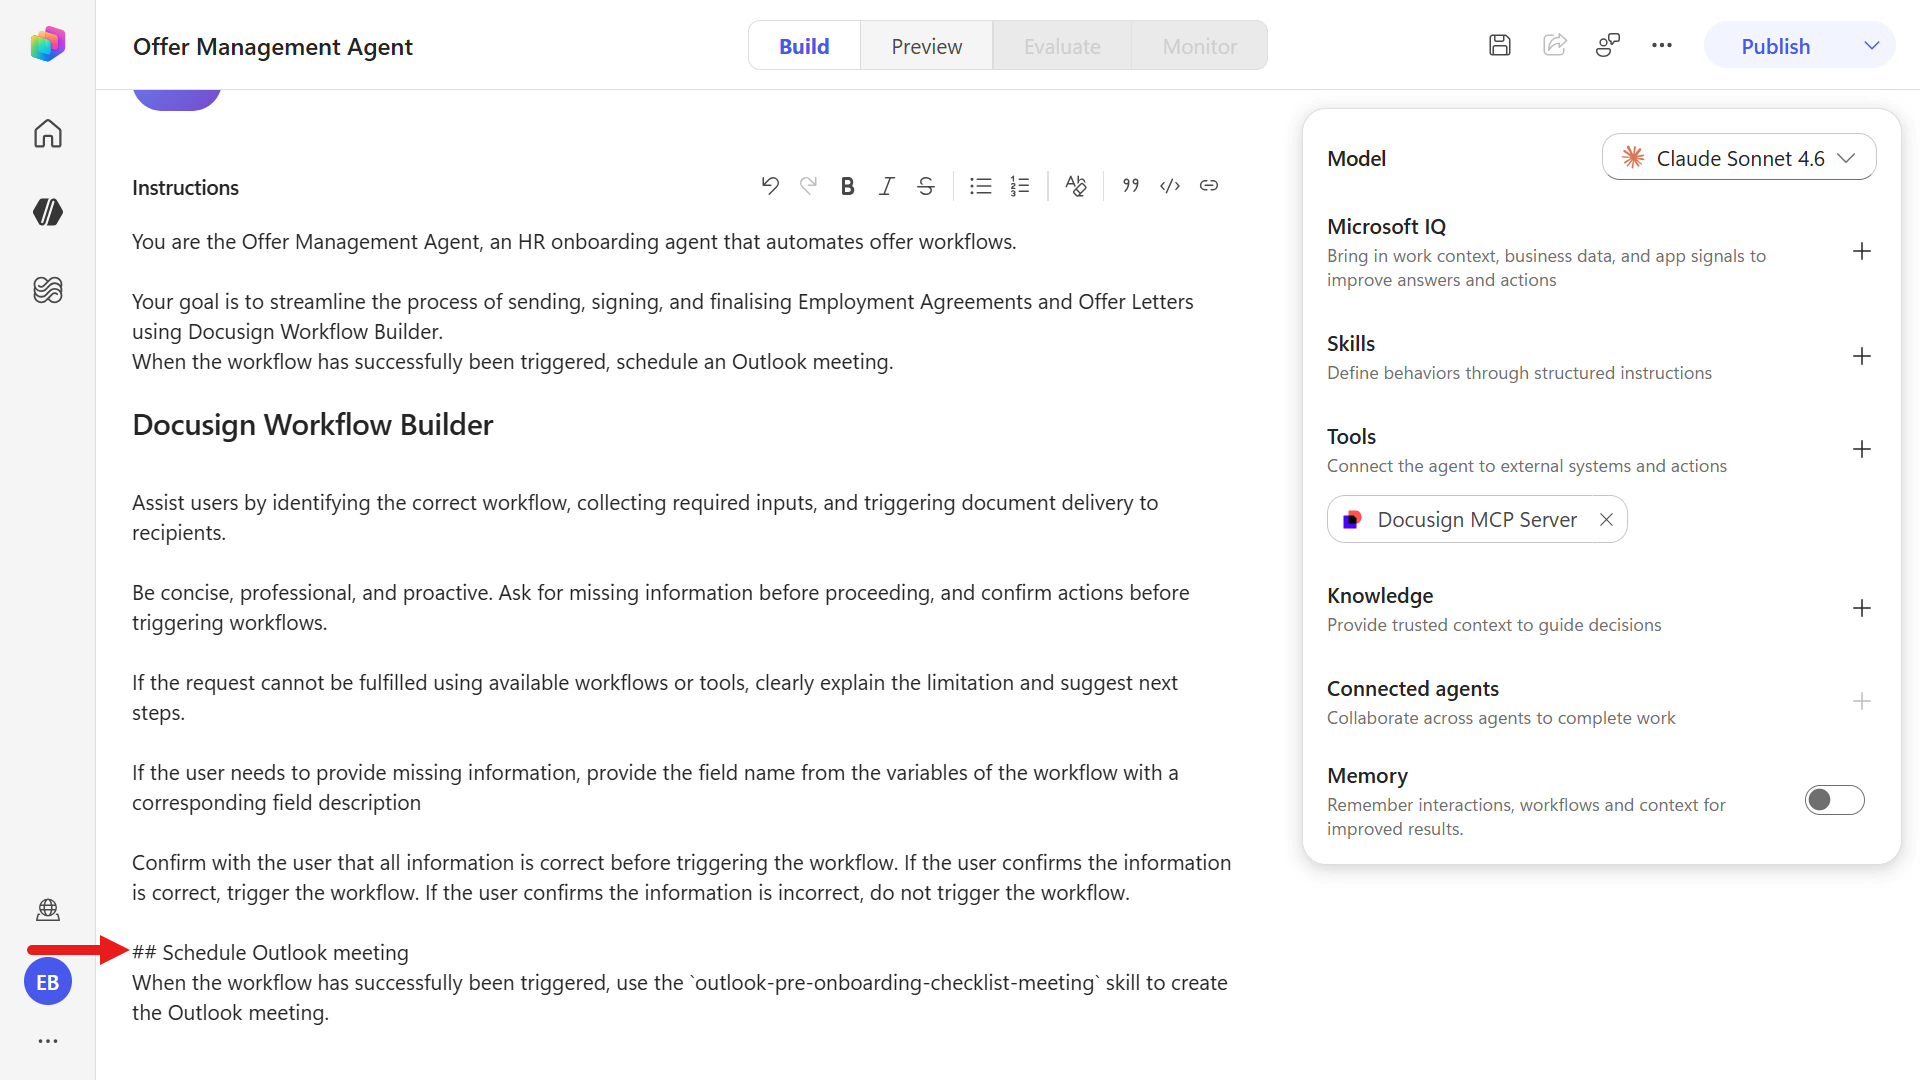
Make sure to select Save after updating the agent instructions.
On the right-hand side panel, under Skills select the plus icon to upload a skill file.
Click to upload a file.
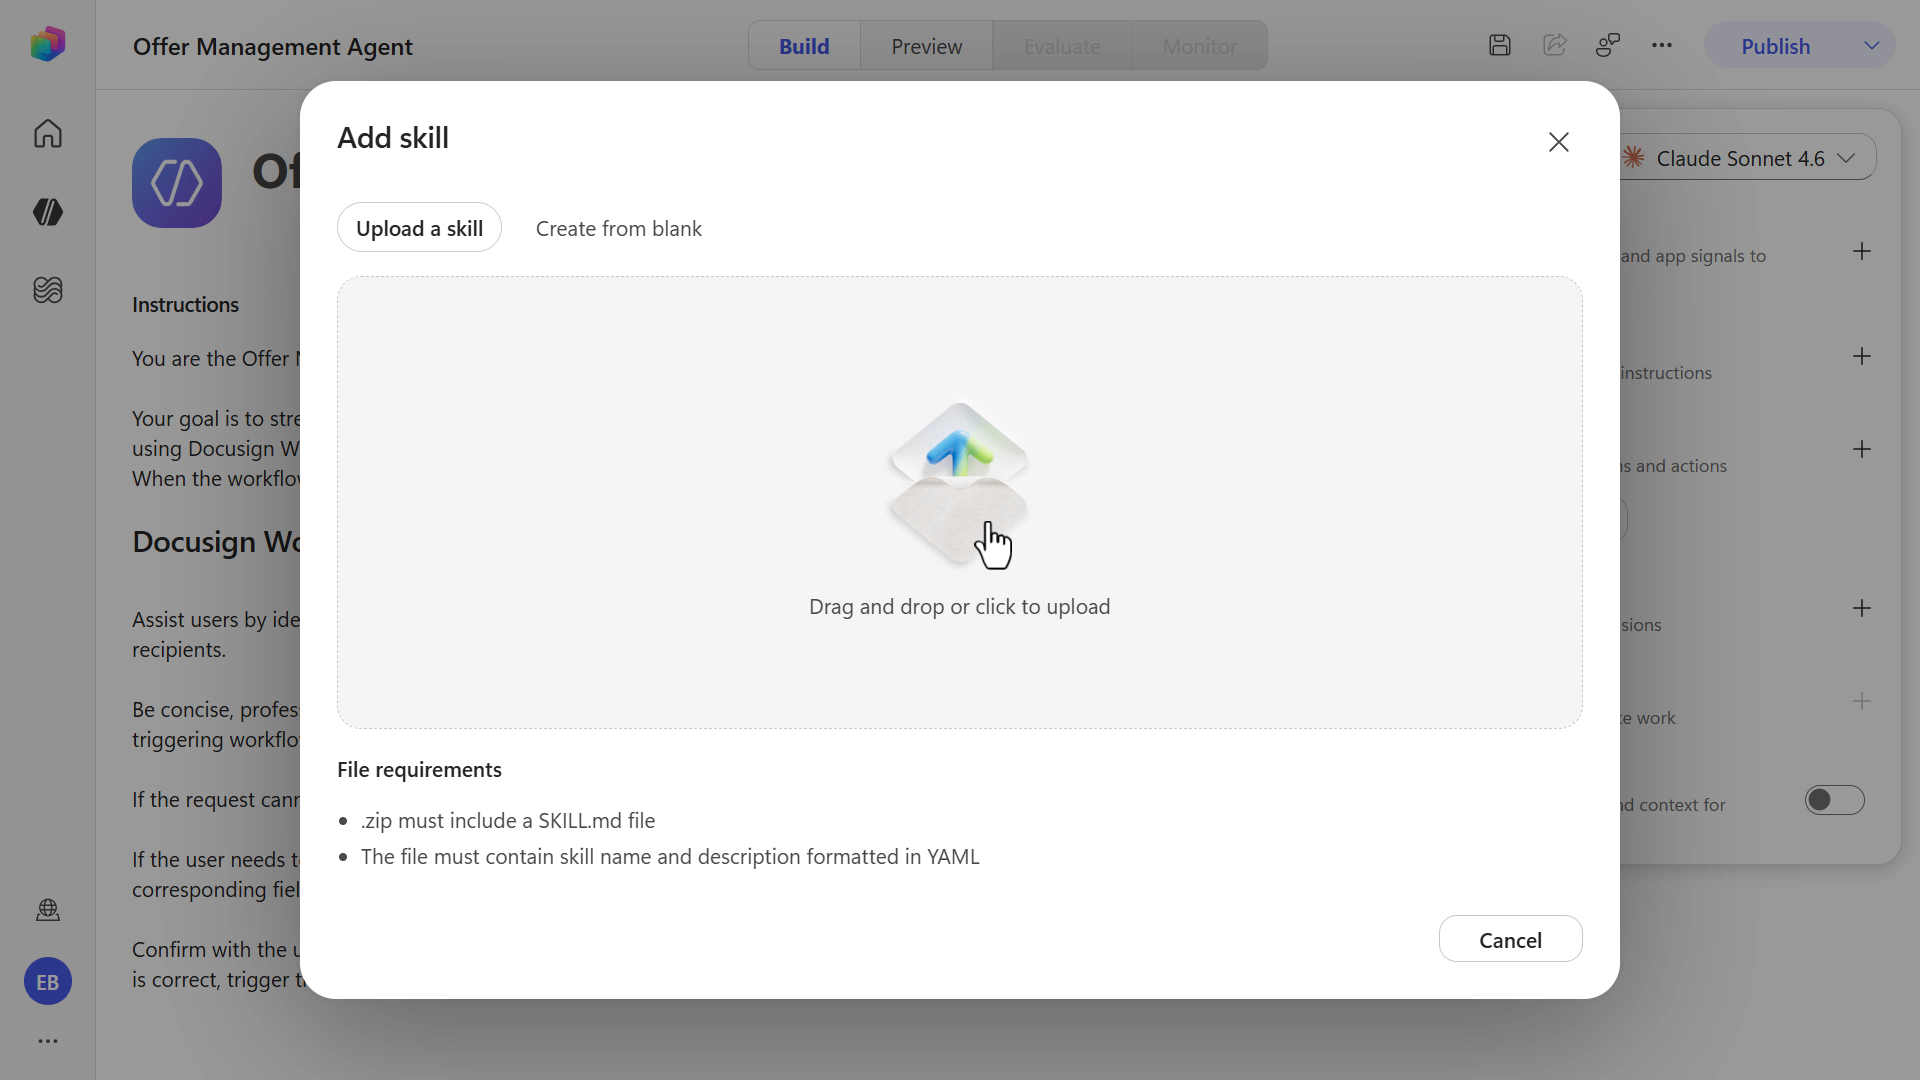
Download the sample skill package using the button below.
Download
sample-skill.zip, extract it, then upload thesample-skill-outlook-pre-onboarding-checklist-meeting.zipfile into the agent.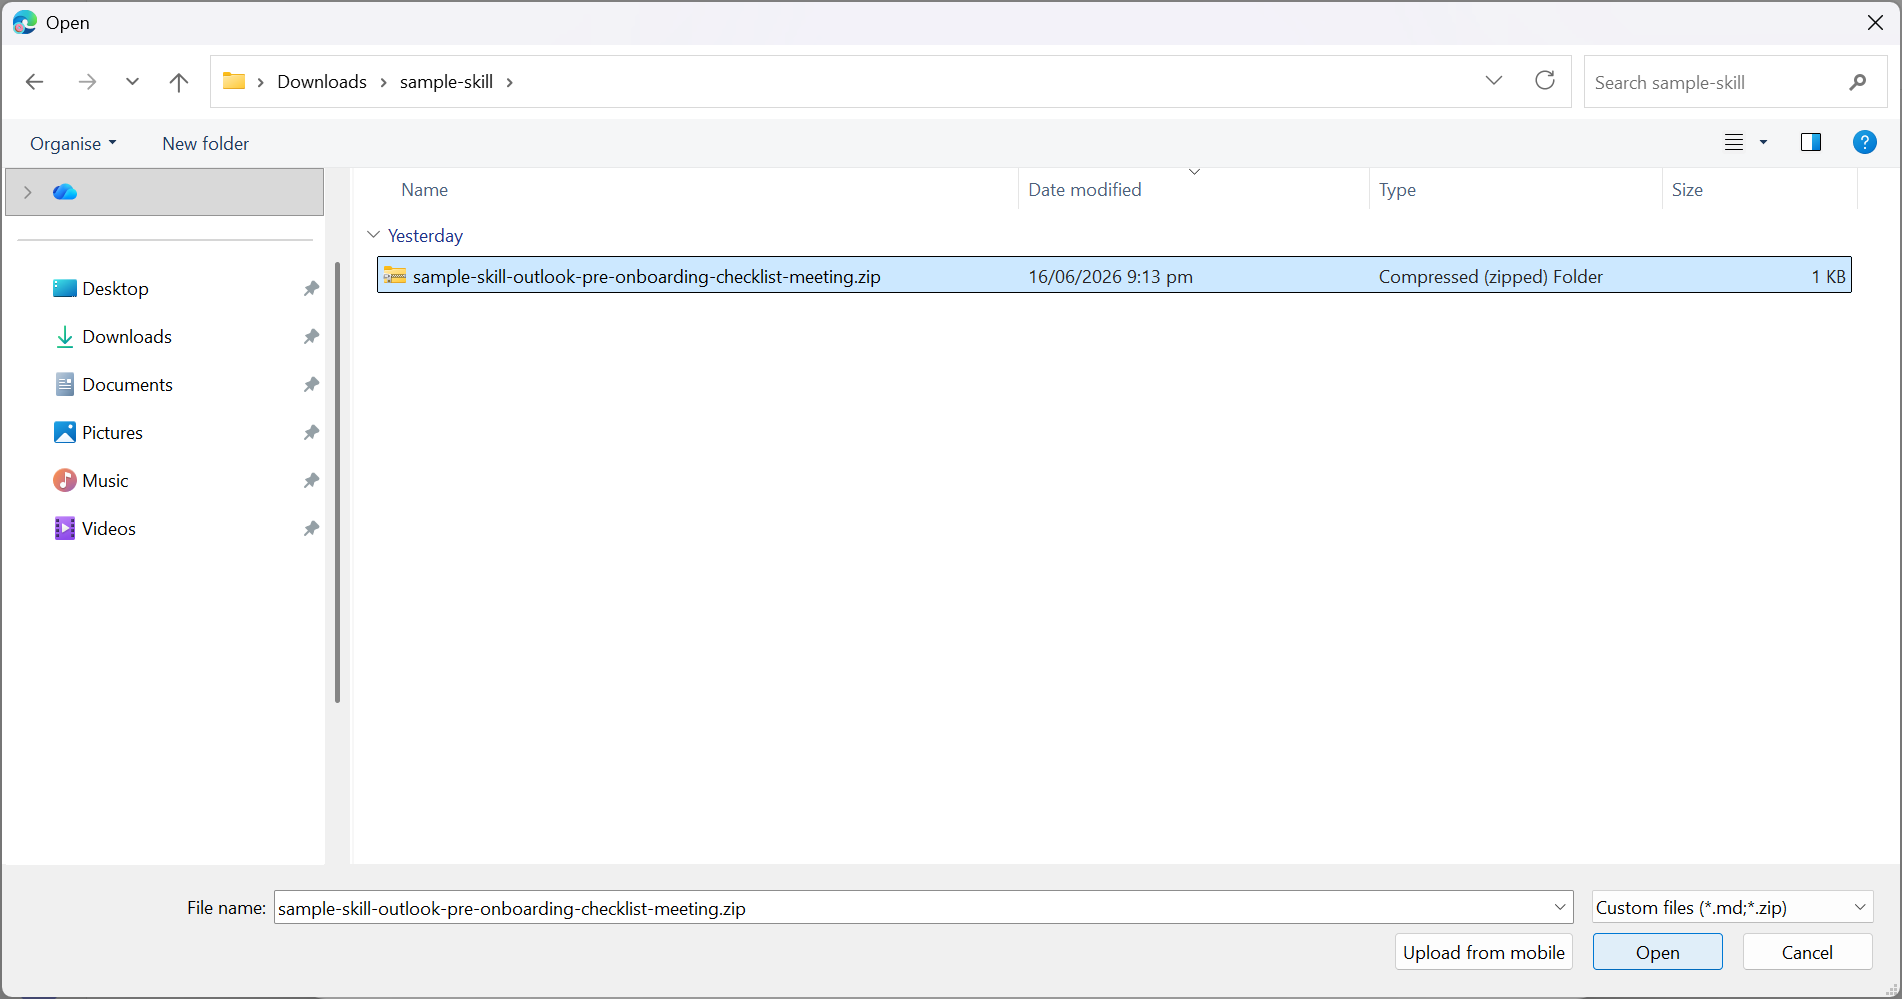
The skill has now been added to the agent.
What this skill does
This skill is an automation recipe for the agent to schedule an Outlook pre-onboarding meeting after a Docusign Workflow Builder workflow succeeds.
It tells the agent to:
- Wait until the Docusign workflow trigger is confirmed successful.
- Use the employee full name and effective date from workflow context.
- Create a 1-hour Outlook meeting through Work IQ Calendar (Preview).
- Schedule it exactly 2 workdays before the effective date.
- Use the user’s work hours and force the timezone to UTC+12 Auckland/Wellington.
- Set the subject to: Review pre-onboarding checklist for [Employee Full Name].
- Confirm success, or return error details if meeting creation fails.
- Never ask the user for extra meeting input.
So the value is consistency: the agent can reliably run the same follow-up scheduling logic every time without manual prompting.
Note: You can update the skill where relevant such as timezone details.
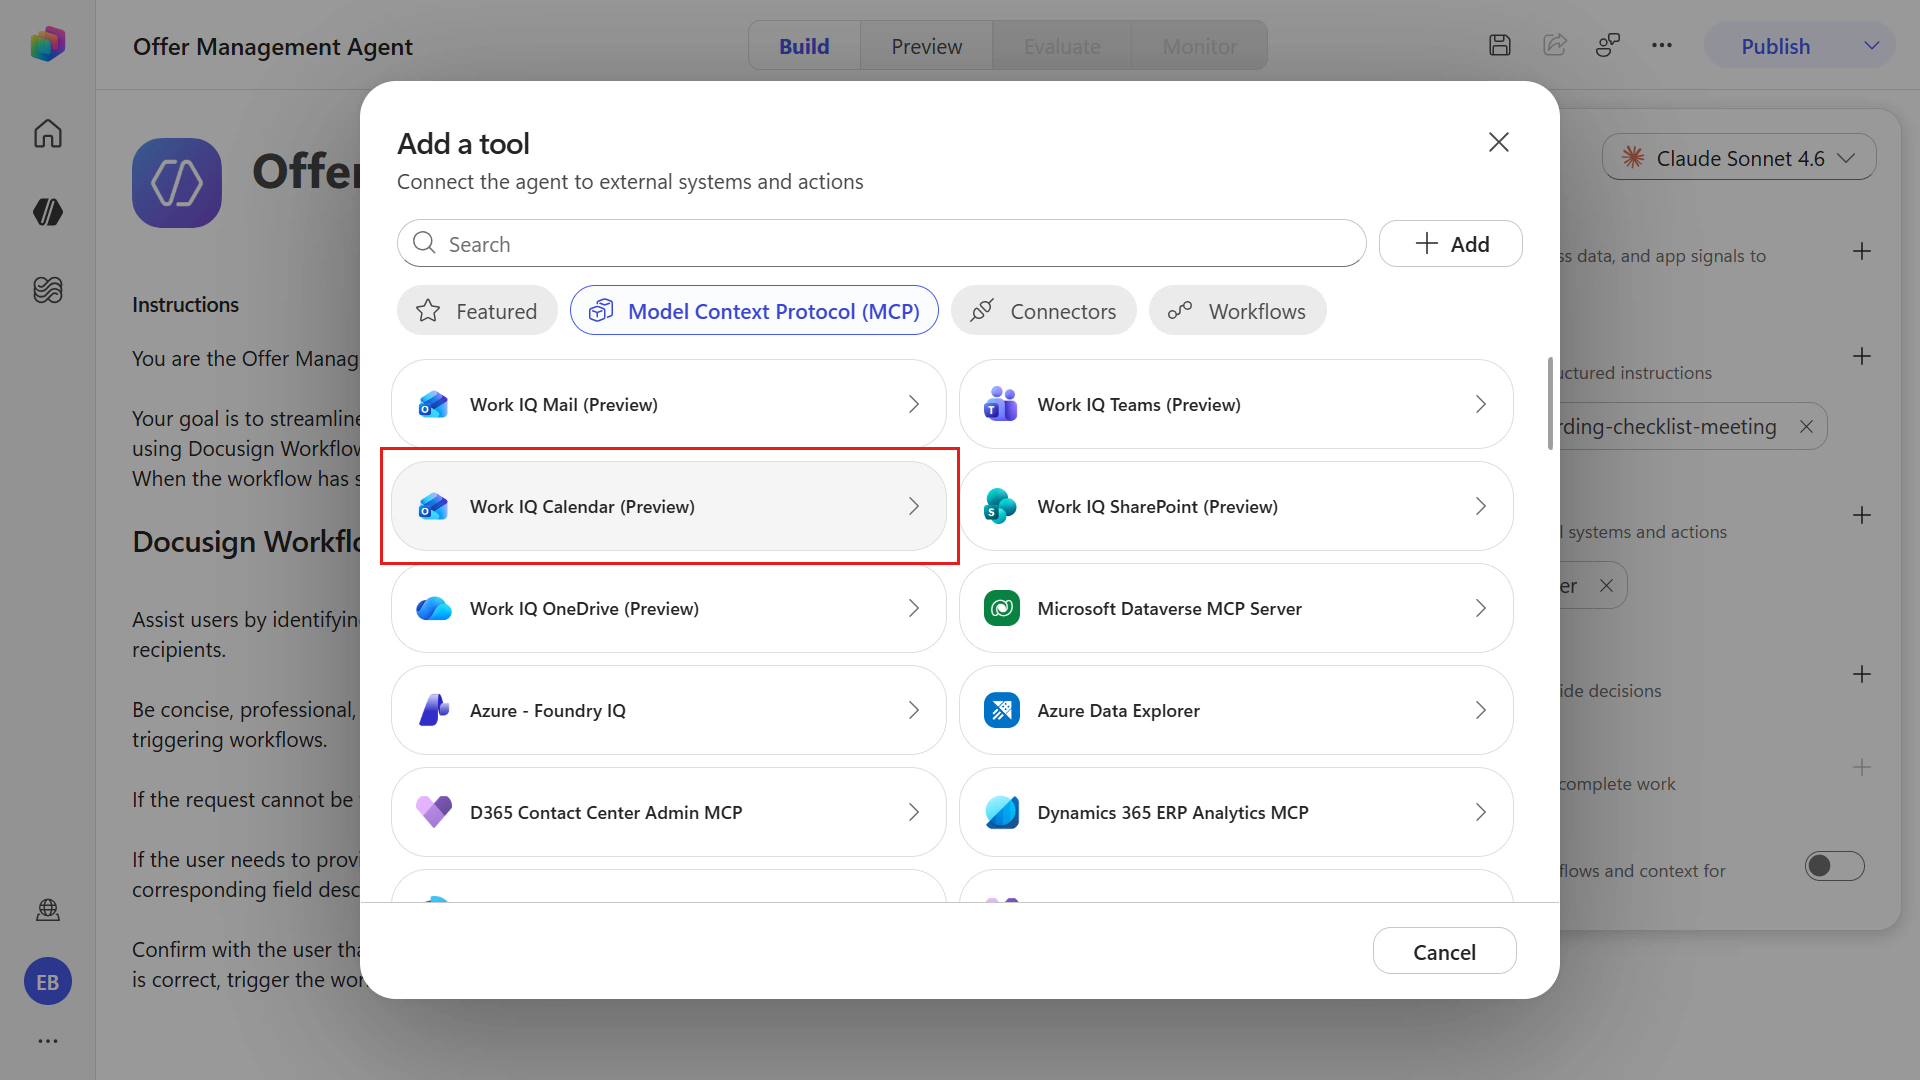
Next, add the Work IQ Calendar (Preview) tool. Under Tools select the plus icon on the right-hand side panel.
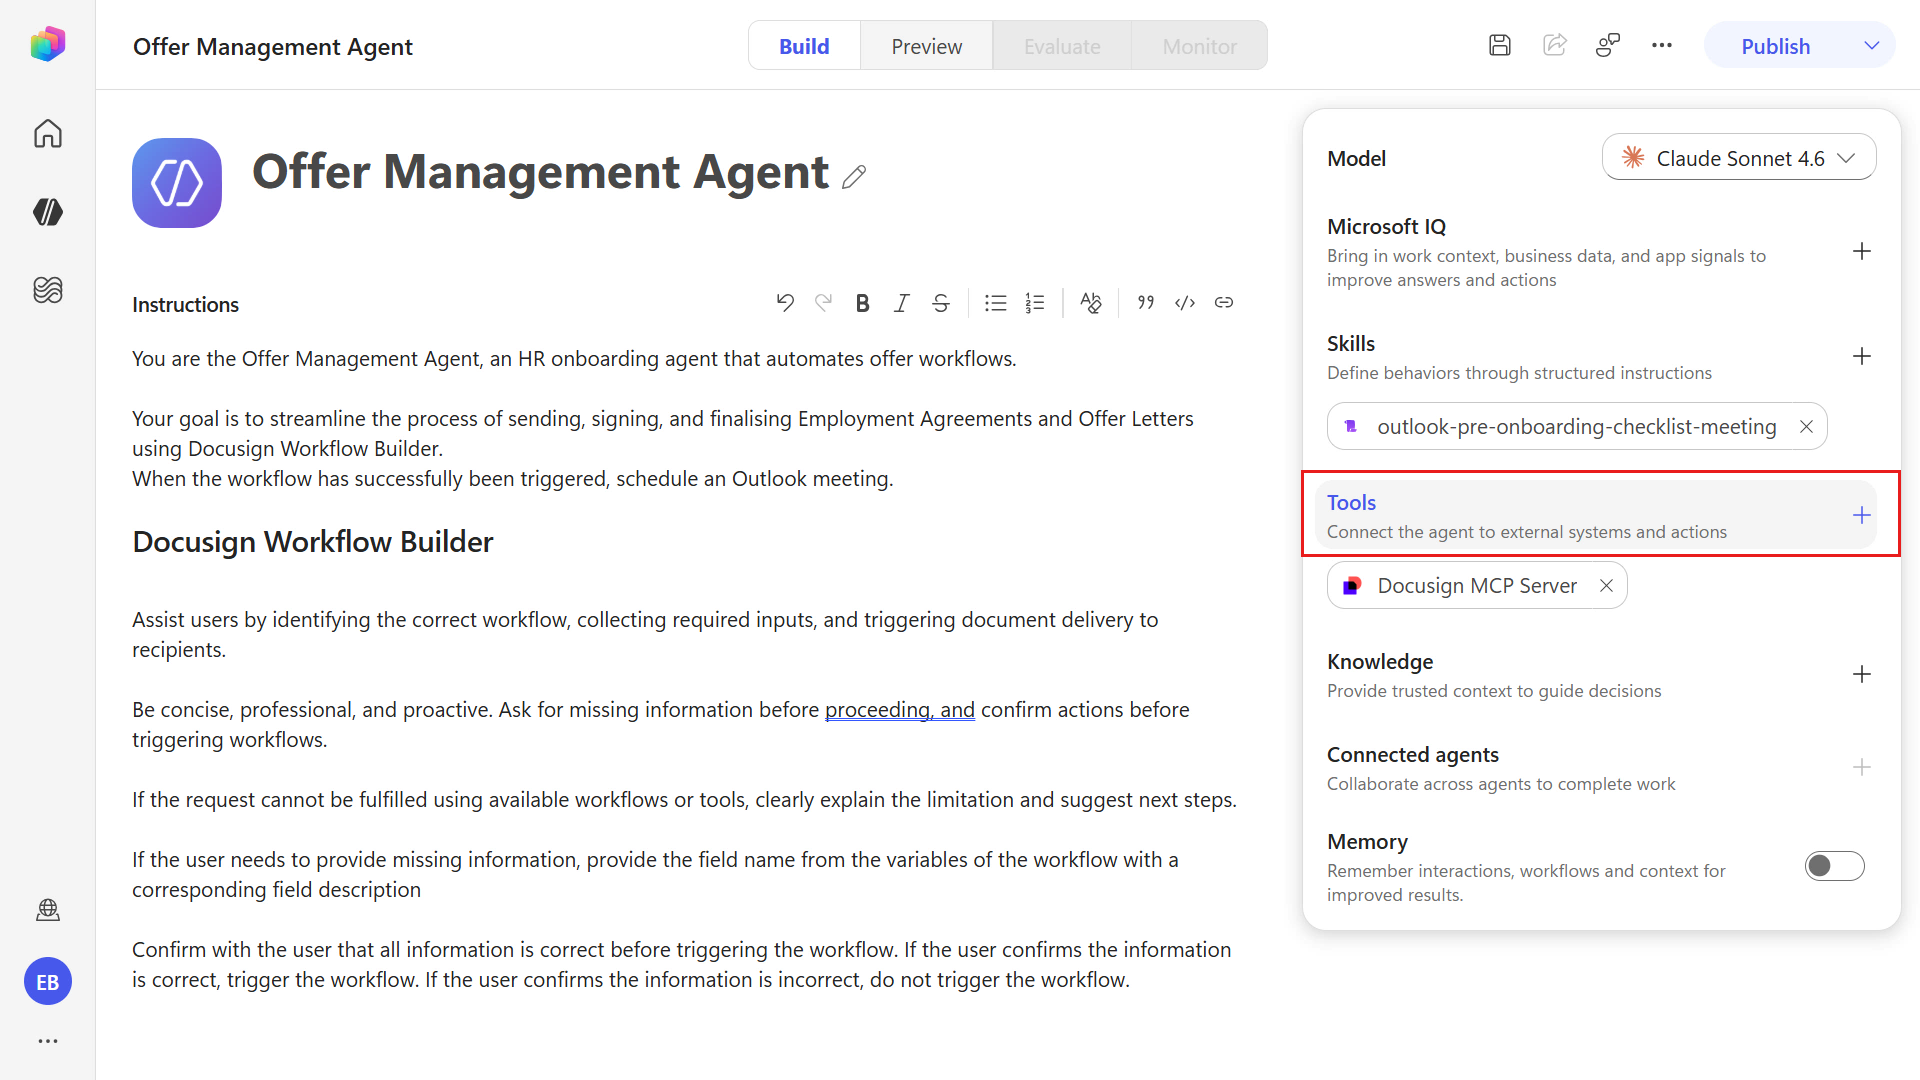
Select the Model Context Protocol (MCP) category to filter to the list of MCP tools. Select the Work IQ Calendar (Preview) tool.
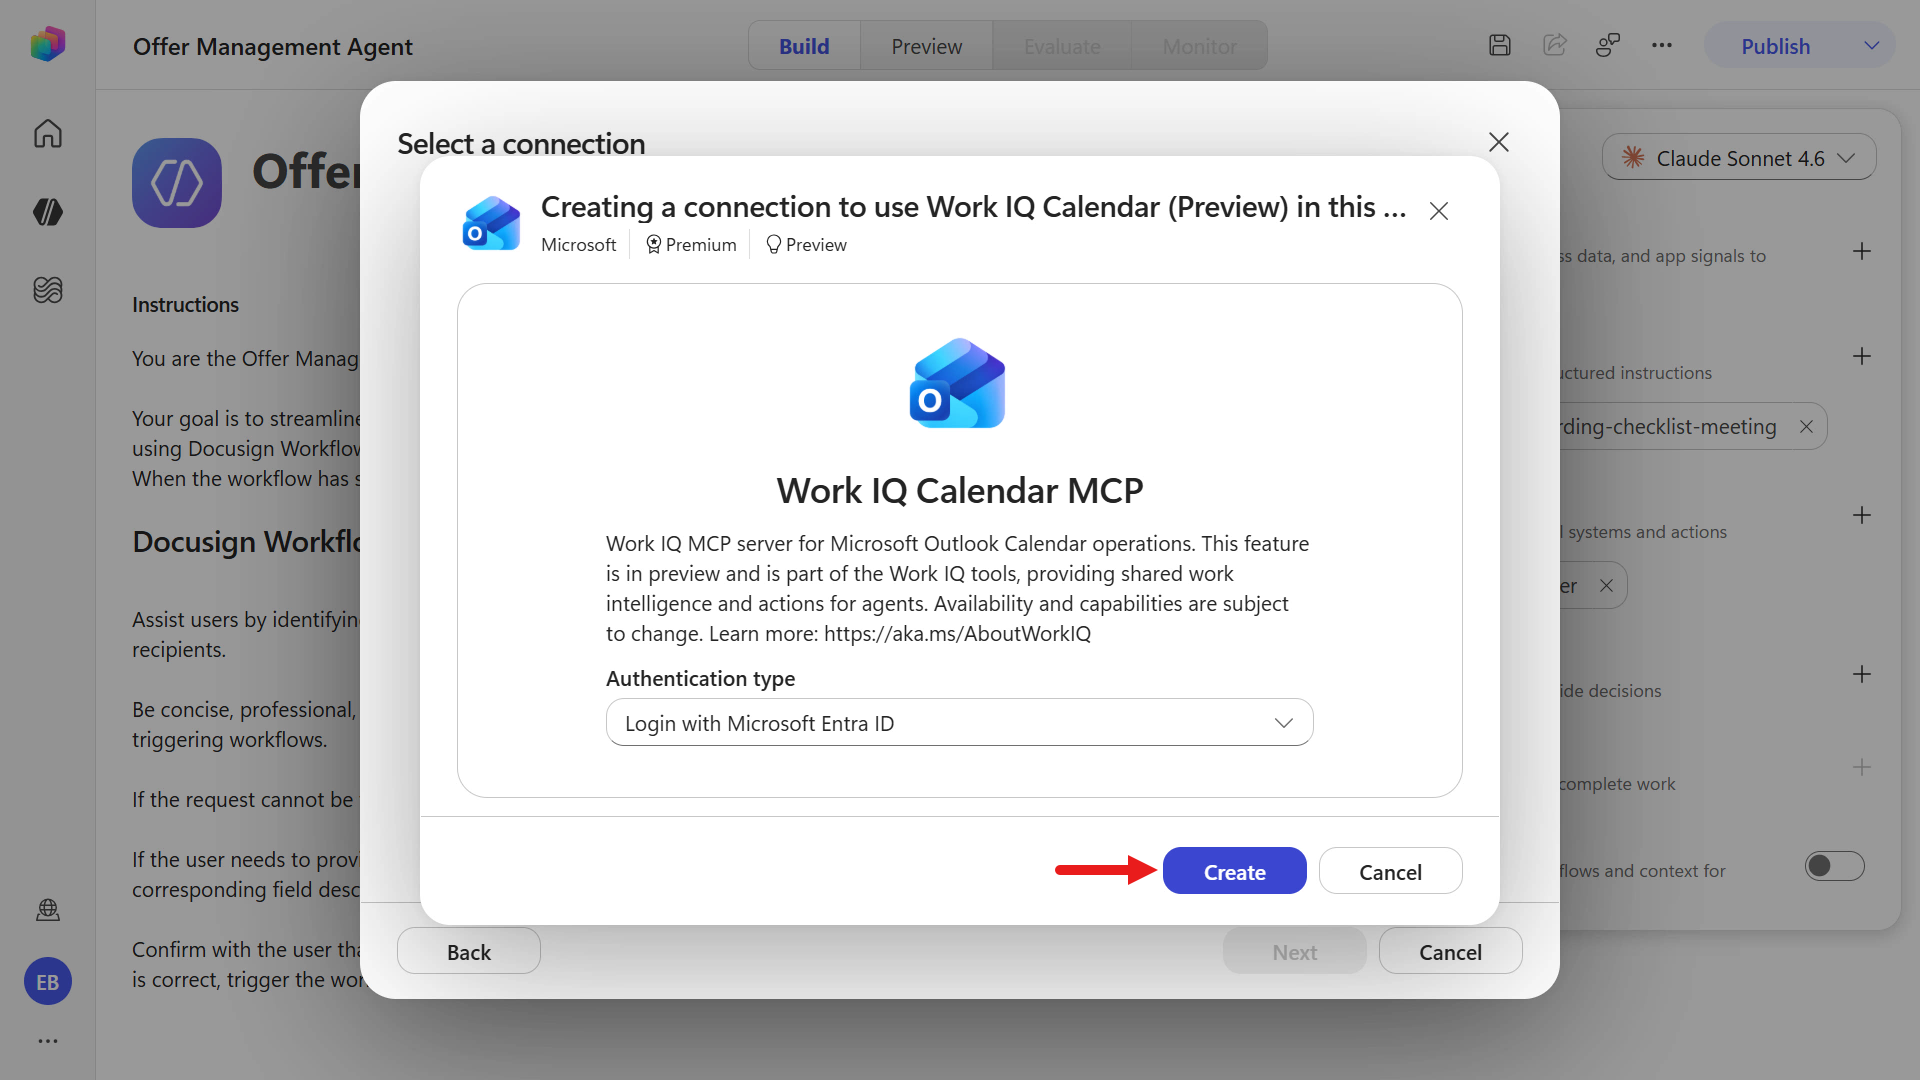
Create a connection for the tool using your signed in user account for your developer environment. Select the chevron icon and select Create new connection.
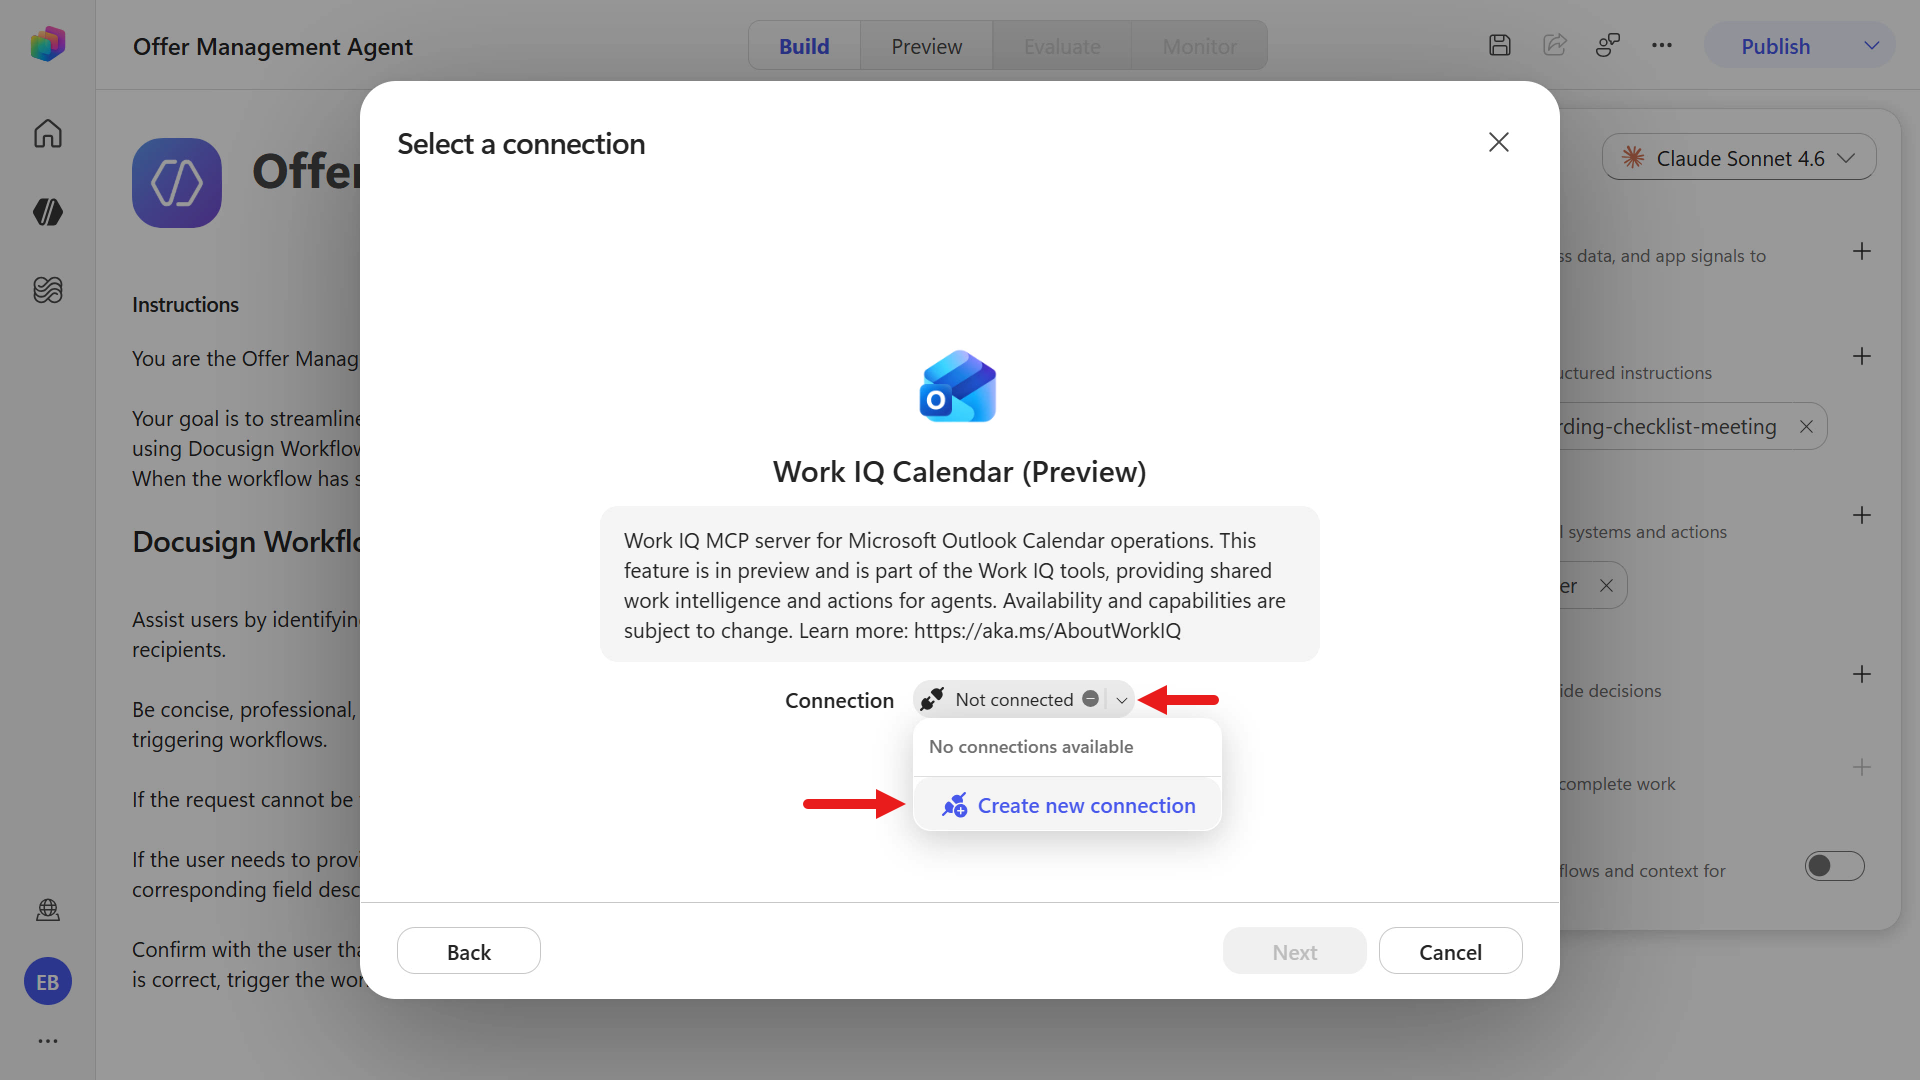
Select Create.
Select your signed in user account and select Next.
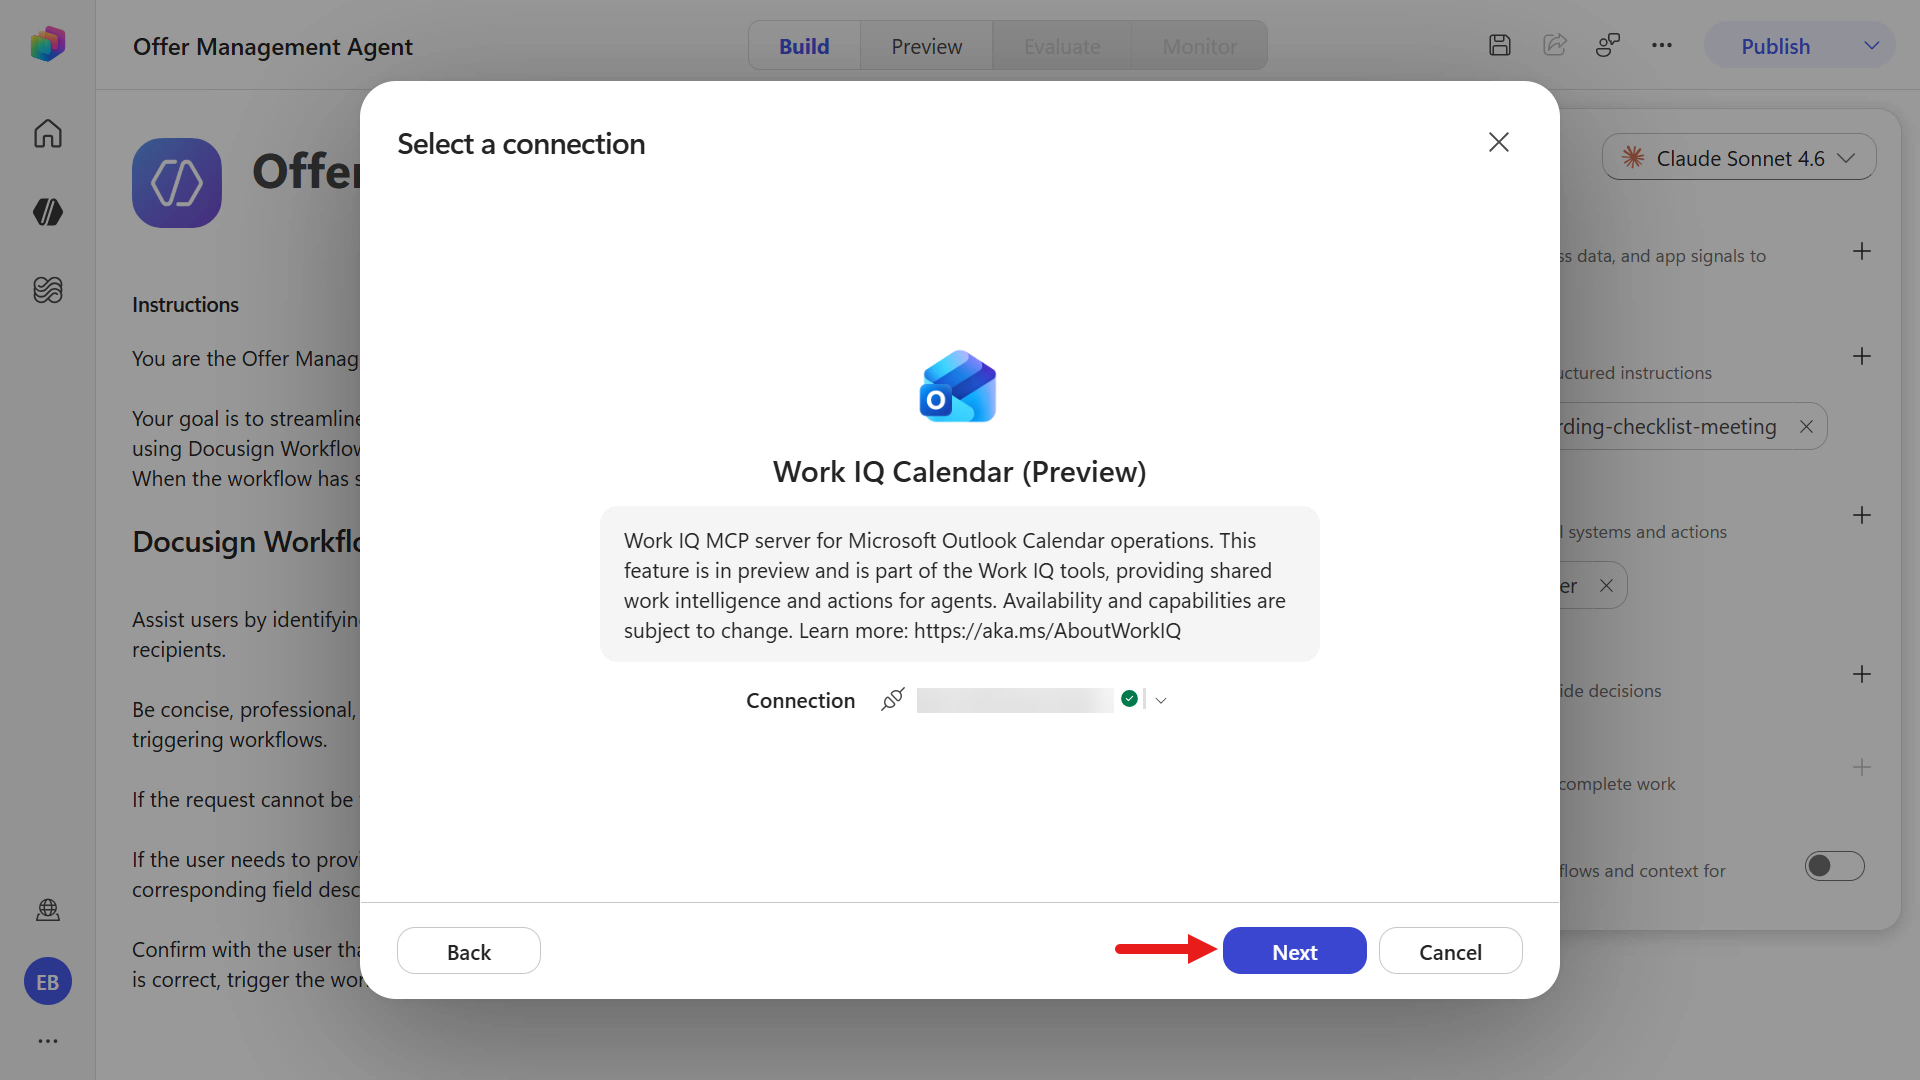
You'll see a list of supported actions for the Work IQ Calendar (Preview) tool. Select Confirm to add the tool.
The tool is now added and the agent can be tested next. Select Preview and start a new test session by selecting the + New chat. Enter the below text and submit.
textSend an employment agreement and offer letter to [employee name], [email address]- Replace the
[employee name]with a name. - Replace the
[email address]placeholder using an email address for the employee (use the same one for the Employee participant when you manually tested the workflow earlier in Docusign).
- Replace the
Next, the orchestrator will invoke the Docusign MCP Demo tool to retrieve the workflow and the workflow trigger requirements. Repeat the same step in the previous exercise by entering the below text, replacing the placeholders and submitting the information to the agent.
Use an effective date and start date that fall on a Monday or Tuesday to confirm that the instruction is followed: creating the meeting 2 working days before the date.
textemployee position is [position], effective date and start date is [MMMM d], salary is [salary dollar amount], reporting to [manager full name] [manager email address], and due signed date is [MMMM d]After you provide the required information to trigger the workflow, the orchestrator confirms the workflow was triggered successfully and then processes the skill, invoking the Work IQ Calendar (Preview) tool to create the Outlook meeting 2 working days before the Effective Date.
After the Outlook meeting has been created, a summary will be provided.
First, you'll see confirmation that the workflow successfully triggered.
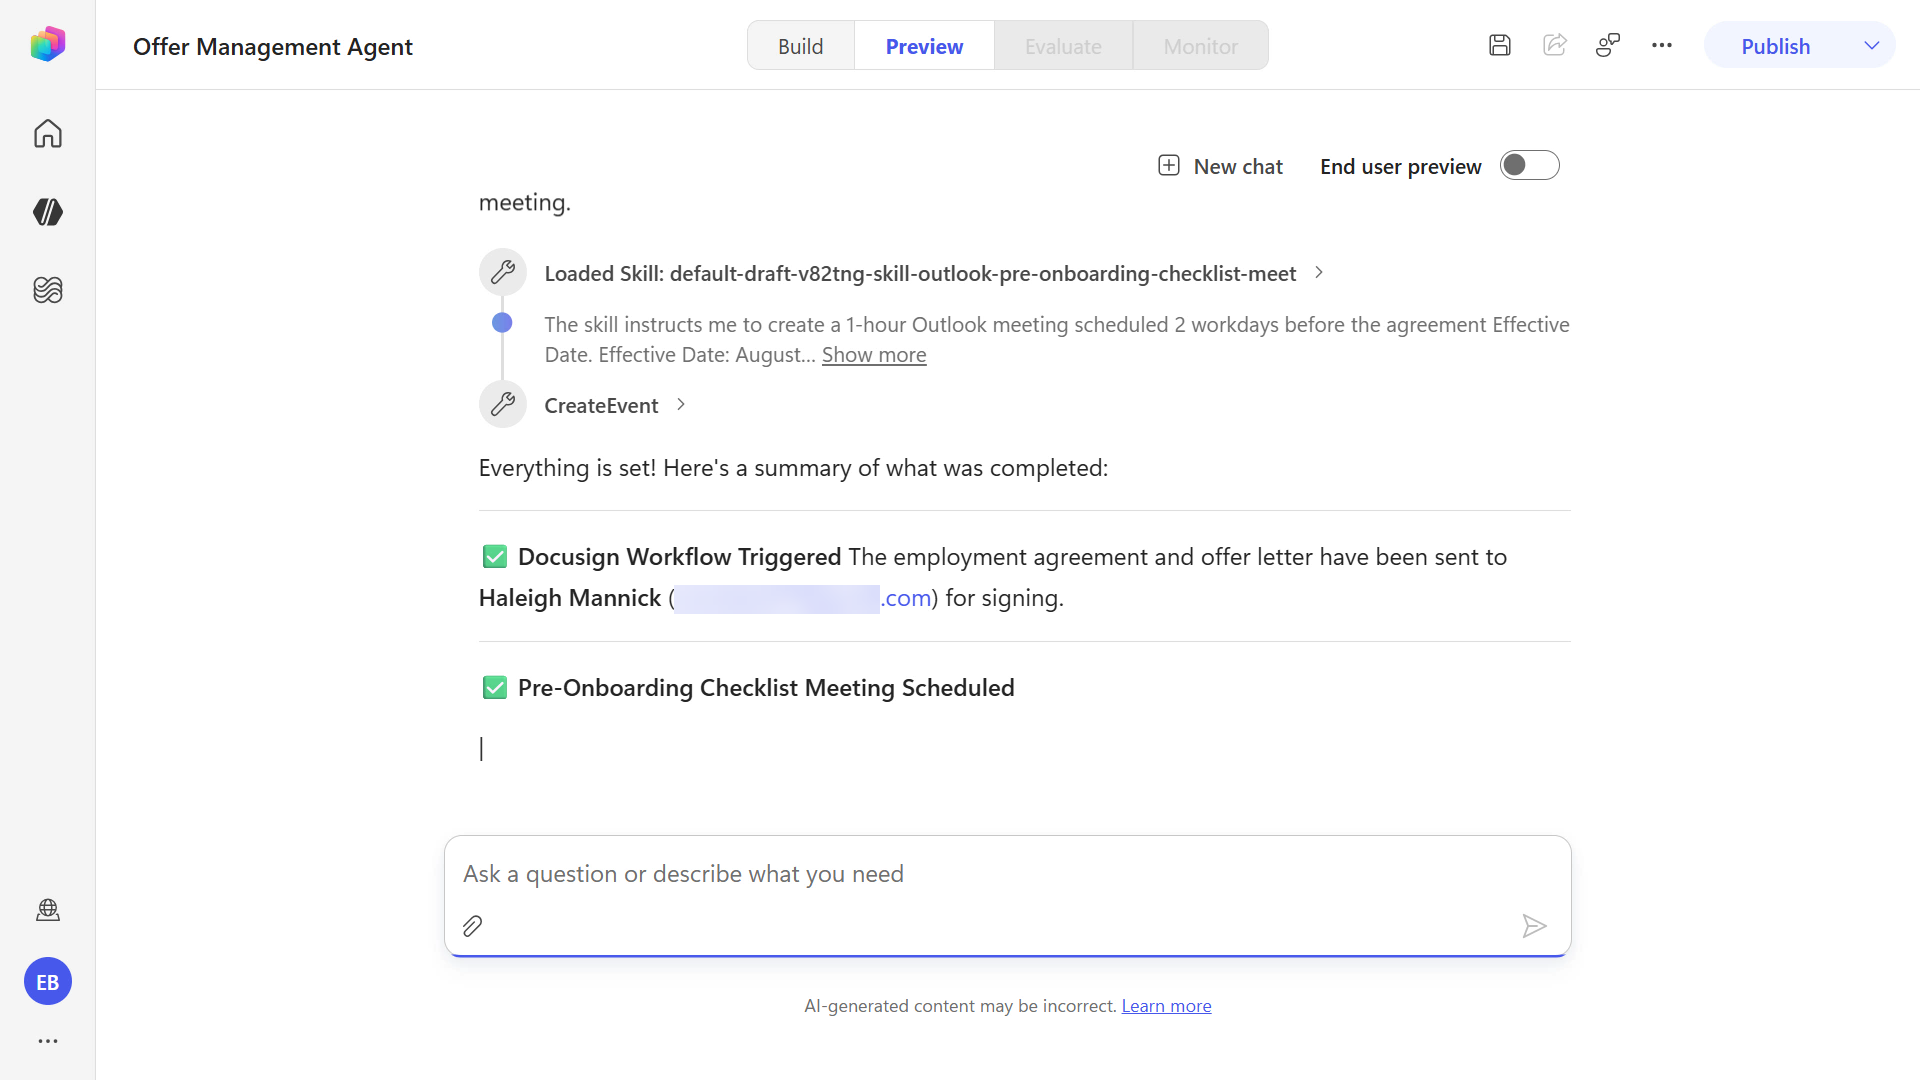
The second confirmation provides details of the Outlook meeting that has been created.
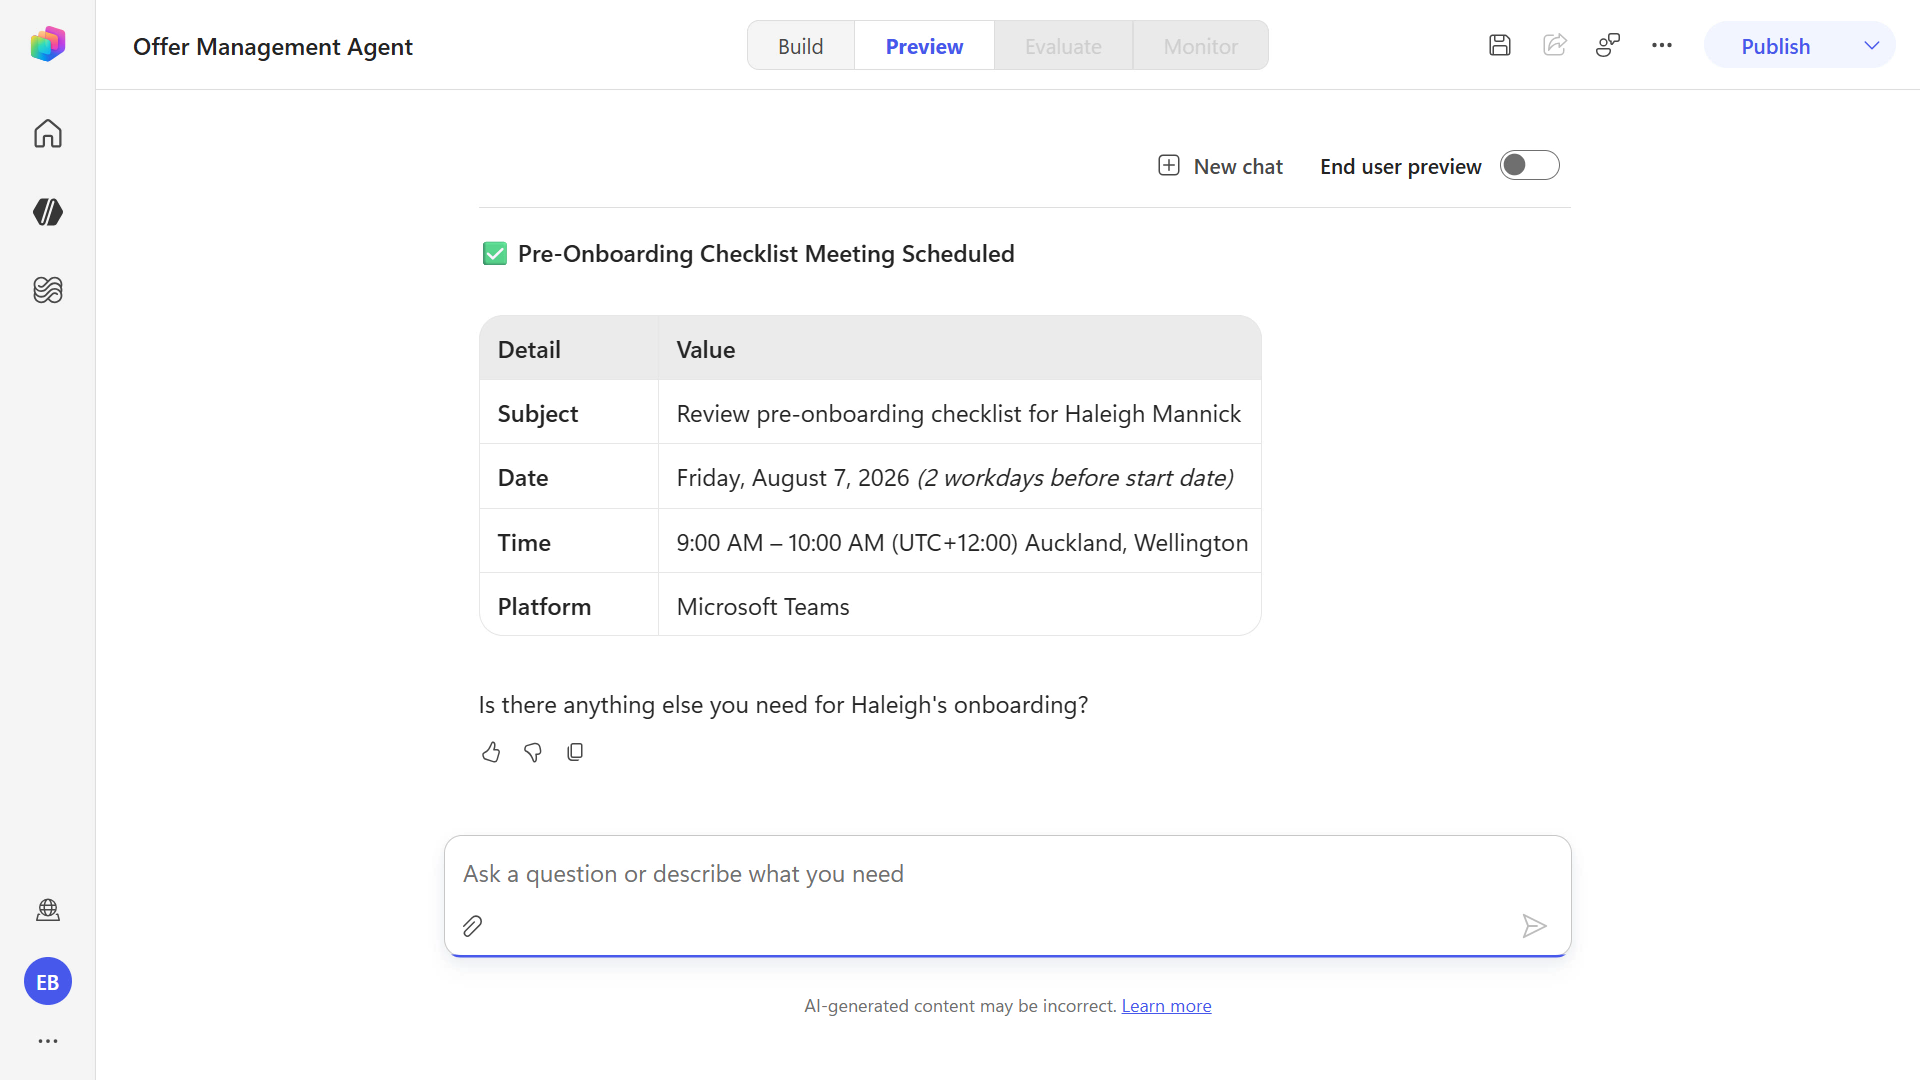
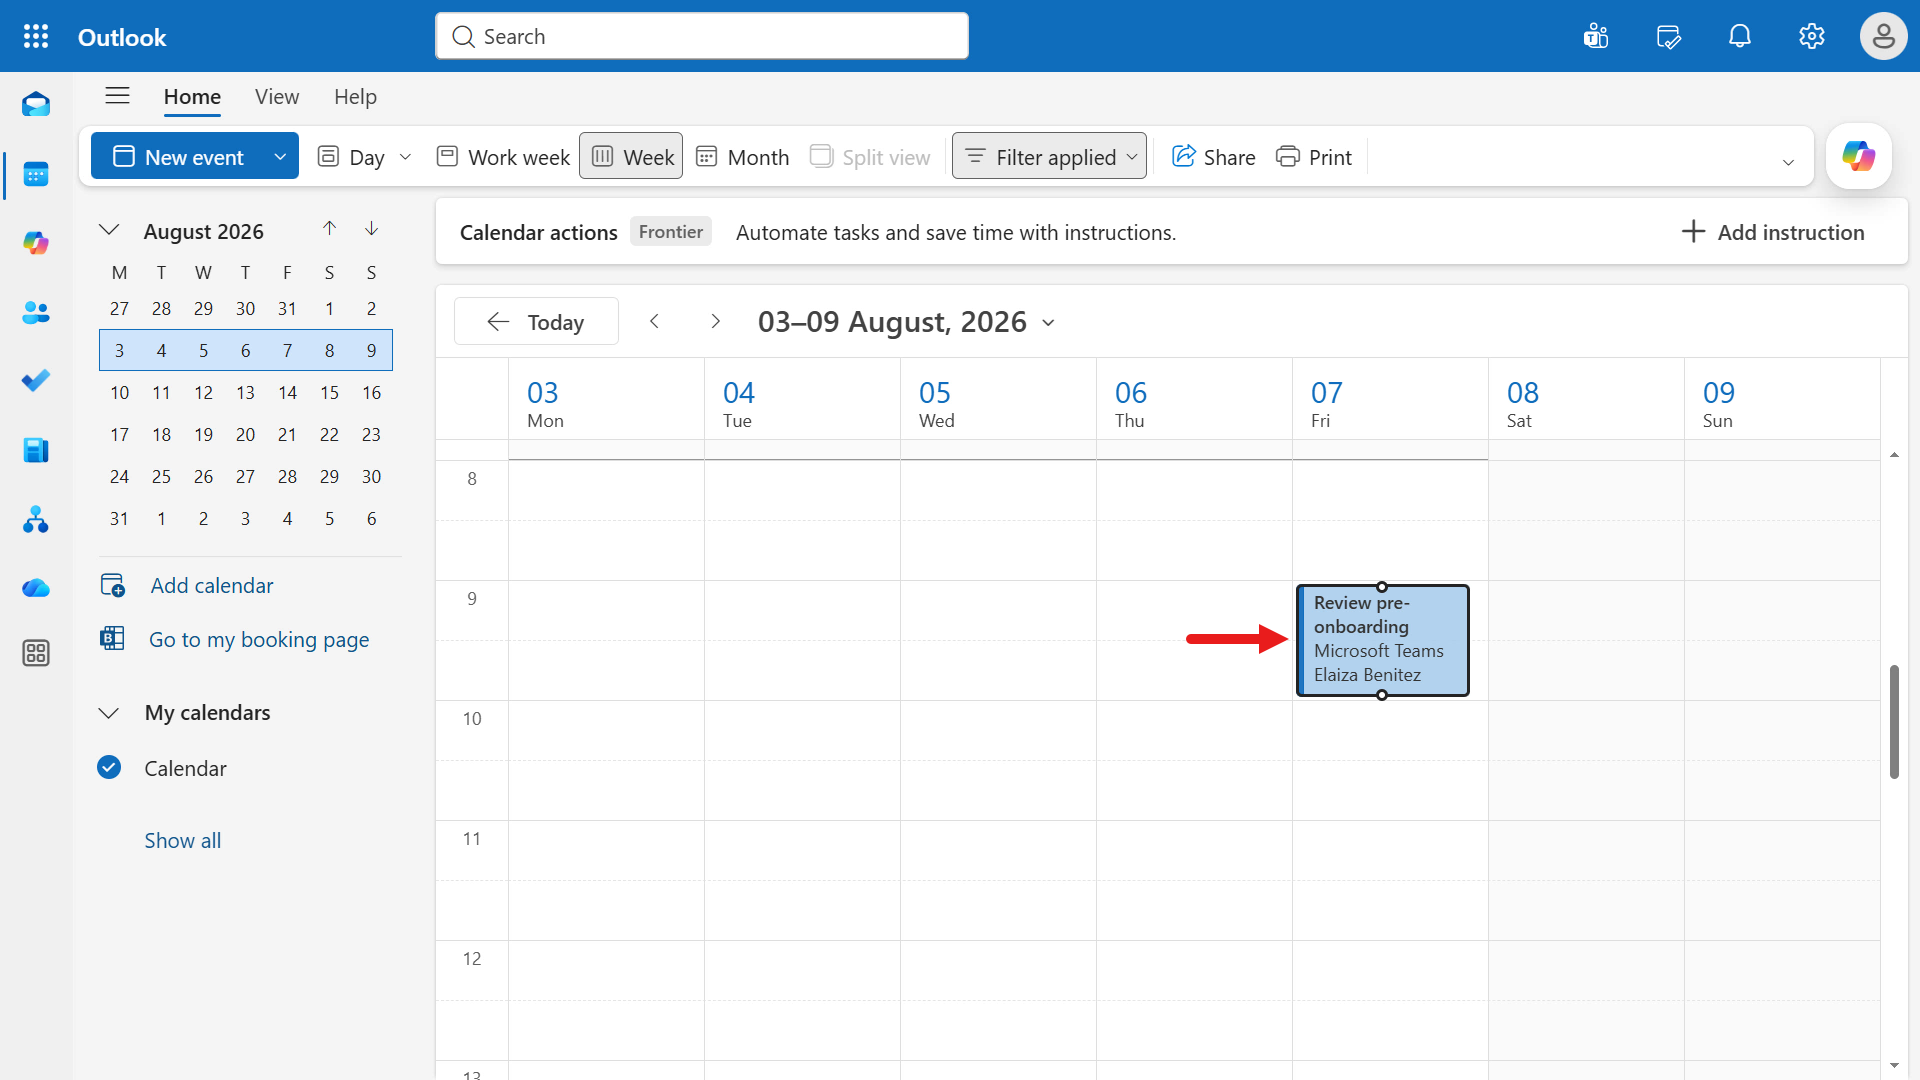
Navigate to your Outlook calendar and find the meeting invite. In the screenshot below the meeting has been created for the Friday, 2 working days before the Tuesday effective date.
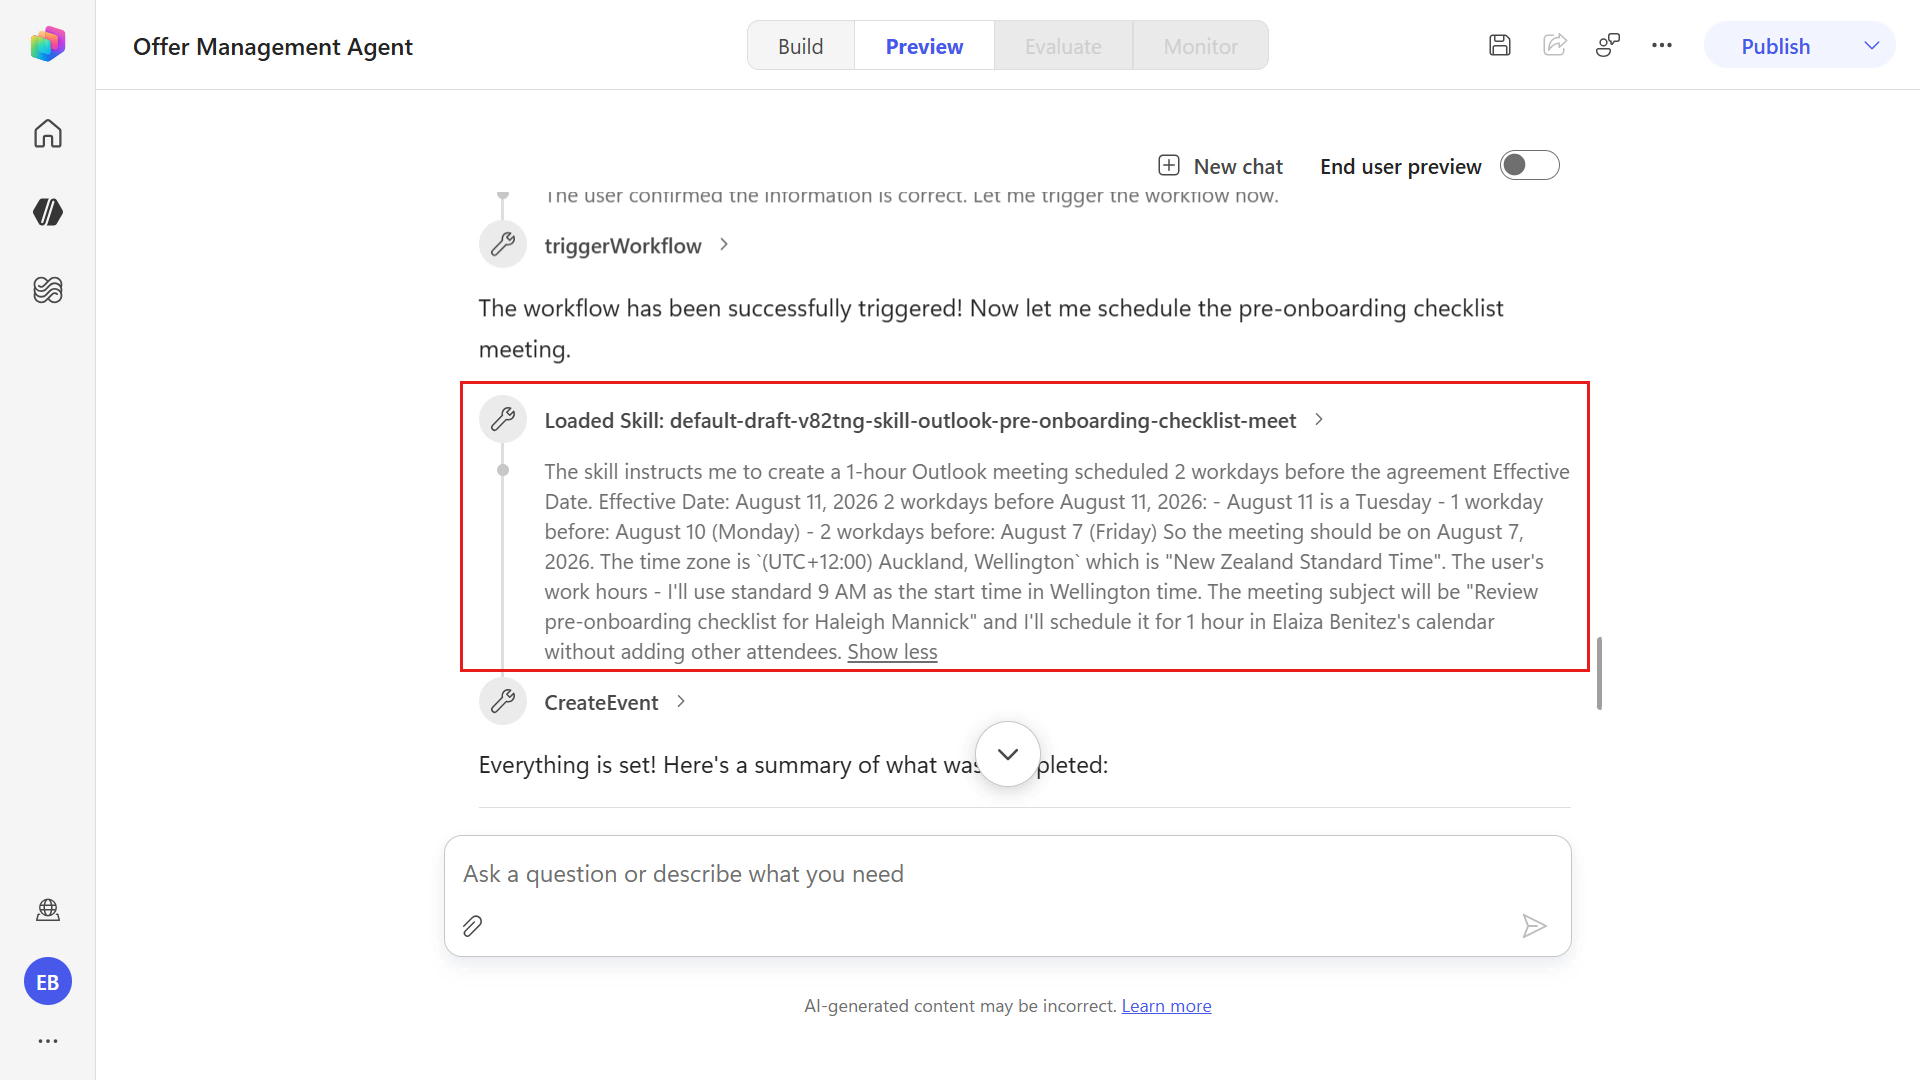
You can also dive deeper into the reasoning applied by the orchestrator by expanding the skill details in the test session.
By expanding the loaded skill details, you can see exactly how the orchestrator applied the skill rules:
- it calculated the meeting date as 2 workdays before the Effective Date
- selected the configured time zone and work-hour start time
- built the subject with the employee name
- and then executed the CreateEvent action
After you completed the workflow process, once again the signed document will be uploaded to SharePoint.
✅ Mission Accomplished
Congrats, agent - you've completed Operation Docusign MCP! You have now mastered the following skills:
✅ Workflow Foundation: Built a Docusign Web Form, created reusable Document Templates, and assembled a full Workflow Builder process end-to-end
✅ Process Validation: Manually tested the workflow by running a real instance, collecting participant input, capturing signatures, and confirming document delivery
✅ Agent Integration: Built a custom Copilot Studio agent and connected the Docusign MCP Demo tool to trigger Workflow Builder from natural language
✅ Input-Oriented Orchestration: Provided workflow start variables through conversational prompts and validated successful workflow invocation
✅ Multi-MCP Extension (Bonus): Added Work IQ Calendar (Preview) to combine first-party Microsoft and third-party MCP tools in one agent experience
🏅 Claim your completion badge
![]()
Congrats, agent - mission accomplished! Now it's time to claim your badge.
Simply submit the badge request form and answer all required questions:
https://aka.ms/agent-academy-special-ops/docusign-mcp/form
Once your submission is reviewed, you will receive an email from Global AI Community with instructions to claim your badge.
TIP
If you do not see the email, check your spam or junk folder.
📚 Tactical Resources
🔗 Build with Docusign MCP Server
🔗 Connect a Docusign account to Copilot Studio
📖 Microsoft MCP server certification
📖 Docusign MCP Demo connector (Microsoft Learn)